![]()
Download Article
![]()
Download Article
- Backing Up Local Data to iCloud
- Uninstalling using Windows Control Panel
- Uninstalling with Revo Uninstaller
- Video
- Q&A
|
|
|
|
The iCloud for Windows app is a great way to interface with your iCloud account on a Windows PC. If you need to uninstall it for any reason, you can easily do so using the Windows Control Panel. You should back up the local data to iCloud first. While it’s pretty easy to uninstall iCloud with Control Panel, it does leave behind some residual files. You can do a more thorough uninstall using an uninstaller program like Revo Uninstaller. This wikiHow teaches you how to uninstall iCloud for Windows using Control Panel and Revo Uninstaller.[1]
Things You Should Know
- Open iCloud and check the boxes next to any data you want to back up. Then click Apply.
- Open the Control Panel and click Uninstall a program.
- Find iCloud in the following list (organized alphabetically) and click to uninstall it.
-

1
Click the Windows Start button
. It’s typically in the lower-left corner of the screen in the taskbar. This opens the Windows Start menu.
-
2
Type iCloud. This searches for the iCloud app in the Windows Start menu. The iCloud icon will be displayed at the top of the Windows Start menu. It has a blue logo that resembles a white cloud.
Advertisement
-
3
Click on iCloud. It appears at the top of the Windows Start menu when type «iCloud.» Click this icon to launch iCloud.
-
4
Select the data to back up. Do so by checking the boxes next to «iCloud Drive,» «Photos,» «Mail, Contacts, Calendars, and Tasks,» and/or «Bookmarks.»
-
5
Click on Apply. It’s in the lower-right corner of the dialog box. This saves all the data you selected to your iCloud account.
-
6
Click on Sign out. When your data has finished uploading, sign out with the button in the lower-left corner of the screen.


Advertisement
-
1
Click the Windows Start button
. It’s typically in the lower-left corner of the screen in the taskbar. This opens the Windows Start menu. Using the Control Panel to uninstall iCloud will remove the bulk of the program. However, some residual files may still be left behind. Using a program like Revo Uninstaller will uninstall the program and search for residual files and registry items left behind.
- Uninstalling iCloud requires an admin password. If you’re not logged into your PC as an admin, log out and log back in as an admin.
-
2
Type Control Panel. This searches for the Windows Control Panel in the Start menu.
-
3
Click Control Panel. It appears at the top of the Windows Start menu when you type «Control Panel.» It has an icon that resembles a computer screen with a pie chart.
-
4
Click Uninstall a program. It’s in the «Programs» section of the Control Panel dialog box.
- On Windows 7 or XP, click on Programs and then click on Program and Features.[2]
- On Windows 7 or XP, click on Programs and then click on Program and Features.[2]
-
5
Check the «iCloud» box. All programs are listed alphabetically.
-
6
Click on Change. It’s above the pane that contains the list of programs. It’s at the top of the list of programs in the center.
- On Windows 7 or XP, click on Uninstall.
-
7
Click on Ok. This dialog box confirms you want to make a change to iCloud.
-
8
Click on the «Remove» radio button. It’s the second option in the dialog box.
-
9
Click on Next. It’s in the lower-right of the dialog box.
-
10
Click on Yes. Doing so confirms that you want to uninstall iCloud from your PC.
-
11
Click on Finish. iCloud for Windows has now been uninstalled and deleted from your PC.[3]


Advertisement
-
1
Download and install Revo Uninstaller. Revo Uninstaller is a free program that uninstalls programs and searches for residual files and registry items left behind after a program is uninstalled. There is a free version and a Pro version of Revo Uninstaller. You can try the Pro version free for 30 days. The Pro version allows you to search for residual files from programs that have already been uninstalled as well as create a back-up of your system before uninstalling anything in case anything goes wrong. Use the following steps to download and install the free version:
- Go to https://www.revouninstaller.com/ in a web browser.
- Click Free Downloads.
- Click Free Download in the «Freeware» column or click Free Trial in the «Pro» column.
- Select your language and click Ok.
- Read and click the radio option next to I accept the agreement. Then click Next.
- Select and install location and click Next.
- Check or uncheck «Create a desktop shortcut» and click Next.
- Click Install.
-
2
Create a System Restore Point. Since Revo Uninstaller will search your system files and registry for residual files left behind, it’s a good idea to create a system restore point before doing an uninstall using Revo Uninstaller. This allows you to return to your current system configuration if Revo accidentally uninstalls any critical files or registry items. The Pro version of Revo Uninstaller lets you create a restore point using the app. If you are using the free version, go ahead and use the following steps to create a system restore point:
- Click the Windows Start menu.
- Type «Create a Restore Point.»
- Click Create a Restore Point in the Windows Start menu.
- Click the hard drive Windows is installed on.
- Click Create.
- Type a name for the restore point.
- Click Create.
-
3
Close all programs and apps that are running. It’s a good idea to close all apps that are running before you uninstalling any programs with Revo Uninstaller. Click any programs running in the taskbar and click the «X» icon, or click the option to close the program in the File menu.
-
4
Open Revo Uninstaller. To open Revo Uninstaller, click the Windows Start menu and type «Revo.» You should see Revo Uninstaller appear at the top of the Windows Start menu. Click Revo Uninstaller to open it. It has an icon that resembles the contents of a box going into a trash bin with an «R» on it.
-
5
Click Windows Apps. It has an icon that resembles the Windows logo. It’s the second option in the Panel at the top. This will load a list of Windows apps installed on your computer. Allow a few minutes for it to load.
-
6
Scroll down and click iCloud. All programs are listed in alphabetical order. Scroll down and click the iCloud app to select it.
-
7
Click Uninstall. It’s the button that resembles a Window with an «X» on it at the panel at the top. Click this icon to uninstall the program.
-
8
Click Continue. It’s the button in the lower-right corner. This will launch a PowerShell window that will automatically run the command to uninstall iCloud.
- If Revo Uninstaller launches an uninstaller app, follow the instructions to finish the install process.
-
9
Click Scan. This option is displayed at the bottom of Revo Scanner once iCloud is finished installing. Click this option to scan for residual files left over. Allow a few minutes for Revo Scanner to finish scanning your system.
-
10
Uncheck any items you don’t want to delete. Look over the list of leftover files and registry items that Revo Uninstaller lists. Uncheck any items that you don’t want to uninstall.
-
11
Click Delete. This deletes all the leftover registry items found by Revo Uninstaller.
-
12
Click Finish. This closes Revo Uninstaller. You have successfully uninstalled iCloud and deleted any residual files leftover.


Advertisement
Add New Question
-
Question
Will removing iCloud from Windows 10 remove photos, notes, etc. from my computer?

It will only remove information stored in your iCloud account. Information stored on your computer will be safe.
Ask a Question
200 characters left
Include your email address to get a message when this question is answered.
Submit
Advertisement
Video
Thanks for submitting a tip for review!
References
About This Article
Article SummaryX
1. Open iCloud and Back up all your local data.
2. Click Sign Out at the bottom.
3. Click the Windows Start button.
4. Type «Control Panel» and click Control Panel to open it.
5. Click Uninstall a program.
6. Scroll down and click iCloud.
7. Click Change at the top of the screen.
8. Select «Remove» and click Next.
9. Click Yes to confirm you want to uninstall iCloud.
10. Click Finish.
Did this summary help you?
Thanks to all authors for creating a page that has been read 216,486 times.
Is this article up to date?
iCloud – облачное хранилище от компании Apple использующее на MacOS и iOS. Также, есть две версии, UWP и Win32 для Windows 10. Система Windows 10 поддерживает свои собственные прогрессивные приложения UWP, которые загружаются и устанавливаются из Microsoft Store. Некоторые пользователи, которые установили программу iCloud Win32 через инсталлятор, могут обнаружить, что кнопка “Удалить” не кликабельна.
Вы должны понимать, что программы установленные через Microsoft Store это UWP приложения, а программы установленные через инсталлятор (.exe) – это Win32 программы, и по сути они разные по архитектуре, но одинаковы по функциональности и дизайну. Давайте разберем, как удалить UWP и Win32 iCloud из Windows 10.
Удалить iCloud, установленный из Apple #
Если вы скачали и установили программу iCloud с сайта Apple, то это Win32 приложение. Чтобы его удалить, в первую очередь рекомендую выйти из учетной записи iCloud, чтобы в дальнейшем не было ошибок синхронизации на других связанных устройствах. Как только вышли из учетной записи, то откройте:
- “Параметры” > “Приложения” > “Приложения и возможности”.
- Справа в списке найдите iCloud и нажмите “Изменить“.
- В появившимся окне установите “Удалить” и нажмите “Далее”.

Удалить iCloud, установленный из Microsoft Store #
Если вы установили программу iCloud скаченную из Microsoft Store (магазин windows), то это UWP приложение. Для удаления откройте:
- Параметры > Приложения > Приложения и возможности.
- Справа в списке найдите iCloud, выделите его одним нажатием мыши, и нажмите “Удалить“.

Как удалить Microsoft Edge в Windows 11Как удалить Edge в Windows 10
iCloud — это облачное хранилище, разработанное компанией Apple, которое позволяет пользователям хранить свои данные, включая фотографии, видео и документы, а также обмениваться ими между устройствами.
Однако, в некоторых случаях пользователи могут столкнуться с необходимостью удалить iCloud с компьютера полностью на Windows 10. Это может произойти, например, если вы больше не пользуетесь данным сервисом или хотите освободить место на жестком диске. Но как удалить iCloud с компьютера полностью без остатков?
В этой статье мы расскажем вам подробную инструкцию по удалению iCloud с компьютера полностью на Windows 10.
Шаг 1: Остановите все iCloud-процессы
Прежде чем начать удаление iCloud с компьютера полностью на Windows 10, необходимо убедиться, что все процессы, связанные с iCloud, остановлены. Для этого откройте диспетчер задач и проверьте, есть ли что-то, связанное с iCloud, в разделе «Процессы». Если есть, щелкните правой кнопкой мыши на этом процессе и выберите «Завершить задачу».
Комплексная инструкция по полному удалению iCloud с компьютера на Windows 10
Шаг 1: Закрыть все открытые приложения и окна на компьютере.
Шаг 2: Открыть меню «Пуск» и выбрать «Параметры».
Шаг 3: В открывшемся окне выбрать «Приложения».
Шаг 4: В списке приложений найти и выбрать «iCloud», затем нажать на кнопку «Удалить».
Шаг 5: Подтвердить действие, нажав кнопку «Да».
Шаг 6: Дождаться окончания процесса удаления iCloud.
Шаг 7: Закрыть окно «Параметры».
Шаг 8: Перезагрузить компьютер для завершения удаления программы.
Шаг 9: Проверить компьютер на наличие остаточных файлов iCloud и удалить их вручную. Для этого откройте проводник, перейдите к папке «Пользователи», затем выберите папку с именем вашего пользователя (обычно это ваше имя), затем перейдите в папку «AppData», «Local» и «Apple». Удалите любые остаточные файлы и папки, связанные с iCloud.
Шаг 10: Перезагрузите компьютер еще раз, чтобы полностью завершить удаление iCloud.
Примечание: Перед удалением iCloud убедитесь, что у вас есть резервные копии всех важных данных и файлов, которые могли быть сохранены в облаке iCloud.
Предварительные настройки перед удалением iCloud
Перед удалением программы iCloud с компьютера на Windows 10 необходимо выполнить несколько предварительных настроек. Эти шаги помогут вам избежать потери данных и упростить процесс удаления.
- Важно сделать резервную копию ваших данных. Перед удалением iCloud проверьте, что все ваши файлы, фотографии и документы сохранены на вашем компьютере или другом внешнем устройстве.
- Убедитесь, что вы знаете учетные данные своей учетной записи iCloud. Вы можете понадобиться ввести свои данные при удалении программы.
- Закройте все приложения и процессы, связанные с iCloud. Перед удалением программы убедитесь, что ни одно из приложений iCloud не выполняется на фоне. Можно использовать диспетчер задач для проверки запущенных процессов.
- Проверьте, что у вас есть права администратора на компьютере. Для удаления программы iCloud потребуется права администратора.
- Отключите все функции iCloud перед удалением программы. Включенные функции iCloud могут привести к ошибкам удаления или оставить остатки после удаления. Настройки iCloud можно найти в системных настройках Windows 10.
После выполнения указанных предварительных настроек вы готовы приступить к удалению программы iCloud с компьютера на Windows 10.
Using iCloud is usually associated with Apple products and their respective operating systems such as Mac OS X and iOS. However, there is a Windows version of iCloud which works just as it should.
All you need to do is download its installer from Apple’s official site, install it, and use your Apple ID in order to sign in to use it and select just which features would like to sync across your devices. Also, you will need to use and setup iCloud on all of the devices you would like to keep synced. However, certain issues may arise with this program so let’s see just what can happen.
Uninstalling iCloud on Windows
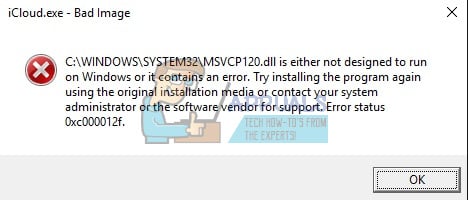
A lot of users have reported that they have uninstalled iCloud on their Windows PCs but they are still receiving iCloud related error messages such as:
“The Shared library “Cloud Music Library” is not responding”
“iCloud music library can’t be enabled”
“iCloud Verification Failed / The request timed out”
“iCloud Error: A critical syncing error with iCloud has been detected. iCloud syncing with Day One has been disabled.”
This shouldn’t happen because people have uninstalled it using its uninstaller but somehow pieces of it have remained on their computer. These pieces are not impossible to remove but make sure you follow the instructions from below carefully and do try each one before giving up.
Solution 1: Uninstalling Through Control Panel/Settings
This is probably the first thing you tried yourself but let’s try this again in order to make sure we tried to uninstall it the conventional way. If this method helps you deal with iCloud-related error messages, you don’t have to continue with other solutions.
- First of all, make sure you are logged in with an administrator account as you won’t be able to delete programs using any other account.
- Backup the data you want to save because deleting iCloud will remove it.
- Open iCloud and check the boxes next to data you want to backup and click Apply.
- As soon as your data has been uploaded to iCloud, click on the Sign out button located in the lower left corner.
- Click on the Start menu and open Control Panel by searching for it. Alternatively, you can click on the gear icon in order to open settings if you are using Windows 10.
- In Control Panel, select to View as: Category at the top right corner and click on Uninstall a Program under the Programs section.
- If you are using the Settings app, clicking on Apps should immediately open a list of all installed programs on your PC.
- Locate iCloud in Control Panel or Settings and click on Uninstall.
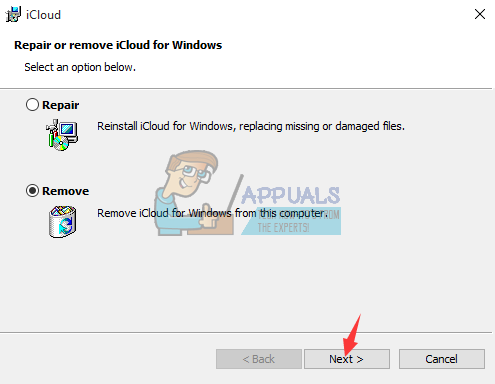
- iCloud’s uninstall wizard should open with two options: Repair and Remove. Select Remove and click Next in order to uninstall the program.
- A message will pop up asking “Do you want to completely remove iCloud for Windows?” Choose Yes.
- Click Finish when the uninstalled completes the process and restart your computer to see whether errors will still appear.
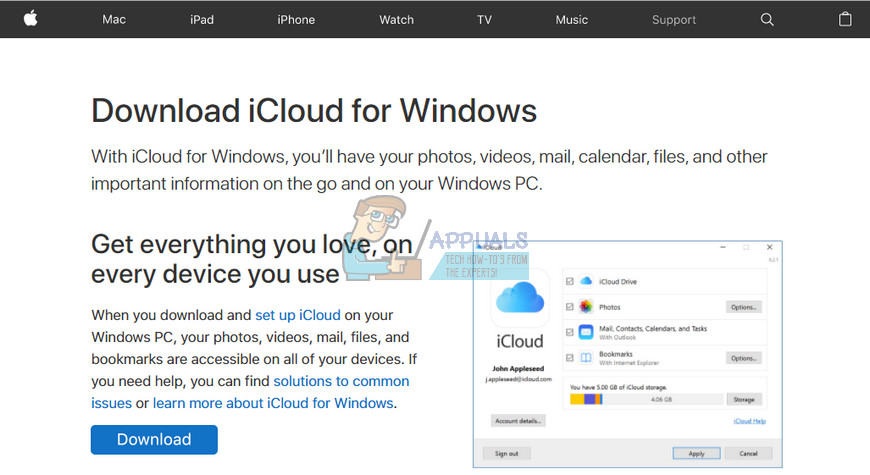
Solution 2: Running the Downloaded Installer
There has been a discussion at Apple Forums where users stated that uninstalling using Control Panel or Settings won’t get the job done properly. Instead, people said that you need to run the installer you downloaded in order to install the program to your PC. This is definitely something you should try and it won’t take a long time.
- Open your Downloads folder or the folder you used to download the iCloud installer to. You can also try and search for the file by typing “iCloudSetup.exe” in your Search bar.
- If you have already deleted the file, you can redownload it by visiting Apple’s site.
- Run the file you located or downloaded and you should again be prompted with Remove and Repair options just like in the Solution 1.
- Follow steps 6-8 in order to uninstall iCloud from your computer.
- Restart your computer and wait to see if everything is okay now.
Solution 3: Locating the Hidden Uninstaller
There is also a way to find the uninstaller and delete iCloud from your computer permanently by locating it on your hard drive. However, if previous installers failed to load properly or if they opened an error message, this solution might not work either but it’s worth giving it a show since this helped a couple of people get rid of iCloud.
- Open My Computer (or This PC) and navigate to your Local Disk C: drive.
- Click on the View tab at the top of the window and check the box next to Hidden Items.
- Navigate to ProgramData >> Apple >> Installer Cache >> iCloud Control Panel #.#.#.## where hashes represent the installed version of the program and it depends from computer to computer.
- Locate the icloud64.msi if your Windows version is 64 bit or look for icloud32.msi if your OS is 32 bit.
- Run this file and the installer should appear.
- Follow the steps 6, 7, and 8 from Solution 1 in order to uninstall iCloud.
- Reboot your computer and check for errors.
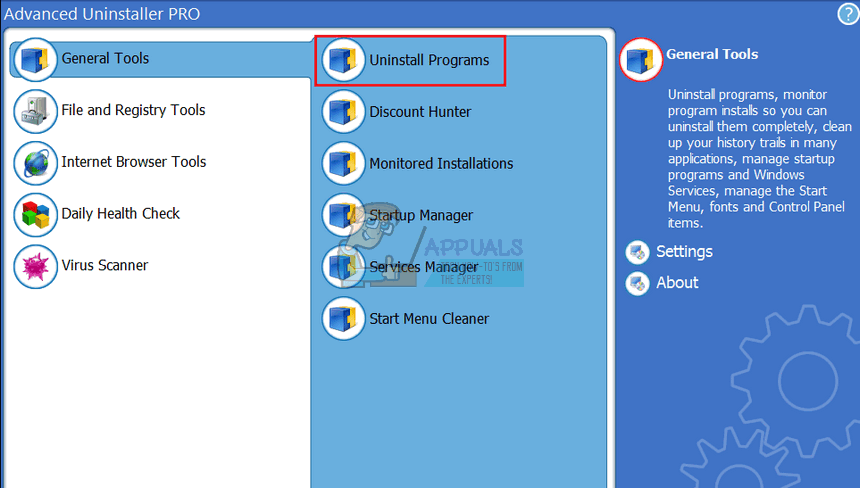
Solution 4: Using Advanced Uninstaller Pro to Remove iCloud
There are a lot of different uninstallers designed to replace Control Panel and Settings as they often get unresponsive and they sometimes freeze in the middle of the uninstallation process. You don’t have to use this particular uninstaller but this one was able to help people who were dealing with this problem in particular and that is exactly why we recommend it.
- Download Advanced Uninstaller Pro from their official website
- Locate the file you downloaded, double-click on it, and follow the instructions on screen in order to uninstall it. Be careful not to install any additional programs you might be prompted to install and uncheck them all. Select Custom Installation and uncheck everything except Advanced Uninstaller Pro.
- Open the program and open General Tools.
- Under General Tools, click on Uninstall Programs and a list of all your installed programs should appear.
- Select iCloud and click the Uninstall button located to the left under the information about the program you selected.
- After clicking on the Uninstall button, the uninstaller will probably fail since it’s either displaying an error message or it has already been used or deleted.
- However, this program implements a scanner whose purpose is to scan your hard drive and your registry for leftovers. It will locate these files and you can click on Select All and remove them.
- Reboot your PC and check to see if your issue persists.
Solution 5: Using Windows PowerShell
Windows PowerShell is a powerful tool which can help you automate tasks using a command-line shell and a scripting language which was built using .NET Framework and .NET Core. It used to be exclusive to Windows but it was made open-source and now it’s available to all platforms. You can use PowerShell to uninstall various apps and you can even use it to delete preinstalled Windows Apps such as Photos, Video, Calculator, etc.
- Type PowerShell in your Search bar, right-click on the first result, and select Run as administrator.
- Copy and paste the following command in order to receive the full list of the apps you have installed along with detailed info regarding every single one: Get-AppxPackage
- Wait for the list to load and try to search for iCloud. This might take a while but be patient while you look through the installed apps.
- When you find it, copy everything next to the PackageFullName line by selecting the entire text and using the Ctrl + C key combination.
- Use the following command in order to uninstall iCloud from your PC. Replace the bolded PackageFullName with the actual name you just copied and click Enter.
Remove-AppxPackage -package PackageFullName
- Restart your computer and see if there are any changes regarding the error messages.
Solution 6: The Aftermath
This solution includes deleting the leftover files after completing any of the solutions above or after completing all of them. However, since we have used several different methods, you shouldn’t be able to find many files related to iCloud. Still, it’s worth to check just in case as these leftover files may simply be the ones which are causing all of these iCloud-related errors even though iCloud is not even installed on your Computer.
- Navigate to following folders and delete everything related to iCloud. Be careful not to delete anything related to other Apple software you may have installed:
My Computer >> C: >> Program Files (x86) >> Common Files >> Apple
My Computer >> C: >> Program Files (x86) >> Apple Software Update
My Computer >> C: >> Program Files (x86) >> Bonjour
My Computer >> C: >> Program Files (x86) >> Common Files >> Apple >> Internet Services
My Computer >> C: >> Program Files >> Common Files >> Apple >> Internet Services
- Check from iCloud entries in registry by typing “regedit” in the Search bar and opening the Registry Editor.
- Backup your registry by clicking on File >> Export… and save the current state of your registry somewhere.
- Look under HKEY_CURRENT_USER\Software and HKEY_LOCAL_MACHINE\Software for folders related to iCloud and delete them.
- Click on Edit >> Find and search for “iCloud” and delete everything you can find related to iCloud.
- Restart your computer and your problems should be gone by now.

Kevin Arrows
Kevin Arrows is a highly experienced and knowledgeable technology specialist with over a decade of industry experience. He holds a Microsoft Certified Technology Specialist (MCTS) certification and has a deep passion for staying up-to-date on the latest tech developments. Kevin has written extensively on a wide range of tech-related topics, showcasing his expertise and knowledge in areas such as software development, cybersecurity, and cloud computing. His contributions to the tech field have been widely recognized and respected by his peers, and he is highly regarded for his ability to explain complex technical concepts in a clear and concise manner.
iCloud — это облачное хранилище, которое позволяет сохранять фотографии, видео, контакты и другие файлы на серверах Apple. Если вы больше не хотите использовать iCloud на вашем компьютере под управлением Windows 10, мы подготовили для вас подробную инструкцию по его удалению.
Шаг 1: Отключите iCloud и выйдите из учетной записи
Перед удалением iCloud с компьютера, вам следует отключить его и выйти из учетной записи. Для этого выполните следующие действия:
1. Откройте iCloud для Windows, щелкнув на иконку iCloud в панели задач.
2. Нажмите на «Выход» в правом нижнем углу окна.
3. Снимите галочку напротив «Использовать iCloud для Windows».
4. Нажмите на «Применить».
Шаг 2: Удаление iCloud с помощью «Панель управления»
После того как вы вышли из учетной записи, вы сможете удалить iCloud с компьютера при помощи стандартного приложения «Панель управления».
1. Нажмите на «Пуск» и выберите «Панель управления».
2. Нажмите на «Программы» и выберите «Программы и компоненты».
3. Найдите «iCloud» в списке программ и дважды кликните на нем.
4. Нажмите на «Удалить» и следуйте инструкциям на экране для завершения удаления.
Шаг 3: Удаление оставшихся файлов и папок
Некоторые файлы и папки могут остаться на вашем компьютере после удаления iCloud. Чтобы удалить их, выполните следующие действия:
1. Откройте проводник в Windows 10.
2. Введите «iCloud» в строку поиска и нажмите enter.
3. Удалите папку «iCloud Drive» и все файлы, которые вы хотите удалить.
4. Перейдите в папку «AppData» и найдите и удалите папку «Apple Computer».
Шаг 4: Перезапустите компьютер
После удаления iCloud с компьютера, вы можете перезапустить его, чтобы завершить процесс удаления.
К сожалению, в Windows 10 нет специального инструмента для удаления iCloud. Но, если вы следуете нашей инструкции, вы сможете удалить iCloud с компьютера полностью без проблем. Перед удалением iCloud, убедитесь, что у вас есть доступ к копиям всех нужных файлов. Если у вас возникнут какие-либо вопросы или проблемы с удалением iCloud, обратитесь в службу поддержки Apple.