 Всем привет
  В диспетчере задач некоторые пользователи видят процесс GoogleUpdate.exe, но не всегда, он то есть, то его нет… и я вот тоже его у себя иногда видел, прям чудеса. Но на самом деле все просто, это не вирус и не вирусная прога, это компонент от браузера Google Chrome. Этот компонент следит чтобы ваш браузер был вовремя обновлен. Для этого он и висит в диспетчере, ну то есть не висит, а иногда проверят нет ли новой версии.
Он неопасен, не грузит процессор и не кушает много оперативки.. но те мне менее лучше его отключить. Не знаю как вы, а я часто браузер не обновляю. Обновляю только тогда когда это реально нужно. Да и как мне кажется то лучше обновлять браузер вручную, там вроде нет ничего особо сложного…
Итак, теперь идем смотреть. Значит что нужно делать чтобы отключить GoogleUpdate.exe и удалить потом?
Открываем диспетчер задач, идем на вкладку Службы и там нажимаем вот на эту кнопку:

Потом откроется окно со службами, вот там крутим и находим службы от Google:

По каждой из них нужно нажать два раза и отключить, я покажу как это сделать для одной, а вы также повторите и для другой. В общем нажимаем по службе два раза, появится такое окно:

Тут нужно в Тип запуска выбрать Отключена, а потом также нажать кнопку Остановить, чтобы прекратилась работа службы. Но она и так может быть остановлена, тогда меняйте только Тип запуска… в итоге у вас должно быть так:

Потом нажимаем ОК и также делаем для второй службы.
Когда службы отключили, то переходим вот в эту папку:
C:\Program Files (x86)\Google

В этой папке есть папка Update, в ней лежит файл GoogleUpdate.exe и все остальное, что касается обновления браузера. Переименуйте папку например вот так:
Update_
После этого, процесса GoogleUpdate.exe вы не увидите больше в диспетчере задач и браузер не будет сам обновляться.
В самом крайнем случае, если вы думаете что из-за переименования папки у вас начались глюки, то можно переименовать обратно, а в службах Google в Тип запуска выбрать Автоматически и сделать перезагрузку. Все будет восстановлено.
Но в 99% глюков никаких не будет… Поэтому можно эту папку и удалить. Я так и сделал. Никаких проблем потом с Google Chrome у меня не было.
На всякий случай, если у вас будут еще какие-то сомнения, ну мол там в системе вирус.. левые процессы.. то на всякий случай проверьте комп лучшими антивирусными утилитами. Я рекомендую двумя, это: AdwCleaner и HitmanPro.
Желаю вам удачи и поменьше глюков… 
На главную!
как удалить
25.06.2016
Есть такой замечательный «ненавязчивый» сервис от компании Google, как GoogleUpdate, который по своему описанию призван помогать счастливым обладателям программного обеспечения Google в деле поддержания их новейшими релизами своих сервисов.
Лично я не помню, что-бы кто-то спрашивал меня хочу ли я того, что-бы он работал на моем компьютере или нет, и поэтому я всегда относился к подобным сервисам с некоторой долей возмущения, но до недавнего момента я это терпел, а сейчас эта заноза подвернулась мне под руку и я решил ее удалить.
Как оказалось, эта программа запускается через сервис назначенных заданий. Как только Вы отходите от своего компьютера на 10 минут, GoogleUpdate запускается и спокойно весит резидентом отъедая драгоценное ОЗУ, мелочь — а неприятно, наверное я жуткий минималист или максималист, это смотря с какой стороны посмотреть.
Вобщем идем по пути: [ Пуск -> Программы -> Стандартные -> Служебные -> Назначенные задания ] и выключаем ненужные нам задания. Получаем следующую картинку:

Если в диспетчере задач [Ctrl+Shift+Esc] уже находится GoogleUpdate.exe, его можно смело завершить.
Еще необходимо просмотреть ветки реестра на наличие параметра Google Update:
HKEY_CURRENT_USER\Software\Microsoft\Windows\CurrentVersion\Run
HKEY_LOCAL_MACHINE\SOFTWARE\Microsoft\Windows\CurrentVersion\Run
Если ничего не помогает, почитайте комментарии, там много полезных советов.
Обязательные поля помечены *
Для удаления Google Update на Windows 10 можно выполнить следующие действия:
1. Откройте «Панель управления» и выберите «Программы и компоненты» в разделе программ.
2. Найдите «Google Update» в списке программ и выберите его.
3. Нажмите на кнопку «Удалить» (расположена сверху в списке программ) и следуйте инструкциям деинсталлятора.
4. После удаления Google Update следует перезапустить компьютер.
5. Если после удаления Google Update на компьютерной машине по-прежнему работает браузер Google Chrome, то следует выполнить еще одно действие — вручную удалить папку GoogleUpdater в программных файлах.
6. Для этого выберите в проводнике папку «Локальный диск С» и найдите папку «Program Files (x86)». В этой папке должна быть папка «GoogleUpdater», которую следует выделить и удалить.
Важно: После удаления Google Update многие приложения и программы на компьютере могут перестать автоматически обновляться. Если вы хотите иметь возможность обновлять свои программы автоматически, рекомендуется поискать другую альтернативу Google Update для вашей операционной системы.
При этом следует учитывать, что Google Update не является вирусом или вредоносным программным обеспечением, а является компонентом, который используется для автоматического обновления приложений и программ. Однако, если вы по какой-то причине хотите удалить Google Update, то вышеописанные действия помогут вам это сделать.
Стоит отметить, что после удаления Google Update на компьютере могут возникнуть проблемы с обновлением и работой некоторых приложений. Если вы столкнулись с такой проблемой, то рекомендуется установить новую версию Google Update или найти другой способ автоматического обновления ваших приложений.
Кроме того, если вы пользуетесь другими браузерами, например, Mozilla Firefox или Microsoft Edge, то Google Update не имеет для вас значения и может быть безболезненно удален.
В целом, удаление Google Update не является сложной задачей и может быть выполнено в несколько простых шагов. Однако, прежде чем удалить этот компонент, стоит внимательно ознакомиться с его функциональностью и возможными последствиями.
Google Update program running in the background is a common problem that every Windows administrator faces. There are plenty of Google services running in a wide range of machines and that’s how the company designed them to keep every of their application up-to-date. However, I find it uncomfortable because it could consume plenty of CPU + RAM + Internet resources. If you are using Windows 10 PC, then you can look up for googleupdate.exe or googleupdater.exe to locate its existence.
Contents
- What is GoogleUpdate.exe?
- Delete GoogleUpdater.exe
- Disable Google Updater in Task Manager
- Windows Task Scheduler
- Bottom Line
What is GoogleUpdate.exe?
Do you remember to Google Play Services?
Google designed the executable program to look up for installed solutions and keep them up-to-date. Windows PC consumers have plenty of reasons to uninstall it, and one of the crucial ones is that they access the internet at any time. Nobody knows its specific function or schedule on when to connect to the internet and update the Google-related programs.
Furthermore, the updating program doesn’t require administrator permission to access the internet and download it. Overall, you don’t have any control over its actions and that could lead to slower downloads. Of course, I don’t want to grant permission to any installed program that I cannot control.
Unfortunately, the company did not provide any official method to remove the program or uninstall it. Administrators have no choice but to opt third-party firewall solutions to block the Google Updater. I will provide proper guidance on how you can remove it, and keep it away from the computer.
Delete GoogleUpdater.exe
Deleting the executable update program is the only way to remove it permanently. Now, you have to find the location of the executable program and then delete it manually. I do recommend the readers to back up the file in another location and it will prevent the program from launching it.
Step 1: There are two locations, where you can find the Google Updater executable file.
- C:\Users\username\AppData\Local\Google\Update\
- C:\Program Files (x86)\Google\Update
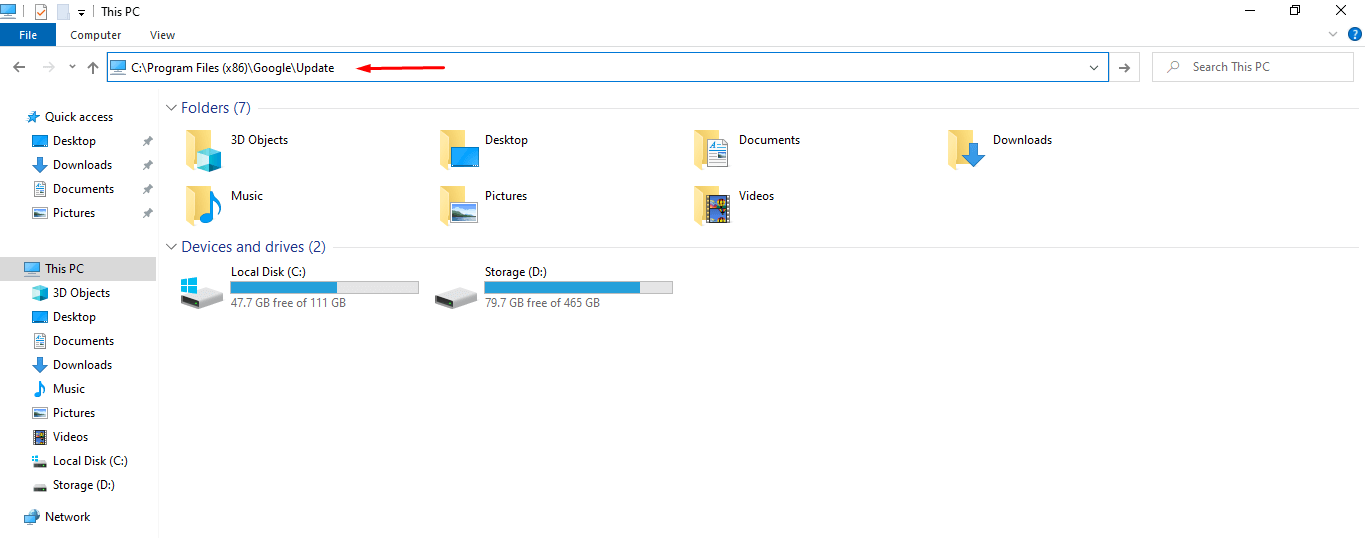
In my case, I found the file in (B) second location and that’s Google Chrome updater.
Step 2: Click on “GoogleUpdate” to select it, then right-mouse click for more options, and then click on “Cut” to continue.
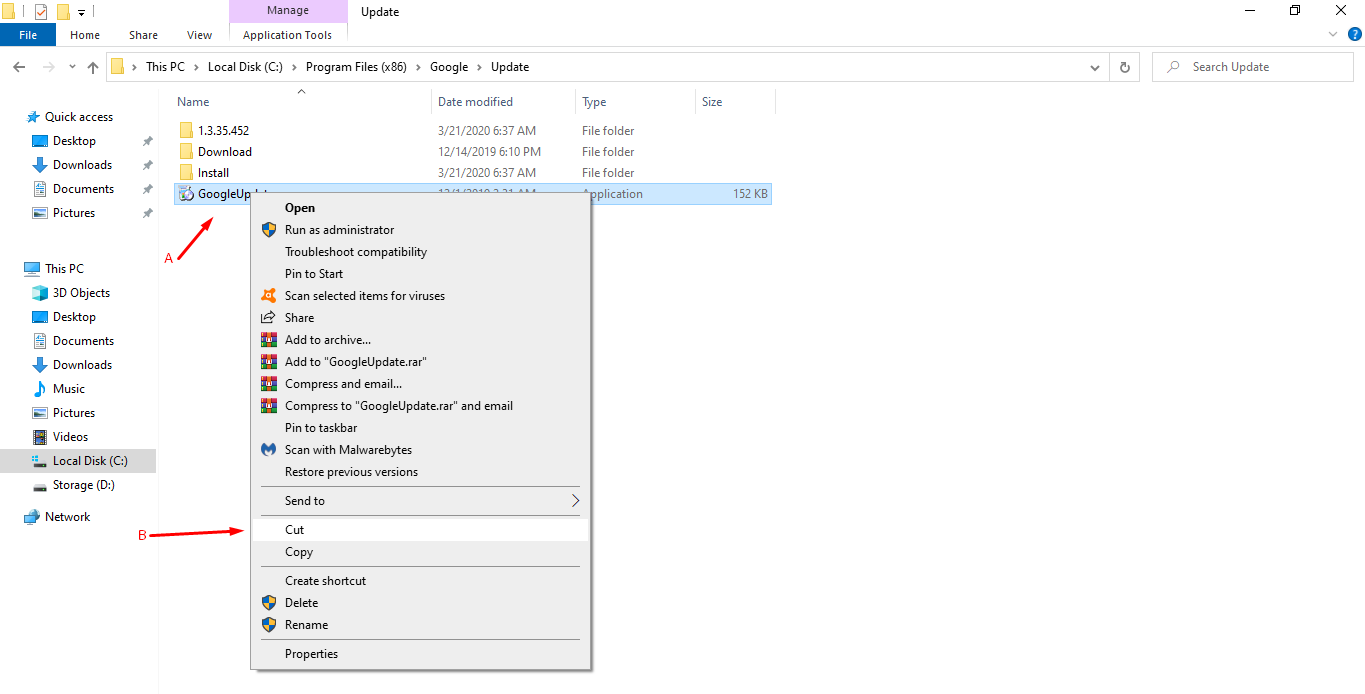
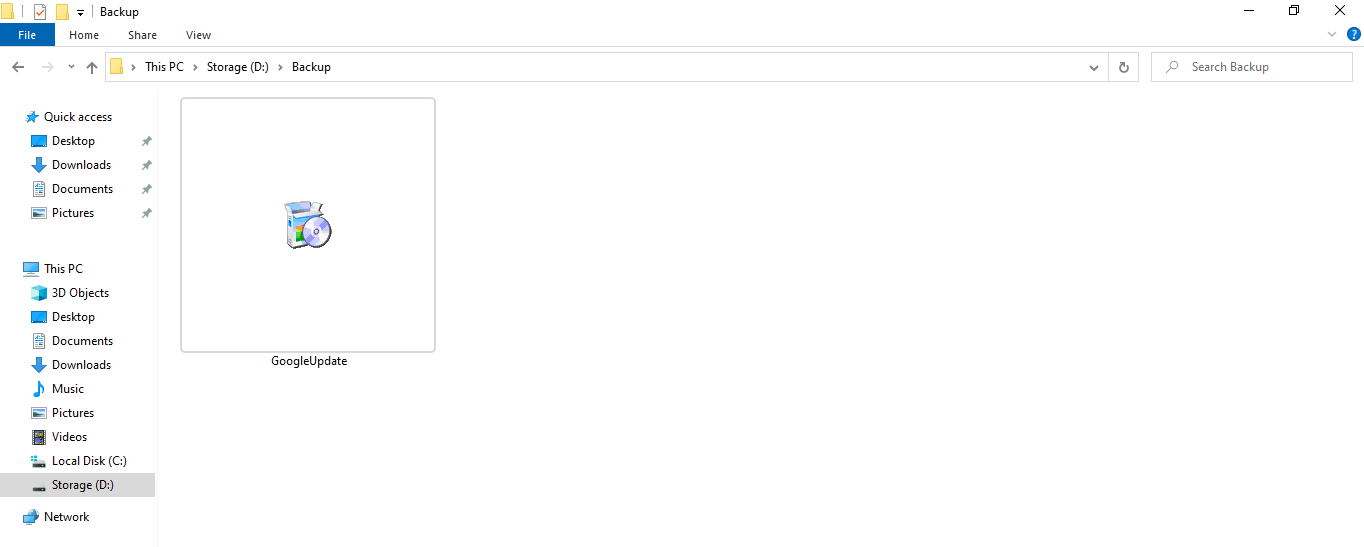
Step 3: Paste the file to another location. I have selected a different partition/drive and then pasted the file in an empty new folder.
Re-install Chrome or Google products to recover the deleted file. I don’t recommend the readers to delete it permanently because I might need it in the future and I don’t wish to reinstall the same program.
Disable Google Updater in Task Manager
Microsoft, Apple, and Google products frequently run updaters in the background that could slow down the computer a little and consume plenty of internet resources. No need to download any additional programs because you can prevent the executable program to launch by disabling it during startup.
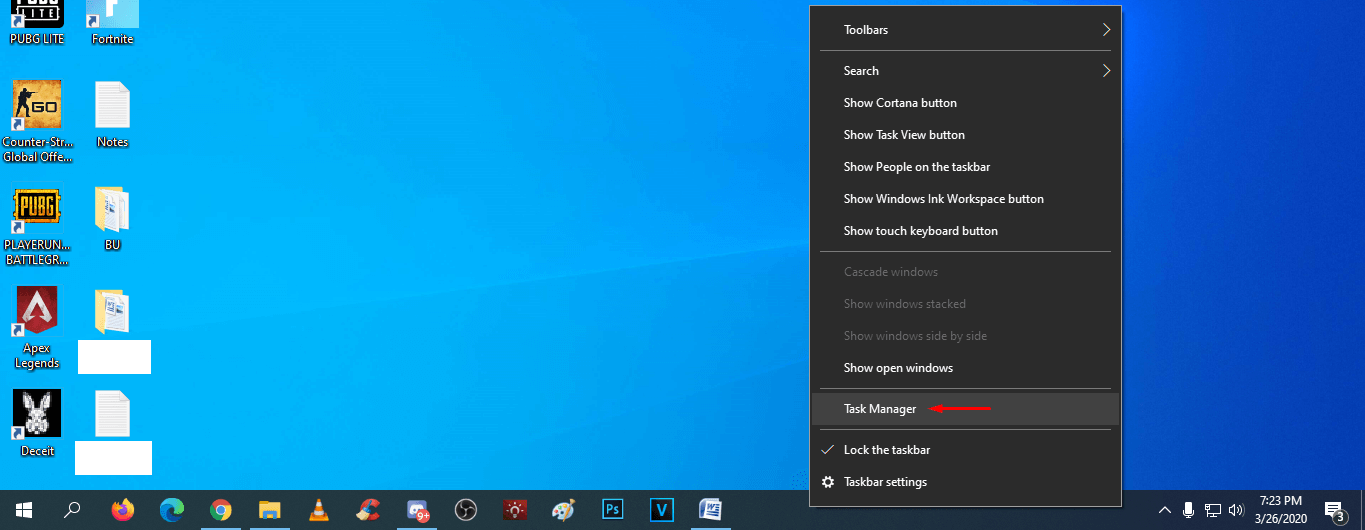
Step 1: Open “Task Manager” by pressing Ctrl + Alt + Del and select “Task Manager” or you can open it by pressing right-mouse click at the bottom of the taskbar.
Step 2: Click on “Startup” located at the top menu.
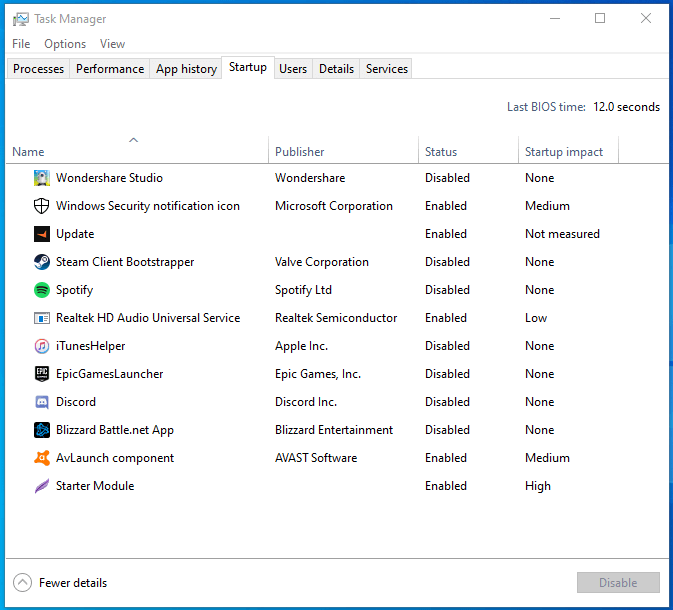
Step 3: Select the executable program from the list and then click on “Disable” to prevent it from running.

Currently, GoogleUpdate.exe or GoogleUpdater.exe is not running on my PC, so I had to select another program for a demonstration.
Preventing Windows from launching the program is the most prominent way to keep it from running in the first place. I have disabled almost every single program because it slows down the computer, and eats up machine resources.
Windows Task Scheduler
Task Scheduler allows third-party programs to run services at a specific period. Of course, we cannot mess around in this section because we don’t have enough options to do so. We are going to remove the schedule permanently and this won’t delete the program whatsoever.
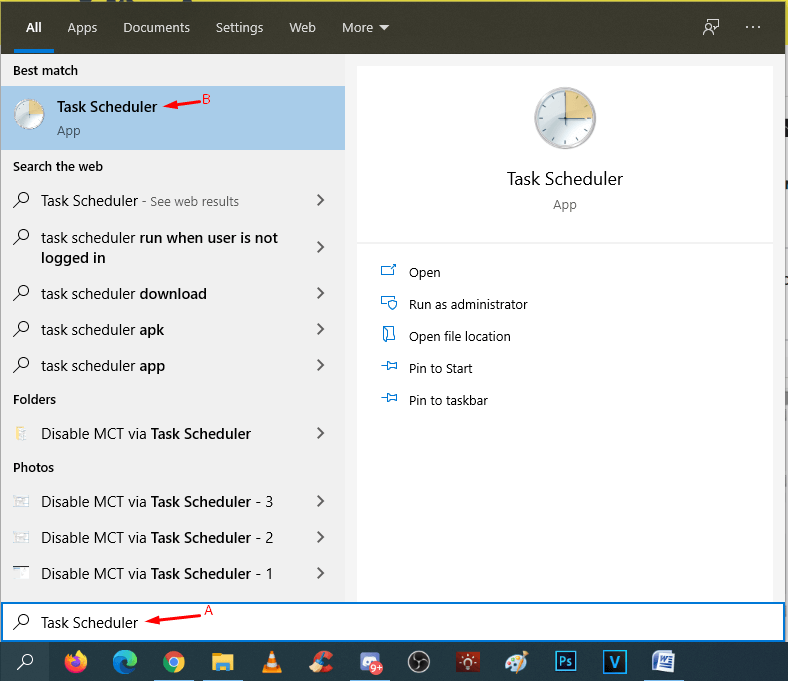
Step 1: Press Windows key + S, then type “Task Scheduler” and then run as administrator.
Step 2: Find Google-related scheduled programs. In my case, I have two updates that I found by scrolling down a little, and the list follows alphabetical order.
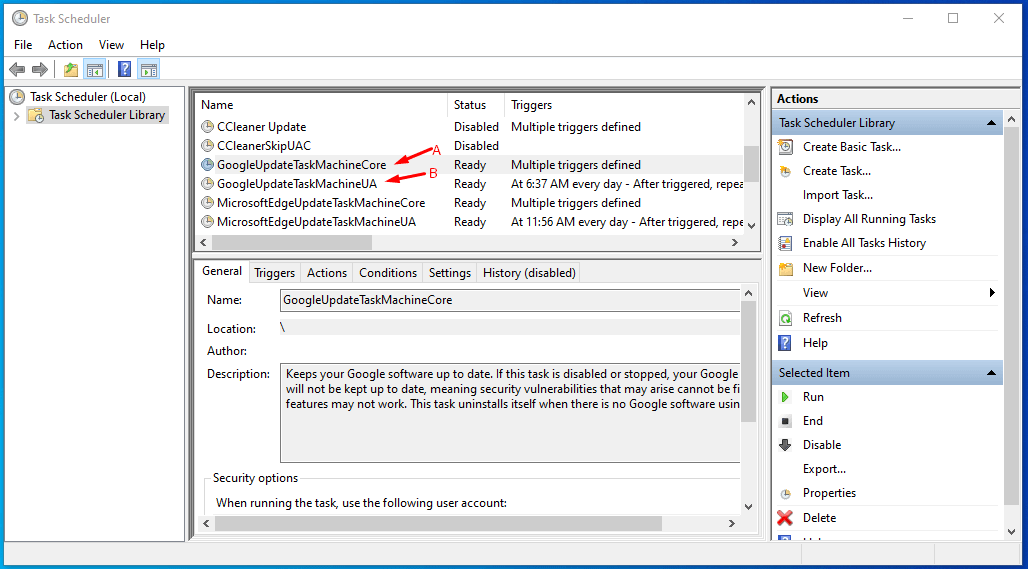
Step 3: Click to select “Google Update” and then right-mouse click for more options to click on the “Delete” button.
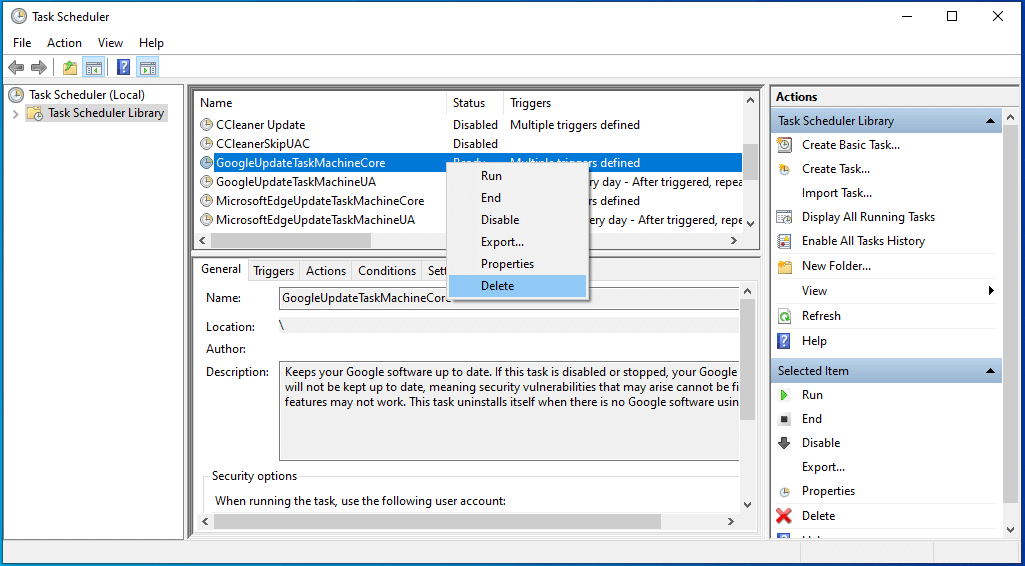
You are not deleting the Google Updater and removing it from the scheduler and preventing it from launching. However, I don’t know how many times it will launch in a week or so. I do recommend moving to the first solution because it will prevent Google from updating programs.
Also make sure you restart your PC or Laptop after the above to steps to benefit from the above tricks and tips provided by our tech team to save your bandwidth.
Bottom Line
Nowadays, updating the Chrome browser has become very important because it enables consumers to prevent privacy invaders and hackers from entering your computer using loopholes. Make sure to keep Google products updated to prevent bugs, glitches and to experience new features. Let us know which solution helped you from removing GoogleUpdate .exe in the comment section below.
71
71 people found this article helpful
Find and remove googleupdate.exe files on Windows 10
Updated on November 8, 2021
What to Know
- Search for googleupdate to find and delete all Google Update files. In Task Manager, click Startup > Google Update Core > Disable.
- In Task Scheduler, right-click any Google Update task and select Delete. In the Windows Registry Editor, enter the following:
- HKEY_CURRENT_USER\Software\Microsoft\Windows\CurrentVersion\ Run\. Then, right-click Google Update and select Delete.
This article explains how to disable Google updates and delete the googleupdate.exe file on Windows.
How to Block or Remove Google Update Files
To remove Google Update files from your Windows computer:
-
Use the search feature in the Windows taskbar to locate and delete all instances of the Google Update files by searching for googleupdate.
You may be prompted to stop certain Windows services when attempting to delete update files.
-
Open Task Manager and select the Startup tab.
-
Choose Google Update Core, then select Disable.
-
Open Windows Task Scheduler and select Task Scheduler Library in the left pane.
Search for task scheduler in the Windows search box to locate and open Task Scheduler.
-
Right-click any Google Update tasks you see, then select Delete.
-
Press Windows key+R on the keyboard to open the Run window, then enter regedit and select OK to open Windows Registry Editor.
-
Enter the following subkey in the text field at the top, then press Enter:
HKEY_CURRENT_USER\Software\Microsoft\Windows\CurrentVersion\Run\
-
Right-click Google Update in the right pane and select Delete.
-
Select Yes to confirm the deletion.
-
Close Registry Editor and reboot the computer.
Common Locations of Google Update Files
The steps above may not remove all Google Update files on your computer. Check the following directories for remaining files:
- C:\Program Files (x86)\Google\Update
- C:\Users\username\AppData\Local\Google\Update\
Googleupdate.exe files are usually located in a folder named Update within the Google application’s installation directory. You may also see files named GoogleUpdateHelper, GoogleUpdateBroker, GoogleUpdateCore, and GoogleUpdateOnDemand, all of which can be deleted.
What Are Google Update Files?
Google Update files allow apps to communicate with Google Play Services to install new updates automatically when an update becomes available. These files may attempt to access the internet without requesting permission, which can slow down your connection and interfere with other downloads.
While there’s no single way to rid the system of Google Update files without deleting the parent application, a permission-based firewall program like ZoneAlarm can be used to block updates temporarily from Google on Windows.
Sometimes this behavior may persist even after the parent application is uninstalled. In this case, you must manually delete the Google Update files.
Thanks for letting us know!
Get the Latest Tech News Delivered Every Day
Subscribe