Командная строка – мощный инструмент для автоматизации и упрощения многих задач, которые возникают при администрировании компьютера с операционной системой Windows. В этой статье мы рассмотрим команды DEL, ERASE, RD и RMDIR. С их помощью вы сможете удалять файлы и папки прямо из командной строки.
Удаление файлов через командную строку
Если вам нужно удалить файл через командную строку, то для этого нужно использовать команду DEL или ERASE. Эти команды являются синонимами и работают одинаково. Вы можете получить подробную информацию об этих командах, если введете их в командную строку с параметром «/?». Например, вы можете ввести «del /?» и в консоль выведется вся основная информация о команде del.
Команда DEL (или ERASE) предназначена для удаления одного или нескольких файлов и может принимать следующие параметры:
- /P – удаление с запросом подтверждения для каждого файла;
- /F – удаление файлов с атрибутом «только для чтения»;
- /S – удаление указанного файла из всех вложенных папок;
- /Q – удаление без запроса на подтверждение ;
-
/A – удаление файлов согласно их атрибутам;
- S — Системные;
- H — Скрытые;
- R – Только для чтения;
- A — Для архивирования
- Также перед атрибутами можно использовать знак минус «-», который имеет значение «НЕ». Например, «-S» означает не системный файл.
Обычно, для того чтобы воспользоваться командной DEL нужно сначала перейти в папку, в которой находится файл для удаления, и после этого выполнить команду. Для того чтобы сменить диск нужно просто ввести букву диска и двоеточие. А для перемещения по папкам нужно использовать команду «CD».

После того как вы попали в нужную папку можно приступать к удалению файлов. Для этого просто введите команду DEL и название файла.
del test.txt

Также, при необходимости вы можете удалять файлы, не перемещаясь по папкам. В этом случае нужно указывать полный путь к документу.
del e:\tmp\test.txt

Если есть необходимость выполнить запрос на подтверждение удаления каждого из файлов, то к команде DEL нужно добавить параметр «/p». В этом случае в командной строке будет появляться запрос на удаление файла и пользователю нужно будет ввести букву «Y» для подтверждения.
del /p test.txt

Нужно отметить, что при использовании параметра «/a», отвечающие за атрибуты буквы нужно вводить через двоеточие. Например, для того чтобы удалить все файлы с атрибутом «только для чтения» и с расширением «txt» нужно ввести:
del /F /A:R *.txt

Аналогичным образом к команде DEL можно добавлять и другие параметры. Комбинируя их вы сможете создавать очень мощные команды для удаления файлов через командную строку Windows. Ниже мы приводим еще несколько примеров.
Уничтожение всех файлов в корне диска D:
del D:\
Уничтожение всех файлов с расширением «txt» в корне диска D:
del D:\*.txt
Уничтожение всех файлов в папке d:\doc (документы с атрибутами будут пропущены):
del D:\doc
Уничтожение всех файлов с атрибутом «только для чтения» и расширением «txt» в папке d:\doc:
del /A:r d:\doc\*.txt
Удаление папок через командную строку
Если вам нужно удалить папку через командную строку Windows, то указанные выше команды вам не помогут. Для удаления папок существует отдельная команда RD или RMDIR (сокращение от английского Remove Directory).
Команды RD и RMDIR являются синонимами и предназначены для удаления папок. Они могу принимать следующие параметры:
- /S — удаление всего дерева каталогов, при использовании данного параметра будет удалена не только сама папка, но и все ее содержимое;
- /Q – удаление дерева папок без запроса на подтверждение;
Например, для того чтобы удалить папку достаточно ввести команду RD и название папки. Например:
rd MyFolder

Если папка содержит вложенные папки или файлы, то при ее удалении будет выведена ошибка «Папка не пуста».

Для решения этой проблемы к команде RD нужно добавить параметр «/s». В этом случае удаление проходит без проблем, но появляется запрос на подтверждение удаления. Например:
rd /s MyFolder

Для того чтобы удаление дерева папок прошло без появления запроса на подтверждение к команде нужно добавить параметр «/q». В этом случае папка удаляется без лишних вопросов. Например:
rd /s /q MyFolder

Также команда RD может принимать сразу несколько папок, для этого их нужно просто разделить пробелом. Например, чтобы сразу удалить
rd Folder1 Folder2

Если же вам нужно удалить через командную строку папку, которая сама содержит пробел, то в этом случае ее название нужно взять в двойные кавычки. Например:
rd "My Files"

Комбинируя команды DEL и RD, можно создавать мощные скрипты для очистки и удаления папок в операционной системе Windows.
Удаление файлов и папок в PowerShell
В консоли PowerShell вы можете использовать рассмотренные выше команды DEL и RD, либо «Remove-Item» — собственную команду (командлет) PowerShell. С помощью данной команды можно удалять можно удалять файлы, папки, ключи реестра, переменные и другие объекты.
Например, для того чтобы удалить файл или папку в консоли PowerShell можно использовать команду:
Remove-item file.txt

Remove-item MyFolder

Посмотрите также:
- Выключение компьютера через командную строку
- Как перезагрузить компьютер через командную строку
- Как вызвать командную строку в Windows 7
- Как поменять дату в Windows 7
- Как выключить компьютер через определенное время
Автор
Александр Степушин
Создатель сайта comp-security.net, автор более 2000 статей о ремонте компьютеров, работе с программами, настройке операционных систем.
Остались вопросы?
Задайте вопрос в комментариях под статьей или на странице
«Задать вопрос»
и вы обязательно получите ответ.
Программистам часто приходится работать в консоли — например, чтобы запустить тестирование проекта, закоммитить новый код на Github или отредактировать документ в vim. Всё это происходит так часто, что все основные действия с файлами становится быстрее и привычнее выполнять в консоли. Рассказываем и показываем основные команды, которые помогут ускорить работу в терминале под OS Windows.
Для начала нужно установить терминал или запустить командную строку, встроенную в Windows — для этого нажмите Win+R и введите cmd. Терминал часто встречается и прямо в редакторах кода, например, в Visual Studio Code.
Чтобы ввести команду в консоль, нужно напечатать её и нажать клавишу Enter.
Содержимое текущей папки — dir
Выводит список файлов и папок в текущей папке.
C:\content-server>dir
 Том в устройстве C имеет метку SYSTEM
 Серийный номер тома: 2C89-ED9D

 Содержимое папки C:\content-server

06.10.2020  00:41    <DIR>          .
06.10.2020  00:37    <DIR>          .circleci
16.07.2020  16:04               268 .editorconfig
16.07.2020  16:04                10 .eslintignore
16.07.2020  16:04               482 .eslintrc
06.10.2020  00:37    <DIR>          .github
16.07.2020  16:04                77 .gitignore
06.10.2020  00:41    <DIR>          assets
06.10.2020  00:41    <DIR>          gulp
16.07.2020  16:10               379 gulpfile.js
16.07.2020  16:10           296 320 package-lock.json
16.07.2020  16:10               751 package.json
16.07.2020  16:04               509 README.md
Открыть файл
Чтобы открыть файл в текущей папке, введите его полное имя с расширением. Например, blog.txt или setup.exe.
Перейти в другую папку — cd
Команда cd без аргументов выводит название текущей папки.
Перейти в папку внутри текущего каталога:
C:\content-server>cd assets
C:\content-server\assets>
Перейти на одну папку вверх:
C:\content-server\assets>cd ..
C:\content-server>
Перейти в папку на другом диске:
c:\content-server>cd /d d:/
d:\>
Чтобы просто изменить диск, введите c: или d:.
Создать папку — mkdir или md
Создаём пустую папку code внутри папки html:
d:\html>mkdir coded:\html>dir

 Содержимое папки d:\html

03.11.2020  19:23    <DIR>           .
03.11.2020  19:23    <DIR>           ..
03.11.2020  19:25    <DIR>           code
               0 файлов              0 байт
               3 папок  253 389 438 976 байт свободно
Создаём несколько пустых вложенных папок — для этого записываем их через косую черту:
d:\html>mkdir css\js
d:\html>dir
 Том в устройстве D имеет метку DATA
 Серийный номер тома: 0000-0000

 Содержимое папки d:\html

03.11.2020  19:23    <DIR>           .
03.11.2020  19:23    <DIR>           ..
03.11.2020  19:25    <DIR>           code
03.11.2020  19:29    <DIR>           css
Создаётся папка css, внутри которой находится папка js. Чтобы проверить это, используем команду tree. Она показывает дерево папок.
Удалить папку — rmdir или rd
Чтобы удалить конкретную папку в текущей, введите команду rmdir:
d:\html\css>rmdir js
При этом удалить можно только пустую папку. Если попытаться удалить папку, в которой что-то есть, увидим ошибку:
d:\html\css>d:\html>rmdir css
Папка не пуста.
Чтобы удалить дерево папок, используйте ключ /s. Тогда командная строка запросит подтверждение перед тем, как удалить всё.
d:\html>rmdir css /s
css, вы уверены [Y(да)/N(нет)]? y
Показать дерево папок — tree
В любом момент мы можем увидеть структуру папок. Для этого используется команда tree.
d:\html>tree
Структура папок тома DATA
Серийный номер тома: 0000-0000
D:.
├───code
└───css
    └───js
Если вы хотите посмотреть содержимое всего диска, введите tree в корне нужного диска. Получится красивая анимация, а если файлов много, то ещё и немного медитативная.
Удаление файла — del или erase
Команда для удаления одного или нескольких файлов.
d:\html>del blog.txt
Переименование файла — ren или rename
Последовательно вводим ren, старое и новое имя файла.
d:\html>dir
 Содержимое папки d:\html

03.11.2020  19:23    <DIR>            .
03.11.2020  19:23    <DIR>            ..
03.11.2020  19:59                 0 blag.txt

d:\html>ren blag.txt blog.txt

d:\html>dir
 Содержимое папки d:\html

03.11.2020  19:23    <DIR>            .
03.11.2020  19:23    <DIR>            ..
03.11.2020  19:59                 0 blog.txt
Команды одной строкой
Очистить консоль — cls.
Информация о системе — systeminfo.
d:\html>systeminfo

Имя узла:                         DESKTOP-6MHURG5
Название ОС:                      Майкрософт Windows 10 Pro
Версия ОС:                        10.0.20246 Н/Д построение 20246
Изготовитель ОС:                  Microsoft Corporation
Параметры ОС:                     Изолированная рабочая станция
Сборка ОС:                        Multiprocessor Free
Информация о сетевых настройках — ipconfig.
d:\html>ipconfig
Настройка протокола IP для Windows
Адаптер Ethernet Ethernet 2:

   Состояние среды. . . . . . . . : Среда передачи недоступна.
   DNS-суффикс подключения . . . . . :
Список запущенных процессов — tasklist.
c:\>tasklist

Имя образа                     PID Имя сессии          № сеанса       Память
========================= ======== ================ =========== ============
System Idle Process              0 Services                   0         8 КБ
System                           4 Services                   0     2 688 КБ
Secure System                   72 Services                   0    23 332 КБ
…
Справка по командам — help
Команда help без аргументов выводит список всех возможных команд. help вместе с именем команды выведет справку по этой команде.
d:\html>help tree
Графическое представление структуры папок или пути.

TREE [диск:][путь] [/F] [/A]

   /F   Вывод имён файлов в каждой папке.
   /A   Использовать символы ASCII вместо символов национальных алфавитов.
В этой статье приведены не все команды и не все их возможности, но вы всегда можете воспользоваться командой help и узнать о том, что ещё может командная строка.
👉🏻 Больше статей о фронтенде и работе в айти в телеграм-канале.
Подписаться
Материалы по теме
- 10 горячих клавиш VS Code, которые ускорят вашу работу
- Полезные команды для работы с Git
- Полезные команды для работы с Node. js
«Доктайп» — журнал о фронтенде. Читайте, слушайте и учитесь с нами.
ТелеграмПодкастБесплатные учебники
Удалить файл или папку с диска или флешки – что, казалось бы, может быть проще? Да, это действительно просто, если только вы не работаете в среде восстановления, в которой Проводник недоступен. В таких случаях вам придется использовать командную строку – мощный инструмент управления Windows, о котором многие пользователи уже начали забывать. Консоль может вам понадобиться и в работающей системе, например, при удалении скрытых и недоступных только для чтения файлов, а также файлов, используемых процессом explorer.exe (после его завершения).
Для удаления файлов в классической командной строке Windows используются две команды – DEL и ERASE, которые функционально ничем не отличаются, имея одинаковый набор аргументов. Команда имеет следующий синтаксис:
del /key full path
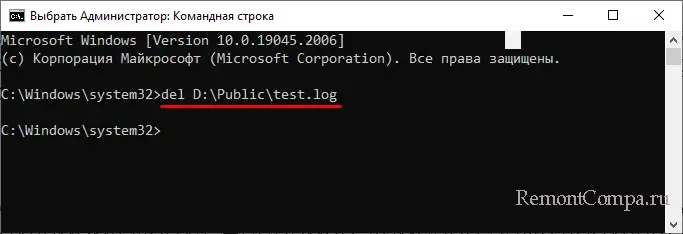
del или erase – это сама команда удаления, /key – это необязательный аргумент, а full path – полный путь к удаляемому файлу. Например, команда ниже удаляет файл test.log в папке Public на диске D:
del D:\Public\test.log
Кстати, указывать полный путь необязательно, если вы заранее перешли в папку с файлов. В этом случае указывается только команда удаления и сам файл:
del test.log

Файлы можно удалять не только по одному, но и все сразу, так, следующая команда удалит все файлы из папки Test:
del D:\Test
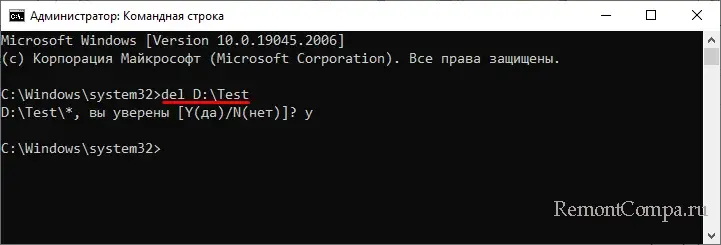
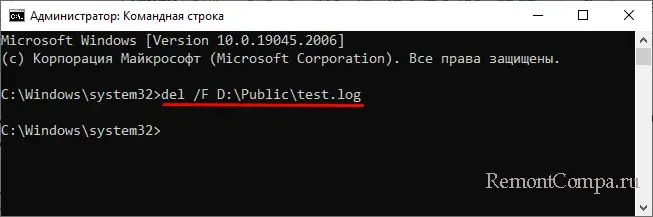
Будут пропущены лишь те файлы, которые имеют атрибуты «Только для чтения», «Скрытые», «Системные» и т. д. Для удаления таких файлов в команду добавляются специальные ключи, например, чтобы удалить файл с меткой «Только для чтения», в команду нужно добавить ключ /F, вот так:
del /F D:\Public\test.log
Помимо ключа /F, командой DEL поддерживает параметры /P, /S, /Q и /A. Рассмотрим их назначение чуть более подробно.
● /P – включает запрос на подтверждение удаления файла.
● /Q – отключает запрос на подтверждение удаления файла, обычно используется при удалении групп файлов.
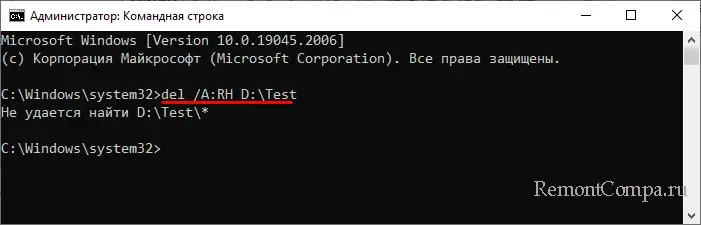
● /A – ключ используется, когда нужно удалить группу файлов с определенными атрибутами – del /A:RH D:\Test – в результате выполнения этой команды из папки Test будут удалены все файлы с атрибутами R (только для чтения) и Н (скрытые).
● /S – если нужно удалить файлы рекурсивно, то есть не только в указанной папке, но и во всех вложенных в нее папках, добавьте в команду ключ S, вот так:
del /S D:\Test.

В принципе, этих знаний достаточно, чтобы удалить любой несистемный файл, но рассмотренная нами тема была бы не раскрыта без упоминания о другом консольном инструменте Windows – PowerShell. Помимо поддержки ею команд DEL и ERASE, PowerShell располагает собственным командлётом для удаления объектов файловой системы. Он называется Remove-Item и имеет следующий синтаксис:
Remove-Item -Path -key
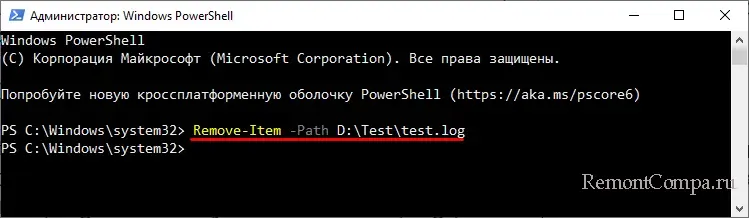
Командлёт очень похож на DEL, Path принимает значение пути к удаляемому объекту, а key – дополнительный параметр или несколько параметров. В отличие от DEL и ERASE, Remove-Item универсален и может использоваться для удаления как файлов, так и каталогов. Удалим файл test.log из папки Test:
Remove-Item -Path D:\Test\test.log
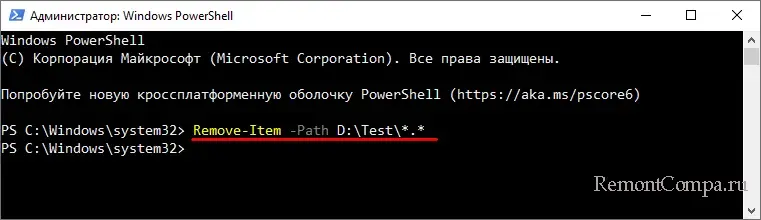
Использовать «-Path» необязательно, так как PowerShell и так понимает, что нужно делать. Папки удаляются аналогично, если нужно удалить только файлы, используется подстановочный знак, в данном случае точка перед расширением.
Remove-Item -Path D:\Test\*.*
Если путь содержит пробелы или кириллицу, его нужно взять в прямые двойные кавычки. Командлёт поддерживает около дюжины параметров, из которых вам наверняка пригодятся -Force и -Recurse.
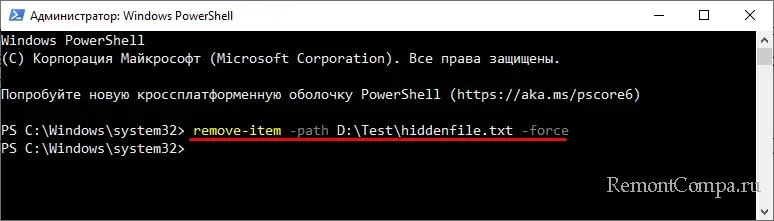
Параметр -Force используется для принудительного удаления файлов с атрибутами «Только чтения», «Скрытый», «Архивный» и «Системный».
remove-item -path D:\Test\hiddenfile.txt -force
Параметр -Recurse служит для удаления файлов в указанной папке и всех вложенных в нее каталогах. Поскольку параметр Remove-Item в связке с командлётом -Recurse работает корректно не во всех версиях PowerShell, вместо Remove-Item лучше использовать Get-ChildItem.
Get-ChildItem -Path «D:\Test» -File -Recurse | foreach { $_.Delete()}

Обращаем внимание, что эта команда удалит все файлы из папок в директории Test мимо Корзины, такова особенность ее работы. И на этом, пожалуй, достаточно. Более подробные сведения об использовании команд DEL, ERASE и Remove-Item можно получить в самой консоли, выполнив интересующую вас команду с ключом /? в классической командной строке и get-help название-командлёта в PowerShell.
Sometimes it’s just faster to do things with the command line.
In this quick tutorial we’ll go over how to open Command Prompt, some basic commands and flags, and how to delete files and folders in Command Prompt.
If you’re already familiar with basic DOS commands, feel free to skip ahead.
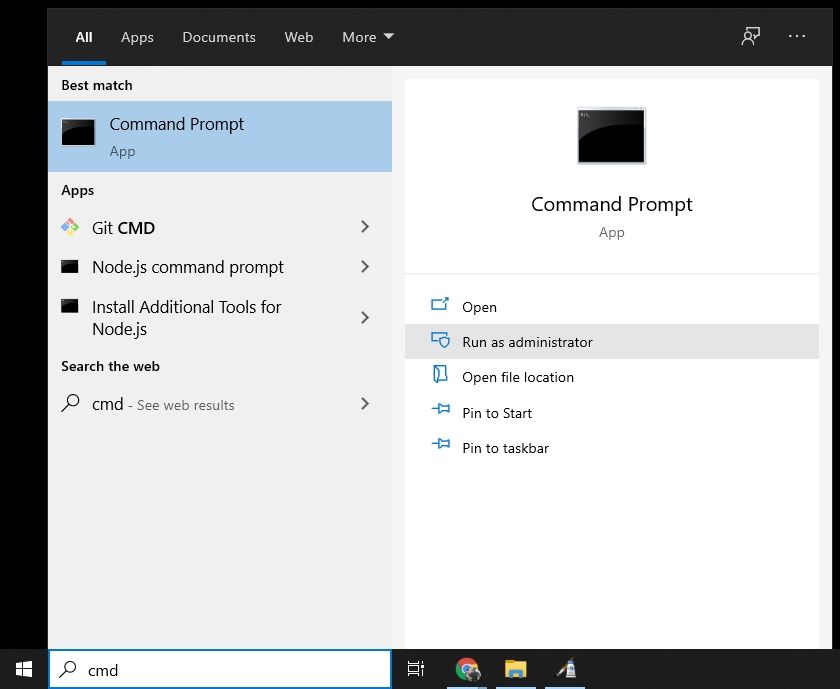
How to open Command Prompt
To open Command Prompt, press the Windows key, and type in «cmd».
Then, click on «Run as Administrator»:
After that, you’ll see a Command Prompt window with administrative privileges:
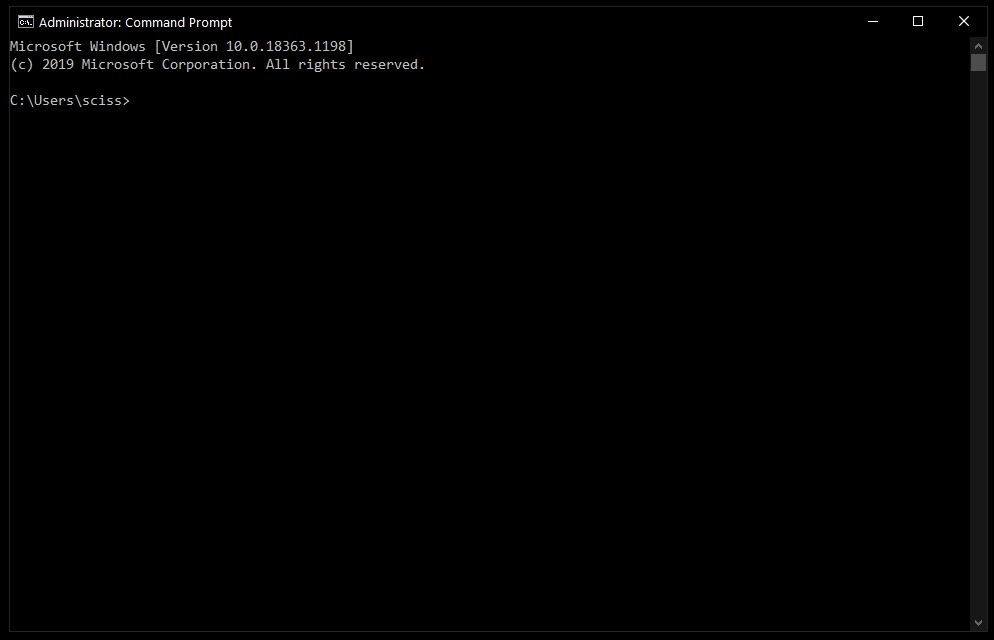
If you can’t open Command Prompt as an administrator, no worries. You can open a normal Command Prompt window by clicking «Open» instead of «Run as Administrator».
The only difference is that you may not be able to delete some protected files, which shouldn’t be a problem in most cases.
How to delete files with the del command
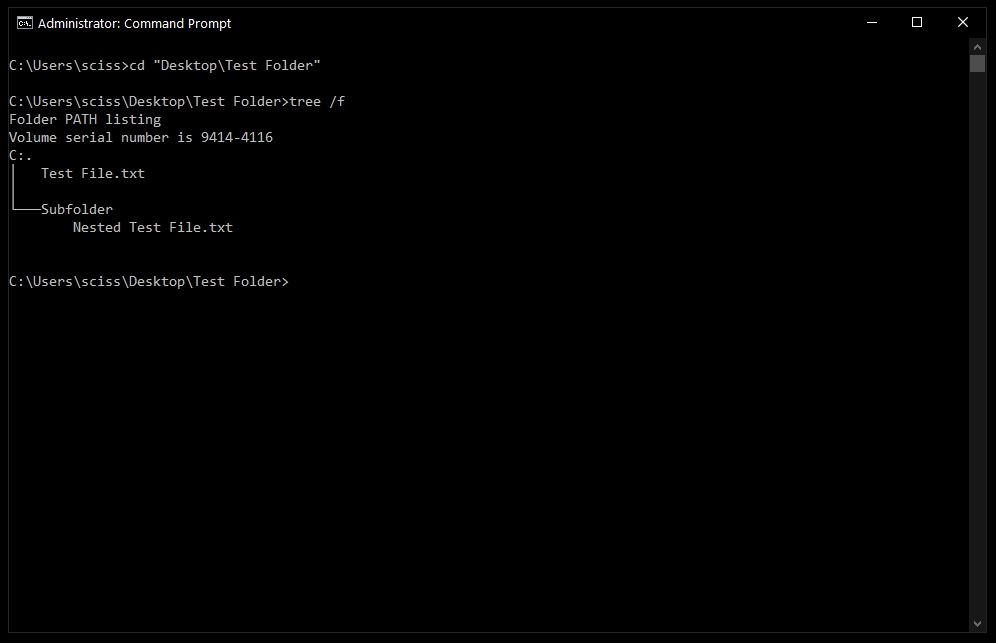
Now that Command Prompt is open, use cd to change directories to where your files are.
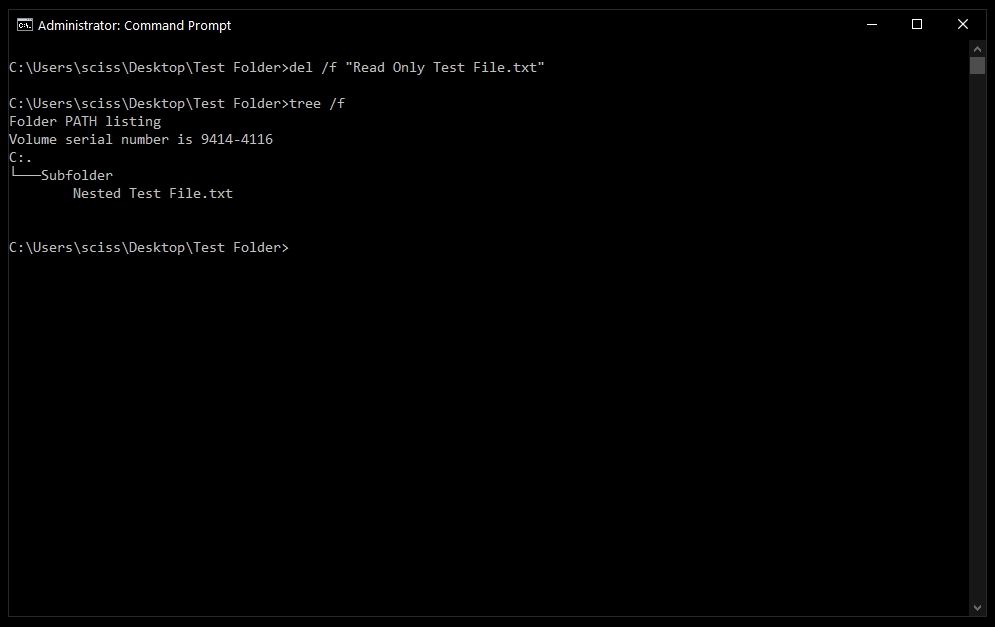
I’ve prepared a directory on the desktop called Test Folder. You can use the command tree /f to see a, well, tree, of all the nested files and folders:
To delete a file, use the following command: del "<filename>".
For example, to delete Test file.txt, just run del "Test File.txt".
There may be a prompt asking if you want to delete the file. If so, type «y» and hit enter.
Note: Any files deleted with the del command cannot be recovered. Be very careful where and how you use this command.
After that, you can run tree /f to confirm that your file was deleted:

Also, bonus tip – Command Prompt has basic autocompletion. So you could just type in del test, press the tab key, and Command Prompt will change it to del "Test File.txt".
How to force delete files with the del command
Sometimes files are marked as read only, and you’ll see the following error when you try to use the del command:
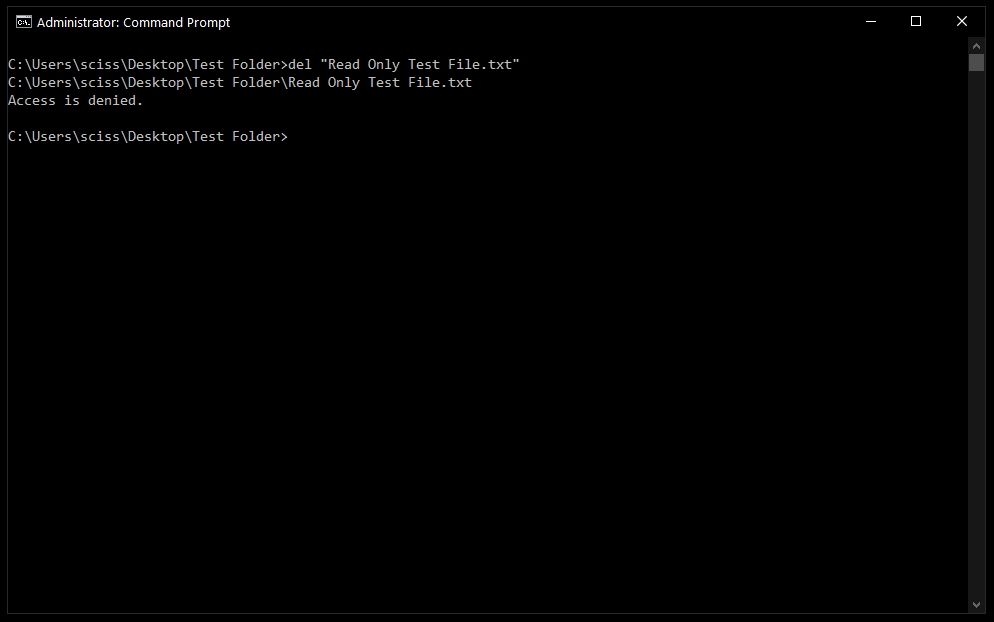
To get around this, use the /f flag to force delete the file. For example, del /f "Read Only Test File.txt":
How to delete folders with the rmdir command
To delete directories/folders, you’ll need to use the rmdir or rd command. Both commands work the same way, but let’s stick with rmdir since it’s a bit more expressive.
Also, I’ll use the terms directory and folder interchangeably for the rest of the tutorial. «Folder» is a newer term that became popular with early desktop GUIs, but folder and directory basically mean the same thing.
To remove a directory, just use the command rmdir <directory name>.
Note: Any directories deleted with the rmdir command cannot be recovered. Be very careful where and how you use this command.
In this case I want to remove a directory named Subfolder, so I’ll use the command rmdir Subfolder:
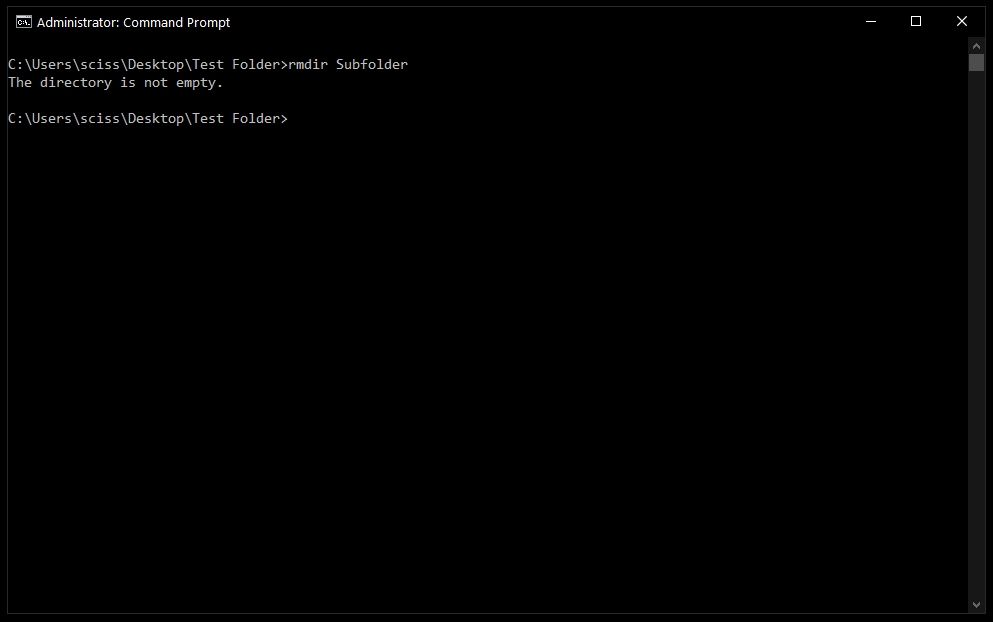
But, if you remember earlier, Subfolder has a file in it named Nested Test File.
You could cd into the Subfolder directory and remove the file, then come back with cd .. and run the rmdir Subfolder command again, but that would get tedious. And just imagine if there were a bunch of other nested files and directories!
Like with the del command, there’s a helpful flag we can use to make things much faster and easier.
How to use the /s flag with rmdir
To remove a directory, including all nested files and subdirectories, just use the /s flag:
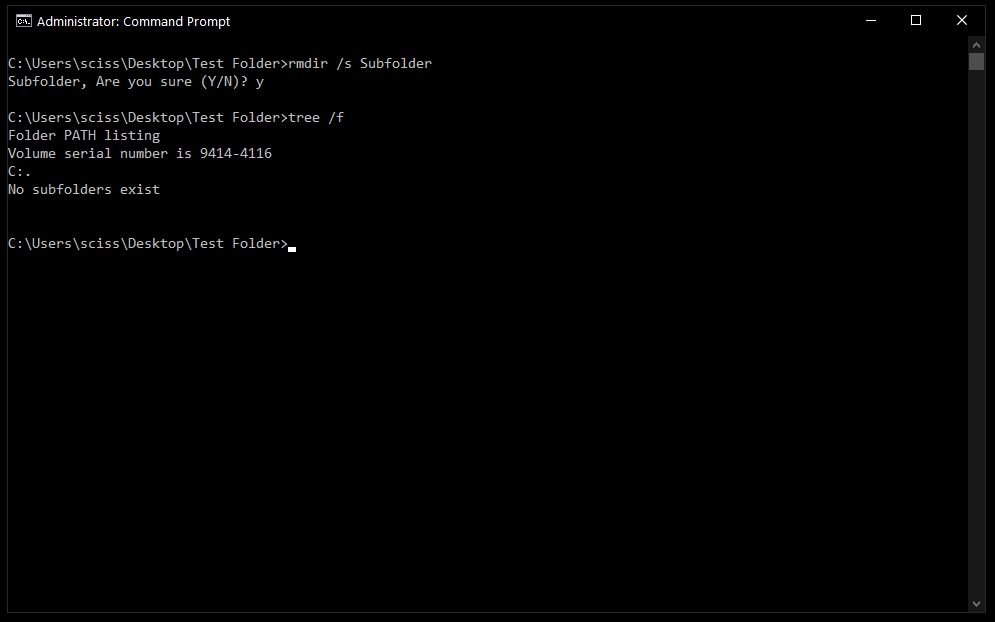
There will probably be a prompt asking if you want to remove that directory. If so, just type «y» and hit enter.
And that’s it! That should be everything you need to know to remove files and folders in the Windows Command Prompt.
All of these commands should work in PowerShell, which is basically Command Prompt version 2.0. Also, PowerShell has a bunch of cool aliases like ls and clear that should feel right at home if you’re familiar with the Mac/Linux command line.
Did these commands help you? Are there any other commands that you find useful? Either way, let me know over on Twitter.
Learn to code for free. freeCodeCamp’s open source curriculum has helped more than 40,000 people get jobs as developers. Get started
![]()
Download Article
![]()
Download Article
Learning how to do simple file management at the Command Prompt (cmd) comes in handy when you’re learning to code. When you create files and folders at the command line, you can access, use, and manipulate those folders and files in Windows apps. We’ll show you how to create folders (directories) and text files at the Windows Command Prompt, and teach you commands for deleting unneeded files and folders.
-

1
Open the Command Prompt. The easiest way to do this is to press Win + S to activate the search bar, type cmd, and then click Command Prompt in the search results.
-
2
Go to the directory in which you want to create the file. The prompt will open to C:\Users\YourName by default. If the directory is somewhere else, type cd path_to_directory and press Enter. Replace path_to_directory with the actual directory location.[1]
- For example, if you want to create a file on the Desktop, type cd desktop and press Enter.
- If the directory you’re looking for isn’t in your user directory (e.g., C:\Users\YourName), you’ll have to type in the whole path (e.g., C:\Users\SomeoneElse\Desktop\Files).
Advertisement
-
3
Create an empty file. If you don’t want to create an empty file, skip to the next step.[2]
To create an empty file:- Type type nul > filename.txt.
- Replace filename.txt with whatever you want to call your new file. The «.txt» part indicates that this is a plain text file. Other common file extensions include «.docx» (Word document), «.png» (empty photo),and «.rtf» (rich text document). All of these file types can be read on any Windows computer without installing additional software.
- Press Enter.
-
4
Create a file containing certain text. If you don’t want to create a file with certain text inside, skip to the next step.[3]
Use these steps to create a plain text file that you can type into:- Type copy con testfile.txt, but replace testfile with the desired file name.[4]
- Press Enter.
- Type some text. This is a rudimentary text editor, but it’s good for quick notes or code. You can use the Enter key to go to the next line.
- Press Control + Z when you’re finished editing the file.
- Press the Enter key. You’ll see «1 file(s) copied,» which means your file is now saved with the name you created.
- Another way to do this is to run this command: echo enter your text here > filename.txt.
- Type copy con testfile.txt, but replace testfile with the desired file name.[4]
-
5
Create a file that’s a certain size. If you don’t want to create a file that’s a specific size, skip this step.[5]
To create a blank text file based on byte size, use this command:- fsutil file createnew filename.txt 1000.
- Replace filename with the desired file name, and 1000 with the actual number of bytes you’d like the file to be.


Advertisement
-
1
Open the Command Prompt. The easiest way to do this is to press Win + S to activate the search bar, type cmd, and then click Command Prompt in the search results.
-
2
Go to the directory containing the file you want to delete. The prompt will open to C:\Users\YourName by default. If the file is somewhere else, type cd path_to_directory and press Enter. Replace path_to_directory with the actual directory location.
- For example, if you want to delete a file from the Desktop, type cd desktop and press Enter.
- If the directory you want to view isn’t in your user directory (e.g., C:\Users\YourName), you’ll have to type in the whole path (e.g., C:\Users\SomeoneElse\Desktop\Files).
-
3
Type dir and press ↵ Enter. This displays a list of all files in the current directory. You should see the file you want to delete in this list.
- Using Command Prompt to delete files results in the files being deleted permanently rather than being moved to the Recycle Bin. Exercise caution when deleting files via Command Prompt.
-
4
Type del filename and press ↵ Enter. Replace filename with the full name and extension of the file you want to delete.[6]
File names include file extensions (e.g., *.txt, *.jpg). This deletes the file from your computer.- For example, to delete a text file entitled «hello», you would type del hello.txt into Command Prompt.
- If the file’s name has a space in it (e.g., «hi there»), you will place the file’s name in quotations (e.g., del "hi there").
- If you get an error that says the file cannot be deleted, try using del /f filename instead, as this force-deletes read-only files.


Advertisement
-
1
Open the Command Prompt. The easiest way to do this is to press Win + S to activate the search bar, type cmd, and then click Command Prompt in the search results.[7]
-
2
Go to the directory in which you want to create the new directory. The prompt will open to C:\Users\YourName by default. If you don’t want to create a new directory here, type cd path_to_directory and press Enter. Replace path_to_directory with the actual directory location.[8]
- For example, if you want to create a directory on your Desktop, you would type in cd desktop and press Enter.
- If the directory you’re looking for isn’t in your user directory (e.g., C:\Users\YourName), you’ll have to type in the whole path (e.g., C:\Users\SomeoneElse\Desktop\Files).
-
3
Type mkdir NameOfDirectory at the prompt. Replace NameOfDirectory with the name of the directory you wish to create.[9]
- For example, to make a directory named «Homework», you would type mkdir Homework.
-
4
Press ↵ Enter. This runs the command to create a folder with the desired name.


Advertisement
-
1
Open the Command Prompt. The easiest way to do this is to press Win + S to activate the search bar, type cmd, and then click Command Prompt in the search results.[10]
-
2
Go to the folder containing the directory you want to delete. The prompt will open to C:\Users\YourName by default. If the directory you want to delete is somewhere else, type cd path_to_directory and press Enter.[11]
Replace path_to_directory with the actual directory location.- For example, if you want to delete a directory from your Desktop, type cd desktop.
- If the directory isn’t in your user directory (e.g., C:\Users\YourName), you’ll have to type in the whole path (e.g., C:\Users\SomeoneElse\Desktop\Files).
-
3
Type rmdir /s DirectoryName. Replace DirectoryName with the name of the directory you want to delete.[12]
- For example, if you’re trying to delete your «Homework» folder, you’d type in rmdir /s Homework here.
- If the directory’s name has a space in it (e.g., «Homework assignments»), place the name in quotations (e.g., rmdir /s "Homework assignments").
-
4
Press ↵ Enter to run the command.[13]
- If you try to delete a directory that contains hidden files or directories, you’ll see an error that says «The directory is not empty.» In this case, you’ll have to remove the «hidden» and «system» attributes from the files inside the directory. To do this:[14]
- Use cd to change into the directory you want to delete.
- Run dir /a to view a list of all files in the directory and their attributes.
- If you’re still okay with deleting all of the files in the directory, run attrib -hs *. This removes special permissions from the undeletable files.
- Type cd .. and press Enter to go back one directory.
- Run the rmdir /s command again to delete the folder.
- If you try to delete a directory that contains hidden files or directories, you’ll see an error that says «The directory is not empty.» In this case, you’ll have to remove the «hidden» and «system» attributes from the files inside the directory. To do this:[14]
-
5
Press y and then ↵ Enter to confirm. This will permanently remove the directory.[15]


Advertisement
Add New Question
-
Question
How can I create directories?

Subhodeep Roy
Community Answer
If you are creating a directory in C drive, the command will be»C:\MD {the name of the directory/folder}» then press Enter.
-
Question
How do I create a folder using CMD?
Navigate to where you want the subfolder created and type «mkdir «.
-
Question
How do I create a test file under the sub folder?
Change directory into the new sub folder and then on the next line, create your new test file. For example: cd mysubfolder $ type nul > newtextfile.txt
See more answers
Ask a Question
200 characters left
Include your email address to get a message when this question is answered.
Submit
Advertisement
Video
Thanks for submitting a tip for review!
-
Using Command Prompt to delete files results in the files being deleted permanently rather than being moved to the Recycle Bin. Exercise caution when deleting files via Command Prompt.
Advertisement
About This Article
Article SummaryX
1. Use the mkdir command to create a folder.
2. Use rmdir /s to delete a folder.
3. Use the copy con or echo command to create a file.
4. Use del to delete a file.
For tips on how to create a file inside a folder, read on!
Did this summary help you?
Thanks to all authors for creating a page that has been read 1,417,089 times.