In this tutorial, we will discuss “How to uninstall Eclipse on Windows 10 completely“. If you will follow all these steps, you will be able to get rid of it for sure.
These steps will remain the same if you are trying to uninstall the legacy version of Eclipse as mentioned below:-
- “How to uninstall Eclipse oxygen on Windows 10”
- “How to uninstall Eclipse ide on Windows 10”
- “How to uninstall Eclipse neon on Windows 10”
- “How to uninstall Eclipse Kepler in Windows 10”
- “How to uninstall Eclipse mars in Windows 10”
Let’s deep dive with a small introduction to Eclipse.
What is Eclipse
Eclipse is an open-source IDE (Integrated development environment) available for cross platforms like Windows, Linux and macOS. The primary use of Eclipse is to develop Java applications but can be used to develop apps in other programming languages also.
Its run-time system is based on Equinox, an implementation of the OSGi core framework specification. Eclipse is flexible and supports different programming plugins like Ruby, Perl, PHP, C, C++, C#, COBOL, D, FORTRAN, GROOVY, JAVASCRIPT and many more to develop applications.
Most of the old versions of Eclipse are scientific names based on moons like Callisto, Europa, Mars, Ganymede, Helios, Juno, Neon, Kepler etc.
The latest version while writing this article is Eclipse IDE 2021‑03.
Why there is no uninstaller of Eclipse Java IDE
Unlike other software, the uninstaller you can see for Eclipse is just a showpiece. if you will click on it.
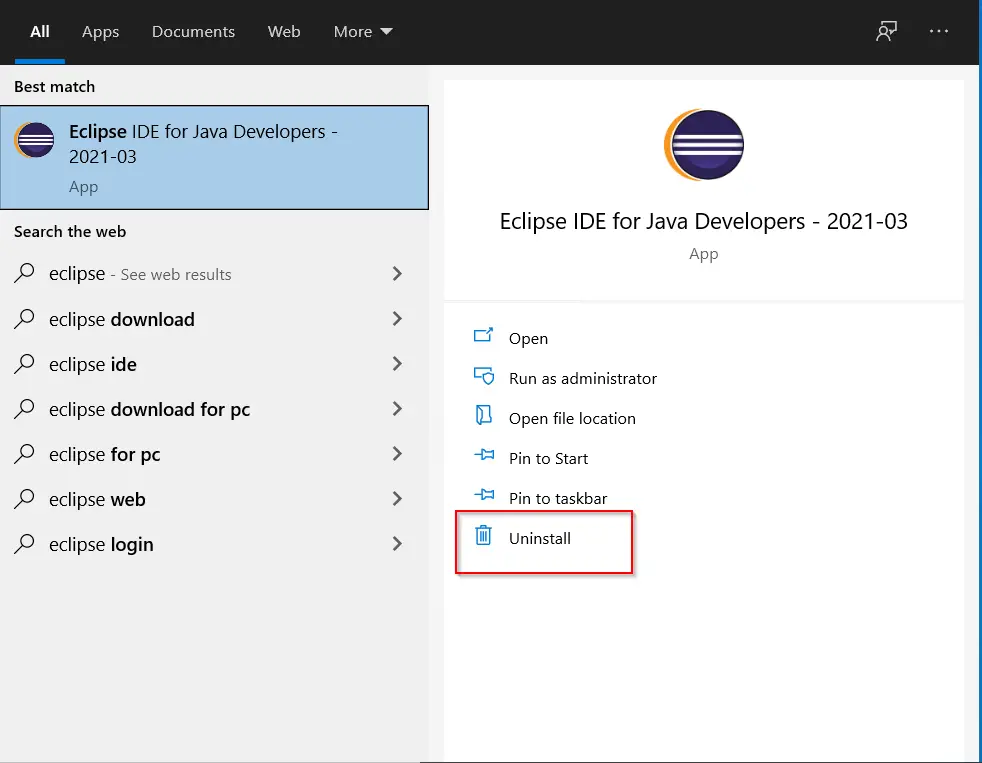
It will take you to the “Uninstall or change program Windows“, where Eclipse is not visible in the list as shown in the image.

As per the discussion in different forums of Eclipse. The installer just automates the task for Downloading, extracting Eclipse files and adding shortcuts. It doesn’t make any entries in the Windows registry (although debatable). That’s why there is no entry in Programs and Features.
So deleting the Eclipse folder manually is enough according to the Eclipse developers. But I don’t completely agree and you will also, once you will read this post further.
Step 1 – Find out the installation location of Eclipse IDE
Generally, the default location of Eclipse installation directory would be “C:\Users\”username“\eclipse\”java-version“
For example, in my case, it’s “C:\Users\Devender\eclipse\java-2021-03\
In case you have provided a custom location during the eclipse installation. Follow this procedure to get your installation directory.
- Right-click on the “Eclipse IDE for Java Developers – 2021-03″ shortcut on the desktop.
- Select “Open file location“

You will get your Eclipse installation location. For example, I have default installation directory in “C:\Users\Devender\eclipse\java-2021-03″
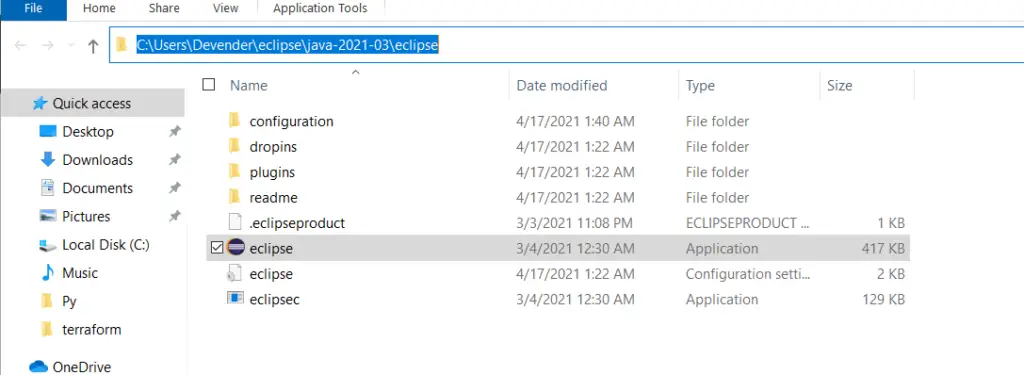
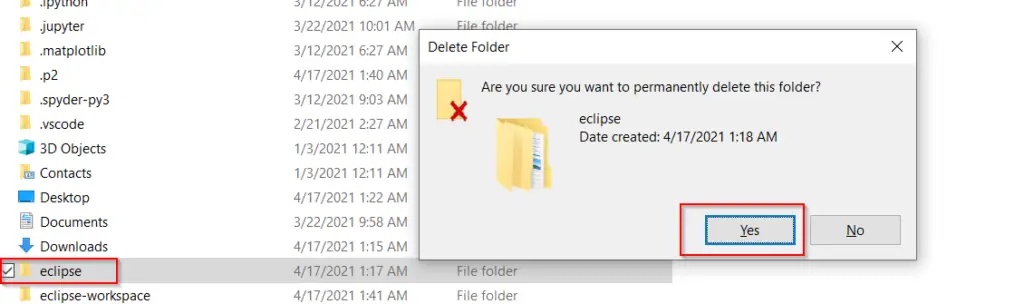
Step 2 – Delete the Eclipse installation directory
Once you find the installation location. Now go to your installation directory and delete the “Eclipse” folder.
For example, I will delete the “C:\Users\Devender\eclipse” folder to uninstall Eclipse on Windows 10.
Step 3 – Delete all Eclipse shortcuts
During the installation, If you have selected the option to create a Desktop and start menu shortcuts for Eclipse. Then go ahead with deletion.
To delete Desktop shortcuts –
- Visit C:\Users\Your-User-Name\Desktop and delete all Eclipse icons.
For instance, I will delete the Eclipse shortcut from the “C:\users\Devender\Desktop” folder.

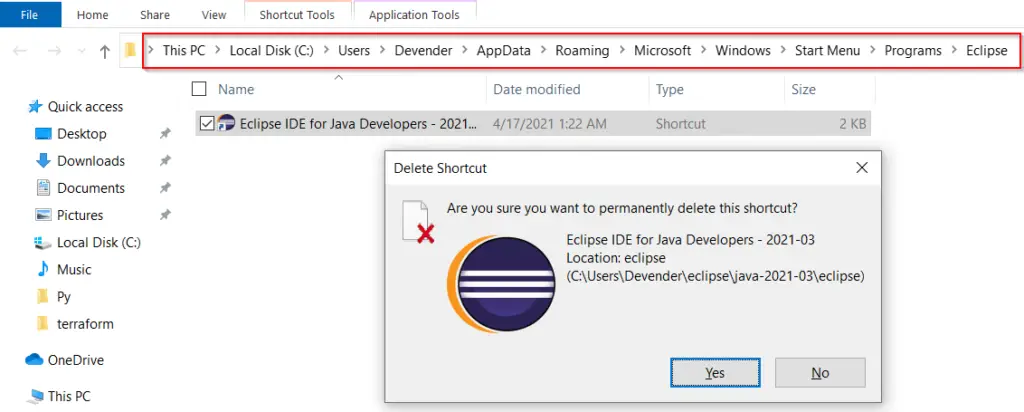
To delete Program menu shortcuts –
- Got to “C:\Users\Your-User-Name\AppData\Roaming\Microsoft\Windows\Start Menu\Programs\Eclipse” and delete it.
I will delete it from “C:\Users\Devender\AppData\Roaming\Microsoft\Windows\Start Menu\Programs\Eclipse” in my case.
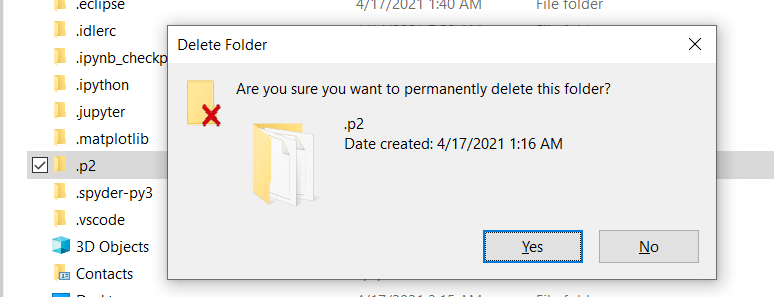
Step 4 – Delete the “.p2” directory
All the cache, settings and temporary files are generally stored under the “.p2” directory. So to remove Eclipse completely from Windows 10. You must delete it.
The location of .p2 folder would be “C:\Users\username“. For example “C:\Users\Devender” in my case.
Step 5 – Delete executable, cache, setup and installers files
These are the common subfolder under “.eclipse folder“
- org.eclipse.oomph.p2
- org.eclipse.oomph.setup
- org.eclipse.oomph.setup.installer
- org.eclipse.tips.state
To uninstall Eclipse completely in Windows 10. Delete .eclipse folder from “C:\users\username” location as shown in image.
In my case, it exists in “C:\users\Devender“.

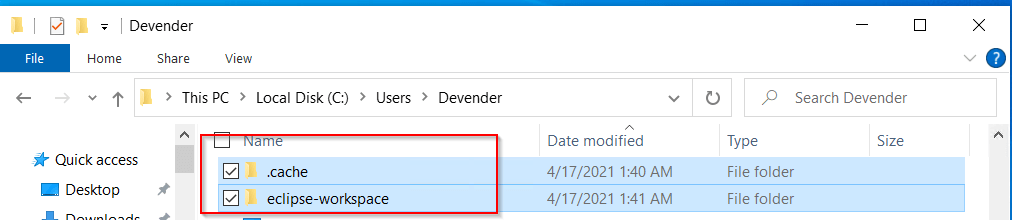
Step 6 – Delete any other related files and folders
Everybody uses Eclipse for a different purpose. So depending upon, how you are using Eclipse IDE, you may have other directories also.
In my case, all these folders exist in the “C:\users\username” directory.
For example:
- “.m2” directory, which contains maven cache and settings.
- “.cache” directory containing tools related cache like Gradle.
- “eclipse-workspace”, where you have saved all your projects.
****Caution note:– Make sure you don’t mess up your other dependent software by abruptly deleting Eclipse dependent files or folders to uninstall Eclipse in Windows 10.
Deleting all these folders will make sure that Eclipse is completely wiped out from your system.
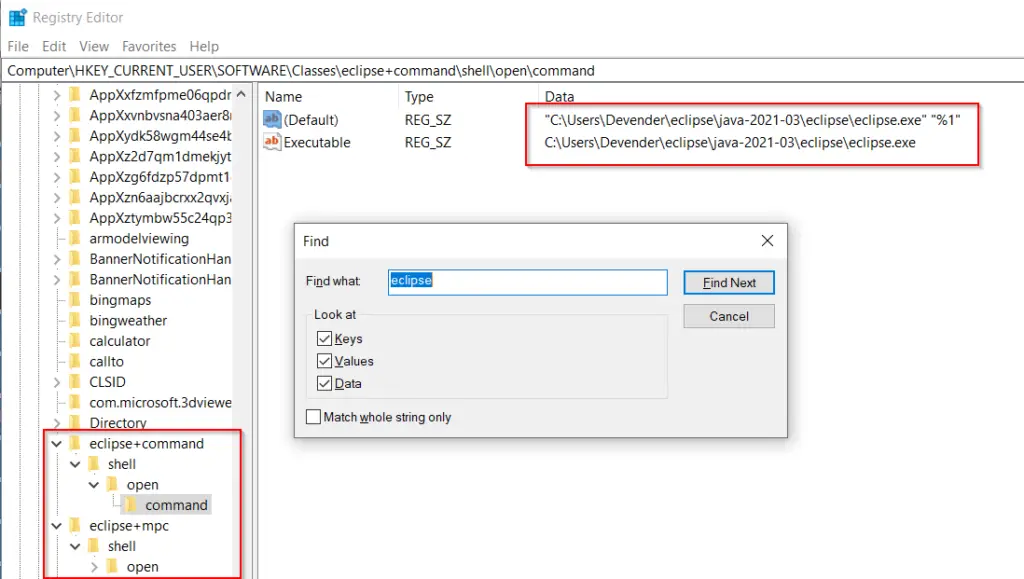
Step 7 – Delete Eclipse registry entries from Windows
Yes, you heard it right. Although the Eclipse developer claims that the installer doesn’t make any entries in the Microsoft Windows registry, but it does.
If you don’t believe me, check out this screenshot.
Follow these steps to delete entries from the Windows registry.
* If you don't feel comfortable editing registry, then you can skip these step, but Eclipse will not be cleanup completely from your system in that case.
Step 7.1 – Open registry
- Press “Windows Key + R” on your system. It will open the “run” dialogue box. Just type <regedit> inside it and hit <enter> or OK button.

Step 7.2- Take backup of registry first
The very first and important step is to take backup of registry to fight with any unwanted mess-up.
- Right-click on “computer”
- Select “export” from drop-down
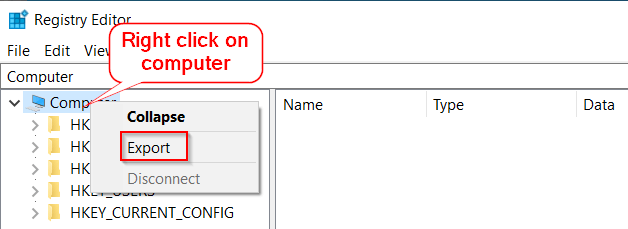
- Provide “file name” to save the registry backup and hit save. I have saved it with “Registry-backup” name in “Py” folder.
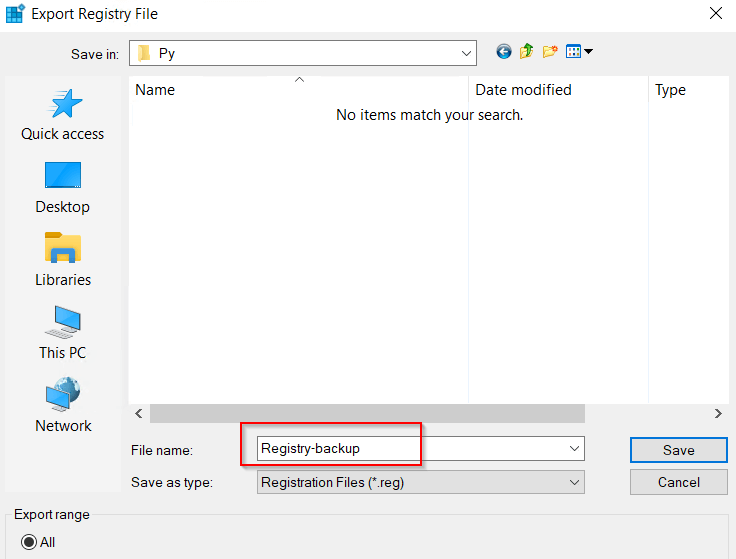
A file with “File-name-provided.reg” will create. For example, in my case, it will be “Registry-backup.reg”.

You can just double click on this file and restore your complete registry. If you will feel, you have corrupted the registry due to some silly mistake.
Although I am sure if you will edit the registry cautiously, you won’t’ land up in this situation.
Step 7.3 – Search and Delete eclipse related files
Now you just need to search for files with the name Eclipse and delete those keys or entries from your windows registry one by one cautiously.
- Press <Ctrl + F> on your keyboard or click Edit and then “Find” from the registry editor menu.
- Type “Eclipse” and click on “Find next“. It will start searching in the registry.
- Right-click on registry value and select Delete from the drop-down list.
For example –
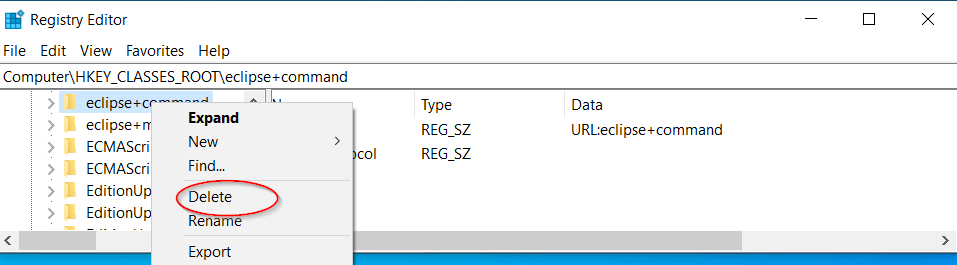
- Select “Yes” to delete the value.

- Click Find Next again. Repeat search and delete procedure till all values pertaining to the “Eclipse” search are removed from the whole registry.
- If you get the message “Finished searching through the registry“. Congrats!! you have successfully removed Eclipse from Windows 10.
Video tutorial
Please find this information video on “How to Uninstall Eclipse on Windows 10 completely“. You can also refer to this, in case you have an issue deleting keys from the registry.
Frequently Asked questions
How do I completely uninstall Eclipse?
By default, there is no uninstaller for Eclipse, but still, you can uninstall Eclipse IDE in Windows 10 easily
1. Delete installation directory, which is generally exist at “C:\Users\”username”\eclipse\”java-version”. Or you can simply right-click on the Eclipse icon and open the file location to see the installation directory of Eclipse on your system.
2. Delete all your desktop shortcuts at C:\Users\Your-User-Name\Desktop
3. Delete all Program Menu shortcuts at C:\Users\Your-User-Name\AppData\Roaming\Microsoft\Windows\Start Menu\Programs\Eclipse
4. Delete .p2 folder inside “C:\Users\username”
5. Delete executables, cache, setup and installer files in .eclipse at “C:\users\username”.
6. Delete .m2 in case of maven and .cache directory containing tools related cache like Gradle.
7. Take a backup of the registry and delete Eclipse registry entries in Windows 10 to completely remove or uninstall Eclipse
How do I uninstall maven?
1. Delete .m2 in case of maven and .cache directory containing tools related cache like Gradle.
2. Remove all environment variables
3. Take a backup of registry and clean maven entries, if any
Can I delete the .p2 folder?
If you want to uninstall Eclipse from Windows 10 completely, then you must remove the “.p2” folder inside “C:\Users\username”. If you are not performing Eclipse uninstallation, then you must avoid deleting the “.p2” folder.
What is the latest version of Eclipse Oxygen?
The latest version of Eclipse oxygen is Eclipse IDE 2021-09, September 15, 2021
Ending thoughts
In my view, Eclipse developers introduced Eclipse “Installers” to automate installation. I really appreciate that and hope they will also work on the uninstaller in future. Which will help to reduce all the manual efforts involved in uninstalling Eclipse on Windows 10.
Let me know your thoughts via comments.
- Details
- Written by
- Last Updated on 04 December 2020 | Print Email
In this short article, I’d like to share with you how to remove Eclipse IDE completely from Windows operating system. Suppose that you have an installation of Eclipse, which was installed by Eclipse installer program.
Eclipse doesn’t come with an uninstaller so you need to perform the following steps to completely remove Eclipse from your computer:
- Delete Eclipse installation directory
- Delete Eclipse shortcut on desktop at C:\Users\YourUserName\Desktop
- Delete Eclipse shortcut in Start menu at C:\Users\YourUserName\Start Menu\Programs\Eclipse
- Delete the .p2 directory under your user home directory C:\Users\YourUserName\ — The .p2 directory stores cache, settings and temporary files that were created by Eclipse IDE. Depending on how you use Eclipse, this directory may contain large amount of data.
NOTE: If you don’t use Maven any more, you can delete the .m2 directory under your user home. The .m2 directory stores jar files downloaded by Maven (repository) so it usually contains a huge amount of data.
Those are the steps which you need to follow in order to completely uninstall Eclipse IDE from Windows operating system. To see the steps in action, you can watch the following video:
Other Eclipse Tutorials:
- How to import existing projects into Eclipse workspace
- How to create, deploy and run Java Servlet in Eclipse
- How to generate JAR file in Eclipse
- How to create WAR file for Java web application in Eclipse
- How to create Ant build file for existing Java project in Eclipse
- How to generate Javadoc in Eclipse
- How to create Java web project with Maven in Eclipse
- 25 Eclipse Shortcut Keys for Code Editing
- How to Add Copyright License Header for Java Source Files in Eclipse
- How to monitor HTTP requests and responses using TCP/IP Monitor in Eclipse
About the Author:
 Nam Ha Minh is certified Java programmer (SCJP and SCWCD). He started programming with Java in the time of Java 1.4 and has been falling in love with Java since then. Make friend with him on Facebook and watch his Java videos you YouTube.
Add comment
A friend of mine installed Eclipse on his computer, and after completing the work, he just wanted it out of his computer. But, when he tried to uninstall this application, he encountered many difficulties.
Because it is a rigid application and sometimes just keeps on coming back and it inserts malware on the computer that can damage its performance.
So today, we are going through some quick and hassle-free methods through which you can completely uninstall Eclipse on the window 10.
Before we explore some easy steps to uninstall Eclipse on window 10, let’s have a look at its definition.
What is Eclipse
An Eclipse is a software or a community which consists of tools collaboration and between different global and local individuals and organizations.
Furthermore, it is an IDE (Integrated Development Environment) that is used in programming, and the users can extend their sources in the programs using different types of tools and plugins that enable them to solve their problems and calculations in related fields and aspects.
The primary language that it uses is JAVA, and it is developed by Eclipse Foundation.
7 Easy Fixes to Uninstall Eclipse On Window 10
It is hard to find an uninstaller or mediator that makes removing difficult of Eclipse from your Pc. These are easy steps or preferences for how you can effectively uninstall Eclipse without any uninstaller. Plus, without getting any malware on your computer.
Many people face issues uninstalling the program because:
- It does not appear in the ‘program and features’ of control Panel
- There is no Uninstaller in programs Installations folder
Fix 1: Uninstallation from Add /Remove Programs

Let’s start things off by trying this quick method :
1: Firstly, you have to stop the program by closing it, and in case it does not stop, you can take aid from the task Manager by pressing CTRL+ALT+DEL.
2: Now, you have to follow the natural process of the program uninstallation by opening the control panel and entering the installation/uninstallation.
3: After entering the folder, you need to search in the eclipse program, and double click the main folders will be deleted.
4: Or you simply press the Windows key and then press the “S” key and type programs, a folder will appear named as “Add or remove programs” now you will have to enter this program and search for the Eclipse software by scrolling up or downwards and locate the eclipse folder.
5: After locating this folder, you simply click on the uninstallation button and uninstall it when the command prompted is popped up.
Now Eclipse is completely deleted from your computer, leaving no file on the computer. If it is still not uninstalled, make sure, there should not be any file left in the Drive.
Fix 2: Uninstallation from Pool files
Sometimes after uninstalling the programs, some files are still stuck in the Directories. If these directories are still showing, that means it is still stuck on your Pc.
So simply, you can make secure by searching each of the drives individually and deleting all the folders or directories of the programs.
In some cases, the Eclipse won’t uninstall this way; you just have to locate its folder containing its files. Then you have to be doubtless that there is no other folder that contains Eclipse or pool or p2 files.
Delete all the folders which contain all the files, and you will observe that Eclipse has been successfully uninstalled from your computer.
Fix 3: Uninstallation through RESTORE
A “system restores point “is another easy, fast and effective way because it enables the user to restore its PC into the last working condition in which he was using the Pc.

It is useful only if you set a system restore point before the installation of the software, and then it will become smoother and efficient once you are done using the software.
To do this :
1: To set a system restore firstly you have close all the applications running in the background
2: Press “Windows + S ” key and search for the system restore point
3: Once open you will see a system restore Option
4: Click System restore, And then you have to select the bar in which the software is not installed by now.

5: After clicking the bar choose the Drive in which Eclipse will be installed
6: When you have selected the Drive, an option will appear to confirm or deny the process. Select Confirm.

7: After it is confirmed, you will see a message stating that you cannot turn off the system restore point. This is the confirmation the system Restore point has been created

Fix 4: Uninstallation BY Using Antivirus
Using Antivirus is another helpful way to remove Eclipse. Sometimes general thought is that Eclipse is not uninstalling because of some computer conditions. Still, it’s because of some virus or malware that the files of the Eclipse Could not be removed.
In these particular cases, you have luckily the Assistance of the Antivirus software’s that you can just download them and scan for the malware. In this way, you can easily uninstall the Eclipse from our computer without any undue hassle.
Fix 5: Uninstallation from registry Command
When a program is being installed in the computer windows, save all the commands installation and uninstallation command in its registry. You can use this method in the uninstalling of the Eclipse IDE Java.
To perform this method:
1: Press ” Windows + R ” Key a command. The Box will open, in this box you have to write Regedit and press the OK button.
2: Then you have to navigate and look for this directory of Eclipse IDE
HKEY_LOCAL_MACHINE\SOFTWARE\Microsoft\Windows\CurrentVersion\Uninstall
3: Now you have to double-click on it and copy the string value data from it
4: Then, reopen the run command box by pressing “Windows + R” and paste the value in the Command box and press OK
5: After that, you have just to follow the Commands, and you will uninstall the Eclipse from our computer
Fix 6: Uninstallations through Uninstaller App
If none of the above methods have worked for you . You can use an uninstaller to get rid of this problem.
- In this method, you just have to download the software named as Uninstaller.
- When you download it, search for the Eclipse select it and right-click and then click on option delete.
- All the files and directories regarding the software will be automatically deleted, and thereby, you are quickly done.
- No files of the Eclipse will remain on your computer.
Fix 7: Uninstallation by reinstalling Windows
Dear readers, above all, the mechanisms that you can use, are handy and easy.
In conjunction with that, sometimes you can’t figure out what is going on with our computer, and it behaves almost abnormally.
So, in that case, you just need to renew your windows. By renewing your windows, you have almost a new computer. Our hard drive is completely formatted. In this way, you just get rid of the Eclipse application that we could not uninstall.
How to uninstall Eclipse on Mac
Uninstallation on the Mac is also very similar to windows.
Just like you have done uninstallation in windows, you have to first remove the application, and then there are some files /directories that are left behind in some other folders. Removing those files is also very important.
Most probably those files will be stored in the User folder. Open the User folder, and in this folder, you will find the file of Eclipse as the name of Eclipse .app. Thus you will be putting it into the trash.

You may also need to delete a subfolder in your home folder. If there are no files of use, you may delete that too.

- Now you should find and remove the Eclipse service files, which are stored in the system Library folder.
- To get access to them, open finder, and then you click Go” in the drop-down menu and further type the directories to the files provided below and click on Go button
- Delete all the files associated with Eclipse
- ~/.eclipse
- ~/Library/Caches/org.eclipse.platform.ide
- ~/Library/Saved Application State/org.eclipse.platform.ide.savedState
- ~/Library/Preferences/org.eclipse.platform.ide.plist
All the files are deleted from the mac, Including the Eclipse app and all the directories.
Furthermore, to this uninstalling experience, you can also download a dedicated uninstaller, which in cases proves to be working more quickly because of its non-complex ability.

Summing Up
These were the best and easiest ways for uninstalling the Eclipse from your computer without damaging your personal space of Windows 10 (any version).
Feel free to comment if you have any questions regarding the uninstallation of the Eclipse.
Was this information useful? Was there any difficulty in Uninstalling Eclipse? Share with us. We’re always here to help you.
Next Guides
- How to uninstall ds4windows [8 Quick fixes]
- [Step by Step] How to uninstall star citizen? Try 5-minute Process
A couple of days ago, I installed Eclipse on Windows 10 to modify some Java applications. After doing my work, I removed it from my computer. However, it reappeared again. No matter how many times I tried to remove it from my computer, it came back again. Later, I found out a solution to uninstall Eclipse on Windows 10. Keep on reading if you are looking for how to uninstall Eclipse on Windows 10.
If you are wondering what Eclipse is, then here is the answer to your question. An Eclipse is a tool that is used for building Java applications. If you want to modify or build Java applications, you use this tool. But, to with Eclipse, you need to know to code.
Uninstalling Eclipse IDE on your Windows 10 is very easy if you know the right method. Without the appropriate method, your Eclipse software will be stuck in the cycle of delete-and-reappear on the desktop.
Method 1 – Using the Eclipse Uninstaller Application
This is one of the easiest methods out there. To remove the Eclipse software completely from your computer, all you need to do is download an application called Uninstaller. After you are down downloading Uninstaller on the system, then find the roof file of Eclipse software on the system. Once you find it, right-click on it and click Delete. And, you are done. This will remove the Eclipse software entirely from your system.

Method 2 – Using the Add or Remove Programs Option
If you are currently a Windows 10 user then it is very easy for you to uninstall Eclipse with the Eclipse uninstaller download. You can follow the given method step by step to entirely remove the Eclipse software from the memory.
Step 1:
With the help of Windows + S key, search for the Programs on your system. Here, look for the Uninstall a Program on the list.

Step 2:
You will get a list and from there click on the Programs and Features option.

Step 3:
Under the Programs and Features option, you will get a list of software that is installed on your computer.
Step 4:
Here, you need to find the Eclipse application. Keep in mind that, you will get a list of programs you are currently using on your system. So, be careful while you are selecting the program for completing the uninstalling process.

Step 5:
Here, select Eclipse and then click on the Uninstall button
Step 6:
Congratulations! You are done removing Eclipse from the system.
Method 3 – Using the System Restore Point
This is another popular method of removing Eclipse software from your system. If you know about the system restore point then, the process will become easier for you. The System Restore helps you get back to the same settings you used in the last working condition. This is very useful when you have no other option available. So, if you create a system restore point right before installing the Eclipse software then, it will become very easy to uninstall Eclipse from your computer.
Step 1:
For restoring the computer to its last working condition, you need to close all the running applications on your system.

Step 2:
With the help of Windows + S key, search for the Create Restore Point on your system.
Step 3:
You will find the available options on the search list and from that open the Create a Restore Point option.

Step 4:
Now, click on the Next bar and pick the restore point where you have not installed Eclipse on your system.

Step 5:
Finish the on-going process and you will easily roll back to the settings where there is not Eclipse on your system.

Step 6:
After this, you need to confirm your restore point. Here, you need to confirm the restoration point before advancing to the next step.

Step 7:
You will see a message here. This will say you cannot turn off the restoring once you have started. And Viola! You are done removing Eclipse from your system successfully.

Method 4: Using Antivirus to Uninstall Eclipse IDE
Unlike the previous ones, this is a bit different. These days, computer malware appears like the common application but this malware is very tough to remove from the system. In most cases, the malware gets into the system when you are surfing on the internet or with the help of the spyware or Trojans.
If you are using Windows 10 for a long time then, you must know that this malware such as adware programs is unwanted by the user and also very difficult to remove. These usually get installed on the computer along with free software like PDF convertors, games, movies, etc. it is very easy for this malware to get pass the anti-virus software.
If you are unable to remove the Eclipse IDE for Java just like this malware then, you have the anti-virus software to rescue. With the help of the antivirus, check whether this is malware or not. IF yes, then, the antivirus software will easily remove it from the computer.
Method 5: Using the Updated Eclipse IDE to Uninstall the Previous One
This is not a direct method like the other we have mentioned earlier. You need to cut the diamond with diamond (metaphorically). Sometimes, it is hard to uninstall the Eclipse IDE from your system if your program is either mission or corrupted. In such a case, it is hard to remove it from the computer and it keeps reappearing no matter how many times you remove it.
The trick here is to either download the latest version of the software or download and reinstall the IDE again. This will help you in removing the corrupted program and give you the one without any issue. In this way, you are removing the corrupted software and reinstalling a new one without any issue and as a result, you will be uninstalling the new one without having similar problems.
Method 6: Using the Uninstall Command in The Registry
When you are installing a program on your computer, Windows always saves the settings and information in its registry along with the uninstall command for uninstalling the program. You can apply this method in uninstalling Eclipse IDE. This method is for those who have used this method before. If you are new to this, then you should refrain from using this method. The reason behind this is any mistake here can crash your system.
Step 1:
Press Windows + R keys for opening the Run command box and then type in Regedit in the command box and click on OK.

Step 2:
Now, navigate to the given registry key and then, look for the Eclipse IDE
HKEY_LOCAL_MACHINE\SOFTWARE\Microsoft\Windows\CurrentVersion\Uninstall
Step 3:
Now, double click on the Uninstall String value and then, copy the Value Data from it

Step 4:
Again, hold the Windows + R keys for opening the Run command box, here you need to paste the Value Data that you have copies in the given box. Here, click on the OK bar.
Step 5:
Follow the wizard for uninstalling the Eclipse IDE. If you are wondering how to uninstall Eclipse oxygen on Windows 10, you can also apply this method for the oxygen version of Eclipse IDE. This applies to all versions of the Eclipse software.
Method 7: Using the Manual Uninstalling Process for Removing Eclipse
The manual uninstalling process can be slow and lengthy but if nothing works then, you need to make this process work. However, as a professional in this field I believe, you would be easily being able to remove the Eclipse program easily from your system. Also, if you are searching on Google for how to uninstall Eclipse Photon in Windows 10 then, you can apply this method here as well.
For this, you need to open the downloaded folder. From this folder, you need to select the uninstall file. Once you have clicked on it, the process of uninstalling will begin. This will take a while to uninstall by using the general method. If you are lucky, then the program will get removed from your system within 5 to 10 minutes.
As most of the users of Windows 10 suffer from uninstalling Eclipse from their system, we have recommended the previous ways of reinstalling it.
Tip 1: If you are looking for how to uninstall Eclipse Photon in Windows 10, then, you can use this tip. You need to delete all the folders related to Eclipse Photon in your computers such as %ProgramFiles%/Eclipse or any other hidden folder related to Eclipse Photon in your system. This will help you in removing any file related to Eclipse Photon.
Tip 2: Eclipse never installs anything outside the folder when you unpack it. Hence, once you can successfully get rid of the mother folder from the system, you can remove Eclipse from your system. As you unzip the zipped Eclipse folder, sometimes, just permanently deleting the unzipped folder helps a lot.
Tip 3: Removing Eclipse with the help of the Uninstaller software is the best. This method successfully removes all the files related to it.
Tip 4: To uninstall eclipse Ubuntu all you need to do is, run the following command:
sudo apt-qetautoremove eclipse*
rm-r ῀/.eclipse/
This will uninstall all the related files and folder to Eclipse on your system.
Final Thoughts
These are the top ways of how to uninstall Eclipse on Windows 10. You can use any of these methods to remove Eclipse after using it.
So, my fellow java expert, now you know all the necessary steps to uninstall this stubborn software permanently from your PC. If you can follow these simple phases properly, you might not need to purchase any premium tool or software just to get rid of this software.
Have you completed the procedure successfully? Or, do you have any more queries regarding a new software? Fill the comment box with whatever in mind. Take care. And Welcome Again in Fixguider. And If This Content Help you please share with your friends. So, That they can know about the solution
Если вы ранее установили Eclipse на свой компьютер Windows 10, и теперь решили удалить его, то вам потребуется следовать определенной последовательности действий. Это может быть полезно, если вы больше не используете Eclipse или если вы хотите переустановить его с чистыми настройками. В этой статье мы предоставим вам пошаговую инструкцию о том, как удалить Eclipse на Windows 10.
Шаг 1: Закрыть Eclipse
Первым шагом перед удалением Eclipse необходимо закрыть программу. Убедитесь, что все процессы Eclipse полностью завершены, включая любые открытые проекты или редакторы файлов. Это поможет избежать потенциальных проблем при удалении.
Шаг 2: Удаление через Панель управления
Для удаления Eclipse с компьютера Windows 10 следует открыть Панель управления. На рабочем столе щелкните правой кнопкой мыши на иконку «Пуск» или нажмите клавишу Win + X и выберите «Панель управления».
Шаг 3: Выберите «Удалить программу»
При открытии Панели управления найдите и выберите раздел «Программы» или «Программы и компоненты». Затем щелкните на ссылку «Удалить программу».
Шаг 4: Найдите Eclipse в списке приложений
После открытия окна «Удаление программы» прокрутите список приложений и найдите Eclipse. Щелкните на нем, чтобы выделить его. Вы также можете использовать поле поиска, чтобы быстро найти Eclipse.
Шаг 5: Удаление Eclipse
После выбора Eclipse нажмите кнопку «Удалить» или «Изменить / Удалить». Появится окно подтверждения, попросившее подтвердить удаление. Щелкните «Да», чтобы продолжить удаление.
После завершения процесса удаления вам будет предоставлен отчет операции. Убедитесь, что Eclipse больше не присутствует в списке установленных программ или приложений. Поздравляем, вы успешно удалили Eclipse с компьютера Windows 10!
Содержание
- Откройте панель управления
- Выберите «Программы и компоненты»
- Найдите Eclipse в списке программ
- Щелкните правой кнопкой мыши на Eclipse
- Выберите «Удалить» из контекстного меню
- Подтвердите удаление в появившемся окне
- Дождитесь завершения процесса удаления
- Вопрос-ответ
- Какой способ удаления Eclipse на Windows 10 самый надежный?
- Могут ли остаться файлы после удаления Eclipse на Windows 10?
Откройте панель управления
Для удаления Eclipse на Windows 10 вам потребуется открыть панель управления. Вот несколько способов, как это можно сделать:
- Нажмите на кнопку «Пуск» в левом нижнем углу рабочего стола, а затем выберите в меню «Панель управления».
- Щелкните правой кнопкой мыши по значку «Пуск» и выберите «Панель управления» в контекстном меню.
- Нажмите комбинацию клавиш «Win + X» на клавиатуре и выберите «Панель управления» в открывшемся меню.
После того как панель управления откроется, вы готовы перейти к следующему шагу удаления Eclipse.
Выберите «Программы и компоненты»
Чтобы удалить Eclipse на Windows 10, вам нужно перейти в раздел «Программы и компоненты». Для этого выполните следующие действия:
- Откройте меню «Пуск», щелкнув на иконке Windows в левом нижнем углу экрана.
- Выберите «Параметры» в открывшемся меню.
- В окне «Параметры» найдите и выберите раздел «Система».
- В левой панели выберите «Программы и компоненты».
Теперь вы находитесь в разделе «Программы и компоненты», где можно увидеть список установленных программ на вашем компьютере.
Найдите Eclipse в списке программ
Перед тем как удалить Eclipse с вашего компьютера, необходимо найти его в списке программ:
- Нажмите на кнопку «Пуск» в левом нижнем углу экрана.
- Выберите «Настройки» в открывшемся меню.
- В настройках выберите «Система».
- В боковом меню выберите «Приложения и функции».
- Прокрутите список приложений и найдите Eclipse.
- Кликните на название Eclipse в списке приложений.
- Нажмите кнопку «Удалить».
- Подтвердите удаление приложения, следуя инструкциям на экране.
После завершения удаления Eclipse с вашего компьютера, он больше не будет отображаться в списке приложений.
Щелкните правой кнопкой мыши на Eclipse
Перед тем как удалить Eclipse с вашего компьютера, необходимо открыть папку, в которой находится исполняемый файл Eclipse. Чтобы сделать это, выполните следующие шаги:
- Откройте проводник Windows, щелкнув на значок папки в панели задач или нажав клавишу «Win + E».
- Перейдите в раздел «Мои документы» или «Документы» и найдите папку с названием «Eclipse». Если вы выбрали другую папку для установки Eclipse, перейдите в эту папку.
- В найденной папке найдите файл с названием «eclipse.exe» или «eclipse» с иконкой программы Eclipse.
- Щелкните правой кнопкой мыши на файле «eclipse.exe» или «eclipse».
После выполнения этих шагов появится контекстное меню.
Продолжайте чтение статьи, чтобы узнать о предстоящих шагах, чтобы полностью удалить Eclipse с вашего компьютера.
Выберите «Удалить» из контекстного меню
После открытия меню «Пуск» перейдите к списку установленных программ на вашем компьютере. Для этого вы можете воспользоваться поиском или прокруткой вниз по списку.
Найдите в списке программу Eclipse и щелкните правой кнопкой мыши на ее значок. Это вызовет контекстное меню, где вы сможете выбрать различные действия.
Из контекстного меню выберите опцию «Удалить». Это запустит процесс удаления программы с вашего компьютера.
После выбора «Удалить» вам может быть предложено подтвердить свое действие или задать дополнительные параметры удаления. Прочитайте предупреждения и инструкции, и при необходимости выполните дополнительные действия.
После завершения процесса удаления Eclipse вы можете закрыть меню «Пуск» и продолжить работу на вашем компьютере.
Подтвердите удаление в появившемся окне
После того как вы выполните все предыдущие действия, будет запущен процесс удаления Eclipse. После некоторого времени на экране появится окно, в котором вам будет предложено проверить и подтвердить удаление программы. В этом окне вы увидите следующую информацию:
- Название программы, которую вы собираетесь удалить — Eclipse;
- Размер программы и количество файлов, которые будут удалены;
- Последствия удаления программы, например, удаление всех настроек и проектов, связанных с Eclipse.
Перед тем как нажать на кнопку «Удалить» рекомендуется проверить, что все необходимые файлы и данные были сохранены или скопированы, чтобы их можно было восстановить в будущем, если потребуется использовать Eclipse снова.
Если вы уверены, что хотите удалить Eclipse, нажмите на кнопку «Удалить». После этого начнется процесс удаления программы. Вам может потребоваться ввести пароль администратора, если ваша учетная запись не обладает правами администратора. Подождите, пока процесс завершится полностью.
После завершения удаления вам будет предложено перезагрузить компьютер. Рекомендуется выполнить эту операцию, чтобы завершить процесс удаления Eclipse и удалить все оставшиеся файлы и записи реестра.
Дождитесь завершения процесса удаления
После того, как вы нажали на кнопку «Удалить» и подтвердили свое действие, начнется процесс удаления Eclipse с вашего компьютера. В течение этого процесса может потребоваться некоторое время, в зависимости от размера программы и скорости вашего компьютера.
Во время удаления Eclipse может открыться окно с информацией о процессе удаления, в котором вы сможете видеть текущий прогресс.
Не закрывайте это окно, оно может быть полезным для отслеживания процесса удаления и для получения дополнительной информации о том, какие файлы и компоненты были удалены.
Если при удалении Eclipse возникли какие-либо проблемы или ошибки, обратитесь к справочному материалу или посетите официальный форум Eclipse для получения дополнительной информации и поддержки.
После завершения процесса удаления вам будет предложено перезагрузить компьютер. Рекомендуется выполнить перезагрузку, чтобы удалить все оставшиеся файлы и компоненты Eclipse и полностью очистить систему.
Важно не прерывать процесс удаления и не выключать компьютер, пока он не будет полностью завершен.
Вопрос-ответ
Какой способ удаления Eclipse на Windows 10 самый надежный?
Самый надежный способ удалить Eclipse на Windows 10 — это использовать стандартные инструменты установки/удаления программ операционной системы. Чтобы это сделать, откройте «Параметры», выберите «Приложения», найдите Eclipse в списке установленных приложений, нажмите на него и выберите опцию «Удалить». Этот метод гарантирует полное удаление программы без оставшихся файлов и записей в системном реестре.
Могут ли остаться файлы после удаления Eclipse на Windows 10?
После удаления Eclipse на Windows 10, некоторые файлы могут остаться в системе. Хотя стандартный метод удаления программы позволяет удалить основные файлы и записи в системном реестре, некоторые временные файлы или настройки могут остаться. Чтобы полностью очистить систему от всех связанных с Eclipse файлов, рекомендуется вручную удалить остаточные файлы и папки из директории установки программы (обычно находится в «C:\Program Files» или «C:\Program Files (x86)») и поискать записи в системном реестре, связанные с Eclipse.