Loading
There are many reasons why you might want to uninstall the Nvidia Cuda Toolkit on your Windows 10 system. Your computer may be running slowly or experiencing some other type of performance issue, or you may simply wish to free up some space on your hard drive.
Contents
- 1 Nvidia Cuda Toolkit 2023
- 2 How To Uninstall Nvidia Cuda Toolkit Windows 10 in 2023?
- 2.1 The first way to remove
- 2.2 The second way to kick out
- 2.3 How to check Cuda Toolkit version Windows 10?
- 2.4 How to check if Cuda Toolkit is installed in Windows 10?
| Nvidia CUDA Toolkit Information | Description | External Links |
|---|---|---|
| Developer | Nvidia Corporation | Nvidia CUDA Toolkit website |
| Initial Release Date | February 15, 2007 | Nvidia CUDA Toolkit Release Notes |
| Latest Release Date | November 19, 2021 (version 11.6.5) | Nvidia CUDA Toolkit Release Notes |
| Platforms | Windows, Linux, macOS | Nvidia CUDA Toolkit website |
| Type | Software development kit for parallel computing | Nvidia CUDA Toolkit Overview |
| Features | CUDA C and C++ programming languages, GPU-accelerated libraries for math, signal processing, image and video processing, and more, profiling and debugging tools, support for multiple GPUs and architectures, integration with other development environments | Nvidia CUDA Toolkit Features |
| Pricing | Free | Nvidia CUDA Toolkit Download |
| Reviews | Nvidia CUDA Toolkit is a highly regarded development kit for GPU-accelerated parallel computing, praised for its performance, ease of use, and compatibility with various programming languages and tools. Some users may experience compatibility issues with specific hardware or software configurations. | Nvidia CUDA Toolkit Reviews |
Whatever your reason may be, uninstalling this program is a relatively straightforward process that can be done either manually or with the help of a specialized tool.
When it comes to manually uninstalling the Nvidia Cuda Toolkit from your system, there are several important steps that you will need to follow in the correct order in order to avoid any issues.
- First, you must quit all running applications before proceeding.
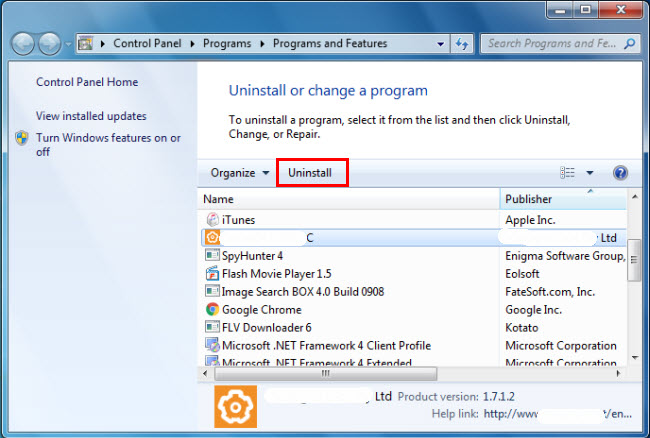
- Next, you will need to open the Control Panel and click on Programs and Features.
- From here, you should be able to remove the toolkit by selecting it from the list of installed programs and clicking on Remove or Uninstall.
- If that doesn’t work, however, then you may need to use a third-party uninstaller or registry editor tool in order to fully remove all traces of the software from your system.
If you would prefer a simpler and faster way to uninstall Nvidia Cuda Toolkit on Windows 10, then using a specialized uninstaller application is typically your best option. These tools scan your system for all traces of the program and then completely remove them with just a few clicks.
They also provide other useful features like easy reinstallation if needed in the future as well as optimization recommendations that can make your PC run more smoothly going forward. So whether you choose to go the manual or automated route, uninstalling Nvidia Cuda Toolkit from your Windows 10 system is an easy task with just a little bit of know-how.
It does not matter if you are also a user of Windows 10. You must have a knowledge little bit what is the exact way to remove it from your PC.
Without wasting the time. We should back to the topic.
People also ask: Iobit uninstaller, uninstall Webroot from a PC.
Let’s begin!
How To Uninstall Nvidia Cuda Toolkit Windows 10 in 2023?
Do you know what is CMD? It is a command prompt. Which allows you to install anything by hitting the command.
No worry, there are many ways to remove Nvidia Cuda Toolkit. But here I’ll just share with you two ways.
So, let’s started!
The first way to remove
This way is to use the control panel. How to do it. Let’s see.
- Click to Type here to search.
- Write ” Control Panel “.
- Then go to programs.
- There will see many programs you have installed.
- Now pick the Nvidia Cuda Toolkit up.
- Click on the software. Then click on uninstall button.
- After that, it will ask you to confirm it.
- Then simply confirm to uninstall.
That’s it.
The second way to kick out
This way is to use CMD. What is this, I already described you above. So, without wasting more time in it.
Let’s start!
- Hit Windows + R.
- Write their ” CMD ” capital or small ” cmd “.
- Then a new window will be opened which will be fully black.
- Write this command ” wmic “.
- Then this one: ” product get name “.
- You will see all programs you have installed.
- Now run this command to remove Nvidia Cuda Toolkit in Windows 10: ” product where name=”Nvidia Cuda Toolkit” call uninstall “.
- Then it will ask Yes or No.
- Simply just type there Yes.
- Or you can write Y instead of Yes.
That’s it.
How to check Cuda Toolkit version Windows 10?
There are a few different ways to check your Cuda Toolkit version on Windows 10.
- One way is to open the Control Panel and click System and Security.
- Then, under System, click View installed updates.
If you use the Settings app to check for updates, you’ll see that Cuda Toolkit is listed as an optional update.
To install it, just click the Check for updates button and then select Optional Updates from the list of available updates.
Cuda Toolkit will be listed as an installed update if it’s already been installed on your computer.
You can also check the version number from within Cuda Studio by clicking Help > About CUDA. The version number is displayed in the lower-right corner.
How to check if Cuda Toolkit is installed in Windows 10?
Check if Cuda Toolkit is installed on Windows 10
- Open the Start menu and search for “Command Prompt”.
- Right-click on “Command Prompt” and select “Run as administrator”.
- In the Command Prompt window, type in the following command and press Enter: “cudatoolkit_info.exe”
- If Cuda Toolkit is installed, you’ll see a message that says “Cuda Toolkit is installed and ready to use.” If Cuda Toolkit isn’t installed, you’ll see a message that says “Cuda Toolkit isn’t installed.”

TechsTribe.com is a blog which aims to provide quality guidance to Bloggers, Webmasters, and Web Developers.
Примечание. Эта статья является веткой блога по настройке учебника по среде tenorflow. Чтобы основной блог не был слишком длинным и чтобы шаги не были достаточно подробными, см.Win10 устанавливает Anaconda3, TensorFlow, Keras
1. Установите CUDA
- Адрес загрузки установочного пакета (в основном блоге он также упоминался при представлении выбора версии)
Адреса загрузки CUDA различных версий на официальном сайте
Различные адреса загрузки cuDNN на официальном сайте - Откройте «cuda_8.0.44_win10.exe», этот процесс будет очень медленным, подождите терпеливо (это также побуждает меня сменить компьютер)

Выберите адрес декомпрессии (в любом случае он временный, просто диск C, это не большая проблема)
начать распаковку (этот процесс все еще очень медленный, особенно когда я не знаю, что пошло не так с моим компьютером за это время, использование ЦП и памяти слишком велико, этот процесс также занял у меня много времени)
После распаковки добавьте его в установщик
- начать установку
4. Стучите по доске! Не выбирайте здесь упрощение по умолчанию. Упрощение здесь следует изменить на все (см. Мелкий шрифт ниже, это семейная корзина). Это не означает, что установка семейной корзины невозможна. Основная причина в том, что установка одного элемента всегда вызывает установка не удалась
Особенно нельзя выбирать эту интеграцию с визуальной студией!
Достаточно выбрать следующую установку
Просто установите его на диск C, и вам будет удобнее искать путь в других местах.
- Успешная установка
- Убедитесь, что установка прошла успешно
(1) Переменные среды должны были добавляться автоматически
(2) Просмотр информации о версии в cmdnvcc -V
(3) После ввода пути проверьте интерфейс мониторинга среды выполнения графического процессора.
(4) Запустите bandwidthTest.exe (сначала вам нужно войти в каталог)
(5) Запустите deviceQuery.exe (сначала вам нужно войти в каталог)


2. Установите cuDNN.
Различные адреса загрузки cuDNN на официальном сайте
Нельзя сказать, что cuDNN установлен, просто разархивируйте загруженный сжатый пакет и поместите файлы из соответствующей папки в соответствующую папку по пути установки CUDA.

3. Удалить
cuDNN просто копирует файлы в каталог установки CUDA, поэтому вы можете удалить его (вы можете удалить всю папку сразу после удаления CUDA)
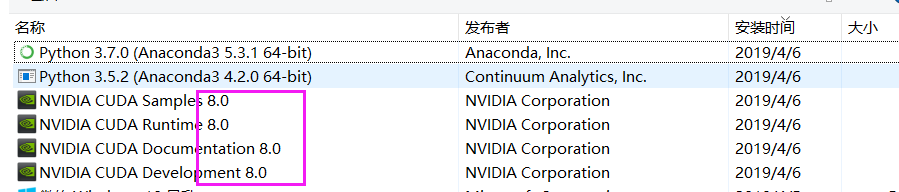
Удаление CUDA: программа удаления из панели управления (не используйте антивирусное ПО, такое как 360, вы не можете найти соответствующую программу), отсортированные по времени установки, верхние с номерами версий, Это CUDA, которая была установлена только что, и вы можете удалить их одну за другой.
Need Space in PC or only want to remove or uninstall Nvidia Cuda Toolkit On PC ( Windows 7, 8, 10, and Mac )? but how to, after it still having files in C: drive? If the application run on the pc, windows 7, 8, & 10 so you can uninstall using Control Panel or CMD Or If this applicaion run in Mac so you know that how to uninstall in MAC. With the help of this article, you will able to uninstall or remove or kick out all of those files also after uninstalling the Nvidia Cuda Toolkit.
Are you bored, or tired of using Nvidia Cuda Toolkit? Now, wanna remove this software from your PC ( Windows 7, 8, 10, and Mac )? There is no condition to follow up before installing, so, you can remove it without getting any confusion about it.
There are 10 methods that users can adapt if they want to uninstall Nvidia Cuda Toolkit :
Method #1
- Go to Start Menu, then click on the Control Panel.
- In Control Panel, under programs, go through the list of the ones that are installed on your computer
- Right-click on Nvidia Cuda Toolkit, and then click on uninstall a program
- Follow the prompt on the screen, and you will get to see a progress bar that will take you to remove the Nvidia Cuda Toolkit from the computer.


Method #2
The second method involves uninstaller.exe, through which Nvidia Cuda Toolkit can be uninstalled. Just follow the instructions below to execute this step:
- Go to the installation folder of Nvidia Cuda Toolkit.
- Find a file that is named uninstall.exe or unins000.exe
- Double click on the file, and then follow the instructions that appear on the screen.


Method #3
The third method involves System Restore. For those who don’t know, System Restore is a utility, which helps the user restore their system to its previous state. System Restore removes all those programs, which interfere with the operation and performance of the computer.


If you have created a system restore point before you installed Nvidia Cuda Toolkit, then you can use this software to restore the system, and remove such unwanted programs. However, before you do so, make sure that you save all the important data.Follow the steps below to know more from this method:
- Close all the files and programs, which are currently running on your PC
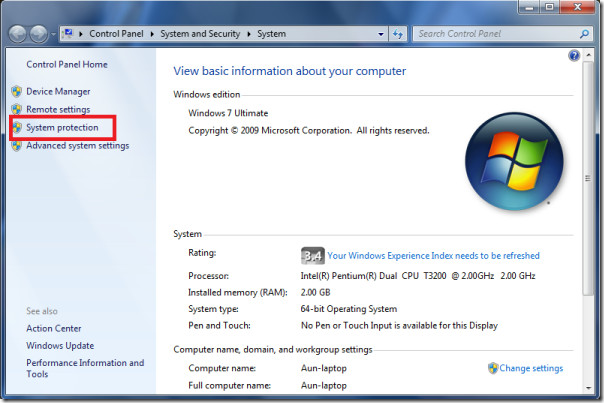
- Open Computer from the desktop, and then select Properties
- System Window will open
- On the left side and click on System Protection
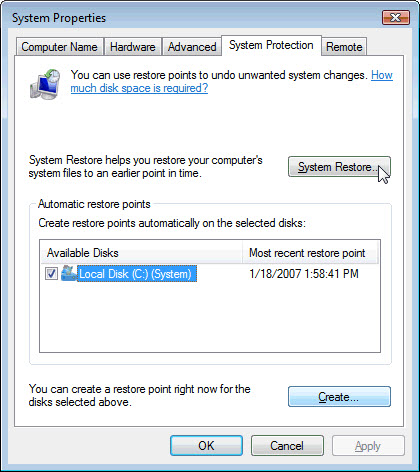
- System Properties will open.
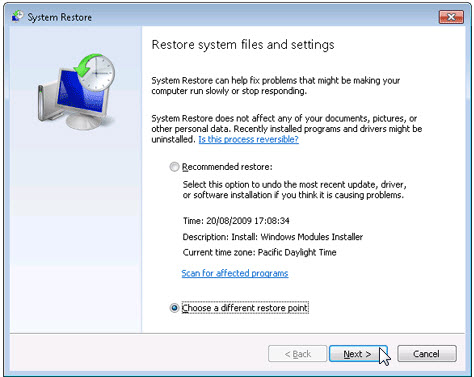
- Then do click on the option of System Restore, and a new window will again open.
- Now, choose the ‘different restore point’ option, and click on Next.
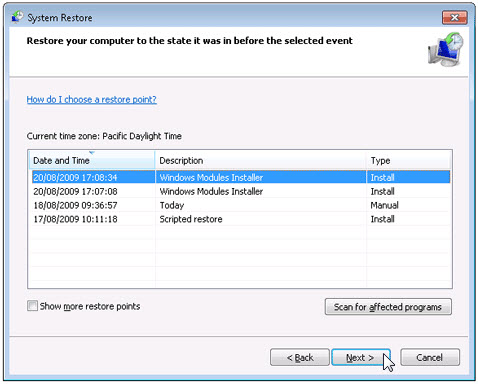
- You have to select a date and time from the given options; when you select a date, the drivers that you installed after the chosen date won’t work.
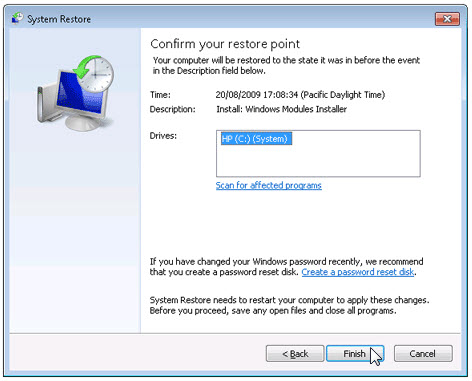
- Click on Finish and then Confirm the ‘Restore Point’ on the screen.
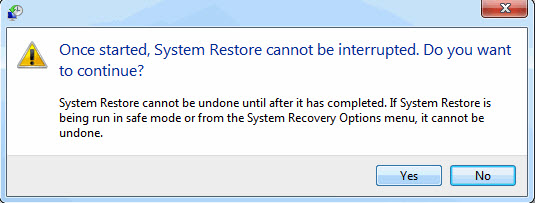
- When you click Yes to confirm, the Nvidia Cuda Toolkit would be uninstalled.
Method #4
If you have an antivirus, then you can use it to uninstall Nvidia Cuda Toolkit.There is much malware or Nvidia Cuda Toolkit software in the computer applications that we download nowadays. They have become very difficult to remove from the system, like Trojan and spyware.
- If you cannot remove Nvidia Cuda Toolkit with the above methods.
- It means that there is malware or Nvidia Cuda Toolkit in it, and only a good antivirus can be used for removing it.
You can either download Norton Antivirus or AVG antivirus, as these are reputable software and will surely remove the malware, Nvidia Cuda Toolkit on the system. 
Method #5
If you want to uninstall Nvidia Cuda Toolkit, then you can do so using Command Displayed in the Registry. A registry is a place where all the settings of Windows, along with information, are stored. This also includes the command to uninstall a software or program.
You can try this method with Nvidia Cuda Toolkit as well, but it is a very risky method. If you make any mistake and delete the wrong information, then the system is most likely to crash. It would become difficult for you to bring it back from deletion.

To execute this method, To follow the steps given below:
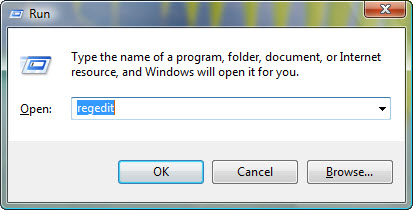
- Hold Windows + R together, and then Run command
- When the command box opens, type Regedit in the box and then click on OK
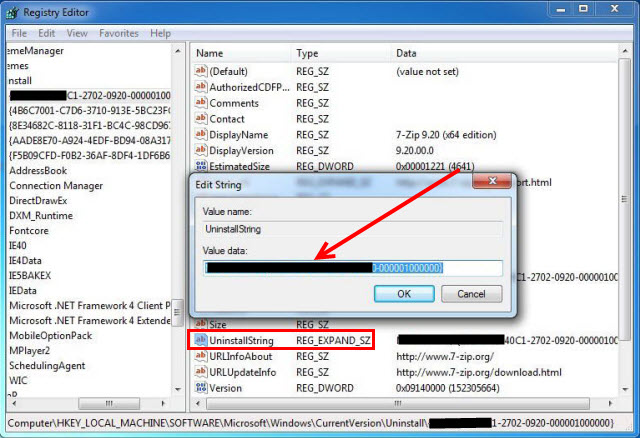
- You have to navigate and find the registry key for the Nvidia Cuda Toolkit
- You will see an uninstall string on the next window; double click on it, and also copy ‘Value Data’
- Again hold Windows + R keys, and run the Command; paste the value data that you just copy and click on OK
Follow what comes on the screen and then uninstall Nvidia Cuda Toolkit.
Method #6
The seventh method is to uninstall the Nvidia Cuda Toolkit using a third-party uninstaller.
At times, those who don’t have any knowledge of computer language, won’t be able to manually uninstall the software fully.
Many files occupy the hard disk of the computer, so it is best to use third-party software to uninstall them.

Method #7
There are some codes that users can type into the command prompt, and they would be able to uninstall the Nvidia Cuda Toolkit. For example, if they want to remove the package, then just type.
sudo apt-get remove Nvidia Cuda Toolkit
If you want to uninstall Nvidia Cuda Toolkit and its dependencies as well, then type:
sudo apt-get remove –auto-remove Nvidia Cuda Toolkit
For those who don’t know, some of the dependencies of Nvidia Cuda Toolkit are GCC-5, libc6, libgcc1, Nvidia Cuda Toolkit dev, and gc++-5.

Method #8
If the user wants to remove the configuration and data files of Nvidia Cuda Toolkit, then they need to run the following code on the Command Prompt:
sudo apt-get purge Nvidia Cuda Toolkit

Method # 9
It depends on you that are you willing to kick-out the data or you want to remove the configuration data or data files, along with the dependencies, then the following code is most likely to work for you:
sudo apt-get auto-remove -purge Nvidia Cuda Toolkit

To uninstall Nvidia Cuda Toolkit on mac because anytime we need space or only want to remove from pc due to some viruses and also many problems which are needed to remove or uninstall from pc.
So I will show you some steps of uninstalling Nvidia Cuda Toolkit on the mac so follow my this step or method if you have still confusion so you may contact with us for uninstall of Nvidia Cuda Toolkit on pc or mac.
How to Uninstall Nvidia Cuda Toolkit on Mac?
For uninstalling Nvidia Cuda Toolkit on the mac so as I told you that there is a simple method to uninstall apps on mac. As there are installed some apps on your Mac and now you want to remove or uninstall from your pc successfully and want to install some other apps on my mac so follow my these steps to uninstall Nvidia Cuda Toolkit on mac.
Method #1
In method 1, you have to open mac on your pc as I’m showing in the image follow the images to uninstall Nvidia Cuda Toolkit on your mac.

In the image, there is a Nvidia Cuda Toolkit app on your mac dashboard and now we have to uninstall it from our mac we will uninstall this app and will remove it in of mac now double-click-on-app showing in the image.

Now you double-clicked on the app mac will ask that are you sure to uninstall Nvidia Cuda Toolkit click on the Delete button so go to Trash of mac to uninstall completely from mac. Showing in image trash bin click on trash bin and go inside there will be Nvidia Cuda Toolkit which we had to delete before so have to uninstall completely from mac.

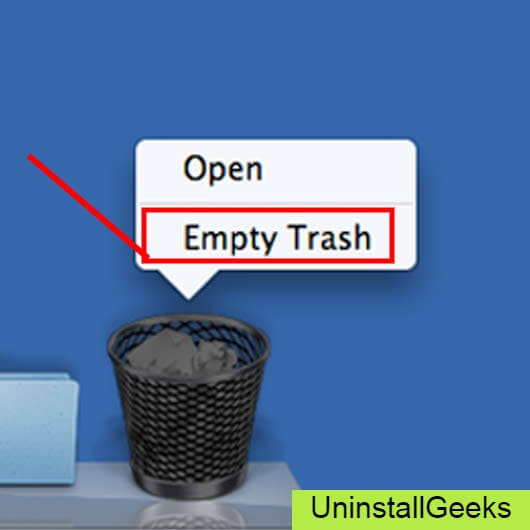
Not right-click on trash to remove all data or app which we had uninstalled before seeing in the image. Click on Empty Trash the whole data which is in the trash will auto remove successfully.
Now we uninstalled Nvidia Cuda Toolkit on the mac so as you see that how to uninstall or remove any app on the mac so if you liked this so share once. This method doesn’t require any antivirus or uninstaller software from them we are to uninstall.
I described only a simple method of uninstalling Nvidia Cuda Toolkit on mac. This method more people are using but some people take it is too hard uninstalling in mac but in this step, anyone can understand this simple method.
How To Install?
For those who don’t know much about Nvidia Cuda Toolkit, they might lean more towards uninstalling it. These Nvidia Cuda Toolkit create an environment, where users can create a high GPU-accelerated application. If you want to install this Nvidia Cuda Toolkit, then make sure that your system is compatible with it.
Firstly, verify that the system you are using has a Nvidia Cuda Toolkit capable GPU, and then download the Nvidia Cuda Toolkit. Install it, and then test that the software runs smoothly on the system. If it doesn’t run smoothly, then it could be because its communication with the hardware is corrupted.


Conclusion
There are other methods of uninstalling the Nvidia Cuda Toolkit as well as in pc or windows, but these could be difficult for those, who don’t have much technical expertise. Execute these methods, and they will surely work. These methods don’t require the user to have much knowledge of the technical side of an operating system. They can follow simple steps and uninstall Nvidia Cuda Toolkit.
Are you in need of uninstalling NVIDIA CUDA Toolkit v 64 bit to fix some problems? Are you looking for an effective solution to completely uninstall it and thoroughly delete all of its files out of your PC? No worry! This page provides detailed instructions on how to completely uninstall NVIDIA CUDA Toolkit v 64 bit.
Possible problems when you uninstall NVIDIA CUDA Toolkit v 64 bit
* NVIDIA CUDA Toolkit v 64 bit is not listed in Programs and Features.
* You do not have sufficient access to uninstall NVIDIA CUDA Toolkit v 64 bit.
* A file required for this uninstallation to complete could not be run.
* An error has occurred. Not all of the files were successfully uninstalled.
* Another process that is using the file stops NVIDIA CUDA Toolkit v 64 bit being uninstalled.
* Files and folders of NVIDIA CUDA Toolkit v 64 bit can be found in the hard disk after the uninstallation.
NVIDIA CUDA Toolkit v 64 bit cannot be uninstalled due to many other problems. An incomplete uninstallation of NVIDIA CUDA Toolkit v 64 bit may also cause many problems. So, it’s really important to completely uninstall NVIDIA CUDA Toolkit v 64 bit and remove all of its files.
How to Uninstall NVIDIA CUDA Toolkit v 64 bit Completley?
Method 1: Uninstall NVIDIA CUDA Toolkit v 64 bit via Programs and Features.
When a new piece of program is installed on your system, that program is added to the list in Programs and Features. When you want to uninstall the program, you can go to the Programs and Features to uninstall it. So when you want to uninstall NVIDIA CUDA Toolkit v 64 bit, the first solution is to uninstall it via Programs and Features.
Steps:
a. Open Programs and Features.
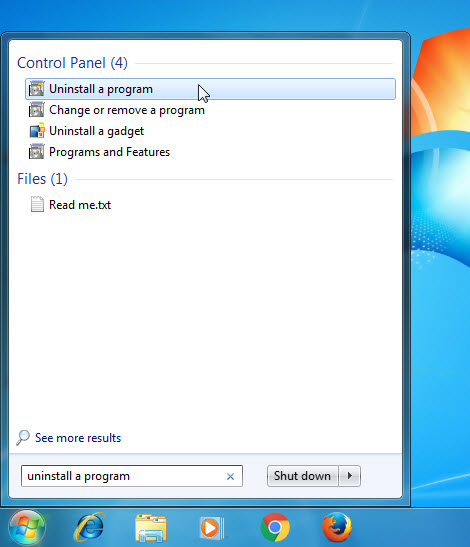
Windows Vista and Windows 7
Click Start, type uninstall a program in the Search programs and files box and then click the result.
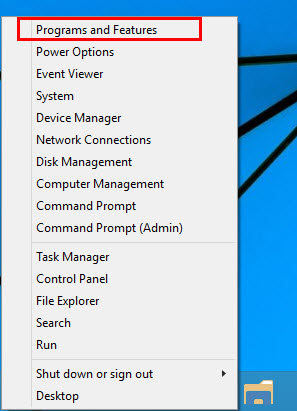
Windows 8, Windows 8.1 and Windows 10
Open WinX menu by holding Windows and X keys together, and then click Programs and Features.
b. Look for NVIDIA CUDA Toolkit v 64 bit in the list, click on it and then click Uninstall to initiate the uninstallation.
Method 2: Uninstall NVIDIA CUDA Toolkit v 64 bit with its uninstaller.exe.
Most of computer programs have an executable file named uninst000.exe or uninstall.exe or something along these lines. You can find this files in the installation folder of NVIDIA CUDA Toolkit v 64 bit.
Steps:
a. Go to the installation folder of NVIDIA CUDA Toolkit v 64 bit.
b. Find uninstall.exe or unins000.exe.
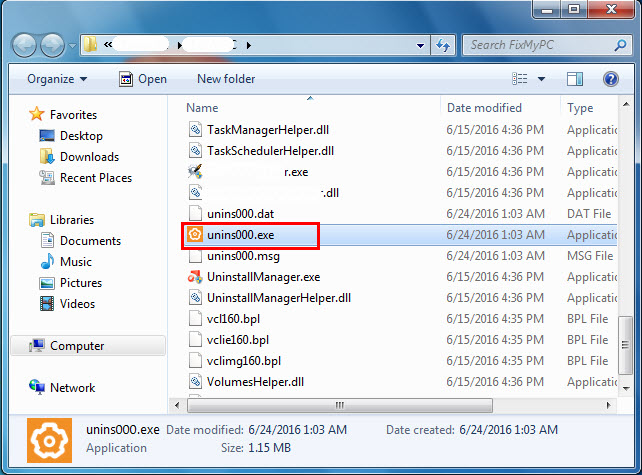
c. Double click on its uninstaller and follow the wizard to uninstall NVIDIA CUDA Toolkit v 64 bit.
Method 3: Uninstall NVIDIA CUDA Toolkit v 64 bit via System Restore.
System Restore is a utility which comes with Windows operating systems and helps computer users restore the system to a previous state and remove programs interfering with the operation of the computer. If you have created a system restore point prior to installing a program, then you can use System Restore to restore your system and completely eradicate the unwanted programs like NVIDIA CUDA Toolkit v 64 bit. You should backup your personal files and data before doing a System Restore.
Steps:
a. Close all files and programs that are open.
b. On the desktop, right click Computer and select Properties. The system window will display.
c. On the left side of the System window, click System protection. The System Properties window will display.
d. Click System Restore and the System Restore window will display.
e. Select Choose a different restore point and click Next.
f. Select a date and time from the list and then click Next. You should know that all programs and drivers installed after the selected date and time may not work properly and may need to be re-installed.
g. Click Finish when the «Confirm your restore point» window appears.
h. Click Yes to confirm again.
Method 4: Uninstall NVIDIA CUDA Toolkit v 64 bit with Antivirus.
Nowadays, computer malware appear like common computer applications but they are much more difficult to remove from the computer. Such malware get into the computer with the help of Trojans and spyware. Other computer malware like adware programs or potentially unwanted programs are also very difficult to remove. They usually get installed on your system by bundling with freeware software like video recording, games or PDF convertors. They can easily bypass the detection of the antivirus programs on your system. If you cannot remove NVIDIA CUDA Toolkit v 64 bit like other programs, then it’s worth checking whether it’s a malware or not.
Method 5: Reinstall NVIDIA CUDA Toolkit v 64 bit to Uninstall.
When the file required to uninstall NVIDIA CUDA Toolkit v 64 bit is corrupted or missing, it will not be able to uninstall the program. In such circumstance, reinstalling NVIDIA CUDA Toolkit v 64 bit may do the trick. Run the installer either in the original disk or the download file to reinstall the program again. Sometimes, the installer may allow you to repair or uninstall the program as well.
Method 6: Use the Uninstall Command Displayed in the Registry.
When a program is installed on the computer, Windows will save its settings and information in the registry, including the uninstall command to uninstall the program. You can try this method to uninstall NVIDIA CUDA Toolkit v 64 bit. Please carefully edit the registry, because any mistake there may make your system crash.
Steps:
a. Hold Windows and R keys to open the Run command, type in regedit in the box and click OK.
b. Navigate the following registry key and find the one of NVIDIA CUDA Toolkit v 64 bit:
HKEY_LOCAL_MACHINE\SOFTWARE\Microsoft\Windows\CurrentVersion\Uninstall
c. Double click on the UninstallString value, and copy its Value Data.
d. Hold Windows and R keys to open the Run command, paste the Value Data in the box and click OK.
e. Follow the wizard to uninstall NVIDIA CUDA Toolkit v 64 bit.
Method 7: Uninstall NVIDIA CUDA Toolkit v 64 bit with Third-party Uninstaller.
The manual uninstallation of NVIDIA CUDA Toolkit v 64 bit requires computer know-how and patience to accomplish. And no one can promise the manual uninstallation will completely uninstall NVIDIA CUDA Toolkit v 64 bit and remove all of its files. And an incomplete uninstallation will many useless and invalid items in the registry and affect your computer performance in a bad way. Too many useless files also occupy the free space of your hard disk and slow down your PC speed. So, it’s recommended that you uninstall NVIDIA CUDA Toolkit v 64 bit with a trusted third-party uninstaller which can scan your system, identify all files of NVIDIA CUDA Toolkit v 64 bit and completely remove them. Download this powerful third-party uninstaller below.