Приложение Citrix Workspace для Windows
Вы можете удалить приложение Citrix Workspace для Windows из панели управления, выполнив следующие действия:
- В поле поиска на панели задач введите Панель управления и выберите ее из результатов.
- Выберите Программы > Программы и функции.
- Щелкните правой кнопкой мыши на Citrix Workspace
<version number>и выберите Удалить Затем следуйте указаниям на экране.
Примечание.
Перед продолжением установки приложения Citrix Workspace вам будет предложено удалить пакет Citrix HDX RTME. Нажмите кнопку ОК, чтобы продолжить удаление. При попытке удалить приложение Citrix Workspace перед продолжением удаления пакета Citrix HDX RealTime Media Engine появится следующее сообщение:
Citrix HDX RealTime Media Engine was detected. Uninstall Citrix HDX RealTime Media Engine before continuing.
Можно также удалить приложение Citrix Workspace для Windows с помощью интерфейса командной строки. Дополнительные сведения см. в разделе Удаление.
Удаление приложения Citrix Workspace для Windows
Если вы являетесь пользователем программного решения Citrix Workspace на операционной системе Windows 10 и хотите полностью удалить его с вашего компьютера, в этой статье мы предоставим вам подробную инструкцию. Citrix Workspace предоставляет широкий спектр возможностей для удаленного доступа к рабочему столу, виртуальным приложениям и данным. Однако, иногда может возникнуть необходимость удалить это программное обеспечение по разным причинам — от неиспользования до устранения проблем или установки более новой версии.
Удаление Citrix Workspace с вашего компьютера может быть немного сложным процессом. Программное обеспечение сложно полностью удалить только с помощью обычных средств операционной системы Windows. В этой инструкции мы расскажем вам о шагах, которые нужно предпринять, чтобы удалить все остатки Citrix Workspace с вашего компьютера.
Перед началом процесса удаления рекомендуется создать точку восстановления системы, чтобы в случае возникновения проблем вы могли вернуть компьютер в предыдущее состояние. Теперь, когда вы готовы, приступим к удалению Citrix Workspace с вашего компьютера на Windows 10.
Содержание
- Как удалить Citrix Workspace на Windows 10
- Почему вам может понадобиться удалить Citrix Workspace на Windows 10
- Подробная инструкция по удалению Citrix Workspace на Windows 10
Как удалить Citrix Workspace на Windows 10
Полное удаление программы Citrix Workspace на компьютере под управлением операционной системы Windows 10 может быть необходимым, если вы больше не используете ее или столкнулись с проблемами при ее работе. Ниже представлена подробная инструкция по удалению Citrix Workspace с вашего компьютера.
- Нажмите на кнопку «Пуск» в левом нижнем углу экрана Windows 10.
- В появившемся меню выберите «Параметры».
- В окне «Параметры» выберите пункт «Приложения».
- В разделе «Приложения и функции» найдите и выберите «Citrix Workspace».
- Нажмите на кнопку «Удалить».
- В появившемся окне подтвердите удаление программы.
- Дождитесь завершения процесса удаления Citrix Workspace.
- После завершения удаления перезагрузите компьютер.
После перезагрузки компьютера все остаточные файлы и записи Citrix Workspace должны быть удалены.
Также рекомендуется проверить наличие и удалить любые остаточные файлы, связанные с Citrix Workspace, вручную. Для этого:
- Откройте проводник Windows, нажав на значок папки в панели задач.
- В строке адреса вверху окна проводника введите следующий путь: C:\Users\Ваше_имя_пользователя\AppData\Local\Programs\ (замените «Ваше_имя_пользователя» на ваше фактическое имя пользователя).
- Найдите и удалите любые папки, связанные с Citrix Workspace.
- Для более полного удаления Citrix Workspace рекомендуется выполнить поиск и удаление следующих файлов и папок:
| Файлы | Папки |
|---|---|
| CitrixWorkspaceApp.exe | Citrix |
| CitrixUpdater.exe | Citrix Files |
| Citrix Files for Windows.exe | Citrix Receiver |
| CitrixReceiverUpdater.exe | Citrix Workspace Updater |
| ReceiverInstallWrapper.exe | Receiver |
| Citrix Shortcuts Manager.exe | Client Name |
| CitrixUrlHandler.exe | Program Neighborhood Agent |
| SelfService.exe | Plug-ins |
После удаления остаточных файлов и папок Citrix Workspace не будет оставаться на вашем компьютере.
Примечание: перед удалением Citrix Workspace убедитесь, что у вас есть достаточные права администратора на компьютере.
Почему вам может понадобиться удалить Citrix Workspace на Windows 10
Citrix Workspace — это программное обеспечение, которое предоставляет доступ к удаленным рабочим столам и приложениям через веб-браузер. Однако, по разным причинам, вам иногда может потребоваться удалить Citrix Workspace с вашего компьютера.
Вот несколько основных причин, почему вам может понадобиться удалить Citrix Workspace на Windows 10:
- Обновление или переустановка программного обеспечения: если у вас возникли проблемы с текущей установкой Citrix Workspace или если вам нужно установить более новую версию, вам может потребоваться удалить предыдущую версию.
- Использование альтернативного программного обеспечения: возможно, вы решили перейти на другую платформу удаленного доступа или удаленных рабочих столов и больше не нуждаетесь в Citrix Workspace.
- Проблемы с производительностью или стабильностью: если у вас возникают постоянные проблемы с подключением или использованием Citrix Workspace, удаление программы и повторная установка может помочь решить эти проблемы.
Если у вас возникли какие-либо из указанных выше проблем, удаление Citrix Workspace может быть хорошим способом исправить их. Однако, перед удалением программы убедитесь, что у вас есть резервные копии всех важных данных, которые могут быть храниться в Citrix Workspace.
Подробная инструкция по удалению Citrix Workspace на Windows 10
Если вам необходимо полностью удалить Citrix Workspace с компьютера под управлением операционной системы Windows 10, следуйте указанным ниже шагам:
-
Шаг 1: Закрыть Citrix Workspace и все его процессы
Перейдите в системный трей (рядом с часами на панели задач) и щелкните правой кнопкой мыши на иконке Citrix Workspace. В контекстном меню выберите пункт «Выход», чтобы закрыть Citrix Workspace и все его связанные процессы.
-
Шаг 2: Удалить Citrix Workspace через Панель управления
Откройте меню «Пуск» и выберите «Панель управления». В поисковой строке Панели управления введите «Удалить программу» и выберите соответствующий результат.
В списке установленных программ найдите Citrix Workspace и щелкните на нем правой кнопкой мыши. В контекстном меню выберите пункт «Удалить» и следуйте инструкциям мастера удаления, чтобы завершить удаление Citrix Workspace с компьютера.
-
Шаг 3: Удалить остатки Citrix Workspace в папках системы
Откройте проводник Windows и перейдите к следующим папкам:
- C:\Program Files\Citrix
- C:\ProgramData\Citrix
- C:\Users\Имя_пользователя\AppData\Local\Citrix
Удалите все содержимое этих папок, связанное с Citrix Workspace. Обратите внимание, что папка «Имя_пользователя» заменяется на актуальное имя вашего пользователя.
-
Шаг 4: Очистить реестр Windows
Откройте редактор реестра Windows, нажав комбинацию клавиш Win + R и вводя команду «regedit». В редакторе реестра перейдите по следующему пути:
Раздел реестра Путь HKEY_CURRENT_USER\Software\Citrix Удалите этот раздел, если он существует. HKEY_LOCAL_MACHINE\Software\Citrix Удалите этот раздел, если он существует. Для удаления раздела реестра, щелкните правой кнопкой мыши на разделе и выберите пункт «Удалить».
-
Шаг 5: Перезагрузить компьютер
После завершения всех вышеперечисленных шагов рекомендуется перезагрузить компьютер, чтобы убедиться, что все изменения в системе вступили в силу.
После выполнения всех указанных шагов Citrix Workspace должен быть полностью удален с вашего компьютера под управлением Windows 10.
Citrix Workspace является популярным программным обеспечением, которое позволяет пользователям удаленно подключаться к рабочему столу или приложениям через интернет. Однако, иногда может возникнуть необходимость удалить Citrix Workspace полностью с операционной системы Windows 10.
Удаление Citrix Workspace может потребоваться по разным причинам. Некоторым пользователям может быть просто нужно освободить место на жестком диске, другим – исправить некоторые проблемы, связанные с работой программы. Независимо от причины, процесс полного удаления Citrix Workspace достаточно прост.
Для начала, нужно убедиться, что все сеансы Citrix Workspace закрыты. Если вы этого не сделаете, программа может быть удалена только частично, а файлы и настройки продолжат оставаться на компьютере. После этого, следует открыть «Панель управления» и выбрать «Программы и функции».
Содержание
- Как удалить Citrix Workspace полностью на Windows 10
- Подготовка к удалению Citrix Workspace
- Шаг 1: Остановка всех связанных процессов и служб
- Шаг 2: Удаление Citrix Workspace через Панель управления
- Шаг 3: Удаление остальных файлов и папок Citrix Workspace
- Шаг 4: Очистка реестра от записей Citrix Workspace
- Шаг 5: Переустановка Citrix Workspace (по желанию)
Как удалить Citrix Workspace полностью на Windows 10
Если вы хотите полностью удалить Citrix Workspace с компьютера под управлением операционной системы Windows 10, следуйте этой подробной инструкции:
- Шаг 1: Закройте все открытые приложения Citrix Workspace, включая загрузчик и адаптеры.
- Шаг 2: Откройте «Панель управления» на вашем компьютере.
- Шаг 3: В «Панель управления» найдите и откройте «Программы и компоненты» (или «Установка и удаление программ»).
- Шаг 4: В списке установленных программ найдите «Citrix Workspace» и выберите его.
- Шаг 5: Нажмите на кнопку «Удалить» или «Изменить/Удалить» (в зависимости от версии Windows).
- Шаг 6: Следуйте инструкциям в «Мастере удаления программ» и дождитесь завершения процесса удаления.
- Шаг 7: После завершения удаления Citrix Workspace перезагрузите компьютер, чтобы убедиться, что все изменения вступили в силу.
После выполнения всех этих шагов Citrix Workspace должен быть полностью удален с вашего компьютера с операционной системой Windows 10.
Примечание: Если у вас есть другие приложения Citrix на компьютере, например Citrix Receiver или Citrix Online Plug-in, вы также можете удалить их с помощью аналогичного процесса. При удалении приложений Citrix убедитесь, что вы не удаляете другие важные компоненты операционной системы или другие приложения, которые могут зависеть от Citrix.
Подготовка к удалению Citrix Workspace
Перед удалением Citrix Workspace важно выполнить несколько подготовительных шагов. Это обеспечит более гладкое и полное удаление программы.
- Сохраните все важные данные: Перед удалением Citrix Workspace убедитесь, что у вас есть копии всех важных файлов и данных, хранящихся в приложении. Это может включать в себя документы, изображения, видео или другие файлы, которые вы считаете важными.
- Выходите из Citrix Workspace: Убедитесь, что вы вышли из Citrix Workspace и закрыли все связанные с ним процессы. Это можно сделать, нажав правой кнопкой мыши на значок Citrix Workspace в системном трее и выбрав соответствующий пункт меню.
- Отключите автозапуск: Перед удалением программы рекомендуется отключить автозапуск Citrix Workspace. Это можно сделать, открыв «Диспетчер задач», перейдя на вкладку «Автозагрузка» и отключив все связанные с Citrix Workspace записи.
- Закройте все программы: Убедитесь, что все остальные приложения и программы на вашем компьютере закрыты перед началом удаления Citrix Workspace. Это позволит избежать возможных конфликтов и сбоев в процессе удаления.
Следуя этим несложным рекомендациям, вы готовы приступить к полному удалению Citrix Workspace с вашего компьютера.
Шаг 1: Остановка всех связанных процессов и служб
Перед началом удаления Citrix Workspace необходимо остановить все связанные процессы и службы. Следуйте инструкциям ниже:
- Шаг 1.1: Откройте диспетчер задач, нажав сочетание клавиш Ctrl + Shift + Esc.
- Шаг 1.2: Во вкладке «Процессы» найдите все процессы, связанные с Citrix Workspace, и выберите их.
- Шаг 1.3: Нажмите кнопку «Завершить задачу» для каждого выбранного процесса, чтобы остановить его.
После остановки всех процессов Citrix Workspace необходимо остановить связанные службы:
- Шаг 1.4: Откройте «Службы», нажав сочетание клавиш Win + R, введите services.msc и нажмите Enter.
- Шаг 1.5: В окне «Службы» найдите все службы, связанные с Citrix Workspace.
- Шаг 1.6: Для каждой службы нажмите правой кнопкой мыши и выберите «Остановить», чтобы остановить ее работу.
Теперь все связанные процессы и службы Citrix Workspace остановлены, и вы готовы перейти к следующим шагам удаления.
Шаг 2: Удаление Citrix Workspace через Панель управления
Если у вас установлена версия Citrix Workspace на компьютере, вы можете удалить ее с помощью Панели управления.
- Откройте Панель управления, нажав Win + X и выбрав пункт «Панель управления».
- В Панели управления выберите раздел «Программы» или «Программы и компоненты».
- В списке установленных программ найдите Citrix Workspace и щелкните по нему правой кнопкой мыши.
- Выберите пункт «Удалить» или «Изменить/Удалить» (в зависимости от версии Windows и установщика).
Откроется мастер удаления, который будет проводить вас через процесс удаления Citrix Workspace.
В этом мастере вы можете выбрать несколько дополнительных опций удаления, включая удаление сохраненных настроек, удаление папки с файлами программы и т. д. Рекомендуется выбрать все опции, чтобы убедиться, что Citrix Workspace полностью удалена с вашего компьютера.
Следуйте инструкциям мастера удаления, чтобы завершить процесс удаления Citrix Workspace.
Шаг 3: Удаление остальных файлов и папок Citrix Workspace
После удаления программы Citrix Workspace через стандартные средства операционной системы Windows 10 могут остаться некоторые файлы и папки, связанные с этим приложением. Чтобы полностью удалить Citrix Workspace с вашего компьютера, выполните следующие действия:
- Откройте проводник Windows, нажав сочетание клавиш Win + E.
- Перейдите в следующие папки и удалите все связанные с Citrix Workspace файлы и папки:
- Локальный диск С: → Пользователи → (ваше имя пользователя) → AppData → Local → Citrix
- Локальный диск С: → Пользователи → (ваше имя пользователя) → AppData → Roaming → Citrix
- Локальный диск С: → Program Files (x86) → Citrix
- Пустите корзину, чтобы окончательно удалить файлы.
После выполнения этих шагов вы должны удалить все остатки Citrix Workspace с вашего компьютера и освободить дополнительное дисковое пространство, занимаемое этой программой.
Шаг 4: Очистка реестра от записей Citrix Workspace
Для полного удаления Citrix Workspace с вашего компьютера необходимо также очистить записи, связанные с программой, в системном реестре Windows. В этом разделе описаны шаги по очистке реестра от записей Citrix Workspace.
- Откройте редактор реестра, нажав комбинацию клавиш Win + R, введите «regedit» и нажмите Enter.
- В редакторе реестра перейдите к следующему пути: HKEY_CURRENT_USER\Software.
- В разделе Software найдите и удалите следующие ключи связанные с Citrix Workspace:
- Citrix
- CitrixOnline
- Затем перейдите к следующему пути реестра: HKEY_LOCAL_MACHINE\Software.
- Найдите и удалите следующие ключи связанные с Citrix Workspace:
- Citrix
- CitrixOnline
- После удаления ключей перезагрузите компьютер, чтобы изменения вступили в силу.
Примечание: перед удалением любых ключей в редакторе реестра очень важно создать его резервную копию, чтобы в случае нежелательных последствий можно было восстановить систему.
Шаг 5: Переустановка Citrix Workspace (по желанию)
Если после удаления Citrix Workspace вы решили переустановить приложение, вы можете выполнить следующие действия:
- Посетите официальный веб-сайт Citrix и перейдите на страницу загрузки Citrix Workspace.
- Выберите соответствующую операционную систему (Windows) и нажмите кнопку «Загрузить».
- После завершения загрузки запустите загруженный файл установки Citrix Workspace.
- Следуйте инструкциям мастера установки, чтобы установить Citrix Workspace на свой компьютер.
Обратите внимание, что если у вас возникли проблемы с установкой или использованием Citrix Workspace, вам может потребоваться обратиться в службу поддержки Citrix для получения дополнительной помощи.
После успешной установки Citrix Workspace вы сможете снова воспользоваться всеми функциями и возможностями данного приложения.
Need Space in PC or only want to remove or uninstall Citrix workspace On PC ( Windows 7, 8, 10, and Mac )? but how to, after it still having files in C: drive? If the application run on the pc, windows 7, 8, & 10 so you can uninstall using Control Panel or CMD Or If this applicaion run in Mac so you know that how to uninstall in MAC. With this article, you will able to delete or kick out all of those files also after uninstalling the Citrix workspace.
Are you bored, or tired of using Citrix workspace? Now, wanna kick-off this software from your PC ( Windows 7, 8, 10, and Mac )? There is no condition to follow up before installing, so, you can remove it without getting any confusion about it.
There are 10 methods that users can adapt if they want to uninstall Citrix workspace :
Method #1
- Go to Start Menu, then click on the Control Panel.
- In Control Panel, under programs, go through the list of the ones that are installed on your computer
- Right-click on Citrix workspace, and then click on uninstall a program
- Follow the prompt on the screen, and you will get to see a progress bar that will take you to remove the Citrix workspace from the computer.


Method #2
The second method involves uninstaller.exe, through which Citrix workspace can be uninstalled. Just follow the instructions below to execute this step:
- Go to the installation folder of Citrix workspace.
- Find a file that is named uninstall.exe or unins000.exe
- Double click on the file, and then follow the instructions that appear on the screen.


Method #3
The third method involves System Restore. For those who don’t know, System Restore is a utility, which helps the user restore their system to its previous state. System Restore removes all those programs, which interfere with the operation and performance of the computer.


If you have created a system restore point before you installed Citrix workspace, then you can use this software to restore the system, and remove such unwanted programs. However, before you do so, make sure that you save all the important data.Follow the steps below to know more from this method:
- Close all the files and programs, which are currently running on your PC
- Open Computer from the desktop, and then select Properties
- System Window will open
- On the left side and click on System Protection
- System Properties will open.
- Then do click on the option of System Restore, and a new window will again open.
- Now, choose the ‘different restore point’ option, and click on Next.
- You have to select a date and time from the given options; when you select a date, the drivers that you installed after the chosen date won’t work.
- Click on Finish and then Confirm the ‘Restore Point’ on the screen.
- When you click Yes to confirm, the Citrix workspace would be uninstalled.
Method #4
If you have an antivirus, then you can use it to uninstall Citrix workspace.There is much malware or Citrix workspace software in the computer applications that we download nowadays. They have become very difficult to remove from the system, like Trojan and spyware.
- If you cannot remove Citrix workspace with the above methods.
- It means that there is malware or Citrix workspace in it, and only a good antivirus can be used for removing it.
You can either download Norton Antivirus or AVG antivirus, as these are reputable software and will surely remove the malware, Citrix workspace on the system. 
Method #5
If you want to uninstall Citrix workspace, then you can do so using Command Displayed in the Registry. A registry is a place where all the settings of Windows, along with information, are stored. This also includes the command to uninstall a software or program.
You can try this method with Citrix workspace as well, but it is a very risky method. If you make any mistake and delete the wrong information, then the system is most likely to crash. It would become difficult for you to bring it back from deletion.

To execute this method, To follow the steps given below:
- Hold Windows + R together, and then Run command
- When the command box opens, type Regedit in the box and then click on OK
- You have to navigate and find the registry key for the Citrix workspace
- You will see an uninstall string on the next window; double click on it, and also copy ‘Value Data’
- Again hold Windows + R keys, and run the Command; paste the value data that you just copy and click on OK
Follow what comes on the screen and then uninstall Citrix workspace.
Method #6
The seventh method is to uninstall the Citrix workspace using a third-party uninstaller.
At times, those who don’t have any knowledge of computer language, won’t be able to manually uninstall the software fully.
Many files occupy the hard disk of the computer, so it is best to use third-party software to uninstall them.

Method #7
There are some codes that users can type into the command prompt, and they would be able to uninstall the Citrix workspace. For example, if they want to remove the package, then just type.
sudo apt-get remove Citrix workspace
If you want to uninstall Citrix workspace and its dependencies as well, then type:
sudo apt-get remove –auto-remove Citrix workspace
For those who don’t know, some of the dependencies of Citrix workspace are GCC-5, libc6, libgcc1, Citrix workspace dev, and gc++-5.

Method #8
If the user wants to remove the configuration and data files of Citrix workspace, then they need to run the following code on the Command Prompt:
sudo apt-get purge Citrix workspace

Method # 9
It depends on you that are you willing to kick-out the data or you want to remove the configuration data or data files, along with the dependencies, then the following code is most likely to work for you:
sudo apt-get auto-remove -purge Citrix workspace

To uninstall Citrix workspace on mac because anytime we need space or only want to remove from pc due to some viruses and also many problems which are needed to remove or uninstall from pc.
So I will show you some steps of uninstalling Citrix workspace on the mac so follow my this step or method if you have still confusion so you may contact with us for uninstall of Citrix workspace on pc or mac.
How to Uninstall Citrix workspace on Mac?
For uninstalling Citrix workspace on the mac so as I told you that there is a simple method to uninstall apps on mac. As there are installed some apps on your Mac and now you want to remove or uninstall from your pc successfully and want to install some other apps on my mac so follow my these steps to uninstall Citrix workspace on mac.
Method #1
In method 1, you have to open mac on your pc as I’m showing in the image follow the images to uninstall Citrix workspace on your mac.

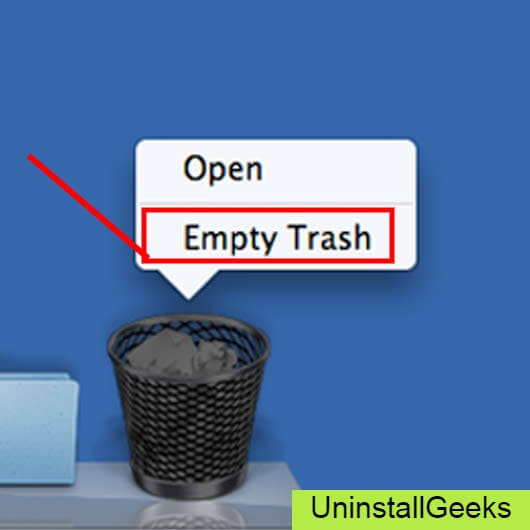
In the image, there is a Citrix workspace app on your mac dashboard and now we have to uninstall it from our mac we will uninstall this app and will remove it in of mac now double-click-on-app showing in the image.

Now you double-clicked on the app mac will ask that are you sure to uninstall Citrix workspace click on the Delete button so go to Trash of mac to uninstall completely from mac. Showing in image trash bin click on trash bin and go inside there will be Citrix workspace which we had to delete before so have to uninstall completely from mac.

Not right-click on trash to remove all data or app which we had uninstalled before seeing in the image. Click on Empty Trash the whole data which is in the trash will auto remove successfully.
Now we uninstalled Citrix workspace on the mac so as you see that how to uninstall or remove any app on the mac so if you liked this so share once. This method doesn’t require any antivirus or uninstaller software from them we are to uninstall.
I described only a simple method of uninstalling Citrix workspace on mac. This method more people are using but some people take it is too hard uninstalling in mac but in this step, anyone can understand this simple method.
How To Install?
For those who don’t know much about Citrix workspace, they might lean more towards uninstalling it. These Citrix workspace create an environment, where users can create a high GPU-accelerated application. If you want to install this Citrix workspace, then make sure that your system is compatible with it.
Firstly, verify that the system you are using has a Citrix workspace capable GPU, and then download the Citrix workspace. Install it, and then test that the software runs smoothly on the system. If it doesn’t run smoothly, then it could be because its communication with the hardware is corrupted.


Conclusion
There are other methods of uninstalling the Citrix workspace as well as in pc or windows, but these could be difficult for those, who don’t have much technical expertise. Execute these methods, and they will surely work. These methods don’t require the user to have much knowledge of the technical side of an operating system. They can follow simple steps and uninstall Citrix workspace.
**5 Essential Steps on How to Uninstall Citrix Workspace Windows 10**
Imagine a scenario where you need to uninstall Citrix Workspace from your Windows 10 computer for various reasons but are unsure of the best way to go about it. You could be experiencing compatibility issues or simply need to free up some space on your machine. In this exclusive article, we will walk you through the **5 essential steps** to successfully remove Citrix Workspace from your Windows 10 operating system.
As an expert engineer in software, I understand that knowing how to uninstall Citrix Workspace Windows 10 is a high priority for users at the first level of awareness in the customer journey. Therefore, this informational article will provide you with accurate, easy-to-follow instructions using technical language suitable for a software-savvy audience.
**Step 1: Gather Important Information**
Before diving into the removal process, make sure you have all the necessary information:
– The exact version of Citrix Workspace installed on your system
– The location of installation files and folders
– An understanding of any possible dependencies that other applications may have on Citrix Workspace
Keep this information handy as it will prove to be vital during the uninstallation process.
**Step 2: Terminate All Running Instances of Citrix Workspace**
Before initiating the uninstallation, ensure that there are no running instances of Citrix Workspace on your Windows 10 system. To do this, follow these simple instructions:
1. Right-click the taskbar and select **Task Manager**.
2. Locate all instances of **Citrix Workspace** in the *Processes* tab.
3. Select each instance and click **End task** to terminate them.
**Step 3: Navigate to Control Panel’s Program Removal Feature**
To begin the actual uninstallation process, navigate to the Control Panel’s program removal feature by following these steps:
1. Press the **Windows key + X** to open the Quick Access Menu.
2. Click on **Control Panel** to open it.
3. Select **Uninstall a program** under the *Programs* category.
**Step 4: Initiate the Uninstallation**
With the Control Panel’s program removal feature open, follow these instructions to begin uninstalling Citrix Workspace Windows 10:
1. Locate **Citrix Workspace** in the list of installed programs.
2. Right-click on the Citrix Workspace entry and select **Uninstall**.
3. Follow the on-screen instructions to complete the process.
4. Restart your system to apply the changes once the uninstallation is complete.
**Step 5: Cleanup Remaining Files and Registry Entries**
After successfully uninstalling the software, it is essential to manually remove any leftover files and registry entries associated with Citrix Workspace. Follow these steps to perform a thorough cleanup:
1. Press the **Windows key + R** to open the Run dialog box.
2. Type **%appdata%** in the input field and press Enter. This will open the AppData folder.
3. Look for any remaining **Citrix Workspace** folders and delete them.
4. Navigate back to the Run dialog box and type **regedit** followed by Enter to open the Registry Editor.
5. Use the search feature (Ctrl + F) to find and delete all remaining Citrix Workspace registry entries.
**Note**: Be cautious when deleting registry entries, as improper modifications can cause system instability.
By following these 5 essential steps, you should now know how to uninstall Citrix Workspace Windows 10 effectively. However, if you encounter any issues or complications during the process, consider reaching out to a professional or consulting the dedicated Citrix community forums for further assistance.
To summarize, follow these key steps to uninstall Citrix Workspace Windows 10:
1. Gather important information about your installation.
2. Terminate all running instances of Citrix Workspace.
3. Navigate to the Control Panel’s program removal feature.
4. Initiate the uninstallation process and restart your system.
5. Cleanup any remaining files and registry entries.
With these steps, you can now confidently remove Citrix Workspace from your Windows 10 system, allowing you to address compatibility issues or free up valuable storage space on your machine. Remember, should you encounter any difficulties, there are always dedicated forums and professional services available to assist you with software-related inquiries.
Windows Programs You Should Uninstall Immediately
Remove Microsoft OneDrive | Save All Documents | Uninstall Delete Microsoft OneDrive Windows 10
Why can’t I delete Citrix Workspace?
There could be several reasons why you can’t delete Citrix Workspace from your device. Here are some possible explanations and solutions:
1. Insufficient Permissions: You may not have the necessary administrative rights to uninstall the application. To resolve this issue, log in as an administrator or a user with administrative privileges and try to uninstall Citrix Workspace again.
2. Running Processes: Citrix Workspace may still have active processes running in the background, preventing it from being uninstalled. To fix this, open Task Manager (Ctrl+Shift+Esc), search for Citrix-related processes, and end them. Then, attempt to uninstall the application again.
3. Corrupted Installation: Citrix Workspace installation might be broken or corrupted, making it difficult to remove the application. In this case, you can try using third-party uninstaller tools like Revo Uninstaller or IObit Uninstaller to force-remove the application.
4. Windows Registry Issues: Sometimes, issues with the Windows registry can prevent an application from being uninstalled. You can use a registry cleaner tool like CCleaner to fix potential registry issues, and then try uninstalling Citrix Workspace again.
Remember to back up your data and create a system restore point before attempting any fixes, especially when working with the Windows registry or using third-party tools.
How do I manually uninstall Citrix?
Manually uninstalling Citrix involves a series of steps to remove the main components and residual files from your computer. Follow these steps to uninstall Citrix from your system:
1. **Close all Citrix applications**: Make sure to close any running Citrix applications before starting the uninstallation process.
2. **Open the Control Panel**: Click on the Start menu, select Control Panel, and then click on Programs and Features (or Add/Remove Programs for older versions of Windows).
3. **Locate Citrix in the program list**: In the list of installed programs, find the Citrix application you want to uninstall, such as Citrix Workspace, Citrix Receiver, or Citrix Virtual Apps and Desktops.
4. **Uninstall the program**: Select the Citrix program, and then click Uninstall (or Remove for older versions of Windows). Follow the prompts to uninstall the software.
5. **Delete residual Citrix folders**: After the uninstallation is complete, navigate to the following folder locations, and delete any remaining Citrix folders:
– C:Program FilesCitrix
– C:Program Files (x86)Citrix
– C:Users%username%AppDataLocalCitrix
– C:Users%username%AppDataRoamingCitrix
6. **Clean the Registry**: Open the Registry Editor by clicking the Start menu and typing “regedit” in the search box. Navigate to the following registry keys, and delete them if they exist:
– HKEY_CURRENT_USERSoftwareCitrix
– HKEY_LOCAL_MACHINESOFTWARECitrix
– HKEY_LOCAL_MACHINESOFTWAREWOW6432NodeCitrix (for 64-bit systems)
Warning: Be careful when editing the registry, as any incorrect modifications can cause system instability. It’s recommended to create a backup of your registry before making any changes.
7. **Restart your computer**: After completing these steps, restart your computer to ensure all Citrix components are removed.
Please note that these instructions are for manually uninstalling Citrix on Windows systems. If you are using a different operating system, such as macOS or Linux, the process may differ.
How do I completely remove Citrix Receiver from Windows?
To completely remove Citrix Receiver from your Windows system, follow these steps:
1. Close any running applications: Ensure that all applications related to Citrix Receiver are closed.
2. Open Control Panel: Click on the Start button and select Control Panel from the list.
3. Uninstall a program: In the Control Panel, click on “Uninstall a program” under the Programs section.
4. Locate Citrix Receiver: Find the Citrix Receiver app in the list of installed programs. If you cannot find it, try searching for “Citrix” using the search bar at the top right corner of the window.
5. Uninstall Citrix Receiver: Right-click on the Citrix Receiver app or select it and click on the “Uninstall” button.
6. Follow the prompts: Follow the on-screen instructions to complete the uninstallation process.
7. Restart your computer: After the uninstall process is complete, restart your computer to ensure all Citrix Receiver components are fully removed.
8. Manually delete leftover files and folders (optional): If you want to ensure that all Citrix Receiver-related files and folders are completely removed, navigate to the following locations and delete any remaining Citrix folders:
– C:Program Files (x86)
– C:Program Files
– C:ProgramData
– C:UsersAppDataLocal
Please note that this step might require administrator access.
By following these steps, you should have successfully removed Citrix Receiver from your Windows system.
Can I remove Citrix from my computer?
Yes, you can remove Citrix from your computer. To do so, follow these steps:
1. Close any active Citrix session.
2. Access the Control Panel on your computer:
a. For Windows users: click the Start button, and then click Control Panel.
b. For Mac users: click the Apple menu, and then click System Preferences.
3. Navigate to Programs and Features (Windows) or Applications (Mac):
a. For Windows users: click Programs, and then click Programs and Features.
b. For Mac users: double-click the Applications folder.
4. Locate the Citrix Receiver or Citrix Workspace application in the list of installed programs/applications.
5. Uninstall the application:
a. For Windows users: right-click the Citrix Receiver or Citrix Workspace, and click Uninstall. Follow the prompts to complete the removal process.
b. For Mac users: drag the Citrix Receiver or Citrix Workspace to the Trash, and empty the Trash.
After completing these steps, Citrix should be removed from your computer. If you encounter any issues during the uninstallation process, consult the Citrix Support for further assistance.
What is the step-by-step process for uninstalling Citrix Workspace from Windows 10?
Uninstalling Citrix Workspace from your Windows 10 computer is a straightforward process. Follow these step-by-step instructions to remove the application:
1. Close any open Citrix Workspace applications.
2. Press the Windows key on your keyboard or click on the Windows icon in the bottom left corner of your screen to open the Start menu.
3. Type “Control Panel” in the search bar and press Enter, then click on the Control Panel app that appears in the search results.
4. In the Control Panel, click on “Programs and Features” under the Programs category.
5. Look for Citrix Workspace in the list of installed programs.
6. Click on Citrix Workspace to select it, and then click the “Uninstall” button near the top of the window.
7. You may be prompted to confirm that you want to uninstall the program. Click “Yes” to proceed.
8. The uninstallation process will begin, and you may be prompted to close any open Citrix Workspace applications if they were not closed earlier. It may take several minutes for the process to complete.
9. Once the uninstallation is complete, you may need to restart your computer for the changes to take effect.
After completing these steps, Citrix Workspace should be uninstalled from your Windows 10 computer.
How can I troubleshoot any issues that arise while attempting to uninstall Citrix Workspace on Windows 10?
When attempting to uninstall Citrix Workspace on Windows 10, you may encounter some issues. To troubleshoot these problems, follow the steps below:
1. Close all running applications: Make sure that all Citrix-related applications and services are closed. You can check this in the taskbar and the Task Manager (Ctrl + Shift + Esc).
2. Restart your computer: Sometimes, a simple restart can resolve issues related to uninstalling apps.
3. Uninstall from Control Panel: Go to Control Panel > Programs > Programs and Features, find Citrix Workspace in the list of installed programs, select it, and click Uninstall.
4. Run as Administrator: If you’re having trouble uninstalling Citrix Workspace, right-click on the Uninstall process and select “Run as administrator.” This will give the uninstaller elevated permissions to remove the program completely.
5. Use the Citrix Cleanup Utility: If the above steps don’t work, you can try using the Citrix Cleanup Utility. Download it from the Citrix website and run the tool to remove any leftover Citrix files and registry entries.
6. Manually remove leftover files and registry entries: In some cases, you might need to manually delete Citrix Workspace’s remaining files and registry entries. Be cautious when doing this, as deleting the wrong files or registry entries can cause system instability.
a. Navigate to the installation directory of Citrix Workspace and delete any remaining folders and files.
b. Press Windows key + R, type “regedit” and press Enter to open the Registry Editor.
c. Search for and delete any Citrix-related registry entries. To do this, press Ctrl + F, type “Citrix” in the search box, and delete any relevant results.
7. Scan for malware: In rare cases, malware can cause issues with uninstalling applications. Run a thorough malware scan using reliable antivirus software to detect and remove any potential threats.
By following these troubleshooting steps, you should be able to resolve the issues you’re experiencing while trying to uninstall Citrix Workspace on Windows 10.
Are there any alternative methods or tools available to effectively uninstall Citrix Workspace from a Windows 10 system?
Yes, there are alternative methods and tools to effectively uninstall Citrix Workspace from a Windows 10 system. Alongside the traditional method of using the “Programs and Features” option in the Control Panel, you can try:
1. Using third-party uninstaller tools: Applications like Revo Uninstaller, IObit Uninstaller, or Geek Uninstaller can help you remove stubborn or problematic software, including Citrix Workspace. These tools often remove leftover files and registry entries as well, ensuring a clean uninstall process.
2. Uninstalling via Command Prompt: You can use the Windows Command Prompt (CMD) to uninstall Citrix Workspace. To do this, follow these steps:
a. Open the Command Prompt as Administrator.
b. Type `wmic` and press Enter.
c. Type `product get name` and press Enter to display a list of installed applications.
d. Locate Citrix Workspace in the list.
e. Type `product where name=”Citrix Workspace” call uninstall` (replace ‘Citrix Workspace’ with the exact name from the list) and press Enter. Follow any prompts to complete the uninstall process.
3. Using Windows PowerShell: You can also uninstall Citrix Workspace via Windows PowerShell by following these steps:
a. Open PowerShell as Administrator.
b. Type `Get-WmiObject -Class Win32_Product | Where-Object { $_.Name -match “Citrix Workspace” } | ForEach-Object { $_.Uninstall() }` and press Enter.
c. Follow any prompts to complete the uninstallation process.
Remember to restart your system after using any of these methods to ensure a complete uninstallation of Citrix Workspace.