После установки серверного дистрибутива Linux на виртуальную машину VirtualBox вы можете обнаружить, что подключение по SSH не работает. Это связано с тем, что по умолчанию на VirtualBox используется подключение к интернету с помощью NAT.
При таком способе подключения у вас нет возможности подключаться к виртуальной машине из своей реальной операционной системы. В частности, вы не сможете подключиться по SSH.
В данной статье мы рассмотрим сразу два способа, как можно решить эту проблему. Первый вариант – проброс портов через NAT, а второй – использование сетевого моста. Оба этих способа сохраняют доступ к интернету на виртуальной машине.
Проброс портов для SSH
Для проброса портов вам нужно знать IP адрес, который присваивается виртуальной машине. Для этого запустите виртуальную машину и выполните на ней команду «ip addr» или «ifconfig». В ответ вы получите информацию о сетевых подключениях, в которой будет указан и IP адрес. В нашем случае был получен IP адрес – «10.0.2.15».
Обратите внимание, если в вашей системе нет команды «ifconfig», то ее нужно будет установить отдельно. В случае Debian и Ubuntu Linux это можно сделать с помощью команды «apt-get install net-tools».

После того как мы узнали IP адрес виртуальную машину нужно выключить и открыть ее настройки в программе VirtualBox.

В настройках виртуальной машины нужно открыть раздел «Сеть», открыть дополнительные настройки и перейти к пробросу портов.

После этого откроется окно для проброса портов. Здесь нужно нажать на кнопку «Добавить» и заполнить следующие данные:
- Имя: SSH.
- Протокол: TCP.
- Адрес хоста: оставляем пустым или указываем 127.0.0.1.
- Порт хоста: любой свободный порт на вашей основной системе, например, 2222.
- Адрес гостя: IP адрес, который был присвоен вашей виртуальной машине. В нашем случае это 10.0.2.15.
- Порт гостя: порт SSH на виртуальной машине, по умолчанию – 22.
После проброса порта закрываем все окна с помощью кнопки «ОК».

После этого можно подключаться к виртуальной машине по SSH. Для этого можно использовать клиент OpenSSH, который доступен в Windows 10. Поскольку порт «2222» на основной системе был проброшен на порт «22» на виртуальной машине, то для подключения по SSH нам нужно выполнить следующую команду:
ssh user@localhost -p 2222
Где «user» — это имя пользователя, а «2222» — используемый порт на основной системе.

Аналогичным способом выполняется подключение с помощью PuTTY. В поле «Host Name» указываем «localhost», а в поле «Port» — «2222». Более подробно об OpenSSH и PyTTY в отдельной статье о подключении по SSH.

Как видно по скриншоту вверху, данный способ отлично работает, и мы успешно подключились по SSH к виртуальной машине VirtualBox.
Подключение через сетевой мост
Также есть альтернативный способ подключения к виртуальной машине по SSH для этого нужно изменить тип подключения с «NAT» на «Сетевой мост». В этом случае виртуальная машина будет подключена к вашей локальной сети и получит IP адрес от вашего роутера из того же диапазона, что и ваша основная система.
Для этого нужно выключить виртуальную машину и зайти в ее свойства в программе VirtualBox. В настройках нужно зайти в раздел «Сеть» и включить тип подключения «Сетевой мост».

После этого нужно запустить виртуальную машину и выполнить на ней команду «ip addr» или «ifconfig» для того, чтобы узнать, какой IP адрес она получила от роутера. В нашем случае был получен IP адрес «192.168.1.214».

После этого к виртуальной машине можно подключаться по SSH. Для этого нужно просто использовать IP адрес, который был ей присвоен роутером. Например, для того чтобы подключиться с помощью клиента OpenSSH нужно выполнить следующую команду:
ssh [email protected]
Где «user» — это имя пользователя, а «192.168.1.214» — это ее IP адрес.

Аналогично работает и подключение с помощью PuTTY. Вводим «192.168.1.214» и подключаемся по стандартному порту «22».

Как и предыдущий способ, вариант с использованием сетевого моста отлично работает, при этом виртуальная машина не теряет доступа к интернету.
Посмотрите также:
- Как сделать общую папку в VirtualBox
- Как подключиться по SSH из Windows 10
- Как запустить виртуальную машину VirtualBox из командной строки
- Как установить Linux на виртуальную машину
- Как установить Windows 7 или 10 на виртуальную машину
Автор
Александр Степушин
Создатель сайта comp-security.net, автор более 2000 статей о ремонте компьютеров, работе с программами, настройке операционных систем.
Остались вопросы?
Задайте вопрос в комментариях под статьей или на странице
«Задать вопрос»
и вы обязательно получите ответ.
В качестве гостевой ОС в VirtualBox запущена Ubuntu. На ней развернут LAMP, где гоняются тесты веб-приложений. Чтобы не возится с общими директориями, но иметь возможность общаться с файловой системой гостевой ОС из домашней, реализуем возможность доступа к гостевой ОС по ssh протоколу. FTP поднимать не будем, так как SFTP, мне кажется, будет более, чем достаточно.
Изначально имеем:
- VM VirtualBox установлен с настройками по-умолчанию;
- домашняя ОС Windows 10;
- Ubuntu Server установленный с ISO.
В Ubuntu устанавливаем SSH сервер. Я никаких настроек не изменял. Начального конфига более, чем достаточно.
sudo apt-get install sshОстанавливаем виртуальную машину. И переходим к её настройкам – Настройки > Сеть.
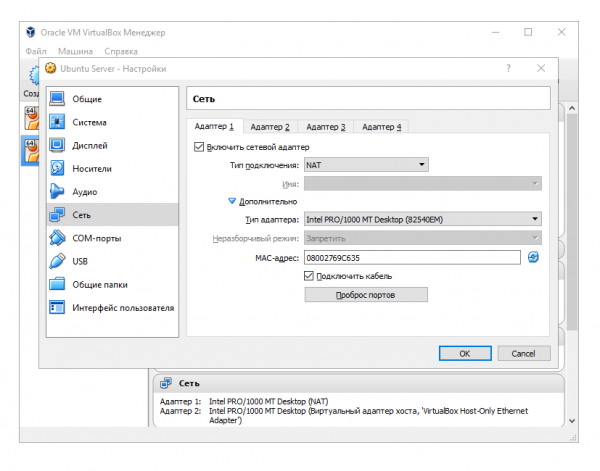
Приведите настройки Адаптера 1 к тем, что вы видите на скриншоте. Если в итоге у вас возникнут какие-то проблемы с сетью гостевой ОС, прежде всего, рекомендую попробовать использовать адаптер иного типа. Я ставлю Intel PRO/1000 MT исходя из железа, используемого на моей машине. Но вы можете попробовать «Паравиртуальную сеть (virtio-net)», например.
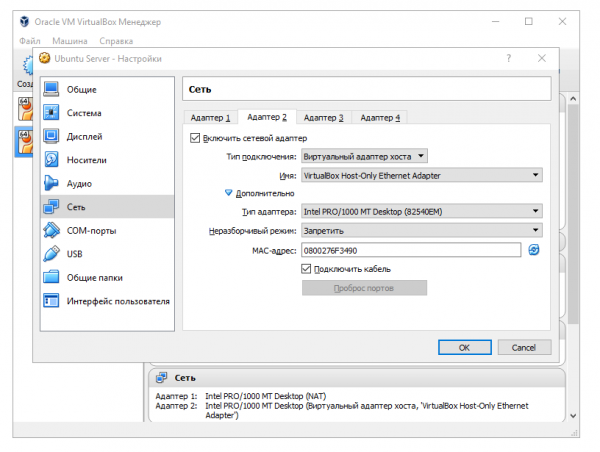
Переходите на вкладку Адаптер 2, включите его и также приведите состояние настроек в аналогичное тому, что на скриншоте. Комментарии по поводу типа адаптера не отличаются от предыдущего случая.
Запустите виртуальную машину. При запуске можете получить ошибку (многие сталкиваются на Windows 10, например), где сообщается о невозможности открыть сетевое соединение:
Failed to open/create the internal network ‘HostInterfaceNetworking-VirtualBox Host-Only Ethernet Adapter’ (VERR_INTNET_FLT_IF_NOT_FOUND).
Failed to attach the network LUN (VERR_INTNET_FLT_IF_NOT_FOUND).
Отправляемся в Панель управления\Сеть и Интернет\Сетевые подключения, находим там VirtualBox Host-Only Network соединение и переходим к просмотру его Свойств. В списке используемых компонентов находим VirtualBox NDIS6 Networking Driver и включаем его.
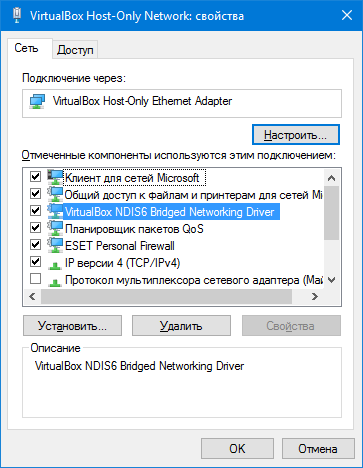
Ошибка не должна больше вас беспокоить. Запускаем виртуальную машину.
Переходим к настройке сетевых интерфейсов в гостевой ОС. Необходимо добиться того, чтобы гостевая ОС имела статический IP адрес, по которому вы и будете к ней подключаться.
С правами root пользователя открываем в режиме редактирования файл /etc/network/interfaces.
sudo nano /etc/network/interfacesНастраиваем интерфейс enp0s8. Содержимое файла необходимо привести к следующему состоянию:
# This file describes the network interfaces available on your system
# and how to activate them. For more information, see interfaces(5).

source /etc/network/interfaces.d/*

# The loopback network interface
auto lo
iface lo inet loopback

# The primary network interface
auto enp0s3
iface enp0s3 inet dhcp

auto enp0s8
iface enp0s8 inet static
    address 192.168.56.10
    netmask 255.255.255.0
Подключаться к виртуальной машине вы будете по ip 192.168.56.10. Сохраняем измененный файл /etc/network/interfaces, перезагружаем виртуальную машину и пробуем подключиться к ней по SSH.
SSH Back to Your Home / Office VirtualBox Guest Machine From The INTERNET
The answers provided by other users here : How to SSH to a VirtualBox guest externally through a host?
… helped me to accomplish the task of connecting from out on the internet to my home computer’s guest machine. You should be able to connect using computers, tablets, and smart phones (android, IPhone,etc). I add a few more step in case it might be helpful to someone else:
Here is a quick diagram of my setup:
-
Remote device ---> INTERNET --> MODEM --> ROUTER --> HOST MACHINE --> GUEST VM -
Remote device (ssh client) ---> PASS THRU DEVICES ---> GUEST VM (ssh server) -
Remote device (leave ssh port 3022) ---> INTERNET --> MODEM --> ROUTER (FWD frm:p3022 to:p3022)--> HOST MACHINE (FWD frm:p3022 to:p22) --> GUEST VM (arrive ssh port 22)
The key for me was to realize that ALL connections was PASSING-THROUGH intermediary devices to get from my remote PC to my guest virtual-machine at home —Hence port forwarding!
Notes:
* Need ssh client to request a secure connection and a running ssh server to process the secure connection.
-
I will forward the port 3022 as used in the chosen answer from above.
-
Enter your IPs where needed (home modem/router, host IP, guest IP,etc.), Names chosen are just examples-use or change.
1.Create ssh tunnel to port 3022 on your modem’s IP / router’s external IP address.
ssh client/device possible commands: ssh -p 3022 user-name@home_external_IP
2.Port forward = we are passing thru the connection from router to host machine
-
Also make sure firewall /IPtable rules on router is allowing ports to be forward (open if needed)
-
Router’s Pfwd SCREEN required entries: AppName:SSH_Fwd, Port_from: 3022, Protocol:both (UDP/TCP), IP_address:hostIP_address, Port_to:3022, everything else can be blank
DD-WRT router software resources / Info:
-
DD-WRT Port_Forwarding
-
DD-WRT Static_DHCP
3.Host Machine Firewall: open port 3022 #so forwarded port can pass thru to guest machine
-
Host Machine: Install VirtualBox, guest additions, and guest machine if not done already
-
Configure guest machine and then follow the Network section below
-
I used VirtualBox GUI to setup guest’s network- easier than CLI
-
If you want to use other methods refer to :
VirtualBox/manual/ch06.html#natforward
4.Some suggest using Network Bridge adapter for guest = access to LAN and other machines on your LAN. This also pose an increase security risk, because now your guest machine is now exposed to LAN machines and possibly the INTERNET hackers if firewall not setup properly. So I selected Network adapter attached to NAT for less exposure to bridged security risks.
On the guest machine do the following:
- Guest Machine VirtualBox Network settings: Adapter 1: Attached to NAT
- Guest Machine VirtualBox Port Forwarding Rule: Name:External_SSH, Protocol:TCP, Host Port: 3022, Guest Port 22, Host&guest IPs:leave blank
- click on advance in Network section then click on Port forwarding to enter rules
- Guest Machine Firewall: open port 22 #so ssh connection can enter
- Guest Machine: Make sure that ssh server is installed, configured properly, and running
- LINUX test to see if ssh server running w/command: sudo service ssh status
- Can check netstat to see if connection made to port 22 on the guest machine
Also there are different ssh servers and clients depending on platform using.
wikipedia/Secure_Shellwikipedia/Comparison_of_SSH_serverswikipedia/Comparison_of_SSH_clients
For Ubuntu Users:
ubuntu community: SSHOpenSSH/Configuringubuntu/community: OpenSSH/Keys
That should be it. If I made a mistake or want to add anything -feel free to do so— I am still a noob.
Hope this helps someone. Good luck!

In this tutorial, we will guide you on how to SSH into a VirtualBox Ubuntu machine remotely. SSH, or Secure Shell, is a protocol that provides a secure channel for two computers to communicate. It is widely used for remote administration of systems and file transfers.
To SSH into a VirtualBox Ubuntu machine remotely, you need to install the OpenSSH server on the virtual machine, configure the network settings of your VirtualBox, obtain the IP address of the virtual machine, and then connect to it using an SSH client on your host machine. Additionally, you may need to configure port forwarding on your router to allow SSH connections from outside your network.
- Prerequisites
- Step 1: Install OpenSSH Server on Ubuntu Virtual Machine
- Step 2: Configure VirtualBox Network Settings
- Step 3: Get the IP Address of the Ubuntu Virtual Machine
- Step 4: Connect to the Ubuntu Virtual Machine via SSH
- Step 5: Allow SSH Connections from Outside Your Network
- Conclusion
Prerequisites
Before we proceed, ensure that you have the following:
- A VirtualBox Ubuntu machine up and running.
- An SSH client installed on your host machine. If you are using Linux or macOS, SSH comes pre-installed. Windows users can use a free program like PuTTY.
Step 1: Install OpenSSH Server on Ubuntu Virtual Machine
Firstly, you need to install the OpenSSH server on your Ubuntu virtual machine. Open the terminal and run the following command:
sudo apt-get install openssh-serverThis command uses apt-get, the package handling utility in Ubuntu, to install the openssh-server package. The sudo command is used to run this command with root privileges.
Step 2: Configure VirtualBox Network Settings
Next, you need to configure the network settings of your VirtualBox. Go to the settings of your virtual machine, navigate to the ‘Network’ tab, and ensure that the ‘Attached to’ field is set to ‘Bridged Adapter’. This configuration allows your virtual machine to connect directly to the physical network.
Step 3: Get the IP Address of the Ubuntu Virtual Machine
You need the IP address of your virtual machine to connect to it remotely. On your Ubuntu virtual machine, open the terminal and run the following command:
ifconfigThis command displays the network configuration. Note down the IP address displayed next to ‘inet addr’ under the ‘eth0’ or ‘enp0s3’ entry.
Step 4: Connect to the Ubuntu Virtual Machine via SSH
Now that you have the IP address, you can connect to your Ubuntu virtual machine from your host machine. Open the terminal on your host machine and run the following command:
ssh username@ip_addressReplace ‘username’ with your Ubuntu username and ‘ip_address’ with the IP address you noted down earlier. This command initiates an SSH connection to the specified IP address using the provided username.
Step 5: Allow SSH Connections from Outside Your Network
To allow SSH connections from outside your network, you need to configure port forwarding on your router. This process varies depending on the router model. You can usually find instructions in your router’s manual or on the manufacturer’s website.
Conclusion
SSH is a powerful tool that allows you to securely access and manage your Ubuntu virtual machine remotely. By following these steps, you should be able to SSH into your VirtualBox Ubuntu machine from anywhere. Always ensure that your SSH connections are secure to prevent unauthorized access to your virtual machine.
SSH, or Secure Shell, is a protocol that provides a secure channel for two computers to communicate. It is widely used for remote administration of systems and file transfers.
To install OpenSSH server on your Ubuntu virtual machine, open the terminal and run the command sudo apt-get install openssh-server.
To configure network settings in VirtualBox, go to the settings of your virtual machine, navigate to the ‘Network’ tab, and ensure that the ‘Attached to’ field is set to ‘Bridged Adapter’. This configuration allows your virtual machine to connect directly to the physical network.
To find the IP address of your Ubuntu virtual machine, open the terminal on your virtual machine and run the command ifconfig. Note down the IP address displayed next to ‘inet addr’ under the ‘eth0’ or ‘enp0s3’ entry.
To connect to your Ubuntu virtual machine via SSH, open the terminal on your host machine and run the command ssh username@ip_address. Replace ‘username’ with your Ubuntu username and ‘ip_address’ with the IP address of your virtual machine.
To allow SSH connections from outside your network, you need to configure port forwarding on your router. The process varies depending on the router model. Refer to your router’s manual or the manufacturer’s website for instructions on how to set up port forwarding.
To ensure the security of your SSH connections, you should use strong passwords or SSH keys, disable root login, and regularly update your SSH server. Additionally, you can use tools like fail2ban to protect against brute-force attacks. Always keep your SSH software up to date to utilize the latest security features.
SSH into VirtualBox — Overview
Once you have installed any Linux distribution using the Oracle VirtualBox, the next step would be connect to your VM using any SSH client such as Putty or may be from a different Linux machine. This can be tricky for beginners or users who are using Oracle VirtualBox for the first time.
There can be multiple reasons due to which you are unable to SSH to your VirtualBox VM, some of them can be
- SSH is not up and running on the VM
- Firewall is not enabled on the VM to allow port 22 for SSH
- Some one has configured SSH on a different port other than the default port 22
Or may be none of the above, and since you are doing it for the first time so you are not sure where to start?
Well GoLinuxCloud to the rescue!!
Follow the steps from this article to first make sure there is no problem with your SSH server and then I will guide you with the steps to SSH into VirtualBox VM.
Lab Environment
I already have installed Oracle VirtualBox on my Windows 10 laptop. To save some time I also have multiple VMs installed which I normally use to practice different topics before converting them into an article.
Today I will be using Ubuntu for my demonstration but the same steps can be used for any other Linux distributions such as Debian, Red Hat, CentOS, Rocky Linux, OEL, SuSE etc
ALSO READ: Fix: the domain status of virtual connect manager is not ok update will not continue
Pre-requisites
First we need to make sure that our SSH Server is UP and running with no issues. So these will be part of your pre-checks before you jump to the next section.
Login to your VirtualBox VM
Login to your VM using the console. These are the list of users on my Ubuntu VM. I will use deepak user to login to the console:
![SSH into VirtualBox VM [Step-by-Step]](https://www.golinuxcloud.com/wp-content/uploads/vm-1-1.jpg "SSH into VirtualBox VM [Step-by-Step]")
Next click on Activities and search for terminal in the search bar. Next click on the Terminal Icon as shown below:
![SSH into VirtualBox VM [Step-by-Step]](https://www.golinuxcloud.com/wp-content/uploads/vm-2-1.jpg "SSH into VirtualBox VM [Step-by-Step]")
Is Your SSH server UP and Running?
Next check if sshd service is active and running. The command may vary based on distributions.
On Ubuntu and Debian you can use:
systemctl status ssh
On Red Hat, CentOS, Fedora, Rocky Linux you can use:
systemctl status sshd
Here is a sample output SSH service from my VirtualBox VM:
![SSH into VirtualBox VM [Step-by-Step]](https://www.golinuxcloud.com/wp-content/uploads/vm-3-1.jpg "SSH into VirtualBox VM [Step-by-Step]")
In case your SSH service in not in Running state then you can manually start the service using:
On Ubuntu and Debian you can use:
systemctl enable ssh --now
On Red Hat, CentOS, Fedora, Rocky Linux you can use:
systemctl enable sshd --now
HINT:
The command to start any service is actually systemctl start <service>. But the above command would start your service and also enable the service to automatically start on reboot. You may also use systemctl restart <service> to perform STOP and START action.
In most cases you don’t need to do any configuration changes to have a running SSHD, unless to plan to customize the configuration.
What Port Number is used by your SSH Server?
Next you should check the port number in use by SSH (SSHD) server. In most cases if you have done a scratch installation then the port number in use would be 22. But just to be sure, let’s verify the same:
You can use either netstat or ss command to check this:
ss -ntlp | grep -i ssh
OR
netstat -ntlp | grep -i ssh
Sample Output:
![SSH into VirtualBox VM [Step-by-Step]](https://www.golinuxcloud.com/wp-content/uploads/vm-4-1.jpg "SSH into VirtualBox VM [Step-by-Step]")
ALSO READ: How to exit full screen mode in qemu virt-manager ( RHEL / CentOS 7)
As you can see, the SSHD server is using port 22 which is the default port. So we have to SSH into VirtualBox using port 22.
Is your firewall blocking SSH Server?
Normally when you are trying to access a VirtualBox VM from the same laptop then the only firewall you encounter would be the firewall installed on the Linux Server.
NOTE:
In some cases if you are connected to some VPN on the Windows client, then also your SSH may not work. Although it depends on the method you use to connect to your VM and there is also a way to make it work which I will shown later in this article.
In most distributions these days we use firewalld so I will share the commands for the same. You can install firewalld if not available:
On Ubuntu and Debian you can use:
apt-get install firewalld
On Red Hat, CentOS, Fedora, Rocky Linux you can use:
dnf install firewalld
Execute the following set of commands to get the default values from your VM:
## Check if firewalld is running
firewall-cmd --state
running

## If the above command returns 'not running' then you can start the service using:
systemctl start firewalld

## Get your default zone
firewall-cmd --get-default-zone
public

## Get the list of interfaces part of your active zone
firewall-cmd --get-active-zones
public
  interfaces: enp0s3 enp0s8
Now that we have these basic information, check if SSH service is enabled in your firewall:
root@ubuntu:~# firewall-cmd --zone=public --list-services
dhcpv6-client ssh
In our case, SSH service is already added in the firewalld. In case it is not present, you can manually add the same using:
firewall-cmd --zone=public --add-service=ssh --permanent
firewall-cmd --reload
If your SSH service is running on a different port then you should manually allow that port in the firewalld. For example, if your SSH server is using port 5022 then you can use the following commands to add port 5022 in the firewall:
firewall-cmd --add-port=5022/tcp --zone=public --permanent
firewall-cmd --reload
firewall-cmd --zone=public --list-ports
5022/tcp
Now that we are all sorted out with firewall, so now we can start with the steps to SSH into VirtualBox VM.
ALSO READ: How to add Network Adapter in Oracle VirtualBox
Method-1: SSH into VirtualBox using Bridged Network Adapter
The first method to SSH into VirtualBox is to use a bridged network adapter in your Virtual Box network Settings.
Step-1: Access Machine Settings of the VM
You don’t need to power off your VM to use this method. So using your VM console, access the Machine option from the Top Menu and click on Settings as shown below:
![SSH into VirtualBox VM [Step-by-Step]](https://www.golinuxcloud.com/wp-content/uploads/vm-5.jpg "SSH into VirtualBox VM [Step-by-Step]")
Step-2: Change Network Settings to use “Bridged Adapter”
Next access the Network Settings as shown below. When a VM is installed, then by default NAT Network is chosen for the Adapter. Select your adapter, in my case I have two adapters in which I wish to use Bridged Adapter for my Second Adapter.
So from the drop down menu, select «Bridged Adapter» and leave all other settings to default.
![SSH into VirtualBox VM [Step-by-Step]](https://www.golinuxcloud.com/wp-content/uploads/vm-6.jpg "SSH into VirtualBox VM [Step-by-Step]")
The VirtualBox setting will automatically select your preferred Network. If you have more than one interfaces in your Windows Laptop then you can select the drop down menu from Name and choose your preferred interface. This may not be required in most cases.
Step-3: Configure Network on Linux Server
Now the changes may have been applied runtime on the Oracle VirtualBox VM but we still need to configure our Network in the Ubuntu Server to use the new Network Settings.
Currently these are my network details for Adapter 2. As you can see, the IP Address of enp0s8 is 10.0.3.15/24 which is clearly a NAT IP:
![SSH into VirtualBox VM [Step-by-Step]](https://www.golinuxcloud.com/wp-content/uploads/vm-7.jpg "SSH into VirtualBox VM [Step-by-Step]")
Next check if your selected interface is configured for STATIC IP or DHCP:
root@ubuntu:~# nmcli con show
NAME                UUID                                  TYPE      DEVICE
Wired connection 1  350f2bf5-04b8-3fde-bc38-37ff1570fd5c  ethernet  enp0s3
Wired connection 2  92c100aa-402f-38e4-938b-2d199ceb891e  ethernet  enp0s8
So, currently I have these two interfaces, check if the enp0s8 interface is configured with static or dhcp:
root@ubuntu:~# nmcli con show "Wired connection 2" | grep "ipv4.method"
ipv4.method:                            auto
Good, so we are using DHCP which makes things easier for us now. But hey you can always assign a static IP Address to your interface but unfortunately that is not the agenda of this article.
ALSO READ: 5 ways to check if server is physical or virtual in Linux or Unix
In case you do want to switch from static to dhcp then you can execute this command:
nmcli con mod "Wired connection 2" ipv4.method auto
Here replace Wired connection 2 with your connection name.
Now that we know our interface is configured with DHCP, we just have to restart our network and it should automatically get the new IP Address from your Router which you are using to connect your Windows 10 laptop.
Use the following command to restart your network:
nmcli networking off
nmcli networking on
This will bring down all your interfaces and then start them again. Alternatively to refresh only one of your interface you can use
ifdown <interface>
ifup <interface>
Sample Output:
![SSH into VirtualBox VM [Step-by-Step]](https://www.golinuxcloud.com/wp-content/uploads/vm-8.jpg "SSH into VirtualBox VM [Step-by-Step]")
As you can see, now the IP Address of enp0s8 interface has been changed and it has picked up the IP Address from my Wi-Fi Router.
Step-4: Verify SSH connectivity to Oracle VirtualBox VM
Now that our SSH service and Oracle VirtualBox VM Networking is all set, let’s try to connect to our Ubuntu VM using Putty Client:
![SSH into VirtualBox VM [Step-by-Step]](https://www.golinuxcloud.com/wp-content/uploads/vm-9.jpg "SSH into VirtualBox VM [Step-by-Step]")
Provide your IP Address and Port Number, Click on Open and you should get a login prompt where you can add your username and password.:
![SSH into VirtualBox VM [Step-by-Step]](https://www.golinuxcloud.com/wp-content/uploads/vm-10.jpg "SSH into VirtualBox VM [Step-by-Step]")
So we have successfully performed SSH into our Oracle VirtualBox VM.
Method-2: SSH into VirtualBox VM using NAT
I would recommend users to use this method to SSH into VirtualBox VM. if you recall, in our previous section of this article, I mentioned about connectivity issues when using some kind of VPN.
So for example you are connected to your office VPN and in parallel you also want to work on your Oracle VirtualBox setup. But the SSH won’t work with bridged Adapter due to the VPN as the network has changed.
Most VPN also do not allow configuring DHCP or static IP so there is no way you can connect to your VM using any SSH Client. In such scenarios we prefer to use NAT as it can bypass the VPN network using Port Forwarding.
ALSO READ: How to get complete dependencies list of rpm ?
Step-1: Access Machine Settings of the VM
We again need to modify our Network Settings of the respective VM. This although doesn’t require your VM to be Powered Off. So you can just head over to Machine and click on Settings from the TOP BAR menu of your Virtual Box Console.
Step-2: Change Network Settings to use “NAT”
Next access the Network Settings. Choose your Adapter and from the drop down menu select «NAT«.
HINT:
You will find two NAT options in the drop down menu, NAT and NAT Network. Be sure to select NAT and not the other one.
![SSH into VirtualBox VM [Step-by-Step]](https://www.golinuxcloud.com/wp-content/uploads/vm-12-e1631252712522.jpg "SSH into VirtualBox VM [Step-by-Step]")
Step-3: Configure Port Forwarding
Next we need to configure Port Forwarding on your VirtualBox VM’s Network Settings. On the same section as above under Network Settings. Click on Advanced and next click on Port Forwarding:
![SSH into VirtualBox VM [Step-by-Step]](https://www.golinuxcloud.com/wp-content/uploads/vm-13.jpg "SSH into VirtualBox VM [Step-by-Step]")
Next another pop-up window will appear where you should provide the Port forwarding details. Click on the ADD icon to add a new rule. Fill in the below details
- Name: Provide any rule name
- Protocol: SSH uses TCP protocol
- Host IP: It is better if you leave this empty
- Host Port: Provide any random port between 0 to 65535
- Guest IP: Again better to leave it empty for our use case
- Guest Port: Provide your SSH service port number.
Sample Output:
![SSH into VirtualBox VM [Step-by-Step]](https://www.golinuxcloud.com/wp-content/uploads/vm-14.jpg "SSH into VirtualBox VM [Step-by-Step]")
Once done, click OK
Step-4: Configure Network on Linux Server
After you have saved the Network Settings changes on the oracle VirtualBox VM, we also need to refresh our network configuration in the Linux server.
We ca again use the same set of commands as we used in the previous section to refresh our network configuration:
nmcli networking off
nmcli networking on
This will bring down all your interfaces and then start them again. Alternatively to refresh only one of your interface you can use
ifdown <interface>
ifup <interface>
Next verify your IP Address:
ALSO READ: Journalctl cheat sheet with 10+ commands to filter systemd logs
![SSH into VirtualBox VM [Step-by-Step]](https://www.golinuxcloud.com/wp-content/uploads/vm-15.jpg "SSH into VirtualBox VM [Step-by-Step]")
For a NAT network, you will always get 10.0.2.15/24 IP Address. So this means our configuration is complete, now let’s try to connect to this VM using SSH Client.
Step-5: Verify SSH connectivity to Oracle VirtualBox VM
We will use PuTTY to verify the SSH connectivity towards the Oracle VirtualBox VM. Open a new PuTTY session and provide the details:
The hostname (or IP Address) section must contain the loopback address and provide the same port number as used for Host Port in Port Forwarding section.
![SSH into VirtualBox VM [Step-by-Step]](https://www.golinuxcloud.com/wp-content/uploads/vm-16.jpg "SSH into VirtualBox VM [Step-by-Step]")
Next click on Open and you should get the login prompt to connect to the VM:
Well Done, you have successfully connected to your Oracle VirtualBox VM using SSH.
Should you use NAT or Bridged Adapter for SSH?
You can choose either of the methods but personally I have setup all my VirtualBox VMs with two Network Adapters wherein one is connected with NAT while the other with Bridged Adapter.
The Bridged Adapter is required when we need a multi-node environment so multiple VMs can SSH to each other. The above provided steps of NAT can not be used to SSH from one VM to another. So I use NAT to connect to my VMs from my Windows laptop while the Bridged connection is used to have a multi-VM setup.
Although there are different ways we can enable SSH between VMs but Bridged Adapter would be the better one as with this we also can access external networks. You may also choose to use Host-Only Network or Internal Network. I have already explained each of these different network options available with Oracle VirtualBox in another article.
Summary
In this tutorial we learned two different methods using which you can SSH into VirtualBox VM. I have also shared my personal recommendation which you should use when working with Oracle VirtualBox. I hope the steps from this article was useful, let me know if you have and feedbacks or questions using the comment section.
Further Reading
Oracle VM VirtualBox: Networking options and how-to manage them