Операционная система Windows более капризная и менее стабильная, чем macOS от Apple. Открытость ОС, отсутствие встроенной системы резервного копирования и большое количество вредоносного ПО часто приводят к необходимости перестанавливать Windows.
При наличии второго Windows-компьютера под рукой создать загрузочную флешку не составит никакого труда.
? Спасибо re:Store за полезную информацию. ?
Сейчас расскажем, как выйти из ситуации, когда есть только рабочий Mac.
В тему: как создать загрузочную флешку macOS в Windows
Еще несколько лет назад создать загрузочную флешку можно было при помощи стандартной утилиты Boot Camp, которая предназначена для быстрой установки Windows на Mac.
Приложение подготавливало загрузочную флешку, записывало на нее установщик Windows и заливало драйвера для корректной работы всех модулей Mac. Использовать такую флешку можно было не только на компьютерах Apple, с ее помощью можно было установить Windows на любой подходящий компьютер.
С недавнего времени разработчики macOS переработали утилиту и вместо создания загрузочной флешки она сразу же начинает установку системы на отдельный раздел Mac.
К счастью, есть и другой достаточно простой способ задать флешку для установки Windows.
Как создать загрузочную флешку Windows
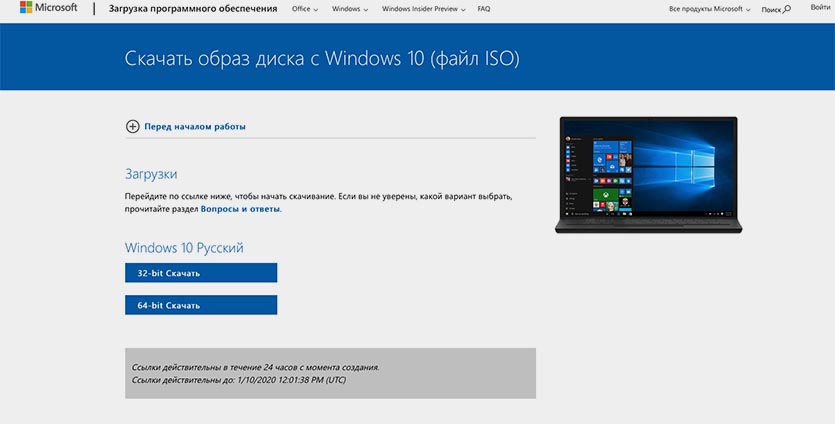
1. Для начала потребуется образ с операционной системой. Скачать его можно прямо с официального сайта Microsoft.
Образ Windows 10 занимает чуть более 5 Гб дискового пространства, на скачивание обычно уходит от 15 до 30 минут.
2. Далее понадобится флешка объемом 8 ГБ и более, которая будет отформатирована в формате Fat32.
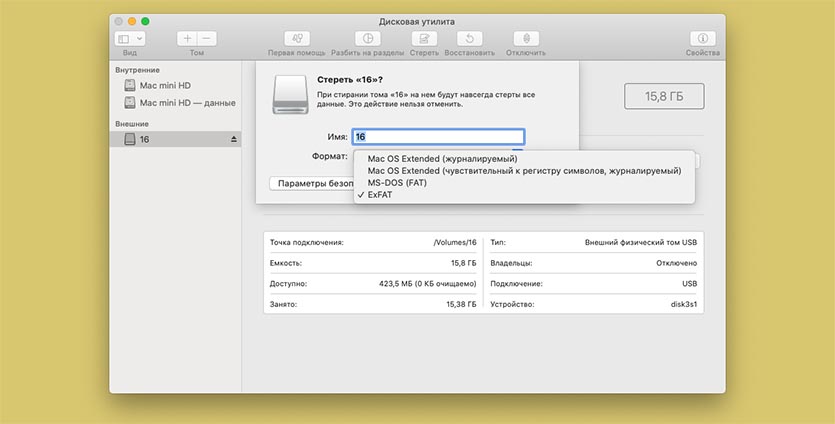
Можно воспользоваться приложением Дисковая утилита или сделать все в Терминале.
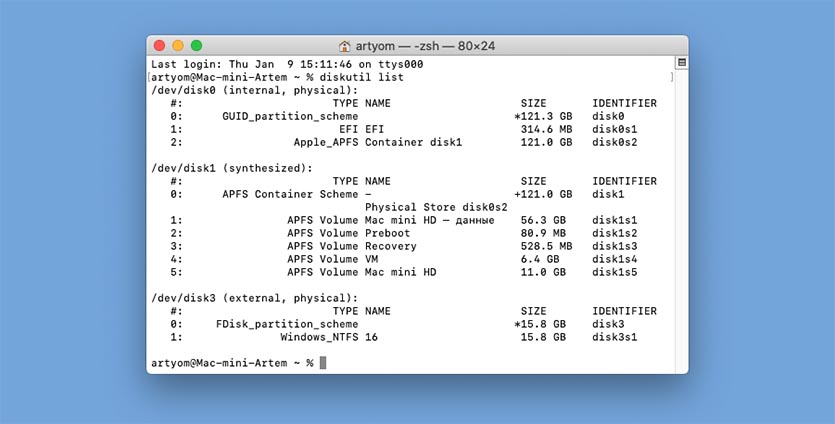
3. В Терминале выполняем следующую команду:
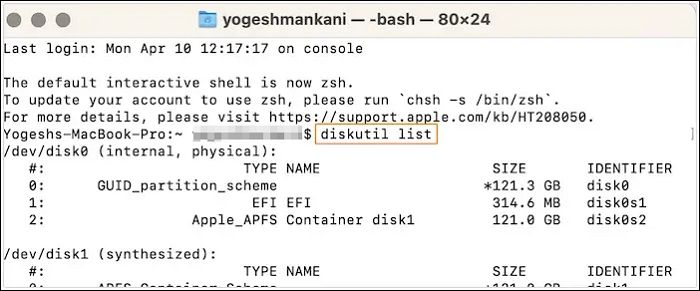
diskutil list
Видим перечень внутренних и внешних накопителей на Mac. Находим нужный по объему и запоминаем его номер. Далее вводим команду:
sudo diskutil eraseDisk FAT32 WININSTALL MBRFormat /dev/disk3
FAT32 — нужная нам файловая система;
WININSTALL — метка флешки после форматирования (можно указать любое имя);
disk3 — номер подключенного накопителя, который будем форматировать.
Вводим пароль администратора, ждем несколько секунд и получаем готовую чистую флешку.
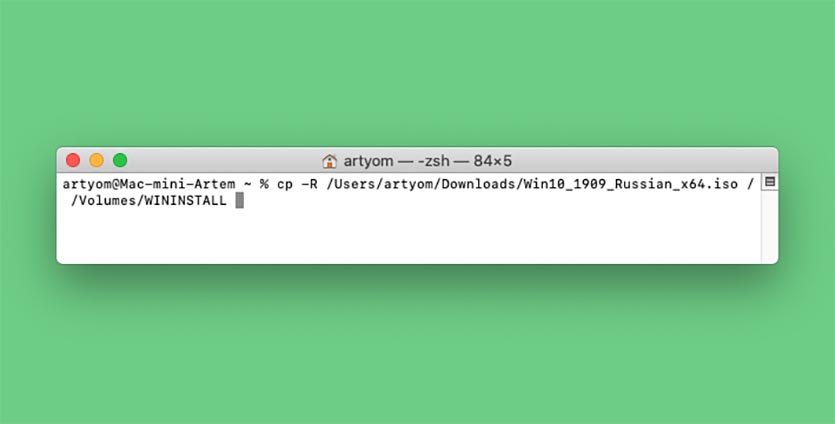
4. Остается лишь скопировать содержимое образа с Windows 10 на флешку.
Для этого монтируем образ и вводим в Терминале такую команду:
cp -R расположение_образа/ расположение_флешки
Чтобы вручную не прописывать длинные пути, нужно лишь ввести начало команды “cp -R “, а затем перетянуть образ на окно Терминала из Finder. Путь к нему пропишется автоматически.
Теперь пишем “/ ” (без кавычек с пробелом) и перетаскиваем в Терминал флешку из Finder.
5. Копирование займет определенное время. Никакого статуса при этом отображаться не будет. Об окончании процесса можно судить по светящемуся диоду на флешке (во время копирования он будет мигать).
Можно просто подождать около 20 минут.
Теперь флешку можно использовать для загрузки на компьютерах и ноутбуках с поддержкой UEFI. К сожалению, для старых Windows-ПК такой способ не подойдет.

 (101 голосов, общий рейтинг: 4.47 из 5)
🤓 Хочешь больше? Подпишись на наш Telegram.
![]()
iPhones.ru
Сделать это проще, чем флешку macOS из Windows.
- macOS,
- windows,
- инструкции,
- Маки
![]()
Артём Суровцев
@artyomsurovtsev
Люблю технологии и все, что с ними связано. Верю, что величайшие открытия человечества еще впереди!
 В этой инструкции подробно о том, как сделать загрузочную флешку Windows 10 на Mac OS X для последующей установки системы либо в Boot Camp (т.е. в отдельный раздел на Mac) либо на обычный ПК или ноутбук. Способов записи загрузочной флешки Windows в OS X не так и много (в отличие от Windows-систем), но те, что имеются, в принципе достаточны для того, чтобы выполнить задачу. Также может быть полезным руководство: Установка Windows 10 на Mac (2 способа).
Для чего это может пригодиться? Например, у вас есть Mac и ПК, который перестал загружаться и потребовалось переустановить ОС или же использовать созданную загрузочную флешку как диск восстановления системы. Ну и, собственно, для установки Windows 10 на Mac. Инструкция по созданию такого накопителя на ПК доступна здесь: Загрузочная флешка Windows 10.
Запись загрузочного USB с помощью Ассистент Boot Camp
В Mac OS X присутствует встроенная утилита, предназначенная для создания загрузочной флешки с Windows и последующей установки системы в отдельный раздел на жестком диске или SSD компьютера с последующей возможностью выбора Windows или OS X при загрузке.
Однако, загрузочная флешка с Windows 10, созданная таким образом, успешно работает не только для этой цели, но и для установки ОС на обычные ПК и ноутбуки, причем загрузиться с нее можно как в режиме Legacy (BIOS), так и UEFI — в обоих случаях все проходит успешно.
Подключите USB накопитель с емкостью не менее 8 Гб к вашему Macbook или iMac (а, возможно, и Mac Pro, мечтательно добавил автор). После чего начните набирать «Boot Camp» в поиске Spotlight, либо запустите «Ассистент Boot Camp» из «Программы» — «Утилиты».
В ассистенте Boot Camp выберите «Создать диск установки Windows 7 или новее». К сожалению, снять отметку «Загрузить последнее ПО поддержки Windows от Apple» (оно будет загружаться из Интернета и занимает не мало) не получится, даже если флешка вам нужна для установки на ПК и это ПО не нужно. Нажмите «Продолжить».

На следующем экране укажите путь к ISO образу Windows 10. Если у вас такового нет, то самый простой способ скачать оригинальный образ системы описан в инструкции Как скачать ISO Windows 10 с сайта Microsoft (для загрузки с Mac полностью подходит второй способ, с использованием Microsoft Techbench). Также выберите подключенную флешку для записи. Нажмите «Продолжить».

Останется только дождаться, когда будет завершено копирование файлов на накопитель, а также загрузка и установка ПО от Apple на тот же USB (в процессе могут запросить подтверждение и пароль пользователя OS X). По завершении вы можете использовать загрузочную флешку с Windows 10 практически на любом компьютере. Также вам покажут инструкцию, как загрузиться с этого накопителя на Mac (удерживать Option иди Alt при перезагрузке).
Загрузочная флешка UEFI с Windows 10 в Mac OS X
Есть еще один простой способ записи установочной флешки с Windows 10 на компьютере Mac, правда этот накопитель подойдет только для загрузки и установки на ПК и ноутбуках с поддержкой UEFI (и включенной загрузкой в режиме EFI). Впрочем, это могут почти все современные устройства, выпущенные в последние 3 года.
Для записи данным способом, также, как и в предыдущем случае нам потребуется сам накопитель и образ ISO, смонтированный в OS X (кликните по файлу образа дважды, и он смонтируется автоматически).
Флешку потребуется отформатировать в FAT32. Чтобы сделать это, запустите программу «Дисковая утилита» (с помощью поиска Spotlight или через Программы — Утилиты).
В дисковой утилите выберите слева подключенную флешку, а затем нажмите «Стереть». В качестве параметров форматирования используйте MS-DOS (FAT) и схему разделов Master Boot Record (и имя лучше задать на латинице, а не на русском). Нажмите «Стереть».
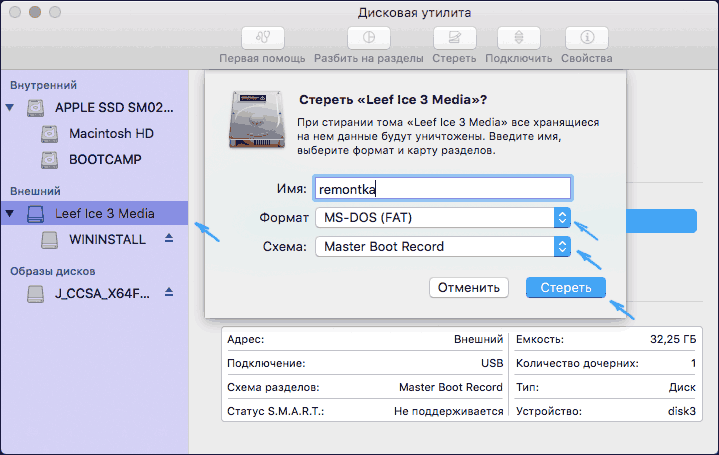
Последний шаг — просто скопировать все содержимое подключенного образа с Windows 10 на флешку. Но есть один нюанс: если пользоваться для этого Finder, то у многих возникает ошибка при копировании файла nlscoremig.dll и terminaservices-gateway-package-replacement.man с кодом ошибки 36. Решить проблему можно, копируя эти файлы по одному, но есть способ и проще — использовать Терминал OS X (запустите его так же, как запускали предыдущие утилиты).
В терминале введите команду cp -R путь_к_смонтированному_образу/ путь_к_флешке и нажмите Enter. Чтобы не писать и не угадывать эти пути, вы можете написать только первую часть команды в терминале (cp -R и пробел в конце), затем перетащить на окно терминала сначала диск с дистрибутивом Windows 10 (значок с рабочего стола), добавив к прописавшемуся автоматически пути слэш «/» и пробел (обязательно), а потом — флешку (здесь добавлять ничего не нужно).

Какая-либо строка прогресса не появится, просто нужно будет подождать, когда все файлы будут переписаны на флешку (это может занять до 20-30 минут на медленных USB накопителях), не закрывая Терминал, пока в нем снова не появится приглашение к вводу команд.

По завершении вы получите готовый установочный USB накопитель с Windows 10 (структура папок, которая должна получиться, показана на скриншоте выше), с которого можно либо установить ОС, либо использовать восстановление системы на компьютерах с UEFI.
| Workable Solutions | Step-by-step Troubleshooting |
|---|---|
| 1. Create Windows 10 Bootable USB on Mac with Boot Camp | Go to Finder. Choose Applications. Select Utilities. Open Boot Camp Assistant. Click on Continue…Full steps |
| 2. Create Windows 10 Bootable USB on Mac with UUByte ISO Editor | Install UUByte ISO Editor on your Mac. Connect the USB drive to the system. The software will detect the…Full steps |
| 3. Create Bootable USB on Mac for Windows with Disk Utility | Plug the USB drive into the system. Open Disk Utility. Format the USB flash drive via MS-DOS (FAT)…Full steps |
| 4. Using Terminal to Create Windows 10 Bootable USB on Mac | Plug the USB drive into your Mac. Open Terminal. To do so, choose Terminal from Utilities folder. Type…Full steps |
Do you want to create Windows 10 bootable USB on macOS Ventura/Monterey/Big Sur? Multiple reasons may prompt a user to do so. Firstly, a new operating system aids in clearing out existing malware. Secondly, it cleans up the system and improves efficiency. Moreover, you can easily create a bootable USB on Mac for Windows.
Creating a Windows 10 Bootable USB on a Windows computer is no big deal. But is it possible to create Windows 10 bootable USB on Mac without Bootcamp? Yes, you can! You can also create Mac bootable USB from Windows.
The latest silicon chips on Mac do not have Bootcamp installed. The new ARM chip architecture doesn’t allow it, so conventional Windows installation is impossible. However, multiple solutions can aid Mac users. It is hassle-free to create Windows 10 bootable USB on Mac with Terminal.
How to Download Windows 10 ISO File for Bootable USB
The best option to attain the Windows 10 ISO File is to visit Microsoft’s official website. Here are the steps you need to follow:
Step 1. Visit the Microsoft Windows 10 download page.

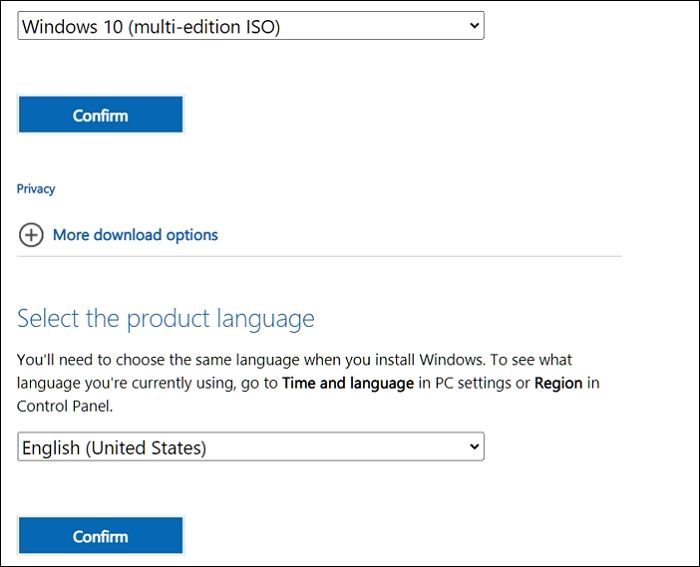
Step 2. Click on the dropdown under Windows 10 version, and then click on confirm.
Step 3. Next, select the language and edition. Click Confirm.
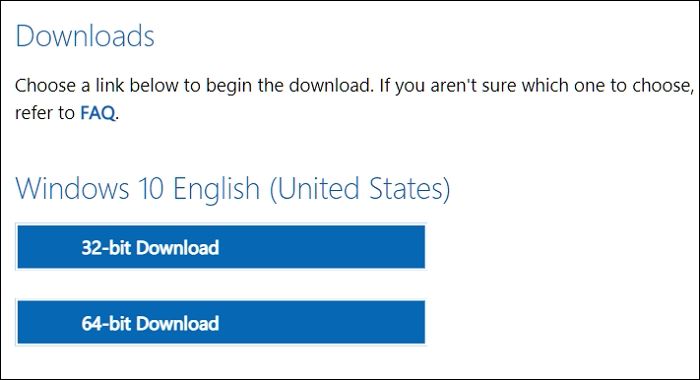
Step 4. Another page will open, giving you a download link. You can choose between Windows 10 32-bit ISO or 64-Bit ISO.
Step 5. Select where you want to save the ISO file. Wait for the download to complete.
How to Format a USB Correctly to Create Windows 10 Bootable USB
Before you go ahead with creating Windows 10 Bootable USB on Mac, it is vital to format the USB. Most users have no idea how to do this or why this is even important. Formatting the USB will erase all existing data and make the space free for the download. Moreover, you also need to ensure that the formatting is compatible with the system you will use it with.
Take a look at the steps you can follow to format drives on Macs:
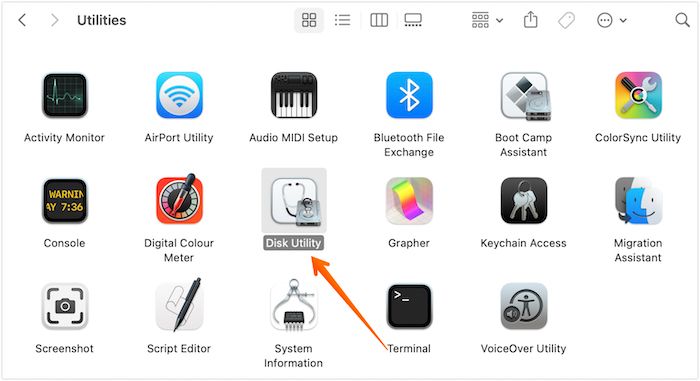
Step 1. Plug in the USB drive. Open Disk Utility. To do so, you need to open the Applications folder. Under that, open the Utilities folder, where you will find Disk Utility app.
Step 2. Choose the USB drive from the list. You will find it on the left-hand sidebar.
Step 3. Choose Erase. Now, type the name you want for the drive.

Step 4. Choose the Format you want. Select Erase.
Step 5. After some time, choose Done. Allow some time for the process to complete.
Download Recovery Software to Avoid Data Loss [Important]
Did you know you may lose data while using Mac to create a bootable USB? Yes! That’s a real possibility. If you want to create a Windows bootable USB on Mac, your Windows PC cannot boot and needs to recover data. Moreover, you can also face data loss after formatting the USB drive. In that case, taking the assistance of professional data recovery software is a great idea.
The EaseUS Data Recovery Wizard for Mac is a highly efficient and user-friendly data recovery tool for Mac. With this tool, you can recover lost data due to various causes, such as malware attacks, USB formatting, accidental deletion, etc. Moreover, you can also retrieve data from Mac-based devices like SSD, HDD, fusion drive, and more!
EaseUS Data Recovery Wizard
- Recover data from formatted USB drive on Mac. It can recover deleted files, documents, photos, audio, music, etc.
- Support data recovery on multiple devices, including USB drives, memory cards, internal hard drives, and digital cameras.
- Recover data from unbootable Mac. If your Mac cannot boot, you can create bootable media with this recovery tool.
Other exciting features include file filters, data protection, iCloud recovery, etc. You can also seek remote IT support if you encounter any issues. Are you eager to use EaseUS Data Recovery Wizard for Mac? In that case, follow these simple steps listed here:
Step 1. Search for lost files
Select the disk location to search for lost files (it can be an internal HDD/SSD or a removable storage device) on macOS Sierra, High Sierra, Mojave, Catalina, Big Sur, Monterey, Ventura, and the latest Sonoma. Click the «Search for lost files» button.
Note: Before data recovery, you’d better click «Disk Backup» from the left sidebar to create a backup of your Mac to avoid further data loss. After backing up, the software can recover data from the Mac backup, and your computer can wirte new data again.

Step 2. Go through the scanning results
EaseUS Data Recovery Wizard for Mac will immediately scan your selected disk volume and display the scanning results.

Step 3. Select the file(s) and recover
In the scan results, select the file(s) to preview and click the «Recover» button to have them back.

Method 1. Create Windows 10 Bootable USB on Mac with Boot Camp
One of the most straightforward solutions to create a Windows 10 Bootable USB on Mac is to use Mac Boot Camp Assistant. It is a multi-faceted boot program that requires an installed Windows ISO file and a USB drive.
Take a look at the steps you need to follow:
Step 1. Go to Finder.
Step 2. Choose Applications.
Step 3. Select Utilities.
Step 4. Open Boot Camp Assistant.
Step 5. Click on Continue.
Step 6. Select the «Create a Windows 10 or later version installs disk» option. Click on Continue. Select Choose.
Step 7. Import the ISO file. Go ahead with Continue. Wait for the process to complete.
Step 8. Check if the bootable USB is named WININSTALL.
Step 9. If it appears so, you can remove the USB.
Note: This solution is only applicable to Intel-based Macs. You can opt for the following methods if you have Macs with an M1 chip.
Method 2. Create Windows 10 Bootable USB on Mac with UU Byte ISO Editor
Another excellent method to create Windows 10 Bootable USB on Mac is with UUByte ISO Editor. The UUByte ISO Editor is a robust tool that enables users to complete the process easily. Most importantly, this app is fully compatible with Apple M1 and M2 Mac. In addition, you can run this app perfectly on the latest macOS Ventura. Here are the steps to follow:
Step 1. Download UUByte ISO Editor app from this link and Install it on your Mac.
Step 2. Connect the USB drive to the system.
Step 3. Click the Burn tab on the welcome screen and you can see the software detect the USB.
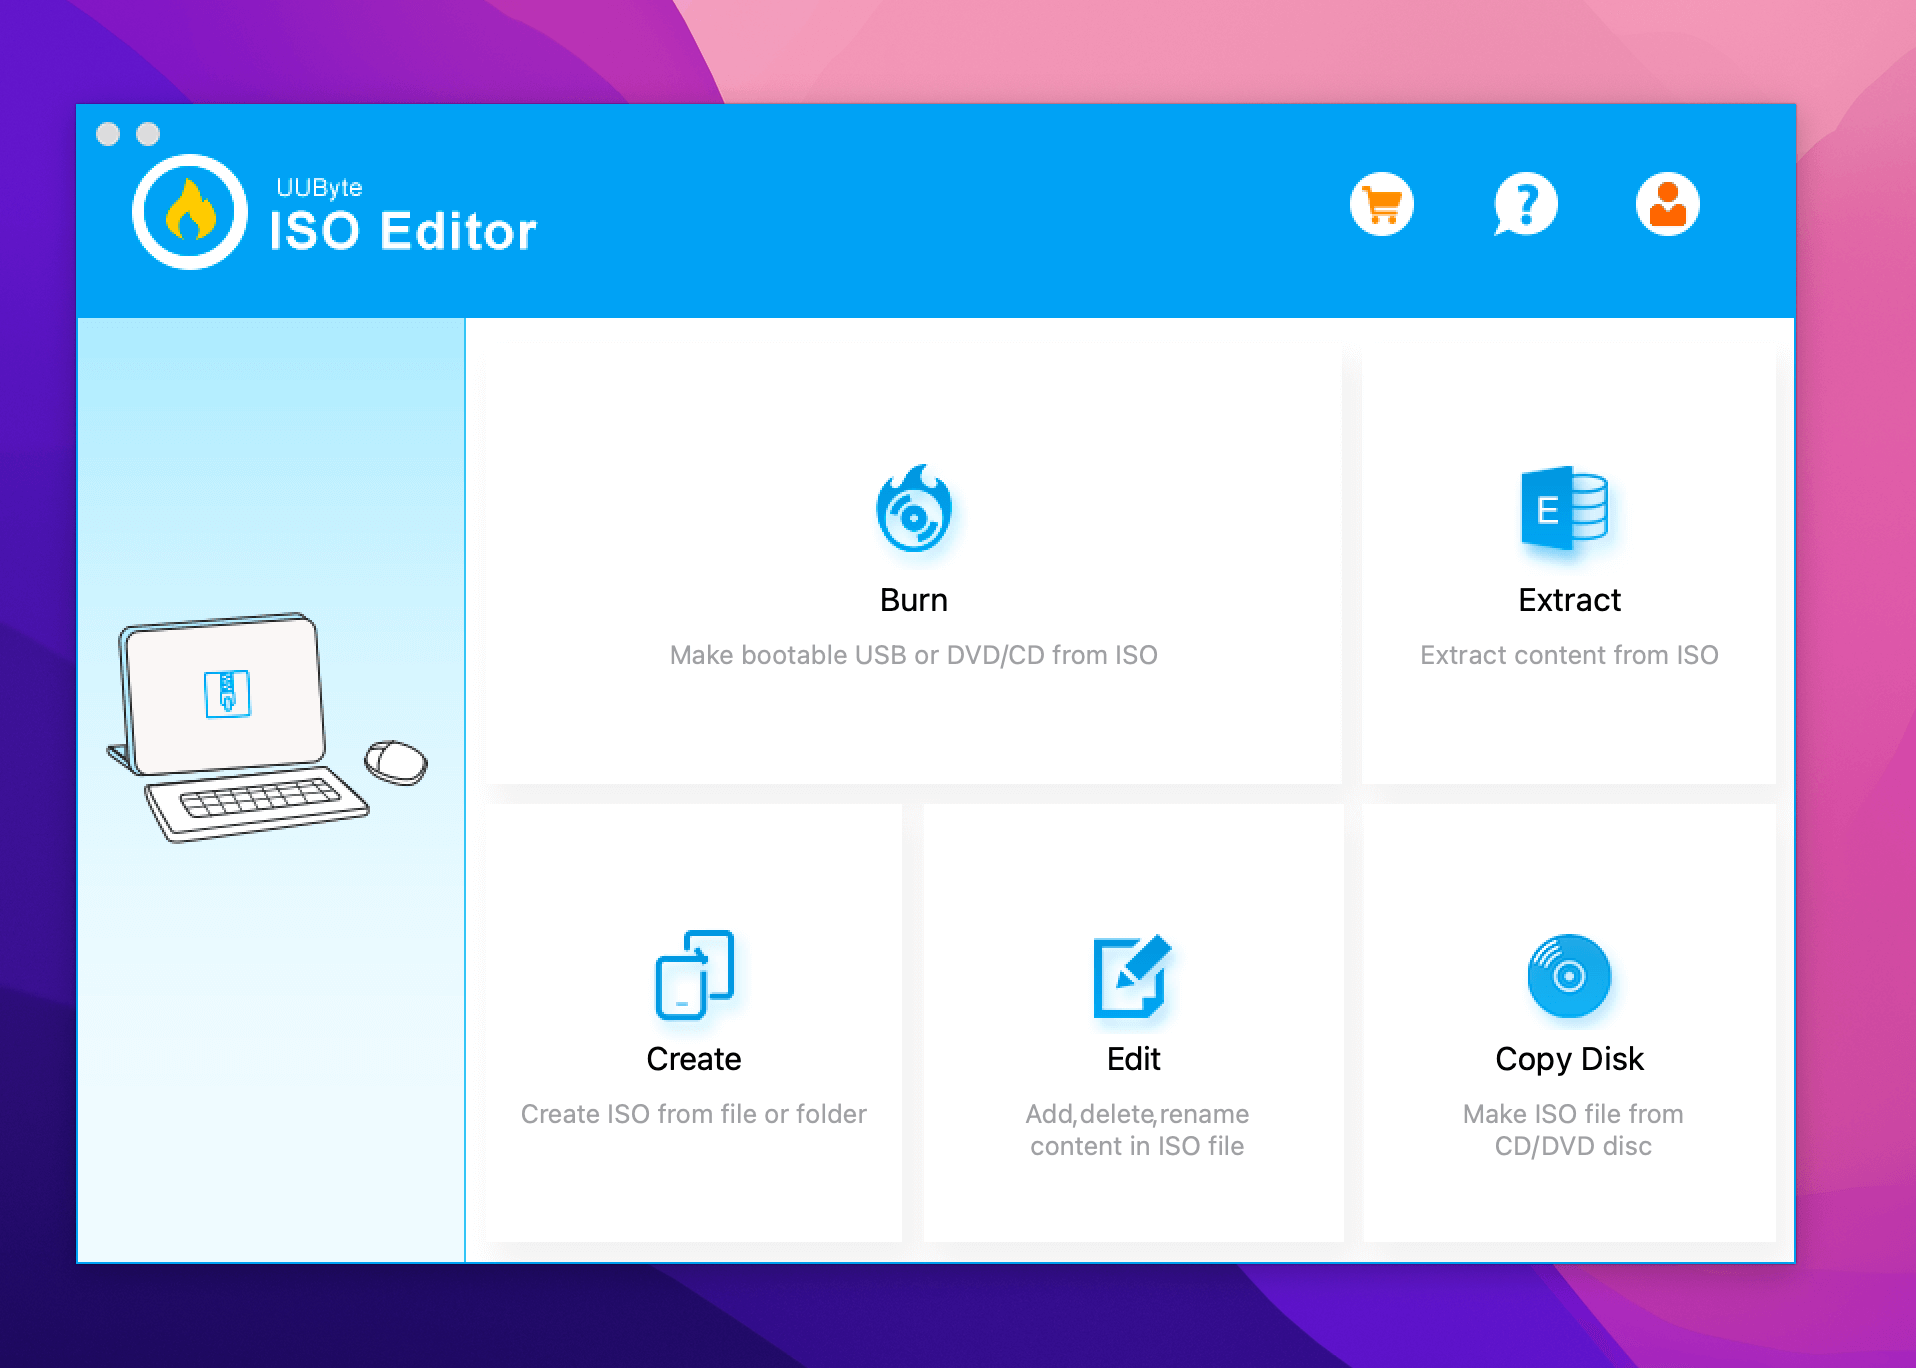
Step 4. Import Windows 10 ISO into the app and choose the right USB drive.

Step 5. Now, click the Burn button at the bottom to start the process. Wait for some time for the completion of the process. It takes approximately 7 minutes to create a bootable USB on Mac. During this step, you can see ISO Editor splits the install.wim file automatically at the end.
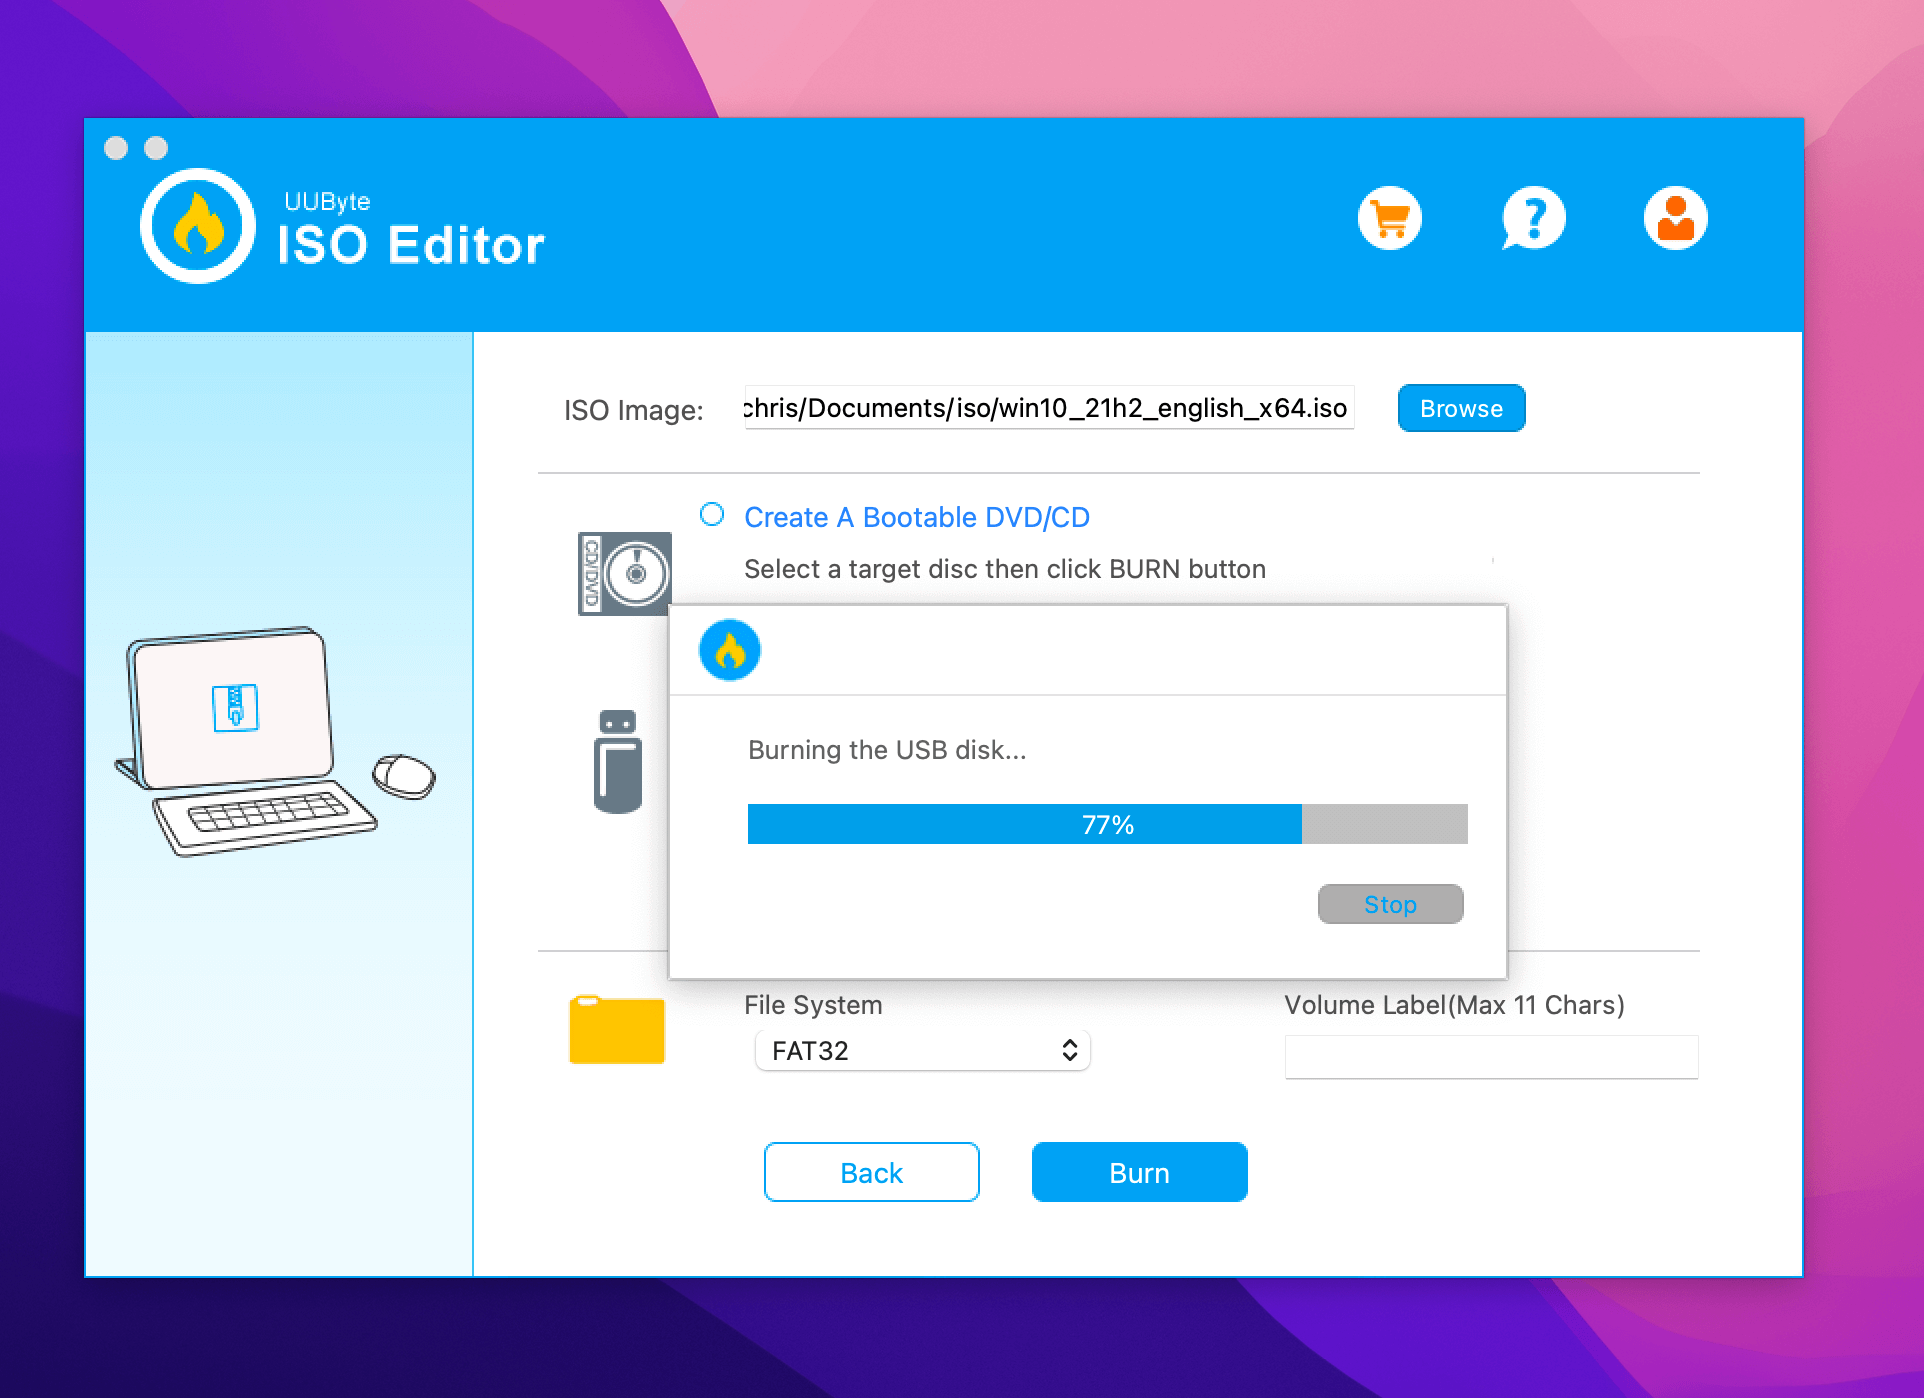
Note: While the process is simple, you should be very careful with it, especially don’t touch the USB device. If you have created Windows 10 bootable USB successfully, remember to share this post with more users!
Method 3. Create Bootable USB on Mac for Windows with Disk Utility
Did you know you can create Bootable USB on Mac for Windows with Disk Utility? For that, you need to follow some simple steps –
Step 1. Plug the USB drive into the system.
Step 2. Open Disk Utility.
Step 3. Format the USB flash drive via MS-DOS (FAT).
Step 4. Send the Windows ISO file to the USB.
Step 5. Wait for the ISO file writing process to complete.
Now, you can use the USB to install Windows on Mac. However, it is essential to understand that this method favors older Mac models. If you have the latest version, use other solutions.
Method 4. Use Terminal to Create Windows 10 Bootable USB on Mac
You can use Mac Terminal to create Windows 10 Bootable USB on Mac. We have also included a video to help out users. Take a look:
- 00:48 Download the Windows 10 ISO file.
- 03:00 Copy the ISO file to the USB drive.
- 04:24 Use the Homebrew package manager.
- 07:32 Create a new folder on the USB drive and copy the downloaded contents.
Check out the written steps to follow:
Step 1. Plug the USB drive into your Mac.
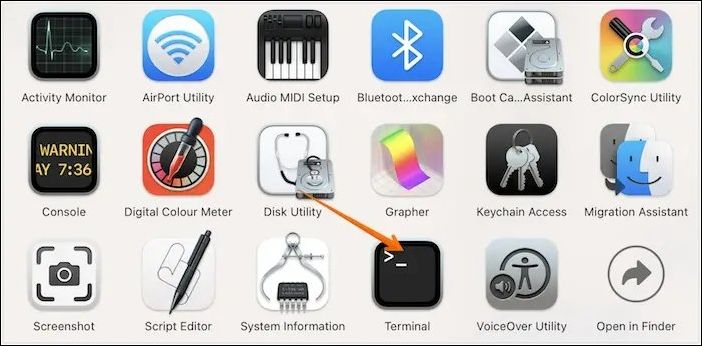
Step 2. Open Terminal. To do so, choose Terminal from Utilities folder.
Step 3. Type diskutil list to find the USB name and press the Enter key.
Step 4. Type diskutil eraseDisk MS-DOS «WINDOWS10» GPT drive name@. Here, the drive name is the name of your USB drive.
Step 5. Download the Windows 10 ISO file.
Step 6. Type hdiutil mount ~/Downloads/WINDOWS10IMAGE.iso. Here, it would be best if you used the ISO file name instead of WINDOWS10IMAG.
Step 7. Next, type cp -rp /Volumes/MOUNTED-ISO/* /Volumes/WINDOWS10/. Here, MOUNTED will be replaced by the name of the ISO mounted.
Step 8. Lastly, type hdiutil unmount/Volumes/MOUNTED-ISO. The Terminal will close, and you will get a bootable USB.
If you are also interested in creating macOS Sonoma bootable USB on Mac, check the following passage:

Create macOS Sonoma Bootable USB Installer
If you have macOS Sonoma installed, then it’s essential to create a bootable USB in case of an issue with the OS. Read more >>
Summary
Isn’t creating Windows 10 Bootable USB on Mac easy? This article lists four methods you can use to create Bootable USB on Mac for Windows. You can follow these hassle-free steps and get it done.
However, data loss is always possible while creating Windows 10 Bootable USB on Mac. For that, you need help from reliable data recovery software. You can check out EaseUS Data Recovery Wizard for Mac in that case. It is a practical yet easy-to-use tool that aids in recovering lost data.
Haven’t you installed EaseUS Data Recovery Wizard for Mac yet? Download it today!
Create Windows 10 Bootable USB on Mac FAQs
You can create Windows 10 Bootable USB on Mac in these different ways. To know more, read the questions and answers listed below —
1. How to create macOS Ventura bootable USB on Mac?
To create macOS Ventura bootable USB on Mac, follow these steps:
- 1. Go to the Apple Store and download macOS Ventura.
- 2. Run Terminal on the system.
- 3. Connect the USB to the Mac.
- 4. Type in sudo /Applications/Install\ macOS\ Ventura. app/Contents/Resources/createinstallmedia —volume /Volumes/MyVolume in the Terminal.
- 5. Hit the Return key.
- 6. Enter the password when prompted.
2. How to rescue data from an unbootable Windows computer?
There are multiple ways to rescue data from an unbootable Windows computer. For instance, you can unplug various cables and reset the connection. You can also use the BIOS feature or eject RAM. However, if nothing works, you can opt for professional data recovery software, EaseUS Data Recovery Wizard for Mac.
3. Can I create Windows 10 bootable USB on a Mac with Terminal?
Yes, you can create Windows 10 bootable USB on a Mac with Terminal. But for that, you must use the diskutil, hdiutil commands with mount and unmount. You will also need to copy the ISO to the USB.
- 1. Download the ISO file from Windows.
- 2. Plug the USB drive into your system.
- 3. Enter «diskutil list» on Terminal to see where the USB is.
- 4. Enter «diskutil eraseDisk MS-DOS «WINDOWS10″ GPT@»
- 5. Now, enter «hdiutil mount ~/Downloads/WINDOWS10IMAGE.iso»
- 6. After that, type «cp -rp /Volumes/MOUNTED-ISO/* /Volumes/WINDOWS10/»
- 7. At last, enter «hdiutil unmount /Volumes/MOUNTED-ISO».
4. How to install macOS Ventura on a Windows PC?
To install macOS Ventura on a Windows PC, follow these steps:
- 1. Create a Bootable USB installer for macOS Ventura.
- 2. Go ahead with the EFI partitions configuration.
- 3. Adjust BIOS settings.
- 4. Install macOS Ventura on the system.
() translation by (you can also view the original English article)
Если, как и я, вы любознательны и/или любите экспериментировать с технологиями, то может возникнуть ситуация, когда вы, время от времени, захотите поиграть с другими операционными системами.
В этом уроке я покажу вам, как создать загрузочный диск с Microsoft Windows 10 на Mac. Возможно, у вас на данный момент нет компьютера под управлением Windows или вы предпочитаете создавать вещи с помощью Mac вместо того, чтобы прибегать к Windows.
Подготовка
Для этого вам потребуется следующее:
- Компьютер
- ISO образ с Windows 10
- USB накопитель объемом 8Гб или больше
Программное обеспечение, которое я буду использовать для создания USB установщика:
- OS X Yosemite 10.10.5
- Ассистент Boot Camp
Необязательно использовать Yosemite. Процесс аналогичен или других недавних версий OS X.
Получаем ISO с Windows 10
Для начала необходимо загрузить копию ISO образа Windows 10, но для этого нужно войти на сайт.


Чтобы загрузить Windows 10, вам нужно будет зарегистрироваться в программе Windows Insider с использованием учетной записи Microsoft.
Эта программа похожа на программу разработчиков Apple и это бесплатно. Если у вас нет аккаунта Microsoft или Windows Insider, создайте его insider.windows.com.
Создание USB-установщика
Как только вы загрузили ISO образ с Windows 10, начнём создавать USB-установщик используя Ассистент Boot Camp от Apple.
Ассистент Boot Camp обычно используется для создания разделов на жёстком диске Mac, чтобы его можно было загрузить на Mac OS X или Microsoft Windows.
В нашем случае, Ассистент Boot Camp будет использоваться только для создания USB установщика и нужно быть очень внимательным, чтобы не создать раздел на внутреннем жёстком диске или SSD в самом Mac.
Если у вас есть сомнения, сделаете резервную копию вашего Mac, перед тем как продолжить. Во всяком случае, у вас должна быть обычная резервная копия, без сомнений.
1. Вставьте пустой USB накопитель на 8 Гб


USB диск, который вы будете использовать, будет полностью перезаписан, поэтому убедитесь, что вы сохранили все данные с этого USB диска. Или же, купите новый USB диск, чтобы вам было спокойнее.
Заметьте, что USB диск должен быть минимум на 8 ГБ. Также можно использовать на 16 Гб или больше, если у вас нет диска на 8 Гб.
2. Запуск Ассистента Boot Camp
Утилита Ассистент Boot Camp находится в Приложения > Утилиты. Вы можете перейти туда и кликнуть по приложению для его запуска.


Самый быстрый способ это нажать Command-Пробел, для вызова Spotlight. Наберите Boot Camp для поиска этой утилиты и нажмите Enter для её запуска.
Скорее всего, вы обнаружите, что Spotlight обнаружил эту утилиту, как только вы ввели первое слово.
Если вы используете Alfred, вы можете найти Ассистент Boot Camp, нажав комбинацию клавиш Option-Пробел и набрав Ассистент Boot Camp, для поиска этой утилиты, а затем нажать Enter для её запуска.


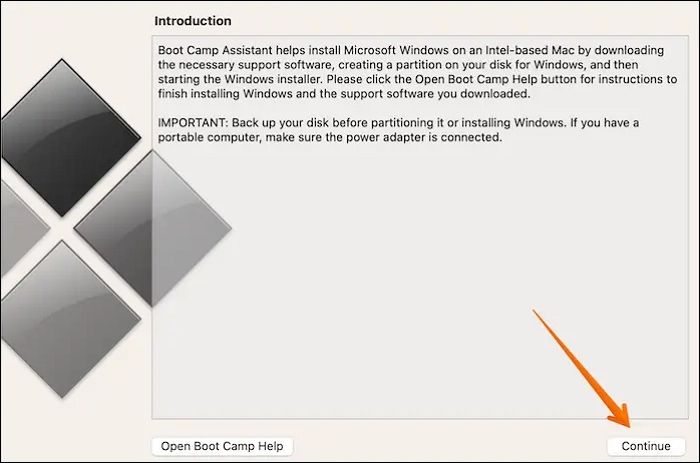
Когда прочитаете инструкцию, нажмите Продолжить.
Выбираем задачи Boot Camp
Ассистент Boot Camp может выполнить в три задачи:
- Создать диск установки Windows 7 или новее
- Загрузить последнее по поддержки Windows от Apple
- Установить или удалить Windows 7 или новее


По умолчанию все эти опции отмечены галочками. Вам нужно отменить опцию 3, Установка Windows 7 или более поздней версии, иначе Ассистент Boot Camp разделит внутренний диск Mac. Это не относится к процессу создания USB-установщика.


Если вы выбрали только параметры 1 и 2, нажмите Продолжить.
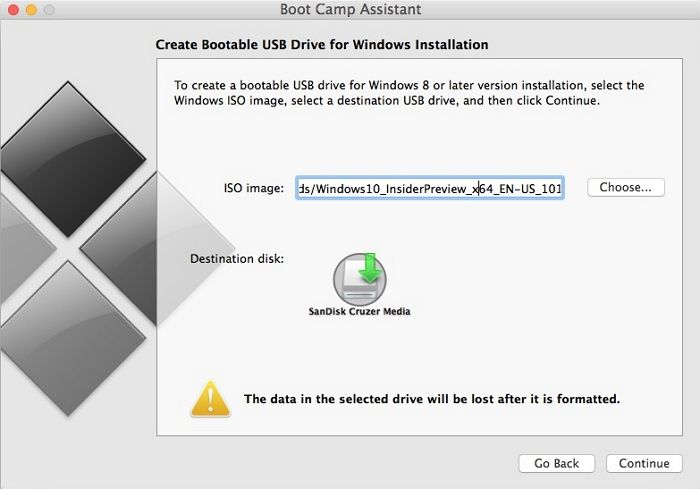
4. Найдите ISO для создания загрузочного USB-диска.
Чтобы создать загрузочный USB для Windows 10, выберите загруженный ранее ISO-файл с Windows 10.
Скорее всего, он был загружен в папку Загрузки Если это так, Ассистент Boot Camp может определить его и предварительно заполнить путь в поле ISO образ.


Если нет, нажмите Выбрать… и перейдите к загруженному ISO- образу и выберите его.
Убедитесь, что в Диске назначения стоит именно тот USB-накопитель, который вы подключили в Mac.


Нажмите Продолжить, для стирания и форматирования USB-накопителя.
5. Настройка


Позвольте Ассистенту Boot Camp сделать своё дело. Форматирование и создание загрузочного USB диска займет некоторое время.
6. Завершение
Когда процесс создания загрузочного USB-накопителя будет завершен.


Ассистент Boot Camp отобразит сообщение — Загрузочный USB диск создан. USB-накопитель будет переименован в WININSTALL.
Нажмите Выход, чтобы закрыть Ассистент Boot Camp.
Теперь USB-установщик готов. Правой кнопкой мыши по значку WININSTALL на рабочем столе и выберите Извлечь «WININSTALL».


Загрузочный USB-накопитель Windows 10 теперь готов к развертыванию при настройке новых ПК.
Вывод
В этом уроке я показал вам, как создать загрузочный USB-диск с Windows 10, для создания резервного носителя для переустановки Windows 10 или для установки Windows 10 на новые ПК.
If you want to install Windows 10 on a Mac M1 or M2 chip, or if you want to install Windows 10 on another computer, you will need to create a bootable Windows 10 USB drive. While this can be done using a variety of methods on a Windows computer, like Windows USB/DVD Download Tool, but it is not as straightforward with a Mac.
In this article, we’ll show you how to create a bootable Windows 10/11 USB drive on a Mac M1 or M2 chip.
What’s Mac M1/M2 Chip?
The M1/M2 chip is a new type of processor from Apple that offers significantly faster performance than previous generations of processors. The M1/M2 chip is based on the ARM architecture and is manufactured using a 7nm process. It is the first processor from Apple to use this architecture and process.
The M1/M2 chip offers up to 8 CPU cores and up to 16 GPU cores. It also features a new type of neural engine, which is designed for machine learning applications. The M1/M2 chip is used in the new MacBook Air, MacBook Pro, and Mac mini.
Why You Need A Windows Bootable USB Installer?
A Windows bootable USB drive can be extremely useful for a number of reasons.
1. A bootable USB drive allows you to boot your computer from a USB drive, instead of from the hard drive. This can be useful if you want to install a new operating system, or if you want to troubleshoot a problem with your computer. A bootable USB drive can also be used to run a live version of a Linux operating system, which can be useful for testing or recovery purposes.
2. A bootable USB drive can also be used to troubleshoot a Windows computer that is having issues.
3. Another reason is if you need to install Windows to use specific Windows-only software or to play Windows-only games.
4. Maybe you’re trying to repair an existing installation of Windows. Whatever the reason, creating a bootable USB is a relatively simple process.
5. Finally, you might need to create a bootable Windows USB if you are having trouble installing Windows from a DVD or CD.
What You Need
There are a few requirements for creating a bootable USB on Mac M1/M2.
– A blank USB flash drive with at least 8GB of storage
– A copy of the Windows 10 installation media (ISO file)
– A Mac computer running macOS with M1/M2 chip
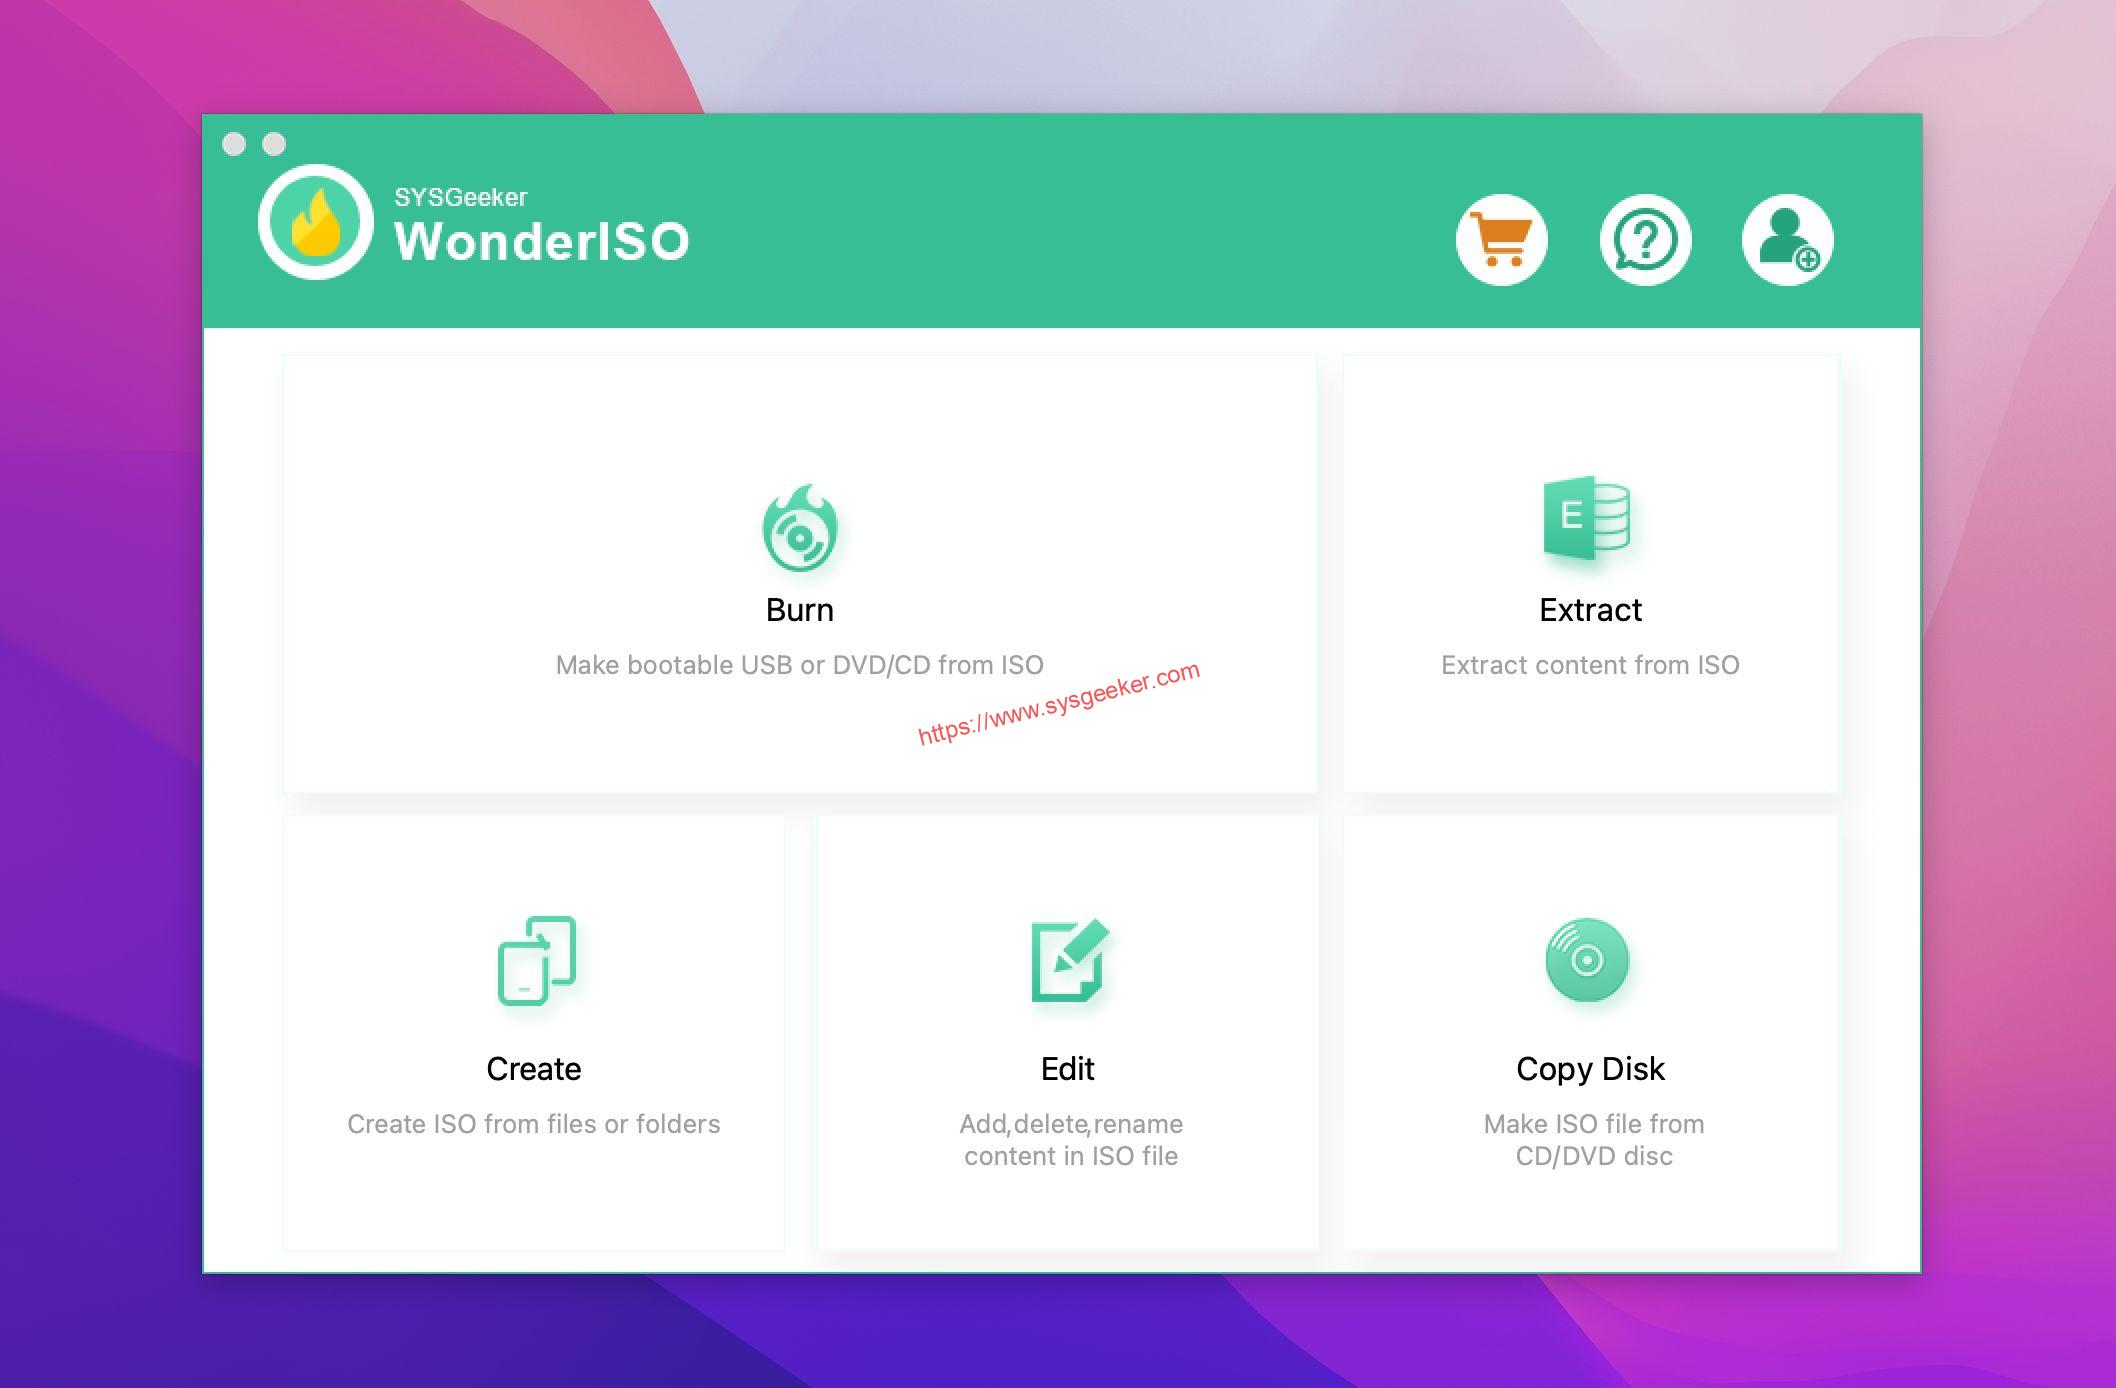
1. Using WonderISO Tool
WonderISO is a software that allows you to create and manage ISO files. It is available for Windows and MacOS. With WonderISO, you can create ISO files from your own files and folders, or extract files from existing ISO files. WonderISO can also split ISO files that are larger than 4 GB into multiple files, making them easier to manage and transfer.
Free DownloadFree Download
1. Download and install WonderISO on your macOS computer.
2. Connect your USB drive to the computer.
3. Launch WonderISO and select the «BURN» option to create a bootable USB drive for Windows 10 or Windows 11. Follow the on-screen instructions to complete the process.
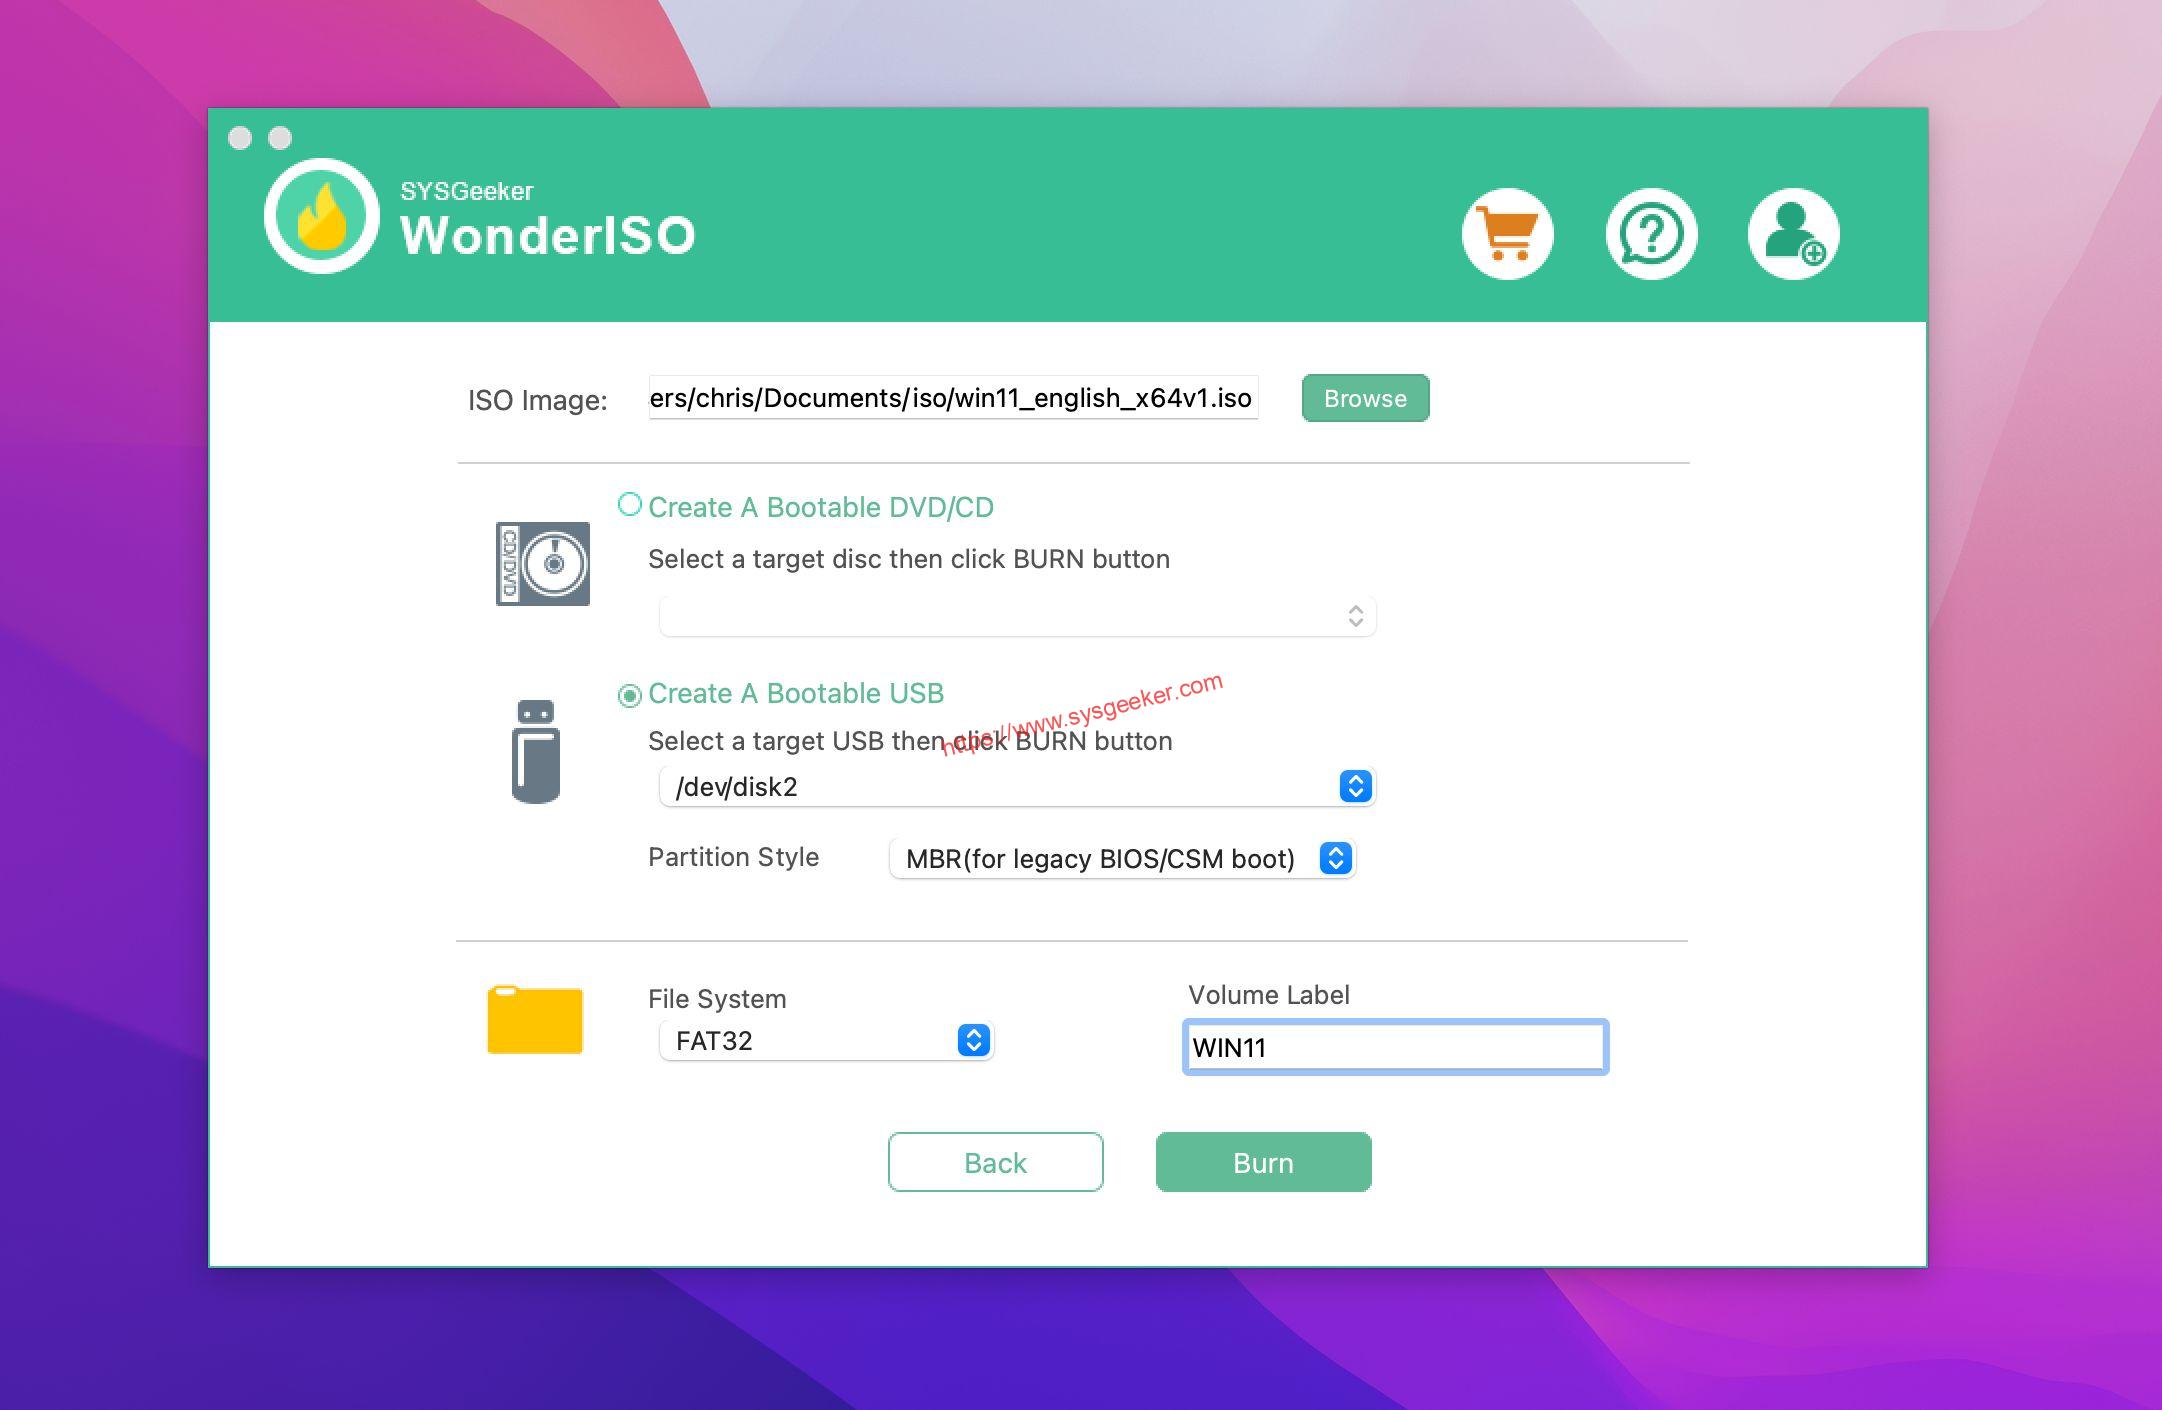
In terms of partition style, we recommend that you choose UEFI partition, because most computers now support UEFI.
4. Once the all settings are complete, click «BURN» button to start writing ISO file to USB drive. Depending on the writing speed of your USB drive, it may take about 10 minutes to complete.

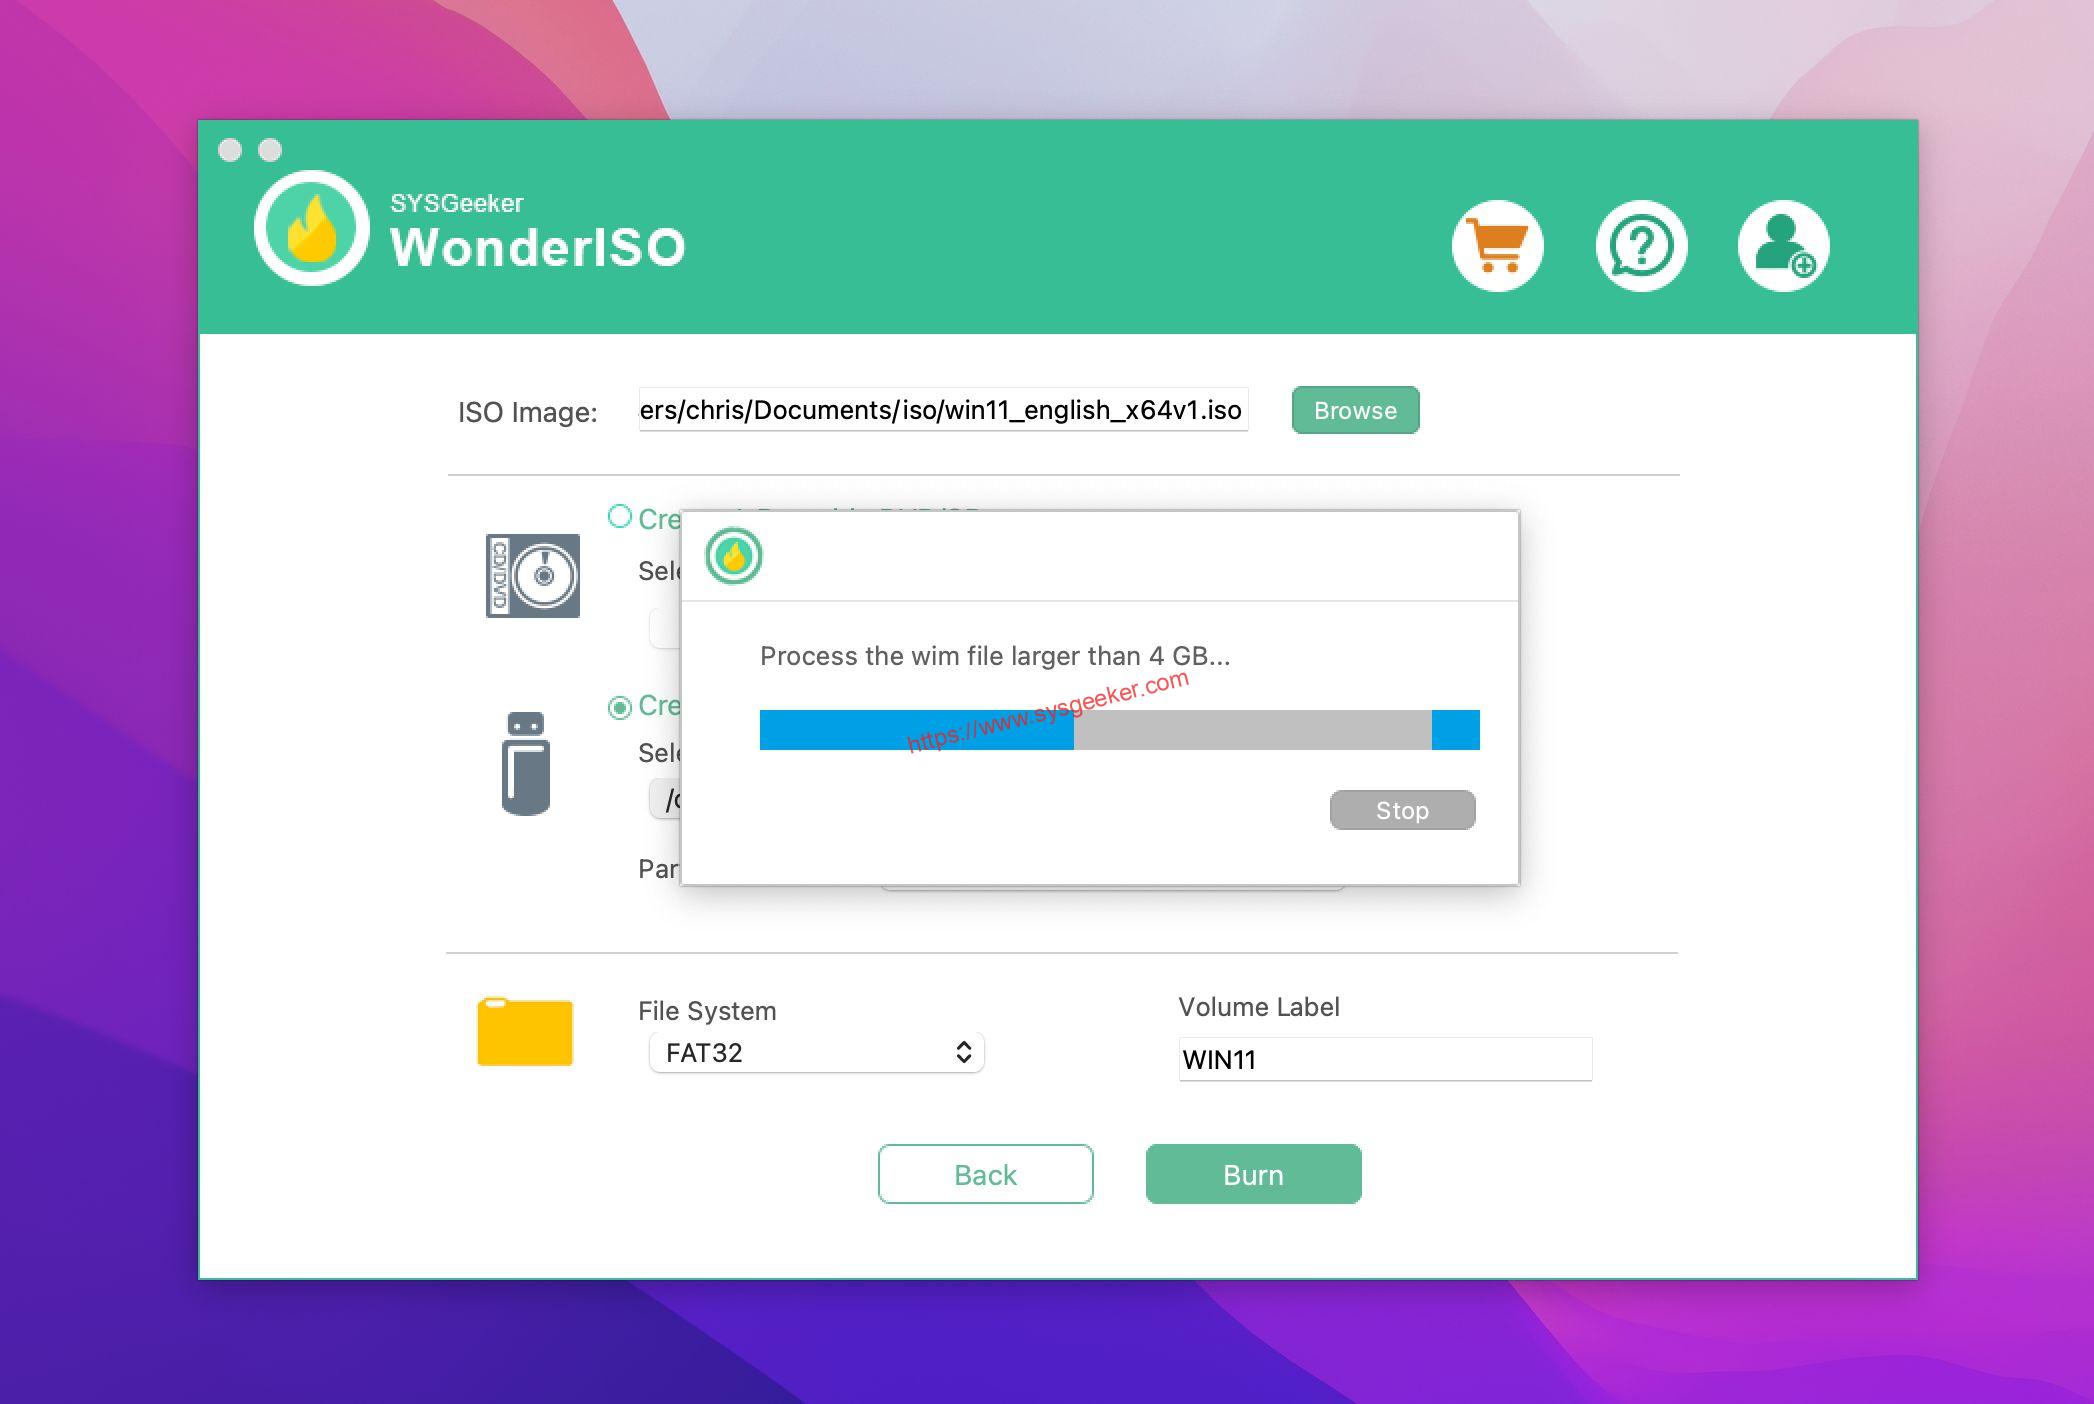
Step 5. Since NTFS does not support ISO files larger than 4GB, the program will automatically split the ISO file larger than 4GB into two smaller ISO files after writing. This process also takes a few minutes
Step 6. When the ISO file split is complete, you should see a success message, which means you have successfully made a bootable installation USB.
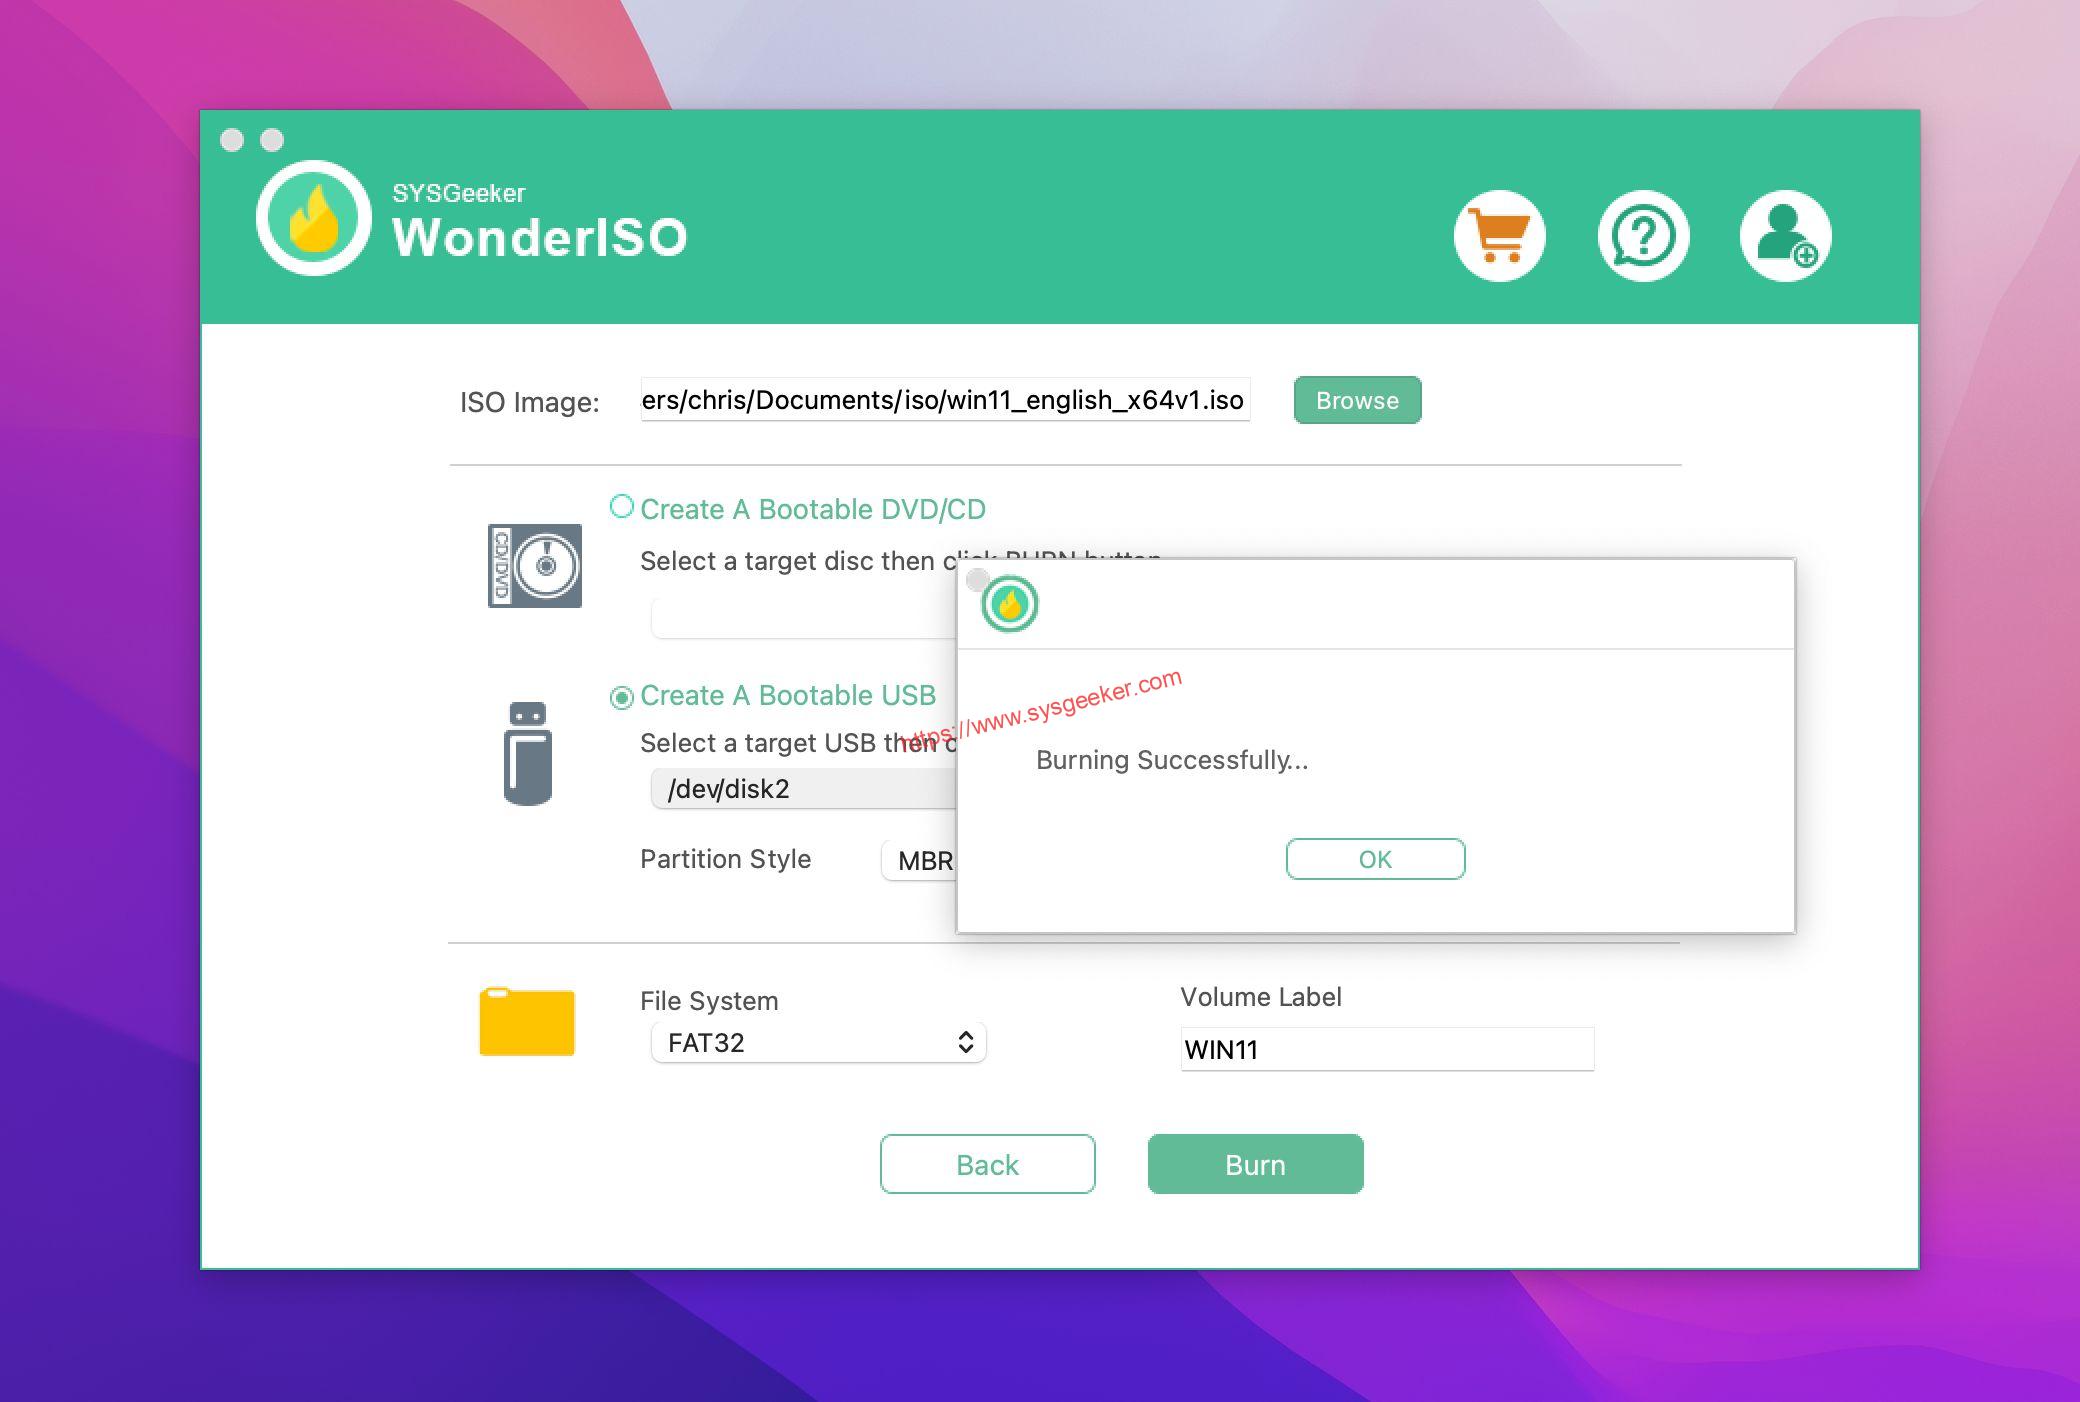
Now, you can eject your USB flash drive and try to install Windows 10/11 on your computer.
Free DownloadFree Download
Pros:
-Allows you to create a bootable USB drive for Windows 10 on macOS
-Simple and easy to use
– Support latest macOS Ventrua.
Cons:
-None that we could find!
Knowledge:
Now the ISO files of Widnows 10 and Windows 11 are larger than 4GB, only the NTFS file system supports files larger than 4GB, but the Mac cannot recognize the NTFS file system. So you have to format it as FAT32. However, WonderISO perfectly solves this problem. It can split ISO into two FAT32 files smaller than 4GB. After the writing is completed, it will be spliced into a complete ISO file.
2. Using Boot Camp
Creating a bootable Windows 10 USB on a Mac with M1 or M2 chip can be done using the Boot Camp Assistant software. It is a utility that comes with your Mac. This software is designed for users who want to install Windows on their Mac computer. The process is simple and only takes a few minutes to complete.
Once you have all of the necessary materials, follow these steps to create a bootable USB drive with Boot Camp Assistant:
1. Open Boot Camp Assistant on your Mac.
2. Click the «Create a Windows 10 or earlier install disk» button.
3. Select the Windows 10 installation media that you downloaded earlier.
4. Click the «Create disk» button.
5. Follow the on-screen instructions to create a bootable USB drive.
3. Using Terminal
Assuming you have a Windows 10 ISO file and a USB drive with at least 8GB of free space, you can create a bootable Windows 10 USB on M1/M2 Mac using Terminal with the following steps:
1. Open Terminal and insert your USB drive into your computer.
2. Type in the following command to find out the disk number of your USB drive:
diskutil list
3. Unmount the drive by typing in the following command, replacing N with the disk number of your USB drive:
diskutil unmountDisk /dev/diskN
4. Type in the following command to create the bootable Windows 10 USB, replacing N with the disk number of your USB drive and PATH/TO/WINDOWS.ISO with the path to your Windows 10 ISO file:
sudo dd if=PATH/TO/WINDOWS.ISO of=/dev/diskN bs=1m
5. Once the process is complete, type in the following command to eject the USB drive:
diskutil eject /dev/diskN
You can now use the bootable Windows 10 USB to install Windows 10 on your computer.
Be aware that this will erase anything on the USB drive, so make sure to back up any important files before proceeding. And make sure you use the correct name for your USB drive, as using the wrong name could result in data loss.
If you are new to using Terminal, this process may seem a bit daunting. However, it’s actually quite simple once you get the hang of it. If you have any questions, feel free to leave a comment below and I’ll do my best to help you out.
4. Using DiskMaker X
DiskMaker X is a bootable USB creator for macOS. It allows you to create a bootable USB drive from a DMG file, which is a common file format for macOS software. DiskMaker X is a free and open source tool, and it is available for download from the developer’s website.
- Creating a bootable USB drive with DiskMaker X is simple.
- First, you need to download the DMG file of the macOS software you want to install.
- Next, open DiskMaker X and select the DMG file.
- Finally, select the USB drive you want to use and click ‘Create Bootable USB’.
How to Boot Your Computer from USB Drive?
Your bootable USB flash drive is now ready to use. To install Windows 10, insert it into your PC, and then follow the on-screen instructions.
-
Boot Mac M1/M2 from USB
- To do this, you need to connect the bootable USB drive to your computer and turn it on.
- Then, you need to hold down the Option key and select the bootable USB drive.
- Finally, you need to follow the instructions on the screen to install macOS on your computer.
-
Boot Widnows from USB
Here are the steps to boot Windows from a USB drive:
1. Connect the USB drive to your computer.
2. Restart your computer.
3. Press the key that allows you to enter your computer’s BIOS settings. This key is often F2, F10, or Del.
4. Use the arrow keys to navigate to the Boot Order section of the BIOS.
5. Change the order so that the USB drive is listed first.
6. Save your changes and exit the BIOS.
7. Your computer will now boot from the USB drive.
Creating a Windows 10/11 bootable USB on Mac M1/M2 is a great way to install the operating system on a new computer, or to reinstall it on an old one. It’s also a good way to try out a new version of Windows without affecting your current installation. This article introduced a few ways to do this, and the method you choose should depend on your needs and preferences.