-
Home
-
Partition Manager
- How to Create and Delete a Guest Account on Windows 11
By Linda | Follow |
Last Updated
Do you want to create a guest account on Windows 11? This post from MiniTool Partition Wizard shows you how to do that. It also tells you how to delete a guest account and how to disable the guest account feature on Windows 11.
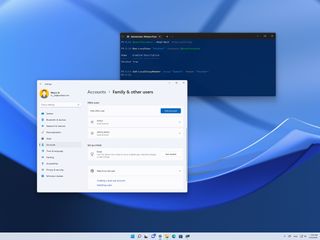
How to Create a Guest Account on Windows 11
If you need to share your PC with others, it’s a good choice to create a dedicated guest account on your Windows 11 PC. The Guest Account lets other people use your computer without being able to change PC settings, install apps, or access your private files.
To create a guest account on Windows 11, you can use the following way:
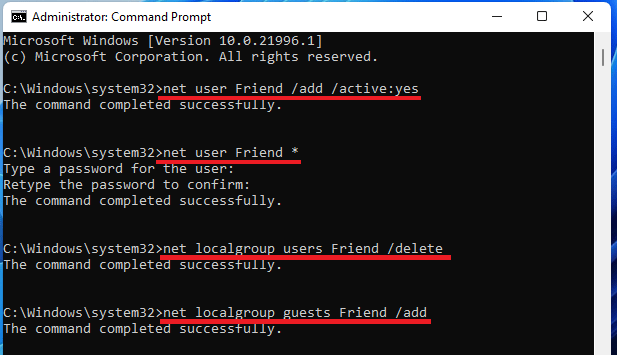
Run the Command Prompt as administrator and then enter the following commands one by one:
- net user Friend /add /active:yes (This will create a standard local user account.)
- net user Friend * (This will set a password for the account.)
- net localgroup users Friend /delete (This will delete the account from the localgroup > users.)
- net localgroup guests Friend /add (This will add the account to the localgroup > guests.)
Tip: It seems that Windows 11 doesn’t allow you to create a guest account via GUI. I have tried the Settings > Accounts tool, but it just creates a standard local account.
How to Add or Remove a User/Microsoft Account on Windows 11?
How to Delete a Guest Account on Windows 11
To delete the guest account, you can use the following 3 ways:
Way 1. Use Settings
- Press Windows key + I to open Settings.
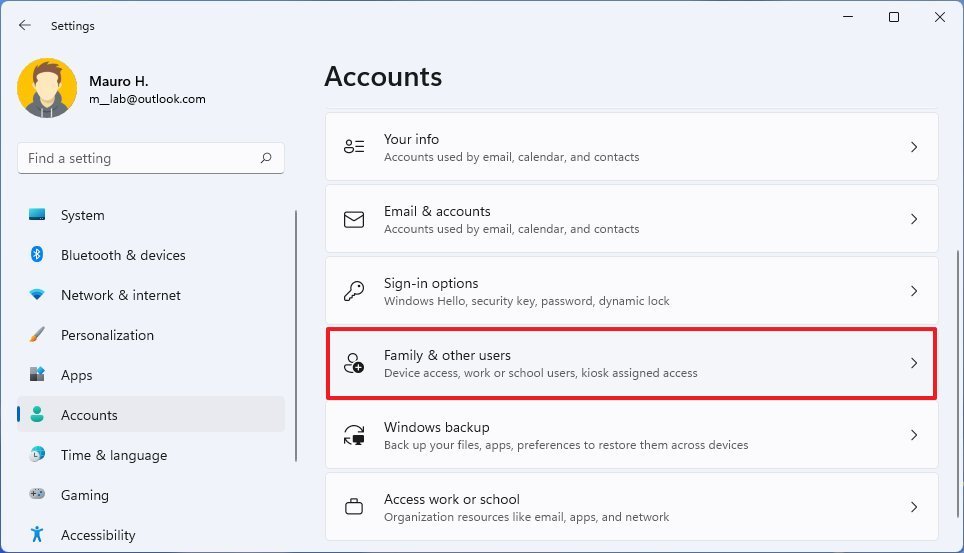
- Go to Accounts > Family & other users.
- Select the guest account and click Remove.
- Select Delete account and data.
Way 2. Use Commands
- net user
- net user guest account name /delete
Please remember to replace the guest account name accordingly.
Way 3. Use Control Panel
- Open Control Panel.
- Click User Accounts. Make sure that your View by is set to Categories.
- Now, click Remove user accounts.
- Select the account you want to remove and then click Delete the account.
- Finally, click Delete files.
Tip: You can check whether an account is a guest account in Control Panel. If an account is a guest account, it will have the “guest account” mark.
How to Disable the Guest Account on Windows 11
If you don’t want to use the Guest Account feature, you can disable it. Here is the guide:
- Press Windows key + R to open the Run box.
- In the Run box, type “msc” and hit Enter.
- In the Local Group Policy Editor, go to Computer Configuration > Windows Settings > Security Settings > Local Policies > Security Options.
- In the right panel, find Accounts: Guest account status. Right-click it and choose Properties.
- Check Disabled and click OK. If you want enable it again, you should navigate to here and check Enabled.
Bottom Line
Is this post helpful to you? Do you have other ideas about guest account Windows 11? Please leave your comments in the following zone. I will appreciate that very much!
About The Author

Position: Columnist
Linda has been working as an editor at MiniTool for 5 years. She is always curious about computer knowledge and learns it crazily. Her articles are simple and easy to understand. Even people who do not understand computer can gain something. By the way, her special focuses are disk management, data recovery and PDF editing.
Хотите временно одолжить свой компьютер? Чтобы обеспечить безопасность и ограничения, создайте гостевую учетную запись в Windows 11. Вот как это сделать.
В Windows вы можете создать несколько учетных записей пользователей, чтобы разделить пользователей и рабочий процесс. Если вы хотите временно одолжить свой компьютер новому пользователю, а не совместно использовать свою учетную запись пользователя, лучше создать гостевую учетную запись пользователя в Windows. Сейчас совместное использование компьютера случается нечасто. Однако будут ситуации, когда вам придется это сделать. Например, недавно мне пришлось поделиться своим компьютером, чтобы члены моей семьи могли увидеть и выбрать несколько фотографий из отпуска.
В старых версиях создать гостевую учетную запись можно всего за два-три клика. Однако в своей бесконечной мудрости Microsoft убрала возможность создания настоящей гостевой учетной записи в Windows 11 и 10.
При этом вы можете создать псевдо-гостевую учетную запись и поделиться этой учетной записью, одалживая компьютер. Конечно, это не так ограничено, как настоящая гостевая учетная запись, но все же лучше, чем совместное использование вашей собственной учетной записи пользователя.
Чтобы приступить к работе, воспользуйтесь одним из приведенных ниже способов, чтобы создать новую гостевую учетную запись в Windows 11.
Важное примечание. Шаги, показанные ниже, будут работать в Windows 10 и 11.
Оглавление:
Команда для создания гостевой учетной записи
Вы можете создать новую гостевую учетную запись в Windows с помощью нескольких команд. По сути, мы создаем новую учетную запись пользователя, а затем перемещаем ее во встроенную группу пользователей «Гости». Звучит сложно, но довольно просто. Позвольте мне показать вам, как это сделать.
- Щелкните правой кнопкой мыши значок «Пуск» на панели задач.
- Выберите опцию «Терминал (администратор)».
- Убедитесь, что вкладка PowerShell открыта.
- Выполните команду «net user Guest1 / add».
- Выполните команду «net localgroup Users Guest/delete».
- Запустите «net localgroup Guest Guest1 / add»
- Закройте окно терминала.
- Вы закончили создание гостевой учетной записи в Windows 11.
Мы должны открыть окно Терминала от имени администратора. Итак, щелкните правой кнопкой мыши значок меню «Пуск» на панели задач и выберите «Терминал (администратор)». После открытия окна терминала убедитесь, что вкладка PowerShell открыта. Вы также можете выполнить приведенные ниже команды в командной строке. Но мы используем PowerShell для простоты.
В окне PowerShell выполните приведенную ниже команду. Это создаст новую учетную запись пользователя. Замените «Guest1» на имя пользователя по вашему выбору.
чистый пользователь Guest1 /добавить
По умолчанию учетная запись пользователя добавляется в группу «Пользователи». Нам нужно переместить его в группу «Гости». Итак, нам нужно сначала удалить только что созданную учетную запись пользователя из группы «Пользователи».
net localgroup Пользователи Гость /удалить
После удаления вновь созданной учетной записи пользователя из группы «Пользователи». Выполните приведенную ниже команду, чтобы переместить его в группу «Гости».
net localgroup Гости Гость1 /добавить
Наконец, закройте окно терминала.
При этом вы создали новую гостевую учетную запись в Windows 11. Вы можете войти в нее с экрана блокировки.
Чтобы удалить учетную запись пользователя, выполните приведенную ниже команду в окне Терминала (администратора). Если вы использовали другое имя пользователя, замените «Guest1» соответствующим образом.
чистый пользователь Guest1 /удалить
Важное примечание. Вы не можете использовать «Гость» в качестве имени пользователя.
Вы также можете создать учетную запись пользователя через приложение «Настройки». Это довольно просто сделать.
- Запустите приложение «Настройки».
- Перейдите на страницу «Учетные записи > Семья и другие пользователи».
- Нажмите кнопку «Добавить учетную запись».
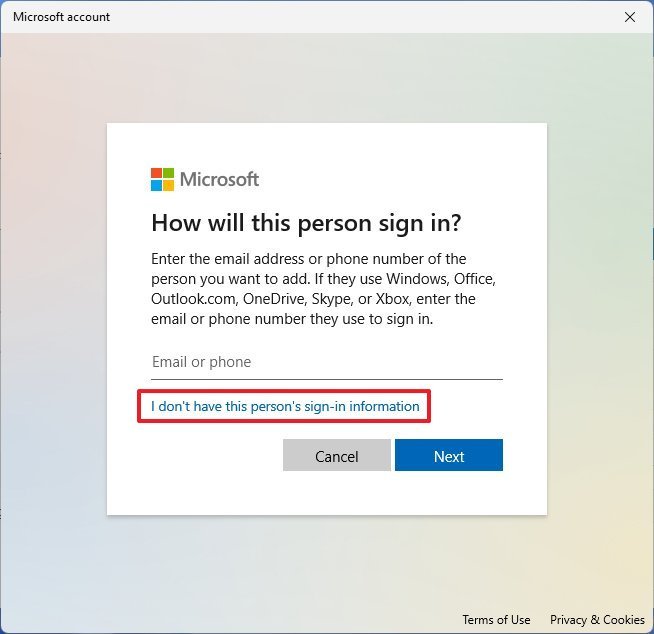
- Щелкните ссылку «У меня нет данных для входа этого человека».
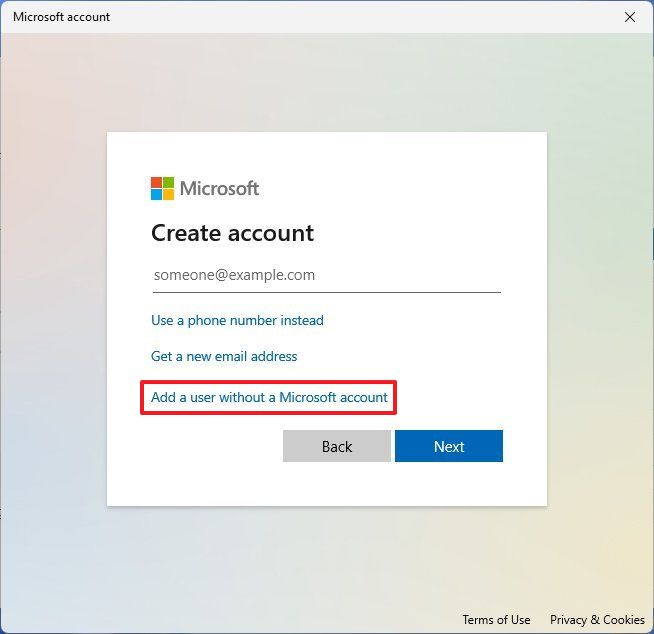
- Щелкните ссылку «Добавить пользователя без учетной записи Microsoft».
- Введите имя пользователя в первое поле.
- (Необязательно) установите пароль в следующих двух полях.
- Нажмите кнопку «Далее».
- (Необязательно) Если вы установите пароль, вам может быть предложено задать контрольные вопросы. Установите их по мере необходимости и нажмите «Далее».
- При этом вы создаете новую учетную запись пользователя.
- Вы можете войти в новую учетную запись с экрана блокировки.
Имейте в виду, что учетная запись пользователя, которую вы только что создали с помощью обоих методов, не является настоящей гостевой учетной записью. Тем не менее, он выполняет свою работу по большей части.
Я надеюсь, что это простое и понятное руководство по Windows помогло вам.
Если вы застряли или вам нужна помощь, оставьте комментарий ниже, и я постараюсь помочь как можно больше.

Creating a guest account in Windows used to be a fairly straightforward process that anyone could do in a few clicks. That’s no longer the case, but you can still create a guest account in newer versions of Windows, such as Windows 11. In this article, we have explained how to create a Windows 11 guest account using Settings, Command Prompt, and PowerShell. So without further ado, let’s dive in.
Create Guest Account in Windows 11 (2022)
Add Guest Account using Windows 11 Settings App
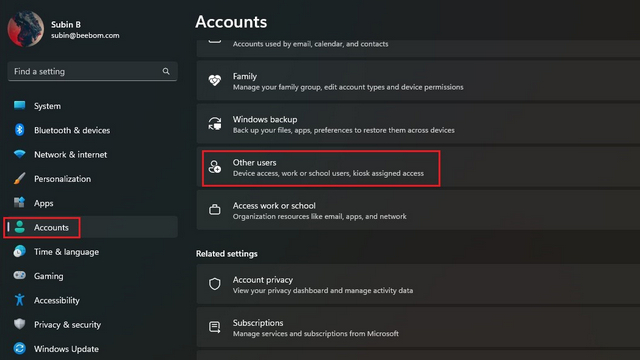
1. Open the Settings app using the Windows 11 keyboard shortcut ‘Win+I’ and switch to the “Accounts” section from the left sidebar. From here, click on “Other users” to set up a guest account. If you’re on an older build of Windows 11, you will find this option as “Family & other users” instead.
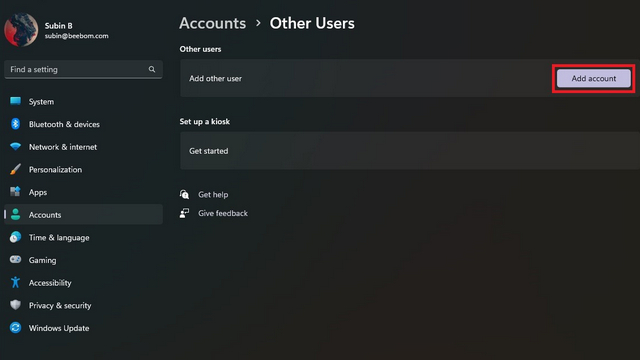
2. Up next, click on “Add account” to create a new user account.
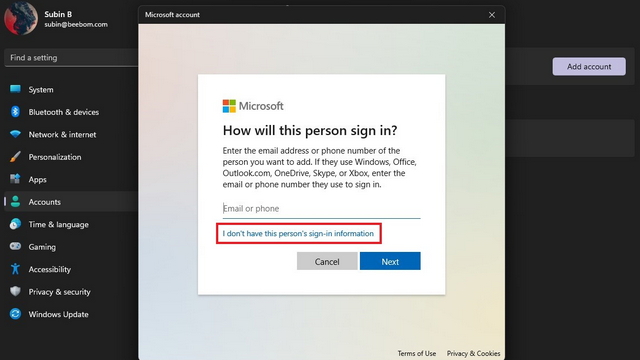
3. When Microsoft’s account creation screen appears, choose “I don’t have this person’s sign-in information”.
4. From the next page, click on “Add a user without a Microsoft account” to create the guest account without linking a Microsoft account.
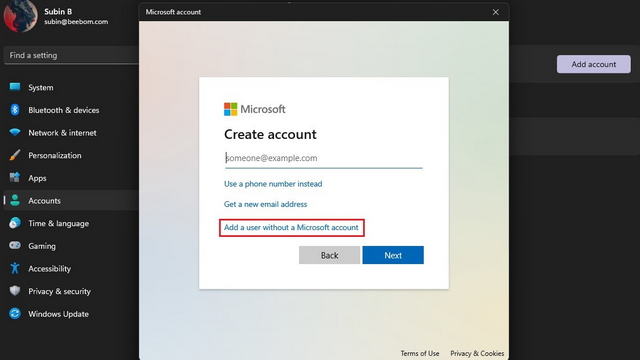
5. You should now set the username, password, and three security questions for the guest account. Do note that you can’t use “Guest” as the username since it is reserved in the OS. Click “Next”, and you now have a second account in Windows 11.

Add New Account to Guest User Group
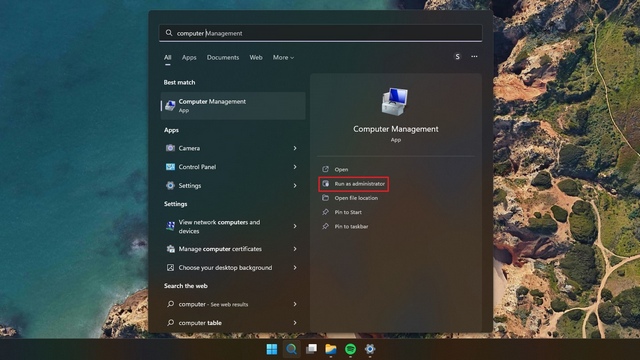
1. Now that you have created an account, you should add it to the guest user group so that the account doesn’t have complete access to your PC. To do this, open Windows Search and open “Computer Management” as an administrator.
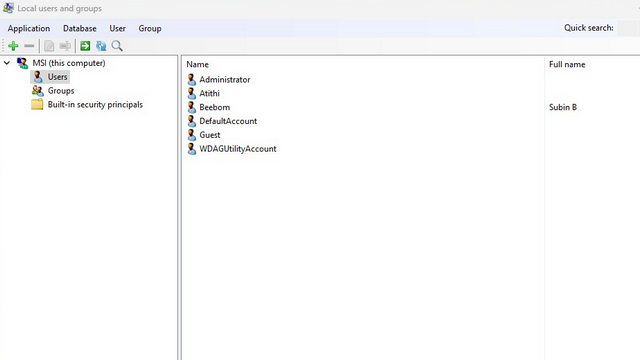
2. When Computer Management appears, navigate to System Tools -> Local Users and Groups -> Users to add the account to the user group. Notably, you won’t find the “Local Users and Groups” option if you’re on the Home edition of Windows 11. As a workaround, you can install and use the Local User and Group Management tool from GitHub. To get started, double-click on the user you just created.
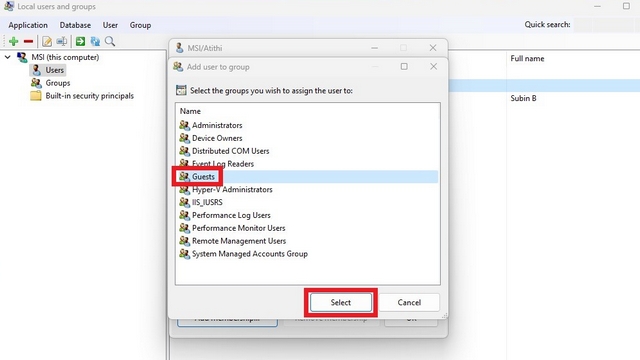
2. Switch to the “Group membership” tab and choose “Add membership” to pick the guest user group.
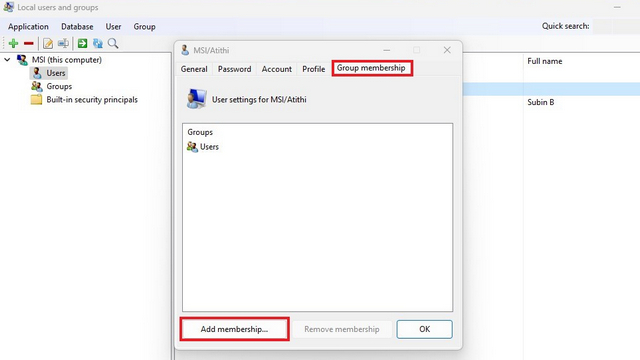
3. Choose “Guests” from the list of groups and click on “Select” to confirm the selection.
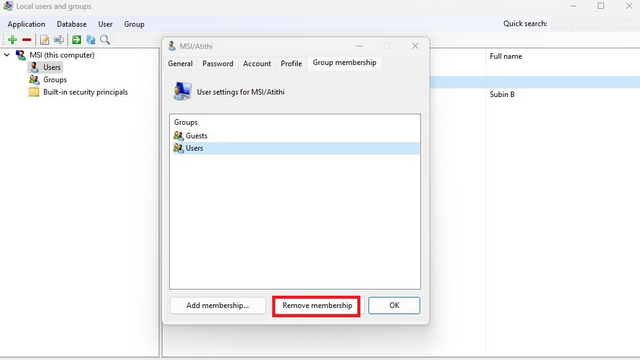
4. After adding the guest user group, click on “Users” and hit the “Remove membership” button. You have successfully created a guest account in Windows 11.
Use Command Prompt to Create Guest Account
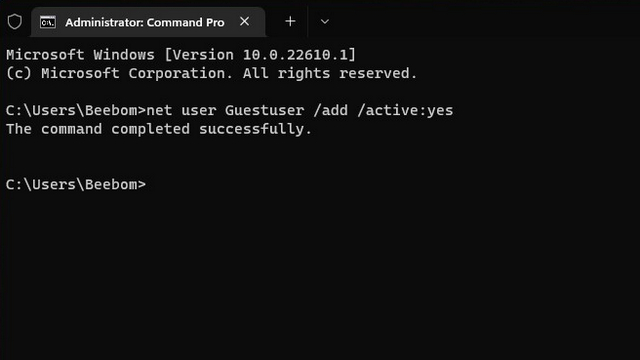
1. Search “Command Prompt” in Windows Search and run it as administrator.

2. Type the following command to create a new guest user. Do note that you can replace “Guestuser” in the command with a name of your choice.
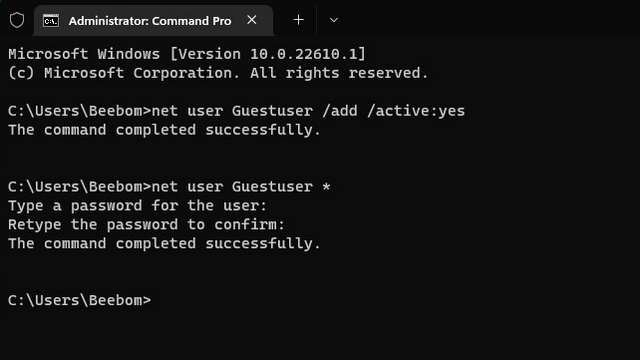
net user Guestuser /add /active:yes
3. Use the command below to set a password for the guest account. And that’s it, you have created a guest account in Windows 11 using Command Prompt.
net user Guestuser *
Create Windows 11 Guest Account Using PowerShell
1. Another way to create Windows 11 guest account is using PowerShell. Search “Powershell” in Windows Search and run it as administrator to open an elevated PowerShell window.
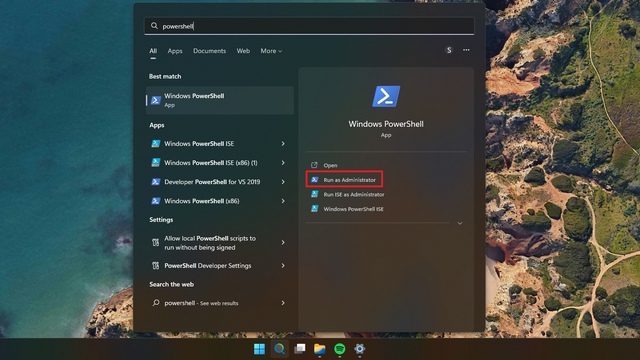
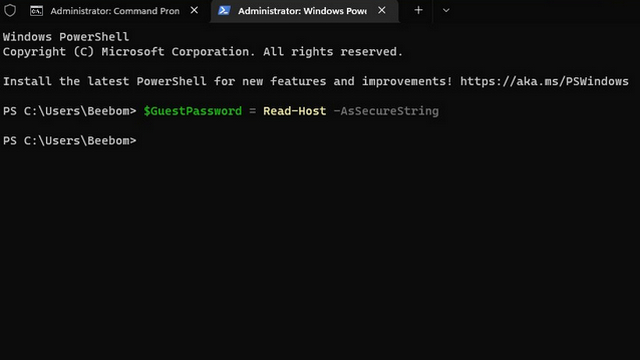
2. Use the command below to set up a password for your guest account.
$GuestPassword = Read-Host -AsSecureString
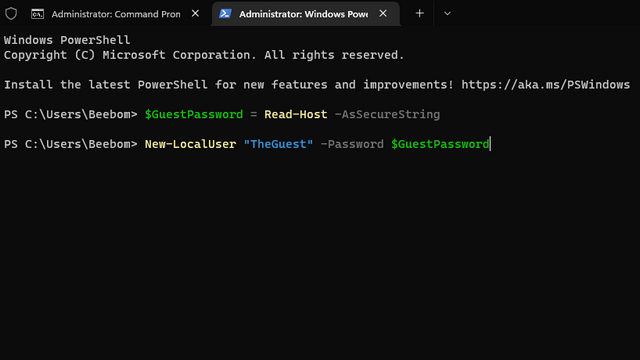
3. Up next, use the command below to set the name for the guest account.
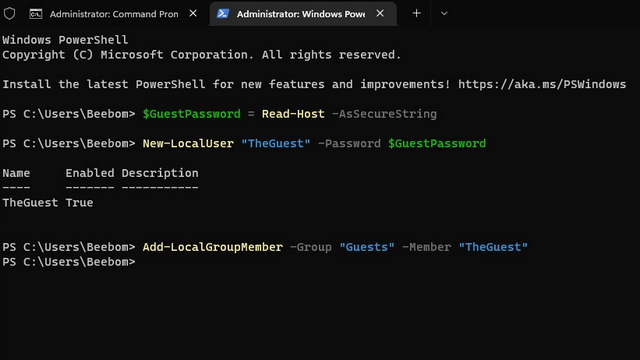
New-LocalUser "TheGuest" -Password $GuestPassword
4. As a final step, use the command below to add the account to the guest user group. You can now share your PC with others using the guest account.
Add-LocalGroupMember -Group "Guests" -Member "TheGuest"
Use Guest Account While Sharing Your PC
So, those are three ways to create a guest account in Windows 11. The option to create a guest account will come in handy, especially if you often find yourself sharing your system with peers or acquaintances. Meanwhile, if you prefer an offline account that’s not associated with your Microsoft account instead, head to our linked guides to create a local account in Windows 11 and remove your Microsoft account from Windows 11.
(Image credit: Windows Central)
In older versions of Windows, a «Guest» account allowed users to create a super locked-down environment to safely share a computer with other people to run apps and access the internet, but this special account is no longer available on Windows 11 (or Windows 10).
However, it’s still possible to create a limited account on Windows 11 with the same characteristics of a «Guest» account using the Settings app, Computer Management, Command Prompt, and even PowerShell commands.
In this Windows 11 guide, we will walk you through the steps to create a temporary guest account on your computer.
- How to create a guest account using Settings
- How to create a guest account using Computer Management
- How to create a guest account using Command Prompt
- How to create a guest account using PowerShell
How to create a guest account using Settings
To create a guest account on Windows 11, use these steps:
- Open Settings.
- Click on Accounts.
- Click the Family & other users page on the right side.
- Under the «Other users» section, click the Add account button.

- Click the I don’t have this person’s sign-in information option.
- Click the Add a user without a Microsoft account option.
- Create a name for the guest account — for example, Visitor.Quick note: Although the built-in «Guest» account has been deprecated, it’s still a reserved name, which means that you can’t use the same name.
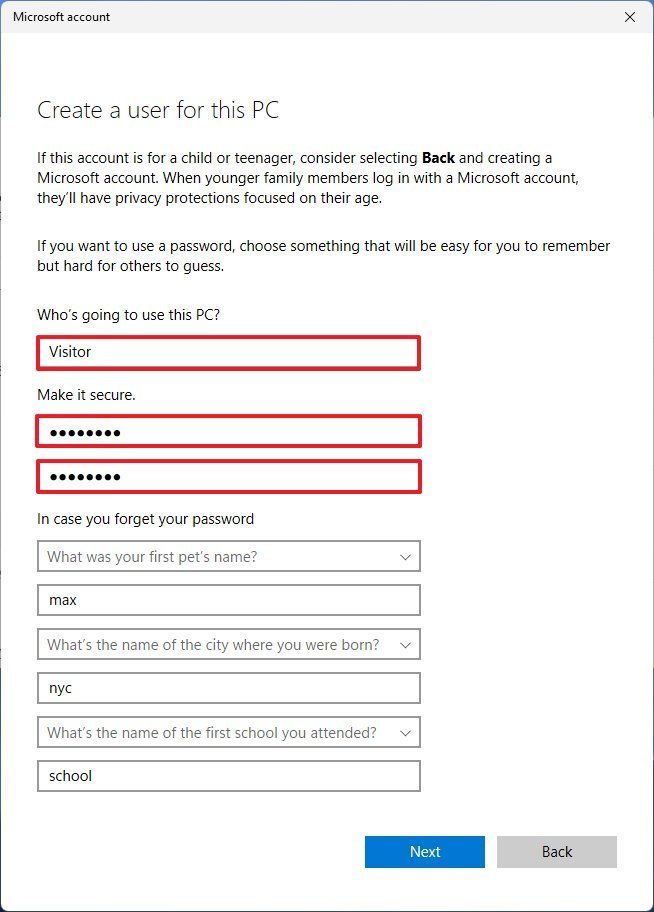
- Create a password for the account.
- Complete the security questions to enable the password recovery feature.
- Click the Next button.
Once you complete the steps, a restricted standard account will be created to share the computer with your house guests. The last thing left to do is sign out and sign in with the newly created account.
Although you can always share a computer with a standard account, you can go a step further and add the new account to the «Guest» group to make it more restrictive. However, since it’s impossible to change user groups from within the Settings app, you need to use the Computer Management app or Command Prompt.
Add account to the Guest user group
To add a Windows 11 account to the Guest group with Computer Management, use these steps:
- Open Start.
- Search for Computer Management and click the top result to open the app.
- Browse to the following path:
System Tools > Local Users and Groups > Users - Right-click the account and select the Properties option.
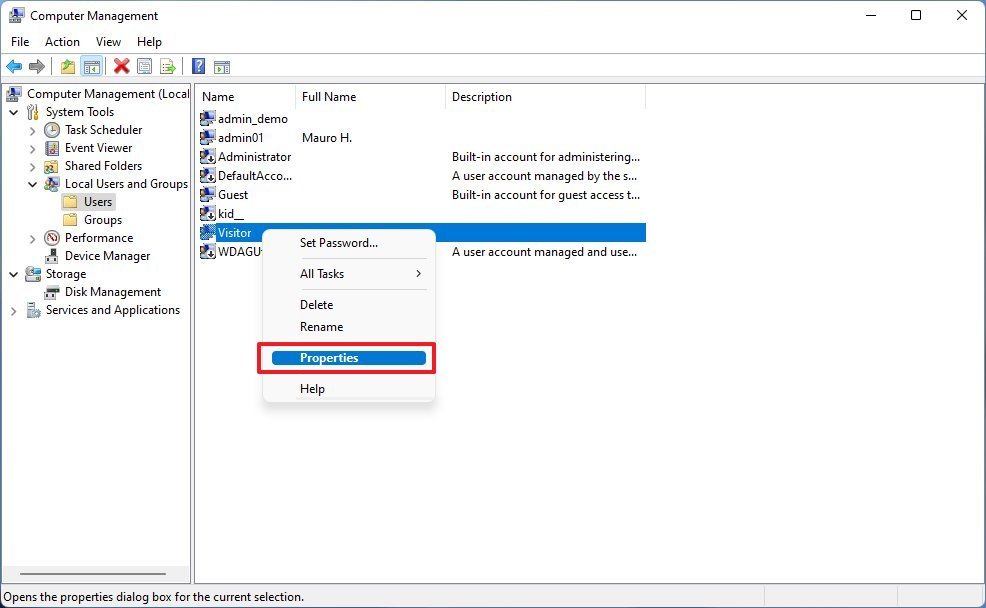
- Click the Member Of tab.
- Click the Add button.
- Click the Advanced button.
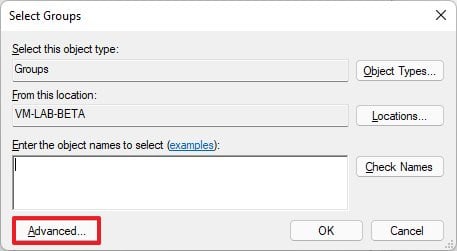
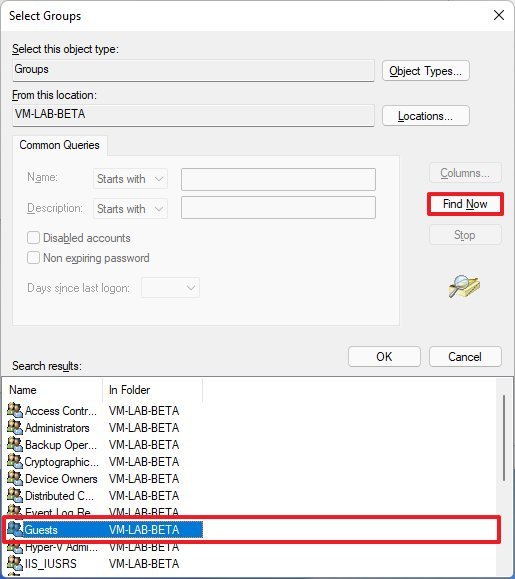
- Click the Find now button.
- Select the Guests group.
- Click the OK button.
- Click the OK button again.
- Select the Users group.
- Click the Remove button.
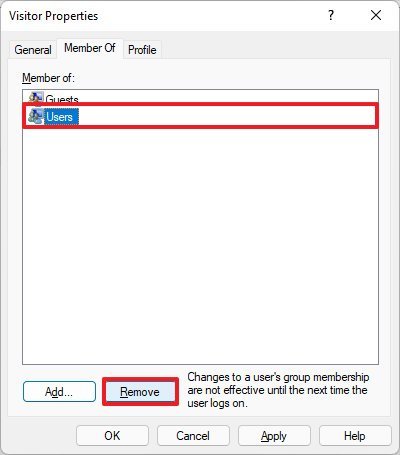
- Click the Apply button.
- Click the OK button.
After you complete the steps, the account will belong to the Guests (more restrictive) system group.
How to create a guest account using Computer Management
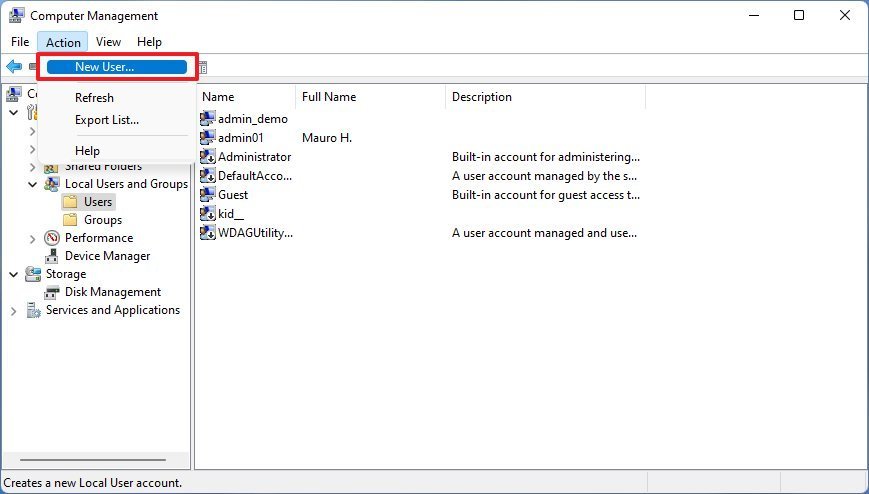
To set up a guest account through Computer Management, use these steps:
- Open Start.
- Search for Computer Management and click the top result to open the app.
- Browse to the following path:
System Tools > Local Users and Groups > Users - Click the «Action» menu and select the New user option.
- Create the account name (for example, Visitor) in the «User name» field.
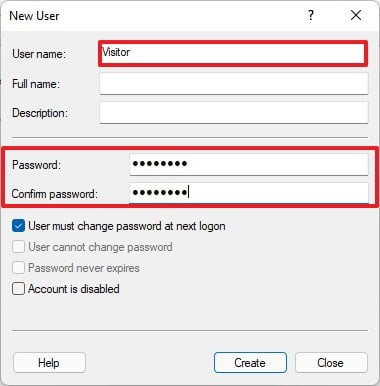
- Create a new password for the guest account.
- Clear the User must change password at next logon option.
- Click the Create button.
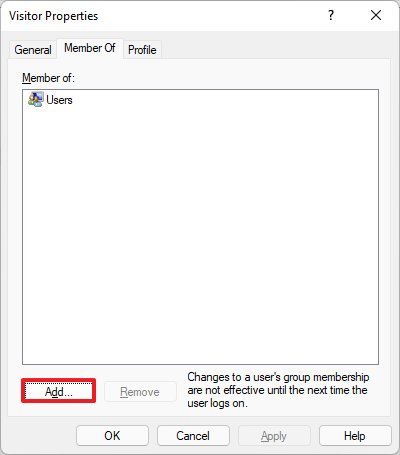
- Right-click the account and select the Properties option.
- Click the Member Of tab.
- Click the Add button.
- Click the Advanced button.
- Click the Find now button.
- Select the Guests group.
- Click the OK button.
- Click the OK button again.
- Select the Users group.
- Click the Remove button.
- Click the Apply button.
- Click the OK button.
After you complete the steps, the restricted local account will be created to share the computer with other people.
How to create a guest account using Command Prompt
To configure a temporary guest account through Command Prompt, use these steps:
- Open Start.
- Search for Command Prompt, right-click the top result, and select the Run as administrator option.
- Type the following command to create a new account and press Enter:
net user Visitor /add /active:yes - Type the following command to set up a password for the account and press Enter:
net user Visitor *Quick note: If this is a temporary guest account, you don’t need to configure a password. You can press Enter twice to set a blank password.
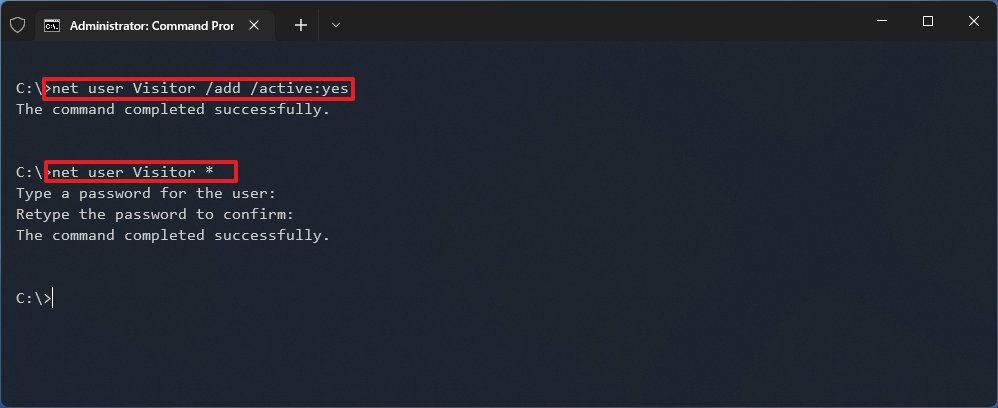
- Type the following command to remove the new user account from the «Users» group and press Enter:
net localgroup users Visitor /delete - Type the following command to add the new user account to the «Guests» user group and press Enter:
net localgroup guests Visitor /add
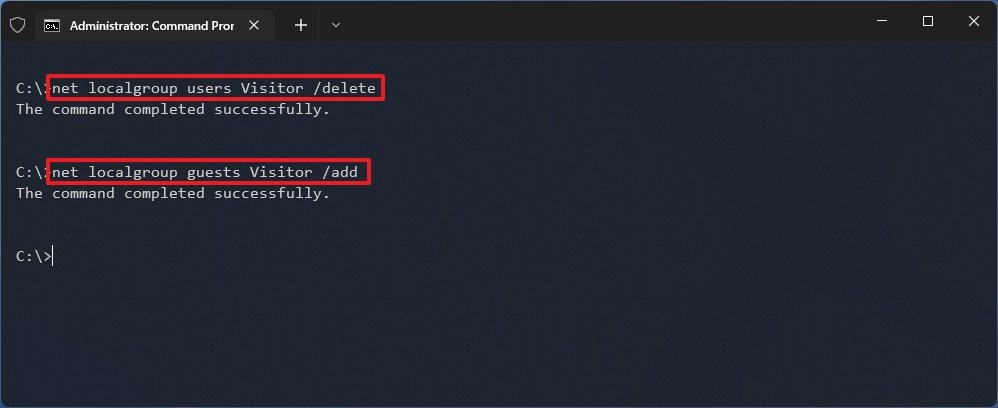
Once you complete the steps, the account will appear on the sign-in screen for anyone to use with the assigned password.
How to create a guest account using PowerShell
To create a guest account with PowerShell commands on Windows 11, use these steps:
- Open Start.
- Search for PowerShell, right-click the top result, and select the Run as administrator option.
- Type the following command to create a password and press Enter:
$GuestPassword = Read-Host -AsSecureString - Create the account password with the blinking cursor.
- Type the following command to create a new account and press Enter:
New-LocalUser "Visitor" -Password $GuestPassword - Type the following command to add the account in the Guests group and press Enter:
Add-LocalGroupMember -Group "Guests" -Member "Visitor"
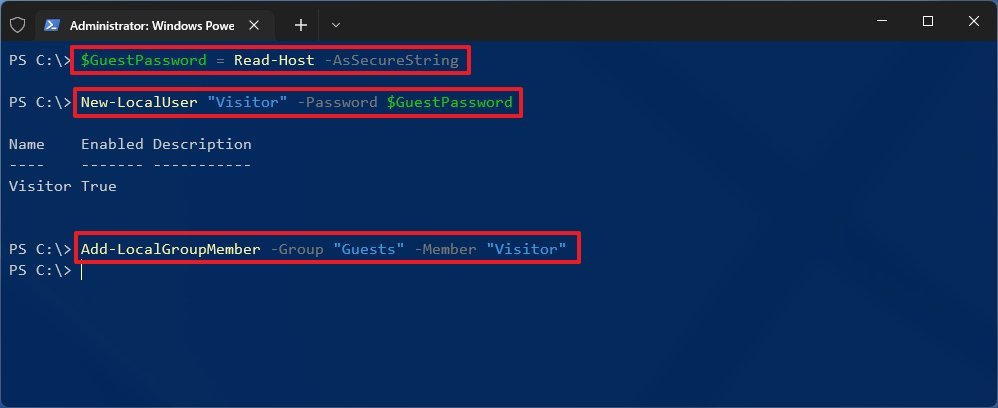
After you complete the steps, PowerShell will create the guest account to share the device with other people.
These steps are meant to set up an account to temporarily share a device with visitors. If you want to share a device more permanently, it’s recommended to create a standard account for each user with a Microsoft account or offline account.
More Windows resources
For more helpful articles, coverage, and answers to common questions about Windows 10 and Windows 11, visit the following resources:
- Windows 11 on Windows Central — All you need to know
- Windows 11 help, tips, and tricks
- Windows 10 on Windows Central — All you need to know
All the latest news, reviews, and guides for Windows and Xbox diehards.
Mauro Huculak is technical writer for WindowsCentral.com. His primary focus is to write comprehensive how-tos to help users get the most out of Windows 10 and its many related technologies. He has an IT background with professional certifications from Microsoft, Cisco, and CompTIA, and he’s a recognized member of the Microsoft MVP community.
На чтение 3 мин. Просмотров 71 Опубликовано
Использование отдельной гостевой учетной записи — это простой метод совместного использования компьютера. Для приглашенных пользователей Microsoft позволяет создать учетную запись гостя в Windows 11. В результате они не смогут получить доступ к личной информации, хранящейся на вашем компьютере. Они смогут использовать только ограниченное программное обеспечение или приложения, которые вы им разрешите.
Однако добавление учетной записи «Гость» в новой Windows 11 немного отличается от того, как это было в Windows 10. Но все же это несколько шагов. Сегодня мы обсудим, как создать учетную запись гостя в Windows 11.
Как создать гостевую учетную запись в Windows 11
В Windows 11 есть два типа гостевых учетных записей. Одна для семейного пользователя, например, учетная запись вашего ребенка или члена семьи. Для этого сначала необходимо зарегистрировать учетную запись Microsoft для члена вашей семьи. Это поможет вам обеспечить безопасность члена семьи в Интернете с помощью настроек безопасности с помощью Microsoft Family Safety.
Если вы хотите создать гостевую учетную запись для человека, который не является членом семьи, вы можете создать учетную запись без учетной записи Microsoft. Вы можете создать локальную учетную запись для других пользователей.
Ниже приведены шаги для создания гостевой учетной записи:
Шаг 1: Нажмите на значок windows, чтобы открыть меню «Пуск». Теперь найдите «Настройки» и откройте его. Или же вы можете использовать Win + I для открытия настроек.

Шаг 2: Откроется окно настроек. Перейдите на вкладку «Учетная запись» и нажмите на опцию «Семья и другие пользователи», чтобы создать гостевую учетную запись в Windows 11.

Шаг 3: Здесь вы увидите два варианта: один для членов семьи и другой для других пользователей. Чтобы создать учетную запись семейного пользователя, нажмите «Добавить учетную запись» рядом с опцией добавления члена семьи и введите учетные данные учетной записи Microsoft для члена семьи. Чтобы создать учетную запись Microsoft, если у вас ее еще нет, выберите «Создать для ребенка». Затем перезагрузите компьютер, чтобы применить изменения. Теперь на экране входа в систему вы найдете два варианта учетных записей пользователей.
Для получения дополнительной информации о том, как создать семейную учетную запись в Windows 11, следуйте руководству по ссылке.

Шаг 4: Чтобы создать гостевую учетную запись для других пользователей, не имеющих учетной записи Microsoft, нажмите кнопку «Добавить учетную запись» рядом с опцией добавления других пользователей.

Шаг 5: Откроется окно создания учетной записи Microsoft. Теперь выберите «У меня нет информации о входе этого человека», чтобы создать обычную локальную учетную запись Windows 11.

Шаг 6: После этого нажмите на «Добавить пользователя без учетной записи Microsoft», чтобы создать учетную запись локального пользователя.

Шаг 7: Теперь введите «Гостевая учетная запись» в качестве имени пользователя; нет необходимости создавать пароль, поскольку это гостевая учетная запись. Если вы собираетесь создать пароль, сделайте его простым. Нажмите «Далее», чтобы сохранить.

Заключение
После этого перезагрузите компьютер, чтобы применить изменения. Теперь на экране входа в систему вы найдете два варианта учетной записи пользователя. Вот и все; вот как можно создать гостевую учетную запись в Windows 11. Вы также можете ознакомиться с нашими руководствами: Как изменить тип учетной записи пользователя в Windows 11 и Как удалить учетную запись пользователя в Windows 11.
Надеюсь, эта статья была полезной для вас. Если она оказалась полезной, не забудьте поделиться ею со своими друзьями и близкими. Также, если у вас возникли вопросы, пожалуйста, задавайте их в разделе комментариев ниже. Мы всегда готовы помочь вам.