Для работы с файлами в Powershell есть около 10 команд. С помощью команды New-Item можно создать файл или папку в Powershell, жесткую и мягкую ссылку. Copy-Item и Move-Item выполняют копирование и перемещение объектов. В этой стать мы рассмотрим все эти операции, а так же удаление директорий и файлов включая сетевые пути, на примерах.
Создание файлов
В следующем примере мы создадим файл с расширением ‘.txt’:
New-Item file.txt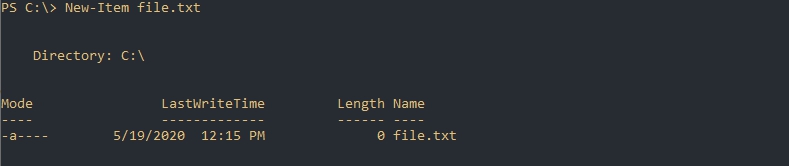
По умолчанию файл создается в той директории откуда был запущен сам Powershell. Изменить путь создания файла можно указав путь в Path:
New-Item -Path 'C:\file.txt'
Каждая папка так же является файлом, но для ее создания в Powershell нужно указывать тип ‘Directory’ в ‘ItemType’:
New-Item -Path 'C:\Dir\' -ItemType Directory
Создание со вложенными директориями
Мы можем создать множество папок не указывая дополнительных параметров:
New-Item -Path 'C:\Dir1\Dir2\Dir3\' -ItemType DirectoryЕсли мы захотим создать директорию и файл, то получим ошибку:
New-Item -Path 'C:\Dir1\Dir2\Dir3\file.txt'- New-Item : Could not find a part of the path
Исправить эту ошибку можно указав параметр Force, который создаст весь путь целиком:
New-Item -Path 'C:\Dir1\Dir2\Dir3\file.txt' -Force
Перезапись
Ключ Force не только создает родительские объекты в виде папок, но и перезаписывает файлы. Если не указан параметр Force, а файл или папка уже существует — вы получите ошибки:
- New-Item : The file ‘C:\Dir1\Dir2\Dir3\file.txt’ already exists.
- New-Item : An item with the specified name C:\Dir1\Dir2\Dir3\ already exists.
Указывая Force — файлы перезаписываются удаляя все содержимое. В случае с папками ничего удалено не будет.
New-Item -Path 'C:\Dir1\Dir2\Dir3\file.txt' -Force
Запись данных
Еще один из способа перезаписи файлов в Powershell — использование символа перенаправления вывода ‘>’. Если объект уже существует — он будет перезаписан, иначе будет создан новый файл:
'test' > file.txt
Get-Content .\file.txt
Почти такой же результат будет если добавить в команду параметр Value. Результат следующего примера будет аналогичен предыдущему:
New-Item -Path 'C:\file.txt' -Value 'test'
Get-Content 'C:\file.txt'
Мягкие и жесткие ссылки
Кроме файлов и директорий в ItemType можно указать следующие типы ссылок:
- SymbolicLink (мягкая ссылка) — обычный ярлык на папку или директорию;
- Junction — старый тип ссылок (до Windows Vista);
- HardLink (жесткая ссылка) — ссылка на объект в файловой системе. Не работает с директориями.
Каждый файл можно представить как ссылку на объект файловой системы. Ярлык устанавливает связь с именем файла (ссылка на ссылку). При переименовании оригинального файла или его удалении ярлык перестает работать.
Жесткая ссылка работает иначе. Она ссылается на объект файловой системы, а не на имя. Поэтому при удалении или переименовании оригинального файла эта связь не потеряется. Такие ссылки можно представить как копии оригинальных фалов, но которые не занимают дополнительное место на диске. Жесткие ссылки работают в рамках одного раздела и их нельзя использовать на каталогах. Сам объект файловой системы (файл) будет существовать до последней такой ссылки.
В следующем примере я создаю жесткую ссылку, где ‘old_file.txt’ — имя существующего файла, а ‘new_link.txt’ — имя нового:
New-Item -Path 'C:\new_link.txt' -ItemType HardLink -Value 'C:\old_file.txt'
Создание множества файлов и директорий
Параметр Path может принимать несколько значений. Это значит, что одной командой мы можем создать несколько объектов:
New-Item -Path 'C:\doc.ini','C:\data.ini'
Можно использовать сочетания директорий и файлов, добавляя ключ Force тем самым избегая ошибок.
Копирование и перемещение папок и файлов
В следующем примере, с помощью Powershell, будет скопирован файл ‘C:\data.txt’ в директорию ‘C:\Catalog\’:
Copy-Item -Path 'C:\data.ini' -Destination 'C:\Catalog\'Перемещение объектов выполняется так же, но с использованием Move-Item:
Move-Item -Path 'C:\data.ini' -Destination 'C:\Catalog\'Если в перемещаемой папке уже существует файл с этим именем, то мы получим ошибку:
- Move-Item : Cannot create a file when that file already exists
Для исправления этой ситуации можно использовать параметр Force или перемещать файл под другим именем. Новое имя можно указать в Destination:
Move-Item -Path 'C:\oldname.ini' -Destination 'C:\Catalog\newname.ini'Каталоги переносятся и копируются так же. Знак ‘\’ в конце Destination говорит, что мы хотим перенести папку внутрь указанной. Отсутствие знака ‘\’ говорит, что это новое имя директории:
Copy-Item -Path 'C:\folder\' -Destination 'C:\folder2'Path — принимает список, а это значит, что мы можем указывать несколько значений через запятую.
Использование масок для копирования и перемещения
Во многих командах Powershell доступны следующие специальные символы:
- * — говорит, что в этом месте есть неизвестное количество неизвестных символов;
- ? — в этом месте есть один неизвестный символ;
- [A,B,C] — в этом месте есть одна из следующих букв A,B,C.
Например так мы скопируем все объекты с расширением ‘txt’ из одной папки в другую:
Copy-Item -Path 'D:\*.txt' -Destination 'D:\Catalog\'Перемещение сработает так же.
Предыдущий вариант сработает, если мы ищем файлы в текущей директории. Для копирования в Powershell внутри всех вложенных каталогов нужно использовать рекурсивный поиск, который доступен только в Copy-Item. Рекурсивный поиск устанавливается ключом Recurse. В следующем примере будет найден и скопирован файл hosts. В качестве * я указал один из элементов неизвестного пути:
Copy-Item -Path 'D:\Windows\System32\drivers\*\host[a,s]' -Destination 'D:\Catalog\' -Recurse
Дополнительные параметры фильтрации
Если предыдущих примеров, где мы находили файлы с неизвестным название, не достаточно, то можно использовать дополнительные параметры. Они доступны в обеих командах Copy-Item и Move-Item:
- Include — включает объекты с этим упоминанием;
- Exclude — работает аналогично предыдущему, но исключает объекты;
- Filter — включает объекты указанные в этом параметре.
Я не вижу смысла использовать все параметры описанные выше в одной команде, но в них есть отличия. Filter будет работать быстрее, так как он работает и фильтрует данные в момент их получения. Include и Exclude сработают после получения всех файлов, но каждое значение для них можно указывать через запятую. Для Include и Exclude так же важно указывать Path с ‘*’ в конце, например ‘C:\dir\*’.
Например мы хотим скопировать все объекты с расширением ‘txt’ и ‘jpg’. Это можно сделать так:
Copy-Item -Path 'D:\*' -Include '*.txt','*.jpg' -Destination 'D:\Catalog\'
Я бы не рекомендовал использовать Filter в обеих командах. Более удобный способ — это искать файлы с Get-ChildItem, а затем их копировать и перемещать в нужное место. В следующем примере будут перенесены все объекты формата ‘.txt’ и ‘.jpg’ в каталог Directory:
# Копирование
Get-ChildItem 'D:\Home\*' -Include '*.txt','*.jpg' -Recurse | Copy-Item -Destination 'D:\Catalog\'
# Перенос
Get-ChildItem 'D:\Home\*' -Include '*.txt','*.jpg' -Recurse | Move-Item -Destination 'D:\Catalog\'
Переименование файлов и директорий
Для переименовывания в Powershell используется Rename-Item. В следующем примере мы укажем новое имя в параметре NewName:
Rename-Item -Path 'D:\SomeData.ini' -NewName 'NewData.ini'В NewName можно указать путь, но он должен соответствовать источнику. При следующем написании будет ошибка:
Rename-Item 'D:\SomeData.ini' -NewName 'D:\SomePath\NewData.ini'- Rename-Item : Cannot rename the specified target, because it represents a path or device name.
Для массового переименовывания объектов можно использовать конвейер с ‘Get-ChildItem’. Например нам нужно поменять расширения файлов с ».jpg» на «.png» — это можно сделать так:
Get-ChildItem -Path 'D:\pictures\*' -Include '*.jpg' |
Rename-Item -NewName {$PSItem.Name -replace '.jpg','.png'}
Удаление
В следующем примере мы удалим файл:
Remove-Item -Path 'C:\pictures\1.png'Пустые каталоги в Powershell удаляются так же. Если в папке находятся другие файлы будет запрошено разрешение на удаление.
Remove-Item 'C:\pictures\'
Избежать таких вопросов можно использовав рекурсию в виде параметра Recurse:
Remove-Item -Path 'C:\pictures\' -RecurseЕсли нужно удалить все файлы внутри каталога, то нужно добавить знак ‘*’. Если внутри каталога будут находится другие папки с файлами, то запросится подтверждение:
Remove-Item 'C:\pictures\*'У команды есть параметры, описанные ранее, в виде:
- Include
- Exclude
- Filter
Работа с сетевыми папками и SMB
Для копирования и переноса данных по сети нужно использовать следующий формат:
'\\server\folder\file'Он сработает со всеми командами, как для источника так и для назначения:
# Копирования
Copy-Item -Path '\\localhost\C$\*.txt' -Destination '\\localhost\C$\NewCatalog\'
# Перенос
Move-Item -Path '\\localhost\C$\*.txt' -Destination '\\localhost\C$\NewCatalog\'
Выполнение команд под другим пользователем
Любая команда выполняется от имени пользователя, который открыл консоль Powershell. Хоть в командах и присутствует параметр ‘Credential’, но при его использовании вы будете получать ошибку:
- The FileSystem provider supports credentials only on the New-PSDrive cmdlet. Perform the operation again without specifying credentials.
Есть несколько способов обойти эти ограничения использовав методы WMI и CIM. В Powershell так же доступен сервис PSRemoting, который создан для выполнения задач удаленно. Мы можем использовать две команды:
- New-PSItem — подключение к компьютеру и дальнейшая работы с ним;
- Invoke-Command — одноразовое выполнение команды.
Этот сервис может не работать по умолчанию и нуждаться в дополнительных настройках. Этот процесс был описан в другой статье.
В следующем примере будет объявлена переменная в которой будет храниться логин и пароль нужной учетной записи:
$credential = Get-Credential
После заполнения этой переменной нужно будет передать ее в параметр Credential. Примеры по работе с файлами удаленно от другого пользователя:
# Переменная, которая хранит нужного пользователя
$credential = Get-Credential

# Удаленное копирование от другого пользователя
Invoke-Command -ComputerName 'localhost' -Credential $credential -ScriptBlock {
   Copy-Item -Path 'C:\*.txt' -Destination 'C:\new_directory\' -Force
}

# Удаленное создание объекта
Invoke-Command -ComputerName 'localhost' -Credential $credential -ScriptBlock {
   New-Item -Path 'C:\SomeData.txt'
}
…
Теги:
#powershell
 Если вы оказались без доступа к чему-либо кроме командной строки или Windows PowerShell и по какой-то причине вам требуется возможность создания или чтения текстовых файлов, это вполне реализуемо, причем более чем одним методом.
В этой инструкции подробно о работе с текстовыми файлами в командной строки или PowerShell (разумеется, можно и в Терминале Windows) — создание и сохранение текстовых файлов, их вывод и чтение в консоли.
Создание текстовых файлов в командной строке
Возможность создания текстовых файлов доступна как в командной строке (cmd.exe), так и в PowerShell. Начнем с первого варианта.
Во всех случаях учитывайте, что при использовании кириллицы потенциально возможны проблемы с кодировкой, а в некоторых случаях кодировка может отличаться при использовании разных команд.
Команда ECHO
Команда командной строки echo предназначена для вывода текстовых сообщений в окне консоли, например, при выполнении сценария в bat-файле, но может быть использована и для вывода текста в файл, благодаря возможности использования оператора «>» для перенаправления вывода из консоли в файл.
Пример команды:
echo Содержимое текстового файла > file.txt
В результате её выполнения в текущей рабочей папке командной строки будет создан файл с именем file.txt и содержимым «Содержимое текстового файла».

COPY CON
Команда copy с параметром con позволяет скопировать содержимое консоли в файл. Использование возможности будет состоять из следующих шагов:
- Введите команду
copy con имя_файла.txt
файл не будет создан, но после выполнения указанной команды у вас появится возможность набрать содержимое этого файла, которое по завершении процесса будет в него сохранено.
- Курсор переместится на строчку ниже, и вы сможете набирать текст так, как делаете это обычно, включая перенос строки.

- Для завершения набора и сохранения текстового файла нажмите сочетание клавиш Ctrl+Z, а затем — Enter. Это добавит отметку конца файла и сохранит его в текущей папке с указанным на 1-м шаге именем.


Создание текстового файла в PowerShell
PowerShell также имеет набор встроенных командлетов для сохранения текстовых данных в файл.
Out-File
Использование Out-File в PowerShell по своей функциональности сходно с оператором перенаправления вывода в командной строке. Вывод консоли перенаправляется в заданный файл.
Пример использования:
"Текстовая строка" | Out-File -FilePath .\file.txt
В этом примере в текущей папке PowerShell будет создан файл с именем file.txt и содержимым «Текстовая строка».
New-Item
Создание нового текстового файла в PowerShell возможно с помощью командлета New-Item. Пример команды, в которой создается текстовый файл file.txt, содержащий «Текстовая строка» в текущем расположении:
New-Item -Path . -Name "file.txt" -ItemType "file" -Value "Текстовая строка"

Set-Content и Add-Content
Ещё два командлета PowerShell для работы с текстовыми файлами:
- Set-Content — перезаписывает содержимое файла
- Add-Content — добавляет содержимое в конце выбранного файла
Их использование можно увидеть на примере следующей команды:
Add-Content -Path .\file.txt -Value "Ещё одна текстовая строка"

Вывод (чтение) текстового файла в командной строке и PowerShell
Теперь перейдем к способам просмотреть текстовые файлы в командной строке или PowerShell. Как и в предыдущем случае, учитывайте, что для файлов, содержащих кириллицу, возможны проблемы с отображением символов в правильной кодировке.
TYPE
Самый простой вариант — использование команды TYPE с указанием пути к файлу, который нужно отобразить в консоли, например:
type file.txt

MORE
Если файл объемный и содержит большое количество строк, используйте команду more, например:
more file.txt
Выполнив команду, вы увидите часть содержимого текста, которая помещается в окне консоли, далее вы можете использовать следующие клавиши:

- Enter — для отображения следующей строки файла.
- Пробел — для отображения следующих строк документа, которые поместятся в активное окно консоли.
- P — Показать следующие N строк. После нажатия этой клавиши с последующим указанием количества строк, будет выведено соответствующее количество строк текстового документа.
- S — пропустить следующие N строк, работает аналогично предыдущему варианту.
- Клавиша «=» — для отображения текущего номера строки.
- Q — для прекращения выполнения команды more.
Get-Content
Вывести содержимое текстового файла в PowerShell можно с помощью Get-Content с указанием пути к файлу, например:
Get-Content file.txt

Также вы можете выводить определенные строки файла, с помощью команд вида (вывод первых или последних 10 строк соответственно):
Get-Content file.txt | Select-Object -First 10
Get-Content file.txt | Select-Object -Last 10
Или присвоить содержимое файла переменной и вывести конкретную строку:
$file_text = Get-Content file.txt
$file_text[2]

Помимо использования ручного ввода команд, вы можете использовать консольные текстовые редакторы — сторонние в версиях для Windows, такие как Vim, Nano, Kinesics Text Editor или даже старый встроенный edit.com (может отсутствовать в вашей версии системы и требовать патча NTVDMx64).
- Use
New-Itemto Create a New Text File Through Windows PowerShell - Use
niCommand to Create a New Text File Through Windows PowerShell - Use
fsutilto Create a New Text File Through Windows PowerShell - Use the
echoCommand to Create a New Text File Through Windows PowerShell - Use Text Editor to Create a New Text File Through Windows PowerShell

PowerShell can perform different standard operations on files and directories in the system. File management is one of them, and it is an important feature available for PowerShell users.
You can easily create, copy, move, remove, and rename files from the command line. This tutorial teaches to create a new text file through Windows PowerShell.
Use New-Item to Create a New Text File Through Windows PowerShell
The New-Item cmdlet creates a new file in the file system. The following command creates a testfile1.txt in C:\New\.
New-Item -Path "C:\New\" -Name "testfile1.txt" -ItemType File
Output:
    Directory: C:\New


Mode                 LastWriteTime         Length Name
----                 -------------         ------ ----
-a----         1/28/2022  11:14 PM              0 testfile1.txt
It creates an empty text file. You can use the -Value parameter to put some content in a new file.
New-Item -Path "C:\New\" -Name "testfile2.txt" -ItemType File -Value "Hello World"
Output:
    Directory: C:\New


Mode                 LastWriteTime         Length Name
----                 -------------         ------ ----
-a----         1/28/2022  11:14 PM             11 testfile2.txt
The Get-Content cmdlet is used to get the content of a file in the specified path.
Get-Content -Path C:\New\testfile2.txt
Output:
Use ni Command to Create a New Text File Through Windows PowerShell
The ni is a built-in alias for the New-Item cmdlet. You can also use this command for creating a new file through Windows PowerShell.
ni -Path "C:\New\" -Name "testfile3.txt" -ItemType File
Output:
    Directory: C:\New


Mode                 LastWriteTime         Length Name
----                 -------------         ------ ----
-a----         1/28/2022  11:23 PM              0 testfile3.txt
Use fsutil to Create a New Text File Through Windows PowerShell
The fsutil is a powerful command that can perform different tasks, including creating new files from the command line. It allows you to create a new file with a specific size.
For example, the following command creates a new file named testfile4.txt in the current directory with a size of 10000 bytes, i.e., 10KB.
fsutil file createnew testfile4.txt 10000
Output:
File C:\Users\rhntm\testfile4.txt is created
Use the echo Command to Create a New Text File Through Windows PowerShell
The echo command is a built-in alias for PowerShell’s Write-Output cmdlet. It is similar to other shells that use echo.
Both commands write the output to the pipeline and redirect the output to a new file. It will create a new file with the same output as its content.
The following command creates a new file, testfile5.txt, with specified contents in the current directory.
echo "PowerShell Tutorial" > testfile5.txt
Check the content of the new file.
Get-Content testfile5.txt
Output:
Use Text Editor to Create a New Text File Through Windows PowerShell
You can use different text editors in PowerShell to create a new file, such as nano, notepad, vim, emacs, etc.
This command will prompt users to create a new file from the notepad.
Similarly, you can install other text editors and create a new file with some content.
I have googled for the below question, but could not find any answer.
Can someone help me on this;
What is the command to create a new file through Windows Powershell?
asked Aug 1, 2017 at 19:34
![]()
JR Sahoo.’JS’JR Sahoo.’JS’
1,3482 gold badges10 silver badges11 bronze badges
2
I’m guessing you’re trying to create a text file?
New-Item c:\scripts\new_file.txt -type file
Where «C:\scripts\new_file.txt» is the fully qualified path including the file name and extension.
Taken from TechNet article
answered Aug 1, 2017 at 19:37
![]()
3
To create file using echo
echo some-text > filename.txt
Example:
C:\>echo This is a sample text file > sample.txt
C:\>type sample.txt
This is a sample text file
C:\>
To create file using fsutil
fsutil file createnew filename number_of_bytes
Example:
fsutil file createnew sample2.txt 2000
File C:\sample2.txt is created
C:\data>dir
01/23/2016  09:34 PM     2,000 sample2.txt
C:\data>
Limitations
Fsutil can be used only by administrators. For non-admin users it throws up below error.
c:\>fsutil file /?
The FSUTIL utility requires that you have administrative privileges.
c:>
Hope this helps!
answered Aug 1, 2017 at 19:41
![]()
Jože StrožerJože Strožer
6631 gold badge6 silver badges14 bronze badges
1
street smart (quick, dirty but works): (might change the file and add an invisible character which might cause the compiler to fail)
$null > file.txt
$null > file.html
Textbook method:
New-Item -path <path to the destination file> -type file
example:
New-Item -path "c:\" -type file -name "somefile.txt"
OR
ni file.xt -type file
absence of -path parameter means it creates it in the current working directory
![]()
answered Jun 24, 2018 at 11:38
![]()
1
ni filename.txt
Replace filename.txt with your file .
I found this the simplest answer to the question, and refer to other answers for more details.
answered Feb 19, 2019 at 20:02
![]()
themefieldthemefield
3,90530 silver badges32 bronze badges
3
Here is another way to create a blank text file in Powershell which allows you to specify the encoding.
First example
For a blank text file:
Out-File C:\filename.txt -encoding ascii
Without -encoding ascii, Powershell defaults to Unicode. You must specify ascii if you want it to be readable or editable by another source.
Overwriting the file with new text:
"Some Text on first line" | Out-File C:\filename1.txt -encoding ascii
This replaces whatever text is in filename.txt with Some Text on first line.
Appending text to the current file contents:
"Some More Text after the old text" | Out-File C:\filename1.txt -encoding ascii -Append
Specifying -Append leaves the current contents of filename.txt alone and adds Some More Text after the old text to the end of the file, leaving the current content intact.
![]()
answered Dec 9, 2018 at 20:22
![]()
Josh HJosh H
911 silver badge2 bronze badges
As many have already pointed out, you can create files with the New-File command.
This command has a default alias set to ni but if you’re used to unix commands you can create your own custom command easily.
Create a touch command to act as New-File like this:
Set-Alias -Name touch -Value New-Item
This new alias will allow you to create new files like so:
touch filename.txt
This would make these 3 commands equivalent:
New-Item filename.txt
ni filename.txt
touch filename.txt
Keep in mind that for this to be persistent, you should add the alias to your powershell profile. To get it’s location simply run $profile on ps. If you want to edit it directly, run code $profile (for VSCode), vim $profile (for vim) or whatever.
answered Nov 18, 2020 at 22:36
![]()
Another way to do it (method I like)
New-Item -ItemType file -Value 'This is just a test file' -Path C:\Users\Rick\Desktop\test.txt
Source: New-Item
answered Nov 19, 2020 at 10:12
![]()
ModroModro
4162 silver badges14 bronze badges
Use the New-item cmdlet and your new file name.
New-item <filename>
Example:
New-item My_newFile.txt
answered Aug 15, 2022 at 13:44
![]()
                                                       # encodings:

New-Item file.js -ItemType File -Value "some content"  # UTF-8

"some content" | Out-File main.js -Encoding utf8       # UTF-8-BOM

echo "some content" > file.js                          # UCS-2 LE BOM
answered Jan 31, 2020 at 14:01
![]()
Every day, sysadmins have to perform various standard operations on the numerous files and folders on their Windows servers. These tasks often include managing users’ data on shared resources and maintaining backups properly. You can use PowerShell to reduce amount of manual work involved.
Before you start, make sure your system policy allows running PowerShell scripts as described in “Windows PowerShell Scripting Tutorial for Beginners.”
View the objects in a directory
To view the content of a directory on a Windows file server, use the Get-ChildItem cmdlet. To show all hidden files, add the -Force parameter. The command below shows all root objects in the Shared folder:
Get-ChildItem -Force \fsShared
If you want to also check all subfolders and their content, add -Recurse parameter:
Get-ChildItem -Force \fsShared -Recurse
To filter the output, add the Filter, Exclude, Include and Path parameters to the Get-ChildItem cmdlet. For advanced object filtering, use the Where-Object cmdlet. The script below searches for all executable files in the IT folder that were modified after April 1, 2018:
Get-ChildItem -Path \fsSharedIT -Recurse -Include *.exe | Where-Object -FilterScript {($_.LastWriteTime -gt '2018-04-01')}
Create files and folders with PowerShell
To create new objects with Windows PowerShell, you can use the New-Item cmdlet and specify the type of item you want to create, such as a directory, file or registry key.
For example, this command creates a folder:
New-Item -Path '\fsSharedNewFolder' -ItemType Directory
And this command creates an empty file:
New-Item -Path '\fsSharedNewFoldernewfile.txt' -ItemType File
Create files and writing data to them
There are at least two built-in methods to create a file and write data to it. The first is to use the Out-File cmdlet:
$text = 'Hello World!' | Out-File $text -FilePath C:datatext.txt
To overwrite an existing file, use the –Force switch parameter.
You can also create files using the Export-Csv cmdlet, which exports the output into a csv file that can be opened in Excel:
Get-ADuser -Filter * | Export-Csv -Path C:dataADusers.csv
Create files after checking that they don’t already exist
The following script checks whether a specific file (pc.txt) already exists in a particular folder; if not, it generates a list of all AD computers and saves it to a new file named pc.txt:
#create array of text files
$files=Get-ChildItem C:data*.txt | select -expand fullname
#check if file exists inside the array
$files -match "pc.txt"
#if matching return “True” key then exit, if “False” then create a report
if($files -eq 'False'){
Get-ADComputer -Filter * | Export-Csv -Path C:datapc.txt
}
else{exit}
Delete files and folders with PowerShell
To delete objects, use the Remove-Item cmdlet. Please note that it requires your confirmation upon execution if the object is not empty. The example below demonstrates how to delete the IT folder and all the subfolders and files inside it:
Remove-Item -Path '\fssharedit'
Confirm
The item at \pdcsharedit has children and the Recurse parameter was not
specified. If you continue, all children will be removed with the item. Are you
sure you want to continue?
[Y] Yes  [A] Yes to All  [N] No  [L] No to All  [S] Suspend  [?] Help
(default is "Y"):
If you have already made sure that every object inside the folder should be deleted, you can use the ?Recurse switch to skip the confirmation step:
Remove-Item -Path '\fssharedit' -Recurse
Delete files and folders older than X days
Sometimes you need to clean up old files from a certain directory. Here’s the way to accomplish that:
$Folder = "C:Backups"

#delete files older than 30 days
Get-ChildItem $Folder -Recurse -Force -ea 0 |
? {!$_.PsIsContainer -and $_.LastWriteTime -lt (Get-Date).AddDays(-30)} |
ForEach-Object {
   $_ | del -Force
   $_.FullName | Out-File C:logdeletedbackups.txt -Append
}

#delete empty folders and subfolders if any exist
Get-ChildItem $Folder -Recurse -Force -ea 0 |
? {$_.PsIsContainer -eq $True} |
? {$_.getfiles().count -eq 0} |
ForEach-Object {
    $_ | del -Force
    $_.FullName | Out-File C:logdeletedbackups.txt -Append
}
Delete files after checking they exist
Here’s how to check whether a file exists and delete it if it does:
$FileName = 'C:datalog.txt'
If (Test-Path $FileName){
   Remove-Item $FileName
}
Delete files from multiple computers in one script
To delete files from remote PCs, you must have the appropriate security permissions to access them. Be sure to use UNC paths so the script will correctly resolve the file locations.
$filelist = @(" c$Temp", "c$Backups") #variable to delete files and folder
$computerlist = Get-Content  C:datapc.txt #get list of remote pc's
    foreach ($computer in $computerlist){
        foreach ($file in $filelist){
            $filepath= Join-Path "\$computer" "$filelist" #generate unc paths to files or folders
            if (Test-Path $filepath)
            {
            Remove-Item $filepath -force -recurse -ErrorAction Continue}}}
Copy files and folders with PowerShell
The Copy-Item cmdlet enables you to copy objects from one path to another. The following command creates a backup by copying the file users.xlsx from one remote computer (fs) and saving it to another (fs2) over the network:
Copy-Item -Path \fsShareditusers.xlsx -Destination \fs2Backupsitusers.xlsx
If the target file already exists, the copy attempt will fail. To overwrite the existing file, even if it is in Read-Only mode, use the -Force parameter:
Copy-Item -Path \fsShareditusers.xlsx -Destination \fs2Backupsitusers.xlsx -Force
Copy files with PowerShell to or from a remote computer
If you’re copying files to or from remote computers, be sure to use UNC paths.
For example, use this command to copy files from a remote file server to the local C: directory:
Copy-Item \fsc$temp -Recurse C:data
To copy files from your local directory to the remote folder, simply reverse the source and destination locations:
Copy-Item C:data -Recurse \fsc$temp
Copy multiple files from one server to another over the network in one script
You can also copy files from one remote server to another. The following script recursively copies the \fsSharedtemp folder to \fsSharedtest:
Copy-Item \fsSharedtemp -Recurse \fsSharedtest
Copy only certain types of files
To copy only certain files from the source content to the destination, use the -Filter parameter. For instance, the following command copies only txt files from one folder to another:
Copy-Item -Filter *.txt -Path \fsSharedit -Recurse -Destination \fs2Sharedtext
Copy files using XCOPY and ROBOCOPY commands or COM objects
You can also run XCOPY and ROBOCOPY commands to copy files, or use COM objects as in the example below:
(New-Object -ComObject Scripting.FileSystemObject).CopyFile('\fsShared', 'fs2Backup')
Move files and directories with PowerShell
The Move-Item cmdlet moves an item, including its properties, contents, and child items, from one location to another. It can also move a file or subdirectory from one directory to another location.
The following command moves a specific backup file from one location to another:
Move-Item -Path \fsSharedBackups1.bak -Destination \fs2Backupsarchive1.bak
This script moves the entire Backups folder and its content to another location:
Move-Item -Path \fsSharedBackups -Destination \fs2Backupsarchive
The Backups directory and all its files and subfolders will then appear in the archive directory.
The Rename-Item cmdlet enables you to change the name of an object while leaving its content intact. It’s not possible to move items with the Rename-Item command; for that functionality, you should use the Move-Item cmdlet as described above.
The following command renames a file:
Rename-Item -Path "\fsSharedtemp.txt" -NewName "new_temp.txt"
Rename multiple files
To rename multiple files at once, use a script like this:
$files = Get-ChildItem -Path C:Temp #create list of files
foreach ($file in $files)
{
    $newFileName=$file.Name.Replace("A","B")  #replace "A" with "B"
    Rename-Item $file $newFileName
}
Change file extensions with PowerShell
You can also use the Rename-Item to change file extensions. If you want to change the extensions of multiple files at once, use the Rename-Item cmdlet with the Get-ChildItem cmdlet.
The following script changes all “txt” file extensions to “bak”. The wildcard character (*)ensures that all text files are included:
Get-ChildItem \fsSharedLogs*.txt | Rename-Item -NewName { $_.name -Replace '.txt$','.bak' }
Using the information in this article, you can automate a variety of simple operations related to file management on your file storages and save time for more important tasks. Good luck!
FAQ
How can I create a file?
Use the New-Item cmdlet to create a file:
New-Item -Path '\fsSharedNewFoldernewfile.txt' -ItemType File
Creating a file overwrites any existing one with the same name, so you might need to check whether the file already exists.
You can also use the New-Item cmdlet to create folders, directories or registry keys.
How do I create a text file
To create a new object with Windows PowerShell, use the New-Item cmdlet and specify the type of item you want to create, like this:
New-Item -Path '\fsSharedNewFoldernewfile.txt' -ItemType File
You can use the New-Item cmdlet to create files, folders, directories and registry keys.
How do I create a directory
To create a new directory with PowerShell, use the New-Item cmdlet:
New-Item -Path '\fsSharedNewFolder' -ItemType Directory
You can also use the New-Item cmdlet to create files, folders or registry keys
How do I delete a file?
To delete an object, use the Remove-Item cmdlet. Confirmation will be requested upon execution if the object is not empty.
Remove-Item -Path '\fssharedit'
You can also delete all files older than X days or delete files from multiple computers with PowerShell.
How do I copy a file?
Use the Copy-Item cmdlet to copy objects from one path to another. The following command creates a backup by copying the file users.xlsx from one remote computer (fs) and to another (fs2) over the network:
Copy-Item -Path \fsShareditusers.xlsx -Destination \fs2Backupsitusers.xlsx
Note that if the target file already exists, the copy attempt will fail. Learn how to overwrite files when copying them from or to a remote computer.
How do I move a file?
The Move-Item cmdlet moves an item, including its properties, contents and child items, from one location to another:
Move-Item -Path \fsSharedBackups1.bak -Destination \fs2Backupsarchive1.bak
You can also move an entire folder with PowerShell.
How do I rename a file?
To rename a single file using PowerShell, use the following command:
Rename-Item -Path "\fsSharedtemp.txt" -NewName "new_temp.txt"
You can also rename multiple files using PowerShell.

Ian is a former Technical Marketing Specialist at Netwrix. He is an IT professional with more than 15 years of experience and an avid PowerShell blogger.