При работе в командной строке (cmd) часто возникает необходимость скопировать файл или целую папку. Также консольные команды для копирования могут использоваться в BAT-файлах для резервного копирования и других задачах.
В этой статье мы расскажем о том, как скопировать файл или папку в командной строке Windows. Статья будет актуальной для всех версий Windows, включая самые новые Windows 11 и Windows 10.
Как скопировать файл через командную строку Windows
Для копирования файлов в командной строке Windows нужно использовать команду «copy». Данная команда позволяет скопировать один или несколько файлов из одной папку в другую. Обратите внимание, команда «copy» копирует только файлы. Для копирования вложенных папок нужно использовать команду «xcopy», которую мы рассмотрим ниже.
В самом простом случае команда для копирования файлов выглядит так:
copy [исходный файл] [новый файл или папка назначения]
Например, чтобы скопировать файл «file1.txt» из текущего каталога в папку «e:\tmp» нужно выполнить:
copy file1.txt e:\tmp

При необходимости для копируемого файла можно указать новое название в папке назначения. Например, чтобы скопировать «file1.txt» из текущего каталога в папку «e:\tmp» и при этом назвать его «newfile.txt» нужно выполнить:
copy file1.txt e:\tmp\newfile.txt

С указанием полных путей команда копирования будет выглядеть так:
copy d:\tmp\file1.txt e:\tmp\file.txt

Для копирования большого количества файлов в названиях можно использовать маски. Символ звездочка (*) обозначает любое количество любых символов, а знак вопроса (?) – один любой символ. Например, чтобы скопировать все документы с расширением TXT из текущего каталога в папку «e:\tmp\» нужно выполнить следующее:
copy *.txt e:\tmp\

Также с помощью команды «copy» можно скопировать все содержимое одной папки в другую. Например, в случае копирования всех файлов из папки «d:\tmp\» в папку «e:\tmp» команда будет выглядеть так:
copy d:\tmp\ e:\tmp

В данном случае из папки «d:\tmp\» будут скопированы только файлы. Для копирования вложенных папок нужно использовать «xcopy».
Полный синтаксис команды «copy» выглядит так:
copy [/d] [/v] [/n] [/y | /-y] [/z] [/a | /b] <source> [/a | /b] [+<source> [/a | /b] [+ ...]] [<destination> [/a | /b]]
Полный список параметров для команды «copy»:
| Параметр | Описание |
| /d | Сохранение копируемых зашифрованные файлов в расшифрованном виде в месте назначения. |
| /v | Проверка правильности записи скопированных файлов. |
| /n | Использование короткого имени файла (если доступно) при копировании файла с именем длиннее восьми символов или с расширением длиннее трех символов. |
| /y | Подавление запроса на подтверждение перезаписи. |
| /-y | Вывод запроса на подтверждение перезаписи. |
| /z | Копирует сетевые файлы в перезапускаемом режиме. |
| /a | Копирование текстового файла ASCII. |
| /b | Копирование двоичного файла. |
| <source> | Указывает расположение, из которого необходимо скопировать один или несколько файлов. Обязательный параметр. |
| <destination> | Указывает расположение, в которое необходимо скопировать файл или несколько файлов. Обязательный параметр. |
| /? | Отображение справки в командной строке. |
Большинство параметров указываются в начале, сразу после команды «copy». Например, для того чтобы подавить вывод запросов на перезапись существующих файлов можно добавить параметр «/y».
copy /y file1.txt file2.txt
Как скопировать папку через командную строку Windows
Для копирования папок с вложенными папками и файлами в командной строке Windows нужно использовать команду «xcopy». Данная команда позволяет скопировать папку из одного расположение в другое с сохранением структуры каталогов. Фактически «xcopy» — это более продвинутая версия команды «copy».
В упрощенном виде синтаксис команды «xcopy» будет выглядеть так:
xcopy [исходная папка или файл] [папка назначения или файл] [параметры]
Для копирования папок с вложенными папками и файлами нужно использовать параметр «/s» или «/e». Без этих параметров команда будет работать только с одним каталогом.
| Параметр | Описание |
| /s | Копирование каталогов с подкаталогами (исключая пустые) |
| /e | Копирование каталогов с подкаталогами (включая пустые). |
Например, для того чтобы скопировать все файлы и вложенные папки (включая пустые) из папки «d:\tmp» в папку «e:\tmp» нужно выполнить:
xcopy d:\tmp e:\tmp /e

Полный синтаксис команды «xcopy» выглядит так:
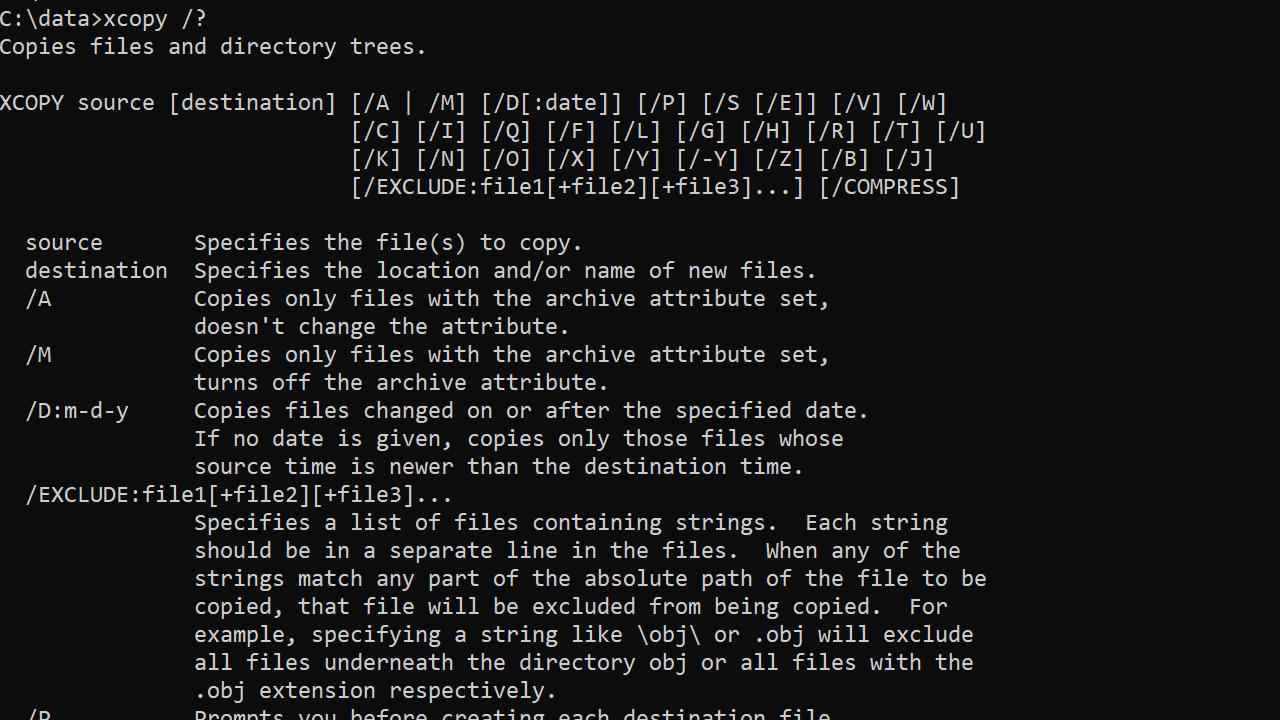
xcopy <Source> [<Destination>] [/w] [/p] [/c] [/v] [/q] [/f] [/l] [/g] [/d [:MM-DD-YYYY]] [/u] [/i] [/s [/e]] [/t] [/k] [/r] [/h] [{/a | /m}] [/n] [/o] [/x] [/exclude:FileName1[+[FileName2]][+[FileName3]]] [{/y | /-y}] [/z] [/b] [/j]
Полный список параметров для команды «xcopy» можно посмотреть на сайте Майкрософт. Здесь же приведены только некоторые самые базовые:
| Параметр | Описание |
| /s | Копирование каталогов с подкаталогами (исключая пустые) |
| /e | Копирование каталогов с подкаталогами (включая пустые). |
| /w | Вывод запроса на подтверждения начала копирования. |
| /p | Запрос подтверждение при создании каждого нового файла. |
| /c | Пропуск ошибок. |
| /v | Проверка всех скопированных файлов на соответствие его исходнику. |
| /q | Скрывает вывод информации от команды xcopy. |
| /f | Вывод имен в процессе копирования. |
| /l | Вывод списка копируемых файлов. |
| /g | Сохранение новых файлов в незашифрованном виде. |
| /d[:мм-дд-гггг] | Копирование файлов, которые были измененные не ранее указанной даты. Если не указать дату (мм-дд-гггг), то команда xcopy будет копировать все файлы, которые новее существующих. |
| /u | Обновление только существующих файлов в папке назначения. |
| /y | Подавление запроса на подтверждение перезаписи. |
| /-y | Вывод запроса на подтверждение перезаписи. |
| /z | Копирует сетевые файлы в перезапускаемом режиме. |
| /h | Копирование скрытых и системных файлов. |
| /r | Перезапись файлов с атрибутом «только для чтения». |
| /t | Создание структуры каталогов без копирования файлов. Пустые каталоги не включаются в структуру. Для включения пустых каталогов нужно добавить параметр /E. |
| <source> | Указывает расположение, из которого необходимо скопировать один или несколько файлов. Обязательный параметр. |
| <destination> | Указывает расположение, в которое необходимо скопировать файл или несколько файлов. Обязательный параметр. |
| /? | Отображение справки в командной строке. |
Параметры указываются в конце команды. Например, для того чтобы скопировать все файлы (включая скрытые, системные и только для чтения) и вложенные папки (включая пустые) из папки «d:\tmp» в папку «e:\tmp» нужно выполнить:
xcopy d:\tmp e:\tmp /e /h /r
Посмотрите также:
- Выключение компьютера через командную строку
- Как перезагрузить компьютер через командную строку
- Как вызвать командную строку в Windows 7
- Как поменять дату в Windows 7
- Как выключить компьютер через определенное время
Автор
Александр Степушин
Создатель сайта comp-security.net, автор более 2000 статей о ремонте компьютеров, работе с программами, настройке операционных систем.
Остались вопросы?
Задайте вопрос в комментариях под статьей или на странице
«Задать вопрос»
и вы обязательно получите ответ.
The xcopy command is a Command Prompt command used to copy one or more files or folders from one location to another location.
With its many options and ability to copy entire directories, it’s similar to, but much more powerful than, the copy command. The robocopy command is also similar but has even more options.
Xcopy Command Availability
This command is available from within the Command Prompt in all Windows operating systems including Windows 10, Windows 8, Windows 7, Windows Vista, Windows XP, Windows 98, etc.
You can also access the command in MS-DOS as a DOS command.
Xcopy Command Syntax
Use the following syntax for the xcopy command:
xcopy source [destination] [/a] [/b] [/c] [/d [:date]] [/e] [/f] [/g] [/h] [/i] [/j] [/k] [/l] [/m] [/n] [/o] [/p] [/q] [/r] [/s] [/t] [/u] [/v] [/w] [/x] [/y] [/-y] [/z] [/exclude:file1[+file2][+file3]…] [/?]
The availability of certain xcopy command switches and other command syntax may differ from operating system to operating system. Learn how to read command syntax if you’re not sure how to read the syntax above or in the table below.
| Xcopy Command Options | |
|---|---|
| Item | Description |
| source | This defines the files or top level folder that you want to copy from. The source is the only required parameter. Use quotes around source if it contains spaces. |
| destination | This option specifies the location where the source files or folders should be copied to. If no destination is listed, the files or folders will be copied to the same folder you run the xcopy command from. Use quotes around destination if it contains spaces. |
| /a | Using this option will only copy archive files found in source. You can not use /a and /m together. |
| /b | Use this option to copy the symbolic link itself instead of the link target. This option was first available in Windows Vista. |
| /c | This option forces xcopy to continue even if it encounters an error. |
| /d [:date] | Use the command with /d option and a specific date, in MM-DD-YYYY format, to copy files changed on or after that date. You can also use this option without specifying a specific date to copy only those files in source that are newer than the same files that already exist in destination. This is helpful when using xcopy to perform regular file backups. |
| /e | When used alone or with /s, this option is the same as /s but will also create empty folders in destination that were also empty in source. The /e option can also be used together with the /t option to include empty directories and subdirectories found in source in the directory structure created in destination. |
| /f | This option will display the full path and file name of both the source and destination files being copied. |
| /g | Using xcopy with this option allows you to copy encrypted files in source to a destination that does not support encryption. This option will not work when copying files from an EFS encrypted drive to a non-EFS encrypted drive. |
| /h | The command doesn’t copy hidden files or system files by default but will when using this option. |
| /i | Use the /i option to force xcopy to assume that destination is a directory. If you don’t use this option, and you’re copying from source that is a directory or group of files and copying to destination that doesn’t exist, the xcopy command will prompt you enter whether destination is a file or directory. |
| /j | This option copies files without buffering, a feature useful for very big files. This option was first available in Windows 7. |
| /k | Use this option when copying read-only files to retain that file attribute in destination. |
| /l | Use this option to show a list of the files and folders to be copied… but no copying is actually done. The /l option is useful if you’re building a complicated command with several options and you’d like to see how it would function hypothetically. |
| /m | This option is identical to the /a option but xcopy will turn off the archive attribute after copying the file. You can not use /m and /a together. |
| /n | This option creates files and folders in destination using short file names. This option is only useful when you’re using the command to copy files to a destination that exists on an drive formatted to an older file system like FAT that does not support long file names. |
| /o | Retains ownership and Access Control List (ACL) information in the files written in destination. |
| /p | When using this option, you’ll be prompted before the creation of each file in destination. |
| /q | A kind of opposite of the /f option, the /q switch will put xcopy into «quiet» mode, skipping the on-screen display of each file being copied. |
| /r | Use this option to overwrite read-only files in destination. If you don’t use this option when you want to overwrite a read-only file in destination, you’ll be prompted with an «Access denied» message and the command will stop running. |
| /s | Use this option to copy directories, subdirectories, and the files contained within them, in addition to the files in the root of source. Empty folders will not be recreated. |
| /t | This option forces the xcopy command to create a directory structure in destination but not to copy any of the files. In other words, the folders and subfolders found in source will be created but there we be no files. Empty folders will not be created. |
| /u | This option will only copy files in source that are already in destination. |
| /v | This option verifies each file as it’s written, based on its size, to make sure they’re identical. Verification was built in to the command beginning in Windows XP, so this option does nothing in later versions of Windows and is only included for compatibility with older MS-DOS files. |
| /w | Use the /w option to present a «Press any key when ready to being copying file(s)» message. The command will begin copying files as instructed after you confirm with a key press. This option is not the same as the /p option which asks for verification before each file copy. |
| /x | This option copies file audit settings and System Access Control List (SACL) information. You imply /o when you use the /x option. |
| /y | Use this option to stop the command from prompting you about overwriting files from source that already exist in destination. |
| /-y | Use this option to force the command to prompt you about overwriting files. This might seem like a strange option to exist since this is the default behavior of xcopy but the /y option may be preset in the COPYCMD environment variable on some computers, making this option necessary. |
| /z | This option allows the xcopy command to safely stop copying files when a network connection is lost and then resume copying from where it left off once the connection is reestablished. This option also shows the percentage copied for each file during the copy process. |
| /exclude:file1[+file2][+file3]… | This option allows you to specify one or more file names containing a list of search strings you want the command to use to determine files and/or folders to skip when copying. |
| /? | Use the help switch with xcopy to show detailed help about the command. Executing xcopy /? is the same as using the help command to execute help xcopy. |
The xcopy command will add the archive attribute to files in destination no matter if the attribute was on or off on the file in source.
Xcopy Command Examples
Following are several examples of how to use this command:
Copy Files to a New Folder
xcopy C:Files E:Files /i
In the above example, the files contained in the source directory of C:Files are copied to destination, a new directory [/i] on the E drive called Files.
No subdirectories, nor any files contained within them, will be copied because the /s option was not used.
Xcopy Backup Script
xcopy "C:Important Files" D:Backup /c /d /e /h /i /k /q /r /s /x /y
In this example, xcopy is designed to function as a backup solution. Try this if you’d like to use xcopy instead of a backup software program to back up your files. Put the command as shown above in a script and schedule it to run nightly.
As shown above, the command is used to copy all the files and folders [/s] newer than those already copied [/d], including empty folders [/e] and hidden files [/h], from source of C:Important Files to the destination of D:Backup, which is a directory [/i]. We have some read-only files we want to keep updated in destination [/r] and we want to keep that attribute after being copied [/k]. We also want to make sure we maintain any ownership and audit settings in the files we’re copying [/x]. Finally, since we’re running xcopy in a script, we don’t need to see any information about the files as they’re copied [/q], We don’t want to be prompted to overwrite each one [/y], nor do we want the command to stop if it runs into an error [/c].
Copy Files and Folders Over the Network
xcopy C:Videos "\SERVERMedia Backup" /f /j /s /w /z
Here, the command is used to copy all the files, subfolders, and files contained in the subfolders [/s] from source of C:Videos to the destination folder Media Backup located on a computer on the network by the name of SERVER. We’re copying some really large video files, so buffering should be disabled to improve the copy process [/j], and since we’re copying over the network, we want to be able to resume copying if we lose the network connection [/z]. Being paranoid, we want to be prompted to start the process before it actually does anything [/w], and we also want to see every detail about what files are being copied as they’re being copied [/f].
Duplicate Folder Structure
xcopy C:Client032 C:Client033 /t /e
In this final example, we have a source full of well-organized files and folders in C:Client032 for a client. We’ve already created an empty destination folder, Client033, for a new client but we don’t want any files copied—just the empty folder structure [/t] so that we’re organized and prepared. We have some empty folders in C:Client032 that might apply to the new client, so we want to make sure those are copied as well [/e].
Xcopy & Xcopy32
In Windows 98 and Windows 95, two versions of the xcopy command were available: xcopy and xcopy32. However, the latter command was never intended to be run directly.
When you execute xcopy in Windows 95 or 98, either the original 16-bit version is automatically executed (when in MS-DOS mode) or the newer 32-bit version is automatically executed (when in Windows).
To be clear, no matter what version of Windows or MS-DOS you have, always run the xcopy command, not xcopy32, even if it’s available. When you execute xcopy, you’re always running the most appropriate version of the command.
Xcopy Related Commands
The xcopy command is similar in many ways to the copy command but with significantly more options, like the ability to copy folders, copy every file in subdirectories, and exclude files.
This command is also very much like the robocopy command except that robocopy has more flexibility than even xcopy.
The dir command is often used with xcopy to check which folders and files are in a directory before completing the command.
Thanks for letting us know!
Get the Latest Tech News Delivered Every Day
Subscribe
The Xcopy tool, which stands for extended copy, is a popular command-line utility for copying massive amounts of data in Windows. Compared to the traditional copy command, Xcopy has more features and switches that give you better control when copying or moving files and folders.
Not a reader? Watch this related video tutorial!
Not seeing the video? Make sure your ad blocker is disabled.
In this guide, you will learn how to use Xcopy for various file copy scenarios. From copying a single file, multiple directories, applying filters or exclusions, and more. By the end, you will have gained the knowledge to use Xcopy in your day-to-day file copying tasks.
Let’s begin!
Prerequisites
To follow along with the examples in this guide, you’ll need the following.
- A Windows (server or client) computer. Xcopy comes built-in to Windows, and you don’t need to download anything else. This guide will use Windows 10 Build 1909.
- Xcopy works on the command prompt or PowerShell, and this article assumes that you already have one open.
Understanding the Xcopy Command
Xcopy is a command-line utility, which has been available out of the box since Windows 98. You can find this tool under the %WINDIR%system32 folder with the executable name xcopy.exe.
Compared to the Windows copy command, Xcopy is much more efficient in copying files and directories. In addition, Xcopy has more options that make it more customizable and lets you control the file copy behavior.
Benefits
There are several benefits or advantages of using Xcopy that you will learn as you progress in this guide. But below are some of the benefits of using Xcopy.
- Faster copy operation on large sets of files and directories.
- Simplifies application deployment.
- Can replicate the source directory structure as is.
- Copy files while retaining the owner and access control list (ACL) information.
- Copy and overwrite read-only files.
- Can exclude files based on the file name, extension, or path.
- Can identify updated files, which is useful for differential backups.
- Integrate and use with scripts.
Limitations
As awesome as Xcopy is, it is not without limitations. Although these limitations may not be a deal-breaker, knowing what they are would be good before diving in.
- Cannot copy open files.
- No support for the Windows Volume Shadow Copy Service (VSS). This lack of VSS support makes Xcopy not suitable for backing up live operating system volumes.
- Insufficient memory error when the length of the path plus file name exceeds 254 characters.
Xcopy Syntax Reference
Xcopy lets you perform various file and folder copy operations. But first, you’ll need to understand its syntax and options. There are a lot of options that would change how Xcopy operates. To help you make sense of these options, the tables that follow will cover them in detail.
The first path designation refers to the source file(s); the second path designation refers to the destination file(s).
xcopy [source] [destination] [options][source]– Pathname for the file(s) to copy (accepts wildcards). You should specify the drive, path, and the files you would want to copy.[destination]– Pathname for the new file(s). If you don’t specify the destination path, the command will copy the files to the same path as the source.[options]– Can be any of the following options in the tables below. You can also view these options by running thexcopy /?command or visiting the Xcopy online documentation.
Source Options
| Switch | Explanation |
| /A | Copy files that have the archive attribute. |
| /M | Copy files with the archive attribute set, then switches off the archive attribute at the destination. Use this option when creating routine backups. |
| /H | Copy hidden and system files and directories. The default value is N. |
| /D:mm-dd-yyyy | Only copies that files with modification date on or after the given date. Without using this option, the command will copy only the files whose date/time is newer than the destination. |
| /U | Only copies the files that already exists at the destination. |
| /S | Copies folders and subfolders recursively excluding the empty one. |
| /E | Copies folders and subfolders recursively including the empty one. |
| /EXCLUDE:file1[+file2][+file3]… | Specify the text file(s) containing a list of strings to match absolute file paths to exclude. |
Destination Options
| Switch | Explanation |
| /I | If the destination does not exist, using this option assumes that the destination is a directory and creates it. If you omit this option, the command prompts to confirm if the destination is a directory or a file. |
| /R | Overwrites read-only files. |
| /T | Creates a recursive folder structure at the destination without copying the files. This option does not include copying empty folders. To include empty folders, use this option together with the /E option. |
| /K | Preserves the file attributes during the copy. Otherwise, the command will reset read-only attributes. |
| /N | Copies files using their short file names. |
| /O | Copies files including ownership and access control list (ACL) information. |
| /X | Copies files including file audit settings and ACL information (implies using /O). |
Copy Options
| Switch | Explanation |
| /W | Prompts for a key press before the copy process can start. |
| /P | Prompts (Y/N) before creating each file. |
| /Y | Suppresses the confirmation to overwrite destination file if exists. |
| /-Y | Prompts to confirm overwriting an existing destination file. |
| /V | Verifies that the source and destination file sizes are identical. |
| /C | Ignores errors and forces the command to continue copying. |
| /B | Copies only the symbolic link but not the link target file. |
| /G | Copies encrypted files to a destination that does not support encryption. |
| /J | Copies files without using the buffer. This switch useful when copying very large files. |
| /Q | Suppresses the display of file names while copying. |
| /F | Displays the full source and destination file paths while copying. |
| /L | Only displays which files to copy without copying them. This switch can be useful when testing Xcopy commands with multiple options to assess the expected result. |
| /Z | Copies files in restartable mode. Using this option, the command gracefully stops copying files during network interruption. The copying will resume after re-estabslishing the network connection. |
Working with Xcopy: Usage Examples
Now that you’re familiar with the Xcopy syntax and options, it’s time to begin actually using it by combining one or more options together. You’ll explore many different scenarios in the following sections to use Xcopy to copy files and folders.
Listing Files to Copy
If you have a file server containing a huge amount of files that you want to copy, perhaps to a backup location, testing out your Xcopy command first would be ideal. One situation when you’d want to test Xcopy is when you’re combining multiple Xcopy options.
Using the /L switch with Xcopy, you can simulate what would have happened when you issued the command by listing which files it would copy. This way, you can confirm whether your command will copy all the files that you intended.
XCOPY C:WorkareaXCopyDemo C:WorkareaXCopyDemoFolder /LCopying a Single File
The most basic operation you can do with Xcopy is copying a file from a source to a destination without using any options. For example, the command below will copy a text file to a destination directory, and the file name will be the same.
XCOPY C:WorkareaXCopyDemoNewFile.txt C:WorkareaXCopyDemoFolderYou can also copy the source file and change the destination filename by running the command below.
XCOPY C:WorkareaXCopyDemoNewFile.txt C:WorkareaXCopyDemoFolderAnotherFile.txtCopying Files to a New Folder
With Xcopy, you can copy files and create the destination directory on the fly. To do so, you need to append the /I option to the Xcopy command.
For example, the command below copies the files from the C:WorkareaDemo folder to the D:Workarea folder. If the destination folder does not exist, Xcopy creates the destination folder using the /I option.
XCOPY C:WorkareaDemo D:Workarea /ICopying All Files and Folders Recursively
Aside from copying files from one folder to another, Xcopy also lets you copy folders and files recursively. And there are two ways you can do a recursive copy—with and without empty folders.
To copy all files and directories while ignoring empty directories, append the /S option to the end of the Xcopy command, as shown below.
On the other hand, to include empty directories during the recursive copy, add the /E option instead to the command.
Including Hidden and System Files
By default, Xcopy does not include hidden and system files in copy operations. But if you need to force Xcopy to include hidden and system files, add the /H switch to the command.
The command below copies all files recursively, including hidden and system files. This command also ignores errors, creates the destination folders, and overwrites existing files.
XCOPY C:WorkareaDocuments D:WorkareaDocuments /S /H /C /YPreserving the Read-Only File Attribute
Another attribute that Xcopy can handle and preserve is the file’s read-only attribute. By default, when Xcopy copies a read-only file, it removes the file’s read-only attribute at the destination. To stop Xcopy from removing the read-only attribute, append the /K switch to the command.
For example, the command below copies a read-only file to another location, and the resulting destination file will still have a read-only attribute. This command will also overwrite the destination file if the file exists.
XCOPY C:WorkareaXCopyDemoNewFile.txt D:Workarea /I /K /YAs a side-effect of preserving the file as read-only, Xcopy cannot overwrite the same file in future copy operations. But, you can force Xcopy to overwrite read-only files by adding the /R switch.
XCOPY C:WorkareaXCopyDemoNewFile.txt D:Workarea /K /R /YFiltering Files to Copy
Suppose there are multiple files in the source folder and subfolders you want to copy. Xcopy allows you to input wildcards as a way to filter which files to copy.
For example, the command below copies only the files with the .cs extension recursively from the root of the C: drive to the root of the E: drive. This command will also ignore errors and overwrites existing files without prompting for confirmation.
Excluding Files and Folders from the Copy
A powerful feature of Xcopy is its ability to exclude files from the copy process. To use this feature, you can leverage the /EXCLUDE switch. This switch accepts the names of the file(s) that contain the exclusion lists.
First, you need to create or have a file containing the exclusion list. For example, you can have a text file called Exclude.txt that contains the following entries. As you can see, the exclusion file can have specific file names, file extensions, and folders as entries.
xyz.txt
Exclude.txt
.pdf
.png
exclude
To run Xcopy with exclusions, run the command below and specify the full path of the exclusion file to the /EXCLUDE switch. This command uses the C:WorkareaXCopyDemoExclude.txt file.
XCOPY C:WorkareaXCopyDemo C:WorkareaBackup /S /Y /Exclude:C:WorkareaXCopyDemoExclude.txtThe result? Xcopy runs to copy files but skips the xyz.txt, Exclude.txt, all files with .pdf and .png extensions, and all files under the exclude directory.
Performing a Differential Copy
When you need to backup files from one location to another, Xcopy has an option that lets you perform a differential backup. Instead of copying all files, a differential backup only copies the files where the modified date falls on or after a date that you specify to the /D:m-d-y switch.
For example, to copy only the files with the modified date on or after April 01, 2021, run the command below. Additionally, this command performs a recursive copy, ignores errors, and overwrites existing files at the destination.
XCOPY C:WorkareaXCopyDemo C:WorkareaBackup /D:04-01-2021 /S /C /YIf you do not specify a date with the /D option, Xcopy will copy only the source files that are newer than the destination files.
Copying Files Based on the Archive Attribute
Typically, backup programs remove a file’s archive attribute after a backup operation. After modifying a file (i.e., edit and save), Windows automatically resets the files archive attribute.
If you create a script to backup files using Xcopy, you can use the archive attribute to determine whether to copy or backup the file.
To copy files with the archive attribute, you can take advantage of the /A and /M switches. Which one of these switches to use depends on whether you want to preserve the file’s archive attribute or not.
The following command performs a recursive copy of files with the archive attribute only. The destination files will retain the archive attribute after the copy due to the /A switch.
XCOPY C:WorkareaDemo D:WorkareaTest /A /S /YIn contrast, to remove the source file’s archive attribute after copying to the destination, specify the /M switch instead.
XCOPY C:WorkareaDemo D:WorkareaTest /M /S /YRetaining File Owner and ACL Information
Imagine creating a backup of an entire profile folder. Each file may have different owners or unique permissions. Should you need to restore those files, you’d want the same owners and permissions intact.
This way, the whole process would seem seamless, and the users will still have the same access to the files they had before. But first, you need to make sure that you’re backing up those files while retaining the existing owners and access.
To copy files and retain the owner and ACL information, add the /O parameter to the xcopy command, as shown below.
XCOPY C:Workarea D:Work /O /I /YApart from retaining the owner and ACL information, you can also include the files’ audit settings. Copying audit settings can be useful if your organization applies group policy objects (GPO) to audit files.
To include file audit settings when copying files with Xcopy, use the /X switch. The /X switch implies the /O switch, too, so you don’t have to use both switches at the same time.
XCOPY C:Workarea D:Work /X /I /YCopying Files and Folders Over the Network
Not only can Xcopy copy files between locations on the same or different disks, but it can also copy files over the network. Unfortunately, copying files over the network is not always reliable. Network connections may suffer from short interruptions and, in some cases, total loss of connection.
Luckily, you can run Xcopy in restartable mode. Meaning, even if the copy progress stops due to a network error, the copy can resume after re-establishing the network connection. To run Xcopy in restartable mode, you’ll need to add the /Z switch to the command.
For example, the command below performs a recursive file copy from the C:Workarea folder to a network location. The /Z parameter makes Xcopy run in restartable mode.
XCOPY C:Workarea "\SERVER01Backup" /S /ZUsing the
/Zswitch, Xcopy also displays the file copy progress in percentage.
Copy Files Using Unbuffered I/O
Buffered I/O corresponds to how the operating system buffers disk reads and writes in the file system cache. While buffering speeds up subsequent reads and writes to the same file, it comes at a cost. As a result, unbuffered I/O (or a raw file copy) is the preferred method for copying a large file.
This copy method reduces the file system cache overhead and prevents the file system cache from being easily flushed with large amounts of file data.
To copy large files using unbuffered I/O, you can append the /J switch to the Xcopy command, as shown below.
XCOPY C:Workareaabc.mp4 D:Temp /I /JCopying Files with Verification
Like any other tasks, copying files may not always return 100% successful results. Some files may become corrupted during transfer even if there are no visible errors.
With Xcopy, you can use the /V switch to verify that the destination and source files are identical based on their size after copying. Identical source and destination files indicate that the copy was successful and that file is intact.
The command below copies all files from C:WorkareaXCopyDemo to C:WorkareaBackup and verifies each file using the /V switch. The /F switch displays the source and destination files’ full path.
XCOPY C:WorkareaXCopyDemo C:WorkareaBackup /F /H /S /X /VCopying Encrypted Files
Xcopy also supports copying encrypted files to destinations that do not support encryption. Using the /G switch, Xcopy copies encrypted source files and creates decrypted destination files.
This copy mode is helpful, especially when backing up encrypted files to network shares or non-Encrypting File System (EFS) volumes.
Xcopy C:WorkareaXCOPYDemo C:WorkareaXCOPYDemoFolder /S /GCopying Folder Structures
In some situations, backup scripts or programs may require you to pre-provision the destination before copying the files from the source. When needed, you can use Xcopy to replicate the source folder structure without the content.
To do so, run the Xcopy command with /T switch. Using the /T switch will cause Xcopy to copy only the directory tree structure to the destination but ignores the empty directories.
You can also add the /E switch to the command to include empty directories, as shown in the example command below.
Xcopy C:WorkareaXCOPYDemo C:WorkareaXCOPYDemoFolder /T /ECommon Errors
If something can go wrong, it probably will. The same is the case when you’re copying files regardless of the volume. Below are the common Xcopy errors that you might encounter.
Invalid Number of Parameters
This error typically occurs when the command you’ve entered contains space characters in it. To avoid this error, when typing a source or destination path that contains space characters, you should surround the path with double-quotes.
For example, if the path is C:Documents and Settings, enter the path as “C:Documents and Settings”.
Cannot Perform a Cyclic Copy
This error happens if the source directory you are copying also includes the target directory. In this case, Xcopy would enter a loop, causing an error. When using Xcopy, the destination must be a fully independent directory or disk if you copy all directories and subdirectories.
Parse Error
This error occurs when you’ve typed wrong or invalid syntax in the command. As an example, you might encounter this error when you’ve specified your path in quotes and but the ending quotes are missing.
For example, the command below has a missing closing double-quote character in the destination path.
Xcopy C:Workarea "C:WorkareaXCopy Demo /S /I /E /YExit Codes
Xcopy returns an exit code for an operation, which you can use to determine if the operation was successful. Exit codes are useful, especially if your task or script takes actions based on the exit code it receives.
The command shell will save exits code in the %ErrorLevel% variable. Your code can then examine the value of this variable to determine the outcome of the Xcopy operation.
Below is a table that lists all the Xcopy exit codes.
| Exit Code | Purpose |
| 0 | This exit code means that there were no errors. |
| 1 | This exit code means that Xcopy did not find any files to copy. |
| 2 | This exit code means that the Xcopy was terminated by pressing CTRL+C. |
| 4 | This exit code means that an initialization error happened either because of insufficient memory or disk space or because you’ve entered invalid syntax. |
| 5 | This exit code means that there was a disk write error. |
Scripting with Xcopy
Apart from using Xcopy interactively, you can reap its benefits better if you use it to automate tasks with scripts. Below are a couple of examples that demonstrate how you can use Xcopy in scripts.
Xcopy Batch Script to Copy Data with Error Handling
This example batch script copies all files recursively with error-handling logic. And based on the error or exit code, the script returns a message showing the reason for the error.
To create the batch file, open a text or code editor of your choice, copy the code below, paste it to your editor, and save the file as copycomplete.bat.
@echo off
rem This batch file copies all source
rem files in all directories and sub-directories from the source
rem path (%1) to the destination path (%2)

xcopy %1 %2 /s /e

if errorlevel 4 goto lowmemory
if errorlevel 2 goto abort
if errorlevel 0 goto exit

:lowmemory
echo Insufficient memory to copy files or
echo invalid drive or command-line syntax.
goto exit

:abort
echo You pressed CTRL+C keys due to which the copy operation has been aborted.
goto exit

:exit
Next, to run the script, invoke its name in the command prompt or PowerShell, followed by the source and destination folders.
pycomplete.bat xcopydemo xcopydemofolder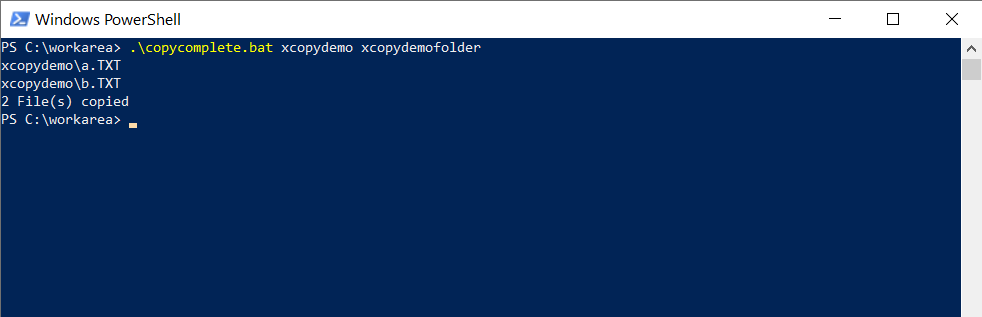
Xcopy Batch Script to Move Data
Xcopy has no built-in functionality to move files and folders from the source to the destination. But, as a workaround, you can create a script that would Xcopy the files first and then delete the files from the source.
The code below will copy the files to the destination. And if the copy process was successful, the script will delete the files at the source. Copy the code below and save it in a new file called movefiles.bat.
Rem Batch file to move files

Xcopy /D /V %1 %2

Rem If the Xcopy process is successful (0), then delete the files at the source.
if errorlevel 0 (
echo Xcopy process completed successfully
del /Q %1
exit /B
)

Rem Errorlevel is not 0
echo The copy process has failed.
Next, to execute the movefiles.bat batch file, invoke its name in the command prompt or PowerShell followed by the source and destination paths, as you did in the previous example.
movefiles.bat xcopydemo xcopydemofolderConclusion
If your job involves copying files in bulk or creating file backups, Xcopy is an excellent tool to help make your job easier. Xcopy delivers accurate and fast file copy results with many options to customize its behavior to fit your requirements.
Для копирования папки в cmd зайдите в командную строку:
1) Нажмите сочетание клавиш Windows+R
2) В открывшемся окне Выполнить наберите cmd
В командной строке вы можете воспользоваться командой copy или xcopy
Пример копирования пустой папки C:\test_copy в папку с:\program files

Одно из отличий команды xcopy от copy – возможность копирования разрешения папки
xcopy /y /o /e «c:\test copy\*.*» «c:\Program Files\test copy\*.*»
Ключ /Y — копирование без подтверждения, если папка уже существует.
Ключ /O – копирование разрешений на папку
Ключ /E – копирование каталогов с подкаталогами включая пустые
Полную справку по xcopy можно посмотреть набрав в командной строке –
xcopy /?
С копированием папок на английском языке все очень просто.
А как скопировать папку с русскими буквами в cmd?

xcopy /y /o /e «c:\Тестовая папка» «c:\Program Files\Тестовая папка\*.*»
Если записать данную команду в bat или cmd файл скопировав в блокнот и сохранив с расширением cmd или bat то копирование работать не будет.

Результат работы команды

Для копирования папки с русским названием сохраните команду в файл прямо в командной строке

echo xcopy /y /o /e «c:\Тестовая папка» «c:\Program Files\Тестовая папка\*.* » >> c:\test_copy.cmd
Русский текст адаптируется под соответствующую кодировку

Копирование будет работать штатно.
For copy folder in cmd, go to the command prompt:
1) Press keys Windows+R
2) In Run menu type cmd and press Enter
At the command prompt, you can use the copy or xcopy command
An example of copying empty folders C:\test_copy in the folder C:\Program files
One of the differences between xcopy and copy is the ability to copy folder permissions
xcopy /y /o / e «c:\test copy\*.*» «c:\Program Files\test copy \*.*»
The /Y — switch copies without confirmation if the folder already exists.
Key /O — copy permissions to the folder
Key /E – copies directories and sub-directories including empty ones
Full help for xcopy can be found by typing in the command line –
xcopy /?
Copying folders in English is very simple.
And how to copy the folder with Russian letters in cmd?
xcopy /y /o /e «c:\Тестовая папка» «c:\Program Files\Тестовая папка\*.*»
If you write this command in bat or cmd file copied to Notepad and save with the extension cmd or bat then copying will not work.
Result run test_copy.cmd
To copy a folder with a Russian name, save the command to a file directly on the command line
echo xcopy /y /o /e «c:\Тестовая папка» «c:\Program Files\Тестовая папка\*.* » >> c:\test_copy.cmd
The Russian text is adapted to the appropriate encoding
The copy will work normally.
In this tutorial, we will learn how to copy files and folders in the Windows Command prompt.
We are going to look at two cmd commands: Copy and Xcopy.
Note that the copy command has some limitations compared to the xcopy. For example, to copy directories or hidden files, you have to use the xcopy command.
Copy Command
On Windows, we can use the copy command to copy one or more files from one location to another:
copy C:\data\sales.doc C:\backupThe preceding command will copy sales.doc from C:\data\ to C:\backup.
Use the /y switch to overwrite duplicate files without confirmation:
copy /y C:\data\sales.doc C:\backupWe can also save a file to a different name. For example, the following command saves file1.txt as file2.txt in the same directory:
copy file1.txt file2.txtYou can also use wildcards to copy multiple files:
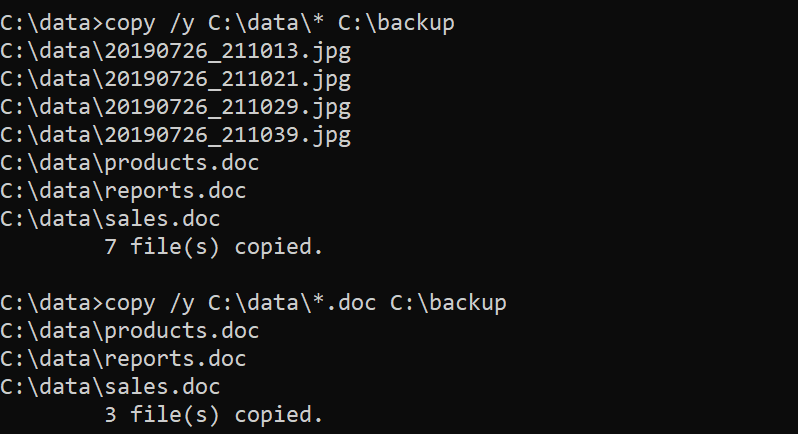
copy /y C:\data\* C:\backup
copy /y C:\data\*.doc C:\backup
The first command copies all files in the C:\data\ directory to C:\backup. The second command copies all files with a .doc extension to the C:\backup.
We can also combine several files into one:
copy file1+file2 file3
copy error* C:\backup\report.txt
In the first line, file1 and file2 are combined to make one file named file3. In the second line, all files whose names start with «error» are copied to the C:\backup, as a single file called report.txt.
You can get a list of all available options with the copy /? command.
Xcopy Command
The xcopy command offers more features. For example, with xcopy, we can copy directories and subdirectories, as well as hidden files.
Command Options
| /Y | Prompt before overwriting an existing file. |
| /H | Copy hidden files/system files. |
| /S | Copy directories and subdirectories. Empty directories are not included by default (use /e for that). |
| /E | Include empty directories. |
| /I | Create the destination folder if it does not exist. Use this option when you want to copy the parent folder itself. |
| /T | Copy directory tree without files. Empty directories are not included by default. Use /e option to include empty folders. |
| /P | Prompt for confirmation before creating each file. |
| /Q | Quiet mode. |
| /exclude | Specify a text file that contains a list of files to exclude. See the examples. |
| /Z | Resume mode. Use this option when copying files over a network. |
| /D:m-d-y | Copies files changed on or after the specified date. |
Examples of Using the Xcopy Command
Copy sales.doc from the current directory to C:\backup:
xcopy sales.doc C:\backupCopy C:\data\accounts (all files including subdirectories) to C:\backup:
xcopy /s /e /h /i /y C:\data\accounts C:\backup\accounts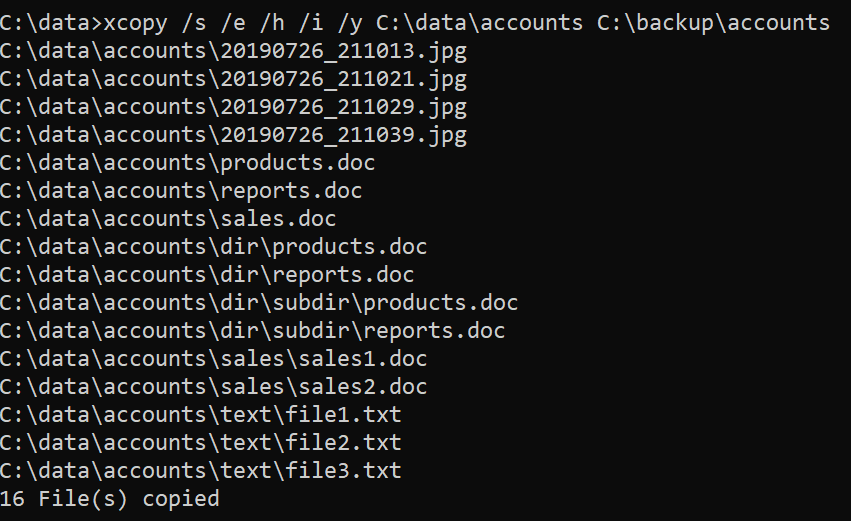
In the following example (without /I switch), the contents of the folder are copied but not the folder itself:
xcopy /s /e /h /y C:\data\accounts C:\backup\Copy the directory structure of C:\OneDrive to the backup directory:
xcopy /s /e /t /y C:\OneDrive C:\backup\You can use wildcard characters to match patterns. The following command copies all files with a .jpg extension:
xcopy /s /h /y C:\data\*.jpg C:\backupUsing for loop to copy multiple files:
for %i in (sales.doc, products.doc) do xcopy /y %i C:\backupExcluding files with xcopy
With the /exclude, we can provide a text file that contains items we want to exclude.
xcopy /s /e /h /y /exclude:C:\Users\user1\files-to-exclude.txt C:\data\ C:\backup\The files-to-exclude.txt may look like the following:
.doc
sales*
In this example, we exclude items with the .doc extension and files whose name starts with sales.
You can get a list of all available options with the xcopy /? command.
Команда COPY
Команда COPY используется для копирование одного или нескольких файлов в командной строке Windows.
Формат командной строки:
COPY [/D] [/V] [/N] [/Y | /-Y] [/Z] [/A | /B] источник [/A | /B] [+ источник [/A | /B] [+ . ]] [результат [/A | /B]]
источник — Имена одного или нескольких копируемых файлов.
/A — Файл является текстовым файлом ASCII.
/B — Файл является двоичным файлом.
/D — Указывает на возможность создания зашифрованного файла
результат — Каталог и/или имя для конечных файлов.
/V — Проверка правильности копирования файлов.
/N — Использование, если возможно, коротких имен при копировании файлов, чьи имена не удовлетворяют стандарту 8.3.
/Y — Подавление запроса подтверждения на перезапись существующего конечного файла.
/-Y — Обязательный запрос подтверждения на перезапись существующего конечного файла.
/Z — Копирование сетевых файлов с возобновлением. Ключ /Y можно установить через переменную среды COPYCMD.
Ключ /-Y командной строки переопределяет такую установку.
По умолчанию требуется подтверждение перезаписи существующих файлов, если только команда COPY не выполняется в пакетном файле.
Команда copy позволяет объединить несколько файлов в один. Чтобы объединить файлы, укажите один конечный и несколько исходных файлов, используя подстановочные знаки или формат «файл1+файл2+файл3+. «.
По умолчанию, используется копирование файлов как двоичных «один в один», поэтому параметр /B можно не задавать. Параметр /A необходим, если в результатах копирования должны обрабатываться специальные символы, применяемые в текстовых файлах.
Ключ /N используется для совместимости с программами MS-DOS, не поддерживающих длинные имена файлов.
Примеры использования COPY:
copy /? — выдать справку об использовании команды.
copy file1.txt file2.txt — копировать файл file1.txt в файл file2.txt в текущем каталоге. Если файл file2.txt существует, то пользователю будет выдан запрос на подтверждение перезаписи существующего файла.
copy /Y file1.txt file2.txt — то же самое, что и в предыдущем примере, но запрос на подтверждение перезаписи существующего файла не выводится.
copy *.txt D:oldfiles*.txt — копирование всех файлов с расширением txt из текущего каталога в каталог D:oldfiles
copy file1.txt + file2.txt +file3.txt file123.txt — копировать содержимое файлов file1.txt , file2.txt и file3.txt в файл file123.txt
copy C:ndldr «D:My Backupsystemntldr» — при использовании имен файлов или каталогов, содержащих пробелы, используются двойные кавычки.
COPY /V file.bin A:saved.bin — выполнить копирование файла на дискету A: с проверкой результата.
    Команда COPY может применяться для копирования файлов с использованием стандартных устройств ввода-вывода:
COPY — описание команды и примеры использования
COPY — Копирование одного или нескольких файлов из одного расположения в другое.
Синтаксис
Параметры
| Параметр | Описание |
|---|---|
| /d | Сохранение копируемых шифрованных файлов как расшифрованных в месте назначения |
| /v | Проверка правильности копирования путем сравнения копий файлов |
| /n | Использование короткого имени (при наличии) копируемого файла, если его имя превышает 8 символов или его расширение превышает 3 символа |
| /y | Отмена вывода запроса на подтверждение перезаписи существующего конечного файла |
| /-y | Вывод запроса на подтверждение перезаписи существующего конечного файла |
| /z | Копирование файлов по сети в режиме перезапуска |
| /a | Указание текстового файла в формате ASCII |
| /b | Указание двоичного файла. источник Обязательный параметр. Задание расположение файла или набора файлов, которые требуется скопировать. Параметр источник может состоять из имени диска с двоеточием, имени папки, имени файла или их комбинации. назначение Обязательный параметр. Задание расположения, в которое требуется скопировать файл или набор файлов. Параметр назначение может состоять из имени диска с двоеточием, имени папки, имени файла или их комбинации |
| /? | Отображение справки в командной строке |
Примечания
- Имеется возможность скопировать текстовый файл, в котором используется символ конца файла (CTRL+Z) для обозначения конца файла.
- Если параметр /a стоит перед списком файлов в командной строке, он применяется ко всем файлам, перечисленным до параметра /b команды copy. В этом случае /b применяется к файлу, предшествующему /b.
- Если параметр /a стоит после списка файлов в командной строке, он применяется ко всем файлам, перечисленным до параметра /b команды copy. В этом случае /b применяется к файлу, предшествующему /b.
- Результат применения параметра /a зависит от его положения в командной строке. Если параметр /a стоит после параметра источник, команда copy обрабатывает файл как текстовый в формате ASCII и копирует данные, которые находятся перед первым символом конца файла.
- Если параметр /a расположен после параметра назначение, команда copy добавляет символ конца файла как последний символ файла.
- Параметр /b задает считывание командным процессором количества байт, равного размеру файла в каталоге. Параметр /b задается по умолчанию для команды copy, за исключением случаев использования copy для слияния файлов.
- Если параметр /b стоит перед списком файлов в командной строке, он применяется ко всем файлам, перечисленным до параметра /a команды copy. В этом случае /a применяется к файлу, предшествующему /a.
- Если параметр /b стоит после списка файлов в командной строке, он применяется ко всем файлам, перечисленным до параметра /a команды copy. В этом случае /a применяется к файлу, предшествующему /a.
- Результат применения параметра /b зависит от его положения в командной строке. Если параметр /b стоит после параметра источник, команда copy копирует файл целиком, включая все символы конца строки.
- Если параметр /b стоит после параметра назначение, команда copy не добавляет символ конца строки.
- Если операция записи не может быть проверена, выводится сообщение об ошибке. Хотя ошибки записи редко возникают при работе с командой copy, параметром /v можно воспользоваться для проверки правильности записи важных данных. Параметр /v также завершает работу команды copy, поскольку необходимо проверить каждый сектор, записанный на диск.
- Если параметр /y установлен заранее в переменной среды COPYCMD, можно переопределить эту настройку, указав параметр /-y в командной строке. При переопределении данной настройки по умолчанию выводится запрос, за исключением исключением случаев выполнения команды copy в пакетном файле.
- Чтобы объединить файлы, укажите один файл в параметре назначение и несколько в параметре источник (используя подстановочные знаки или формат файл1+файл2+файл3).
- Если во время фазы копирования теряется сетевое подключение (например, если сервер переходит в автономный режим, разрывая подключение), команда copy /z позволяет продолжить копирование после восстановления подключения. Кроме того, параметр /z позволяет отобразить сведения о завершении операции копирования в процентах для каждого файла.
- Использование внешних устройств в операциях копирования. В качестве параметров источник и назначение можно указать имена устройств.
- Если в параметре назначение указано устройство (например Com1 или Lpt1), параметр /b позволяет скопировать данные на это устройство в двоичном режиме. В двоичном режиме команда copy /b копирует все символы (включая управляющие символы, такие как CTRL+C, CTRL+S, CTRL+Z и перевод строки) на устройство как данные. Однако если параметр /b не указан, данные копируются на устройство в формате ASCII. В этом режиме управляющие символы могут вызвать слияние файлов в системе Windows XP в процессе копирования. Дополнительные сведения см. в разделе «Слияние файлов».
- Если конечный файл не задан, по умолчанию файлы будут скопированы с тем же именем, датой и временем создания в текущий каталог на текущем диске. Если исходный файл находится в текущем каталоге на текущем диске, выполнение команды copy завершается и выводится следующее сообщение об ошибке:
Примеры использования
Чтобы скопировать файл Memo.doc в файл Letter.doc на текущем диске и убедиться, что символ конца файла находится в конце скопированного файла, введите следующую команду:
Чтобы скопировать файл Robin.typ с текущего каталога на текущем диске в существующий каталог Birds на диске C, введите следующую команду:
Если каталог Birds не существует, файл Robin.typ будет скопирован в файл с именем Birds в корневой каталог диска C.
Чтобы скопировать несколько файлов в один, перечислите несколько файлов в параметре источник, разделяя их имена значком плюс (+), и укажите в параметре назначение файл, который должен содержать результат объединения этих файлов. Например, чтобы объединить файлы Mar89.rpt, Apr89.rpt и May89.rpt из текущего каталога на текущем диске и поместить их в файл Report в текущем каталоге на текущем диске, введите следующую команду:
При объединении команда copy создает конечный файл с текущими датой и временем. Если параметр назначение не указан, файлы объединяются и сохраняются в файле с именем первого файла в списке. Например, чтобы объединить четыре файла в файле Report, если такой файл уже существует, введите следующую команду:
Кроме того, несколько файлов можно объединить в один с помощью символов подстановки (* или ?). Например, чтобы объединить все файлы с расширением .txt в текущем каталоге на текущем диске в файл Combin.doc, введите следующую команду:
Если требуется объединить несколько двоичных файлов в один с использованием подстановочных знаков, воспользуйтесь параметром /b. В результате CTRL+Z не будет рассматриваться как символ конца файла в Windows XP. Например, введите следующую команду:
Если объединяются двоичные файлы, результат может оказаться непригодным из-за нарушения внутреннего форматирования.
В следующем примере команда copy объединяет каждый файл с расширением .txt с соответствующим ему файлом с расширением .ref. Результатом является файл с тем же именем, но с расширением .doc. Таким образом, команда copy объединит файлы File1.txt и File1.ref в файл File1.doc, затем файлы File2.txt и File2.ref в файл File2.doc и т. д. Например, введите следующую команду:
Как скопировать файл (папку) в командной строке Windows
При работе в командной строке (cmd) часто возникает необходимость скопировать файл или целую папку. Также консольные команды для копирования могут использоваться в BAT-файлах для резервного копирования и других задачах.
В этой статье мы расскажем о том, как скопировать файл или папку в командной строке Windows. Статья будет актуальной для всех версий Windows, включая самые новые Windows 11 и Windows 10.
Как скопировать файл через командную строку Windows
Для копирования файлов в командной строке Windows нужно использовать команду « copy ». Данная команда позволяет скопировать один или несколько файлов из одной папку в другую. Обратите внимание, команда « copy » копирует только файлы. Для копирования вложенных папок нужно использовать команду «x copy », которую мы рассмотрим ниже.
В самом простом случае команда для копирования файлов выглядит так:
Например, чтобы скопировать файл « file1.txt » из текущего каталога в папку « e:tmp » нужно выполнить:
При необходимости для копируемого файла можно указать новое название в папке назначения. Например, чтобы скопировать « file1.txt » из текущего каталога в папку « e:tmp » и при этом назвать его « newfile.txt » нужно выполнить:
С указанием полных путей команда копирования будет выглядеть так:
Для копирования большого количества файлов в названиях можно использовать маски. Символ звездочка (*) обозначает любое количество любых символов, а знак вопроса (?) – один любой символ. Например, чтобы скопировать все документы с расширением TXT из текущего каталога в папку « e:tmp » нужно выполнить следующее:
Также с помощью команды « copy » можно скопировать все содержимое одной папки в другую. Например, в случае копирования всех файлов из папки « d:tmp » в папку « e:tmp » команда будет выглядеть так:
В данном случае из папки « d:tmp » будут скопированы только файлы. Для копирования вложенных папок нужно использовать « xcopy ».
Полный синтаксис команды « copy » выглядит так:
Полный список параметров для команды « copy »:
| Параметр | Описание |
| /d | Сохранение копируемых зашифрованные файлов в расшифрованном виде в месте назначения. |
| /v | Проверка правильности записи скопированных файлов. |
| /n | Использование короткого имени файла (если доступно) при копировании файла с именем длиннее восьми символов или с расширением длиннее трех символов. |
| /y | Подавление запроса на подтверждение перезаписи. |
| /-y | Вывод запроса на подтверждение перезаписи. |
| /z | Копирует сетевые файлы в перезапускаемом режиме. |
| /a | Копирование текстового файла ASCII. |
| /b | Копирование двоичного файла. |
| <source> | Указывает расположение, из которого необходимо скопировать один или несколько файлов. Обязательный параметр. |
| <destination> | Указывает расположение, в которое необходимо скопировать файл или несколько файлов. Обязательный параметр. |
| /? | Отображение справки в командной строке. |
Большинство параметров указываются в начале, сразу после команды « copy ». Например, для того чтобы подавить вывод запросов на перезапись существующих файлов можно добавить параметр «/y».
Как скопировать папку через командную строку Windows
Для копирования папок с вложенными папками и файлами в командной строке Windows нужно использовать команду « xcopy ». Данная команда позволяет скопировать папку из одного расположение в другое с сохранением структуры каталогов. Фактически « xcopy » — это более продвинутая версия команды « copy ».
В упрощенном виде синтаксис команды « xcopy » будет выглядеть так:
Для копирования папок с вложенными папками и файлами нужно использовать параметр « /s » или « /e ». Без этих параметров команда будет работать только с одним каталогом.
| Параметр | Описание |
| /s | Копирование каталогов с подкаталогами (исключая пустые) |
| /e | Копирование каталогов с подкаталогами (включая пустые). |
Например, для того чтобы скопировать все файлы и вложенные папки (включая пустые) из папки « d:tmp » в папку « e:tmp » нужно выполнить:
Полный синтаксис команды « xcopy » выглядит так:
Полный список параметров для команды « xcopy » можно посмотреть на сайте Майкрософт. Здесь же приведены только некоторые самые базовые:
| Параметр | Описание |
| /s | Копирование каталогов с подкаталогами (исключая пустые) |
| /e | Копирование каталогов с подкаталогами (включая пустые). |
| /w | Вывод запроса на подтверждения начала копирования. |
| /p | Запрос подтверждение при создании каждого нового файла. |
| /c | Пропуск ошибок. |
| /v | Проверка всех скопированных файлов на соответствие его исходнику. |
| /q | Скрывает вывод информации от команды xcopy. |
| /f | Вывод имен в процессе копирования. |
| /l | Вывод списка копируемых файлов. |
| /g | Сохранение новых файлов в незашифрованном виде. |
| /d[:мм-дд-гггг] | Копирование файлов, которые были измененные не ранее указанной даты. Если не указать дату (мм-дд-гггг), то команда xcopy будет копировать все файлы, которые новее существующих. |
| /u | Обновление только существующих файлов в папке назначения. |
| /y | Подавление запроса на подтверждение перезаписи. |
| /-y | Вывод запроса на подтверждение перезаписи. |
| /z | Копирует сетевые файлы в перезапускаемом режиме. |
| /h | Копирование скрытых и системных файлов. |
| /r | Перезапись файлов с атрибутом «только для чтения». |
| /t | Создание структуры каталогов без копирования файлов. Пустые каталоги не включаются в структуру. Для включения пустых каталогов нужно добавить параметр /E. |
| <source> | Указывает расположение, из которого необходимо скопировать один или несколько файлов. Обязательный параметр. |
| <destination> | Указывает расположение, в которое необходимо скопировать файл или несколько файлов. Обязательный параметр. |
| /? | Отображение справки в командной строке. |
Параметры указываются в конце команды. Например, для того чтобы скопировать все файлы (включая скрытые, системные и только для чтения) и вложенные папки (включая пустые) из папки « d:tmp » в папку « e:tmp » нужно выполнить: