Недавно мне предстояло решить интересную задачу, а именно узнать все ip адреса оборудования в локальной сети. Вроде, задачка ординарная, но решить ее можно было разными способами. Хотелось бы рассмотреть в рамках данной статьи некоторые из них.
Как вывести список ip адресов в сети?
Первый способ узнать все ip адреса в локальной сети – это работа через командную строку.
Для этого мы нажимаем на кнопку пуска, в поисковом запросе пишем «cmd» и нажимаем клавишу «Enter».

Перед нами откроется окно редактора командной строки. В редакторе очень много команд, которые могут нам пригодиться, но в данном случае нам нужна команда «arp -a».
Введите данную команду в терминал как показано на следующем рисунке:

Команда «arp» нам дает не только возможность определить ip оборудования, но и так же показывает mac адреса этого оборудования, что так же может быть нам интересно.
Итак, после того как вы ввели команду и нажали «Enter» перед вами откроется весь список ip адресов оборудования в локальной сети.

Если же вас интересует всего лишь ip адрес только вашего компьютера, то нужно ввести в терминал команду «Ipconfig»- тогда вы увидите все данные по вашему компьютеру.

Однако такое команды определяют все Ip в локальной сети далеко не всегда. И в таком случае потребуется программа для поиска ip адресов в сети «Advanced IP Scanner» – это сетевой сканер. Скачать ее можно на просторах интернета, а я в свою очередь расскажу, как с ней работать.
Сканирование сети на ip адреса
После установки программы мы щелкаем по значку «Advanced IP Scanner».
В результате запуска мы видим, как откроется рабочее окно программы.

Далее все просто: нажимаем на кнопку «IP» (определяет подсеть этого компьютера), после чего нажимаем на кнопку «Сканировать» и через несколько минут видим результат.

Как видите, сканирование нам показало не только IP оборудования, но также имя производителя и mac адреса – то есть полную информацию о сети.
Но не всегда у нас бывает доступ к компьютерам локальной сети: в таком случае приходится пользоваться смартфоном, в моем случае это смартфон на базе андроид. Скачиваем программу сетевого сканера (например, у меня Network IP scanner). И после запуска нажимаем кнопку сканирования сети: как правило, через несколько минут видим результат сканирования сети на ip адреса.

- Распечатать
Оцените статью:
- 5
- 4
- 3
- 2
- 1
(106 голосов, среднее: 4.2 из 5)
Поделитесь с друзьями!
Время на прочтение
4 мин
Количество просмотров 71K
В локальной сети (LAN) обычно есть множество обменивающихся данными хостов. Сканирование сетей при помощи IP-сканера позволяет отделам ИТ, сетевым администраторам и службам безопасности следить, какие IP обмениваются данными и какие типы устройств занимают IP-адреса. Также это помогает выявлять сторонние несанкционированные хосты, которые тоже могут быть подключены к сети. Существует множество бесплатных сетевых IP-сканеров, помогающих сетевым и системным администраторам обнаруживать устройства в сети и управлять IP-ресурсами. В этой статье мы рассмотрим следующие инструменты: Nmap, Advanced IP Scanner, Angry IP Scanner, free IP scanner компании Eusing, встроенную командную строку и PowerShell.
▍ Nmap
Nmap уже долгое время считается надёжным инструментом информационной безопасности, он используется инженерами и сотрудниками служб безопасности. Это кроссплатформенная утилита, имеющая широкий спектр функцию, не ограничивающихся простым сканированием сетей.
Она содержит утилиты сканирования сетей, используемые для исследования сетей, и предоставляет множество утилит для аудита безопасности. Она позволяет выполнять глубокое изучение IP-пакетов, в том числе содержащих информацию о сервисах, приложениях, идентификации ОС и других характеристиках удалённого хоста. В ней есть опции «интересных портов», помогающие быстро находить порты удалённых хостов, которые часто бывают открытыми.
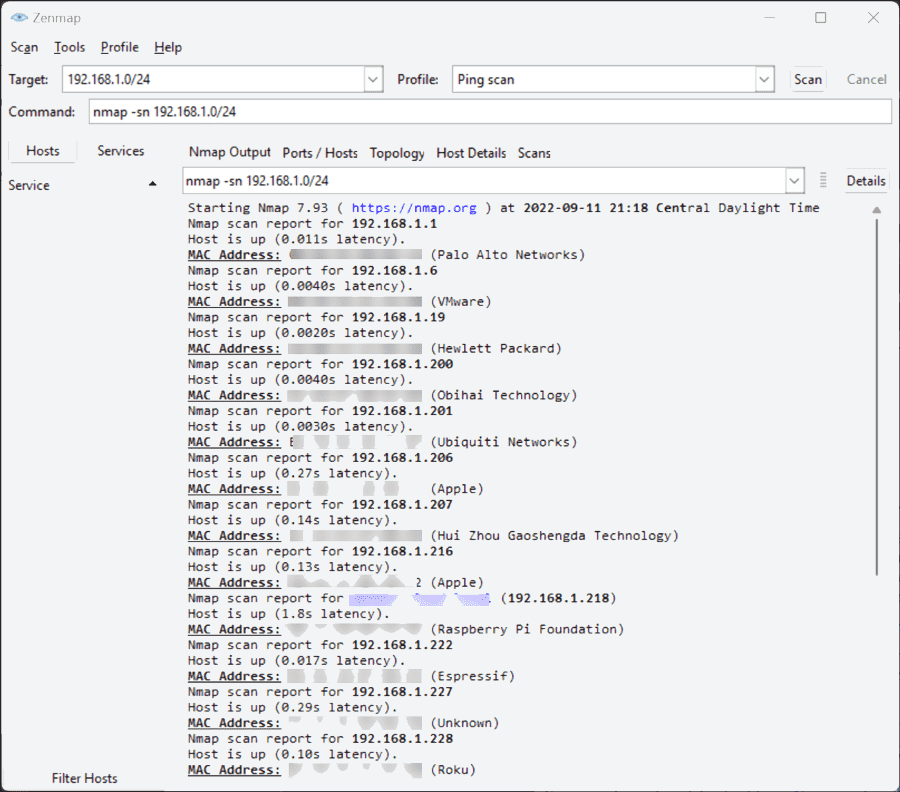
Утилита сканирования сетей Nmap, выполняющая быстрое сканирование пингом локальной сети
Бесплатный Nmap Security Scanner для Linux/Mac/Windows можно скачать здесь.
▍ Advanced IP Scanner
Большинство из нас в тот или иной момент времени сталкивалось с Advanced IP Scanner. Этот инструмент уже многие годы обеспечивает возможность быстрого сканирования сетей. Advanced IP Scanner — бесплатная утилита, которая быстро скачивается и мало весит. Начать сканирование сети с её помощью можно всего лишь за пару минут.
Сканирование сети при помощи Advanced IP Scanner
Этот инструмент, совместимый только с Windows, предоставляет множество базовых функций сканирования, в том числе определение имён устройств, IP-адресов и MAC-адресов при помощи OUI lookups для распознавания производителей устройств. Результаты работы утилиты можно экспортировать в файл CSV для дальнейшего исследования устройств в других инструментах и документации. Также она может взаимодействовать с функциональностью Wake-On-LAN найденных удалённых хостов и позволяет удобно обмениваться данными с устройствами, с поддержкой RDP.
Advanced IP Scanner — это автономный исполняемый файл, который можно просто запускать без установки, что повышает его удобство и простоту использования.
Advanced IP Scanner можно скачать здесь.
▍ Angry IP Scanner
Angry IP Scanner — ещё один популярный инструмент в этой категории. Он тоже является кроссплатформенным, поскольку поддерживает Windows, Mac и Linux. Angry IP Scanner сканирует сетевые порты и IP-адреса.
Angry IP Scanner обеспечивает быстрое и простое сканирование сетей
Он пингует адреса и резолвит имена хостов из DNS. Также он определяет MAC-адреса устройств для OUI lookup, а его возможности можно легко расширить при помощи опенсорсных плагинов, написанных на Java. Он имеет множество других функций, например, получение имени NetBIOS, рабочей группы, подключенных пользователей Windows, определение веб-серверов и многое другое. Инструмент позволяет экспортировать результаты в CSV, TXT, XML или в файлы списков IP-портов.
Angry IP Scanner — это автономный исполняемый файл, не требующий установки. Однако для его работы требуется установка на хост среды выполнения Java, что для кого-то может оказаться препятствием.
Angry IP Scanner можно скачать здесь.
▍ Free IP scanner компании Eusing
Free IP scanner — это простая утилита IP-сканирования, имеющая множество отличных функций. Это быстрый сканер, для обеспечения производительности использующий технологию многопоточности. Пользователь может настраивать уровни приоритетов процесса сканирования и максимальное количество потоков. Разработчик утверждает, что инструмент может сканировать сотни компьютеров в секунду.
Free IP scanner
Для поиска находящихся онлайн-хостов он использует пинг. Опционально он может резолвить имена хостов, находить открытые порты и использовать другие функции в случае нахождения онлайн-хостов. Как и другие сканеры, он может получать информацию NetBIOS, в том числе имя хоста, рабочую группу, подключенного пользователя и MAC-адрес. Результаты сканирования можно сохранять в простой текстовый файл. К сожалению, этот инструмент не имеет автономного исполняемого файла, поэтому его нужно устанавливать. Программа запрашивает код регистрации, однако это freeware-программа, которую можно использовать без регистрации.
Free IP scanner можно скачать здесь.
▍ Встроенная командная строка и PowerShell
Также для нахождения хостов в сети можно использовать встроенные командные среды, в том числе командную строку и PowerShell. Например, можно выполнить простую однострочную команду для быстрого пинга и возврата всех онлайн-хостов в конкретной подсети:
for /l %i in (1,1,255) do @ping 10.1.149.%i -w 1 -n 1|find /i "ttl="
Кроме того, компания Microsoft предоставляет множество превосходных бесплатных примеров кода для различных ping-утилит, встроенных в галерею PowerShell. Я пробовал работать с модулем ping_scan, и он неплохо справляется со своей задачей. В галерее есть множество опций для выполнения быстрых и простых сканирований сети при помощи ping.
▍ В заключение
Бесплатные сетевые IP-сканеры позволяют администраторам выполнять мониторинг сети и подключенных хостов. Кроме того, они способны определять типы хостов и производителей устройств, что помогает в обеспечении безопасности сетей. Системные администраторы и сотрудники служб безопасности могут использовать эти простые инструменты для слежения за сетями и создания подробной актуальной документации сети.
RUVDS | Community в telegram и уютный чат
Command Prompt provides a quick solution
by Vlad Turiceanu
Passionate about technology, Windows, and everything that has a power button, he spent most of his time developing new skills and learning more about the tech world. Coming… read more
Updated on
- To scan IP addresses on Local Network is quintessential for Admins and Windows users who oversee a network of interconnected devices.
- Most users prefer using the cmd IP scan command for this purpose.
- However, using third-party tools is a much better option due to the advanced options that these tools offer.
- If you want to scan an IP range on Windows and get valuable information about your network, check the recommendations below.
Scanning the LAN for IP addresses is extremely important, especially if you are an admin and want to analyze all the devices connected to the network.
Admins usually prefer to have access to shared folders and the control to automatically shut down the PC, remotely.
There is more than one way to scan the LAN for IP addresses and in this segment, we will walk you through some of the best means to do so.
How can I scan IP addresses on a Local Network?
- How can I scan IP addresses on a Local Network?
- 1. Perform a cmd IP scan
- 2. Scan an IP address third-party software
- PRTG Network Monitor
- Angry IP Scanner
- SolarWinds IP Tracker
- Advanced IP Scanner
- NetCrunch
- Why do I need to scan IP addresses?
1. Perform a cmd IP scan

- Type Cmd in the Start menu search bar.
- Type ipconfig.
- Ping this machine IP address by punching in the following command ping 192.168.x.xxx
- In the next step type arp -a.
This is the simplest method that allows you to scan the LAN using the cmd IP scan. Although this method is a bit crude, it doesn’t require any additional software.
2. Scan an IP address third-party software
PRTG Network Monitor
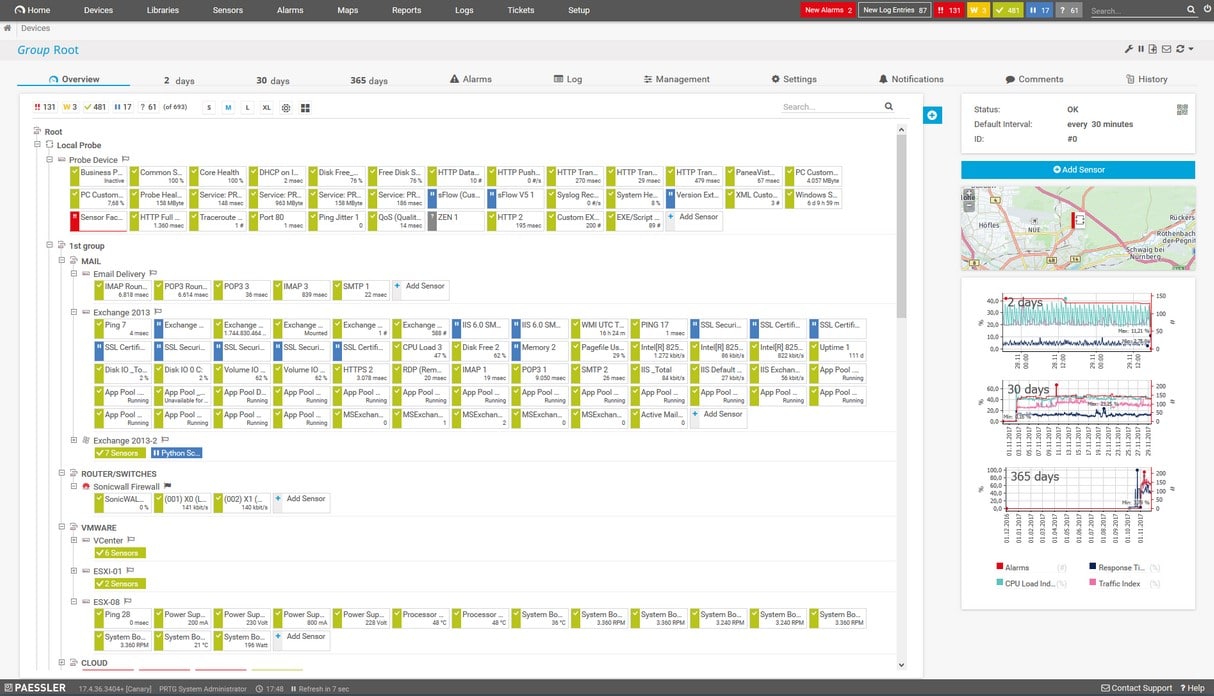
One alternative way that can help you keep track of your entire LAN and WAN is by using a dedicated tool, such as PRTG Network Monitor.
You can monitor the bandwidth, all your workstations, routers, and servers as well. You can use this tool as a portable network scanner and check your network right away, in just a few minutes, from any device.
The tool is able to scan network segments by pinging defined IP ranges and this way PRTG will recognize a broad range of devices and systems in an automatic manner, and it will create sensors from predefined device templates.
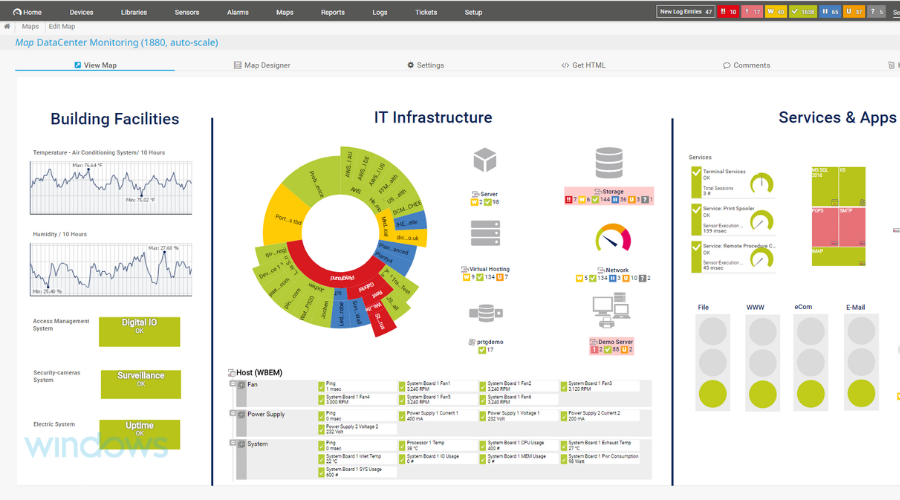
PRTG Network Monitor also allows you to create maps and web pages with up-to-date monitoring data.
The software is perfect for managing the network, and it’s one of the best ways to scan for IP range on Windows, so be sure to try it out.
Other great features:
- Bandwidth monitoring
- Database monitoring
- Ability to monitor entire LAN network
- SNMP support

PRTG Network Monitor
PRTG Network Monitor is advanced network monitoring software that will easily scan for IP addresses in your LAN network.
Angry IP Scanner
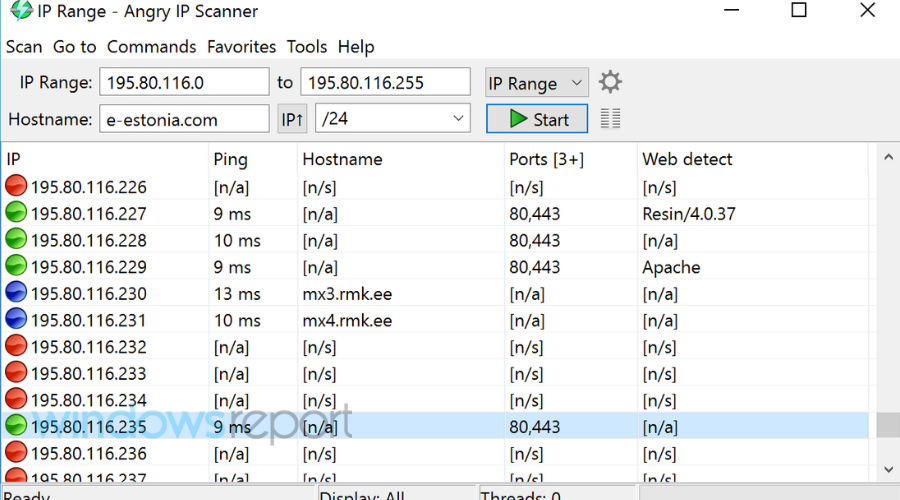
Presuming that you want to see the IP addresses that are being used in a particular subnet its tools like Angry IP Scanner will come in handy.
How we test, review and rate?
We have worked for the past 6 months on building a new review system on how we produce content. Using it, we have subsequently redone most of our articles to provide actual hands-on expertise on the guides we made.
For more details you can read how we test, review, and rate at WindowsReport.
Angry IP Scanner will help you scan a range of IP addresses and will also fetch advanced details regarding the connections.
Users can customize their queries and can import the same in CSV, TXT, XML, and even IP-Port list files.
The Angry IP Scanner is a freeware and it is extensible with many data fetchers whilst offering a command-line interface. This program is best suited for network administrators across both small and large enterprises.
Using this tool is simple, and it’s a perfect choice if you need to scan a network for IP addresses on Windows 10.
⇒ Get Angry IP Scanner
SolarWinds IP Tracker
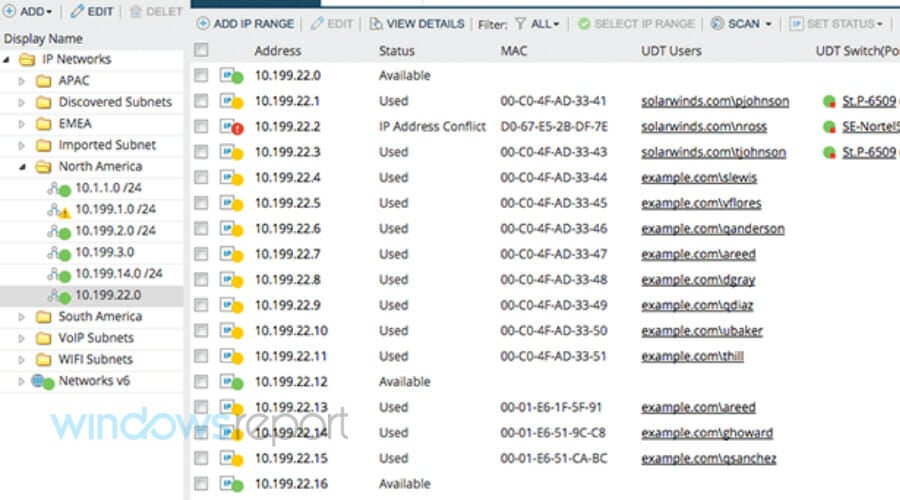
SolarWinds is yet another IP address tracker utility that can be used to access to scan the IP range on Windows 10.
SolarWinds lets you track an unlimited number of IP addresses without the need for complex configurations.
Once a new subnet is added along with the name and addresses the application will generate the list of all the IP addresses on the LAN.
SolarWinds also comes with a feature that lets you filter the IP addresses by checking out the user or the reserved ones. The program also allows users to see the last time an IP address was used.
⇒ Get SolarWinds IP Tracker
Advanced IP Scanner
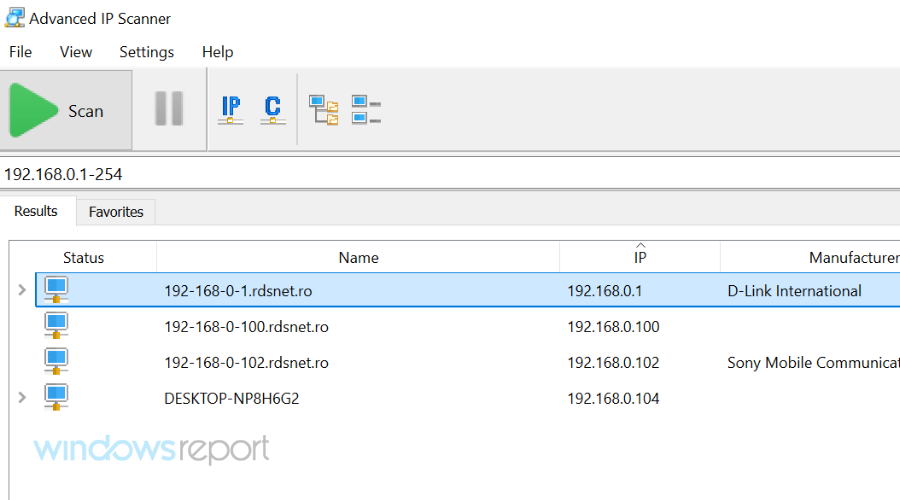
The best part of the Advanced IP Scanner is its simple and straightforward utility. The Advanced IP Scanner can locate all the devices connected to both your wireless and wired local network.
It’s particularly useful if you want to get a list of devices connected to your Wi-Fi network.
Advanced IP Scanner also offers a remote PC shutdown feature that will allow admins to shut down the PCs on the network. Furthermore, it also supports the Wake-on-LAN standard that lets you start the system remotely by sending wake-up packets.
The results tab mentions Status, name, IP, Manufacturer, and MAC address of all the systems connected to the network.
Furthermore one could also populate important statistics including DNS and Response time.
⇒ Get Advanced IP Scanner
NetCrunch
Every single device that gets connected to a network has some kind of IP address, and a good network monitoring tool knows how to blacklist or permit certain IP addresses from gaining access to a network.
Well, NetCrunch is one such tool, providing you with an entire host of server monitoring tools, including the ability to decide who can access it, and view everything that goes in and out.
This includes the ability to scan devices for their IP addresses and manage them in the sense that you decide which IP can connect to the network, and what is the access level and the privileges of the IP addresses that are connected to the network.
Based on this, you can grant or restrict access to data, regulate the use of bandwidth, and more.
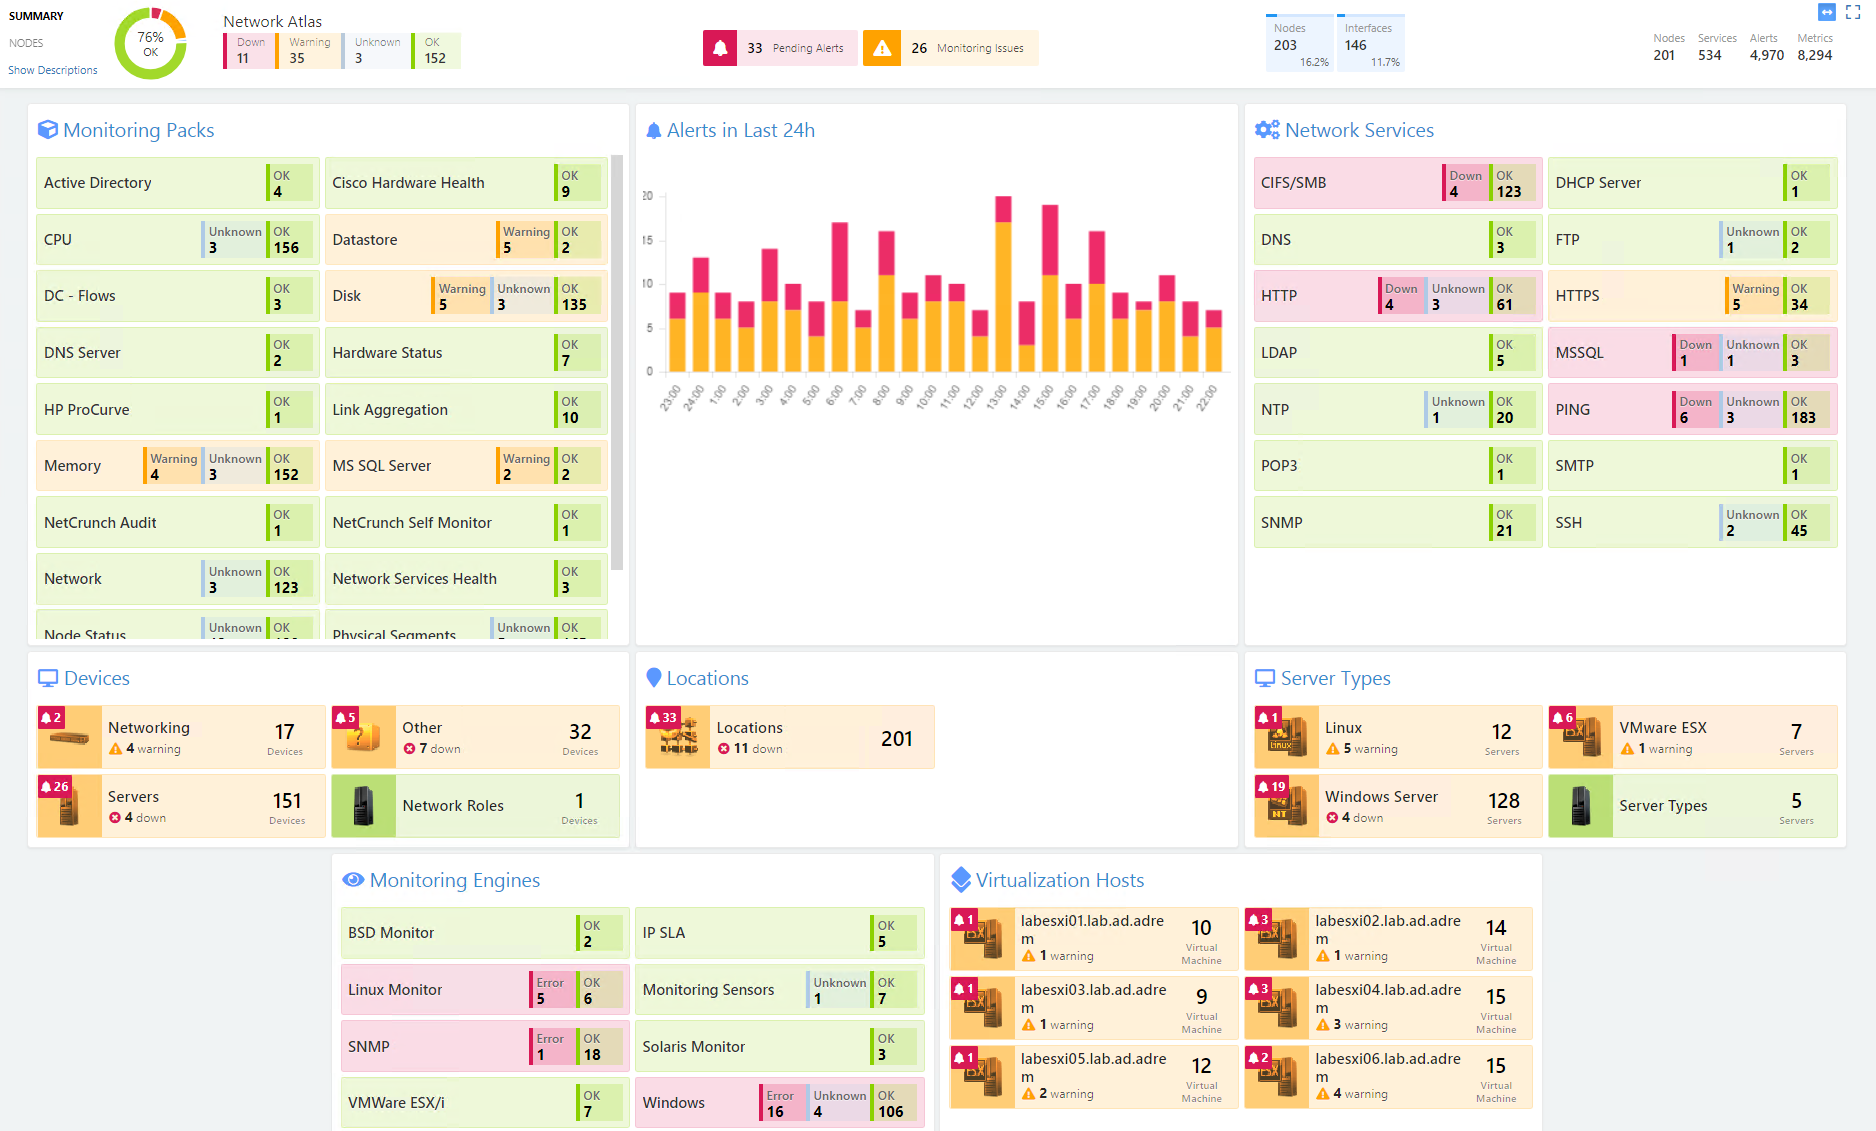
You can scan your network for new nodes simply by IP Network (starting IP address/network mask), and NetCrunch will perform an IP-address sweep, accurately identifying each device and service running on them.
Depending on your monitoring requirements, you can specify a filter strategy that will only identify or add the devices of interest.
You can also perform discovery via Active Directory or add a list of nodes to NetCrunch from a CSV file.
⇒ Get NetCrunch
- Fix: The default gateway is not available on Windows 10/11
- How to Automatically Detect LAN Settings Windows 10
As you can obviously tell, these tools vary in terms of features, and which one is best for you is highly dependent on the level at which you want to manage your LAN.
Why do I need to scan IP addresses?
IP addresses are part of layer 3 in the OSI network and are necessary for Inter-VLAN communication. In essence, every layer 3 device will be needing an IP address.
The IP address is also required if you are configuring DHCP snooping and some of the other advanced features.
These are the best methods that you can use to scan IP addresses on LAN network. What tools or methods do you use? Let us know in the comments below.
If you have any more tricks or suggestions, feel free to discuss them. Please let us know about your experience if you decide to try or already have input on any of these methods or third-party tools.
icon-bg

icon-bg
icon-bg
Сканирование и обнаружение
устройств в сети
Как произвести сканирование сетевых устройств: пошаговое руководство.
В этой статье мы рассмотрим функционал сканера программы Total Network Inventory, разберемся как сканировать сеть на наличие устройств, как произвести анализ сетевого оборудования, а главное получить полезную информацию о всех процессах в сети вашей организации.
1. Для чего нужно сканировать компьютеры и устройства в сети?
2. Какими методами можно сканировать локальную сеть с помощью TNI?
3. Сканирование сети с помощью Сканера IP адресов.
3.1. Сканирование устройств на базе MS Windows;
3.2. Сканирование устройств Linux, а также других Unix подобных ОС и macOS;
4. Как сканировать устройства в сети по протоколу SNMP.
1. Для чего нужно сканировать компьютеры и устройства в сети?
Прежде, чем приступить непосредственно к сканированию, стоит разобраться, для чего рекомендуют проводить эту процедуру. Любая организация обладает большим количеством техники, без которой ряд рабочих процессов был бы невозможным. Помимо компьютеров на базе различных ОС (Windows, Linux, macOS), серверов, ноутбуков, нас окружают камеры видеонаблюдения, маршрутизаторы, роутеры, принтеры, VOIP-телефония, устройства ИБП и т.п. У всех них есть одна общая деталь — наличие сетевого интерфейса. Для корректного функционирования каждой единицы техники важны не только правильно выполненные первоначальные настройки, но и дальнейшее поддержание оборудования в рабочем состоянии. К тому же, достаточно часто встречается такая ситуация, когда системный администратор (старый уволился, новый приступил к работе, и т.п.), не отслеживал изменения в сети и, как следствие, не ориентируется в рабочих процессах: не владеет информацией об IP адресах, не знает когда последний раз проводилось сканирование, не ориентируется в инструментах, которые применяются или применялись для проверки работоспособности сети и т.п. В таких случаях, сканирование сетевых устройств является обязательной процедурой для получения необходимой информации.
Помимо вышеописанных процессов, важно знать и архитектуру вашей сети. Эти данные необходимы, если вы собираетесь сделать апгрейд технического парка, провести аудит, подключить дополнительный канал связи (запасной или ускоренный). Также, достаточно часто, корпоративная сеть может стать мишенью для различных кибер-угроз. В этом случае, своевременное выявление сторонних устройств в сети помогает предотвратить вмешательство в работу и хищение важных данных.
2. Какими методами можно сканировать локальную сеть с помощью TNI?
Эффективным инструментом для сканирования сети на наличие устройств, который широко используют администраторы является Total Network Inventory. Он имеет множество встроенных полезных функций и высокие показатели информативности. Основные методы сканирования, которые поддерживает программа:
— сканирование с использованием WMI – представляет собой стандартный набор интерфейсов доступа к устройствам, приложениям и параметрам операционной системы Windows;
— удаленное сканирование по протоколу SMB – для сбора наиболее полной информации о сканируемой системе. Метод позволяет удаленно запускать агент сканирования с необходимыми локальными привилегиями для проверки и удаленного доступа к файлам, загрузки данных реестра и сбора дополнительных данных от системных утилит.
— удаленное сканирование по протоколу RPC – проверка клиент-серверных приложений на базе ОС Windows;
— удаленное сканирование с использованием протокола SSH – подходит для Unix систем и macOS;
— удаленное сканирование с использованием протокола SNMP — сетевые принтеры, управляемые коммутаторы, маршрутизаторы, xDLS-модемы, IP-телефоны, беспроводные точки доступа и т.п. Чаще всего именно эти устройства поддерживают данный протокол, а TNI, в свою очередь, позволит их просканировать;
— низкоуровневое сканирование оборудования — TNI загружает и устанавливает драйвер для сбора данных об оборудовании на низком уровне, например: информация из SPD о модулях памяти, данные жестких дисков и т.п.;
— ручное сканирование.
3. Сканирование сети с помощью Сканера IP адресов.
Рассмотрим работу Сканера IP адресов, который подходит для работы с такими ОС как Windows и Unix – системы. Также доступно сканирование нестандартного сетевого оборудования, которое использует сетевые протоколы, не принадлежащие к семействам вышеупомянутых систем.
Стоит уточнить, что программа позволяет работать с таким оборудованием как: сетевые хранилища устройств (NAS), принтеры, роутеры, коммутаторы, UPS устройства, VOIP телефоны, веб-серверы на базе различных ОС. Для всего оборудования, алгоритм сканирования практически одинаковый (отличается только протоколом, который использует техника в своей работе).
Базовый алгоритм сканирования:
- После запуска TNI, необходимо выбрать закладку Сканер, укзать диапазон IP адресов для сканирования, работчую группу или домен Active Directory.
- Ввести пароль администратора и запустить сканирование.
- Программа быстро просканирует сеть и предоставит информацию в виде дерева. Во вкладке «Просмотр и Отчеты» вы увидите полную информацию о любом из выбранных устройств.
- Данные можно просматривать, строить отчеты и экспортировать в разных форматах.
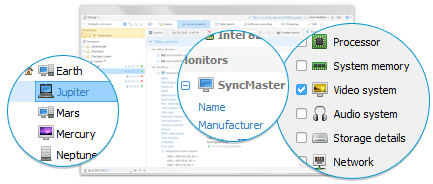
3.1 Сканирование устройств на базе MS Windows.
Существует 3 типа сканирования для этого типа ОС. Рассмотрим первый — удаленное сканирование по протоколу SMB:
- на удаленный ПК в администраторскую общую папку admin$ загрузите исполняемый файл tniwinagent.exe.
- главный модуль TNI соединится с Диспетчером служб удаленного компьютера, инсталлирует и запустит агент как службу.
- агент просканирует оборудование, сохранит собранную информацию в сжатый файл и остановится.
- главный модуль импортирует полученный файл в хранилище.
- служба-агент деинсталлируется, исполняемый файл удалится.
Удаленное сканирование по протоколу RPC — не имеет преимуществ перед вышеописанным и рекомендуется к использованию только тогда, когда по тем или иным причинам использование протокола SMB невозможно:
- главный модуль TNI подключается напрямую к службе WMI целевого компьютера;
- через протокол RPC осуществляется подключение и сбор информации удаленно.
Есть и определенные недостатки этого способа, а именно — генерируется существенный трафик и скорость сканирования может упасть при медленном соединении.
3.2. Сканирование устройств Linux, а также других Unix подобных ОС и macOS.
Сканирование компьютеров под управлением macOS (только 64 бит), Linux, FreeBSD и ESX/ESXi осуществляется при помощи исполняемого файла, который, через протоколы SSH и SCP/SFTP загружается на удаленный ПК и собирает информацию. Есть определенные особенности, которые нужно принять во внимание перед началом сканирования:
- на удаленном компьютере должен быть запущен сервер SSH-2 (TCP на 22 порт, либо в настройках приложения задать «Особый порт SSH») с поддержкой SFTP или SCP, и сетевой экран должен разрешать к нему доступ;
- пользователю, от имени которого производится сканирование, разрешен доступ к SSH-серверу (опция сервера AllowUsers). Если сканирование производится от пользователя root, то для него должна быть также выставлена опция PermitRootLogin — yes;
- пользователь, должен иметь права администратора (для ОС Linux, если он не root — должен находиться в списке sudoers).
Удаленное сканирование с использованием протокола SSH.
- TNI производит подключение к удаленному компьютеру по указанному протоколу — в домашней папке пользователя, от имени которого производится сканирование, создается временная папка, в которую по протоколу SFTP или SCP передается агент сканирования.
- агент сканирования запускается и по завершении работы создает файл с собранной о сети информацией.
- файл с информацией передается по протоколу SFTP или SCP обратно в TNI, который, в свою очередь, добавляет его в открытое хранилище.
- временная папка с агентом и созданным им файлом удаляется.
4. Как сканировать устройства в сети с помощью SNMP.
Чтобы провести инвентаризацию этим способом, пользователю не придется применять десятки команд, узнавать, динамический или статический IP используется определенной техникой. SNMP сканер прост в настройке и запуске, но, несмотря на это, соберет подробную информацию о каждом маршрутизаторе, коммутаторе, сетевом принтере всего за один проход.
Алгоритм запуска и сканирования такой же, как и у вышеописанной функции за исключением того, что выбрать нужно функцию «SNMP».
В завершение.
Чтобы сканировать устройства в сети, стоит использовать проверенное программное обеспечение. Вы забудете о ручном вводе команд в консоль, сможете провести детальное сканирование любого сетевого оборудования в сети под управленим самых различных ОС. Загрузите Total Network Inventory и получите всю необходимую информацию всего за пару кликов в любое удобное для вас время.
Scanning for IP address lets you have better control over your network. With 1-2 commands, you can quickly map out the devices in your network and the IP addresses that they are using. But to understand how to scan a network, first, you need to understand how are IP addresses assigned.
Follow these four simple steps to scan your network for IP addresses in use:
- Open a Command Prompt window.
- On Windows or macOS type ipconfig or on Linux type ifconfig. Press return. Note down the subnet mask, the default gateway, and your own computer’s IPv4 address.
- Enter the command arp -a to get a list of all other IP addresses active on your network.
- Enter the command ping <IP_address> giving any of the addresses returned by ARP in order to test the response times to that node – don’t include the angle brackets that are shown in that example.
DHCP (Assigning IPs Dynamically)
An automated process in networking, called DHCP (Dynamic Host Configuration Protocol), assigns IP dynamic addresses to hosts as soon as they enter the network. In a home or small network, the DHCP server is usually a part of the router. When you come into the network, the router will look for an available IP address in its pool and assign it to you, so that your device can communicate with others without any conflict.
Dynamic allocation of IP addresses is a great advantage for both end-users and network admins. But sometimes you would need to have some control in order to manage and troubleshoot your network more efficiently.
Related post: Find device or IP with MAC
Related Post: PowerShell Kill Process Command
If you are here for free tools and trials, here is our list of the four best tools for discovering IP addresses on a network:
- Paessler PRTG Network Monitor – EDITOR’S CHOICE A package of network, server, and application monitoring tools that includes an IP scanner. Runs on Windows Server.
- ManageEngine OpUtils – FREE TRIAL A suite of network address monitoring tools that covers IP addresses, MAC addresses, and port numbers with a cut-down free version also available. Installs on Windows Server and Linux.
- Angry IP Scanner A free network scanner that identifies all connected devices and lists their IP addresses plus connection response speeds. Available for Windows, macOS, Linux.
- MyLAN Viewer A network scanner that identifies all connected devices and lists their IP addresses and MAC addresses. Runs on Windows.
What will you learn in this Tutorial
In this tutorial, you will learn the basic networking skills on how to scan a network for IP addresses. We will scan a network with native OS commands, find which addresses were assigned dynamically, which statically, and test their connectivity.
In the end, we will compare some free IPAM tools aka IP address scanning tools that can give you additional information. To improve your IP addressing insights, even more, we will show you some tools that allow you to track IP addresses and even manage them.
Simple IP Scanning
Operating Systems, like Windows and Linux, come with their own native simple networking set of tools. Commands such as “ipconfig”, “arp -a”, or “ping” allow simple scanning and troubleshooting.
The simplest way to get a quick list of IP addresses and their devices connected to your network is with those OS native commands found in the command line. With a list of the assigned IP address and their devices, you can easily find the devices that are causing the most problems.
- ipconfig This command displays all network settings assigned to one or all adapters in the computer. You can find information such as your own IP, subnet, and Gateway. For Linux and MacOS is “ifconfig”.
- arp -a When you issue the “arp -a”, you’ll get IP-address-to-mac conversion and the allocation type (whether dynamic or static) of all devices in your network.
- PingIt helps determine connectivity between two hosts and find the IP address of a hostname.
Related Post: Best IP & Port Scanners
Reading The Output
Finding your own network adapter configuration
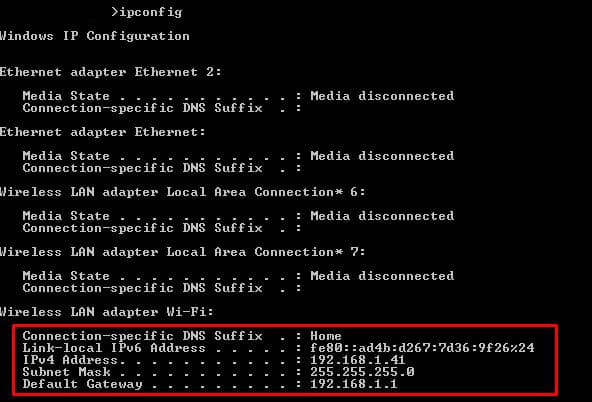
In the following screenshot, you’ll see the output from the ipconfig command. On a Windows, the ipconfig command can be entered through the Command line.
Go to Run > type cmd > type ipconfig
- This Windows computer has 5 network adapters, but the last one (Wireless LAN adapter Wi-Fi) is the only one connected to a network. The rest are disconnected.
- In this network, the router (or Default Gateway) is playing the role of the DHCP server. It is assigning the IP address dynamically and giving access to the Internet.
- You are reading two of the most important IP addresses for your device; Your own device’s IP (IPv4 and IPv6) and your Gateway. The Subnet Mask is also very important, it shows that you are on the same subnet as the gateway.
Now you know your subnet, which in this case is 192.168.1.0/24 (using the CIDR range). Now you need to find the rest of the IP address in your network.
Scanning your Network
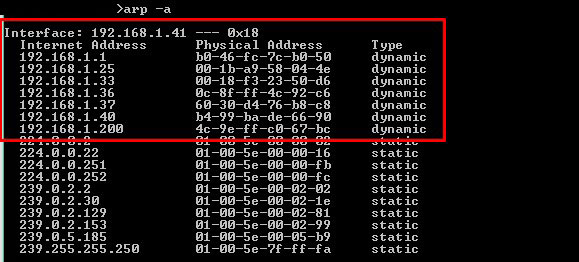
The job of the ARP protocol is to map IPs to MAC addresses. It provides a method for hosts on a LAN to communicate without knowing any address and create a cache of information. When a new computer enters the LAN, it receives an IP and updates its ARP cache with the Gateway information. This ARP cache can be found using the “arp-a” command.
- Use the command line to enter the “arp -a” command.
- This computer has been connected for some time into the LAN, so its ARP cache is very precise and complete. The first IP address shown in the display is the Gateway (the same we found through the ipconfig command).
- The output shows the IP, the MAC addresses, and their assignation type. The addresses displayed here were dynamically assigned by the DHCP server in the LAN. All of these IPs are devices connected to the LAN (192.168.1.0/24). The other static addresses are reserved for Multicasting.
- With the MAC information, you can know the vendor. Try searching for vendor prefixes or use an automatic online tool such as MACvendors.
Testing Connectivity
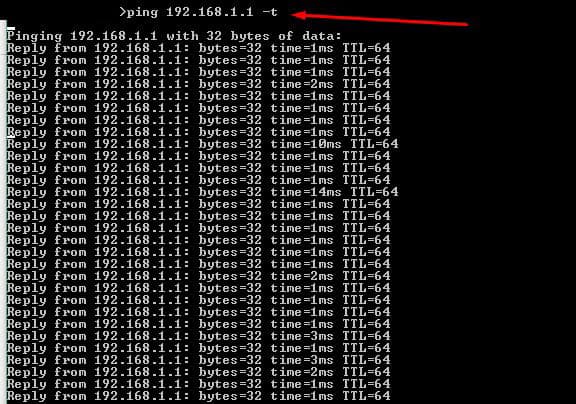
Finally, with some information, you can test connectivity. In the following test, we tried an extended ping with “ping -t” to the gateway. With this, you can learn some simple insights about delay and latency.
From the list generated by the ARP command, you could ping all the live hosts. Or you can go beyond and ping the entire subnet to find hosts not found by the ARP (but that would be too much manual work…). Later, we’ll discuss how to automatically ping entire subnets at once.
Enhancing IP Scanning
Although having a list of devices and their allocated IP address will give you good insights, the information will not be enough when your network scales. Manual IP scanning in multiple subnets and BYOD (Bring-Your-Own-Device) scenarios is nearly impossible. As the network scales, problems will scale too.
Larger networks demand more results, flexibility, and easy-to-read set of commands.
An IP Address Scanner tool helps you with larger demands. These tools are able to map the entire local network, finds live hosts, and to provide the results of the “arp-a” in a clearer format. Other IP Scanners do not depend on ARP but they operate using repeated ping tests. A Ping Sweep tool lets you ping entire subnets and find live hosts just with one button.
Some other IP Scanners go the extra mile and give more information such as Port number, DNS, DHCP, etc. All of this data is also presented in the most visual and easy-to-read format. They also allow users to save all results and present them in detailed reports.
The best IP Address discovery tools
Our methodology for selecting a third-party tool to scan for IP addresses
We reviewed the market for IP address discovery tools and analyzed options based on the following criteria:
- A service that can be run on demand, on a schedule, or continuously
- Scans of the entire network or the option to limit searches to an address range
- DNS resolution
- Mapping from MAC addresses to IP addresses
- A system that can also provide availability and response time tests
- A free trial that provides a no-cost opportunity to assess the package or a free tool
- Value for money from a system that is offered at a fair price or a free tool that is worth installing
With these selection criteria in mind, we identified a number of network scanners that will discover IP addresses and identify the devices to which they have been allocated by mapping to MAC addresses.
1. Paessler PRTG – FREE TRIAL
Paessler PRTG is a collection of sensors for networks, servers, and applications. You can customize the package by choosing which sensors to turn on. However, there is one sensor that is not optional because it forms the foundation of all of the PRTG monitoring systems – this is the IP scanner.
Key Features:
- Part of a full system monitor
- Continuous Ping sweep
- Results graphs
- Free option
Feature Distinction
PRTG stands apart from the rest of the address discovery tools for its wide supportability of multiple network devices and protocols. One of PRTG’s unique features is its auto-discovery service based on the SNMP protocol.
Why do we recommend it?
We recommend PRTG Network Monitor as one of the best tools to scan IP addresses because its capabilities go beyond simple IP scanning. Being a comprehensive network monitoring tool PRTG combines different robust features, including integrated advanced IP scanning, continuous ping sweeps, SNMP-based autodiscovery service, results graphs, and more.
The IP scanner in PRTG creates an autodiscovery service. It is actually based on the Simple Network Management Protocol (SNMP). Under SNMP processes, the PRTG server broadcasts a request for status reports. Device agents respond with a message that contains a database of details. The PRTG system compiles these reports into a network hardware inventory and that includes the MAC address and IP address of each device.
Once the device information of the network has been recorded, all network monitoring can begin. PRTG is available for installation on Windows Server and it is also offered as a cloud service.
Who is it recommended for?
We recommend PRTG for small to medium-sized enterprises (SMEs) with a moderate employee count and revenue level. The solution is designed for network administrators and IT professionals managing networks of various sizes on those SMEs.
Pros:
- Drag and drop editor makes it easy to build custom views and reports
- Supports a wide range of alert mediums such as SMS, email, and third-party integrations into platforms like Slack
- Supports a freeware version
Cons:
- Is a very comprehensive platform with many features and moving parts that require time to learn
Price: Free for up to 100 sensors. The paid version starts at $1,799 for 500 sensors.
Download: Offered for a 30-day free trial.
Download Free Trial!
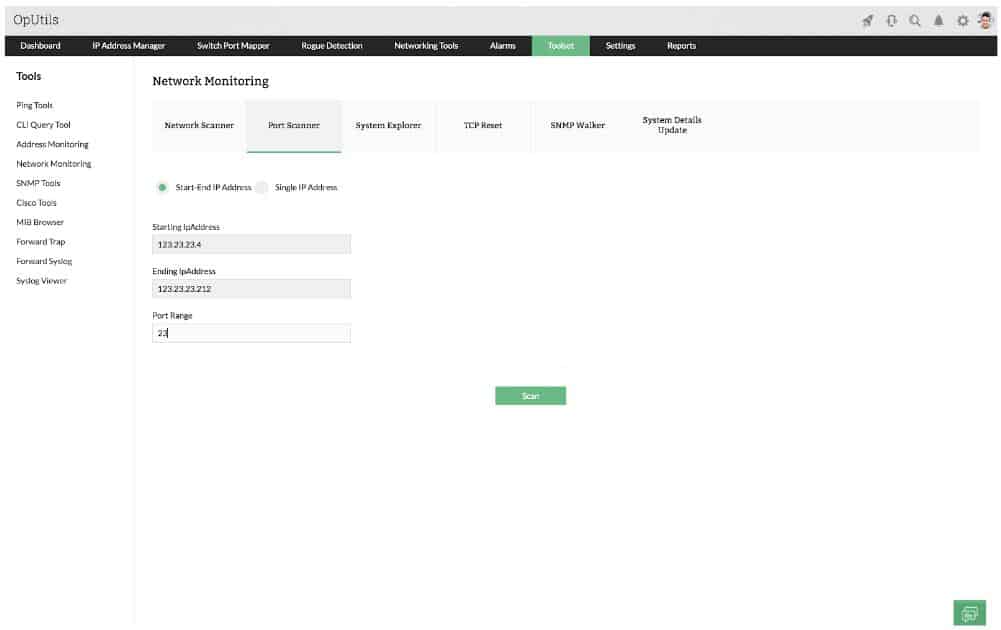
ManageEngine OpUtils combines an IP address manager, a switch port mapper for MAC address discovery, and a port scanner to identify open TCP and UDP ports on all devices. This combination delivers all address-related functions that you will need in order to fully manage your network.
Key Features:
- IP address manager
- Subnet planner
- Identifies abandoned addresses
Feature Distinction
The uniqueness of OpUtils is its robust suite of utilities. It includes an IP address scanner, subnet planner, tools for identifying abandoned addresses, and advanced configuration and diagnosis features.
Why do we recommend it?
We recommend ManageEngine OpUtils for its efficient network management capabilities. OpUtils offers an IP address manager as part of its utility suite, so you can discover all connected devices, and their associated IP addresses, and then manage them from a single console.
The IP address manager is, in itself, a suite of utilities. This group of services includes an IP address scanner. This will discover all of the devices connected to your network and list the IP addresses allocated to them. The IPAM is able to produce IP address reconciliation reports that will enable you to update your native DHCP server in case it fails to notice expired address leases.
The IP address tracker service in the bundle can produce a hierarchical view of your network, enabling you to identify subnets and the allocation of addresses to each. DHCP management tools in the pack let you manage subnet address pools. The switch port mapper identifies each device by MAC address and switch port number. The port scanner in OpUtils lets you see which TCP and UDP ports on each device are open.
OpUtils is available for Windows Server and for Linux.
Who is it recommended for?
ManageEngine OpUtils is recommended for various-sized networks, from SMBs to large enterprises. The solution is designed for any network admin or IT professional within those networks, looking for a complete IP address management solution.
Pros:
- Supports IP management and physical switch port monitoring
- Offers built-in troubleshooting tools to help
- Supports CISCO and SNMP tools to help configure, administer and diagnose issues
- Better suited for sysadmin
Cons:
- Offers many advanced features and options, not suited for small home networks
Price: OpUtils is available in a Free version, which includes a port scanner and Ping utilities. Contact the ManageEngine sales team for a quote on the paid version.
Download: The paid version of OpUtils can be downloaded as a 30-day free trial.
Download Free Trial!
3. Angry IP Scanner
Angry IP Scanner is one of the most popular scanners on the web, with over 29 million downloads. It is open-source, free, and available for Windows, MacOS, and Linux. It can let you scan your local network or the Internet-facing IP addresses.
Key Features:
- On-demand Ping sweeps
- Tabulated results
- Save to file
Why do we recommend it?
Angry IP Scanner is recommended for being one of the most used and relied-on open-source tools. If IP address scanning is all you need, Angry IP Scanner is easy to use and quite efficient in scanning both local and Internet-facing IP addresses.
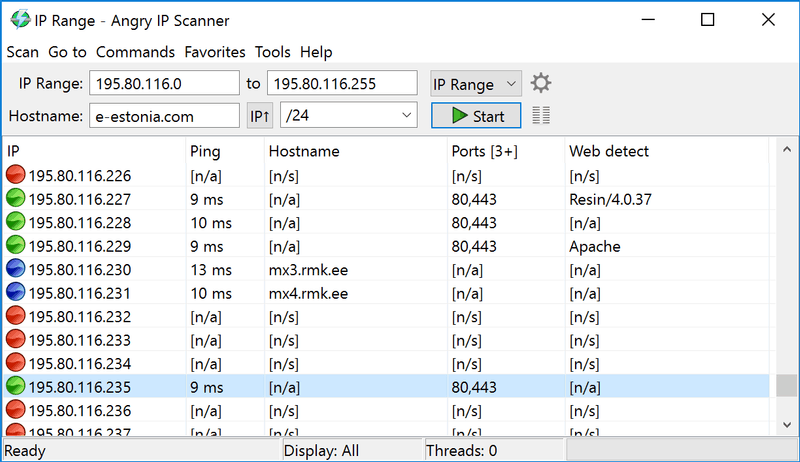
This tool is not only capable of scanning IP addresses but also ports. When you define an IP address range, you can also specify a number of the port, and see if a device in your network is using a specific service (defined by the port). Angry IP Scanner also lets you save all the scan results into multiple formats, such as TXT, XML, CVS, etc.
When you scan, you’ll know what hosts are alive, their response time, hostname, MAC address, etc. If you want even more information, you can extend results by developing Java plugins.
Who is it recommended for?
Angry IP Scanner is recommended for one-off scans of smaller networks. It works very well in uncomplicated situations and small networks where network admins require a fast and simple way to scan networks. Angry IP Scanner does not scale well on larger networks.
Pros:
- Easy to install and use – great for a mobile toolkit
- Better suited for one-off scans of small networks
Cons:
- Lacks advanced features such as DHCP reconciliation and rouge DHCP identification
- Doesn’t scale well in large environments
- Lacks detailed reporting that’s useful in enterprise networks
Price: Open Source and 100% free.
Download: Get Angry IP from its official site.
IP Address Tracker Tools
Having a map of IP addresses, MAC addresses, used ports, etc, is great for networking inventorying and may help with some troubleshooting cases. But a list can not control and display real-time results.
An IP address Tracker is a good upgrade to our set of tools and commands described so far. It does allow scanning multiple subnets and displaying results, but it also allows you to keep track of one or more IP addresses.
An IP Address Tracker will notice when an IP address is released. This can be either because the device lost connectivity or it changed IP address. It will help you minimize IP addressing conflicts (when two devices are trying to take the same IP) and reduce DNS errors.
MyLAN Viewer
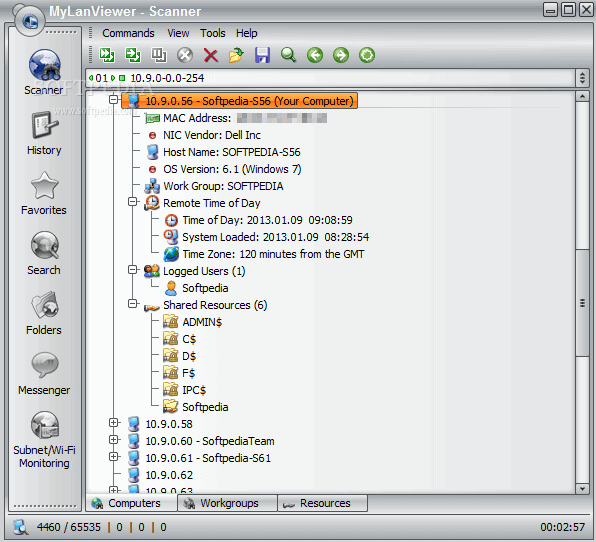
MyLAN Viewer is a NetBIOS and IP address scanner for Windows systems. Just like the IP Scanners shown above, this tool will scan a network and show devices in an easy-to-read format.
Key Features:
- Continuous scans
- Alerts for IP address profile changes
- Device details
Why do we recommend it?
MyLAN Viewer is recommended for its dedicated IP scanning capabilities. It provides advanced IP scanning, including continuous scans, schedules, and alerts for IP address profile changes. Also, if you are looking for a comprehensive network data collection (aside from IP addresses), MyLAN Viewer is a great option.
But MyLANViewer goes beyond, and not only shows computer name, IP, and MAC, but also NIC, OS version, logged users, shared folders, and much more.
This tool is able to track specific IP addresses and show notifications when their state change. With it, you can also keep track of network security by showing port information and detecting rogue DHCP servers. MyLAN Viewer tracks all devices in the subnet including hidden, and displays alerts when new devices enter the network, and others go.
This tool can also display the following metrics as well:
- Display Whois data.
- Perform traceroute.
- Manage “Remote Shutdown and Wake On LAN (WOL)”.
- Monitor wireless networks.
Who is it recommended for?
MyLAN Viewer is recommended for network admins working with Windows-based networks and who need detailed information about connected devices. It does not scale well on large networks, thus it is better to use MyLAN Viewer on smaller networks.
Pros:
- Provides whois, traceroute, WOL, and remote shutdown options, great for small networks and home labs
- Offers file management features, allowing users to quickly share or unshare folders in a workgroup
- Great for detecting rogue DHCP servers and addressing IP conflicts on smaller networks
Cons:
- The interface can feel cluttered in large networks, less nested menus could improve usability.
- Lack of enterprise reporting and monitoring capabilities
Price: Free, but only available for Windows systems.
Download: Get MyLAN Viewer from its official site.
Related Post: Best Wake On LAN Tools
IP Address Management (IPAM)
Basic IP Address Scanning should be enough to manage small networks. But when networks scale they depend on multiple subnets and detailed management requirements.
Sometimes large-scale networks have standalone DHCP and DNS Servers in order to assign addresses to multiple subnets. But IP conflicts occur and it is really challenging to manage them manually. An IP Address Management or “IPAM” is a piece of software able to actively control DHCP and DNS. It also gives you the ability to manage multiple subnets.
IP address scanning FAQs
How do I find a network name from an IP address?
To get the network name of a host from an IP address you need to query the DNS server. Open a Command Prompt window and enter nslookup <IP_address> putting in the IP address you have instead of <IP_address>.
How do I identify an unknown device on my network?
To see all of the devices connected to your network, type arp -a in a Command Prompt window. This will show you the allocated IP addresses and the MAC addresses of all connected devices. To get the hostname of each IP address you see in the list, use nslookup <IP_address> putting in the IP address you have instead of <IP_address>.
How can I tell what device is at an IP address?
To get deeper information on devices connected to your network rather than just an IP address or MAC address, use a network monitor that scans for details with SNMP – the SolarWinds Network Performance Monitor is one example.

