Downloading Vim
Vim is available for many different systems and there are several versions.
This page will help you decide what to download.
Most popular:
Details and options for:
- Unix
- PC: MS-DOS and MS-Windows
- Amiga
- OS/2
- Macintosh
- Others
| Mirrors | Alternative sites to download Vim files from. |
| Sources | Build Vim yourself and/or make changes. |
| GitHub | Obtain Vim sources with a git client (recommended). |
| Mercurial | Obtain Vim sources with a Mercurial client (recommended if you don’t like git). |
| Patches | Include the latest improvements (requires sources and rebuilding). |
| Runtime | Get the latest syntax files, documentation, etc.. |
| Script links | Links to individual syntax, indent, color, compiler and ftplugin scripts. |
| Translations | Non-English documentation packages. |
Versions before 7.3 can also be obtained with
Subversion
and
CVS.
Version
Vim 9.0 is the latest stable version. It is highly recommended, many bugs have
been fixed since previous versions.
If you have a problem with it (e.g.,
when it’s too big for your system), you could try version 6.4 or 5.8 instead.
To avoid having to update this page for every new version, there are
links to the directories. From there select the files you want to download.
In the file names ## stands for the version number. For example,
vim##src.zip
with version 9.0 is vim90src.zip and
vim-##-src.tar.gz for version 9.0
is vim-9.0-src.tar.gz.
Links are provided for quick access to the latest version.
Note that the links point to the latest version (currently 9.0) to avoid
that caching causes you to get an older version.
Unix
The best way to install Vim on Unix is to use the sources. This requires a
compiler and its support files. Compiling Vim isn’t difficult at all.
You can simply type «make install» when you are happy with the default
features. Edit the Makefile in the «src» directory to select specific
features.
You need to download at the sources and the runtime files.
And apply all the latest patches.
For Vim 6 up to 7.2 you can optionally get the «lang» archive, which adds
translated messages and menus. For 7.3 and later this is included with the
runtime files.
- Using git
-
This is the simplest and most efficient way to obtain the latest version,
including all patches. This requires the «git» command.
The explanations are on the GitHub page.Summary:
git clone https://github.com/vim/vim.git
cd vim/src
make
- Using Mercurial
-
This is another simple and most efficient way to obtain the latest version,
including all patches. This requires the «hg» command.
The explanations are on this page:
MercurialSummary:
hg clone https://bitbucket.org/vim-mirror/vim
cd vim/src
make
- version 7.x, 8.x and 9.x
-
There is one big file to download that contains almost everything.
It is found in
the unix directory
(ftp):
The files ending in «.tar.gz» are tar archives that are compressed with gzip.
Unpack them with tar -xzf filename.
The single big file ending in «.tar.bz2» is a tar archive compressed with
bzip2. Uncompress and unpack it with
bunzip2 -c filename | tar -xf —.
All archives should be unpacked in the same directory.
If you can’t compile yourself or don’t want to, look at the site of the
supplier of your Unix version for a packaged Vim executable. For Linux
distributions and FreeBSD these are often available shortly after a new Vim
version has been released. But you can’t change the features then.
-
Debian packages are available at:
http://packages.debian.org/vim. -
Sun Solaris Vim is included in the Companion Software:
http://wwws.sun.com/software/solaris/freeware/.
Vim for other Sun systems can be found at
http://sunfreeware.com/. -
HPUX with GTK GUI for various HPUX versions:
http://hpux.its.tudelft.nl/hppd/hpux/Editors/vim-6.2/ or
http://hpux.connect.org.uk/hppd/hpux/Editors/vim-6.2/ (note that the remark about the GNU GPL is wrong)
TOP
PC: MS-DOS and MS-Windows
For modern MS-Windows systems (starting with XP) you can simply use the
executable installer:
gvim90.exe (ftp)
It includes GUI and console versions, for 32 bit and 64 bit systems.
You can select what you want to install and includes an uninstaller.
If you want a signed version you can get a build from
vim-win32-installer
It supports many interfaces, such as Perl, Tcl, Lua, Python and Ruby.
There are also 64bit versions which only run on 64 bit MS-Windows and use a
lot more memory, but is compatible with 64 bit plugins.
You can also get a nightly build from there with the most recent improvements,
with a small risk that something is broken.
Since there are so many different versions of MS operating systems, there are
several versions of Vim for them.
For Vim 5.x, Vim 6.x and Vim 7 look in
the pc directory (ftp).
- Self-installing executable gvim##.exe gvim90.exe (ftp)
-
For Vim 6 and later. This includes a GUI version
of Vim — with many features and OLE support — and all the runtime files.
It works well on MS-Windows 95/98/ME/NT/2000/XP/Vista/7.
Use this if you have enough disk space and memory. It’s the simplest way to
start using Vim on the PC. The installer allows you to skip the parts you
don’t want.
For Vim 6.3 and later it also includes a console version, both for MS-Windows
95/98/ME and MS-Windows NT/2000/XP/Vista/7. The installer automatically
selects the right one.
- Runtime files vim##rt.zip vim90rt.zip (ftp)
-
For all the following binary versions you need this runtime archive, which
includes the documentation, syntax files, etc. Always get this, unless you
use the self-installing executable.
There are three versions that run as an MS-Windows application. These provide
menus, scrollbars and a toolbar.
- GUI executable gvim##.zip gvim90.zip (ftp)
- This is the «normal» GUI version.
- OLE GUI executable gvim##ole.zip gvim90ole.zip (ftp)
-
A GUI version with OLE support. This offers a few extra features,
such as integration with Visual Developer Studio. But it uses quite a bit
more memory.
There are three versions that run on MS-DOS or in a console window in
MS-Windows:
- Win32 console executable vim##w32.zip vim90w32.zip (ftp)
-
The Win32 console version works well on MS-Windows NT/2000/XP/Vista/7. It
supports long file names and is compiled with «big» features. It does not run
perfectly well on MS-Windows 95/98/ME, especially when resizing the console
window (this may crash MS-Windows…). - 32 bit DOS executable vim##d32.zip vim73_46d32.zip (ftp)
-
The 32 bit DOS version works well on MS-Windows 95/98/ME. It requires a DPMI
manager, which needs to be installed on MS-DOS. MS-Windows already has one.
It supports long file names, but NOT on MS-Windows NT/2000/XP/Vista/7. It is
compiled with «big» features.
Not available for 7.4 and later. - 16 bit DOS executable vim##d16.zip vim71d16.zip (ftp)
-
The 16 bit DOS version is the only one that runs on old MS-DOS systems. Only
use this if you are really desparate, because it excludes many useful features
(such as syntax highlighting and long file names) and quickly runs out of
memory.
The last version available is 7.1. Version 7.2 and later are too big to fit in
the DOS memory model.
There are a few extra files:
- iconv library libiconv
-
A library used for converting character sets.
Put «iconv.dll» in the same directory as gvim.exe to be able to edit files in
many encodings. You can find the dll file in the bin directory of the
«libiconv-win32» archive. - newer intl library libintl
-
The included libintl.dll does not support encoding conversion.
If you have installed the iconv library, as mentioned above, you can install a
gettext library that uses it.
Get «intl.dll» from the bin directory in the gettext-win32 archive and store it
as «libintl.dll» in the same directory as gvim.exe, overwriting the file
that may already be there. - PC sources vim##src.zip vim90src.zip (ftp)
-
The source files, packed for the PC. This only includes the files needed on
the PC, not for other systems. The files are in dos format CR-LF. - PC debug files gvim##.pdb gvim90.pdb (ftp) gvim##ole.pdb gvim90ole.pdb (ftp) vim##w32.pdb vim90w32.pdb (ftp)
- When you notice a bug or a crash in Vim these files can be used to help tracing down the problem. In Vim 7 do «:help debug-win32» to see how.
- PC translations vim##lang.zip vim72lang.zip (ftp)
-
Only for 7.2 and earlier, for 7.3 and later these are included in the «rt» archive.
Translated messages and menu files, packed for the PC. Use this to see
non-English menus. The messages are only translated when the libintl.dll
library is installed. - Windows 3.1 GUI executable gvim##w16.zip and gvim##m16.zip
-
These are GUI versions for 16 bit windows (Windows 3.1). The «w16» has many
features, «m16» has few features (for when you’re short on memory).
The files ending in «.zip» can be unpacked with any unzip program.
Make sure you unpack them all in the same directory!
Alternate distributions
- Yongwei’s build
-
You may also try Yongwei’s build,
executables with slightly different interfaces supported.
- Cream
-
For an unofficial version that used to include all the latest patches and
optionally a bit
more: Cream.
The «one-click installer» mentioned includes the Cream changes.
For the «real Vim» use the «without Cream» version listed further down.
Unfortunately, it stopped updating since Vim 8.0.
- Cygwin
- For a Cygwin binary look at others.
TOP
Amiga
Quite a long time ago, Vim development started on the Amiga. Although it’s a
really old system now, it might still work. However, this has not been tested
recently.
You may have to use an older version for which Amiga binaries are available.
For Vim 5.x and Vim 6 look in
the amiga directory (ftp).
Vim 7 files can be found at
os4depot.net. This is for AmigaOS 4. Made by Peter Bengtsson.
- Runtime files vim##rt.tgz vim64rt.tgz (ftp)
- Documentation, syntax files, etc. You always need this.
- Executable vim##bin.tgz vim64bin.tgz (ftp)
-
The executables for Vim and Xxd.
For Vim 6 it includes «big» features, for Vim 5.x it
includes the normal features.
For Vim 6.2 it is not available (my Amiga had harddisk problems then, this miraculously healed later). - Big executable vim##big.tgz
- Vim with «big» features and Xxd. Only for Vim 5.x.
- Sources vim##src.tgz vim64src.tgz (ftp)
-
The source files for the Amiga.
Only needed when you want to compile Vim yourself.
The files are all tar archives, compressed with gzip. To unpack, first
uncompress them with gzip -d filename. Then unpack with
tar xf filename. You need to unpack the archives in the same
directory.
TOP
OS/2
The OS/2 version runs in a console window.
For Vim 5.x and Vim 6 look in
the os2 directory (ftp).
Version 6.2 is not available.
Versions 6.3 and 6.4 were compiled by David Sanders.
Version 7.0 was compiled by David Sanders.
- Runtime files vim##rt.zip vim70rt.zip (ftp)
- Documentation, syntax files, etc. You always need this.
- Executables vim##os2.zip vim70os2.zip (ftp)
- Vim, Xxd, Tee and EMX libraries.
The files ending in «.zip» can be unpacked with any unzip program.
Make sure you both zip archives in the same directory!
If you want to compile the OS/2 version, you need the EMX compiler. Use the
Unix source archive, runtime files and the extra archive. After unpacking the
runtime archive, move all the files and directories in the «runtime»
directory one level up.
TOP
Macintosh
The terminal version of Vim is included as «vi», you already have it. It’s
lagging behind a bit though and has limited features, thus you may want to
additionally install a recent version or one with more features.
MacVim
There most popular version is MacVim. This is being actively developed. This
behaves like a Mac application, using a GUI.
MacVim has more a Mac look and feel, is developed actively and most people
prefer this version. Most of MacVim was made by Bj�rn Winckler.
MacVim can be downloaded here: https://github.com/macvim-dev/macvim
New versions are made quite often.
Subscribe to the
vim-mac maillist
to be informed about bugs and updates.
Homebrew
This is a terminal version installed with the «brew» command.
It is updated frequently.
It can be downloaded here: formulae.brew.sh/formula/vim.
Older
Older binaries for Mac OS/X can be found on this
SourceForge project.
Maintained by Nicholas Stallard.
Here is a multi-byte version of Vim 5.7 (for Japanese, possibly also for
Korean and Chinese; not for Unicode):
http://www-imai.is.s.u-tokyo.ac.jp/~asai/macvim-e.html
Background
Most of the work for
the Macintosh port (Classic and Carbon) was done by Dany St-Amant.
If you have OSX and a setup for compiling programs, you can use the source code
and compile yourself. See the Unix section above. The development tools can be
downloaded from Apple’s developer web site.
Turn to the vim-mac maillist to meet other
Vim-Mac users.
TOP
Others
This is a list of links to sites where various versions of Vim can be obtained.
These are supported by individuals, use at your own risk.
| Android | Search for «Vim Touch» by Momodalo in the Play Store. |
| i/OS | Run Vim on your iPhone or Ipad. |
| QNX (ftp) | Provided by Yakov Zaytsev. Requires QNX 6.3.0/6.3.2 with service pack 2. |
| Agenda | http://pi7.fernuni-hagen.de/hartrumpf/agenda/vim/vim.vr3 |
| Cygwin (with GTK GUI) | http://lassauge.free.fr/cygwin/ |
| Open VMS | http://www.polarhome.com/vim/ |
| MorphOS | http://www.akcaagac.com/index_vim.html |
TOP
Вы не можете вернуться в школу вовремя из-за эпидемии. Вам необходимо установить vim на свой домашний компьютер с Windows и настроить среду, которая записана здесь.
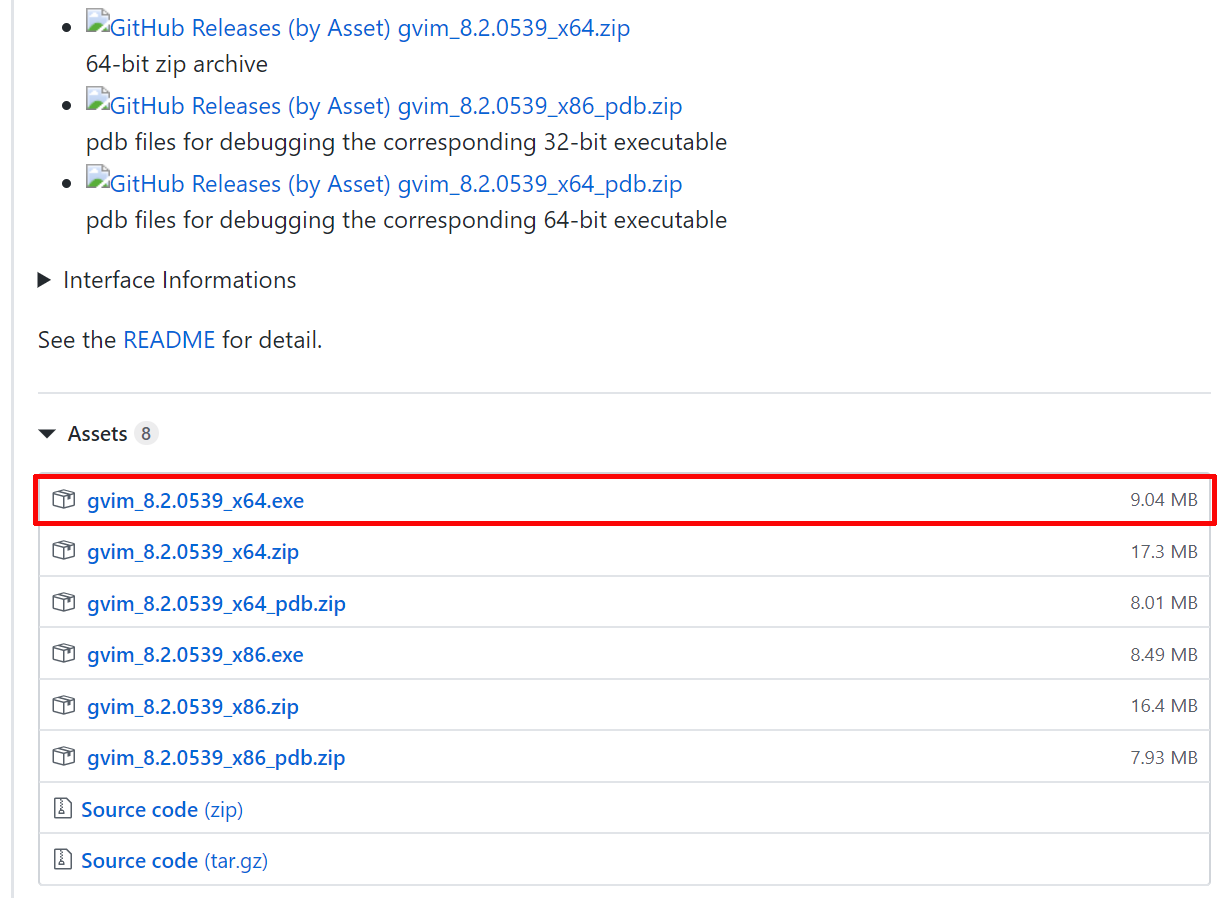
1 Загрузите vim для windows
Загрузите версию vim для Windows с github:https://github.com/vim/vim-win32-installer/releases
2 Установите vim
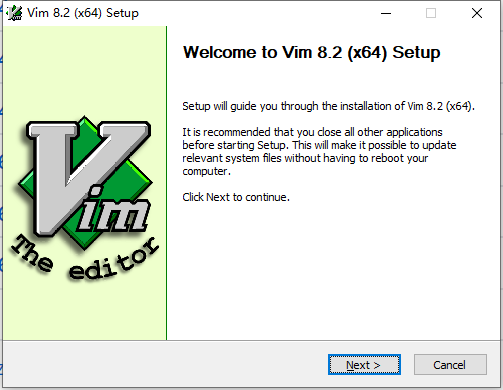
- Дважды щелкните загруженный файл gvim_8.2.0539_x64.exe, чтобы начать установку, сначала выберите язык, затем войдите в интерфейс приветствия, нажмите «Далее»

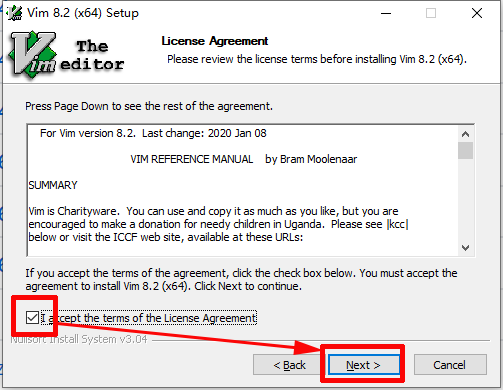
- Получение согласия
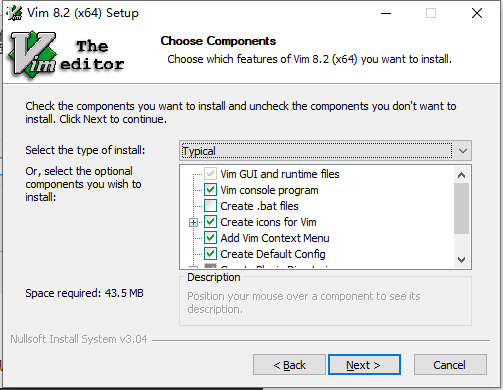
- Выберите содержимое для установки, нажмите значение по умолчанию без особых требований, а затем нажмите кнопку «Далее».
- Выберите настройки vim, по умолчанию без особых требований, а затем нажмите Далее
- Выберите путь установки
- Процесс установки следующий, нужно немного подождать
- Отображается следующий интерфейс, указывающий на то, что установка прошла успешно. Нажмите Готово, чтобы завершить установку.
3 Добавить переменные среды
Чтобы запустить vim непосредственно из cmd или терминала Windows, добавьте путь установки vim в переменную окружения.
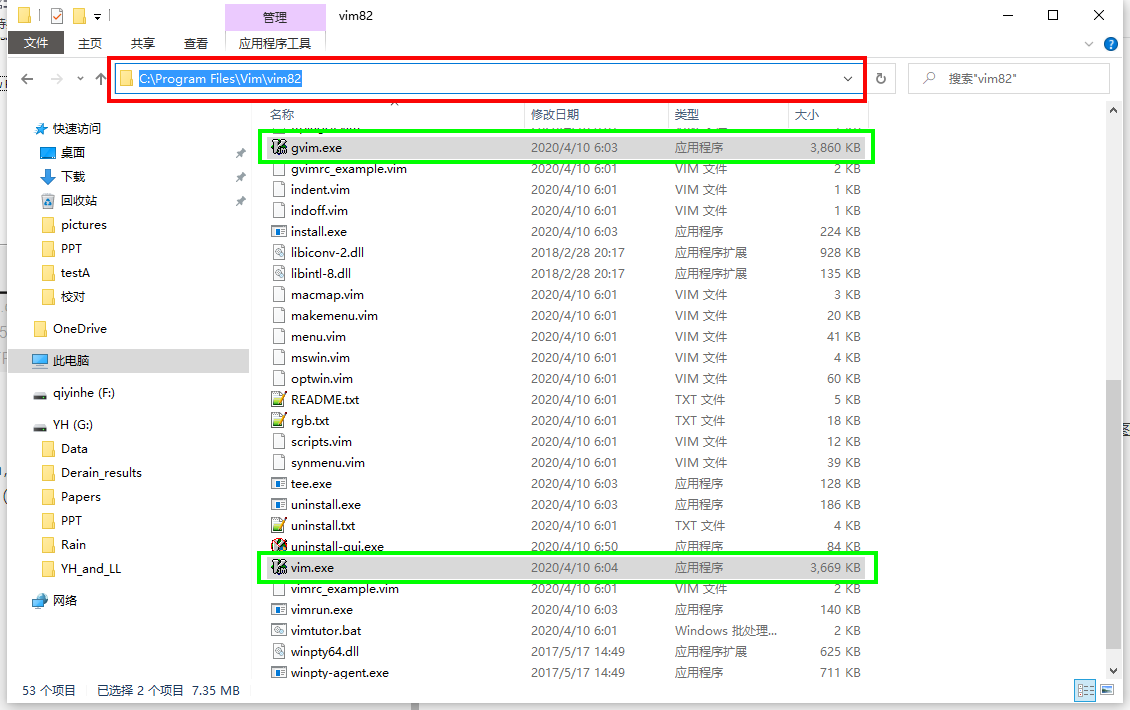
- Сначала найдите vim.exe или gvim.exe в пути установки (оба находятся в одной папке), скопируйте путь, как показано ниже.
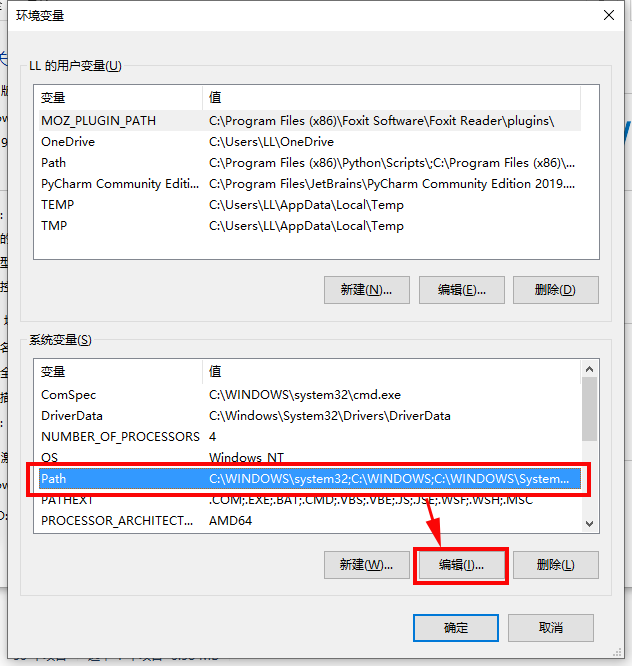
- Щелкните правой кнопкой мыши этот компьютер-> Свойства-> Расширенные настройки системы-> Переменные среды, выберите Путь и нажмите Изменить, как показано ниже.
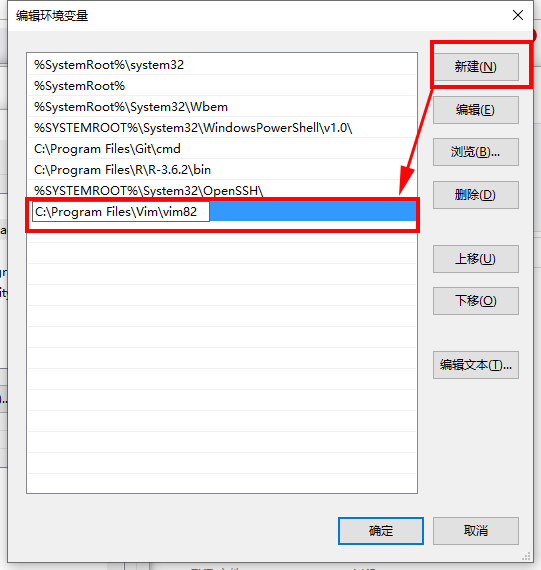
- Нажмите New и вставьте сюда путь к папке, в которую только что скопировал vim.exe, как показано ниже:
- Наконец, нажмите три подтверждения (всего в описанном выше процессе появится три окна, и каждое окно будет подтверждено один раз) для успешного добавления.
3 Настройте vim
Есть один в установленной папке vim_vimrcФайл, эквивалентный vim под Linux.vimrcFile, настройте в нем vim, в большинстве случаев так же, как Linux.
- Базовая конфигурация выглядит следующим образом
"базовая конфигурация
"
"
" Установить номер строки
set number
"Подсветка синтаксиса. Автоматическое распознавание кодов и использование нескольких цветов для обозначения
syntax enable
" Выберите цветовую тему(Он был загружен и помещен в папку ~ / .vim / colors.)
colorscheme badwolf
"Поддержите использование мыши
set mouse=a
" После нажатия клавиши Enter отступ следующей строки будет автоматически соответствовать отступу предыдущей строки.
set autoindent
"После нажатия клавиши Tab количество пробелов, отображаемых vim
set tabstop=4
" В нормальном режиме>>Увеличьте один уровень отступа,<<Отменить один уровень отступа,==При отмене всех отступов количество пробелов для каждого уровня отступа
set shiftwidth=4
«Автоматически преобразовывать табуляцию в пробел (чтобы отступы клавиши табуляции в разных редакторах не вызывали проблем)
set expandtab
" Сколько пробелов превращается в Tab
set softtabstop=4
"Строка, в которой выделен курсор
set cursorline
highlight CursorLine cterm=NONE ctermbg=black guibg=NONE guifg=NONE
" Отключить автоматический перенос строк
set nowrap
"При вертикальной прокрутке расстояние между курсором и верхом / низом (единица измерения: строка)
set scrolloff=5
" При горизонтальной прокрутке расстояние между курсором и началом или концом строки (единица измерения: символ)
set sidescrolloff=30
"Установите ширину линии, то есть сколько символов отображается в строке
set textwidth=1000
" Отображать ли строку состояния: 0 означает отсутствие отображения, 1 означает отображение только в нескольких окнах, 2 означает отображение
set laststatus=2
"Задайте информацию, отображаемую в строке состояния: имя файла, код ASCII символа, на котором находится курсор, шестнадцатеричный код ASCII символа, на котором находится курсор, положение курсора, процент содержимого выше. строка, где находится курсор во всем файле, общая строка файла Номер
set statusline=\ %F%m%r%h%w\ \ \ \ ASCII=\%03.3b\ \ \ \ HEX=\%02.2B\ \ \ \ POS=%04l,%04v\ \ \ \ %p%%\ \ \ \ NumOfLine=%L
" Показать пробел в конце строки
highlight WhitespaceEOL ctermbg=red guibg=red
match WhitespaceEOL /\s\+$/
"Когда курсор встречает скобку, другая половина скобки автоматически выделяется.
set showmatch
" В режиме командной строки текущая набранная команда отображается внизу. Например, при вводе dd для удаления строки введите первый d, и в правом нижнем углу отобразится d. Когда dd полностью введен, операция завершена, и нижний дисплей исчезнет.
set showcmd
"При поиске выделите результат поиска
set hlsearch
" При поиске каждый раз, когда вы вводите символ, он автоматически переходит к первому совпадающему результату.
set incsearch
"Игнорировать регистр при поиске
set ignorecase
" Не создавать файл подкачки
set noswapfile
"Сохранять историю отмены операций
set undofile
" Задайте место сохранения файла истории операций
" set undodir=
" Сколько исторических операций необходимо запомнить vim
set history=1000
"В командном режиме нижняя инструкция по эксплуатации автоматически завершается нажатием клавиши Tab. При первом нажатии Tab отображается список всех соответствующих инструкций по выполнению операций; при втором нажатии клавиши Tab каждая инструкция будет выбрана по очереди.
set wildmenu
set wildmode=longest:list,full
" Определите сочетание клавиш F1 для переключения окна vim
map <F1> <C-w>w
"Установить код формы файла utf8
set encoding=utf-8
set termencoding=utf-8
set fileencoding=utf-8
set fileencodings=ucs-bom,utf-8,chinese,cp936
- Установите плагин vundle
git clone https://github.com/VundleVim/Vundle.vim.git C:\Program Files\Vim\vimfiles\bundle
Если git не установлен, повторно выполните указанную выше команду после установки самостоятельно.
- в
_vimrcДобавьте следующий контент, чтобы установить каждый общий плагин один за другим. Подробнее см. В блоге, который я написал при настройке vim в Linux:https://blog.csdn.net/qyhaill/article/details/99701566
"Управление плагинами
set rtp+=$VIM\vimfiles\bundle\Vundle.vim
call vundle#begin()
Plugin 'VundleVim/Vundle.vim'
Plugin 'tpope/vim-fugitive'
Plugin 'airblade/vim-gitgutter'
Plugin 'jiangmiao/auto-pairs'
Plugin 'tpope/vim-surround'
Plugin 'scrooloose/nerdcommenter'
Plugin 'scrooloose/nerdtree'
Plugin 'jistr/vim-nerdtree-tabs'
Plugin 'zxqfl/tabnine-vim'
call vundle#end()

"  Конфигурация различных плагинов
"
"
"Конфигурация комментатора NERD
"  Сменить лидера с"\" к ","
let mapleader = ","
"  Автоматически добавлять пробелы после комментария
let g:NERDSpaceDelims = 1
"Используйте компактный синтаксис для уточненных многострочных комментариев: используйте компактный синтаксис, чтобы украсить многострочные комментарии.
let g:NERDCompactSexyComs = 1
"  Выровнять построчные разделители комментариев по левому краю вместо следующего отступа кода: Выровнять построчные разделители комментариев по левому краю вместо следующего отступа кода:
let g:NERDDefaultAlign = 'left'
"Разрешить комментирование и инвертирование пустых строк (полезно при комментировании региона): разрешить комментирование и инвертирование пустых строк (полезно при комментировании региона)
let g:NERDCommentEmptyLines = 1
"  Включить обрезку конечных пробелов при раскомментировании: удалить пробел в конце текущей строки при раскомментировании
let g:NERDTrimTrailingWhitespace = 1
"Включите NERDCommenterToggle, чтобы проверять, прокомментированы все выбранные строки или нет: я пока не знаю, что это означает и для какой цели
" let g:NERDToggleCheckAllLines = 1
"
"
"Конфигурация NERDTree
"  Установите F2 как горячую клавишу для переключения NERDTree
map <F2> :NERDTreeToggle<cr>
"Измените значок отображения дерева
" let g:NERDTreeDirArrowExpandable = '+'
" let g:NERDTreeDirArrowCollapsible = '-'
"  Автоматически открывать NERDTree, если при открытии vim нет файла
" autocmd vimenter * if !argc()|NERDTree|endif
"  Автоматически закрывать, когда NERDTree остается единственным окном
autocmd bufenter * if (winnr("$") == 1 && exists("b:NERDTree") && b:NERDTree.isTabTree()) | q | endif
"
"
"nerdtree-git-plugin конфигурация
let g:NERDTreeIndicatorMapCustom = {
    \ "Modified"  : "✹",
    \ "Staged"    : "✚",
    \ "Untracked" : "✭",
    \ "Renamed"   : "➜",
    \ "Unmerged"  : "═",
    \ "Deleted"   : "",
    \ "Dirty"     : "✗",
    \ "Clean"     : "︎",
    \ 'Ignored'   : '☒',
    \ "Unknown"   : "?"
    \ }
- Откройте vim в cmd и выполните
:PluginInstallУстановите плагин.
Vim is a versatile editor that is highly customizable. For this reason, it has won the hearts of those who prefer high levels of customization and control in their text editors. With Vim, you can use key mappings to execute sophisticated commands. Vim also offers a Recording feature that makes it possible to automate keystroke sequences to run functions. Like many text editors, Vim gives you the advantage of adding plugins that extend the functionality by adding additional features.
Vim was originally created for Unix-based systems, but as time passed, this text editor found its way to the windows and Mac platforms. So, in this article, you will learn how to install the vim editor on the Windows Operating System.
Let us get started.
Downloading the Vim Editor.
To install the Vim editor, you need the executable file found on the official Vim website. https://www.vim.org/ .
Head over to the site and click on the Download button on the left side of the screen as shown below.

This should take you to the download section where you will find the different Operating systems.

We are interested on the Windows version.
Click on the standard self-installing executable to download the .exe file.
Installing the Vim Editor.
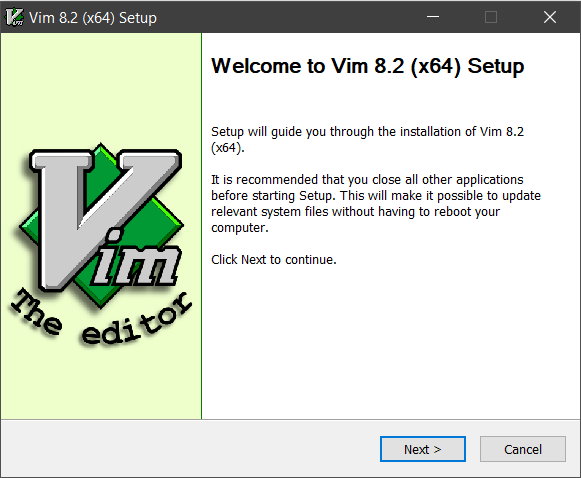
Once the file is saved on your computer, open it to start the installation wizard.

-
Choose the language you wish for the installer and click Okay.
-
On the next page, you will notice that the executable will install Vim version 9. The version should vary depending on the time of download. Click Next to proceed.

- The next step is to accept the terms of License Agreement. Mark the check box and click next to proceed.

-
The next screen prompts you for the features you wish to install. This is step depends on your needs.
- Typical is the default type of install. You can add extra features by clicking on the features you need and this changes the type of install to custom.
- Minimal type of install removes all the extra features while the Full type will install all the additional features.
-
The next screen prompts for the enhancement settings and keyboard/mouse remapping.
-
Leave the Compatibility and enhancement section to default which enables all the vim enhancements.
This screen also enables you to add
key mappingsfor the keyboard and the mouse as you wish. -
To remap the keys, Change the mapping section from
Do not remap keys (Default)toRemap a few keys
-


- Choose the destination folder to install the vim editor and click on the install button.

Once the installation is done, Click finish to exit the installation wizard.
Adding Vim Installation path to the system Variables.
Open the vim installation folder and copy the path. In my case, it is installed on this path.
C:\Program Files (x86)\Vim\vim90
Open the start menu and type System Variables

Click on Environment Variables. This should take you to the next window where you can edit the environment variables
Under system variables, choose Path and click on edit to add the vim installation path you copied.

On the next window, click on new and paste the path then click Okay.

Once you are done with this step, you should be able to use Vim like you do with Vi on Unix systems.
How to Use the Vim editor in Windows.
Now that you have Vim installed on your computer, the next step is to use it.
Open Vim by opening the command prompt or powershell and using the vim command.
Vim
If the installation was successful, you should see a similar window as the one below.

Creating files with Vim
Open the cmd and navigate to where you want to create the text file using the cd command.
The syntax to creating a file using Vim is as follows:
vim filname.txt
Example:
vim geekbits.txt
This is how it should look on the commandline.

The command above should open the vim editor where you can write you text and save it.

Saving files with Vim
To save the file, you should press the ESC key to switch to the command mode.
Type :wq then press Enter to save the file and quit Vim.
Learn more about how to use the Vim Editor in this Article: How to use the Vim Editor.
Conclusion
Due to the versatility of the Vim editor, editing text files has become very easy and efficient. The vim editor is very powerful because it has an extensive plugin system and intergrates with many tools and not forgetting the built-in commands.
This article has shown you how to install the Vim editor on the Windows operating system. If you found the article helpful, Share it and subscribe to geekbits to get notified via email everytime we publish interesting articles.
Thanks for reading 
If you enjoy our content, please consider buying us a coffee to support our work:

Edit text file in CMD with Vim
Edit text file in Command Prompt with notepad
cd command in Linux
How to Track Your Screen Time on Linux With ActivityWatch
How to Enable Passwordless SSH Login on Linux
Published by
![]()
Just a guy behind the Screen who lacks knowledge about what the future holds. Join me on my Journey.
IDE давно окружали разработчиков, но разработчики старшего поколения использовали свой код прямо из окна терминала. Хотя IDE повышают производительность и упрощают кодирование таких функций, как автозаполнение и IntelliSense. Использование текстового редактора bare-bones, такого как Vi / Vim, имеет свои преимущества. Вы можете написать код с нуля, поскольку нет шаблонов. Он углубляет ваши знания о языке программирования и гарантирует, что вы понимаете каждый бит кода. Если вы занимаетесь разработкой программного обеспечения, вы, должно быть, слышали и боялись о добром старом Vim. В этом посте мы рассмотрели, как настроить и установить Редактор текста Vim на Windows 10/8/7.
Установка текстового редактора Vim в Windows

Для всех тех, кто не знаком с Vi / Vim, я должен сказать вам, что это один из старейших и один из самых стабильных текстовых редакторов. Он работает в терминальном окне и имеет мощные функции, такие как многоуровневое дерево отмены, обширная система плагинов и интеграция со многими другими инструментами. Если вы были / являетесь пользователем Linux и хотите установить Vi / Vim в Windows, вы находитесь в нужном месте.
Шаг 1: Чтобы начать работу, вам необходимо загрузить редактор Vim Text Editor для Windows. Перейдите по этой ссылке и загрузите программу установки для Windows.
Шаг 2: Теперь откройте установочный файл и следуйте инструкциям на экране. На этапе, когда установка запрашивает у вас тип установки, выберите Полный и нажмите далее.

Шаг 3: После завершения установки откройте окно CMD и введите напор и нажмите enter. Voila, теперь вы находитесь в редакторе Vim Text Editor. Ввод чего-то не будет работать, потому что использование Vim не так просто, как есть.
Обучение Vim
Один из лучших способов узнать Vim — пройти официальную документацию. Эта ссылка приведет вас к документации, которая поможет вам перейти к лучшим источникам, чтобы узнать vim. Если вы ищете что-то более быстрое, просто введите :Помогите внутри напор окна, и вы можете пройти через встроенное руководство.
Это может показаться бесполезным, но правильный способ выйти из vim — это ввести : д а не нажатием кнопки закрытия окна.
Если вы уже используете Vim Text Editor для UNIX-систем, тогда это должно быть похоже. Все команды должны работать так, как есть, и не так много разных вещей. Если вы хотите настроить Vi / Vim в Windows, вам нужно отредактировать файл конфигурации.
В UNIX вызывается файл конфигурации .vimrc тогда как в Windows это называется _vimrc.
Файл конфигурации может находиться внутри вашей папки $ VIM, которая не что иное, как C: Program Files (x86) Vim _vimrc.
Вы можете отредактировать этот файл, если хотите добавить пользовательскую конфигурацию.

Если у вас возникли какие-либо проблемы при установке, поделитесь ими с комментариями. Также расскажите о том, как использовать текстовый редактор Vim для Windows в комментариях ниже.
Рекомендуемые:
Получите удобный оптимизированный текстовый редактор с Jarte

Вы ищете удобный текстовый редактор без раздувания коммерческих приложений? Jarte — это оптимизированный текстовый редактор с настраиваемой структурой пользовательского интерфейса и хорошо стоит взглянуть на него.
Руководство для начинающих по Nano, текстовый редактор командной строки Linux

Новое в командной строке Linux? Смущенный всеми другими расширенными текстовыми редакторами? How-To Geek получил вашу спину с этим руководством к Nano, простому текстовому редактору, который очень дружелюбен для новичков.
Как улучшить свой любимый текстовый редактор с помощью дополнительных параметров

Ваш любимый текстовый редактор не хватает нескольких функций? Возможно, вы хотите легко получить количество слов или изменить случай выбранного текста. Существует простой способ улучшить ваш редактор с помощью этих и дополнительных функций.
Cold Turkey Writer — лучший текстовый редактор без отрыва для Windows

Cold Turkey Writer — бесплатный текстовый редактор, не содержащий отвлечений, для Windows, который блокирует все, пока пользователь не достигнет цели, установленной им.
Редактор MS-DOS: Скрытый текстовый редактор в операционной системе Windows

Редактор MS-DOS имеет все функции как «Блокнот» и многое другое! С его помощью вы также можете работать с несколькими текстовыми файлами, изменять цвета фона, изменять цвет текста и т. Д.
These days, Vim becomes
more and more popular on Windows. Today, let’s learn how to install Vim on
Windows, including:
- gVim
-
WSL
(our preferred option) - Cygwin
Installing gVim on Windows
gVim is a Vim GUI for Windows. For sometime, this and the Cygwin alternative
(discussed below) were the main ways to run Vim on Windows.
Installing gVim is
simple and follows the standard way to install applications on Windows. So go ahead and download your installer from
Vim’s official download page, run the installation and follow the instructions.
 |
| Initial Setup |
Choose the components you want to install:
 |
| Choosing your components |
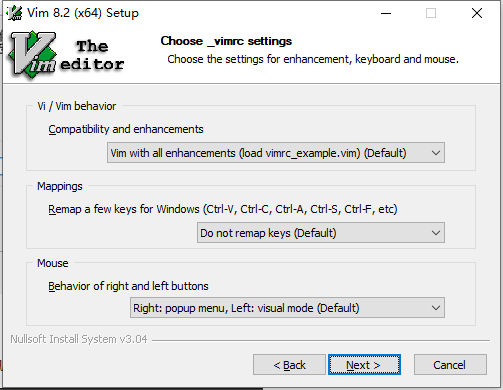
Choose your vimrc settings:
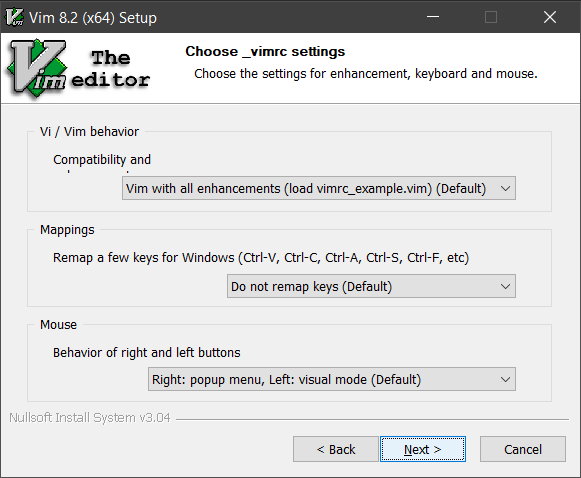 |
| Choosing your .vimrc settings |
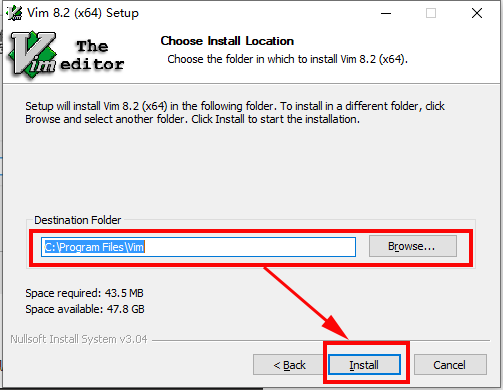
Specify the install location:
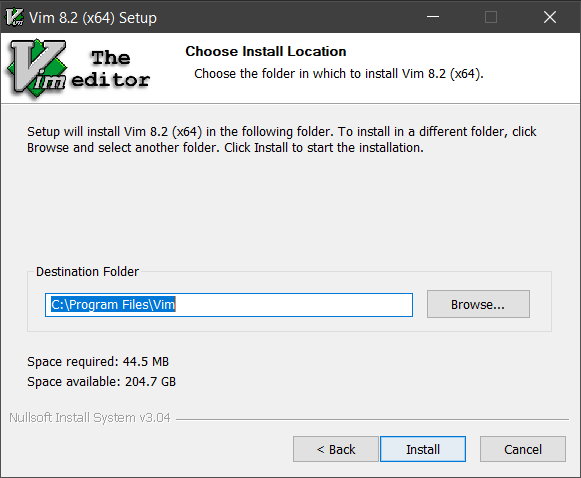 |
| Specifying your install location |
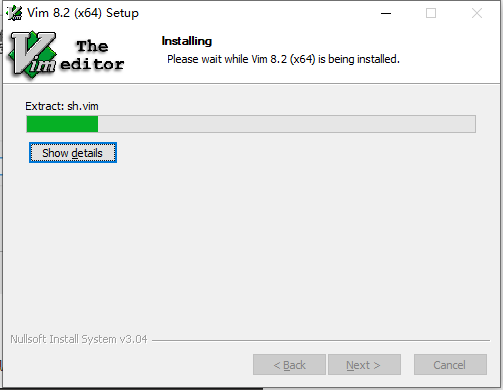
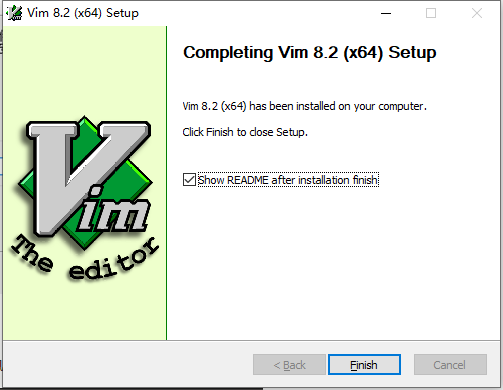
And that’s it! Vim is now installed on your system. Start it from the Start Menu.
Installing Vim on WSL
Despite installing Vim using the installer above feel more natural to Windows users, we’d like to suggest a different approach: installing Vim on WSL. Since it’s really simple, follows the same setup described by
us in our Linux tutorial and is the way you will probably do when using Linux.
For this setup we
assume you have a
Ubuntu WSL instance
and
WSL installed in your system. Installing Vim on Ubuntu under WSL is done by opening a WSL terminal and
typing these commands:
sudo apt-get update
sudo apt-get install vim
Once you install it, open a new WSL terminal and run vim with the vim command from the command line:
Installing Vim using Cygwin
Installing Vim with
Cygwin (a
POSIX-compatible runtime for Windows) may be the least recommended way to do so
these days. However, if you have Cygwin installed already and is comfortable
with it, installing Vim on it simply requires running Cygwin’s setup.exe again
and selecting Vim.
If you don’t have Cygwin installed,
install it and select
Vim from your install screen.
Testing the Install
With Vim installed, next step is to test if it’s running with the command
below:
vim
Exiting Vim
In case it’s your first time with
Vim, to exit press:
<Esc> :q!
Listing installed features
It’s also possible to list which features are installed in your setup by
running from the terminal:
vim —version
The enabled features will be marked with (+) while the disabled should have
the (-) symbol aside.
Conclusion
One this post we reviewed three different ways to install
Vim, with WSL being our recommendation. We hope it helps!
See Also
- How to get started with Vim
- Why use Vim
- Installing Vim on Linux
- Installing Vim on Mac
- Vimtutor — Your first Vim tutorial
- Learn to learn Vim
- Fundamental concepts of Vim
- Vim Modes — All you need to know