«Чистая» установка (в оригинале — vanilla installation) позволяет установить систему без изменения файлов основного раздела, лишь добавляя загрузчик и необходимые драйверы в скрытый раздел диска EFI. При этом раздел с установленной macOS X остается незатронутым.
Это руководство предназначено для настольных ПК. Для ноутбуков, лучше поискать другое (там есть свои тонкости и особенности). Большая часть современного железа на базе процессоров Intel совместима с таким экспериментом.
Глоссарий
- EFI — скрытый раздел диска, который используется на компьютерах Mac для хранения прошивки. В Hackintosh используется для размещения загрузчика OC на ПК.
- Clover — это и есть загрузчик, который мы будем использовать. Он указывает на раздел с установленной macOS X в качестве загрузки, а также загружает необходимые драйверs и исправления.
- Config.plist — конфигурационный файл для Clover. Он расскажет системе, какой Maс сконфигурирован (Mac Pro, Mac Mini или iMac), внесет необходимые исправления в ветку ACPI, пропатчит драйверы по необходимости.
- Kexts — производное от слов kernel extensions. По простому говоря, драйверы.
Для установки потребуется
- Образ macOS X, скачанный из Apple Store: Mojave, Catalina.
- Флешка на 8 Гб для Mojave и на 16 Гб для Catalina.
- Clover — сам загрузчик.
- Clover Configurator — утилита, позволяющая редактировать Config.plist, открывать скрытый раздел EFI и много чего еще.
Создание загрузочной флешки
Стираем флешку в дисковой утилите с параметрами:
- Имя: USB.
- Формат: Mac OS Extended (журналируемый).
- Схема разделов: GUID.
Запускаем Terminal и копируем в него команду для создания загрузочной флешки:
sudo «/Applications/Install macOS Mojave.app/Contents/Resources/createinstallmedia» —volume /Volumes/USB
Вводим пароль, нажимаем «Y» и ждем несколько минут.
После окончания процесса переноса файлов мы получим флешку с которой можно установить macOS X на компьютеры Mac. Чтобы установить macOS X на ПК, нам нужно добавить загрузчик Clover и необходимые драйверы.
Установка Clover
Теперь нужно запустить ранее скачанный установщик Clover, ввести пароль и на третьем этапе установки — выбрать «Изменить размещение установки… » и указать на флешку «Install macOS Mojave».
На четвёртом этапе установки «Тип установки» нажать «Настроить» и выбрать пять параметров:
-
Установить Clover только для UEFI-загрузки.
- Установить Clover на раздел EFI (ESP).
- Драйверы для UEFI-загрузки → Рекомендуемые драйверы → ApfsDriverLoader.
- Драйверы для UEFI-загрузки → Рекомендуемые драйверы → AptioMemoryFix.
- Драйверы для UEFI-загрузки → Драйверы файловых систем → VBoxHfs.
- Если чипсет материнской платы ниже 300-й серии, возможно, потребуется эмулятор переменных NVRAM. Нужно уточнить, есть ли он в вашей материнской плате. Если нет, нужно выделить еще один драйвер EmuVariableUefi. Он эмулирует переменные NVRAM и прописан по адресу: драйверы для UEFI-загрузки → дополнительные драйверы → EmuVariableUefi.
- Все остальные галки отключить (и это важно).
После установки, на рабочем столе появится подключенный раздел EFI. Его отключать не нужно. Он нам еще пригодится. Нужно проверить, что в папке /Volumes/EFI/clover/drivers/UEFI находятся (как минимум) три драйвера: ApfsDriverLoader, AptioMemoryFix и VBoxHfs. Если это так, все сделано правильно. Если нет, нужно перемотать назад и повторить установку Clover.
Скачивание драйверов
Эмулятор SMC
- VirtualSMC.kext, или FakeSMC.kext, — минимально необходимый драйвер для загрузки. Он эмулирует SMC компьютера Mac, говоря операционной системе, что все пучком — это Mac. Без него загрузка невозможна.
Сетевая карта
- IntelMausiEthernet.kext — для большинства сетевых карт Intel.
- AtherosE2200Ethernet.kext — для сетевых карт Atheros и Killer.
- RealtekRTL8111.kext — для сетевых карт Realtek 100-1000Mb.
Звук
- AppleALC.kext — универсальный драйвер для всех совместимых звуковых карт. Работает только в паре с Lilu.kext и поддерживает большинство существующих аудиокодеков.
Графика
- WhateverGreen.kext — решает вопросы поддержки как дискретных графических адаптеров, так и встроенной графики. Работает в паре с Lilu.kext. Начиная с macOS X Mojave, в Apple отказались от поддержки адаптеров Nvidia, но добавили поддержку AMD RX 5XX и 5XXX. Если у вас адаптер Nvidia, то можно попробовать установить более раннюю версию OS. Например, High Sierra.
Wi‑Fi и Bluetooth
- Компьютеры Mac не славятся особым разнообразием комбо-чипов Wi‑Fi и Bluetooth. По большому счету, здесь выбор только из адаптеров Broadcom или Broadcom. Очень рекомендую использовать адаптер BCM94360CS2. Эти чипы используются в MacBook и работают «из коробки». Только нужно озадачится переходником с этого адаптера на разъем M.2.
- В противном случае, можно использовать адаптеры M.2 серии BCM94352Z с AirportBrcmFixup.kext в паре с Lilu.kext —для Wi-FI, BrcmFirmwareData.kext и BrcmPatchRAM2.kext — для Bluetooth.
Теперь нужно скопировать скачанные драйверы в папку /Volumes/EFI/clover/kexts/Other.
Общая конфигурация системы
Для конфигурирования системы используется файл Config.plist. Он прописан по адресу /Volumes/EFI/clover. После установки Clover создает собственный Config.plist, но шансы загрузки с ним невелики. Там огромное количество ненужностей, которые могут конфликтовать с системой и драйверами.
Исходя из некоторого опыта пробных установок на различных конфигурациях, я подготовил свой Config.plist, который вы можете скачать здесь. Он практически пустой, основная задача — определить ближайшую похожую конфигурацию компьютера Mac к вашей конфигурации ПК, сгенерировать серийный номер и UUID. Для этого мы воспользуемся Clover Configurator, скачанным ранее.
- Запускаем Clover Configurator и открываем в нем скачанный Config.plist. Переходим в раздел smbios (слева). И нажимаем на стрелку вверх-вниз (справа). Появится большой список компьютеров Mфс. В нем нужно выбрать конфигурацию, максимально похожую на конфигурацию вашего ПК. В моем случае, это Mac mini 8,1. Clover Configurator заполнит все поля, включая серийный номер.
- Чтобы убедиться, что серийный номер не совпадает с серийным номером настоящего компьютера Mac (иначе, это принесет проблемы с учетной записью Apple ID), нужно нажать на кнопку «Проверка серийного номера». Если после проверки появилась информация о гарантийных обязательствах и длительности поддержки, то нужно повторить действия из первого пункта, пока не появится надпись красного цвета: «We’re sorry, but this serial number isn’t valid. Please check your information and try again». Это говорит о том, что такой серийник в базе Apple не зарегистрирован. И это правильно.
- Теперь из раздела «Board Serial Number» нужно скопировать номер и вставить в раздел Rt Variables (слева) в подраздел MLB (справа).
Все по пунктам — как на картинках:
Теперь нужно сохранить файл Config.plist и переместить его с заменой по адресу /Volumes/EFI/clover/config.plist. На этом все, загрузочная флешка готова. Можно извлечь ее из компьютера Mac и перейти к установке macOS X на ПК.
Настройки BIOS
- Intel Virtualization Technology: Enabled
- Vt‑d: Disabled
- ioapic 24-110 Entries: Enabled
- Network Stack: Disabled
- XHCI Handoff: Enabled
- Fast Boot: Disabled
- Secure Boot / OS Type: Other OS
- Storage Boot Option Control: UEFI
- Serial & Parallel port, TPM: Disabled
Установка
- Для чистоты эксперимента лучше отключить от ПК принтеры, хабы, джойстики и прочую периферию, оставив только монитор, клавиатуру и мышь. Флешку лучше подключить к разъему USB 2.0.
- Во время включения ПК нужно нажать F8 или другую кнопку (зависит от BIOS) для выбора флешки в качестве загрузки и выбрать UEFI загрузчик с названием флешки.
- В появившемся меню Clover выбрать «Boot macOS Install from Install macOS Mojave». Начнется обычная установка macOS X. Во время установки дисковой утилитой стираем диск с параметрами:
— Имя: SYSTEM
— Формат: APFS
— Схема разделов: GUID - Компьютер перезагрузится три раза. Каждый раз при перезагрузке, нужно загружаться с флешки (пункт второй).
- Во время первой и второй перезагрузки нужно выбрать «Boot macOS Install from SYSTEM»
- После 3-й перезагрузки выбрать «Boot macOS from SYSTEM». Если вы дошли до этого этапа без зависаний и артефактов, то с большей долей вероятности ваш ПК будет работать с macOS X. Если что-то пошло не так, то необходимы дополнительные драйверы и фиксы именно для вашей системы. Лучшим способом узнать какие — заглянуть на профильные ресурсы, такие как AppleLife (на русском), или Tonymacx86 (на английском).
Постустановка
- (Для перфекционистов) — оставить флешку в ПК (на внешнем USB-разъеме или на одном из внутренних) и включить в BIOS загрузку с флешки по умолчанию. В этом случае диск с macOS X останется таким же, как и в оригинальных Mac. На все 100%!
- Или установить Clover и все драйверы (ранее описанным способом) на раздел EFI диска с установленной macOS X. В обоих случаях системный раздел macOS X останется незатронутым.
По данной схеме удалось без бубнов установить macOS Mojave на конфигурацию:
- Материнская плата: Asus Prime H310T R.2
- Процессор: Core i3-9100
- Память: 32Gb DDR4 2666 KingSpec
- Накопитель: M.2 NVME SSD 256Gb KingSpec (macOS X)
- Накопитель: 2.5″ SSD SATA3 256Gb KingSpec (Windows 10 Pro)
- WiFi/Bluetooth: Broadcom BCM94360CS2 + M.2-адаптер
- Корпус: DNK-H 2020
После четырёх месяцев тестирования все работает как часы:
- Wi-Fi и Bluetooth, AirDrop, Handoff, пробуждение по сети. Bluetooth-клавиатура, мышь, трекпад.
- DisplayPort, HDMI, зеркалирование, расширение экрана. Quick look, Metal, OpenCL. Аппаратная виртуализация. Сон.
- Аудиовход и выход, линейный, микрофон. Звук по HDMI.
- Siri разговаривает, Time Machine работает.
- iCloud-сервисы. Регистрируется проверенным устройством и может получать коды проверки Apple ID.
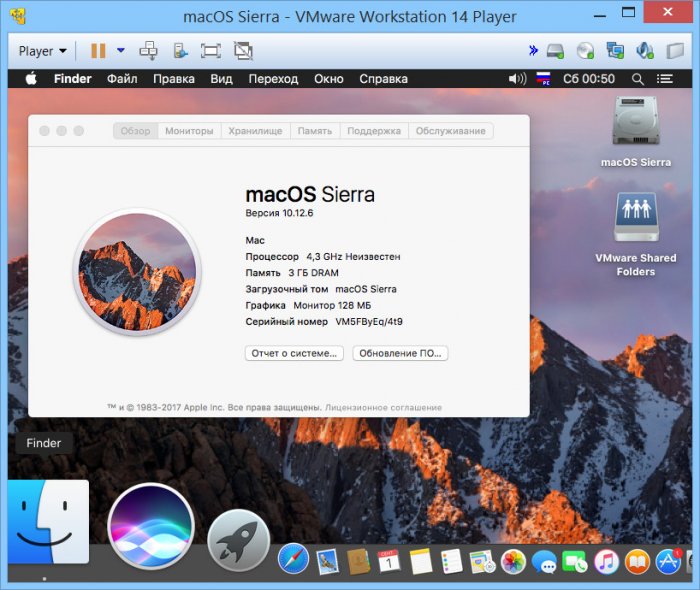
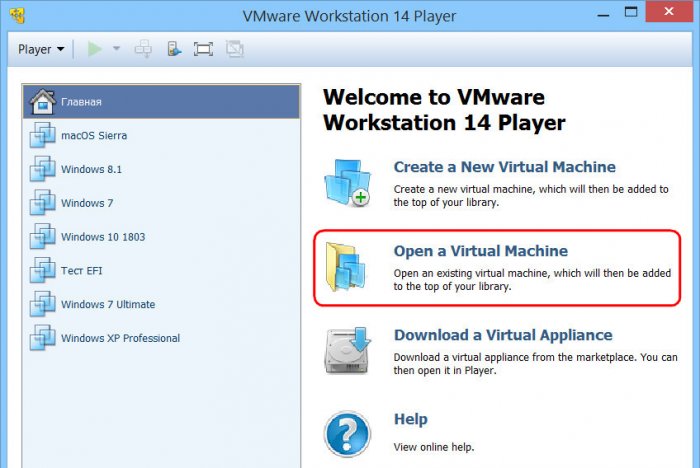
Смотрите в сторону покупки iMac или MacBook, но долгие годы привыкали к специфике и функционалу операционной системы Windows? Переживаете, насколько быстро сможете освоиться в среде Mac OS? А, возможно, просто хотите исследовать операционную систему от Apple? Для этих целей не обязательно погружаться в густые дебри специфики установки на ПК Хакинтош, если вы знакомы хотя бы с азами работы VMware Workstation. Этот гипервизор является самым простым способом запуска Mac OS в среде Windows. Для него в сети существуют готовые виртуальные машины (ВМ) с установленной и настроенной системой от Apple. Как протестировать Mac OS Sierra или High Sierra на VMware?
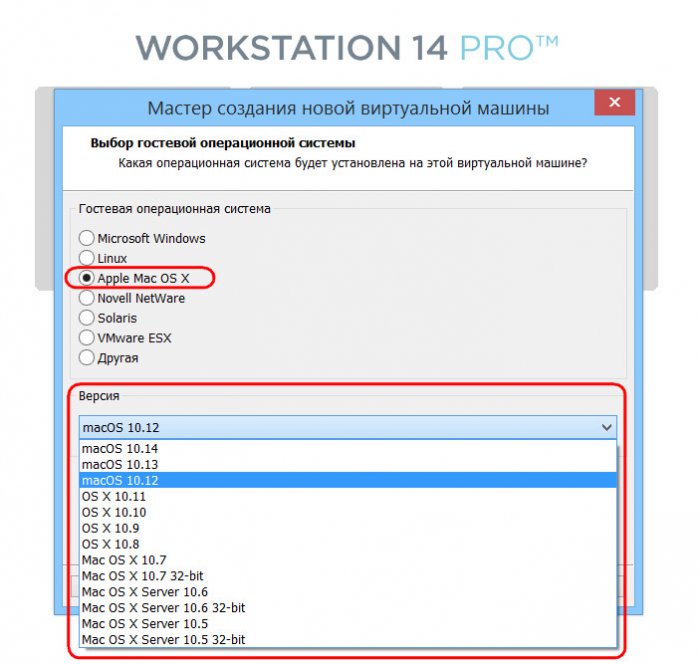
Как установить Mac OS на Windows
1. Готовые ВМ Mac для гипервизоров
Готовые ВМ избавляют нас от массы хлопот, с которыми мы вынуждены столкнуться при установке Macintosh на обычные ПК и ноутбуки. Не понадобится устанавливать загрузчик Clover или Chameleon, искать кексты и специальные файлы типа FakeSMC, настраивать эмуляцию комплектующих. Не нужно будет ждать, пока система установится. Все эти хлопоты взяли на себя сборщики ВМ. Мы получаем готовый виртуальный компьютер с уже интегрированными дополнениями гостевых ОС и пользовательским профилем, который при желании можем переименовать или удалить, создав другой.
Поскольку Mac официально запрещается устанавливать на обычные ПК и ноутбуки, естественно, тестовых сборок операционной системы в формате рабочих файлов гипервизоров не найдём на официальных ресурсах Apple. Зато найдём их на торрент-трекерах Интернета.
ВМ с установленной Mac – это, по сути, те же устройства Хакинтош. Юристы и диванные эксперты в теме могут сколь-угодно дискутировать по поводу наличия состава правонарушения в условиях использования Macintosh на гипервизорах, но к технической стороне вопроса это не имеет никакого отношения. Работая с гипервизором, нам, увы, придётся столкнуться и с проблемами функционирования виртуальных ОС, и с проблемами устройств Хакинтош как то: отсутствие плавности эффектов интерфейса, периодические тормоза, неработающие из-за отсутствия драйверов отдельные функции или специфическое оборудование и т.п. Для ВМ с Mac существуют те же ограничения по процессорам, что и для Хакинтош – нужен компьютер на базе Intel, желательно с поддержкой SSE4.2.
Готовые ВМ существуют для и для VirtualBox, и для VMware. Последние выигрывают в большем удобстве работы с виртуальной Mac: в продуктах VMware стабильно работают дополнения гостевых ОС, и мы сможем настроить общие папки с основной Windows, а также нужное нам разрешение экрана.
2. Sierra или High Sierra
На момент написания статьи в сети существуют готовые ВМ с актуальной Mac OS:
• Sierra (10.12) — версия от 20.09.2016г.;
• High Sierra (10.13) – версия от 25.09.2017г.
А, возможно, есть уже и ВМ с самой последней версией Mojave (10.14). Но именно Sierra считается самой стабильной версией, пригодной для экспериментов на ПК. Именно ВМ Mac OS Sierra мы скачаем и настроим для работы с VMware. А потом зафиксируем её в снапшоте и обновим до High Sierra через App Store.
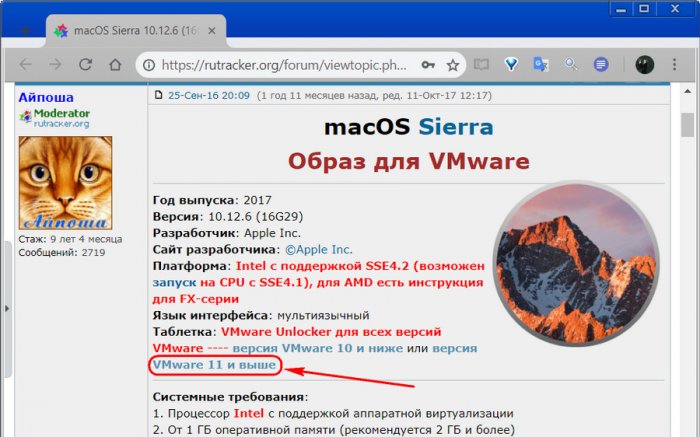
3. Скачивание ВМ
Для скачивания файлов ВМ Mac OS Sierra для VMware отправляемся на RuTracker:
https://rutracker.org/forum/viewtopic.php?t=5287454
Добавляем раздачу в торрент-клиент, и пока тот будет загружать архив с ВМ, мы проделаем кое-какую операцию непосредственно с гипервизором VMware. В описании раздачи, в графе «Таблетка» переходим по ссылке «версия VMware 11 и выше». Если, конечно же, у вас установлена актуальная версия гипервизора выше 11-й. На сегодняшний день последняя это 14-я.
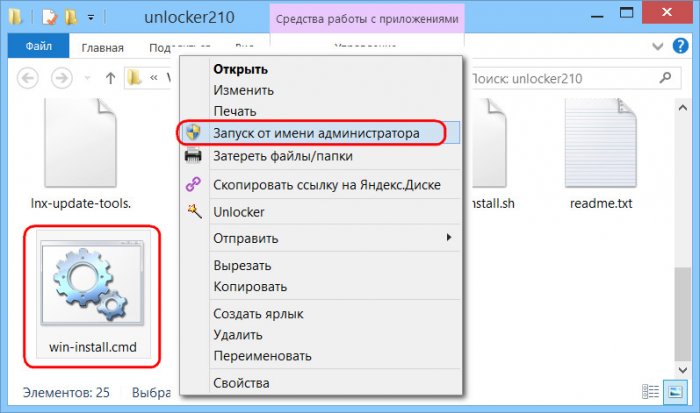
4. Разблокировщик VMware для поддержки Mac
Перейдя по ссылке в описании торрент-раздачи, скачиваем некий архив с названием «unlocker210». Это разблокировщик VMware для поддержки Mac OS. Дело в том, что продукты VMware изначально не предусматривают поддержку Macintosh в качестве гостевой ОС. Собственно, для решения этого вопроса и нужен этот unlocker210. Распаковываем скачанный архив, находим в папке файл win-install.cmd и запускаем его (важно) от имени администратора.
Теперь VMware в числе поддерживаем гостевых ОС сможет предложить нам Mac OS — любую, вплоть до самой последней версии 10.14.
5. Распаковка и настройка ВМ
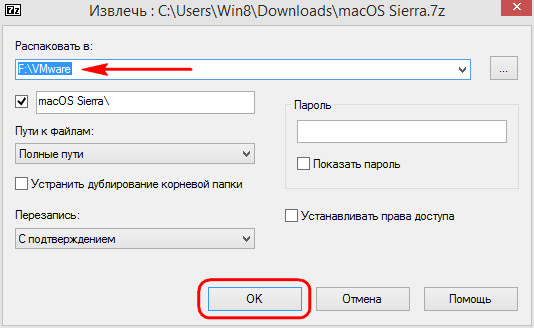
Загруженный торрентом архив распаковываем с помощью Total Commander или архиватора 7-Zip.
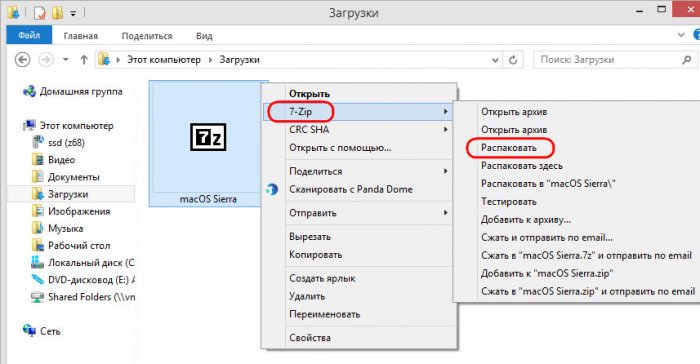
Указываем путь распаковки, он же путь хранения файлов ВМ.
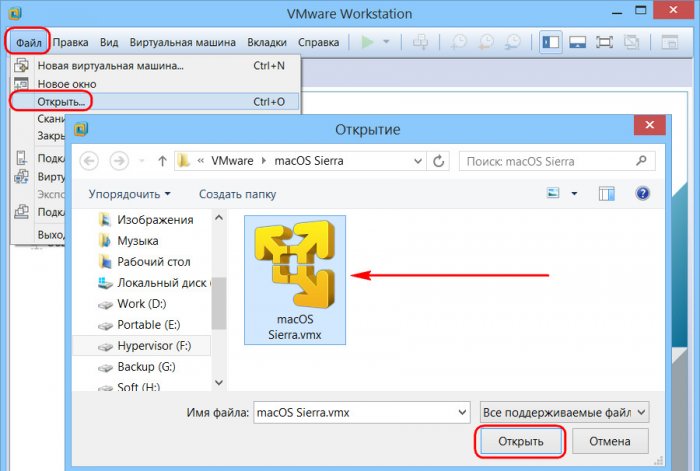
Далее запускаем VMware Workstation. И в окне программы открываем файл машины «.vmx».
Если используется последняя версия продуктов VMware, обновляем ВМ.

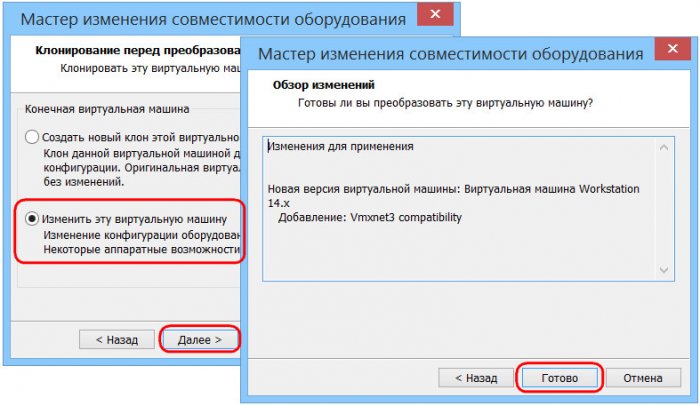
Жмём «Далее», выбираем последнюю версию программы.
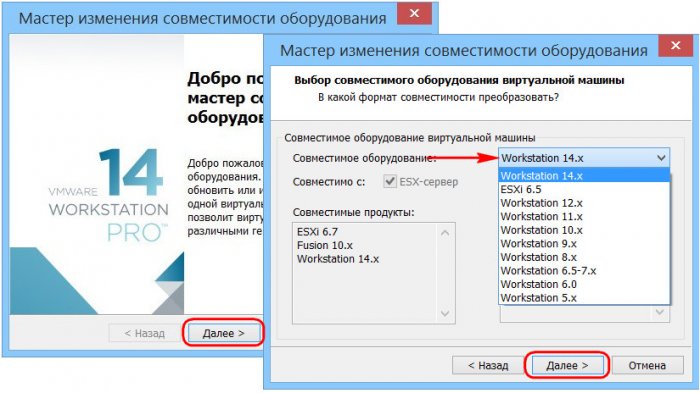
Кликаем «Изменить эту виртуальную машину», затем «Готово».
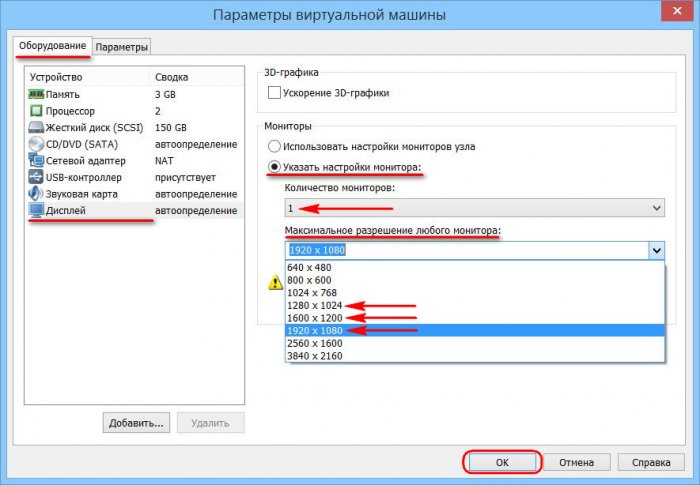
Теперь идём в настройки ВМ.
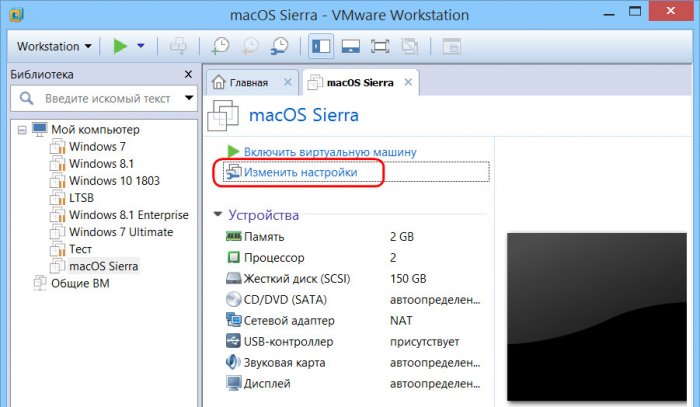
Нам нужен раздел «Оборудование». Во вкладке «Память» сборщик установил объём оперативной памяти 2 Гб. Если компьютер позволяет больше выделить, выделяем.
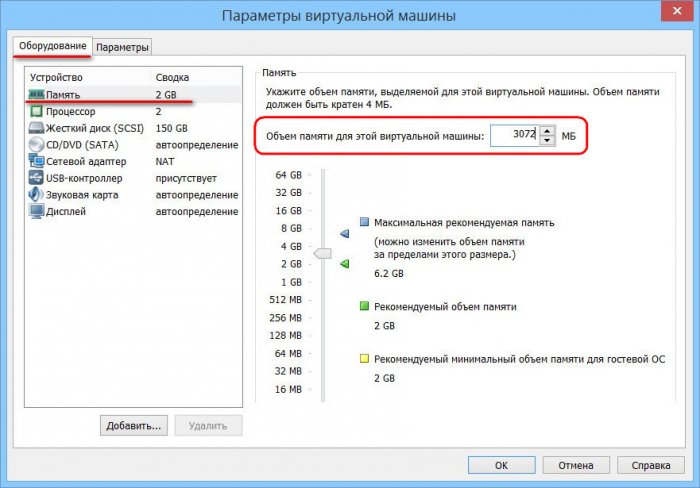
Если у процессора компьютера только 2 ядра, убираем одно из них во вкладке, соответственно, «Процессор». Далее идём во вкладку «Дисплей». Здесь активируем «Указать настройки монитора» и выбираем нужное разрешение. По итогу жмём «Ок».
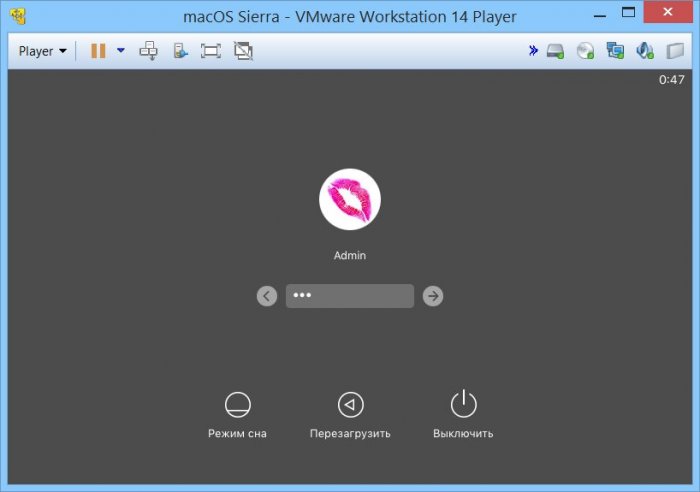
Запускаем ВМ, в появившемся окошке жмём «I Moved It».

Если всё нормально, Мас запускается, можем ВМ приостановить и для лучшей производительности перейти на VMware Player. Открываем в нём файл машины «.vmx».
Сборщик создал учётную запись с именем Admin и паролем 123. Входим в систему.
6. Обновление до High Sierra
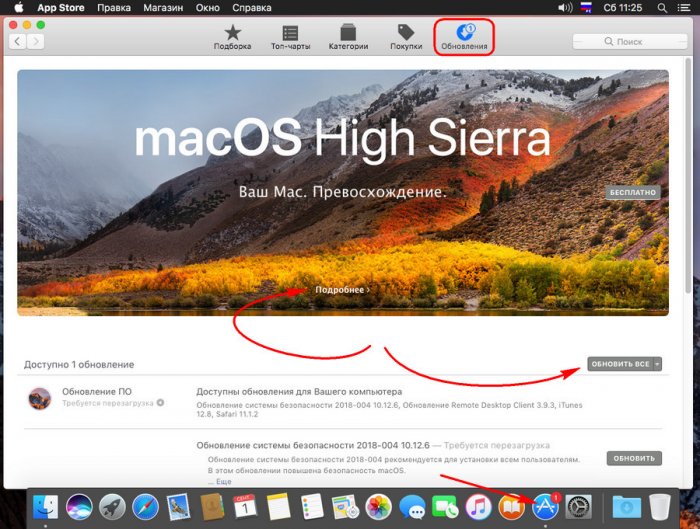
Перед обновлением до High Sierra необходимо исследовать работоспособность Sierra, чтобы потом можно было сравнить, какая из версий работает стабильнее в условиях гипервизора. И, естественно, сделать снапшот ВМ для обеспечения возможности отката к Sierra.
Для обновления запускаем приложение App Store, внутри него открываем раздел «Обновления». Здесь, кстати, можно просто установить обновления для Sierra и не обновляться до High Sierra. Для этого жмём кнопку «Обновить все». Для обновления же до High Sierra жмём «Подробнее» на картинке с рекламой этой версии.
Загружаем.
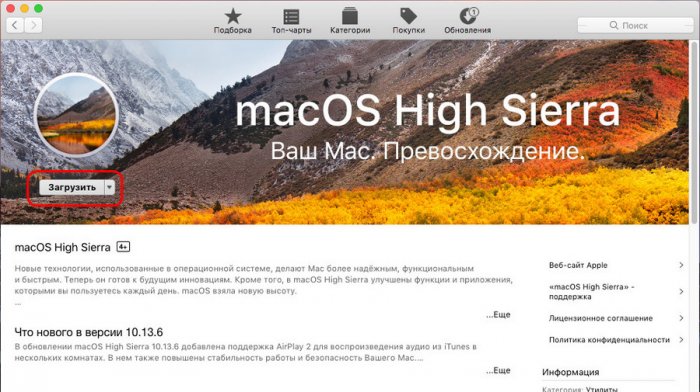
И устанавливаем.

Это будет относительно долгий процесс. Дальнейшее наше участие не понадобится.
Читаем так же:
2. Как создать загрузочную флешку Mac OS в Windows
Уровень сложности
Простой
Время на прочтение
3 мин
Количество просмотров 3.6K
Описываю свой рабочий опыт установки macOS на старенький macbook, так как другие способы описанные в интернете не дали результатов, либо привели к новым ошибкам.
Для начала скачиваем дистрибутив в формате *.dmg. Сделать это можно из App Store со второго macbook, либо с торрент (важно чтобы это была чистая копия из App Store).
Берем флешку на 8Гб и более, вставляем в компьютер с Windows, нажимаем Win+R, пишем cmd.
Запускается консоль и в ней уже пишем diskpart потом list disk, на экран выводиться список дисков windows, теперь важно не перепутать диски и выбрать именно диск с флешкой. Пишем select disk (номер флешки):

Теперь нам нужно преобразовать загрузочную область в формат GPT, набираем по очереди команды:
clean, convert GPT, create partition primary, exit.
C сайта https://www.acutesystems.com/ скачиваем программу TransMac, она платная, но работает 15 дней которых должно хватить. Запускаем, выбираем наш флеш накопитель, сначала выбираем пункт Format Disk fo Mac. И после завершения процесса выбираем Restore with Disk Image где нам нужно будет указать наш дистрибутив с macOS в формате *.dmg.

Все флешка готова, но загрузиться с нее не выйдет. Если загрузить мак удерживая клавишу alt, слоты загрузки будут пустые. Поэтому загружаем Recovery system удерживая клавиши cmd+R (нажимать нужно сразу после кнопки включения до появления яблока или земного шара).
Тут нам понадобиться дисковая утилита, запускаем ее, смотрим что флешка определилась и далее нам нужно отформатировать основной диск (Тут я подразумеваю что все ваши нужные файлы лежат в облаке, важных файлов на самом маке нет, так как после форматирования все файлы будут УТЕРЯНЫ).
Нажимаем в меню пункт вид-показывать все устройства. Выбираем APPLE SSD, нажимаем кнопку стереть. Вводим имя, Mac OS Extended, Схема разделов GUID.

Ну а теперь можно и загрузочную флешку сделать. Выходим из дисковой утилиты и в меню выбираем пункт Утилиты-Терминал. Пишем команду def. -h и смотрим что в файловой системе есть флеш накопитель с названием который был в дисковой утилите (у меня это /Volumes/Install macOS Mojave) после этого копируем дистрибутив на жесткий диск командой
cp -R "/Volumes/Install macOS Mojave/Install macOS Mojave.app" "/Volumes/Macintosh HD"
После копирования закрываем терминал cmd+Q. Выбираем флешку и форматируем также как форматировали жесткий диск (Имя: USB, Mac OS Extended, Схема разделов GUID.).
Теперь запускаем терминал и создаем загрузочный образ:
"/Volumes/Macintosh HD/Install macOS Mojave.app/Contents/Resources/createinstallmedia" --volume /Volumes/USB
Соглашаемся, вводим y и возможно потребуется пароль от системы.
Теперь можно перезагрузить мак с зажатой клавишей alt и в пункте загрузки мы увидим картинку Install macOS Mojave. Теперь можно нажать пункт Установить macOS.
Если в процессе установки вылетела ошибка “Экземпляр программы установка macOS Mojave поврежден и не может быть использован.”
Нужно найти в интернете дату выпуска дистрибутива, отключить WiFi, запустить терминал ввести команду установки даты date: месяц-число-время-год в формате ммддччммгггг
Например, 12 декабря 10:00 2017 будет выглядеть так:
date 120110002017
Если не помогло, перезагружаем, отключаем интернет, ставим дату и после этого только запускаем установку.
После этого устанавливаем mac OS как обычно.
P.S.1: Чтобы восстановить флешку для пользования под Windows скачиваем программу SD Memory Card Formatter for Windows с сайта https://www.sdcard.org/ так как в проводнике вряд ли получиться отформатировать.
P.S.2: У других дистрибутивов названия путей будут другие, так что смотрите по возможности название папок например командой ls в терминале.
парпар
Если вы хотите опробовать операционную систему macOS, но не хотите покупать Mac, можно установить macOS на Windows. В этой статье мы рассмотрим, как это сделать без использования виртуальной машины.
Шаг 1: Скачивание macOS
Первым шагом является загрузка образа macOS на компьютер с Windows. Обычно этот образ можно найти на торрент-сайтах. Но есть одна проблема – вместе с образом часто поставляются нежелательные программы и вирусы. Поэтому, рекомендуется использовать официальный сайт Apple для загрузки образа macOS.
Шаг 2: Создание загрузочной флешки
Далее, вам нужно создать загрузочную флешку с установочным образом macOS. Для этого необходимо подготовить флешку и скачать на нее программу терминала в MacOS, которая позволит создать загрузочный диск.
- Подключите флешку к компьютеру;
- Откройте приложение «Дисковая утилита»;
- Выберите нужную флешку из списка устройств;
- Нажмите кнопку «Очистить»;
- Задайте имя для флешки и выберите формат «Mac OS расширенный (журнал компьютера)»;
- Нажмите кнопку «Очистить»;
- Скачайте файл Unibeast и сохраните его на жестком диске компьютера с Windows;
- Переместите скачанный файл Unibeast на флешку.
Теперь флешка готова для загрузки.
Шаг 3: Установка macOS
После подготовки флешки, вам нужно установить macOS на компьютер. Для этого потребуется перезагрузить компьютер и загрузить macOS с флешки.
- Подключите флешку к компьютеру;
- Перезагрузите компьютер и нажмите клавишу, чтобы войти в биос (BIOS);
- Найдите раздел «Boot»;
- Запустите компьютер с флешки, нажав клавишу «Enter»;
- Запустится программа установки macOS;
- Следуйте инструкциям на экране и установите ОС на жесткий диск.
Шаг 4: Настройка macOS
После установки macOS на вашем компьютере, необходимо настроить ее. Вы можете сделать это таким же способом, как вы бы это делали на настоящем Mac. Просто следуйте инструкциям на экране и конфигурируйте систему под свои нужды.
Заключение
Как вы видите, установка macOS на Windows не сложна. Главное – скачать официальный образ и правильно подготовить флешку. Следуя нашей инструкции, вы сможете установить и настроить macOS на вашем компьютере с Windows и наслаждаться всеми своими любимыми функциями этой операционной системы.
- Вы сможете поднять голову из салата….и я вас поцелую?
- Куда лучше всего поехать отдыхать в июне с 8-летним сыном?
- Хочу опасную работу
- Почему Омская обл. -единственная в России, где время с Москвой
- Правоверны ЛИ Православные?
- Вот что такое — ЧУДО АКЦИЯ??;-))
- Набор из 2 хлопковых масок на глаза на monkeyplace.ru/shop
- Luvr-shop.ru: Пряжа для вязания Charm4180
![]()
Download Article
![]()
Download Article
This wikiHow teaches you how to run macOS High Sierra on your Windows computer. To do this, you will need to download Niresh Catalina. You will also need Transmac or a Mac along with a supported Windows computer and a blank hard drive.
-

1
Check your computer’s specifications. Your Windows computer must have an Intel Core i3, i5, i7 or i9 processor in order to run macOS Catalina, as well as a minimum of four gigabytes of RAM. To check these specs:
- Open Start
.
- Type in system information.
- Click System Information at the top of the menu.
- Look at the name of the processor to the right of the «Processor» heading.
- Scroll down and look at the number to the right of the «Installed Physical Memory» heading.
- Open Start
-
2
Check your computer’s BIOS type. Next to the «BIOS Mode» heading in the System Information menu, check to see whether it says «UEFI» or «BIOS». Keep this information in mind for later.
- You can exit System Information after this point.
Advertisement
-
3
Determine your computer’s bit type. There are two types of computer: 32-bit, and 64-bit. Your computer must be able to support 64-bit operation in order to install macOS.
-
4
Make sure you have access to a recent model of Mac. The Mac in question must be able to download macOS Catalina.
- If your Mac can’t run macOS Catalina, try finding another one.
-
5
Gather the required equipment. In order to install macOS High Sierra on your Windows computer, you will need the following hardware:[1]
- USB drive — Find a flash drive that can hold at least 16 gigabytes.
- Blank hard drive — Find a USB external hard drive that holds at least 100 gigabytes (this is where you’ll install your macOS stuff, so the bigger, the better).
- USB-C adapter — If you’re working with a Mac that doesn’t have traditional USB ports, you’ll need a USB-C-to-USB-3.0 adapter.


Advertisement
-
1
Go to the Hackintosh Zone download site. Make sure you sign in with you account by clicking.
-
2
Click Log in or Register. It’s in the upper-right side of the page. A menu will appear at the top of the page.
-
3
Enter your email address. Do so in the «Email address» field. Make sure this is an email address that you can easily access—you’ll need to log in and verify the email address later.
-
4
Check the «No, create an account now» box. It’s near the bottom of the menu.
-
5
Click Sign up. Doing so takes you to the Create an Account page.
-
6
Enter the required information. Fill out the following fields:
- Name — Enter the name you want to use for your account.
- Password — Enter a password you’d like to use for the login.
- Confirm Password — Repeat the password you entered above.
- Date of Birth — Select the month, day, and year of your birth.
- Location — Type in your country’s name.
-
7
Check the «I agree to the terms and rules» box. It’s near the bottom of the page.
-
8
Click Sign up. This button is at the bottom of the page. Doing so creates your account and sends a confirmation email to your provided email address.
-
9
Go to your email inbox. Go to the email address that you selected for your account. You may have to log in with your email address and the email account’s password to open the inbox.
-
10
Open the confirmation email. Click the email from «tonymacx86.com» to open it.
-
11
Click the confirmation link. Click the link below the «Confirm Account» text in the middle of the email. This will take you back to the Unibeast download site.
-
12
Double-click the Downloads tab. It’s on the right side of the row of tabs that’s near the top of the page. The Downloads page should open.
- If you just see a drop-down menu appear, click the Downloads tab once more.
-
13
Click Hackintosh then download Hackintosh Catalina.
- For example, the current release of
-
14
Click Download Now. It’s in the top-right corner of the page. Doing so will download Unibeast onto your Mac.
-
15
Download Multibeast. This program, which is hosted on the same site as Unibeast, will allow you to install drivers so that you can use things like your PC’s speakers, the Internet, and so on:
- Double-click the Downloads tab again.
- Click Multibeast — High Sierra 10.2.0
- Click Download Now in the upper-right corner of the page.


Advertisement
-
1
Open your Mac’s
App Store. Click the App Store app icon, which is blue with a white «A» on it, in your Mac’s Dock.
-
2
Click the search bar. It’s in the upper-right side of the App Store window.
-
3
Search for High Sierra. Type high sierra into the search bar, then press ⏎ Return.
-
4
Click Download. It’s to the right of the High Sierra icon. Doing so will prompt the installer to begin downloading onto your Mac.
-
5
Wait for the installer window to open. Once it does, you’ll need to close it immediately.[2]
-
6
Press ⌘ Command+Q when the window opens. This will close the installer window.
-
7
Open
Finder. Click the blue face-like icon in your Mac’s Dock.
-
8
Click the Applications folder. It’s on the left side of the Finder window.
-
9
Make sure that the installer is there. The installer will be called «Install macOS High Sierra» or something similar and will have an image of a ridge of mountains on it. As long as the installer is present in the Applications folder, you can proceed.
- If the installer isn’t there, try downloading High Sierra again.


Advertisement
-
1
Plug your USB drive into your Mac. This is the 16-gigabyte minimum flash drive that you’ll use to install macOS High Sierra on your computer.
- If your Mac doesn’t have traditional USB ports on it, attach your USB-C to USB-3.0 adapter first.
-
2
Open Spotlight
. Click the magnifying glass icon in the top-right corner of the screen. A search bar will open.
-
3
Type disk utility into Spotlight. This will search your Mac for the Disk Utility app.
-
4
Click Disk Utility. It’s below the Spotlight search bar. Doing so will open Disk Utility.
-
5
Select your USB drive. Click the USB drive’s name in the upper-left side of the window.
-
6
Click the Erase tab. It’s near the top of the window. A pop-up box will appear.
-
7
Click the «Format» drop-down box. You’ll find this in the middle of the pop-up box. Clicking it prompts a drop-down menu.
-
8
Click OS X Extended (Journaled). This will set your USB drive’s file system to that of your Mac.
-
9
Click the «Scheme» drop-down box. It’s below the «Format» drop-down box.
-
10
Click GUID Partition Map. This option is in the «Format» drop-down menu.
-
11
Click Erase. Doing so will reformat your USB drive to your Mac’s file system.
-
12
Click Done when prompted. You can now proceed with creating your installation drive.


Advertisement
-
1
Open the Unibeast folder. Double-click the Unibeast folder to unzip and open it.
-
2
Open Unibeast. Double-click the Unibeast PKG file to open it.
-
3
Click Open when prompted. Doing so will open the Unibeast setup window.
- If your Mac is currently running macOS Sierra or higher, you’ll have to verify the Unibeast installation before continuing.
-
4
Click Continue four times. It’s in the bottom-right corner of the first four pages of the Unibeast setup window.
-
5
Click Agree when prompted. It’s at the top of the window.
-
6
Select your USB drive, then click Continue. Click the USB drive’s name to select it.
-
7
Select High Sierra, then click Continue. You should see High Sierra in the middle of the page.
-
8
Select a motherboard type. Depending on whether your Windows computer has a UEFI- or a BIOS-type motherboard, your choice will vary:
- UEFI — Click UEFI Boot Mode, then click Continue.
- BIOS — Click Legacy Boot Mode, then click Continue.
-
9
Select a graphics card option if necessary, then click Continue. Check the box next to Inject [card name] for your preferred graphics card settings.
- If your graphics card supports macOS High Sierra by default, skip this step.
-
10
Click Continue. It’s in the bottom-right corner of the page. Doing so will prompt you to enter your Mac’s password.
-
11
Enter your Mac’s password. Type in the password you use to log into your Mac.
-
12
Click OK. This will prompt Unibeast to begin installing to the USB drive. Once the installation process is complete, your USB drive will be ready to install macOS High Sierra on your PC. While the Unibeast installation finishes up, you should change your Windows computer’s boot order.


Advertisement
-
1
Unplug any USB items from your Windows computer. Make sure that you don’t have any USB drives, in particular.
-
2
Enter your computer’s BIOS or UEFI settings page. This process varies from computer to computer, but you will typically restart your computer and then repeatedly press a key (e.g., Del) immediately as the computer begins to start up.
-
3
Locate the «Boot Order» section. This section is normally on the main page of the BIOS, though you may need to use the arrow keys to navigate over to the «Boot» or «Advanced» tab.
- The «Boot Order» section varies from BIOS to BIOS. If you can’t find your BIOS’ «Boot Order» page, consult your motherboard’s manual or look up your computer model online to find direct instruction for your specific BIOS page.
-
4
Select Removable Devices. Use the arrow keys to move the blinking bar down to Removable Devices.
- On some pages, this section may instead be called USB Devices or something similar (e.g., Peripherals).
-
5
Move your selected location to the top of the list. Typically, you’ll press the + key with the boot location you want to use selected until it’s at the top of the «Boot Order» list.
- You can double-check the key that you’re supposed to use in the legend that’s usually on the right side or the bottom of the BIOS page.
-
6
Save your settings and exit the BIOS. Look for the key you’re supposed to press to save and exit in the legend on the right side of the page, then press it. Doing so will shift your Windows computer’s boot priority so that installation USB drive will be selected as the boot point once you plug it in.
- You may have to press another key to confirm this choice.


Advertisement
-
1
Place Multibeast on the USB drive. Open the USB drive’s folder, then drag the Multibeast file into the folder. You’ll need to use Multibeast later, so having it on the flash drive will make using it when necessary as simple as possible.
-
2
Eject the Unibeast USB drive from the Mac. Open the Finder, then click the ⏏ Eject icon to the right of the USB drive’s name in the upper-left corner of the Finder window. After doing so, you can remove your USB drive.
- You should make sure that the Unibeast installation is complete before doing this.
-
3
Shut down your Windows computer. Press and hold the Power button on your Windows computer until your computer shuts down completely. This will usually occur one or two seconds after the computer’s display turns off.
-
4
Plug both the Unibeast USB drive and the blank hard drive into your computer. These should both fit into USB ports on your computer.
-
5
Start your Windows computer. Press the Power button to start the computer. Once the computer has a chance to begin booting, it should select your plugged-in USB drive as a place from which to boot.
-
6
Select your USB drive when prompted, then press ↵ Enter. This will begin the macOS installation process.
-
7
Select a language, then click →. Doing so takes you to the next page of the installer.
-
8
Click Continue twice. It’s in the bottom-right corner of the pages.
-
9
Click Agree when prompted. You’ll see this at the top of the screen.
-
10
Click the Utilities menu item. This menu item is in the top-left side of the screen. A drop-down menu will appear.[3]
-
11
Click Disk Utility. It’s in the drop-down menu.
-
12
Select the blank hard drive. Click the blank hard drive’s name on the left side of the page.
-
13
Click the Erase tab. It’s near the top of the page.
-
14
Format the blank hard drive. Change the following fields:
- Format — Click the drop-down box, then click Mac OS X Extended (Journaled)
- Scheme — Click the drop-down box, then click GUID Partition Map
-
15
Click Erase. Doing so will reformat your blank hard drive for macOS’ file system.
-
16
Click Done when prompted, then close the Disk Utility window. You can now proceed with installing macOS High Sierra on the hard drive.
-
17
Click the blank hard drive’s name, then click Continue. This will both select the hard drive as the installation point and begin installing macOS High Sierra.
-
18
Wait for macOS High Sierra to finish installing. This process should take around 15 minutes.
-
19
Follow the on-screen prompts. You’ll be prompted to enter specific information, such as your name, a password, your preferred language, your location, and so on. Once you complete this setup process, macOS’ software will be completely set up on your Windows computer.


Advertisement
-
1
Open your flash drive. Open
Finder, then click the name of the flash drive from which you installed macOS High Sierra. This will open the flash drive’s window in Finder.
-
2
Double-click the Multibeast file. Doing so will open the Multibeast window.
-
3
Click the Bootloaders tab. It’s at the top of the window.
-
4
Select the proper bootloader. Check the «Clover UEFI Boot Mode» box if you selected the UEFI boot mode for your motherboard during the Unibeast tool creation, or check the «Clover Legacy Boot Mode» box if you used legacy boot mode.
-
5
Click the Drivers tab. You’ll find this option at the top of the window.
-
6
Click Audio. It’s on the left side of the window.
-
7
Select audio drivers. Click the current audio item’s heading in the middle of the window to expand it, then check the box next to your computer’s audio provider’s name.
-
8
Click Misc. This option is on the left side of the window.
-
9
Check the «FakeSMC» box. You’ll find it near the top of the window.
-
10
Click Network. It’s on the left side of the window.
-
11
Select an Internet driver. Click the name of your Internet card, then check the box next to the driver’s name.
-
12
Click the Customize tab. It’s at the top of the window.
-
13
Select the proper graphics options. Check the box next to your computer’s graphics card name, then check the «Fixup» box for your graphics card’s manufacturer.
- For example, to install drivers for a NVIDIA card, you would check both the «NVIDIA Web Drivers Boot Flag» box and the «NVIDIA Graphics Fixup» box.
- Leave the «Inject» options blank.
-
14
Click System Definitions. It’s on the left side of the window.
-
15
Select a Mac which most closely resembles your computer. Click the heading of the type of Mac (e.g., iMac) which resembles your computer, then check the box next to the type of Mac which uses your computer’s graphics card settings.
-
16
Click the Build tab. It’s at the top of the window.
-
17
Select a drive. Click the «Select Install Drive» box on the right side of the window, then click your macOS drive’s name in the resulting drop-down menu.
-
18
Install the drivers. Once you complete this process, you should be able to use your macOS PC with minimal trouble:
- Click Install in the bottom-right corner.
- Click Agree when prompted.
- Enter your Mac’s password when prompted.
- Click Install Helper


Advertisement
Add New Question
-
Question
Will this work on AMD systems?

No, it won’t, unfortunately.
-
Question
Why do high system requirement applications like Android Studio, After Effects, Photoshop, etc., run so smoothly on a Mac but are quite slow in Windows?
This is very much dependent on the hardware you are using. It may be that the Windows PC you are using has lower specs or has other software which is slowing it down.
-
Question
Can I use other virtual programs like VirtualBox or VMWare to use Mac OS?
You can; VMware will be the best for using it because it provides for functions and runs smoothly on Windows. You should allocate 4 GB RAM for Mac OS.
See more answers
Ask a Question
200 characters left
Include your email address to get a message when this question is answered.
Submit
Advertisement
-
If you enjoy macOS on your Windows computer, consider purchasing a Mac to stay Apple-compliant.
-
Windows computers with macOS installed on them are called «Hackintoshes».
-
macOS doesn’t have the proper drivers to run utilities like Wi-Fi or sound on your Windows computer, which is why you’ll need to use Multibeast.
Show More Tips
Thanks for submitting a tip for review!
Advertisement
-
Only do this if your computer has sufficient amount of RAM installed.
-
Installing macOS on a Windows computer violates the Apple End User License Agreement.
Advertisement
References
About This Article
Article SummaryX
Installing macOS on a Windows computer is tricky, but not impossible. You’ll need to download the macOS High Sierra installation file on a Mac and then transfer the installer over to Windows by using a macOS-formatted USB drive running a program called Unibeast; after this point, you can use the USB drive to install macOS over onto a blank hard drive that you’ve also formatted for macOS. Once you’ve installed macOS, it’s a good idea to run Multibeast from the flash drive in order to install drivers needed for things like sound, Internet, and graphics cards.
Did this summary help you?
Thanks to all authors for creating a page that has been read 1,899,190 times.