Уровень сложности
Простой
Время на прочтение
3 мин
Количество просмотров 3.6K
Описываю свой рабочий опыт установки macOS на старенький macbook, так как другие способы описанные в интернете не дали результатов, либо привели к новым ошибкам.
Для начала скачиваем дистрибутив в формате *.dmg. Сделать это можно из App Store со второго macbook, либо с торрент (важно чтобы это была чистая копия из App Store).
Берем флешку на 8Гб и более, вставляем в компьютер с Windows, нажимаем Win+R, пишем cmd.
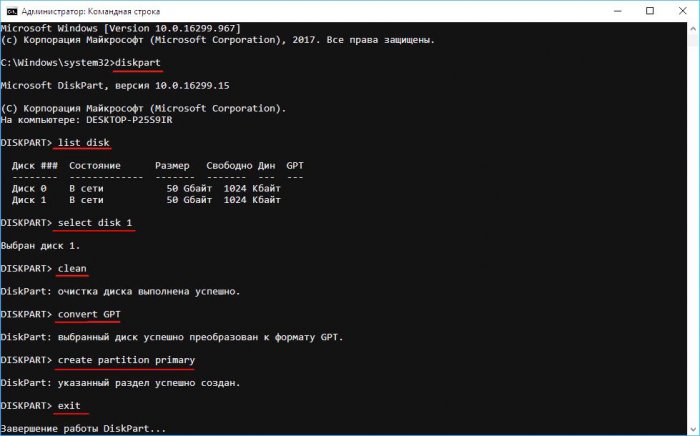
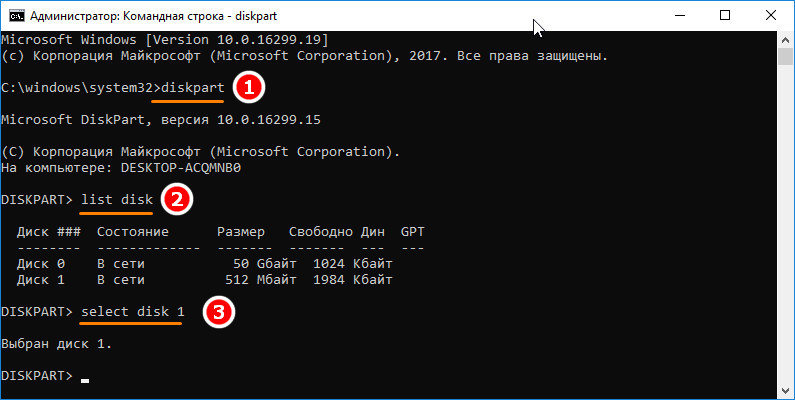
Запускается консоль и в ней уже пишем diskpart потом list disk, на экран выводиться список дисков windows, теперь важно не перепутать диски и выбрать именно диск с флешкой. Пишем select disk (номер флешки):

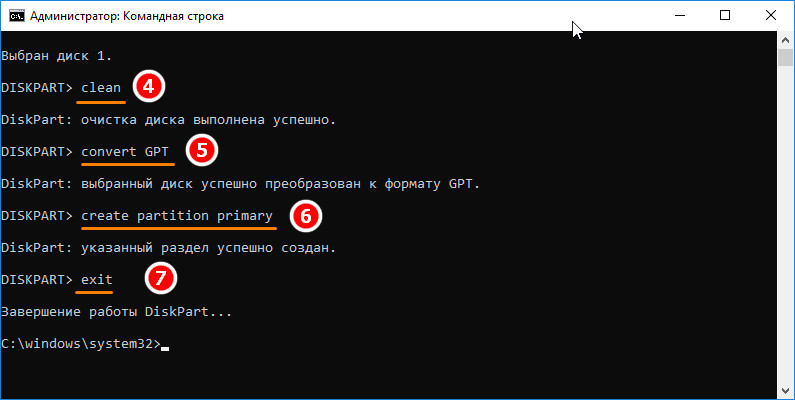
Теперь нам нужно преобразовать загрузочную область в формат GPT, набираем по очереди команды:
clean, convert GPT, create partition primary, exit.
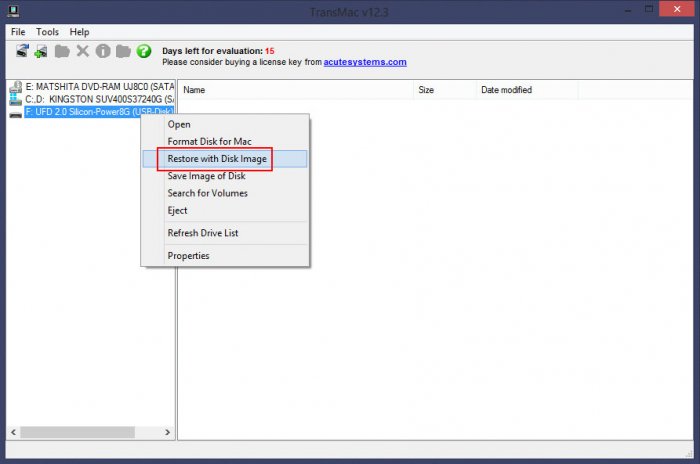
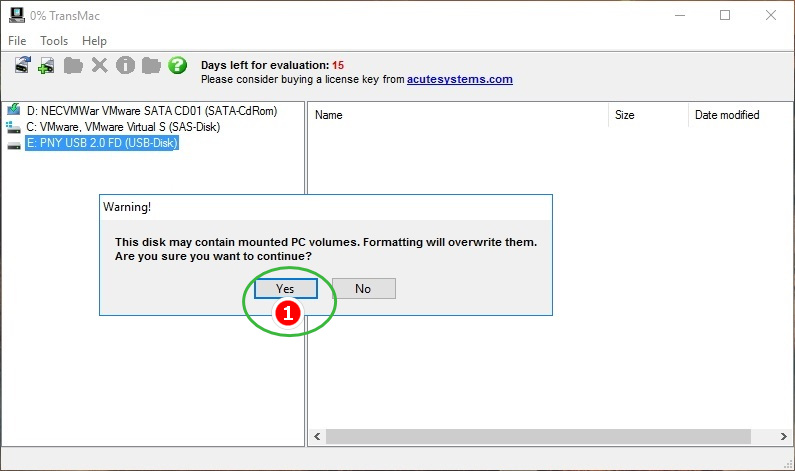
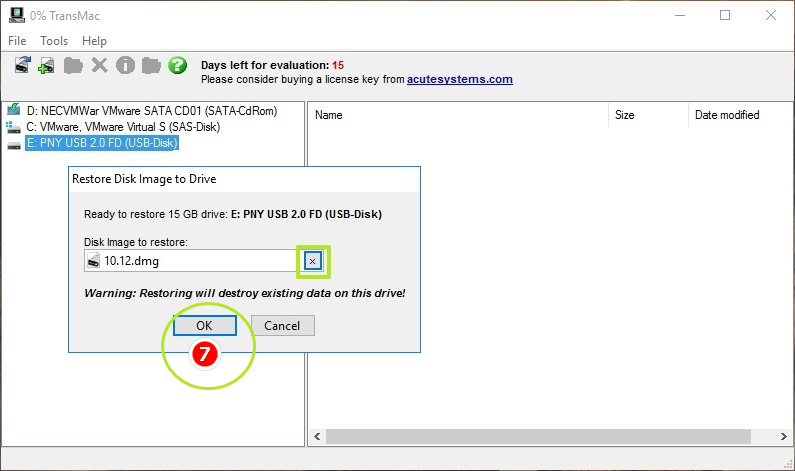
C сайта https://www.acutesystems.com/ скачиваем программу TransMac, она платная, но работает 15 дней которых должно хватить. Запускаем, выбираем наш флеш накопитель, сначала выбираем пункт Format Disk fo Mac. И после завершения процесса выбираем Restore with Disk Image где нам нужно будет указать наш дистрибутив с macOS в формате *.dmg.

Все флешка готова, но загрузиться с нее не выйдет. Если загрузить мак удерживая клавишу alt, слоты загрузки будут пустые. Поэтому загружаем Recovery system удерживая клавиши cmd+R (нажимать нужно сразу после кнопки включения до появления яблока или земного шара).
Тут нам понадобиться дисковая утилита, запускаем ее, смотрим что флешка определилась и далее нам нужно отформатировать основной диск (Тут я подразумеваю что все ваши нужные файлы лежат в облаке, важных файлов на самом маке нет, так как после форматирования все файлы будут УТЕРЯНЫ).
Нажимаем в меню пункт вид-показывать все устройства. Выбираем APPLE SSD, нажимаем кнопку стереть. Вводим имя, Mac OS Extended, Схема разделов GUID.

Ну а теперь можно и загрузочную флешку сделать. Выходим из дисковой утилиты и в меню выбираем пункт Утилиты-Терминал. Пишем команду def. -h и смотрим что в файловой системе есть флеш накопитель с названием который был в дисковой утилите (у меня это /Volumes/Install macOS Mojave) после этого копируем дистрибутив на жесткий диск командой
cp -R "/Volumes/Install macOS Mojave/Install macOS Mojave.app" "/Volumes/Macintosh HD"
После копирования закрываем терминал cmd+Q. Выбираем флешку и форматируем также как форматировали жесткий диск (Имя: USB, Mac OS Extended, Схема разделов GUID.).
Теперь запускаем терминал и создаем загрузочный образ:
"/Volumes/Macintosh HD/Install macOS Mojave.app/Contents/Resources/createinstallmedia" --volume /Volumes/USB
Соглашаемся, вводим y и возможно потребуется пароль от системы.
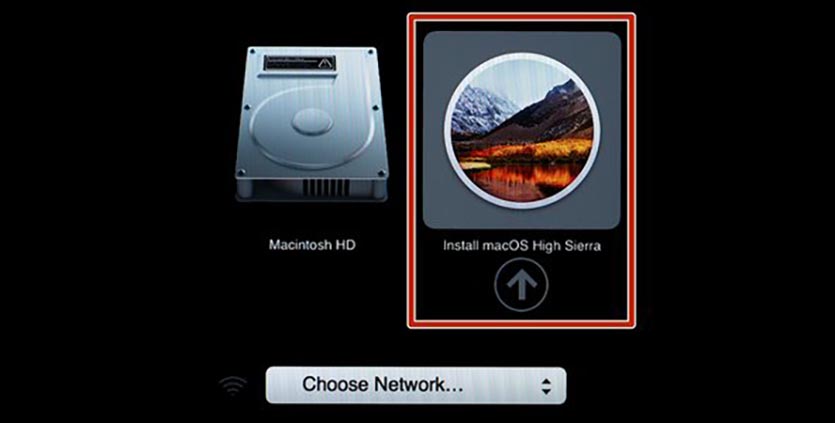
Теперь можно перезагрузить мак с зажатой клавишей alt и в пункте загрузки мы увидим картинку Install macOS Mojave. Теперь можно нажать пункт Установить macOS.
Если в процессе установки вылетела ошибка “Экземпляр программы установка macOS Mojave поврежден и не может быть использован.”
Нужно найти в интернете дату выпуска дистрибутива, отключить WiFi, запустить терминал ввести команду установки даты date: месяц-число-время-год в формате ммддччммгггг
Например, 12 декабря 10:00 2017 будет выглядеть так:
date 120110002017
Если не помогло, перезагружаем, отключаем интернет, ставим дату и после этого только запускаем установку.
После этого устанавливаем mac OS как обычно.
P.S.1: Чтобы восстановить флешку для пользования под Windows скачиваем программу SD Memory Card Formatter for Windows с сайта https://www.sdcard.org/ так как в проводнике вряд ли получиться отформатировать.
P.S.2: У других дистрибутивов названия путей будут другие, так что смотрите по возможности название папок например командой ls в терминале.
парпар
Когда компьютер Mac внезапно перестал запускаться, а резервной копии macOS под рукой нет, поможет чистая переустановка системы.
Если рядом есть другой Mac, то проблем с созданием загрузочной флешки не возникнет. Сейчас расскажем, как выкрутиться из ситуации с Windows-ПК.
? Спасибо re:Store за полезную информацию. ?
Как создать загрузочную флешку в Windows
1. Для создания флешки скачиваем приложение TransMac.
Утилита распространяете на сайте разработчика по цене $59. К счастью, есть бесплатный 15-дневный триал.
2. Теперь потребуется найти образ для установки macOS.
Официального способа скачать операционную систему из Windows нет. Придется либо искать друга с компьютером Mac, либо пользоваться известными всем сайтами.
Обратите внимание, что для работы утилиты TransMac нужен образ macOS в формате *.dmg
Если удастся найти друга с яблочным компьютером и скачать macOS из Mac App Store, будет проще у него же и сделать нагрузочную флешку по инструкции.
![]()
3. Когда образ скачан, а утилита установлена, запускаем TransMac от имени Администратора и соглашаемся на триальный период использования программы.
4. Подключаем к компьютеру флешку (понадобится накопитель емкостью 8ГБ и более)
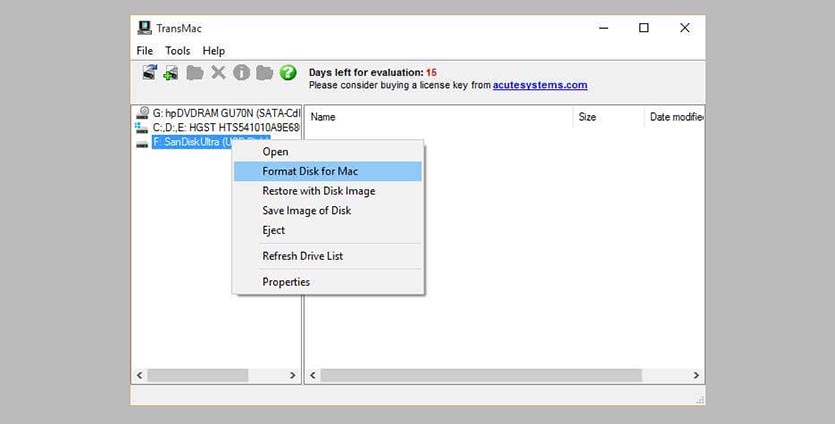
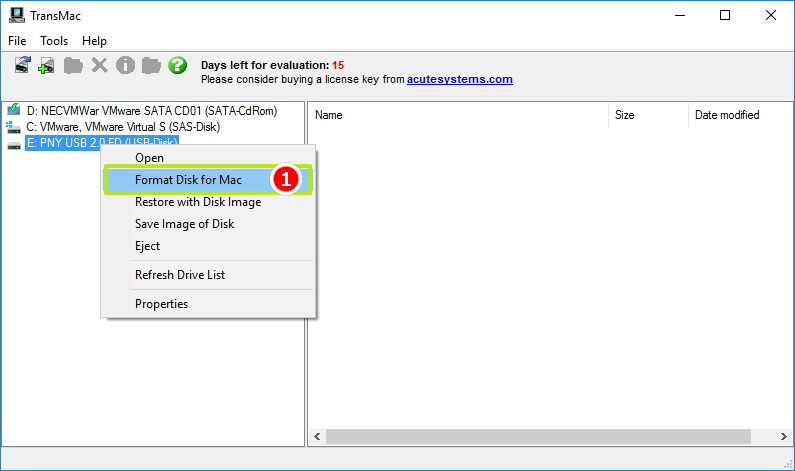
5. В боковом меню находим подключенный накопитель и через контекстное меню форматируем командой Format Disk for Mac.
Внимание! Данный процесс является необратимым, все данные с флешки будут удалены.
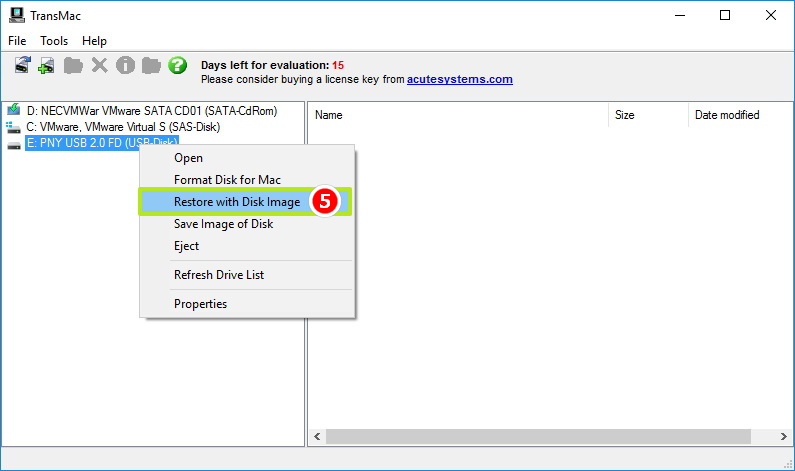
6. После окончания форматирования снова вызываем контекстное меню диска и выбираем пункт Restore with Disk Image.
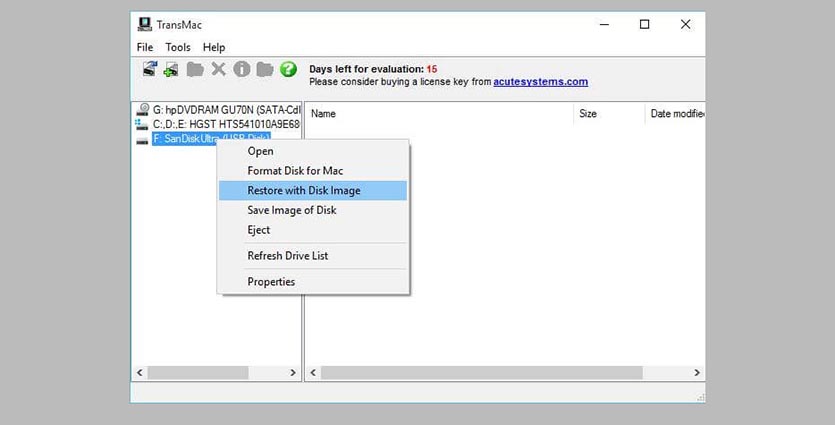
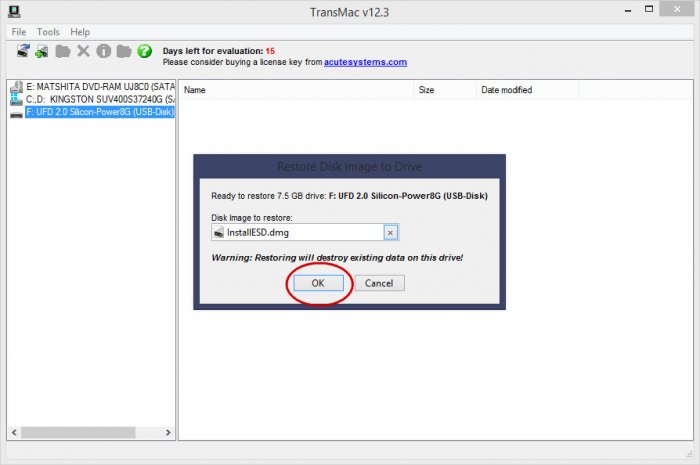
7. В открывшемся окне проводника указываем скачанный образ для установки macOS.
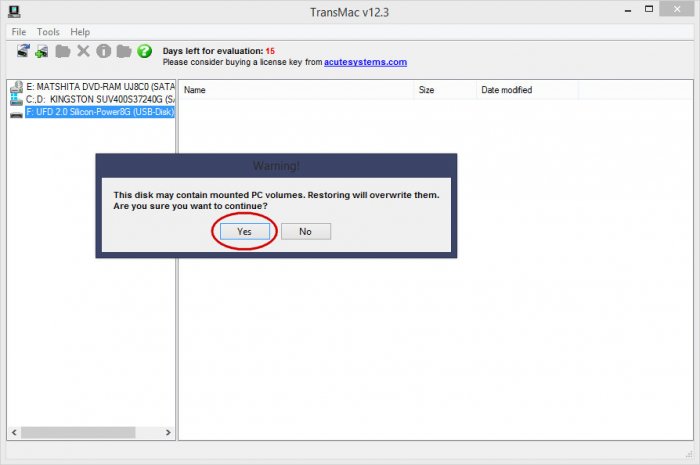
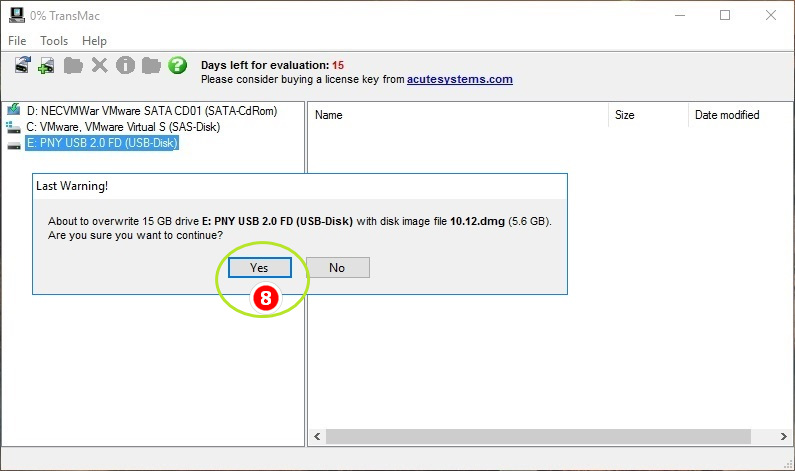
8. Подтверждаем запись образа на флешку и ждем 20-30 минут, пока процесс не завершится.
Все! Флешка для установки macOS готова.
Как запустить Mac с флешки
Подключаем наш накопитель к компьютеру Mac и включаем его с зажатой клавишей Alt (Option).
Обратите внимание, что для загрузки со внешних накопителей на Mac с чипом T2 нужно произвести некоторые манипуляции.
В меню выбора диска указываем флешку и производим установку macOS.
Следуйте подсказкам мастера установки и через несколько минут получите работоспособный Mac.

 (93 голосов, общий рейтинг: 4.54 из 5)
🤓 Хочешь больше? Подпишись на наш Telegram.
![]()
iPhones.ru
Это может пригодиться каждому, когда нет второго Mac под рукой.
- macOS,
- restore,
- windows,
- инструкции,
- фишки
![]()
Артём Суровцев
@artyomsurovtsev
Люблю технологии и все, что с ними связано. Верю, что величайшие открытия человечества еще впереди!
Каждый уважающий себя пользователь должен иметь под рукой как минимум диск с операционной системой, дабы загрузить с него компьютер и выполнить восстановление, если тот по какой-то причине не смог загрузиться самостоятельно. Касается это не только Windows, но и Mac OS. Правда, создавать такой образ нужно заранее, чтобы затем внезапно не оказаться обезоруженным. В ОС от Apple для этих целей можно воспользоваться такими программами как MacDaddy Install Disk Crеаtor и DiskMaker X, но что, если беда случилась, а вы так и не позаботились загодя создать загрузочный носитель с «яблочной» системой?
Неприятно, но не катастрофично, потому что создать его вы можете на другом маке, а если он недоступен, вполне сгодится ПК под управлением Windows, нужно только установить на него программу TransMac. Это простое приложение предназначается для просмотра содержимого оптических и жестких дисков, флеш-накопителей и томов Apple File System, а также файлов dmg, dmgpart, sparsebundle и sparseimage. Программа поддерживает работу с файловыми системами HFS, HFS+, создание, редактирование и разделение образов DMG, их запись на оптические и флеш-накопители.
Для создания загрузочной флешки Mac OS вам понадобится установочный образ DMG с операционной системой от Apple, флеш-накопитель объёмом 16 Гб и установленная на компьютер с Windows программа TransMac. Перед тем как приступать к записи, флешку необходимо соответствующим образом подготовить, создав на ней раздел GPT. Для этого откройте от имени администратора командную строку и выполните в ней следующие команды:

Первой командой запускается утилита Diskpart, второй и третьей командами выводится список подключенных к компьютеру носителей и выбирается номер нужного диска, в данном случае флешки, четвертая и пятая команды очищают и преобразовывают диск в GPT, шестая команда создаёт на нём первичный раздел. Наконец, команда exit завершает работу утилиты Diskpart.
Подготовив носитель, запустите программу TransMac от имени администратора, слева на панели кликните по подключённой флешке ПКМ и выберите в меню опцию «Restore with Disk Image».
Подтвердите действие в открывшемся диалоговом окошке, затем в новом диалоговом окне
укажите путь к образу DMG и нажмите ОК.
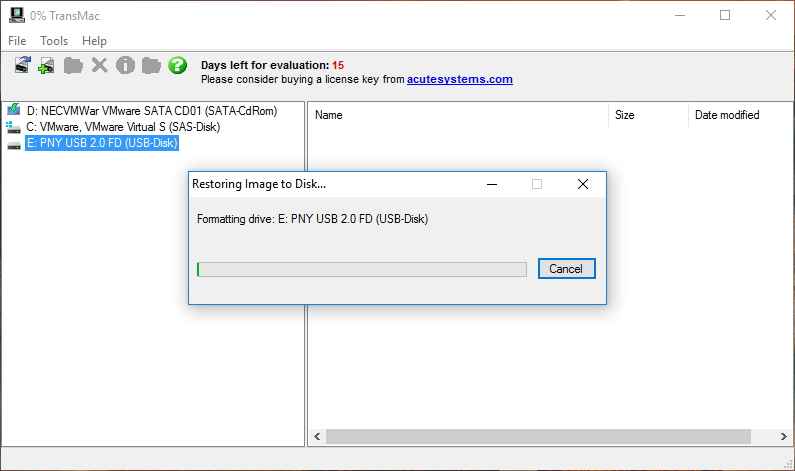
Начнётся процедура копирования файлов загрузочного образа на флешку. Она может занять достаточно длительное время, час или даже более, так что наберитесь терпения. По завершении процедуры вы станете обладателем загрузочной флешки, с помощью которой сможете попасть в среду восстановления операционных систем от Apple.
Статьи по этой теме:
1. Как установить Mac OS на Windows
2. Windows или Mac — какая из операционных систем лучше
Какой бы ни была надежной операционная система Mac, рано или поздно ее придется переустановить. Как и в случае с Windows, в этой ситуации вам понадобится загрузочный носитель — флешка с записанным на нее дистрибутивом MacOS. Загрузочные флешки с MacOS имеют несколько иную структуру, чем загрузочные носители с Windows, что никак не мешает создавать их в Win-среде. Для этого удобнее всего использовать программу TransMac, предназначенную для доступа к данным Mac из PC.
Она позволяет искать, записывать, переименовывать и удалять данные в файловых системах APFS, HFS и HFS+, конвертировать DMG в ISO, но в данный момент нас интересует функция записи DMG на внешние носители — флешки и оптические диски.
TransMac платная, но у нее есть 15-дневный пробный период, в течение которого программой можно пользоваться без функциональных ограничений.
Скачайте программу с сайта www.acutesystems.com/scrtm.htm, установите и запустите с правами администратора.
Справа на панели вы увидите список ваших дисков, кликните по подключенной к ПК флешке и выберите в меню «Format Disk for Mac».
Подтвердите действие в диалоговом окошке, присвойте флешке произвольное название.
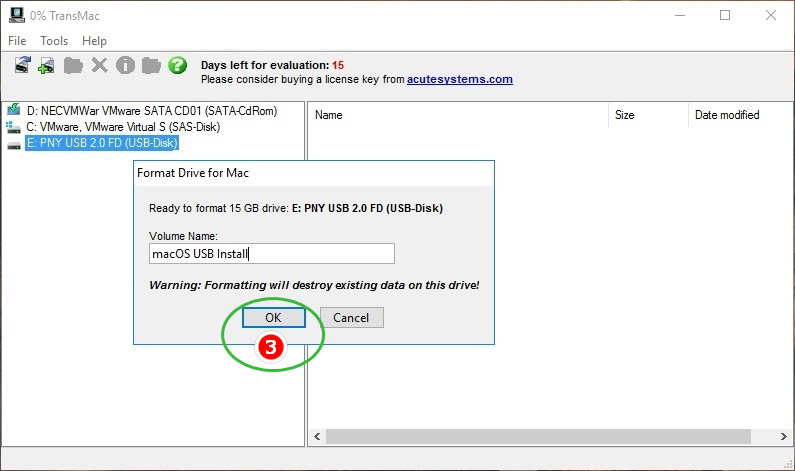
И нажмите «Yes».
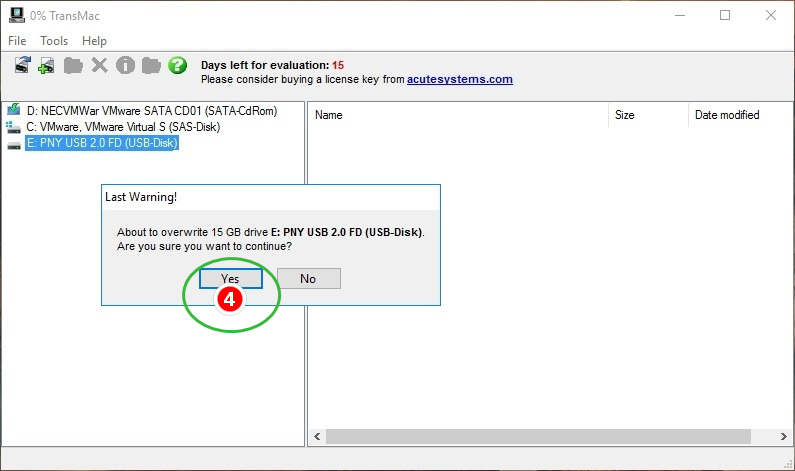
Форматирование является обязательным для флешек, размеченных средствами Windows, этот шаг можно пропустить только если на флешке имеется primary-раздел со стилем разметки GPT. Переразметив накопитель, выберите на этот раз в меню «Restore with Disk Image».
Подтвердите действие.

И укажите путь к установочному файлу DMG.
После очередного подтверждения операции,
дождитесь завершения записи образа на флешку.
Если вдруг на этапе форматировании флешки в TransMac возникнут проблемы, раздел GPT на накопителе придется создать вручную.
Последовательность выполнения команд приведена на скриншотах ниже, будьте внимательны при определении номера физического диска командой list disk.
Разметив таким образом флешку, перейдите в TransMac и начните с шага с использованием опции «Restore with Disk Image».
![]() Загрузка…
Загрузка…
![]()
Download Article
![]()
Download Article
This wikiHow teaches you how to run macOS High Sierra on your Windows computer. To do this, you will need to download Niresh Catalina. You will also need Transmac or a Mac along with a supported Windows computer and a blank hard drive.
-

1
Check your computer’s specifications. Your Windows computer must have an Intel Core i3, i5, i7 or i9 processor in order to run macOS Catalina, as well as a minimum of four gigabytes of RAM. To check these specs:
- Open Start
.
- Type in system information.
- Click System Information at the top of the menu.
- Look at the name of the processor to the right of the «Processor» heading.
- Scroll down and look at the number to the right of the «Installed Physical Memory» heading.
- Open Start
-
2
Check your computer’s BIOS type. Next to the «BIOS Mode» heading in the System Information menu, check to see whether it says «UEFI» or «BIOS». Keep this information in mind for later.
- You can exit System Information after this point.
Advertisement
-
3
Determine your computer’s bit type. There are two types of computer: 32-bit, and 64-bit. Your computer must be able to support 64-bit operation in order to install macOS.
-
4
Make sure you have access to a recent model of Mac. The Mac in question must be able to download macOS Catalina.
- If your Mac can’t run macOS Catalina, try finding another one.
-
5
Gather the required equipment. In order to install macOS High Sierra on your Windows computer, you will need the following hardware:[1]
- USB drive — Find a flash drive that can hold at least 16 gigabytes.
- Blank hard drive — Find a USB external hard drive that holds at least 100 gigabytes (this is where you’ll install your macOS stuff, so the bigger, the better).
- USB-C adapter — If you’re working with a Mac that doesn’t have traditional USB ports, you’ll need a USB-C-to-USB-3.0 adapter.


Advertisement
-
1
Go to the Hackintosh Zone download site. Make sure you sign in with you account by clicking.
-
2
Click Log in or Register. It’s in the upper-right side of the page. A menu will appear at the top of the page.
-
3
Enter your email address. Do so in the «Email address» field. Make sure this is an email address that you can easily access—you’ll need to log in and verify the email address later.
-
4
Check the «No, create an account now» box. It’s near the bottom of the menu.
-
5
Click Sign up. Doing so takes you to the Create an Account page.
-
6
Enter the required information. Fill out the following fields:
- Name — Enter the name you want to use for your account.
- Password — Enter a password you’d like to use for the login.
- Confirm Password — Repeat the password you entered above.
- Date of Birth — Select the month, day, and year of your birth.
- Location — Type in your country’s name.
-
7
Check the «I agree to the terms and rules» box. It’s near the bottom of the page.
-
8
Click Sign up. This button is at the bottom of the page. Doing so creates your account and sends a confirmation email to your provided email address.
-
9
Go to your email inbox. Go to the email address that you selected for your account. You may have to log in with your email address and the email account’s password to open the inbox.
-
10
Open the confirmation email. Click the email from «tonymacx86.com» to open it.
-
11
Click the confirmation link. Click the link below the «Confirm Account» text in the middle of the email. This will take you back to the Unibeast download site.
-
12
Double-click the Downloads tab. It’s on the right side of the row of tabs that’s near the top of the page. The Downloads page should open.
- If you just see a drop-down menu appear, click the Downloads tab once more.
-
13
Click Hackintosh then download Hackintosh Catalina.
- For example, the current release of
-
14
Click Download Now. It’s in the top-right corner of the page. Doing so will download Unibeast onto your Mac.
-
15
Download Multibeast. This program, which is hosted on the same site as Unibeast, will allow you to install drivers so that you can use things like your PC’s speakers, the Internet, and so on:
- Double-click the Downloads tab again.
- Click Multibeast — High Sierra 10.2.0
- Click Download Now in the upper-right corner of the page.


Advertisement
-
1
Open your Mac’s
App Store. Click the App Store app icon, which is blue with a white «A» on it, in your Mac’s Dock.
-
2
Click the search bar. It’s in the upper-right side of the App Store window.
-
3
Search for High Sierra. Type high sierra into the search bar, then press ⏎ Return.
-
4
Click Download. It’s to the right of the High Sierra icon. Doing so will prompt the installer to begin downloading onto your Mac.
-
5
Wait for the installer window to open. Once it does, you’ll need to close it immediately.[2]
-
6
Press ⌘ Command+Q when the window opens. This will close the installer window.
-
7
Open
Finder. Click the blue face-like icon in your Mac’s Dock.
-
8
Click the Applications folder. It’s on the left side of the Finder window.
-
9
Make sure that the installer is there. The installer will be called «Install macOS High Sierra» or something similar and will have an image of a ridge of mountains on it. As long as the installer is present in the Applications folder, you can proceed.
- If the installer isn’t there, try downloading High Sierra again.


Advertisement
-
1
Plug your USB drive into your Mac. This is the 16-gigabyte minimum flash drive that you’ll use to install macOS High Sierra on your computer.
- If your Mac doesn’t have traditional USB ports on it, attach your USB-C to USB-3.0 adapter first.
-
2
Open Spotlight
. Click the magnifying glass icon in the top-right corner of the screen. A search bar will open.
-
3
Type disk utility into Spotlight. This will search your Mac for the Disk Utility app.
-
4
Click Disk Utility. It’s below the Spotlight search bar. Doing so will open Disk Utility.
-
5
Select your USB drive. Click the USB drive’s name in the upper-left side of the window.
-
6
Click the Erase tab. It’s near the top of the window. A pop-up box will appear.
-
7
Click the «Format» drop-down box. You’ll find this in the middle of the pop-up box. Clicking it prompts a drop-down menu.
-
8
Click OS X Extended (Journaled). This will set your USB drive’s file system to that of your Mac.
-
9
Click the «Scheme» drop-down box. It’s below the «Format» drop-down box.
-
10
Click GUID Partition Map. This option is in the «Format» drop-down menu.
-
11
Click Erase. Doing so will reformat your USB drive to your Mac’s file system.
-
12
Click Done when prompted. You can now proceed with creating your installation drive.


Advertisement
-
1
Open the Unibeast folder. Double-click the Unibeast folder to unzip and open it.
-
2
Open Unibeast. Double-click the Unibeast PKG file to open it.
-
3
Click Open when prompted. Doing so will open the Unibeast setup window.
- If your Mac is currently running macOS Sierra or higher, you’ll have to verify the Unibeast installation before continuing.
-
4
Click Continue four times. It’s in the bottom-right corner of the first four pages of the Unibeast setup window.
-
5
Click Agree when prompted. It’s at the top of the window.
-
6
Select your USB drive, then click Continue. Click the USB drive’s name to select it.
-
7
Select High Sierra, then click Continue. You should see High Sierra in the middle of the page.
-
8
Select a motherboard type. Depending on whether your Windows computer has a UEFI- or a BIOS-type motherboard, your choice will vary:
- UEFI — Click UEFI Boot Mode, then click Continue.
- BIOS — Click Legacy Boot Mode, then click Continue.
-
9
Select a graphics card option if necessary, then click Continue. Check the box next to Inject [card name] for your preferred graphics card settings.
- If your graphics card supports macOS High Sierra by default, skip this step.
-
10
Click Continue. It’s in the bottom-right corner of the page. Doing so will prompt you to enter your Mac’s password.
-
11
Enter your Mac’s password. Type in the password you use to log into your Mac.
-
12
Click OK. This will prompt Unibeast to begin installing to the USB drive. Once the installation process is complete, your USB drive will be ready to install macOS High Sierra on your PC. While the Unibeast installation finishes up, you should change your Windows computer’s boot order.


Advertisement
-
1
Unplug any USB items from your Windows computer. Make sure that you don’t have any USB drives, in particular.
-
2
Enter your computer’s BIOS or UEFI settings page. This process varies from computer to computer, but you will typically restart your computer and then repeatedly press a key (e.g., Del) immediately as the computer begins to start up.
-
3
Locate the «Boot Order» section. This section is normally on the main page of the BIOS, though you may need to use the arrow keys to navigate over to the «Boot» or «Advanced» tab.
- The «Boot Order» section varies from BIOS to BIOS. If you can’t find your BIOS’ «Boot Order» page, consult your motherboard’s manual or look up your computer model online to find direct instruction for your specific BIOS page.
-
4
Select Removable Devices. Use the arrow keys to move the blinking bar down to Removable Devices.
- On some pages, this section may instead be called USB Devices or something similar (e.g., Peripherals).
-
5
Move your selected location to the top of the list. Typically, you’ll press the + key with the boot location you want to use selected until it’s at the top of the «Boot Order» list.
- You can double-check the key that you’re supposed to use in the legend that’s usually on the right side or the bottom of the BIOS page.
-
6
Save your settings and exit the BIOS. Look for the key you’re supposed to press to save and exit in the legend on the right side of the page, then press it. Doing so will shift your Windows computer’s boot priority so that installation USB drive will be selected as the boot point once you plug it in.
- You may have to press another key to confirm this choice.


Advertisement
-
1
Place Multibeast on the USB drive. Open the USB drive’s folder, then drag the Multibeast file into the folder. You’ll need to use Multibeast later, so having it on the flash drive will make using it when necessary as simple as possible.
-
2
Eject the Unibeast USB drive from the Mac. Open the Finder, then click the ⏏ Eject icon to the right of the USB drive’s name in the upper-left corner of the Finder window. After doing so, you can remove your USB drive.
- You should make sure that the Unibeast installation is complete before doing this.
-
3
Shut down your Windows computer. Press and hold the Power button on your Windows computer until your computer shuts down completely. This will usually occur one or two seconds after the computer’s display turns off.
-
4
Plug both the Unibeast USB drive and the blank hard drive into your computer. These should both fit into USB ports on your computer.
-
5
Start your Windows computer. Press the Power button to start the computer. Once the computer has a chance to begin booting, it should select your plugged-in USB drive as a place from which to boot.
-
6
Select your USB drive when prompted, then press ↵ Enter. This will begin the macOS installation process.
-
7
Select a language, then click →. Doing so takes you to the next page of the installer.
-
8
Click Continue twice. It’s in the bottom-right corner of the pages.
-
9
Click Agree when prompted. You’ll see this at the top of the screen.
-
10
Click the Utilities menu item. This menu item is in the top-left side of the screen. A drop-down menu will appear.[3]
-
11
Click Disk Utility. It’s in the drop-down menu.
-
12
Select the blank hard drive. Click the blank hard drive’s name on the left side of the page.
-
13
Click the Erase tab. It’s near the top of the page.
-
14
Format the blank hard drive. Change the following fields:
- Format — Click the drop-down box, then click Mac OS X Extended (Journaled)
- Scheme — Click the drop-down box, then click GUID Partition Map
-
15
Click Erase. Doing so will reformat your blank hard drive for macOS’ file system.
-
16
Click Done when prompted, then close the Disk Utility window. You can now proceed with installing macOS High Sierra on the hard drive.
-
17
Click the blank hard drive’s name, then click Continue. This will both select the hard drive as the installation point and begin installing macOS High Sierra.
-
18
Wait for macOS High Sierra to finish installing. This process should take around 15 minutes.
-
19
Follow the on-screen prompts. You’ll be prompted to enter specific information, such as your name, a password, your preferred language, your location, and so on. Once you complete this setup process, macOS’ software will be completely set up on your Windows computer.


Advertisement
-
1
Open your flash drive. Open
Finder, then click the name of the flash drive from which you installed macOS High Sierra. This will open the flash drive’s window in Finder.
-
2
Double-click the Multibeast file. Doing so will open the Multibeast window.
-
3
Click the Bootloaders tab. It’s at the top of the window.
-
4
Select the proper bootloader. Check the «Clover UEFI Boot Mode» box if you selected the UEFI boot mode for your motherboard during the Unibeast tool creation, or check the «Clover Legacy Boot Mode» box if you used legacy boot mode.
-
5
Click the Drivers tab. You’ll find this option at the top of the window.
-
6
Click Audio. It’s on the left side of the window.
-
7
Select audio drivers. Click the current audio item’s heading in the middle of the window to expand it, then check the box next to your computer’s audio provider’s name.
-
8
Click Misc. This option is on the left side of the window.
-
9
Check the «FakeSMC» box. You’ll find it near the top of the window.
-
10
Click Network. It’s on the left side of the window.
-
11
Select an Internet driver. Click the name of your Internet card, then check the box next to the driver’s name.
-
12
Click the Customize tab. It’s at the top of the window.
-
13
Select the proper graphics options. Check the box next to your computer’s graphics card name, then check the «Fixup» box for your graphics card’s manufacturer.
- For example, to install drivers for a NVIDIA card, you would check both the «NVIDIA Web Drivers Boot Flag» box and the «NVIDIA Graphics Fixup» box.
- Leave the «Inject» options blank.
-
14
Click System Definitions. It’s on the left side of the window.
-
15
Select a Mac which most closely resembles your computer. Click the heading of the type of Mac (e.g., iMac) which resembles your computer, then check the box next to the type of Mac which uses your computer’s graphics card settings.
-
16
Click the Build tab. It’s at the top of the window.
-
17
Select a drive. Click the «Select Install Drive» box on the right side of the window, then click your macOS drive’s name in the resulting drop-down menu.
-
18
Install the drivers. Once you complete this process, you should be able to use your macOS PC with minimal trouble:
- Click Install in the bottom-right corner.
- Click Agree when prompted.
- Enter your Mac’s password when prompted.
- Click Install Helper


Advertisement
Add New Question
-
Question
Will this work on AMD systems?

No, it won’t, unfortunately.
-
Question
Why do high system requirement applications like Android Studio, After Effects, Photoshop, etc., run so smoothly on a Mac but are quite slow in Windows?
This is very much dependent on the hardware you are using. It may be that the Windows PC you are using has lower specs or has other software which is slowing it down.
-
Question
Can I use other virtual programs like VirtualBox or VMWare to use Mac OS?
You can; VMware will be the best for using it because it provides for functions and runs smoothly on Windows. You should allocate 4 GB RAM for Mac OS.
See more answers
Ask a Question
200 characters left
Include your email address to get a message when this question is answered.
Submit
Advertisement
-
If you enjoy macOS on your Windows computer, consider purchasing a Mac to stay Apple-compliant.
-
Windows computers with macOS installed on them are called «Hackintoshes».
-
macOS doesn’t have the proper drivers to run utilities like Wi-Fi or sound on your Windows computer, which is why you’ll need to use Multibeast.
Show More Tips
Thanks for submitting a tip for review!
Advertisement
-
Only do this if your computer has sufficient amount of RAM installed.
-
Installing macOS on a Windows computer violates the Apple End User License Agreement.
Advertisement
References
About This Article
Article SummaryX
Installing macOS on a Windows computer is tricky, but not impossible. You’ll need to download the macOS High Sierra installation file on a Mac and then transfer the installer over to Windows by using a macOS-formatted USB drive running a program called Unibeast; after this point, you can use the USB drive to install macOS over onto a blank hard drive that you’ve also formatted for macOS. Once you’ve installed macOS, it’s a good idea to run Multibeast from the flash drive in order to install drivers needed for things like sound, Internet, and graphics cards.
Did this summary help you?
Thanks to all authors for creating a page that has been read 1,899,190 times.