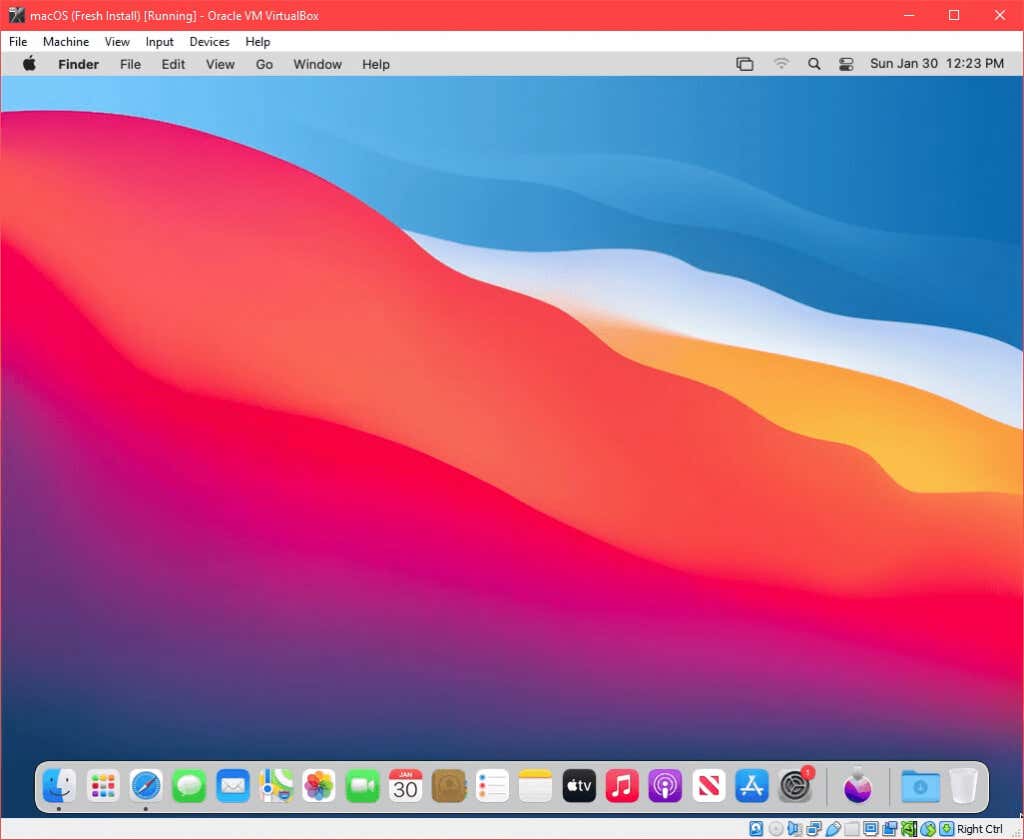
macOS Big Sur 11.7.4 is the latest version of Apple’s desktop operating system, released in January 2022. This update includes various improvements and bug fixes to enhance the overall user experience.
One of the notable improvements in this update is related to the security of the operating system. Apple has fixed several security vulnerabilities that could potentially allow attackers to gain unauthorized access to a user’s device. The update also includes new security features that enhance the overall security of the system.
Another notable improvement is related to the stability and performance of the operating system. Apple has addressed several bugs that could cause the system to crash or freeze, improving the overall stability of the system. Additionally, Apple has improved the performance of some of the system’s features, including the Finder app and the Safari web browser.
The update also includes some new features and enhancements to existing features. For example, Apple has added support for AirPods Pro spatial audio on Macs with M1 processors. There are also improvements to the Apple Music app, including the ability to share lyrics and see what friends are listening to.
Overall, macOS Big Sur 11.7.4 is a stable and reliable operating system that provides a secure and efficient user experience. It is highly recommended for all Mac users update to this version to take advantage of the various improvements and bug fixes.
So, through this guide, you will learn a step-by-step guide on how to install macOS Big Sur on VirtualBox on Windows PC. As, we have tried several macOS operating systems on VirtualBox & VMware, which you can check in the links below down.
- Related: How to Install macOS Big Sur Final on VMware on Windows PC?
- How to Install macOS Ventura 13 on VMware on Windows PC?
- How to Install macOS Ventura 13 on VirtualBox on Windows PC?
- How to Install macOS Monterey Final on VirtualBox on Windows PC?
- How to Install macOS Monterey Final on VMware on Windows PC?
What is VirtualBox?
When it comes to the world of virtualization testing software, then VirtualBox is one of the software that allows you to install multiple operating systems on a single physical machine. VirtualBox is a free and open-source software for Windows, macOS, and Linux to install more than one software at the same time. So, VirtualBox currently has the best features for Windows 11/10. So, if you have a Windows PC, but want to test the macOS operating system on your Windows PC. Then I recommend you the best solution, and that is VirtualBox. Here is the below down guide step-by-step on how to install VirtualBox+Extensions Pack on Windows PC.
- How to Install VirtualBox on Windows 11 PC (New Guide)
So, to install macOS Big Sur on VirtualBox on Windows PC, firstly you need to prepare the requirements. The first thing is you have to download and install the VirtualBox on your Windows PC, plus its extensions Pack. And the next thing is you have to enable the Virtualization technology from the BIOS of your computer.
- Download & Install VirtualBox on your Windows PC
- Enable the Virtualization Technology from the BIOS
- Download the macOS Big Sur ISO file
- Download the macOS Big Sur vmdk file
- Create a new virtual machine for macOS Big Sur
- Run the commands to configure the virtual machine of macOS Big Sur on VirtualBox on Windows PC
- Start the Virtual Machine to install the macOS Big Sur
- Complete the basic settings of macOS Big Sur
Here is the guide on how to convert a macOS ISO image file to a vmdk file on Windows PC.
- How to Convert macOS ISO Image File to VMDK File?
Also, for the installation of macOS Big Sur on VirtualBox on Windows PC. The first thing that is too much important is to enable the virtualization technology from the BIOS. The next thing is you need to have at least 4GB of RAM and Windows 64-Bit. And macOS Big Sur’s latest version needs at least 30GB of disk space. Also, for the installation of macOS Big Sur on a Windows PC, the SSD is recommended because SSD is much faster than HDD.
Create a New Virtual Machine For macOS Big Sur
Now let’s begin with the first, which is to create a new virtual machine for macOS Big Sur on VirtualBox on Windows PC. So, to create a virtual machine simply open up the VirtualBox and click on the new option.

When this window appeared click on the expert mode option.

Once the next window is opened name the virtual machine of macOS Big Sur and continue the rest of things according to the below down.
- Name macOS Big Sur
- Folder different folder is recommended for installation
- ISO Image is not recommended to select in this step
- Type Mac OS X
- Version Mac OS X (64-Bit)

Click on the hardware tab, increase the base memory, and increase the processor.

Click on the hard disk tab, select the location, and specify the disk size for macOS Big Sur. Also, select the hard disk file type (VDI VirtualBox disk image) and click on Finish to create the virtual machine.

Edit the Virtual Machine of macOS Big Sur
After the virtual machine is successfully created for macOS Big Sur, so there are some other settings to edit it for better performance. So, simply click on the Settings option.

When the settings window opened from the left-handed window side select the system tab, on the motherboard tab uncheck the floppy disk.

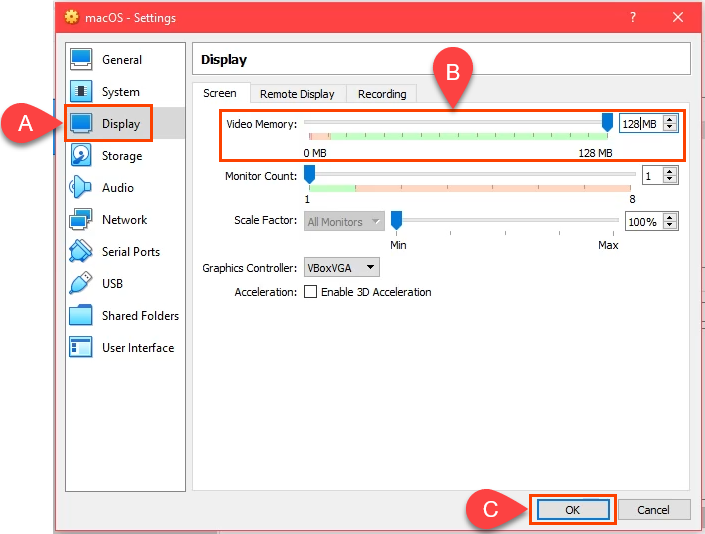
Select the display tab, and on the screen tab, increase the video memory up to 128MB.

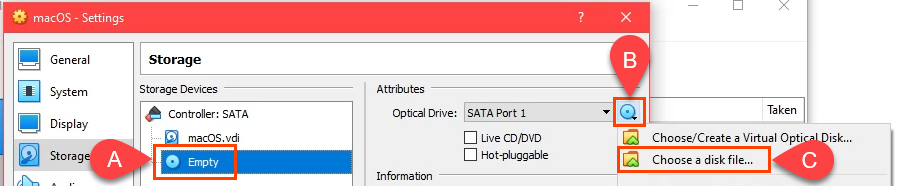
Click on the storage tab, select the empty disc icon, click on the disc icon, and click on Choose a disk file.

Now select the macOS Big Sur ISO image file and click on open.

Choose the USB tab, then select the (USB 3.0 (XHCi) Controller) option and click OK to save the changes.

Apply the Commands to Configure the macOS Big Sur on VirtualBox
After that, the virtual machine is successfully created for macOS Big Sur, the settings are edited. And now it’s time to edit some commands and apply them to the Virtual Machine of macOS Big Sur to configure it. Don’t forget that this command configures the macOS Big Sur Virtual Machine. If you enter any part of the commands wrong then you will face an error during the installation.
To Apply the commands imply close the VirtualBox, then copy & paste the below commands into the notepad window. Then replace the VM Name with the name of the macOS Big Sur Virtual Machine.
cd "C:\Program Files\Oracle\VirtualBox\"
VBoxManage.exe modifyvm "VM Name" --cpuidset 00000001 000106e5 00100800 0098e3fd bfebfbff
VBoxManage setextradata "VM Name" "VBoxInternal/Devices/efi/0/Config/DmiSystemProduct" "iMac19,1"
VBoxManage setextradata "VM Name" "VBoxInternal/Devices/efi/0/Config/DmiSystemVersion" "1.0"
VBoxManage setextradata "VM Name" "VBoxInternal/Devices/efi/0/Config/DmiBoardProduct" "Mac-AA95B1DDAB278B95"
VBoxManage setextradata "VM Name" "VBoxInternal/Devices/smc/0/Config/DeviceKey" "ourhardworkbythesewordsguardedpleasedontsteal(c)AppleComputerInc"
VBoxManage setextradata "VM Name" "VBoxInternal/Devices/smc/0/Config/GetKeyFromRealSMC" 1
Once the VM Name changed, navigate to the Windows start menu and search for commands prompt when the command prompt appeared right-click and run as administrator.

Once the command prompt window opened line by line copy-paste the commands and hit enter.

Perform a Clean Installation of macOS Big Sur on VirtualBox
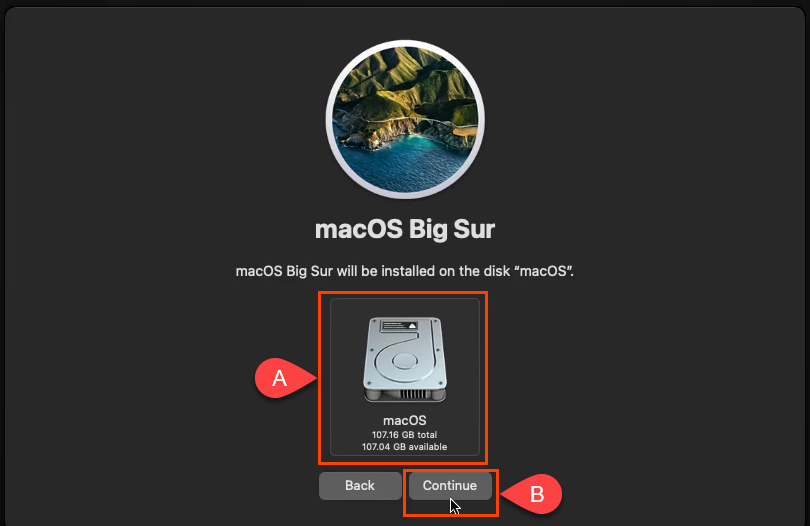
When the virtual machine is successfully created for macOS Big Sur on VirtualBox on Windows PC. And finally, it’s time to perform a clean installation of macOS Big Sur on VirtualBox on a Windows PC. So, simply again navigate to VirtualBox and open it. On the main click on the start button to start the installation process.

Once the installation is launched on the first window select your language and click continue.

On the recovery window, select the Disk Utility option and click continue.

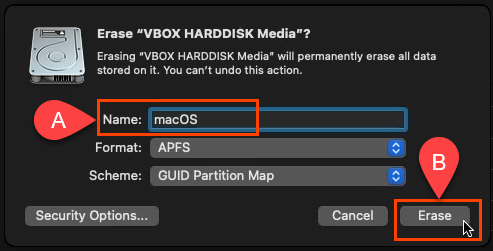
When the disk utility window opened, from the left-handed window side select the VBOX Harddisk option, then click on erase. And format the hard disk with the below-down parameters.
- Name: optional
- Format: Mac OS X Extended (Journaled)
- Scheme: GUID Partition Map

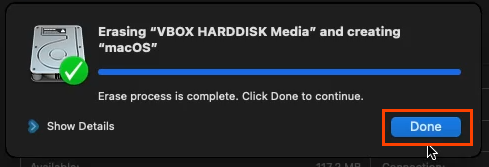
Once the disk is erased successfully click on the done option.

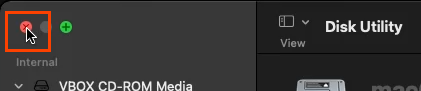
Now close the disk utility.

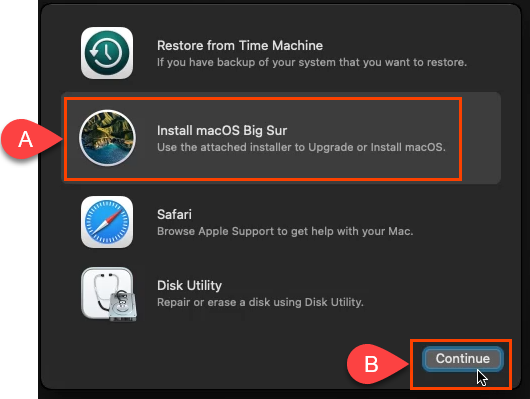
Again on the recovery window option, select install macOS Big Sur and click continue.

To set up the installation of macOS Big Sur click continue.

Agree with the terms and conditions of macOS Big Sur.

Now select the disk to install the macOS Big Sur, this disk is formatted in the disk utility window in the previous step.

Now the installation will start installing macOS Big Sur on VirtualBox. So, the installation process may take time, wait for the installation that it should be complete. Also, during the installation, the virtual machine will restart several times.

Complete the Basic Settings of macOS Big Sur
When the installation of macOS Big Sur is completed on VirtualBox on Windows PC. So, there are a few basic settings for the use of macOS Big Sur on VirtualBox on a Windows PC.
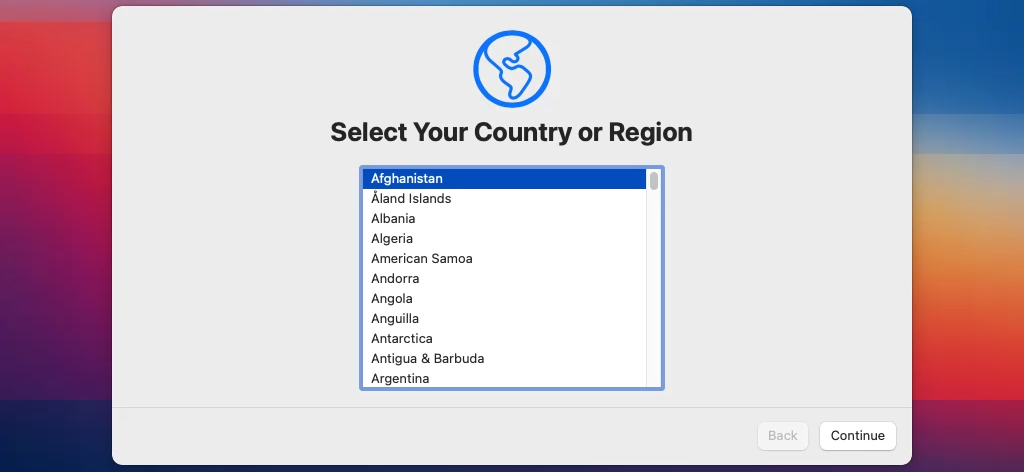
- Select your country and click continue
- Choose a keyboard layout and click continue. If you want to customize the keyboard layout, to add any other language you can add that by clicking on customize settings.
- You can turn on the accessibility options feature on macOS Big Sur. There are multiple options for accessibility such as Vision, Motor, Hearing, and Cognitive. So if you don’t want to use this feature click on the Not now option.
- Read the Data & Privacy then click continue.
- On the migration assistant page simply click on the not now option.
- You can enter the Apple ID on this window, So, there is no need to enter the Apple ID simply continue by clicking on the Set up later option.
- Click agree to agree with the terms and conditions of macOS Big Sur.
- If you want to use the express setup, so if you don’t want simply click continue.
- On the Analytics window simply click continue.
- On the Screen-time window click to set up later.
- Enable Siri and click continue.
- On the improve Siri & Dictation click on the not now option.
- Select the look for macOS Big Sur on VMware on Windows PC.
- And finally, the macOS Big Su is successfully installed on VMware on Windows PC.
Check the below link on how to Fix the macOS Big Sur screen Resolution on VirtualBox on Windows.
- Fix macOS Big Sur screen Resolution on VirtualBox on Windows
Conclusion
After that, the macOS Big Sur is successfully installed on VirtualBox on Windows PC. The only thing is remaining to use the macOS Big Sur full-screen mode on VirtualBox on Windows PC. That is easy there are some commands which you can find in the above description to apply the full-screen mode of macOS Big Sur on VirtualBox on a Windows PC.
Apple has announced the next major release of macOS at WWDC 2020. Available today in developer beta and coming to all users in fall 2020. macOS Big Sur will be a free software update later this year. In the meantime, the developer beta is available on https://developer.apple.com/macos/ and for public beta in July.
This OS has new features that include an all-new iOS inspired design, Control Center arriving for Mac, a revamped Safari with greater privacy controls, Apple’s new translation software that uses on-device processing, and more.
Macs compatible with macOS Big Sur (macOS 11):
- 2015 and later MacBook
- 2013 and later MacBook Air
- Late 2013 and later MacBook Pro
- 2014 and later iMac
- 2017 and later iMac Pro
- 2014 and later Mac mini
- 2013 and later Mac Pro
And Accordingly, the following models capable of running macOS Catalina will not be able to be upgraded to macOS Big Sur:
- 2012 and Early 2013 MacBook Pro
- 2012 MacBook Air
- 2012 and 2013 iMac
- 2012 Mac mini
Tip: before reading the rest of the article, it’s recommended to navigate to the Required File section of this post and download macOS Big Sur then you’ve time to read the item until the downloading gets complete.
Steps to Install macOS Big Sur on VirtualBox on Windows
- Install VirtualBox on Windows PC
- Install/Update VirtualBox Extension
- Create a New Virtual Machine & Customize it
- Run VirtualBox Code to the Command Prompt
- Start the Virtual Machine
- Perform Clean Installation of macOS Big Sur
- Summary
Important Note:
Before we get started, make sure your system can support Virtualization Technology (VT), and it is enabled from BIOS so that you should be able to run Virtualization software like Virtualbox or VMware. Also, you should have a 64-bit Windows operating system with at least 2 GB Ram and 20 GB of free storage, however, we recommend you at least 4 GB of RAM or higher so you can store more files and install more apps on macOS Big Sur.
Furthermore, if you have an SSD, it’s highly recommended to use it as storage because SSD is much faster then mechanical hard drive (HDD ) and macOS run on SSD very smooth. Anyway, it is not 100% compulsory but if you have, don’t hesitate to use it.
Required Files
- Download Virtualbox
- Download Virtualbox Code
- macOS Big Sur Beta 11.0 (20A4299v) Dev Beta 1
- macOS Big Sur Beta 11.0 (20A4300b) Dev Beta 2
- macOS Big Sur Beta 11.0 (20A5343j) Dev Beta 4/Public Beta 1
- macOS Big Sur 11.0.1 (20B29) Initial public release Latest
Note: You can create macOS Big Sur ISO Image.
Recommendation: It’s highly recommended to create a new drive on your Windows PC and install macOS Big Sur on that drive.
Step 1: Install VirtualBox on Windows PC
From the “Required File” section of this post, you should have downloaded VirtualBox as well and if you didn’t, download VirtualBox’s latest version and install it on your Windows system. If you’ve already installed VirtualBox, then you can skip this step. Other than that, double click on VirtualBox Setup and click Next for a couple of times and you’re done with the installation.
This slideshow requires JavaScript.
Step 2: Install or Update VirtualBox Extension
This step is not 100% percent necessary but it’s highly recommended to do this step because macOS Big Sur might not be compatible with VirtualBox and for this reason, it will cause a problem during the installation. Download VirtualBox Extension and follow the steps below.
#1. Open up VirtualBox, navigate to Tools>Pereferences>Extensions.3
#2. Click on Plus icon and select VirtualBox extension which you’ve downloaded at the beginning of this section. Click Install or Upgrade and then click OK button.
#3. Finally, you should see something like the screenshot below.

Update Virtualbox Extension
Step 3: Create a New Virtual Machine & Customize it
Creating a virtual machine for macOS Big Sur is the same when you create a virtual machine for the Windows Operating system or Linux. We will use the ISO image of macOS Big Sur to do the installation process.
Note: We’ll make the VMDK as well if we receive lots of requests for that. Otherwise, there is no point because you can install macOS Big Sur with iso image as well.
#1. Open up your VirtualBox application and click New.
#2. Type a name for your Virtual Machine. Click Expert Mode and choose the following options then click Create.

Expert Mode
- Name the VM
- Virtual Machine Location (a separate drive is recommended)
- Type (Mac OS X)
- Version (Mac OS X 64-bit)
- Memory 4 GB (recommended 8 GB or higher)
- Create a virtual hard disk
Your setting should look something like the screenshot below.

Create New Virtual Machine
#3. Select where you want to save your virtual hard disk. Also, make sure to increase the size of the disk. From virtual hard disk, type make sure to select VHD. If you select dynamic allocated, your VM speed will not be good but it’s good that does not allocate the specified storage at once, unlike fixed-size type.

Create Virtual Hard Disk
#3. It’s time to customize some of the settings according to your choice. Click Settings and from the pane choose System. On the Motherboard, tab uncheck Floppy disk and move it down. If you’re not happy with your memory setting still, you can change it.
#4. Click the Processor tab and select a minimum of two processors or higher.

Increase the Processor
#5. Navigate to the Display menu then increase the Video memory to 128 MB.

Increase Video Memory
It’s time to select your macOS Big Sur ISO file. Click Storage and then select on Empty. Click on DVD icon and choose your macOS Big Sur ISO file.

Select ISO Image
Make sure your macOS Big Sur ISO file is on the top, not your Disk because if your disk is on the top, your VM might not boot. Just change the SATA port number to 0 for your iso image. It’s not 100% compulsory.

ISO Image SATA 0
Step 4: Run VirtualBox Code to the Command Prompt
Once you’ve created and customized your virtual machine, it’s time to run some codes in order to install macOS Big Sur on VirtualBox.
First, you should notice your virtual machine name because later on, we will use it. Open the VirtualBox code which you should have downloaded from the Required File section of this post.
#1. When you opened VirtualBox code via notepad or any other text editor, use the replace function of the program to replace the VM Name to your virtual machine name. See the picture below to get an idea of how it’s done.
cd "C:\Program Files\Oracle\VirtualBox\"
VBoxManage.exe modifyvm "VM Name" --cpuidset 00000001 000106e5 00100800 0098e3fd bfebfbff
VBoxManage setextradata "VM Name" "VBoxInternal/Devices/efi/0/Config/DmiSystemProduct" "iMac19,1"
VBoxManage setextradata "VM Name" "VBoxInternal/Devices/efi/0/Config/DmiSystemVersion" "1.0"
VBoxManage setextradata "VM Name" "VBoxInternal/Devices/efi/0/Config/DmiBoardProduct" "Mac-AA95B1DDAB278B95"
VBoxManage setextradata "VM Name" "VBoxInternal/Devices/smc/0/Config/DeviceKey" "ourhardworkbythesewordsguardedpleasedontsteal(c)AppleComputerInc"
VBoxManage setextradata "VM Name" "VBoxInternal/Devices/smc/0/Config/GetKeyFromRealSMC" 1
Replace VM Name
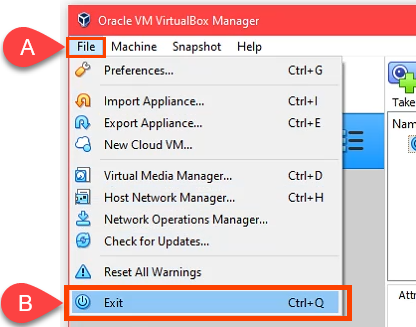
Tip: It’s highly important that you should quit the VirtualBox program before executing the code. If you don’t do it, your virtual machine might not proceed to the installation step.

Exit VirtualBox
#2. Once you replaced the “VM Name” with your virtual machine name, then run the code one by one to the command prompt (CMD). You can open the command prompt by pressing Windows+X key in Windows 10 or click windows key and type CMD and run command prompt as administrator.
This slideshow requires JavaScript.
Step 5: Start the Virtual Machine
Starting macOS Big Sur with the older version of the Mac Operating system was a bit different, but with new macOS Big Sur still, it’s easy to set it up.
#1. Open the VirtualBox app then click the Start button. A black screen with a few yellow & white text will appear on the screen.

Start Virtual Machine
#2. Once you started the VM then you’ll see some code running in the background. Just wait until you see the Apple logo.
This slideshow requires JavaScript.
#3. Select a Language and click Continue arrow.

Select Language
#4. Select Disk Utility and click Continue.

Select Disk Utility
#5. Select your main Virtual Disk and click the Erase button. Make sure to check the size of the disk and you should not erase the wrong disk.

Erase Virtual Disk
#6. Name your Disk that you want to install macOS Big Sur on it. I’ll name here macOS HD. Once typed a name then click the Erase button.

Name the Virtual Disk
#7. Close Disk utility.

Close Disk Utility
#8. Select Install macOS and click Continue.

Install macOS
#9. Click Continue.

macOS Big Sur Beta
#10. Agree to terms and Conditions.

Agree to the Terms & Conditions
#11. Select the installation disk and click Continue. Once you click continue it’ll take around 29 minutes to complete the first part of the installation.
NOTE: If you get the Operation Couldn’t be Completed BiErrorDomain Error 3 then follow this step by step guide below.
Fix the Operation Couldn’t be Completed BiErrorDomain Error 3
This is a very common error with macOS Big Sur beta version 1 that most people have faced. Just use our VirtualBox code and it should work without any error.
- Fix the Operation Couldn’t be Completed BiErrorDomain Error 3

Installation Disk
Step 6: Perform Clean Installation of macOS Big Sur
- Once you hit enter, a whole bunch of code will run on the screen, but you should not worry about it. Wait for a few minutes, and you should see the macOS Big Sur installation window. Have a cup of coffee until the installation complete because it’s going to take around 29 minutes to finish.
- Once the installation part complete, your system will reboot, and after the restart, you should see macOS Big Sur Welcome page.
- Select the following options. You can change most of the settings later on, so don’t worry about that for now.
- Select your Country and click Continue.
- Choose a Keyboard Layout and click Continue. If you don’t agree with preset options then you customize it. Just click Customize Settings.
- You can turn on the Accessibility features now with macOS Big Sur. You’ve several options with accessibility like vision, motor, hearing, and cognitive. If you don’t want to set up right now just click Not Now button to skip them.
- Read Data & Privacy and click Continue.
- Now, you can transfer your data from your previous Mac or from your Windows PC. If you don’t want to transfer anything right now, just click the Not Now button to continue.
- Click on Set Up Later then Don’t Sign In. You can add your Apple ID later.
- Click Agree to the Terms and Conditions and click Continue.
- Fill out the Full name, Account name, Password, and Hint then click Continue.
- If you want to customize Express Set Up, you can click on Customize Settings otherwise click on Continue.
- On the Analytics page click Continue.
- On-Screen Time, click Set up Later.
- Select an appearance theme and click Continue. Here you choose your dark mode if you want.
- Wait for a few seconds and you’ll see the login screen now.
- Well done 👍👌😮 you’ve installed macOS Big Sur on VirtualBox Successfully.

Welcome to macOS Big Sur VBox
Click on the image below to see the full resolution
This slideshow requires JavaScript.
Summary
Basically, in this article, I’ve shown you the step by step pictorial guide on how to install macOS Big Sur on VirtualBox on Windows computer. After reading and following this guide, you should have done the following;
- Downloaded VirtualBox with its Extension
- Installed VirtualBox on your system
- Installed & upgraded VirtualBox extension
- Created a new virtual machine for macOS Big Sur
- Customized macOS Big Sur VM
- Executed the VirtualBox code to the CMD
- And finally performed a clean installation of macOS Big Sur.
Related: How to install macOS Big Sur on VMware on Windows.
We are ready to keep receiving your feedback about this article, and other posts on wikigain. Your suggestion and feedback are highly appreciated.
Warning: All the content of this site is copyright protected, and no-one has the right to copy-paste our materials.
It’s been a long time since Apple was a distant runner-up to Microsoft in the personal computer world. Still, Windows is the most popular desktop operating system (OS). If you’re primarily a Windows user, you may need to dip your toes in the Mac world infrequently. Instead of buying a MacBook, You could install macOS in a virtual machine on your Windows PC.
Can I Run macOS on Windows?
If you’re a Windows power user, you know you can run Linux or other versions of Windows within Hyper-V. If you’re a Mac power user, you know you can run Windows on a Mac with Boot Camp, or a virtual machine like VMWare Fusion, Parallels, or VirtualBox. But, can you run a macOS on Windows? You could run macOS on VMWare in Windows, but using VirtualBox is free.
You can install macOS in VirtualBox on Windows if you have:
- A legally obtained copy of a macOS
- At least 2 GB of spare RAM
- A 64-bit based CPU with at least 4 logical CPUs
- Administrator access on the PC
Fortunately, many computers today exceed the minimum hardware requirements.
Get a Copy of macOS
Open the Apple App Store and download a copy of BigSur. It’s an entire operating system, so it’s a large download. Make sure you’ve got the space and time to download it. If you don’t have access to download macOS BigSur from the App Store, we don’t recommend using other versions found on the internet, for security reasons.
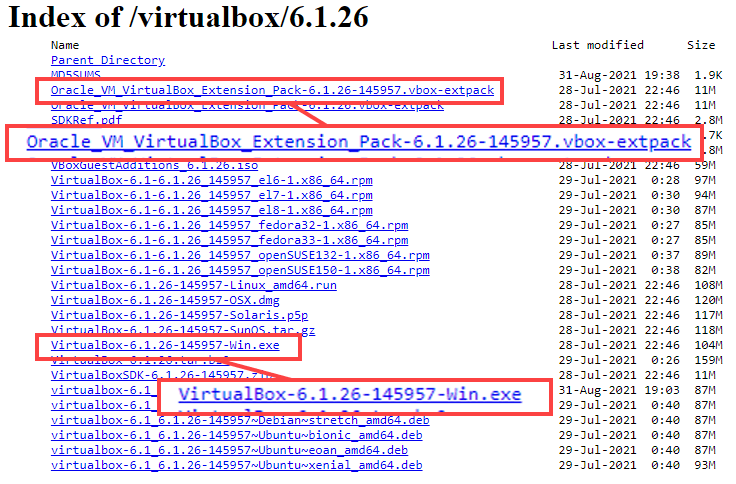
The newest version of VirtualBox that this process appears to work with is VirtualBox v6.1.26. Go to the VirtualBox 6.1.26 download site and select VirtualBox-6.1.26-145957-Win.exe. Also select the VirtualBox Extension pack Oracle_VM_VirtualBox_Extension_Pack-6.1.26-145957.vbox-extpack.
- Install VirtualBox by running the downloaded installer.
- When the VirtualBox installation is complete, Install the VirtualBox extension pack.
Create a Virtual Machine In VirtualBox
Think of creating a virtual machine as building a computer inside your computer. This gives macOS its own place to install to and allocates the resources it needs to work.
- Select the New button.

- Enter a name for the virtual machine in the Name field. A simple name is easier to work with, like macOS. Select where the macOS virtual machine will be installed in the Machine Folder field. For a multi-disk PC, pick a disk with at least 100GB of free space. If possible, pick an SSD disk. That will help performance. Or leave it as the default. VirtualBox will automatically set the Type to Mac OS X and Version to Mac OS X (64-bit) based on the name entered for the VM.
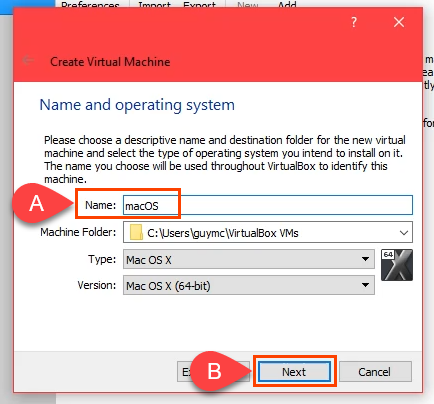
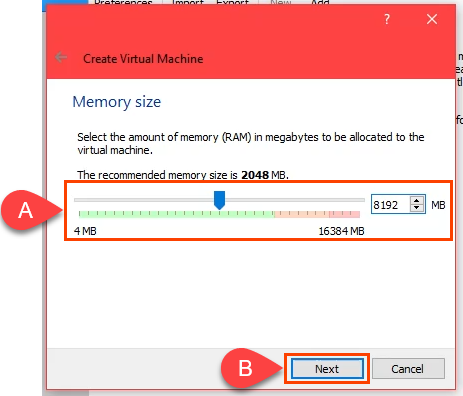
- Allocate as much memory as possible for the macOS VM without exceeding 50% of total memory. Your PC still needs resources too.
- Ensure that Create a virtual hard disk now is selected and select Create to continue.
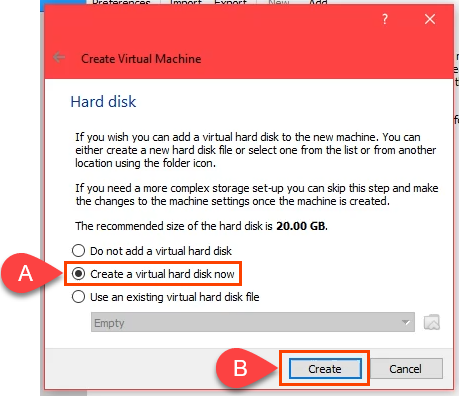
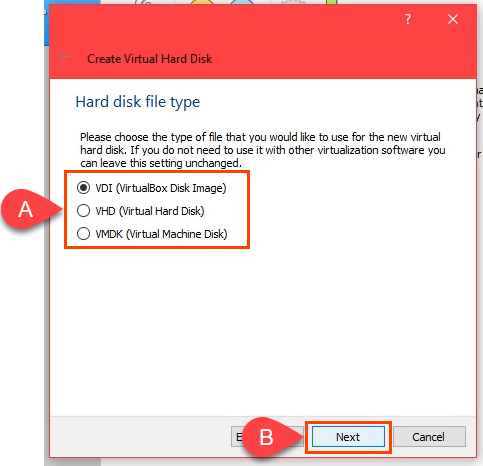
- Choose a hard disk file type. The default VHD is good. Or choose another one based on what you need.
- VDI (VirtualBox Disk Image): Only works in VirtualBox. If you might migrate the VM to another VM host like Hyper-V or VMWare, don’t choose this one.
- VHD (Virtual Hard Disk): Good for migrating the VM to Hyper-V.
- VMDK (Virtual Machine Disk): Good for migrating the VM to VMWare.
- If you’re creating the macOS on an SSD or nvMe drive, you can select Dynamically allocated. SSDs are fast enough to resize without affecting performance much. If you’re not certain, choose Fixed size. Select Next to continue.
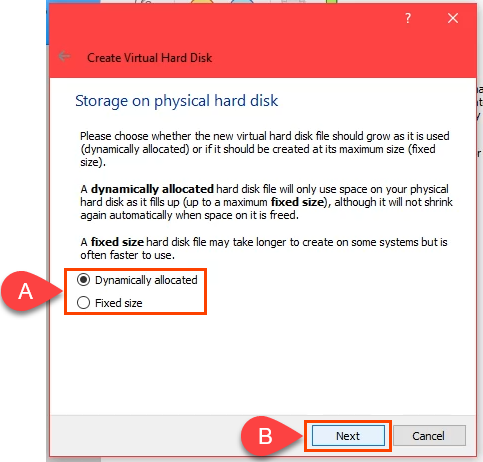
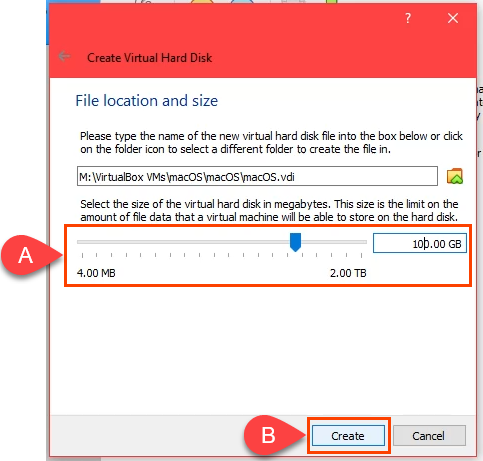
- On the File location and size screen, leave the default folder path. Allocate a minimum of 60 GB for the virtual hard disk. If you plan on installing several programs or upgrading the macOS to Monterey, use at least 100 GB. Select Create to continue.
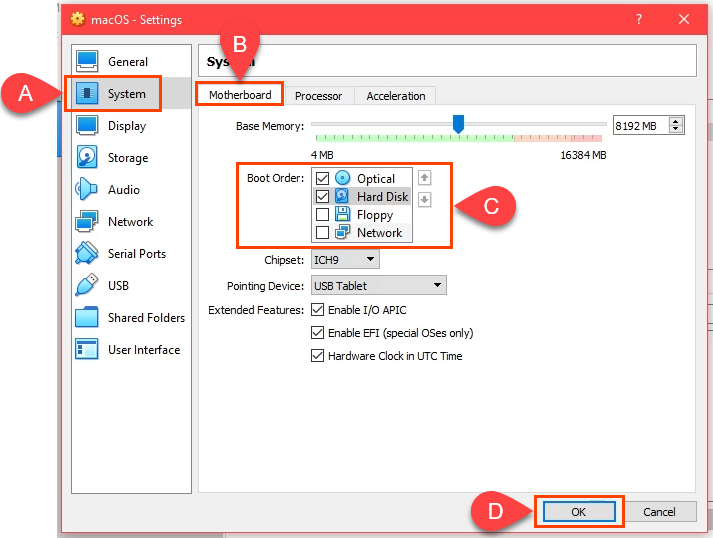
- When the VM creation process ends, select the macOS VM and select the Settings button.

- Go to the System page then the Motherboard tab.In the Boot Order field uncheck Floppy. Use the up and down arrows to adjust the boot order so Optical is first, and Hard Disk is second. The defaults for the remaining options are good to leave as is.
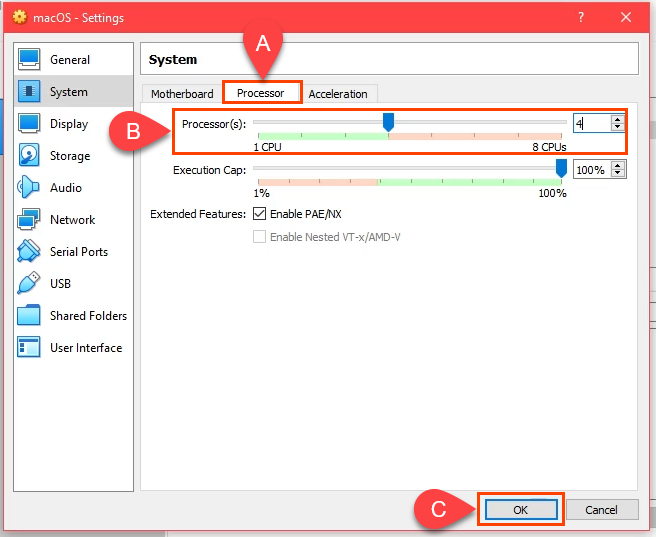
- Move to the Processor tab. Adjust Processor(s) to at least 2 CPUs. If your CPU has 4 cores and 8 logical processors, VirtualBox will show that you have up to 8 CPUs to use. Don’t use more than half. Leave Execution Cap at 100% and Enable PAE/NX should be selected by default as well. Select OK to continue.
- Go to the Display page, then the Screen tab. Max out Video Memory to 128MB. Leave the defaults for the other options on this tab selected.
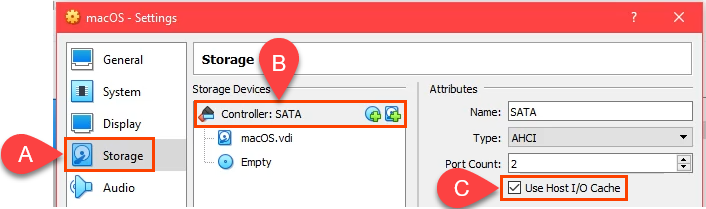
- Go to the Storage page. Select Controller: SATA and then check the Use Host I/O Cache box. Then select the Empty storage device.
Select the DVD icon next to the Optical Drive field. Then select Choose a disk file. Navigate to where you stored the macOS .iso download and select it. Select OK to continue.
- To complete the next step, exit VirtualBox. The next step won’t work if you don’t exit it or it keeps running as a zombie process. You will not be able to create the macOS VM. After closing VirtualBox, open Task Manager and ensure the process is not listed.
- Go to GitHub and get the VirtualBox macOS codes. Copy them from there and paste them into Notepad. The codes will need to be edited to match your macOS VM situation.
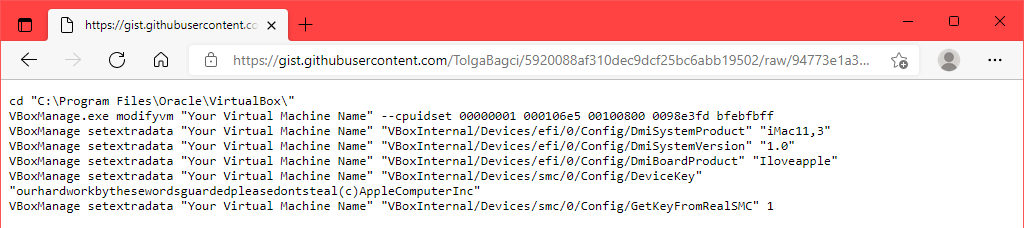
If you installed VirtualBox to a location different from what’s shown in the first line, edit the first line to match.

In the remaining lines, change Your Virtual Machine Name to macOS, the name you gave this VM.

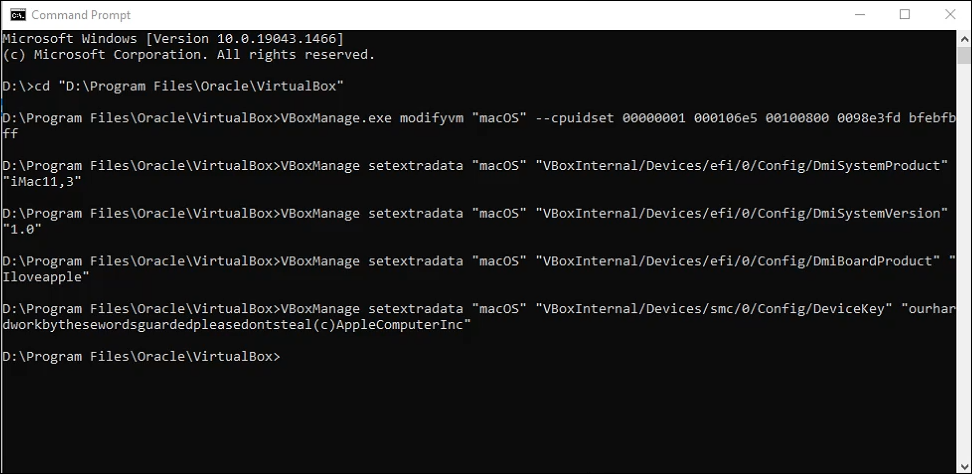
- Open the Command Prompt as Administrator. Copy the first line of code and enter it. This will change the base directory in the Command prompt to where you installed VirtualBox. Then copy, paste, and run each line by itself in the Command prompt.
Install macOS Big Sur
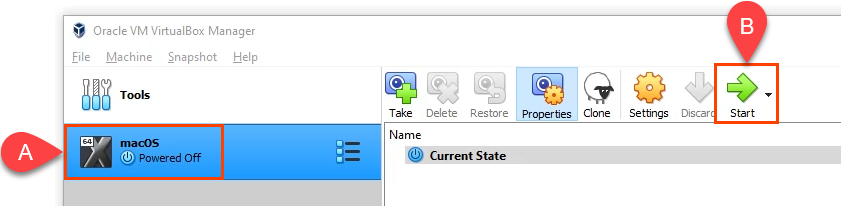
- When the last command finishes, close the Command Prompt and open VirtualBox again. Choose your macOS VM and select Start.
- You’ll see a lot of white text on a black background. This can take a few minutes. If the white text and black background step continues for more than 15-20 minutes, it’s probably not going to work. You’ll see the Apple icon and a progress bar. If you get this far, it’s probably going to work.

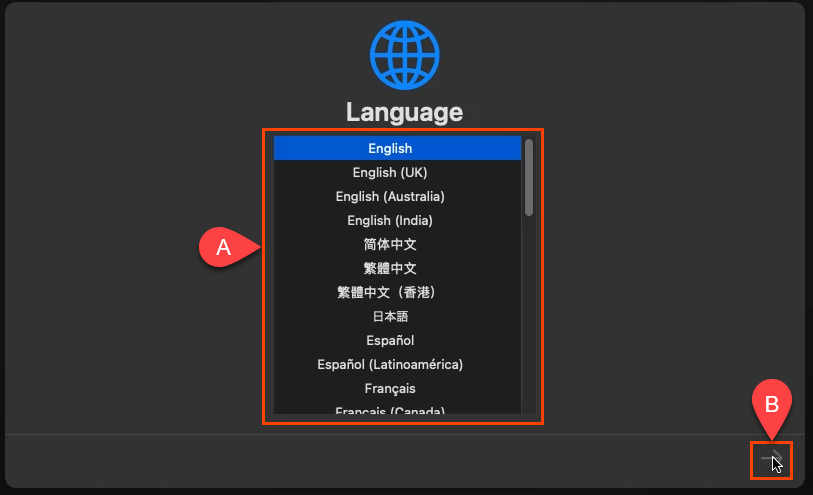
- Next you’ll see the Language screen. Choose the language you prefer and select the next arrow to go to the macOS Recovery screen.
- Select Disk Utility.

- On the Disk Utility screen, select the VBOX HARDDISK MEDIA in the left column and select Erase.

- It will ask you to confirm that you want to erase it. You need to give the volume a new name, too. Any name will do. Select Erase to continue.
- Once the volume is erased and renamed, select Done to continue.
- Close the Disk Utility window.
- On the Recovery screen, select Install macOS Big Sur and then Continue.
- It asks you to Continue again. Then it will ask you to agree to the software license agreement (SLA) twice. Agree if you want to continue.
- Select the disk to install macOS Big Sur on. Only your macOS disk should be showing so click on that. Then select Continue.
- It starts installing. The screen might say that there’s about 12 to 18 minutes remaining. It’s not correct as this part can take an hour.

- It will go to a black screen with white text, then to a gray screen with the Apple logo that says, “Less than a minute remaining…” There is a lot more than a minute remaining.

- Eventually, you’ll see the Select Your Country or Region screen. You’re now in the setup of your freshly installed macOS. Go through the set up.
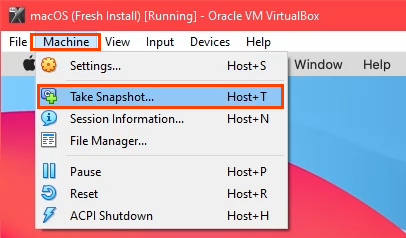
- Once you’ve completed the setup, take a snapshot of the freshly installed state. This allows you to revert back to it easily should something go wrong with the macOS VM in the future.
Change the Resolution of the macOS Virtual Machine
If you prefer greater resolution than the VirtualBox default, you can do that too.
- Shut down the macOS virtual machine and completely exit VirtualBox.
- Open the Command Prompt as Administrator.
- Navigate to where VirtualBox is installed.
- Enter the following command:
VBoxManage setextradata “macOS” VBoxInternal2/EfiGraphicsResolution 1920×1080
The last part of the command, 1920×1080 is the resolution. It can be changed to any of 1280×720, 1920×1080, 2560×1440, 2048×1080, 3840×2160, 5120×2880, or 7680×4320 supported resolutions. Some may not work for you though. After the command completes, restart VirtualBox and your macOS VM to make sure the change works.
Tips on Using macOS in VirtualBox
During the install, if you see a circle-slash like a no parking sign, the installation isn’t going to work. Shut the machine down as there’s no sense waiting.

Again, check to ensure that you applied the VirtualBox codes correctly. Completely close VirtualBox and reapply them if needed.
If that doesn’t work, change the VM settings to use less RAM or CPUs. Sometimes the PC can’t keep up with a higher setting.
Once the install is complete, you can change the VM settings to use more RAM or CPUs to increase the performance, as long as you’re not doing anything else on the host PC.
Enjoy your new macOS virtual machine!
Apple makes new products, software, and updates every year and they introduce the updated version in WWDC(Apple Worldwide Developers). In this event people attend the show and watch the updates live, but this year the format was different. It was completely different due to coronavirus and the big incident of George Floyd. According to Apple, they value the health of customers over their enjoyment. But still, they managed the WWDC show so wonderful, entertaining, and at the same time educating. Some fans even tweeted that this year’s WWDC was better than the previous years and they didn’t have to pay money to watch the show. In this article, I’ll show how to install macOS Big Sur on VirtualBox on Windows PC.
Some of the biggest launches were, macOS Big Sur, iOS 14, iPadOS 14, WatchOS 7, tvOS 14, Apple Silicon Chips, AirPods, and many small improvements but there were changes that many fans didn’t like. Such as there was no hardware introduction and many fans were upset about that. Because all Apple lovers wait the entire year for WWDC to get introduced to new products and new updates but this year’s new products were not n the way. Anyway, let’s have a look at the updates WWDC brought this year. Let’s Have a look at macOS Big Sur. Within the next sections, we’ll not only show up the macOS Big Surs features but also show how to install macOS Big Sur on VirtualBox on Winows PC.
- Related: Install macOS Catalina on VirtualBox on Windows PC
What’s New in macOS Big Sur
In the new macOS Big Sur Apple especially focused on the small details and the need of customers. macOS Big Sur has powerful designs and its customization options have made,macOS Big Sur to the list of most advanced desktops operating systems in the world. This macOS is the newest version of macOS and its full version will release in fall this year. macOS Big Sur is huge improvements because Apple doesn’t use the number 10 for macOS Big Sur. macOS Big Sur is the 11.0 version of macOS.
As the version number has increased the best features, new changes, and easy to use formula has changed too. With macOS Big Sur Apple brought a huge update since the introduction of Mac OS X (many years ago). We have explained every detail from head to toe about macOS Big Sur in this Article. And we have a glance at WWDC too. After this,
With the previous macOS was named Catalina, Apple used a picture of Santa Catalina island as the desktop picture. Apple had wonderful pictures of Santa Catalina Island on the Desktop as the profile picture. and With the Time-shifting desktop feature, that looks way better. But with macOS Big Sur we don’t have a pic of Big Sur bridge as the desktop or profile picture. instead, we have wonderful and colorful paints on the profile picture that can match to mood and personality of everyone.
In macOS, Big Sur widgets can be customized in three different sizes. And users can select the size of widgets and get information easier than ever. In the new macOS, windows have a lighter appearance for a better look with additional translucency and rounded edges. App icons have updated and have a new uniform squircle shape which looks wonderful. In the new macOS, Big Sur menu bars in apps have been redesigned and have a bigger space with many better tools for editing. And with the new tools, you can be better able to blend in with your content, the sound system has been entirely redone. Also, there are new symbols in toolbars, sidebars, and controls to provide clarity and consistency across all the apps.
Another huge improvement in macOS Big Sur is the redesigned Notification Center. Notification Center has been redesigned with more interactive notifications grouped just like iOS 14. Safari has completely u[updated like never before and it has been redesigned. This new Safari is wonderful, let me explain it.
- Related: Install macOS Catalina on VirtualBox on Windows PC [New Method]
-
iOS14
iOS 14 is the new and updated version of iOS. According to Apple, they have spent time rethinking the most iconic elements of experience on the iPhone. And after thinking and trying hard enough, they brought 3 new major and fantastic changes in iOS 14. The first and one of the most iconic changes in iOS 14 is the Home screen, Appl library. As we get more storage space in new iPhone devices. We want o download new and more apps. but as apps increase and we get more and more apps. We end up with a lot of pages and we sometimes forget what was on the last or second last page.
Wouldn’t it be great if there were a way to organize all of those apps without doing hard work? Yes, Apple has excepted our request and they brought a new feature by the name of App Library. It has a new space at the end of or home screen pages that automatically organize all your apps in one simple and easy to navigate view. And you can hide app pages if you don’t need them right at the moment or if you want them to be secret. We have suggestions in App Library and all the apps are organized from A to Z in the search bar. Alongside this, I’ll explain and share step by step how to install macOS Big Sur on VirtualBox on Winows PC.
-
Widgets
Another special thing that Apple has brought major changes in is Widgets. Every iPhone user needs help of Widgets to get information at a glance. But a lot has changed since Apple first introduced Widgets and the first iPhones. And now the use of Widgets is less than ever because we have Apple watches. And we can get information in seconds from our wrists’ watch. This Year Apple has changed a lot in Widgets.
Widgets are now more beautiful and data-rich in different sizes that you can choose according to your self. And now they are even more accessible besides that you can drag that out of today’s news and see that on your home screen.
- Related: Download macOS Big Sur ISO Image
Before years iPhone users needed to download apps to watch a video and do work. But now with the new features of Picture in picture, iPhone users can do more than 2 jobs at the same time. For example, you can facetime with your friend and scroll through Instagram.
Siri has been completely redesigned and now it has many new updates like if you ask Siri question in iOS 14, your screen won’t go black and you won’t see spelling and conversation of you and Siri. Siri also helps you in dictation and translating speeches, phrases, conversations, and voice even offline. And this translating can be in 11 languages. such as English, Mandarin Chinese, French, German, Spanish, Italian, Japanese, Korean, Arabic, Portuguese, and Russian. There are many other changes in Messages, emojis, group messages, Maps that are now its available in 3new countries, CarPlay, App Store, AppClips, Safari, and many small and quick changes.
-
iPadOS
iPadOS builds on all the amazing features of iOS while having that deliver a distinct experience for iPad. This year iPadOS delivers unique made for iPad design that takes great advantage of iPad’s large, multi-touch display. ipadOS has over 1 million apps available in the App store and iPadOS has the storage to download all of those apps on your iPad. In iPadOS also you will find redesigned Widgets like iOS 14 and in the Photos editing your pictures and videos are easier than ever with the new sidebar. You can drag a picture to the editing section in the sidebar, and edit that however, you want. And tools are better than ever.
You also can add one picture to multiple albums. This sidebar is in many other apps like, Notes, Files, Calendar, and Music. And these apps have many more improvements. Also, Siri has been updated and redesigned in iPadOS too. Siri comes at the corner of your screen and you can watch and read while talking to Siri about your new meeting. Calls have improved in iPadOS and in iOS 14. And now it will come like a notification instead of covering all your screens. Search has also really changed and developed, and now you can search on Home Screen or any app. And now the suggestions developed with the search. And now you can find web answers by Search. Whether you’re a Windows lover or Mac, we have a pretty great option for you which is why not both so here’s how to install macOS Big Sur on VirtualBox on Winows PC.
- Related: How to Install macOS Big Sur on PC – Hackintosh
Including these apps and improvements, all the things that have been introduced in iOS 14, you can use on your iPadOS. Apple pencil has also developed and not can work just like text. Now even an unprofessional artist can draw and work very professionally with Apple pencil. Users said after we use Apple pencil, we don’t want to take that off. Now Apple has brought new features in Apple pencil and after the update, users can work on every app and software with Apple pencil. Apple has made huge improvements to handwriting recognition and now when a user writes, they can easily make a selection as they do for a text. You can double-tap to select a word or you can change the color and move writing anywhere you want.
Also, many amazing updates are coming and have come to Air pods. AirPods will now seamlessly move between your devices with the user having a manual switch. AirPods can switch automatically from an iOS to iPadOS and from iPadOS to Mac. AirPods Pro also has a new exciting feature by the name of Spatial audio. With the Spatial audio feature, you can experience a movie theater on your ipadOS or iOS at home.
macOS Big Sur (macOS 11)
macOS is one of the biggest inventions of Apple developers. Every year macOS gets updated and more developed in WWDC(Apple Worldwide Developers Conference). And this yar’s star is macOS Big Sur. macOS Big Sur introduces an entirely new design and major updates to some of the important apps and platforms. And just like its name, Big Sur brings unmatched levels of power and beauty. At WWDC 2020 Apple said, we have refined some of the most iconic elements of Mac experience. The first feature Apple talked about was Dock. Dock has an elegant new design that floats along the bottom of your desktop and you will notice gorgeous new apps icons. Finder has also a new gorgeous top to bottom design for its sidebar. And it has a compact space-efficient toolbar.
Mails also have got a wonderful update. Users will notice that mail has all new glyphs in the sidebar. And the colors are also back, each app uses its own key color. The new toolbar makes it really easy to get all your control.
Photos are wonderful now. Users can get to all their albums and media types from the sidebar, and the photo grid is backed by Metal. Apple has refused the design for all the apps on the system. And apps like Calendar, Notes, Podcasts, Music, and iWork have got wonderful and easy to use.
- Related: How to Install Android 8.1 Oreo on VirtualBox on Windows 10
The menu bar has developed and for controlling and doing all the things like Wifi, and sound you can use the new Control Center to Mac and macOS. All your controls will be there and it’s easy to make adjustments.
Your Notification Center has also reinvented and now with a single view it will bring your notifications and widgets. You can see the complete notification from your Notification Center and use the newly redesigned widgets. You also can edit those widgets.
In apps of Big Sur also, there are a lot of changes. Messages have many new updated features, and one of the most used ones is Powerful Search. This new feature he’s you find the right thing at the right moment. Massages have a redesigned photo picker too and with this, you can share pictures and videos easier. My favorite thing, memoji. Now I can create my memoji on my Mac and you also can.
Maps on macOS Big Sur is wonderful with the new edition of favorites. Now you won’t lose your favorite coffee shop or library. You also can create your own guides for the places you want to visit. And with an indoor map, you won’t be lost in any public place, such as Airpot. Features introduced in iOS 14 will be available on macOS Big Sur also.
Mac Catalyst is my second most favorite thing on macOS but this year it is even better. This year developers will be able to optimize their apps to fully utilize the native resolution of mac screen. Including powerful new menu and keyboard APIs and updated controls like checkboxes and date pickers. There’s a growing list of third party catalyst available.
Safari is the best app and we love safari for its speedy performance, power efficiency, and state of the art privacy protections. Safari is the world’s fastest desktop browser and this year Safari will be faster than any other browser. Safari will still be more private and you will not be tracked by any website on Safari. And you can see how that website treats users’ privacy. macOS Big Sur is wonderful and other many new features are on way such as customizable start page, redesigned taps, native translation, and many more. By this point, you’ve pretty much known about Big Sur and how great it is, however, let’s move into how to install macOS Big Sur on VirtualBox on Windows PC.
What is VirtualBox?
Before we jump into the process of installing, we need to know what is VirtualBox and how it works. Does VirtualBox have any harm to our computer or No? Before we talk about usages, goodness, and badness of VirtualBox and talk about its definition. We need to know what is virtualization? virtualization is the main job of VirtualBox. All the processes that a VirtualBox do are, called virtualization.
virtualization allows a single hardware computer to use different operating systems. Computers in the 20th century have high CPU and hardware power, But of that power isn’t used with a single operating system. That’s why virtualization was created. With virtualization, a single hard drive can work as multiple hard drives. And users can install and use different operating systems in one drive.
After understanding virtualization, Now we can understand VirtualBox too. VirtualBox is an open open-source advisor for x86 virtualization. VirtualBox is a virtualization program, which helps users use 2 or more than 2 operating systems in a single drive. VirtualBox is a huge program and it can create and run almost any operating system in it via virtual machine. But it completely doesn’t make it complicated nor expensive. Instead, it’s pretty easy to use and completely free, yes, without any cost. With that in mind, let’s jump into how to install macOS Big Sur on VirtualBox on Winows PC.
- Related: Download macOS Big Sur DMG File – Latest Version
How to Install macOS Big Sur on VirtualBox on Windows PC
As far as installing macOS Big Sur is concerned, you might be wondering how we and you would accomplish install macOS Big Sur on VirtualBox on Windows PC. The answer is, how we and specifically you would do is via the third-party app which we mentioned above. That is VirtualBox. Just like we introduced VirtualBox, it’s a great simple free tool which does the perfect job of letting us install macOS Big Sur on VirtualBox on Windows PC. How it actually does is, since it’s a free virtual machine app, different from VMware, it doesn’t restrict us to the operating system it has. What I mean by that is, it has all the operating system list we need, that includes macOS.
If you have install macOS Big Sur on VMware on Windows PC, you know VMware doesn’t give the macOS option in the operating system by default. For which, we would need to download and install Unlocker for VMware. But with VirtualBox, that’s definitely not the case, because it supports install macOS Big Sur on VirtualBox and as well as other versions of VirtualBox. This also means we now no need to install macOS Unlocker for VMware which is only for VMware as known from it’s name. So without installing the patch, you can easily accomplish with this installation and the steps and install macOS Big Sur on VirtualBox on Winows PC.
- Download macOS Big Sur ISO File – Latest Version
Step one – Create or Download macOS Big Sur ISO
The first and by far one of the most important steps to take and do is to whether create or download macOS Big Sur ISO. Don’t worry, we’ve both the option covered and by no means you’re supposed to accomplish this alone. Whichever option you choose, we’ll help you with that. And we’ve done via another article which has entirely shown the way to do it with the steps and whatever is needed.
If you’re assuming you would get it from the App Store or Apple’s beta program, you are totally wrong. The reason is, it isn’t the ISO file, means Apple has its own file format which is DMG and even though you download Big Sur from Apple’s beta program which doesn’t directly give you the Big Sur. Despite that, if you attempt to download Big Sur from there, you will likely end up with macOS Developer Beta Access Utility. In fact, if you proceed with it which will let you download macOS Big Sur, it won’t be ISO at the end of the day.
- Related: How to Install macOS Big Sur on VMware on Windows PC
So what we have done is we have made a complete step by step tutorial on how to create macOS Big Sur ISO. Check it out and you’ll find it as easy as copying and pasting commands as long as you’ve macOS Big Sur with you. And not to confuse you, it needs to be done within a Mac. So if you’ve a Mac and a reliable connection, you can probably create macOS Big Sur ISO pretty easily. The good thing is, it gives you the latest version of Big Sur, whether its in beta mode or final version.
But the problem is, not everyone has a reliable and speed internet connection or some might be suffering from a limited connection which is really difficult to achieve then. In this case, we’ve done the job beforehand and you don’t really need any work not minimal work even. You’ll only need to download Big Sur ISO and that’s the only thing you need to do.
macOS Big Sur Beta 11.0 Developer Beta 2 (20A4300b) July 7, 2020
So with all those things and hurdles, most of you would want to download macOS Big Sur ISO since I assume most of you doesn’t have access to macOS neither have a reliable connection. I mean if you have a Mac, means there wouldn’t be need to install macOS Big Sur on VirtualBox on Windows. So in this case, you can quite easily download it from here because that’s all you’ve to do. So when you have this option, you don’t really need to select the first option.
- Download macOS Big Sur ISO – latest version
Step Two – Install Oracle VM VirtualBox on Windows
With the file only, we can’t install macOS Big Sur on VirtualBox on Winows PC straightly. What we need is a platform or an environment to run in. So with this in mind, we need to install VirtualBox which is not our only option but definitely our preferred way to do. So we encourage you to first download and install VirtualBox on your Windows machine so we can proceed further. Both the download and installing process is as easy as you would imagine. It requires a minimal work of only getting the file and running it with a few wizards to fiddle with. Also, it isn’t heavy or should slow down your PC, instead it installs very quickly and won’t take much time and space.
- Download Oracle VM VirtualBox
In this case, download the Orcale VM VirtualBox from the link below and then install it once it’s finished downloading. Not to forget, download the VirtualBox extension pack also with it.

VirtualBox wizard
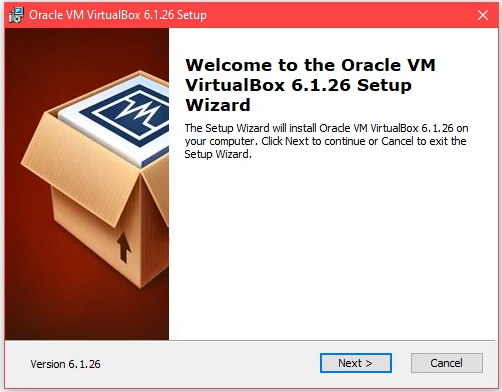
The best thing is, it desn’t required nothing more then simply download and install like signing up or asking questions or license or anything else. So once you’ve run the setup, it will look like this. Simply press Next.
Press Next a few times more and when this window appears, click Install.

Install VirtualBox
When it’s finished, click Finish.

Finish Installation
You can let it run and simply exit the installation.
Step Three – Install VirtualBox Extension Pack
So when you’ve installed the VirtualBox, it also requires installing VirtualBox extension pack. What it is, it is basically a pack of tools and features which enable us USBs that includes mouse and keyword working and a bunch of other things which it supports. But it’s not as necessary as it seems like or as VMware Tools. Despite that, we will install which might prevent some problems and errors that might occur when installing. And as well as, since Big Sur isn’t fully out yet, and is still in beta mode, it might have some problems or bugs and errors so it’s better to install VirtualBox extension pack so it can try to prevent or catch up with those errors. I recommend installing VirtualBox extension pack for a better experience. Here’s how to proceed with it to accomplish how to install macOS Big Sur on VirtualBox on Winows PC.
- Download Oracle VM VirtualBox Extension Pack
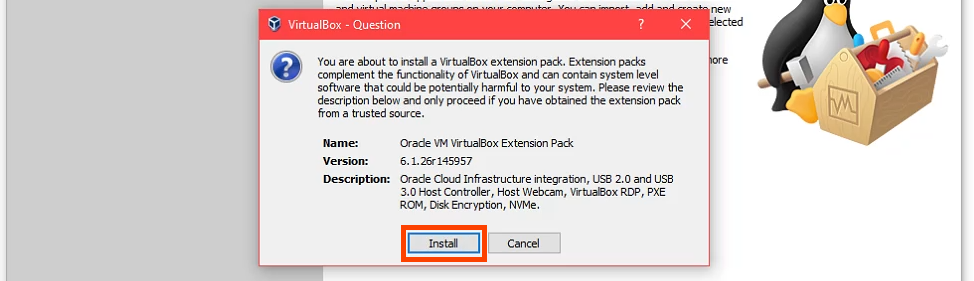
Not to worry, it’s also similar to installing VirtualBox, and can be obtained from the same page where you would get VirtualBox. So after you’ve get it, fire up the VirtualBox and simply open it up, and it will prompt you to install, so simply click on Install and it will be installed.

Install VirtualBox Extension Pack
It will show up some other windows, like terms and conditions and stuff like that. Simply proceed with them and let it install.

Agree with the Terms Conditions
Once it’s finished, click OK.

Installation Finished
Step Four – Create A Brand New Virtual Machine
Creating a virtual machine in VirtualBox is different from VMware. That means it’s pretty easy and just like we mentioned, it doesn’t require installing patch instead it supports installing macOS by default. Not only that, it also provides an option of expert option which will make the wizard all in one window so you can set up the machine within a window not going through options. So let’s see how it is and how it looks like. So let’s first create a new machine to install macOS Big Sur on VirtualBox on Windows PC as quickly as you can.
To create a new machine, open up the VirtualBox, and click on New.

Create Virtual Machine
The create virtual machine window will appear, simply click on Expert Mode.
Now fill up the blank with a name probably macOS Big Sur, and then specify a location where the files would be store. After then, it will automatically detect the OS and version. Next up, increase the memory size to as high as you can means 50-60% of your system’s memory and in the last section, select create a virtual machine disk now.

New Machine
Within this window, first, specify where you would like to save your machine’s disk and then also specify the disk size. For the disk size, make sure you assign at least 100 or more GBs of storage space. And last for the disk type, select VHD which will automatically expand the disk size by your usage and won’t use any extra space if you’re using not all of it. When you’re done, click on Create.

Create Hard Disk
Step Five – Set up The Virtual Machine Settings
At this point, we’re basically near to finalize the machine but without setting it up, it’s of no use. The customize is primiarly done in order to meet our needs and as well as run the machine according to our computer resources. Don’t take it funny because if you skip this part, it will seriously fail the installation and is definitely a game changer. Even if you get in trouble with some things you can assume you’ve done something wrong in this part maybe. That’s almost the last step to how to install macOS Big Sur on VirtualBox on Winows PC.
Goto the machine’s settings.

And on the System tab, uncheck floppy.

Uncheck Floppy
In the next tab which is processors, set the processor to the highest you can means 50-60% of your system resources at least 2 or more.

Increase Processors
Next to the display tab, set the video memory to the highest and also change the Graphics Controller to the VMSVGA.

Increase Video Memory
Heading to the next tab, which is Storage, click on the disc icon and then click on the disc icon on the left side and then choose macOS Big Sur ISO ISO. This will direct the machine to use the macOS Big Sur ISO for booting.
To change it to boot first, from the optical drive menu, set the macOS Big Sur ISO to SATA Port 0. Make sure it’s up not down the disk since it shows the machine will boot from what.

Add macOS Big Sur ISO
Step Six – Apply Commands on Command Prompt
Similar to running a command, it also requires running a simple command which is quite easy. These codes aren’t different from any other code and are very simple to apply. If you are wondering what it does is, it basically patches VirtualBox to install and run macOS Big Sur without any problem, even though VirtualBox supports installing macOS by itself. Don’t worry it won’t harm, neither the machine nor your computer.
Not to forget, find out and copy your virtual machine’s exact name. To do this, open up the VirtualBox then click on the settings icon and copy your machine name from there.

VM Name
The procedure is quite simple. All you’ve to do is first close VirtualBox with the machine which is very important.

Close VirtualBox
In this step, copy and paste the following code to the Notepad and then press Ctrl + H. Then write down the name of the machine, in this case, we will write “VM Name” and then in the next blank, write down the “macOS Big Sur” then press Replace All. It will simply replace all of the VM Name to the machine name which will be ready for the next step.

Manage Commands
Once that’s done, copy the whole commands and simply open up the command prompt from the start menu. No need to open it as an administrator.

Command Prompt
Once opened, paste the whole commands with a single right-click then press Enter.

Enter Commands
Step Seven – Install macOS Big Sur on VirtualBox on Windows PC
The machine’s got ready, yh!! And that’s all for creating and setting up the machine and there’s nothing more remaining or important to do. There it comes time to install macOS Big Sur on VirtualBox on Windows PC. A little different from VMware but in actual it’s pretty easy than what you had imagined. So let’s see how it goes.
Now fire up the VirtualBox and then start up the machine from the button. Since it’s the first time, it will take a considerable time.

Start Machine
Not different from the actual installation on Mac or installation on VMware, it simply is the same to how to install macOS Big Sur on VirtualBox on Windows PC. So after a long wait, it will come up the same installation you might have seen before. Select your preferred language and click Continue.

Then select Disk Utility and click Continue.

Go to Disk Utility
Now select the disk we created earlier on VirtualBox and then click on Erase.

Erase Disk
Give out a special name and click on Erase.

Erase Disk
Once finished, click on Done then close the window out.

Done
At this point, when the disk is ready click on the Install macOS and Continue with it.

Install macOS
With the macOS installation, Continue only. That’s the how-to install macOS Big Sur on VirtualBox on Windows PC.

Continue macOS
Agree with the terms and conditions and click on Agree.

Terms & Conditions
Last but not least, select the only disk we erased and click on Install.

Install macOS
The installation will begin in a minute so not to worry, it will do all itself. Means you can let it like this for some while and it will install all by itself with a few reboots and wait it will be all ready.

Installing macOS
Step Eight – Set up macOS Big Sur Settings on VirtualBox
The installation is pretty much done now. What’s remaining is to make and choose how you’d like to set up your Mac and what things you’d like to be in or out and what things you’d like your Mac to do for you and things like that. It’s a last tiny part of the installation which is super simple. And the good thing is, you can start testing up its settings, so whatever your choice, go for it.
So after a few time, when the installation is completed, it will be in this spot.
In this point, choose your region and Continue.

Select Your Language
Select your preferred keyboard and things and click Continue.

Written and Spoken language
If you have some physical problems or would like to set up those, it’s fine. Otherwise, no need for any of those, simply click Not Now.

Select Accessibility
If the data and privacy window comes up, agree with it.

Data and Privacy
Don’t transfer anything from your PC unless your want to use it as your primary operating system which we assume you won’t. However, if you need something to transfer in, you can do it later more easily so don’t choose it.

Migration Assisstant
Whether you want to sign in now or later you can do both. If you have an Apple ID, you can do it now, or if you don’t have an Apple ID, you can do it later also.

Sign In with Your Apple ID
Read or simply agree with the terms and conditions by clicking on Agree. Then click Agree on the pop up again.

Agree Terms Conditions
Just like Windows or any other operating system, you’ll need to create a user account at least one to work, however, as Mac is more secure due to it’s security, you need to create an account with a password in order to use your Mac. So fill up the details and click on Continue.

Create User Account
The express set up reminds and enables maps and other apps track and see your location in order to improve things.

Express Set up
Just like its name, the Analytics will send info and diagnostic data back to Apple in order to improve things up so Continue with it.

Analytics
Continue with the screen time by clicking on Set up later as I assume you don’t want to set it up and also because you might not be familiar with.

Screen Time
When the Siri pops up, you’re free to opt in or out with Siri, and simply click on Continue.
Choose your preferred look and click Continue.

Choose Your Look
And there you go! The installation is going to be finished soon completely, it is just preparing and setting up things in place to make it ready for use, so simply chill.

Setting Up Your Mac
Once it does so, it should be within the main area. And figure out how beautiful it is, how updated and how speed it is. And check whatever you’d like to, and know why its beating or challenging Windows and taking over the Windows day by day so by using it you will definitely get to know. That’s the procedure on how to install macOS Big Sur on VirtualBox on Windows PC.

Install macOS Big Sur on VirtualBox on Windows PC
Here’s another shot with the details.

Install macOS Big Sur on VirtualBox on Windows PC
Last Step – Fix macOS Big Sur Screen Resolution on VirtualBox
After installing Big Sur successfully on VirtualBox, you might be now confident to get your hands dirty with things. But actually that isn’t the case because there’s a problem, not actually huge but little small problem and that is the screen resolution. If you’ve used or even if you haven’t very much, still you might have the idea to do full-screen resolution, but when you do, you’ll see the black covered all around the screen except for the middle which is the wallpaper and that is pretty small.
And that is obviously not ignorebale and it does happen for all even for us, but luckily there’s a pretty easy fix to it. By default, the screen resolution is the small resolution you see which comes with VirtualBox and not only on VirtualBox, it’s also appears on VMware if you’ve installed before. But no worries, we can solve it with these steps.
These methods not only work for macOS Big Sur but also works for macOS Catalina, macOS Mojave and other versions just by changing their machine names and others all are the same, the steps and everything. While there are different ways and different methods to fix, but as you know us, we choose the one that works the best or at least which works better than others.
And if you have installed the previous versions of macOS on VirtualBox, you might have the idea of how we have done it and how we will accomplish with this. So get ready and let’s go.
First and foremost, close the machine and VirtualBox both.

Fix macOS Big Sur Screen Resolution
Then close VirtualBox.

Close VirtualBox
After its done, open up the macOS Big Sur Code for VirtualBox and then press Ctrl + H which will open the replace panel. After you do, write down VM Name at the first, and then your virtual machine name at the second which is macOS Big Sur for us. Once you do that, click Replace All.
If you don’t know your virtual machine name, head over to the VirtualBox and then the machine and you can see there or from the settings.
In this screen, open the Command Prompt (No need to do it as administrator) from the Start Menu.

Command Prompt
Now change the resolution or let it by default as it is 1920×1080 if your screen resolution is that. If it isn’t then you can change the screen resolution from the below. The resolutions are mentioned below and you can simply choose the one which fits your screen and replace the current resolution which is 1920×1080 it’s that easy.

macOS Big Sur Screen Resolution Code
Once that’s done, copy the one-line command and open the Command Prompt and paste the line on the Command Prompt by right-clicking and then press Enter.

Commands Entered
Once done, fire up the VirtualBox and switch on the machine.

Start VM
And there it is, the macOS Big Sur is there with the full resolution. Sign in and you will see the ultimate macOS Big Sur with all it’s features and full-screen resolution.

macOS Big Sur on VirtualBox – Full Screen Resolution
To check, head over to the Apple icon and click About this Mac and then from the Displays menu, you will see your screen resolution.

macOS Big Sur on VirtualBox – Full Screen Resolution
This is the easiest and most working way to do this. Except this, there are a lot of ways to do it but since they sometimes work and sometimes not, it makes them not compelling or very good to use. As well as, they aren’t very easy, instead they are a little or more complicated. Since all of them does the same job but the one we have picked is better so there’s no more thing to choose from.
Overall, this was all about installing and setting up macOS Big Sur on VirtualBox. So what we did was install macOS Big Sur on VirtualBox on Windows PC completely from scratch like from getting up the file or creating to fixing the small screen resolution problem and making it entirely ready to use. Other than this, we’re working on the video and will be out soon and we will keep you updated with that.
- How to Fix EFI Internal Shell on macOS Catalina on VirtualBox
- How to Speed Up Slow macOS Catalina
- How to Fix macOS Mojave Screen Resolution on VirtualBox on Windows
- How to Fix screen resolution of macOS Catalina on VirtualBox new method
Out of these, like previous versions of macOS, users might get some problems around and some nice users who know the solution also helps them but not to worry, we are also hearing and trying to catch up and throw out your problems into the fix machine. So whoever have a problem you can easily comment and we will reply, but whoever knows the solution, it’s appreciated to share the solution that have worked fo him.
macOS Big Sur is the current major release of macOS, Apple’s operating system for Macintosh computers. It was announced on the 22nd of June, the last year 2020, and was released on the 12th of November, the same year. However, you can also install macOS Big Sur on a Windows PC. You can use the OpenCore or Clover bootloader to install the macOS Catalina with Windows OS and dual boot or you can install macOS Big Sur on Windows 10 PC using VMWare.
- Download and Install the prerequisite files.
- Unlock VMware.
- Create a new Virtual Machine.
- Edit macOS Big Sur VMX file.
- Launch macOS Big Sur Virtual Machine
- Install VMware tools (optional).
Step 1: Download and install the prerequisite files
The following is a list of files that are required to successfully run macOS Big Sur on a Windows PC. Kindly download and install each one of them.
- VMware Workstation 15 Pro OR VMware Player 15.
- macOS Unlocker V3 for VMware
- Github Link
- Direct Download Link
- macOS Big Sur Beta ISO
- VMware Tool – Mediafire (Optional).
Step 2: Unlock VMware
In the previous step, you must have downloaded macOS Unlocker V3 for VMware from either one of the links provided. After extracting the zip/rar file that you downloaded, run win-install.cmd as administrator.


Step 3: Create a new Virtual Machine
To create a new virtual machine on your computer, follow these instructions:
- Launch VMware.
- Click on Create a New Virtual Machine.

- Select ‘Typical’ and then click on the Next button.

- Select “I will install the operating system later” and click Next.

- From the list that you see, choose Apple Mac OS X and then click on the Next button.

- You will now have to give a name to the Virtual Machine. Then, click on the Browse button and select a location to save the virtual machine files. Once done, click on Next.

- Make sure you set the values in the following screen like the screenshot given below.

- On the next screen, which would be Ready To Create virtual Machine, Click on the Customize Hardware button.

- Increase the memory to at least 8GB for better performance.

- From the options given on the left-hand side of the screen, choose Processors. After that, increase the number of cores to 4 cores for higher performance. If you do not have that many specifications, the minimum requirement is 4GB Memory and 2 Cores of Processor.

- On the left-hand side, select New CD/DVD (SATA) from the menu. Then, select Use ISO image file and hit the Browse button.

- Locate the iso file that you downloaded and click on Open.

- Once the ISO file has been selected, click on the Close button.

- Select Finish.

Step 4: Edit MacOS Big Sur VMX File
- Open the Virtual Machine folder that you selected in Step 3.6. If you didn’t specify this manually, the default location is Documents > Virtual Machine.
- Open macOS Big Sur Beta.vmx file via Notepad.

- At the end of the file, paste the following code and save the file.
smbios.reflectHost = "TRUE"
hw.model = "MacBookPro14,3"
board-id = "Mac-551B86E5744E2388"
smc.version = "0"
Step 5: Launch macOS Big Sur Virtual Machine
- Open VMware.
- On the macOS Big Sur VM window, click on Power On this Virtual Machine.

- You will now have to wait while the app boots up.

- Choose your language and click on Next.

- Choose Disk Utility and hit on the Continue button.

- Erase the VMware Virtual SATA Hard Drive Media.

- From the Format options, choose APFS and then click on Erase.

- Click on Done.
- From the Disk Utility tab on the left-hand side, click on Quit Disk Utility.

- You know what to do here. Select Install macOS and hit Continue.

Now, the installation process will start. During the process, macOS will restart multiple times. You are expected to keep calm as this process takes up to 45 minutes to finish.
Step 6: Install VMware Tools (Optional)
If you have followed the above steps, you would have noticed by now that that the macOS Big Sur resolution is not according to that of your screen resolution. Moreover, there is no built-in option to change that. To resolve this issue, an external application has to be installed called VMware Tools. The steps to install it and change the resolution of macOS are very easy to understand. Therefore, we will not discuss the steps here.
The guide to install macOS Big Sur on Windows PC ends here. If you have followed the steps correctly, macOS would run smoothly on your Windows PC without any trouble. If you want to install macOS beside Windows and not on VMware, follow our guide How to Install macOS Catalina 10.15 on Windows PC and Laptops.
An Avid learner, a Tech Enthusiast and the founder of TechPosts Guides, Ravi is a Raspberry Pi fan and an open-source lover. He spends most of his weekends working with IoT devices and playing games on the Xbox. He is also a solo-traveler who loves hiking and exploring new trails.
Follow him on .Twitter, Facebook, and YouTube.