The icons that are shown on your screen for different file types are essentially saved in an icon cache on your computer. This helps in letting the operating system quickly display the icons instead of scanning the files each time, thus, the process is sped up. However, in some cases, the icon cache can get corrupted or damaged which can result in the icons of the different files being incorrect and weird. In such a scenario, you will have to delete the icon cache so that it is rebuilt automatically by Windows. Therefore, in this article, we are going to show you how to rebuild your icon cache if you are in such a scenario.
As it turns out, similar to the icon cache, there is a cache for thumbnails as well. As such, the same thing can happen with thumbnails too which may result in them becoming blurry or not showing up at all. This means that the thumbnail cache has been corrupted as well. In that case, what you need to do is to rebuild the thumbnail cache in order to get the thumbnails back.
The icon cache or iconcache.db is a special database file which is kept by Windows. It uses it to draw icons on the screen for apps such as explorer instead of getting the image from the original application. The sole reason why it’s done is to make Windows draw the icons faster. Well, rebuilding the icon cache is easy in Windows 11, though the method has changed from Windows 7 and 8.1. Although, if you are looking for a way to rebuild the icon cache of your Windows computer, then we have you covered as well as we are going to be showing you how to rebuild the Windows icon cache in Windows 11. So, with that said, let us get started with any further ado.
As it turns out, you can easily rebuild your icon cache whenever it gets corrupted or you are facing issues with the icons being displayed incorrectly. There are actually three ways you can rebuild your icon cache. First, you can use the Windows Explorer to manually delete your icon cache. This may be a bit tedious, however, this enables you not to download any files online which is the second option.
Second, you can use a bat file that will automatically delete your icon cache so that it is built again automatically. Thirdly, you can use the command prompt and delete the icon cache via a few commands. We will be listing all of them in this article. With that said, let us get started and show you how to rebuild the icon cache in Windows 11.
Use File Explorer
Using the File Explorer, in order to rebuild the icon cache in Windows 11, you would have to do the following:
- First of all, open up the Windows Explorer.

Opening up File Explorer - Then, navigate to the following path by simply copy pasting it in the address bar:
C:\Users\%username%\AppData\Local\Microsoft\Windows\Explorer

Navigating to the Icon Cache Folder - Here you will see many files. Delete any file starting with iconcache as there will be lots of such files.
- After deleting them, a new folder will be created there named “IconCacheToDelete” automatically.
- Don’t worry about it, once you reboot your computer, this folder will go away.

Use Command Prompt
Another way of deleting the icon cache would be to use the command prompt. This is a bit easier as compared to the first method as you just have to enter a set of commands to get the job done. If you do not wish to use the command prompt either, you can jump to the next method down below where you can use a script to get the job done. To do this, follow the instructions down below:
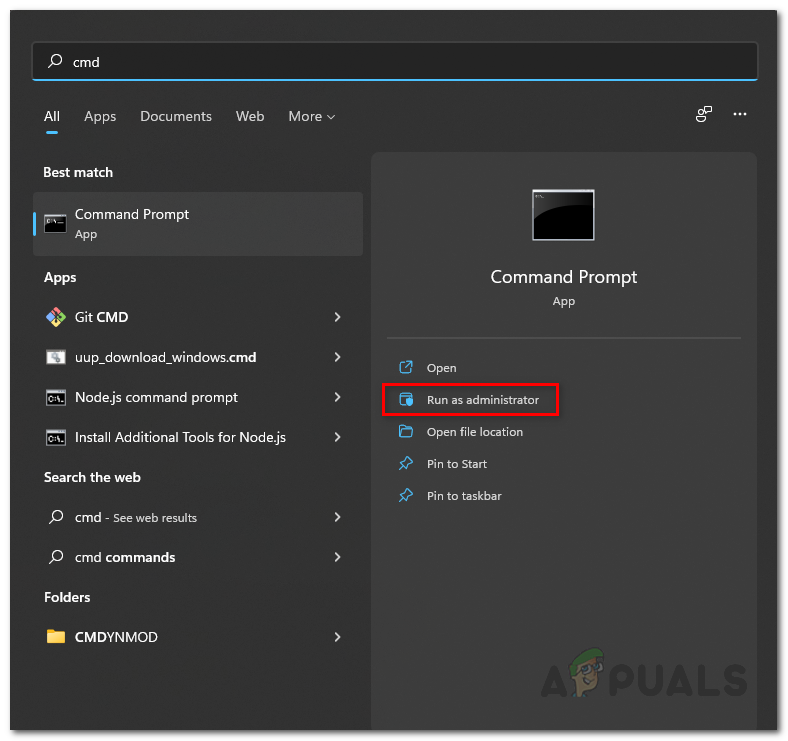
- First of all, open up the Start Menu and search for cmd. Right-click on the result shown and choose Run as administrator. Alternatively, you can click the Run as administrator option on the right hand side.

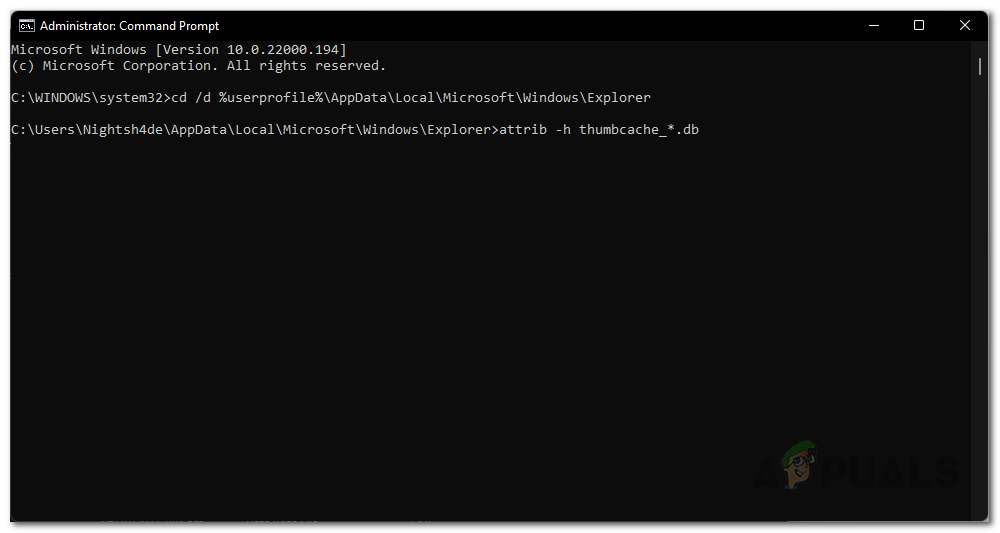
Opening Command Prompt as an Admin - Once the command prompt window is open, type in the following commands one by one to delete the cache:
cd /d %userprofile%\AppData\Local\Microsoft\Windows\Explorer
attrib –h iconcache_*.db
del iconcache_*.db start explorer

Making Icon Cache Files Visible - For the sake of explanation, the first command changes the current working directory to the specified folder.
- Furthermore, the second command removes all the files starting from iconcache_ from being hidden and the third command deletes these files.
- Once you have done that, go ahead and restart your computer.
- That’s it, you are done. Now you have successfully deleted the icon cache in Windows 11.
Use Batch Script
Finally, the easiest way of deleting the icon cache would be to simply run a batch script that we will be providing. The script will be automatically deleting the icon cache on your computer and then prompting you to restart your computer.
To download the script, just click here. After that, go ahead and run the script and follow the on screen prompts in the command prompt window that appears.
Rebuild Thumbnails Cache
Just like icon cache, Windows uses thumbnails cache for generating the thumbnails in Windows Explorer. These cache files contain small thumbnails for different files on your computer and Windows Explorer loads the thumbnails from these files as opposed to generating thumbnails for each image again and again when you open a folder in it. As generating thumbnails on the go is very resource demanding and would use a lot of cpu and slow down your computer if you are multitasking.
Windows generates thumbnails for the images on your computer once and stores them in the files starting from thumbs in the folder where the thumbnails cache is to be stored. These files end with .db in the end.
If for some reason, the thumbnails cache gets corrupted then you will have problems with thumbnails while using Windows Explorer to browse files. Some thumbnails may not appear at all and there would be visible problems for you to get the idea that something is not right with your computer.
Thus, for that what you need to do is to delete the thumbnails cache in your Windows which are many files stored in the same directory where the icon cache is stored. To delete the thumbnails cache, you are going to be using a command prompt. Follow the instructions down below to do this:
- First of all, open up the command prompt window by searching for it in the Start Menu. Click on the Run as administrator option on the left hand side.
Opening Command Prompt as an Admin - After that, type the following commands in the command prompt one by one:
cd /d %userprofile%\AppData\Local\Microsoft\Windows\Explorer
attrib –h thumbcache_*.db
del thumbcache_*.db
Making Thumbnail Cache Files Visible - That’s it, restart your computer now. The thumbnails cache will now be rebuilt as you have deleted the existing cache thumbnails databases.
If you were facing a problem at your end that was caused by corrupted thumbnails or icon cache files, then deleting the thumbnails or icon cache files would have caused Windows to regenerate the thumbnails or icon cache and your problem will be fixed. If the issue was caused by something else, then you will have to troubleshoot the problem.

Kamil Anwar
Kamil is a certified MCITP, CCNA (W), CCNA (S) and a former British Computer Society Member with over 9 years of experience Configuring, Deploying and Managing Switches, Firewalls and Domain Controllers also an old-school still active on FreeNode.
При отображении иконок различных программ или типов файлов в проводнике File Explorer, Windows вместо обращения к исходным файлам с иконками, получает копии картинок значков из специальных файлов с кэшем иконок. За счет того, что операционной системе не нужно каждый раз загружать оригинальные файлы иконок, ускоряется работа и прорисовка объектов в проводнике Windows.
В некоторых случаях, при повреждении файла с кэшем иконок, в проводнике (и на рабочем столе) могут отображаться белые иконки ярлыков и файлов, или вместо иконок приложений отображаются стандартные иконки Windows. В этом случае рекомендуется выполнить сброс системного кэша иконок.
На скриншоте ниже видно, что в макете стартового меню Windows 10 вместо значков некоторых приложений отображаются стандартные иконки папок.
![]()
Примечание. Некоторые пользователи при появлении такого бага пытаются переустановить проблемное приложение, что помогает далеко не всегда.
Кэш иконок в различных версиях Windows представляет собой один или несколько db файлов, хранящихся в профиле пользователя.
- В Windows 7 это файл IconCache.db в каталоге %userprofile%\AppData\Local
- В Windows 10 и Windows 8.1 – это множество файлов, имя которых начинается с iconcache_ (iconcache_16.db, iconcache_32.db, iconcache_48.db и т.д. в соответствии с размерами иконки в пикселях) и хранятся в каталоге %userprofile%\AppData\Local\Microsoft\Windows\Explorer
Не путайте файлы кэша иконок с файлами thumbs.db, которые содержат кэш эскизов изображения и видео в папке.

Сброс кэша иконок в Windows с помощью утилиты ie4uinit
В Windows есть специальная встроенная утилита ie4uinit (IE Per-User Initialization Utility), которую можно использовать для быстрого сброса кэша иконок.
- В Windows 10:
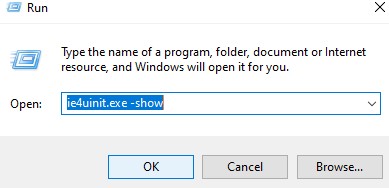
ie4uinit.exe -show - Для Windows 7:
ie4uinit.exe -ClearIconCache
Эту команду нужно выполнить через меню Win+R -> команда -> Enter.
Команды абсолютно безопасные, но помогают восстановить нормальное состояние кэша иконок далеко не во всех случаях.
Скрипт удаления файлов с кэшем иконок в Windows
Чтобы сбросить кэш иконок, достаточно удалить db файлы с кэшем. Но предварительно нужно завершить процесс проводника File Explorer, чтобы он не блокировал доступ к файлам iconcache. Рассмотрим, как сбросить базу данных кэша иконок без перезагрузки Windows.
- Закройте все запущенные приложения;
- Откройте окно командной строки (
cmd.exe
или
powershell.exe
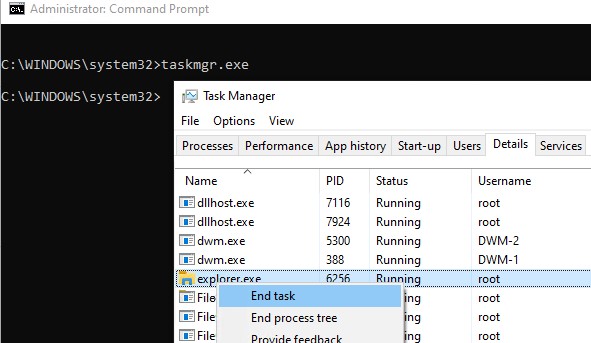
) с правами администратора; - Запустите диспетчер задач
taskmgr.exe - В окне Task Manager перейдите на вкладку Details, найдите процесс explorer.exe и завершите его (End Task);

- Также вы можете завершить процесс из командной строки:
taskkill /f /im explorer.exe - Затем последовательно выполните следующие команды для удаления кэша иконок в профиле пользователя (в зависимости от версии ОС):
Для Windows 10/ 8.1 (просто скопируйте этот код в окно командной строки или сохраните как текстовый файл reset_icon_windows.bat).
taskkill /f /im explorer.exe
cd /d %userprofile%\AppData\Local\Microsoft\Windows\Explorer
 attrib –h iconcache_*.db
del /f IconCache*
del /f thumbcache*
cd /d  %userprofile%\AppData\Local\
attrib –h IconCache.db
del /f IconCache.db
start C:\Windows\explorer.exe
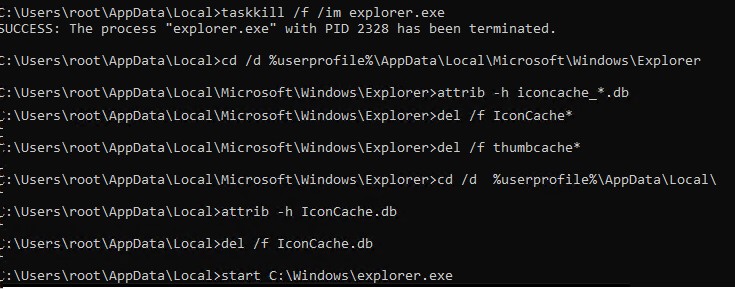
В моем случае скрипт не смог удалить только файл
iconcache_idx.db
(Access is denied), но это не повлияло на итоговый результат. Кэш иконок был успешно сброшен.
Для Windows 7:
cd /d %userprofile%\AppData\Local
del /f /a s IconCache.db
start C:\Windows\explorer.exe<
Последняя команда в обоих случаях перезапустит процесс проводника Windows (
explorer.exe
), который при запуске пересоздаст файлы с кэшем иконок (в соответствии с заданными файловыми ассоциациями).
If your icons appear blank or look corrupted or do not refresh correctly, when they should, then it is quite possible that your icon cache database may have become corrupted on your Windows 11/10 PC. The same thing applies to Thumbnails too. If they do not display correctly, then they may have become corrupted. In such a scenario, you may need to delete the cache files in order to rebuild the Icon cache and clear the Thumbnail cache.
This post will show you the location of these cache files so that you can delete IconCache.db and thumbcache.db files, in order to rebuild the Icon cache and clear the Thumbnail cache in Windows 11/10.
The Icon Cache or IconCache.db is a special database file that Windows utilizes to keep copies of each icon handy. When Windows needs to draw an icon, it uses the copy from the cache instead of retrieving the icon image from the original application file. This helps in making Windows draw the icons faster. Things were different in Windows XP, and they are different in Windows 7/8. Things changed again from Windows 8.1 onwards. In Windows 11/10, you need to do the following.
If you needed to rebuild the Icon Cache in Windows 7/8, you needed to do the following:
- Open File Explorer > Folder Options > Views to show Hidden System Files.
- Next, go to C:\Users\%username%\AppData\Local folder
- Delete the hidden IconCache.db file. Reboot.
- This action would purge and rebuild the icon cache.
But this is not enough in Windows 11, Windows 10 or Windows 8.1. You will have to navigate to the following folder:
C:\Users\%username%\AppData\Local\Microsoft\Windows\Explorer
![]()
Here you will see a lot of files like iconcache_32.db, iconcache_48.db, iconcache_96.db, iconcache_256.db, iconcache_1024.db, iconcache_1280.db, iconcache_1600.db, iconcache_1920.db, iconcache_2560.db, iconcache_exif.db, iconcache_idx.db, iconcache_sr.db, iconcache_wide.dd, iconcache_wide_alternate.db, etc.
Delete them all to purge and rebuild your icon cache in Windows 10. If you were to be able to delete some of them, you would now be able to see a new folder created named IconcacheToDelete, which will disappear when you reboot your computer or restart Windows File Explorer.
![]()
If you find that you are unable to delete these files, do the following.
First, close all open programs. Next, open Task Manager, look for the process Windows Explorer, right-click on it and select End process. Next, from the File menu > select Run new task. Type cmd.exe, check the Create this task with administrative privileges box and press Enter.
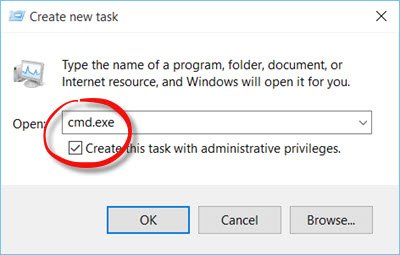
This will open an elevated command prompt window.
Now type the following commands one after the other and hit Enter:
cd /d %userprofile%\AppData\Local\Microsoft\Windows\Explorer attrib –h iconcache_*.db del iconcache_*.db start explorer
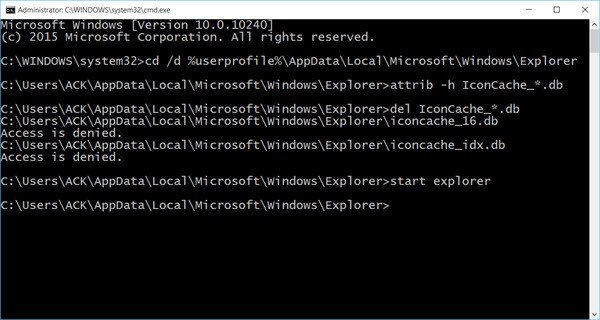
This will rebuild your icon cache in Windows 11/10.
TIP: See how you can stop Windows from deleting the Thumbnail cache on every shutdown, restart or boot.
Clear Thumbnail cache in Windows 11/10
Windows Thumbnail cache or Thumbs.db files are hidden data-files in the Windows operating system, which contain small images, displayed when you view a folder in “thumbnail” view, as opposed to tile, icon, list, or detail view. Windows keeps a copy of all your pictures, video and document thumbnails so that they can be displayed quickly when you open a folder. In Windows XP you see these ‘hidden’ files thumbs.db files scattered all over the place. In Windows Vista and later, the thumbnails ‘thumbcache’ are stored at C:\Users\Owner\AppData\Local\Microsoft Windows\Explorer – which is the same where the icon cache files are stored.
If you want to delete and clear the Thumbnail cache, you will have to follow the same procedure as mentioned above, but finally, use these commands:
cd /d %userprofile%\AppData\Local\Microsoft\Windows\Explorer
attrib –h
thumbcache_*.db
del thumbcache_*.db
start explorer
Please let us know if this worked for you and helped you resolve your problem.
TIP: FixWin 11 for Windows 11/10 lets you reset the thumbnail cache. You will find the fix under the System fixes tab.
Windows 10 users may want to use Thumbnail and Icon Cache Rebuilder, which lets you purge and rebuild Thumbnail & Icon Cache in a click.
If your desktop or explorer icons load slowly when they start the Windows PC, you may want to increase Icon Cache size and see if it helps you. See this post if your Desktops icons are slow to load.
You run your PC, and suddenly you notice your Windows 11 PC icons seem broken, blank, corrupted, or don’t load correctly.
You try to solve the problem by restarting your computer, but it doesn’t work. Are you worried and frustrated and can’t find a way out?
If this issue is the case, there is nothing to worry about.
I have been in a similar situation as you, and I have been able to get out of this issue with proper tests and research. So, if you are looking for an ultimate solution to solve your broken or corrupted icons problem on your Windows 11 computer, you are in the right place then.
This post will show you some of the best practical and effective methods to rebuild icon cache techniques to solve your broken, blank, or corrupted icons issue on your Windows 11 computer.
Keep reading and precisely follow the instructions.
So, let’s get started to solve your broken, blank, or corrupted icons issue.![]()
Why are the Icons Broken or Corrupted on Windows 11
The icon appears damaged, empty, or corrupted because your PC icon cache database may have been corrupted. When your icon cache database may have become corrupted, it creates conflicts with the system and doesn’t load your PC icon correctly.
Scanning the files manually and loading them each time is a slower process that turns the system process slower.
For this reason, Windows saves the icons that appear for files in an icon cache to be displayed as fast as possible to speed up the process instead of scanning the files and loading them each time.
The icon cache database could become corrupted when more and more files are added. You may notice that some icons are broken when the database is corrupted.
You can also face the same issue with the file thumbnails on your Windows 11 computer. If the thumbnails seem broken or corrupted on your PC, then your thumbnail cache database has been corrupted.
In most cases, rebuilding the icon cache and thumbnail cache will solve the issue of the broken, blanked, corrupted, or doesn’t load icon or thumbnail correctly on your Windows 11 PC.
You’ve seen the possible causes of the damaged, empty, or corrupted icon problem on your Windows 11 computer so far, and in the next part, I’ll show you several tested and proven solutions to solve the problem.
So, let’s get started to know the solutions to solve the damaged, empty, or corrupted icon issue.
Here’s a complete guide on how to Create RDP Shortcut Icon on Windows 10.
Many Windows 11 users face the damaged, empty, or corrupted icon issue when the icon cache database is corrupted.
In the previous section, you’ve seen the possible potential reason for the damaged, empty, or corrupted icon issues on your Windows 11 computer so far. This section will show you several tested and proven solutions to solve the problem.
In most cases, rebuilding the icon cache will solve the issue of the broken, blanked, corrupted, or doesn’t load icon correctly on your Windows 11 PC.
So, let’s dive right in to know the solution for the damaged, empty, or corrupted icon issue.
Here are the steps to rebuild the icon cache on Windows 11:
1. Refresh Icons
The first method to fix your damaged, blank or corrupted icon appear issue on your Windows 11 computer is to refresh the icons using the Command Prompt.
Follow the steps below to refresh the icons using the Command Prompt:
Here’s a complete guide on how to fix can’t install Windows 11 on SSD.
2. Rebuild Icon Cache Using File Explorer
Using File Explorer, you can quickly rebuild the icon cache on your Windows 22 computer.
Follow the steps below to rebuild the icon cache using File Explorer:
3. Rebuild Icon Cache Using Command Prompt
Another effective and proven way to rebuild the icon cache on your Windows 11 computer is by executing some commands into the Command Prompt.
Follow these steps to rebuild the icon cache using the Command Prompt:
Check out the easiest way to compare two folders on Windows 11.
How to Rebuild Thumbnail Cache on Windows 11
If you face the thumbnail corrupted or blank issue, like an icon on your Windows 11 computer, your thumbnail cache is corrupted. For this reason, you can meet the corrupted or empty thumbnail issue.
To solve the thumbnail corrupted, damaged, not loading correctly, or blank, you need to delete or clear the thumbnail cache and rebuild the cache file.
Follow these steps to rebuild the thumbnail cache using the Command Prompt:
Also, check out the easiest way to fix blue screen on Windows 11.
Final Thoughts
Scanning the files icon or thumbnail manually and loading them each time is a slower process that turns the system process slower.
When your PC icon or thumbnail cache database may have been corrupted, the icon or thumbnail appears damaged, empty, or corrupted. The corrupted files can conflict with the system and incorrectly load your PC icon or thumbnail.
Here, I demonstrate several tested and proven solutions to solve the damaged, empty, or corrupted icon or thumbnail issue by rebuilding the cache on your Windows 11 computer.
Using these practical methods, you can successfully solve your system’s damaged or corrupted icon or thumbnail problem.
I hope you found this post to be informative. If you found your solution, please let me know which method works for you.
You may also look at other posts if you’re interested in learning more about similar topics.
We may face the icon cache corruption issue sometimes in Windows 10/11 and earlier OS. The icon cache corruption causes the wrong icons to show up for certain programs or in certain areas of the Windows shell, or no icons at all. For example, your pinned taskbar shortcuts may show up with the wrong icon.
My earlier post Incorrect icon shown for a file type tells you how to refresh the shell icons using Default Apps. In some cases, the old icon may still show up after changing the file type association.
To render the icons for various shell objects like folders, special folders, and files, Windows caches the icons in database files so that Windows doesn’t have to read the file or folder icon and extract them every time. Occasionally, you’ll see icon-caching bugs in Windows resulting in incorrect, missing, or out-of-date icons being shown for programs and desktop shortcuts and other areas of the shell.
To resolve the incorrect icons issue, you may want to clear and rebuild the icon cache database completely. This post explains how to accomplish the task using different methods. The instructions apply to all versions of Windows, including Windows 11.
Clear and Rebuild the Icon Cache:
- Method 1: Using ClearIconCache.exe freeware tool
- Method 2: Manually
- Method 3: Using a Script
Before proceeding, try a simple fix like the ie4uinit.exe refresh method. In many situations, all that you need to do is refresh the icons without the need to clear and rebuild them.
If refreshing the icons using ie4uinit.exe or Default Apps doesn’t help, you’ll have to clear the icon cache completely.
How to Clear and Rebuild the Icon Cache in Windows
Let’s see how to clear the icon cache completely and let Windows rebuild it automatically.
1) Clear & Rebuild icon cache using ClearIconCache.exe Utility
Clear Icon Cache (ClearIconCache.exe) utility from Leo Davidson will cleanly exit Explorer, delete the shell icon cache (IconCache*.db), and localized thumbnail cache (ThumbCache*.db), and then restart Explorer.
Leo Davidson is a trusted source — he is the one who wrote the famous PDF x64 thumbnail & preview fix for Windows some years back. And he’s the owner of FileTypeDiag and many other useful portable tools.
With Clear Icon Cache, you double-click the program, and it takes care of the details for you. Clear Icon Cache works in Windows Vista, Windows 7, Windows 8, and Windows 10. Though Windows 11 isn’t mentioned, it should work on Windows 11 without any issues.
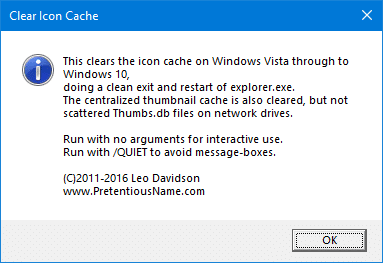
To run the utility in noninteractive or silent mode, run ClearIconCache.exe /QUIET
As said earlier, the utility also clears the thumbnail caches on the computer.
RELATED: How to Restart Explorer Gracefully Using Shortcut or Command-line
2: Clear & Rebuild the Icon Cache Database Manually
The icon cache database files are located in your %LocalAppData% folder with file names prefixed with iconcache_ – each icon size has a separate cache (database) file.
The file names look like this:
iconcache_16.db
iconcache_32.db
iconcache_48.db
iconcache_96.db
iconcache_256.db
iconcache_768.db
iconcache_1280.db
iconcache_1920.db
iconcache_2560.db
iconcache_exif.db
iconcache_idx.db
iconcache_sr.db
iconcache_wide.db
iconcache_wide_alternate.db
![]()
To clear the icon cache manually, follow these steps:
- Close all folder windows that are currently open.
- Launch Task Manager using the Ctrl + Shift + Esc key sequence.
- In the Task Manager Process tab, right-click on the Explorer.exe process and select End Process.
Note: It’s even better if you exit explorer gracefully. See instructions for Windows 7 and Windows 10 to know how to quit the Explorer.exe shell process gracefully. Don’t restart a new explorer.exe process yet!
- Click the End process button when asked for confirmation.
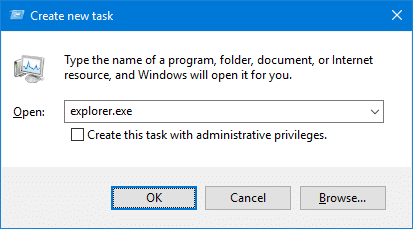
- From the File menu of Task Manager, select New Task (Run…)
- Type CMD.EXE, and click OK
- In the Command Prompt window, type the commands one by one and press Enter after each command:
CD /d %userprofile%\AppData\Local
DEL IconCache.db /a
- Additionally, in Windows 8, Windows 10, and Windows 11, the icon cache database is also stored in
%userprofile%\AppData\Local\Microsoft\Windows\Explorer. To clear them, you must close all running applications, and run these commands in the Command Prompt.CD %userprofile%\AppData\Local\Microsoft\Windows\Explorer DEL IconCache*.db /a EXIT
If you receive Access is Denied error when deleting the IconCache*.db files, then one or more of the open programs is using the icon cache database. Close all programs and try again, or try clearing them from Safe mode.
- In Task Manager, click File, select New Task (Run…)

- Type EXPLORER.EXE, and click OK.
Editor’s note: Instead of using Task Manager to exit Explorer.exe in Step 3 above, an even better way to do this is to terminate the Explorer.exe Shell cleanly using the method described in the article Terminate and Restart Explorer.exe Process Cleanly in Windows 7. If you’re using Windows 8, Windows 10, or Windows 11, check the article How to Exit Explorer and Restart Explorer in Windows 10/11.
Method 3: Automatically Clear & Rebuild the Icon Cache Using Script
This method uses a small script that I wrote to clean up the icon cache completely. Once done, the script restarts the Explorer shell for the change to take effect.
Contents of the Script – Cleariconcache.vbs
'cleariconcache.vbs
'Clears the icon cache databases to lets Windows rebuild them fresh.
'for Windows Vista, 7, 8, Windows 10, Windows 11.
'Written by Ramesh Srinivasan.
'Written on Jan 31 2016
'Updated on Apr 01 2016
'Reviewed on Aug 02 2022
'https://www.winhelponline.com/blog/

Option Explicit
Dim WshShell, objFSO, strICPath1, strICPath2, strmsg, rtnStatus, Process, iDirtyFlags, iDirtyFlags2
Const DeleteReadOnly = True
Set WshShell = WScript.CreateObject("WScript.Shell")
Set objFSO = CreateObject("Scripting.FileSystemObject")
strICPath1 = WshShell.ExpandEnvironmentStrings("%LOCALAPPDATA%")
strICPath2 = strICPath1 & "\Microsoft\Windows\Explorer"

ExitExplorerShell
WScript.Sleep(3000)
ClearIconCache
WScript.Sleep(2000)
StartExplorerShell

Sub ExitExplorerShell()
	strmsg = "Explorer Shell will be terminated now."
	strmsg = strmsg & " Please save all your work and close all programs."
	strmsg = strmsg & "Icon cache may not be cleared if programs are using them. Want to continue?"
	rtnStatus = MsgBox (strmsg, vbYesNo, "Clear the Icon Cache")
	If rtnStatus = vbYes Then
		For Each Process in GetObject("winmgmts:"). _
			ExecQuery ("select * from Win32_Process where name='explorer.exe'")
	   		Process.terminate(1)
		Next
	ElseIf rtnStatus = vbNo Then
		WScript.Quit
	End If
End Sub

Sub StartExplorerShell
	WshShell.Run "explorer.exe"
End Sub

Sub ClearIconCache()
	If (objFSO.FileExists(strICPath1 &"\IconCache.db")) Then
	On Error Resume Next
    	objFSO.DeleteFile strICPath1 &"\IconCache.db", DeleteReadOnly
	On Error Goto 0
    	If Err.Number <> 0 AND Err.Number <> 53 Then
    		iDirtyFlags = 1
    	End If
	End If

	If objFSO.FolderExists(strICPath2) Then
	On Error Resume Next
    	objFSO.DeleteFile(strICPath2 & "\icon*.db"), DeleteReadOnly
	On Error Goto 0
    	If Err.Number <> 0 AND Err.Number <> 53 Then
    		iDirtyFlags2 = 1
    	End If
	End If

	WshShell.Run "ie4uinit.exe -ClearIconCache"
	WshShell.Run "ie4uinit.exe -show"
End Sub

If iDirtyFlags = 1 Then
	rtnStatus = MsgBox ("Some programs are still using the IconCache.db in LOCALAPPDATA. Close all programs and try again", vbOKonly, "Clear the Icon Cache")
End If

If iDirtyFlags2 = 1 Then
	If iDirtyFlags <> 1  Then
		rtnStatus = MsgBox ("Some programs are still using the cache in Location 2. Close all programs and try again", vbOKOnly, "Clear the Icon Cache")
	End If
End If

If iDirtyFlags = 0 And iDirtyFlags2 = 0 Then
 	MsgBox "Successfully cleared the Icon Caches.", vbOKOnly, "Clear the Icon Cache"
End If

Set WshShell = Nothing
Set objFSO = Nothing
How to Use?
- Download
cleariconcache.vbsor create the VBScript file manually using Notepad. - Save all your work and close all programs, so that icon cache files are not locked by any program.
- Double-click the script file
cleariconcache.vbs
- Click Yes when you’re prompted to restart the shell.
Optionally, when the following dialog shows up, you can manually terminate the explorer shell gracefully (instead of the script doing it forcefully). See instructions for Windows 7 and Windows 10/11 to know how to quit the Explorer.exe shell process gracefully. Don’t restart a new explorer.exe process yet! Once done, click Yes.

If the Icon Cache database files can’t be deleted, some programs are using them. Close all applications and try rerunning the script.

It should be able to delete the icon cache files.

After clearing the cache, the Explorer shell should start automatically and rebuild a fresh set of icon cache.
I hope you were able to fix icon rendering issues on your Windows computer by clearing the icon cache completely.
One small request: If you liked this post, please share this?
One «tiny» share from you would seriously help a lot with the growth of this blog.
Some great suggestions:
- Pin it!
- Share it to your favorite blog + Facebook, Reddit
- Tweet it!
So thank you so much for your support. It won’t take more than 10 seconds of your time. The share buttons are right below. 