В этой статье мы рассмотрим, как установить Windows 10 или 11 по сети без использования загрузочной USB флешки (установочного DVD диска). Для загрузки компьютера по сети через PXE мы будем использовать небольшой Tiny PXE Server. Инструкция применима для установки Windows на устройствах как с UEFI, так и с BIOS прошивкой.
В корпоративных сетях для разливки образов Windows по сети используются более функциональные Windows Deployment Services (WDS) и Microsoft Deployment Toolkit (MDT). В этой статье мы покажем, как быстро запустить PXE сервер на любом имеющемся компьютере (будь то устройство с Windows или Linux) и использовать его для сетевой установки Windows на компьютеры в этой же LAN с помощью простых средств.
Нам понадобятся:
- Установочный ISO образ с Windows 10 или 11 (проще всего создать его с помощью Windows Media Creation Tool согласно инструкции https://winitpro.ru/index.php/2013/12/31/sozdaem-zagruzochnuyu-fleshku-s-windows-7-dlya-uefi-sistemy/ )
- Образ Windows PE — можно использовать свой образ WinPE, извлечь его из образа восстановления MS DART, получить оригинальный WinPE с помощью Windows Assessment and Deployment Kit (Windows ADK), или использовать готовый образ типа Hiren’s BootCD PE.
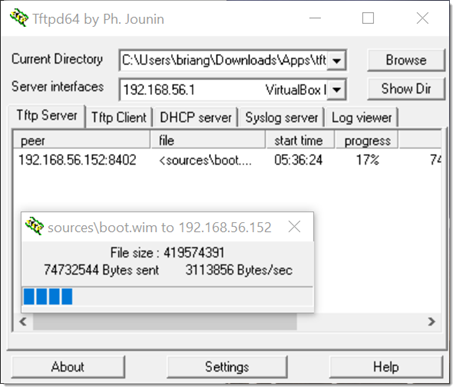
- Сервер Tiny PXE (http://reboot.pro/files/file/303-tiny-pxe-server/ )
Содержание:
- Создаем загрузочный образ Windows PE с помощью ADK
- Подготовка сервера сетевой установки TinyPXE
- Сетевая установка Windows 10 и 11 с PXE сервера
Создаем загрузочный образ Windows PE с помощью ADK
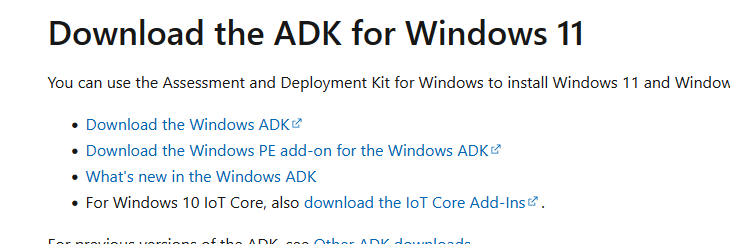
Скачайте Windows ADK для Windows 11 и Windows PE add-on for the Windows ADK по ссылкам на странице https://docs.microsoft.com/en-us/windows-hardware/get-started/adk-install .
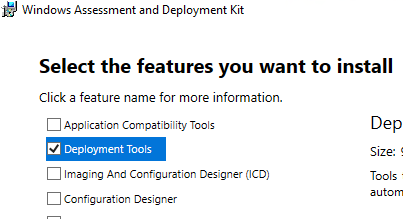
При установке Windows ADK выберите минимальную установку Deployment Tools.
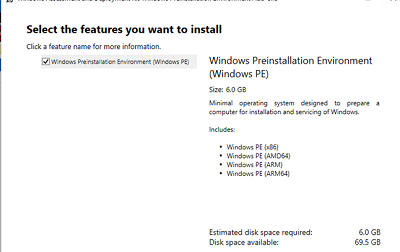
Затем аналогично установите Windows PE add-on for Windows ADK.
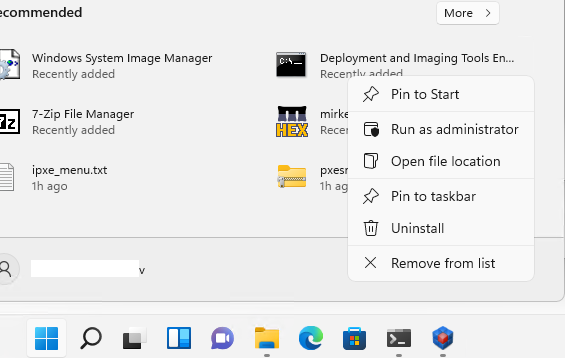
После окончания установки запустите Deployment and Imaging Tool из стартового меню Windows. Или запустите вручную команду:
"C:\Program Files (x86)\Windows Kits\10\Assessment and Deployment Kit\Deployment Tools\DandISetEnv.bat"
Теперь скопируйте файлы для среды WinPE в указанный каталог (создавать не нужно):
copype amd64 C:\tools\winpe
В данном случае я создаю файлы для среды WinPE x64. Можно использовать другие опции в зависимости от архитектуры: x86, arm или arm64.

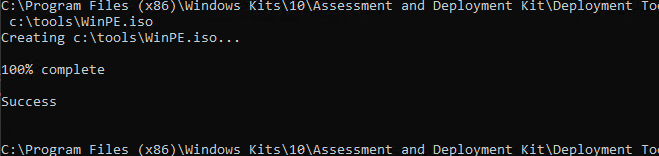
Теперь можно создать загрузочный ISO образ с WinPE:
MakeWinPEMedia /ISO C:\tools\winpe c:\tools\WinPE.iso
Подготовка сервера сетевой установки TinyPXE
Теперь нужно настроить ваш PXE сервер:
- Распакуйте архив pxesrv.zip в каталог C:\tools\pxesrv;
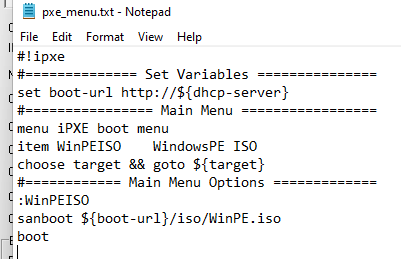
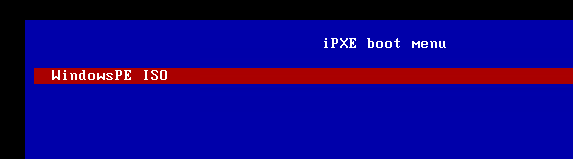
- Перейдите в каталог C:\tools\pxesrv и создайте текстовый файл pxe_menu.txt со следующим содержимым:
#!ipxe
set boot-url http://${dhcp-server}
 #================ Main Menu =================
menu iPXE boot menu
item WinPEISO WindowsPE ISO
choose target && goto ${target}
#============ Main Menu Options =============
:WinPEISO
sanboot ${boot-url}/iso/WinPE.iso
boot
- Скопируйте полученный ранее файл WinPE.iso в каталог C:\tools\pxesrv\files\iso;
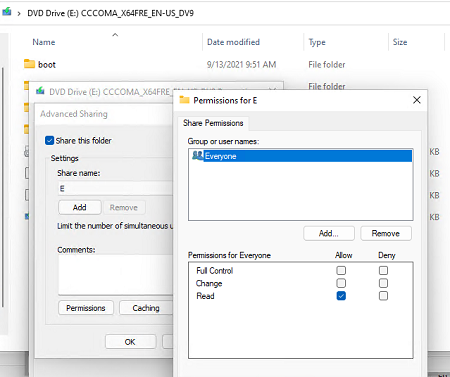
- Смонтируйте установочный ISO образ в виртуальный привод Windows и откройте общий сетевой доступ к нему (если хотите, можете открыть к нему анонимный доступ, но это не обязательно);
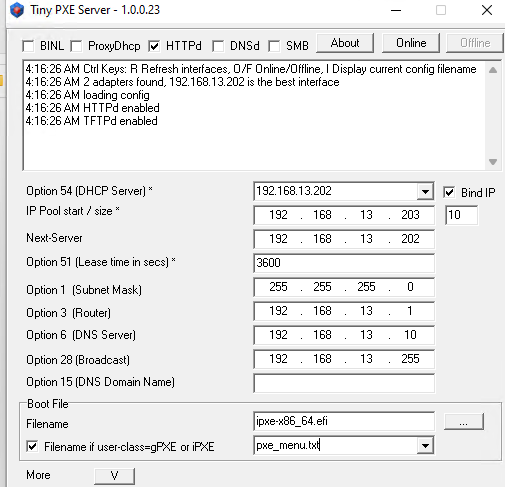
- Запустите файл pxesrv.exe с правами администратора;
- Включите опцию HTTPd;
- Если ваш компьютер сам будет раздавать IP адреса по DHCP (Tiny PXE это умеет), отключите опцию ProxyDHCP. Убедитесь, что в полях Option 54 DHCP Server и Next-Server указан IP адрес вашего компьютера. В поле IP Pool start указано начало диапазона DHCP, убедитесь что этот диапазон не занят в вашей сети;
- В разделе Boot File укажите ipxe.pxe (для загрузки на BIOS устройствах) или ipxe-x86_64.efi (для UEFI устройств);
- В поле Filename if user-class=gPXE or IPXE укажите имя файла меню, который вы создали ранее pxe_menu.txt;
- Запустите PXE сервер, нажав кнопку Online;
Итак, ваш PXE сервер запущен и готов к работе. Если в Windows включен брандмауэр (проще), отключите его или разрешите входящий трафик для процесса pxesrv.exe по протоколам DHCP, PXE, HTTP, TFTPS и SMB.
Сетевая установка Windows 10 и 11 с PXE сервера
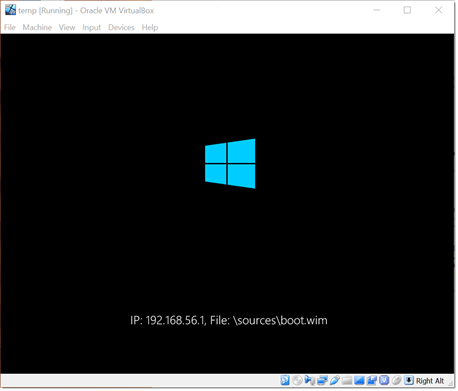
Теперь вам нужно загрузить ваш компьютер, на который вы хотите установить Windows, с PXE сервера. Компьютер должен находится в той же локальной сети (VLAN), что и компьютер с PXE сервером.
В настройках BIOS/UEFI компьютера выберите в качестве первичного устройства загрузки PXE.
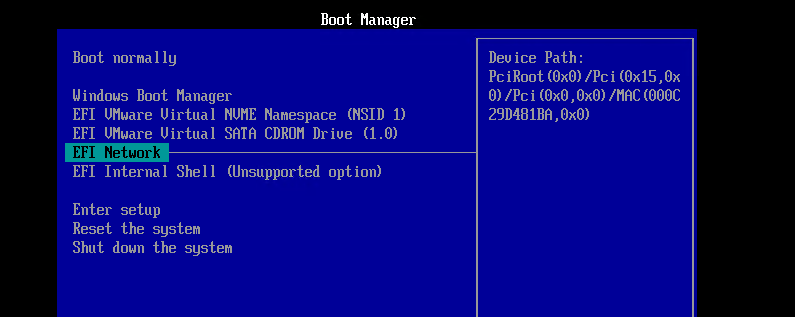
При запуске среды PXE компьютер обнаружит в сети DHCP сервер, получит IP адрес и получит доступных опции в меню iPXE.
Компьютер загрузится по сети в среде WinPE.
В моем случае при тестировании загрузки с PXE сервера виртуальной машины VMWare с UEFI прошивкой появилась ошибка:
Could not describe SAN devices: Operation not supported
Could not boot image: Operation not supported https://ipxe.org/err/3c2220
Как оказалось, в UEFI прошивки виртуальной машины на моем хосте VMware ESXi есть баг:
This error indicates that your UEFI firmware has a bug that prevents the installation of the iSCSI boot firmware table (iBFT). Switch to booting in “legacy” BIOS mode rather than UEFI mode.
Пришлось переключить ВМ в режим BIOS и запускать PXE сервер с опцией ipxe.pxe. После этого пошла нормальная установка Windows по сети.
Вам осталось подключить по SMB сетевой каталог, в котором хранится ваш установочный ISO образ Windows 11.
После инициализации среды командой
wpeinit
подключите ваш сетевой каталог, в который смонтирован установочный образ Windows. Выполните команду:
Net use E: \\192.168.13.202\e
Где
192.168.13.202
– имя компьютера на котором хранится установочный образ, а
E
– название общей папки.
Введите имя пользователя, с правами доступа к вашей Windows с PXE сервером.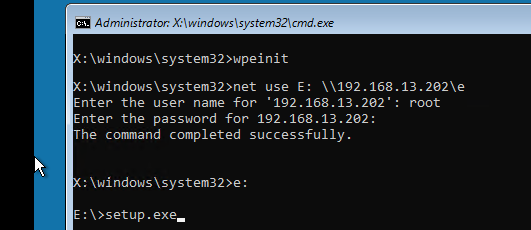
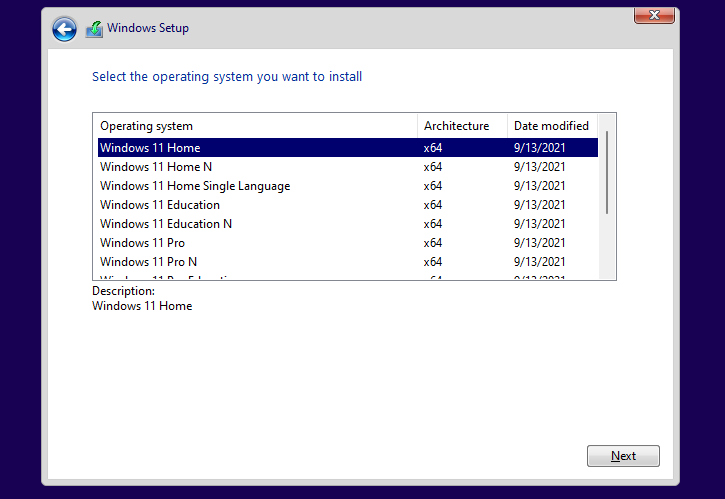
Запустите знакомый мастер установки Windows.
Hello World,
Today, I’ll provide you some information about building up a custom PXE Server. Microsoft offers deployment tools such as Windows Deployment Server or even Microsoft deployment Toolkit 2010 or even more advanced product such as SMS or SCCM.
They are all great tools but they have “heavy” dependencies mainly on Active Directory. You need to have a working Active Directory in order to take full advantages of all these products. In some scenarios, it’s not possible to use these technologies. But don’t panic ! You can create your own PXE Server/TFTP Server. Usin a PXE server, you can easily deploy through your network OS images to capable pxe workstations and improve the overall process.
SETUP YOUR INFRASTRUCTURE
I’m assuming that you have no Active Directory available or reacheable. Imagine a situation where you have to setup a staging area in a room with no network connection to the rest of your network. You will need a switch and at least one computer (stand-alone) to host the PXE/TFTP services.
You have 2 options in order to create your PXE/TFTP infrastructure :
- You can use ready to use tools such as TFTPD32.exe or TFTP Server from SolarWinds
- You can try to tweak your windows system and get a TFTP server up an running in Minutes (more fun but more challenging may be !). I’ll provide some scripts and utilities to smooth your installation.
Option 1 : Using TFTP Server From Solarwinds
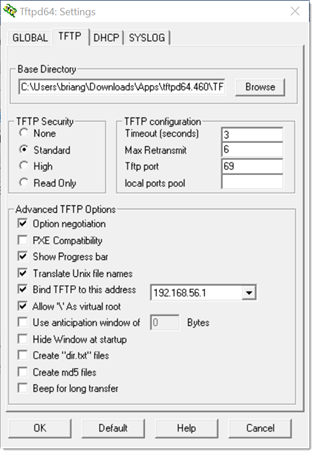
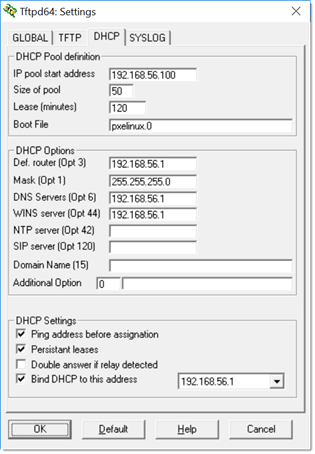
If you want to configure a TFTP server only and you are about to use DHCP,DNS services from Windows Operating System, the TFTP server from SolarWinds might fit yours needs. With this free utility, you will be able to configure quickly your TFTP server. You simply download the free tool from their site (you need to register to have access to the download ). On your future TFTP Server, you perform the Setup installation routine. At the end of the procedure, you have shortcut on your desktop. Double-click on the shortcut and you will see the following window.

On the menu, click on File and select Configure. the following windows will be displayed. As you can see, you cannot configure much. You can simply start the TFTP server and specify where to store your TFTP/PXE Boot files.

In order to have a fully working PXE infrastructure, you will need to install DHCP server and configure it to support PXE technology. You will also need to populate the tftp root directory with your pxe files and bootable images. We will provide some explanation later in this post but first let’s check which other options do we have
Option 2 : Using TFTPD32.exe
You can download the tool from here. The tool includes DHCP,TFTP,DNS services. The tool can also be installed as a windows service if you need to. You have some advanced settings that can be configured but for this post we are just interested in the DHCP-TFTP Functionality.
Note: if you want to make TFTP32.exe a windows service, you need to download the correct package from their web site. You have 2 options: TFTP32.ex as stand alone and TFTP32.exe as service
Logon into your future TFTP Windows server and install the Tftpd32.exe software. Based on your configuration, you will need to configure the DHCP settings and the basic TFTP Server Settings.To ease the setup, I’m assuming that you will be using the DHCP feature of the TFTPD32.exe utilty. After the installation, you can click on the shortcut created on the desktop and you will see a screen similar to the following :

If you click on settings button, you will be redirected to the following dialog box. I have changed the Base TFTP Directory to c:\tftproot. You can accept default or point to another folder if you prefer to. Press OK when done

Finally, go to the DCHP server tab and fill in the requested information (if you intend to use the DHCP feature of TFTD32.exe)

As you can see, this is quite straightforward ! Using TFTPD32 can be useful, if you do not have the DHCP Service already installed on your Windows box. Like the previous option, we are not able to boot in PXE mode at this stage, we will need to populate the tftp root directory with the correct files. Note that in the DHCP configuration, you will need to provide the path of the boot file for the pxe server. Again no panic, we will explain that in the next lines.
Option 3 : Build up your “Custom” TFTP Server
With this option, we will try to use only windows components in order to build up your TFTP/PXE server. We will use a “old” recipe in order to have a working TFTP Server running on a Windows 2003 server. You can configure a TFTP Server by using the following procedure
Step 1 : installing and Configuring the TFTP service
- Copy the file tftpd.exe from %root%\system32\dllCache to %root%\system32 ( This is only possible for Windows 2003 Operating Systems. If you have Windows 2008 OS or later, you will need to copy the file from a Windows 2003 box.)
- using the resource kit instsrv.exe, create a service using the following command
intsrv tftpd c:\winnt\system32\tftpd. ( or you can use SC.exe)
- Start the service using the command net start tftpd
- Normally, after the service starts, it creates a folder in %root%\tftpdroot
- To start the service automatically at boot time, in services.msc change to start automatically option
Additional information : if the tftpdroot is not automatically created, you need to created it manually. You need to check that a registry key has been created as well. If not, you need to created it manually. Navigate to HKLM\system\CurrentControlSet\Services\tftpd\Parameters. Create (if not existing) the key directory and in the value specify the location of the tftpdroot folder
Step 2 : installing and Configuring the DHCP service
You install the DHCP service via the Add/remove program applet. You need to configure additional settings within the DHCP in order to have a working PXE server. The following options should be configured :
- Scope options : 066 Boot server value :host name or IP Address of the Tftp/DHCP server
- Scope options : 067 boot file name value:<%your pxeboot file%>)
- Restart the DHCP
- Scope option: 043 Vendor specific info Value : 01 04 00 00 00 00 ff.
- add additional option via Netsh
C:\WINDOWS\system32>netsh
netsh>dhcp
netsh dhcp>server \\<server name> *OR* <server IP address>
netsh dhcp server>add optiondef 60 PXEClient String 0 comment=PXE support
netsh dhcp server>set optionvalue 60 STRING PXEClient
To verify that the Option 060 was added successfully enter the command:
netsh dhcp server>show optionvalue
Exit issuing command exit and restart your DHCP server. You have a TFTP Server up and running with no third-party tools. That’s cool ! Again, in order to have a working PXE Server, you will need to populate the TFTP ROOT Directory and ensure that the bootfile name option in your DHCP is set correctly.
BONUS
I have explained the manual process. You will get a small bonus ! You can find a batch file sample here that will help you in automating the setup of your TFTPD and DHCP Server. The Batch file is valid on Windows 2003 at the moment. I’ll publish a little bit later a GUI that will be working with Windows XP or Windows 2003 and later (including Windows 2008)
Tftp directory content
Time to populate our tftp Directory. We will upload all the necessary files into the TFTP directory in order for our pxe clients to boot into WINPE 2.0 or 3.0 enviromnent. You can customize your WinPE boot image in order to add some additional tools and utilities and automate for example capture or dump of an image on a target PXE machine. This is out of scope of this post. but we will come back to that in some future posts.
So, what do you need to upload in this directory. I have tried to keep to a minimum the number of files to be uploaded. This is the content of my basic tftproot directory

As you can see, I’ve created a sub folder called Boot and copied there 5 files. Where do you find these files ? If you have a Windows VISTA/7 or windows 2008/R2 installation media, you can extract the following files from the boot folder at the root of the DVD media
- Boot.sdi
In the Source folder of your DVD, you have a boot.wim file as well. You will need to mount this image (using imagex.exe utility) and extract the following file
- pxeboot.0 (located in windows\boot\PXE inside the boot.wim )
- Bootmgr.exe (located in windows\boot\PXE inside the boot.wim)
Finally, you will need to create your own BCD file. You can copy the following text into a batch file and run it on a Windows VISTA/7 or windows 2008 R2. You will need then to upload a wim file into your directory. You can use the boot.wim file from the DVD media and rename it in order to reflect the name you want to use in your BCD File (in my case, I’ve renamed the boot.wim file in winpe.wim)
Rem Creates BCD (boot configuration data) for Windows PE 3.0
set BCD-File=c:\tftproot\boot\BCD
del %BCD-File%
Bcdedit /createstore %BCD-File%
Bcdedit /store %BCD-File% /create {ramdiskoptions} /d “Ramdisk options”
Bcdedit /store %BCD-File% /set {ramdiskoptions} ramdisksdidevice boot
Bcdedit /store %BCD-File% /set {ramdiskoptions} ramdisksdipath \boot\boot.sdi
for /f “tokens=1-3” %%a in (‘Bcdedit /store %BCD-File% /create /d “WinPE x86” /application osloader’) do set guid1=%%c
Bcdedit /store %BCD-File% /set %guid1% systemroot \Windows
Bcdedit /store %BCD-File% /set %guid1% detecthal Yes
Bcdedit /store %BCD-File% /set %guid1% winpe Yes
Bcdedit /store %BCD-File% /set %guid1% osdevice ramdisk=[boot]\boot\winpe.wim,{ramdiskoptions}
Bcdedit /store %BCD-File% /set %guid1% device ramdisk=[boot]\boot\winpe.wim,{ramdiskoptions}
Bcdedit /store %BCD-File% /create {bootmgr} /d “Windows Vista BootManager”
Bcdedit /store %BCD-File% /set {bootmgr} timeout 30
Bcdedit /store %BCD-File% /set {bootmgr} displayorder %guid1%
Bcdedit /store %BCD-File% /enum all
Download the CreateBCD.zip File
Final note: because I’ve created a boot sub folder, I had to change the boot file name value in the DHCP Server from pxeboot.0 to \boot\pxeboot.0
That’s it for this post ! This is a first step into deployment tasks. This infrastructure will be useful in many many scenarios
Till next time see ya

Загрузочный сервер — как загрузочная флешка, только сервер и по сети
Время на прочтение
12 мин
Количество просмотров 438K
Загрузочная флешка с набором нужного софта — замечательный инструмент системного администратора. Казалось бы, что может быть лучше? А лучше может быть загрузочный сервер!
Представьте, вы выбрали в BIOS загрузку по сети и можете установить ОС/вылечить компьютер от вирусов/реанимировать диски/протестировать ОЗУ/etc с PXE Boot сервера, ведь это куда удобнее, нежели бегать с флешкой от машины к машине.
А в случае большого компьютерного парка, такой инструмент и вовсе незаменим.
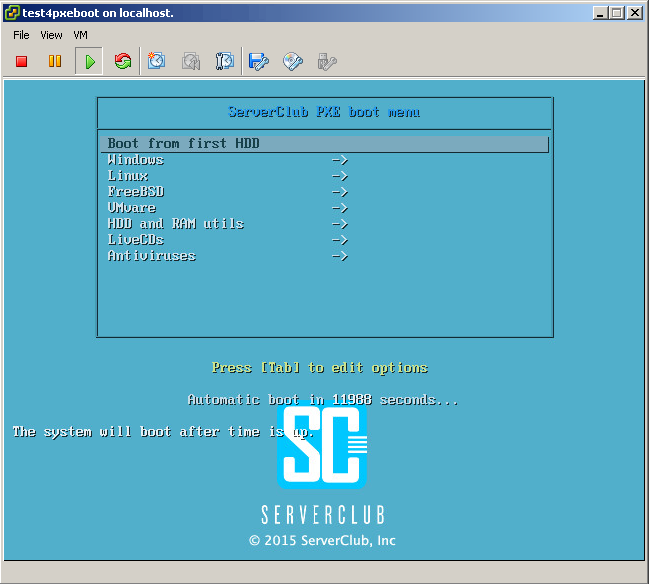
Вот такое меню встречает нашу команду инженеров при загрузке с PXE
Под катом вас ждет описание всех настроек, а так же небольшой сюрприз.
Начало
Возьмем за основу, что свежеустановленный Debian Wheezy уже весело подмигивает нам консолью.
Подготовим базу для дальнейших манипуляций. Установить и настроить нам потребуется:
- TFTP сервер
- Samba
- Syslinux
- DHCP сервер
- HTTP сервер
- NFS сервер
1. TFTP
# aptitude install tftpd-hpa
приведем конфиг /etc/default/tftpd-hpa к виду
TFTP_USERNAME="tftp"
TFTP_DIRECTORY="/srv/tftp" #пусть к корню tftp
TFTP_ADDRESS="0.0.0.0:69"
TFTP_OPTIONS="--secure  -l -v -m /etc/tftpd.remap" #файл для замены слешей в путях с windows style на linux style
и поместим в /etc/tftpd.remap вот такую строку
rg \\ /UPD, дополнение от читателя Aleksey Shipilev
Повыдирал себе волос, пока отдебажил tftp.
Что на ThinkPad X201i, что в VirtualBox загрузка отваливалась с:
PXE-E32: TFTP Open timeoutСудя по всему, PXE агенты умудрились быть не полностью совместимыми, полечилось добавлением «-r blksize»:
TFTP_OPTIONS=»—secure -l -v -r blksize»
2. Samba
# aptitude install samba
В конец файла /etc/samba/smb.conf добавим информацию о папке, где будут лежать инсталляционные файлы Windows.
[images]
comment = images
path = /srv/tftp/images
create mask = 0660
directory mask = 0771
writable = yes
guest ok=yes
Cоздаем папку, даем права и рестартим самбу
# mkdir /srv/tftp/images
# chmod 777 /srv/tftp/images
# service samba restart
3. Syslinux
Скачиваем и заливаем в корень TFTP сервера все необходимое
# cd /tmp
# wget https://www.kernel.org/pub/linux/utils/boot/syslinux/4.xx/syslinux-4.02.tar.gz  #только с этой версией удалось подружить инсталлятор ESXi
# tar -xf syslinux-4.02.tar.gz
# cd syslinux-4.02/
# find ./ -name "memdisk" -type f|xargs -I {} cp '{}' /srv/tftp/
# find ./ -name "pxelinux.0"|xargs -I {} cp '{}' /srv/tftp/
# find ./ -name "*.c32"|xargs -I {} cp '{}' /srv/tftp/
Перейдем к настройке
# cd /srv/tftp/
# mkdir pxelinux.cfg
# cd pxelinux.cfg
Создадим конфиг основного меню и внесем начальные настройки
# cat > default
ui vesamenu.c32
PROMPT 0
menu background background.jpg
menu title ServerClub PXE boot menu

LABEL bootlocal
   menu label Boot from first HDD
   kernel chain.c32
   append hd0 0
   timeout 120
 TEXT HELP
The system will boot after the time is up
 ENDTEXT
4. DHCP
# aptitude install isc-dhcp-server
дефолтный конфиг переместим, создадим вместо него свой и перезапустим DHCP демон
# mv /etc/dhcp/dhcpd.conf{,_orig}
# cat > /etc/dhcp/dhcpd.conf
option domain-name-servers 8.8.8.8, 8.8.4.4;
option ip-forwarding on;
default-lease-time 60;
min-lease-time 120;
max-lease-time 300;
authoritative;
ddns-update-style interim;
log-facility local7;
shared-network PXE-Netwotk {
  subnet 10.0.10.0 netmask 255.255.255.0 {
  range 10.0.10.10 10.0.10.254;
  option routers 10.0.10.1;
  option subnet-mask 255.255.255.0;
  option domain-name-servers 8.8.8.8, 8.8.4.4;
  filename "pxelinux.0";
  next-server 10.0.10.1;
  option root-path "10.0.10.1:/srv/tftp/";
  }
}
# service isc-dhcp-server restart
Спойлер для тех, у кого в роли DHCP сервера выступает MikroTik
address=10.0.10.0/24 gateway=10.0.10.1 dns-server=8.8.8.8, 8.8.4.4 wins-server="" ntp-server=212.20.50.208 caps-manager="" domain="domain.local" next-server=10.0.10.1 boot-file-name="pxelinux.0" dhcp-option=""
Спойлер для тех у кого DHCP на Cisco
network <ip сети> <маска>
ip dhcp pool <Имя пула>
bootfile pxelinux.0
next-server <IP сервера tftp>
default-router <Шлюз>
option 66 ascii «Имя сервера»
dns-server <DNS сервера>
option 150 <IP сервера tftp>
domain-name <доменное имя>
Так же стоит заметить, что в данной инсталляции у севера две сетевые карты и он является еще и шлюзом в интернет.
Поэтому необходим еще ряд нехитрых манипуляций
# sed -i 's/\#net.ipv4.ip_forward=1/net.ipv4.ip_forward=1/g' /etc/sysctl.conf
# sysctl -p
# iptables -t nat -I POSTROUTING -s 10.0.10.0/24 -o eth0 -j MASQUERADE
# sed -i 's/INTERFACES=\"\"/INTERFACES=\"eth1\"/g' /etc/default/isc-dhcp-server
# service isc-dhcp-server restart
5. HTTP
Пока просто установим, а зачем он нам понадобился будет понятно далее по тексту.
# aptitude install apache2
6. NFS
Ровно так же как и предыдущий пункт.
# aptitude install nfs-kernel-server
Если все сделано правильно, то при загрузке какой-либо машины с этого DHCP/PXE/TFTP сервера мы увидим следующее:

Основа готова!
Двигаемся далее.
Научим сервер устанавливать различные ОС
Для установки нам будут доступны:
- Windows 2008R2/20012R2
- Debian 6/7
- Centos 6/7
- Ubuntu 12.04/12.10/14.04/14.10
- FreeBSD 9.2/10.1
- VMware ESXi 5.0/5.5
Структура меню, а следовательно и файл /srv/tftp/pxelinux.cfg/default притерпели изменения.
Теперь конфиг главного меню PXE сервера теперь выглядит так
ui vesamenu.c32
PROMPT 0
menu background background.jpg
menu title ServerClub PXE boot menu

LABEL bootlocal
   menu label Boot from first HDD
   kernel chain.c32
   append hd0 0
   timeout 120
 TEXT HELP
The system will boot after time is up.
 ENDTEXT

LABEL Windows           ->
      KERNEL vesamenu.c32
      APPEND pxelinux.cfg/windows

LABEL Linux             ->
      KERNEL vesamenu.c32
      APPEND pxelinux.cfg/linux

LABEL FreeBSD           ->
      KERNEL vesamenu.c32
      APPEND pxelinux.cfg/bsd

LABEL VMvare            ->
      KERNEL vesamenu.c32
      APPEND pxelinux.cfg/vmware
Листинг директории /srv/tftp/pxelinux.cfg/
root@pxe:/srv/tftp/pxelinux.cfg# ls -l
total 32
-rw-r--r-- 1 tftp tftp  475 Фев 17 18:04 bsd
-rw-r--r-- 1 tftp tftp  881 Фев 17 18:00 default
-rw-r--r-- 1 tftp tftp 1316 Фев 17 18:01 linux
-rw-r--r-- 1 tftp tftp  363 Фев 17 18:03 vmware
-rw-r--r-- 1 tftp tftp  312 Фев 18 00:01 windows
Под спойлером содержимое конфига каждого из подпунктов меню представленных выше
windows
PROMPT 0
UI vesamenu.c32
MENU BACKGROUND background.jpg
MENU TITLE Windows

LABEL <- Main Menu
      KERNEL vesamenu.c32
      APPEND pxelinux.cfg/default

LABEL W2K8_x64_R2 & W2K12_x64_R2 (menu inside)
	kernel Boot/pxeboot.0


LABEL <- Main Menu
      KERNEL vesamenu.c32
      APPEND pxelinux.cfg/default
linux
PROMPT 0
UI vesamenu.c32
MENU BACKGROUND background.jpg
MENU TITLE Linux

LABEL <- Main Menu
      KERNEL vesamenu.c32
      APPEND pxelinux.cfg/default

LABEL Debian-7-x64
        kernel debian/7/linux
        append initrd=debian/7/initrd.gz

LABEL Debian-6.0.6-x64
        kernel debian/6/linux
        append initrd=debian/6/initrd.gz

LABEL CentOS-7-x64
        kernel centos/7/vmlinuz
        append initrd=centos/7/initrd.img method=http://mirror.mirohost.net/centos/7/os/x86_64/ devfs=nomount ksdevice=link ramdisk_size=100000

LABEL CentOS-6-x64
        kernel centos/6/vmlinuz
        append initrd=centos/6/initrd.img method=http://mirror.mirohost.net/centos/6/os/x86_64/ devfs=nomount ksdevice=link ramdisk_size=100000

LABEL Ubuntu-14.10-x64
        kernel ubuntu/14.10/linux
        append initrd=ubuntu/14.10/initrd.gz expert dmraid=true

LABEL Ubuntu-14.04-x64
        kernel ubuntu/14.04/linux
        append initrd=ubuntu/14.04/initrd.gz expert dmraid=true

LABEL Ubuntu-12.10-x64
        kernel ubuntu/12.10/linux
        append initrd=ubuntu/12.10/initrd.gz expert dmraid=true

LABEL Ubuntu-12.04_4-x64
        kernel ubuntu/12.04_4/linux
        append initrd=ubuntu/12.04_4/initrd.gz expert dmraid=true

LABEL <- Main Menu
      KERNEL vesamenu.c32
      APPEND pxelinux.cfg/default
bsd
PROMPT 0
UI vesamenu.c32
MENU BACKGROUND background.jpg
MENU TITLE BSD

LABEL <- Main Menu
      KERNEL vesamenu.c32
      APPEND pxelinux.cfg/default

LABEL FreeBSD-10.1-x64
        kernel memdisk
        initrd freebsd/10/mfsbsd-se-10.1-RELEASE-amd64.iso
        append iso raw

LABEL FreeBSD-9.2-x64
        kernel memdisk
        initrd freebsd/9/fbsd92.iso
        append iso raw


LABEL <- Main Menu
      KERNEL vesamenu.c32
      APPEND pxelinux.cfg/default
vmware
PROMPT 0
UI vesamenu.c32
MENU BACKGROUND background.jpg
MENU TITLE VMware

LABEL <- Main Menu
      KERNEL vesamenu.c32
      APPEND pxelinux.cfg/default

LABEL VMware-5.5
        kernel vmw/5.5/mboot.c32
        append -c /vmw/5.5/boot.cfg ks=http://10.0.10.1/vmw5.5/ks.cfg +++

LABEL VMware-5.0
	kernel vmw/5.0/mboot.c32
	append -c /vmw/5.0/boot.cfg ks=http://10.0.10.1/vmw5.0/ks.cfg +++

LABEL <- Main Menu
      KERNEL vesamenu.c32
      APPEND pxelinux.cfg/default
Пути к папкам, где лежат установочные файлы для каждой из ОС, описаны относительно корня TFTP сервера, т.е. /srv/tftp.
Например для FreeBSD указано
LABEL FreeBSD-10.1-x64
        kernel memdisk
        initrd freebsd/10/mfsbsd-se-10.1-RELEASE-amd64.iso
        append iso raw
следовательно в корне TFTP нужно создать папки freebsd/10/, при этом обратите внимание на права
ls -l /srv/tftp/freebsd/10/
total 193780
-rw-r--r-- 1 tftp tftp 198430720 Фев 17 18:17 mfsbsd-se-10.1-RELEASE-amd64.iso
У всех должно быть право на чтение — это правило справедливо для всех файлов отдаваемых по TFTP.
И еще пара слов о установке FreeBSD.
Логин / пароль для входа в загружаемый iso: root / mfsroot(либо root без пароля).
Плюс пара примеров скриптов инсталяции FreeBSD на ZFS:
1. RAID6 из 4-х дисков.
2. RAID1 из 2-х дисков.
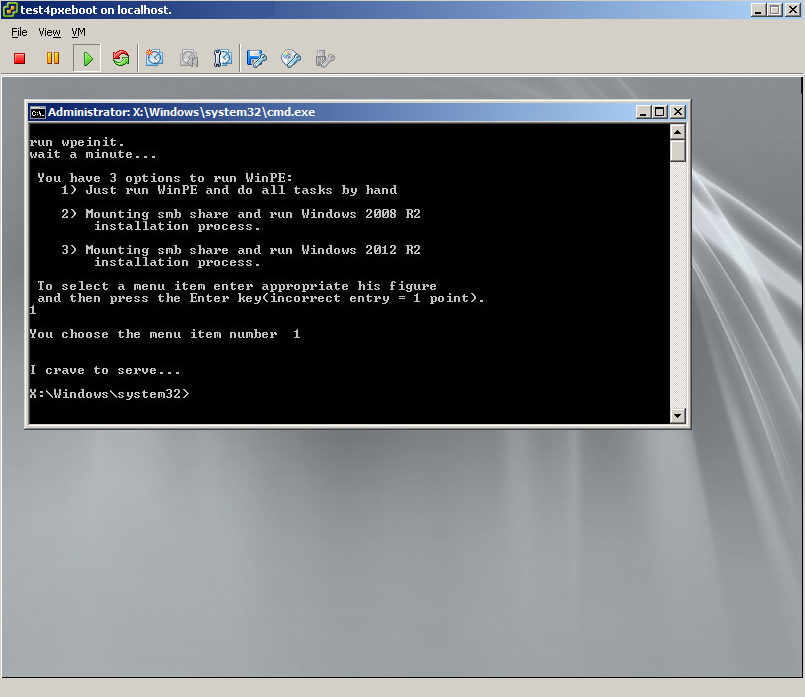
О том как подготовить Windows к установке с PXE мы писали ранее.
Различие с данной инсталляцией составляет лишь то, что здесь мы можем установить и Windows 2008R2 и Windows 2012R2(впрочем и Windows 7/8 тоже, нужно только подготовить файлы дистрибутива и winpe соответствующим образом). После загрузки winpe мы монтируем папку /srv/tftp/images/, где содержаться файлы для установки ОС от Microsoft:
ls -l /srv/tftp/images/
total 8
drwxr-xr-x 6 root root 4096 Фев 17 22:19 w2k12r2
drwxr-xr-x 7 tftp tftp 4096 Фев 17 19:05 w2k8r2
и запускаем нужный инсталятор.
Для автоматизации, через startnet.cmd, я набросал вот такое меню:
Теперь осталось разобраться с VMware.
Как вы заметили, конфиг для установки гипервизоров несколько отличается от остальных — именно тут нам и понадобится HTTP сервер.
В /var/www создадим папки vmw5.5, vmw5.0, а в папках сделаем симлинки на конфиг
# cd /var/www
# mkdir vmw5.5
# cd  vmw5.5/
# ln -s /srv/tftp/vmw/5.5/ks.cfg
# mkdir ../vmw5.0
# cd ../vmw5.0/
# ln -s /srv/tftp/vmw/5.0/ks.cfg
О том как подготовить, например, Debian к установке с PXE написано здесь, но я на этом останавливаться не стану.
Добавим способность загружать различные дисковые утилиты и тест памяти
Данный раздел будет содержать:
- Memtest86+
- Clonezilla-live
- SystemRescueCD
- MHDD
Конфиги разместились здесь
default
ui vesamenu.c32
PROMPT 0
menu background background.jpg
menu title ServerClub PXE boot menu

LABEL bootlocal
   menu label Boot from first HDD
   kernel chain.c32
   append hd0 0
   timeout 120000
 TEXT HELP
The system will boot after time is up.
 ENDTEXT

LABEL Windows                     ->
      KERNEL vesamenu.c32
      APPEND pxelinux.cfg/windows

LABEL Linux                       ->
      KERNEL vesamenu.c32
      APPEND pxelinux.cfg/linux

LABEL FreeBSD                     ->
      KERNEL vesamenu.c32
      APPEND pxelinux.cfg/bsd

LABEL VMvare                      ->
      KERNEL vesamenu.c32
      APPEND pxelinux.cfg/vmware


LABEL HDD and RAM utils           ->
      KERNEL vesamenu.c32
      APPEND pxelinux.cfg/du
du
PROMPT 0
UI vesamenu.c32
MENU BACKGROUND background.jpg
MENU TITLE HDD and RAM utils

LABEL <- Main Menu
      KERNEL vesamenu.c32
      APPEND pxelinux.cfg/default

LABEL Memtest86+
	kernel memtest/memtest


label Clonezilla-live
	MENU LABEL Clonezilla Live
	KERNEL clonezilla/vmlinuz
	APPEND initrd=clonezilla/initrd.img boot=live config noswap nolocales edd=on nomodeset ocs_live_run="ocs-live-general" ocs_live_extra_param="" keyboard-layouts="" ocs_live_batch="no" locales="" vga=788 nosplash noprompt fetch=tftp://10.0.10.1/clonezilla/filesystem.squashfs


label SystemRescueCD
	kernel SystemRescueCD/isolinux/rescue64
	append initrd=SystemRescueCD/isolinux/initram.igz dodhcp nfsboot=10.0.10.1:/srv/tftp/SystemRescueCD

LABEL MHDD
        kernel memdisk
        initrd mhdd/mhdd32ver4.6.iso
        append iso raw


LABEL <- Main Menu
      KERNEL vesamenu.c32
      APPEND pxelinux.cfg/default
А я расскажу зачем мы ставили еще и NFS сервер.
Как видно из конфига загрузки SystemRescueCD, необходимые этому LiveCD файлы он подтягивает монтируя каталог по протоколу NFS. Сервер уже установлен, остается только отредактировать /etc/exports и перезапустить серверный демон.
# cat >> /etc/exports
/srv/tftp/SystemRescueCD/ 10.0.10.1/255.255.255.0(ro,no_subtree_check,all_squash,insecure,anonuid=1000,anongid=1000)
# service nfs-kernel-server restart
Предполагаю у вас возник резонный вопрос — «Что тут делает LiveCD, если для них есть отдельный пункт?»
SystemRescueCD содержит массу полезных программ для работы с диском(например таких как GParted и testdisk) и поэтому он доступен и здесь и в LiveCD.
LiveCD
В набор наших LiveCD войдут:
- Debian 7 LiveCD
- HirensBootCD
- Trinity Rescue Kit CD
- SystemRescueCD
- Plop Live
Конфиги
в конец default добавилось
LABEL LiveCDs                     ->
      KERNEL vesamenu.c32
      APPEND pxelinux.cfg/livecds
livecds
PROMPT 0
UI vesamenu.c32
MENU BACKGROUND background.jpg
MENU TITLE LiveCDs

LABEL <- Main Menu
      KERNEL vesamenu.c32
      APPEND pxelinux.cfg/default

LABEL Debian LiveCD
        KERNEL Debian7live/vmlinuz
	APPEND initrd=Debian7live/initrd boot=live fetch=tftp://10.0.10.1/Debian7live/filesystem.squashfs root=/dev/ram0 rw

LABEL HirensBootCD
	MENU LABEL Hiren's Boot CD
	KERNEL memdisk
	APPEND iso initrd=hirens/hirens.iso

LABEL Trinity Rescue Kit CD
	kernel trk/kernel.trk
	append initrd=trk/initrd.trk ramdisk_size=65536 root=/dev/ram0 vga=788 splash=verbose pci=conf1 trkmenu timeout 100 trknfs=10.0.10.1:/srv/tftp/trk ip=dhcp

LABEL SystemRescueCD
	kernel SystemRescueCD/isolinux/rescue64
	append initrd=SystemRescueCD/isolinux/initram.igz dodhcp nfsboot=10.0.10.1:/srv/tftp/SystemRescueCD

LABEL Plop Live
	KERNEL plop/bzImage
	APPEND initrd=plop/initramfs.gz vga=normal nfsmount=10.0.10.1:/srv/tftp/plop


LABEL <- Main Menu
      KERNEL vesamenu.c32
      APPEND pxelinux.cfg/default
Для загрузки Trinity Rescue Kit CD и Plop Live в /etc/exports нужно добавить строки:
/srv/tftp/trk/ 10.0.10.1/255.255.255.0(ro,no_subtree_check,all_squash,insecure,anonuid=1000,anongid=1000)
/srv/tftp/plop/ 10.0.10.1/255.255.255.0(ro,no_subtree_check,all_squash,insecure,anonuid=1000,anongid=1000)
и отправить команду рестарта NFS демону.
Несколько слов о выбраных LiveCD.
Debian 7 LiveCD
Этот CD — сборка одного из наших инженеров, включающая в себя следующее:
Логин / пароль: root / ServerClub
HirensBootCD
Едва ли нуждается в представлении, содержит множество полезных утилит.
Подробнее можно ознакомиться здесь.
Грузится достаточно долго, не работает MiniXP и Linux. Остальные утилиты доступны для использования.
Trinity Rescue Kit CD
Со слов разработчиков, создан для восстановления ОС Windows.
Содержит утилиты для сброса паролей, антивирусы, программу для клонирования «компьютера» по сети(при чем на несколько компьютеров одновременно), а так же многое другое.
Подробнее здесь.
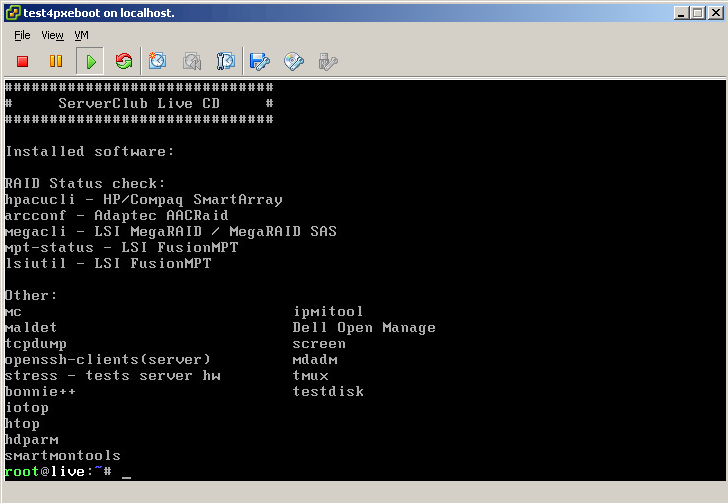
SystemRescueCD
Основан на Gentoo, предназначен для восстановления Linux систем.
Включает в себя большое количество всевозможных программ для администрирования, со списком можно ознакомится по ссылке.
Plop Live
LiveCD с тремя полноценными DE на выбор, а так же необходимым админским софтом.
Антивирусы
- Kaspersky Rescue Disk 10

- AVG Rescue CD

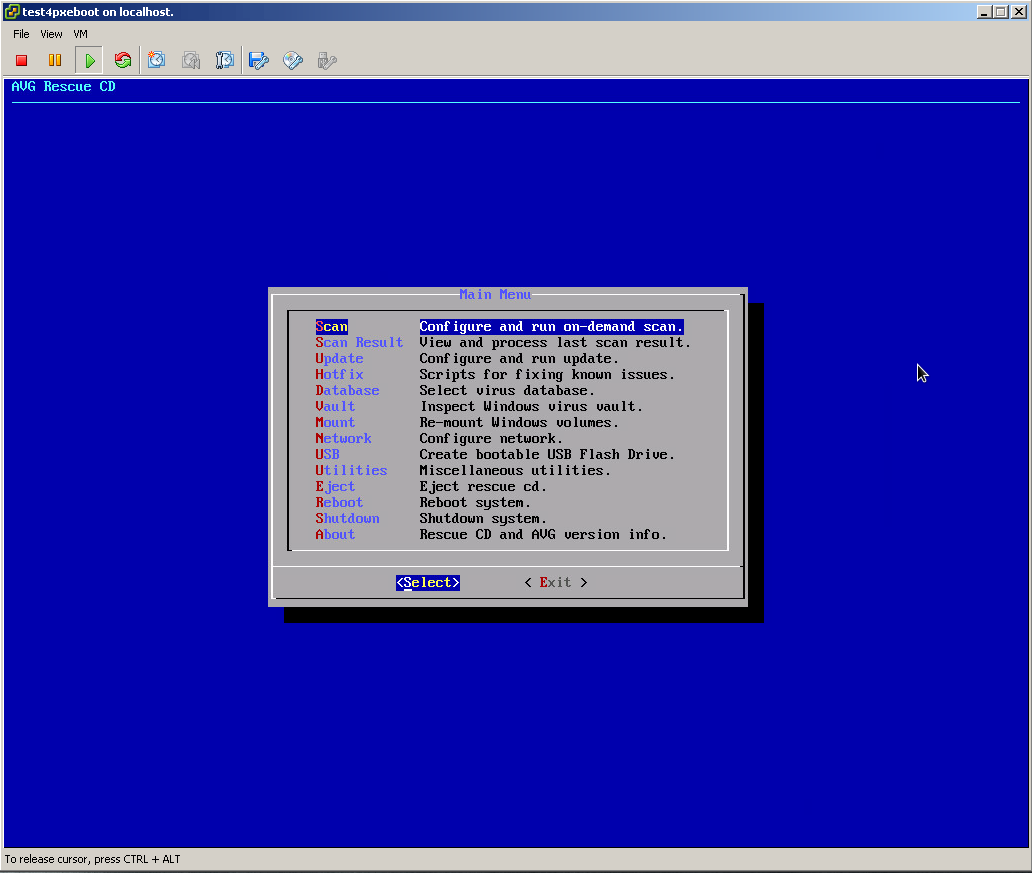
В отдельном представлении оба антивируса не нуждаются.
О Kaspersky Rescue disk подробнее можно прочесть здесь.
С описанием AVG Recsue CD вас ознакомит данный url.
Итоговый конфигурационный файл основного меню, а так же файл меню антивирусов
default
ui vesamenu.c32
PROMPT 0
menu background background.jpg
menu title ServerClub PXE boot menu

LABEL bootlocal
   menu label Boot from first HDD
   kernel chain.c32
   append hd0 0
   timeout 120000
 TEXT HELP
The system will boot after time is up.
 ENDTEXT

LABEL Windows                     ->
      KERNEL vesamenu.c32
      APPEND pxelinux.cfg/windows

LABEL Linux                       ->
      KERNEL vesamenu.c32
      APPEND pxelinux.cfg/linux

LABEL FreeBSD                     ->
      KERNEL vesamenu.c32
      APPEND pxelinux.cfg/bsd

LABEL VMvare                      ->
      KERNEL vesamenu.c32
      APPEND pxelinux.cfg/vmware


LABEL HDD and RAM utils           ->
      KERNEL vesamenu.c32
      APPEND pxelinux.cfg/du

LABEL LiveCDs                     ->
      KERNEL vesamenu.c32
      APPEND pxelinux.cfg/livecds

LABEL Antiviruses                 ->
      KERNEL vesamenu.c32
      APPEND pxelinux.cfg/av
av
PROMPT 0
UI vesamenu.c32
MENU BACKGROUND background.jpg
MENU TITLE Antivirues

LABEL <- Main Menu
      KERNEL vesamenu.c32
      APPEND pxelinux.cfg/default


LABEL Kaspersky Antivirus
	KERNEL kav/rescue
	APPEND initrd=kav/rescue.igz root=live rootfstype=auto vga=791 init=/init kav_lang=ru udev liveimg doscsi nomodeset

LABEL Kaspersky Antivirus (text mode)
	KERNEL kav/rescue
	APPEND initrd=kav/rescue.igz root=live rootfstype=auto vga=791 init=/init kav_lang=ru udev liveimg nox kavshell noresume doscsi nomodeset


label AVG
        menu label AVG Rescue CD
        kernel avg/vmlinuz
        append max_loop=255 vga=791 initrd=avg/initrd.lzm init=linuxrc reboot=bios

label AVG nofb
        menu label AVG Rescue CD with Disabled Framebuffer
        kernel avg/vmlinuz
        append max_loop=255 video=vesafb:off initrd=avg/initrd.lzm init=linuxrc reboot=bios

label AVG vgask
        menu label AVG Rescue CD with Resolution Selection
        kernel avg/vmlinuz
        append max_loop=255 initrd=avg/initrd.lzm init=linuxrc vga=ask reboot=bios


LABEL <- Main Menu
      KERNEL vesamenu.c32
      APPEND pxelinux.cfg/default
Заключение, оно же и сюрприз
На протяжении статьи я сознательно не давал объяснений где взять и как подготовить контент, потому как действия эти весьма тривиальны и только перегрузили бы текст.
В качестве сюрприза предлагаю вам два варианта нашей сборки, доступные по ссылкам ниже:
- Архив со всем контентом /srv/tftp (ссылка на торрент файл, прямая ссылка)
- Архив всей ОС (ссылка на торрент файл, прямая ссылка)
В первом случае необходимо самостоятельно подготовить сервер(в этом поможет глава «Начало» данного эпоса), разархивировать содержимое архива и внести корректировки сообразно реалиям вашей среды.
Второй случай подразумевает установку на голое железо или виртуальную машину.
Вкратце шаги по развертыванию сборки из полного архива ОС будут такими:
1. Загрузиться с Linux LiveCD.
2. Разметить диск и отформатировать разделы.
3. Примонтировать «/» раздел.
4. Распаковать архив.
5. Установить загрузчик.
6. Перезагрузиться.
7. Настроить ОС в соответствии вашей сети и начать пользоваться.
Логин / пароль: root / ServerClub.
ВАЖНО: Если в вашей сети есть работающий dhcp сервер, то перед запуском нашей сборки отключите в ней автостарт dhcp.
Полезные ссылки
Как подготовить Kaspersky Rescue disk 10 для загрузки с PXE
Wiki syslinux
Как подготовить ESXi для установки с PXE
C PXE не грузится интсаллятор ESXi. Решение
От чего с PXE не грузится интсаллятор ESXi. Решение
За сим заканчиваю, благодарю за внимание!
Для тех, у кого нет аккаунта на Хабре.
Если у вас возникнут вопросы/замечания, то пишите мне на почту — er[dog]serverclub.com.
UPDATE – 04-03-2019: try serva https://www.vercot.com/~serva/ instead of tftpd32, it supports uefi.
Download the “Portable” version of the Tftpd32 software.
http://tftpd32.jounin.net/
All of my source files: https://drive.google.com/open?id=1FAIPPtIogFOk_uklAS_D7YxLrxI36Hly
My TFTPROOT folder contents and source
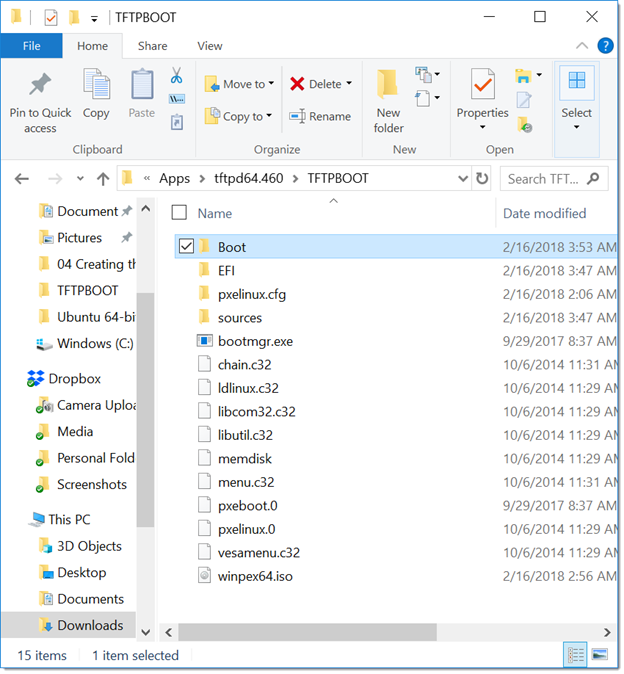
Files were pulled from Windows 10 ADK installation.
C:\Program Files (x86)\Windows Kits\10\Assessment and Deployment Kit\Windows Preinstallation Environment\amd64\Media =>
TFTPROOT\bootmgr.exe
TFTPROOT\Boot\en-us\bootmgr.exe.mui
TFTPROOT\Boot\en-us\memtest.exe.mui
TFTPROOT\Boot\Fonts\*.*
TFTPROOT\Boot\Resources\bootres.dll
..Media\EFI\Microsoft\Boot\BCD => TFTPROOT\Boot\BCD
..Media\EFI\Microsoft\Boot\boot.sdi => TFTPROOT\Boot\bood.sdi
Opened “C:\Program Files (x86)\Windows Kits\10\Assessment and Deployment Kit\Windows Preinstallation Environment\amd64\en-us\winpe.wim” with 7-zip and copied and renamed the following file:
TFTPROOT\pxeboot.n12 => \pxeboot.0
Copied “C:\Program Files (x86)\Windows Kits\10\Assessment and Deployment Kit\Windows Preinstallation Environment\amd64\en-us\winpe.wim” and renamed to “boot.wim”
winpe.wim => TFTPROOT\sources\boot.wim
Download the latest syslixuxXX.zip from https://www.kernel.org/pub/linux/utils/boot/syslinux/
Extracted with 7zip, searched and copied out the following files to the TFTPROOT folder:
TFTPROOT\ldlinux.c32
TFTPROOT\libcom32.c32
TFTPROOT\libutil.c32
TFTPROOT\memdisk
TFTPROOT\menu.c32
TFTPROOT\pxelinux.0
TFTPROOT\vesamenu.c32
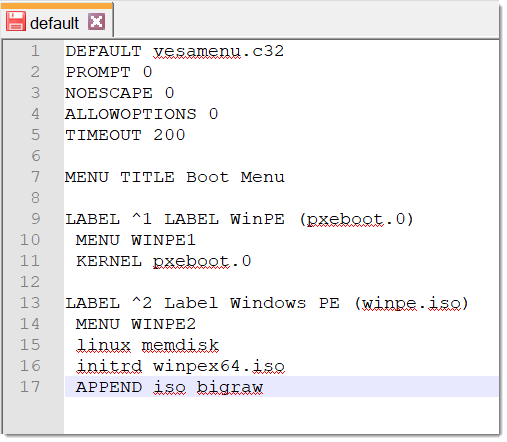
Lastly, I created a “default” file in a”pxelinux.cfg” folder with the following content:
DEFAULT vesamenu.c32
PROMPT 0
NOESCAPE 0
ALLOWOPTIONS 0
TIMEOUT 200

MENU TITLE Boot Menu
LABEL ^1 LABEL WinPE (pxeboot.0)
MENU WINPE1
KERNEL pxeboot.0

LABEL ^2 Label Windows PE (winpe.iso)
MENU WINPE2
linux memdisk
initrd winpex64.iso
APPEND iso bigraw
Windows Deployment Services can not be installed on Windows Server Core unfortunately — it still requires a Windows Server install with a GUI (Desktop Experience). Luckily we can still install it using PowerShell and the command line. In this post I’ll go through the initial steps on how to deploy and configure a WDS server using command line and PowerShell.
Installing Windows Server
Boot the server from the Windows Server media and on the “Select the Operating System you want to install” screen, select the option “Windows Server Standard” or “Datacenter” edition with “Desktop Experience” in brackets.
Please note: You can no longer add and remove the GUI (Desktop Experience) with Windows Server 2016 onwards as you could with Windows Server 2012/2012 R2. This is due to numerous problems with keeping the installation and removal process consistent with updates. With Windows Server 2016 and above the only way to add or remove the GUI is to re-install and select one of the server editions with the “Desktop Experience” option.
Initial Configuration
Once the install process has completed, you will be prompted to set the Administrator password.
- Set the local “Administrator” password.
- Log in to Windows as the Administrator user.
- Open an elevated command prompt by pressing “Win + X” and selecting “Command Prompt (Admin)” from the menu.
- Type
sconfigto get the Server Configuration menu. - You’ll need to configure at least the Network Settings — IP address, subnet mask, gateway, and DNS.
- You may want to enable Remote Desktop.
- Add the server to the domain — you’ll be asked if you’d like to change the computer name, and prompted to restart the server.
- After the restart, log in as a user with administrator privileges to the server.
Important note: Windows Server 2016 shipped with a bug that causes it to fail to get updates from WSUS out of the box. To work around it you should update directly from the internet or download and install the latest Cumulative Update for Windows Server 2016, which at the time of writing is KB4093120, download here.
Additional Storage Configuration
You may want to configure additional locally attached disks or iSCSI/MPIO storage. Creating new volumes that are locally attached can be done via the diskpart command line tool. Below are the commands to create a new, NTFS formatted volume, with the drive letter of E:\ and the name “Data”, from a second disk in the server using the diskpart tool. First, run diskpart from the command line, then use the following commands:
|
|
The MPIO feature must be installed before the tool is available. You can do this via PowerShell:
|
|
When MPIO is installed you can load the MPIO utility using mpiocpl. For the iSCSI utility you can use iscsicpl. iSCSI is installed as part of the base Windows Server feature set.
Install Windows Deployment Services (WDS)
If you’ve just logged on to the server, open an elevated command prompt as before, by pressing “Win + X” and selecting “Command Prompt (Admin)” from the menu. Type “PowerShell” into the command line window before running any of the commands below.
First we need to install the WDS feature:
|
|
Now we need to run some post install tasks. The following command will initialize the WDS server and use the E:\ drive to store it’s content.
|
|
WDS is now installed and the initial configuration is complete, but some further configuration is required via the WDS Microsoft Management Console (MMC).
- Log in to the server as a user with administrator privileges.
- Open the “Windows Deployment Services MMC” under “Windows Administrative Tools” in the Start Menu.
- Expand the “Servers” node and Right click on the
server-name.contoso.comand select “Properties”. - On the “PXE Response” tab select the “Respond to all client computers (known and unknown)” do not tick the “Require administrator approval option”.
- Click “Apply” and close the window.
To add a ‘LiteTouch’ boot image from MDT to WDS:
- Log in to the server as a user with administrator privileges.
- Open the “Windows Deployment Services MMC” under “Windows Administrative Tools” in the Start Menu.
- Navigate to “Servers” >
server-name.contoso.com> “Boot Images”. - Right click in the empty window, and select “Add Boot Image”.
- Navigate to the “Boot” folder in the deployment share of MDT and select
LiteTouchPE_x64.wim. - Complete the wizard.
To test the new boot image, create a new VM in Hyper-V with the following configuration:
- Generation 1
- 2x vCPUs
- 4GB of RAM
- Legacy Network Adapter with access the local network.
- Virtual Hard Drive of at least 80GB.
- Boot from the legacy Network Adapter.
- If using Hyper-V on Windows 10 1709 and above, make sure “Use Automatic Checkpoints” is disabled.
Start the Virtual Machine and you should be prompted to press F12 to boot and the deployment environment should start just as if you were booting from the LiteTouchPE_x64.iso. If the VM is not booting from the network, it could be that the VM is on a different VLAN. To enable PXE booting on different VLANs you’ll need to add the IP address of the WDS server as a IP helper address on each VLAN on the routing switch.
Configuration for BIOS and UEFI Clients
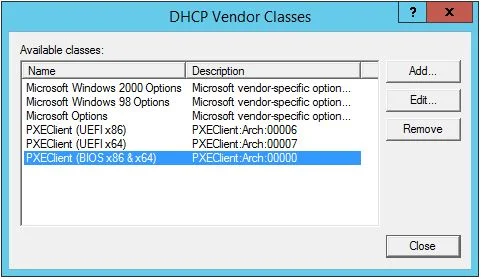
If you have a mixture of devices with both BIOS and UEFI firmware that you wish to PXE boot, some additional configuration may be required depending on the network and versions of DHCP and WDS. On a network with a Windows Server 2016 DHCP server, WDS server and Cisco switches with a helper address configured, I haven’t needed to do this configuration but I wanted to include it for completeness. Your mileage may vary. Most of the following information is from a very helpful video from BranchCache Bob — here’s the video. It is assumed that you have a Microsoft Windows Server running DHCP. The first thing to do is to define the vendor classes for both the BIOS PXE Client and the UEFI PXE Client.
- Go to “DHCP”, right-click on “IPv4”
- In the “DHCP Vendor Classes” window, click Add
- For the “Name” enter “PXEClient (UEFI x86)”
- For the “Description” enter whatever you want
- Under the “ASCII” text enter
PXEClient:Arch:00006— Important Note: you will not be able to paste this text, and it’s also case-sensitive - Click OK to add it to the list
- Now repeat steps 2 — 6 for “PXEClient (UEFI x64)” with
PXEClient:Arch:00007as the ASCII value. - Finally, repeat steps 2 — 6 for “PXEClient (BIOS x86 & x64)” with
PXEClient:Arch:00000(five zero’s) as the ASCII value.
or using PowerShell:
|
|
You should now have three additional vendor classes.
Now we need to create policies in DHCP so that the correct files are served to the correct clients. You will need to do this for each DHCP scope.
- Go to “DHCP” and expand the scope you wish to create a policy for
- Right-click on “Policies” and choose “New Policy”
- Enter “PXEClient (UEFI x64)” for the name
- Enter a “Description”, or leave it blank. Click Next
- On the “Configure Conditions for the policy” screen, click Add
- In the “Add/Edit Condition” window, click the “Value:” drop down menu
- Choose the “PXEClient (UEFI x64)” vendor class you created earlier
- Tick the “Append wildcard” check box and then click Add and finally OK
- Click Next on the “Configure Conditions for the policy” screen
- On the “Configure settings for the policy” screen, click No for the “Do you want to configure an IP address range for the policy”. Click Next
- “Please Note:” if DHCP is on the same server as WDS, you will need to set option 060, if WDS is on a different server, you do not need to set option 060
- On the “Configure settings for the policy” screen, scroll down until you see options “060” (if applicable), “066” and “067”
- Tick option “060” and enter “PXEClient” if applicable
- Tick option “066” and enter either the FQDN or the IP address of the WDS server.
- Tick option “067” and enter
boot\x64\wdsmgfw.efi— this is the x64 UEFI boot file for WDS. Click Next. - On the “Summary” screen, if all the details are correct, click Finish
- Now repeat steps 2 — 14 for “PXEClient (UEFI x86)” with
boot\x86\wdsmgfw.efias option “067” - Finally, repeat steps 2 — 14 once again for “PXEClient (BIOS x86 & x64)” with
boot\x64\wdsnbp.comas option “067” and leave option “060” empty
or using PowerShell:
|
|
The -ScopeId should be the IP range of the DHCP scope you want to add the policy to.
Don’t forget to repeat the above for each DHCP scope you wish to PXE boot from. In DHCP if you expand the “Scope Options” folder you should see the new options you just created and under “Policy Name” should be the names of the policies you just created.
You should now be able to boot both a UEFI and BIOS devices from the network. Please note, if DHCP is installed on the same server as WDS, you will need to check both the “Do not listen on DHCP ports” and “Configure DHCP options to indicate that this is also a PXE server” options.
Support My Work
If you would like to support me, please check out the links below.
- Patreon
- PayPal
If you have any questions or comments please leave them below.
Thanks
-Mike