Windows Defender Interference may affect WIndows 10 ping
by Henderson Jayden Harper
Passionate about technology, Crypto, software, Windows, and everything computer-related, he spends most of his time developing new skills and learning more about the tech world. He also enjoys… read more
Updated on
Reviewed by
Alex Serban

After moving away from the corporate work-style, Alex has found rewards in a lifestyle of constant analysis, team coordination and pestering his colleagues. Holding an MCSA Windows Server… read more
- Ping can check whether a particular IP address is available in the network and measures the response time.
- Windows Firewall may block the ping request if it doesn’t allow the File and Printer Sharing app to run.
- You can enable ping via Windows Firewall, Windows Firewall with Advanced Security, PowerShell, and the Command Prompt.
Ping is the primary TCP/IP command for troubleshooting connectivity, reachability, and name resolution on Windows. It helps users verify IP-level connectivity to another TCP/IP computer by sending Internet Control Message Protocol (ICMP) echo Request messages.
However, users can encounter issues enabling ping on Windows 10 if the Windows Firewall blocks ping requests. Likewise, you may check our guide on what to do if you are getting a destination host unreachable error while trying to ping a host.
What causes ping not to work?
As said earlier, Ping verifies whether a particular IP address is available in the network. The ping request may not be able to send to the IP address or receive corresponding Echo Reply messages. Hence, it results in the request to return futile.
However, a couple of factors may be responsible for the problem. Some are:
How we test, review and rate?
We have worked for the past 6 months on building a new review system on how we produce content. Using it, we have subsequently redone most of our articles to provide actual hands-on expertise on the guides we made.
For more details you can read how we test, review, and rate at WindowsReport.
- Windows Defender Firewall interference – You may experience issues with pinging if the Windows Defender Firewall is impeding the process. Ping does not work when Windows Firewall does not allow the File and Printer Sharing app to run. Also, ping may not work when Firewall blocks all incoming connections on your network path.
- Host or destination IP does not exist – If the IP address you want to verify for availability is not identified or does not exist, the ping request won’t work. So, you may encounter problems with ping if the host or target IP does not exist.
Other factors not highlighted above may also be responsible for ping not working. Hence, we’ll help you with steps to fix the issue and enable ping on your device.
How can I enable ping in Windows 10?
1. Use Windows Firewall with Advanced Security
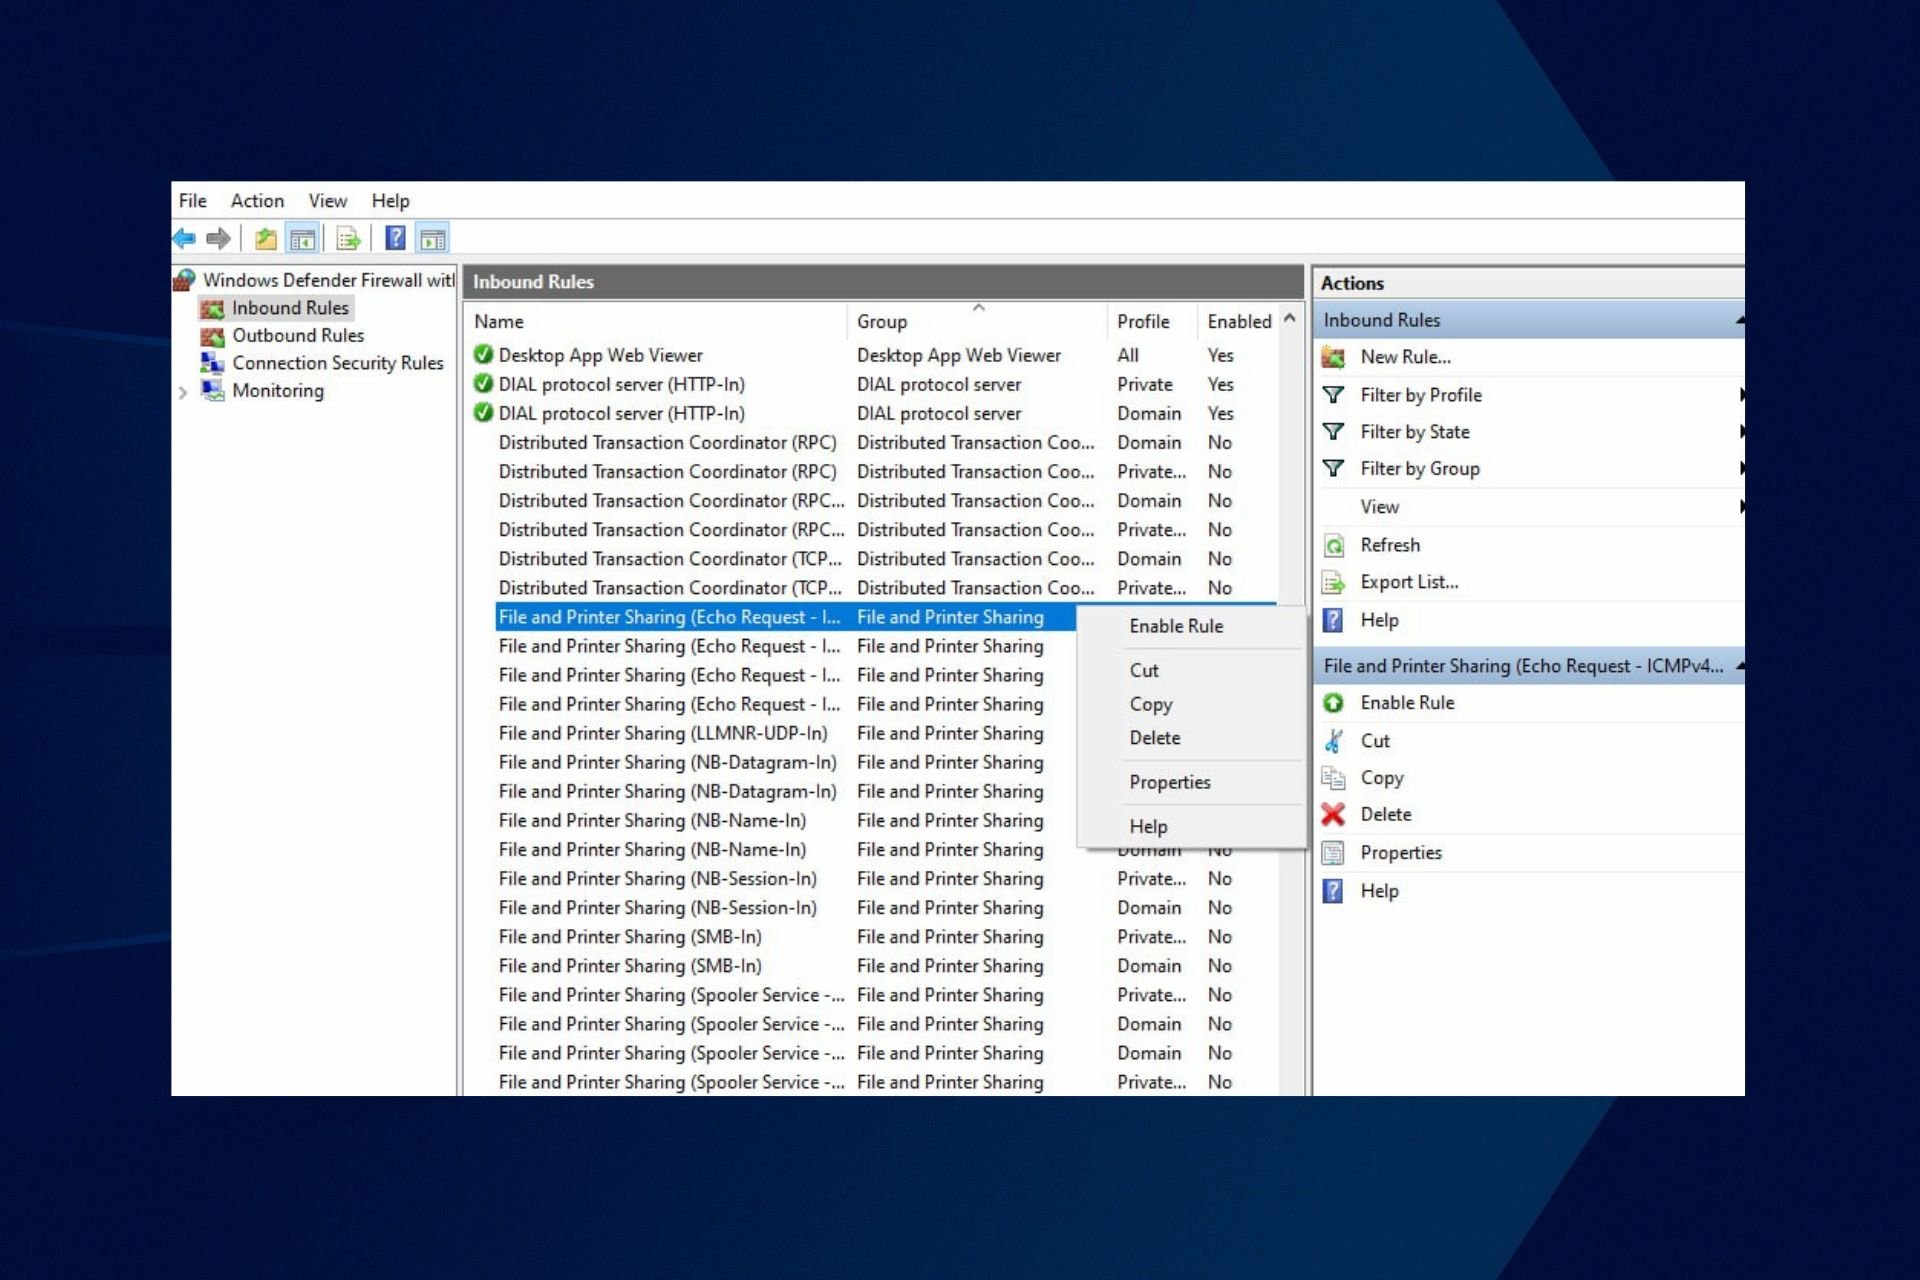
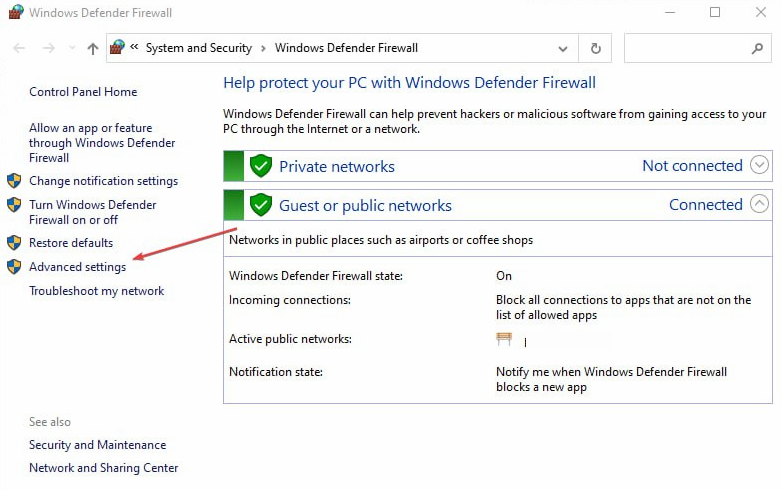
- Press Windows + R key to open the Run dialog box, type firewall.cpl in the text field, and click OK to open Windows Defender Firewall.
- Click on Advanced settings from the right pane.

- Click on Inbound Rules, find and right-click on File and Printer Sharing (Echo Request – ICMPv4 – In) that has a Public Profile, then click on Enable Rule from the drop-down.

- To know if you have successfully enabled File and Printer Sharing (Echo Request – ICMPv4 – In), check the Enabled tab and confirm if it says Yes.

Enabling the File and Printer Sharing (Echo Request – ICMPv4 – In) option will allow your computer to ping and whether a particular IP address is available in the network or not.
Check our guide on Firewall disabled but still blocking apps on Windows 10 for more information.
2. Allow File and Printer Sharing through Windows Firewall
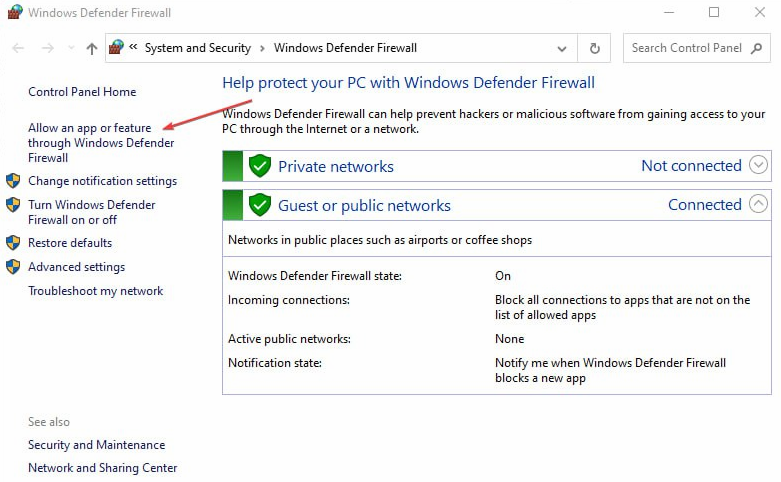
- Press Windows + R key to open the Run dialog box, type firewall.cpl in the text field, and click OK to open Windows Defender Firewall.
- Click on the Allow an app or feature through Windows Defender Firewall option.

- Click the Change settings button.
- Check the box for File and Printer Sharing, and click OK to save the changes.

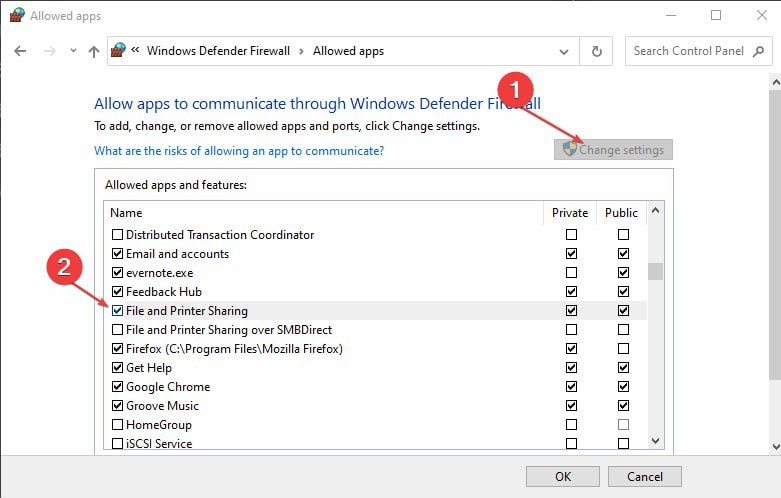
Checking the box for File and Printer Sharing enables the ping functionality on your computer.
- Is Windows 11 Faster Than Windows 10?
- How to Change the Icon Size on Windows 10
- Are Windows 11 Product Keys Backward Compatible?
- Microsoft Store Apps vs Desktop Apps: Which Ones to Use?
3. Use PowerShell
- Left-click the Start button, type PowerShell, and click Run as administrator.
- Click Yes on the User Account Control prompt.
- Copy and paste the following lines of commands and press Enter:
netsh advfirewall firewall add rule name="Allow ICMPv4" protocol=icmpv4:8,any dir=in action=allownetsh advfirewall firewall add rule name="Allow ICMPv6" protocol=icmpv6:8,any dir=in action=allow
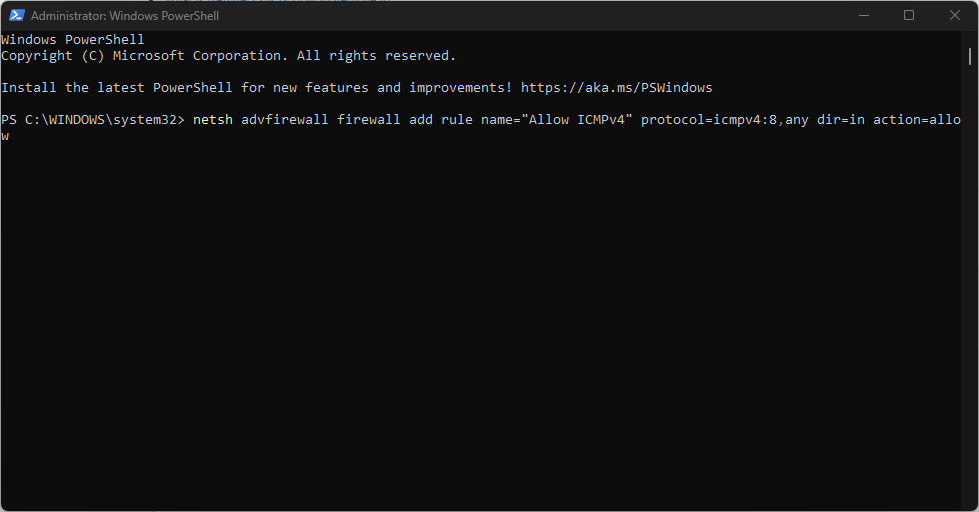
The above commands will enable the ping functionality, allowing your Windows PC to respond to ping requests.
You can check our guide about PowerShell not showing the full output and some fixes to get it working if you experience it.
4. Use the Command Prompt
- Left-click the Start button, type Command Prompt, and click the Run as administrator option.
- Click Yes on the User Account Control (UAC) prompt.
- Type the following lines of commands and press Enter to run them:
netsh advfirewall firewall add rule name="ICMP Allow incoming V4 echo request" protocol=icmpv4:8,any dir=in action=allow - Close the Command Prompt and restart your PC.

The above commands will create two exceptions to allow traffic through the firewall and allow ping requests.
Read our guide on what to do if Command Prompt keeps crashing on your PC.
In addition, our readers may be interested in ways to fix Cannot Ping computers on the same Network on Windows 10.
If you have further questions or suggestions concerning enabling ping on Windows 10, kindly drop them in the comments section.
![]()
Если вы точно уверены, что компьютер находится в сети, что он получает правильные настройки IP и пр., попробуйте выполнить ещё 2 дополнительных действия.
1. Проверьте, включено ли Брандмауэре правило, которое разрешает ответ на пинги.
Перейдите в «Параметры Windows», далее «Сеть и Интернет».

В открывшемся окне (справа или внизу), найдите пункт Брандмаэр Windows.

Далее, в окне Брандмауэра, выберите пункт «Дополнительные параметры».

В левой части открывшегося окна, выберите пункт «Правила для входящих подключений», затем, прокрутите список вниз, пока не найдёте правило с названием «Наблюдение за виртуальной машиной (эхо-запрос — ICMPv4 — входящий трафик)», нажмите на нём правой кнопкой мыши и выберите пункт «Включить правило».

Проверьте, появился ли пинг по IP и имени компьютера (хоста).
Если пинг по имени хоста не включился, то, на компьютере который не пингуется выполните второе действие.
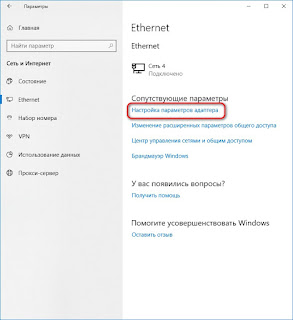
2. Перейдите в «Параметры Windows» и выберите пункт «Сеть и Интернет».
Далее выберите пункт «Ethernet».

Далее «Настройка параметров адаптера»
Найдите интерфейс, который подключен к вашей локальной сети. Нажмите на нём правой кнопкой мыши и выберите пункт «Свойства».

В свойствах сетевого интерфейса отключите протокол IPv6.
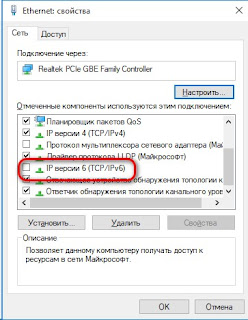
Пинги по имени хоста должны проходить.
Содержание

Параметры Брандмауэра
Самый простой способ запретить или разрешить ping — воспользоваться оснасткой
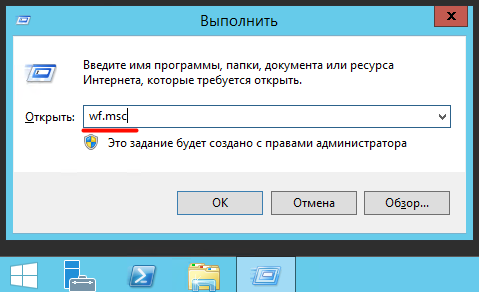
«Брандмауэр Windows в режиме повышенной безопасности».
Для ее запуска нажимаем клавиши Win+R и вводим команду wf.msc.
Заходим в раздел входящих правил («Правила для входящих подключений»).
Здесь нас интересует предопределенное правило для IPV4 — ″Общий доступ к файлам и принтерам (эхо-запрос — входящий трафик ICMPv4)″.
Обратите внимание, что в таблице присутствуют три правила с одинаковым названием.
На самом деле это одно и то же правило, просто настроенное для разных профилей — одно для доменного профиля, второе для общего и частного.

Отключить/Включить правило
Для того, чтобы выключить/включить правило — выберите его и нажмите на правой панели «Отключить правило»/«Включить правило».

С отключенным правилом Ваш сервер не отвечает на запросы утилиты ping и наоборот, с включенным — отвечает.
Мы часто слышим вопросы:
- Как сделать, чтобы мой компьютер пинговался?
- Почему мой компьютер не пингуется?
И самое плохое, что в интернете часто советуют выключить брандмауэр. Мы хотим предупредить, что полностью выключать брандмауэр порой рискованно. И в этой статье мы расскажем…
Для чего разрешать пинг?
Пинг используется для определения доступности устройства (компьютера, роутера, точки доступа, модема) в сети, а также для тестирования стабильности сетевого канала и качества соединения. Если вы в данный момент настраиваете свою сеть или пользуетесь какими-либо программами, определяющими доступность компьютера посредством пинга, то для вас есть смысл разрешить входящий пинг на компьютерах в вашей сети.
Как разрешить пинг (ping), не отключая брандмауэр (firewall)
Как разрешить ping в Windows XP
1 Нажмите Пуск.
2 Выберите Панель управления:

3 Выберите категорию Сеть и подключения к Интернету:

4 Кликните по ссылке Сетевые подключения:

5 Нажмите два раза по нужному сетевому подключению:
Мы подсоединяемся к роутеру по Wi-Fi, поэтому в нашем примере выбираем Беспроводное сетевое подключение.

6 В окне состояния сетевого соединения вызовите Свойства:

7 В открывшемся окне перейдите на вкладку Дополнительно.
8 Нажмите кнопку Параметры:

9 В окне Брандмауэр Windows перейдите на вкладку Дополнительно.
10 В области Протокол ICMP нажмите кнопку Параметры:

11 Установите флажок возле пункта Разрешать запрос входящего эха.
12 Нажмите кнопку OK для сохранения параметров:

Как разрешить ping в Windows 7/8.1
1 Кликните правой кнопкой мыши по иконке сети в панели задач.
2 Выберите Центр управления сетями и общим доступом:

3 Нажмите на ссылку Брандмауэр Windows:

4 Кликните по ссылке Дополнительные параметры:

5 В левой части окна выделите пункт Правила для входящих соединений.
6 В правой части окна выберите Создать правило:

7 Установите переключатель в положение Настраиваемые.
8 Нажмите Далее:

9 Еще раз Далее:

10 В настройке Тип протокола выберите из списка тип ICMPv4.
11 Нажмите Далее:

12 Снова просто Далее:

13 Установите переключатель в положение Разрешить подключение.
14 Нажмите Далее:

15 Выберите типы сетей, в которых вы хотите разрешить входящий пинг. Мы советуем снять галку возле профиля Публичный.
16 Нажмите Далее:

17 В строке Имя укажите произвольное понятное для вас имя правила брандмауэра.
18 Нажмите Готово для применения настроек:

— Advertisement —
Hello! This time I’m going to talk to you about security in Windows 10. It is well known that the system offers multiple layers of security to keep the privacy of our information safe. Certainly, this entails control over network connections. These are really useful for exchanging information and sending data. However, sometimes these connections can fail and so it is imperative to get the error. One of the resources used for this task is PING. It is a basic Internet program that allows a user to verify that a particular IP address exists and can accept requests. This app verifies whether the IP address of a host is currently operational, and how long it takes to respond. Ping works by sending an Internet Control Message Protocol (ICMP) Echo Request to a specified interface on the network and waiting for a reply.
Additionally, it can be used for troubleshooting to test connectivity and determine response time. However, most administrator users consider the ICMP protocol to be potentially unsafe and prefer to block these calls. For this reason, the Windows 10 firewall by default has a security policy of blocking such requests. This is easy to check, trying to ping our computer from a remote machine, we’ll see the following message:

However, it is not advisable to completely block these calls. Therefore, here I show you how to enable and disable ping in Windows 10.
Enable ping in windows 10. Command line mode.
The first thing we need to do is to open a Command Prompt as administrators. Once there, we have to create a rule for IPv4 addressing and another for IPv6. All right, to create the first rule you just have to type the following command in the console:
netsh advFirewall Firewall add rule name="OSRadar Rule PING IPv4" protocol=icmpv4:8,any dir=in action=allow
If everything was done correctly, the CMD should look like this:

Next, we will create the rule for IPv6 addressing:
netsh advFirewall Firewall add rule name="OSRadar Rule PING IPv6" protocol=icmpv6:8,any dir=in action=allow

We have correctly applied the rules for the ping command. We can check that it works, pinging from a remote computer:

To disable the exception for IPv4 addresses, just type the following commanding in the CMD:
netsh advFirewall Firewall add rule name="OSRadar Rule PING IPv4" protocol=icmpv4:8,any dir=in action=block
In the case of IPv6 addressing, the command to write will be the following:
netsh advFirewall Firewall add rule name="OSRadar Rule IPv6" protocol=icmpv6:8,any dir=in action=block
Please note that you can choose the name you want for the rules. If you want to see every rule in the system in detail, just write the following in the terminal:
netsh advFirewall Firewall show rule name=all

Enable ping in windows 10. Graphic mode.
It is also possible to create specific rules to enable and disable ping by entering the Windows 10 Firewall Advanced Security Configuration. With this intention, just type Firewall on the search bar:

Immediately the Firewall options will be displayed. As we did before, we have to create a rule for IPv4 and another for IPv6.

So first, select the Inbound Rules option in the left column and right-click the mouse to create a New Rule:

A rule creation wizard will start. Please select Custom in the rule type and press Next to continue.

On the next screen select All programs and press Next to continue.

In the protocol type, select ICMPv4 and then click on customize.

In the pop-up screen activate the Specific ICMP types box and navigate until you activate the Echo Request option. Press accept to apply the changes.

Next, we can define which specific IP addresses this rule will apply, on the contrary, we will allow the requests of all the addresses. Once the selection is made, press next to continue.

Now select Allow the connection and press Next to continue

In the following screen, we have to select when the new rule will be applied. Please check the 3 available options and press next to continue.

Finally, we only have to assign a name to the rule and press Finish to close the wizard.

Finally, we can see the rule created correctly. To create the exception for IPv6 addressing, we have to repeat the same process but in the protocol and ports window, we have to select ICMPv6.

To disable any of the created rules, just right-click on it and choose Disable Rule.

Conclusion
Finally, we have seen how to enable and disable ping in Windows 10. This will allow us to manage and administer our connections using this command. Finally, we have seen how to enable and disable ping in Windows 10. This will allow us to manage and administer our connections using this command. Consequently, we will be able to monitor the levels of security and data protection on our computers. This is all for now, before saying goodbye I invite you to review our tutorial on bash in Windows 10