После страшного происшествия проходит 20 лет. Однако есть отчаянные люди, которые жаждут приключений. Наш главный герой в их числе. Его манит заброшенный дом и он отправляется на исследования. Теперь он узник этого места. Дальше представлено — The Girl in the Window прохождение игры с картинками.
Если застряли на каком-то этапе, ниже можно найти подсказки в пошаговом руководстве.
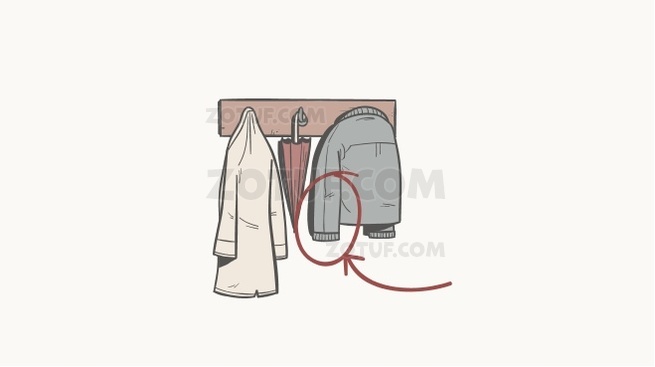
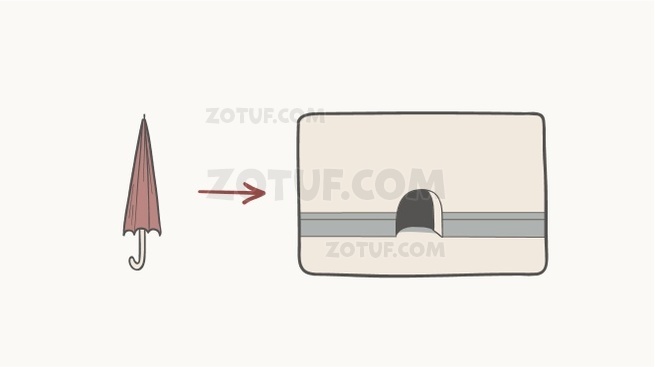
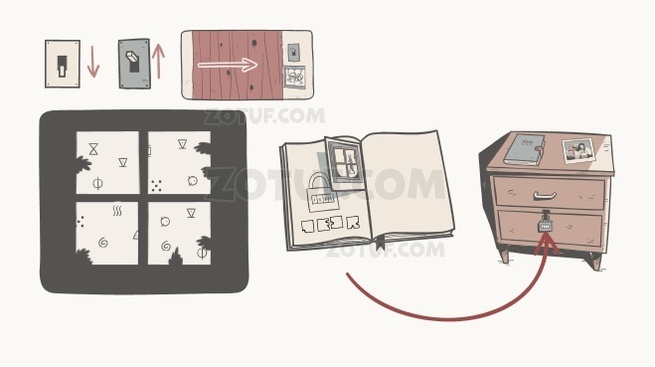
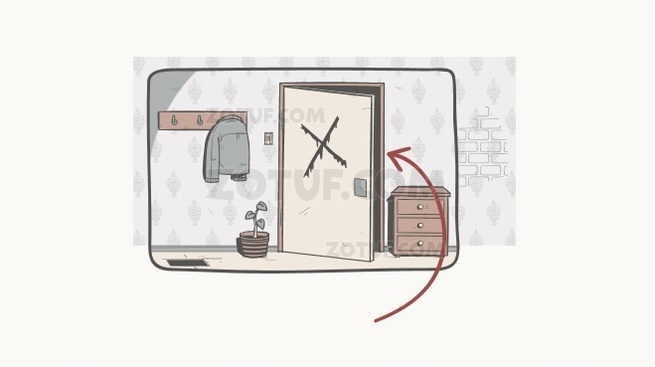
- Входная дверь закрылась. Достаньте порванный листок из кармана серой куртки на вешалке. Пальто вдруг оживет и уйдет прочь. Заберите рядом весящий зонт.
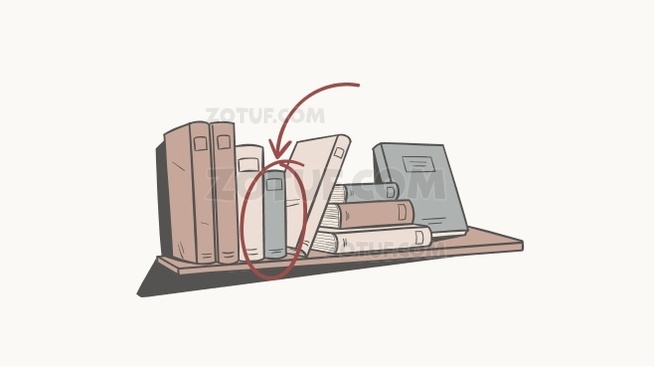
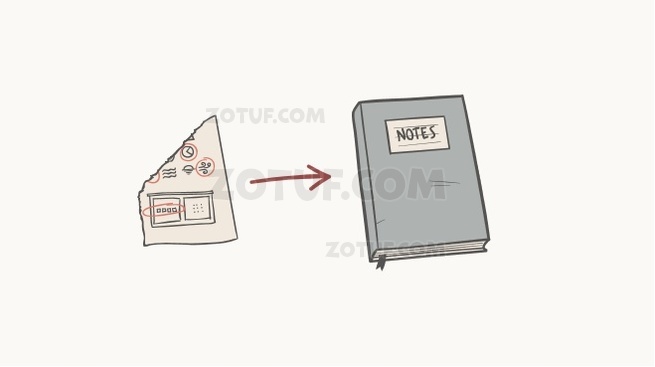
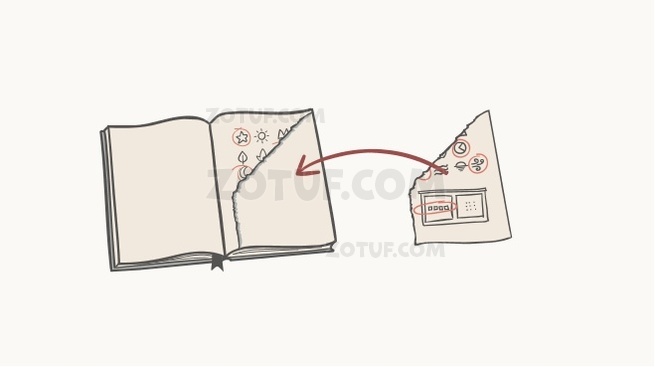
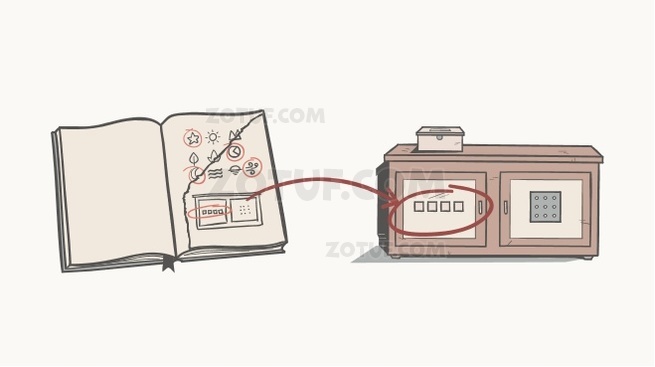
- Пройдите два раза вправо, где заколоченная дверь. С книжной полки подберите блокнот серого цвета. В нем хранятся подсказки для следующих головоломок. А в конце оторванный лист. Добавьте к нему свой из инвентаря.

Теперь у вас есть код от ящика под книжной полкой.
- Отоприте правильной комбинацией ящик.

Тут хранится зеркальце
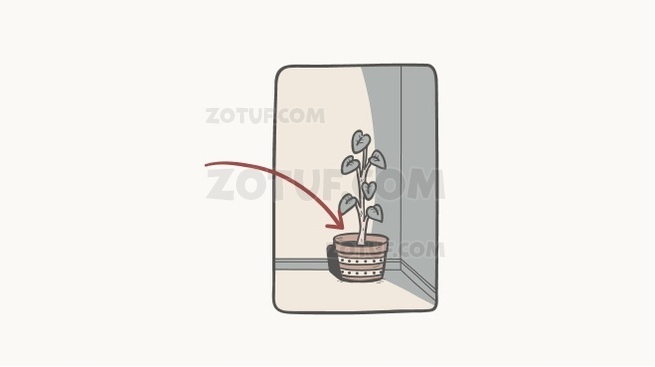
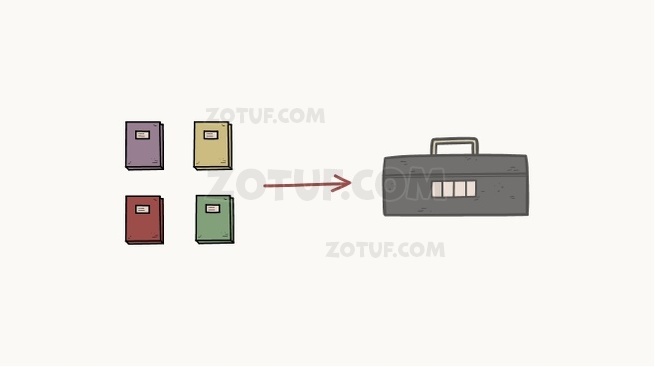
- Сверху этого же ящика находится шкатулка. В квадратах изображены листочки. Погуляв по комнатам, обнаружите, что в них есть горшки с растениями. Код соответствует количеству листьев на них.

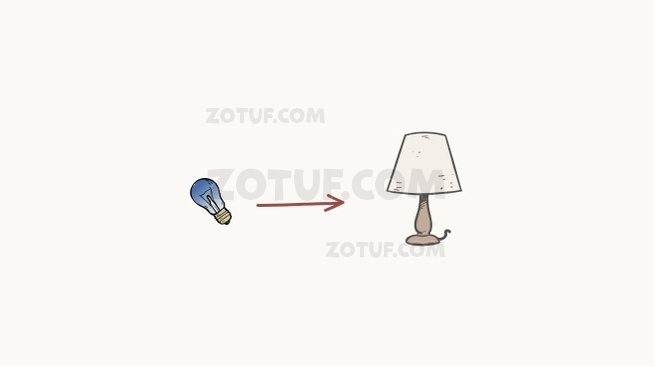
В середине фотокарточка с указанным днем недели и временем, а также спички.
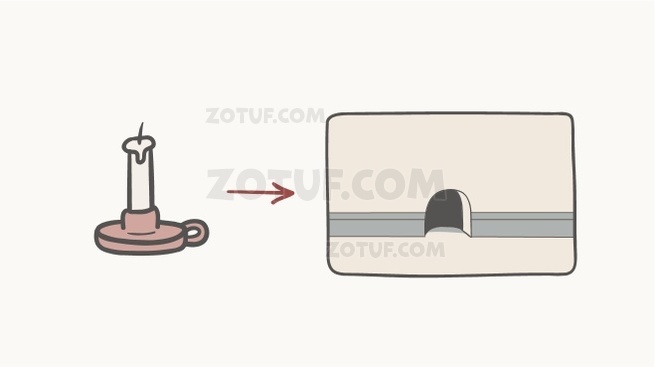
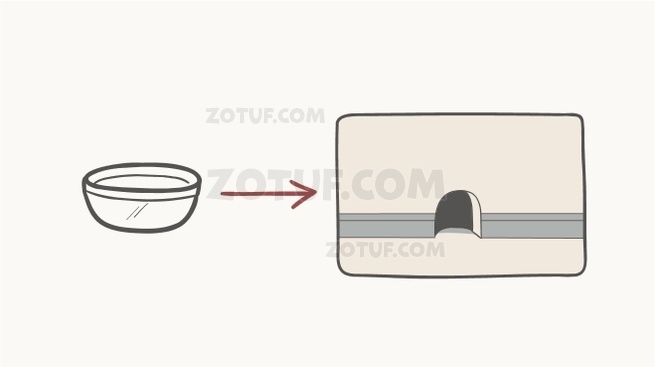
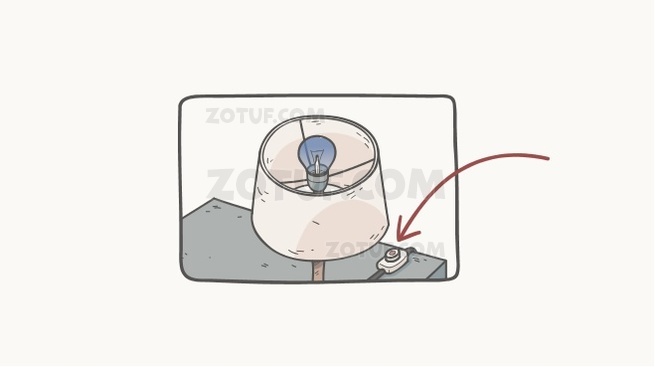
- Справа от входной двери стоит тумба. Возьмите с нее свечу. Подожгите ее спичкой и засуньте в мышиную нору в стене.

Чтобы достать вилку с проводом, воспользуйтесь зонтом.
- В комнате с телевизором стоит шкаф. В верхнем ящике фотокарточка. Еще одна лежит в среднем ящике, возле входной двери.
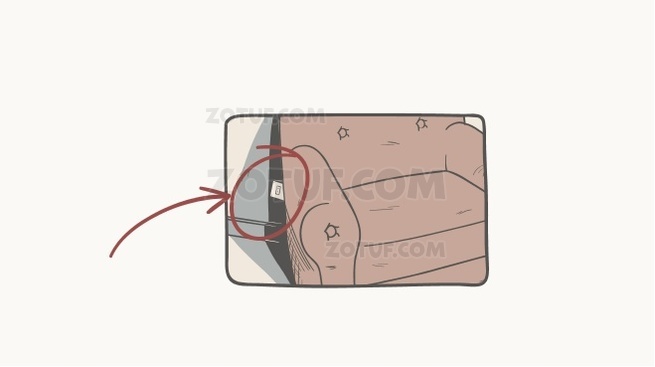
- Троньте кресло, чуть левее него розетка-тайник.

Внутри ключ.
- В этой же комнате есть тумба с двумя ящиками. В верхнем лежит видеокассета. Сверху фотокарточка.
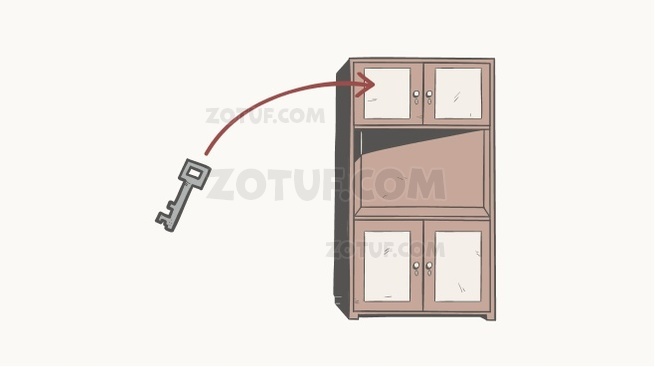
- Найденным ключом откройте ящик шкафа.

Обнаружите изоленту.
- Используйте ее, чтобы починить провод телевизора. Добавив заранее свой кусок.
Ответы к игре — Шаги 11 — 19
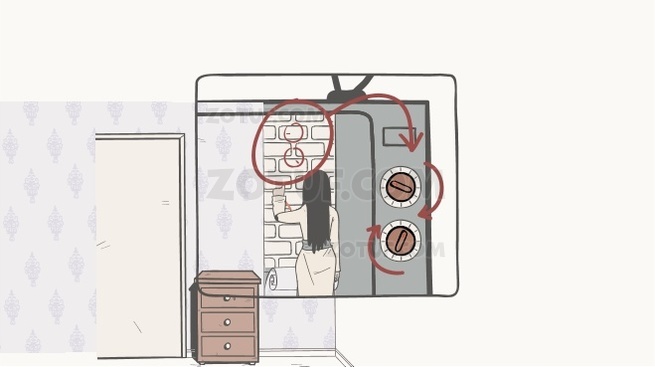
- Вставьте видеокассету в видеоплеер и включите телевизор. В нем девушка рисует расположение ручек. А на тумбе вторая ручка от ТВ. Заберите ее, вставьте в соответсвующее отверстие. Настройте аппарат, как нарисовала девушка.

Получите рукоятку.
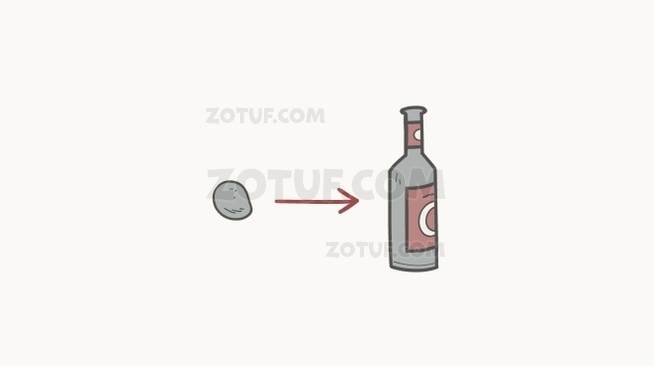
- Из шкафа возьмите бакал. В комнате с картиной вампира стоит горшок. Заберите из него камень.
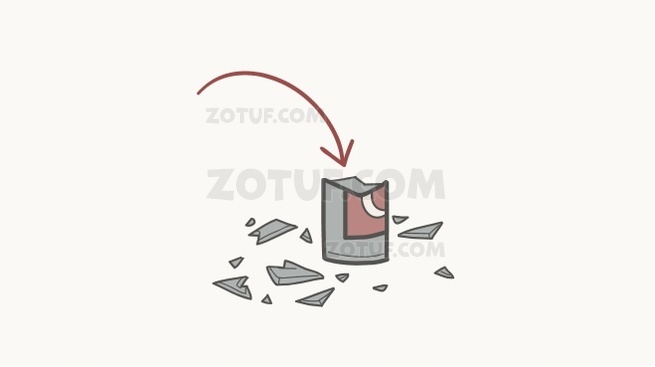
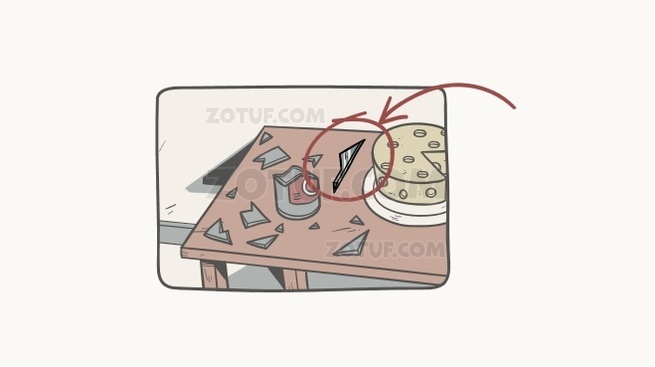
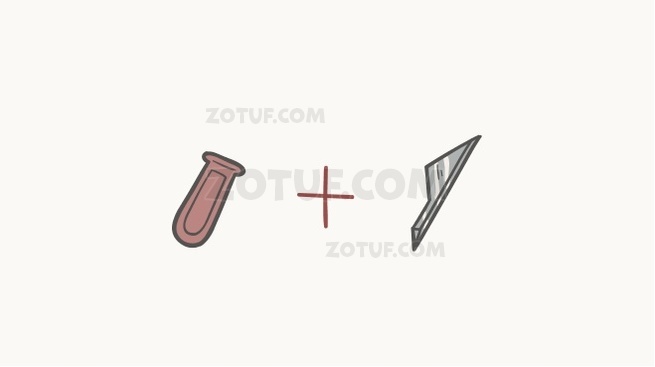
- Следуйте в комнату с креслом. Тут на столе бутылка, разбейте ее камнем. Подберите кусок стекла. Объедините го с рукояткой, чтобы получился нож. Внутри бутылки — ключ.
- Поднимите подушку с кресла и разрежьте ткань под ней. Тут лежит крест.
- Найденным ключом откройте верхний ящик возле входной двери. Получите перчатку.
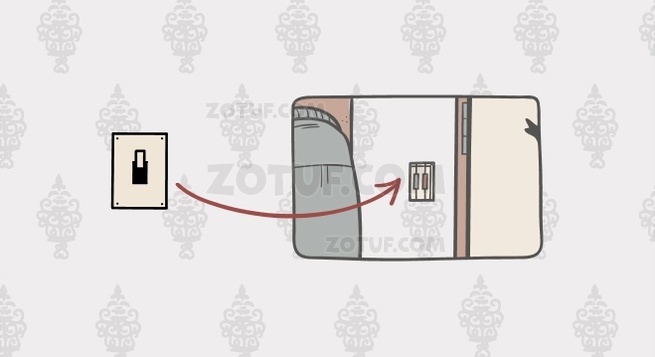
- Возле окна электрощиток. Открыв его решите головоломку. Но не забудьте прежде одеть перчатку.

Сверху выключатель. Тапните по нему, чтобы за окном загорелась лампа. Задерните штору.
- От сыра на столе отрежьте ножом маленький кусочек. На тумбе дневник, изучите в нем информацию.
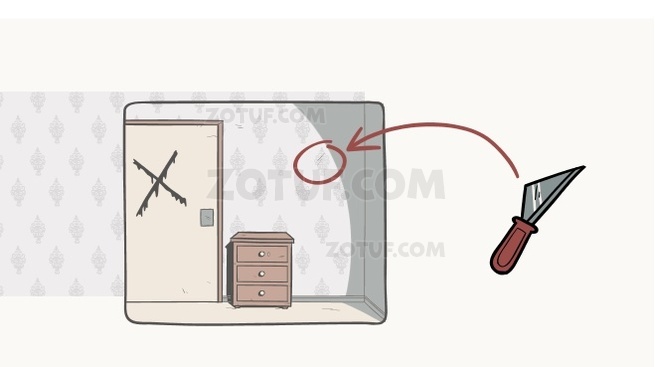
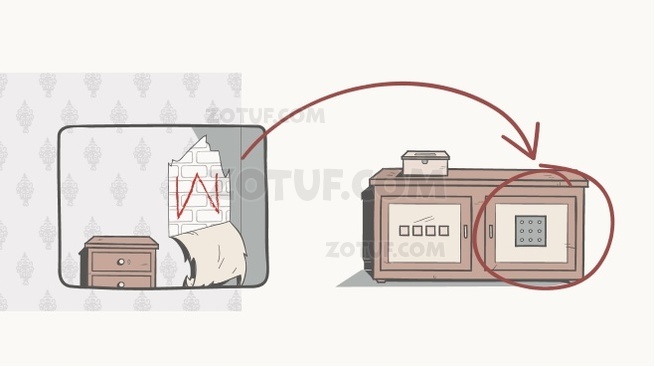
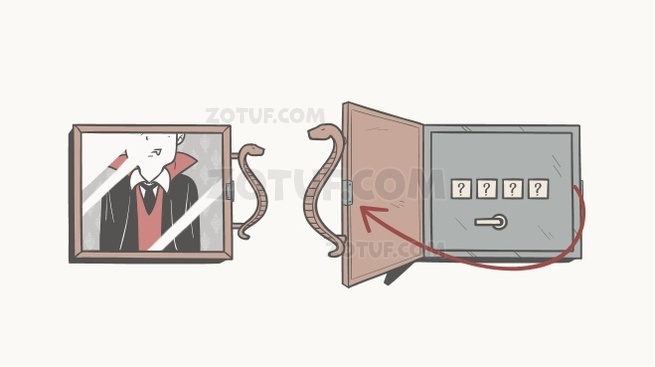
- Вернитесь к входной двери, справа на обоях есть надрез, сделайте его больше, чтобы увидеть большую букву М. Это пароль от сейфа в комнате с картиной вампира.

В середине окажется ключ и выключатель.
- Последний поместите слева от входной двери. Выключите свет. Идите в комнату с телевизором. На стене видны помеченные символы. Чтобы узнать порядок, достаточно взглянуть в блокнот из инвентаря. Включите свет.
Шаги 20 — 28
- Идите к тумбе, которая находится в комнате с окном. Отоприте навесной замок с набором символов со стены.

В ящике лежит металлическая трубка.
- Возвращайтесь к входной двери. Под вешалкой находится выделяющаяся доска. Убрав ее, получите чеснок. Доску тоже заберите.
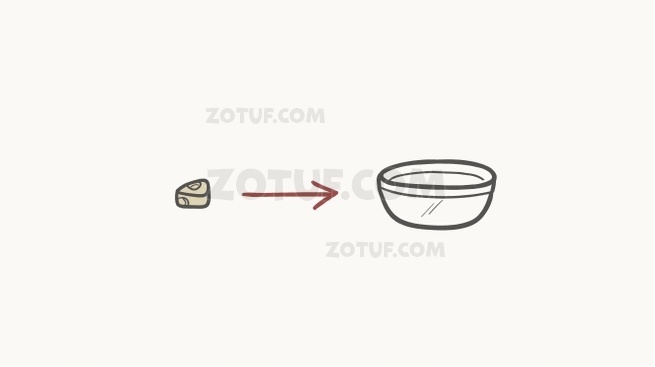
- Откройте ключом в шкафу нижний ящик, отыщите миску.
- Возле мышиной норы разместите миску, добавьте доску, в емкость положите кусочек сыра.

Словите грызуна.
- В комнате с телевизором есть труба, в трещине лежит ключ. Запустите туда мышь.

Она добудет ключ.
- Ним отоприте последний ящик в шкафу.

В середине отвертка и вино.
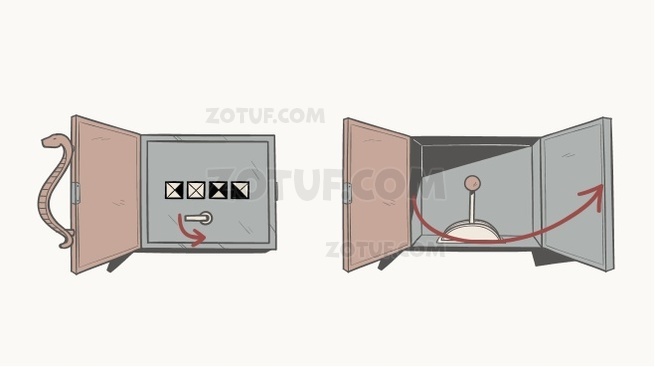
- Налейте его в бокал. Раму картины с вампиром открутите отверткой. За ней окажется сейф.
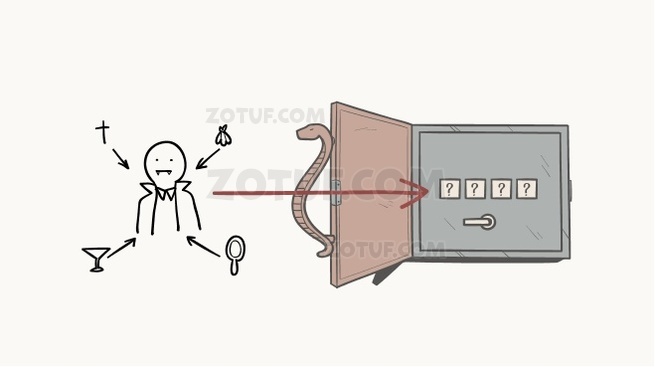
- Вампиру с картины дайте вино, крест, чеснок и зеркало. Кровопийца покажет символы, которые применимы к сейфу. Порядок подскажет доска с вырезками из газет.

Пароль от сейфа получается такой.

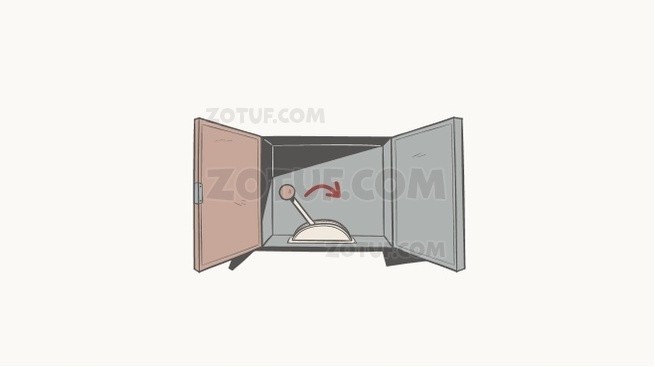
Внутр рычаг. Поверните его.
- Выйдите через входную дверь. На полу лежит вырезка из газеты с фото главного героя.
Поздравляю, вы закончили The Girl in the Window прохождение игры.
Читать также:
Haunted Laia прохождение
Hello everyone and welcome to our walkthrough for “The Girl in the Window” a room escape game created by the Dark Dome. The Girl in the Window is the second game in the series, and the story of this game is also set in Hidden Town, which is filled with all kinds of mysteries. In this walkthrough, we will show you how to solve all the puzzles and finish the game.
NOTE: Some puzzles will CHANGE with each playthrough, but the logic behind solving the puzzles will always remain the SAME. For example, in one playthrough a code to open a safe could be 1234, and in another playthrough, the code could be 4321. However, you will always discover the numbers for the code at the same location and by using the same hints.
At the beginning of the story, we find out that a terrible murder happened in one of the houses in Hidden Town, and this house was closed and abandon ever since. However, the people started noticing some strange things inside the house, with some of them even claiming that they saw the girl in the window. Our character feels drawn to the house and decides to step inside, but the door immediately shuts behind him. So, our task is to find a way to unlock the door and escape from the house… We will probably learn more about the mystery surrounding this house, while we’re trying to find a way to escape.

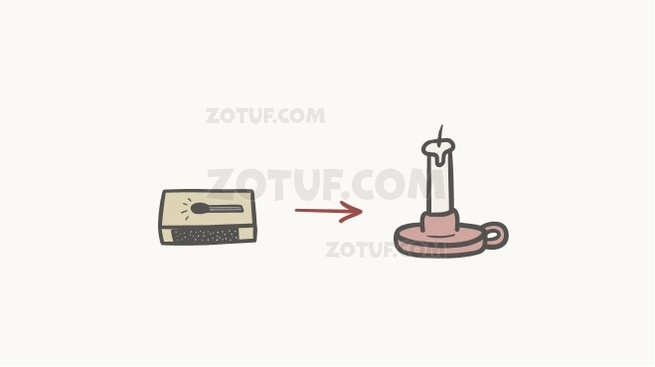
On the small cabinet to the right of the door, you will see a candle. Tap on it to take a closer look and tap once more to pick it up. A “Candle” will be added to your inventory.

Now tap on the middle drawer to open it. Inside you’ll see a photo. Tap on it to take a closer look. We can see that a stranger stood in front of the house for three hours. Let’s put down the photo and see what else we can find.

Tap on the umbrella to take a closer look. Tap once more to pick it up, and an “Umbrella” will be added to your inventory.

Now, tap on the sleeve of the jacket on the right to move it aside. You will see a torn-out note in the pocket below the sleeve. Tap on the note to pick it up. We should probably look for the other part of the note.

Also, as soon as we took out the note from the pocket, some kind of a ghost appeared inside the coat on the left and walked away with it.

Ok, now let’s see what we can find in the room on the right. Tap on the arrow on the right to go there.

As soon as we entered, we could see a goblet moving on its own. Tap on it to pick it up, and a “Goblet” will be added to your inventory.

We can also tap on the top-right cabinet door, and we will see a photo inside it. Tap on the photo to take a closer look. It looks like the stranger was spying on the house again while pretending to read a newspaper. Let’s put down the photo and see what else we can find.

Tap on the arrow on the right to go to the next room.

As soon as we entered we could see that one of the books on the wall shelf moved. Tap on the blue book to the left of it to take a closer look, and tap again to pick it up.

Tap on the book that we just picked up to take a closer look, and tap on the arrow on the right to open it.

Tap on the photo to take a closer look at it. We can see the stranger showed up again and spied on someone inside the house.

Ok, this book contains many useful notes that will help us in solving the puzzles inside this house. But, let’s first skip to the last page by tapping twice on the arrow on the right.

Looks like we found the other half of the torn-out note. So, select a “Piece of Paper” from the inventory and tap on the page on the right to reassemble it.

Here we can see ten symbols, but only ten of them are marked. Also, next to each of the marked symbols, we can see a roman numeral, and it represents their order in the next puzzle. So, let’s write down/memorize the order of the symbols.
First, we have a “Star”
Second, we have a “Crescent Moon”
Third, we have a “Circle with the triangle”
Fourth, we have some lines that look like a “Wind” blowing
We can also see that these symbols should be used to unlock the left cabinet door.
NOTE: The order of the symbols might be different in your game, but you can still determine the correct order of the symbols by looking at the roman numerals next to them.

So, tap on the left door of the cabinet to take a closer look.

Tap on the fields of the puzzle, and entered the symbols in the same order (left to right) as we saw on the note in the book. The order was: a “Star”, a “Crescent Moon”, a “Circle with the triangle”, and a “Wind”. As soon as you enter the correct symbols, you will hear a clicking sound, indicating that the cabinet door is unlocked.

Tap on the cabinet door to open it. Tap on a “Mirror” inside to pick it up and it will be added to your inventory.

Now, let’s take a look at the notes inside the book again.

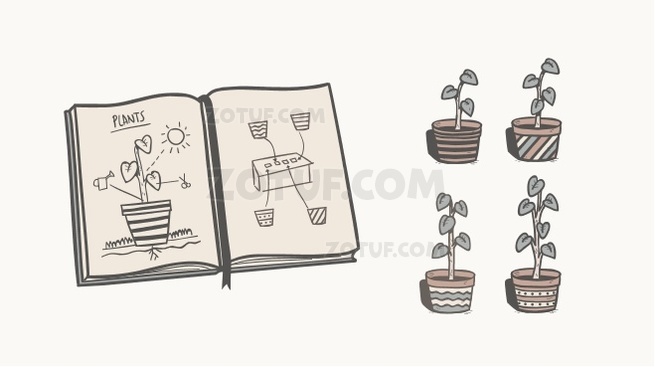
Tap on the arrow on the left to turn the page. Here we can see another puzzle, and this one is solved by counting the number of leaves on the plants inside the vases, as you’ll soon see. However, we also have to look at the vases in the correct order. So, looking from right to left, the order is:
First, the vase with diagonal stripes
Second, the vase with stripes and dots
Third the vase with “wavy” stripes
Fourth, the vase with horizontal stripes
Write down/ memorize the order of the vases.
NOTE: The order of the vases might be different in your game.

Ok, inside this room we can see a vase with the stripes and dots (the second one). We can see that there are SIX leaves on the plant inside this vase. Memorize/Write down this information.

Since we’re already here, let’s tap on the vase to take a closer look at it. Inside we can see a stone. Tap on it to pick it up, and a “Stone” will be added to your inventory.

Ok, now let’s look for the other vases. Tap on the arrow on the right to go to the next room.

In this room, we can see the third vase, the one with wavy stripes. There are FIVE leaves on the plant inside the vase. Write down/memorize this information.

There are some other things that we could examine in this room, but let’s first finish the puzzle with the vases. So, tap on the arrow on the right to go to the next room.

In this room, we can see the fourth vase, the one with horizontal stripes. There are THREE leaves on the plant inside the vase. Write down/memorize this information, and let’s proceed to the next room.

Finally, in this room, we can see the first vase, the one with the diagonal stripes. There are FOUR leaves on the plant inside the vase. Write down/memorize this information, and let’s proceed to the next room, and solve this puzzle.

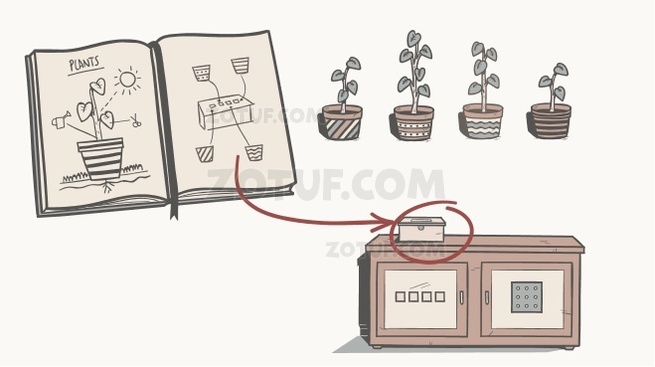
In this room, you will see a white box. Tap on it to take a closer look.

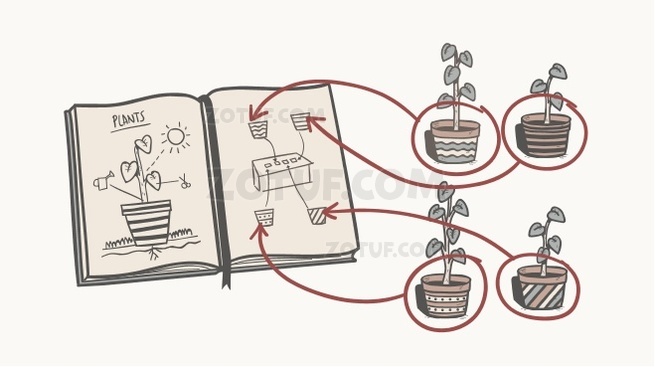
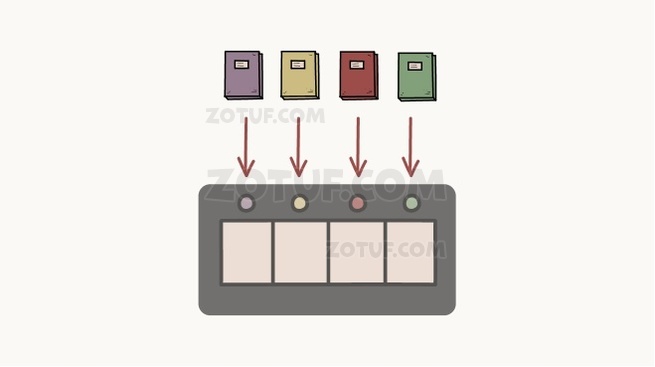
Ok, now let’s tap on the fields and enter the correct number of leaves. So, starting from right to left we have:
First field = Four leaves (the vase with diagonal stripes)
Second field = Six leaves (the vase with stripes and dots)
Third field = Five leaves (the vase with “wavy” stripes)
Fourth field = Three leaves (the vase with horizontal stripes)

As soon as you enter the correct code, you will see a clicking sound, indicating that you managed to unlock the box. Also, the ghost of the dark-haired girl will suddenly appear behind our character, and it seems that she wanted to touch his shoulder. But it looks like she’s gone, so tap on the box to open it.

Tap on the image inside the box to take a closer look at it. We can see that the stranger was no longer trying to look inconspicuous, as he now openly stood in front of the window and stared at someone inside the house.

Tap on the other item inside the box to pick it up and a “Box of Matches” will be added to your inventory.

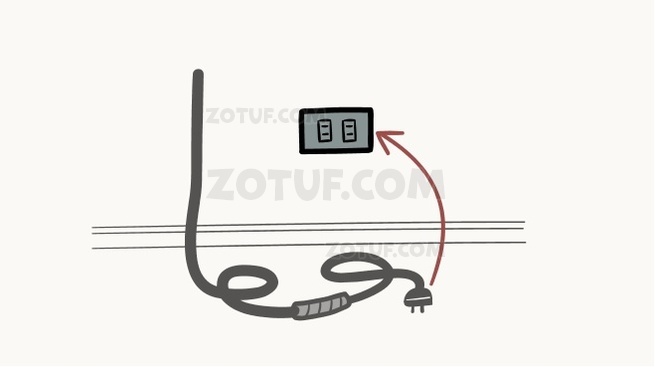
Ok, we can see a mouse hole to the right of the boarded door. We can light up the candle with matches and use it to illuminate the mouse hole. So, let’s do that. Select the “Box of Matches” from your inventory and tap on the “Candle” to light it up – a “Lit Candle” will be added to your inventory.

Now, tap on the mouse hole in the wall to take a closer look at it. Select the “Lit Candle” from the inventory and tap inside the mouse hole to place the candle and illuminate the hole.

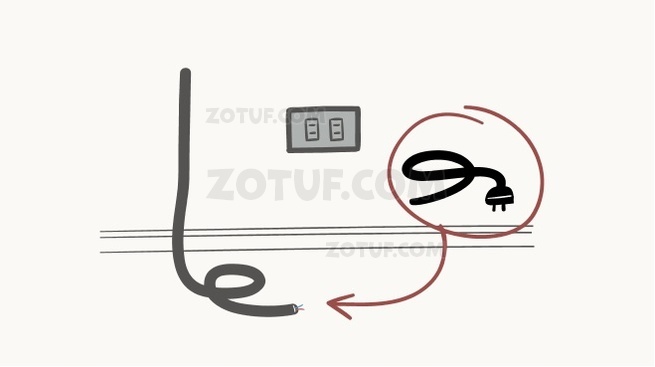
We can see an electrical cable inside the hole. However, if we tap on it, we can see that our character can’t reach it with his hand. Also, we can see some mouse tracks.

So, select the “Umbrella” from the inventory and tap on the electrical cable. Our character will be able to reach it and a “Cable with a Plug” will be added to your inventory.

Ok, now let’s go to the next room on the right.

Tap on the table to take a closer look at it.

You will see an empty bottle and a cheese. Select the “Stone” from the inventory (we found it inside the vase) and tap on the bottle to break it.

Tap on a piece of broken glass to pick it up, and a “Piece of Glass” will be added to the inventory.

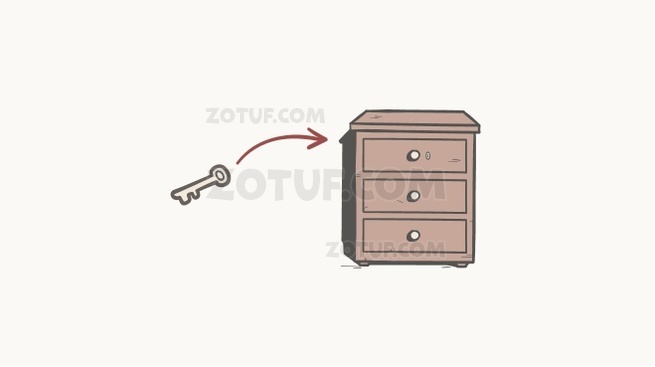
Now, tap on the broken bottle to look inside it. Inside the broken bottle, you will see a small key. Tap on it to pick it up and a “Key with the round handle” will be added to your inventory.

There is also an armchair in the left corner of the room. Tap on the armchair to take a closer look at it.

Behind the armchair, you will see a loose outlet. Tap on it to take a closer look, and tap again to remove it.

We can see that a small key was hidden behind the outlet. Tap on it to pick it up and a “Key with a square handle” will be added to your inventory.

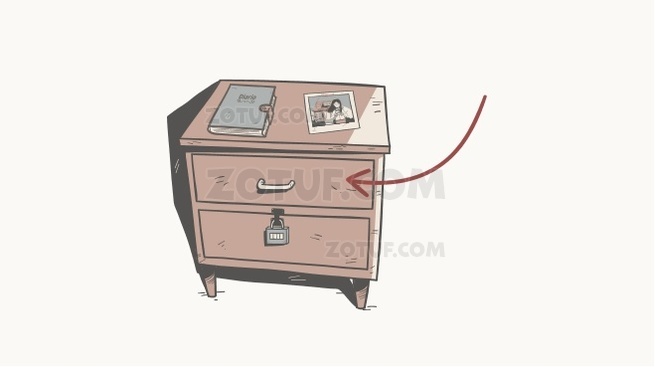
Now, let’s take a look at the top drawer of the cabinet on the right. Tap on it to take a closer look, and tap once more to open it.

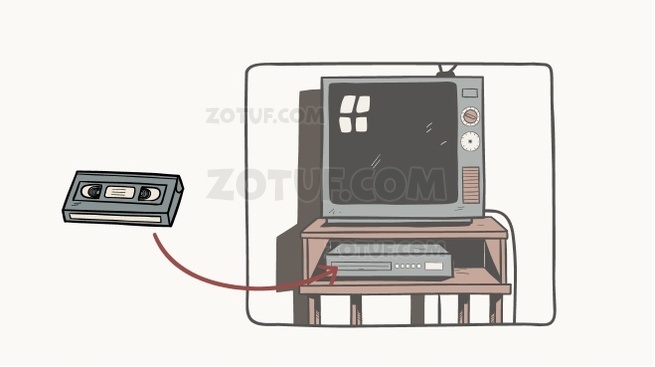
Inside the drawer, you will see a VHS tape. Tap on it to pick it up, and a “Video Cassette tape” will be added to your inventory.

Ok, now let’s go to the next room on the right.
Tap on the drawer to the right of the front door to take a closer look at it. Select the “Key with the round handle” (we found it inside the broken bottle) from the inventory and tap one keyhole on the top drawer to unlock it.

Tap on the drawer to open it, and inside you will see some kind of glove. Tap on the glove to pick it up, and an “Electrical Safety Glove” will be added to your inventory.

Ok, now let’s go to the next room on the right (the one with the TV).

Now, let’s take a look at the upper-left cabinet door.

Select the “Key with the square handle” (we found it behind the armchair) from the inventory and tap on the keyhole on the cabinet door to unlock it.

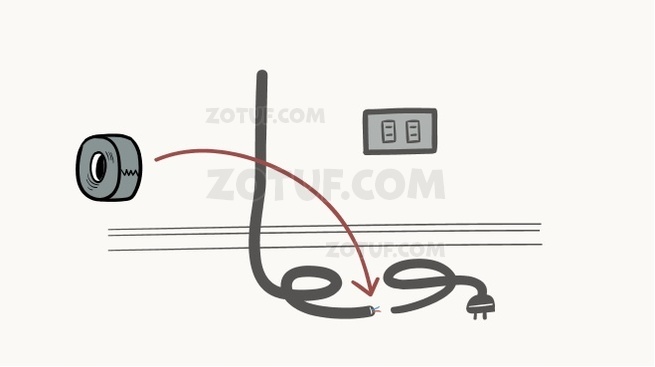
Tap on the cabinet door to open it and inside you will see duct tape. Tap on it to pick it up, and “Electrical insulating tape” will be added to your inventory.

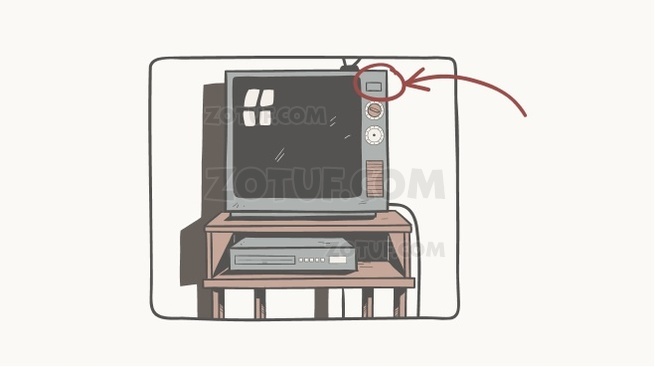
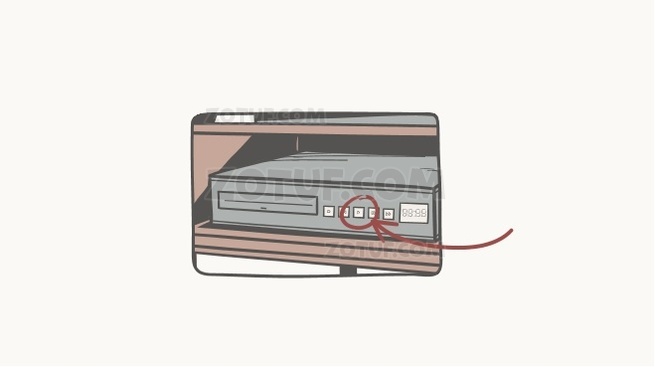
Ok, now let’s take a look at the cable below the TV.

We can see that the cable is broken. Select the “Cable with a plug” from the inventory and tap to the right of the broken cable.

Ok, now let’s fix this cable. Select the “Electrical insulating tape” from the inventory and tap between the two cables to connect them.

Now, tap on the cable to plug it into the electrical outlet.

We repaired the cable, so we can now turn on the TV. First, tap on the TV to take a closer look at it. Then, tap on the bottom in the upper right corner of the TV to turn it on.

Ok, now let’s see what’s on the videotape. First, tap on the VCR to take a closer look at it. After that, select the “Video Cassette tape” from the inventory and tap on the VCR to put it in.

Tap on the “play” button so we can finally see what’s on this tape.

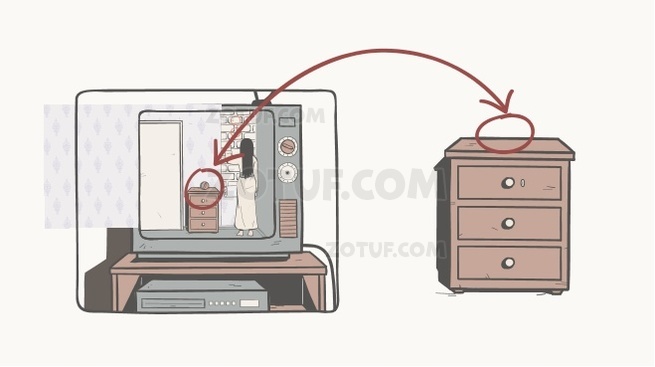
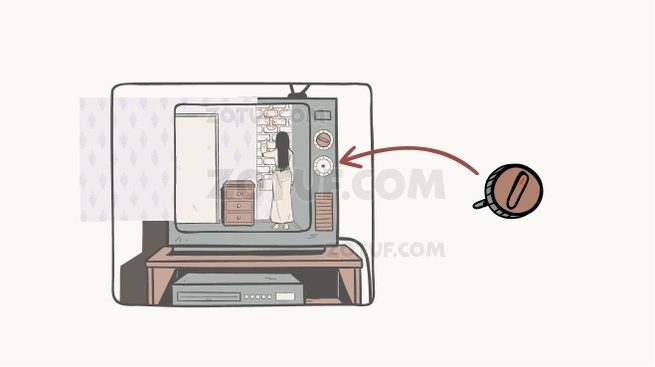
You will see that the lower dial on the TV is missing. However, we saw that it appeared in the video on top of the cabinet. So, maybe it also appeared there in real time? Let’s check it out.

Tap on the arrow on the left to go back to the previous room.

We can see that the dial appeared on the drawer, just like in the video. Tap on the dial to take a closer look at it, and tap once more to pick it up. A “Dial” will be added to your inventory.

Ok, let’s go back to the room with the TV.

As before, tap on the TV to take a closer look at it. Now, select the “Dial” from the inventory and tap on the empty slot to insert it.

We should now turn both dials to the correct position. The correct position of the dials is drawn on the circles, above the creepy girl. Also, you can tell in which directions the dials are pointing by looking at the small red line.

Ok, now let’s turn the dials. As you can see on the image, the upper dial should be pointing at the 9 o’clock position, while the lower dial should be pointing at the 5 o’clock position.
As soon as you point the dials to the correct position, the small compartment below them will open up, and we can see that there’s something inside it. Tap on this item to pick it up, and a “Plastic Handle” will be added to your inventory.

Ok, we can now make the improvised knife, so let’s do that. Select the “Plastic Handle” from the inventory and tap on the “Piece of glass” to combine these two items. A “Makeshift Knife” will be added to your inventory.

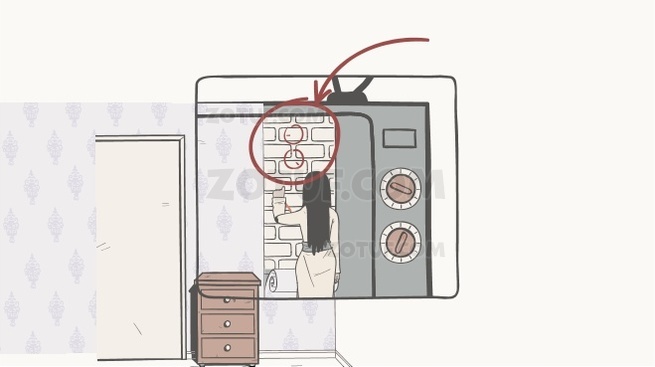
Ok, now let’s go back to the room on the left and use the knife to remove the wallpaper.

Ok, since the dial appeared on this cabinet, we know that the girl in the video was drawing on the wall to the right of it. So, select the “Makeshift Knife” from the inventory and tap on the wallpaper several times to remove it.

After removing the wallpaper, we can see that there’s a symbol that resembles the letter “M” below it. We will use this information to solve yet another puzzle, so memorize this symbol.
NOTE: In your game, the sign below the wallpaper could be something different than the letter “M” (letter “W” for example). But you will always discover it by removing the wallpaper with the makeshift knife.

Ok, before solving the puzzle with the symbol “M” let’s first go to the room on the left (the one with the armchair).

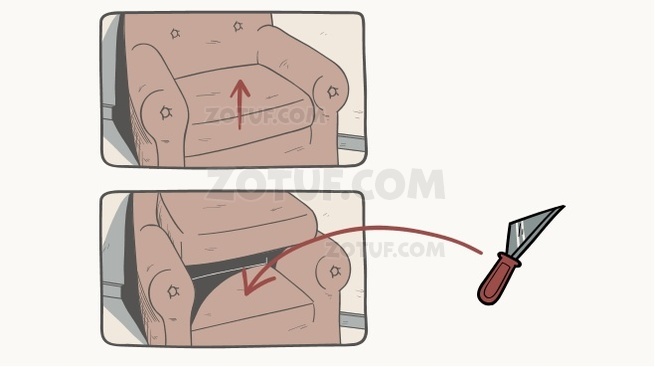
Tap on the armchair to take a closer look at it, then tap again to lift up the cushion – your character will say that he can feel something hidden inside the armchair.

Now, select the “Makeshift Knife” from the inventory and tap below the cushion (twice) to cut the armchair.

Our character will discover the crucifix hidden inside the armchair. Tap on it to pick it up, and a “Wooden Cross” will be added to your inventory.

Ok, now let’s go to the next room on the left.

Tap on the cabinet door on the right to take a closer look at it, and tap again to start the interaction.

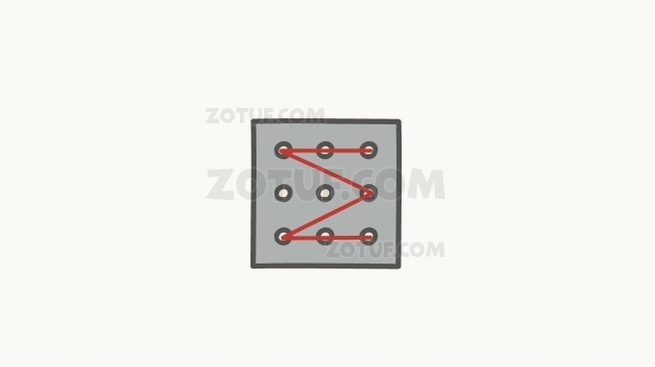
Ok, here we need to draw the symbol that we discovered below the wallpaper. In our case that’s the letter “M”. So let’s do it. You can draw the letter “M” by tapping on certain fields as shown in the image below.

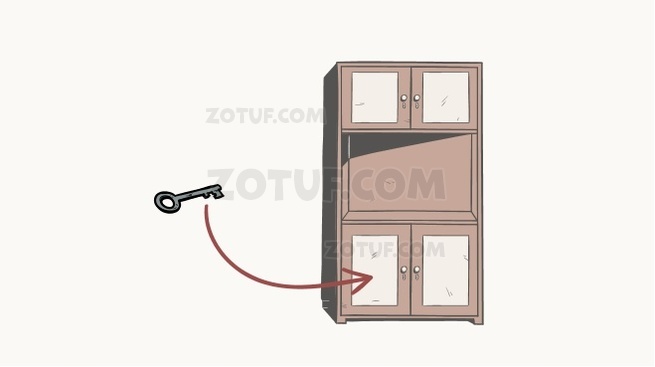
As soon as you draw the correct symbol, you will hear a clicking sound that indicates that the cabinet door is unlocked. So, tap on the door to open it. Inside you’ll see two items. Tap on them to pick them up and a “Light Switch” and a “Key with an oval-shaped handle” will be added to your inventory.

Ok, now let’s go back to the room with the TV – it’s the first one on the left.

Tap on the lower left cabinet to take a closer look at it.

Select the “Key with an oval-shaped handle” and tap on the keyhole on the left to unlock the cabinet door.

After that, tap on the cabinet door to open it, and inside you will see some kind of a bowl. Tap on it to pick it up and a “Glass Bowl” will be added to your inventory.

Ok, now let’s go to the room with the armchair. It’s the second one on the right.

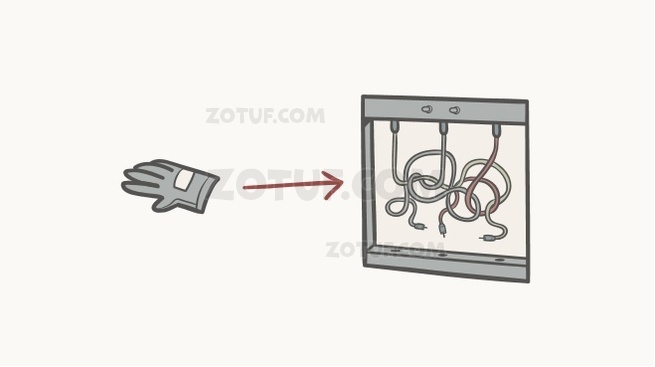
Let’s check out that electrical panel on the right. Tap on it twice to take a closer look and open it.

We can see a lot of wires, but it seems that our character can’t touch them with his bare hands.

But we have a solution for this problem. Select the “Electrical Safety Glove” from the inventory and tap on the cables.

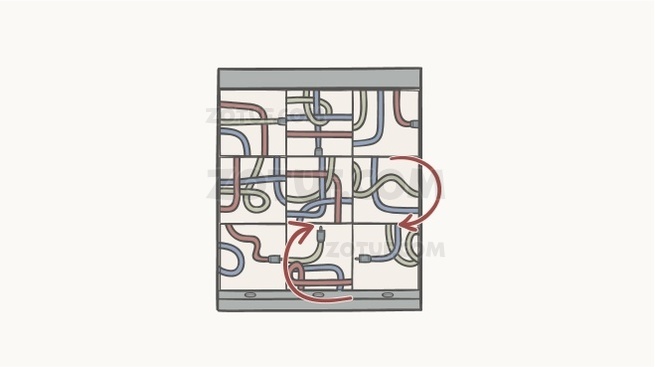
Well, now we should properly reconnect the cables. This puzzle might seem somewhat confusing at first, but it can be easily solved in three simple steps.
Step 1
We are going to rotate the cable in the first (top) row so that their plugs are all pointing upward. So,
Rotate the left field in the first row until the plug on the blue cable is pointing upwards.
Rotate the middle field in the first row until the plug on the green cable is pointing upwards.
Rotate the right field in the first row until the plug on the red cable is pointing upwards.

Step 2
We will do the similar thing as in step 1, only this time the plugs on the cables in the third (bottom) row should be inserted into the slots (pointing downwards). So,
Rotate the left field in the third row until the plug on the red cable is pointing downwards.
Rotate the middle field in the third row until the plug on the blue cable is pointing downwards.
Rotate the right field in the third row until the plug on the green cable is pointing downwards.

Step 3
Ok, the only thing left to do now is to connect the cables in the second (middle) row with the cables in the other rows. So,
Rotate the left field in the second row until the green cable is reconnected with the green cable below it (left field in the third row). NOTE: you could also choose to line up the cables with the field above.
Rotate the middle field in the second row until the green and red cables are reconnected with the green and red cable below them (middle field in the third row).
Rotate the right field in the second row until the blue cable is reconnected with the blue cable below it (right field in the third row).
NOTE: As you line up the cables in the fields in the second row with the cables in the fields in the third row, they will be also lined up with the cables in the first row.

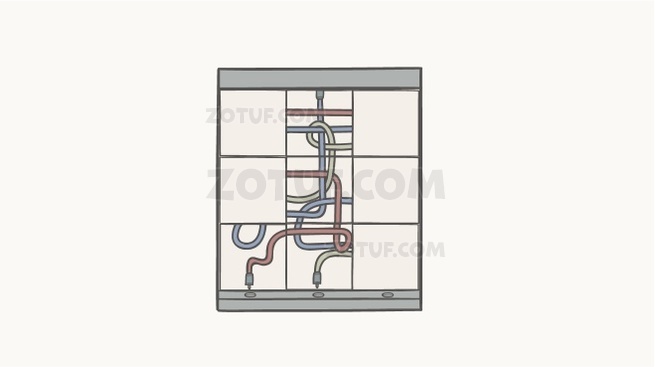
After completing this puzzle we have restored the power to the street light outside. So, tap on the switch to turn on the light.

Next, tap on the red curtain on the left to pull it over the window.

Ok, now let’s go back to the front door. It’s the first room on the right.

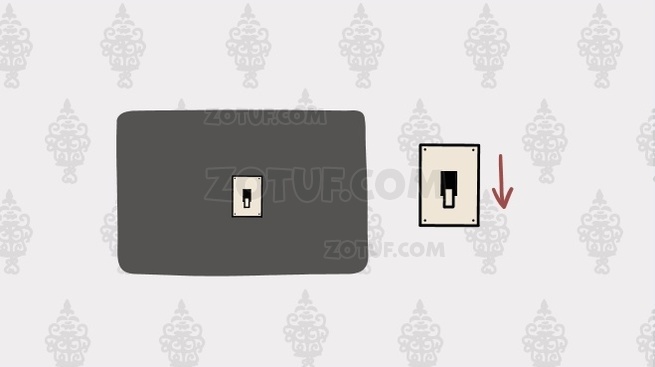
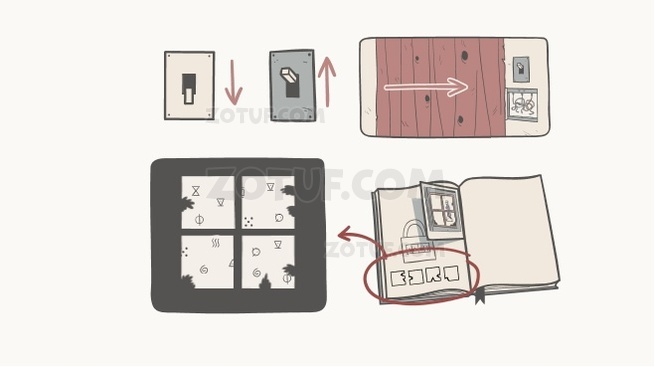
We can see that to the left of the front door, the light switch is missing. Tap to examine the wires more closely.

Select the “Light Switch” from the inventory and tap on the slot to reconnect it.

Ok, now tap on the switch to turn off the light.

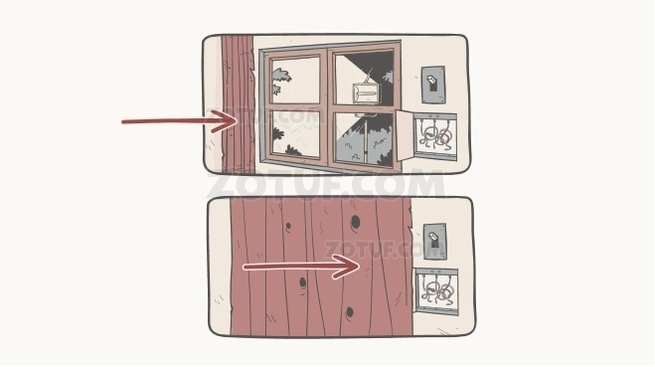
Let’s go and check out the room on the right (the one with the TV).

After turning off the lights, we can see that shadows are forming four squares on the wall, and inside of the squares, there are some symbols. Some of the symbols are marked with white circles. Also, some shadows are cutting inside the squares – take note of these shapes.

Now, let’s check out the book in our inventory and look for clues about this puzzle. Go to the first page.

On the left page, we can see a padlock marked with numbers 1,2,3, and 4. Below it there are four notes, also marked with numbers 1,2,3, and 4. Also, each note looks like a square, but there are some pieces missing from each square. So, if you look closely you can conclude that the pieces of the note that are missing will match perfectly with the shadows on the squares that we just looked at. So, let’s first memorize what pieces are the notes on the hint missing and compare them with the shadow squares on the wall.
Number 1 Note is missing a bottom left corner
Number 2 Note has two cuts on the right side (missing two parts)
Number 3 Note has a single cut on the left side (missing a single part)
Number 4 Note has one cut on the bottom and one cut on the right side (missing two parts)
NOTE: In your game, the notes might look differently, because different parts of the note might be cut out. However, you can still solve this puzzle by using the same logic – comparing the notes with “shadow squares”.

Ok, now let’s take a look again at the squares on the wall and compare them with notes.
The First note (marked with number 1) was missing a bottom left corner, just like the lower-left square. The marked symbol inside the square is some kind of vertical wavy line. So, the First Symbol = “Vertical Wavy Lines”
The Second Note was missing two parts on the right side, just like the square in the upper right corner. The marked symbol inside the square is a circle with two diagonal lines. So, the Second Symbol = “Circle with two diagonal lines”
The Third Note was missing a single part on the left side, just like the square in the upper left corner. The marked symbol inside the square is some kind of a reverse triangle. So, the Third Symbol = “Reversed Triangle”.
The Fourth Note was missing one part at the bottom and one part on the right side, just like the square in the lower right corner. The marked symbol inside the square looks like a drawing of a ripple. So, the Fourth Symbol = “Ripple”
Memorize/ Write Down this information and let’s finally solve this puzzle. You could also draw these symbols on the note if that’s easier.

Ok, these symbols are used to unlock the drawer on the cabinet that is located in the room with the armchair. So, let’s go there. It’s the second room on the right.

First, let’s close the top drawer.

Then tap on the padlock on the bottom drawer to examine it. We can see that we will need four symbols to unlock this padlock, so let’s enter the symbols that we discovered by solving the previous puzzle. So, looking from left to right, we have
First = “Vertical Wavy Lines”
Second = “Circle with two diagonal lines”
Third = “Reversed Triangle”
Fourth = “Ripple”
NOTE: As I already mentioned, the order of the symbols might be different in your game, but you can solve this puzzle by following the steps in this guide.

As soon as you enter the correct symbols you will unlock the drawer but, at this moment the “creepy girl” will appear behind our character and she will gently touch his shoulder.

Tap to open the bottom drawer. Inside of it, you will see a metal pipe. Tap on it to pick it up and a “Metal Bar” will be added to your inventory.

Ok, before we continue, let’s first go back to the front door, and turn on the lights. It’s the first room on the right.

Tap on the switch next to the door to examine it, and tap once more to turn on the light.

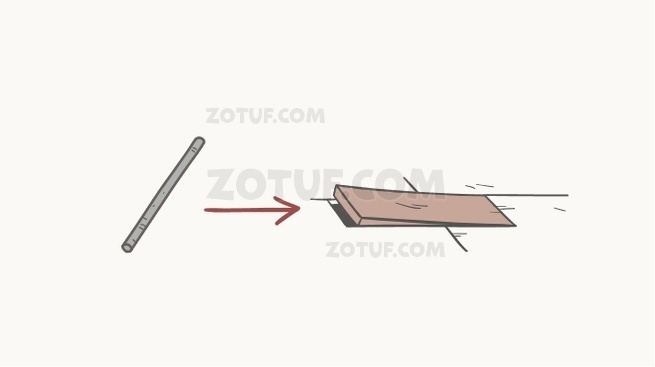
Inside this room, we can also see that there’s a loose floorboard, to the left of the vase. Tap on the board to examine it. Then, select the “Metal Bar” from the inventory and tap on the floorboard to remove it.

Tap on the floorboard to pick it up and a “Small Board” will be added to your inventory.

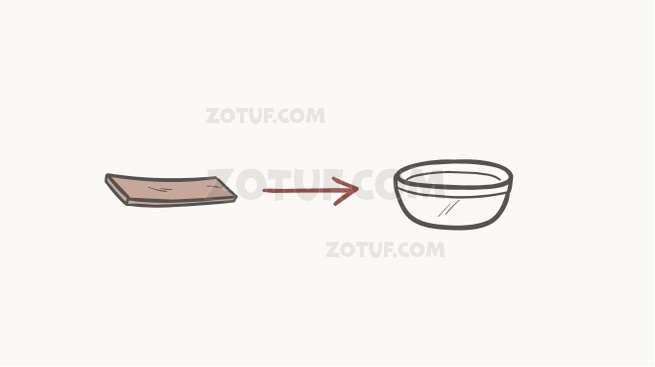
Before we move on, tap on the hole in the floor to look if there’s anything inside. Tap on the white object inside the hole, and “Garlic” will be added to your inventory.

Now, let’s take a look at the book with clues, once more.

On the first page on the right, we can see the instructions for making a mousetrap. To make the mousetrap we will need a bowl, a small board, and a slice of cheese. The only thing that we are missing is cheese, so let’s go get it.

Tap on the left arrow to go to the room with the armchair.

Select the “Makeshift Knife” from the inventory, tap to look at the cheese, and tap once more to cut it.

Tap on the slice of cheese to pick it up and a “Piece of Cheese” will be added to your inventory.

Let’s go to the room in which we saw a mouse hole in the wall. It’s the first one on the left.

Tap on the mouse hole to take a closer look at it.

Now, let’s set the trap. First, select the “Glass Bowl” from the inventory and tap on the right of the mouse hole to place it.

Next, select the “Small board” from the inventory, and tap to the left of the glass bowl to set up a platform through which a mouse can enter into a bowl.

Finally, select the “Piece of Cheese” from the inventory and tap inside the glass bowl to set the bait.

The mouse will get out of this hole, climb over the board, and inside the bowl. He will eat the cheese but won’t be able to get out. So, tap on the mouse to pick it up and a “Mouse” will be added to your inventory.

Now, let’s go to the room with the TV. It’s the first one on the left.

Tap on the crack in the pipe on your left to take a closer look at it.

At first, we could see the eyes of some kind of a ghost, looking at us through the crack in the pipe. But, once he left, we could see that there’s a small key inside the pipe.

Ok, now let’s use the mouse to get the key inside the pipe. Select the “Mouse” from your inventory and tap on the higher opening on the pipe to put it inside.

The mouse will get to the other end of the pipe, and it will push out the key. The hand of the ghostly black creature will try to reach the key from the pipe, but fortunately, the key fell too far away. So, tap on the key to pick it up, and a “Key with hexagonal handle” will be added to your inventory.

The lower right cabinet door inside this room is still locked, and we can use this key to unlock it. So, tap on the lower right cabinet door to take a closer look at it. Select the “Key with hexagonal handle” from the inventory and tap on the keyhole on the door to unlock it.

Ok, tap on the cabinet door to open in. You will see two items inside. Tap on them to pick them up and a “Screwdriver” and a “Bottle of Wine” will be added to your inventory.

Let’s go to the first room on the right.

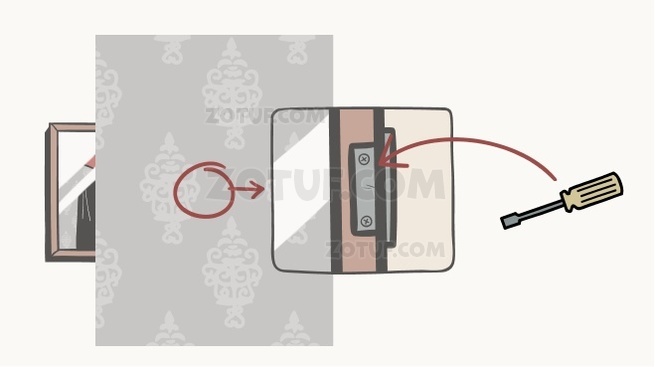
Tap on the picture on the wall to take a closer look at it.

Ok, now tap on the screws on the right to take a look at them. Select the “Screwdriver” from the inventory and tap on the screws to remove them.

After removing the screws, the “Vampire” will disappear, and our character will see the “creepy girl” jumping out from the picture and trying to grab him. Well, it seems that he wasn’t too scared, and even chuckled a few moments after the event.

Tap on the “handle” of a picture to open it and see what’s behind it.

You will see four symbols, that look like four white triangles inside a square. Clearly, we will need a correct combination of the symbols in order to unlock the safe behind the picture. So, let’s leave it alone for now, and put the picture back in its place.

Let’s take a look at our book with clues.

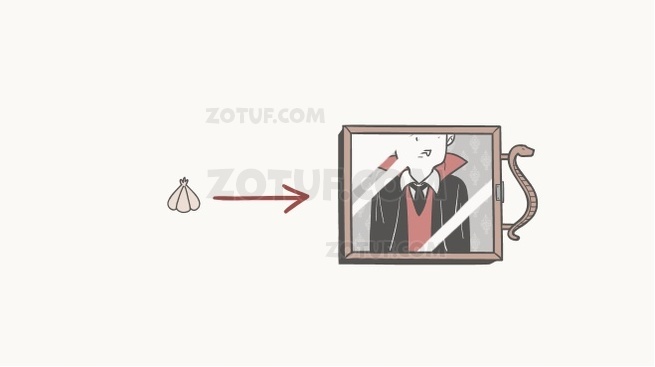
On, the last page of the book we can see a “Vampire” just like the one in the picture on the wall. We can also see that we should “give” four items to the Vampire: a wooden cross, garlic, a goblet with wine, and a mirror. Fortunately, we already have all four required items. However, we still do not know in which order we should give these items to the Vampire in the picture. So, let’s find out.

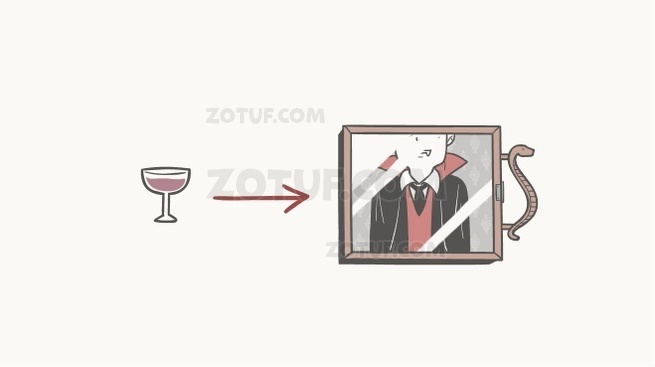
Before we proceed, let’s pour the wine into the goblet. Select the “Bottle of Wine” from your inventory and tap on the goblet. A “Goblet with the red wine” will be added to your inventory.

Ok, now let’s go to the next room on the right and look for clues about the Vampire.

Tap on the board with the cutout articles from the newspaper to take a closer look at it.

Tap on the first article “Horror in the Hidden Town”.

Our character will move the article, and behind it, you will see a mirror. If we presume that the clues were left in the order from left to right, the mirror should be the first thing we should give to the Vampire. So, the First Item = Mirror

Ok, now tap on the “Horrible Crime” article.

Our character will move the article, and behind it, you will see a wooden cross. So, the Second Item = Wooden Cross

Tap on the last article “The Unsolved Murder Case”.

Our character will move the article, and behind it, you will see two items, Garlic, and a Goblet. So,
Third Item = Garlic
Fourth Item = Goblet
Write Down/Memorize the order of the items.
NOTE: The order of the items might be different in your game, but you can discover the correct order just like we did – by looking behind the cutout newspaper articles.

Before we solve the last puzzle, there’s something that I forgot to do. Let’s take a look at the Diary, located on top of the wooden cabinet. Tap to take a closer look at it, and tap again to open the “Diario”.

We can clearly see that whoever wrote this diary (probably the girl in the window) was being spied on by some stranger for several days. It’s obvious that she was frightened of him. Let’s take a look at the next page, by tapping on the arrow on the right.

The girl told her parents about this man and that he tried to break into the house, but they didn’t believe her. However, it seems that he managed to break in on his second try. The girl locked herself in the bathroom, hoping that he will leave her alone. But, it seems that he knew where she hid…

As we turn to the next page, the red text will appear before the eyes of our character. It seems that it was written by the “creepy girl” after her death… Let’s leave the diary alone, and solve the last puzzle so that we can get out of this cursed house.

Tap on the arrow on the left to go back to the room with the picture of a Vampire.

Tap on the picture of a Vampire to take a closer look at it.

Ok, now let’s give the four items from our inventory to the Vampire and see what happens. We discovered the order of the items by looking below the cutout newspaper articles. So, first, select the “Mirror” from your inventory and tap on the picture of the Vampire.

The first symbol for solving the puzzle behind the picture will appear. So,
First Symbol = black bottom and left triangles / white top and right triangles

Let’s give him the second item. Select the “Wooden Cross” from the inventory and tap on the picture of the Vampire.

The second symbol for solving the puzzle behind the picture will appear.
The second Symbol = black right and left triangles / white top and bottom triangles

Let’s give him the third item. Select “Garlic” from the inventory and tap on the picture of the Vampire.

The third symbol for solving the puzzle behind the picture will appear.
Third Symbol = black right triangle / the other three triangles are white

Let’s give him the fourth item. Select “Goblet with red wine” from the inventory and tap on the picture of the Vampire.

The Vampire will lick his lips and will draw an “X” sign with red wine. This probably means that all four triangles are visible. So,
The fourth Symbol = Four white triangles

When we put it all together, we have
First Symbol = black bottom and left triangles / white top and right triangles
The second Symbol = black right and left triangles / white top and bottom triangles
Third Symbol = black right triangle / the other three triangles are white
The fourth Symbol = Four white triangles
Write Down/Memorize this information. Let’s take a look behind the picture and solve this puzzle.
NOTE: The order of the symbols might be different in your playthrough, but you can discover the correct order of the symbols by following the steps in this guide.

Tap on the four fields of this puzzle and enter the symbols that we discovered.
After entering the correct symbols, tap on the handle to open the safe.

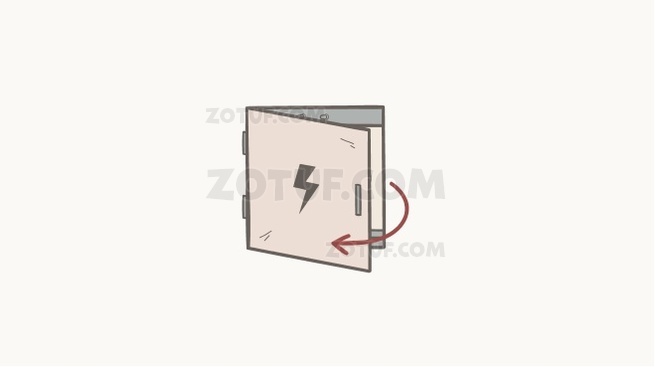
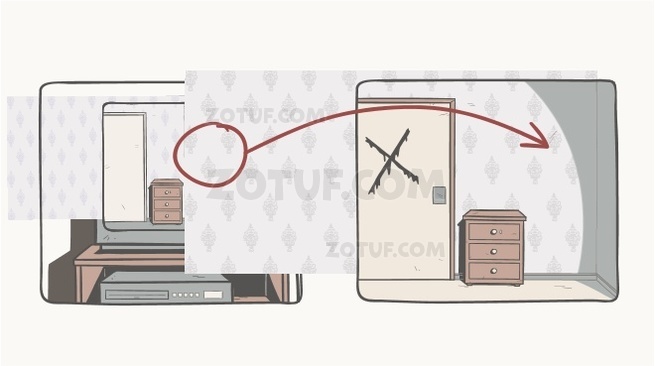
Tap on the lever to pull it, and you will unlock and open the front door.

But, as soon as our character reached the door, the note on the wall appeared, and it says that he shouldn’t go. But, we have no other choice but to tap on the door and try to get out.

At first, our character was very happy because he finally escaped from the haunted house. But then, he saw the other part of the cutout news article. The title was “Siblings Killed”. He was shocked when he realized that his face is on the picture of the article.

He realized that’s the other half of the newspaper article that he saw inside the house. At this moment the “creepy girl” which is actually his sister, appeared behind our character and gently pulled him back into the house. He didn’t even try to resist, because he realized that he should stay inside with her…


The story ends with our character looking through the window, together with this sister…

Well, that brings us to the end of this adventure, it certainly had an unexpected ending. If you’re interested in Escape Room games, check out our guides for the other games of this genre.
Thank you for reading.

Полное прохождение игры Девушка в окне — The Girl in the Window
IOS и Андроид
(Разработчик Dark Dome)
1. Входная дверь закрылась. Достаньте порванный листок из кармана серой куртки на вешалке. Пальто вдруг оживет и уйдет. Заберите рядом весящий зонт.
2. Пройдите два раза вправо, где заколоченная дверь. С книжной полки подберите блокнот серого цвета. В нем хранятся подсказки для следующих головоломок. А в конце оторванный лист. Добавьте к нему свой из инвентаря. Теперь у вас есть код от ящика под книжной полкой.

3. Отоприте правильной комбинацией ящик. Здесь хранится зеркальце.

4. Сверху этого же ящика находится шкатулка. В квадратах изображены листочки. Походив по комнатам, обнаружите, что в них есть горшки с растениями. Код соответствует количеству листьев на них.
В середине фото с указанным днем недели и временем, а также спички.

5. Справа от входной двери стоит тумба. Возьмите с нее свечу. Подожгите ее спичкой и засуньте в мышиную нору в стене. Чтобы достать вилку с проводом, воспользуйтесь зонтом.

6. В комнате с телевизором стоит шкаф. В верхнем ящике лежит фото. Еще одно фото лежит в среднем ящике, возле входной двери.
7. Коснитесь кресла, чуть левее него розетка-тайник. Внутри которой ключ.

8. В этой же комнате есть тумба с двумя ящиками. В верхнем лежит видеокассета. Сверху лежит фото.
9. Найденным ключом откройте ящик шкафа. Найдете изоленту.

10. Используйте изоленту, чтобы починить провод телевизора. Добавив заранее свой кусок провода.
11. Вставьте видеокассету в видеоплеер и включите телевизор. В нем девушка рисует расположение ручек. А на тумбе вторая ручка от ТВ. Заберите ее, вставьте в соответствующее отверстие. Настройте аппарат, как нарисовала девушка. Получите рукоятку.

12. Из шкафа возьмите бокал. В комнате с картиной вампира стоит горшок. Возьмите из него камень.
13. Следуйте в комнату с креслом. На столе будет бутылка, разбейте ее камнем. Подберите кусок стекла. Объедините его с рукояткой, чтобы получился нож. Внутри бутылки будет ключ.
14. Поднимите подушку с кресла и разрежьте ткань под ней. Найдете там крест.
15. Найденным ключом откройте верхний ящик возле входной двери. Получите перчатку.
16. Возле окна электрощит. Открыв его решите головоломку. Но не забудьте прежде одеть перчатку. Сверху выключатель. Нажмите на него, чтобы за окном загорелась лампа. Задерните штору.

17. От сыра на столе отрежьте ножом маленький кусочек. На тумбе лежит дневник, изучите в нем информацию.
18. Вернитесь к входной двери, справа на обоях есть надрез, сделайте его больше, чтобы увидеть большую букву М. Это пароль от сейфа в комнате с картиной вампира. В середине окажется ключ и выключатель.

19. Последний поместите слева от входной двери. Выключите свет. Идите в комнату с телевизором. На стене видны помеченные символы. Чтобы узнать порядок, достаточно взглянуть в блокнот из инвентаря. Включите свет.
20. Идите к тумбе, которая находится в комнате с окном. Отоприте навесной замок с набором символов со стены. В ящике лежит металлическая трубка.

21. Возвращайтесь к входной двери. Под вешалкой находится выделяющаяся доска. Уберите ее, далее получите чеснок. Доску тоже заберите.
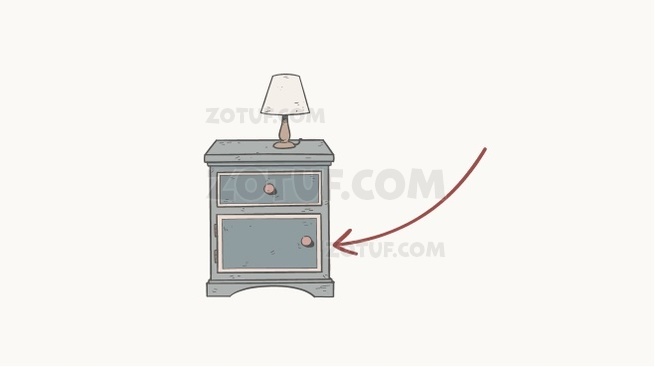
22. Откройте ключом в шкафу нижний ящик, найдите миску.
23. Возле мышиной норы разместите миску, добавьте доску, в емкость положите кусочек сыра. Поймайте грызуна.

24. В комнате с телевизором есть труба, в трещине лежит ключ. Запустите туда мышь. Она добудет ключ.

25. Этим ключом отоприте последний ящик в шкафу. В середине отвертка и вино.

26. Налейте его в бокал. Раму картины с вампиром открутите отверткой. За ней будет сейф.
27. Вампиру с картины дайте вино, крест, чеснок и зеркало. Кровопийца покажет символы, которые примените к сейфу. Порядок подскажет доска с вырезками из газет. Пароль от сейфа получается такой как на картинке. Внутри будет рычаг. Поверните его.


28. Выйдите через входную дверь. На полу лежит вырезка из газеты с фото главного героя.
Published by
The Girl in the Window – A puzzle game surrounded by ancient secrets and a bunch of mysteries. At the beginning of the story, we learn that a terrible murder took place in one of the houses of the hidden city, and since then this house has been closed and abandoned. However, people began to notice strange things in the house, and some even claimed to have seen a girl in the window. This is very strange, because this house has been abandoned for 20 years. Our character feels drawn to the house and decides to go inside, but the door immediately closes behind him. So, our task is to find a way to unlock the door and escape from the house. And as we progress through the game, we learn a lot more about the mystery surrounding this house. If you are stuck and do not know how to get through one of the locations, on our website you can watch the walkthrough of The Girl in the Window and find a way to escape from this terrible house.
The Girl in the Window – Walkthrough
Here you can watch the complete walkthrough of The Girl in the Window, step by step in pictures.
Step 1
Step 2
Step 3
Step 4
Step 5
Here we see ten symbols, but only four of them are marked. In addition, next to each of the marked symbols we can see a Roman numeral, it represents the order of the password in the puzzle.
Step 6
Step 7
Step 8
Step 9
Step 10
Step 11
Step 12
Step 13
Step 14
Step 15
Step 16

Step 17
Step 18
The puzzle is solved by counting the number of leaves on the plants in the vases.
Step 19
Enter the correct number of leaves. According to your sequence, it is different for everyone.
Step 20
Step 21
Step 22
Step 23
Step 24
Step 25
Step 26
Step 27
Step 28
Step 29
Step 30
Step 31
Step 32
Step 33
Now we have to rotate both twisted to the correct position. The correct position of the dials is drawn on the circles above the girl.
Step 34
Step 35
Step 36
Step 37
Step 38

Step 39
In your game, the sign under the wallpaper may be different from the letter “M”, for example, the letter “W”.
Step 40
Step 41
Step 42
Step 43
Step 44

Step 45
Step 46
Step 47
Step 48
Step 49

Step 50
Step 51
Step 52
Step 53
Step 54
Step 55
Step 56
Step 57

Step 58

Step 59
Step 60

Step 61
Step 62
Step 63
Step 64
The character order may differ in your playthrough, but you can determine the correct character order by following the steps above.
Step 65
Step 66
Step 67
Step 68 (Secret ending)
Step 69
Step 70
Step 71
Step 72
Step 73
Step 74
Step 75

Congratulations! You have completed the game The Girl in the Window.

(Last Updated On: November 25, 2022)
The Girl in the Window is the first point-and-click adventure game from Dark Dome. It’s shorter than the other two games – Unwanted Experiment and Nowhere House, but very intriguing. 20 years ago, a murder took place in one of Hidden Town’s houses. Since then, the house is abandoned. Townsfolk see a girl in the window. Strange incidents happen around this house. You decide to investigate what’s the mystery behind the girl’s appearance in the abandoned house. The door gets locked when you enter the house. How will you escape?

Solve a series of simple, yet challenging puzzles to escape the abandoned house. Our Girl in the Window walkthrough will guide you through all puzzles. You may watch the playthrough to solve them or read our text walkthrough to escape the house.
[mv_video doNotAutoplayNorOptimizePlacement=”false” doNotOptimizePlacement=”true” jsonLd=”true” key=”cd4vcpbcxzz1hxmh14ct” ratio=”16:9″ thumbnail=”https://mediavine-res.cloudinary.com/video/upload/cd4vcpbcxzz1hxmh14ct.jpg” title=”The Girl in the Window: Complete Walkthrough and Guide” volume=”70″]
The Grey Book
Use the arrow keys on the left and right side of the screen to explore rooms in the locked house.
Move to the room that has a portrait of a vampire. Tap on the potted plant placed on the lower-right corner. Take the stone from the potted plant.
Go to the room that has a couch on the left side. Tap the brown couch and then tap the broken switchboard next to it. Take the key with a square handle hidden behind the broken switchboard.
Go to the TV room. There’s a cupboard next to the TV, on the right. Use the square handle key to open the upper cabinet of the cupboard. Open the cabinet and take the electrical insulating tape.
Go back to the room that has a brown couch on the left and a table on the center. On top of the table is a bottle and a cheese cake. Use the stone to break the empty bottle.
Take the key with a round handle inside the broken bottle. Tap the broken bottle to take it.
Now move to the room that has a door with an “X“ mark. Tap on the chest of drawers on the right. Use the round handle key to open the top-most drawer. Take the electrical safety glove from the drawer. The glove and the insulated tape will be used later. Both will be used on different occasions.
Go to the room that has the portrait of a vampire. Tap on the bookshelf on the left and take the smallest grey book placed upright on the bookshelf.
Go through all pages of the grey book. These pages provide hints to all puzzles in The Girl in the Window.
We will first solve the potted plant puzzle:
Love point-and-click adventure games, check out our Ghost Case Walkthrough and Guide.
Potted Plant Puzzle
You may have noticed potted plants of various sizes placed in a corner of each room. These plants are part of a puzzle that will help you open a small casket in the room that has a vampire’s portrait. The casket is placed on a table, which is located on the left of the barricaded door.
Pay attention to the size of each potted plant and the pattern drawn on all pots in each room. One pot will have a wavy pattern, another will have diagonal lines drawn on it. Also, count the number of leaves in each plant.
Open the grey book and go to the page that shows the correct order of potted plants to enter the number combination on the casket.
The screenshots below show how to enter the correct combination to open the casket. Note the correct order of pots to enter the numbers and then count the number of leaves on each pot. The number of leaves on a pot is the number that you need to enter in the casket.


Note: The order to enter the numbers (based on the pot on each room) on the grey book’s page is randomly generated in every new game.
After entering the correct number combination, open the small casket. Take the matchbox.
Switching On the TV
In the room that has the door in the middle with an “X” sign. Tap on the chest of drawers on the right and take the candle.
Combine the box of matches with the candle to light it.
Move to the vampire portrait room and tap on the mouse hole. Place the lit candle inside the mouse hole. You will see a cable with a plug inside the mouse hole. Your hand won’t reach to get it.
Go to the room with a door having “X” sign and take the red umbrella. Go back to the room that has a mouse hole and drag the power cable from the mouse hole with the help of the umbrella.
Move to the TV room and tap the switchboard next to the television. You will see broken wire. Place the cable with a plug next to the wire. Use the insulating tape to attach the broken cord with the broken cable connected to the TV.
Go to the room that has couch on the left. On the right side is another chest of drawers. The bottom drawer is locked. Slide open the top drawer to take the VHS cassette.
Go back to the TV room and put the cassette in the VCR below the TV. Turn on the TV by pressing the top button and then turn on the VCR by tapping on the play button.
You will see a girl scribbling something on the wall. A TV dial will appear on top of the chest of drawers.
Move to that room that has the same chest of drawers. This is the same room that has a door with an “X” sign. You will see the same dial magically appear on top of the drawer. Take that dial.
Fix the missing dial on the television, just below the first dial. Now pay attention to the TV visual and move both dials to the same position as shown in the visual, just above the girl.
A tiny compartment just below the dials will open, revealing a plastic handle. Take it.
Love point-and-click horror games? Check out our full Creepy Tale walkthrough and guide.
The Letter on the Wall
Move to the room where the cheesecake is kept on the table. This is the same room where you broke the empty glass bottle placed next to the cheesecake. Among the broken bottle shards, there will be a big, pointed glass shard. Tap to take it.
Create a makeshift knife by combining the glass shard with the plastic handle.
Move to the room that has the “X“ symbol on the door. You will notice a very small slit on the right wall. Use the knife on that small slit to tear the wallpaper. It will reveal a letter (E, M or W). The letter will be randomly generated.
The letter is part of a puzzle found on the Vampire portrait room. Tap on the right wooden cabinet. This wooden cabinet is located on the left side of vampire portrait.
You will see a set of 9 small dots. Connect the dots to draw the letter displayed on the wall in that room. The cabinet will open. Take the light switch and a key with an oval shaped handle.
The Light Switch Puzzle
Use the light switch on the empty switch area next to the door that has an “X“ mark on it. This empty switch cavity has a blue and red fuse. Tap on the light switch and then tap on the empty switch to fit it.
Turn off the lights using the same switch. All rooms will darken a bit. Don’t switch on the lights.
Now move to the room that has a couch on the left and the cheesecake/broken glass on the center.
Tap on the fuse box on the right side of the room, next to the window. Solve the wire puzzle. Watch our A Girl in the Window walkthrough video to find out how to solve the fuse box wire puzzle. Make sure you tap on the electrical safety glove to wear it and then solve the puzzle as you won’t be able to touch the wires with your bare hands.
After solving the wire puzzle. Switch on the light using the grey switch above the fuse box. The floodlight behind the shut window will light up. Close the maroon/red curtains over the window. You will see light escape through four tiny holes on the curtain.
Now move to the TV room. On the left side are symbols and the shadow of the window pane over them. Light will fall on four specific symbols, all because of the light escaping from the four tiny holes through the red curtain. Note down the symbols mentally or on a piece of paper.

The glowing symbols on the wall and the reflection of the window pane on the wall are all hints for the padlock puzzle. The padlock can be found on the bottom drawer on the right side of the couch/window room. Go to that room and tap on the padlock to enter the symbols in the right order.
To know the right combination of the symbols on the padlock, open the grey book from the inventory list on the bottom of the screen. Flip the pages until you find the padlock puzzle page.

On the padlock page in the grey book, you will find the correct order to enter the combination of symbols on the padlock. The cards below the padlock are numbered from 1-4. Pay attention to the shadow of shrubs/plants on the numbered cards below the padlock on the puzzle page. The cards on the page will look torn, but it’s actually the shadow of the plants because of the light from the floodlight. The same plant or shrub shadow can be found on the wall where the light falls on the four symbols. Looking at the shadow of plants both on the padlock puzzle page and the wall, you will be able to find out the correct combination to enter the symbols.
Once you get the right order of symbols, go to the room where the padlock can be found on the drawer on the right. Enter the symbols in the right order to open the drawer and take the metal rod from the drawer.
The Mouse and the Cheese
Move to the room that has an “X” mark on the door and switch on the lights. You may switch off the lights on the fuse box room.
In the same room that has an “X” mark on the door, there will be a small wooden plank covering a cavity on the left side, just beside the potted plant.
Use the metal bar to pull up the wooden plank. There will be a garlic bulb hidden in the cavity. Take it. Don’t forget to take the wooden plank also along with the garlic bulb. The garlic bulb will be used in the vampire puzzle.
Use the key with an oval shaped handle to unlock the lower cabinet in the TV room. Take the glass bowl.
With the makeshift knife, cut the cheesecake and take a small piece of cheese.
Now move to vampire portrait room, tap on the mouse hole and place the glass bowl next to the mouse hole. Place the piece of cheese inside the glass bowl, and the wooden plank on the rim of the wall, slanted. You can view the same in the mouse puzzle on the grey book.
The mouse will come out of the hole and move towards the glass bowl to eat the cheese. Tap the mouse to take it.
The Vampire Portrait Puzzle
The Girl in the Window’s vampire puzzle is a bit tricky, but once you acquire all objects and know the correct order, it will be easy to solve it:
Move to the TV room, tap on the mouse in your inventory list on the bottom of the screen. Now tap on the pipe next to the symbols on the wall. The mouse will enter the small pipe opening and come out of the bottom pipe opening. He will drop a key with a hexagonal handle on the floor. Take the key.
Use the key to open the cabinet on the right side of the room. Take the red wine bottle and screwdriver from the cabinet. Also, take the empty wine glass above the cabinet in the same TV room. Combine the wine bottle with the glass to fill the wine glass.
Move to the couch room and tap on the couch. Tap once again on the couch to lift the cushion. Use the makeshift knife to cut the cushion and take the red cross.
Now move to the room with an “X” mark on the door. Tap on the grey jacket and take a torn piece of paper from its pocket by tapping on it.
Open the grey book and flip the pages until you find a torn paper. Attach the torn paper which you just found on the grey jacket. You will find another set of symbols. Pay attention to the red circles around each symbol and roman numerals beside each circle (I, II, III, IV). The roman numerals suggest the correct order to enter the symbols.
Move to the vampire portrait room and tap on the left wooden cabinet on the left side of the room. Enter the symbols in the right order as shown on the grey book. Open the cabinet and take the mirror.
Open the grey book again and go to the page that has a vampire portrait. You will see a few familiar objects pointing at the portrait. These are: garlic bulb (already taken from the cavity hidden by the wooden plank), a glass of wine, the red cross and the mirror. By now, you will have all four objects in the inventory on the bottom of the screen.
Tap on the vampire portrait and unscrew both screws using the screwdriver. Open the glass portrait to reveal a secret safe behind the portrait. You will have to enter four tangram patterns in the right order to reveal a switch. For now, close the portrait.
To get the tangram symbols, use each of the four objects on the vampire portrait. The vampire will reveal all four symbols each time you tap on an object (example: mirror, wine glass, red cross) and then tap on the portrait.
Note down all four symbols revealed by the vampire. Now you will have to enter them in the right order on the secret safe behind the portrait.
Move to the couch room/window room and tap on the pin board hanging on the wall. Underneath each paper clipping are the same symbols of the objects (red cross, garlic bulb, wine glass etc.)
The correct order will be: (1) the symbol underneath the big paper clipping on the left, followed by the (2) symbol on the small paper clipping on the top-right and finally the (3) symbol on the bottom-right corner of the pin board.
Now that you know the correct order, again use the objects (garlic, cross etc.) as per the correct order shown on the pin board on the vampire one by one to get the right tangram symbol combination revealed by the vampire.
Enter all four tangram symbols in the right order behind the portrait (open the portrait again to enter the tangram symbols). Open the safe. A switch will be revealed. Tap on the switch. The door with an “X“ mark will open you will be able to escape.
Ending
I won’t reveal what will happen next. The scenes are very heart-wrenching. I guess there might be another ending, but for now this ending is truly poignant.