I ran into the same problem and the only way I was able to open the CMD as administrator from CMD was doing the following:
- Open CMD
- Write
powershell -Command "Start-Process cmd -Verb RunAs"and press Enter - A pop-up window will appear asking to open a CMD as administrator
![]()
Felix Dombek
13.7k17 gold badges79 silver badges131 bronze badges
answered Aug 26, 2015 at 1:05
![]()
GuiGui
2,3171 gold badge11 silver badges3 bronze badges
6
I don’t have enough reputation to add a comment to the top answer, but with the power of aliases you can get away with just typing the following:
powershell "start cmd -v runAs"
This is just a shorter version of user3018703 excellent
solution:
powershell -Command "Start-Process cmd -Verb RunAs"
answered Nov 10, 2018 at 9:29
![]()
StieglerStiegler
7196 silver badges8 bronze badges
2
Simple way I did after trying other answers here
Method 1: WITHOUT a 3rd party program (I used this)
- Create a file called
sudo.bat(you can replacesudowith any name you want) with following content
powershell.exe -Command "Start-Process cmd \"/k cd /d %cd%\" -Verb RunAs"
- Move
sudo.batto a folder in yourPATH; if you don’t know what that means, just move these files toc:\windows\ - Now
sudowill work in Run dialog (win+r) or in explorer address bar (this is the best part :))
Method 2: WITH a 3rd party program
- Download NirCmd and unzip it.
- Create a file called
sudo.bat(you can replacesudowith any name you want) with following content
nircmdc elevate cmd /k "cd /d %cd%"
- Move
nircmdc.exeandsudo.batto a folder in yourPATH; if you don’t know what that means, just move these files toc:\windows\ - Now
sudowill work in Run dialog (win+r) or in explorer address bar (this is the best part :))
answered Oct 29, 2016 at 16:40
![]()
Dheeraj BhaskarDheeraj Bhaskar
18.6k9 gold badges63 silver badges66 bronze badges
13
According to documentation, the Windows security model…
does not grant administrative privileges at all
times. Even administrators run under standard privileges when they
perform non-administrative tasks that do not require elevated
privileges.
You have the Create this task with administrative privileges option in the Create new task dialog (Task Manager > File > Run new task), but there is no built-in way to effectively elevate privileges using the command line.
However, there are some third party tools (internally relying on Windows APIs) you can use to elevate privileges from the command line:
NirCmd:
- Download it and unzip it.
nircmdc elevate cmd
windosu:
- Install it:
npm install -g windosu(requires node.js installed) sudo cmd
answered Mar 21, 2014 at 15:28
![]()
Ricardo StuvenRicardo Stuven
4,7042 gold badges34 silver badges36 bronze badges
7
I use nirsoft programs (eg nircmdc) and sysinternals (eg psexec) all the time. They are very helpful.
But if you don’t want to, or can’t, dl a 3rd party program, here’s another way, pure Windows.
Short answer: you can while elevated create a scheduled task with elevated privileges which you can then invoke later while not elevated.
Middle-length answer: while elevated create task with (but I prefer task scheduler GUI):
schtasks /create /sc once /tn cmd_elev /tr cmd /rl highest /st 00:00
Then later, no elevation needed, invoke with
schtasks /run /tn cmd_elev
Long answer: There’s a lot of fidgety details; see my blog entry «Start program WITHOUT UAC, useful at system start and in batch files (use task scheduler)»
![]()
bluish
26.4k28 gold badges122 silver badges181 bronze badges
answered Feb 19, 2015 at 7:59
![]()
3
The following as a batch file will open an elevated command prompt with the path set to the same directory as the one from where the batch file was invoked
set OLDDIR=%CD%
powershell -Command "Start-Process cmd -ArgumentList '/K cd %OLDDIR%' -Verb RunAs "
answered Apr 14, 2017 at 0:25
![]()
statlerstatler
1,3212 gold badges16 silver badges24 bronze badges
1
While both solutions provided by Dheeraj Bhaskar work, unfortunately they will result in the UAC dialog showing up on top (z-order-wise) but not getting focused (the focused window is the caller cmd/powershell window), thus I either need to grab the mouse and click «yes», or to select the UAC window using Alt+Shift+Tab. (Tested on Win10x64 v1607 build14393.447; UAC = «[…] do not dim […]».)
The following solution is a bit awkward as it uses two files, but it preserves the correct focus order, so no extra mouse / keyboard actions are required (besides confirming the UAC dialog: Alt+Y).
- cmdadm.lnk (shortcut properties / Advanced… / Run as administrator = ON)
%SystemRoot%\System32\cmd.exe /k "cd /d"
- su.bat
@start cmdadm.lnk %cd%
Run with su.
answered Dec 3, 2016 at 0:18
![]()
OgmiosOgmios
6467 silver badges12 bronze badges
3
Make the batch file save the credentials of the actual administrator account by using the /savecred switch. This will prompt for credentials the first time and then store the encrypted password in credential manager. Then for all subsequent times the batch runs it will run as the full admin but not prompt for credentials because they are stored encrypted in credential manager and the end user is unable to get the password. The following should open an elevated CMD with full administrator privileges and will only prompt for password the first time:
START c:\Windows\System32\runas.exe /user:Administrator /savecred cmd.exe
![]()
bluish
26.4k28 gold badges122 silver badges181 bronze badges
answered May 17, 2018 at 18:32
![]()
My favorite way of doing this is using PsExec.exe from SysInternals, available at http://technet.microsoft.com/en-us/sysinternals/bb897553
.\psexec.exe -accepteula -h -u "$username" -p "$password" cmd.exe
The «-h» switch is the one doing the magic:
-h If the target system is Vista or higher, has the process run with the account’s elevated token, if available.
answered Sep 7, 2014 at 14:11
![]()
David RodriguezDavid Rodriguez
2,4321 gold badge18 silver badges15 bronze badges
4
I’ve been using Elevate for awhile now.
It’s description — This utility executes a command with UAC privilege elevation. This is useful for working inside command prompts or with batch files.
I copy the bin.x86-64\elevate.exe from the .zip into C:\Program Files\elevate and add that path to my PATH.
Then GitBash I can run something like elevate sc stop W3SVC to turn off the IIS service.
Running the command gives me the UAC dialog, properly focused with keyboard control and upon accepting the dialog I return to my shell.
answered Jun 11, 2017 at 16:33
![]()
seangwrightseangwright
17.3k6 gold badges43 silver badges54 bronze badges
4
Dheeraj Bhaskar’s method with Powershell has a missing space in it, alt least for the Windows 10 incarnation of Powershell.
The command line inside his sudo.bat should be
powershell.exe -Command "Start-Process cmd \"/k cd /d %cd% \" -Verb RunAs"
Note the extra space after %cd%
;)Frode
answered May 14, 2019 at 9:19
![]()
Similar to some of the other solutions above, I created an elevate batch file which runs an elevated PowerShell window, bypassing the execution policy to enable running everything from simple commands to batch files to complex PowerShell scripts. I recommend sticking it in your C:\Windows\System32 folder for ease of use.
The original elevate command executes its task, captures the output, closes the spawned PowerShell window and then returns, writing out the captured output to the original window.
I created two variants, elevatep and elevatex, which respectively pause and keep the PowerShell window open for more work.
https://github.com/jt-github/elevate
And in case my link ever dies, here’s the code for the original elevate batch file:
@Echo Off
REM Executes a command in an elevated PowerShell window and captures/displays output
REM Note that any file paths must be fully qualified!

REM Example: elevate myAdminCommand -myArg1 -myArg2 someValue

if "%1"=="" (
    REM If no command is passed, simply open an elevated PowerShell window.
    PowerShell -Command "& {Start-Process PowerShell.exe -Wait -Verb RunAs}"
) ELSE (
    REM Copy command+arguments (passed as a parameter) into a ps1 file
    REM Start PowerShell with Elevated access (prompting UAC confirmation)
    REM     and run the ps1 file
    REM     then close elevated window when finished
    REM Output captured results

    IF EXIST %temp%\trans.txt del %temp%\trans.txt
    Echo %* ^> %temp%\trans.txt *^>^&1 > %temp%\tmp.ps1
    Echo $error[0] ^| Add-Content %temp%\trans.txt -Encoding Default >> %temp%\tmp.ps1
    PowerShell -Command "& {Start-Process PowerShell.exe -Wait -ArgumentList '-ExecutionPolicy Bypass -File ""%temp%\tmp.ps1""' -Verb RunAs}"
    Type %temp%\trans.txt
)
answered Mar 7, 2017 at 14:38
![]()
..
@ECHO OFF
SETLOCAL EnableDelayedExpansion EnableExtensions
NET SESSION >nul 2>&1
IF %ERRORLEVEL% NEQ 0 GOTO ELEVATE
GOTO :EOF

:ELEVATE
SET this="%CD%"
SET this=!this:\=\\!

MSHTA "javascript: var shell = new ActiveXObject('shell.application'); shell.ShellExecute('CMD', '/K CD /D \"!this!\"', '', 'runas', 1);close();"
EXIT 1
save this script as «god.cmd» in your system32 or whatever your path is directing to….
if u open a cmd in e:\mypictures\ and type god
it will ask you for credentials and put you back to that same place as the administrator…
answered Feb 9, 2018 at 0:40
![]()
jOte-jOte-
514 bronze badges
2
There seem to be a lot of really creative solutions on this, but I found Stiegler & Gui made the most sense to me. I was looking into how I could do this, but using it in conjunction with my domain admin credential, instead of relying on the local permissions of the «current user».
This is what I came up with:
runas /noprofile /user:DomainName\UserName "powershell start cmd -v runas"
It may seem redundant, but it does prompt for my admin password, and does come up as an elevated command prompt.
answered Oct 7, 2021 at 14:18
![]()
1
Here is a way to integrate with explorer.
It will popup a extra menu item when you right-click in any folder within Windows Explorer:

Here are the steps:
- Create this key:
\HKEY_CLASSES_ROOT\Folder\shell\dosherewithadmin - Change its Default value to whatever you want to appear as the menu item text.
E.g. «DOS Shell as Admin« - Create another key:
\HKEY_CLASSES_ROOT\Folder\shell\dosherewithadmin\command - and change its default value to this:
powershell.exe -Command "Start-Process -Verb RunAs 'cmd.exe' -Args '/k pushd "%1"'" - Done. Now right-click in any folder and you will see your item there within the other items.
*we use pushd instead of cd to allow it to work in any drive. 
![]()
not2qubit
14.7k8 gold badges97 silver badges137 bronze badges
answered Jul 18, 2020 at 21:11
![]()
rribasrribas
4151 gold badge6 silver badges6 bronze badges
For fans of Cygwin:
cygstart -a runas cmd
answered Nov 15, 2020 at 12:22
![]()
gavenkoagavenkoa
45.6k20 gold badges253 silver badges308 bronze badges
The quickest way by far is to:
CTRL+ALT+DELETE- Run TASK MANAGER
- Click
FILE > Run New Task > type in "cmd"and tick the «Create this task with administrative privileges.» box.
Not sure if this helps but this is how I managed to do it. Doesn’t help if you need a command to run from batch but hey-ho … I needed this just because windows explorer is corrupted and needed to fix it.
This is my workaround. Hope this helps someone if not the original poster.
![]()
tomerpacific
4,77415 gold badges34 silver badges52 bronze badges
answered Aug 16, 2021 at 10:30
![]()
GarethGareth
691 gold badge1 silver badge6 bronze badges
1
When a CMD script needs Administrator rights and you know it, add this line to the very top of the script (right below @ECHO OFF):
NET FILE > NUL 2>&1 || POWERSHELL -ex Unrestricted -Command "Start-Process -Verb RunAs -FilePath '%ComSpec%' -ArgumentList '/c \"%~fnx0\" %*'" && EXIT /b
The NET FILE checks for existing Administrator rights. If there are none, PowerShell restarts the current script (with its arguments) in an elevated shell, and the non-elevated script closes.
To allow running scripts -ex Unrestricted is necessary.
-Command executes the following string.
Start-Process -Verb RunAs runs a process As Administrator:
the shell (%ComSpec%, usually C:\Windows\System32\cmd.exe) starting (/c) the current script (\"%~fnx0\") passing its arguments (%*).
Maybe not the exact answer to this question, but it might very well be what people need that end up here.
answered Sep 21, 2021 at 10:15
![]()
Michel de RuiterMichel de Ruiter
7,1915 gold badges49 silver badges75 bronze badges
2
A little late for an answer but answering anyway for latecomers like me.
I have two approaches. First one is based on little alteration to @Dheeraj Bhaskar’s answer and second one is new(that is not mentioned in any answer here).
Approach 1: Create a admin command for windows(just for the sake of flexibility).
@ECHO OFF
powershell -Command "Start-Process %1 -Verb RunAs"
Open notepad -> copy/paste above script -> save it as admin.bat in c:\windows
A lot can be added in the above script to make it better but I’ve tried to keep it simple and also because I’m not an expert in batch scripting.
Now you can use admin as command to run any other command or application with elevated privileges.
To answer the original question- type admin cmd in standard cmd.
Approach 2:Using runas command. For this we need to enable the built-in Administrator account if not already enabled and set a password. This account is disabled by default on most systems.
When manufacturing PCs, you can use the built-in Administrator account to run programs and apps before a user account is created. Source
Steps to enable Administrator account-
- Hit Windows+R and type
compmgmt.mscwhich will open Computer Management window. - Go to System Tools -> Local Users and Groups -> Users
- You should see an account with name Administrator here(more info about this account can be found here).
- Right click on Administrator and select Properties.
- Check Password never expires. Uncheck Account is Disabled and everything else then click OK. This will enable administrator account on your system. Skip if already enabled.
- Again Right click on Administrator and click on Set Password(by default it has no password set but for
runascommand to work we need to set a password).
Now windows will show you a life threatening warning which you can accept.
OR If you want to play safe then you should login into it after enabling this account and set a password from there.
Now runas command should work-
Start a standard cmd and type-
runas /user:administrator cmd
EXTRA:
Now we can create something similar to Linux’s sudo command. Create a sudo.bat file with following script and save it in c:\windows.
@ECHO OFF
powershell -Command "runas /user:administrator %1"
Now we can do sudo cmd
answered Dec 1, 2021 at 16:32
![]()
avmavm
3853 silver badges16 bronze badges
I did this for my smartctl, and it became a portable App.
I borrowed it from here.
@echo off

set location=%cd%\bin
powershell -Command "Start-Process cmd -Verb RunAs -ArgumentList { '/k "TITLE Smartctl" & color 07 & pushd "%location%" & prompt $g & echo "Welcome to Smartctl cmd"' }"
prompt $g hides the long leading path.
pushd "%location%" is similar to cd /d "%location%"
- Saved as
smartctl.cmd - Create a shortcut for
smartctl.cmd - Copy the shortcut to
C:\Users\#YourName#\AppData\Roaming\Microsoft\Windows\StartMenu\Programs - Click search next to the start menu and input
smartctl - Right click
Pin to Start
answered Dec 3, 2021 at 6:28
![]()
Just use the command:
runas /noprofile /user:administrator cmd
answered Jan 8, 2020 at 9:32
![]()
Use:
start, run, cmd, then control+shift+enter
You’ll get UAC and then an elevated command shell.
answered Mar 28, 2021 at 2:36
![]()
Jeter-workJeter-work
7827 silver badges22 bronze badges
Install gsudo tool and use gsudo command. UAC popup appears and eventually command prompt right in the current console window will be elevated:
C:\Users\Someone>net session
System error 5 has occurred.

Access is denied.

C:\Users\Someone>gsudo
C:\Users\Someone# net session
There are no entries in the list.
The tool can be installed using various package managers (Scoop, WinGet, Chocolatey).
answered Jul 16, 2022 at 20:51
![]()
Ilya SerbisIlya Serbis
21.3k7 gold badges87 silver badges75 bronze badges
1
Create text file named «admin_cmd.reg» with the following content, and run it:
Windows Registry Editor Version 5.00

[HKEY_CLASSES_ROOT\Directory\Background\shell\runas]
@="Cmd here as admin"
"HasLUAShield"=""
"NoWorkingDirectory"=""
"Icon"="imageres.dll,-5324"

[HKEY_CLASSES_ROOT\Directory\Background\shell\runas\command]
@="cmd.exe /s /k pushd \"%V\""
Click on empty space in any folder will give you «Cmd here as admin«

answered Jul 11 at 11:29
![]()
user1438233user1438233
1,1731 gold badge15 silver badges30 bronze badges
Can use a temporary environment variable to use with an elevated shortcut (
start.cmd
setx valueName_betterSpecificForEachCase %~dp0
"%~dp0ascladm.lnk"
ascladm.lnk (shortcut)
_ properties\advanced\"run as administrator"=yes
(to make path changes you’ll need to temporarily create the env.Variable)
_ properties\target="%valueName_betterSpecificForEachCase%\ascladm.cmd"

_ properties\"start in"="%valueName_betterSpecificForEachCase%"
ascladm.cmd
setx valueName_betterSpecificForEachCase=
reg delete HKEY_CURRENT_USER\Environment /F /V valueName_betterSpecificForEachCase
"%~dp0fileName_targetedCmd.cmd"
) (targetedCmd gets executed in elevated cmd window)
Although it is 3 files ,you can place everything (including targetedCmd) in some subfolder (do not forget to add the folderName to the patches) and rename «start.cmd» to targeted’s one name
For me it looks like most native way of doing this ,whilst cmd doesn’t have the needed command
![]()
Jee Mok
6,1678 gold badges48 silver badges81 bronze badges
answered Jul 25, 2018 at 23:28
![]()
iliailia
391 silver badge7 bronze badges
1
You can use the following syntax, I had the same question and did not think a script should be needed.
runas /profile /user:domain\username cmd
This worked for me, it may be different on your network.
answered Nov 29, 2019 at 15:28
![]()
I did it easily by using this following command in cmd
runas /netonly /user:Administrator\Administrator cmd
after typing this command, you have to enter your Administrator password(if you don’t know your Administrator password leave it blank and press Enter or type something, worked for me)..
answered Aug 16, 2018 at 7:18
![]()
2
Press the Windows + X key and you can now select the Powershell or Command Prompt with admin rights. Works if you are the admin. The function can be unusable if the system is not yours.
![]()
Trooper Z
1,63714 silver badges32 bronze badges
answered Feb 25, 2019 at 14:11
![]()
I’ve created this tool in .Net 4.8 ExecElevated.exe, 13KB (VS 2022 source project) it will execute an application with an elevated token (in admin mode).
But you will get an UAC dialog to confirm! (maybe not if UAC has been disabled, haven’t tested it).
And the account calling the tool must also have admin. rights of course.
Example of use:
ExecuteElevated.exe "C:\Utility\regjump.exe HKCU\Software\Classes\.pdf"
answered Nov 14, 2014 at 23:55
![]()
MrCalvinMrCalvin
1,6991 gold badge19 silver badges27 bronze badges
7
I used runas /user:domainuser@domain cmd which opened an elevated prompt successfully.
answered Mar 10, 2014 at 23:02
![]()
JasonCJasonC
192 silver badges7 bronze badges
1
Как оказалось, есть несколько способов открыть командную строку с повышенными привилегиями на устройстве Windows, часто это необходимо, так как большинство системных команд требует прав администратора компьютера. В этой статье мы покажем вам пять различных методов запуска командной строки от имени администратора, используя такие функции, как окно поиска Windows, меню «Пуск» и диалоговое окно «Выполнить». Итак, давайте посмотрим, как это сделать.

Содержание
- Использование окна поиска Windows
- С помощью меню ‘Пуск’
- Использование диалогового окна ‘Выполнить’
- Через диспетчер задач
- Создав ярлык на рабочем столе
Использование окна поиска Windows
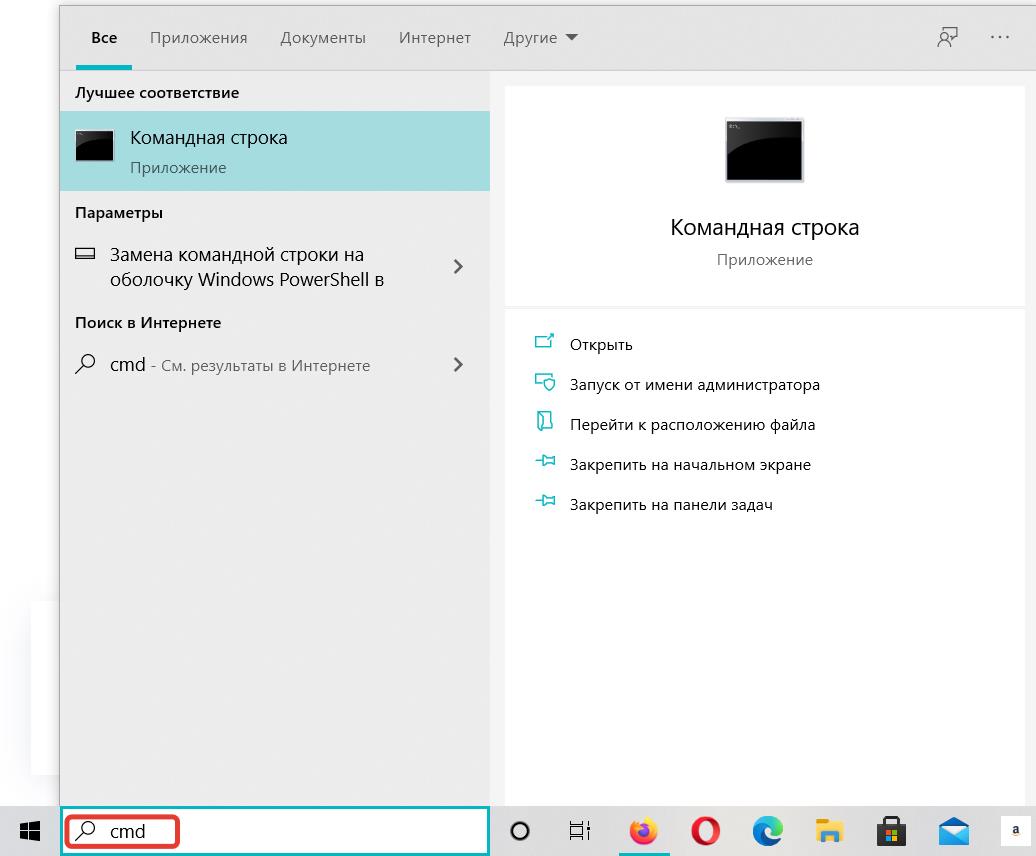
Чтобы открыть командную строку с повышенными привилегиями с помощью поля поиска Windows, следуйте приведенным ниже инструкциям:
- Перейдите на панель задач и щелкните поле поиска, чтобы открыть поиск Windows. Кроме того, вы также можете использовать сочетания клавиш, такие как Win + S или Win + Q.
- В поле поиска введите cmd, чтобы приложение Командная строка отображалась в списке результатов.
- Теперь щелкните правой кнопкой мыши командную строку и выберите Запуск от имени администратора.

- Далее появится приглашение UAC с просьбой разрешить командной строке вносить изменения на вашем устройстве. Нажмите кнопку «Да», чтобы открыть командную строку с повышенными привилегиями на экране компьютера.
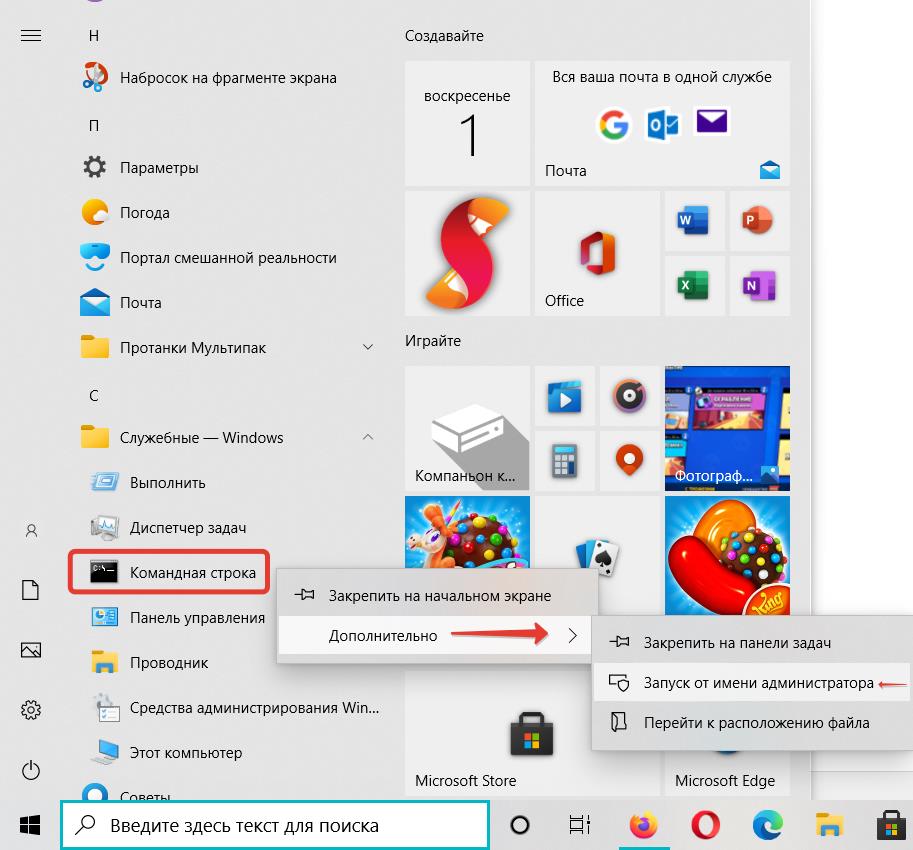
Вот как открыть командную строку от имени администратора с помощью меню Пуск.
- Перейдите на панель задач и нажмите кнопку «Пуск».
- Прокрутите список меню вниз, пока не найдете Служебные-Windows.
- Как только вы найдете Служебные-Windows, разверните этот пункт меню. Теперь щелкните правой кнопкой мыши командную строку Дополнительно, а затем нажмите пункт Запуск от имени администратора.
- После этого появится элемент управления учетными записями пользователей с запросом вашего согласия. Нажмите кнопку Да, чтобы запустить командную строку от имени администратора.
Совет! Чтобы упростить задачу, просто щелкните в верхней части окна символ # и нажмите клавишу С. Теперь в категории С вы попадете в Служебные-Windows.
Использование диалогового окна ‘Выполнить’
Windows 10 поставляется со встроенным диалоговым окном Выполнить, с помощью которого вы можете напрямую открывать свои любимые программы. Вот краткое руководство по открытию командной строки с повышенными привилегиями с помощью этого метода.
- Щелкните правой кнопкой мыши кнопку Пуск и выберите приложение Выполнить. Кроме того, вы также можете использовать сочетание клавиш Win + R, чтобы открыть окно Выполнить.
- В текстовой области введите cmd и нажмите комбинацию клавиш Ctrl + Shift + Esc.
- Если появится запрос UAC, нажмите кнопку Да, чтобы открыть командную строку с повышенными привилегиями.
Через диспетчер задач
Чтобы открыть командную строку с повышенными привилегиями с помощью диспетчера задач, следуйте приведенным ниже инструкциям:
- Нажмите комбинацию клавиш Ctrl + Shift + Esc, чтобы напрямую открыть диспетчер задач.
- Если диспетчер задач находится в режиме меньшего количества деталей, разверните его, щелкнув Подробнее.
- Перейдите в строку меню и щелкните меню Файл.
- Теперь нажмите и удерживайте клавишу Ctrl, а затем нажмите пункт меню Запустить новую задачу.
После того, как Вы выполните данные действия, запустится командная строка от имени администратора.
Создав ярлык на рабочем столе
Чтобы создать ярлык на рабочем столе для запуска командной строки с повышенными привилегиями, выполните следующие действия:
- Щелкните правой кнопкой мыши пустое поле на экране рабочего стола и выберите Новый ярлык.
- В новом всплывающем окне скопируйте и вставьте приведенные ниже команды, а затем нажмите Далее.
C:\Windows\System32\cmd.exe
- Дайте подходящее имя этому ярлыку, а затем нажмите Готово, чтобы создать ярлык. Данные действия создадут новый ярлык для запуска командной строки на экране вашего рабочего стола.
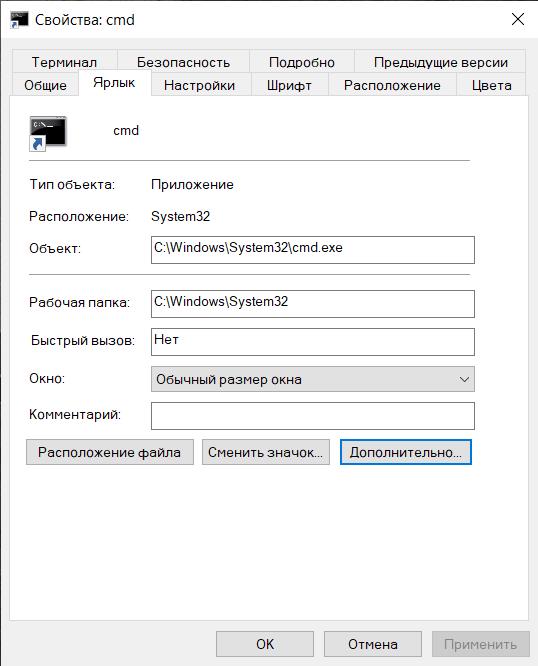
- Щелкните этот новый ярлык правой кнопкой мыши и выберите в контекстном меню пункт Свойства.
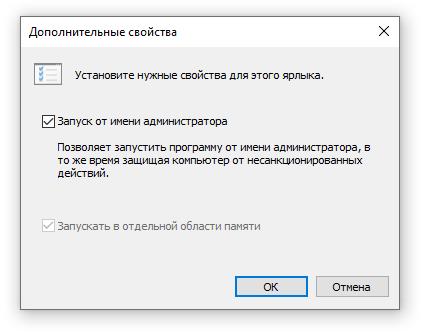
- Далее перейдите на вкладку Ярлык и нажмите кнопку Дополнительно.
- Затем установите флажок Запуск от имени администратора и нажмите ОК.
- Теперь нажмите кнопку Применить и ОК, после этого изменения вступят в силу.
- Чтобы открыть командную строку с повышенными привилегиями, вам просто нужно дважды щелкнуть новый ярлык на рабочем столе.
Небольшой совет о том, как запустить командную строку от имени администратора или, другими словами, открыть командную строку с повышенными привилегиями в Windows 7 или Windows 10/8. Мы видели, как запустить командную строку и выполнить много задач. Но для выполнения некоторых задач требовались повышенные привилегии. В таких случаях вам нужно открыть окно командной строки с повышенными правами. Итак, давайте посмотрим, как запустить, запустить или открыть командную строку от имени администратора или повышенного уровня CMD с правами администратора и правами в Windows 10/8/7.
Запустите командную строку от имени администратора
В Windows 7 выполните следующие действия.
Введите cmd в Начать поиск.
В результатах вы увидите «cmd».

Щелкните правой кнопкой мыши по нему и в контекстном меню выберите Запуск от имени администратора .
В Windows 10 и Windows 8 выполните следующие действия.
Переместите курсор в левый нижний угол и щелкните правой кнопкой мыши, чтобы открыть меню WinX. Выберите Командная строка (Администратор), чтобы открыть командную строку с повышенными правами.

Как видите, в Windows 10/8.1 все стало проще.
Есть и другие способы открыть командную строку с повышенными правами:
- Нажмите Ctrl + Shift + Esc, чтобы открыть диспетчер задач. Нажмите меню «Файл»> «Запустить новое задание». Чтобы открыть окно командной строки, введите cmd . Не забудьте установить флажок Создать эту задачу с правами администратора . Затем нажмите Enter.
- Вы также можете открыть командную строку с повышенными привилегиями из диспетчера задач с помощью клавиши CTRL.
- Или просто откройте меню «Пуск» или «Пуск» и начните вводить командную строку . Затем удерживайте клавиши Shift и Ctrl , а затем нажмите Enter , чтобы открыть командную строку в командной строке с повышенными привилегиями.
Если вы хотите, вы также можете закрепить командную строку с правами администратора Tile to Windows 8.1 Start Screen.
Теперь посмотрим, как открыть командную строку PowerShell с повышенными правами в Windows 10.
В Windows 8, как и в предыдущих версиях Windows, ряд задач администрирования и управления системой осуществляется через интерфейс командной строки (cmd.exe). Однако, как и в предыдущих версиях Windows, ряд подобных задач для своего выполнения требуют наличие прав администратора. В этой статье мы поговорим о том, как открыть командную строку с правами администратора в Windows 8. В связи с тем, что Microsoft несколько переделало интерфейс этой операционной системы, эта процедура будет несколько отличаться о той, к которой мы привыкли в Windows 7 (отсутствует меню Пуск). Проблема в том, что при щелчке правой кнопкой мыши по ярлыку программы на стартовом экране Metro, меню «Run as administrator» не появляется.
В Windows 8 запустить командную строку с помощью прав администратора можно несколькими способами:
- Со стартового экрана
- Из меню проводника Explorer
- С помощью диспетчера задач
- При помощи меню Win+X

Опишем каждый из этих способов открытия командной строки с правами админа в Win8 подробнее.
Открываем командную строку из интерфейса Metro UI
В строке «Поиск» интерфейса Windows 8 Metro UI, нужно набрать “cmd” (или “command prompt”), в результате в левой панели отобразится найденное приложение. Затем нужно щелкнуть правой кнопкой мыши по появившемуся ярлыку и в нижней части экрана появится строка с дополнительными опциями запуска. Выберите «Запуск от имени администратора» (“Run as administrator”)
Все то же самое можно выполнить, выделив найденное приложение и нажав на клавиатуре комбинацию Ctrl + Shift + Enter.

Запуск командной строки из проводника
Откройте окно проводника Windows Explorer, нажав сочетание клавиш Win+E. В левом окне выберите элемент Мой компьютер, а справа – диск C:\. Затем в верхнем меню выберите File->Open command prompt -> Open command prompt as administrator (Открыть командную строку как администратор).

Запуск командной строки из диспетчера задач
Откройте диспетчер задач Windows 8, нажав сочетание клавиш Ctrl + Shift + Esc. Затем нужно создать новую задачу, выбрав пункт меню «Файл -> Запустить новую задачу» («File -> New Task (Run)»), набрать в появившемся окне cmd, поставить флажок «Запустить задачу с привилегиями Администратора» («Create this task with administrative privileges.») и нажать ОК.

Запуск из меню быстрого доступа Win+X
Окно командной строки с повышенными привилегиями также можно открыть с помощью меню быстрого запуска, для этого, находясь на начальном экране, нужно нажать Win+X. В появившемся меню выберите пункт «Командная строка (администратор)» («Command Prompt (Admin)»).

Вот какие способы запуска командной строки с правами администратора в Windows 8 удалось обнаружить нам. В комментариях предлагайте свои варианты 🙂 .
На чтение 4 мин Просмотров 5к.
 Windows 10 отличается от предыдущих версий тем, что разработчики ограничили права администратора для того, чтобы обеспечить максимальную безопасность системы.
Что такое права администратора? Админ (Администратор) – это эксперт в деле настройки системы, поэтому ему обычно даются расширенные права, однако в данной версии даже админу не дают полных прав, чтобы максимально обезопасить систему от неквалифицированного вмешательства.
В этой статье мы опишем как получить права администратора Windows 10 в расширенном виде, если это необходимо.
Содержание
- Как получить права
- Способ №1 – запуск утилит с расширенными правами админа
- Способ №2 – запуск утилит с расширенными правами под именем обычного пользователя
- Способ №3- получение расширенных прав админа с помощью командной строки
- Способ №4 – получение расширенного доступа админа через «Локальную политику безопасности»
- Способ №5 – получение расширенного доступа через надстройку, управляющую учётными записями
- Заключение
Как получить права
Способ №1 – запуск утилит с расширенными правами админа
Для запуска программ-утилит нужно предварительно выполнить вход в Windows под учетной записью, владеющей правами админа.
Запустим встроенную в систему программку WordPad с расширенными правами. Для этого будем действовать в следующем порядке:
- При помощи Win + Q перейдем к строке поиска, где наберём «WordPad»;
- Далее кликнем по найденной программке правой кнопкой мыши. В контекстном меню находим пункт «Запустить от имени администратора». WordPad будет запущена в расширенном режиме.
Также WordPad может быть запущена через меню «Пуск». Зайдя в меню и кликнув по программе, переходим во вкладку «Все приложения», дальше переходим в «Дополнительно» и кликнем «Пуск от имени администратора» – программа запущена с увеличенными возможностями.
Если ярлычок программки, которую нужно запустить с расширенными возможностями, находится на десктопе, переходим в контекстное меню ярлычка и выбираем пункт, отвечающий за пуск от имени админа.
Ещё один метод запуска утилиты WordPad с расширенными полномочиями – запуск в командной строке.
Для этого нажмём на значок «Пуск» правой кнопкой мыши и кликнем пункт «Администратор. Командная строка». Потом пишем в консоли команду write и наш редактор будет работать с увеличенными правами.
Способ №2 – запуск утилит с расширенными правами под именем обычного пользователя
Запускаем программку Notepad++ через контекстное меню ярлыка на рабочем столе:
 Войдем в систему с учётной записью обычного пользователя;
- Далее заходим в ярлыковое контекстное меню;
- Выбираем поочерёдно « Свойства» – «Ярлык»;
- В окне «Дополнительные свойства» устанавливаем птичку напротив «Запуск от имени Администратора»;
- система запросит пароль Админа – вводим пароль и запускаемся с расширенными возможностями.

Способ №3- получение расширенных прав админа с помощью командной строки
Выполним следующие действия:
- Зайдём в систему Windows с имеющей права админа учётной записью;
- Затем в поисковой строке вводим «CMD» для поиска консоли командной строки;
- В консоли выбираем пункт запуска от имени админа и кликаем по этой строке;
- В появившемся окне вводим: net user администратор / active : yes .
После исполнения этой команды, учётная запись получает расширенные права администратора. Отменить это действие можно заменив yes на no .
Способ №4 – получение расширенного доступа админа через «Локальную политику безопасности»
Порядок действий следующий:
 Зайдём с систему с имеющей права администратора учётной записью;
- Зайдем в окно командной строки, как это описано в способе №3 способе и вводим: secpol. msc
- Выполнив эту команду, зайдём в «Локальную политику безопасности»;
- Далее переходим поочерёдно в «Локальные политики» – «Параметры безопасности» – «Учётные записи: Состояние учётной записи. Администратор»;
- В окне «Учётные записи: Состояние учётной записи. Администратор» переключатель поставим в положение Включен – режим будет включен.

После этого права расширенного админа присваиваются вашей учётной записи.
Способ №5 – получение расширенного доступа через надстройку, управляющую учётными записями
Выполним действия в следующем порядке:
- Запустим консоль как в первом способе и введём запись: lusrmgr . mse и нажмём enter для выполнения команды;
- В открывшемся окне «Локальные пользователи и группы» выберем пункт «Пользователи», щёлкаем по нему и открываем окно «Администратор». В этом окне в пункте «Отключить учётную запись» снимаем галочку.
Перезагрузив компьютер и войдя в систему с учётной записью, с которой выполняли действия, мы получаем полные права админа.
Способ №6 – как получить права администратора в Windows 10 с расширенными возможностями через учётные данные пользователей
- Войдём в командную строку и введём: control userpasswords2;
- Выполнив команду, попадаем в «Учётные записи пользователей»
- Переходим во вкладку «Дополнительно»
- В этой развёрнутой вкладке, нажав кнопку «Дополнительно» переходим в окно «Локальные пользователи и группы».
- Далее – как в способе №5: «Пользователи» – «Администратор» – убрать птичку «Отключить учётную запись».

Перезагрузив компьютер, войдите снова с уже имеющей расширенные права учётной записью.
Заключение
Приведённые примеры показывают, что получить расширенные права админа легко. Но зайдя в систему, нужно быть осторожным, чтобы не сделать неверных действий, могущих вызвать необратимые последствия. Потребуется переустановка системы, а это приведёт к потере данных. На мой взгляд, разработчики недаром ограничили полномочия администратора, для нормальной работы вполне хватает сокращённых прав.