 Обновлено:
Опубликовано:
Тематические термины: MTU, Windows, Linux, FreeBSD
Windows
Linux
FreeBSD
Провайдера
Windows
Нажмите комбинащию клавишь Win + R
В появившемся окне введите cmd и нажмите OK

В открывшемся черном окне введите команду:
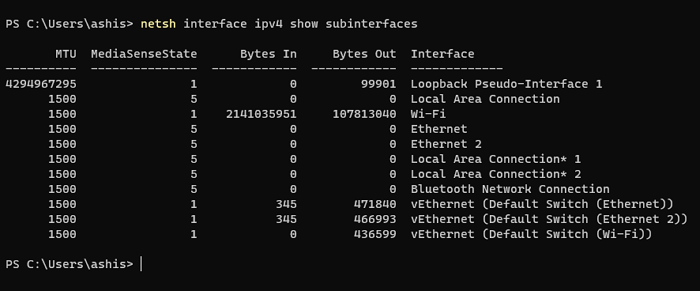
netsh interface ipv4 show subinterfaces
В первой колонке ответа мы увидим значение MTU:

* в данном примере, значение MTU равно 1500 для сетевого адаптера Ethernet.
Linux
ip address
В более современных системах используется утилита для работы с сетевыми интерфейсами — ip address. Вводим команду:
ip a
В полученном результате находим нужный сетевой интерфейс и строчку на подобие:
eth0: <BROADCAST,MULTICAST,UP,LOWER_UP> mtu 1500 qdisc pfifo_fast state UP qlen 1000
* то, что мы ищем — mtu 1500.
ifconfig
В более ранних системах или с установленным ifconfig вводим:
ifconfig eth0
* где eth0 — сетевой адаптер, для которого хотим узнать MTU.
В полученном результате находим что-то на вроде:
eth0: flags=4163<UP,BROADCAST,RUNNING,MULTICAST> mtu 1500
* где mtu 1500 — наше значение.
FreeBSD
В данной системе работаем с уже описанным выше ifconfig:
ifconfig em0
Получаем:
em0: flags=8843<UP,BROADCAST,RUNNING,SIMPLEX,MULTICAST> metric 0 mtu 1500
Провайдера
Чтобы определить оптимальное значение MTU для нашего сетевого адаптера, подключенного к сети Интернет, необходимо узнать значение, используемое на оборудовании поставщика.
Для этого выполняем ping с запретом фрагментации сетевых пакетов (-f) и выставлением определенного размера пакета (-l):
ping dmosk.ru -f -l 1472
* 1472 будет соответствовать MTU — 1500, так как к пакету мы должны еще прибавить 28 (заголовок).
Наша задача — подобрать значение пакета, при котором будет идти пинг:
Ответ от 90.156.242.197: число байт=1472 время=13мс TTL=56
Ответ от 90.156.242.197: число байт=1472 время=12мс TTL=56
Если мы видим:
Требуется фрагментация пакета, но установлен запрещающий флаг.
Требуется фрагментация пакета, но установлен запрещающий флаг.
Значит значение -l нужно уменьшить, пока сигнал не начнет проходить.
Находим значение, которое стоит на границе с ошибкой и прибавляем к нему заголовок пакета — 28. Так мы получаем наше оптимальное MTU.
На данный момент большинство Интернет провайдеров предоставляет услуги связи с фрагментом в 1500. Старые подключения от Ростелеком или подключения на основе PPPoE могут работать на меньших значениях.
![]()
Была ли полезна вам эта инструкция?
Да Нет
 Настройка MTU (Maximum Transmission Unit) знакома большинству пользователей, которые когда-либо настраивали Wi-Fi роутеры, но доступна и в Windows для Ethernet и других подключений. MTU — это максимальный размера блока данных одного пакета в байтах (без учета размера заголовка), стандартный размер — 1500 байт.
При необходимости размер MTU в Windows 11, 10 и других версий можно изменить. В этой инструкции — о том, как это сделать, а также узнать текущий размер MTU.
Способы изменения размера MTU в Windows 11 и Windows 10
Прежде чем приступить, вы можете определить текущий размер MTU для сетевых интерфейсов, для этого достаточно запустить командную строку или Терминал от имени администратора, после чего использовать следующую команду:
netsh interface ipv4 show subinterfaces

Размеры MTU будут указаны в первом столбце в результатах выполнения команды. Если вам требуется изменить размер пакета, вы можете использовать один из следующих способов.
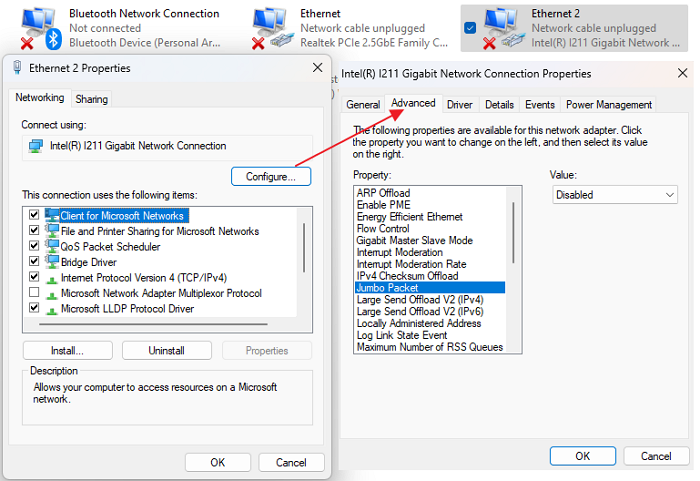
Включение Jumbo frame
Первая возможность — включить Jumbo Frame (Jumbo-кадр), позволяющий передавать данные в размере, превышающем стандартные 1500 байт. Для этого используйте следующие шаги:
- Нажмите клавиши Win+R, введите ncpa.cpl и нажмите Enter.
- В списке подключений нажмите правой кнопкой мыши по подключению, для которого нужно включить Jumbo frame и выберите пункт «Свойства».
- Нажмите кнопку «Настроить» для настройки сетевого адаптера.

- На вкладке «Дополнительно» найдите пункт «Jumbo packet» и измените его значение, затем примените настройки.


При включении Jumbo frame соединение может быть кратковременно разорвано, но обычно затем работает исправно. Учитывайте, что настройка Jumbo packet может быть доступна не для всех сетевых карт, также её наличие может зависеть от используемых драйверов.
Изменение MTU в командной строке
Вторая возможность — использование командной строки для изменения размера MTU:
- Запустите командную строку от имени администратора и введите следующую команду, чтобы посмотреть список имен интерфейсов:
netsh interface ipv4 show subinterfaces
- В следующей команде измените ИМЯ_ИНТЕРФЕЙСА и значение MTU для изменения MTU для соответствующего подключения:
netsh interface ipv4 set subinterface ИМЯ_ИНТЕРФЕЙСА mtu=РАЗМЕР store=persistent

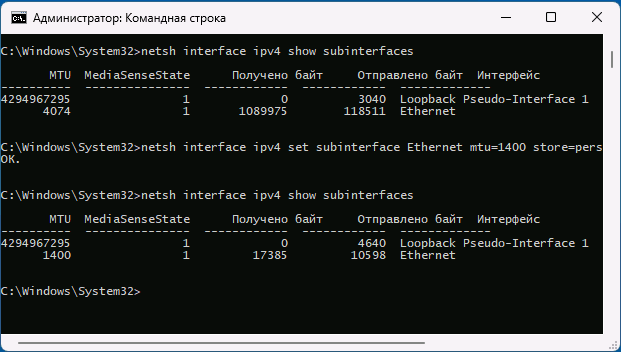
После успешного выполнения команды, размер MTU будет изменен.
Определить оптимальный размер пакета (значение MTU) для текущего Интернет-подключения можно в командной строке с помощью команды, ping адреса_сайта -f -l РАЗМЕР, например:
ping google.com -f -l 1500

Задачей будет поиск такого значения MTU, которое не приводит к сообщениям о необходимости фрагментации пакета.
Are you having trouble getting your computer to connect to the internet? It could be because your MTU size is set too low. You can easily check your MTU size in Windows 10 by following a few easy steps. In this article, you’ll learn how to check your MTU size in Windows 10 and how to adjust it if needed.
To check your MTU size in Windows 10, follow these steps:
- Open the Command Prompt window. Click Start and type cmd to open the command prompt.
- Type netsh interface ipv4 show subinterface and press Enter. You will see a list of network connections along with their MTU size.
- Type netsh interface ipv4 set subinterface “name of connection” mtu=1458 store=persistent to set the MTU size.
- Restart your computer to apply the new settings.

Understanding MTU and its importance
MTU is an acronym for Maximum Transmission Unit. It is the size of the largest packet of data that can be transmitted over a network. It is important to check the MTU size of your network to ensure that it is properly configured and that data can be sent and received without any issues. By setting the correct MTU size, you can optimize the performance of your network and ensure that data is being sent and received without any issues.
The size of the MTU varies from network to network and depends on the type of network being used. For example, the default MTU size for an Ethernet network is 1500 bytes, while the default MTU size for a Wi-Fi network is 2346 bytes. The size of the MTU also depends on the type of data being sent and received. For example, if you are sending large amounts of data, such as video or audio files, you may need to increase the MTU size to ensure that the data is being sent and received without any issues.
Why it is important to check the MTU size in Windows 10
In order to ensure that your network is running optimally, it is important to check the MTU size in Windows 10. If the MTU size is set too low, the data may be fragmented, leading to slower transfer speeds and other issues. On the other hand, if the MTU size is set too high, the data may be dropped, leading to network congestion and other issues. By checking the MTU size in Windows 10, you can ensure that your network is running optimally and that data is being sent and received without any issues.
Another reason why it is important to check the MTU size in Windows 10 is to ensure that your network is secure. If the MTU size is set too low, the data may be vulnerable to attack, as it is more likely to be fragmented. On the other hand, if the MTU size is set too high, the data may be vulnerable to attack, as it is more likely to be dropped. By checking the MTU size in Windows 10, you can ensure that your network is secure and that data is being sent and received without any issues.
How to check the MTU size in Windows 10
It is easy to check the MTU size in Windows 10. The first step is to open the Control Panel and then select Network and Internet. From here, you can select Network and Sharing Center and then select Change Adapter Settings. From here, you can select the network you want to check the MTU size for and then select Properties.
From the Properties window, you can select the Networking tab and then select Internet Protocol Version 4 (TCP/IPv4). From here, you can select Properties and then select the Advanced button. From the Advanced window, you can select the Networking tab and then select the Maximum Transmission Unit (MTU) field.
Tools to check the MTU size
There are also several tools available to help you check the MTU size in Windows 10. One of the most popular tools is the MTU Checker, which is available for free from the Windows Store. This tool can be used to check the MTU size for any network and can be used to quickly and easily check the MTU size in Windows 10.
Another popular tool is the MTU Analyzer, which is available for free from the Windows Store. This tool can be used to analyze the MTU size of any network and can be used to quickly and easily check the MTU size in Windows 10.
Conclusion
It is important to check the MTU size in Windows 10 in order to ensure that your network is running optimally and securely. There are several tools available to help you check the MTU size in Windows 10, such as the MTU Checker and the MTU Analyzer. By using these tools, you can easily and quickly check the MTU size in Windows 10.
Few Frequently Asked Questions
What is MTU?
MTU stands for Maximum Transmission Unit. It is the size of the largest packet (a collection of bytes) that can be transmitted over a network. MTU is important for the performance of a network, as it affects the speed and reliability of data transmission. It is also important for security, as it determines the size of a packet that can be sent without being fragmented. In order for a network to function properly, the MTU must be set correctly.
What is the standard MTU size?
The standard MTU size for most networks is 1500 bytes. However, certain networks may have different MTU sizes, depending on the type of hardware and software being used.
How to Check Mtu Size in Windows 10?
In Windows 10, you can check the MTU size by using the command line tool “netsh”. To do this, open the command prompt (Windows Key + R, then type “cmd”) and type “netsh interface ipv4 show subinterface”. This will display a list of all the network interfaces and their associated MTU size.
What are the consequences of having an incorrect MTU size?
Having an incorrect MTU size can lead to a variety of problems. These include slow internet speeds, packet loss, and difficulty connecting to certain websites. It can also lead to security issues, as larger packets can be fragmented and sent in multiple parts, making them more vulnerable to attack.
What are the steps to change the MTU size in Windows 10?
To change the MTU size in Windows 10, you need to open the command prompt (Windows Key + R, then type “cmd”) and type “netsh interface ipv4 set subinterface “” mtu= store=persistent”. Replace with the name of the network interface (e.g. “Local Area Connection”) and with the desired MTU size.
What should I do if I am still having issues with my MTU size after changing it?
If you are still having issues with your MTU size after changing it, you may need to restart your computer or router. Additionally, you may need to contact your ISP or network administrator for further troubleshooting.
How to Find and Change MTU Size in Windows 10 and Increase INTERNET SPEED
If you’re looking for an easy way to check your MTU size in Windows 10, this guide has shown you how. You can check your MTU size with the ping command or use the netsh command to check your MTU size with a few simple steps. With this knowledge, you can ensure that your MTU size is optimized for your network and give you an optimal connection experience in Windows 10.

Очень редко, но такие моменты наступают, когда необходимо изменить стандартное значение размера пакета.
Если у Вас FTP-клиент не догружает файлы или сайты в интернете открываются не всегда одинаково быстро, то, возможно, настала пора обратить внимание на установленные значения MTU.
Очень редко, но такие моменты наступают, когда необходимо изменить стандартное значение размера пакета.
Если у Вас FTP-клиент не догружает файлы или сайты в интернете открываются не всегда одинаково быстро, то, возможно, настала пора обратить внимание на установленные значения MTU.
Что такое MTU и сколько ставить?
Что такое MTU? Вот как рассказывает нам Wikipedia.
Многие задают вопрос не что это такое, а сколько устанавливать? Однозначного ответить на этот вопрос нельзя. Зависимостей очень много. Начиная от серверов, где размещены сайта, и заканчивая качеством линии связи.
У Вашего компьютера MTU должно быть равно или меньше, которое установлено на вашем роутере, маршрутизаторе провайдера или куда вы там подключаетесь. Но это не гарантирует Вам хорошую работу. На моем домашнем роутере, к примеру, а также на всех компьютерах домашней сети, установлено значение 1490. Это число я получил экспериментальным методом (если бы я тогда встретил утилиту TCP Optimizer, умеющую определять подходящий MTU, было бы в разы проще). У меня плохо отправлялись файлы на удаленный FTP-сервер, а при этом значении всё отлично работает. Хотя стоит заметить, что значение у провайдера стоит стандартное – 1500.
В Windows MTU можно поменять двумя способами: простым и сложным. Простой способ заключается в установке стороннего программного обеспечения, а сложный – в изменении MTU «родными» средствами.
Начнем с сложного, ибо он самый правильный.
Ручной метод изменения MTU в Windows
Все делается с помощью консоли. Вообще все хорошие и удобные вещи делаются только через консоль. Это стоит запомнить. 
Узнаем MTU вручную
Запускаем системную консоль Windows с правами администратора:
cmd.exeДля того, чтобы посмотреть текущие значения MTU, вводим команду:
netsh interface ipv4 show subinterfaces
MTU  Состояние определения носителя   Вх. байт  Исх. байт
------  ---------------  ---------  ---------  -------------
4294967295                1          0          0  Loopback
1500                      1   83147897    2724203  Локальное подключение к сети
В моем случае у меня только один интерфейс и это LAN со стандартным значением MTU 1500.
Меняем MTU вручную
Теперь вводим команду для того, чтобы изменить MTU для интерфейса LAN:
netsh interface ipv4 set subinterface "Локальное подключение к сети" mtu=1490 store=persistent
MTU  Состояние определения носителя   Вх. байт  Исх. байт
------  ---------------  ---------  ---------  -------------
4294967295                1          0          0  Loopback
1490                      1   83147897    2724203  Локальное подключение к сети
Этой командой я указал новое значение 1490 для MTU.
Для того, чтобы посмотреть новый результат:
netsh interface ipv4 show subinterfacesМеняем MTU в Windows с помощью TCP Optimizer
Для некоторых проще что-то делать используя графический интерфейс и в этом может помочь утилита TCP Optimizer. Вот, вроде как, ее официальный сайт. У нее достаточно много настроек и самое главное ее достоинство – она умеет определять максимальный пакет, с которым работает ваш компьютер.
Узнаем оптимальное MTU
На скрине ниже показано, как можно узнать оптимальное MTU до сайтов. Сайты можно вручную задать на те, которые Вам нужны. В примере я указал этот блог:

Устанавливаем MTU через TCP Optimizer

После всех изменений не забываем нажать на кнопку Apply changes.
Теги: сеть
Комментарии
Sometimes, you may have noticed that some websites don’t function well on your broadband connection. While most websites run fine, certain seem to have an issue. If you have encountered this situation, it is time to change the Maximum Transmission Unit (MTU) on Windows 11/10 computers.
How to check current MTU settings?
MTU, or Maximum Transmission Unit, is necessary or responsible for this case because it is the parameter that defines the maximum packet size that can be transmitted over a network. So by optimizing MTU, you can enhance your network performance. As a result, you can browse the internet more efficiently.
But not many are aware of how MTU functions. There are two quick ways to check the current MTU settings, these are:
Use Windows Terminal to check the current MTU value
Windows Terminal has to be the easiest way to learn about your current MTU value. To get started, follow the below steps:
- Press Windows Key + X to access the quick menu.
- Click Windows Terminal (Admin).
- Now run the following command and press enter.

netsh interface ipv4 show subinterfaces
- Once done, you should see the MTU value of different networks under the MTU tab.
Check MTU network adapter settings
There is also an alternative option which is checking through the Network adapter settings. For this, you need to follow the below steps:
- Press the Windows key + R to launch Run.
- Type ncpa.cpl and press Enter, and you should see a list of different Network adapters.
- Right-click on any of the adapters for which you want to check the MTU and then select Properties.
- Click the Configure button to open the adaptor connection properties
- Switch to the Advanced Tab and select Jumbo Frame

- Then select the higher value from the dropdown on the right.
Note: The adapter uses the default MTU value if you don’t see the Jumbo Packet option. It also means you cannot change through the control panel method.
Now that you know your MTU value, you can increase or decrease the value per your needs. To do so, there are two methods that you can follow. These are:
- Using Windows Terminal
- Changing MTU through Network Adapter settings
Let’s now look at these methods one by one below:
1] Using Windows Terminal
Changing MTU using the command prompt has to be the easiest method. All you have to do is run two commands – one to identify the interface name and the other to change the MTU value, and you are good to go. So go ahead and follow these steps:
- First, press Windows Key + X to access the quick menu and launch Windows Terminal (Admin).
- Now run the following command to list down all the network adapters:
netsh interface ipv4 show subinterfaces
- Now note down the Interface name for which you want to change the MTU.
- Next, to change the MTU value of your preferred interface, run the following command:
netsh interface ipv4 set subinterface <subinterface name> mtu=9000 store=persistent
- Over here, replace <subinterface name> with the interface name. Also, you change the mtu=9000 value to something else per your requirements.
2] Changing MTU through network adapter settings
You can do it through Network Adapter settings to change your MTU value through a visual interface. For this, follow the below steps:
- Launch Run by pressing Windows Key + X.
- Type ncpa.cpl and press Enter.
- Right-click on your preferred Network adapter and go to Properties.
- Next, click on the Configure button.
- Next, select Jumbo Packet, and from the disable dropdown menu, select any of the MTU values.

- Once done, save the changes and reboot your computer.

How to determine the optimal MTU Value?
Now you might be wondering what would be the ideal MTU value. You can quickly figure that out by running a command in Windows Terminal.
You need to run the ping command, which will send requests to the network and increase the size of the Packet till you get a message about the needed fragment of the Packet. So whichever website is not loading correctly, you can try the ping command with it by following the below steps:

Launch Windows Terminal, and run the following command:
ping [url] -f -l <packet_size>
Over here, replace [url] with your respective URL and set the <packed_size> to 1450. As you run your ping, keep increasing the size with each command until you see the Packet needs to be the fragmented message.
How to troubleshoot Common Issues around MTU?
While dealing with MTU, it is easy to mess things up. If you enter the wrong MTU value, it can impact the overall network performance.
In such a case, you can try restoring the default MTU value. The default MTU value on most computers is 1500. So you can follow the above steps to change the MTU value to 1500 and see if it helps you out.
If you still face any other internet issues, running Windows Troubleshooter might be helpful. To run it, follow the below steps:
- Press Windows Key + I to launch Settings.
- Navigate to System > Troubleshoot > Other troubleshooters.
- Over here, click on the Run button next to Internet Connections and let the troubleshooter run.
Conclusion
So that was all for how to change MTU on Windows 11/10. Changing MTU value using Windows Terminal is a much easier and straightforward process. While if you make the changes using Network adapters, you may not find the required options to make changes. So go ahead and try the above steps on your own and see if they are helpful to you.