Learn how to check, understand, and filter error logs on your PC
by Kazim Ali Alvi
Kazim has always been fond of technology, be it scrolling through the settings on his iPhone, Android device, or Windows. And at times, unscrewing the device to take… read more
Updated on
- If you have been facing issues with the computer, like an application crashing frequently, the Windows 11 error logs could help find the underlying cause.
- In the Event Viewer, you can easily check error logs, filter them, and create custom views.
- Also, find out how easy it really is to create a log file in Windows 11.
XINSTALL BY CLICKING THE DOWNLOAD
FILE
Whenever you encounter an error in Windows, it certainly is a cause for concern. But, we often do not bother discovering what caused it or don’t know how to
Error logs, as the name suggests, are the log files that store all the information as to why the error happened, the program or process that lead to it, along the exact date and time of it.
But it’s certainly not easy to decipher the information listed there. Therefore, we have dedicated this guide to help you understand how to check the error logs in Windows 11, the various types, add filters, and clear them.
Why do I need to check Windows 11 error logs?
Checking error logs on Windows 11 allows you to find the underlying cause of an issue.
For example, if Windows 11 is unstable and crashes frequently or encounters a BSOD (Blue Screen of Death) error, you can go to the event logs, check for the one created at the time of the crash, and find out what caused it.
Though do remember that you are likely to come across a lot of errors and warnings here, and there’s nothing to panic about. If you don’t notice any problem with the system, simply ignore these.
Where can I find error logs?
Error logs on Windows 11 can be found in the event log in Event Viewer. This feature contains the unexpected issues your PC encounters, the exact date and time, and the cause.
Does Windows Keep an error log?
How we test, review and rate?
We have worked for the past 6 months on building a new review system on how we produce content. Using it, we have subsequently redone most of our articles to provide actual hands-on expertise on the guides we made.
For more details you can read how we test, review, and rate at WindowsReport.
One of the advantages of the Windows operating system is that it keeps a log of the important happenings on your PC. This includes a log of the errors that occur.
As mentioned earlier, this can be found in the Event Viewer.
How do I check error logs in Windows 11?
- Why do I need to check Windows 11 error logs?
- How do I check error logs in Windows 11?
- How to understand Windows 11 error logs?
- What are the different types of error logs?
- How can I filter error logs?
- How to create a custom view to check a particular category and level of logs in Windows 11?
- How can I clear error logs in Windows 11?
- How do I create my own log file in Windows 11?
It’s pretty simple and quick to access the error logs on your Windows 11 OS, but in case you didn’t used before, the steps below will surely help you find them.
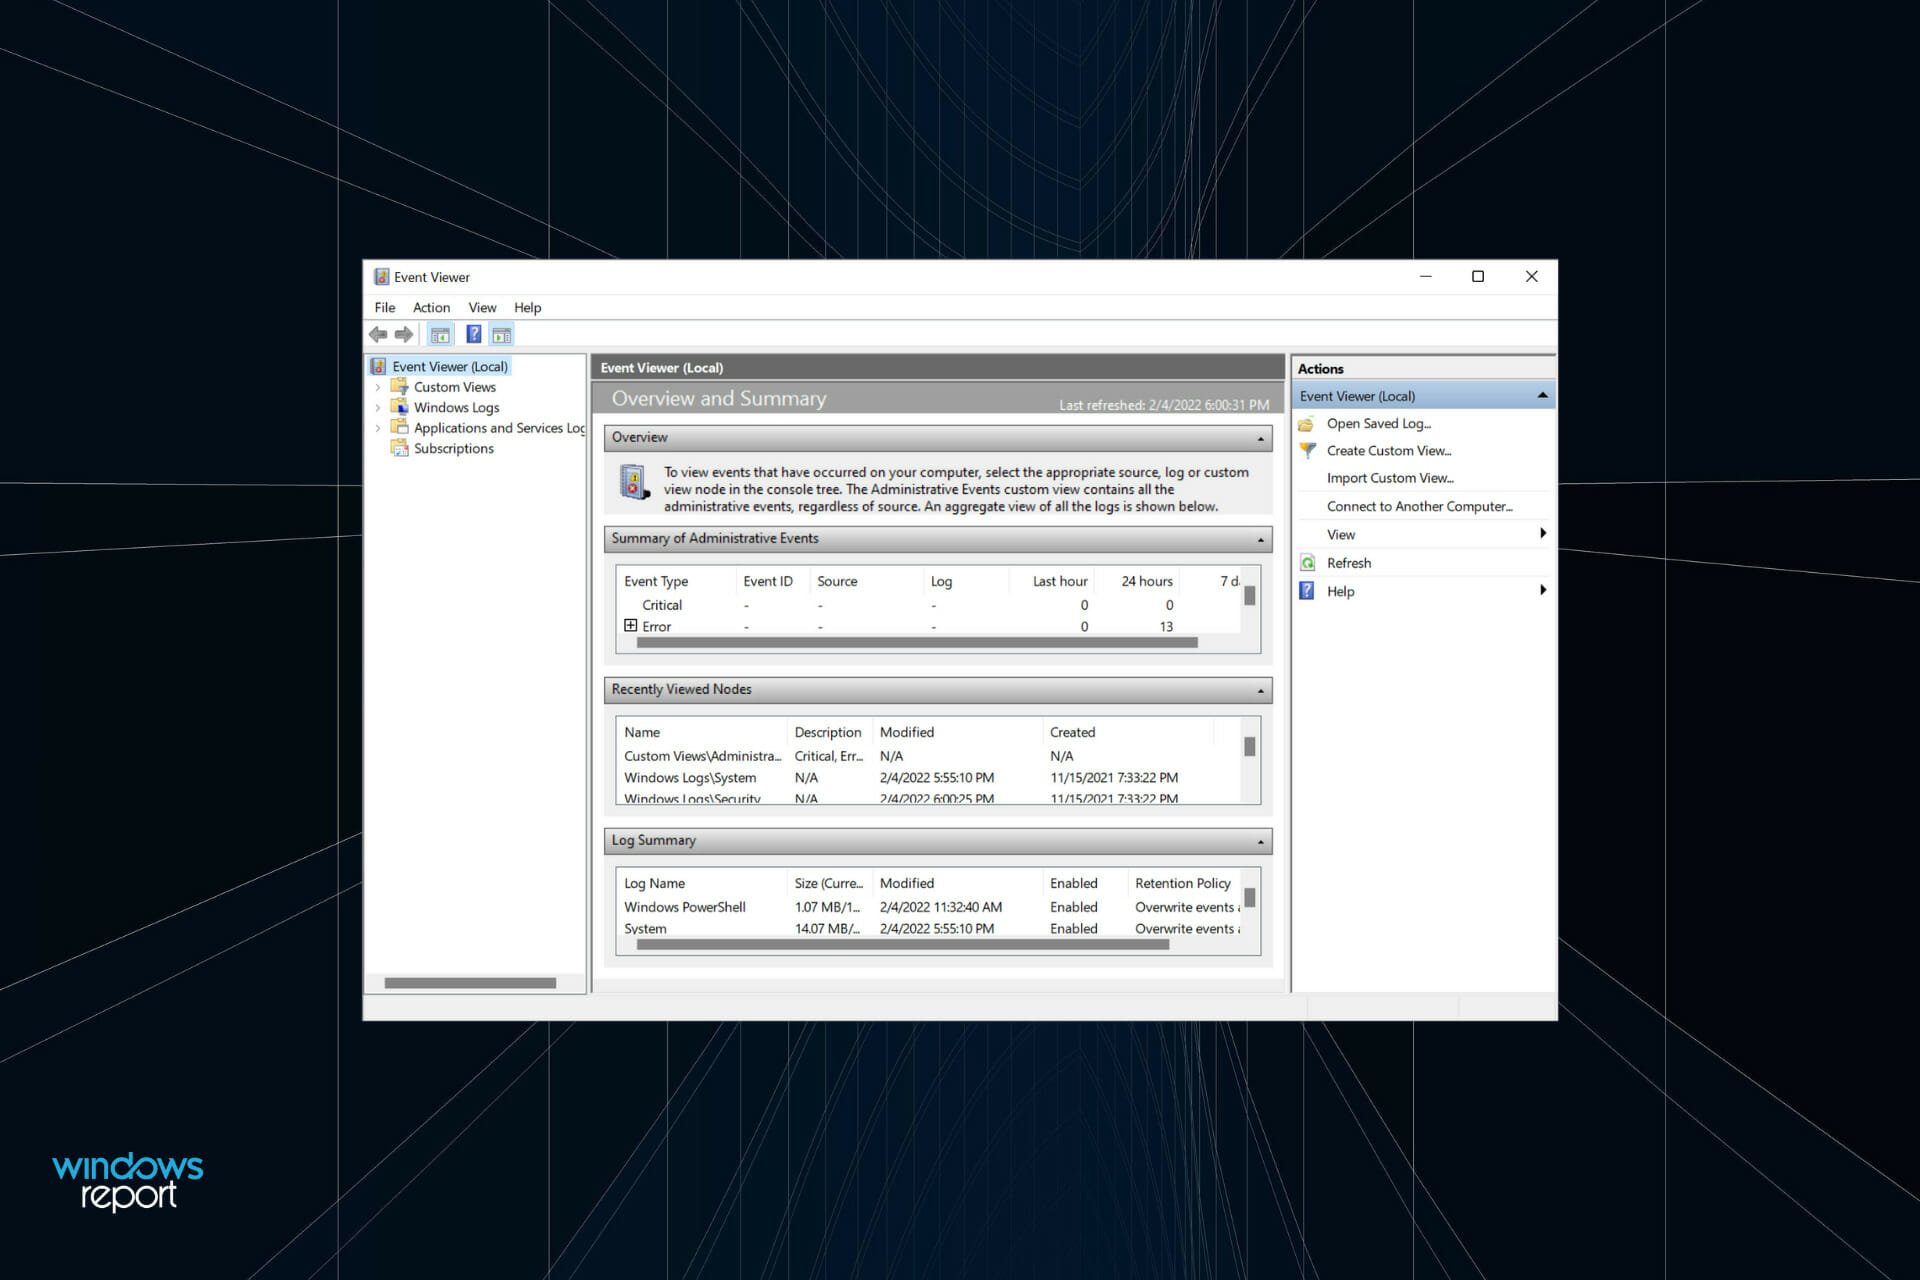
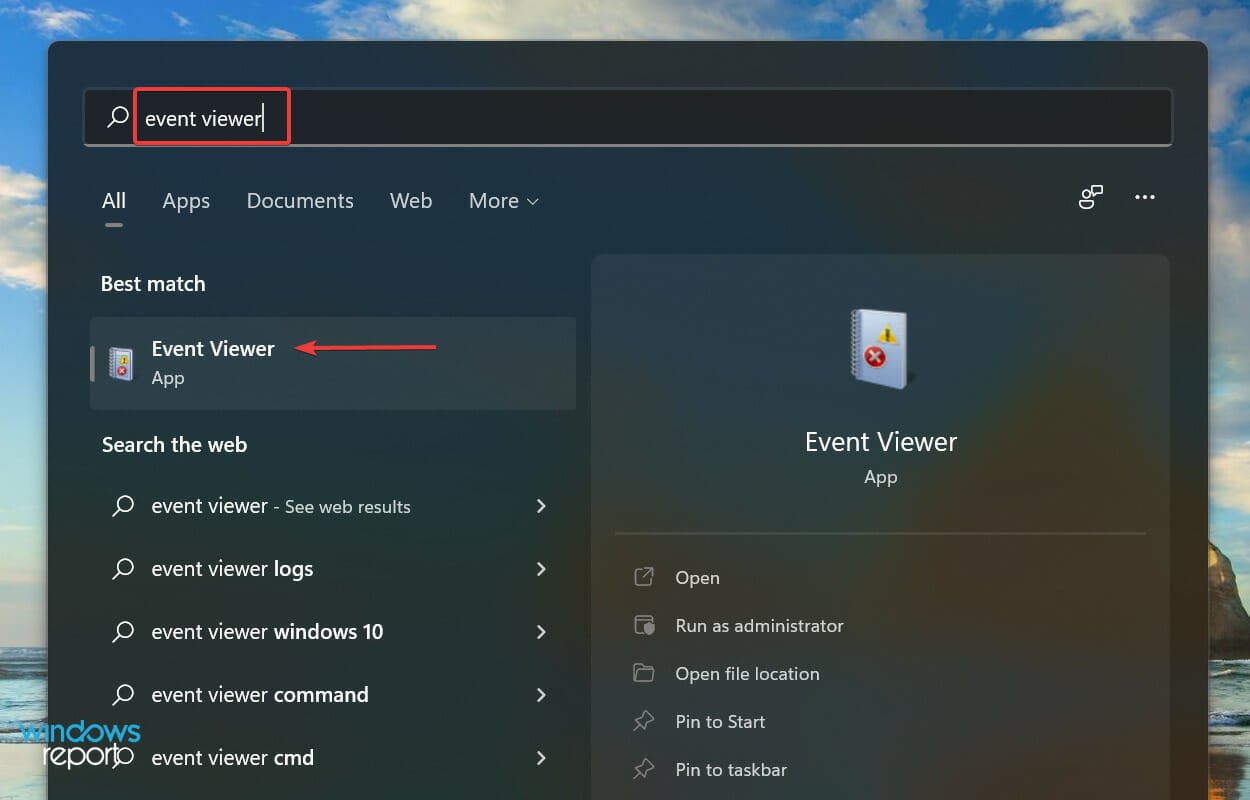
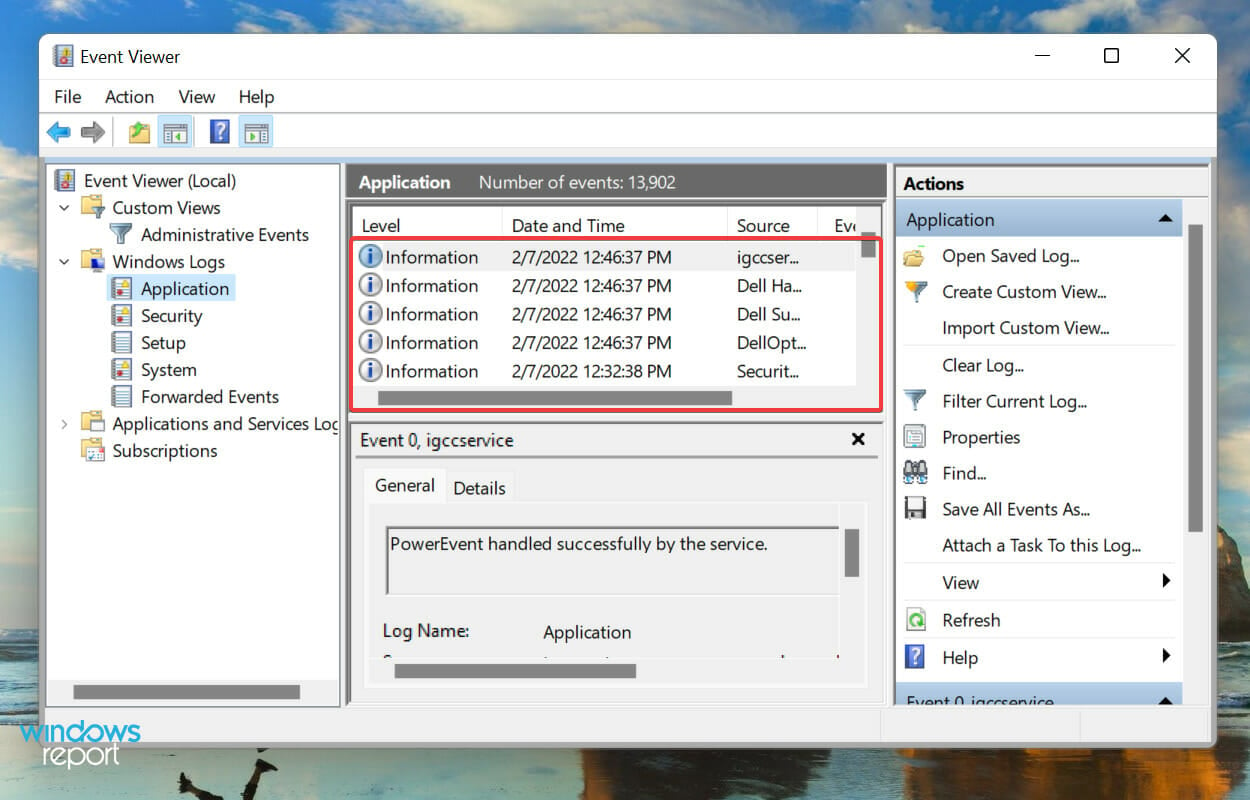
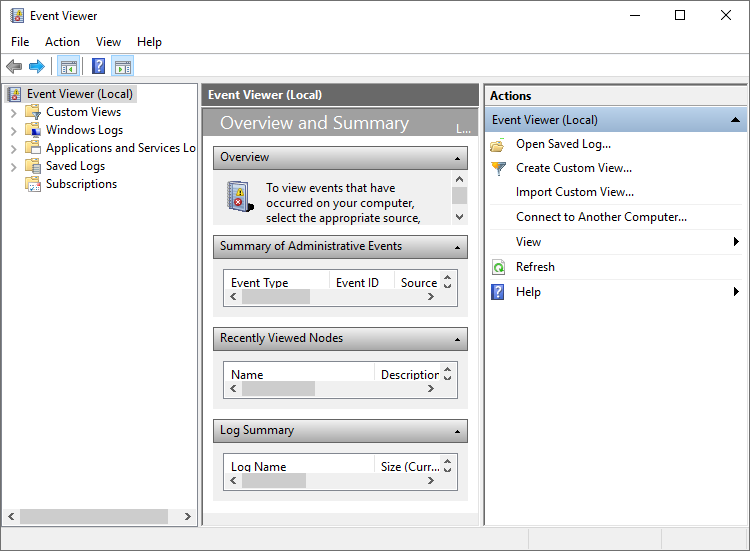
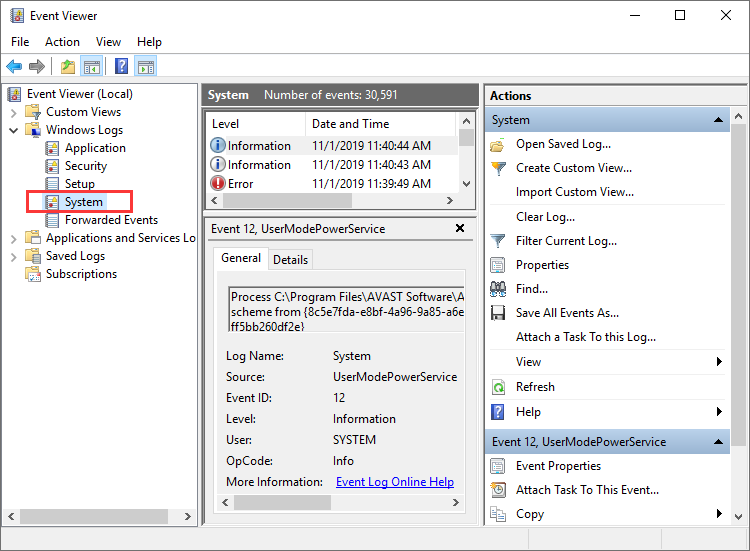
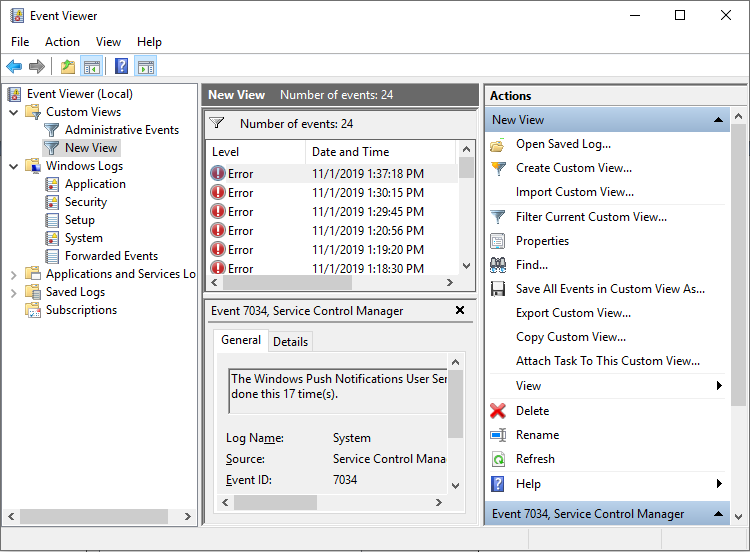
1. Press Windows + S to launch the Search menu, enter Event Viewer in the text field at the top, and click on the relevant search result.
2. Double-click on Windows Logs in the navigation pane on the left.
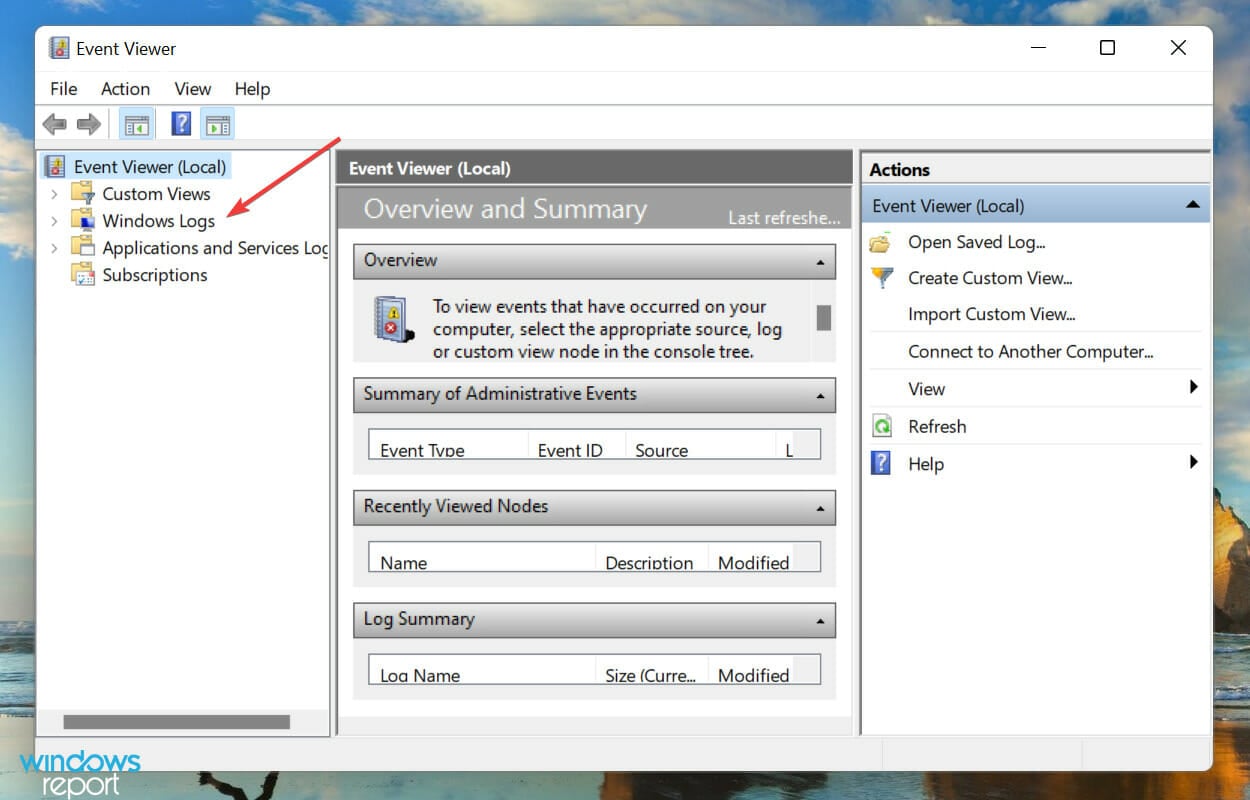
3. You will now find the five different categories. Select any of these, and all the error logs under it will be listed on the right.

4. Now, click on any of the error logs to view all the relevant information about them.
You now know how to check the Windows 11 error logs, but just knowing that won’t suffice. There’s still a lot out there to understand before you can actually make some sense out of these logs, and use them to your advantage.
How to understand Windows 11 error logs?
When you view a log, the general details and the Event ID is critical in identifying and eliminating the error. Apart from that, there’s an Event Log Online Help link at the bottom, which may provide some valuable insights.
For instance, here’s a Windows 11 error log when the relevant driver for a device failed to load.
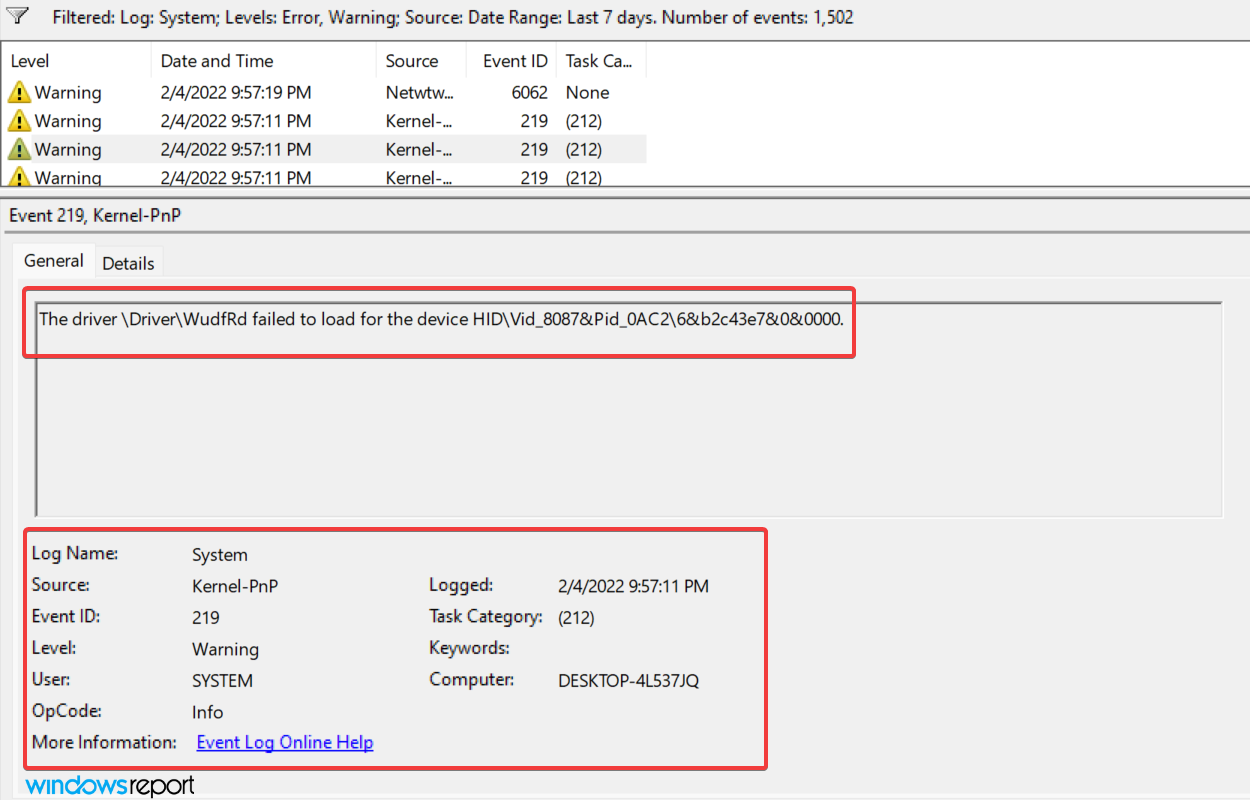
The 219 Event ID helped find out a lot of information along with the relevant fixes for the problem.
We just did a Google search for this Event ID and there were a plethora of results. But this requires a proper understanding of Windows 11 error logs.
But, it’s important to mention here that not all error logs will be as descriptive. Some might have things that you wouldn’t be able to comprehend or use jargon excessively. No matter the case, a simple Google search would suffice.
What are the different types of error logs?
When you go through the Windows 11 error logs, there are basically three important categories, referred to as Event Level, under which these are placed. And, the categories define the severity of the event for which the log is created. The three categories are as follows:
- Information: These are created when an operation goes through successfully. For instance, when a driver is loaded or an application is launched without encountering any issues.
- Warning: These are created when the OS finds an issue with the system. These issues do not pose an imminent risk, but could be problematic in the future. For instance, if you are running low on disk space, a log will be created.
- Error: These indicate a major problem, though most of the time, Windows takes care of these as well. As an example, if a driver or service does not load, an error log will be created. But, these are the most critical ones of all.
If you are identifying problems with the PC, ignore the Information logs, go through the Warning logs, but pay special attention to the ones categorized as Error, since these are most likely to record the problem you are looking for.
When you open the Event Viewer in Windows 11, it will list out all three. The view will remain the same if you have not changed the Windows 11 Error Reporting logs location in the in the Group Policy.
But identifying all logs for one of these levels will take up a lot of your time. This is where filtering error logs comes to your aid. Check the next section to find out how you can do that.
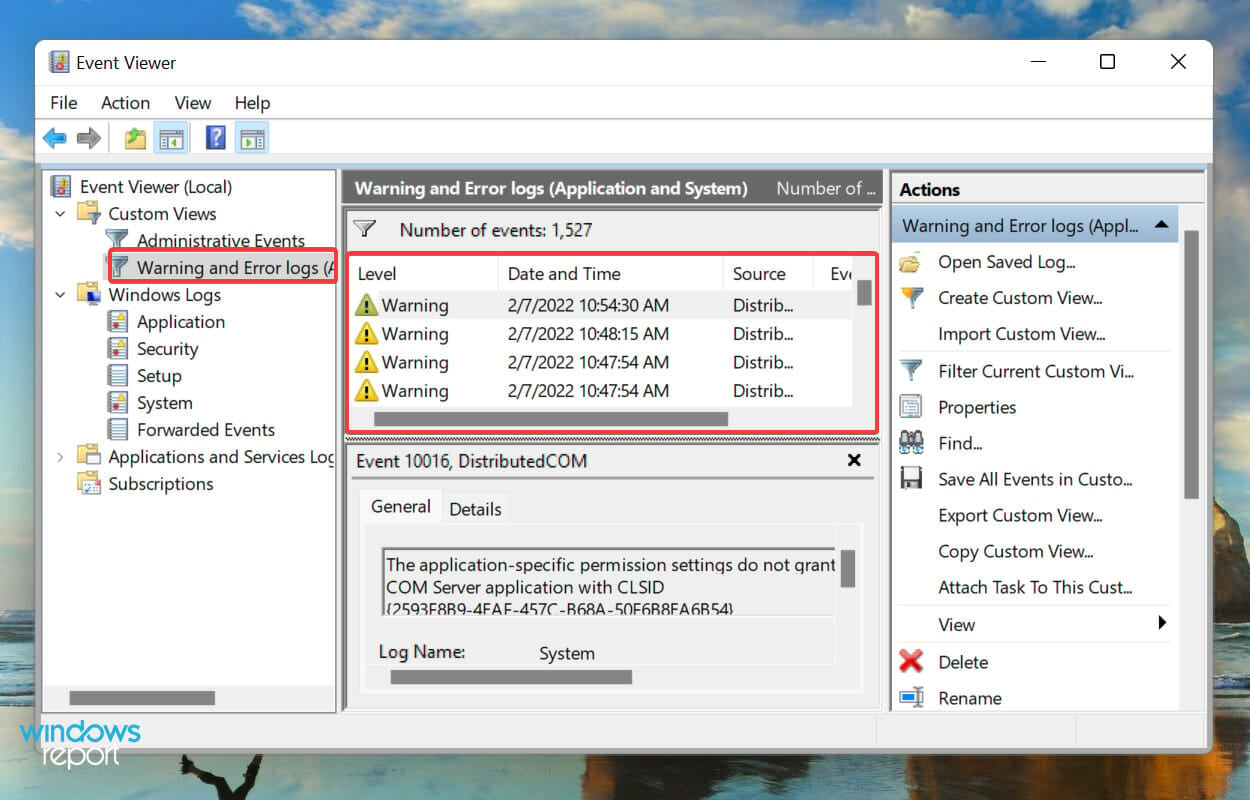
How can I filter error logs?
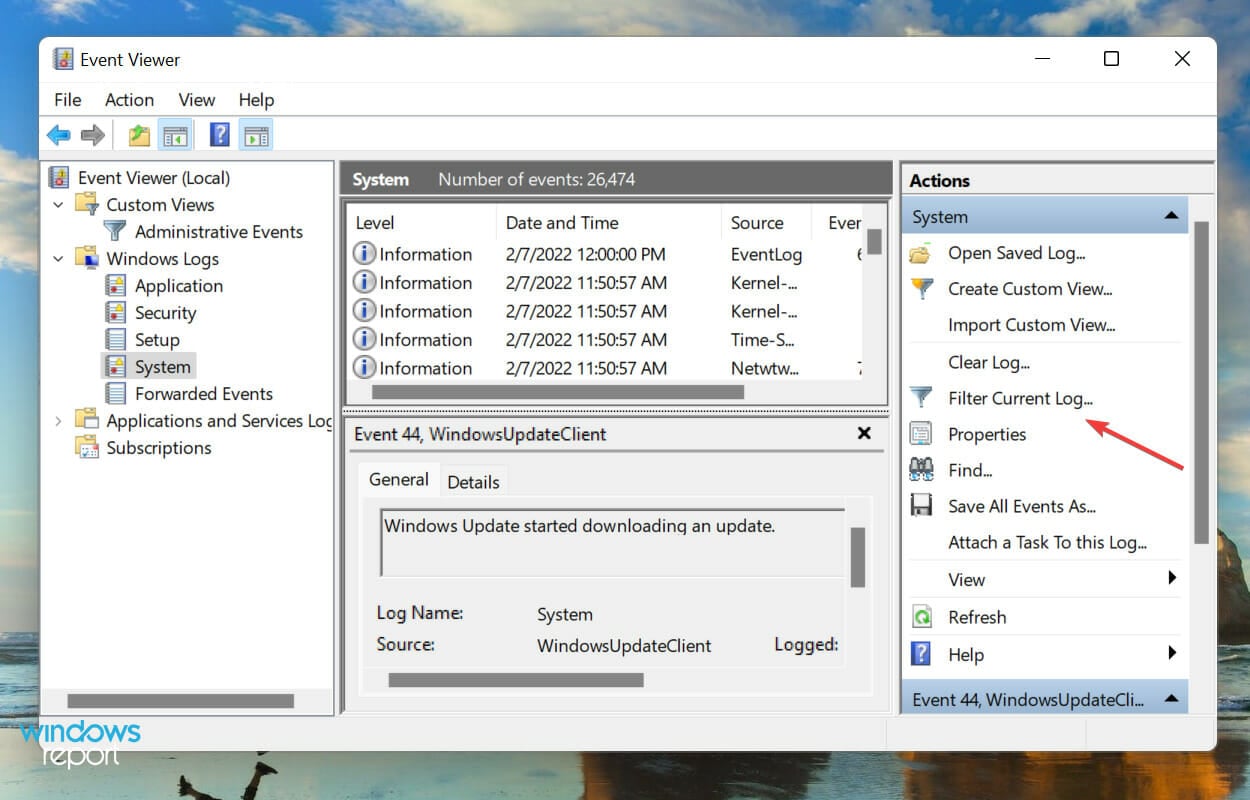
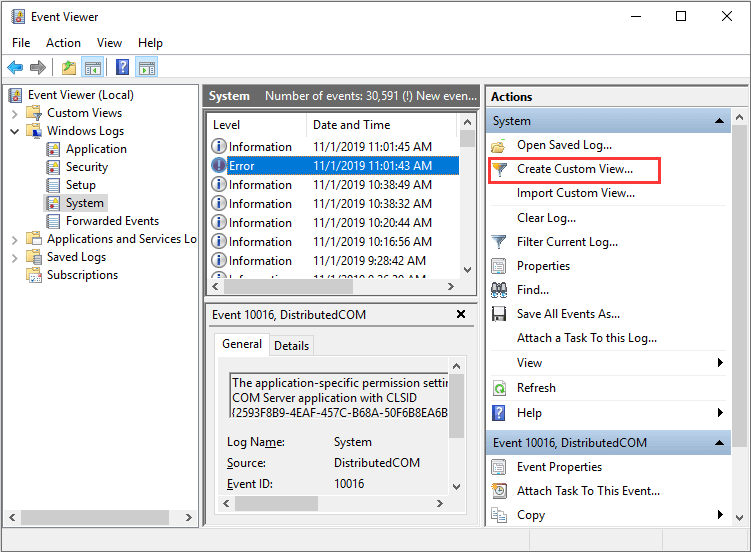
- Open the Event Viewer, navigate to the particular category of logs from the left, and then click on Filter Current Log on the right.

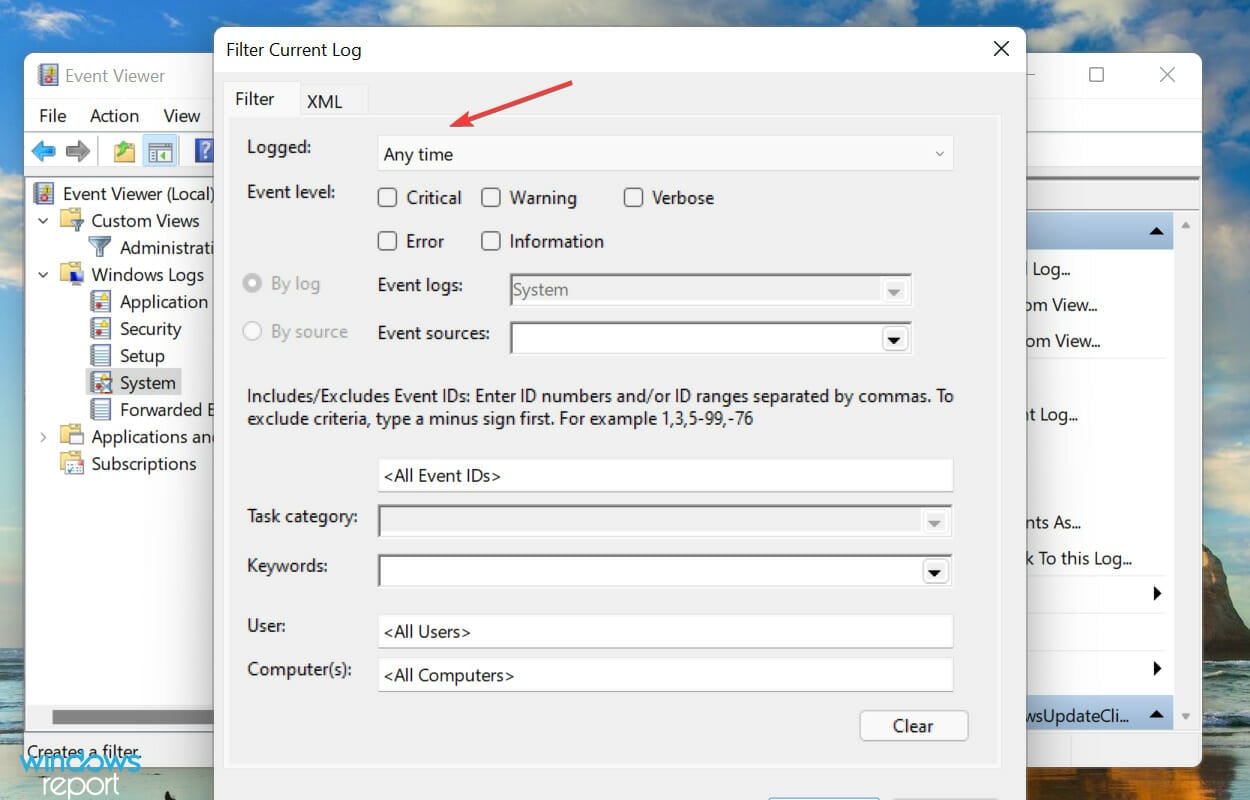
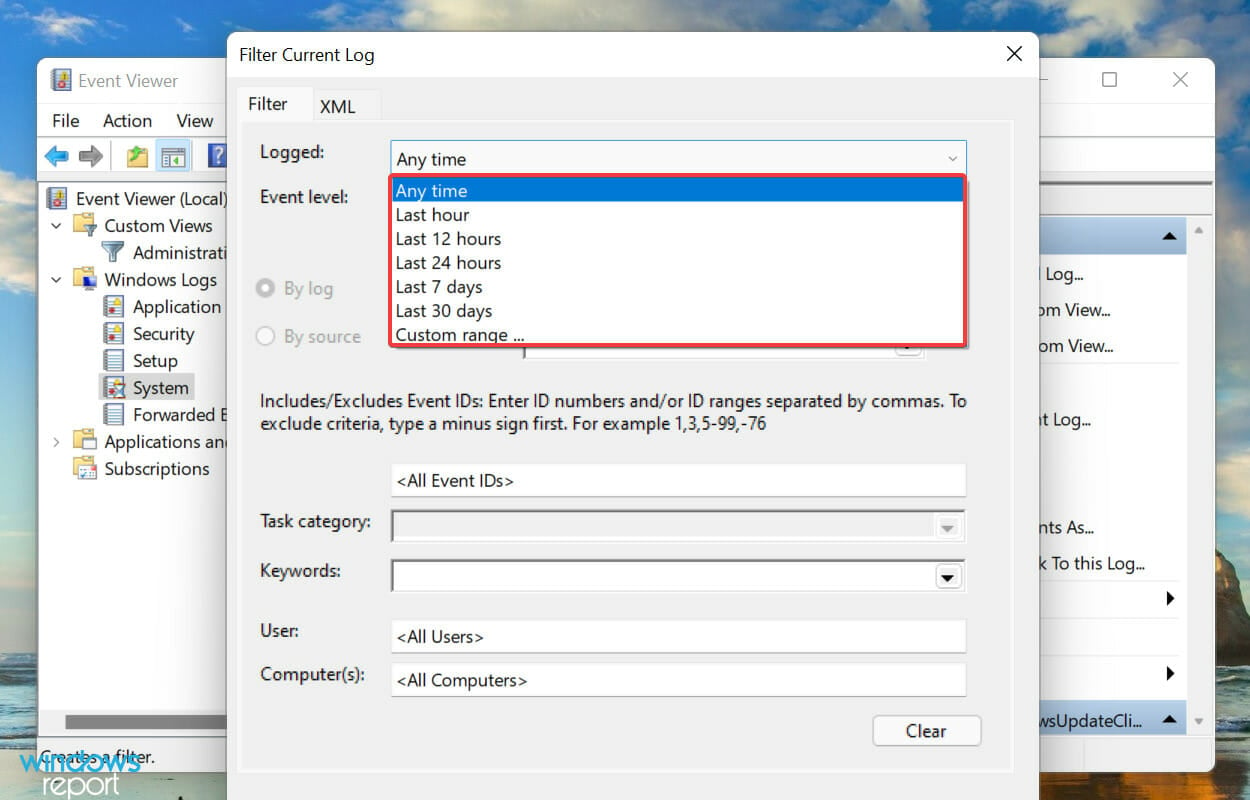
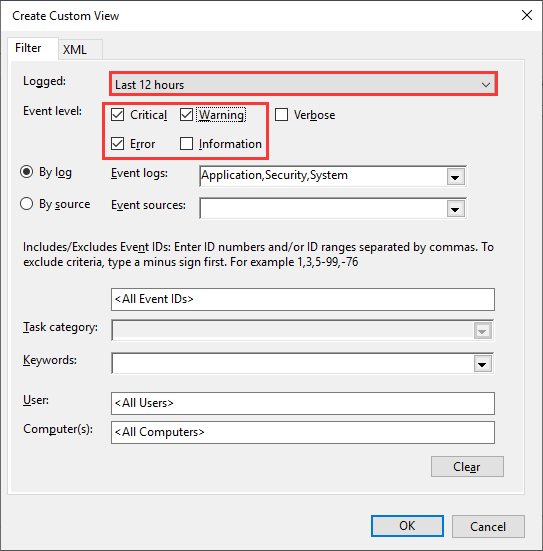
- Next, click on the Logged dropdown menu to select the duration for which you want to check the logs.
- Now, select a time duration from the list of options. You can also choose the last option to create a custom range.
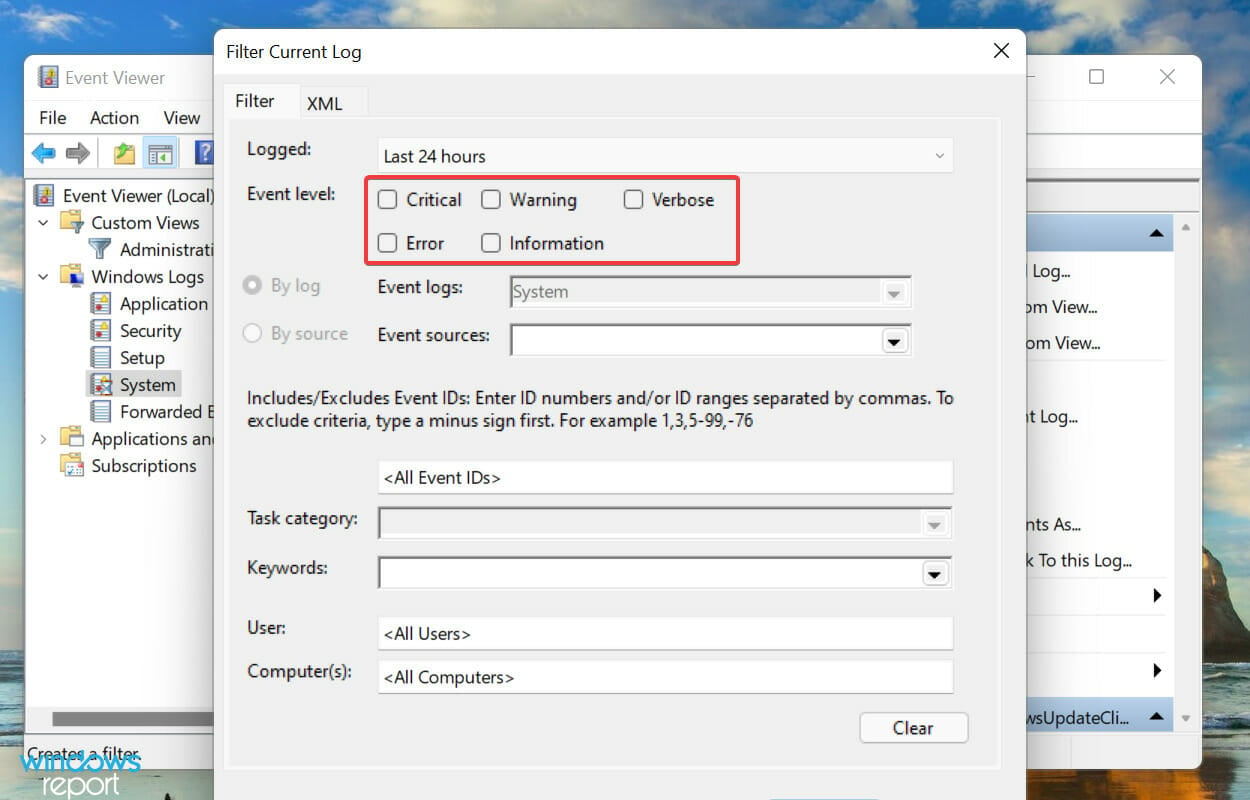
- Once done, tick the checkboxes for the Event Levels that you want to filter.
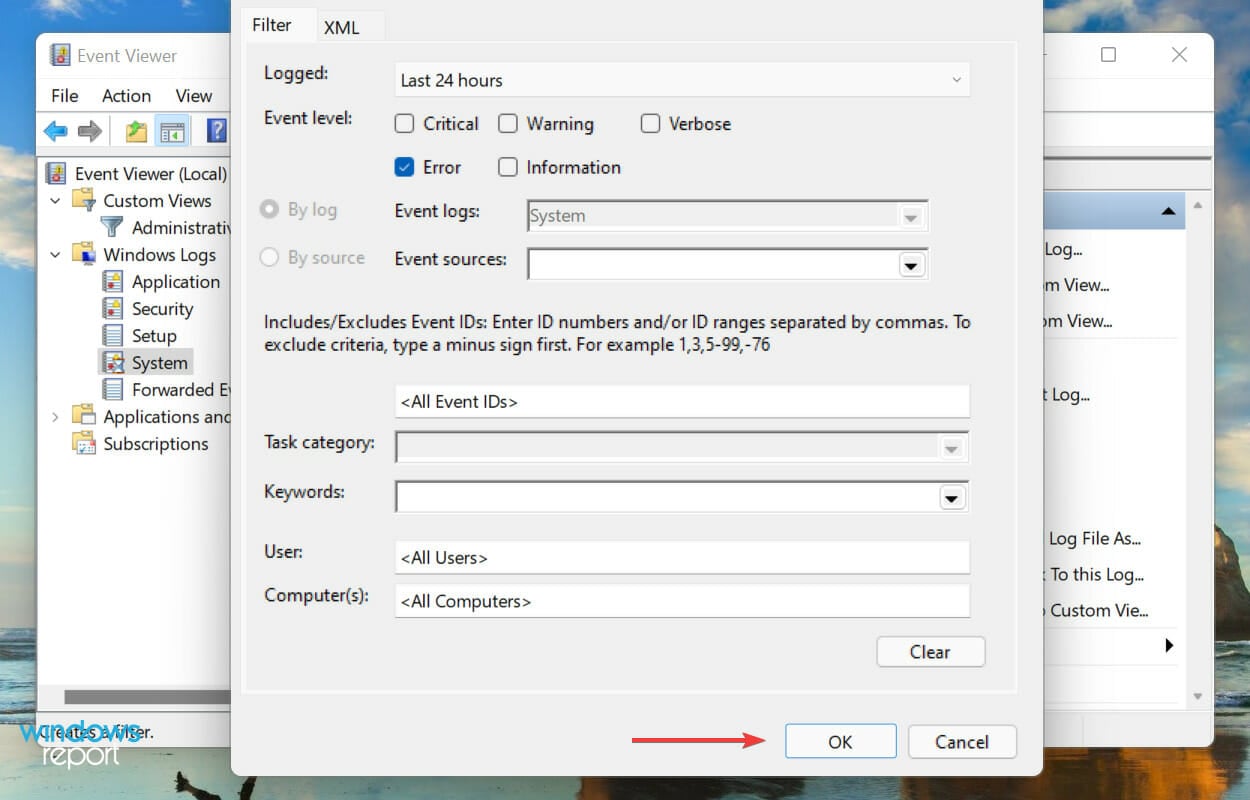
- Finally, click on OK at the bottom to filter the error logs.
- All the errors logs that fall under the choosen filters will now be listed.
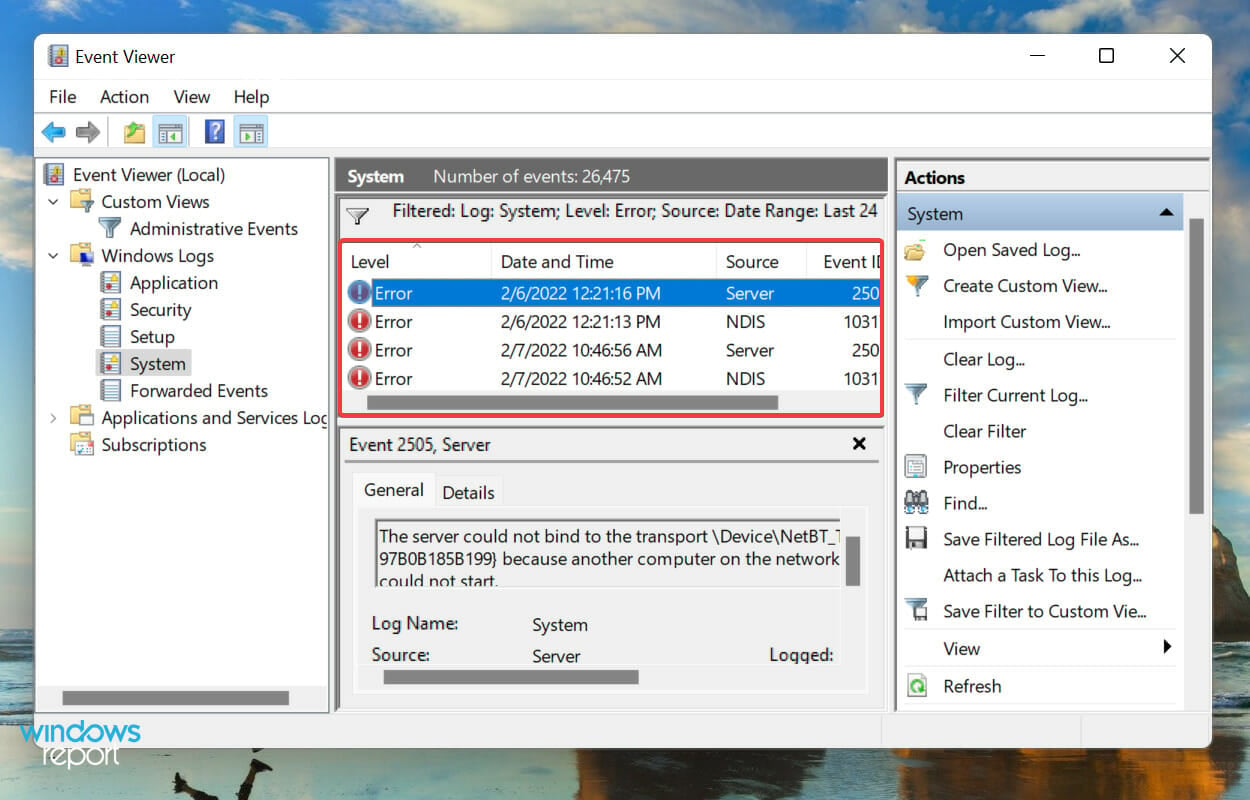
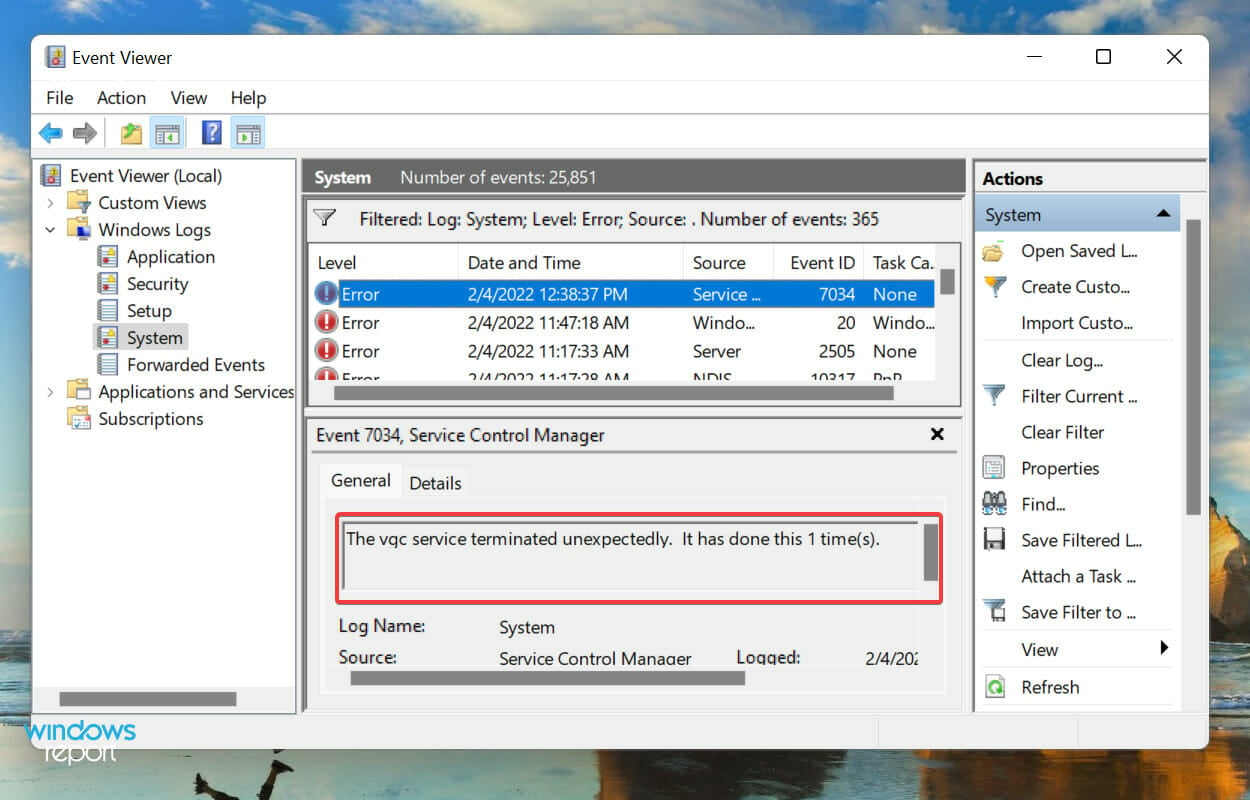
We selected the duration as 24 hours, and level as Error, and filtered the logs. Event Viewer then listed the four Windows 11 error logs that were created during that time.
- How to Disable the Insert Your Security Key Into the USB Port popup
- DTS Sound Unbound for Windows 11: Download & Install
- Fix: EXCEPTION_ILLEGAL_INSTRUCTION Error on Windows 11
- Delayed Write Failed Error on Windows 11: How to Fix it
How to create a custom view to check a particular category and level of logs in Windows 11?
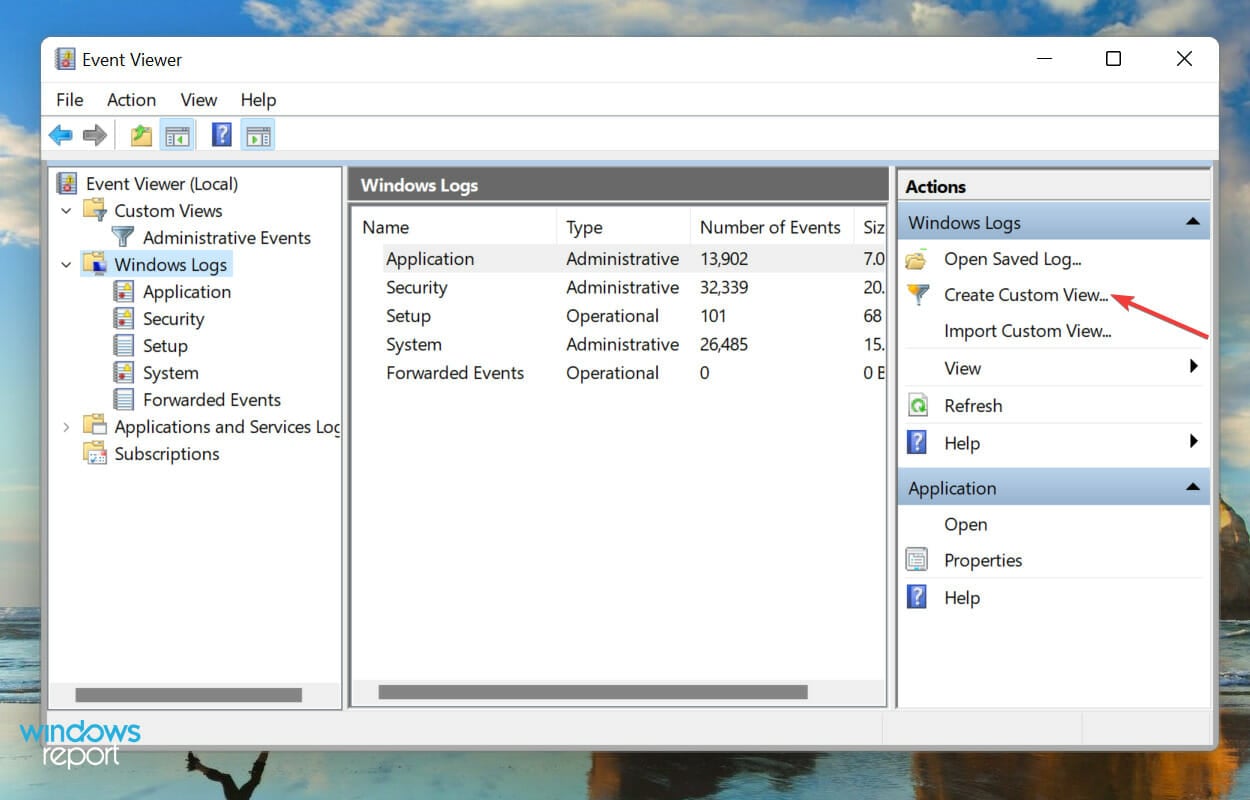
- Open the Event Viewer and click on Create Custom View on the right.
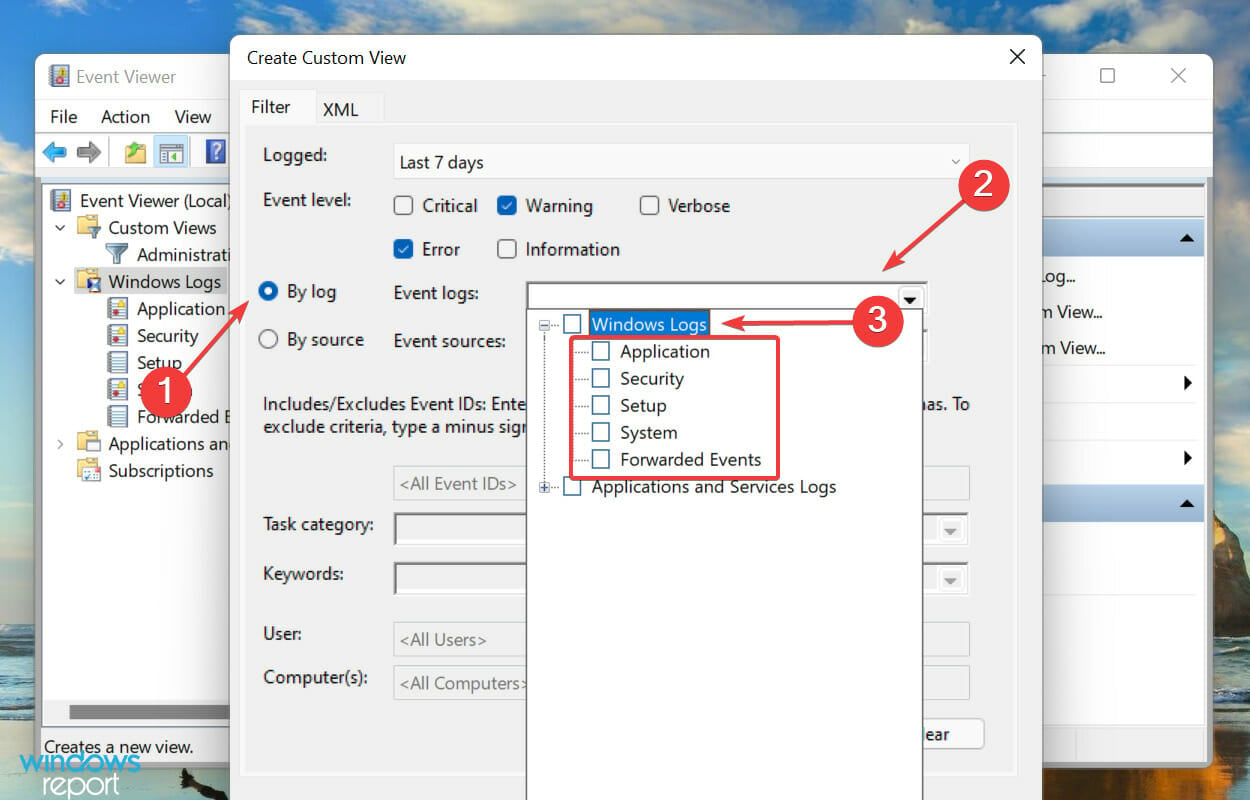
- Next, select the duration and Event Level, as you did earlier when creating a filter.
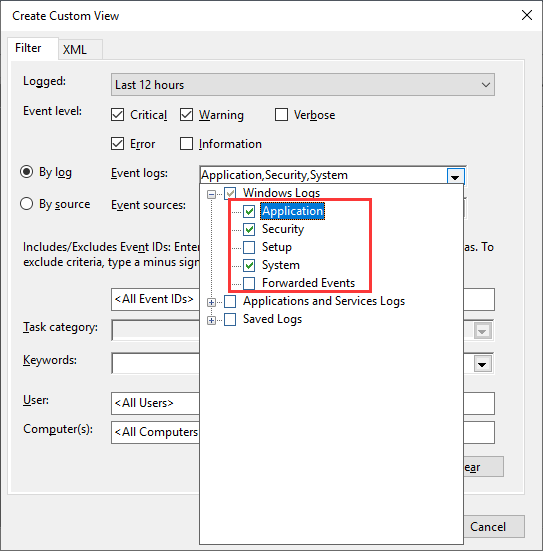
- With the By logs option selected, click on the Event logs dropdown menu, double-click on the Windows Logs entry to expand and view the various categories, and tick the checkboxes for the desired ones.
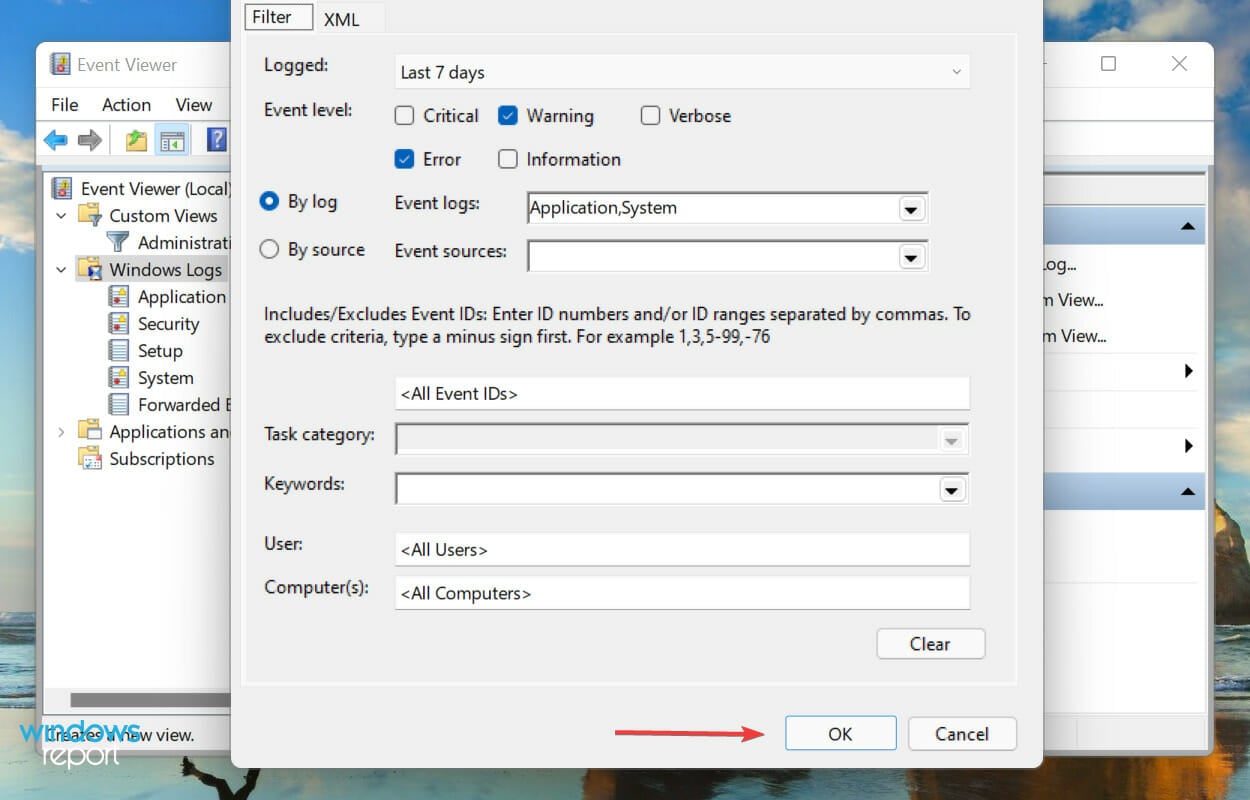
- Now, click on OK at the bottom to set filters for the new custom view.
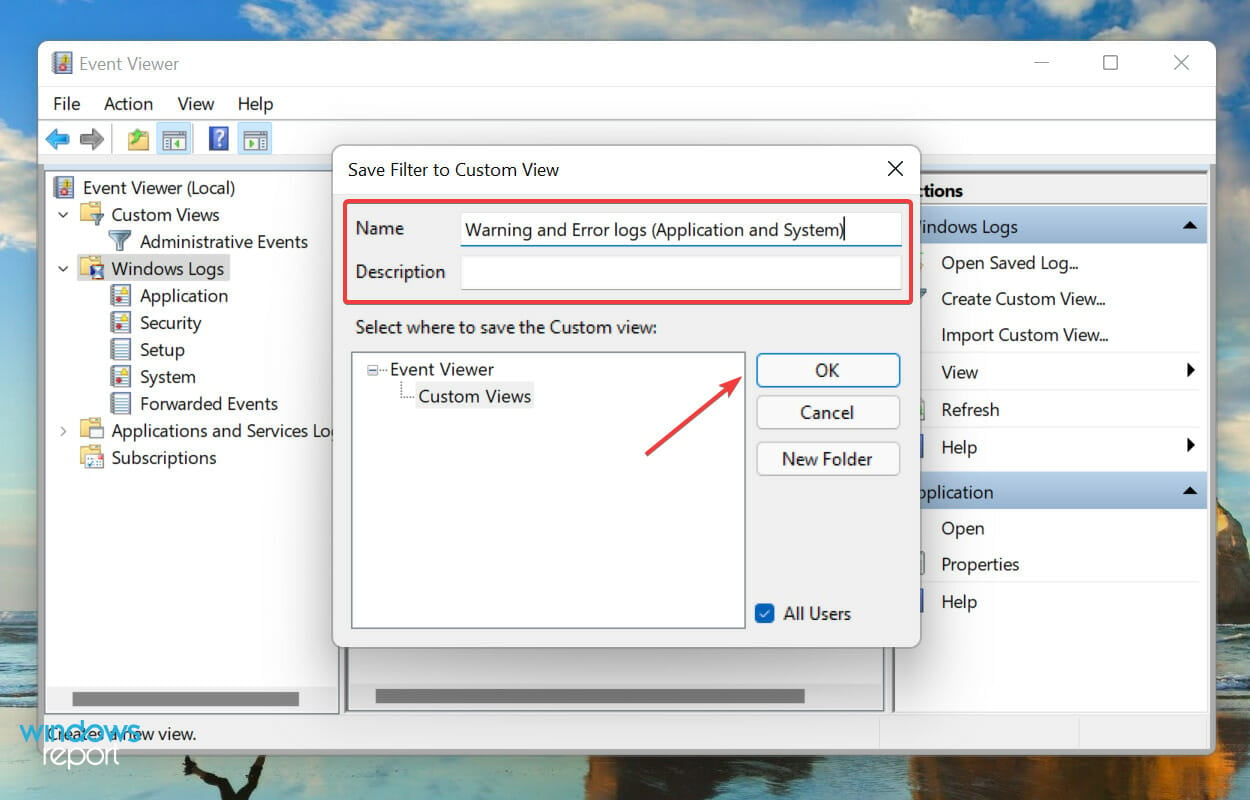
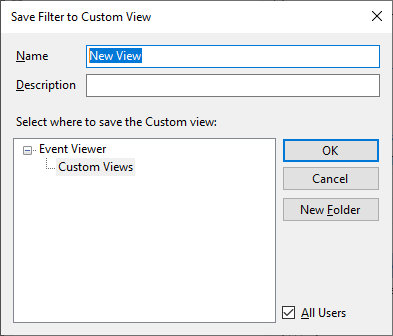
- Enter a Name and Description for the custom view and click on OK.
- The new custom view will now be listed on the left, and all logs falling under it on the right.

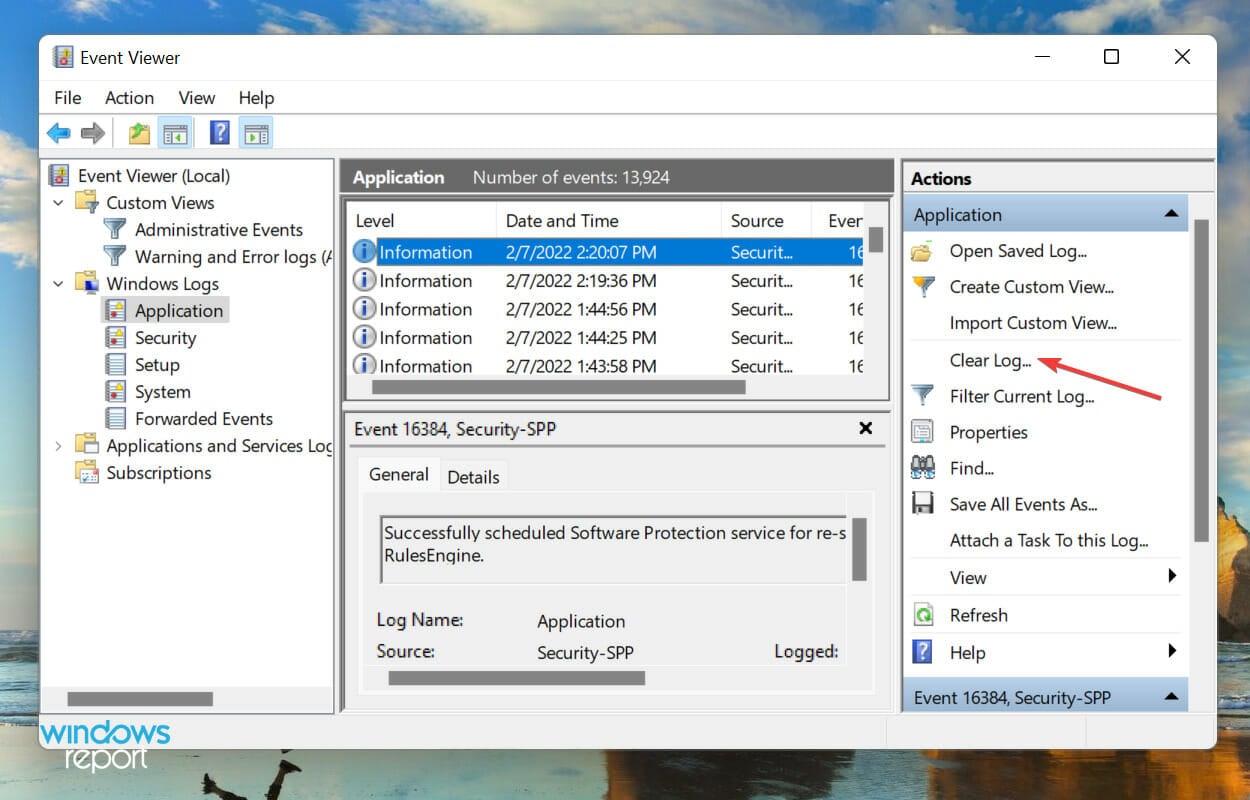
How can I clear error logs in Windows 11?
- Launch the Event Viewer, navigate to the relevant category, and click on Clear Log from the list of options on the right.
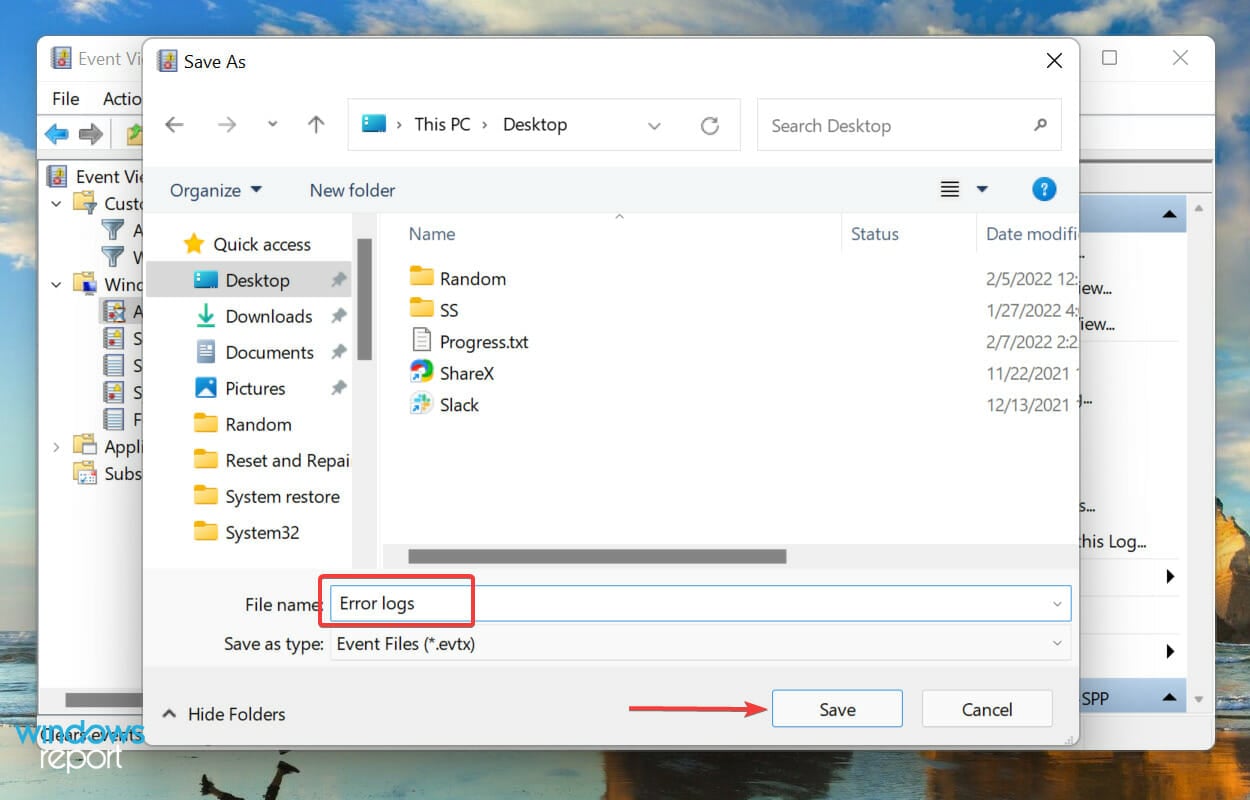
- You now have two options, either Save and Clear the error logs or directly Clear them. Choose the desired option.
- If you selected Save and clear, choose the location for the file, add a name for it and click on Save.
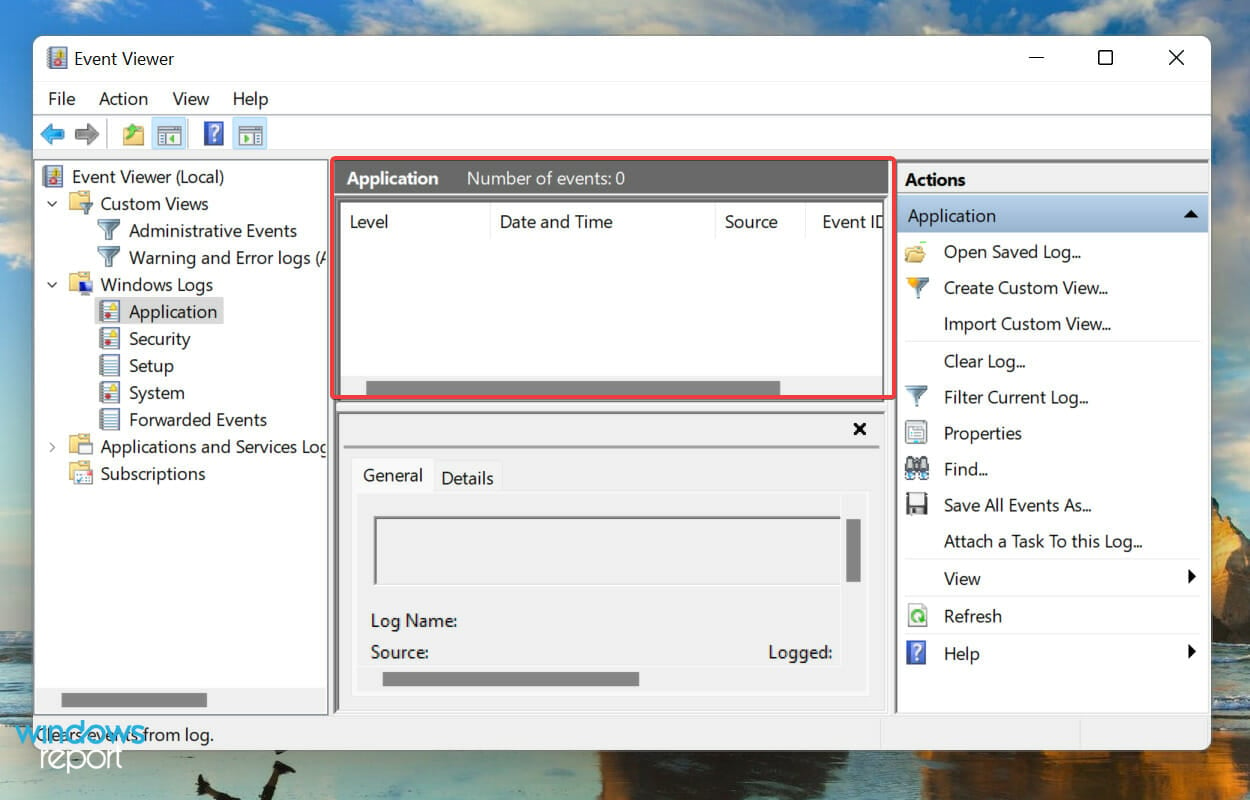
- Once saved, they error logs will be cleared right away and there will be none listed under that particular category.
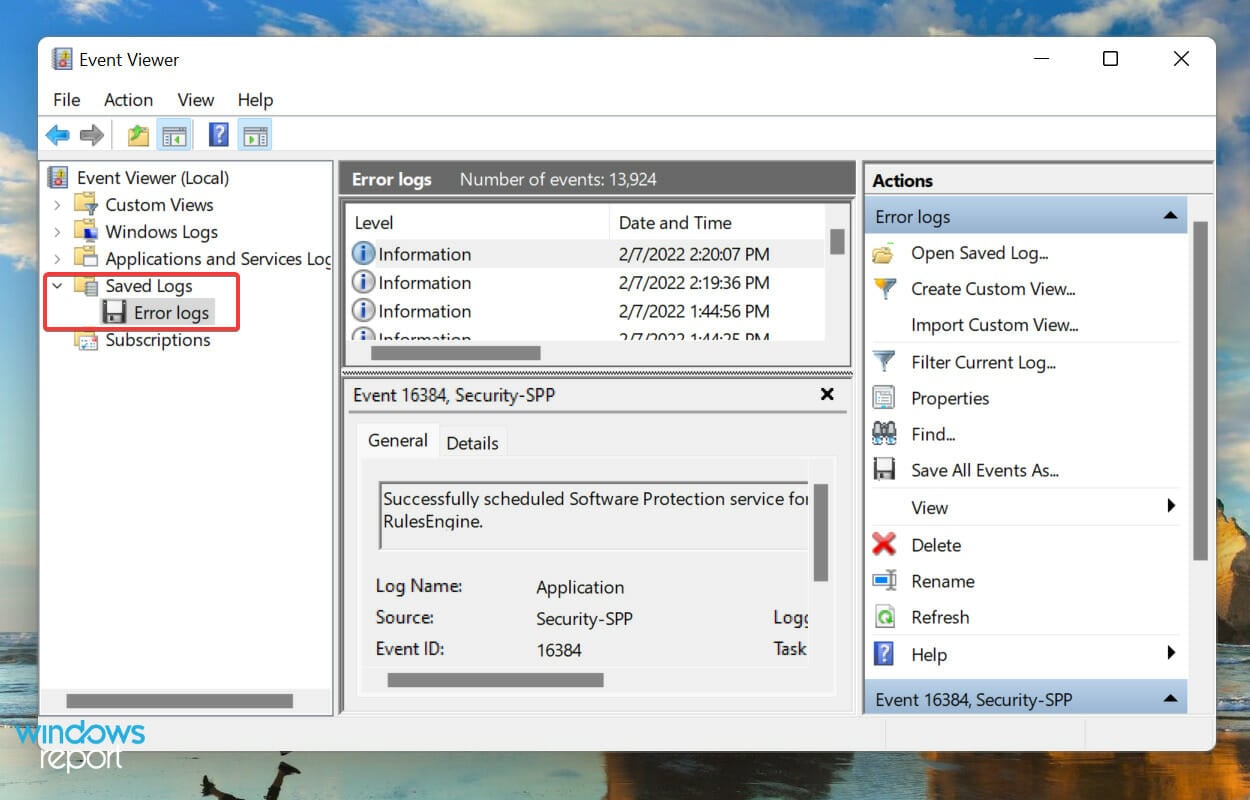
- In case you saved the error logs before deleting them, these can be found under Saved Logs in the navigation pane on the left.

The OS creates thousands of logs for each type of event, be it the successful launch of a driver and service or the most fatal errors. Like any other file, these too consume space on your hard disk, no matter how small it is.
So, if you are running out of space, or just want a more organized Event Viewer, clearing the Windows 11 error logs may help.
How do I create my own log file in Windows 11?
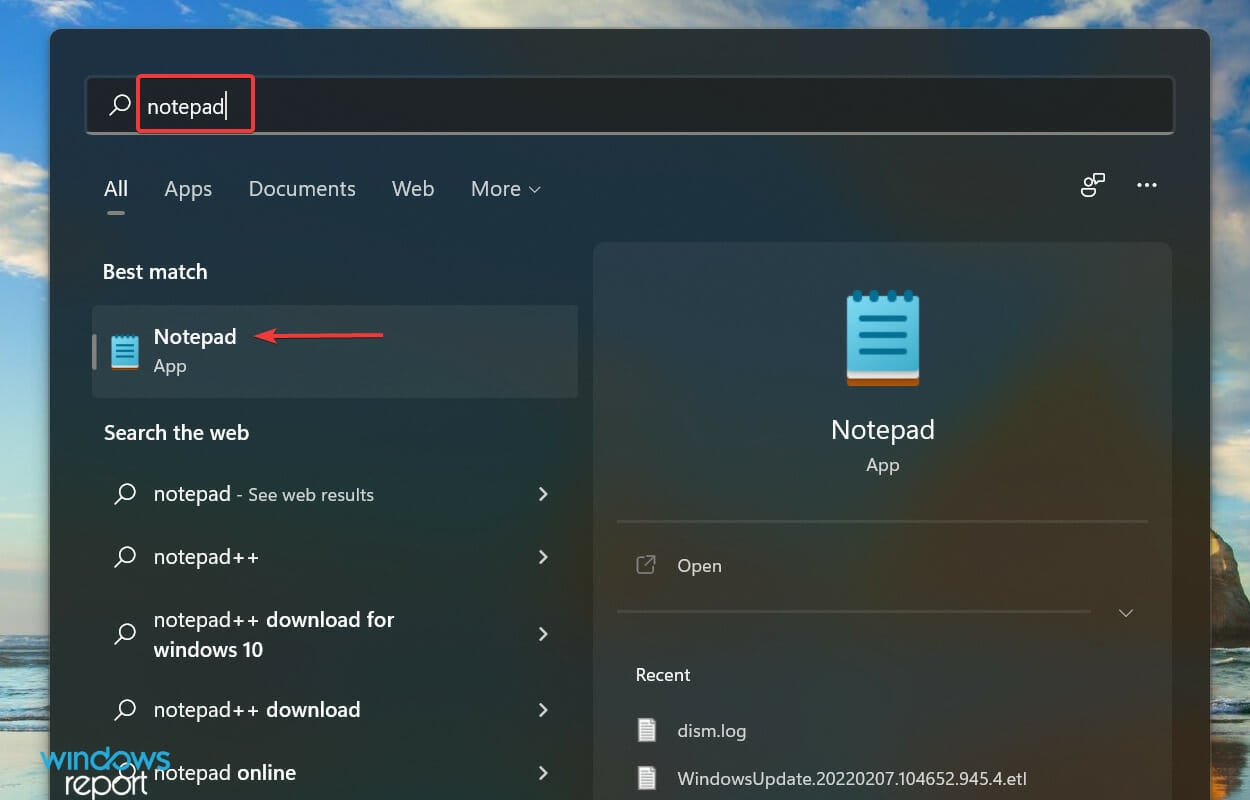
- Press Windows + S to launch the Search menu, enter Notepad in the text field at the top, and click on the relevant search result that appears.
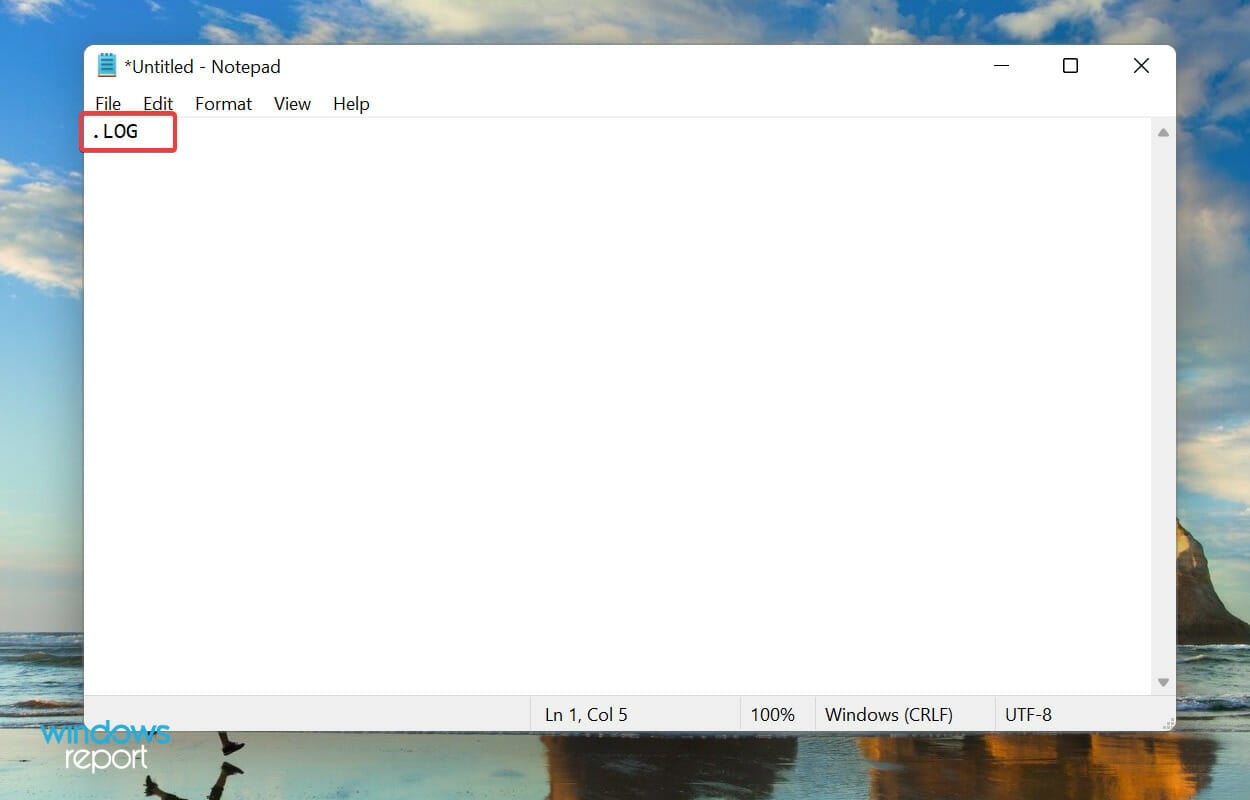
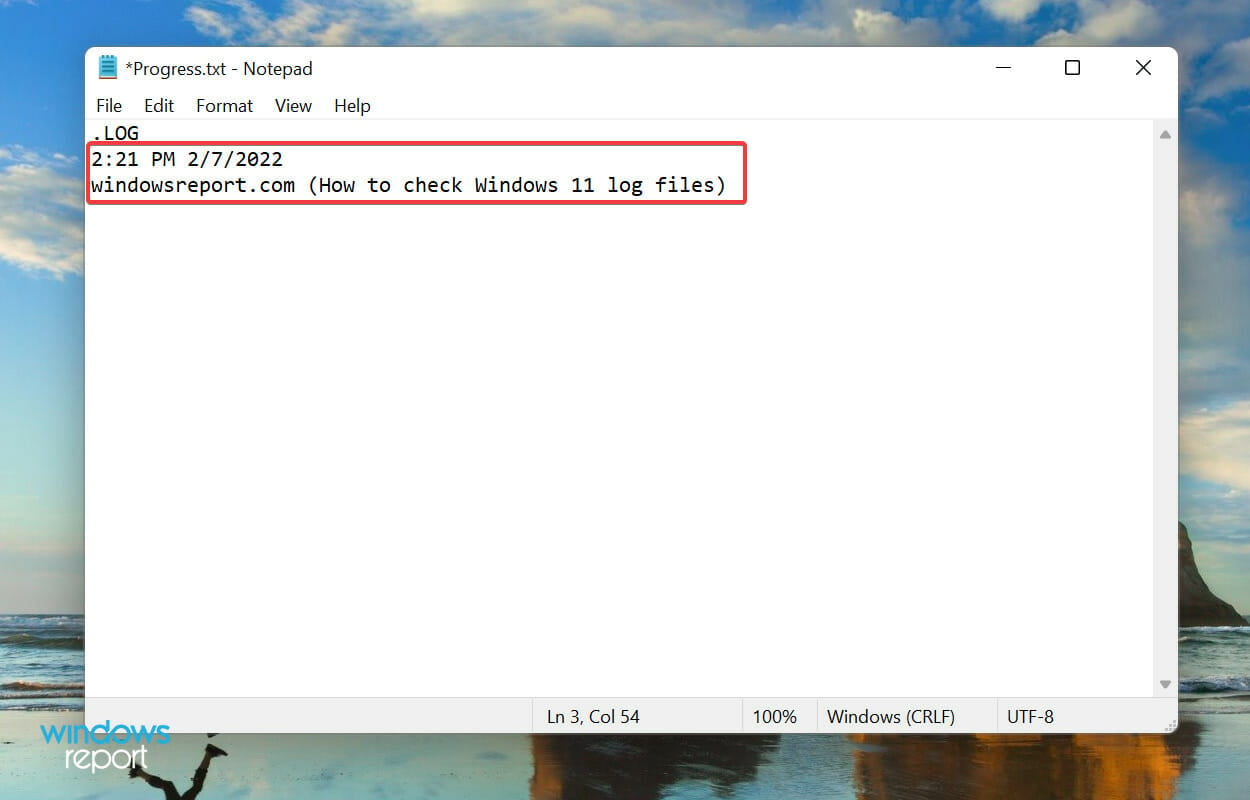
- Enter .LOG in the very first line of the Notepad.
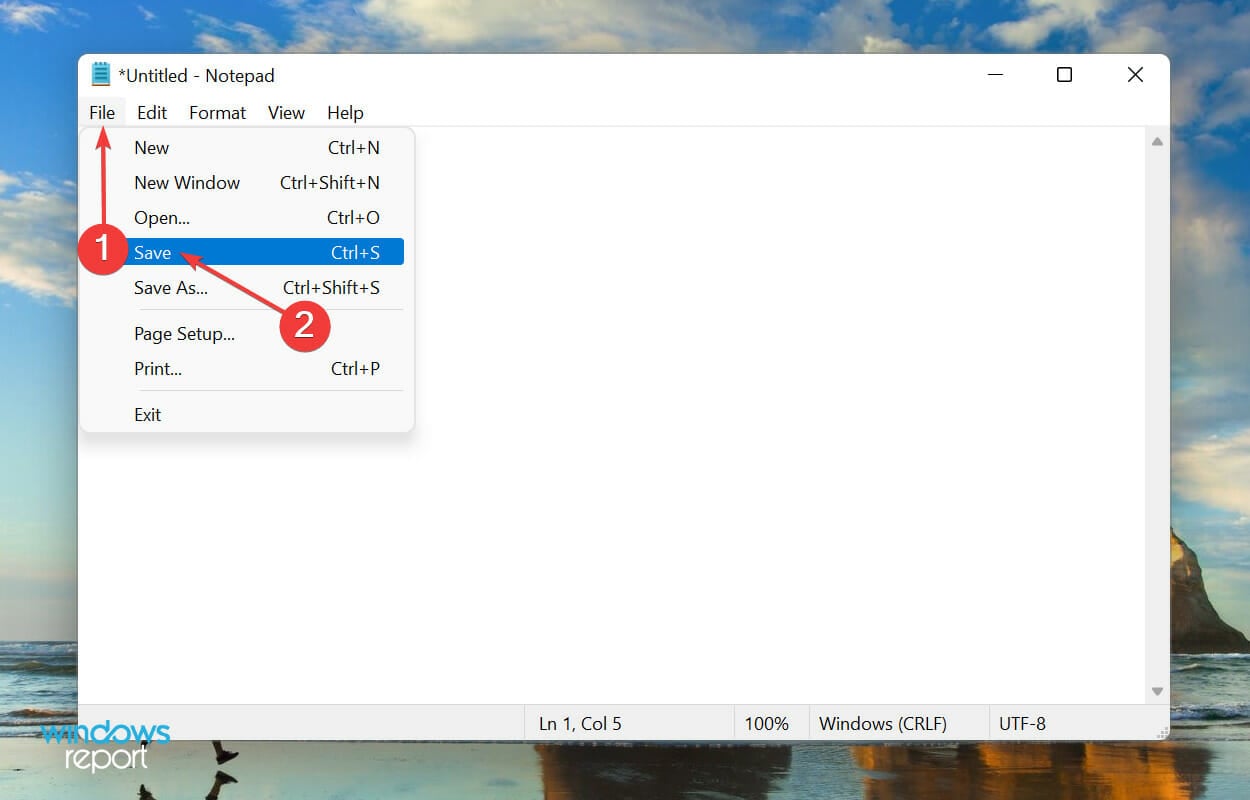
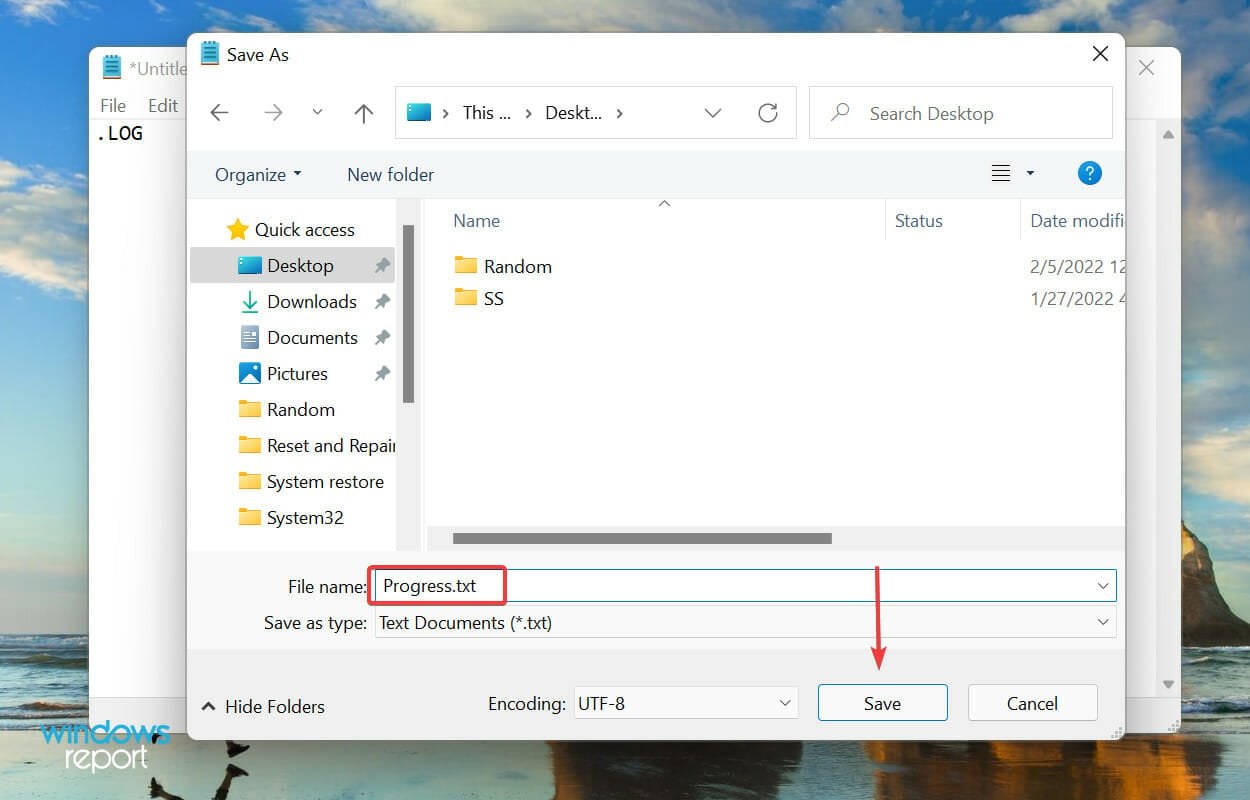
- Click on the File menu, and select Save from the list of options.
- Next, choose the location and name for the file, and click on Save at the bottom. Now, close the Notepad.
- Once the log file is created, the current date and time will be mentioned everytime you open it, and you can enter whatever you want to and hit Ctrl + S to save it.
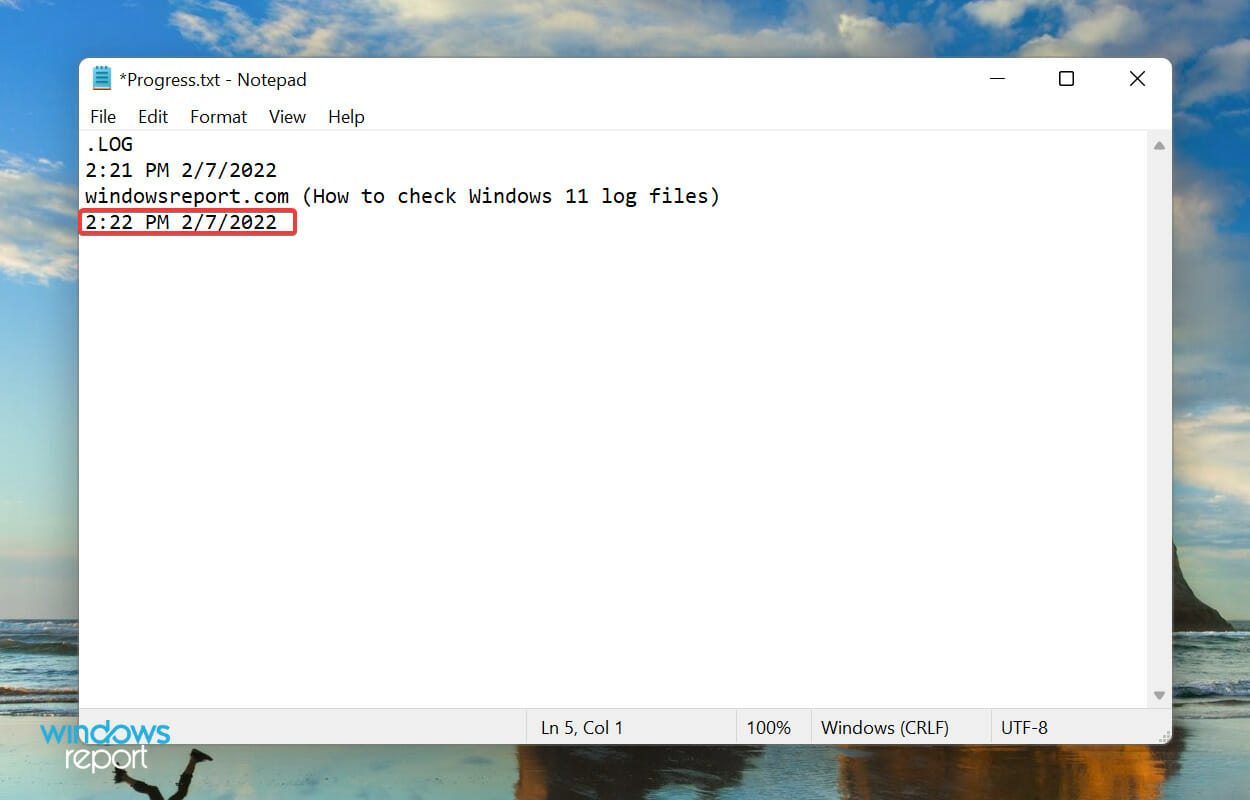
- Now, when you open the same log file the next time, the previously added entry will be listed under that date and time, and the current date and time will again be mentioned below the last entry.
A log file is used to basically record data. Windows uses it for errors, warnings, and information, while you can use it for other purposes.
Creating a log file is simple, and so is maintaining it. Say, you want to record the progress for a book that you are reading, just create a log file, and enter the number of pages you read each day, or as you may please.
That’s all you need to know about Windows 11 error logs. From now on, identifying the underlying cause and troubleshooting both trivial and intricate errors should not be a problem anymore.
Also, if you feel that Event Viewer does not meet all your requirements, check the best apps to view errors logs in Windows 11. And if Event Viewer is not working in Windows 10 and 11, rest assured that our detailed guide will help you.
Do not hesitate to drop a comment if you have any queries or would like us to add a related topic.
![]()
-
Home
-
Partition Magic
- How to View Windows 10 Crash Logs and Error Logs
By Irene |
Last Updated
When you computer crashes, a crash log will be generated, which can help you analyze the causes of the crash. But, do you know how to view Windows 10 crash logs and error logs? If you don’t know, don’t worry. This article from MiniTool will show you how to view Windows 10 crash log with two methods.
Method 1. View Windows 10 Crash Logs with Event Viewer
To view Windows 10 crash logs, you can make use of the built-in tool Event Viewer, which keeps a log of application and system messages, errors, warnings, etc. You can follow the steps below to check Windows crash logs Windows 10 with Event Viewer.
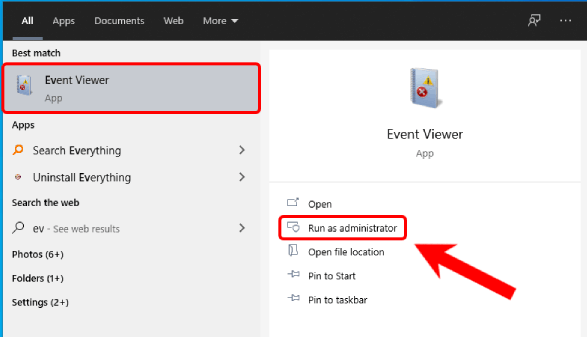
Step 1. Type Event Viewer in the Windows 10 Cortana search box. Then right click the best match Event Viewer and choose Run as Administrator.
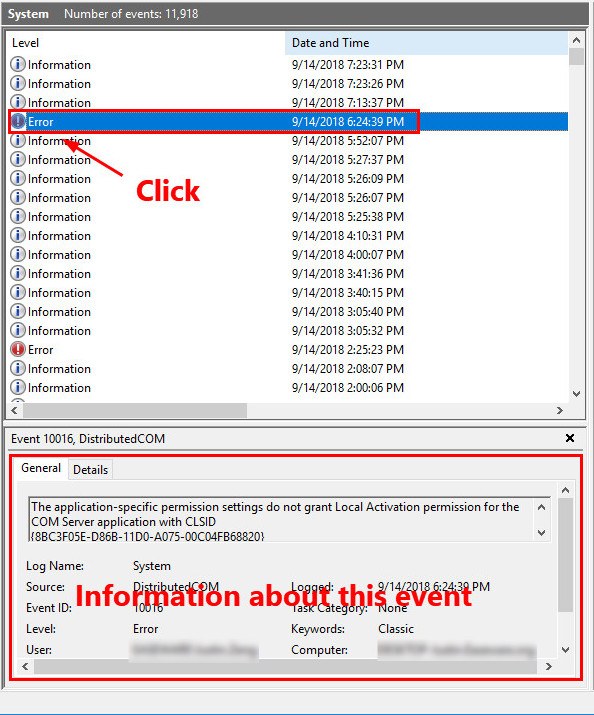
Step 2. Here is the main interface of Event Viewer. On the left side of the window, you can view all the Logs according to the category. To view Windows 10 crash logs such as the logs of blue screen error, just click on Windows Logs.
Step 3. Then choose System under Windows Logs.
Step 4. Find and click Error on the event list. Then you can view the detailed crash log information shown up in the bottom of the window.

You can also create a custom view so you can view the crash logs more quickly. Here are steps on how to create a custom view.
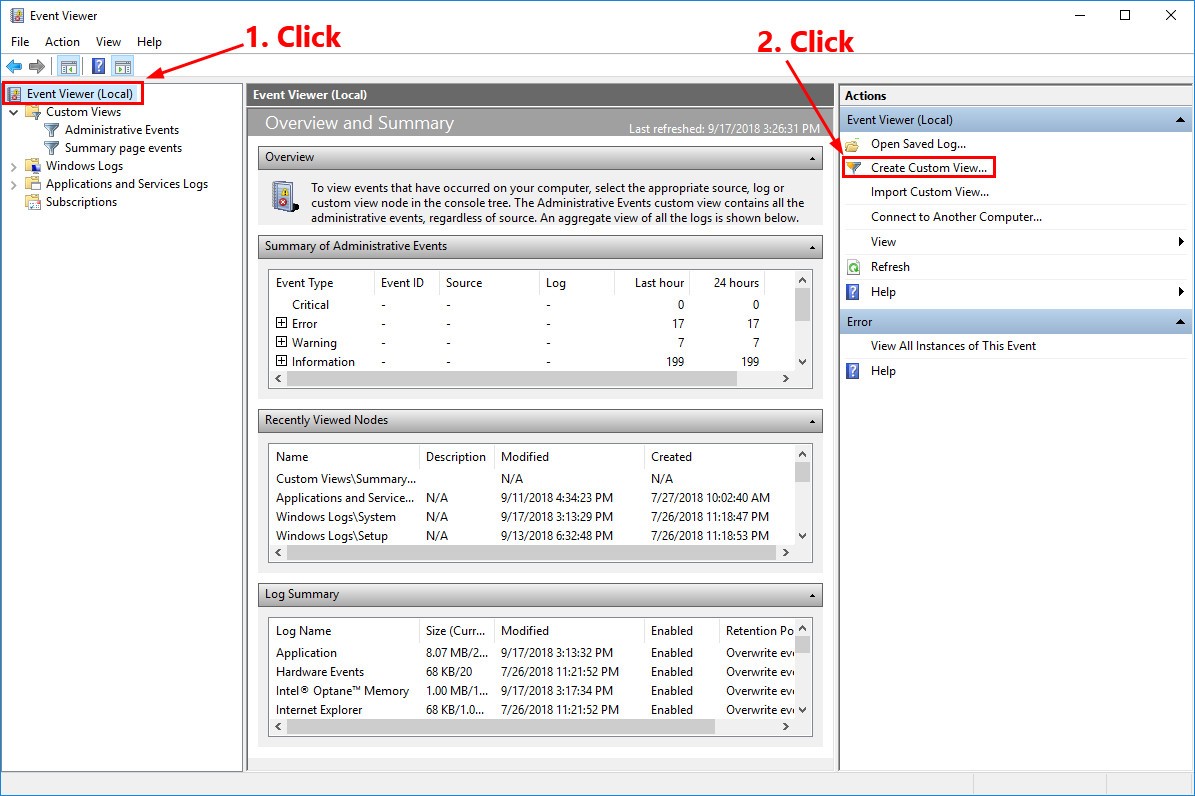
Step 1. Click on Create a Custom View on the right window. As you click on Create Custom View, a new window will pop up.

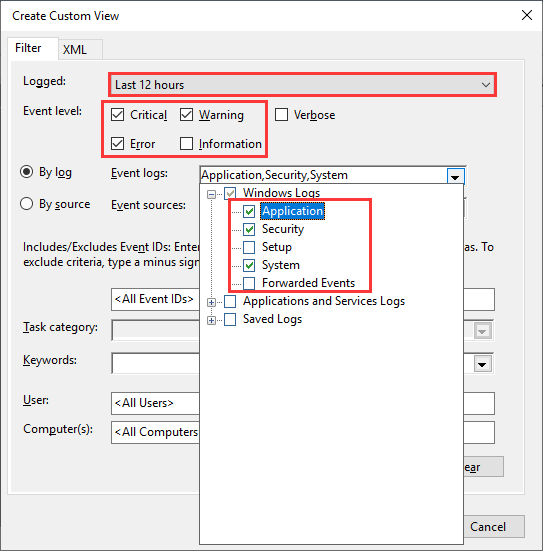
Step 2. Choose a time period you want to view. Then check the boxes next Critical, Warning and Error in the Event levels section.
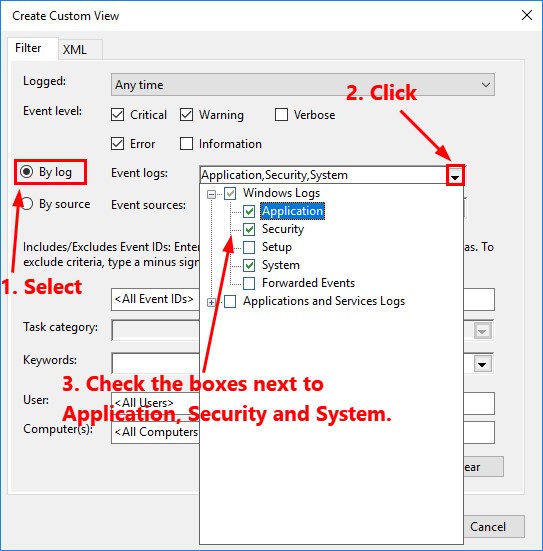
Step 3. Select the By log option. Then click the drop-down menu next to Event logs, and then select Application, Security and System.
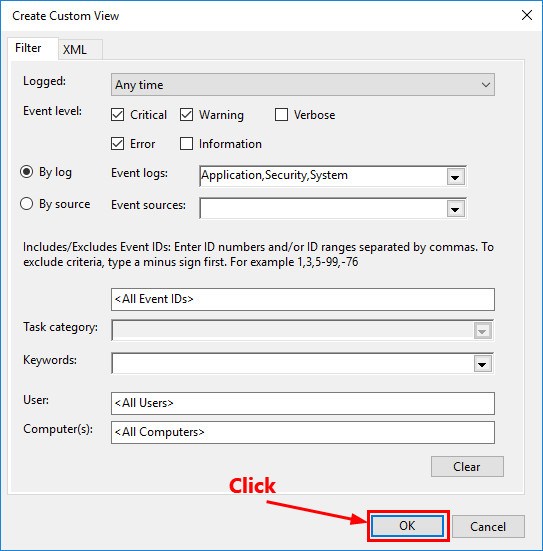
Step 4. Then click OK to save the settings.
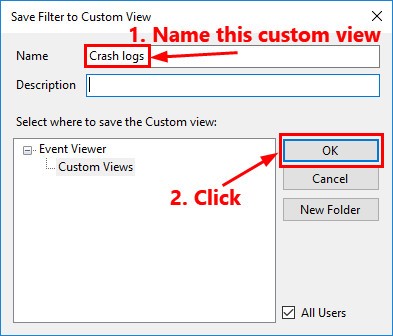
Step 5. Name this custom view and then click OK to start to view the Windows 10 crash log.
Step 6. Then you can view all the Windows 10 crash logs during the tome period you select.
Windows Reliability Monitor also enables you to view recent system and application crashes. Here’s how to check Windows 10 crash logs with Reliability Monitor.
Method 2. View Windows 10 Crash Log with Reliability Monitor
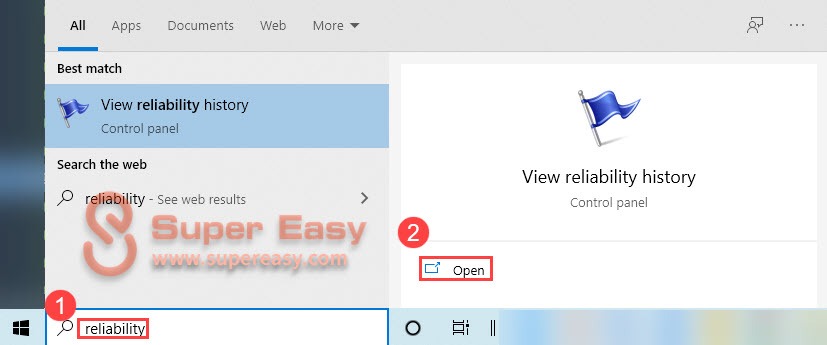
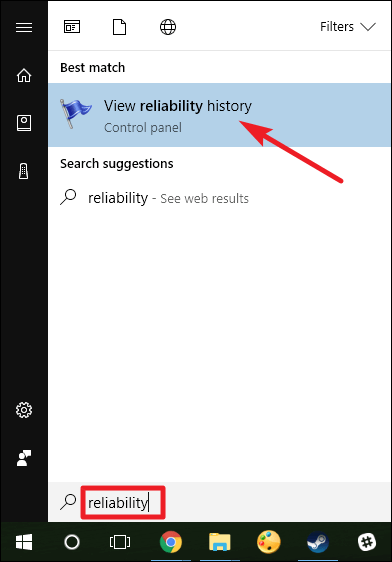
Step 1. Type reliability in the Windows 10 Cortana search box. Then click the best match View reliability history.
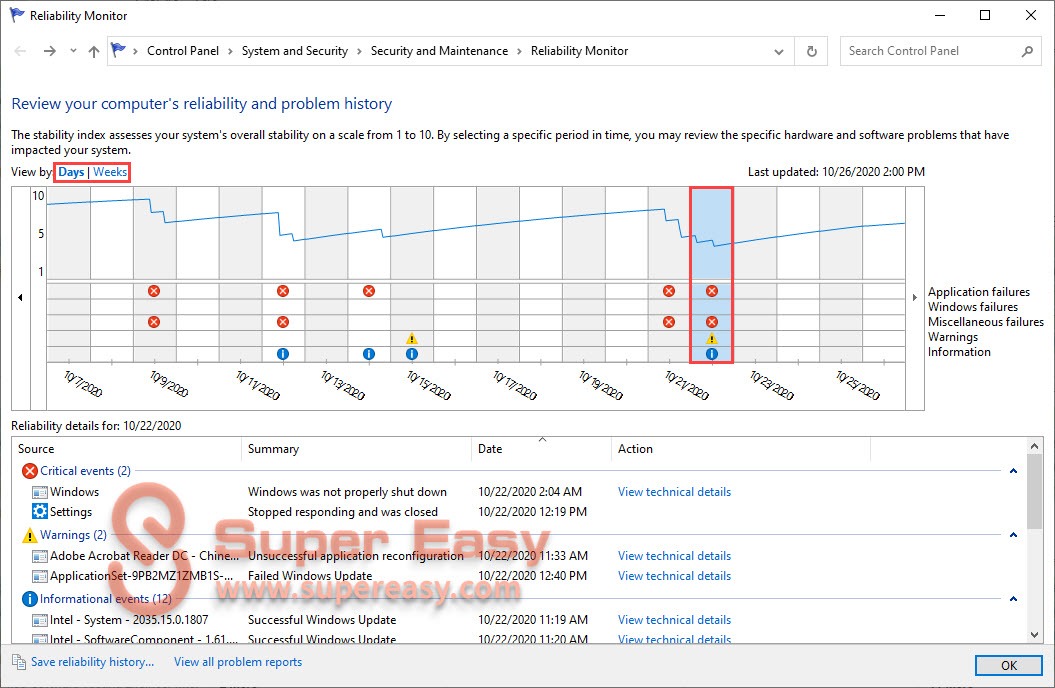
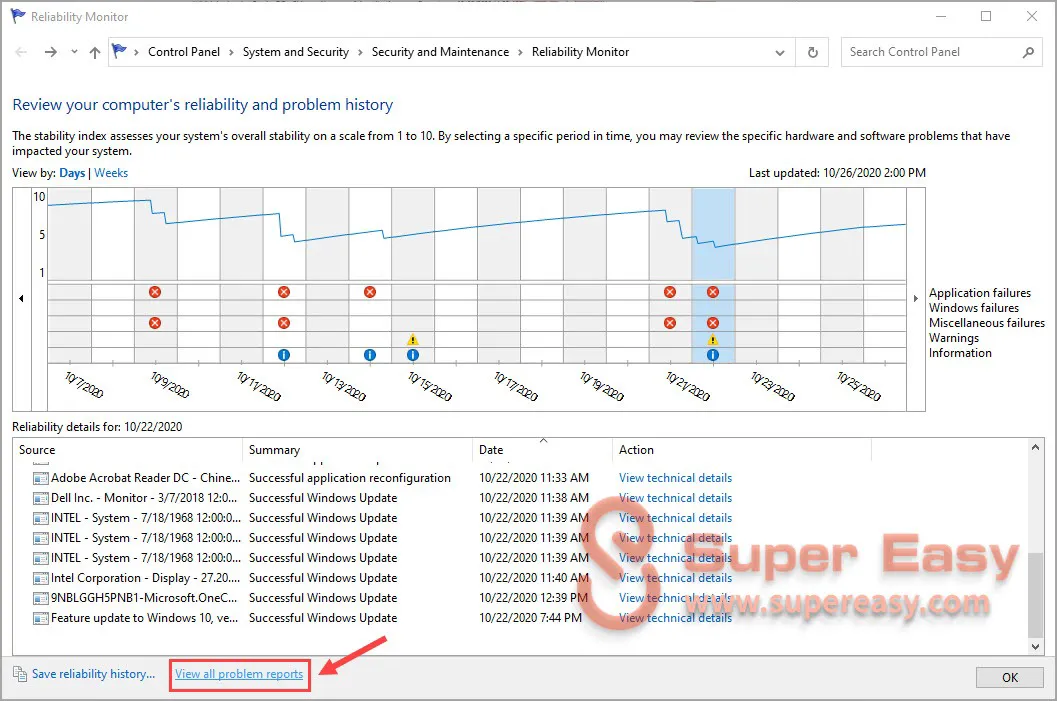
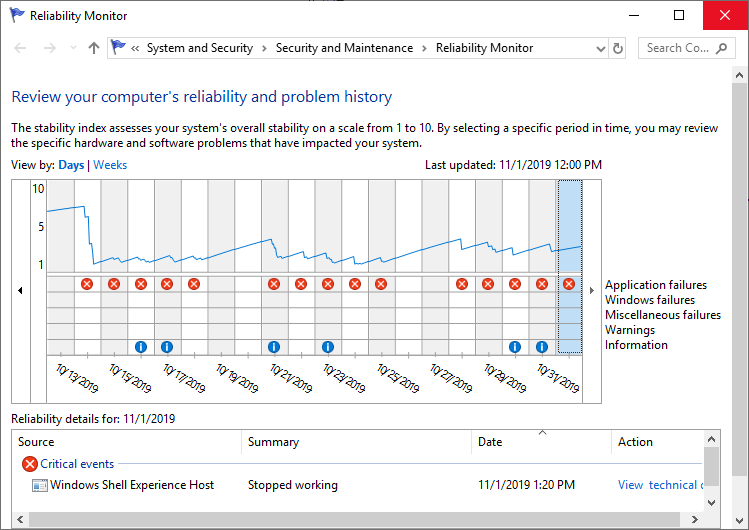
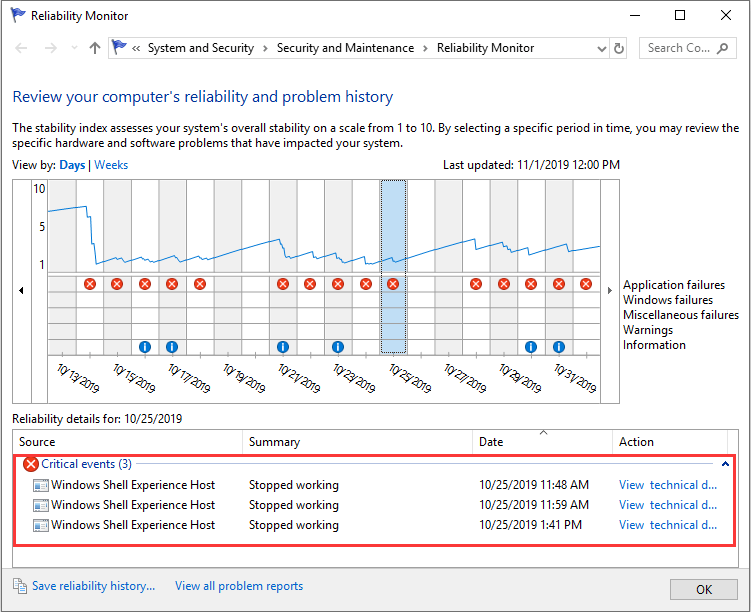
Step 2. From the main interface, you can see that the Reliability Monitor window is arranged by dates. If Windows crashes or freezes, you will see a red circle with an “X” representing the failure, as shown below.

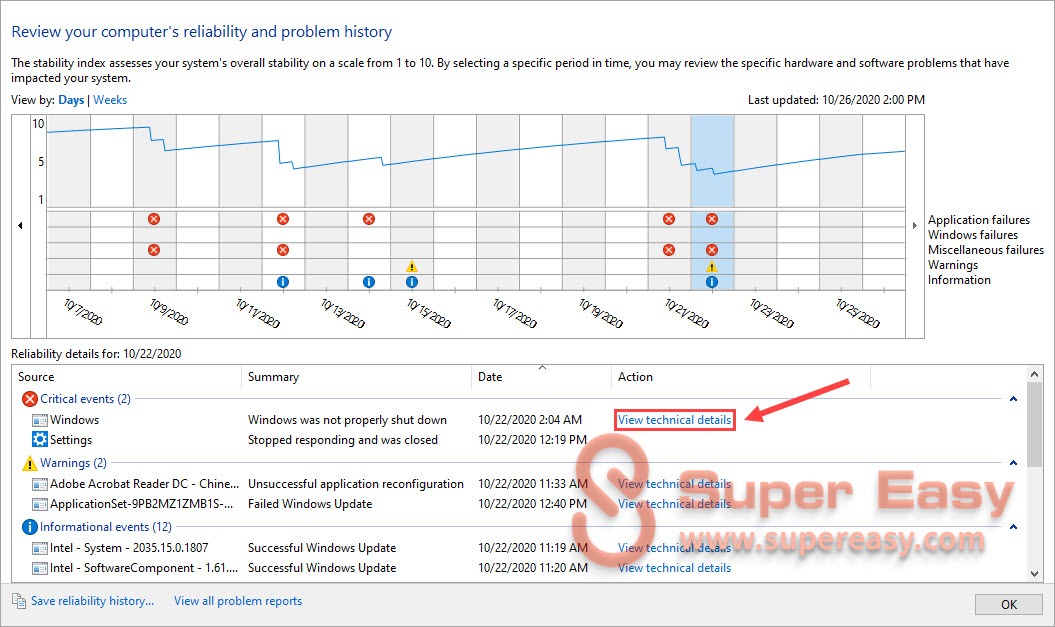
Step 3. If you want to view a certain day’s crash log, just click that day’s column and more detailed information will be displayed at the bottom. You can also double click one of the listed events to open a new window with more information.

Conclusion
Event viewer and Reliability Monitor are all good for you to check Windows 10 crash logs. Choose a tool you like and you can get all the Windows crash log information.
About The Author
Position: Columnist
Irene joined MiniTool in 2018 and has since become a professional in the areas of disk management and Windows tricks. Irene’s expertise allows her to assist clients with managing their hard drives, optimizing their Windows operating system, and troubleshooting any technical issues that arise.
Don’t worry if your Windows 10 computer often crashes or freezes. When your computer crashes, Windows 10 will generate a crash log to help you analyze and troubleshoot the causes of the crash. If you don’t know how to check crash logs in Windows 10, you’ve come to the right place!
In this article, you’ll learn how to check Windows 10 crash logs quickly and easily!
- Method 1: View crash logs with Event Viewer
- Method 2: View crash logs with Reliability Monitor
Method 1: View crash logs with Event Viewer
Event Viewer is the component of the Windows system that allows you to view the event logs on your machine. Event Viewer keeps a log of application and system messages, including information messages, errors, warnings, etc. With Event Viewer, you can narrow down the causes of the crashes on your PC.
Follow these steps:
Just follow the steps below and you should be able to view all the crash logs easily in Windows 10!
- Configure the advanced system settings of your Windows 10 operating system
- Open Event Viewer
- Create a custom view
- Export the crash logs
Step 1: Configure the advanced system settings of your Windows 10 operating system
To make full use of Event Viewer, you need to configure the advanced system settings of your Windows 10 OS. Follow the instructions below to make sure you have correctly configured the advanced system settings of your system.
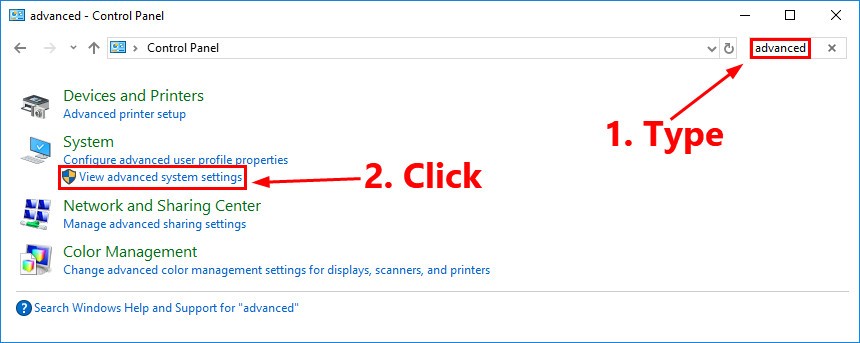
- On your keyboard, press the Windows logo key and R at the same time to open the Run dialog. Type control and then press Enter to open the Control Panel.

- Type advanced in the search box in the upper-right corner and then click View advanced system settings.

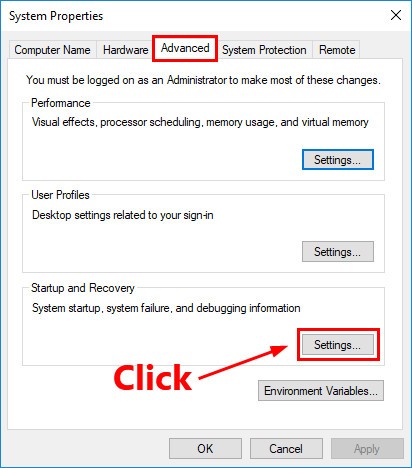
- Navigate to the Advanced tab and then click Settings… in the Startup and Recovery section.

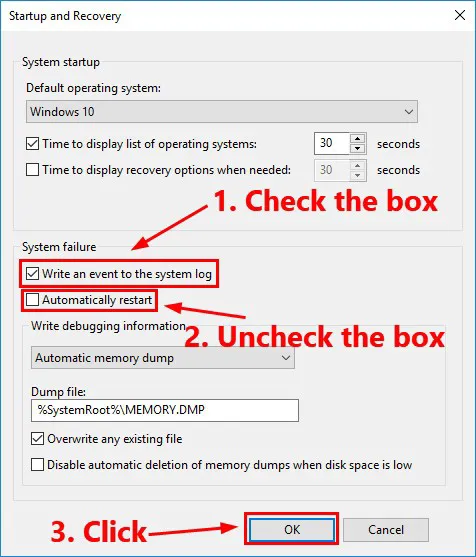
- Configure the settings in the System failure section the same way you see on the screenshot below. Then click OK to save the changes.

Note: The option Automatically restart has little to do with Event Viewer. By unchecking the box next to Automatically restart, you tell Windows 10 not to reboot and to save the crash dump file when there is a system failure. So you can see the BSOD (Blue Screen of Death) error message if your PC is running into a BSOD. If you check this box, you may not see the BSOD error message.

Now you’ve correctly configured the advanced system settings of your system.
Step 2: Open Event Viewer
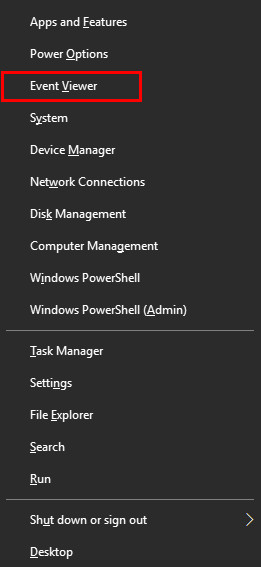
- On your keyboard, press the Windows logo key and X at the same time. Then select Event Viewer to open it.

- There are 2 methods to view the information about a certain event:
- Start from the left panel to view events
- Start from Summary of Administrative Events to view events
Start from the left panel to view events
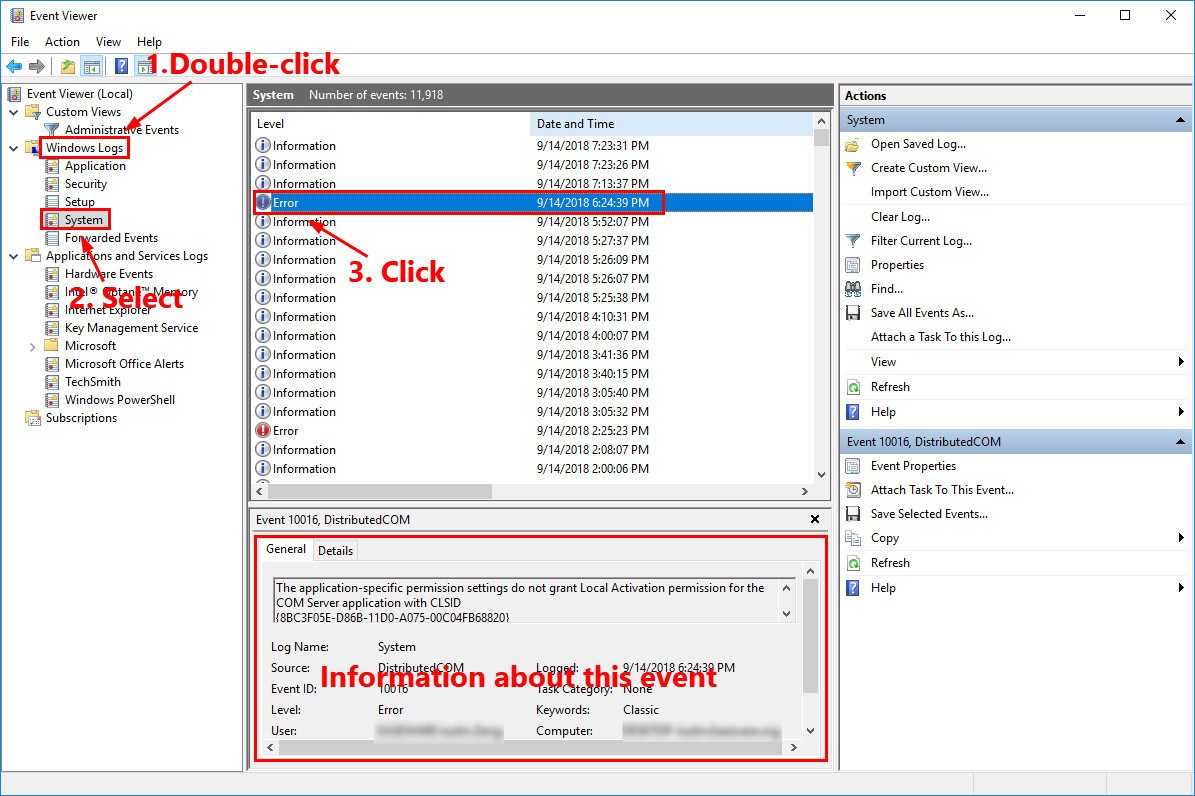
- In the left panel, double-click a category to expand it.
- Select the category you’re interested in and the related information will show up in the middle part of the window.
- Click one event in the list and the detailed information will show up in the bottom of the window.

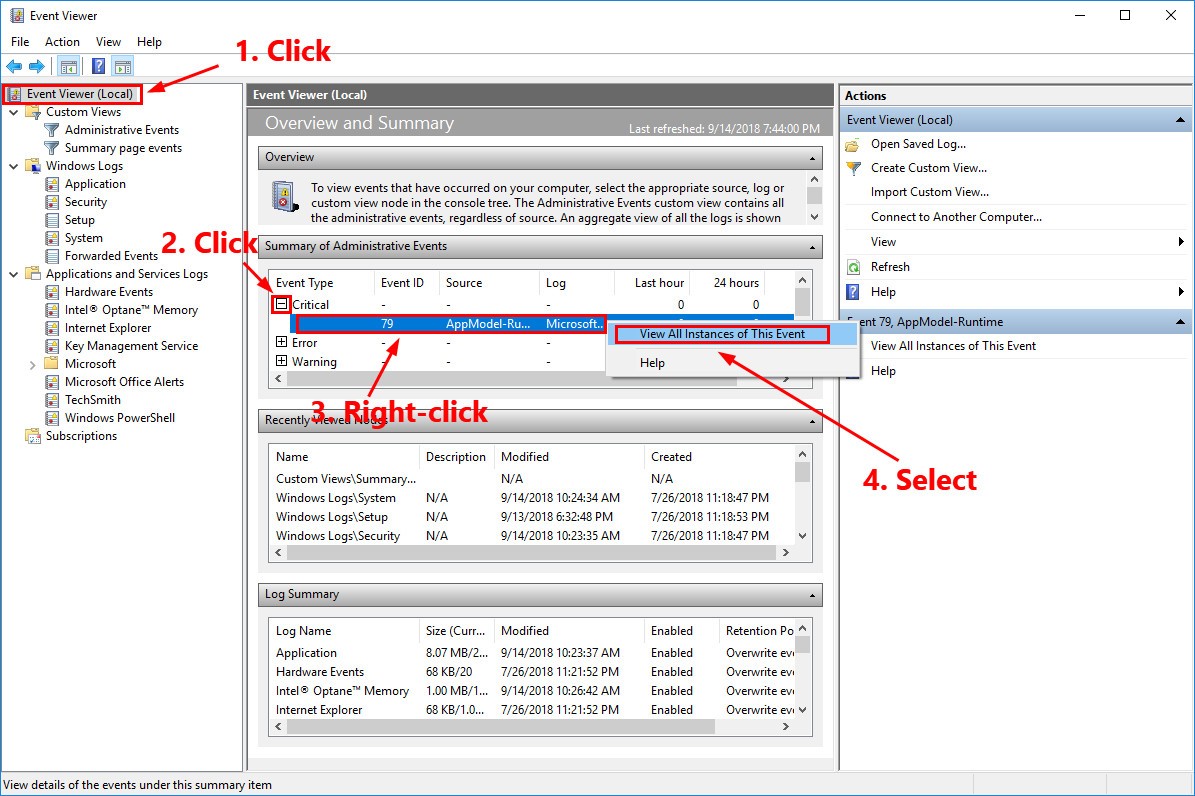
Start from Summary of Administrative Events to view events
- In the left panel, Click Event Viewer (Local), then in the section of Summary of Administrative Events, click the plus button (+) in front of the Critical event type to expand it.
- Right-click the record of the critical event and select View All Instances of This Event.
- Click one event in the list and the detailed information will show up in the bottom of the window.

Step 3: Create a custom view
By creating a custom view, you can view the crash logs more quickly. Here is how to do it:
- In the left panel, click Event Viewer (Local) in the left panel. In the Actions section, click Create Custom View….
- In the pop-up window, under the Filter tab, click the downward arrow next to Logged to select a time range. Then check the boxes before Critical, Warning and Error to select the Event levels.

- Click the By log option button to create the custom view by log. Click the downward arrow next to Event logs to open the drop-down list, then select Application, Security and System.
- Click OK to save the settings.
- In the pop-up window, name this custom view and then click OK to start to view the crash logs.

- Next time if you want to view this custom view, just double-click Custom Views in the left panel and then select Crash logs.

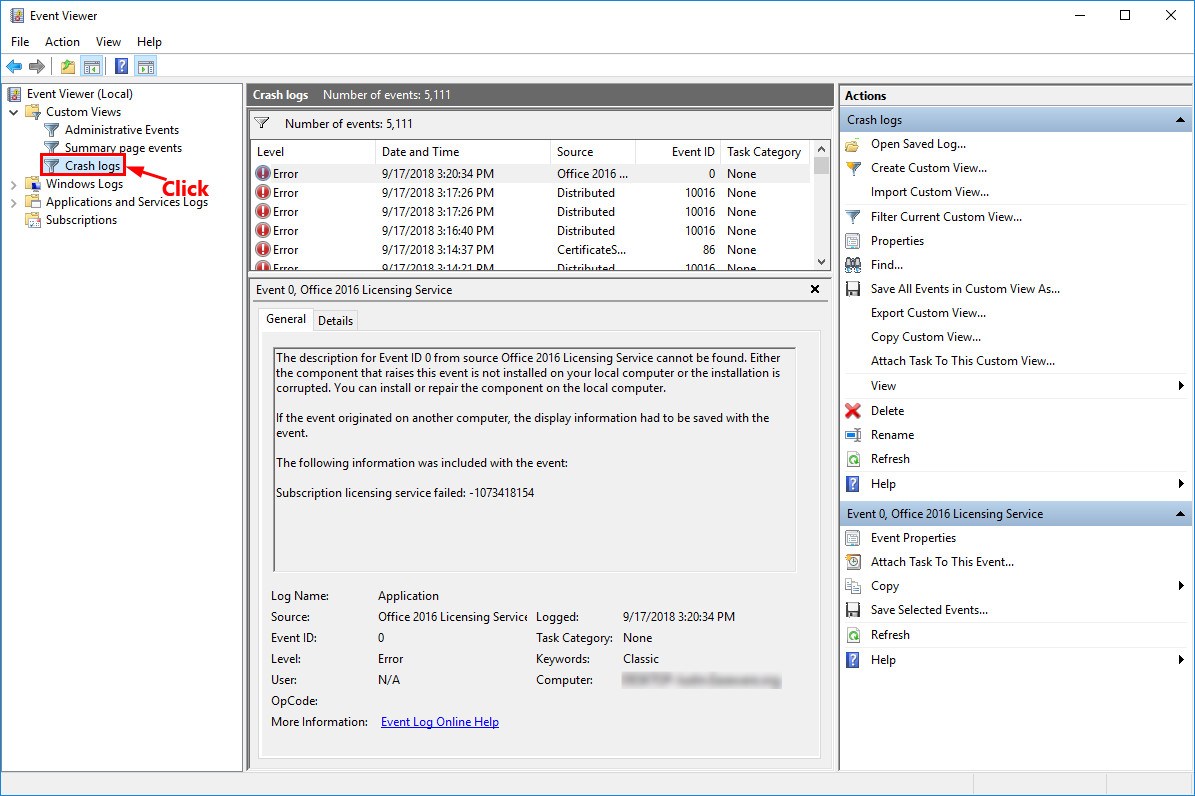
Step 4: Export the crash logs
You can also export the crash logs for diagnostics.
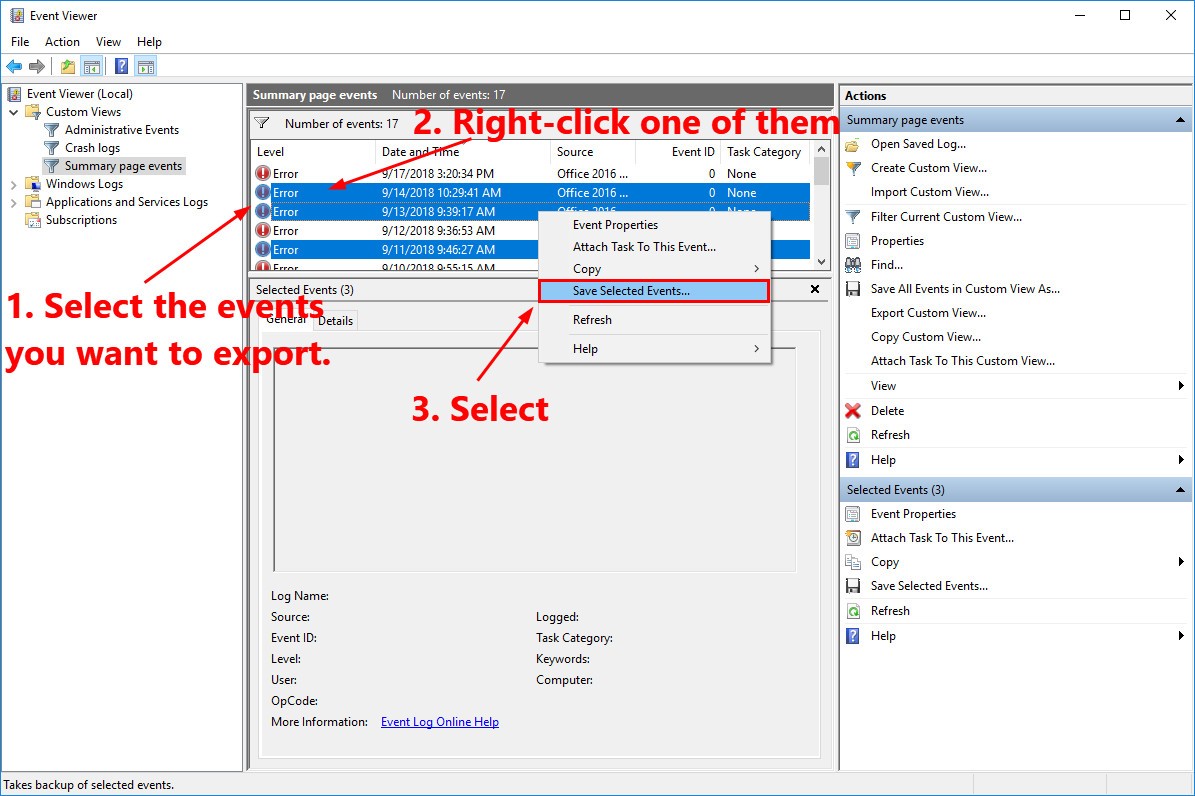
If you want to export certain events, here is how to do it:
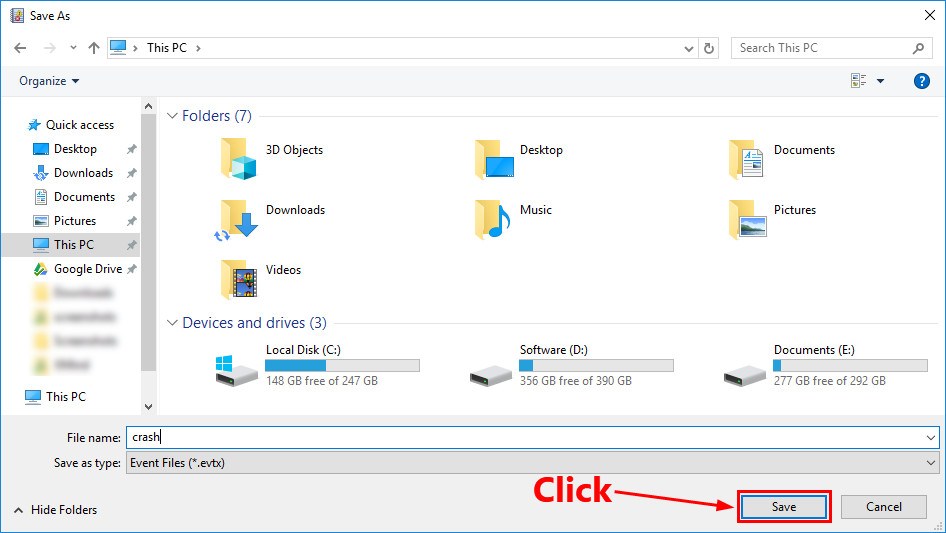
- Select the events you want to export. Right-click one of them and then select Save Selected Events….
- Find a location to save this file. Name this file and then click Save.

If you want to export a custom view, here is how to do it:
- In the left panel, double-click Custom Views and then select the custom view you want to export.
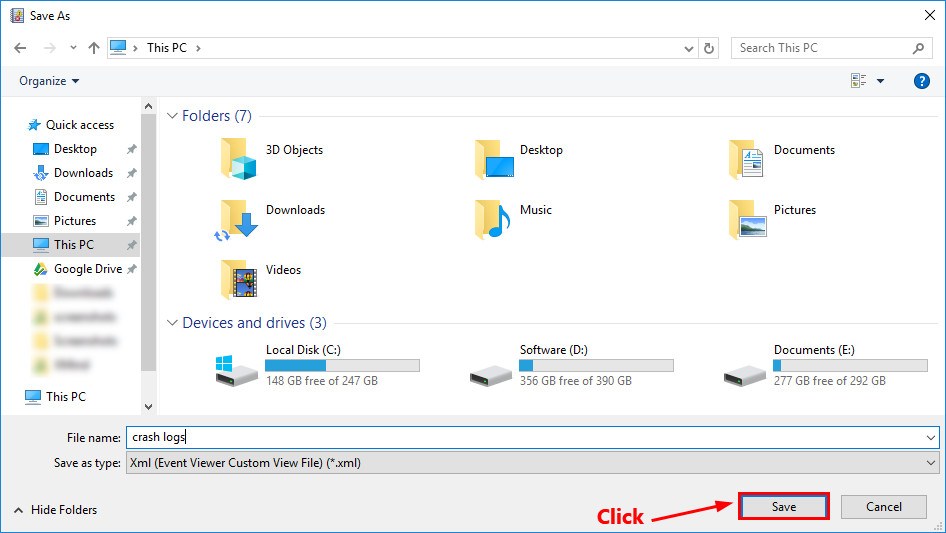
- In the Actions section, click Export Custom View….
- Find a location to save this file. Name this file and then click Save.

That’s it! Now you’ve exported the crash log.
Method 2: View crash logs with Reliability Monitor
Reliability Monitor is another useful built-in troubleshooting tool in Windows 10. Reliability Monitor shows you your Windows 10 system stability history at a glance. In addition, it tracks critical events, warnings and informational events on your computer.
Follow the steps below to view crash logs with Reliability Monitor:
- On your keyboard, press the Windows logo key and type reliability. Then click Open under View reliability history. The Reliability Monitor window will pop up.

- In Reliability Monitor, you can review your computer’s reliability and problem history in days or weeks. The default reliability report is viewed by days.
As you can see, the report records application failures, Windows failures, miscellaneous failures, warnings and informational events. The view marks failures with a red cross icon, warnings with a yellow exclamation icon, and informational events with blue info icon. Select a day marked with icons to view the reliability details.

- To view the technical details of an event, just click View technical details next to that event. Click OK to exit the problem Details window.


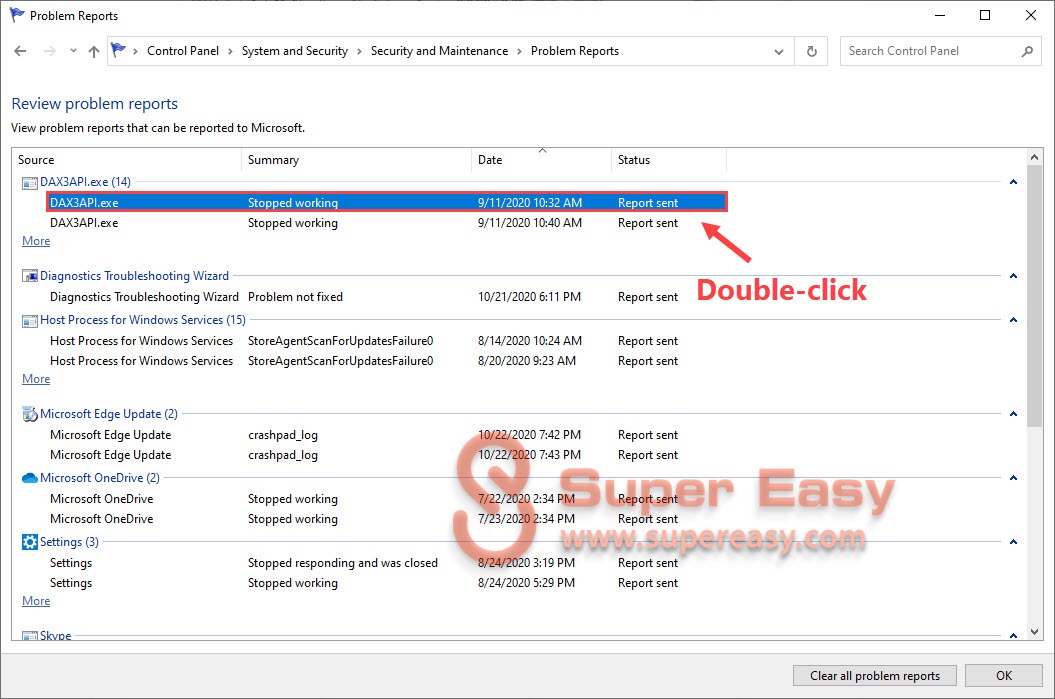
- Click View all problem reports to view all crash logs. the Problem Reports window will pop up.

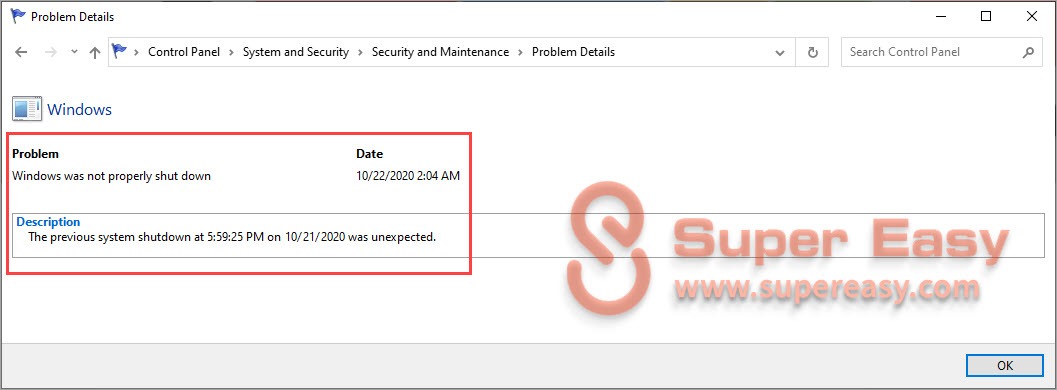
- Double-click a problem event to view the details.

In the Problem Details window, you can view more detailed info about the problem description, signature and extra info.

That’s it! After knowing the detailed info about the crash, you now can analyze and troubleshoot the causes of the crash.
Hopefully, after reading this article, you’ve learned how to view Windows 10 crash logs! If you have any questions or suggestions on this topic, feel free to leave us a comment below. Thanks for reading!

Justin is a technical writer. As a Microsoft 365 Certified: Modern Desktop Administrator Associate, he loves exploring new technologies and writing technical how-to tips to help people fix their computer / phone issues. When he’s not writing, there’s a 99 percent chance he’s reading, playing video games or listening to music.
Contributor(s):
![]()
![]()

When the Windows PC crashes or freezes, a crash log is generated; you can check the Windows crash logs to find out what is causing this issue on your computer.
Sometimes, the computer screen turns blue, or the system starts freezing. Consequently, end up losing files on the computer. If the same is happening to you, then don’t panic. In this case, you should check for Windows crash report or error logs on your computer.
Here, I have discussed different ways how to check crash logs in Windows 10. So, keep reading the article to learn how to view Windows crash logs and error logs.
To repair corrupted Windows system files & optimize PC performance, we recommend Advanced System Repair:
This software is your one stop solution to fix Windows errors, protect you from malware, clean junks and optimize your PC for maximum performance in 3 easy steps:
- Download Advanaced System Repair rated Excellent on Trustpilot.
- Click Install & Scan Now to install & scan issues causing the PC problems.
- Next, click on Click Here to Fix All Issues Now to fix, clean, protect and optimize your PC effectively.
Table of Contents
Method 1: Check Windows 10 Crash Logs/Error Logs via Event Viewer
The first method finds the Windows crash logs using the Event Viewer. Event Viewer collects all the information about the system software & device drivers.
It includes different types of information, from errors to the system’s success. It captures error types, warning types, informational types, alert types, success audit types, failure audit types, notice types, and debug types.
As there is a huge amount of data stored in the Event Viewer, our main focus is to collect the Windows error logs that caused crashing on the system. To do so, you have to follow these steps:
- Go to the Windows Search box and type Event Viewer.
- Right-click on the Event Viewer and select Run as Administrator.
- Now, on the left section of the Event Viewer window, you can see all the categorized logs.
- To see the Windows error logs, click on the Windows Logs to expand the section.
- Click on the System.
- Under the list of events, you can see all the errors that occurred on your system and caused Windows to crash.
- To see the details of errors, you need to select the particular error from the list.
- After selecting the error, you will get detailed information about that error at the bottom of the window.
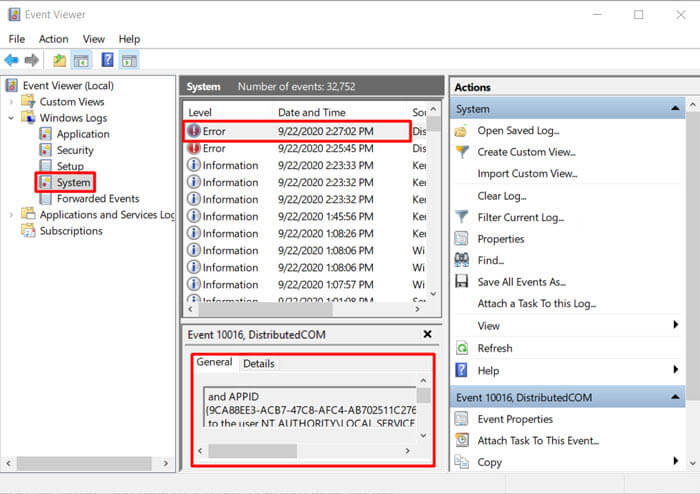
- Under the General tab, you will get general information about the error. And under the Detail tab, raw event data.
Method 2: Create Custom View to See Error Logs/Crash Logs on Windows 10
Another method of checking the Windows 10 crash logs is creating the Custom View in Event Viewer. It is a more efficient and quick way of seeing the Windows 10 error logs or crash logs. For this, you need to do the following:
- Open Event Viewer as shown in the above-given steps.
- Go to the Windows Logs > System.
- Now, go to the errors list and select the error.
- Select the Create a custom view option given at the right-side Actions section of the window.
- Now, a new window will pop up on the screen. Here, you need to select the time range for which you wish to see the log.
- Next, select the checkboxes given next to the Warning, Critical, and Error.
- Select “By log” and click on the dropdown list > select the System, Security, and Applications options.
- Click on the OK button.
- Set the name of your custom view > click on the OK button.

- Now, you can see all the Windows 10 crash logs of the selected time period.
Method 3: View Windows 10 Crash Log/Error Logs via Reliability Monitor
The Reliability Monitor feature was first introduced on Windows 7 and later adopted in Windows 10/8.1/8. Reliability Monitor provides an overview of how the system works.
It represents Windows’s warnings, errors, and crashing information in a graphical format. In simple words, it shows you how your system is reliable and stable has been.
So, if your Windows 10 system crashes or shows errors, you can use the Reliability Monitor to check the crash logs.
- Go to the Windows Search box > type reliability.
- Click on the View reliability history.
- This is how the Reliability Monitor window looks like. Here, all the reliability and problem history is sorted by dates. If your Windows 10 crashes, freezes, or hang, then you can see the red circle and X icon in the report.
- Now, if you want to see the crash log of a specific date, just go to the column of that day and you will get the detailed information of the error at the bottom section of the window.
- To find out more about the particular problem, double-click on the event.
Method 4: Find Error Logs on Windows 10 by Using PowerShell.
Windows 10 has a powerful feature i.e. PowerShell, that allows you to run command-line programs. So, to find the error and crash logs on Windows 10, you can run the below-given commands in the PowerShell:
- Press Windows + X keys > select Powershell from the list.
- In the Powershell, write any of these commands and press the Enter key:
Get-EventLog -Log LogName | where {$_.entryType -match “LogType”}
Or
Get-EventLog -Log system | where {$_.entryType -match “Error”}
Or
Get-EventLog -LogName System -EntryType Error
Or
Get-EventLog -LogName System -Newest 15 -EntryType Error
Method 5: Use 3rd Party Software to Find Windows 10 Crash/Error Logs
Apart from the above-given manual methods, there is some third-party software you can use to see the Windows 10 Event Logs. So. here are those third-party apps that can help you to see the crash logs on Windows 10:
- EventTracker
- SysMon
- Splunk
- Project Lasso
- LOGalyze
- ADAudit Plus
How to Check Windows 10 Event Logs?
Besides Windows crash logs and error logs, event logs can also help you discover the problem of Windows crashing. When a program crashes on the system or suddenly disappears, an event log file can help you troubleshoot the problem.
To view event logs on the Windows system, follow these instructions:
- Press Windows + X keys > select Event Viewer from the list.
- Go to the Windows Logs.
- Click on the Application.
- Select the latest error from the events list shown as the Application error under the Source column.
- Now, you can see the error detail in the box given at the bottom.
How to Find Windows 10 BSOD Log?
If your system crashes and the BSOD error appears just after that, you don’t need to check the entire error log; instead, only find the BSOD log in Windows 10. For this, you have two options –
1: By using Create Custom View option in Event Viewer
As already discussed, creating a custom view in the Event Viewer enables users to check the logs more effectively and easily. The same method will be used to find the Windows 10 BSOD logs. Hence, go to Method 2 and follow the steps.
2: Use Third-Party BSOD Viewer
If you found the above method too tricky or complicated, you can do it easily with the 3rd party Event Viewer. Use the BlueScreenView to find the BSOD logs.
This app will do the same thing as Windows Event Viewer. This tool will scan your computer and search for the BSOD crashed files so that you can easily troubleshoot the problem.
Windows 10 crashing is not a new problem and is very common among users. This is something that every other Windows user experiences with their computers. However, it is important to know the reasons that are causing this issue on your system.
Hence, I gathered some of the common causes of why your Windows computer is crashing:
- Failing RAM: If your computer’s RAM fails, it will be difficult for Windows to gather data from memory. As a result, your Windows will crash or freeze as it will keep trying to retrieve information from memory.
- Bad drivers: Another biggest reason for Windows crashing is a bad driver. It is because installing the wrong driver will crash the system and may welcome viruses to the system.
- Hard drive malfunctioning: If the hard drive on your computer is not working properly, it can also cause crashes. A malfunctioning hard drive affects the files on the computer, making work difficult for Windows to open those files.
- System Overheating: When the system overheats, parts of the computer become unable to function, which causes Windows to crash/freeze.
How to Fix Windows Crashing?
Windows crashing is a common problem that makes things hard for the system. Henceforth, there are some solutions that you can follow to fix this problem on your computer:
- Disconnect external devices: To fix this problem, you should disconnect all the external devices as it might be the reason that is causing the communication problem between Windows 10 & your device.
- Update drivers: Running outdated or corrupted drivers often leads to crashing problems on Windows 10. So, check whether the device drivers are compatible and updated or not.
- Remove Virus/Malware: The virus/malware on the system corrupts/infects the files, including the ones required for Windows 10 functioning. So, if this is the case with you, check for viruses/malware on your PC.
- Run SFC: The corrupted/damaged Windows system files won’t let Windows work efficiently. Hence, you need to run the SFC command on your computer to fix the corrupt system files.
- Use PC Repair Tool: The best solution that most professionals use to fix the Windows crashing issue is using the PC Repair Tool. This tool can fix several PC errors/issues, including BSOD errors, DLL errors, repair corrupted Windows system files, and crashing problems.
Conclusion
So, this is all about finding Windows 10 crash logs. Whenever your Windows crashes or freezes, follow one of these methods and see the event logs on Windows 10 to find out the reasons causing problems on your system.
I hope the article is helpful for you. If you still have any queries, please share them on our Facebook or Twitter page. Also, don’t forget to follow us on social media for more informative Windows 10 guides.
Good Luck..!

Hardeep has always been a Windows lover ever since she got her hands on her first Windows XP PC. She has always been enthusiastic about technological stuff, especially Artificial Intelligence (AI) computing. Before joining PC Error Fix, she worked as a freelancer and worked on numerous technical projects.
Системный журнал событий (он же «Просмотр событий» или «Event Viewer») в Windows 10 – это один из самых важных инструментов в операционной системе, к которому прибегают не все пользователи, а зря. Ведь он помогает показать все важные ивенты, которые происходят как с самой ОС, так и с установленными программами. В таком случае даже неопытный пользователь может легко найти решение по конкретной проблеме, так как в нем сохраняются все логи ошибок. Ну или хотя бы «загуглить» информацию, которая уже поможет.
Далее я расскажу, как открыть журнал событий (ошибок), создать ярлык на рабочем столе или отключить службу. На самом деле инструкции почти ничем не отличаются и от других версий «Окон», поэтому вы можете пользоваться ею всегда. Если в процессе возникнут какие-то вопросы (в том числе по ошибкам, которые вы найдете), то смело обращайтесь ко мне в комментариях, и я вам постараюсь помочь. Поехали!
Содержание
- Способ 1: Панель управления и создание ярлыка для быстрого доступа
- Способ 2: Выполнить
- Способ 3: Поиск
- Способ 4: Прямой запуск
- Можно ли отключить журнал событий и как это сделать?
- Задать вопрос автору статьи
Способ 1: Панель управления и создание ярлыка для быстрого доступа
Если ранее её можно было вызвать с помощью правой кнопки по кнопке «Пуск», то почему-то разработчики в данный момент её оттуда убрали. Переживать не стоит, её полностью убирать не будут, но сам факт достаточно странный. Поэтому мы воспользуемся другим методом.
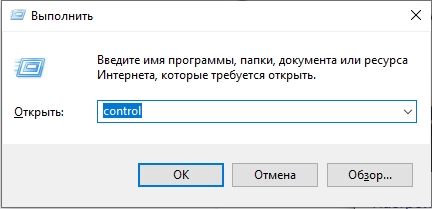
- Открываем «Панель управления». Это можно сделать двумя способами. Первый – зажимаем вспомогательную кнопку (находится между Ctrl и Alt) – не отпускаем её и жмем по букве R. Откроется приложение «Выполнить». Вводим команду:
control
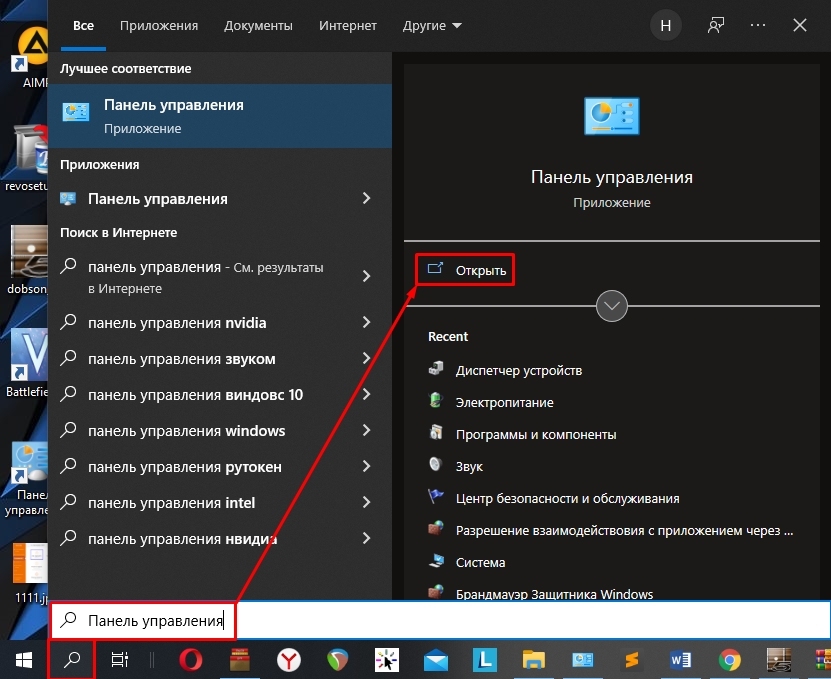
- Второй способ – это воспользоваться поиском. Чтобы его открыть нажмите по значку лупы и введите название.
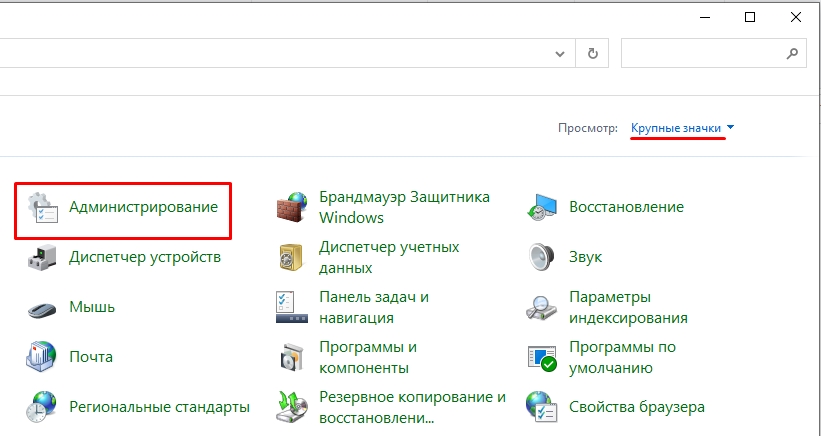
- Находим раздел «Администрирование» и жмем по нему. Если вы не можете его найти, то значит у вас установлен неправильный режим просмотра. Посмотрите на картинку ниже и установите такой же режим как у меня.
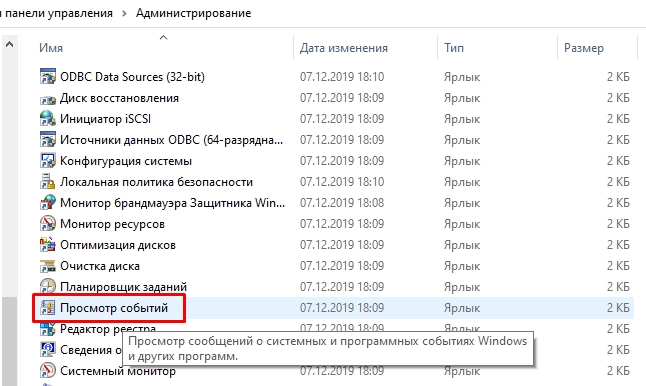
- Далее вы увидите несколько ярлыков – жмем двойным щелчком левой кнопкой мыши по кнопке «Просмотр событий».
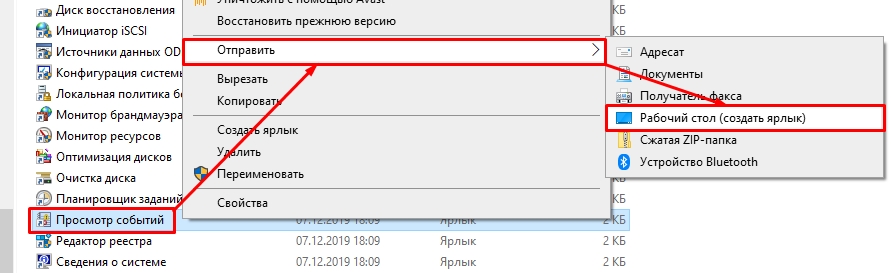
Если вы постоянно работаете с этой системной утилитой, то я вам рекомендую сделать ярлык, который будет расположен на рабочем столе. Для этого кликаем правой кнопкой, далее из выпадающего меню выбираем «Отправить» – «Рабочий стол (создать ярлык)».
Способ 2: Выполнить
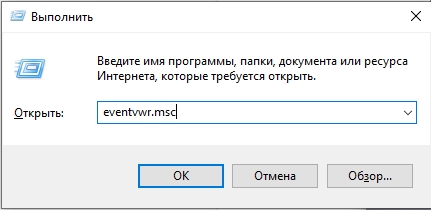
Сейчас вы спросите: а почему мы ранее не воспользовались этим методом, если уже вызывали окно «Выполнить»? – Я хотел, чтобы вы понимали само расположение системной утилиты. Так же мы таким образом знакомимся со структурой операционной системы. В общем воспользуемся нашей любимыми клавишами «WIN + R», чтобы вызвать исполняемую программу и вводим команду:
eventvwr.msc
СОВЕТ! Если каким-то образом кнопки не работают, то вы можете вызвать окно «Выполнить», также через поиск Виндовс.
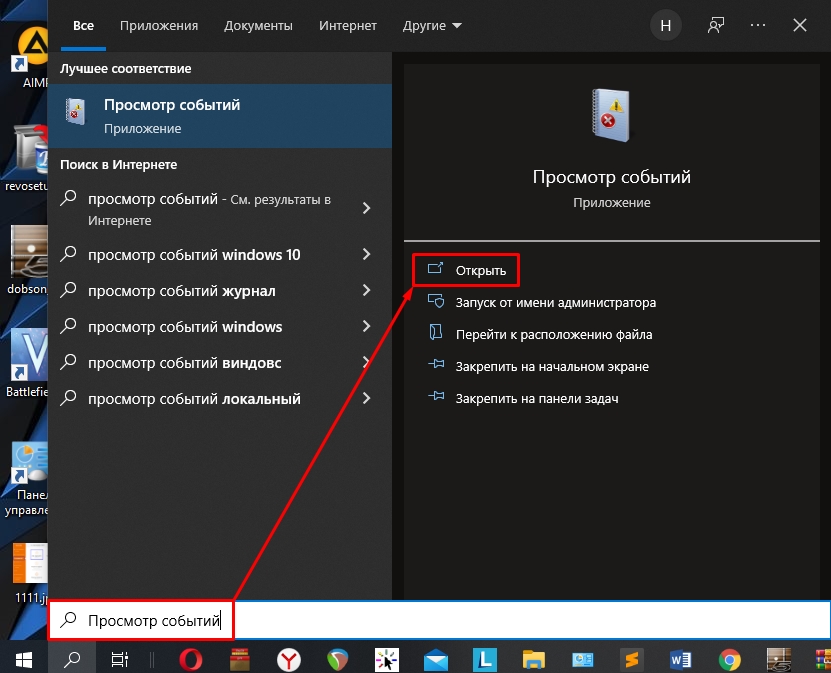
Способ 3: Поиск
Скорее всего вы уже догадались, что мы сейчас будем делать. Открываем окно поиска операционной системы, нажав по лупе. Кстати окно поиска можно вызвать через + S. Далее в строку поиска вводим:
Просмотр событий
или
eventvwr.msc
Очень важно среди команд выбрать именно «Открыть».
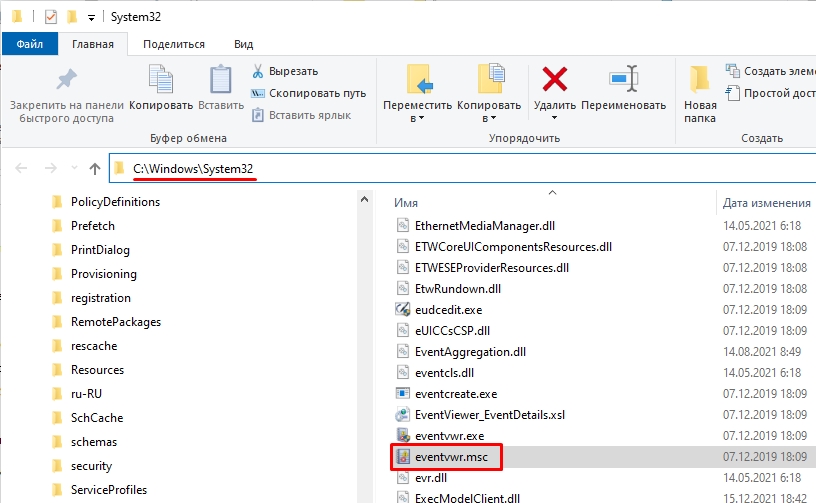
Так как это системная утилита, то её можно запустить прямым методом. Для этого переходим в системный диск «C», открываем папку «Windows» и находим основной раздел «System32». Далее нам нужно найти файл:
eventvwr.msc
Файлов и папок там будет много. Вы можете найти его вручную – все файлы расположены в алфавитном порядке. Или вы можете воспользоваться поиском.
Можно ли отключить журнал событий и как это сделать?
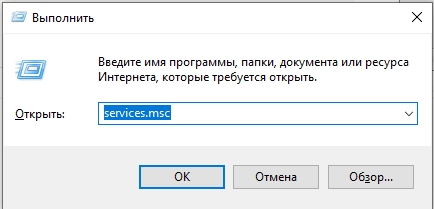
Конечно это не рекомендуется делать. Но если у вас возникли какие-то трудности с этой утилитой, то делаем следующее – сначала используем + R. Вводим команду:
services.msc
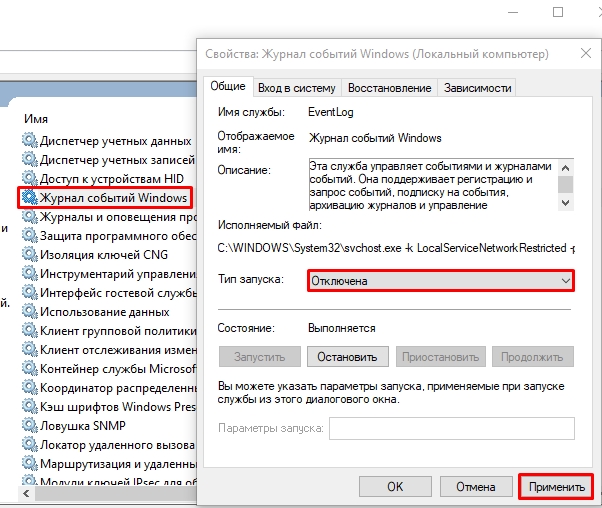
Находим «Журнал событий Windows», открываем его двойным щелчком левой кнопкой мыши. Устанавливаем «Тип запуска» – «Отключена». Жмем «Применить» и перезагружаем комп. Или вы можете «Остановить» лог ошибок вручную, но я все же рекомендую перезапустить ОС.
На этом все, дорогие друзья. Если остались какие-то вопросы, то милости прошу в комментариях под этой статьей. Всем добра!