-
Home
-
Partition Manager
- CMD List Drives: How to List Drives in Command Prompt? [Answered]
By Ariel | Follow |
Last Updated
Sometimes you may to need list all drives on your systems. How to list drives in CMD/PowerShell? This post of MiniTool provides a full guide on PowerShell/CMD list drives and a professional tool to manage your drives.
When formatting a drive or copying files from a drive to another drive, you may need to use the CMD or Windows PowerShell tool to list drives. However, many people don’t know how to list drives in Command Prompt or PowerShell, like a user from the superuser forum:
Is there a way to list the available drives from cmd.exe? (Other than manually typing c: d: …) and seeing which ones return errors.https://superuser.com/questions/139899/see-available-drives-from-windows-cli
How to List Drives in CMD
Command Prompt, also known as CMD, is the command-line interpreter in Windows operating system. You can input certain commands in the Command Prompt window to take corresponding actions. If you want to list drives of your systems, you can use the WMIC (Windows Management Instrumentation for Management) or Diskpart command.
List Drives CMD via WMIC:
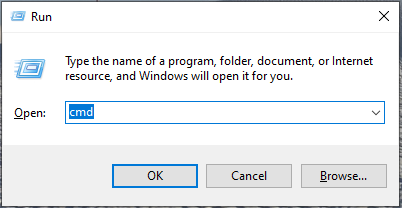
Step 1. Press Win + R keys to open the Run dialog box, and then type cmd in it and press Ctrl + Shift + Enter keys together to open the elevated Command Prompt window.
Step 2. To let CMD list drives, type one of the following commands and hit Enter.
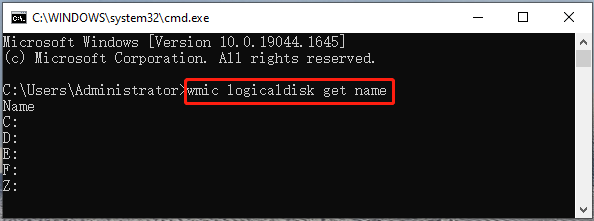
- wmic logicaldisk get name
- wmic logicaldisk get caption
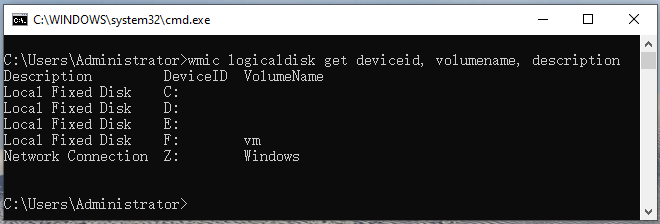
Step 3. If you want to display the Device ID and volume name, type the following command and hit Enter. Also, you can run the fsutil fsinfo drives command to list drives on your computer
wmic logicaldisk get deviceid, volumename, description
List Drives CMD via Diskpart:
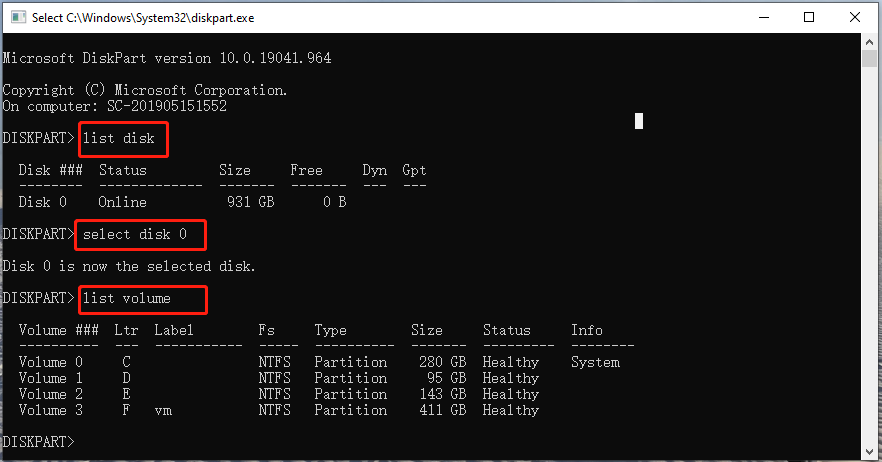
DiskPart is a disk partition management tool that uses command lines to perform operations. It can be used to list drives CMD as well. Here’s how to use it.
Step 1. Open the Command Prompt window again as we explained above.
Step 2. Type the following commands in order and hit Enter after each one. Then you will see a list of drives on the disk, including partition/volume number, label, letter, file system, size, and status.
- diskpart
- list disk
- select disk *
- list volume/list partition
How to List Drives in PowerShell
PowerShell is a command-line tool like CMD. Here you can let PowerShell list drives as well. To do so, follow the steps below:
Step 1. Open the Run dialog box, and then type powershell in it and hit Enter.
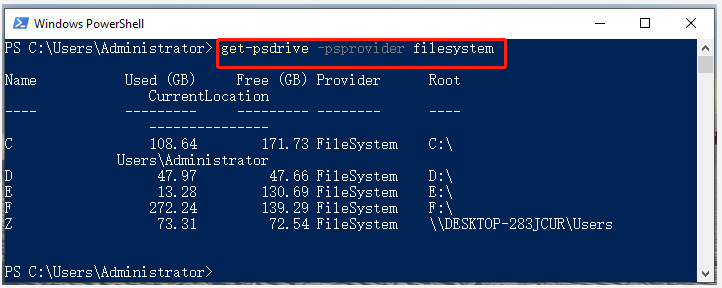
Step 2. In the Windows PowerShell window, type the following command and hit Enter.
get-psdrive -psprovider filesystem
How to let PowerShell/CMD list drive letters? Now, I believe that you already have known the answer.
Better Choice Than PowerShell/CMD List Drives
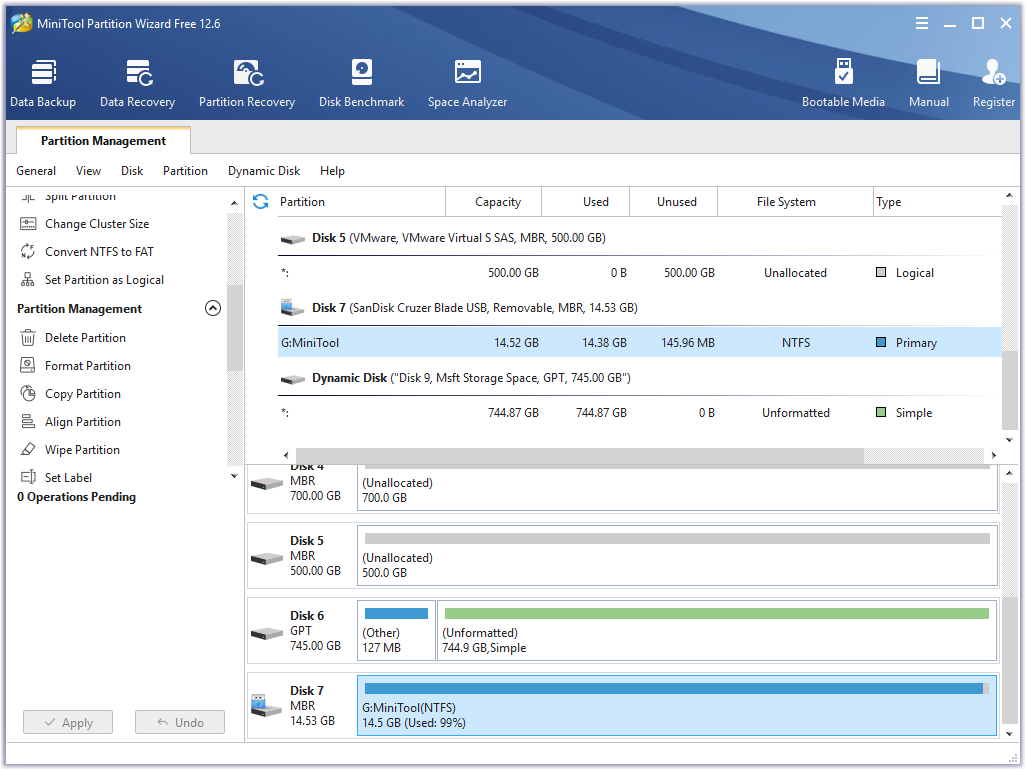
Although both of the two Windows tools can help you list drives, you may encounter some limitations to further managing drives/disks with them. For example, you can’t format a drive larger than 32GB to FAT32 using CMD. If you want to manage your hard disk or partitions more effectively, it’s highly recommended that you use a professional tool like MiniTool Partition Wizard.
MiniTool Partition Wizard DemoClick to Download100%Clean & Safe
It is a popular partition manager trusted by millions of users around the world. With this tool, you can not only obtain the drive information easily but do many other powerful tasks, including create/extend/move/format/wipe partition, convert NTFS to FAT32 without data loss, convert MBR to GPT, migrate OS, rebuild MBR, recover data, etc.
About The Author

Position: Columnist
Ariel has been working as a highly professional computer-relevant technology editor at MiniTool for many years. She has a strong passion for researching all knowledge related to the computer’s disk, partition, and Windows OS. Up till now, she has finished thousands of articles covering a broad range of topics and helped lots of users fix various problems. She focuses on the fields of disk management, OS backup, and PDF editing and provides her readers with insightful and informative content.

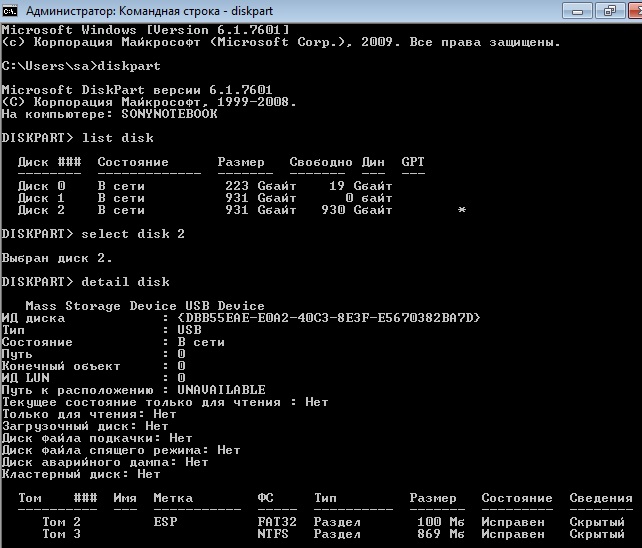
Для работы с DISKPART требуются права администратора системы. Утилита является мощным и небезопасными инструментом для работы с дисковыми данными. Для примера, имеем жесткий диск от ноутбука с зашифрованными разделами, которые нельзя удалить с помощью стандартных средств управления дисками в Windows.

Запускаем командную строку от имени администратора, в ней запускаем утилиту управления дисками
diskpart
Для получения списка дисков используется команда:
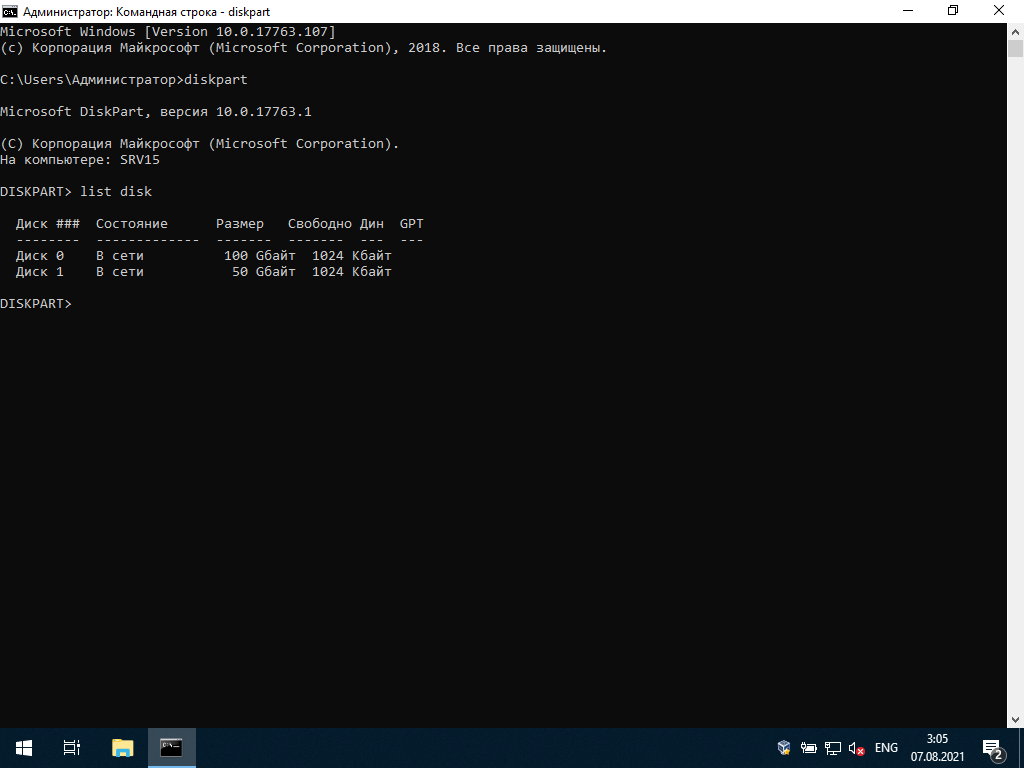
DISKPART> list disk
В результате получаем список дисков, присутствующих в системе. Далее выбираем нужный диск
DISKPART> select disk 2
Можно посмотреть информацию о выбранном диске
DISKPART> detail disk
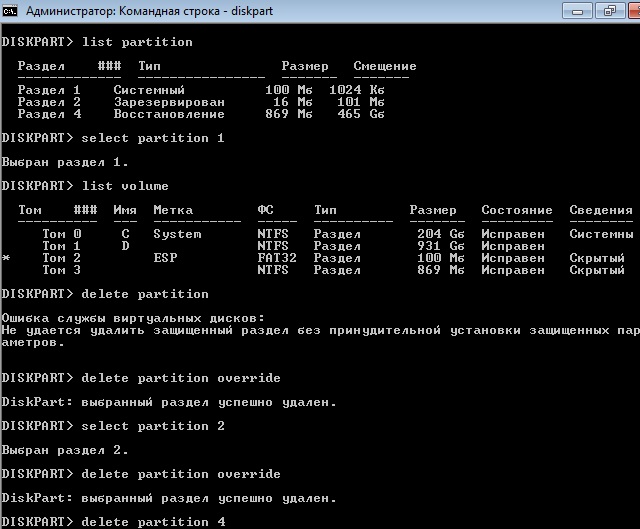
Для получения списка логических томов используется команда
DISKPART> list volume
Получение списка разделов
DISKPART> list partition
Выбираем нужный раздел и пробуем его удалить
DISKPART> select partition 1
Выбран раздел 1.
DISKPART> delete partition
Ошибка службы виртуальных дисков:
Не удается удалить защищенный раздел без принудительной установки защищенных параметров.
Удалить выбранный раздел независимо от его защиты
DISKPART> delete partition override
DiskPart: выбранный раздел успешно удален.
Повторяем команды select partition и delete partition override для всех разделов диска.
Дальше можно разметить диск штатными средствами консоли управления дисками в Windows, или здесь же.
DISKPART> create partition primary
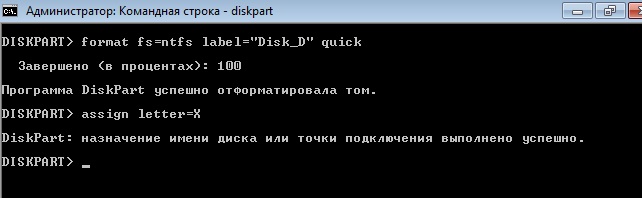
Для быстрого форматирования раздела с использованием метки тома Disk_D и файловой системы NTFS:
DISKPART> format fs=ntfs label="Disk_D" quick
Раздел готов к использованию и ему можно присвоить букву
DISKPART> assign letter=X
18 314
I absolutely love the pure batch method shown in the answer from cybercontroler, all internal commands no less!
I wanted to share my batch edit/modification that based on cybercontroler’s answer.
For my current project, I needed to identify which drive labeled as DATA so I replaced the echo command with vol (internal command).
I also used the set command to create the variable [1] that would contain the full set of capital letters in order to shorten the for command’s length.
Since if exist will be checking for drive letters only, there will never be a space character in this test, so I omitted the double quotes.
Testing the omission the two back slashes yields the same results.
The added command line @echo off filtered the output to show results only.
I piped the results to the external find command to filter serial number lines created by the vol command.
I placed a pause command so that it wouldn’t be necessary to run a «Command Prompt» beforehand in order to see the results when clicking on the batch file.
The results from the original identified all available drive letters mixed in with for command processing the full set of capital letters. With @echo off filtering, my run displayed:
C:
D:
The results using vol displays:
Volume in drive C is OS
 Volume in drive D is DATA
Press any key to continue . . .
Here’s my batch file which includes both for commands; you can comment-out the for command that you do not want to run by prefixing command lines with two colons (::).
Batch File
echo Available Drives:
for %%v in (A B C D E F G H I J K L M N O P Q R S T U V W X Y Z) do if exist "%%v:\\"

echo %%-:
@echo off
set [1]=A B C D E F G H I J K L M N O P Q R S T U V W X Y Z
for %%- in (%[1]%) do if exist %%-: vol %%-: | find "in drive"
pause
Note that this batch method does not identify DVD drives, not sure why. But the command fsutil fsinfo drives does. My output reads: Drives: C:\ D;\ J:\ (J:\ being my DVD drive.)
Если вы часто работаете с командной строкой или PowerShell, вам может потребоваться копировать файлы с или на внешний диск, в такое и во многих других случаях вам может потребоваться отобразить диски в окне консоли. В этом посте мы покажем вам, как вы можете составить список дисков с помощью командной строки или PowerShell в Windows 10/8/7.
Список дисков с помощью командной строки
Если вам нужно просто перечислить диски, вы можете использовать WMIC . Инструментарий управления Windows (WMI) – это инфраструктура для управления данными и операциями в операционных системах на базе Windows.
Откройте командную строку и введите следующую команду:
wmic logicdisk get name
Нажмите Enter, и вы увидите список дисков.
Вы также можете использовать следующий параметр:
заголовок wmic логического диска

Использование следующего отобразит идентификатор устройства и имя тома:
wmic logicdisk get deviceid, имя, описание
Windows также включает дополнительный инструмент командной строки для управления файлами, системами и дисками, который называется Fsutil . Эта утилита помогает вам подобрать файлы, изменить короткое имя файла, найти файлы по SID (идентификатор безопасности) и выполнить другие сложные задачи. Вы также можете использовать fsutil для отображения дисков. Используйте следующую команду:
fsutil fsinfo диски
Он также покажет подключенные диски.
Вы также можете использовать diskpart , чтобы получить список дисков вместе с некоторыми более подробной информацией. Утилита Diskpart может сделать все, что может сделать консоль управления дисками, и даже больше! Это бесценно для сценаристов или тех, кто просто предпочитает работать в командной строке.
Откройте CMD и введите diskpart . Далее используйте следующую команду:
объем списка

Вы увидите, что на консоли отображаются номер и буква тома, метка, тип форматирования, тип раздела, размер, состояние и другая информация.
Список дисков с помощью PowerShell
Чтобы отобразить диски с помощью PowerShell, введите powershell в тех же окнах CMD и нажмите Enter. Это откроет окно PowerShell.
Теперь используйте следующую команду:
get-psdrive -psprovider filesystem

Надеюсь, это поможет.
Теперь посмотрим, как вы можете получить список всех драйверов устройств с помощью командной строки.
Краткая инструкция по работе с консольной утилитой DiskPart для управления разделами дисков в ОС Windows.
Запуск
Запускается утилита в консоли Windows командой
# diskpart
После запуска попадаем в консоль DiskPart.
Чтобы посмотреть, какие команды используются для работы, достаточно выполнить
DISKPART> help

Вывод списков дисков и томов
Для вывода списка дисков в системе необходимо выполнить команду
DISKPART> list disk
Для вывода списка томов в системе используется команда
DISKPART> list volume

Преобразование диска в MBR или GPT
Внимание! Данные действия приведут к потере всей информации на жёстком диске. Перед выполнением рекомендуется скопировать данные на другие носители.
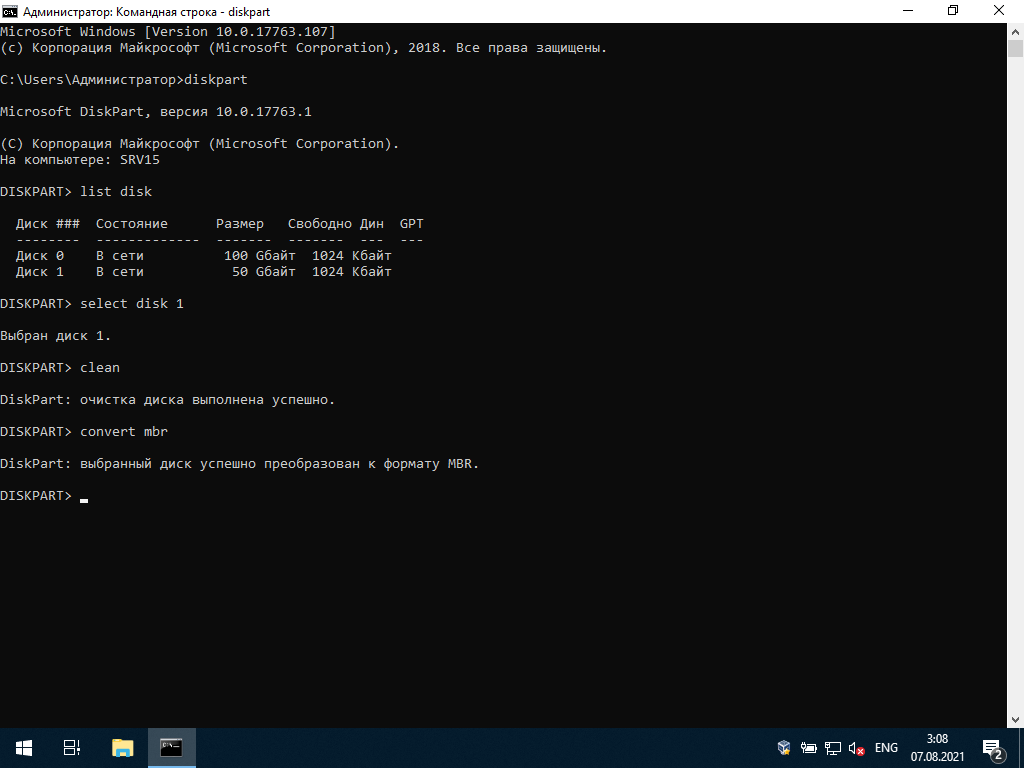
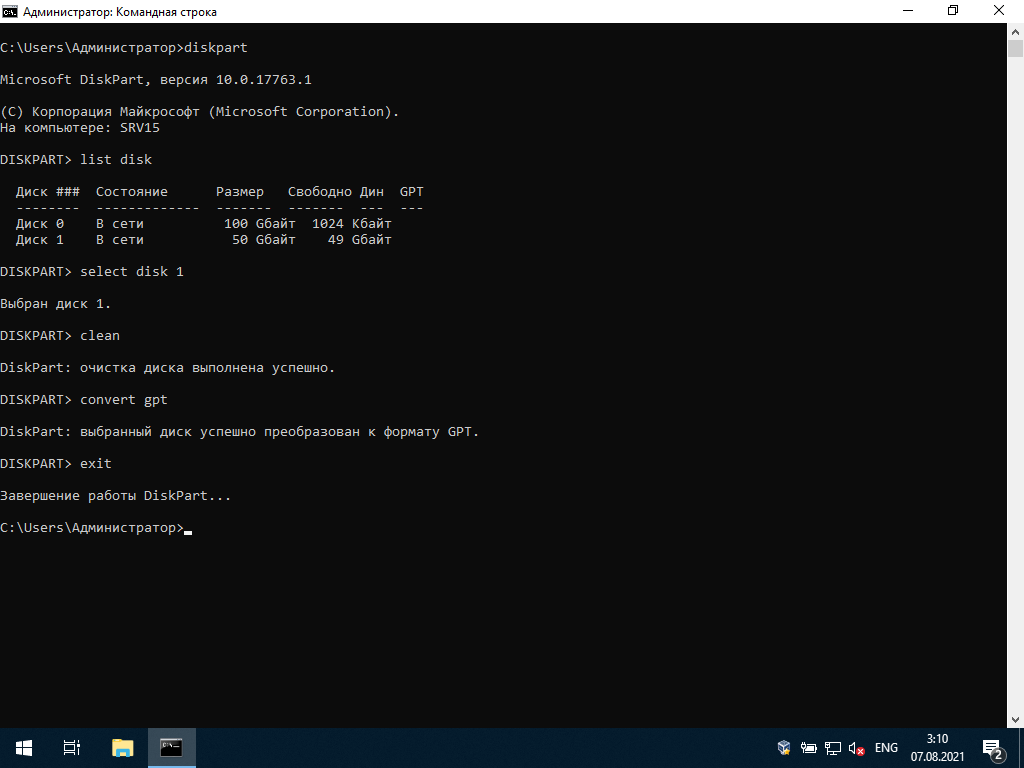
Для конвертации таблицы разделов диска в необходимо сначала выполнить команду выбора диска для работы с ним. Например, выбор диска 1
DISKPART> select disk 1
Затем чистим диск
DISKPART> clean
Конвертируем таблицу разделов в MBR
DISKPART> convert mbr
Для выхода из консоли DiskPart
DISKPART> exit
Если необходимо отконвертировать таблицу разделов в GPT, тогда вводим
DISKPART> convert gpt
Если необходимо преобразовать таблицу разделов в нужный формат перед установкой Windows, то необходимо сначала вызвать консоль сочетанием клавиш Shift + F10, запустить DiskPart и затем отконвертировать в нужный формат.
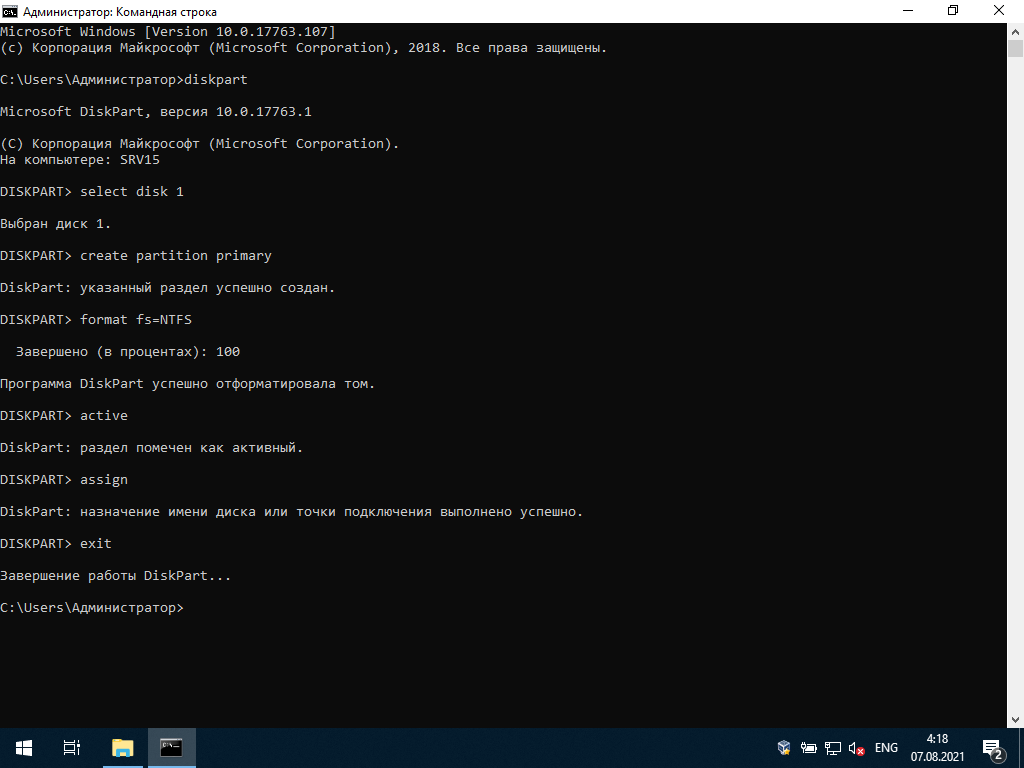
Создание раздела, форматирование и назначение буквы диска
Создадим основной раздел на выбранном диске
DISKPART> create partition primary
отформатируем его в NTFS
DISKPART> format fs=NTFS
сделаем его активным
DISKPART> active
и назначим ему букву
DISKPART> assign
для выхода из консоли DiskPart вводим
DISKPART> exit
Для того, чтобы назначить разделу определённую букву, необходимо воспользоваться такой командой
DISKPART> assign letter= N
после знака «=» обязательно должен быть пробел.