-

Funbit
Member
- Публикаций:
-
0
- Регистрация:
- 13 апр 2003
- Сообщения:
- 92
- Адрес:
- Russia
Можно ли как-нибудь послать udp сообщение (на указанный адрес и порт) стандартными средствами Windows XP/2000, т.е. используя только то, что поставляется вместе с ОС (без всяких portqry и т.п.) ? (никакого программирования, просто предположите, что кроме свежеустановленной ОС у вас ничего нет)
-
ganes
New Member
- Публикаций:
-
0
- Регистрация:
- 7 дек 2004
- Сообщения:
- 62
- Адрес:
- Ukraine
Никак! Развечто какойнибудь клиент типа ftp.exe и-то
собственный удп пакет он тебе незгенерит если даже
он и мог-бы их посылать…
П.С Надь хоть Doo.Mать-Вашу чо спрашивать, пошли-бь
занялись чам нябуДь!
-
Funbit
Member
- Публикаций:
-
0
- Регистрация:
- 13 апр 2003
- Сообщения:
- 92
- Адрес:
- Russia
ganes
лучше бы сам пошел и занялся чем-нибудь, чем умничать тут
-
ZENiTH
New Member
- Публикаций:
-
0
- Регистрация:
- 13 май 2003
- Сообщения:
- 16
легко:
слушаешь 69 ingress udp port
nc -L -u -p 69
посылаешь udp egress udp packet
tftp.exe 192.168.0.2 GET file.bin
получаешь приблизительно такой пакет
☺file.bin netascii
-
ZENiTH
New Member
- Публикаций:
-
0
- Регистрация:
- 13 май 2003
- Сообщения:
- 16
если хочешь произвольный порт измени его в этом файле
C:\windows\system32\drivers\etc\SERVICES
-
Flasher
Member
- Публикаций:
-
0
- Регистрация:
- 31 янв 2004
- Сообщения:
- 640
а у ftp и tftp — протоколы одинаковые ?
т.е. при get запросе сначало отправляется ip,port потом RETR filename.exe ?
Кажись не в тему, но имеет отношение к tftp
")
-
ash
New Member
- Публикаций:
-
0
- Регистрация:
- 9 ноя 2004
- Сообщения:
- 52
- Адрес:
- Latvia
Нет, не одинаковые.
hxxp://www.google.com/search?q=site:www.faqs.org+tftp
hxxp://www.google.com/search?q=site:www.faqs.org+ftp
-
Funbit
Member
- Публикаций:
-
0
- Регистрация:
- 13 апр 2003
- Сообщения:
- 92
- Адрес:
- Russia
ZENiTH
nc -L -u -p 69
что есть nc ?
-
ZENiTH
New Member
- Публикаций:
-
0
- Регистрация:
- 13 май 2003
- Сообщения:
- 16
nc это порт юниксовой утилитки, полное название netcat, здесь она используется просто для проверки что соединение было
-L слушать
-u слушать по udp
-p порт
могу залить если нужна (с исходниками)
-
Funbit
Member
- Публикаций:
-
0
- Регистрация:
- 13 апр 2003
- Сообщения:
- 92
- Адрес:
- Russia
ZENiTH
что-то я не понял, на чистом winXP откуда всё это ? =\
-
ZENiTH
New Member
- Публикаций:
-
0
- Регистрация:
- 13 май 2003
- Сообщения:
- 16
nc просто показывает что факт входящего соединения был, вместо неё может быть любой ip и порт, а исходящее соединение делается с помощью встроенной утилиты XP tftp.exe как и было в исходных условиях задачи
-
Funbit
Member
- Публикаций:
-
0
- Регистрация:
- 13 апр 2003
- Сообщения:
- 92
- Адрес:
- Russia
да, спасибо, работает,
только жаль, что сообщение с нулевого байта начинается
-
Funbit
Member
- Публикаций:
-
0
- Регистрация:
- 13 апр 2003
- Сообщения:
- 92
- Адрес:
- Russia
да, спасибо, работает,
только жаль, что сообщение с нулевого байта начинается

")


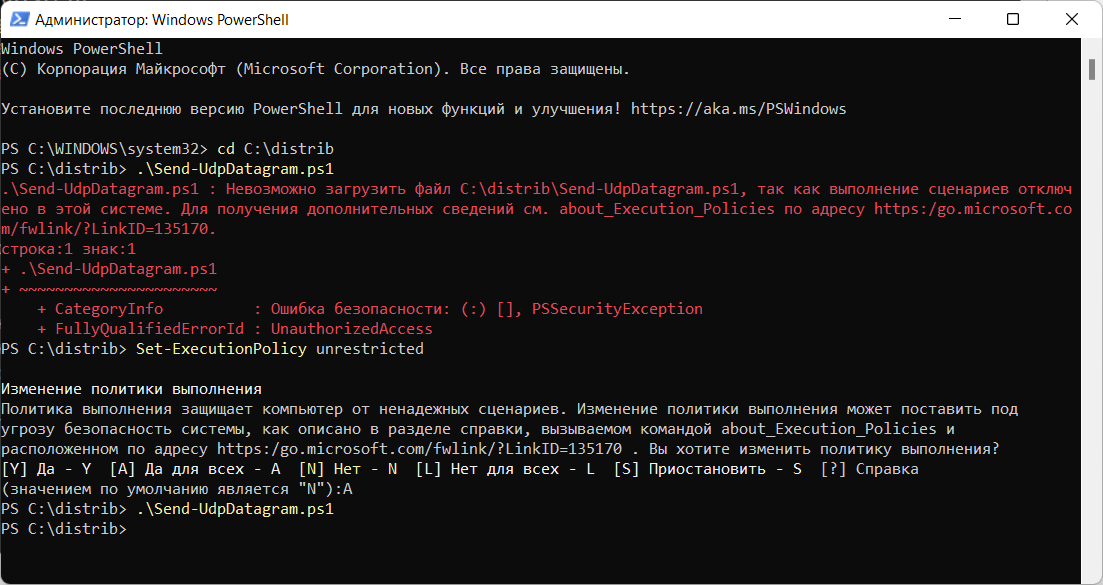
Понадобилось мне как-то проверить, работает ли UDP порт на компьютере. На получателе настраиваю прослушивание UDP порта с помощью PktMon:
PktMon — ловим UDP трафик в Windows 10
Слушаю, слушаю. Нет трафика. Нужно самому послать UDP пакет, а под рукой нет никаких подручных средств. На помощь приходит Powershell.
function Send-UdpDatagram
{
      Param ([string] $EndPoint,
      [int] $Port,
      [string] $Message)

      $IP = [System.Net.Dns]::GetHostAddresses($EndPoint)
      $Address = [System.Net.IPAddress]::Parse($IP)
      $EndPoints = New-Object System.Net.IPEndPoint($Address, $Port)
      $Socket = New-Object System.Net.Sockets.UDPClient
      $EncodedText = [Text.Encoding]::ASCII.GetBytes($Message)
      $SendMessage = $Socket.Send($EncodedText, $EncodedText.Length, $EndPoints)
      $Socket.Close()
}
Send-UdpDatagram -EndPoint "127.0.0.1" -Port 53 -Message "test.mymetric:0|c"Скрипт писал не сам, но проверил. Работает.
Примечание
Пришлось ещё разрешить выполнение PowerShell скриптов.
Powershell — невозможно загрузить файл ps1, так как выполнение сценариев отключено в этой системе
I have an app that listens on a localhost port. I want a minimal launcher to bring that app’s to the front.
My app is in Java. I don’t know how to write any exe files, but I can write bat files, and then make a shortcut that launches the bat file without showing the terminal. I would like to have the bat file send some data to a port (preferably UDP so there will not be any stream overhead).
How can I send data to a UDP port?
One of the things I thought of was nslookup, but that will only connect to port 53 as far as I know.
This only needs to work on Windows. Would like it to work on XP and up, but I can make a workaround if necessary.
asked Jun 13, 2011 at 22:02
![]()
700 Software700 Software
85.5k83 gold badges235 silver badges341 bronze badges
This is a job for netcat.
http://nc110.sourceforge.net/
After installing you can easily launch it from the command line or write a BAT script to execute it for you.
To send date through UDP rather than TCP, use the «-u» switch.
For example, to send the data to UPD port 2345 on localhost execute:
nc -u localhost 2345
Then type the data you want to send.
![]()
Jim Fell
13.8k37 gold badges128 silver badges202 bronze badges
answered Jun 13, 2011 at 22:57
![]()
0x900x90
6,0992 gold badges36 silver badges55 bronze badges
1
I was having quite a few problems sending a UDP command to a Brightsign digital sign with netcat. I ended up using Swiss File Knife. It is possible I had the syntex wrong with my netcat statement. (If anyone could suggest the correct syntax based on my working SFK statement, I would love to know)
I just wanted to send a few asci key words to my sign from a batch file.
My sign was 192.168.1.22 and listening on port 5000
Here are my working steps:
Download Swiss File Knife SKF: http://swissfileknife.sourceforge.net/
Copied the file to C:\tools and renamed the sfk174.exe file to skf.exe(to make is shorter) and used the bellow syntax to send the UDP command Special
C:\tools\sfk udpsend 192.168.1.22 5000 “Special” (make sure you put your asci word in quotes. it will work without but not for words with spaces between)
I put the commands in a batch file and created a windows icon for the customer and they worked great.
![]()
Jim Fell
13.8k37 gold badges128 silver badges202 bronze badges
answered Apr 10, 2015 at 13:18
![]()
0
You can send an udp packet like this :
c:\nemesis\nemesis.exe udp -P do7on.txt -D 192.168.0.10 -y 1025
Nemesis : http://nemesis.sourceforge.net/
answered Jun 13, 2011 at 23:43
![]()
1
- Download source code- 35.1 KB

Introduction
In this article, I will explain how to create UDP packets and then send them to a remote server through the Internet using WinPCap for Windows. The code has been tested to work with Windows XP SP2 and Vista SP1 on Linksys routers, and on Toshiba modems connected directly to the Internet. Please note that the code here is very minimalistic, and can be greatly expanded depending on your needs. The reason I use WinPCap in this article is that it solves the issue of Winsock for Windows (XP SP2 and above) not allowing raw UDP packets to be sent (in Linux, you can just use regular sockets). With WinPcap, it is possible to specify your own source IP and source hardware addresses in packets.
Background
You should know the basics of how computers communicate through the Internet; this includes knowing what packets, sockets, UDP, IP addresses, and MAC addresses are. Additionally, you might want to review the packet headers before reading over this material. The headers involved are Ethernet II, IP, and UDP. Also, know how memcpy() works; it’s used a lot. Lastly, you must know how to install headers and libraries for use with your compiler.
Before we begin
Getting WinPCap
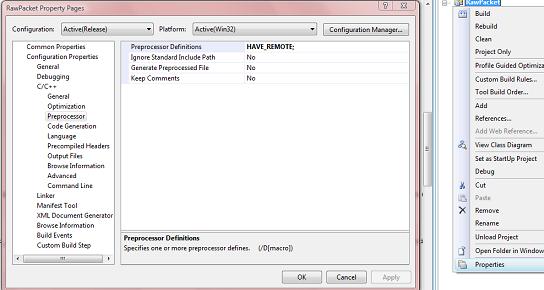
The WinPCap 4.02 libraries I use here can be downloaded here. Once the libraries are set up, you need to add «HAVE_REMOTE» to your preprocessor. In Visual Studio 2008, this can be done in the C++ Options of your project. Make sure you do this because I spent a good time wondering why my WinPCAp project would not compile despite me checking for errors many times. Also, if you want to run WinPCap applications, you will have to install the WinPcap binaries.
Windows SDK
Some functions and structures used in this article are from Winsock2 and the Iphlp API. These are included in the Windows SDK, and can be downloaded for free here (1.33 GB; good luck dial-up users).
How a UDP packet works
Headers
First part of the packet — Ethernet II header
A packet to be sent through the Internet usually starts with an Ethernet II header. This header consists of three main parts: the destination hardware address, the source hardware address, and the type. The most important thing here is the destination hardware address because it determines the first place the packet is sent after being created. In this article, I set the destination hardware address to that of my «Default Gateway». A default gateway is a modem/router/computer that connects a network to the Internet or another network. If you use this code in a network with more than one LAN, you will have to determine what default gateway address to use with GetIpNetTable and your own addresses. The «type» part of the Ethernet II header specifies what kind of packet is being used. In this case, «0x0800» is used to specify IPv4.

(An image showing the individual bytes we will have to fill in later. The packet was made using the example application and captured using Wireshark.)
Second part of the packet — IP header
The IP header stores the IP addresses of the source and the destination as well as other important data. Information about the IP header can be found here. We will have to fill all of this in after we fill in the Ethernet code.
Third part of the packet — UDP header
UDP is used by many applications, and so there has to be a way for an application to know which information is meant for it. Where an IP and MAC address are used to determine what computer the information is meant for, ports are used by UDP to determine what application the information is meant for. Information about UDP headers can be found here.
Checksums
The IP and UDP headers require a checksum to be calculated. This is probably the most annoying part of crafting UDP packets, but is fortunately pretty straightforward. In the IP header, the «Checksum is the 16-bit one’s complement of the one’s complement of the header».
In the UDP header, the Checksum is the 16-bit one’s complement of the one’s complement of the pseduoheader (described later).
Using the code
Choosing the correct device
The first thing we must code is a way to determine what device is to be used to send the packets. Most home computers today have a «loop-back interface» that is used to access the computer itself with «localhost». This device cannot be used for sending packets to remote servers, and so you must make sure to use another one. In the sample project, I use the «ShowDeviceList()» function in the «NetworkStuff.h» file to show a list of network devices installed on the computer, using WinPCap.
void ShowDeviceList(void)
{
        char Error[PCAP_ERRBUF_SIZE];
    pcap_if_t* Devices;pcap_findalldevs_ex(PCAP_SRC_IF_STRING,NULL,
                                           &Devices,Error);
    int i = 1;
    for(pcap_if_t* CurrentDevice = Devices;CurrentDevice != NULL;
        CurrentDevice = CurrentDevice->next)
    {
        cout<<i << ". "<<  CurrentDevice->description << endl;
        i++;
    }
}
The function first creates an error buffer for use by the pcap_findalldevs_Ex function. Remember that this buffer is not optional, and will result in a program crash if set to null. The pcap_findalldevs_ex function sets a «pcap_if_t» pointer at the beginning of a linked list of network devices. A loop is then executed to show the description of each device. (If you do not have an understanding of linked lists, I suggest you read this.)
Next, the user enters the number of his selection, and the program loops that number of times and sets the global «CurrentDevice» to the appropriate pcap_if_t* device.
cout << "Enter the number of your device (example: 2)" << endl;
ShowDeviceList();
int chosen;
cin >> chosen;

int i = 1;char Error[PCAP_ERRBUF_SIZE];
pcap_findalldevs_ex(PCAP_SRC_IF_STRING,NULL,&ChosenDevice,Error);

for(pcap_if_t* CurrentDevice = ChosenDevice;
    CurrentDevice != NULL;
    CurrentDevice = CurrentDevice->next)
{
    if(i == chosen)
    {
        ChosenDevice = CurrentDevice;
        break;
    }
    i++;
}
ChosenDevice should now be set to the device chosen by the user.
Getting the required device information
Now, we must find the required information about the chosen device. This is the MAC address of the device’s default gateway, and in the case that the user wants to use real information, it is also the device’s MAC and IP addresses. In the sample application, I created a structure called «DeviceInfo» to store this information, and the function «GetAdapterInfo()» to fill it in. The GetAdapterInfo() function uses the IP Helper API by Microsoft to greatly simplify getting device information. (Previously, I believe you had to use Windows Drivers to read NIC data.)
DeviceInfo GetAdapterInfo(pcap_if_t* Device)
{
    DeviceInfo DevInfo;
    ZeroMemory(&DevInfo,sizeof(DevInfo));

    IP_ADAPTER_INFO* AdapterInfo = new IP_ADAPTER_INFO [48];
    ULONG AIS = sizeof(IP_ADAPTER_INFO) * 48;
    GetAdaptersInfo(AdapterInfo,&AIS);     for(IP_ADAPTER_INFO* Current = AdapterInfo;Current != NULL;
        Current = Current->Next)
    {
        if(strstr(Device->name,Current->AdapterName)!=0)

        {
            DevInfo.DefaultGateway = inet_addr(Current->GatewayList.IpAddress.String);
                              DevInfo.IP = inet_addr(Current->IpAddressList.IpAddress.String);
                           memcpy((void*)DevInfo.PhysicalAddress,(void*)(Current->Address),6);
            ULONG MACSize = 6;
            if(SendARP(DevInfo.DefaultGateway,NULL,
                      (void*)DevInfo.GatewayPhysicalAddress,&MACSize)
                !=NO_ERROR){cout << "SendARP Failed. No default gateway\n"; }
                                        DevInfo.Exists = true;
            return DevInfo;
        }
    }
    DevInfo.Exists = false;
    return DevInfo;
}
We are now able to get the information of the pcap_if_t* device chosen earlier into a DeviceInfo structure for use in packets. Note that if you choose a loop-back interface, the DeviceInfo.Exists member will be set to false for error checking. (GetAdaptersInfo() does not get loopback interfaces, and so the if() condition will never be satisfied.)
Input
Next, we can get input for use in the RawPacket class. It is easier if all the input is in a char buffer and is then converted to a data type supported by the class.
DeviceInfo di;
di = GetAdapterInfo(ChosenDevice);
if(di.Exists == false)
{
    cout << "Invalid Selection (Try another device)\n";
    return 0;
}

cout << "You chose: " << ChosenDevice->name << endl;

char SourceIP[16];
char SourcePort[6];
char SourceMAC[19];

char DestinationIP[16];
char DestinationPort[6];

char DataString[2048];

cout << "Enter source IP (or -1 for real)\n";
cin >> SourceIP;
cout << "Enter source port (0-65535)\n";
cin >> SourcePort;
cout << "Enter source MAC (or -1 for real) \n";
cin >> SourceMAC;
cout << "Enter destination IP\n";
cin >> DestinationIP;
cout << "Enter destination port(0-65535)\n";
cin >> DestinationPort;
cout << "Enter data string\n";
cin >> DataString;
The way you handle input is, of course, dependent on your needs. Just remember that if you want to have an option to use real device data (real MAC or IP), it is stored in the DeviceInfo structure for ease of access.
The RawPacket class and how it works
The following code is executed in the sample application if neither the source MAC or the source IP were -1:
RawPacket RP;

RP.CreatePacket(MACStringToBytes(SourceMAC),
        di.GatewayPhysicalAddress,
        inet_addr(SourceIP),
        inet_addr(DestinationIP),
        atoi(SourcePort),
        atoi(DestinationPort),
        (UCHAR*)DataString,
        strlen(DataString));

    RP.SendPacket(ChosenDevice);
The usage of RawPacket.CreatePacket and RawPacket.SendPacket should be pretty straightforward. Just know that the inet_addr() function converts a string containing a decimal dot IP address to a 4 byte integer, and atoi converts a string representation of a number to an integer. DataString is the data carried at the end of the packet that is separate from the headers. The last argument is the length of DataString in bytes. MACStringToBytes converts a MAC address in the format of (xx:xx:xx:xx:xx:xx) (each xx represents a 2 digit hexadecimal number) to a 6 byte array. Its definition follows:
unsigned char* MACStringToBytes(LPSTR String)
{
    char* Tmp = new char[strlen(String)];
    memcpy((void*)Tmp,(void*)String,strlen(String));
        unsigned char* Returned = new unsigned char[6];
    for(int i = 0;i<6;i++)
    {
        sscanf(Tmp,"%2X",&Returned[i]);         memmove((void*)(Tmp),(void*)(Tmp+3),19-i*3);    }
    return Returned;
}
Inside the class
Now, here is the first function we call from RawPacket. This function basically creates a buffer big enough to hold the data plus the headers of the packet, and then appends the data to the buffer. Note that most of the hard coded values here can be changed depending on your needs. Also, you should know what the «Length» in each header means. In the IP header, it means the length of the IP header itself plus the length of the UDP header plus the length of the data at the end. In the UDP header, it means the length of the UDP header plus the length of the end data. Usually, IP headers are 20 bytes, and UDP headers are 8 bytes. Remember to put shorts and ints into network byte order using htons() or htonl() before copying them to the packet.
void RawPacket::CreatePacket
                     (unsigned char* SourceMAC,
                      unsigned char* DestinationMAC,
                      unsigned int   SourceIP,
                      unsigned int   DestIP,
                      unsigned short SourcePort,
                      unsigned short DestinationPort,
                      unsigned char* UserData,
                      unsigned int   UserDataLen)
{
    RawPacket::UserDataLen = UserDataLen;
        FinalPacket = new unsigned char [UserDataLen + 42];
        USHORT TotalLen = UserDataLen + 20 + 8;

        memcpy((void*)FinalPacket,(void*)DestinationMAC,6);    memcpy((void*)(FinalPacket+6),(void*)SourceMAC,6);     USHORT TmpType = 8;                                       memcpy((void*)(FinalPacket+12),(void*)&TmpType,2);
        memcpy((void*)(FinalPacket+14),(void*)"\x45",1);

        memcpy((void*)(FinalPacket+15),(void*)"\x00",1);
    TmpType = htons(TotalLen);
    memcpy((void*)(FinalPacket+16),(void*)&TmpType,2);
    TmpType = htons(0x1337);
    memcpy((void*)(FinalPacket+18),(void*)&TmpType,2);

        memcpy((void*)(FinalPacket+20),(void*)"\x00",1);
        memcpy((void*)(FinalPacket+21),(void*)"\x00",1);
        memcpy((void*)(FinalPacket+22),(void*)"\x80",1);
        memcpy((void*)(FinalPacket+23),(void*)"\x11",1);
    memcpy((void*)(FinalPacket+24),(void*)"\x00\x00",2);

        memcpy((void*)(FinalPacket+26),(void*)&SourceIP,4);
        memcpy((void*)(FinalPacket+30),(void*)&DestIP,4);
        TmpType = htons(SourcePort);
    memcpy((void*)(FinalPacket+34),(void*)&TmpType,2);
    TmpType = htons(DestinationPort);
    memcpy((void*)(FinalPacket+36),(void*)&TmpType,2);
    USHORT UDPTotalLen = htons(UserDataLen + 8);         memcpy((void*)(FinalPacket+38),(void*)&UDPTotalLen,2);
    /Finally append our own data
    memcpy((void*)(FinalPacket+42),(void*)UserData,UserDataLen);

    unsigned short UDPChecksum = CalculateUDPChecksum(UserData,
        UserDataLen,SourceIP,DestIP,htons(SourcePort),
        htons(DestinationPort),0x11);
    memcpy((void*)(FinalPacket+40),(void*)&UDPChecksum,2);

    unsigned short IPChecksum = htons(CalculateIPChecksum();
    memcpy((void*)(FinalPacket+24),(void*)&IPChecksum,2);

    return;
}
Checksums
Now, for the checksum functions. These are CalculateUDPChecksum and CalculateIPChecksum. I will go over the latter first.
unsigned short RawPacket::CalculateIPChecksum(void)
{
    unsigned short CheckSum = 0;
    for(int i = 14;i<34;i+=2)
    {
        unsigned short Tmp = BytesTo16(FinalPacket[i],FinalPacket[i+1]);
        unsigned short Difference = 65535 - CheckSum;
        CheckSum += Tmp;
        if(Tmp > Difference){CheckSum += 1;}
    }
    CheckSum = ~CheckSum;
    return htons(CheckSum);
}
The cool thing about calculating the IP checksum is that we don’t need items that are spread across the packet. The IP checksum is based only on the 20 bytes of the entire IP header. Since the IP header in our packet starts at the 15th byte, we set i to 14 (arrays start at zero) and stop at 14+20 (34). The checksum for the IP header is based on the 16 bit complement of the 16 bit one’s complement sum. This means that we must join every two bytes into one, then add it to the checksum, and if the addition causes the checksum total to go over 65535 (the maximum an unsigned short can hold), we add one to the checksum. In the function, BytesTo16() joins the two bytes and puts the result in Tmp, and then Difference holds the highest number Tmp can be without causing CheckSum to go over 65535. At the end of every loop, a check is made to see if Tmp is higher than Difference, and one is added accordingly. At the very end of the function, the ~ operator is used to get the One’s Complement of CheckSum. (The one’s complement of the one’s complement sum).
Here is the BytesTo16 function used to join two chars into a short:
unsigned short BytesTo16(unsigned char X,unsigned char Y)
{
     unsigned short Tmp = X;
     Tmp = Tmp << 8;
     Tmp = Tmp | Y;
     return Tmp;
}
The UDP checksum function is very similar to the IP checksum one, except that first a «pseduoheader» must be constructed. The pseudoheader is made up of the source IP, the destination IP, the source port, the destination port, the length (the length should be in the pseudoheader twice), the protocol, and the actual data. Note that if the length of the pseudoheader is an odd number, a zero should be added at the end for check sum purposes. Make sure that all things are in the network byte order because otherwise there will be problems.
unsigned short RawPacket::CalculateUDPChecksum(unsigned char* UserData,
                                               int UserDataLen,
                                               unsigned int SourceIP,
                                               unsigned int DestIP,
                                               unsigned short SourcePort,
                                               unsigned short DestinationPort,
                                               unsigned char Protocol)
{
    unsigned short CheckSum = 0;
    unsigned short PseudoLength = UserDataLen + 8 + 9;
    PseudoLength += PseudoLength % 2;
    unsigned short Length = UserDataLen + 8;
    unsigned char* PseudoHeader = new unsigned char [PseudoLength];
    for(int i = 0;i < PseudoLength;i++){PseudoHeader[i] = 0x00;}
    PseudoHeader[0] = Protocol;
    memcpy((void*)(PseudoHeader+1),(void*)(FinalPacket+26),8);
    Length = htons(Length);     memcpy((void*)(PseudoHeader+9),(void*)&Length,2);     memcpy((void*)(PseudoHeader+11),(void*)&Length,2);

    memcpy((void*)(PseudoHeader+13),(void*)(FinalPacket+34),2);    memcpy((void*)(PseudoHeader+15),(void*)(FinalPacket+36),2);
    memcpy((void*)(PseudoHeader+17),(void*)UserData,UserDataLen);


    for(int i = 0;i < PseudoLength;i+=2)
    {
        unsigned short Tmp = BytesTo16(PseudoHeader[i],PseudoHeader[i+1]);
        unsigned short Difference = 65535 - CheckSum;
        CheckSum += Tmp;
        if(Tmp > Difference){CheckSum += 1;}
    }
    CheckSum = ~CheckSum;     return CheckSum;
}
Woot, that’s about it. Just use these functions to place the UDP or IP checksum where they belong. Also, I am not yet sure why I need to do htons() on the IP checksum but not the UDP checksum.
Sending the information
The next function to look at is RawPacket.SendPacket(pcap_if_t* Device). This is where WinPCap sends the packets. Fortunately for us, this function is very simple.
void RawPacket::SendPacket(pcap_if_t* Device)
{
    char Error[256];
    pcap_t* t;
    t = pcap_open(Device->name,65535,PCAP_OPENFLAG_DATATX_UDP,1,NULL,Error);
    pcap_sendpacket(t,FinalPacket,UserDataLen + 42);
    pcap_close(t);
}
pcap_sendpacket sends packets, but first, we must get a pcap_t* for its first parameter. Since we already have the ChosenDevice variable, we can just pass its device->name to pcap_open so that pcap_t* t contains a handle to the device we want. pcap_open is described here. pcap_sendpacket just takes a pcap_t* variable, the data to send in an unsigned char buffer, and the length of the data. The length here is the length of the data plus 42 bytes of headers.
Improving the code
This class could use variables (instead of taking them all in one function), accessor functions, and perhaps some sort of division between headers.
Points of interest
I thought it was interesting that some ISPs don’t allow packets with spoofed source IPs or MAC addresses to be sent. I tried this myself, and could only send using my real IP and MAC (using spoofed values made the packets visible to me on Wireshark, but not at the target server), but my friend in Mexico was able to successfully send packets with both of these items being spoofed. (I was the server, and was able to see his packets coming from «11.33.33.77»). Just remember that if you are only using this in a local network, you should be able to use any IP or MAC address that exists in your LAN (192.168.1.0 — 192.168.1.100, for example). Another problem I had was knowing what the destination MAC was. At first, I thought it was the hardware address of the device at the destination IP. Then, I learned that it is actually just the hardware address of the next device to which the data should be sent. (For me, the default gateway.)
History
No changes yet.
|
|
Send UDP network messages on the command line with the free Swiss File Knife for Windows, Mac OS X and Linux. |
- Download the free Swiss File Knife Base from Sourceforge.
- Open the Windows CMD command line, Mac OS X Terminal or Linux shell.
- OS X : type
mv sfk-mac-64.exe sfkandchmod +x sfkthen./sfk - Linux: type
mv sfk-linux-64.exe sfkandchmod +x sfkthen./sfk.
OS X and Linux syntax may differ, check the help within the tool.
sfk udpsend host[:| ]port [options] [data] [data2] [...]

send an UDP message and optionally receive replies.
maximum message size is 2000 bytes. your network may
limit this further, e.g. to 1500 or 1000 bytes.

options
   -listen        wait for a single reply, and dump it.
   -listen=n      wait for so many replies and dump them.
   -listenall     receive endless.
   -replyport=n   specify replyport for listening.
   -timeout=n     wait up to n msec for replies.
   -wide, -lean   etc. change hex dump output format.
                  for details, type "sfk hexdump"
   -flat          print messages as plain text.
   -showip        show target ip in [sent ...] info.
   -broad         send broadcast. this option is normally
                  used with address 255.255.255.255

input data format:
   0x123456       a hex string which is converted to binary
   foo            any other plain text is sent as is, but
                  zero termination is NOT done automatically.

   all given data fragments are joined into one large block.
   how long the block can be is system dependent, but it must
   always stay below 2000 bytes.

multicast send
   if a multicast group address is given, like
      sfk udpsend 224.0.0.123 5000 testtext
   then udpsend tries to send a multicast message.
   this may or may not work depending on the OS, network
   interface, router and firewall settings, user rights and
   other programs running in parallel.

chaining support
   small chain input data can be sent.
   to send continuous text over 1k do not use udpsend
   but tonetlog. type "sfk netlog" for more.

aliases
   sfk udp   like udpsend, but does not use chain input.
   sfk cudp  call udp quickly without any output,
             same as sfk udp -quiet.

return code
   0   ok
   >0  send failed, or no -listen reply

web reference
   http://stahlworks.com/sfk-udpsend

examples
   sfk udpsend localhost 5000 hello 0x00
      send "hello" followed by a zero byte to localhost
      on port 5000

   sfk udpsend 127.0.0.1:5000 -listen -replyport 5010 test
      send "test" to localhost on port 5000
      and then receive a single reply on port 5010.

   sfk echo foo +udpsend localhost:5000
      sends "foo" with (CR)LF to localhost port 5000.

   sfk echo foo +xed "/[eol]//" +udpsend localhost:5000
      the same but strips (CR)LF line ending.
      use "sfk udpdump 5000 -text" to receive.
sfk udpsend host[:| ]port [options] [data] [data2] [...] send an UDP message and optionally receive replies. maximum message size is 2000 bytes. your network may limit this further, e.g. to 1500 or 1000 bytes. options -listen wait for a single reply, and dump it. -listen=n wait for so many replies and dump them. -listenall receive endless. -replyport=n specify replyport for listening. -timeout=n wait up to n msec for replies. -wide, -lean etc. change hex dump output format. for details, type "sfk hexdump" -flat print messages as plain text. -showip show target ip in [sent ...] info. -broad send broadcast. this option is normally used with address 255.255.255. 255 input data format: 0x123456 a hex string which is converted to binary foo any other plain text is sent as is, but zero termination is NOT done automatically. all given data fragments are joined into one large block. how long the block can be is system dependent, but it must always stay below 2000 bytes. multicast send if a multicast group address is given, like sfk udpsend 224.0.0.123 5000 testtext then udpsend tries to send a multicast message. this may or may not work depending on the OS, network interface, router and firewall settings, user rights and other programs running in parallel. chaining support small chain input data can be sent. to send continuous text over 1k do not use udpsend but tonetlog. type "sfk netlog" for more. aliases sfk udp like udpsend, but does not use chain input. sfk cudp call udp quickly without any output, same as sfk udp -quiet. return code 0 ok >0 send failed, or no -listen reply web reference http://stahlworks.com/sfk-udpsendexamples sfk udpsend localhost 5000 hello 0x00 send "hello" followed by a zero byte to localhost on port 5000 sfk udpsend 127.0.0.1:5000 -listen -replyport 5010 test send "test" to localhost on port 5000 and then receive a single reply on port 5010. sfk echo foo +udpsend localhost:5000 sends "foo" with (CR)LF to localhost port 5000. sfk echo foo +xed "/[eol]//" +udpsend localhost:5000 the same but strips (CR)LF line ending. use "sfk udpdump 5000 -text" to receive.

you are viewing this page in mobile portrait mode with a limited layout. turn your device right, use a desktop browser or buy the sfk e-book for improved reading.
sfk is a free open-source tool, running instantly without installation
efforts. no DLL’s, no registry changes — just get sfk.exe from the zip package and use it (binaries for windows, linux and mac are included).


the Endless Image 🍣 Sushi