Prerequisite – Introduction of MAC Address, and Difference between MAC Address and IP Address
A Media Access Control address is unique in nature which is doled out to a Network Interface Card to be utilized as a network address in communications within a network. In the Open Systems Interconnection network model, these addresses are utilized under the data link layer. Network nodes with multiple network interfaces, like routers and multi-layer switches, should have a single MAC address for every NIC. MAC addresses are regularly utilized for different purposes:
- Static IP Assignment: Routers permit you to allot static IP to your PCs.
- MAC Address Filtering: Networks can utilize this option, just permitting gadgets with explicit MAC address to have an interface with a system.
- MAC Authentication: Some Internet specialist co-ops may require validation with a MAC address and just permit a gadget with that MAC address to associate with the Internet.
- Device Identification: Many air terminal Wi-Fi systems and other open Wi-Fi systems utilize a gadget’s MAC address to recognize it.
- Device Tracking: Because they’re distinctive in nature, MAC can be utilized to follow you.
Note: Use the following steps for ethical purposes only.
EASY METHOD:
Step 1: Right-Click on the Windows Start button which is located on the bottom-left corner of your screen.
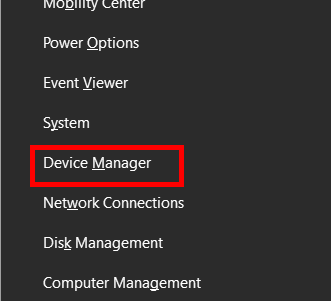
Step 2: Select the Device Manager option.
Now, foremost we are going to change the Ethernet(Wired Medium) adapter’s MAC address.
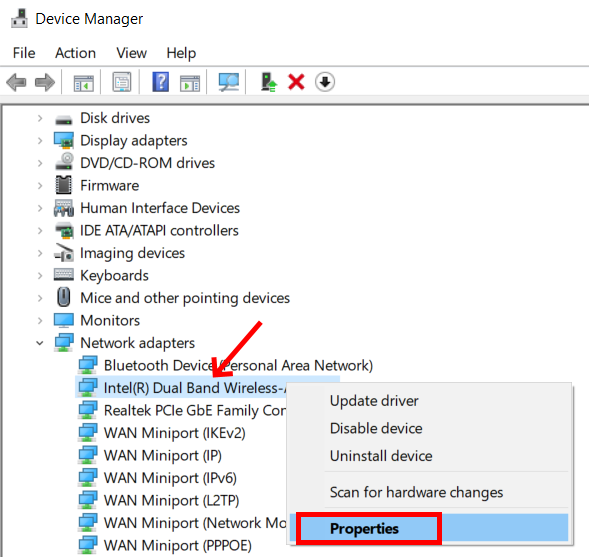
Step 3: Click on Network adapters.

Step 4: Right-Click the Network Adapter(in this case the Ethernet NIC which is ”Realtek PCIe Gbe Family Controller”) you want to change and then, select the Properties option.

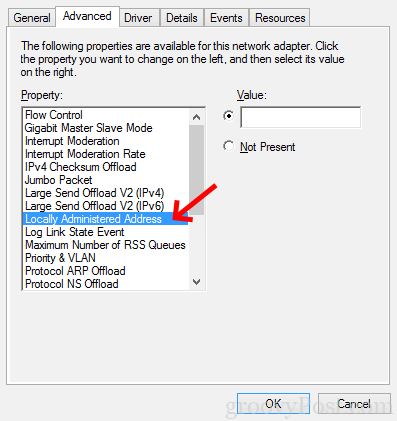
Step 5: Go through the Advanced Tab and then, select the Locally Administered Address(Network Address).

Step 6: Specify the new MAC address and then, Click OK. If the MAC address change fails try setting the second character to 2 or 6 or A or E(Make sure to enter exactly 12 digits in the empty field of value).

Step 7.0: Use a command prompt command to verify the MAC address change.
Step 7.1: Use the following command in order to verify that the MAC address has been changed or not:
getmac

Now, we can see that the desired NIC’s MAC Address has been changed.
TRICKY METHOD:
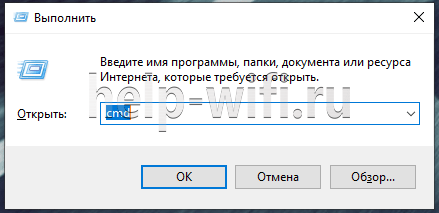
Step 1: Open a command prompt by typing ‘cmd’ in the search bar and clicking on open.
Step 2: Type in the following command in order to find the MAC address and transport name:
getmac

Step 3: Click Device Manager.
Now secondly, we are going to change the wireless medium network adapter’s MAC address.
Step 4: Right-click on Network adapters, and select Properties option.(Here, in this case, the NIC is “Intel(R) Wireless-AC 9560 160MHZ”.)

Step 5: Now, we can go to the Advanced Tab, and then we can change the MAC address as earlier.
But, here, in the case of this NIC, we don’t have any option of network address as in the earlier case, so we have to follow the Value Changing Process in the Registry of Windows 10.

This is the hard method and this uses the Windows Registry, so we have to be careful while making the required changes.
Step 1: Firstly, go to open a command prompt shell, and then type “getmac” in order to see the Transport Address as well as MAC Address.

Step 2: Now, in order to know what is the Wireless NIC’s MAC address, we can navigate to the Network & Internet Settings, and then right-click on the Wifi option, from there select the properties option which will show you the required details.

Step 3: Now, firstly click on the Start button and type “Registry Editor” and open it.

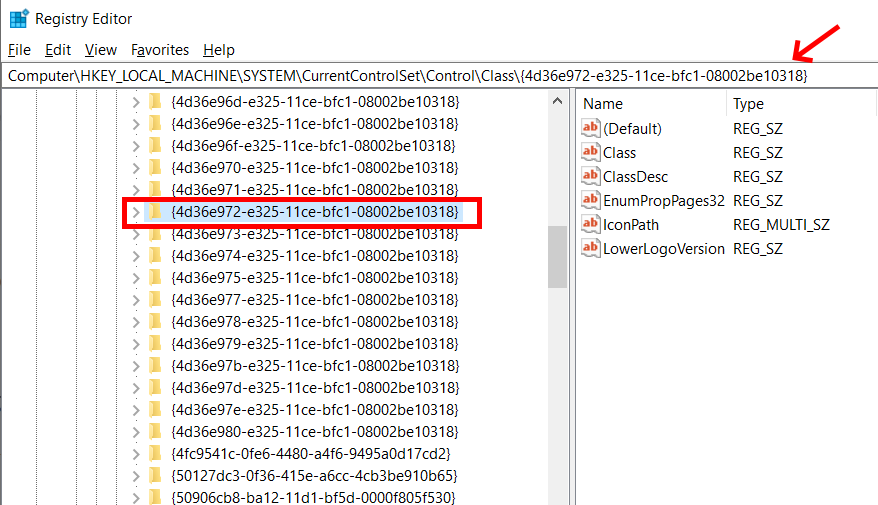
Step 4.0: Now, we have to navigate into a specific folder which is:
"HKEY_LOCAL_MACHINE/SYSTEM/ControlSet001/Control/Class/{4D36E972-E325-11CE-BFC1-08002BE10318}"
Step 4.1: Firstly, in order to get into the correct folder, we can easily direct to the Class directory and from there on we can follow the next steps:

Step 4.2: Right-click on the class folder and select the find option, and then copy the first part of the transport name which is mention in the Wireless Network MAC address row against the physical address.

Step 4.3: Now, paste the highlighted text into the empty search bar in a previously selected find option:

Step 4.4: Now, click on the “Find Next” button, and then you will be redirected to the required folder and the sub-directory automatically.

Step 4.5: Verify that the “NetCfgInstanceId” (this will be shown on the right-hand side on the window) is the same as the value shown in the “getmac” command.

Step 5: Now, Right-click on the white-space on the right-hand side of the window opened and choose to create a string value with the name NetworkAddress.


Step 6: Right Click on the NetworkAddress string created and then select the Modify option and then, specify your MAC address.
Note: If the MAC address change fails try setting the second character to 2 or 6 or A or E.

Step 7: Now, the MAC address has been changed so, in order to verify the changes we have to Wireless Network Adapter option in Control Panel and Disable it by right-clicking on it, then after few seconds we will double click on the same icon in order to re-enable the Wireless NIC.

Step 8: Right-click on the same icon in order to go to the properties for verifying the changed MAC Address.
Now, we can see that the Physical Address has been changed accordingly.
Step 9: Use the ‘getmac’ command to verify that the MAC address has changed.
Now, the MAC Address has been changed successfully!
Sources:
1.https://en.wikipedia.org/wiki/MAC_address
На чтение 5 мин Просмотров 26.4к.

Специалист техподдержки, PHP-программист, разработчик WordPress
Вопрос, как поменять МАК-адрес компьютера в Windows 10, совершенно незаслуженно забыт большинством современных пользователей. Никто не спорит: если человек установил роутер, он посмотрел MAC-адрес компьютера один раз, поменял его на маршрутизаторе и закрыл вопрос.
Это если связь с интернетом настроена через роутер (или другое устройство), а если нет? Если кабель от провайдера воткнут непосредственно в компьютер, то покупка более быстрой сетевой карты, замена компьютера или даже просто перенос кабеля в другое гнездо ведут к общению с поддержкой провайдера. Но зачем? Узнав МАК-адрес сетевой карты на старом компьютере, нужно сменить его на новом с Windows 10 и продолжать пользоваться. Общение с поддержкой в таком случае не понадобится.
Содержание
- Драйвер адаптера
- Системный реестр
- С помощью программы TMAC
- Как проверить заменённый MAC
Драйвер адаптера
Самый простой вариант изменить MAC-адрес компьютера с Windows 10 — прямо в сетевой карте.
Достоинства такого способа:
- не нужно специальных знаний о системном реестре — трогать его не придётся;
- не нужно искать никакие программы — все уже есть в самой ОС;
- быстрота — часто сразу же после изменения восстанавливается интернет на компьютере.
Настройка производится из «Диспетчера устройств», найти его можно в:
- альтернативном меню Windows 10;
- в классическом, начав набирать название в окне поиска в нижней части;
- через команду «Выполнить» вызываемую по Win+R.
Воспользуемся первым вариантом
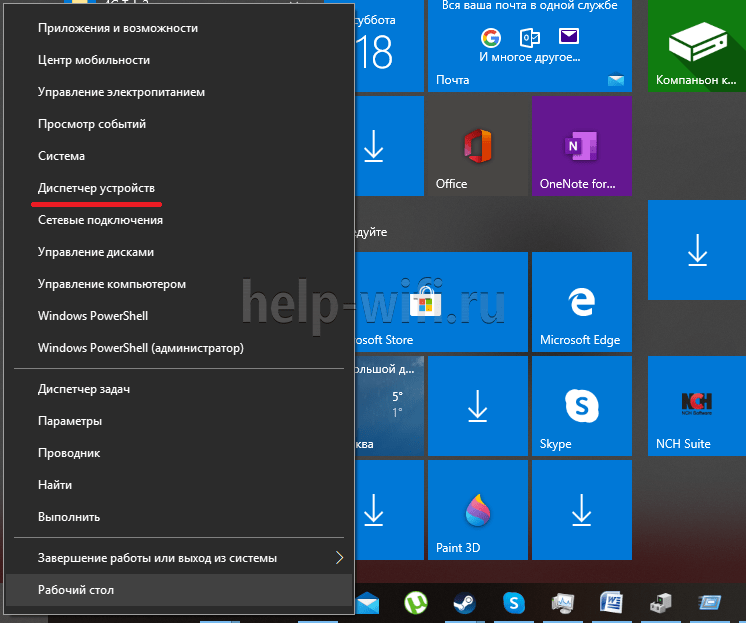
В открывшемся окне найдём раздел сетевые адаптеры, а в нём выберем нужный. Двойное нажатие на название откроет окно свойств.
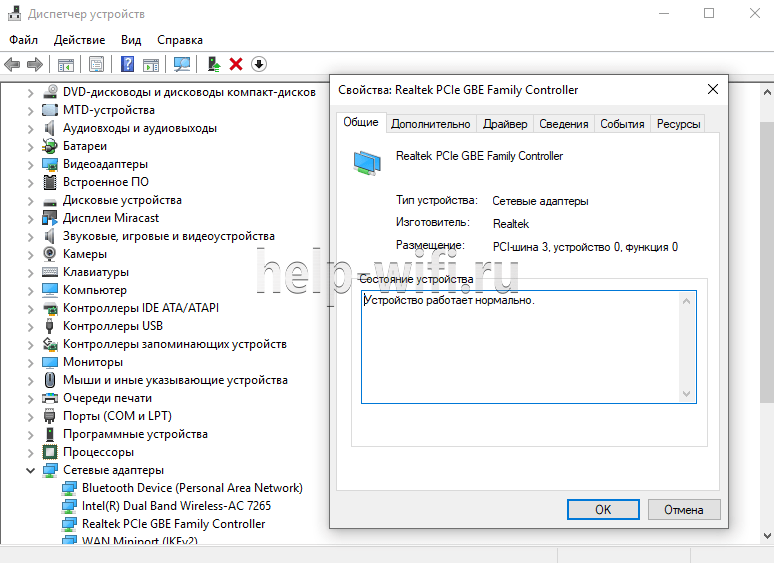
Открываем вкладку «Дополнительно» и в левой части окна ищем пункт вида network address, сетевой адрес, физический адрес или что-то подобное.

Выделим его курсором и в правой части появится поле для ввода нового адреса. Ввод подтверждаем нажатием «ОК». После этого карта показывает адрес, который прописан у провайдера. Рекомендуется перезагрузить компьютер.
Системный реестр
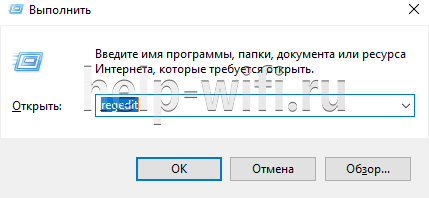
Чуть сложнее и дольше сменить адрес адаптера вариантом 2 — в системном реестре. Как и диспетчер устройств, открыть его можно несколькими способами. Например, введя команду «regedit» в окне, вызываемом по Win+R.
Откроется редактор реестра, в котором прописаны все параметры уставленной ОС. Работать надо внимательно и аккуратно. Сделать твик (так называют изменение реестра) нужно в ветке HKEY_LOCAL_MACHINE\SYSTEM\CurrentControlSet\Control\Class\{4D36E972-E325-11CE-BFC1-08002bE10318}.
Тут прописаны все устройства, которые нашла ОС при установке. Их реальные имена, адреса, драйвера и прочая информация. Комбинация цифр в конце отвечает за сетевые устройства в системе.
Думать о том, что у вас будут другие цифры и вы не найдёте нужного раздела, не стоит. Об этом подумали разработчики ОС.
Надо последовательно проверить папки 0000, 0001… 0003. Параметр «DriverDesc» укажет реальное название сетевой карты.

Найдя раздел нужной, переходим к параметру NetworkAddress.
Значение, указанное в нём, подменяет собой аппаратный адрес устройства. Иногда параметр отсутствует, но его можно создать. На запрос реестра о типе указать «строковый». Указывая его значение, изменяем МАС-адрес компьютера.

После этого нужно перезагрузить сетевой адаптер.
С помощью программы TMAC
Программ, позволяющих посмотреть и изменить МАС, существует немало. Большая действует через реестр, предоставляя красивую обёртку для описанного разделом выше способа.
Но у них есть и свои достоинства:
- простота;
- понятность;
- нельзя изменить ничего лишнего, тем самый нарушив работоспособность виндовс.
Утилиту Technitium MAC Address Changer (сокращённо TMAC) скачиваем с официального сайта разработчика https://technitium.com/tmac/.
Программа позволяет менять, сохранять, восстанавливать, генерировать случайные адреса. Не требует перезапуска сети для применения изменений. При запуске отображает все карты компьютера с действующими адресами. Дополнительный плюс — большая, постоянно обновляемая база данных производителей сетевых карт и аппаратных адресов, используемых ими.
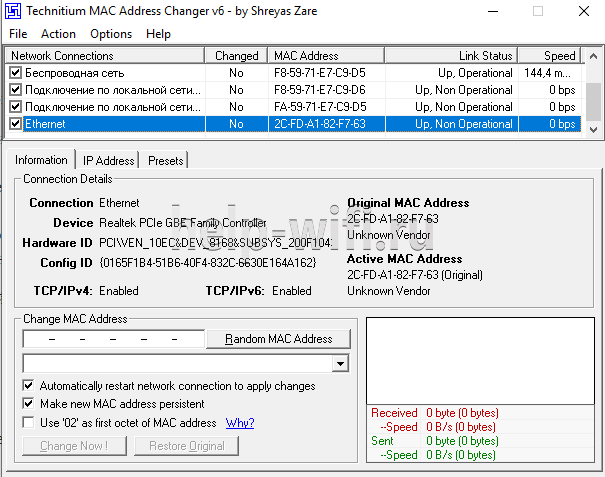
Сменить МАК-адрес компьютера с Windows 10 с помощью программы можно в несколько щелчков.
- Выбрать в списке нужную карту — в нижней части появится подробная информация о действующем и реальном адресах, менялся ли действующий и предполагаемый производитель обоих устройств.
- В левом нижнем углу в блоке «Change MAC Address» ввести 10 символов нового адреса.
- Нажать кнопку справа от поля.
- Если не менять настроек ниже, адрес изменится, а программа перезапустит сетевое соединение для применения изменений.
- При желании восстановить предыдущие значения нужно нажать «Restore Original».
На вкладке «IP Address» предусмотрена возможность настройки параметров IP соединения (адрес, маска, DNS).
Как проверить заменённый MAC
Узнать MAK-адрес компьютера c Windows 10 можно несколькими способами. Разберем один из простых методов через командную строку.
- Для начала открываем командную строку.
- Комбинацией клавиш Win+R запускаем приложение «Выполнить» в котором прописываем команду «cmd».

- В командной строке прописываем команду «getmac /v /fo list» или «ipconfig/all».


Каждая команда предоставит полную информацию о всех сетевых соединениях, их адресах и параметрах подключения.
MAC Address or Media Access Control Address is a unique address or code assigned to a device capable of communicating within a network. MAC addresses can be found on any device that uses communication technologies such as WiFi, Ethernet, or Bluetooth. These addresses are physical identifiers that come inscribed in hardware right from the time they are manufactured. For each of these communicating technologies installed on your PC, the Media Access Control addresses are different.
If you want to change the Wi-Fi MAC Address on your Windows 10 PC, we shall discuss how to, but first, get to know more about the MAC address a bit more.
Table of Contents
MAC addresses can be used to identify devices connected to a network. The device can be tracked, allowed access, or restricted on the network based on these addresses. There are various reasons one would feel the need to change the MAC address, but the most common one is spoofing the network to bypass a local MAC address.
Is it possible to Change MAC Address in Windows 10?
Although MAC addresses are supposed to be permanent but dynamic, it is possible to change a device’s MAC address. You can change the MAC address on your PC, including the WiFi MAC address.
Methods to Change MAC Address in Windows 10?
In the section below, we look at the methods you can use to change your PC’s Wi-Fi MAC address.
1 – Change the MAC Address in Device Manager
The best and the simplest way to change the WiFi MAC address in Windows 10 PC is through the Device Manager. Let us take a look at the steps involved in this process.
Step 1: Press Windows + X keys on your keyboard together. Locate the Device Manager option in the menu that will open. This will launch the Device Manager window.
Step 2: Now, in the Device Manager window, click on the Network adapter option. This will expand the list of network adapter drivers. As you want to change the WiFi MAC address, make a right-click on the Wireless driver. A context menu will open up. Here, select the Properties option.
Step 3: In the Properties window that will open, go to the Advanced tab. Here, go to the Property section and look for the Locally Administered Address option; select it. Now, on the same window on the right, you will see a Value window; click on it. In this section, you will need to enter a Hexadecimal value of 12 characters. It could be a random Hexadecimal value. If you want, you can get one from here: Random MAC Address Generator. This website, just like the name says, generates random MAC addresses that you can use. Just make sure to enter only the characters and not the separators(:).
After entering a value, click Ok.
Step 4: To make the new MAC address in use, close down the Device Manager window, then restart your computer.
The new address would not be applied unless the restart takes place.
Making sure that the MAC address is changed
Once the PC restarts, you will have to make sure that the MAC address has changed. How to do that? Follow the steps:
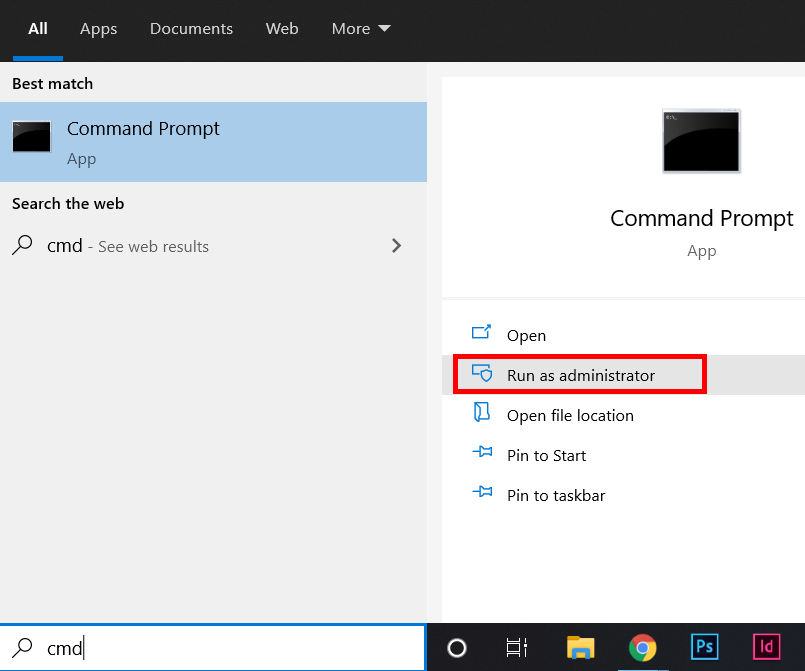
Press the Windows key + S to open the Start search menu. Here, type cmd. From the search result’s right pane, double click on the Run as administrator option.
This will run the CMD application in administrator mode. In the CMD window, type the following command and press the Enter button:
ipconfig/all
Here, you will be able to see a list of information. Look for the Physical Address section. Here, you will be able to see the new MAC address.
Whether you choose to change your MAC address, you can use this command to view the changed MAC address of the network adapter.
2 – Change the MAC Address in Control Panel
You can also choose to change your MAC address for the WiFi network adapter through the Network and Sharing Center in Contol Panel. Check out the steps provided below:
Step 1: Open Control Panel on your PC. For this, press the Start button and type Control. You will see the Control panel in the search results; click on it.
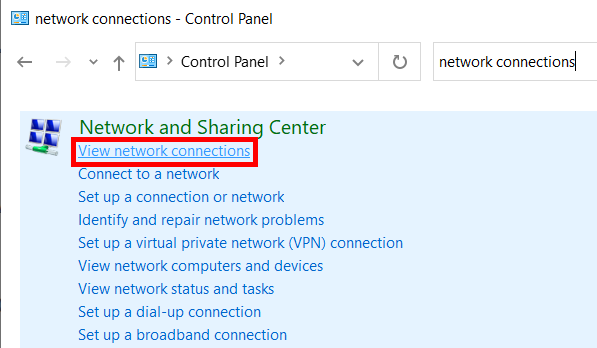
Step 2: In the Control Panel search bar, type network connections. From the Control Panel window results, you will find many options under the Network and Sharing Center section. From these results, select the View network connections option.
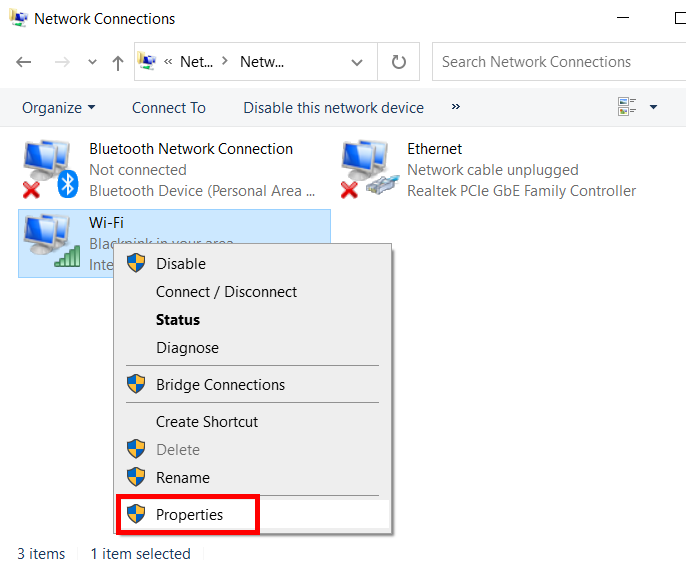
Step 3: You will now be able to view the network connections available on your PC. Identify the Wireless connection, make a right-click on it, then select the Properties option.
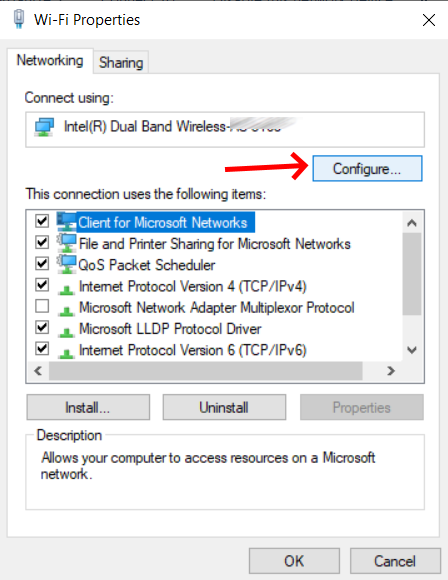
Step 4: The Wireless adapter properties window will open. Here, click on the Configure option.
Step 5: A new window will open, something similar to where we changed the final solution’s MAC address. Go to the Advanced tab and repeat the same process mentioned in Step 3 of the previous answer.
After changing the MAC address successfully, do not forget to restart your PC to apply the changes. Now, open Command Prompt with admin privileges and run the ipconfig/all command to ensure the changes.
3 – Use Registry Editor to Change MAC Address
Registry Editor can also be used to change the MAC address on your PC. Although the process is a bit lengthy, it is pretty straightforward to follow. All you need to do is carry out the steps provided below as given.
Also, make sure to make the changes very carefully, as a misstep in the Registry Editor could render your PC useless. Here are the steps:

Step 1: Press the Start button in the Start search menu, type registry editor. In the search result, go to the right panel and click on the Run as administrator option. This will launch the Registry Editor with administrator privileges, enabling you to change your MAC address of Windows 10.
Step 2: Go to the left pane of the Registry Editor and navigate to the following location:
Computer\HKEY_LOCAL_MACHINE\SYSTEM\CurrentControlSet\Control\Class\{4d36e972-e325-11ce-bfc1-08002be10318}
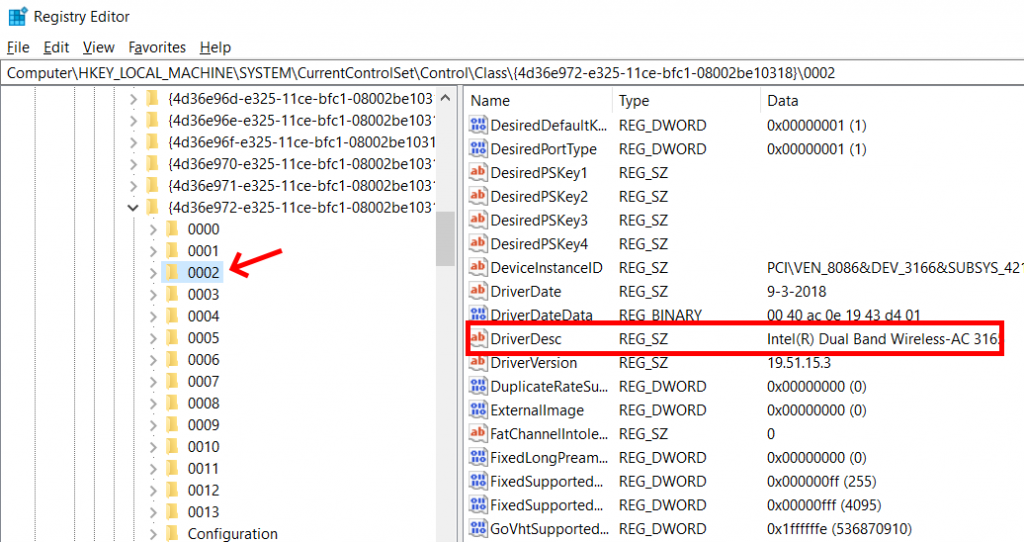
Step 3: Click on the 4d36e972-e325-11ce-bfc1-08002be10318 directory to expand its list. Now, click on each of the sub-directories, like 0000, 0001, etc. After selecting each of these, go to the right panel and look for the DriveDesc entry. This will tell you if the device that you have selected is WiFi (wireless).
Step 4: After identifying the wireless sub-directory, make a right-click to New and select the String Value option.
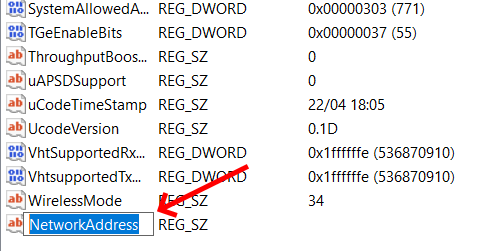
Step 5: On the right pane of the Registry Editor, a new entry will appear; name it NetworkAddress.
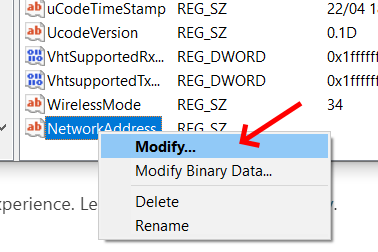
Step 6: Make a right-click on the NetworkAddress entry and select the Modify option from the context menu.

Step 7: An Edit String window will open up. Here, in the Value data field, enter a 16 character MAC address. You can make use of the MAC address generator that I mentioned earlier in Method 1. Click Ok after entering the value.
After making the change, restart your PC to apply the difference to your MAC address.
4 – Change MAC Address through Command Prompt
You can also make use of the Command Prompt to change your MAC address on the PC. For this, you will need to launch Command Prompt in Admin mode. Also, it is recommended to change the MAC address in the CMD window after you have followed the steps provided in the Registry Editor process. This is because you will need some information from the registry editor. To be precise, you will require the sub-directory name under the 4d36e972-e325-11ce-bfc1-08002be10318 associated with the WiFi adapter. In the last process, the sub-directory was 0002. Thus we will be using the same. You can replace it according to your PC’s configuration. Here are the steps:
Step 1: Open Command Prompt with Admin privileges. For this, press Windows key + S at a time. The start search panel will open up. Here, type cmd. In the search result, select the Run as administrator option. Alternatively, you can also use PowerShell for the same. To launch Powershell, type Powershell in the search bar. From the search result, select the run as administrator option.
Step 2: In the CMD / PowerShell window, type the following command:
reg add HKEY_LOCAL_MACHINESYSTEMCurrentControlSetControlClass{4D36E972-E325-11CE-BFC1-08002BE10318}_0002 /v NetworkAddress /d 012df566e30a /f
In the above command, make sure to replace the 0002 with the wireless directory according to your Registry Editor and 012df566e30a with the new MAC address you want to set.
It was once done; press Enter button after typing in the command. After the command has been executed, go ahead and close Command Prompt window. Also, restart your PC once.
Note: You can use the above process if you need to change your Wi-Fi MAC address in Windows 10 frequently.
Recommended for You:
How to Enable 5ghz WiFi on Windows 10
How to Enable WiFi in Windows 10
Solved: DHCP is Not Enabled For WiFi in Windows 10
Mac Flooding: How Does it Work?
 Вчера написал о том, как узнать MAC-адрес компьютера, а сегодня речь пойдет о его смене. Зачем может понадобиться его поменять? Самая вероятная причина — если ваш провайдер использует привязку по этому адресу, а вы, скажем, купили новый компьютер или ноутбук.
Пару раз встречал споры на тему того, что MAC-адрес изменить нельзя, ведь это аппаратная характеристика, а потому поясню: на самом деле, «зашитый» в сетевой карте MAC-адрес вы, действительно, не измените (это возможно, но требует дополнительного оборудования — программатора), но это и не нужно: для большей части сетевого оборудования потребительского сегмента, MAC-адрес, заданный на программном уровне, драйвером, имеет приоритет над аппаратным, что и делает описанные ниже манипуляции возможными и полезными.
Изменение MAC-адреса в Windows с помощью диспетчера устройств
Примечание: первые две цифры задаваемого MAC-адреса не нужно начинать с 0, а заканчивать следует 2, 6, A или E. В противном случае, на некоторых сетевых картах смена может не сработать.
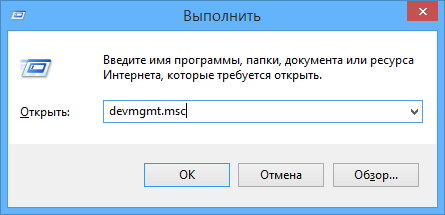
Для начала, запустите диспетчер устройств Windows 7 или Windows 8 (8.1). Быстрый способ сделать это — нажать клавиши Win+R на клавиатуре и ввести devmgmt.msc, после чего нажать клавишу Enter.
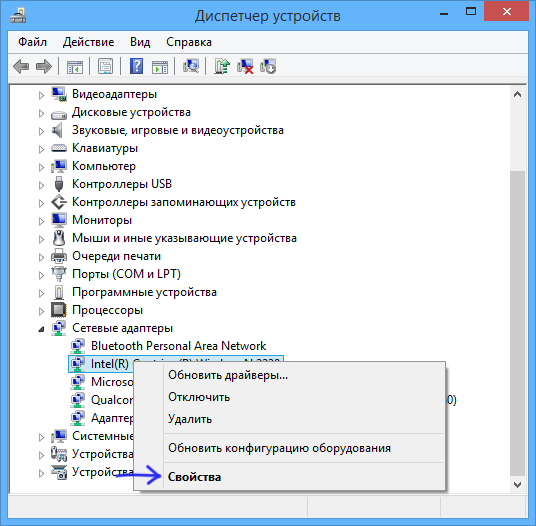
В диспетчере устройств откройте раздел «Сетевые адаптеры», кликните правой кнопкой мыши по сетевой карте или Wi-Fi адаптеру, MAC-адрес которого нужно изменить и нажмите «Свойства».
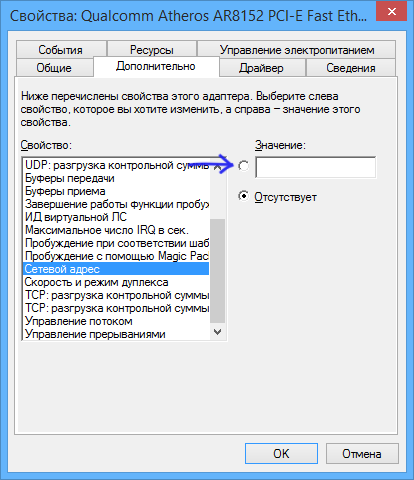
В окне свойств адаптера выберите вкладку «Дополнительно» и найдите пункт «Сетевой адрес», и установите его значение. Чтобы изменения вступили в силу, нужно либо перезагрузить компьютер, либо отключить и включить сетевой адаптер. MAC-адрес состоит из 12 цифр 16-ричной системы и задавать его нужно, не используя двоеточия и другие знаки препинания.
Примечание: не для всех устройств можно проделать вышеописанное, для некоторых из них пункта «Сетевой адрес» не будет на вкладке «Дополнительно». В этом случае, следует воспользоваться другими способами. Для проверки, вступили ли изменения в силу, можно использовать команду ipconfig /all (подробнее в статье про то, как узнать MAC-адрес).
Изменение MAC-адреса в редакторе реестра
Если предыдущий вариант вам не помог, то можно воспользоваться редактором реестра, способ должен работать в Windows 7, 8 и XP. Для запуска редактора реестра нажмите клавиши Win+R и введите regedit.
В редакторе реестра откройте раздел HKEY_LOCAL_MACHINE\SYSTEM\CurrentControlSet\Control\Class\{4D36E972-E325-11CE-BFC1-08002BE10318}

В этом разделе будет содержаться несколько «папок», каждая из которых соответствует отдельному сетевому устройству. Найдите то из них, MAC-адрес которого нужно изменить. Для этого обращайте внимание на параметр DriverDesc в правой части редактора реестра.
После того, как вы нашли нужный раздел, кликните правой кнопкой мыши по нему (в моем случае — по 0000) и выберите — «Создать» — «Строковый параметр». Назовите его NetworkAddress.

Дважды кликните по новому параметру реестра и задайте новый MAC-адрес из 12 цифр шестнадцатеричной системы счисления, не используя двоеточий.
Закройте редактор реестра и перезагрузите компьютер для того, чтобы изменения вступили в силу.
Бывает много разных случаев, когда нужно узнать MAC-адрес компьютера, или изменить его. В этой статье я покажу, где в Windows 10 найти и посмотреть MAC-адрес, и как его сменить. Весь процесс практически не отличается от Windows 8, и даже Windows 7.
В основном, узнавать MAC-адрес нужно при настройке интернета. Если у вас провайдер делает привязку по MAC-адресу, и вы например купили новый компьютер на Windows 10, или решили настроить интернет на другом компьютере, то нужно будет сообщить новый MAC-адрес интернет-провайдеру, что бы он прописал его в настройках. Или самому прописать в личном кабинете, если есть такая возможность. MAC-адрес может понадобится при настройке какой-то функции на Wi-Fi роутере. По этому адресу можно определить нужный компьютер, и задать параметры.
MAC-адрес – это уникальный адрес, который имеет каждый сетевой адаптер. Сетевая карта, или беспроводной адаптер. В нашем случае, мы говорим о MAC-адресе сетевой карты. Его можно изменять, в отличии от Wi-Fi адаптера, MAC которого сменить не так просто.
Узнаем и меняем MAC-адрес сетевой карты в Windows 10
Есть много способов, которыми можно узнать MAC-адрес на компьютере с Windows 10. Я покажу один из них.
Нажмите на значок интернет соединения правой кнопкой мыши и откройте Центр управления сетями и общим доступом.

Дальше, слева нажмите на пункт меню Изменение параметров адаптера. Нажмите правой кнопкой мыши на адаптер Ethernet и выберите Свойства. Дальше, просто наведите курсор на название вашей сетевой карты в поле «Подключение через», и в всплывающем окне вы увидите MAC-адрес вашей сетевой карты.

Как сменить MAC-адрес?
В этом же окне нажмите на кнопку Настроить.

В новом окне перейдите на вкладку Дополнительно. Выберите в списке пункт Network address, установите метку возле поля, и задайте нужный MAC-адрес. Нажмите Ok для сохранения.

Вот и все, мы только что сменили сетевой адрес, нашей сетевой карты.
Надеюсь, статья получилась полезной.