Режим загрузки Windows: как сменить Legacy на UEFI?
Можно ли в Windows сменить Legacy на UEFI без потери данных? С момента появления возможности простым смертным приобрести в пользование хранилища 2 Тб и выше, производители материнских плат стали добавлять поддержку UEFI в ПО своего «железа». Плюс ко всему это и улучшенная производительность, и дополнительные утилиты диагностики… Даже если самой системы на диске ещё нет. Сама UEFI поддерживается только 64-х битными версиями Windows поколений W7|8|10. И даже, будь обладателем Windows 10 версии 1607 (не знаю, зачем на ней сидеть до этого момента), вы бы не смогли воспользоваться преимуществами UEFI без переустановки системы. Всё потому, что UEFI применяет пресловутую таблицу GPT, принцип формирования которой в корне отличается от таблицы MBR на Legacy BIOS — режиме.
Однако, начиная с версии 1703 сборки 10.0.15063, у вас есть возможность сменить Legacy на UEFI без переустановки Windows. Если, конечно, эту возможность поддерживает сама материнская плата. Это можно провернуть при помощи уже знакомой нам по статье Способы конвертации MBR в GPT встроенной утилиты mbr2gpt.exe.
Условия к соблюдению:
- Установленная Windows версии 1703 сборка 10.0.15063 и позднее
- Windows была ранее обновлена до W10 с предыдущей версии
- Система установлена по методу Legacy при поддержке программного обеспечения BIOS, с использованием носителя, предназначенного для установки системы на MBR.
На самом деле, если у вас установлена Windows любой версии в режиме Legacy, 99% вероятности, что все вышеприведённые условия соблюдены. В этом вы можете удостовериться, пройдя по указанным в абзаце ссылкам. Дело в том, что современные средства записи и установки в сети по-другому Windows и не дадут установить. Вам лишь останется удостовериться, что
- версия и сборка Windows для этой операции подходящие
- вы УЖЕ не используете UEFI режим


Как узнать версию Windows?
По ссылке выше будет наиболее исчерпывающие ответы, но если быстренько, то вам лучше всего ответит апплет Про Windows, вызываемый из строки поиска WIN + R
winver


Из той же строки можно вызвать консоль управления дисками, которая ответит, не волнуетесь ли вы зря, а система давно работает по UEFI-принципу:
diskmgmt.msc
MBR и GPT: основные понятия.
Если кнопка контекстного меню действия Преобразовать в GPT-диск НЕАКТИВНА, вы загружаетесь в с MBR-таблицей. Это, кстати, является косвенным доказательством того, что операция вообще возможна.
Что может пойти не так?
Всё, что угодно. Я провёл несколько таких операций без сучка и задоринки, однако лучше все важные данные спрятать по другим разделам и подготовить как минимум одну точку восстановления системы. Но, перед тем, как начать, следует запомнить, что ОБРАТНОГО ХОДА у вас не будет. Без очистки диска и его содержимого конвертация из GPT в MBR будет крайне затруднена.
Как сменить Legacy на UEFI из консоли?
- Запускаем консоль cmd от имени администратора
- вводим команду конвертации
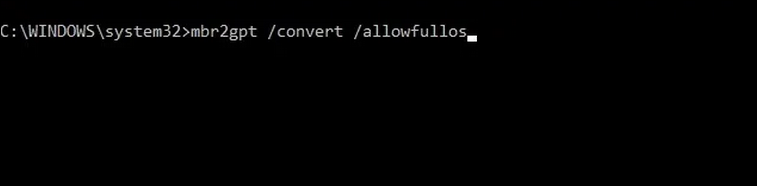
mbr2gpt.exe /convert /allowfullOS

Ждём вот такой ответ консоли:

Последняя строчка консоли говорит о том, что в BIOS следует выставить режим UEFI на замену режиму Legacy. Выходим в BIOS и в разделе Boot ищем примерно такие настройки смены режимов. Многие платы поддерживают совместные режимы (вариант с Both), но UEFI в таком случае обязательно должен быть первым:


- Сохраните изменения F10 и перезагружайтесь в Windows. В противном случае при попытке загрузиться жёсткий диск «потеряется».
Сразу после операции в текущем сеансе Windows покажет консоль Управления дисками в таком примерно формате (до первой перезагрузки):

КСТАТИ
Абсолютно ту же самую операцию можно провернуть и с загрузочной флешки, даже не входя в саму Windows. Указанную команду следует ввести в той же консоли cmd, которую легко вызвать с экрана Установки Windows, зажав Shift+F10:

Несколько способов войти в консоль cmd без загрузки Windows
При этом порядок действий остаётся тем же. Главное — верно указать на диск, который подлежит конвертации. Для пущей уверенности запустите предварительно утилиту Diskpart, и проверьте список дисков
list disk
В ответе консоли вы увидите информацию по дискам, видимых загрузочником:

Обратите внимание на последний столбец с GPT в шапке — он пуст для диска 0. Покиньте Diskpart командой
exit
И повторите команду для выбранного диска. Если диск в единственном экземпляре, то ему присвоен номер 0:
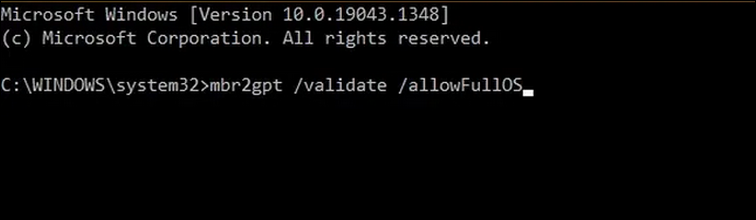
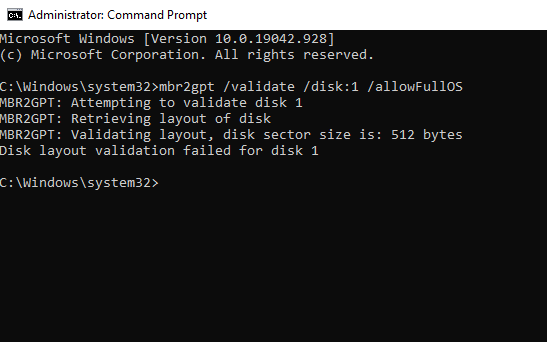
mbr2gpt /validate /disk:0 /allowFullOS
После перезагрузки окно из Diskpart примет чуть иной вид. Видите символ * в столбце с GPT?

Успехов.
- 1. Why Do We Change BIOS Mode from Legacy to UEFI
- 2. How to Check You Are Using Legacy or UEFI
- 3. How to Change BIOS Mode from Legacy to UEFI
BIOS is the basic input/output system that controls communication between computer hardware and operating systems. BIOS is stored on a ROM chip located on the motherboard. The BIOS contains a set of instructions that the computer uses to perform basic operations, such as booting up.
UEFI (Unified Extensible Firmware Interface) is a newer type of BIOS that offers several advantages over Legacy BIOS. One key advantage of UEFI is that it provides a more user-friendly interface. BIOS screens are often text-based and difficult to navigate, whereas UEFI screens are typically graphical and easier to use. In addition, UEFI offers better support for large hard drives and long filenames. It can also boot faster than BIOS due to its smarter handling of driver loading. Finally, UEFI provides better security features, such as encrypting the boot process and requiring a password for BIOS settings changes. With so many advantages, it’s no wonder that users want to change BIOS mode from Legacy to UEFI.
However, some computers still use Legacy BIOS, so it’s still important to know the difference between the two types of BIOS. Follow this link to know more information about BIOS and UEFI.
How to Check You Are Using Legacy or UEFI
There are several ways to check whether you are using Legacy or UEFI mode on your computer. One way is to check the System Information.
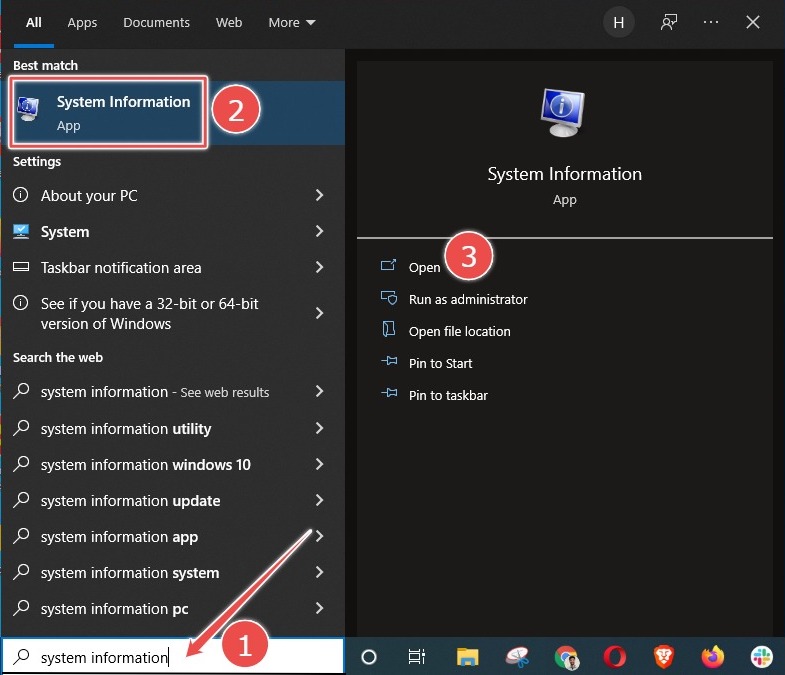
Step 1: Search «System Information» in the search bar and open it.
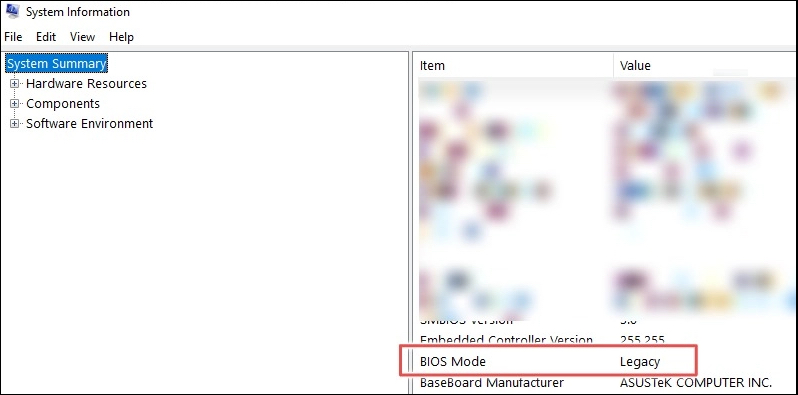
Step 2: Check your BIOS Mode.
There is more than one way to check whether you are using Legacy or UEFI. Follow this link if you are interested in other methods to check Windows using UEFI or Legacy.
How to Change BIOS Mode from Legacy to UEFI
Users may need to change the BIOS mode from Legacy to UEFI for various reasons. For example, they may be upgrading to a new operating system that requires UEFI, or they may want to take advantage of features that are only available in UEFI mode. In any case, changing the BIOS mode is not as difficult as users think.
- Prerequisites
- Part 1. Convert MBR to GPT
- Part 2. Convert Legacy BIOS to UEFI
Prerequisites
In order to change the BIOS mode from legacy to UEFI, there are a few prerequisites that must be met.
- Windows version must be at least Windows 10 v1703.
- The MBR disk should not contain more than three partitions. If there are more than three partitions, you can merge or delete them.
- Turn off BitLocker before converting BIOS mode since it doesn’t allow Windows to convert the drive from Legacy BIOS to UEFI.
- The operating system must be 64-bit.
- No dual boot.
Although you will not lose your data during conversion, we still recommend you back up your data first.
Part 1. Convert MBR to GPT
Converting a hard drive from MBR to GPT is necessary when changing BIOS mode from Legacy to UEFI. EaseUS Partition Master makes it easy to change convert drives from MBR to GPT with just a few clicks.
Step 1. Download and launch EaseUS Partition Master on your computer.
Step 2. Go to Disk Converter, select «Convert MBR to GPT» and click «Next» to continue.

Step 3. Select the target MBR disk that you tend to convert to GPT, and click «Convert» to start the conversion.

In addition, EaseUS Partition Master offers a number of other benefits.
- Migrate Windows 11 to a new SSD in one click.
- Resize/extend/shrink/create dynamic volume easily.
- Convert file system from FAT32 to NTFS.
As a result, it’s the perfect tool for anyone who needs to change their BIOS mode or convert their hard drive.
You can also learn how to convert MBR to GPT by command prompt in our related article, which is more time-consuming.
Part 2. Convert Legacy BIOS to UEFI
Open the BIOS setting to choose UEFI as the boot mode. The general procedure is as follows, although some details may vary by the computer manufacturer.
Step 1: Turn on or restart your computer.
Step 2: When the computer manufacturer logo interface appears, long-press F2 to open the BIOS Setup. Generally speaking, most computers can enter the BIOS Setup by long-pressing F2, and some computers may enter through other keys, such as ESC, DEL, F12, etc.
Note: If you do not open the BIOS Setup in time at this time, Windows will load successfully, and you need to restart the computer to convert to BIOS mode.
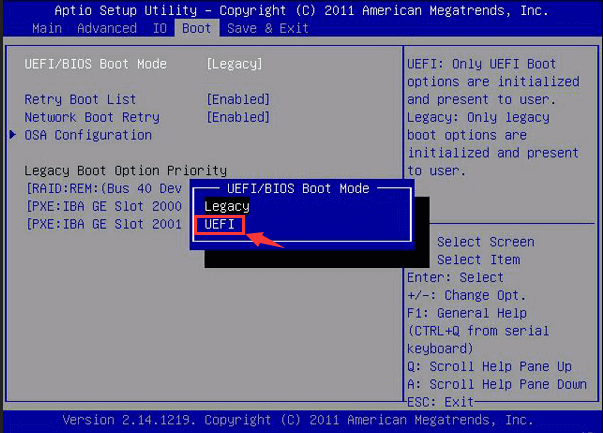
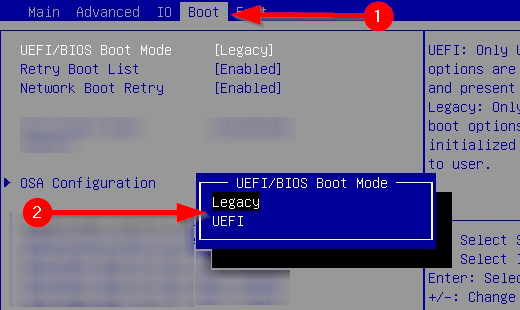
Step 3: Use arrow keys to select the «Boot» tab.
Step 4: Select «UEFI» in the «UEFI/BIOS Boot Mode». Press Enter.
Step 5: Move to the «Save & Exit» tab and press Enter.
Conclusion
The article discusses how to change the BIOS mode from legacy to UEFI in Windows 10/11. It recommends using EaseUS Partition Master to convert MBR to GPT before changing the BIOS mode. This is because EaseUS Partition Master will ensure that the data on the hard drive is not lost during the MBR-to-GPT convention. Then convert Legacy BIOS to UEFI from the firmware settings screen for your motherboard.
Современные материнские платы ПК и ноутбуков поддерживают два вида интерфейса: UEFI (Unified Extensible Firmware Interface) и стандартный BIOS (Legacy). Если операционная система установлена на GPT-диск, то в настройках BIOS Должен быть выставлен режим UEFI, если же система установлена на MBR-диск, то выставить необходимо Legacy. Разница между GPT и MBR-дисками вы можете прочитать в нашей статье (Unified Extensible Firmware Interface).
Исходя из описания мы поняли, что для успешного перевода Legacy на UEFI первым делом необходимо конвертировать диск MBR в GPT формат.
Для этого предлагаем три варианта:
Первый вариант. Конвертация диска из MBR в GPT из Windows.
1. С помощью встроенной утилиты mbr2gpt в Windows 10 (начиная с сборки 1703) есть возможность конвертировать диск с таблицей разделов MBR в таблицу GPT без потери данных.
Из под Windows запустите командную строку от имени администратора и выполните команду:
mbr2gpt.exe /convert /allowfullOS
где,
/convert – ключ конвертации диска диска;
/allowFullOS – позволяет запускать конвертацию системного раздела непосредственно из запущенной Windows 10. Если не указывать этот параметр, при запуске из Windows, появится ошибка: “ERROR: MBR2GPT can only be used from the Windows Preinstallation Environment. Use /allowFullOS to override”.
2. После ввода команды дождитесь завершения процесса конвертации диска из MBR в GPT.
MBR2GPT will now attempt to convert disk 0.
If conversion is successful the disk can only be booted in GPT mode.
These changes cannot be undone!
MBR2GPT: Attempting to convert disk 0
MBR2GPT: Retrieving layout of disk
MBR2GPT: Validating layout, disk sector size is: 512 bytes
MBR2GPT: Trying to shrink the system partition
MBR2GPT: Trying to shrink the OS partition
MBR2GPT: Creating the EFI system partition
MBR2GPT: Installing the new boot files
MBR2GPT: Performing the layout conversion
MBR2GPT: Migrating default boot entry
MBR2GPT: Adding recovery boot entry
MBR2GPT: Fixing drive letter mapping
MBR2GPT: Conversion completed successfully
MBR2GPT: Before the new system can boot properly you need to switch the firmware to boot to UEFI mode!
3. Перезагрузите компьютер и войдите BIOS.
В режиме BIOS перейдите по меню Boot — Boot Mode и измените режим загрузки с BIOS (Legacy) на UEFI.
Сохраните изменения BIOS и загрузитесь в Windows.
Напишите в комментариях какой способ вам помог.
Второй вариант. Конвертация диска из MBR в GPT во время установки Windows.
Утилиту mbr2gpt можно использовать в командной строке даже если возникла необходимость конвертации диска во время установки Windows. Например, когда выходит ошибка «Windows cannot be installed to this disk. The selected disk has an MBR partition table. On EFI system, Windows can only be installed to GPT disks» или другая.
1. В окне установки нажмите комбинацию клавиш Shift+F10 для вызова окна командной строки.
2. Необходимо узнать какой диск будем указывать в команде для конвертации. Для этого вводим в командной строке команду DISKPART.
3. Далее вводим команду LIST DISK, который покажет все существующие диски.
Запомните номер вашего диска, который необходимо конвертировать и введите команду EXIT для выхода из утилиты DISKPART и возврата в консоль командной строки.
4. В командной строке введите команду
mbr2gpt /convert /disk:0
где disk:0 — номер диска, который надо было запомнить на шаге 3.
5. По окончанию утилита выполнит конвертацию в GPT. Закройте командную строку, обновить окно установки, нажав на кнопку «Обновить» и продолжайте установку Windows.
Напишите в комментариях какой способ вам помог.
Третий вариант. Преобразовать MBR в GPT с удаление данных диска.
Этот вариант подходит только в том случае, если вам не важна сохранность данных диска или вы уже сделали их резервную копию, так как способ подразумевает очистку диска.
Для этого прейдите к статье.
Установка Windows на данный диск невозможна. На выбранном диске находится таблица MBR-разделов. В системах EFI Windows можно установить только на GPT-диск.
Если вам необходимо конвертировать диск обратно в MBR раздел и включить режим Legacy, тогда для вас подойдет эта статья .
Напишите в комментариях какой способ вам помог.
Time for an upgrade? Here’s how to convert a Legacy BIOS into UEFI in Windows 10 or 11.

Every time you turn on your computer, you are sometimes greeted by a screen that displays the manufacturer’s information. This is called the BIOS, and it has two main types; Legacy BIOS and UEFI. Older motherboards have legacy BIOS firmware while modern computers come with the UEFI BIOS.
It is possible to completely change the BIOS on your computer, but do so with caution: If you don’t know what you’re doing, it could lead to irreversible damage. We have put together this guide to help you upgrade from Legacy BIOS to UEFI. Let’s get started!
Why Should You Convert Legacy BIOS to UEFI?
Whenever you turn your computer on, you are actually activating the BIOS, which loads the rest of your computer’s hardware. The BIOS of a computer determines how the PC will turn on, from which drive it will boot, and how it will perform basic functions.
Additionally, it is used for identifying and configuring items such as hard drives, floppy drives, optical drives, CPUs, memory, and other equipment in computers.
Old computers come with the Legacy BIOS, which manages the data flow between your operating system and connected devices. However, it has certain limitations. For instance, it cannot recognize drives larger than 2.1TB, and the setup programs are text-only.
On the other hand, modern PCs come with UEFI BIOS, which is extensively customizable and does the same job better. UEFI can support drives 2.2TB or larger thanks to its use of GUID Partition Tables (GPT) instead of the outdated Master Boot Record (MBR). The UEFI stores all the information about initialization and startup in an EFI file called .efi, which resides on an EFI System Partition called ESP. A boot loader program for the operating system installed on the computer is also included in the ESP partition.
To put it simply, switching to UEFI is a worthwhile upgrade that provides you with the following advantages:
- Better performance of the computer as a whole
- Fast booting times
- Removes compatibility issues with Legacy BIOS
Additionally, UEFI is more secure than Legacy BIOS. UEFI’s Secure Boot feature ensures that only approved operating systems can be installed on your computer. However, UEFI can still be vulnerable to certain security attacks.
How to Check if You Are Using Legacy BIOS
You can determine your BIOS version by following these steps if you are not sure which version you are using:
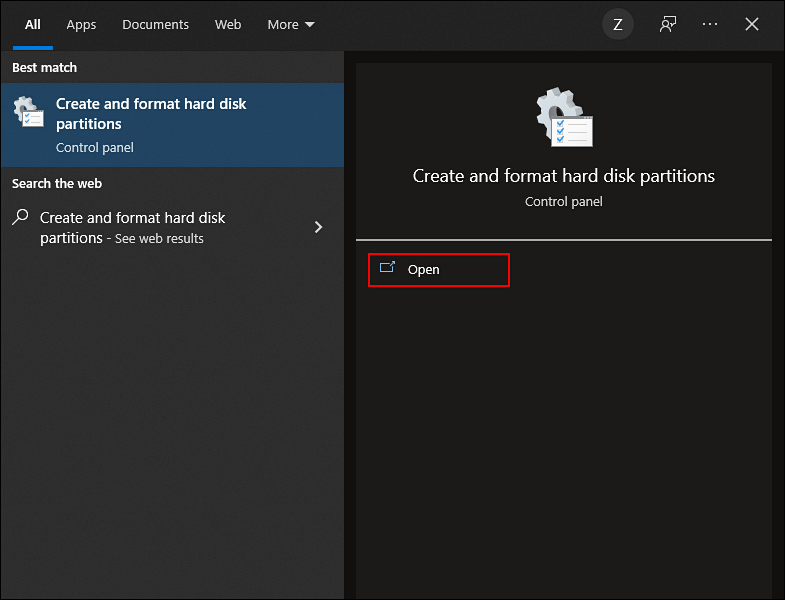
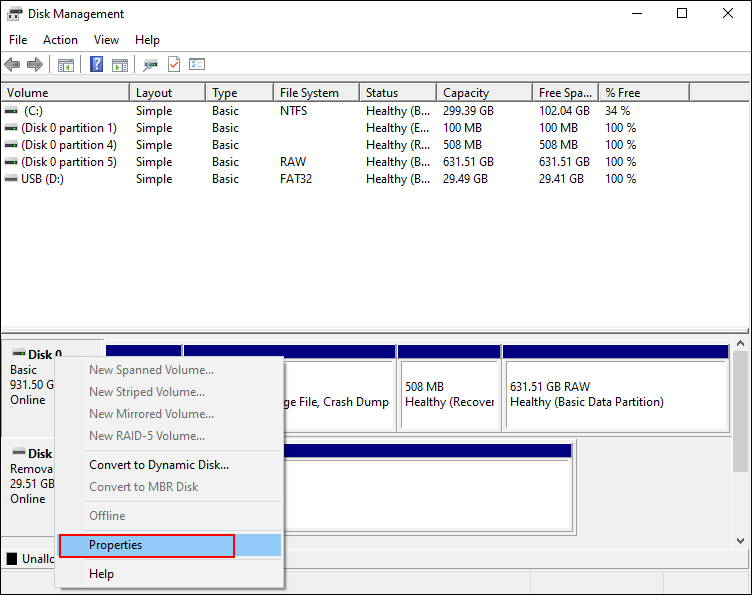
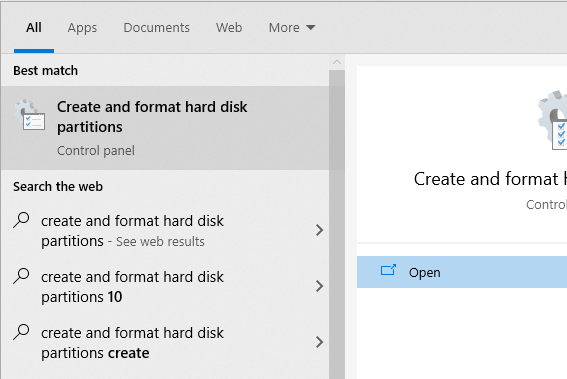
- Type Create and format hard disk partitions in the search area of the taskbar and click Open. This should launch the built-in Disk Management tool.

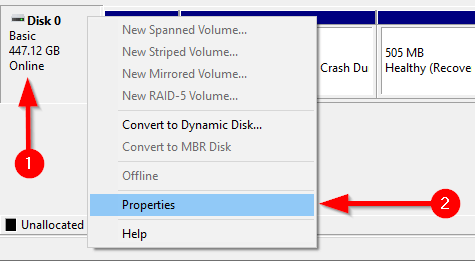
- In the Disk Management tool, right-click on the Windows installation disk (Disk 0) and select Properties from the context menu.

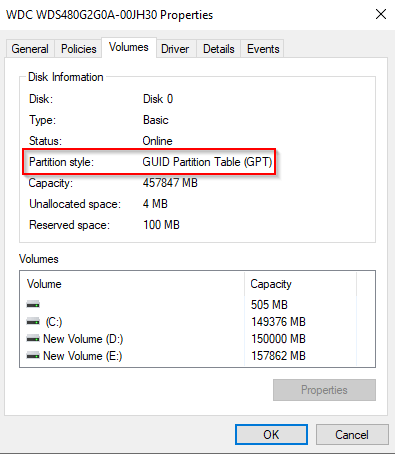
- Go to the Volumes tab inside the Properties window. If you locate Master Boot Record (MBR) next to Partition style, your system is using Legacy BIOS.
- If you see GUID Partition Table (GPT) instead, then your system is on UEFI already, and you don’t need to do anything else!

Following your determination of which BIOS you are using, you can move on to the practical steps.
The Prerequisites for Upgrading to UEFI
Before you jump into converting Legacy BIOS to UEFI, here are a few things you should know:
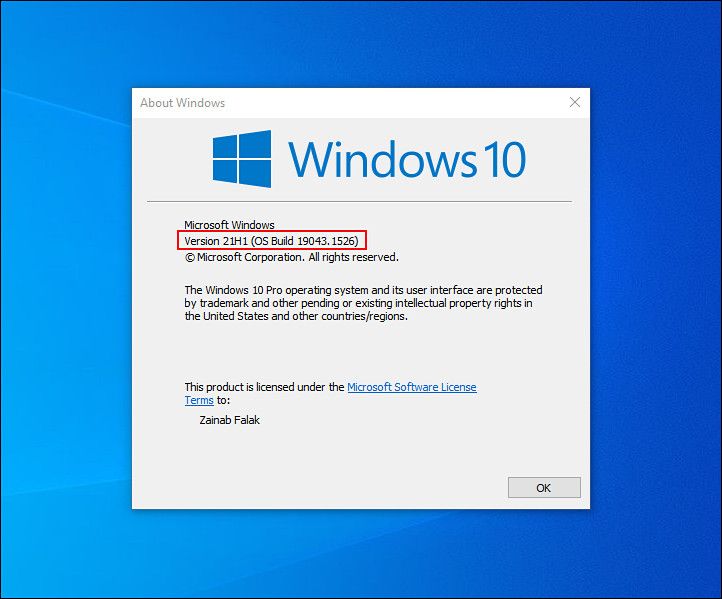
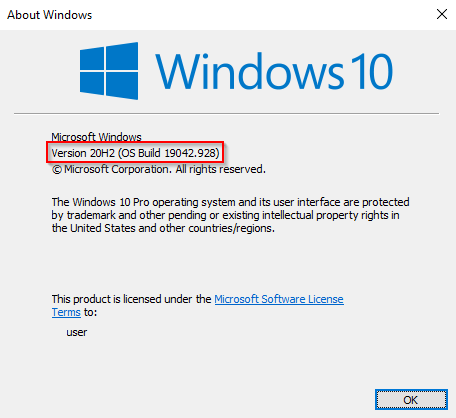
- Your Windows version should be Windows 10 v1703 or higher. In case you do not know which operating system version you are on, press Win + R keys simultaneously on your keyboard. In the text field of the dialog box, type winver and hit Enter. In the About Windows box, you should see your current Windows version.

- Your targeted disk shouldn’t contain more than three partitions. If more than three partitions are present on the Windows 10 installation drive, you can merge or delete them.
- BitLocker does not allow Windows to convert your drive from Legacy BIOS to UEFI. This is why if you are using it, we suggest disabling or suspending BitLocker before you proceed.
- Once the conversion process is complete, you may have to change your firmware settings from Legacy BIOS to UEFI. As the process to switch from one to the other will vary depending on your motherboard manufacturer, ensure you have your manual with you.
- You will not lose your data during the conversion process. However, we recommend that you back up your data to be safe.
How to Convert Legacy BIOS to UEFI
Now that you have verified that your system is running Legacy BIOS and have created a backup of your data, let’s begin the conversion process.
Here is what you need to do:
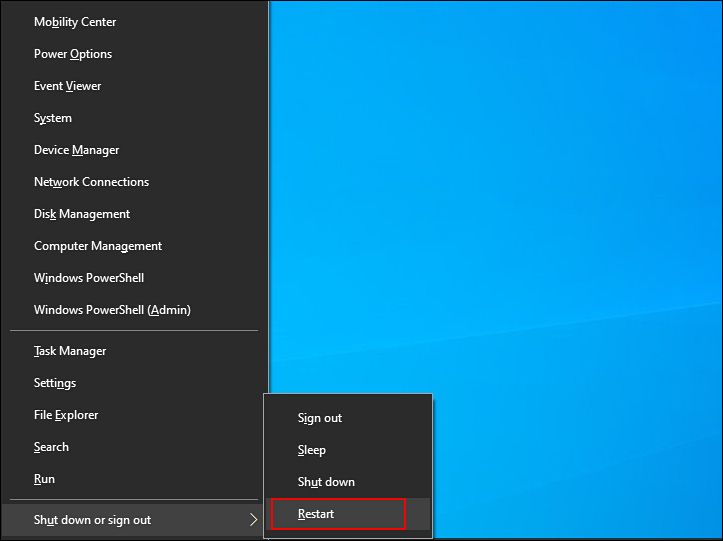
- Press Win + X keys on simultaneously on your keyboard.
- Select Shut down or sign out and then click on Restart while holding the Shift key from the context menu that appeared on your screen.

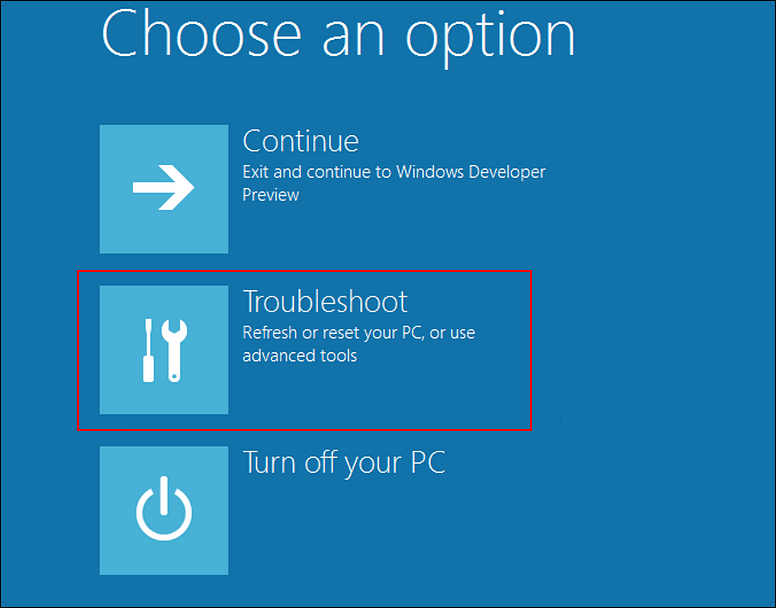
- Your system should not boot into the Advanced Startup screen.
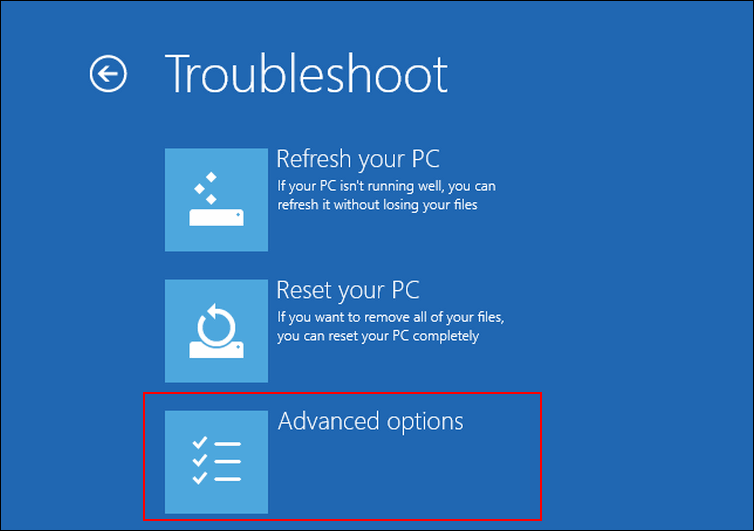
- From there, click on Troubleshoot.

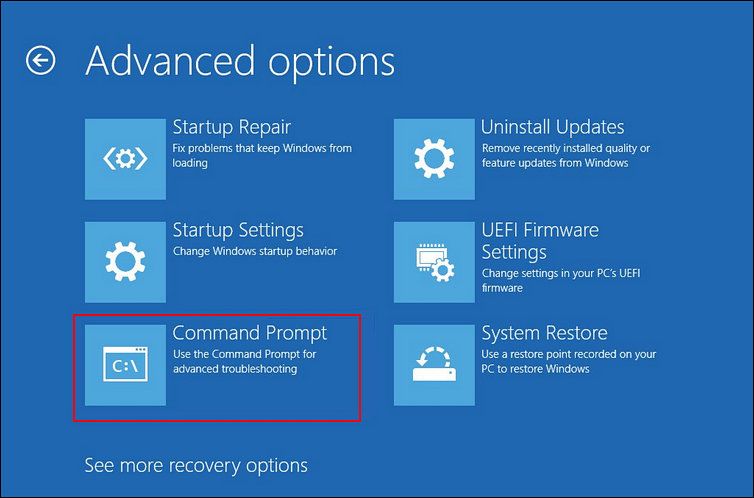
- Select Advanced option in the next window.

- Now, click on Command Prompt.

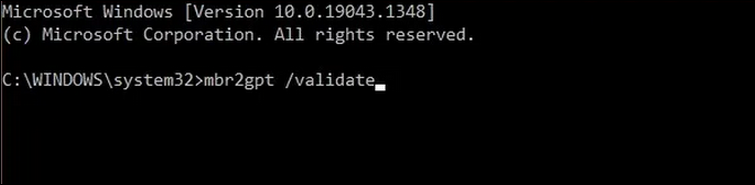
- Once you are inside the Command Prompt window, type the command mentioned below and hit Enter to execute it.
mbr2gpt /validate

- This command should validate the targeted disk. Continue with the next step if the Validation completed successfully message is displayed. If any error is displayed, then this implies that the disk or system may not have the capacity to handle the conversion.
- In case you cannot validate using the command above, execute the following command.
mbr2gpt /validate /allowFullOS

- Once the disk is validated, execute the following command to complete the conversion.
mbr2gpt /convert

- Windows should now begin the conversion process. Wait patiently for the process to complete and then reboot your PC.
- Upon rebooting, launch the firmware settings screen for your motherboard and switch it from Legacy BIOS to UEFI. Since the steps for this vary depending upon your motherboard, consult your manual for the exact procedure.
- Once done, follow the steps we outlined above to verify whether you’ve been converted from Legacy BIOS to UEFI.
BIOS Updated Successfully
The Legacy BIOS upgrade to UEFI has now been completed successfully. The UEFI system is more powerful and has more advanced features than BIOS. UEFI speeds up boot time and offers security features such as «Secure Boot,» which prevents the computer from being booted by unauthorized or unsigned programs. This makes UEFI the next generation of BIOS.
Microsoft added a useful tool missing from the earlier versions of Windows and even some older versions of Windows 10. The MBR2GPT tool enables Windows 10 users to convert Legacy BIOS to UEFI without reinstalling Windows 10.
You can invoke the MBR2GPT tool using Command Prompt, and two commands later, you’ll have switched from Legacy BIOS to UEFI.
Which Is Better: Legacy BIOS vs. UEFI
BIOS (Basic Input/Output System) is a piece of code that your microprocessor requires to start up after you press the computer’s power button. BIOS first appeared long ago and worked perfectly well. BIOS did have some constraints though.
For instance, BIOS uses Master Boot Record (MBR) to define a maximum partition capacity of 2.2 TB. Hardware developments over the past decade and a half warranted a new firmware. Then came UEFI (Unified Extensible Firmware Interface).
UEFI, much like BIOS, is low-level software that your computer runs when you press the power button and before booting the OS. UEFI is more robust and removes constraints associated with BIOS.
For instance, UEFI supports partitions of up to 9 ZB, offers faster boot time, and provides security features like “Secure Boot.”
Getting Ready to Convert Legacy BIOS to UEFI
You need to get a few things in order before we talk about changing BIOS from Legacy to UEFI.
Check Your BIOS Version
Verify that you’re currently using Legacy BIOS. You don’t want to have to go through the entire process only to find out you were using UEFI the whole time.
Open the Disk Management app to verify which BIOS version you’re running. Search for Create and format hard disk partitions in the Start Menu and open the Best match. This will take you to the Disk Management app.
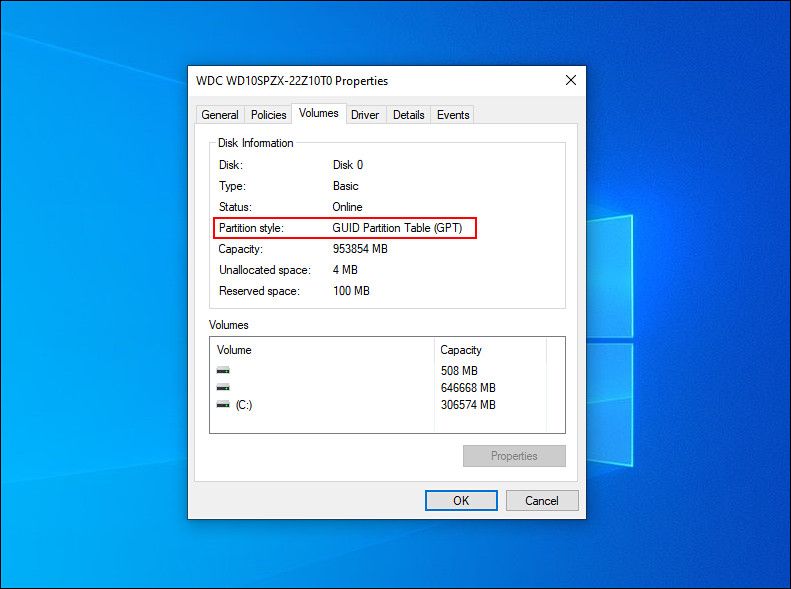
In the app, right-click on the disk on which you’ve installed Windows and select Properties.
Next, you want to check your disk partition style to confirm whether you’re running the Legacy BIOS or UEFI. If you’re using BIOS, your disk partition style will be MBR. If you’re already on UEFI, the disk partition style will be GPT.
You can check the disk partition style under the Volumes tab in Properties. Search for Partition style under Disk information.
Check Your Windows Version
The MBR2GPT tool is available on Windows 10 version 1703 and later. Verify that you have the right version before starting the process by searching for winver in the Start Menu and opening the Best match. The new window that opens will display the version in the second line.
Legacy BIOS to UEFI Conversion Prerequisites
Assuming you’ve verified that you’re using the Legacy BIOS, there are a few other things you need to check, and in some cases, change.
- Ensure that the target disk (i.e., the Windows drive) has three or fewer partitions (drive C, D, etc., are all partitions). You can view the partitions by pressing Win + R and running diskmgmt.msc. If you see more than three partitions, you’ll need to merge the partitions or delete them.
- If you’ve encrypted the target disk using BitLocker, this will interfere with the conversion process. Since Windows won’t convert an encrypted disk, you’ll need to disable BitLocker before you begin the conversion.
- After conversion, you can’t boot into Windows until you change the motherboard’s firmware settings from Legacy BIOS to UEFI. Take a quick tour of the firmware and look for the setting that allows you to switch between BIOS and UEFI before starting the conversion. The process differs across manufacturers, so you may need to look around a little. If you can’t find the setting, use the manual.
- Create a precautionary backup.
Once you’ve made sure everything is in order, it’s time to use the MBR2GPT tool.
- Search for cmd in the Start Menu, right-click, and select Run as administrator.
- Your disk must meet the conversion requirements for the MBR2GPT tool to be able to convert it. Check if it does by validating the disk using the following command:
mbr2gpt /validate /disk:0 /allowFullOS
If the disk you want to convert is not disk 0, replace 0 with the appropriate disk number.
If your disk doesn’t meet the conversion requirements, you’ll see an error. For instance, the following error resulted from validating a USB drive.
- If the validation was successful, run the following command to begin the conversion:
mbr2gpt /convert /disk:0 /allowFullOS

Let the conversion run, it should only take a few seconds.
- Restart your PC and go into your motherboard’s firmware to change the settings. Assuming you already figured out how to enter the BIOS before starting the process, this should take only a few seconds. In most cases, you’ll see an option to select the Boot mode under the Boot tab/section in your firmware.
- Boot into Windows.
- Verify that you’ve successfully converted the partition using the same process you used earlier. Head to the Disk Management app, right-click on the converted disk, select Properties > Volume, and this time around the Partition style should be GUID Partition Table (GPT).
Enjoy Your Modernized BIOS
UEFI comes with a lot of capabilities. Given that most modern systems are using UEFI, it’s only natural to want to convert Legacy BIOS to UEFI. Well, you’re all done. Fortunately, you didn’t have to reinstall Windows either.