 Через короткое время после выхода Windows 11, известная программа для создания загрузочных установочных флешек Rufus была первой, которая встроила возможность установки без доверенного платформенного модуля TPM 2.0. К сегодняшнему дню количество доступных в утилите опций для образов Windows 11 стало ещё более широким.
В этой инструкции подробно о том, как отключить проверку на наличие модуля TPM 2.0 и включенной безопасной загрузки (Secure Boot), минимальных требований к объему оперативной памяти и места на диске, а также экран настройки сбора персональных данных, создав загрузочную флешку в Rufus последней версии. Дополнительная возможность — установка Windows 11 с локальной учётной записью. Также может быть полезным: способы создания загрузочной флешки Windows 11, Создание мультизагрузочной флешки в Ventoy (также отключает требования к системе для Windows 11).
Опции при создании загрузочной флешки Windows 11, доступные в Rufus
Сам процесс записи установочного накопителя в Rufus не изменился по сравнению с тем, что было описано в статье про одну из предыдущих версий программы: Создание загрузочной флешки Windows в Rufus.

Однако в новой версии (скачать можно на официальном сайте — https://rufus.ie/ru/), при использовании образа ISO Windows 11 (Как скачать Windows 11 оригинальные ISO образы), возможно включение дополнительных опций в программе.
Ранее обход требований Windows 11 включался в поле «Параметры образа», теперь в главном окне программы такие настройки отсутствуют. Вместо этого, после того как заданы все параметры создания загрузочной флешки, достаточно нажать кнопку «Старт», чтобы появилось следующее окно с дополнительными параметрами:

В текущей версии текст в окне представлен на английском языке, а потому поясню каждый из пунктов:
- Remove requirement for 4Gb RAM, Secure Boot and TPM 2.0 — отключить требование наличия модуля TPM 2.0 и включенной безопасной загрузки Secure Boot, а также наличия нужного объема оперативной памяти.
- Remove requirement for an online Microsoft account — отменить требования обязательного создания учетной записи Майкрософт. Также вы можете создать локальную учетную запись при установке Windows 11 другими способами или удалить учетную запись Майкрософт уже после установки.
- Create a local account with username — автоматическое создание локальной учётной записи с указанным именем при установке Windows 11 с созданного USB-накопителя.
- Set regional options to the same values as this user’s — установить региональные параметры такими же, как у текущего пользователя. Пропускает настройку языков и клавиатур при установке системы.
- Disable data collection (Skip privacy questions) — опция для отключения экрана настройки параметров конфиденциальности при установке (отключает сбор данных во всех пунктах).
Используя эти опции при создании загрузочной флешки Windows 11, вы можете не только отключить нежелательные вам требования к установке, но и сильно сократить время, необходимое для первоначальной настройки после копирования файлов.
Частый вопрос пользователей касается также требований новой ОС к поколению процессора. Здесь всё просто: эти требования не учитываются при чистой установке Windows 11 с флешки, то есть установка возможна даже при использовании очень старых CPU (при условии, что они в принципе с этим могут справиться).
What is Rufus?
If you are looking for a clean install of the Windows 11 operating system on your PC and wondering how to use Rufus to install Windows 11, then the best way to do so is by creating a bootable USB drive. Rufus utility will help you create a bootable USB drive on your PC.
Rufus is a utility software that helps users to create or format bootable USB flash drives. Rufus is used when you need a USB installation media from bootable ISO, which includes Linux, UEFI, and Windows, to install on a PC without any operating system.
* Do you know how to create a Windows bootable USB with Rufus?
How to use Rufus to install Windows 11
To reduce the chance of getting stuck in the process of the bootable USB creation with Rufus, get to know the four basic requirements and prepare for them in advance.
1. An empty USB stick, flash drive
Once the installation process of the Rufus utility is complete, users will now need an empty flash drive to burn the ISO image. Make sure the USB device you are using is empty. Format the drive before going on to the next step.
2. Download Windows 11 ISO image
There are multiple Windows 11 files available on the internet, so downloading it is quite simple. All you have to do is open the internet and look for Windows 11 ISO images. Make sure to download the file from a renowned website to be sure that the file is not corrupt.
*This guide tells you how to download Windows 11 automatically without searching iso around.
3. Download and install Rufus on your PC
If you want to download and install Windows 11 with the help of Rufus, then you have to download and install the Rufus utility on your PC. When you are downloading Rufus if you are asked to download the update, make sure to do that as well.
4. Burn ISO image to the USB drive in Rufus
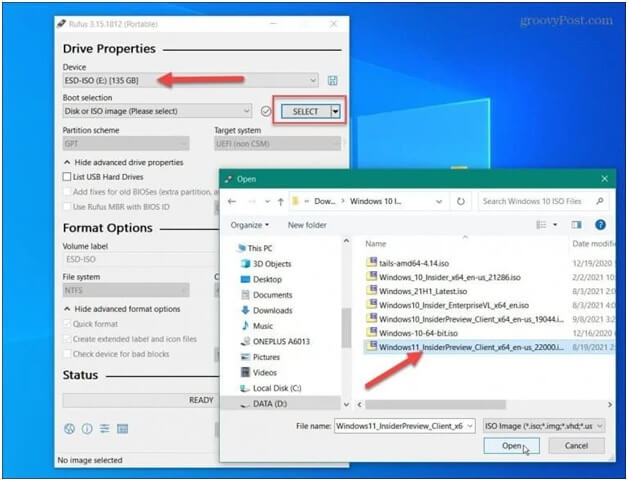
Launch the Rufus application and select the USB flash drive you want to use under devices. Click on the Select button on the right-hand side of the application. This will open up a new window where you need to select the Windows 11 ISO file you have downloaded from the internet.
Full guide for how to create and install Windows 11 with Rufus
Step 1. Now go to the third option available on the Rufus utility called «Image Option». Select on the dropdown to Standard Windows Installation. Go to the partition option and select GPT. Click on the Volume Label and type the name of the USB drive as you like.
Step 2. Keep all the rest options as it is and click on the Start button. You will see a warning come up on the screen which says all data on the flash drive will be wiped, so make sure you click on the OK button.
Step 3. Wait for the USB drive to get created. You can check on the Status section to stay updated on how much the installation has been completed.
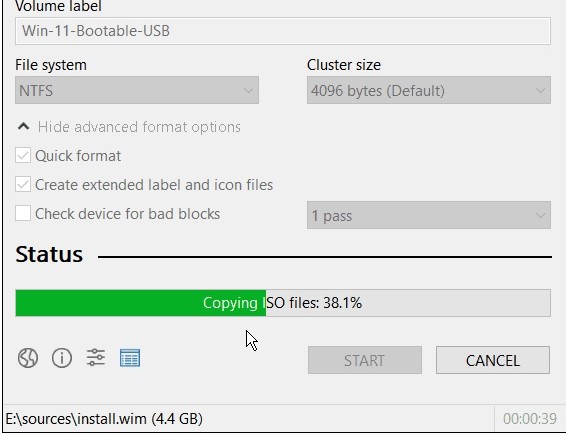
Once the process is complete, you would get to see the following media bar.
Step 4. Once the USB drive is completed, insert the USB drive on the computer you are looking to install the OS and reboot the system. This will start up the installation process. Proceed ahead, and your OS will be installed in a very short time.
How to run Windows 11 from a bootable USB drive
The other case is that you need a bootable Windows 11 USB drive from other computers. Rufus can help you clean install a Windows 11 operating system on a computer, but with EaseUS OS2Go, you can try to copy a Windows 11 operating system to a USB drive and then make it bootable on any device, including another PC and Mac.
What’s EaseUS OS2Go?
EaseUS OS2GO is a popular Windows bootable USB creation tool that helps in creating a portable USB drive from an Already installed Microsoft Windows operating system. It helps in cloning an already installed OS into a USB drive.
A simple comparison between OS2Go and Rufus
EaseUS OS2GO and Rufus are utility software that helps in creating bootable USB drives, but both of them are quite different from each other. Rufus is used when you already have an ISO file of the operating system, and all you have to do is creating the bootable USB drive. Whereas EaseUS OS2Go is used to directly clone and make a USB bootable drive from a previously installed operating system. Both of the utility software have their uses.
Guide for how to create a bootable Windows 11 bootable drive with OS2Go
Step 1. Install EaseUS OS2Go on your Windows computer, it will display your system drive’s used space. Plug in a USB drive that is larger than the system drive used space. Choose the target USB drive and click Next to continue.

Step 2. EaseUS OS2Go will notify you that the following operation would delete all data on your drive. Make sure that you have backed up all the important data. Click the Continue button to proceed.

Step 3. Adjust disk layout. The default disk layout on the target drive will be exactly the same as the resource drive. You could also edit the layout according to your needs. Tick the option there if you’re using a Solid State Drive as the Windows bootable drive. Next, click Proceed.

Step 4. Then EaseUS OS2Go will start to create the portable USB drive. It usually takes a while depending on your OS and Network condition. When the progress reaches 100%, the USB drive should be bootable now.

Step 5. Insert the portable Windows USB and start your computer. Press the required key (F2, DEL, F10…) to access BIOS. Choose to boot from the USB disk.
Note: Please make sure that the boot mode (UEFI or Legacy) of the portable USB and your target computer are the same, otherwise you may not be able to boot.
Both Rufus and EaseUS OS2GO are popular in the market when creating a bootable USB drive. They are just used in different scenarios. You can choose the process you want depending on how and where you are creating a bootable drive.
20 июля 2023
1 мин. чтения
601 просмотр
В этой инструкции вы узнаете, как создать загрузочную флешку Windows 11 с помощью программы Rufus, а также как отключить проверку на наличие модуля TPM 2.0, безопасной загрузки и другие параметры, которые могут создать препятствия при установке новой ОС.
Шаг 1. Подготовка
Перед началом процесса убедитесь, что у вас есть:
- USB-накопитель емкостью не менее 8 ГБ;
- Скачанный образ Windows 11 в формате ISO;
- Установленная последняя версия Rufus. Если у вас её нет, скачайте с официального сайта: https://rufus.ie/ru/.

Шаг 2. Запуск Rufus и настройка параметров
- Запустите Rufus и вставьте USB-флешку в компьютер.
- В главном окне программы выберите вашу носитель в поле «Устройство».
- Далее, в разделе «Выбрать» найдите и выберите скачанный образ Windows 11.

Шаг 3. Настройка дополнительных параметров
После того как заданы основные параметры, нажмите кнопку «Старт». Перед вами появится окно с дополнительными параметрами.

В этом окне:
- Удалить требования 4 ГБ ОЗУ, безопасной загрузки и TPM 2.0 — отключает требование TPM 2.0, Secure Boot и объема ОЗУ.
- Удалить требование сетевой учетной записи Microsoft — отключает обязательное создание учетной записи Microsoft при установке.
- Создать локальную учетную запись с именем пользователя — позволяет создать локальную учетную запись с предварительно заданным именем.
- Установить те же региональные параметры, что и для этого пользователя — автоматически устанавливает региональные параметры, соответствующие текущему пользователю.
- Отключить сбор данных (пропустить вопросы о конфиденциальности ) — отключает сбор данных и экран настройки параметров конфиденциальности при установке.
- Отключить автоматическое шифрование устройств BitLocker — отключает шифрование пользовательских данных.
Выберите необходимые параметры, затем нажмите «ОК».
Шаг 4. Начало процесса создания установочного носителя
После выбора всех параметров, Rufus начнет записывать образ на флеш-накопитель. Этот процесс может занять некоторое время. Подождите, пока Rufus завершит работу.

Заключение
Теперь у вас есть загрузочная флешка Windows 11, готовая к установке на ваш компьютер без ограничений, связанных с TPM, безопасной загрузкой и другими параметрами. Установка будет проходить быстрее благодаря автоматическим настройкам, которые вы выбрали.
Товары из статьи

Если вам необходимо записать на флэшку через Rufus актуальную версию Windows 11 примените нашу инструкцию. Инструмент быстро запишет ISO-образ в накопитель и создаст загрузочную флэшку, полностью готовую к установке операционной системы.

Простая утилита Rufus настроиться на ваше устройство, форматирует USB-накопитель и запишет установочные файлы Windows 11. После чего, вы сможете установить операционную систему на компьютер прямо с загрузочной флэшки.
Может быть полезно
Примечание. Обзаведитесь заранее ISO-образом Windows 11, загрузив на компьютер актуальную версию одним из способов предоставленных в нашей статье: Скачать Windows 11 — операционная система Microsoft и поместите в удобное место.
Как создать загрузочную флэшку Windows 11 через Rufus
1. Скачайте Rufus на компьютер и запустите утилиту:

2. Подключите флэшку к USB разъёму вашего компьютера.
3. В разделе «Устройство» выберите флэшку на которую будет происходить запись.
4. В правой части «Метод загрузки» выберите «Диск или ISO-образ» нажмите по кнопке «Выбрать«, в появившемся окне найдите расположение ISO и кликните на образ диска Windows 11.
5. Обратите внимание на «Схема раздела» должен быть установлен параметр «GPT» для (UEFI). Настройки этого раздела и «Целевая система» выставятся автоматом по формату, но на всякий случай перепроверьте!
6. Файловую систему и размер кластера можно не трогать.
Важно. Если у вас не поддерживаемое оборудование (проверить совместимость) или нужен обход требования аккаунта Microsoft. После нажатия по кнопке «Старт«, в появившемся окне выберите необходимые параметры:
• Удалить требования 4 ГБ ОЗУ, безопасной загрузки и TPM 2.0.
• Удалить требования сетевой учетной записи Microsoft.
• Создать локальную учетную запись с именем пользователя.
• Установить те же региональные параметры, что и для этого пользователя.
• Отключить сбор данных (пропустить вопросы о конфиденциальности).
• Отключить автоматическое шифрование BitLoker.

7. Нажмите кнопку «Старт«.

8. Согласитесь на уничтожение данных нажав «OK«.

9. Как только процесс создания загрузочной флэшки будет завершен, просто нажмите «Закрыть» чтобы выйти из программы.

Вот и все, новая операционная система Windows 11 готова к чистой установке.
Rufus is a free tool to quickly create a bootable USB flash drive to upgrade or clean install Windows 11. The utility works similarly to the Media Creation Tool, and you can provide an existing ISO file or download the files directly from the Microsoft servers.
Unlike the Microsoft solution, Rufus not only allows you to create a USB installation media, but it completes the process faster. You can prepare a USB drive for Windows 11 22H2, 21H2, and even older versions like Windows 10 and 8.1. Also, the tool can create a bootable USB that bypasses the security and memory requirements to install the operating system on unsupported hardware.
In this guide, you will learn the steps to use Rufus to download the ISO file and create a bootable media to install Windows 11 (versions 21H2, 22H2, 23H2, and higher) from scratch.
- Create Windows 11 bootable USB using Rufus with ISO download
- Create Windows 11 bootable USB using Rufus with existing ISO file
- Create Windows 11 bootable USB for unsupported hardware using Rufus
Create Windows 11 bootable USB using Rufus with ISO download
To use Rufus to download the Windows 11 ISO file and create a bootable media, connect a USB flash drive with 8GB of space, and then use these steps:
-
Open Rufus website.
-
Under the “Download” section, click the link to download the latest version.
-
Double-click the executable to launch the tool.
-
Click the Settings button (third button from the left) at the bottom of the page.

-
Under the “Settings” section, use the “Check for updates” drop-down menu and select the Daily option.

-
Click the Close button.
-
Click the Close button again.
-
Open Rufus again.
-
(Optional) Under the “Device” section, use the drop-down menu and select the USB flash drive to create the installation media.
-
Under the “Boot selection” section, use the drop-down menu and select the “Disk or ISO image” option.
-
Click the down-arrow button (on the right side) and select the Download option.

-
Click the Download button.
-
Select the Windows 11 option.
-
Click the Continue button.
-
Under the “Release” section, select the 22H2 option to choose Windows 11.
-
Click the Continue button.
-
Select the Windows 11 Home/Pro/Edu option.
-
Click the Continue button.
-
Select the language of Windows 11.
-
Click the Continue button.
-
Select the operating system architecture. (Windows 11 is only available in x64 architecture.)
-
Click the Download button.
-
Select the location to save the Windows 11 ISO file automatically.
-
Under the “Image option” setting, select the “Standard Windows 11 Installation” option.
-
(Optional) Continue with the default settings after the download.
-
(Optional) Under the “Volume label” setting, specify a name for the drive — for example, Windows 11 Setup.
-
Click the Start button.
-
Clear the “Remove requirement for 4GB+ RAM, Secure Boot and TPM 2.0” option.

-
(Optional) Check the “Remove requirement for an online Microsoft account” option to be able to create a local account during the out-of-box experience (OOBE).
-
(Optional) Check the “Create a local account with username” option and specify the account name if you want an installation with a local account instead of a Microsoft account (not recommended).
-
(Optional) Clear the “Set regional options to the same values as this user’s” option.
-
(Optional) Clear the “Disable data collection” option.
-
Click the OK button.


Once you complete the steps, you can use the bootable USB flash drive to install Windows 11 using a clean or in-place upgrade installation.
Create Windows 11 bootable USB using Rufus with existing ISO file
To create a bootable USB with Rufus using an existing ISO file, use these steps:
-
Open Rufus website.
-
Under the “Download” section, click the link to download the latest version.
-
Double-click the rufus.4.xx.exe file to launch the tool.
-
Under the “Device” section, use the drop-down menu and select the USB flash drive to create the Windows 11 bootable media.
-
Under the “Boot selection” section, use the drop-down menu and select the “Disk or ISO image” option.
-
Click the Select button.
-
Select the Windows 11 ISO file for version 22H2 or 21H2.
-
Click the Open button.
-
Under the “Image option” setting, select the “Standard Windows 11 Installation” option.
-
Under the “Partition scheme” section, select the GPT option.
-
Under the “Target system” section, select the UEFI (non-CSM) option.
-
Under the “Volume label” section, specify a descriptive name for the bootable USB drive. For example, Win11_Install_USB.
-
Use the default settings for the File system and Cluster size options.
-
Check the Quick format option.
-
Check the “Create extended label and icon files” option.
-
(Optional) Clear the “Remove requirement for 4GB+ RAM, Secure Boot and TPM 2.0” option.
-
(Optional) Check the “Remove requirement for an online Microsoft account” option to be able to create a local account during the out-of-box experience (OOBE).
-
(Optional) Check the “Create a local account with username” option and specify the account name if you want an installation with a local account instead of a Microsoft account (not recommended).
-
(Optional) Clear the “Set regional options to the same values as this user’s” option.
-
(Optional) Clear the “Disable data collection” option.
-
Click the Start button.
-
Click the OK button to confirm the USB’s deletion and the bootable drive’s creation.


After you complete the steps, the tool will begin creating a USB media with the Windows 11 installation media.
Create Windows 11 bootable USB for unsupported hardware using Rufus
Alternatively, Rufus has the option to create a bootable USB that bypasses the TPM 2.0, Secure Boot, and memory requirements to install Windows 11 on unsupported hardware.
To create a Windows 11 22H2 or 21H2 bootable USB for unsupported hardware, use these steps:
-
Open Rufus website.
-
Under the “Download” section, click the link to download the latest version.
-
Double-click the rufus.4.xx.exe file to launch the tool.
-
Under the “Device” section, use the drop-down menu and select the flash drive to create the Windows 11 bootable USB media.
-
Under the “Boot selection” section, use the drop-down menu and select the Disk or ISO image option.
-
Click the Select button.
-
Select the Windows 11 ISO file for version 22H2 or 21H2.
-
Click the Open button.
-
Under the “Image option” section, select the “Standard Windows 11 Installation” option.
-
Under the “Partition scheme” section, select the GPT option.
-
Under the “Target system” section, select the UEFI (non-CSM) option.
-
Under the “Volume label” section, specify a descriptive name for the Windows 11 bootable USB flash drive – For example, Windows 11 Setup.
-
Use the default settings for the File system and Cluster size options.
-
Check the Quick format option.
-
Check the “Create extended label and icon files” option.
-
Click the Start button.
-
Check the “Remove requirement for 4GB+ RAM, Secure Boot and TPM 2.0” option to bypass the Windows 11 hardware requirements.
-
(Optional) Check the “Remove requirement for an online Microsoft account” option to be able to create a local account during the out-of-box experience (OOBE).
-
(Optional) Check the “Create a local account with username” option and specify the account name if you want an installation with a local account instead of a Microsoft account (not recommended).
-
(Optional) Clear the “Set regional options to the same values as this user’s” option.
-
(Optional) Clear the “Disable data collection” option.
-
Click the OK button.

Once you complete the steps, Rufus will create a bootable USB media that will bypass the security and memory requirements to upgrade or install a fresh copy of Windows 11 on virtually any supported or unsupported hardware. (See also this video tutorial on the Pureinfotech YouTube channel to complete this task.)