Время на прочтение
9 мин
Количество просмотров 75K
Curl (client URL) — это инструмент командной строки на основе библиотеки libcurl для передачи данных с сервера и на сервер при помощи различных протоколов, в том числе HTTP, HTTPS, FTP, FTPS, IMAP, IMAPS, POP3, POP3S, SMTP и SMTPS. Он очень популярен в сфере автоматизации и скриптов благодаря широкому диапазону функций и поддерживаемых протоколов. В этой статье мы расскажем, как использовать curl в Windows на различных примерах.
▍ Установка в Windows
Во всех современных версиях Windows, начиная с Windows 10 (версия 1803) и Server 2019, исполняемый файл curl поставляется в комплекте, поэтому ручная установка не требуется. Чтобы определить местоположение curl и его версию в системе, можно использовать следующие команды:
where curl
curl --version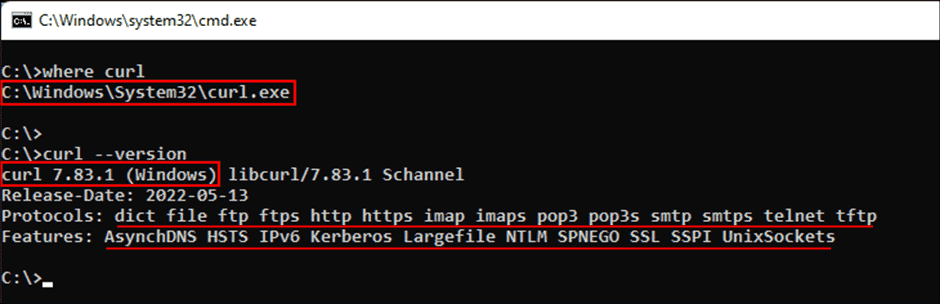
Определение местоположения и версии curl в Windows
Команда curl —version также выводит список протоколов и функций, поддерживаемых текущей версией curl. Как видно из показанного выше скриншота, к использованию встроенной утилиты curl всё готово. Если вместо этого отображается сообщение об ошибке, curl может быть недоступен потому, что вы используете более раннюю версию Windows (например, Windows 8.1 или Server 2016). В таком случае вам потребуется установить curl в Windows вручную.
▍ Синтаксис curl
Команда curl использует следующий синтаксис:
curl [options...] [url]Инструмент поддерживает различные опции, которые мы рассмотрим ниже. Как и в любом инструменте командной строки, вы можете использовать для получения справки команду curl —help.
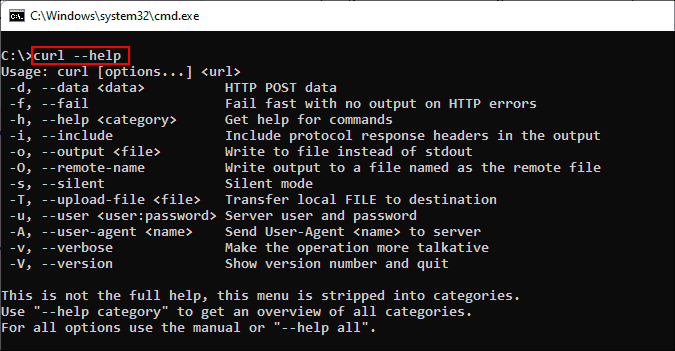
Получение справки при помощи команды curl
Для получения подробной справки можно использовать команду curl —help all. Справка разделена на категории, поэтому при помощи curl —help category можно просмотреть все темы.
Ознакомившись с синтаксисом curl, давайте рассмотрим различные способы применения этого инструмента на примерах.
▍ HTTP-запрос GET
При использовании curl с URL и без указания опций запрос по умолчанию использует метод GET протокола HTTP. Попробуйте выполнить такую команду:
curl https://4sysops.comПриведённая выше команда по сути эквивалентна curl —request GET 4sysops.com, отправляющей запрос GET к 4sysops.com по протоколу HTTPS. Чтобы указать версию протокола HTTP (например, http/2), используйте опцию —http2:
curl --http2 https://4sysops.comВ случае URL, начинающихся с HTTPS, curl сначала пытается установить соединение http/2 и автоматически откатывается к http/1.1, если это не удаётся. Также он поддерживает другие методы, например, HEAD, POST, PUT и DELETE. Для использования этих методов вместе с командой curl нужно указать опцию —request (или -X), за которой следует указание метода. Стоит заметить, что список доступных методов зависит от используемого протокола.
▍ Получение информации об удалённом файле
Если вы администратор, то иногда вам могут быть интересны только заголовки HTTP. Их можно получить при помощи опции —head (или -I). Иногда URL может перенаправлять пользователя в другую точку. В таком случае опция —location (или -L) позволяет curl выполнять перенаправления. Также можно использовать —insecure (или -k), чтобы разрешить незащищённые подключения и избежать ошибок с сертификатом TLS в случае, если целевой URL использует самоподписанный сертификат. Пользуйтесь этой опцией только при абсолютной необходимости. Все эти три опции можно скомбинировать в одну краткую запись, как показано в следующей команде:
curl -kIL 4sysops.com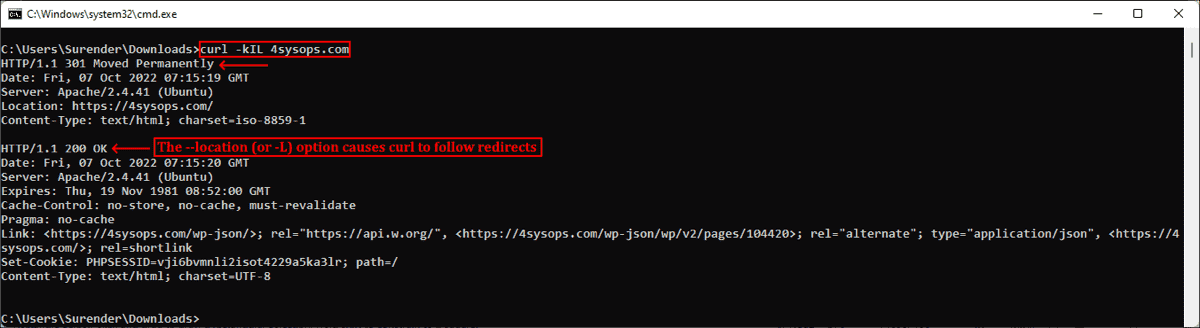
Опции просмотра заголовков запросов, включения незащищённого соединения и использования перенаправлений
Как можно заметить, такая краткая запись особенно полезна для комбинирования нескольких опций. Приведённая выше команда по сути эквивалентна команде curl —insecure —head —location 4sysops.com.
Опция —head (или -I) также даёт основную информацию об удалённом файле без его скачивания. Как показано на скриншоте ниже, при использовании curl с URL удалённого файла он отображает различные заголовки, дающие информацию об удалённом файле.
curl -IL https://curl.se/windows/dl-7.85.0_5/curl-7.85.0_5-win64-mingw.zip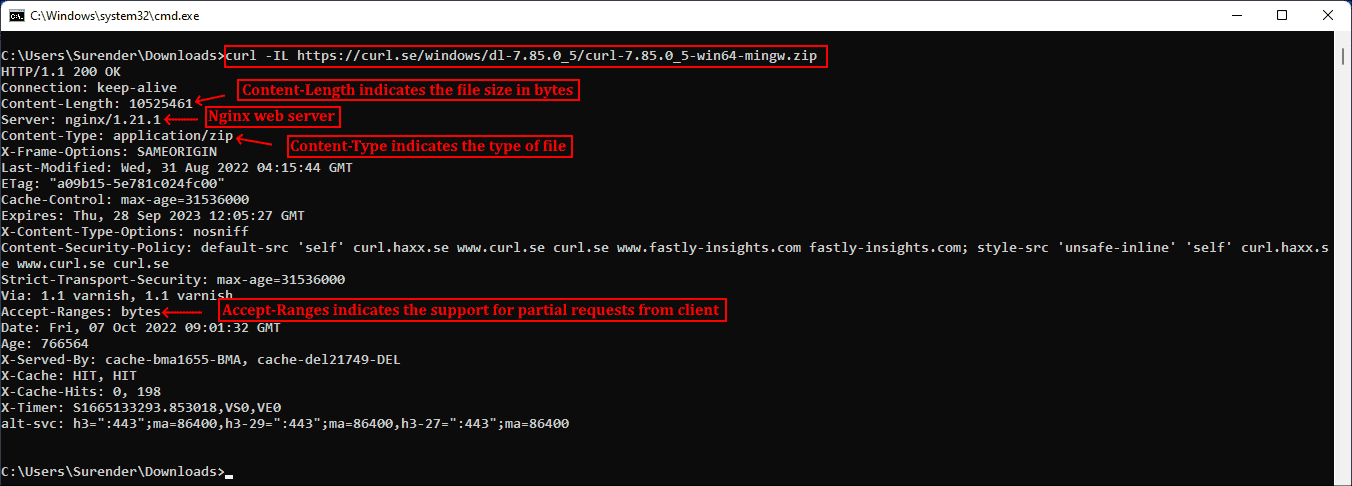
Использование curl для просмотра основной информации удалённых файлов
Заголовок Content-Length обозначает размер файла (в байтах), Content-Type сообщает о типе медиафайла (например, image/png, text/html), Server обозначает тип серверного приложения (Apache, Gunicorn и так далее), Last-Modified показывает дату последнего изменения файла на сервере, а заголовок Accept-Ranges обозначает поддержку частичных запросов для скачивания от клиента, что по сути определяет возможность продолжения прерванной загрузки.
▍ Скачивание файла
Для скачивания файла и сохранения с тем же именем, что и на сервере, можно использовать curl с опцией —remote-name (или -O). Показанная ниже команда скачивает последнюю версию curl для Windows с официального сайта:
curl -OL https://curl.se/windows/latest.cgi?p=win64-mingw.zip
Скачивание файла с именем по умолчанию и индикатором прогресса
При необходимости для нахождения ресурса добавляется опция -L, разрешающая перенаправления. Если нужно сохранить файл с новым именем, используйте опцию —output (или -o). Кроме того, при использовании команды curl в скрипте может понадобиться отключить индикатор прогресса, что можно сделать при помощи опции —silent (или -s). Эти две опции можно скомбинировать:
curl -sLo curl.zip https://curl.se/windows/latest.cgi?p=win64-mingw.zip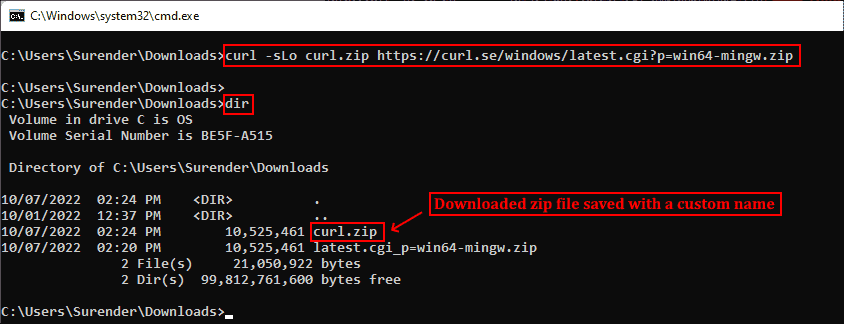
Скачивание файла без индикатора и сохранение под произвольным именем
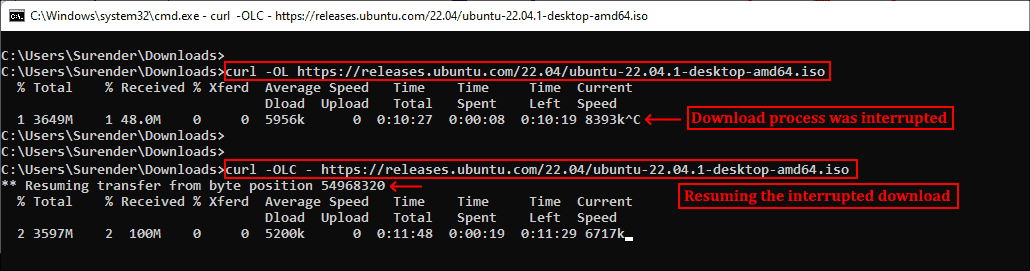
▍ Продолжение прерванного скачивания
Наличие Accept-Ranges: bytes в заголовке ответа в буквальном смысле обозначает, что сервер поддерживает скачивания с возможностью продолжения. Чтобы продолжить прерванное скачивание, можно использовать опцию —continue-at (или -C), получающую смещение (в байтах). Обычно указывать смещение непросто, поэтому curl предоставляет простой способ продолжения прерванной загрузки:
curl -OLC - https://releases.ubuntu.com/22.04/ubuntu-22.04.1-desktop-amd64.iso
Продолжение прерванного скачивания
Как видно из скриншота, я скачивал iso-файл Ubuntu, но скачивание было прервано. Затем я снова запустил команду curl с опцией -C, и передача продолжилась с того диапазона байтов, на котором была прервана. Знак минус (—) рядом с -C позволяет curl автоматически определить, как и где продолжить прерванное скачивание.
▍ Аутентификация с Curl
Также Curl поддерживает аутентификацию, что позволяет скачать защищённый файл, предоставив учётные данные при помощи опции —user (or -u), принимающей имя пользователя и пароль в формате username:password. Если не вводить пароль, curl попросит ввести его в режиме no-echo.
curl -u surender -OL https://techtutsonline.com/secretFiles/sample.zip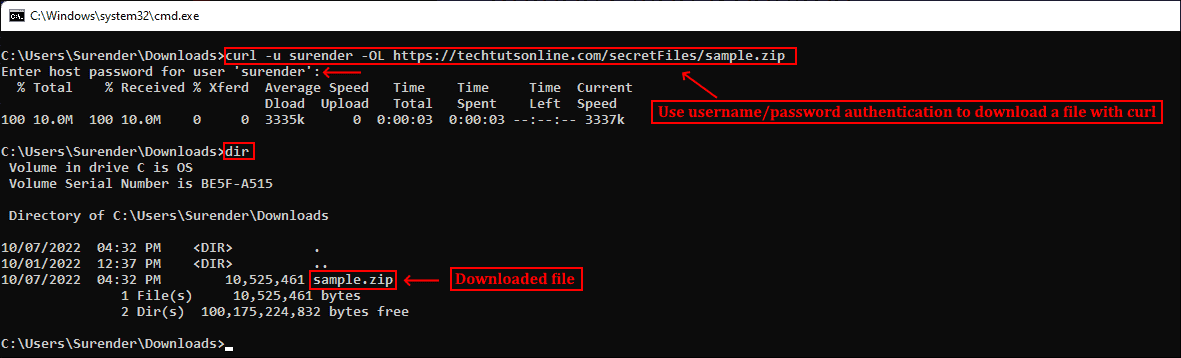
Скачивание файла с аутентификацией по имени пользователя и паролю
Если вы используете Basic authentication, то необходимо передать имя пользователя и пароль, а значит, воспользоваться защищённым протоколом наподобие HTTPS (вместо HTTP) или FTPS (вместо FTP). Если по каким-то причинам приходится использовать протокол без шифрования, то убедитесь, что вы используете способ аутентификации, не передающий учётные данные в виде простого текста (например, аутентификацию Digest, NTLM или Negotiate).
Также curl поддерживает использование файлов конфигурации .curlrc, _curlrc и .netrc, позволяющих задавать различные опции curl в файле, а затем добавлять файл в команду при помощи опции curl —config (или curl -K), что особенно полезно при написании скриптов.
▍ Выгрузка файла
Опция —upload-file (или -T) позволяет выгружать локальный файл на удалённый сервер. Показанная ниже команда выгружает файл из локальной системы на удалённый веб-сервер по протоколу FTPS:
curl -kT C:\Users\Surender\Downloads\sample1.zip -u testlab\surender ftps://192.168.0.80/awesomewebsite.com/files/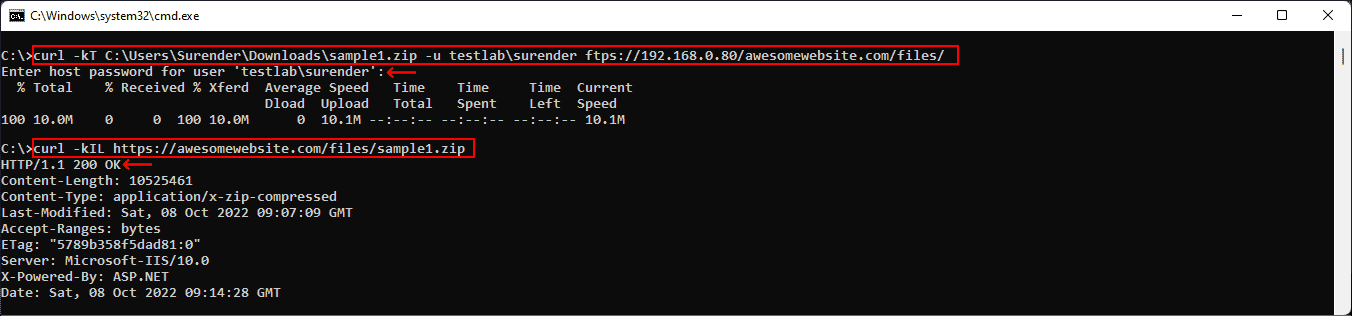
Выгрузка файла на удалённый сервер
Опция -k добавляется для устранения проблем с сертификатами на случай, если веб-сервер использует самоподписанный сертификат. Наклонная черта в конце URL сообщает curl, что конечная точка является папкой. Можно указать несколько имён файлов, например «{sample1.zip,sample2.zip}». Ниже показано, как с помощью одной команды curl можно выгрузить на сервер несколько файлов:
curl -kT sample[1-5].zip -u testlab\surender ftps://192.168.0.80/awesomewebsite.com/files/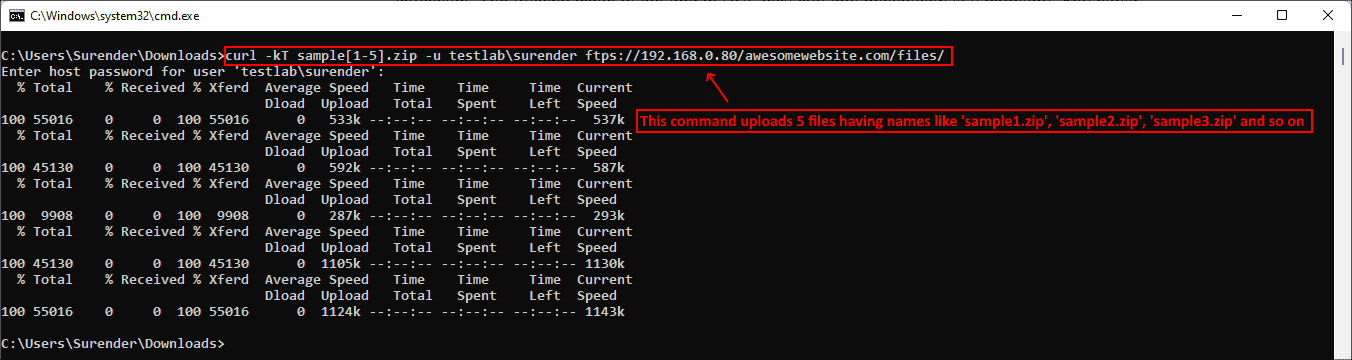
Выгрузка нескольких файлов на сервер
▍ Последовательность команд
Как говорилось ранее, curl поддерживает различные методы в зависимости от используемого протокола. Дополнительные команды можно отправлять при помощи —quote (или -Q) для выполнения операции до или после обычной операции curl. Например, можно скачать файл с удалённого сервера по протоколу FTPS и удалить файл с сервера после успешного скачивания. Для этого нужно выполнить следующую команду:
curl -u testlab\surender -kO "ftps://192.168.0.80/awesomewebsite.com/files/sample1.zip" -Q "-DELE sample1.zip"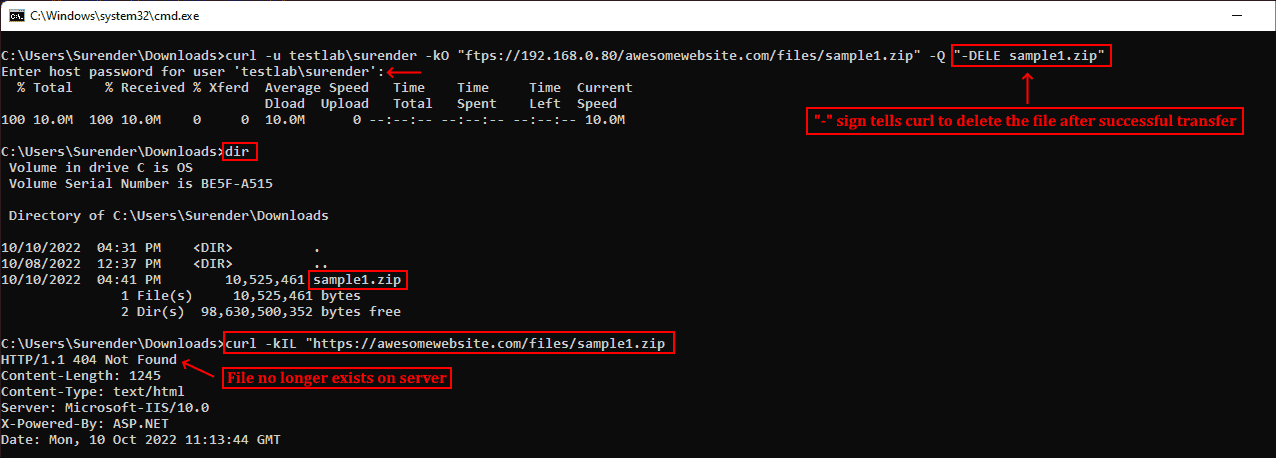
Удаление файла после успешного скачивания
В показанном выше примере я скачал файл sample1.zip с FTPS-сервера при помощи опции -O. После опции -Q я добавил минус (-) перед командой DELE, что заставляет curl отправить команду DELE sample1.zip сразу после успешного скачивания файла. Аналогично, если вы хотите отправить команду на сервер до выполнения операции curl, используйте плюс (+) вместо минуса.
▍ Изменение user-agent
Информация user-agent сообщает серверу тип клиента, отправляющего запрос. При отправке запроса curl на сервер по умолчанию используется user-agent curl/<version>. Если сервер настроен так, чтобы блокировать запросы curl, можно задать собственный user-agent при помощи опции —user-agent (или -A). Показанная ниже команда отправляет стандартный user-agent Google Chrome:
curl -kIA "Mozilla/5.0 (Windows NT 10.0; Win64; x64) AppleWebKit/537.36 (KHTML, like Gecko) Chrome/106.0.0.0" https://awesomewebsite.com/files/secretFile.zip
Использование собственного user-agent с командой curl, чтобы избежать блокировки сервером
На показанном выше скриншоте видно, что обычный запрос curl был отклонён веб-сервером (с ответом 403 Forbidden), но при передаче другого user-agent запрос выполняется успешно, возвращая ответ 200 OK.
▍ Отправка куки
По умолчанию запрос curl не отправляет и не сохраняет куки. Для записи куки можно использовать опцию —cookie-jar (или -c), а отправить куки можно опцией —cookie (or -b):
curl -c /path/cookie_file https://awesomewebsite.com/
curl -b /path/cookie_file https://awesomewebsite.com/
Первая команда записывает файл куки, а вторая отправляет куки с запросом curl. Также можно отправить куки в формате ‘name = value’:
curl -b 'session=abcxyz' -b 'loggedin=true' http://echo.hoppscotch.io
Отправка нескольких куки командой curl
Я воспользовался веб-сайтом echo.hoppscotch.io для демонстрации заголовков HTTP-запросов, которые обычно невидимы клиентам, отправляющим запрос. Если вы не хотите пользоваться этим веб-сайтом, то можете применить опцию –verbose (или -v) для отображения запроса в сыром виде (который отображает и заголовки запросов).
▍ Использование прокси-сервера
Если вы пользуетесь прокси-сервером для подключения к интернету, в curl можно указать прокси опцией —proxy (или -x). Если прокси-сервер требует аутентификации, то добавьте —proxy-user (или -U):
curl -x 192.168.0.250:8088 -U username:password https://awesomewebsite.com/Прокси-сервер указывается в формате server:port, а пользователь прокси — в формате username:password. Можно не вводить пароль пользователя прокси, тогда curl попросит ввести его в режиме no-echo.

Использование прокси-сервера и аутентификации
▍ Дополнительные заголовки запросов
Иногда вместе с запросом к серверу необходимо отправить дополнительную информацию. В curl это можно сделать при помощи —header (или -H), как показано в следующей команде:
curl -vkIH "x-client-os: Windows 11 Enterprise (x64)" https://awesomewebsite.com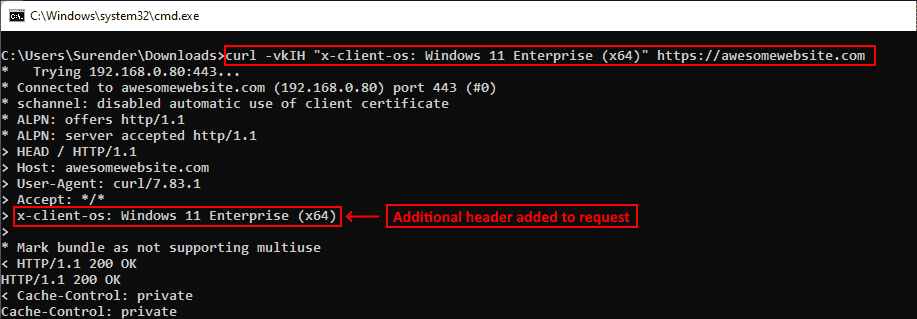
Указание дополнительных заголовков для запроса curl
Можно отправлять любую информацию, недоступную через стандартные заголовки HTTP-запросов. В этом примере я отправил название своей операционной системы. Также я добавил опцию -v для включения verbose-вывода, отображающего дополнительный заголовок, отправляемый вместе с каждым моим запросом curl.
▍ Отправка электронного письма
Так как curl поддерживает протокол SMTP, его можно использовать для отправки электронного письма. Показанная ниже команда позволяет отправить электронное письмо при помощи curl:
curl --insecure --ssl-reqd smtps://mail.yourdomain.com –-mail-from sender@yourdomain.com –-mail-rcpt receiver@company.com --user sender@yourdomain.com --upload-file email_msg.txt
Отправка электронного письма командой curl
Давайте вкратце перечислим использованные здесь опции:
- Опция —insecure (или -k) используется, чтобы избежать ошибки сертификата SSL. Мы уже применяли её ранее.
- Опция —ssl-reql используется для апгрейда соединения передачи простого текста до зашифрованного соединения, если оно поддерживается SMTP-сервером. Если вы уверены, что ваш SMTP-сервер поддерживает SSL, то можно использовать непосредственно имя сервера smtps (например, smtps://smtp.yourdomain.com), как показано на скриншоте.
- Опция —mail-from используется для указания адреса электронной почты отправителя.
- Опция mail-rcpt указывает адрес электронной почты получателя.
- Опция —user (или -u) отправляет имя пользователя для аутентификации, оно должно совпадать с адресом mail-from, потому что в противном случае письмо может быть отклонено или помечено как спам.
- Опция —upload-file (или -T) используется для указания файла, в котором находится отправляемое письмо.
На скриншоте ниже показано письмо, полученное мной во входящие:
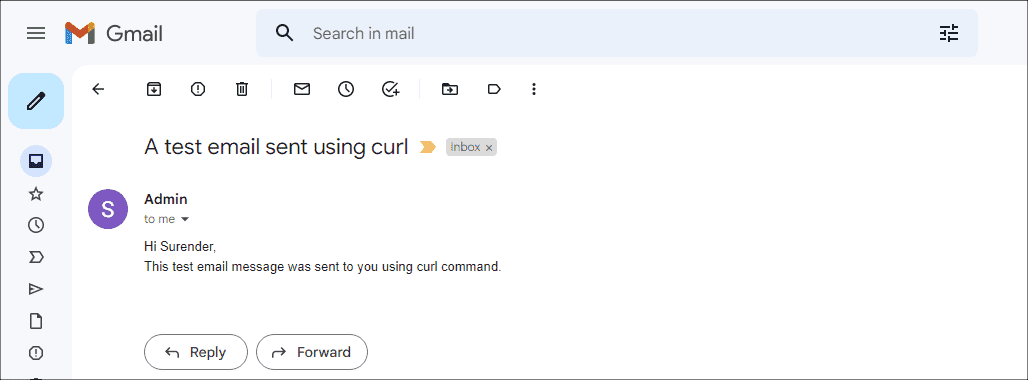
Просмотр письма, отправленного с помощью curl
Это всего лишь несколько примеров использования curl — на самом деле их гораздо больше. Я настоятельно рекомендую проверить справку по curl и поэкспериментировать с ней.
А вы используете curl? И если да, то для чего?
Telegram-канал с полезностями и уютный чат

Edit me
Хотя Postman удобен, его трудно использовать для представления в документации, как совершать запросы с его помощью. Кроме того, разные пользователи, вероятно, используют разные клиенты с графическим интерфейсом или вообще не используют их (предпочитая командную строку)
Вместо того, чтобы описывать, как выполнять REST-запросы с использованием GUI-клиента, такого как Postman, наиболее традиционный метод документирования синтаксиса запроса — использовать curl.
curl — это утилита командной строки, которая позволяет выполнять HTTP-запросы с различными параметрами и методами. Вместо того, чтобы переходить к веб-ресурсам в адресной строке браузера, можно использовать командную строку, чтобы получить те же ресурсы, извлеченные в виде текста.
Установка curl
curl доступен на MacOS по умолчанию, для Windows требуется установка. Ниже представлены инструкции по установке curl.
Установка на MacOS
Проверить установлен ли curl на MacOS можно так:
- Открываем Терминал (нажимаем
Cmd+spacebarдля открытия Спотлайт и вводим Terminal). - В терминале пишем
curl -V. Ответ должен быть примерно таким:
curl 7.54.0 (x86_64-apple-darwin16.0) libcurl/7.54.0 SecureTransport zlib/1.2.8
Protocols: dict file ftp ftps gopher http https imap imaps ldap ldaps pop3 pop3s rtsp smb smbs smtp smtps telnet tftp Features: AsynchDNS IPv6 Largefile GSS-API Kerberos SPNEGO NTLM NTLM_WB SSL libz UnixSockets
Если такого ответа нет, то curl необходимо скачать и установить
Установка на Windows
Установка curl в Windows включает другие шаги. Сначала определяем версию windows: 32-разрядная или 64-разрядная версия Windows, щелкнув правой кнопкой мыши Компьютер и выбрав Свойства. Затем следуем инструкциям на этой странице. Нужно выбрать одну из бесплатных версий с правами Администратора.
После установки проверяем версию установленной curl;
- Открываем командную строку нажав кнопку
Пуски введяcmd - В строке пишем
curl -V
Ответ должен быть примерно таким:
curl 7.54.0 (x86_64-apple-darwin14.0) libcurl/7.37.1 SecureTransport zlib/1.2.5
Protocols: dict file ftp ftps gopher http https imap imaps ldap ldaps pop3 pop3s rtsp smtp smtps telnet tftp
Features: AsynchDNS GSS-Negotiate IPv6 Largefile NTLM NTLM_WB SSL libz
Создание тестового вызова API
После установки curl делаем тестовый вызов API
curl -X GET "https://api.openweathermap.org/data/2.5/weather?zip=95050&appid=fd4698c940c6d1da602a70ac34f0b147&units=imperial"
В ответ должен вернуться минимизированный JSON:
{"coord":{"lon":-121.96,"lat":37.35},"weather":[{"id":701,"main":"Mist","description":"mist","icon":"50d"}],"base":"stations","main":{"temp":66.92,"pressure":1017,"humidity":50,"temp_min":53.6,"temp_max":75.2},"visibility":16093,"wind":{"speed":10.29,"deg":300},"clouds":{"all":75},"dt":1522526400,"sys":{"type":1,"id":479,"message":0.0051,"country":"US","sunrise":1522504404,"sunset":1522549829},"id":420006397,"name":"Santa Clara","cod":200}
curl и Windows
Если вы используете Windows, обратите внимание на следующие требования к форматированию при использовании curl:
- Используйте двойные кавычки в командной строке Windows. (Windows не поддерживает одинарные кавычки.);
- Не используйте обратную косую черту
\для разделения строк. (Это только для удобства чтения и не влияет на вызов на Mac.) - Добавив -k в команду curl, вы можете обойти сертификат безопасности curl, который может быть необходимым.
🔙
Go next ➡
Search code, repositories, users, issues, pull requests…
Provide feedback
Saved searches
Use saved searches to filter your results more quickly
Sign up
Curl (client URL) is a command-line tool powered by the libcurl library to transfer data to and from the server using various protocols, such as HTTP, HTTPS, FTP, FTPS, IMAP, IMAPS, POP3, POP3S, SMTP, and SMTPS. It is highly popular for automation and scripts due to its wide range of features and protocol support. In this article, you will learn how to use curl in Windows with various examples. Let’s get started.
Contents
- Install curl on Windows
- Curl syntax
- HTTP GET request
- Get remote file information.
- Download a file
- Resume interrupted download
- Authentication with Curl
- Upload a file
- Quote a command
- Change the user-agent
- Send a cookie
- Use a proxy server
- Additional request headers
- Send an email
- Author
- Recent Posts

Surender Kumar has more than twelve years of experience in server and network administration. His fields of interest are Windows servers, Active directory, PowerShell, web servers, networking, Linux, virtualization, and Kubernetes. He loves writing for his blog.
Install curl on Windows
All the modern Windows versions, starting with Windows 10 (version 1803) and Server 2019, have the curl executable pre-installed, so there is no need for a manual installation. To determine the curl location and version in your system, you can use the following commands:
where curl
curl --version

Determine the location and version of curl in Windows
The curl —version command also lists the protocols and features supported by the current curl version. If you see an output, as shown in the screenshot above, you’re all set to use the built-in curl utility. If you get an error message instead, curl might not be available, probably because you’re on an earlier version of Windows (e.g., Windows 8.1 or Server 2016). In that case, you might need to manually setup curl in Windows.
Curl syntax
The curl command uses the following syntax:
curl [options...] [url]
It supports various options, which we will discuss later in this post. As with any other command-line tool, you can use the curl —help command to get help.

Getting help with the curl command
To get detailed help, you can use curl —help all. The help section is divided into categories, so the curl —help category gets you an overview of all the categories.
Now that you’ve become familiar with curl syntax, let’s discuss various use cases with the help of examples.
HTTP GET request
When you use curl against a URL without specifying any option, the request defaults to the GET method of the HTTP protocol. Try this:
curl https://4sysops.com
The above command is essentially equivalent to curl —request GET https://4sysops.com, which sends a GET request to 4sysops.com using the HTTPS protocol. To specify the HTTP protocol version (e.g., http/2), use the —http2 option, as shown below:
curl --http2 https://4sysops.com
For URLs starting with HTTPS, curl first tries to negotiate to establish a http/2 connection and automatically falls back to http/1.1 if the negotiation fails. It also supports other methods, such as HEAD, POST, PUT, and DELETE. To use these methods, along with the curl command, use the —request (or -X) option, followed by the method. Notice that the methods that are available depend on the protocol being used.
Get remote file information.
As an admin, you might want to be interested in HTTP headers only. This can be done using the —head (or -I) option. Sometimes, a URL might redirect you to another location. In that case, —location (or -L) allows the curl to follow the redirects. You can also use —insecure (or -k) to allow insecure connections to avoid any TLS certificate errors if the target URL is using a self-signed certificate. Use this only when absolutely necessary. All three of these options can be combined in short-notation, as shown in the following command:
curl -kIL 4sysops.com

View request headers allow insecure connection and follow redirect options with curl
You can see that short-notation is particularly useful for combining multiple options. The above command is essentially equivalent to the curl —insecure —head —location 4sysops.com command.
The —head (or -I) option also gives you basic information about a remote file without actually downloading it. As shown in the screenshot below, when you use curl with a remote file URL, it displays various headers to give you information about the remote file.
curl -IL https://curl.se/windows/dl-7.85.0_5/curl-7.85.0_5-win64-mingw.zip

Use curl to view the basic information about remote files
The Content-Length header indicates the size of the file (in bytes), Content-Type reveals the media type of the file (for instance image/png, text/htm), Server indicates the type of server application (Apache, Gunicron, etc.), Last-Modified shows the date when file was last changed on the server, and the Accept-Ranges header indicates the support of partial requests from the client for downloads, which essentially means you can resume an interrupted download.
Download a file
You can use curl with the —remote-name option (or -O, in short) to download a file and save it with the same name as on the server. The following command downloads the latest version of curl for Windows from the official website:
curl -OL https://curl.se/windows/latest.cgi?p=win64-mingw.zip

Downloading a file with a default name and progress indicator using curl
The -L option is added to follow redirects, if needed, for locating the resource. If you want to save the file with a new name, use the —output (or -o) option instead. Furthermore, while using the curl command in a script, you might want to suppress the progress indicator using —silent (or -s). Both options can be combined, as shown in the following command:
curl -sLo curl.zip https://curl.se/windows/latest.cgi?p=win64-mingw.zip

Silently download a file and save with a custom name using curl
Resume interrupted download
The presence of Accept-Ranges: bytes in the response header literally means that the server supports resumable downloads. To resume an interrupted download, you can use —continue-at (or -C), which accepts an offset (in bytes). Generally, specifying an offset is tricky, so curl offers an easy way of resuming an interrupted download:
curl -OLC - https://releases.ubuntu.com/22.04/ubuntu-22.04.1-desktop-amd64.iso

Resuming an interrupted download with curl
As you can see in the screenshot, I was downloading an Ubuntu iso file, which was interrupted. When I ran the curl command again with the -C option, the transfer was resumed from the byte range where it was interrupted. The minus sign (—) next to -C allows the curl to automatically figure out how and where to resume the interrupted download.
Authentication with Curl
Curl also supports authentication, allowing you to download a protected file by supplying credentials with the —user (or -u) option, which accepts a username and password in the username:password format. If you skip typing the password, curl will prompt you to type it in no-echo mode.
curl -u surender -OL https://techtutsonline.com/secretFiles/sample.zip

Downloading a file using username and password authentication with curl
If you use a basic authentication method, you have to transfer a username and password, which means that you should use a secure protocol such as HTTPS (instead of HTTP) or FTPS (instead of FTP). If, for some reason, you have to use an unencrypted protocol, make sure you use an authentication method that doesn’t transmit credentials in clear text (for instance, Digest, NTLM, or Negotiate authentication).
Curl also supports the use of .curlrc, _curlrc, and .netrc config files, allowing you to define various curl options in a file and then to include the file in your command with curl —config (or curl -K), which is particularly useful for scripting.
Upload a file
The —upload-file (or -T) option allows you to upload a local file to a remote server. The following command shows how to upload a file from a local system to a remote web server using the FTPS protocol:
curl -kT C:\Users\Surender\Downloads\sample1.zip -u testlab\surender ftps://192.168.0.80/awesomewebsite.com/files/

Uploading a file to a remote server using curl
The -k option is included to avoid certificate errors if the web server uses a self-signed certificate. The trailing slash at the end of the URL tells curl that the destination is a directory. You could specify multiple file names, such as “{sample1.zip,sample2.zip}.” The following command shows how to upload multiple files with a single curl command:
curl -kT sample[1-5].zip -u testlab\surender ftps://192.168.0.80/awesomewebsite.com/files/

Upload multiple files to a remote server using curl
Quote a command
As already discussed, curl supports various methods based on the underlying protocol being used. You can send additional commands using —quote (or -Q) to perform a particular operation either before or after the regular curl operation; for instance, if you want to download a file from a remote server using the FTPS protocol and want the file to be removed from the server once it has been downloaded successfully. To do this, you can run the command shown below:
curl -u testlab\surender -kO "ftps://192.168.0.80/awesomewebsite.com/files/sample1.zip" -Q "-DELE sample1.zip"

Delete a file after successful download using curl command
Here, I downloaded the sample1.zip file from an FTPS server with the help of the -O option. After the -Q option, I added a minus sign (-) just before the DELE command, which tells the curl to send the DELE sample1.zip command immediately after the file is downloaded successfully. Likewise, if you want to send a command to the server before performing the actual curl operation, use a plus (+) sign instead of a minus sign.
Change the user-agent
The user-agent tells a server what type of client is sending the request. When you send a curl request to the server, the curl/<version> user-agent is used by default. If the server is configured to block the curl requests, you can specify a custom user-agent using —user-agent (or -A). The following command sends a common Google Chrome user-agent:
curl -kIA "Mozilla/5.0 (Windows NT 10.0; Win64; x64) AppleWebKit/537.36 (KHTML, like Gecko) Chrome/106.0.0.0" https://awesomewebsite.com/files/secretFile.zip

Use a custom user agent with a curl command to avoid server blocks
The above screenshot shows that a normal curl request was forbidden by the web server (with a 403 Forbidden response), but when I passed a custom user-agent, the request was successful, returning a 200 OK response.
Send a cookie
By default, the curl request does not send or store cookies. To write a cookie, use the —cookie-jar (or -c) option, and with —cookie (or -b), you can send a cookie:
curl -c /path/cookie_file https://awesomewebsite.com/
curl -b /path/cookie_file https://awesomewebsite.com/
The first command writes a cookie file, and the second command sends the cookie with a curl request. You can also send a cookie in ‘name = value’‘ format, as shown below:
curl -b 'session=abcxyz' -b 'loggedin=true' http://echo.hoppscotch.io

Send multiple cookies using a curl command
I used the echo.hoppscotch.io website to view HTTP request headers that aren’t normally visible to clients sending a request. If you don’t want to use this website, you could use the –verbose (or -v) option to see your request in raw form (which will show request headers, too).
Use a proxy server
Do you use a proxy server to connect to the internet? No problem! Curl lets you specify a proxy server using the —proxy (or -x) option. If your proxy server requires authentication, add —proxy-user (or -U):
curl -x 192.168.0.250:8088 -U username:password https://awesomewebsite.com/
The proxy server is specified in the server:port format, and the proxy user is specified in the username:password format. Again, you could skip typing the password for the proxy user, and curl will prompt you to enter it in no-echo mode.

Use a proxy server and authentication with a curl command
Additional request headers
Sometimes, you might want to send additional information along with your request to the server. With curl, you can do so easily by using —header (or -H), as shown in the following command:
curl -vkIH "x-client-os: Windows 11 Enterprise (x64)" https://awesomewebsite.com

Specify additional headers with a curl request
You could send any information that isn’t available with standard HTTP request headers. In this example, I sent my operating system name. I also added the -v option this time to enable verbose output, which displayed the additional header being sent along with my curl request.
Send an email
Since curl supports the SMTP protocol, you could use it to send an email message. The following command shows how to send an email using curl:
curl --insecure --ssl-reqd smtps://mail.yourdomain.com –-mail-from sender@yourdomain.com –-mail-rcpt receiver@company.com --user sender@yourdomain.com --upload-file email_msg.txt

Send an email message using a curl command
Let’s quickly discuss the options used:
- The —insecure (or -k) command is used to avoid an SSL certificate error. We have used this before.
- The —ssl-reql option is used to upgrade a plain-text connection to encrypted connection if supported by the SMTP server. Alternatively, if you’re sure your SMTP server supports SSL, you could directly use the smtps server name (e.g., smtps://smtp.yourdomain.com), as you can see in the screenshot.
- The —mail-from option is used to define the sender’s (from) email address.
- The mail-rcpt option specifies the recipient’s email address.
- The —user (or -u) option sends the username for authentication, which should match the mail-from address, because otherwise your message might be rejected or flagged as spam.
- The —upload-file (or -T) option is used to specify a file that contains the email message to send.
The following screenshot shows the email message I received in my inbox:

Viewing the email message sent with curl
Viewing the email message sent with curl
Subscribe to 4sysops newsletter!
These are just a few examples, but there is a lot more you can do with curl. I highly recommend checking out curl help and experimenting with it. You’ll notice what a powerful command curl is.
The cURL command, short for “Client for URLs“, is a versatile command-line tool for transferring data across various network protocols. Supporting an extensive array of protocols such as HTTP, HTTPS, FTP, SMTP, and many more, it has found a central place in the toolkit of many network and system administrators.
Starting with Windows 10, Microsoft has included cURL by default in the Command Prompt. This means that Windows 11 also supports cURL commands without needing to install additional software. This comprehensive guide will focus on using cURL in the Command Prompt on Windows 11, covering various examples such as downloading and uploading files, sending an email, managing cookies, handling HTTP headers, dealing with SSL certificates, and more.

Verifying cURL Installation in Windows 11
First, let’s verify that cURL is installed on your system. Open Command Prompt and type in the following command:
curl --version
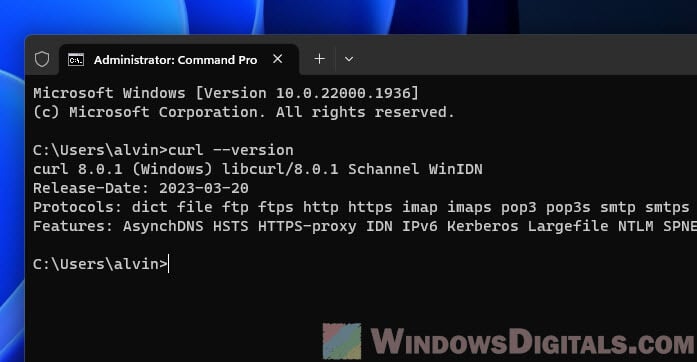
This command should display the installed version of cURL on your system, confirming its installation.
Also see: How to use FTP via Command Line (CMD) on Windows 11
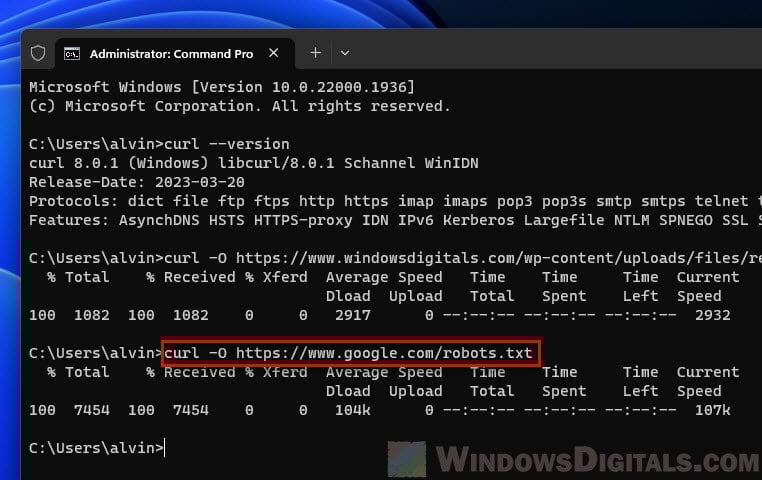
Downloading Files with cURL
One of the most common uses of cURL is downloading files from the web. The process is simple and intuitive. To download a file, use the -O (or --remote-name) option followed by the URL of the file:
curl -O https://example.com/myfile.txt
This command will download the file myfile.txt from example.com and save it in the current working directory.
To save the downloaded file with a different name, use the -o (or --output) option:
curl -o renamedfile.txt https://example.com/myfile.txt
The -o option followed by a filename allows you to specify a different name for the downloaded file.
Related resource: How to Download an FTP File Using CMD in Windows 11/10
Uploading a File using cURL
cURL enables file uploads to servers using several protocols, such as FTP, SFTP, and HTTP/HTTPS. Here’s an example using FTP:
curl -T localfile.txt ftp://example.com/ --user username:password
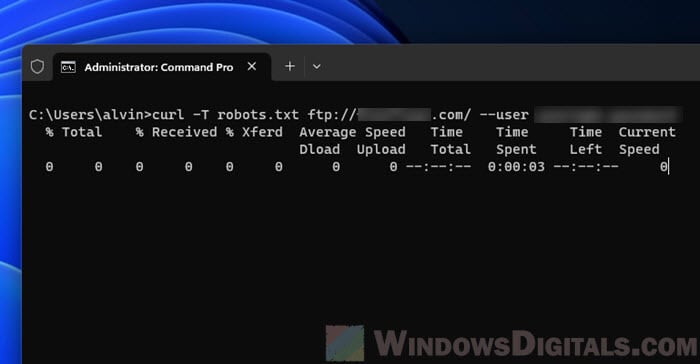
This command will upload localfile.txt from your local machine to example.com via FTP. Replace username:password with your actual username and password for the FTP server.
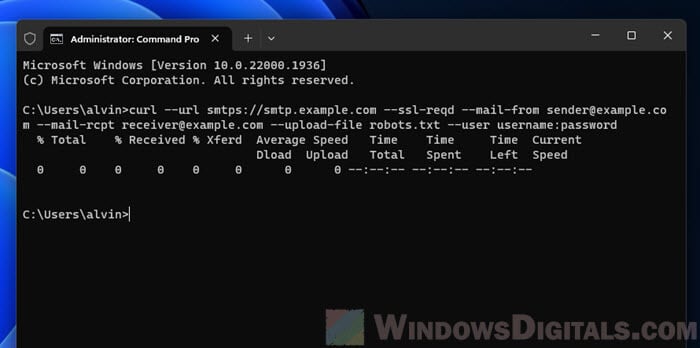
Sending an Email with cURL
cURL’s support for the SMTP protocol means you can use it to send emails. This is particularly useful for sending automated notification emails from scripts. Here’s an example:
curl --url smtps://smtp.example.com --ssl-reqd --mail-from [email protected] --mail-rcpt recei[email protected] --upload-file email.txt --user username:password
In this example, email.txt is a text file containing the email’s subject, headers, and body. Replace smtp.example.com, [email protected], [email protected], and username:password with your SMTP server details and email information.
Managing Cookies with cURL
Cookies can be managed in cURL commands by using the -b (or --cookie) option to send cookies, and the -c (or --cookie-jar) option to store cookies. Here’s an example of sending a cookie:
curl -b "name=value" https://example.com
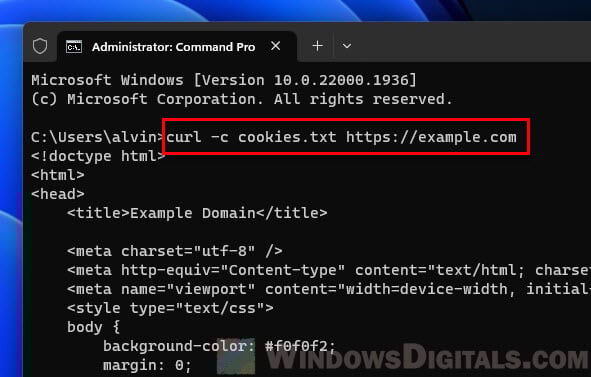
And here’s an example of storing the server’s cookies into a file:
curl -c cookies.txt https://example.com
Setting HTTP Headers with cURL
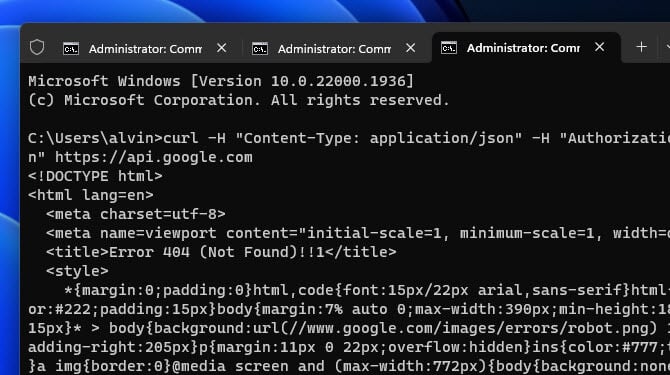
In many instances, particularly when working with APIs, you may need to set specific HTTP headers in your request. This can be achieved with cURL using the -H (or --header) option:
curl -H "Content-Type: application/json" -H "Authorization: Bearer your_token" https://api.example.com
Working with SSL Certificates
cURL allows you to troubleshoot SSL certificates, check their validity, and even download them. To check the validity of a certificate, you can use the following command:
curl -vI https://example.com 2>&1 | findstr "expire date"
In this example, the command uses cURL to check the validity of an SSL certificate by retrieving the server’s response headers and searching for the “expire date” string. It allows for quick verification of SSL certificate expiration dates.
Linked issue: Fixing Website’s Security Certificate Error on Windows 11/10
Making POST Requests with cURL
A POST request is a way to send data to a server. With cURL, making POST requests is straightforward. Let’s say we want to send some JSON data to an API. We can do so like this:
curl -d "{'key1':'value1', 'key2':'value2'}" -H "Content-Type: application/json" -X POST https://api.example.com
The -d (or --data) option specifies the data to be sent, while the -H (or --header) option sets the Content-Type header to application/json. The -X (or --request) option specifies that this is a POST request.
cURL and REST APIs
cURL is also invaluable when working with REST APIs, which use standard HTTP methods like GET, POST, PUT, DELETE, etc. We have already seen examples of GET (downloading files) and POST (sending data) operations. Now let’s look at how to use cURL for a PUT request, typically used for updating resources:
curl -d "{'key1':'value1', 'key2':'value2'}" -H "Content-Type: application/json" -X PUT https://api.example.com/resource/1
And here’s how to make a DELETE request, used to delete a resource:
curl -X DELETE https://api.example.com/resource/1
Concluding Thoughts
Running cURL from the Command Prompt in Windows 11 is not only a simple process, but also a powerful tool that allows you to interact with web services directly from your machine, automating tasks, testing web servers, and much more. It’s a tool that is as powerful as it is ubiquitous – cURL is essentially available on every platform, making your scripts portable and universal.
If you’re ever unsure about a cURL command or need to check how to write one, don’t forget you have a handy helper: the curl --help command. This is like a mini instruction book right at your fingertips, giving you a fast rundown of what cURL can do. It’s the first place to go if you have questions or need help with cURL.
