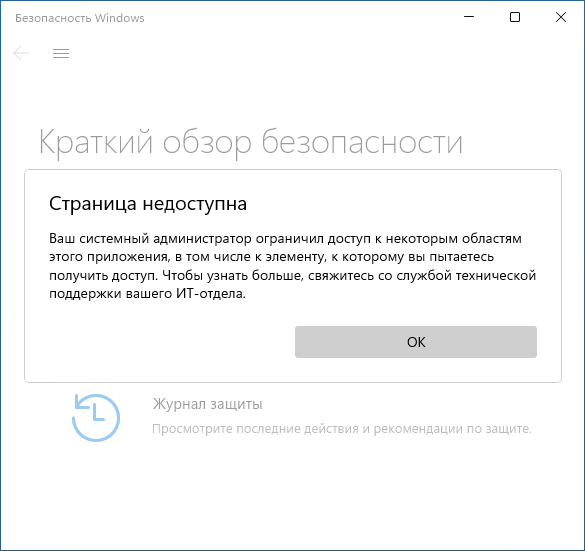
 При открытии отдельных параметров встроенного антивируса Windows 11 и Windows 10, известного как Microsoft Defender или Защитник Windows, вы можете увидеть сообщение «Страница недоступна. Ваш системный администратор ограничил доступ к некоторым областям этого приложения, в том числе к элементу, к которому вы пытаетесь получить доступ».
В этой инструкции подробно о способах исправить ситуацию и получить доступ к нужным настройкам, а также о том, почему это может происходить.
- Возможные причины
- Способы снять ограничения Microsoft Defender
- Windows PowerShell
- В реестре
- В gpedit.msc
- Удаление всех настроенных политик
Возможные причины
Сначала о возможных причинах, по которым пользователь может получать сообщение о том, что «администратор ограничил доступ к некоторым областям этого приложения» в «Безопасность Windows»:
- Был установлен сторонний антивирус, заблокировавший часть функций и настроек Microsoft Defender. Обычно это выполняется в целях обеспечения стабильной работы и в такой ситуации, возможно, не следует предпринимать каких-либо действий.
- Вы использовали какие-либо средства для отключения Защитника Windows 11 и Windows Как и в предыдущем случае: если это было сделано вами целенаправленно, может иметь смысл оставить всё как есть.
- Вами или сторонним ПО на компьютере (иногда — вредоносным) были настроены локальные политики Microsoft Defender, отключающие доступ к отдельным его параметрам.
- Политики, ограничивающие доступ к настройкам, действительно были настроены вашим системным администратором (если речь идёт о компьютере организации). В такой ситуации, если есть необходимость в изменении параметров, возможно, действительно следует обратиться к системному администратору.
Не исключены и другие сценарии появления проблемы, например, в какой-либо «сборке» Windows соответствующие политики могут быть настроены изначально.
Для выполнения всех далее описанных действий вы обязательно должны иметь права администратора на компьютере. Если это не так, потребуется либо зайти под учетной записью администратора, либо каким-то образом получить необходимые права, например, включив скрытую системную учетную запись «Администратор».
Способы снять ограничения доступа в Microsoft Defender
Почти во всех случаях ограничения в окне «Безопасность Windows» задаются политиками Microsoft Defender, изменить которые можно в редакторе локальной групповой политики (если у вас Windows 11/10 Pro или Enterprise) или редакторе реестра (для любой версии Windows).
Прежде чем приступать, рекомендую проверить, есть ли точки восстановления системы на дату, когда проблемы ещё не было. Если есть — используйте их в первую очередь, а уже затем переходите к далее описанным подходам к решению. В частности, это может помочь, когда причиной ошибки стали обновления системы безопасности Windows, прецеденты чему уже были.
Windows Powershell (Терминал Windows)
Перед тем как прибегать к далее описанным методам решения проблемы, попробуйте следующий быстрый метод решения, иногда он оказывается работоспособным:
- Закройте окно «Безопасность Windows».
- Запустите Windows PowerShell или Терминал Windows от имени администратора, сделать это можно через меню по правому клику на кнопке Пуск.
- Введите команду
Set-MpPreference -UILockdown 0
и нажмите Enter.

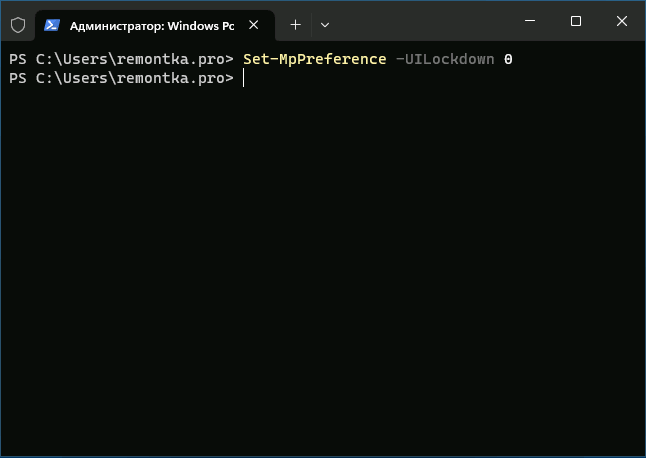
После успешного выполнения команды закройте окно консоли и проверьте, была ли решена проблема.
В реестре
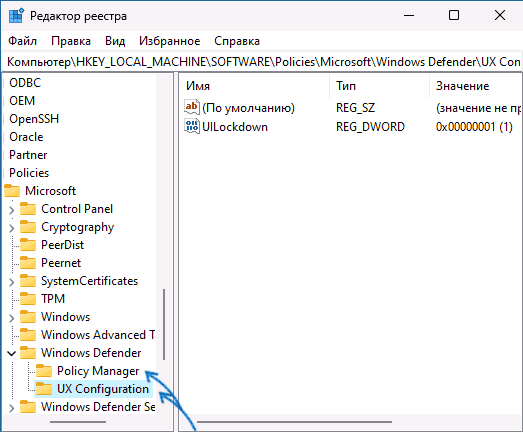
Рекомендую начать с редактора реестра:
- Нажмите правой кнопкой мыши по кнопке «Пуск», выберите пункт «Выполнить», введите regedit и нажмите Enter.
- В редакторе реестра перейдите к разделу
HKEY_LOCAL_MACHINE\SOFTWARE\Policies\Microsoft\Windows Defender\
- По умолчанию в этом разделе должен быть лишь один подраздел — Policy Manager, при этом пустой. Если в нём есть значения кроме «По умолчанию» — удалите их (выбираем значение, правый клик — удалить). Если в этом расположении есть другие подразделы, например, UX Configuration — удалите их тоже.

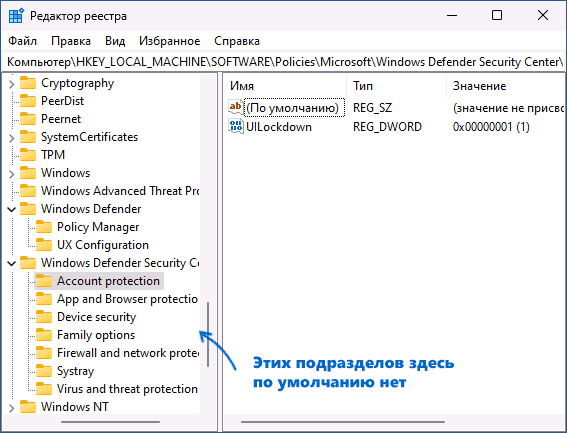
- Проверьте, существует ли раздел реестра
HKEY_LOCAL_MACHINE\SOFTWARE\Policies\Microsoft\Windows Defender Security Center\
Если он присутствует в реестре и содержит какие-либо значения или подразделы, удалите их тоже.

- Закройте редактор реестра и перезагрузите компьютер, затем проверьте, решило ли это проблему.
В ситуации, когда после перезагрузки компьютера проблема не решена, при этом какие-то из указанных разделов или значений реестра вы удаляли, проверьте: не появились ли они снова.
Если вы снова их там наблюдаете, при этом речь идёт о личном компьютере с личной учётной записью, есть вероятность что какое-то стороннее программное обеспечение добавляет эти изменения в реестр. Возможно, это антивирус, а возможно — наоборот. Если есть подозрения о наличии чего-то вредоносного, имеет смысл выполнить проверку с помощью таких средств как Dr.Web CureIt!, AdwCleaner и других.
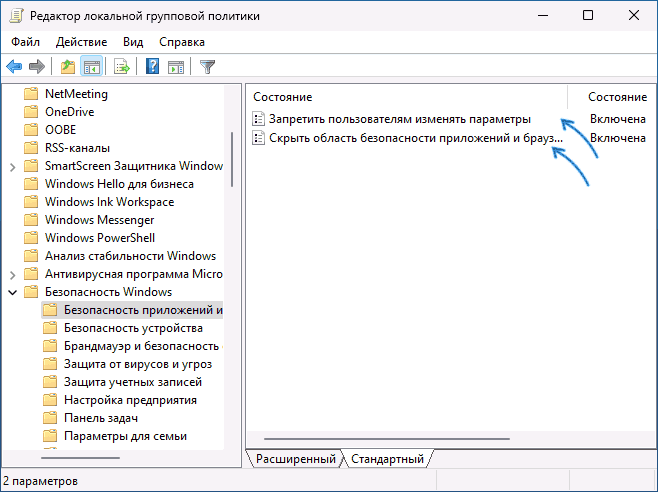
В редакторе локальной групповой политики
В Windows 11 и Windows 10 Pro или Enterprise, можно использовать редактор локальной групповой политики для проверки настроенных политики и их отключения:
- Нажмите клавиши Win+R на клавиатуре, введите gpedit.msc и нажмите Enter.
- В редакторе локальной групповой политики перейдите в раздел «Конфигурация компьютера» — «Административные шаблоны» — «Компоненты Windows».
- Поочередно зайдите в подразделы «Безопасность Windows», «Центр обеспечения безопасности», «Антивирусная программа Microsoft Defender» и изучите политики в этих разделах и их подразделах: по умолчанию состояние всех должно быть «Не задана». Если для каких-то из политик вы видите «Включена» или «Отключена», дважды нажмите по такой политики и установите «Не задано», примените настройки.

- После выполнения этих действий, перезагрузите компьютер и проверьте, решило ли это проблему.
Также здесь может оказаться полезным материал: Как сбросить локальные групповые политики и политики безопасности в Windows.
Удаление всех настроенных политик, имеющих отношение к Защитнику Windows и не только к нему
При отсутствии желаемого результата после выполнения описанных выше шагов можно попробовать удалить вообще все настроенные политики из реестра.
Учитывайте, если в них было настроено что-то полезное, оно также будет потеряно, возможны и нежелательные последствия. Выполняйте эти действия только под свою ответственность. Желательно создать точку восстановления системы перед выполнением далее описанных действий.
Запустите командную строку от имени администратора, затем по порядку введите следующие команды, нажимая Enter после каждой. Выполнение некоторых из указанных команд может завершаться с ошибкой, в этом случае просто переходим к следующей.
reg delete "HKLM\Software\Microsoft\Windows\CurrentVersion\Policies" /f
reg delete "HKLM\Software\Microsoft\WindowsSelfHost" /f
reg delete "HKLM\Software\Policies" /f
reg delete "HKLM\Software\WOW6432Node\Microsoft\Policies" /f
reg delete "HKLM\Software\WOW6432Node\Microsoft\Windows\CurrentVersion\Policies" /f
reg delete "HKLM\SOFTWARE\Policies\Microsoft\Windows Defender" /v
reg delete "HKLM\SOFTWARE\Policies\Microsoft\Windows Defender Security Center" /v
reg delete "HKCU\Software\Microsoft\Windows\CurrentVersion\Policies" /f
reg delete "HKCU\Software\Microsoft\WindowsSelfHost" /f
reg delete "HKCU\Software\Policies" /f
reg delete "HKLM\Software\Microsoft\Policies" /f
Перезагрузите компьютер после выполнения команд и проверьте, была ли решена проблема.
Если есть основания полагать, что сообщение «Ваш системный администратор ограничил доступ к некоторым областям этого приложения» — результат работы вируса или другого вредоносного ПО, предпримите меры для его поиска и удаления. Здесь может оказаться полезной инструкция: Что делать, если вирус блокирует сайты, установку и запуск антивирусов.
Windows Defender — стандартный антивирус для Windows 10, который защищает компьютер от вирусов, троянов и других угроз. Он отслеживает каждый запуск файлов и может блокировать потенциально опасные приложения. Но иногда он может помешать работе полезных программ, поэтому важно знать, как управлять настройками Windows Defender.
- Как разрешить файл в Windows Defender
- Как добавить приложение в исключения Windows Defender
- Как вернуть файл из карантина Защитника Windows
- Как отключить защиту на Windows 10
- Дополнительные рекомендации
Как разрешить файл в Windows Defender
Если Windows Defender заблокировал запуск полезной программы, необходимо добавить этот файл в список исключений. Для этого выполните следующие действия:
- Выберите Пуск > Параметры > Обновление и безопасность > Безопасность Windows > Защита от вирусов и угроз.
- В разделе Параметры защиты от вирусов и угроз выберите Управление настройками.
- В разделе Исключения нажмите Добавление или удаление исключений.
- Добавьте файл в список исключений.
Как добавить приложение в исключения Windows Defender
Кроме отдельных файлов, можно добавить в исключения целые приложения. Чтобы это сделать, пройдите по следующей инструкции:
- Перейдите в параметры > обновления и безопасности > защиты от вирусов.
- В области защиты от вирусов выберите «Управление настройками».
- В области «Исключения» выберите «Добавить или удалить исключения».
- Выберите «Добавить исключение».
- Выберите «Приложение» и выберите нужное приложение, которое нужно добавить в список исключений.
Как вернуть файл из карантина Защитника Windows
Защитник Windows может помещать потенциально опасные файлы в карантин. Если программа, которую вы считаете безопасной, была помещена в карантин, вы можете ее восстановить. Сделать это можно следующим образом:
- Нажмите на кнопку для открытия центра безопасности;
- В новом меню выберите пункт «Защита от вирусов и угроз»;
- Нажмите «Журнал сканирования»;
- Нажмите «Угрозы в карантине», чтобы раскрыть весь список;
- Выберите файл, который вы хотите восстановить, и нажмите кнопку «Восстановить».
Как отключить защиту на Windows 10
Несмотря на то, что Windows Defender — необходимый инструмент, иногда требуется отключить его для каких-то конкретных целей. Сделать это можно следующим образом:
- Выберите приложение Безопасность Windows в результатах поиска, перейдите в защиты от вирусов.
- В защите от вирусов выберите Управление настройками.
- Выберите для параметра Защита в режиме реального времени значение Выкл.
Дополнительные рекомендации
- Не отключайте Windows Defender надолго, если вы не уверены в своей безопасности в Интернете.
- Регулярно проверяйте свою систему на наличие вирусов и других угроз.
- Создавайте резервные копии важных файлов и документов на внешний носитель, на случай вирусной атаки.
- Никогда не скачивайте файлы из ненадежных источников, особенно те, которые требуют предварительного скачивания дополнительного ПО.
Как изменить способ открытия файла андроид
Для изменения способа открытия файла на Андроиде необходимо выбрать или изменить приложение, которое будет использоваться для этого. Сначала нужно открыть приложение Файлы и выбрать категорию, чтобы отобразить список файлов. Затем нажмите и удерживайте файл, который вы хотите открыть. После этого перейдите в меню Еще > Открыть с помощью и выберите приложение, которое вы хотите использовать для открытия файла. Этот способ позволяет быстро и удобно изменить настройки открытия файла на Андроиде в соответствии с вашими потребностями. Также можно воспользоваться стандартным приложением, которое используется для открытия файлов на устройстве, или выбрать другое приложение из списка установленных приложений.
Как разрешить доступ к папке Windows
Для того, чтобы разрешить доступ к папке Windows, необходимо выполнить несколько простых действий. Сначала нужно нажать на кнопку «Пуск», после чего выбрать пункт «Параметры». Затем необходимо перейти в раздел «Сеть и Интернет», а затем выбрать «Параметры общего доступа» справа. В разделе «Частные» нужно выбрать опцию «Включить сетевое обнаружение» и «Включить общий доступ к файлам и принтерам». После этого доступ к папке Windows будет разрешен. Это может пригодиться тем, кто работает в условиях сетевой инфраструктуры и нуждается в обмене данными с другими пользователями. Теперь открыть нужную папку можно будет с любого устройства, находящегося в одной сети. Конфиденциальность информации при этом должна быть обеспечена путем ограничения доступа к файлам и папкам только авторизованных пользователей.
Как найти папку Documents and Settings
Если вы хотите найти папку Documents and Settings на компьютере с операционной системой Windows, то нужно знать, что ее расположение может зависеть от версии Windows. Если у вас установлена Windows XP, папка находится по адресу C:\Documents and Settings\Local Settings. Если вы используете Windows 7, то папка Local расположена по адресу C:\Пользователи\Имя пользователя\AppData\Local. В этой папке хранятся временные файлы и данные приложений и программ, установленных на вашем компьютере. Важно помнить, что Documents and Settings — это устаревшее название, и в более новых версиях Windows название папки заменено на Users. Как бы то ни было, для доступа к локальным и временным файлам программ вам нужно найти соответствующую папку на вашем устройстве.
Как открыть папку System32
Для того чтобы открыть папку System32, необходимо выполнить несколько простых шагов. Вначале нужно нажать сочетание клавиш Win-R, после чего в открывшемся окне ввести команду «drivers» и нажать Enter. Таким образом, откроется папка %SystemRoot%\System32\drivers, где содержится множество важных системных файлов. Данная папка ответственна за работу большинства программ на компьютере, поэтому в нее часто нужно заглядывать, чтобы проверить наличие или состояние конкретных файлов. Несмотря на то, что некоторые файлы в папке System32 могут быть скрытыми, пользователь всегда может получить к ним доступ, следуя вышеописанным инструкциям. Важно помнить, что системные файлы необходимо редактировать или удалять только в крайнем случае, чтобы не повредить работу операционной системы.
Download Windows Speedup Tool to fix errors and make PC run faster
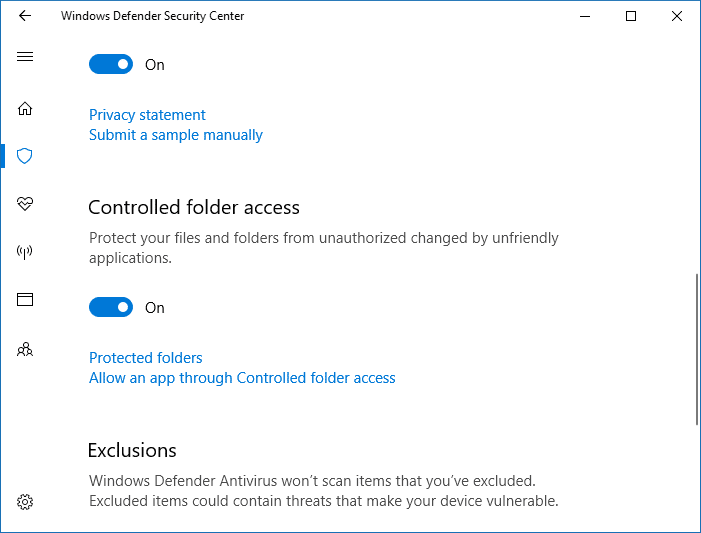
Windows 11/10 brings in one minor but very crucial change to Ransomware Protection in Windows Security. This feature made sure that ransomware and other malware were blocked from hijacking your device and data. It also included settings which once enabled protects files, folders, and memory areas on your device from authorized changes by unfriendly applications.

To allow desktop software through Controlled Folder Access, do the following:
- Open Windows Security and switch to Virus and threat protection.
- Scroll down till you find Ransomware Protection. Click on Manage ransomware protection.
- Turn on this feature if it’s turned off.
- Then click on Allow apps through Controlled folder access.
- Here you can choose apps where were previously blocked or you can add new ones using the menu.
- This will open a file picker window, and you will have to browse through Program files to find the exe of the program, and then select it.
As of now, I don’t see any support for the Microsoft Store apps, though.
This will make sure that you can give access to programs you trust. Some Programs which I often use like Dropbox, Microsoft Word, etc. should be able to access them without any trust issue.
In case one of your programs is blocked by Controlled Folder feature, then you can come here, and unblock it. There is no way to block apps right now.
You should know that Ransomware can get into your PC from almost anywhere. The website, email and even from your favorite app if you are not careful. So make sure to give access to programs which you trust. All your files are backed up on OneDrive connected with the Microsoft account on your PC. So when you get a warning, you can always restore files.
Ashish holds a Bachelor’s in Computer Engineering and is a veteran Windows and Xbox user. He has work experience as a Database and Microsoft.NET Developer. He has been a Microsoft MVP (2008-2010) and excels in writing tutorials to improve the day-to-day experience with your devices.
Windows 10 Fall Creators Update adds a beneficial security feature named Controlled folder access, which is part of the Windows Defender Exploit Guard. You may have noticed the Unauthorized changes blocked notifications. Windows Defender’s Controlled folder access feature is the one behind those notifications. Controlled folder access helps you protect valuable data from malicious programs, such as ransomware.
This article explains how to configure CFA and prevent Unauthorized changes blocked notifications when running a program.
Windows Defender Exploit Guard is a new set of host intrusion prevention capabilities for Windows 10/11, allowing you to manage and reduce the attack surface of apps installed on the computer.
Contents
- What is Controlled folder access?
- How to Use Controlled folder access?
- Enabling Controlled folder access
- Enable protection for additional folder locations
- Allow an app for Controlled folder access
- Allow recently blocked apps for Controlled folder access
- Manage Controlled folder access Using PowerShell
- Enable Controlled folder access using PowerShell
- Protect additional folders using PowerShell
- Allow a specific app (Notepad++) using PowerShell
- Allow all blocked apps (interactively) using PowerShell
- Troubleshoot: Controlled folder access option grayed out or inaccessible
- [Tip] Enable or disable Controlled folder access using shortcut or command-line
What is Controlled folder access in Windows
 Controlled folder access is an anti-ransomware feature in Windows that helps protect your documents, files and memory areas on your computer from modification by suspicious or malicious apps (especially ransomware). Controlled folder access is supported on Windows Server 2019 as well as Windows 10/11.
Sometimes Controlled folder access can block legitimate apps from writing to protected folders (such as the Desktop, Documents folders etc), and shows the notification Unauthorized changes blocked. You an configure Controlled folder access so that you can allow specific applications, as well as add custom folders to the list of “protected” folders.
It is especially useful in helping to protect your documents and information from ransomware that can attempt to encrypt your files and hold them hostage.
Prerequisite: Microsoft Defender Antivirus real-time protection must be enabled for the Controlled folder access feature to work.
Enabling Controlled folder access
To enable Controlled folder access, use these steps:
- Double-click the Defender shield icon in the notification area to open the Windows Defender Security Center.
- Click Virus & threat protection
- Click Virus & threat protection settings

Enabling Windows Defender Controlled folder access - Enable the “Controlled folder access” setting. UAC dialog will pop up now for getting your confirmation/consent.
From now on, Controlled folder access monitors the changes that apps make to files in the protected folders.
Enable protection for additional folder locations
By default, these folders are protected, and there is no way to remove protection for these folders:
User shell folders: Documents, Pictures, Videos, Music, Favorites, and Desktop
Public shell folders: Documents, Pictures, Videos, and Desktop
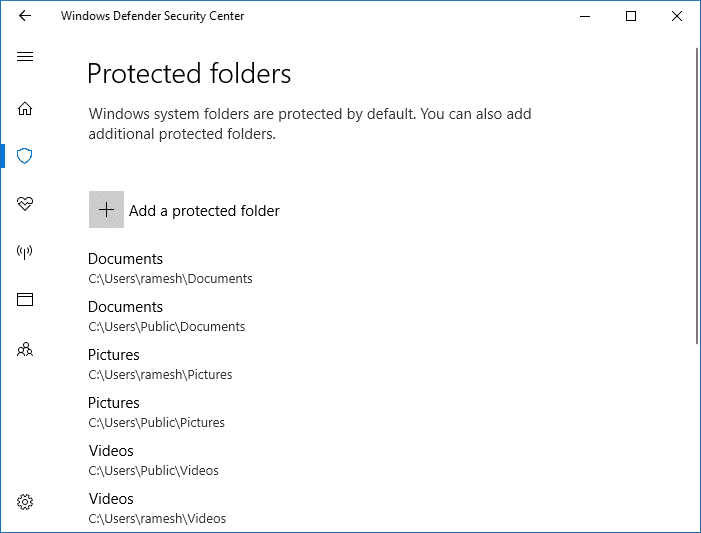
However, some users may not prefer storing their files in the personal shell folders or libraries; they may have their documents in a network share or other locations. In that case, you can bring additional folder locations under Windows Defender protection, by clicking Protected folders link in Windows Defender Security Center, and clicking Add a protected folder button. You can also enter network shares and mapped drives.
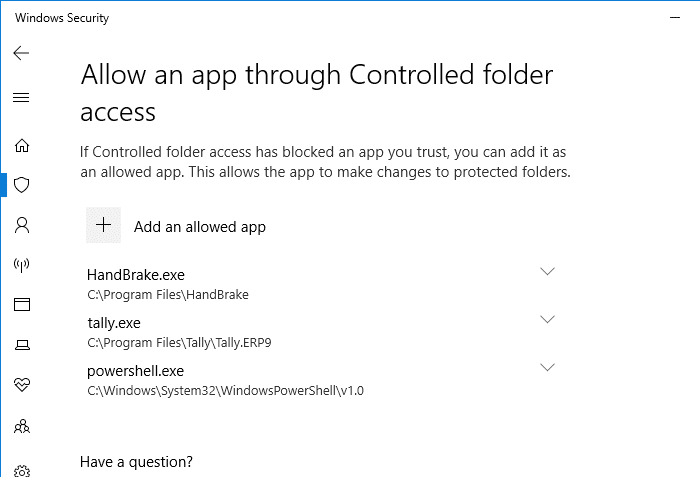
Add (whitelist) apps for Controlled folder access
Windows Defender Controlled folder access will block write access (by “unfriendly” apps) to files in protected folders. If an app attempts to make a change to these files, and the app is blacklisted by the feature, you’ll get a notification about the attempt.
Just as you can complement the protected folders with additional folder paths, you can also add (whitelist) the apps that you want to allow access to those folders.
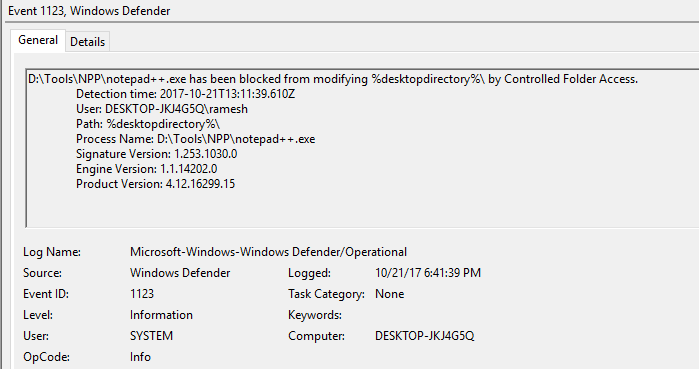
Notepad++ blocked
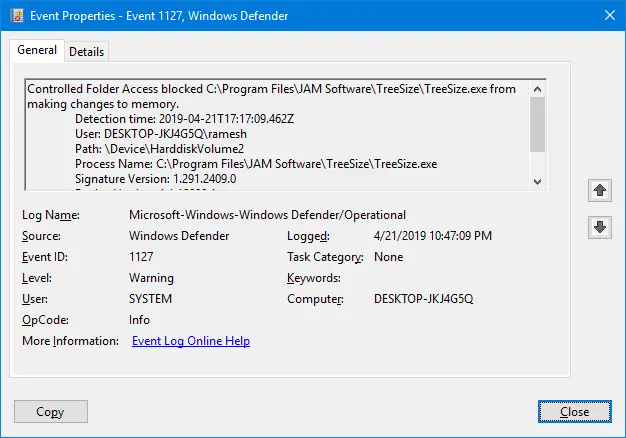
In my case, Controlled folder access was blocking the 3rd party text editor program Notepad++ from saving to the desktop.
D:\Tools\NPP\notepad++.exe has been blocked from modifying %desktopdirectory%\ by Controlled Folder Access.
And an event log entry (Event ID: 1123) is generated for the blocked event.
It will be listed under Applications and Services Logs → Microsoft → Windows → Windows Defender → Operational
| Event ID | Description |
|---|---|
| 5007 | Event when settings are changed |
| 1124 | Audited Controlled folder access event |
| 1123 | Blocked Controlled folder access event |
| 1127 | Blocked “changes to the memory” event? |
There is no official info regarding CFA Event ID: 1127. It could be related to blocked “making changes to memory” events. I found an interesting entry in my system.
Log Name:      Microsoft-Windows-Windows Defender/Operational
Source:        Microsoft-Windows-Windows Defender
Date:
Event ID:      1127
Task Category: None
Level:         Warning
Keywords:
User:          SYSTEM
Computer:      DESKTOP-JKJ4G5Q
Description:
Controlled Folder Access blocked C:\Program Files\JAM Software\TreeSize\TreeSize.exe from making changes to memory.
 	Detection time: 2019-04-21T17:17:09.462Z
 	User: DESKTOP-JKJ4G5Q\ramesh
 	Path: \Device\HarddiskVolume2
 	Process Name: C:\Program Files\JAM Software\TreeSize\TreeSize.exe
 	Signature Version: 1.291.2409.0
 	Engine Version: 1.1.15800.1
 	Product Version: 4.18.1903.4
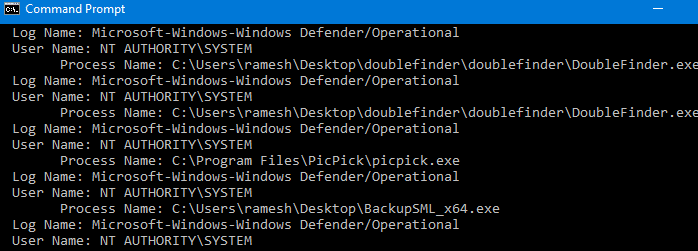
To get the list of the last 25 blocked apps, open a Command Prompt window and run this command-line:
wevtutil qe "Microsoft-Windows-Windows Defender/Operational" /q:"*[System[(EventID=1123)]]" /c:15 /f:text /rd:true | findstr /i "process name:"
Also, see the PowerShell script at the end of this article to list items in a listview grid window and whitelist selected items in a single click.
Here is the list of Unauthorized changes blocked notifications, as seen in the Action Center.

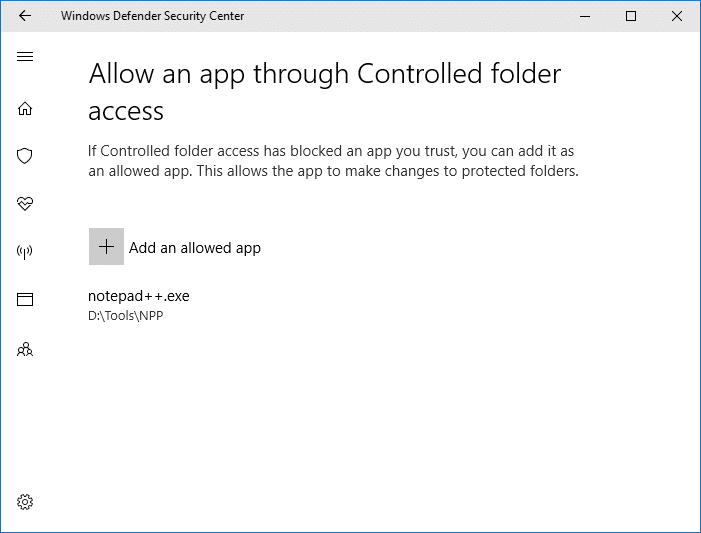
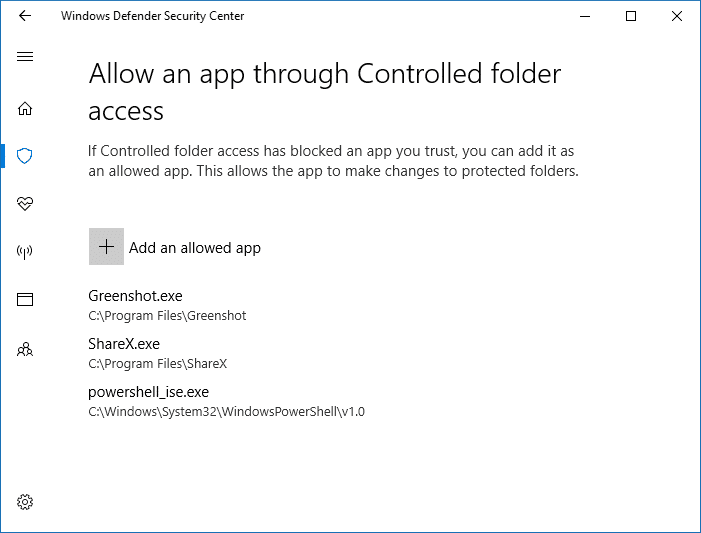
I allowed the app right away, as Notepad++ is a widely used and trusted program. To allow an app, click Allow an app through Controlled folder access option in Windows Defender Security Center. Then, locate and add the app you want to allow.
Allow recently blocked apps
The Controlled folder access also lets you allow apps that were recently blocked. To see the list of apps that are blocked, click on the Add an allowed app button, and click Recently blocked apps.
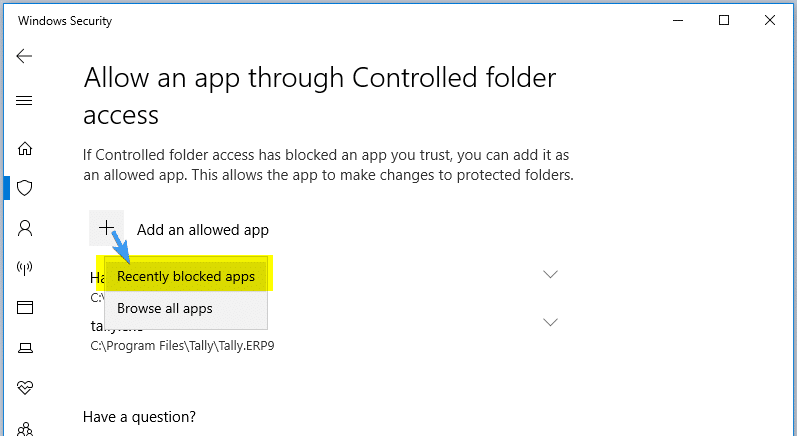
You’ll get the list of apps there were recently blocked. From the list, you can click select an app and add it to the allow list. To do so, you need to click on the + glyph icon or button near the app entry.
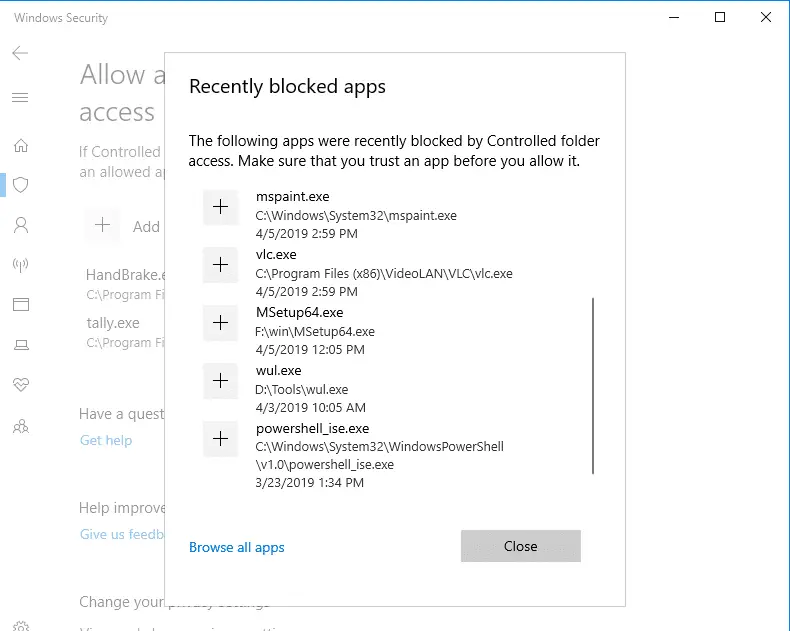
Here, I’ve whitelisted PowerShell.exe process, as an example.
Make sure you allow only the apps you trust. Allowing PowerShell.exe should be done with extreme caution, as crypto-malware may silently execute a PowerShell command or script on a vulnerable computer.
Manage Controlled folder access Using PowerShell
PowerShell’s Set-MpPreference cmdlet supports many parameters so that you can apply every Windows Defender setting through script. For the full list of parameters supported by this cmdlet, check out this Microsoft page.
Enable Controlled folder access using PowerShell
Start powershell.exe as administrator. To do so, type powershell in the Start menu, right click Windows PowerShell and click Run as administrator.
Enter the following cmdlet:
Set-MpPreference -EnableControlledFolderAccess Enabled

To disable, use this command:
Set-MpPreference -EnableControlledFolderAccess Disabled
Protect additional folders using PowerShell
Add-MpPreference -ControlledFolderAccessProtectedFolders "c:\apps"
Allow a specific app (Notepad++) using PowerShell
Add-MpPreference -ControlledFolderAccessAllowedApplications "d:\tools\npp\notepad++.exe"
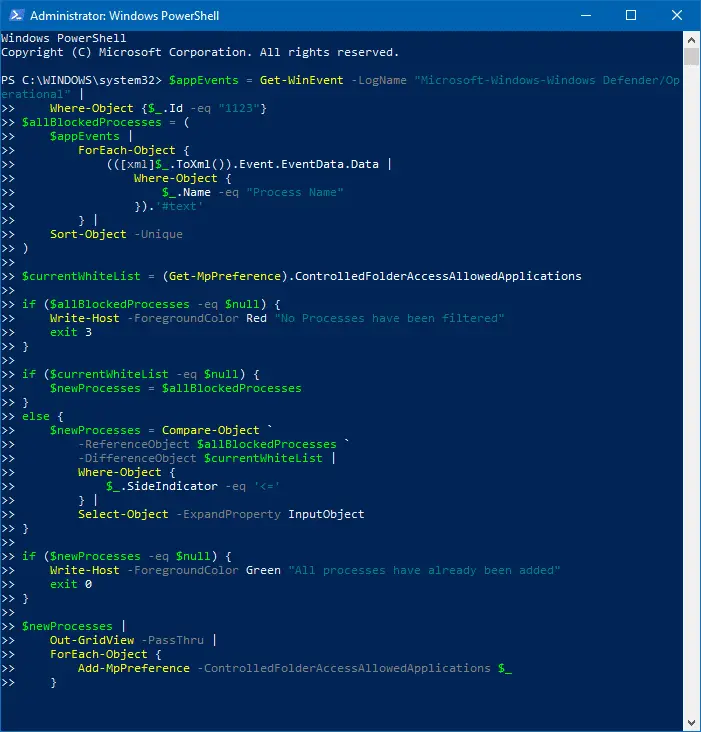
Allow all blocked apps to Controlled folder access (interactively) using PowerShell
Redditor /u/gschizas has come up with a neat little PowerShell script which parses the event log (entries with ID: 1123 which is the “Blocked Controlled folder access” event) to gather the list of apps blocked by Windows Defender’s Controlled folder access. The script then offers to whitelist all or selected programs from the listing.
How to use the script?
- Open PowerShell as administrator.
- Visit the gschizas GitHub page
- Select all the lines of code and copy to clipboard.
- Switch to the PowerShell window and paste the contents there, and press ENTER

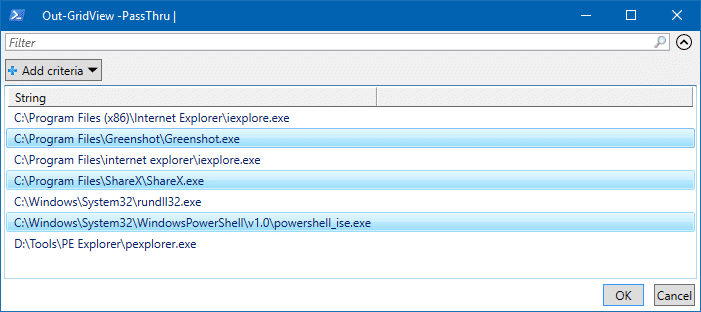
Allow all apps through Controlled folder apps –Powershell script The list of blocked apps is shown, as recorded in the event log.

Select the apps to whitelist - Select the apps you want to whitelist and click OK. To multi-select programs, press the Ctrl button and click on the corresponding entry.
- Click OK.This allows the apps through Controlled folder access en masse.
Apps added to Controlled folder apps “Allow” list
In an enterprise environment, Controlled folder access can be managed using:
- 1. Windows Defender Security Center app
- 2. Group Policy
- 3. PowerShell
Troubleshooting: Controlled folder access option missing, grayed out or inaccessible
When you try to open the Controlled folder access page via Start, you may see this error message:
Page not available
Your IT administrator has limited access to some areas of this app, and the item you tried to access is not available. Contact IT helpdesk for more information.
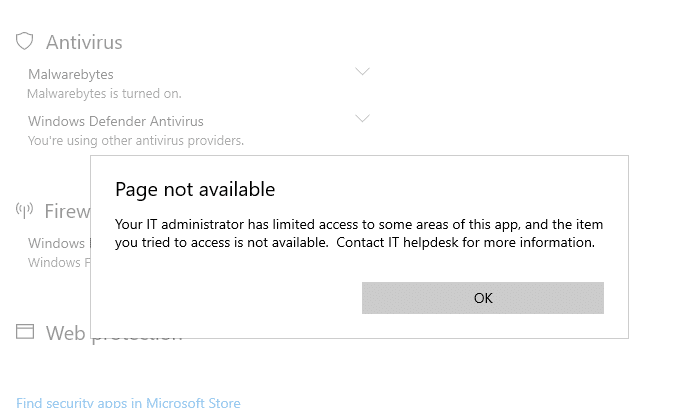
You may be wondering if the above error is caused by some group policy restrictions in effect on your computer. It may not necessarily be true.
The error occurs if you’re using a third-party antivirus solution on your computer, which would have turned off the built-in Windows Defender. As stated earlier, the Controlled folder access feature fully relies on Windows Defender real-time protection. If Windows Defender is turned off, Controlled folder access wouldn’t work. Hence the page remains inaccessible or grayed out, depending upon the build of Windows 10/11 you’re using.
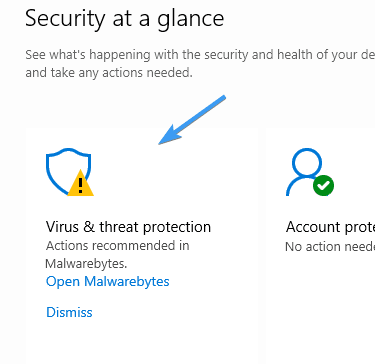
In my case, the error occurred after I installed Malwarebytes Premium. It had replaced Windows Defender.
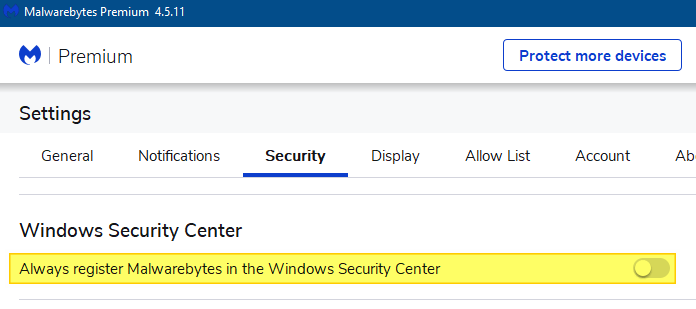
Note: If you’re a Malwarebytes premium user, you can still enable and use Windows Defender alongside Malwarebytes premium.
To do so, open Malwarebytes Premium → Settings → Security → Disable Always register Malwarebytes in the Windows Security Center.
This option ensures that Malwarebytes Premium doesn’t turn off Microsoft Defender Antivirus. It can run alongside Defender so that the Controlled folder access feature would work as well. After turning off the setting, the Malwarebytes program status wouldn’t appear in the Windows Security Center.
Enable or disable Controlled folder access using desktop shortcuts
In some situations, you may need to temporarily disable Controlled Folder Access to allow programs to write to protected folders, without having to whitelist each program. For example, you may have whitelisted the ShareX program, but screen captures may still not work because the video capture and processing tool FFMpeg.exe is not whitelisted in Controlled Folder Access. And you may not want to allow the external program permanently.
For this purpose, you can create two desktop shortcuts to disable/enable Controlled Folder Access quickly.
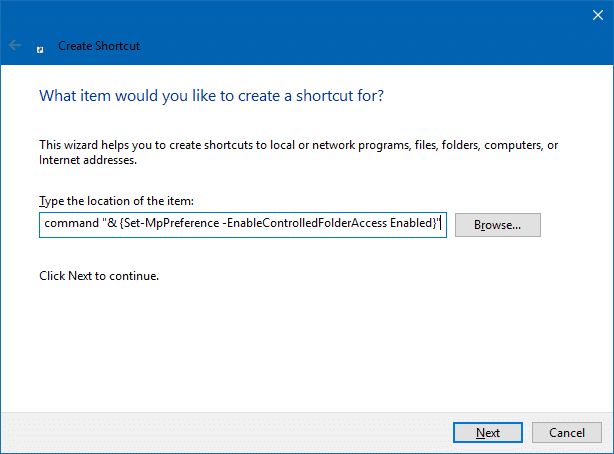
- Right-click on the desktop, click New, shortcut
- In the “Type the location of the item” text box, type the following command:
powershell.exe -command "& {Set-MpPreference -EnableControlledFolderAccess Enabled}"
- Name the shortcut “Enable Controlled Folder Access”.Quick Tip: In the shortcut Properties tab, you may configure it to run minimized if you don’t want to see the PowerShell window when the command is executed. Of course, PowerShell.exe need to be whitelisted in order for these shortcuts to work. PowerShell’s executable path is
C:\Windows\system32\WindowsPowerShell\v1.0\powershell.exeif you’re going to whitelist it. - Similarly, create another shortcut with the following target:
powershell.exe -command "& {Set-MpPreference -EnableControlledFolderAccess Disabled}"Name it as “Disable Controlled Folder Access”, and optionally, change the shortcut icon for both the items as desired.

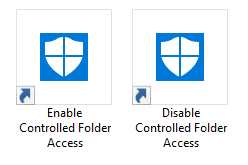
Run as Administrator
The shortcut/command has to be run elevated (as administrator). So, right-click each shortcut and click Properties. Click Advanced, and enable “Run as Administrator” checkbox, and click OK, OK.
Repeat the step for the other shortcut.
Closing words
Microsoft Defender Antivirus is getting a new security feature in almost every Windows 10 build. To name a few, Windows Defender Offline scanner, Limited Periodic Scanning, “Block at first sight” Cloud-protection and Automatic sample submission, and adware or PUA/PUP protection capability, and Application Guard.
And now Controlled folder access introduced in the Fall Creators Update is yet another valuable feature to guard the system against threats, such as ransomware.
One small request: If you liked this post, please share this?
One «tiny» share from you would seriously help a lot with the growth of this blog.
Some great suggestions:
- Pin it!
- Share it to your favorite blog + Facebook, Reddit
- Tweet it!
So thank you so much for your support. It won’t take more than 10 seconds of your time. The share buttons are right below. 
Related article
- Cannot Save Files to Desktop and Error “File not found”.
Подобно другим антивирусам, встроенный Защитник Windows ведет историю обнаруженных угроз, просмотреть которую можно в журнале защиты. Эти записи будут отображаться в журнале, даже если опасный файл обезврежен и помещен в карантин, что может вызвать своеобразный побочный эффект, проявляющийся наличием красного или желтого значка на иконке Защитника в системном лотке. в Windows 10 2004 разработчики вроде бы должны были решить эту проблему.
Но, судя по отзывам пользователей, сталкиваться с ней приходится и в последней стабильной версии системы.
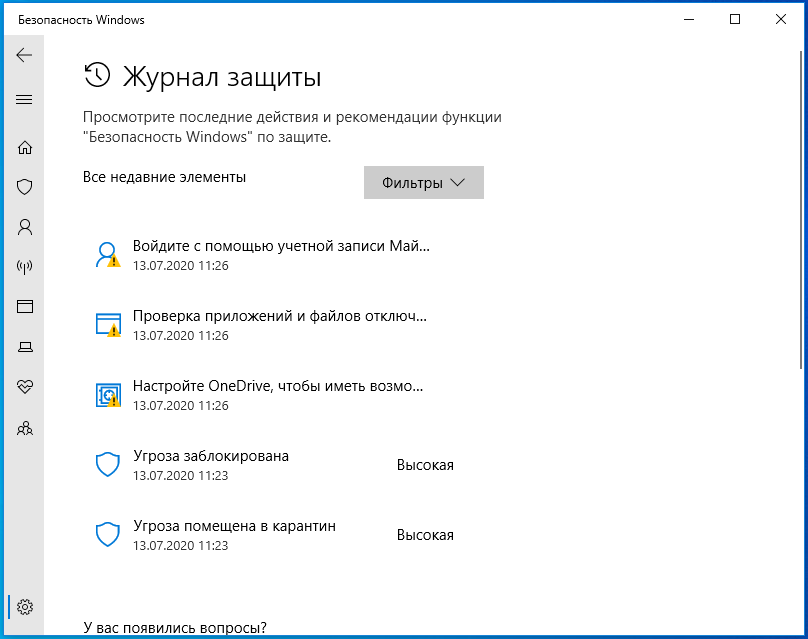
Чтобы избавиться от этих предупреждающих о несуществующей уже угрозе значков, нужно очистить журнал Windows Defender. В сборках до релиза 1903 сделать это можно было через интерфейс управления безопасностью Windows, в более поздних сборках системы кнопка очистки журнала отсутствует. Данные журнала удаляются автоматически по истечении 30-и дней, но вы можете сократить этот период или просто удалить их принудительно.
Изменение срока хранения Журнала Защитника
Для изменения срока хранения записей в журнале Защитника Windows 10 мы предлагаем использовать консоль PowerShell.
Запустив ее от имени администратора, выполните в ней команду Get-MpPreference и найдите в полученном списке параметр ScanPurgeItemsAfterDelay.
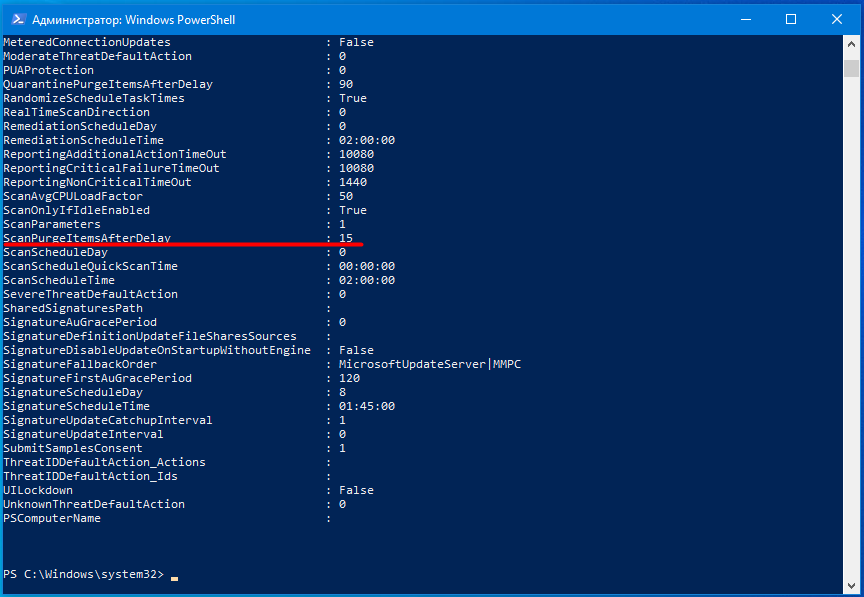
В Windows 10 2004 его значение равняется 15, то есть данные журнала хранятся 15 дней. Чтобы сократить этот срок, скажем, до двух дней, выполните в PowerShell такую команду:
Set-MpPreference -ScanPurgeItemsAfterDelay 2

Принудительная очистка Журнала Защитника
Если вы хотите очистить журнал прямо сейчас, выполните следующие действия.
Перейдите в Проводнике в папку C:\ProgramData\Microsoft\Windows Defender\Scans, а затем зайдите в расположенную в ней папку History, подтвердив вход с правами администратора.
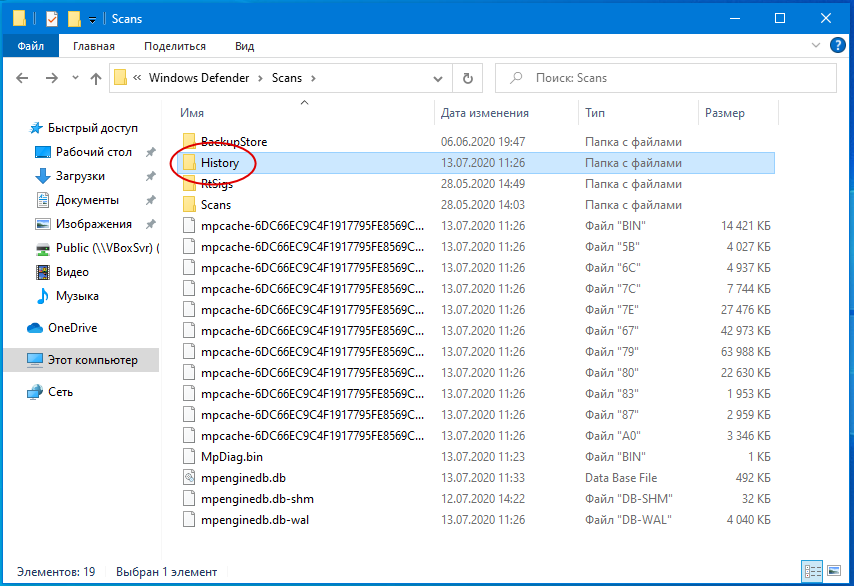
В свою очередь, в ней найдите папку Service и удалите ее.
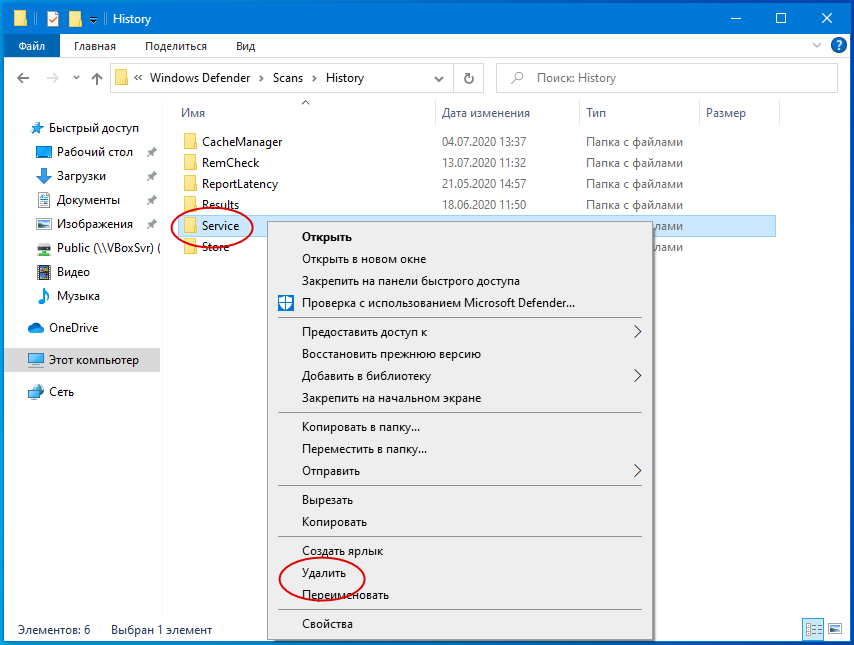
Вместе с ней будет удалена и история действий Windows Defender.
Должен исчезнуть и значок предупреждения на иконке Защитника. Однако, если у вас не настроены базовые функции безопасности, желтый значок предупреждения будет отображаться независимо от того, имеются в журнале записи или нет.
![]() Загрузка…
Загрузка…