Установка и настройка DNS-сервера и Active Directory, DHCP-сервера в Windows Server 2019 не отличается от предыдущих выпусков серверов компании Microsoft, таких как Windows Server 2016, 2012. Пройдя несколько шагов несложно устанавить следующие роли: DNS-сервер и Доменные службы Active Directory, DHCP-сервер.
- Переименование сервера
- Настройка сетевого интерфейса
- Установка на сервера ролей: DNS-сервер, Доменные службы Active Directory, DHCP-сервер
- Повышение роли сервера до уровня контроллера домена
- Настройка обратной зоны DNS
- Настройка DHCP-сервера
Переименование сервера
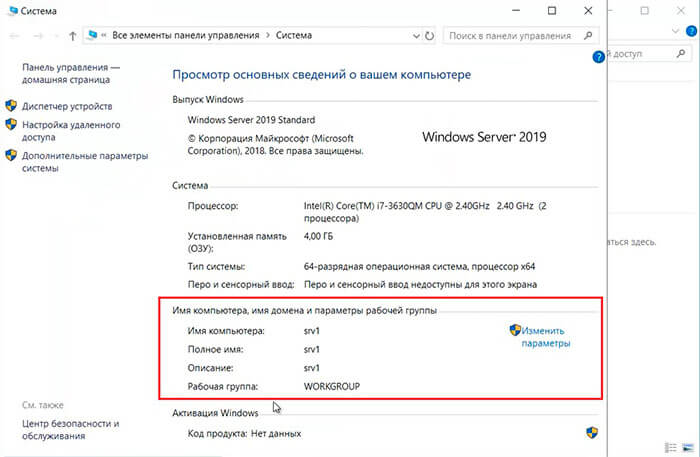
1. Для изменения имени сервера нажимаем правой клавишей мыши на «Этот компьютер«, в появившемся меню выбираем «Свойства«.
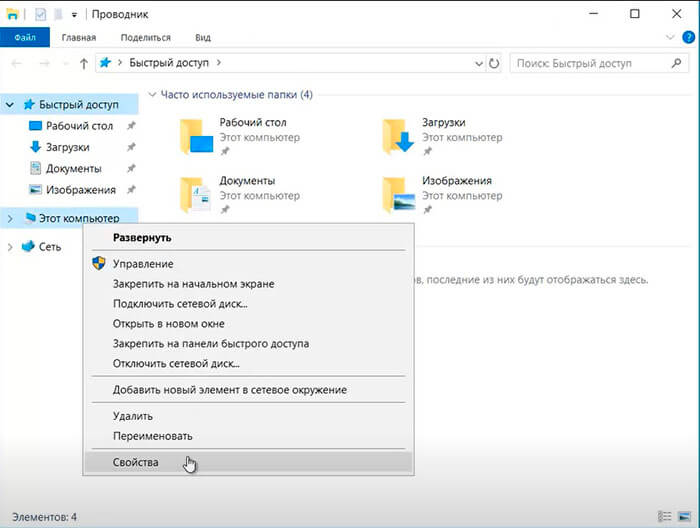
2. Далее нажимаем «Изменить параметры«. В открывшемся окне добавляем описание сервера, далее выбираем «Изменить«.
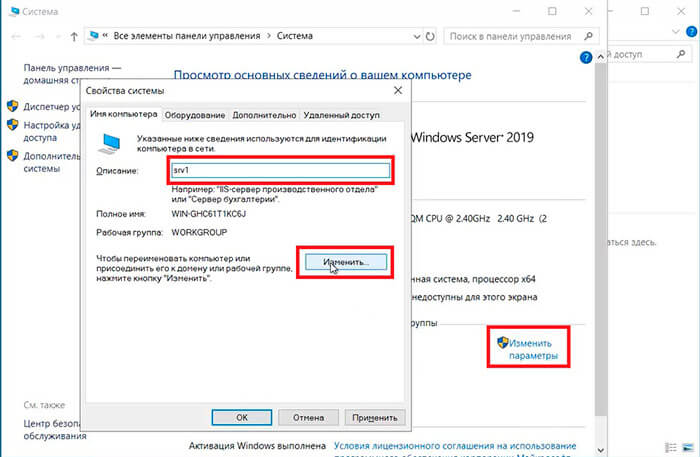
3. Задаём «Имя компьютера«, нажимаем «ОК«. Появится предупреждение о том, что изменения вступят в силу после перезагрузки компьютера. Подтверждаем — «ОК«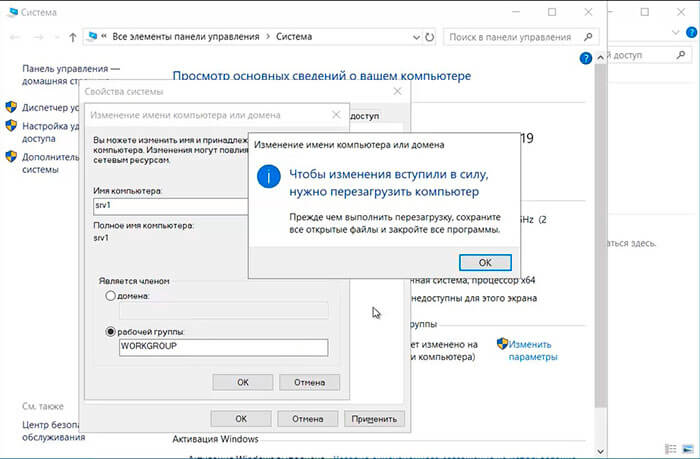
4. Нажимаем «Перезагрузить сейчас» и ожидаем перезагрузки сервера.
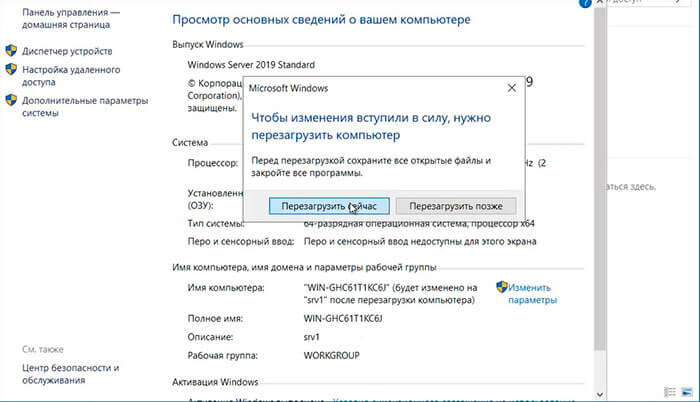
5. После перезагрузки компьютера проверяем имя сервера («Мой компьютер» — правой клавишей мыши — «Свойства«).
Настройка сетевого интерфейса
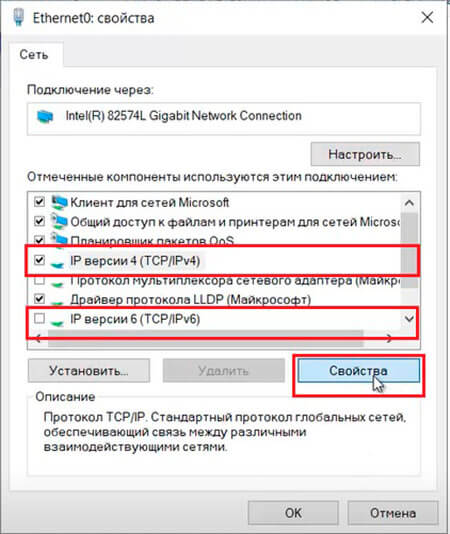
6. Для настройки сетевого интерфейса в поиске набираем ncpa.cpl, далее «Enter«. Снимаем чекбокс «IP версии 6«, далее выбираем «IP версии 4«, далее «Свойства«.
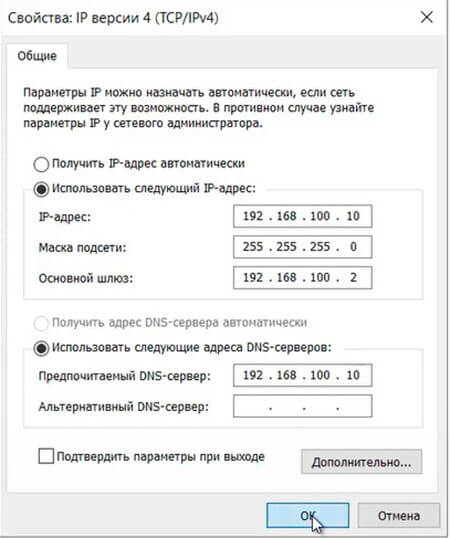
7. Выбираем «Использовать следующий IP-адрес» и задаём статический IP-адрес сервера, маску подсети, основной шлюз (если есть), и предпочитаемый DNS-сервер. Нажимаем «ОК«. На этом настройка сетевого интерфейса закончена.
Установка на сервера ролей: DNS-сервер, Доменные службы Active Directory, DHCP-сервер
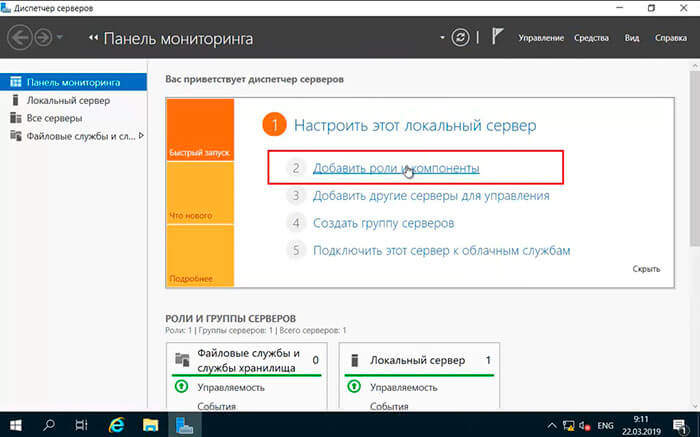
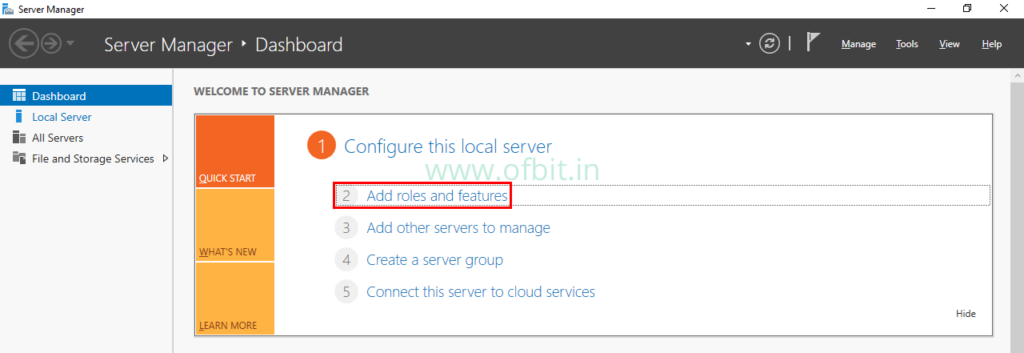
8. Нажимаем «Пуск«, далее «Диспетчер серверов«.

9. В новом окне выбираем «Добавить роли и компоненты«.
10. Читаем предупреждение сервера «Перед началом работы«, не забываем защитить учетную запись администратора надежным паролем, затем «Далее«.
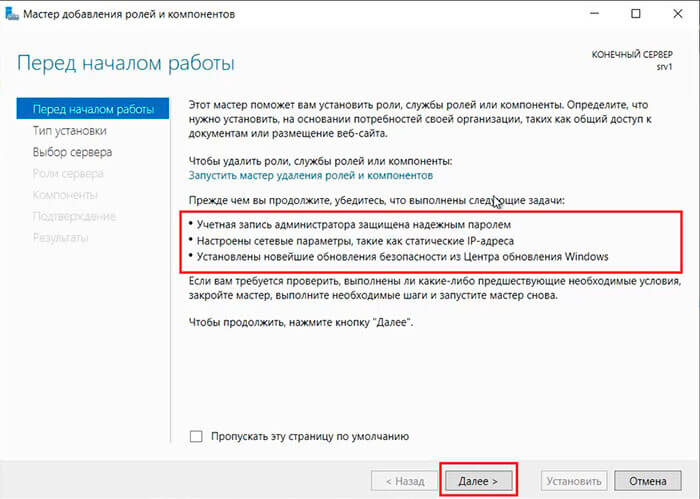
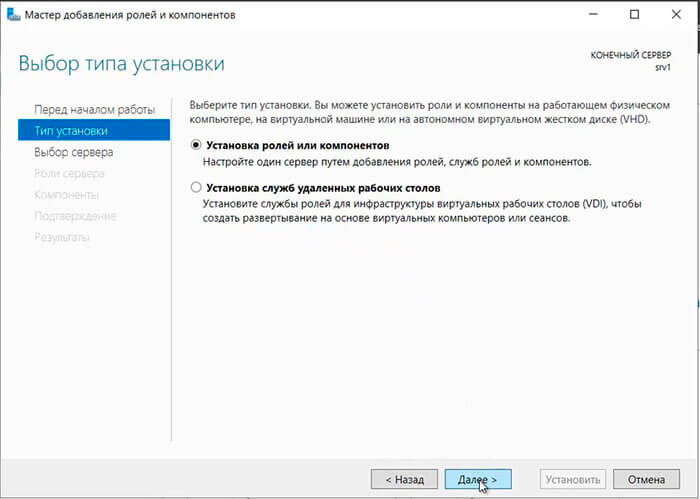
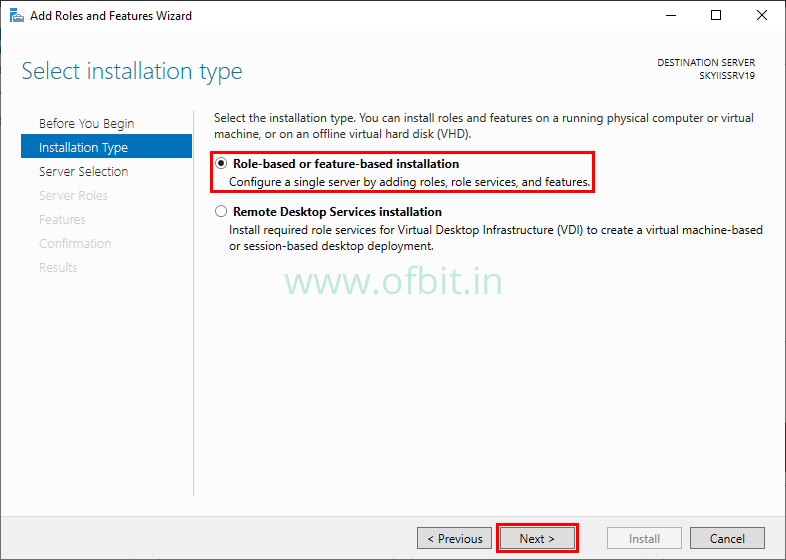
11. Проверяем, что чекбокс стоит на «Установка ролей или компонентов«, затем «Далее«.
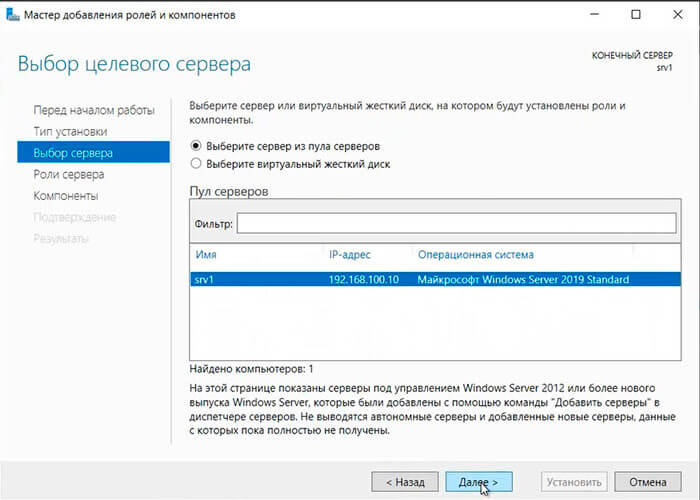
12. Выбираем сервер, на который будут установлены роли и компоненты. Снова «Далее«.
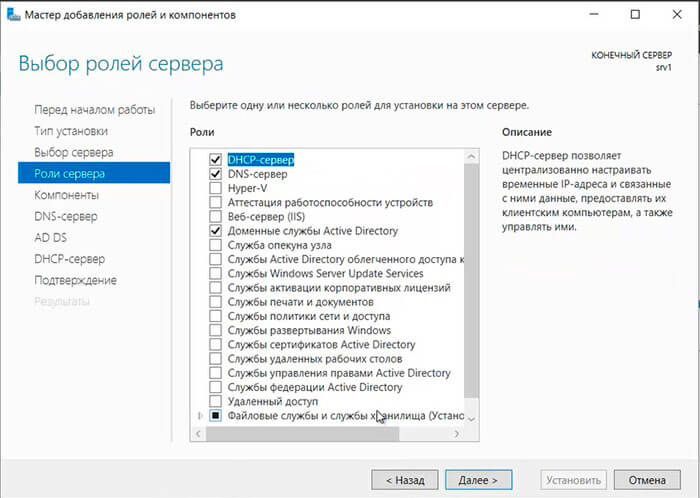
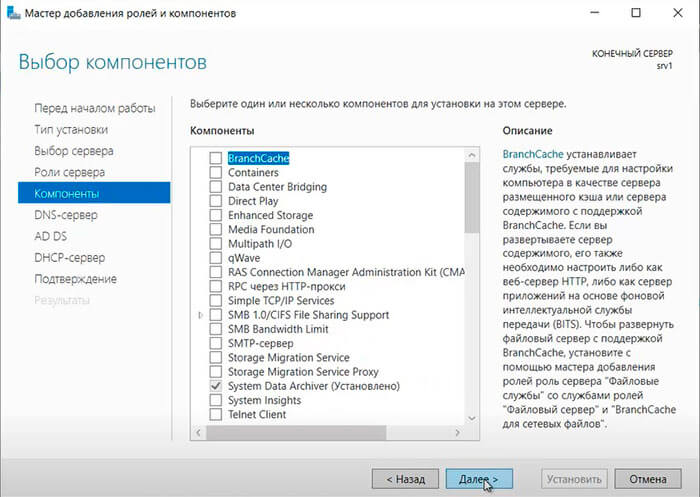
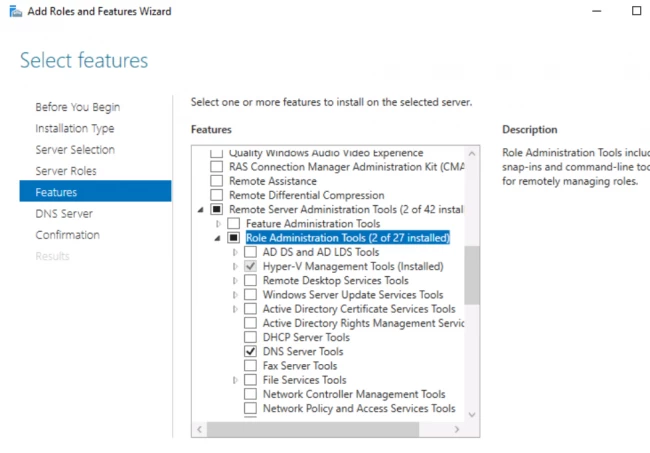
13. Устанавливаем чекбоксы напротив выбранных ролей сервера, в данном случае это DNS-сервер, Доменные службы Active Directory, DHCP-сервер. Нажимаем «Далее«.
14. При каждом выборе роли будет появляться «Мастер добавление ролей и компонентов«, который будет спрашивать о добавлении компонентов для выбранных ролей сервера. Нажимаем «Добавить компоненты«.

15. Нажимаем «Далее«, необходимые компоненты были выбраны в предыдущем шаге.
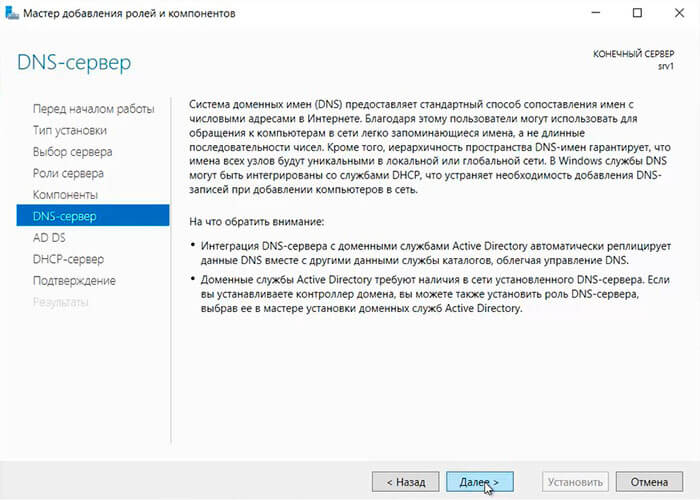
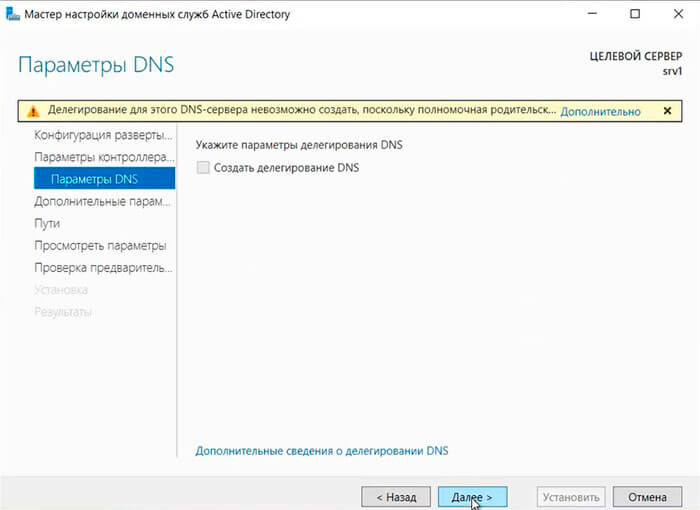
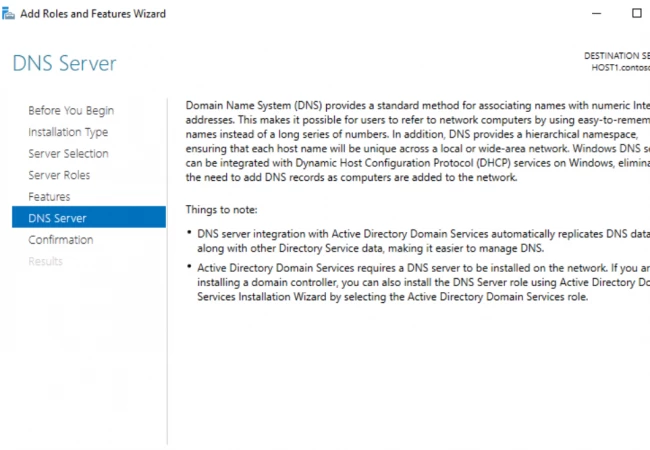
16. Читаем предупреждение DNS-сервера на что обратить внимание, затем «Далее«.
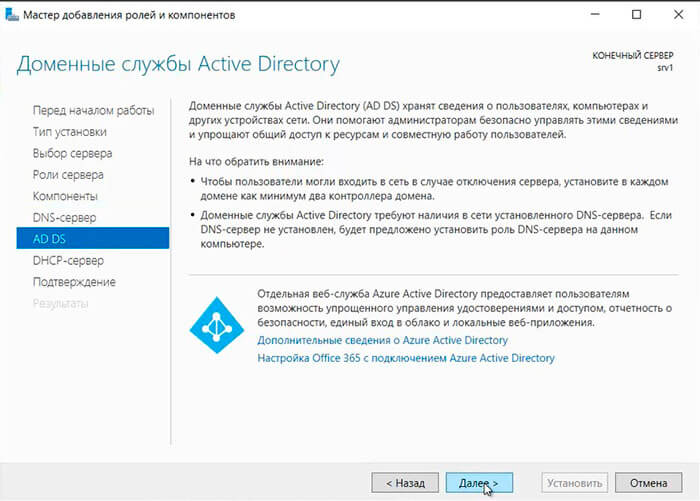
17. Читаем предупреждение AD DS, нажимаем «Далее«.
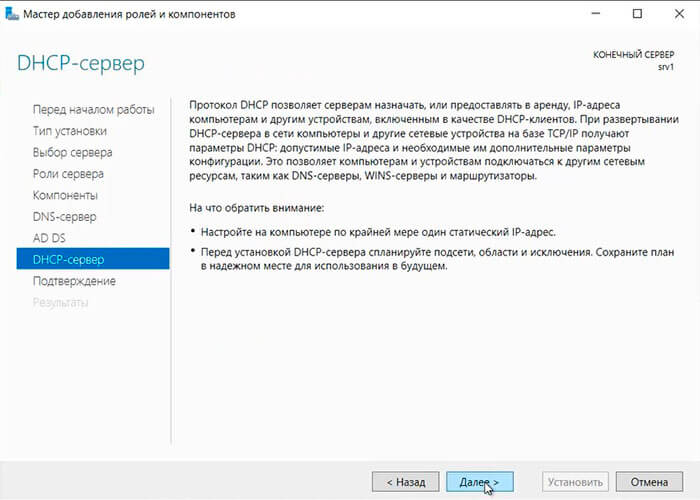
18. Читаем предупреждение DHCP-сервера, снова «Далее«.
19. Ставим «чекбокс» напротив «Автоматический перезапуск конечного сервера, если требуется«, нажимаем «Установить«.
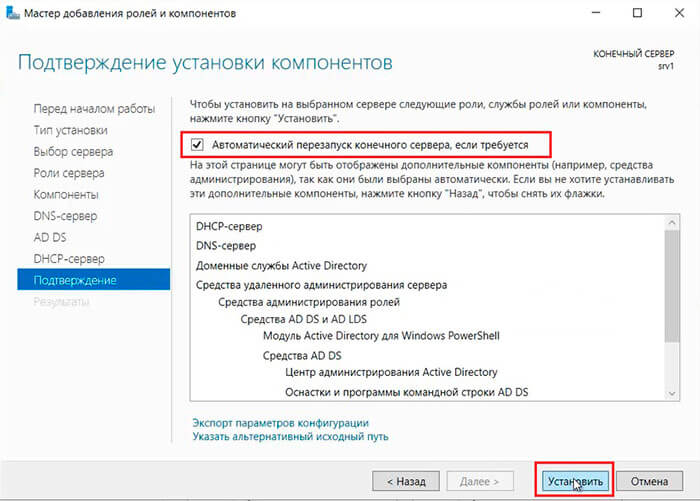
В результате произойдет установка выбранных ролей сервера.
Повышение роли сервера до уровня контроллера домена
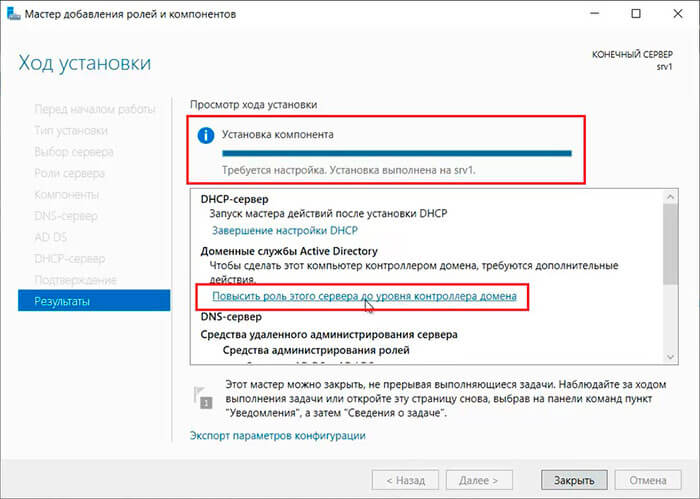
20. Нажимаем «Повысить роль этого сервера до уровня контроллера домена«.
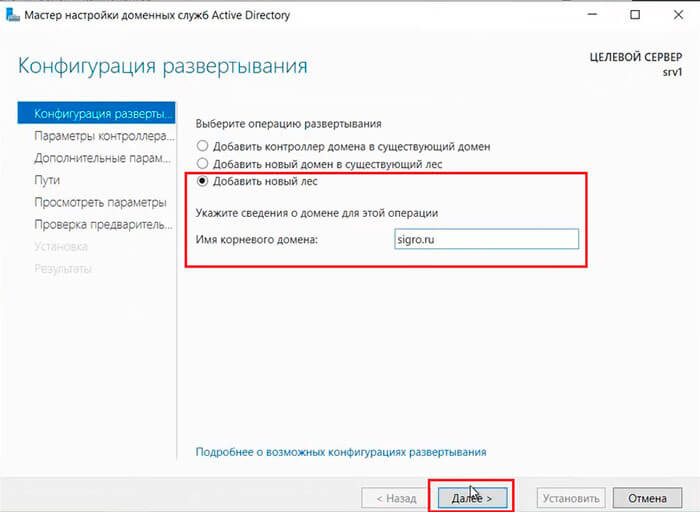
21. Далее выбираем «Добавить новый лес» и задаем «Имя корневого домена«.
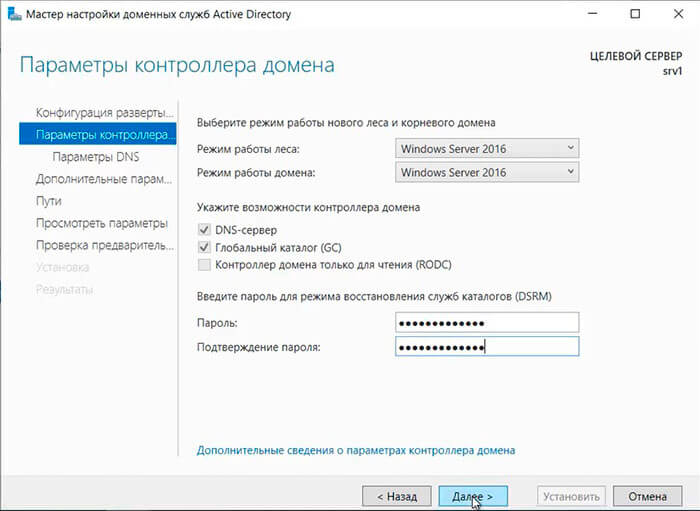
22. В следующем окне дважды вводим пароль для режима восстановления служб каталогов (DSRM), затем «Далее«.
23. В следующем окне снова «Далее«.
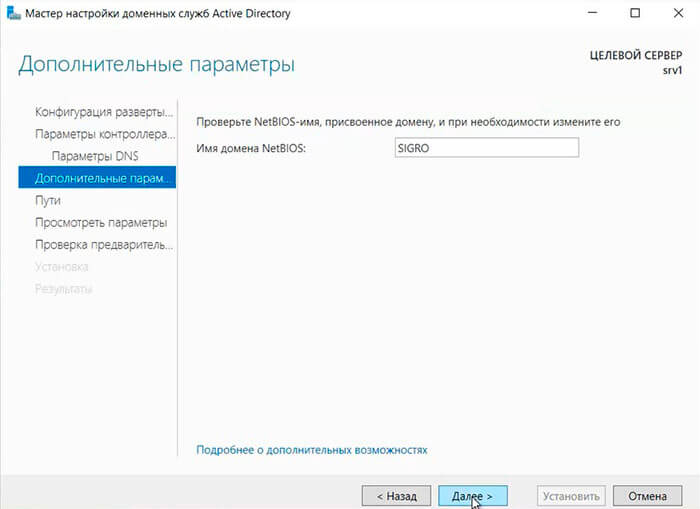
24. Проверяем NetBIOS-имя, присвоенное домену, и при необходимости меняем его. Затем «Далее«.
25. Оставляем по умолчанию расположение базы данных AD DS, файлов журналов и папки SYSVOL, снова «Далее«.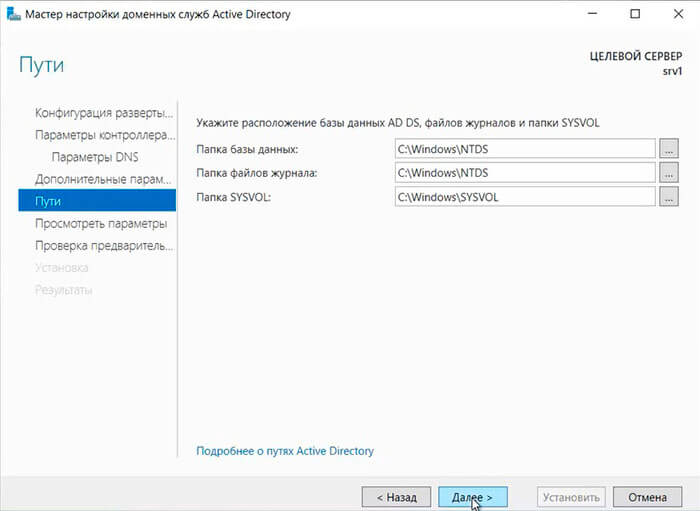
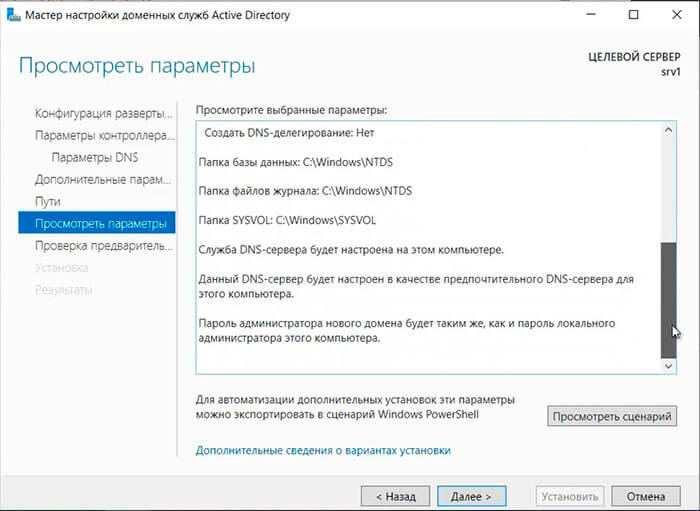
26. После просмотра выбранных параметров и их одобрения нажимаем «Далее«.
27. Если проверка готовности к установке выполнена успешна, то запускаем установку — «Установить«.
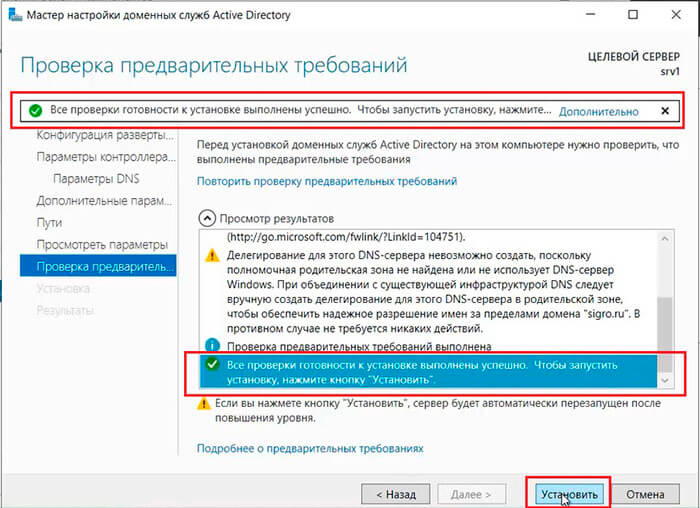
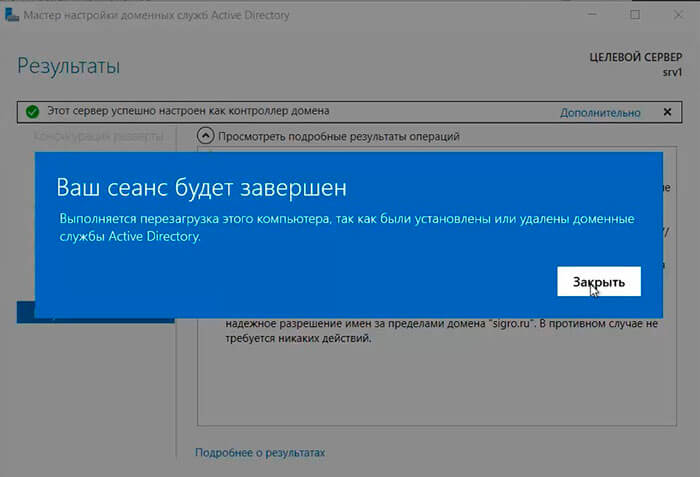
28. По завершению установки произойдет перезагрузка сервера.
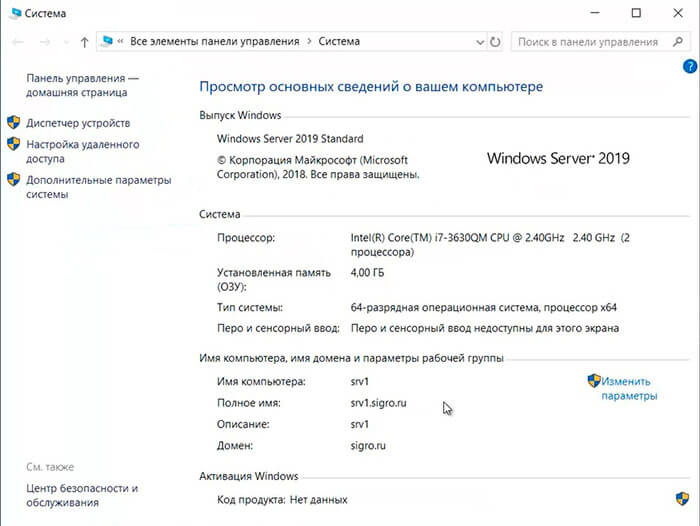
29. После перезагрузки полное имя компьютера изменится, к имени сервера добавиться доменное имя. Active Directory можно использовать.
Настройка обратной зоны DNS
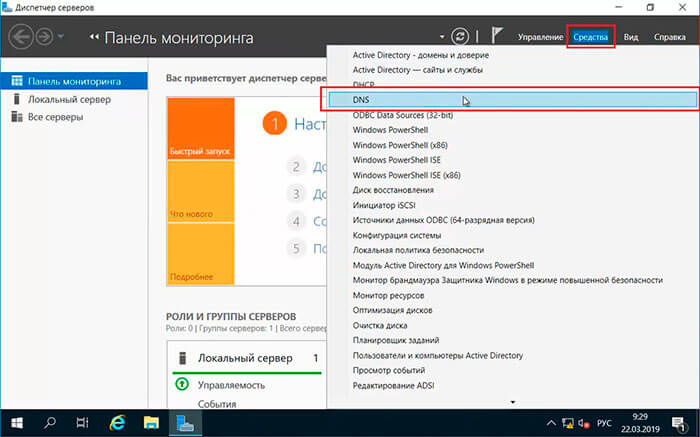
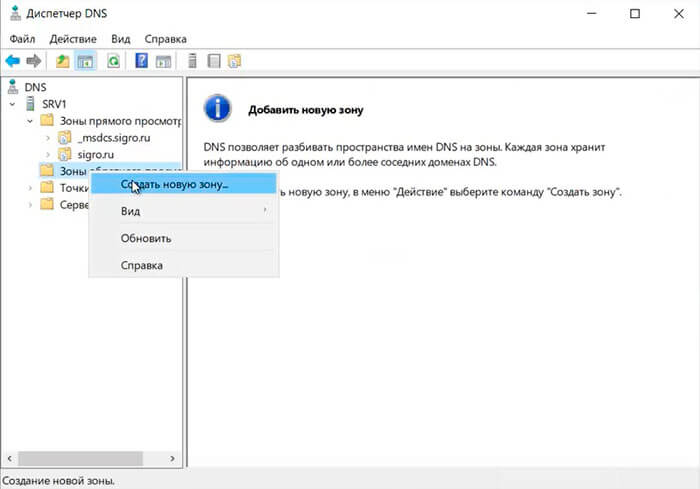
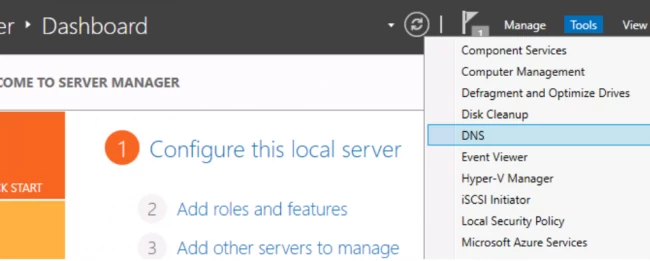
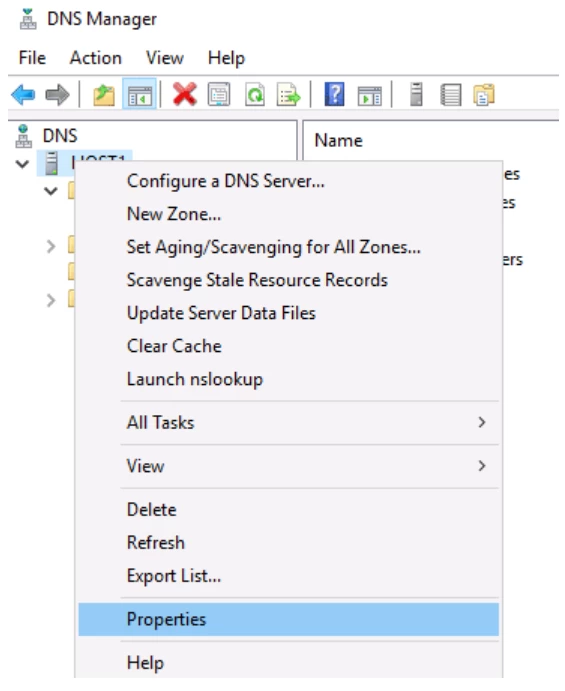
30. Для настройки обратной зоны DNS в Диспетчере серверов выбираем «Средства» — «DNS«
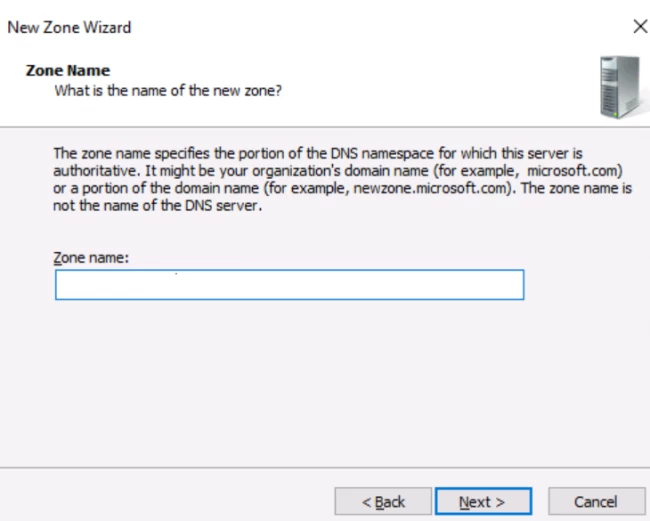
31. Раскрываем дерево DNS, нажимаем правой клавишей мыши на «Зоны обратного просмотра«, в появившемся меню «Создать новую зону…«.
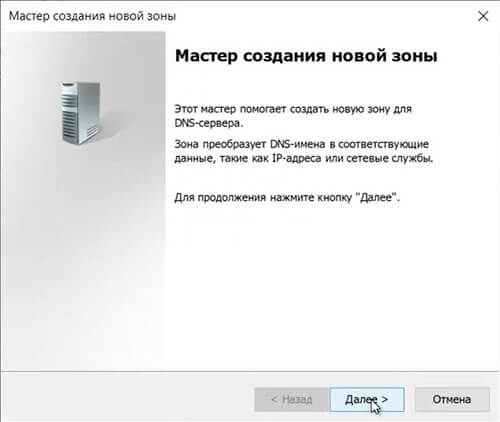
32. В появившемся мастере создания новой зоны нажимаем «Далее«.
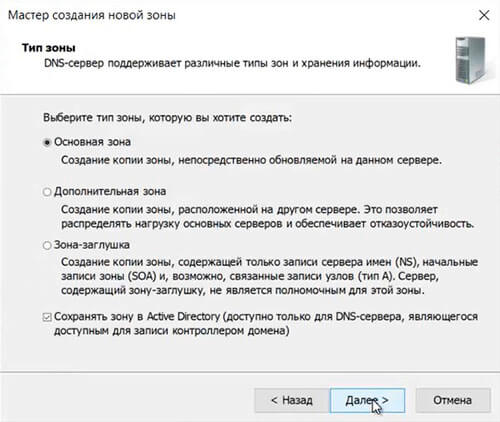
33. Выбираем «Основная зона«, затем «Далее«.
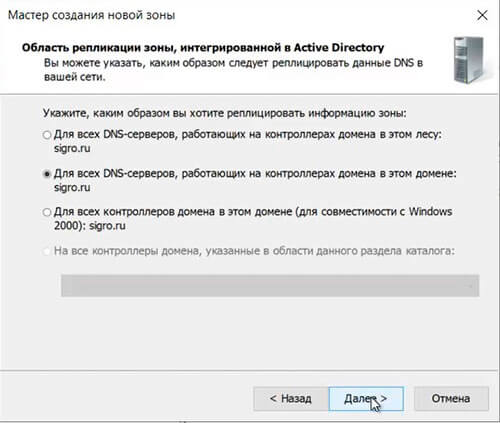
34. Оставляем по умолчанию область репликации зоны, интегрированной в Active Directory, нажимаем «Далее«.
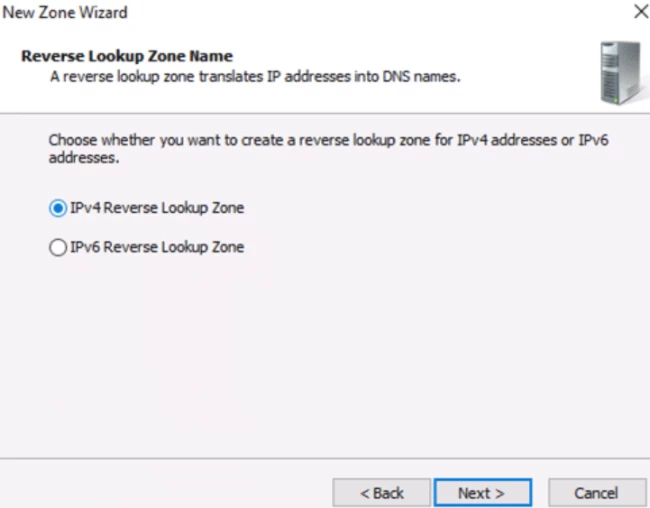
35. Оставляем «Зона обратного просмотра IPv4», просто «Далее«.
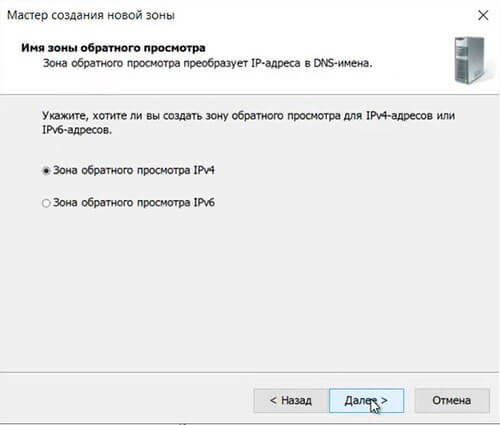
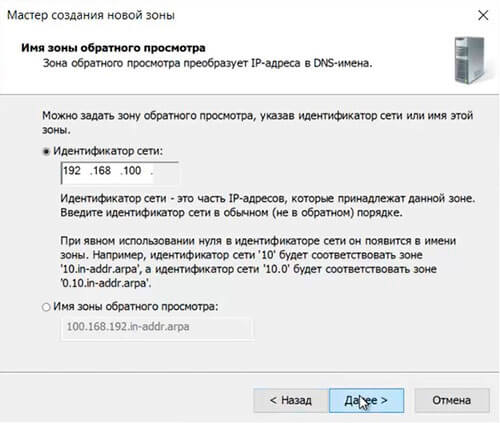
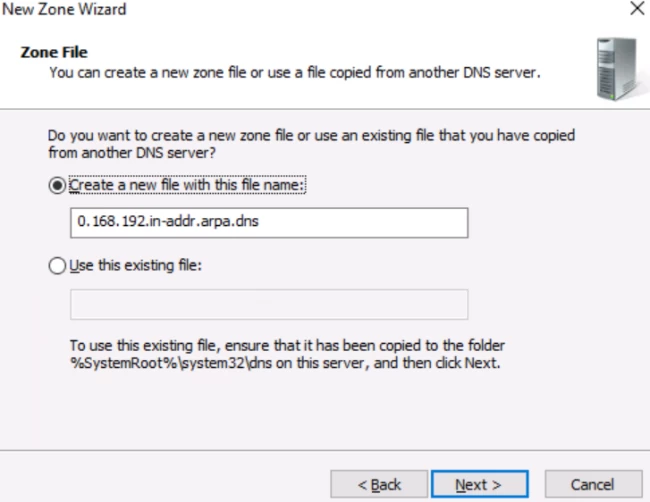
36. В следующем окне задаем Зону обратного просмотра, которая преобразует IP-адреса в DNS-имена. В идентификатор сети забиваем три актета своей сети, затем «Далее«.
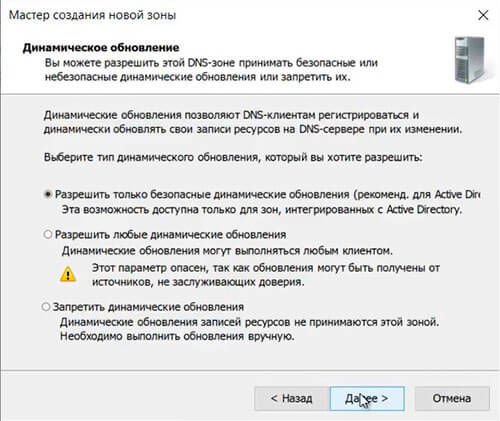
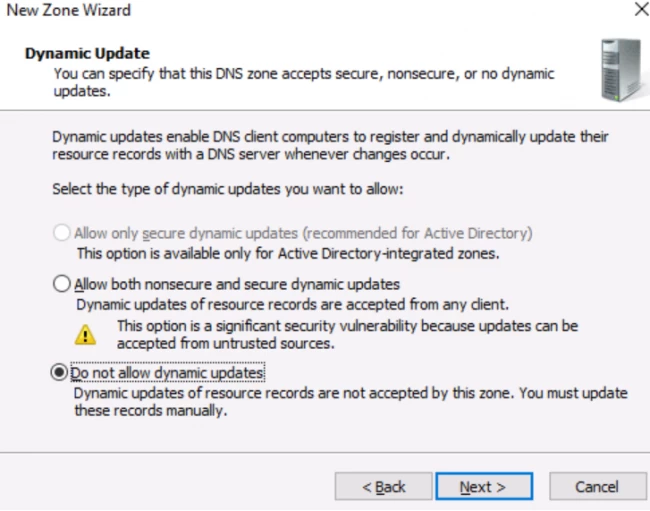
37. Разрешаем только безопасные динамические обновления, снова «Далее«.
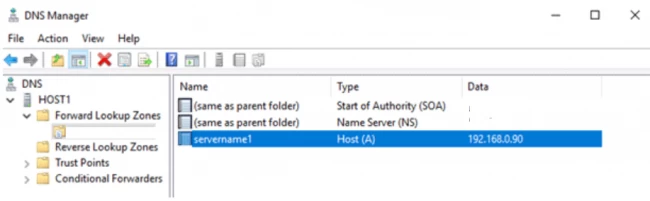
38. Зона обратного просмотра создана.

Настройка DHCP-сервера
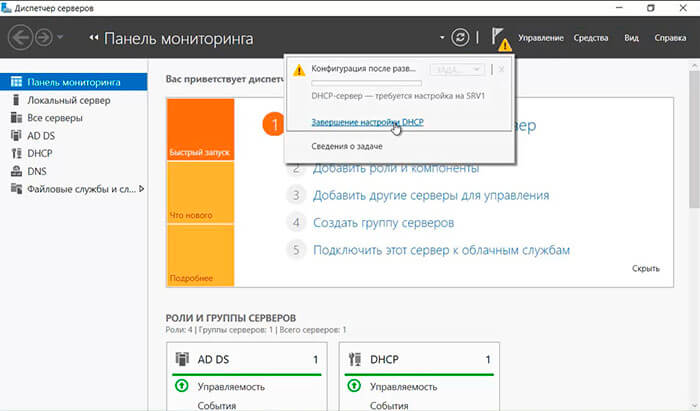
39. После установки роли DHCP-сервера в Диспетчере серверов нажимаем на желтый треугольник, в появившемся окне выбираем «Завершение настройки DHCP«.
40. В следующем окне читаем описание завершения настройки DHCP-сервера на конечном компьютере, затем «Далее«.
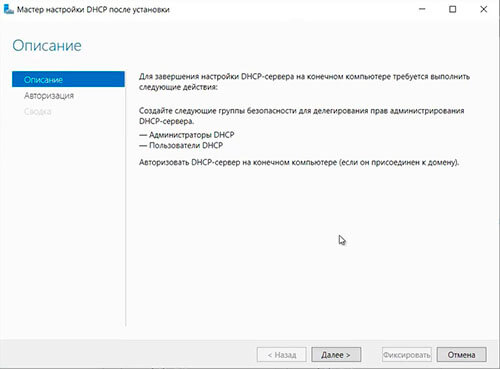
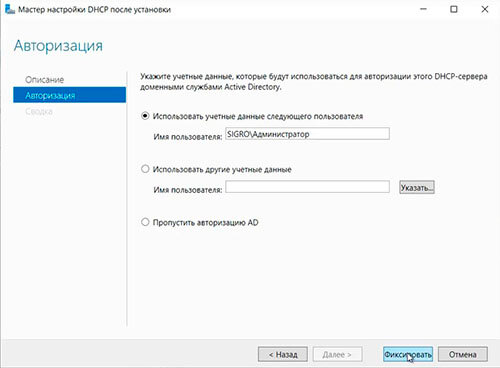
41. Оставляем по умолчанию учетные данные, которые будут использоваться для авторизации DHCP-сервера доменными службами Active Directory. Нажимаем «Фиксировать«.
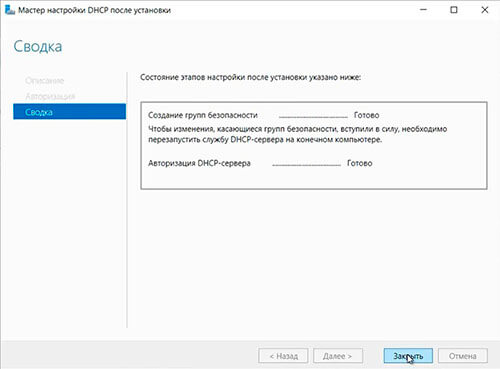
42. В следующем окне нажимаем «Закрыть«.
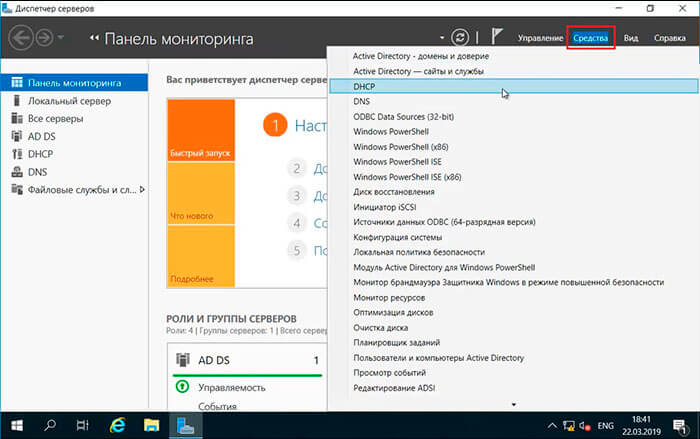
43. В диспетчере серверов нажимаем «Средства» — «DHCP«.
44. В открывшемся окне открываем дерево DHCP. Правой клавишей мыши нажимаем на домен, в появившемся окне выбираем «Добавить или удалить привязки…«.
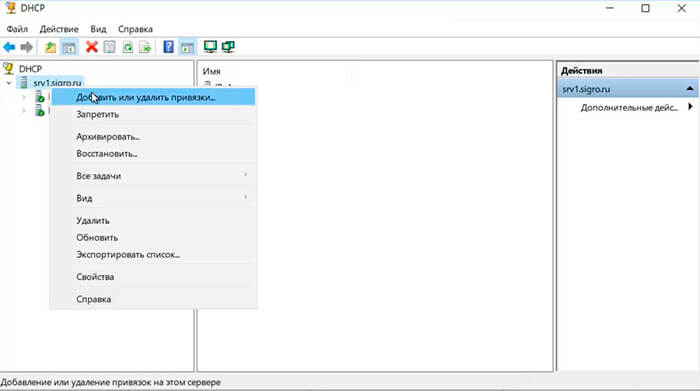
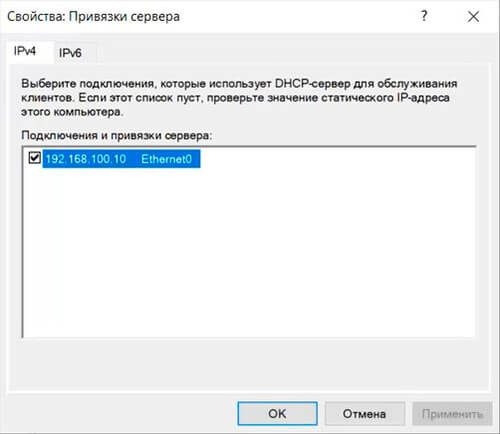
45. Проверяем сетевой интерфейс, который будет использовать DHCP-сервер для обслуживания клиентов. Далее «ОК«.
46. Затем правой клавишей нажимаем на IPv4, в появившемся меню выбираем «Создать область…«.
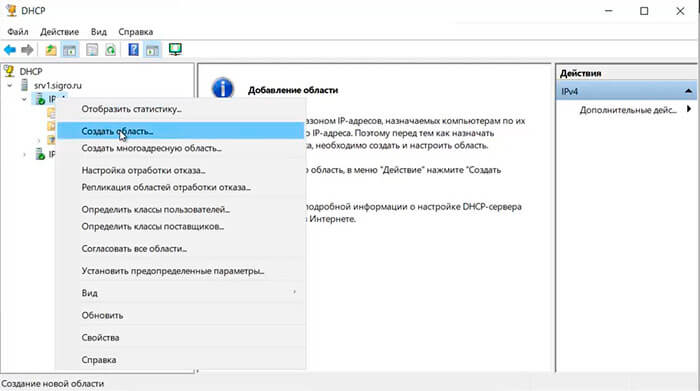
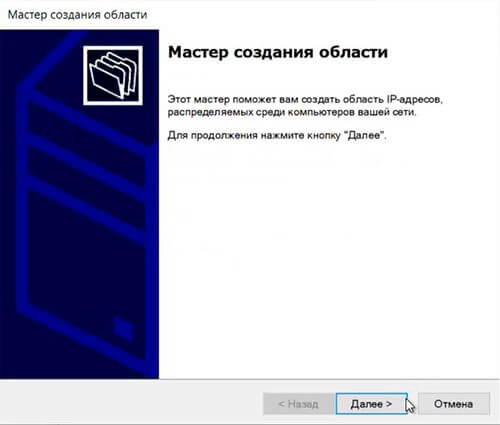
47. Откроется мастер создания область, который помогает создать область IP-адресов, распределяемых среди компьютеров вашей сети. Нажимаем «Далее«.
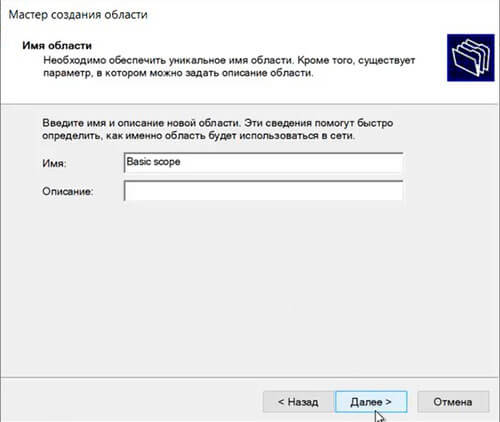
48. Задаем имя новой области, если необходимо, задаем также описание новой области. Снова «Далее«.
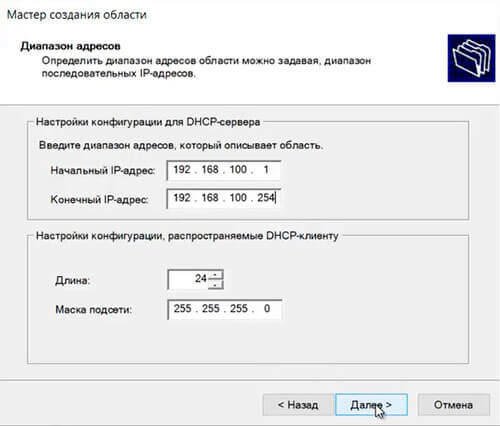
49. Вводим диапазон адресов, который описывает создаваемую область, маску подсети. Нажимаем «Далее«.
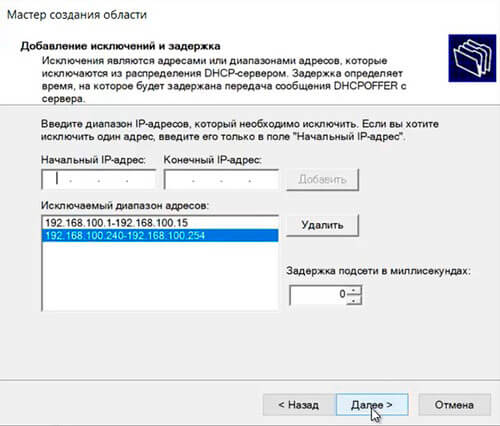
50. В следующем окне вводим с помощью кнопки «Добавить» один адрес или диапазон IP-адресов, который необходимо исключить. После ввода всех адресов или диапазонов нажимаем «Далее«.
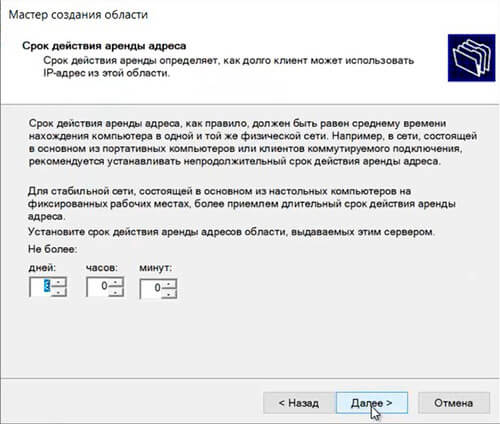
51. Оставляем по умолчанию срок действия аренды адресов области, выдаваемых сервером. Снова «Далее«.
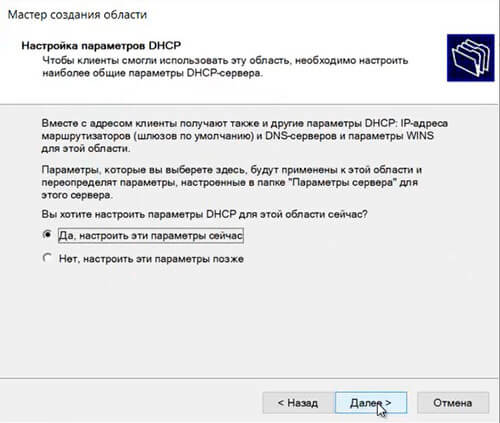
52. Для настройки других параметров DHCP выбираем «Да, настроить эти параметры сейчас«, затем «Далее«.
53. Добавляем с помощью кнопки «Добавить» IP-адрес маршрутизатора, снова «Далее«.

54. Оставляем по умолчанию родительский домен, который клиентские компьютеры в сести будут использовать для разрешения DNS-имен. Затем «Далее«.
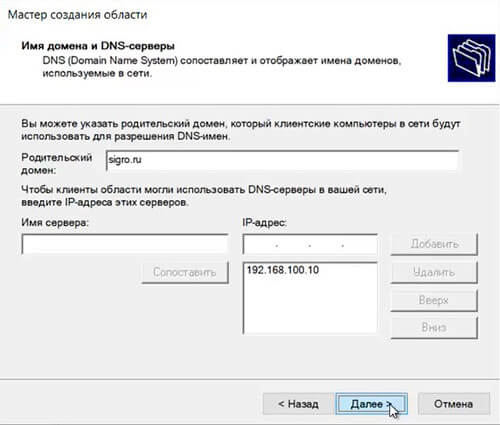
55. Вводим IP-адреса WINS-сервера, или нажимаем просто «Далее«.

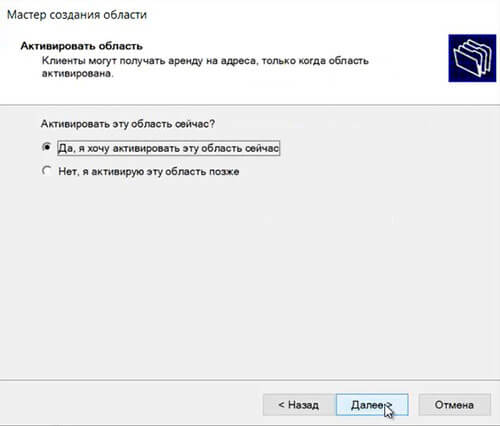
56. Выбираем «Да, я хочу активировать эту область сейчас«, затем «Далее«.
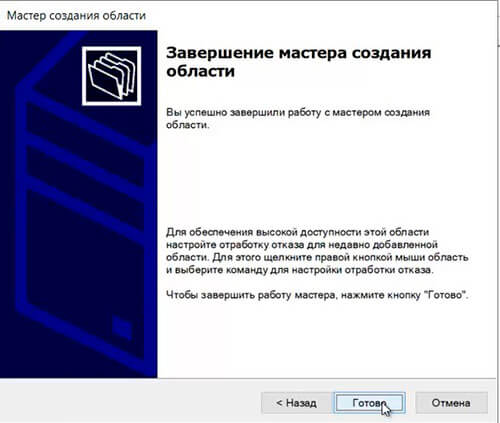
57. В следующем окне появится «Вы успешно завершили работу с мастером создания области», нажимаем «Готово».
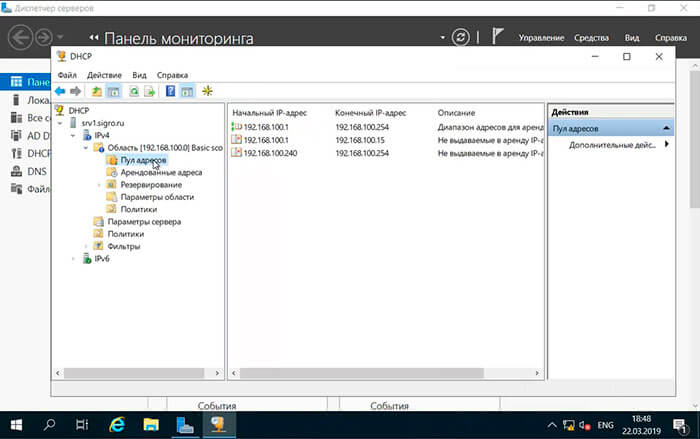
58. Вновь созданный диапазон появится в «Пул адресов«.
Посмотреть видео можно здесь:
Читайте также:
- Windows server 2019 — установка и настройка WSUS, создание и настройка GPO
- Windows server 2019 — добавление и удаление компьютера в домене
- Windows server 2019 — переименование администратора домена, изменение формата выводимого имени пользователя
- Windows server 2019 — создание и удаление пользователя, группы, подразделения в домене
- Windows server 2019 — установка и настройка сервера печати, разворачивание МФУ с помощью GPO
- Windows server 2019 — GPO изменение экранной заставки, отключение монитора, изменение политики паролей
— Advertisement —
Hello, how are you? Today we will continue to explore the functionalities of Windows Server. Specifically, we will talk about one of the most important roles. Indeed, a DNS server is of paramount importance within the system. Since this role, it has the function of translating IP addresses into domain names and vice versa. As a result, the functionality of the server will be considerably increased. Well, let’s see how to install and configure a DNS server in Windows Server 2019/2016.
How to install the DNS role in Windows Server 2019/2016.
Most commonly, this role has been installed along with the Active Directory role. Most commonly, this role has been installed along with the Active Directory role. So if you have reviewed our posts on Windows Server you should already know how to do it. However, I remind you of the steps. In the first place, from the Server Manager click on Add Roles and Features

Press Next to continue

Now select the type of installation. In this case, we will use the role or feature based installation.

Please select the server where the DNS server will be installed.

Below, you can see the DNS role already installed. If not, check the box and follow the instructions in the wizard.

Setting up a DNS server in Windows Server 2019/2016.
Once the installation is verified, it is time to configure the DNS role. To do this, once again we will use the Server Manager. Once there, please enter the Tools menu. Then, click on DNS:

Then the DNS manager will be displayed. Please right-click on the name of the server. Then select Configure a DNS Server.

The DNS Server Configuration Wizard will be displayed immediately. Press Next to continue.

Now it is time to select the optimal alternative for the zone to be used on the server. If you are using small networks, then I recommend creating a forward lookup zone.

Now please set the location of the primary server. This time, the server maintains the zone.

Then assign the name of the zone.

Now it’s time to set up how to receive updates. For security reasons, I recommend using the first option.

In this option, it is possible to configure the DNS server as a temporary reseller. This is very interesting, as it allows our DNS server to query other external DNS servers. This is in the case of those records that it is not able to resolve itself. With this in mind, please add the IP address of the external DNS server.

After this step, the assistant will have finished his work. After this step, the assistant will have finished his work.

Finally you will be able to see the area created correctly. Consequently, the DNS server administration is now available on Windows Server.

Conclusion
Well, in this simple way we have seen how to install and configure a DNS server in Windows Server 2019/2016. Therefore, the administrator has this important feature. All right, that’s it for now. Before saying goodbye I invite you to see our post about activating Wi-Fi in Windows Server. See you soon!
List of content you will read in this article:
While there are plenty of DNS servers, both free and paid, available for anyone to use, in certain situations it is better to have your own. Its installation, however, can be more complex than you may think. In this tutorial, we are going to discuss the installation of DNS servers in Windows Server 2012, 2016, and 2019.
What is DNS?
In simple terms, DNS or Domain Name Server is like an internet address book. While you browse information on the web, you type different domain names, such as abc.com or xyz.com. Right? Furthermore, the web browser interacts with the help of IP (Internet Protocol) addresses.
The DNS translates the domain names to the IP addresses so that the web browsers can access the internet resources. Every device connected with the internet has a unique IP address. The devices use these IP addresses of other devices to exchange information. The DNS servers discard the requirement of remembering such complicated numbers, such as 192.168.1.1. Or there are even more complex addresses like 2111.bc00.2789.1::c567:s9a2.
Moving on, here are some insights about the features of the Window Servers!
Windows Server 2019 is power-packed with several features, standing first in the lane of other windows servers, namely, windows server 2012 and 2016!
Features of Windows Server 2019:
- Windows Admin center
- Storage Migration Services
- HCI and WSSD
- System Insights
In the same way earlier, as compared to Windows server 2012, Windows Server 2016, was clearly a more updated and powerful addition.
Here are some of the features:
- Addition of more DNS policies
- Improvised support of Windows Powershell
- Root hints IPv6
- Support for unknown record
- Addition of RRP
How to Install a DNS Server on Windows?
Let us begin our core topic to understand the process of installing a DNS server. Before that, here are some prerequisites.
Prerequisites
- Server with Windows Server 2012,2016,2019 (as per your requirements)
- Pre-installed DNS server role
If you do not have a pre-installed DNS server role, follow these steps!
Installing DNS server role
Now, let us start the process of installation:
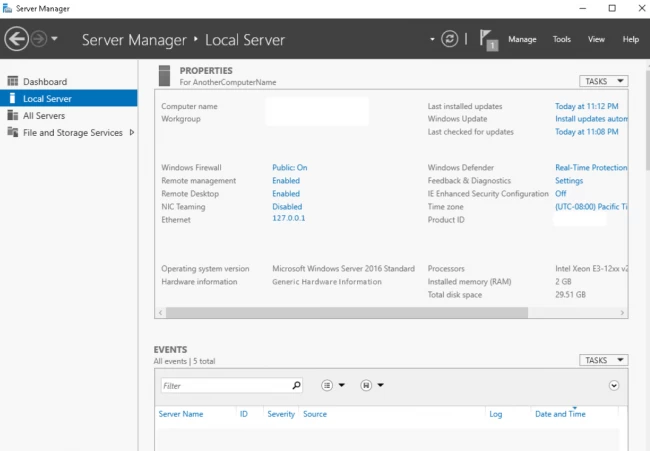
- Click on the Server Manager and move on to Local server.
- Tap on Manage, as you can see the very first option that says, Add roles and features, click on it.
- Read the information and the data in front of you for a better understanding and then click on next.
- Click on the first option, Role-based or feature-based installation, and move on to the next page.
- Next up, from the server pool, you have to choose your desired server for the DNS server role.
- Then select the DNS server role. You will encounter a pop-up window asking you to install some additional tools for the DNS server. If you wish to install the tools, check your requirements and accordingly take the step.
- Now, you will see a checklist. Tick off the option DNS server. By default, the option of file and storage services is checked. Tap on next.
- The next window shows you some additional features for your DNS server. Read them carefully, add them if required.
- The next window is again an informational slide. Read and click Next.
- That’s it! The last window asks for your confirmation and takes you back to the Server Manager.
Bravo! You have successfully installed the DNS Server role in your system. Now, go to your Server Manager. You can see a box representing the DNS role!
Well, now that you have installed the DNS server role, let us tread forward. Here is a guide to making your work easy regarding the installation of the DNS server in Windows Server 2012.
Install the DNS server in Windows Server
To configure the DNS server, follow these steps:
- Open the Server Manager and click ‘Tools’. Then hit the DNS option.
- Now, the configuration of the zones is pending.
Zones are simply the distinct portions of a domain namespace. Furthermore, click on the DNS server, then on the Action menu. Click on Configure a DNS Server and the DNS Server wizard pops up. The wizard shows you three options, namely,
- Create forward and reverse lookup zones
- Create a forward lookup zone
- Configure root hints only
You need to select one option. Now, to sort your ambiguities, let us explain these pointers one by one.
- Forward and reverse lookup zone: This option takes an IP address and resolves it into a domain name.
- Forward lookup zone: This option is the exact opposite of the forward and reverse lookup zones. It helps you to take a domain name and then resolve it into an IP address.
- Root hints only: This option allows you to have the IP addresses of the DNS servers where records can be easily acquired.
Now, click on the option that suits you the best, and hit next. After that, enter the zone name. Move on and click next. Let us tread forward.
- Right Click on the Forward lookup zone and click on the first option, the ‘New zone’ option.

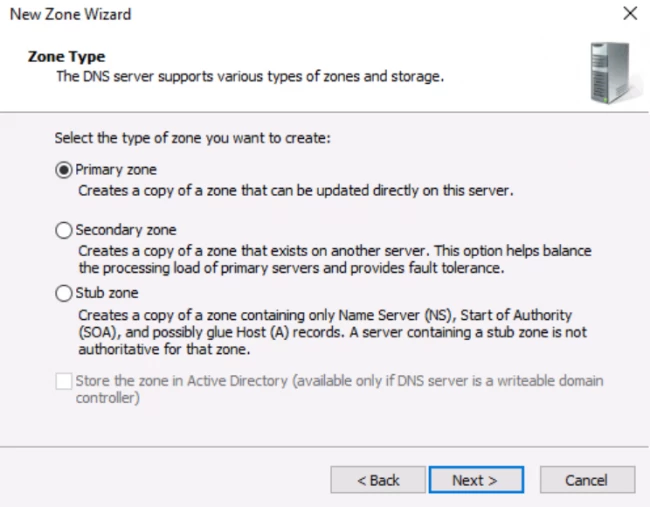
- Now, you have to select the kind of DNS you want to have. Now, there are three options on the screen. Primary zone, Secondary zone, and Stub zone.
The location of the Primary zone is in your server, whereas the Secondary zone resides on some other server. If your requirement is not related to handling large networks, then simply go for the Primary zone. Now, click on next and type any desired name for your zone file.
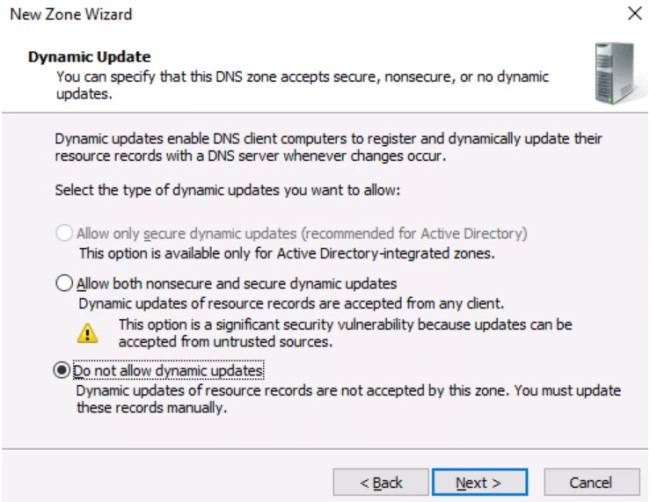
- The wizard box of the new zone file appears and asks you to select an option related to dynamic updates.
Now, you have to make a selection regarding how your server will respond to the Dynamic updates. You will see several options. Options like, allow only secure dynamic updates and then, do not allow dynamic updates. Here, choose the first option if you want integration between the DNS and the Active directory. If not, then opt for the latter option.
- Simply click next and hit finish.
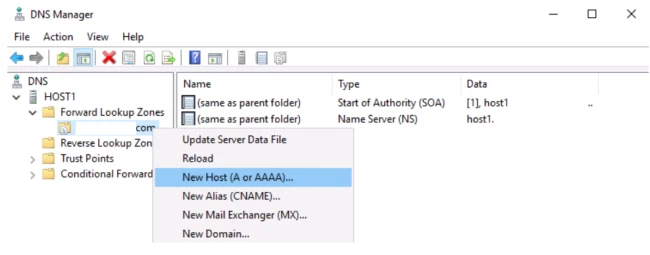
Great! You have successfully created the forward zone. Now, to set up the zone, you have to complete another task. You need to add DNS records. There are numerous DNS records. Here’s a glimpse of some of them:
- A-record
- MX
- NS
- CNAME-record
- Now, click on your zone name file and hit the option,’ New host (A or AAAA)’.
- Enter the asked details in the next window and tap on Add host.
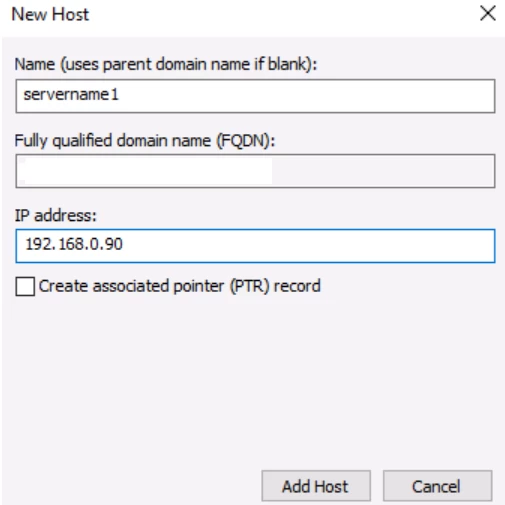
The host is now created.
Now, using PowerShell, create a record. The next step is to allocate a file name for storing your DNS records. The zone name that you entered previously with a .dns extension, is by default the filename.
When you go to the DNS server window, you will see that a host has been created. Now, choose the reverse lookup zone and click on add new zone again. Keep following the steps as done in the case of forward lookup zone till you click the option of Primary zone.
Now here you have to enter the kind of IP address. Choose IPv4 and click next.
In the next window, type the first three parts of your IP address and hit next.

Again, click next.
Again click on Do not allow dynamic updates and hit next.
The next window is the last window. Hit finish.
The next popup is regarding the configuration of the forwarders. Forwarders are DNS servers to which the server sends queries when it itself can’t answer them.
To complete the configuration, click on the properties.
Click next, and add the desired address where you want to divert the requests.
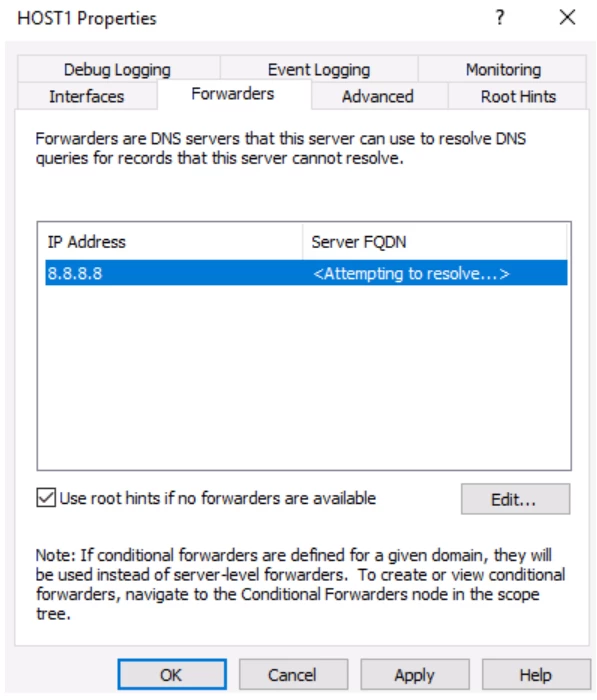
And that’s it, you’re done.
Conclusion
If you have precisely followed all the steps outlined in this article, the DNS server has been successfully installed in the Windows Server. We hope that this article assisted you to accomplish your goal in the best way possible. If you run into any problems during the installation process, have any questions or suggestions, please leave a comment in the comment section below.

In this article, we will learn How to Install and Configure DNS Server on Windows Server 2019. DNS is a vital component of any Active Directory implementation. Domain Name System (DNS) is a structured database similar to Active Directory that is often stored on Domain Controller servers. An Active Directory database contains information about the domain objects themselves, where DNS is responsible for storing and resolving all the names on your network. Windows Server 2019 utilizes the domain name system (DNS) as its primary method of name resolution.
Before we start Installing DNS Server, it is recommended that the Local Server should be configured with static IPv4. In case of IP address changes, clients might not be able to contact the DNS server.
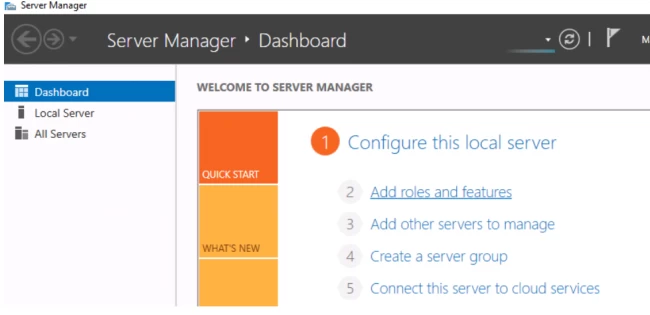
Step 1: Launch Server Manager and Click Add roles and features.
Alternatively, you can press the Windows+ R to open the Run, or open the Command Prompt. Then type ServerManager and press Enter.
Step 2: Click Next on the ‘Before You Begin’ page.
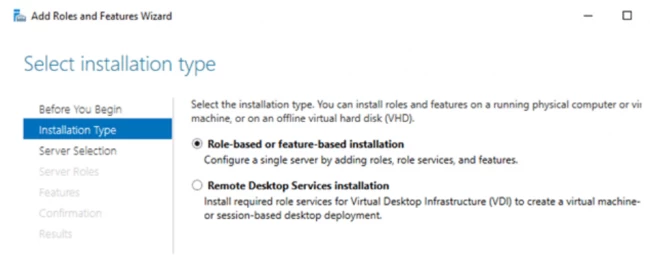
Step 3: Select Role-Based or Feature-Based installation.
On installation type page leave the default selection and click Next.
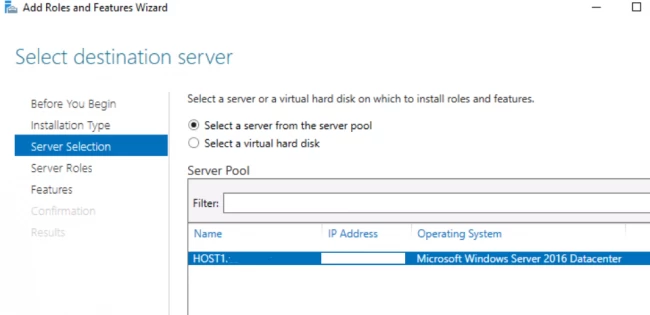
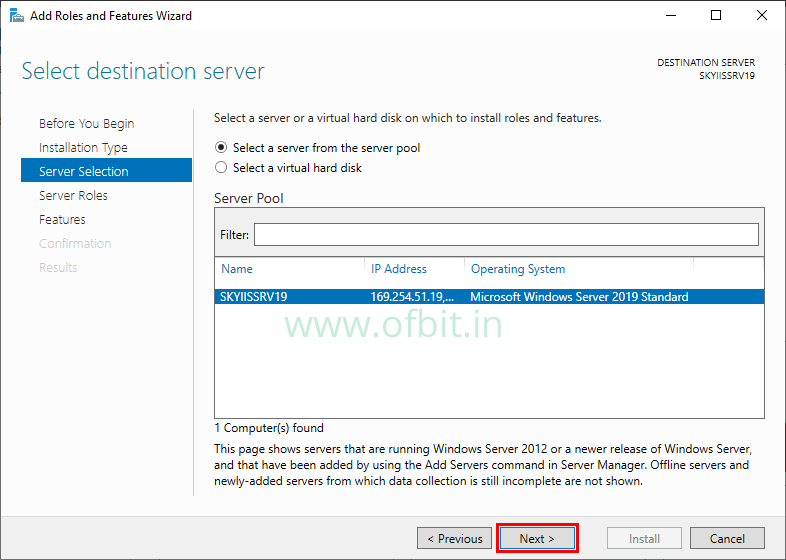
Step 4: Select Destination Server.
Select the server from the server pool to add the DNS role to and click Next.
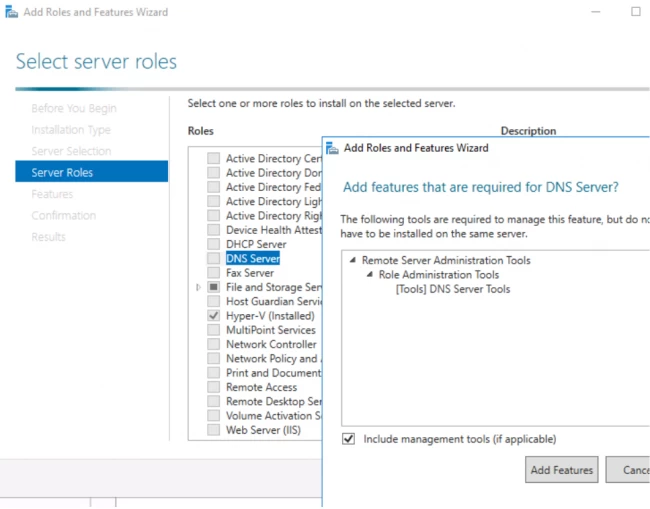
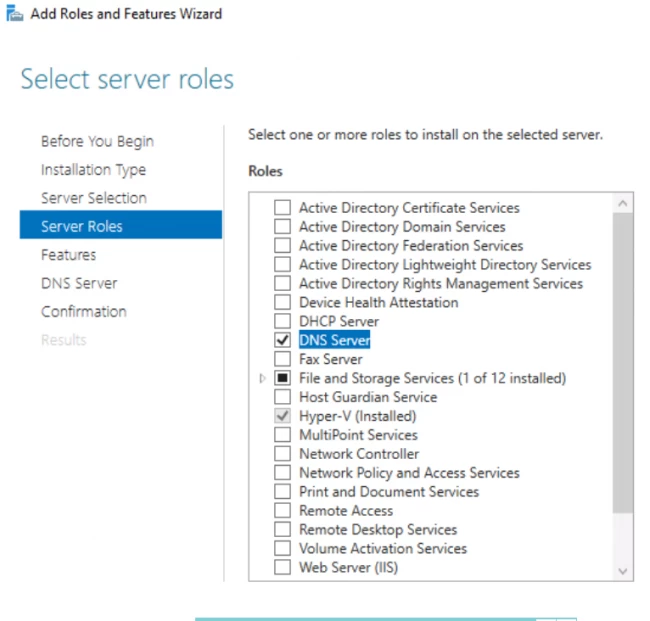
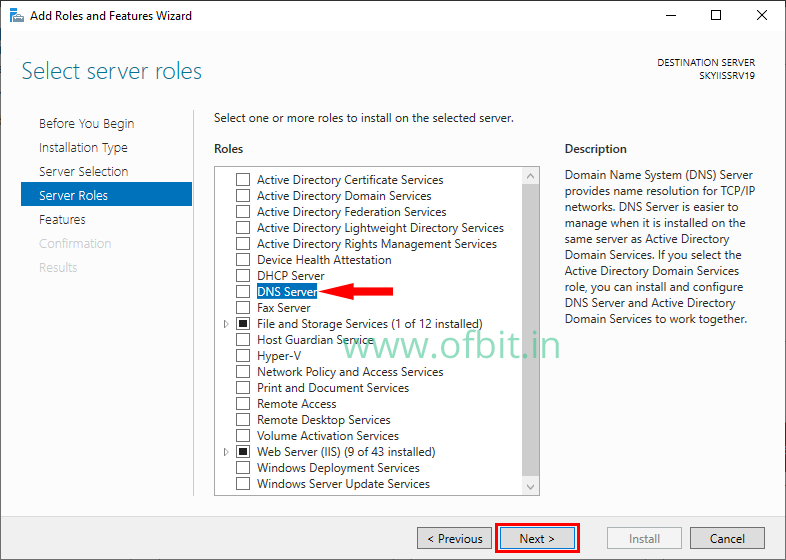
Step 5: Select DNS Server Role and Features that are required for DNS Server.
Select the DNS Server check box from the Roles.
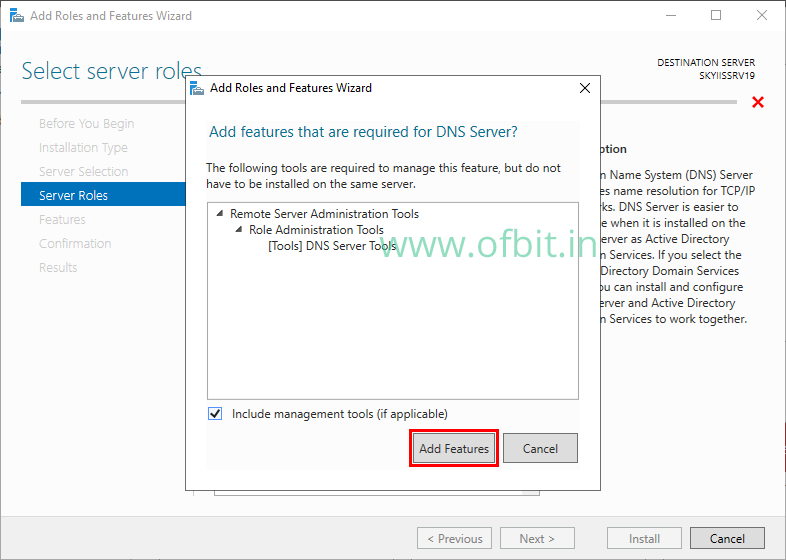
On this pop up page, click Add features. And then Click Next to continue.
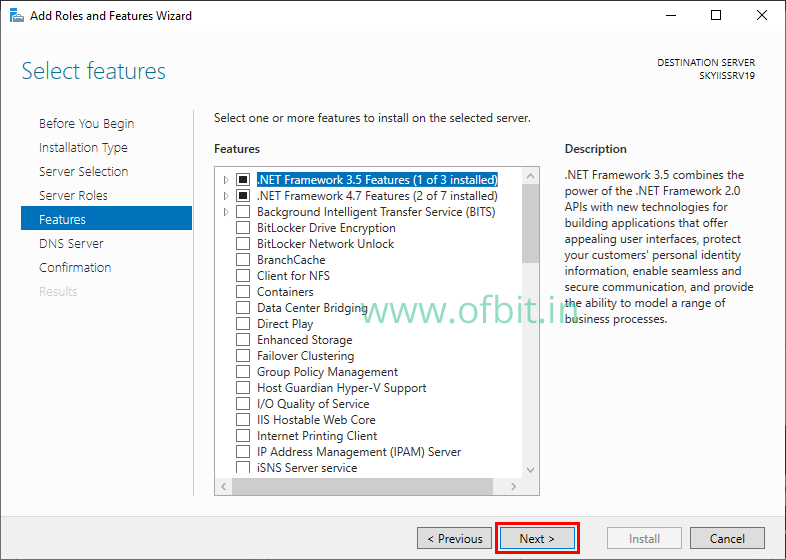
Step 6: Click Next to skip the Features selection.
Step 7: Click Next on the Introduction to DNS Server page.
This page will give you an introduction and things to notes for DNS Server. Click Next to continue.
Step 8: Confirm Installation Selection.
Click Install on the Confirmation page to install the DNS role.

Step 9: Once DNS Installation succeeded Click Close.
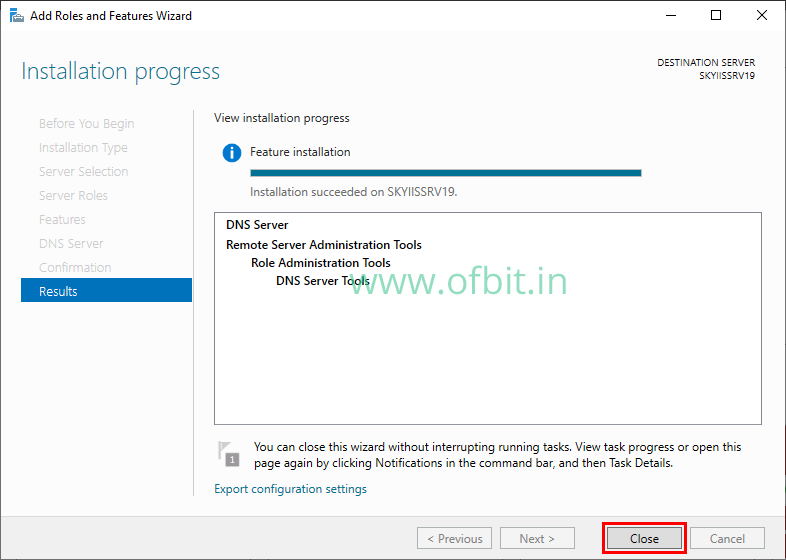
So we have successfully installed the DNS Server on Windows Server 2019. The installation process is very straightforward, and no reboot is necessary.
The DNS role has been installed on the Windows Server 2019 server but has not been configured yet. Now let’s move to the next section to learn how to configure DNS server.
Configure DNS Server on Windows Server 2019
In this section, we will learn How to Configure DNS Server on Windows Server 2019. Here we create a DNS Forward Lookup and Reverse Lookup Zones, which is recommended for a large network. After that, we will learn to create A and PTR records and confirm if the DNS server is configured and working.
First, let’s start with How to Configure DNS Forward Lookup Zone in Windows Server 2019.
Second, we will learn How to Configure DNS Reverse Lookup Zone in Windows Server 2019.
Follow us:
If you like our articles and tutorials, you can follow us on Facebook. Also, join our Official Facebook Group for QnA sessions and Discussions with the worldwide technical community.
Как установить и настроить Active Directory, DNS, DHCP?
Здравствуйте, уважаемые друзья! В предыдущем выпуске мы с вами рассмотрели базовые настройки Windows Server 2019. В сегодняшней статье мы с вами продолжим разговор про Windows server 2019, в частности рассмотрим установку и настройку Active Directory, DNS, DHCP Windows Server 2019.
Прежде чем приступить к дальнейшей установке, нам с вами необходимо будет проверить ip адрес сетевого интерфейса. Сделать это можно при помощи специальной команды ncpa.cpl, прописав ее в командной строке.

Проверим еще раз ip адрес сетевого интерфейса

На следующем шаге откроем «Диспетчер серверов» и нажмем «Добавить роли и компоненты» и нажимаем несколько раз «Далее», чтобы перейти к выбору установок ролей на Windows Server 2019.

Теперь нам с вами нужно определиться какие конкретно роли мы хотим установить на свой Windows Server 2019.

На следующем шаге потребуется перейти по кнопкам «Далее» и установить «Автоматический перезапуск конечного сервера».

Теперь нам с вами потребуется в процессе создать новый лес и повысить роль этого сервера до уровня контроллера домена, как показано на рисунке ниже.

В процессе установки нам с вами нужно будет подтвердить правильность заданных параметров, перейдя по кнопкам «Далее». В завершении нажимаем «Установить».

Затем Сервер будет перезагружен, о чем уведомит нас в соответствующим сообщением.

Ждем перезагрузки компьютера и проверяем имя компьютера в созданном нашем домене.

Как настроить зону обратного просмотра?
На следующем шаге мы с вами будем настраивать зону обратного просмотра. Для этого в главном окне диспетчера серверов заходим «Средства» -> «DNS».

В открывшемся окне диспетчера серверов необходимо будет кликнуть ПКМ по «Зона обратного просмотра».

Теперь нужно будет нажать несколько раз «Далее» и указываем, что мы хотим создать зону обратного просмотра.

Далее задаем наш соответствующий идентификатор сети, как показано на рисунке ниже.

Как мы видим, зона обратного просмотра успешно создана.

Как настроить DHCP сервер?
В завершении нам оcтается выполнить настройку DHCP сервера. Для этого заново переходим в «Средства» -> «DHCP».

Если говорить простыми словами, то нам с вами потребуется настроить зону IP адресов, благодаря которым компьютеры будут выходить в общедоступную локальную сеть.
В нашем варианте используем DHCP сервер Ipv4 для обслуживания клиентов. Кликаем правой кнопкой мыши (ПКМ) и создаем область.

Необходимо будет указать диапазон IP адресов, как показано на рисунке ниже.

На следующем этапе переходим по кнопкам «Далее» и соглашаетесь с тем, что хотите активировать эту область сейчас.

Стоит также добавить в исключения IP адреса.

На следующем шаге проверяем домен


В завершении мы с вами можем перейти в пул адресов нашего сервера Windows Server 2019 и посмотреть общие правила настройки IP адресов.
