Содержание
- Что такое SSH?
- Способ 1. Встроенный SSH-клиент в Windows 10
- Способ 2: использование SSH в подсистеме Windows для Linux
- Способ 3: использовать Putty
- Завершение
Что такое SSH?
SSH означает Secure Shell – протокол, который был изобретен в 1995 году для замены небезопасного Telnet (телекоммуникационная сеть).
Теперь системный администратор является основным способом безопасного входа на удаленные серверы Linux через общедоступный Интернет.
Хотя он выглядит и действует так же, как Telnet, все коммуникации по протоколу SSH зашифрованы для предотвращения перехвата пакетов.
Если вы используете компьютер с Linux или Mac, SSH-клиент установлен по умолчанию.
Вы можете открыть окно терминала и запустить команду ssh, как показано ниже, для подключения к удаленному серверу Linux.
ssh username@itsecforu.local
Теперь давайте обсудим, как использовать SSH в Windows.
Способ 1. Встроенный SSH-клиент в Windows 10
Группа разработчиков Microsoft PowerShell решила перенести OpenSSH (и клиент, и сервер) на Windows в 2015 году.
Наконец, он появился в Windows 10 Fall Creator Update в 2017 году и по умолчанию включена в обновлении от апреля 2018 года.
Чтобы использовать клиент OpenSSH в Windows 10, просто откройте окно PowerShell или окно командной строки и выполните команду ssh.
Например, если я хочу подключиться к своему рабочему столу Ubuntu в локальной сети, я бы запустил.
ssh cryptoparty@192.168.0.101
cryptoparty – это имя пользователя на моем рабочем столе Ubuntu, а 192.168.0.101 – это частный IP-адрес моего рабочего стола Ubuntu.
При первом подключении к компьютеру с Linux вам будет предложено принять ключ хоста.
Затем введите свой пароль для входа.
После входа в систему вы можете запускать команды Linux для выполнения административных задач.
Чтобы выйти из окна Linux, выполните команду выхода или нажмите Ctrl + D.

Чтобы выйти из окна Linux, выполните команду exit или нажмите Ctrl + D.
Способ 2: использование SSH в подсистеме Windows для Linux
Подсистема Windows для Linux (WSL) позволяет запускать встроенные средства командной строки Linux непосредственно в Windows 10.
Если вы являетесь системным администратором, WSL, вероятно, является излишним просто для использования SSH, поскольку он установит и запустит дистрибутив Linux (без графического интерфейса) на рабочем столе Windows 10.
Kali Linux в подсистеме Windows для Linux
WSL создан для веб-разработчиков или тех, кому нужно работать над проектами с открытым исходным кодом.
Вы можете использовать не только SSH, но и другие инструменты командной строки Linux (Bash, sed, awk и т. д.).
Откройте Microsoft Store и введите WSL в поле поиска. Выберите «Запустить Linux на Windows» и установите дистрибутив Linux по вашему выбору.
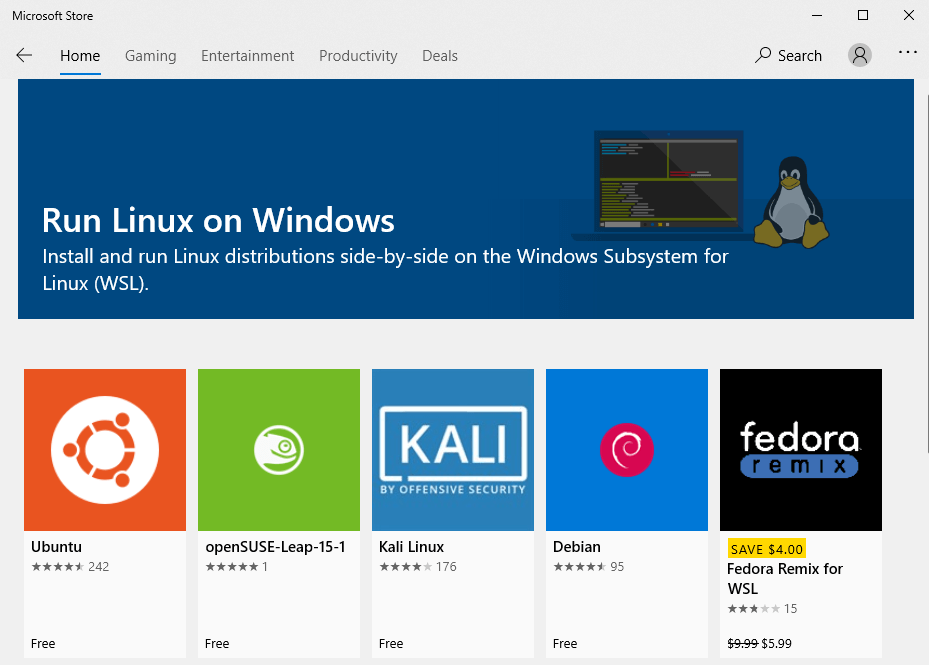
Например, я выбрал Ubuntu и нажимаю кнопку Get, чтобы установить ее.

После установки дистрибутива Linux откройте панель управления и выберите «Программы» -> «Включить или отключить функции Windows».
Установите флажок Подсистема Windows для Linux, чтобы включить эту функцию.
(Вам может потребоваться перезагрузить компьютер с Windows, чтобы изменения вступили в силу.)
После этого вы можете использовать команду ssh, как показано ниже, для подключения к серверу Linux или ПК, на котором работает SSH-сервер.
ssh itsecforu@192.168.0.101
Способ 3: использовать Putty
Putty – известный и самый популярный SSH-клиент в Windows до появления клиента Windows OpenSSH и подсистемы Windows для Linux.
Чтобы использовать SSH с Putty, вам необходимо скачать программу Putty с официального сайта и установить ее.
Запустите Putty из меню «Пуск». Затем введите IP-адрес или имя хоста окна Linux и нажмите кнопку «Open», чтобы подключиться к этом серверу.

Примите ключ хоста, и вам будет предложено ввести имя пользователя и пароль.
См. также:
- Как использовать команды SSH в командной строке Windows 10
- 6 команд для очистки терминала Linux
Завершение
Я надеюсь, что эта статья помогла вам использовать SSH в Windows.
Как всегда, если вы нашли эту статью полезной, поделитесь ей, чтобы получить больше советов и рекомендаций. Берегите себя 🙂
В мире ИТ существует уже довольно широкий спектр операционных систем, начиная с серверных, заканчивая операционными системами для мобильных устройств. В обычных пользовательских компьютерах и в серверах довольно часто используются две ОС — Linux и Windows. Поэтому очень часто возникают ситуации, когда приходится подключаться по сети из одной операционной системы к другой для выполнения разнообразных операций.
В этой статье мы рассмотрим варианты подключения к Linux из Windows. Существуют бесплатные и условно бесплатные утилиты вроде AnyDesk или TeamViewer, но установка их довольно тривиальна и не нуждается в дополнительном пояснении. Утилиты подобного рода обладают рядом ограничений при бесплатном некоммерческом использовании, либо их функциональность не удовлетворяет тем или иным потребностям пользователя. Мы рассмотрим полностью бесплатные способы как подключится к Linux из Windows.
Удалённый доступ к Linux с помощью VNC
На сегодняшний день самое популярное удаленное подключение к Linux из Windows, с использованием привычный в Windows графического интерфейса, является VNC (Virtual Network Computing) — утилита, использующая протокол RFB (Remote FrameBuffer — удалённый кадровый буфер). Управление осуществляется путём передачи нажатий клавиш на клавиатуре и движений мыши с одного компьютера на другой и ретрансляции содержимого экрана через компьютерную сеть.
В качестве сервера VNC в данном примере будет использоваться TightVNC, установленный в Ubuntu 20.04. Для установки сервера VNC необходимо выполнить ряд действий:
Шаг 1. Установка рабочей среды XFCE
Xfce — одна из самых легковесных рабочих сред, используемых в Linux, она будет быстро работать даже при слабом и нестабильном сетевом подключении. Установите её с помощью команд:
sudo apt update
sudo apt install xfce4 xfce4-goodies
Шаг 2. Установка TightVNC
Далее установите TightVNC:
sudo apt install tightvncserver
Шаг 3. Настройка пароля
Перед началом выполнения всех действий необходимо задать пароль пользователя VNC. Выполните команду:
vncpasswd
Вам будет предложено создать новый пароль, а также пароль только для просмотра. Откажитесь от второй опции:
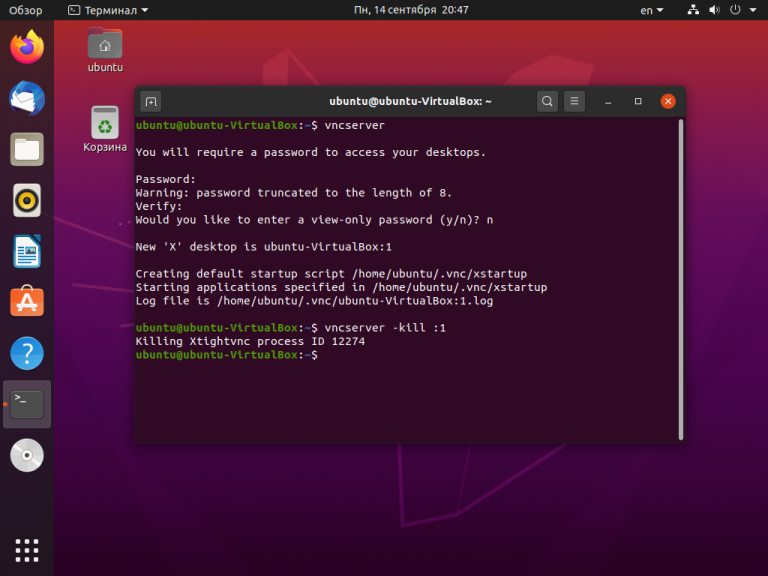
Завершите процесс vncserver:
vncserver -kill :1
Шаг 4. Настройка скрипта запуска
Отредактируйте скрипт, который выполняется после запуска VNC-сервера:
nano ~/.vnc/xstartup
Он должен содержать такой текст:
#!/bin/sh

unset SESSION_MANAGER

unset DBUS_SESSION_BUS_ADDRESS

startxfce4 &
Сделайте файл исполняемым:
chmod +x ~/.vnc/xstartup
Шаг 5. Запуск VNC сервера
На этом этапе уже можно запустить VNC-сервер с помощью команды:
vncserver
Шаг 6. Подключение из Windows
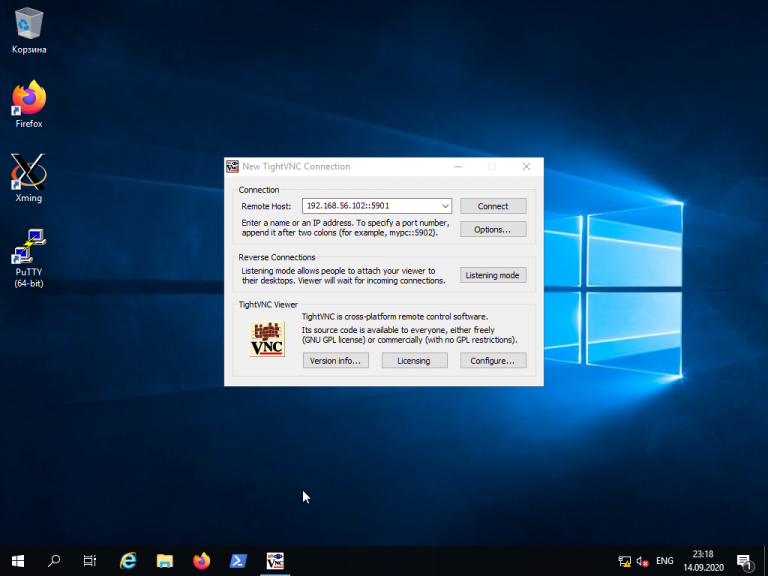
Для того, чтобы подключиться из Windows к вашему Linux-серверу, используйте TightVNC Viewer.
Укажите IP-адрес компьютера, к которому нужно подключиться, и номер порта в поле Remote Host. В данном примере — 192.168.56.102::5901:
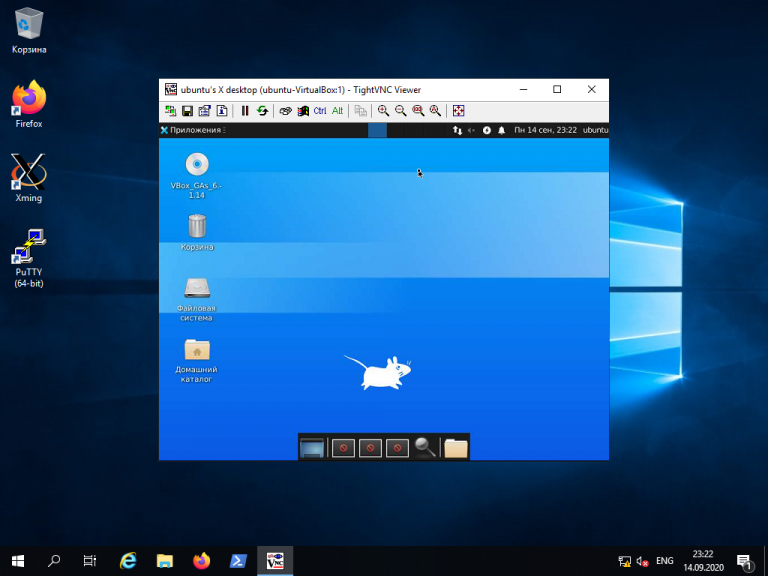
После того, как будет введён пароль, вы должны увидеть рабочий стол Xfce:
Шаг 8. Настройка systemd
Для того, чтобы запуск вашего VNC-сервера добавить в автозагрузку надо использовать systemd. Создайте новый файл сервиса systemd:
sudo nano /etc/systemd/system/vncserver@.service
Его содержимое должно быть следующим:
[Unit]

Description=Systemd VNC server startup script for Ubuntu 20.04

After=syslog.target network.target

[Service]

Type=forking

User=ubuntu

ExecStartPre=-/usr/bin/vncserver -kill :%i &> /dev/null

ExecStart=/usr/bin/vncserver -depth 24 -geometry 800x600 :%i

PIDFile=/home/ubuntu/.vnc/%H:%i.pid

ExecStop=/usr/bin/vncserver -kill :%i

[Install]

WantedBy=multi-user.target
Измените имя пользователя ubuntu и рабочего каталога ubuntu на нужные вам значения. Если у вас запущен VNC-сервер, остановите его:
vncserver -kill :1
Сообщите systemd о появлении нового сервиса:
sudo systemctl daemon-reload
Добавьте запуск вашего нового сервиса в список автозагрузки:
sudo systemctl enable vncserver@1.service
Запустите VNC-сервер:
sudo systemctl start vncserver@1
Использование RDP для удалённого подключения
Помимо VNC, для управления Linux-сервером из Windows можно воспользоваться RDP (Remote Desktop Protocol). Для этого на компьютере с Ubuntu 20.04 установите утилиту xrdp:
sudo apt install xrdp
Для корректной работы сервиса необходимо добавить пользователя xrdp в группу ssl-cert:
sudo adduser xrdp ssl-cert
Установите Xfce:
sudo apt-get install xfce4
Добавьте Xfce в сессии RDP в качестве рабочего стола по умолчанию:
echo xfce4-session >~/.xsession
Перезапустите сервис xrdp:
sudo systemctl restart xrdp.service
Процедура подключения из Windows к Linux-серверу по протоколу RDP почти ничем не отличается от подключения к удалённым Windows-серверам. Введите IP-адрес сервера, логин и пароль пользователя в Linux:
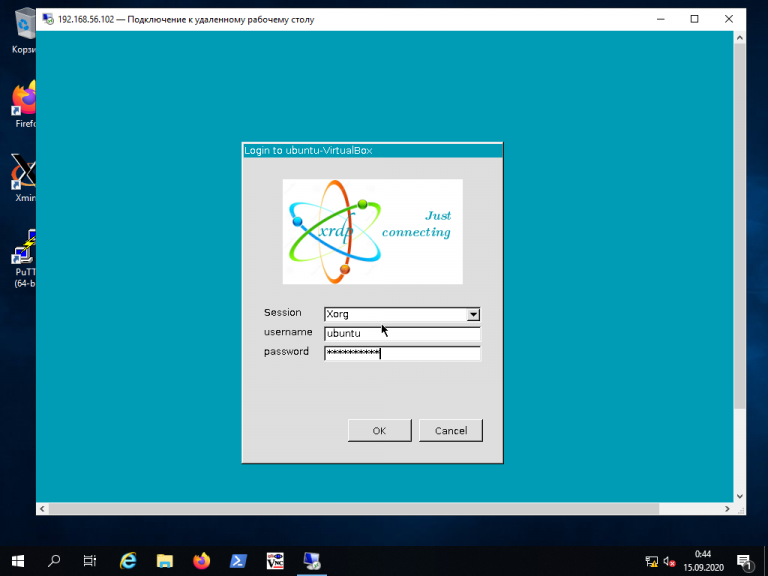
Если всё сделано правильно, вы увидите рабочий стол Xfce:
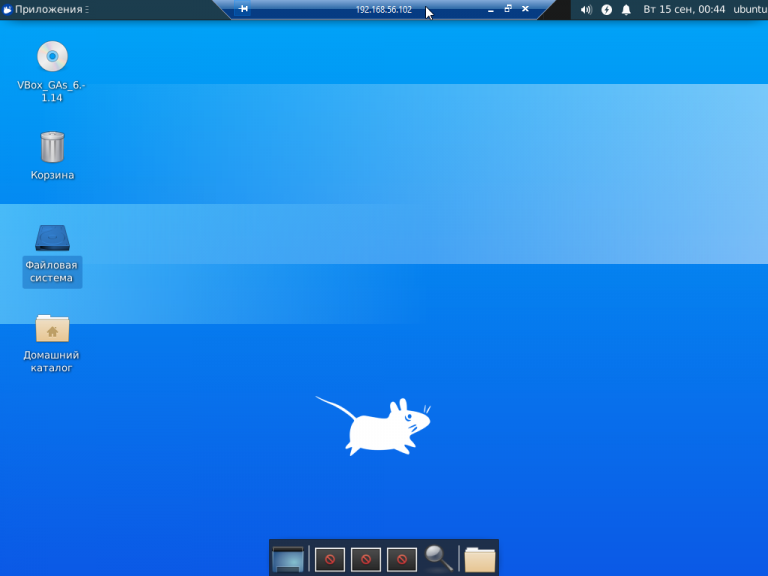
Для подключения к компьютеру под управлением Linux по протоколу SSH из Windows можно воспользоваться PowerShell. Сначала становите OpenSSH Client, если ещё не установлен. Запустите на вашем компьютере PowerShell от имени администратора системы и выполните следующую команду:
Get-WindowsCapability -Online | ? Name -like 'OpenSSH*'
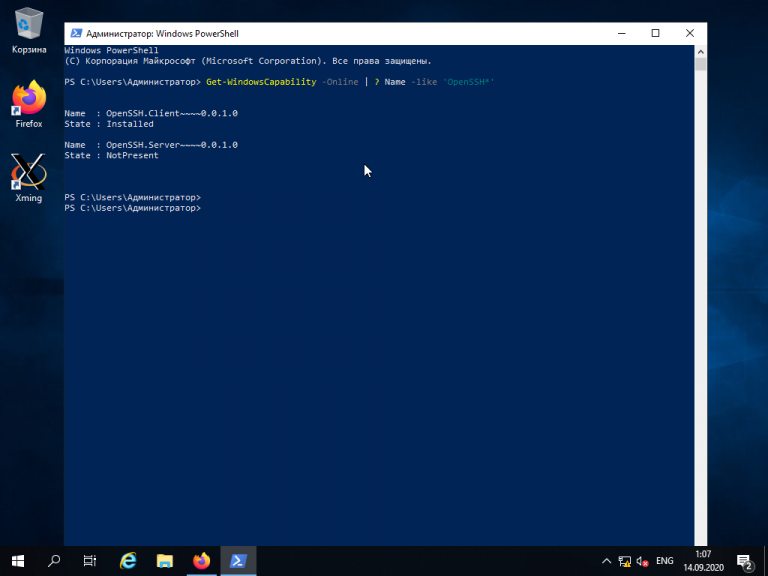
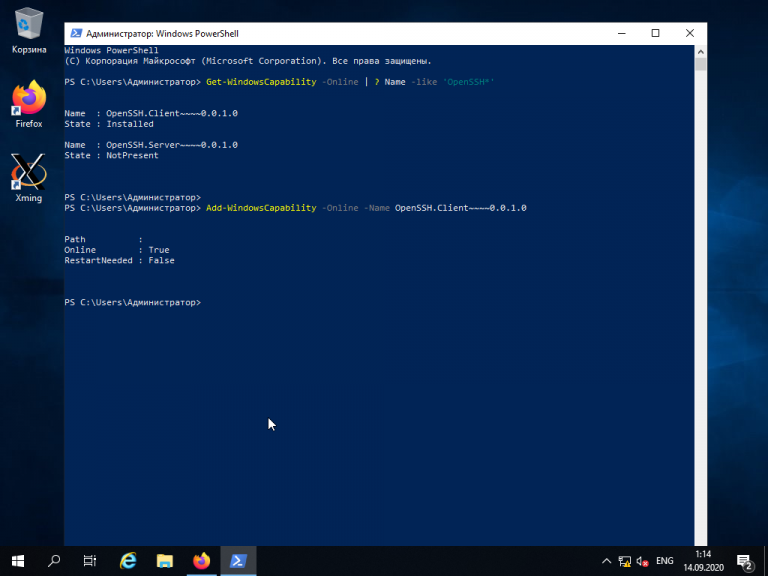
Это необходимо для того, чтобы узнать текущую версию SSH-клиента. В данном примере доступна версия OpenSSH.Client-0.0.1.0. Установите OpenSSH.Client с помощью команды:
Add-WindowsCapability -Online -Name OpenSSH.Client~~~~0.0.1.0
Для того, чтобы подключиться к устройству, на котором запущен SSH-сервер, необходимо ввести имя пользователя и IP-адрес. Команда для подключения по SSH используя PowerShell выглядит так:
ssh ubuntu@192.168.56.1
Здесь ubuntu — имя пользователя на удалённом компьютере, а 192.168.56.1 — IP-адрес Linux-сервера, на котором запущен демон SSH.
При первом подключении необходимо подтвердить использование специального персонального ключа для шифрованного соединения по SSH-протоколу (введите слово Yes), затем введите пароль пользователя (в данном случае для пользователя ubuntu):
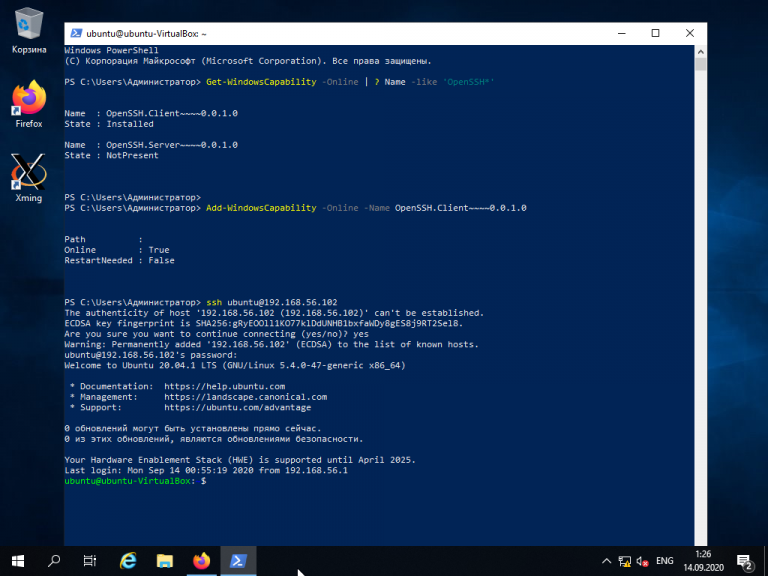
Как видите, соединение прошло успешно. Теперь можно выполнять все команды так же, как если бы вы их выполняли используя стандартный Linux SSH-клиент:
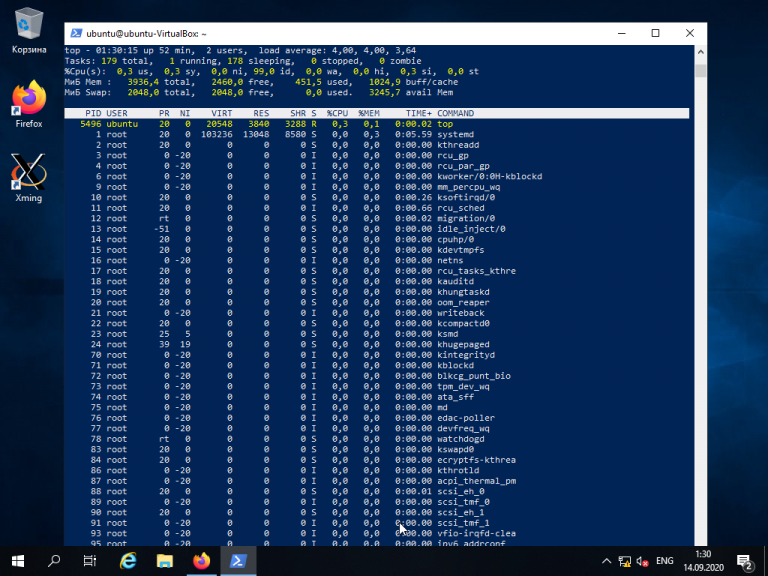
Для завершения терминальной сессии на удалённом компьютере введите команду exit. Теперь вы знаете как выполняется подключение к Linux из Windows по SSH.
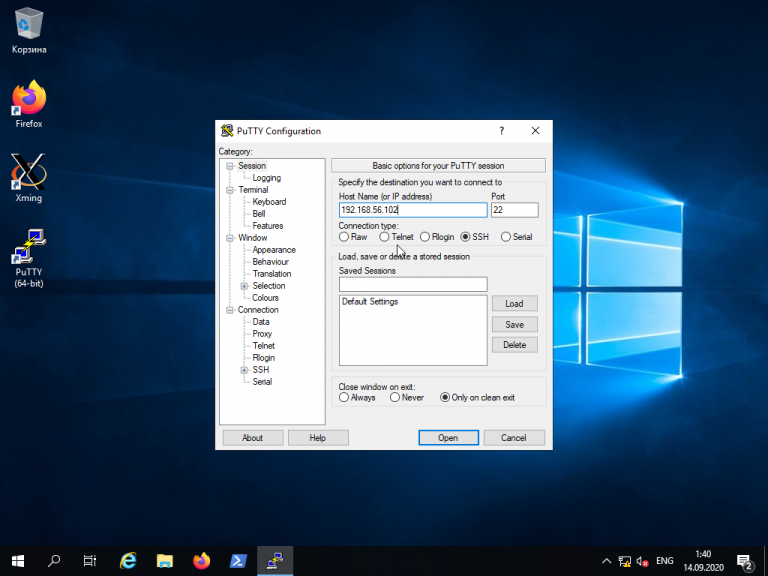
Использование Putty для подключения к Linux
Пожалуй, одним из самых популярных способов подключения к Linux из Windows является кроссплатформенная утилита Putty — небольшая по размерам, но очень часто незаменима для подключения по таким протоколам как SSH, Telnet, rlogin и даже с помощью последовательных портов.
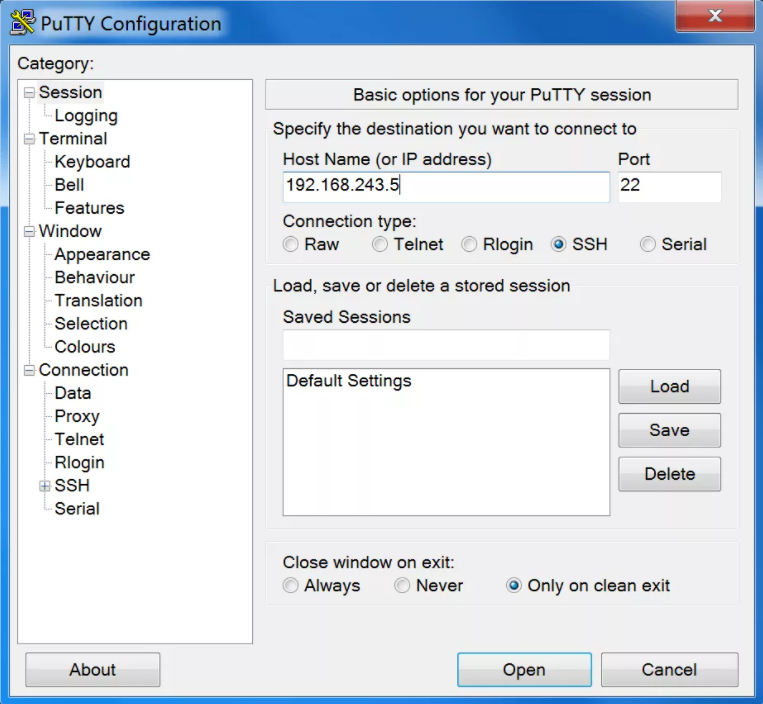
Для обычного подключения к Linux-серверу по протоколу SSH достаточно в поле Host Name (or IP—address) указать его IP-адрес и нажать кнопку Open (в данном примере Linux-сервер имеет IP-адрес: 192.168.56.102):
При первом подключении Putty предупредит, что используется специальный ключ безопасности и его нужно добавить в доверенные хосты. Нажмите кнопку Да:
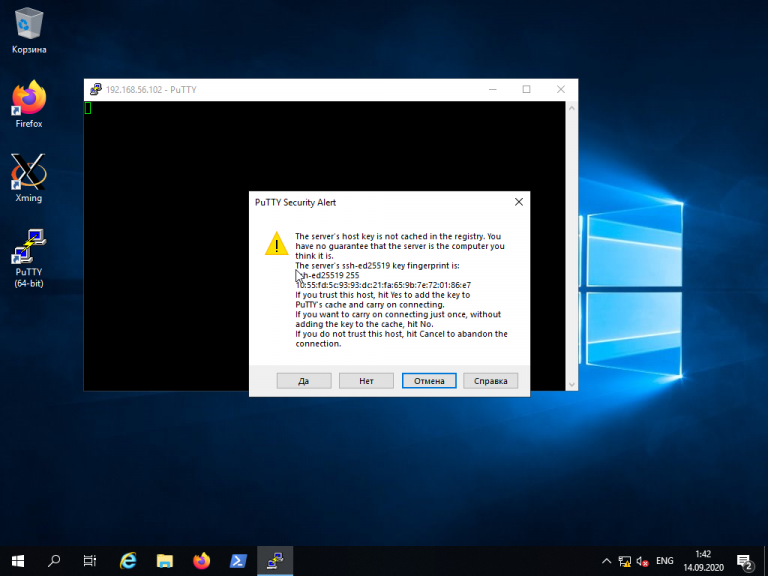
Далее нужно будет ввести логин и пароль. Если всё сделано правильно, запустится удалённая сессия терминала Linux:

Мало кто знает, что Putty позволяет запустить почти любое приложение, установленное на компьютере с Linux, по сети в Windows. Для этого на компьютере с Windows нужно установить собственный X-сервер. В данном примере воспользуемся Xming.
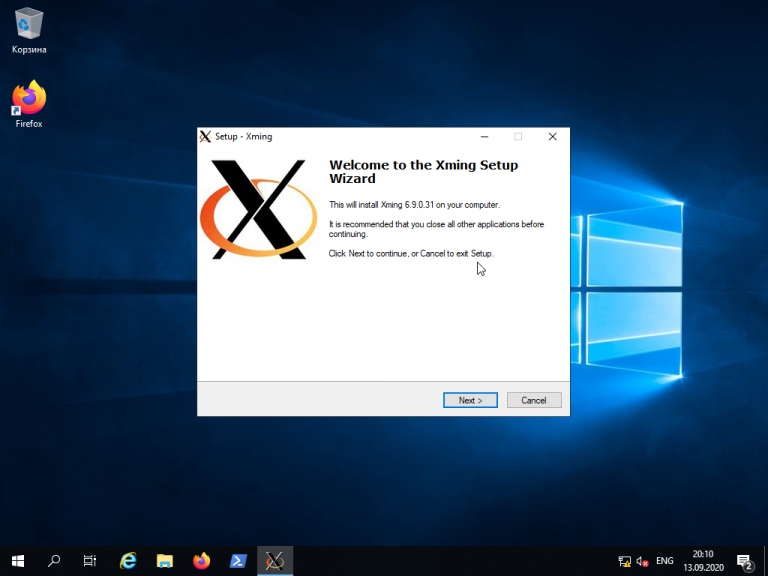
Скачайте Xming с официального сайта. Установка довольно тривиальная, поэтому не будем на ней останавливаться. Ничего не меняйте в процессе установки. Просто нажимайте кнопку Next до тех пор, пока программа не установится и не запустится:
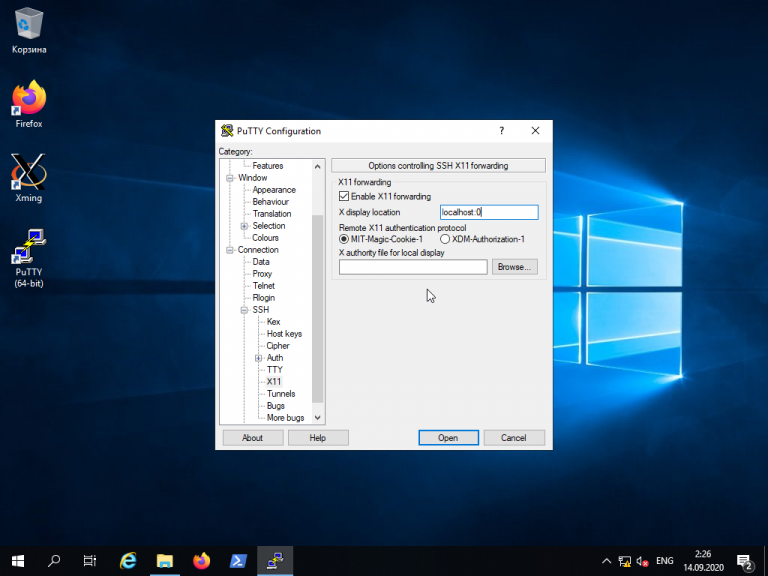
Когда установка Xming завершится, откройте Putty и в настройках сессии для вашего подключения в разделе SSH -> X11 включите флажок напротив опции Enable X11 forwarding, а также, в строке Отображение дисплея X впишите значение localhost:0, после чего откройте сессию подключения с помощью кнопки Open:
В открывшемся терминале Putty введите консольное название программы, обладающей графическим интерфейсом. В данном примере введено название графического редактора drawing:
drawing &
(Знак & позволит запустить программу в фоновом режиме, в этом случае в окне Putty можно будет выполнять и другие команды):
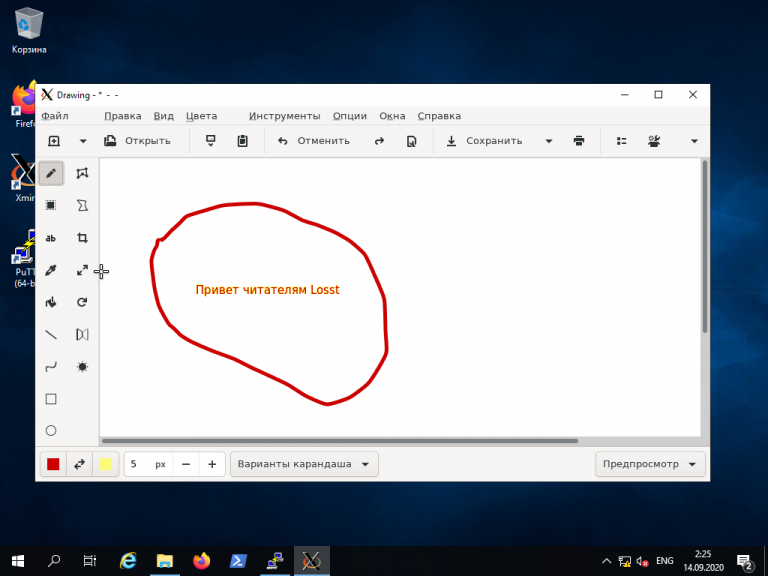
Как видите, Linux-приложение drawing успешно запустилось по сети на X-сервере, установленном в Windows. С ним можно работать так же, как и с локальным приложением.
Выводы
Сегодня не существует слишком уж больших проблем для подключения к Linux из Windows. Способов существует довольно много. Каждый из них обладает своими достоинствами и недостатками, например, скорость работы VNC, да и других тоже, существенно зависит от скорости сетевого соединения. Существуют также программные средства, позволяющие подключаться к Linux-серверам используя мессенджеры или браузеры.
Обнаружили ошибку в тексте? Сообщите мне об этом. Выделите текст с ошибкой и нажмите Ctrl+Enter.

Статья распространяется под лицензией Creative Commons ShareAlike 4.0 при копировании материала ссылка на источник обязательна .
Для настройки и управления удаленными серверами на базе Linux обычно используется протокол SSH. С помощью SSH на удаленный компьютер можно передавать данные и команды, которые будут выполняться так как бы они выполнялись на локальной машине.
В этой инструкции мы рассмотрим процесс подключения к SSH из Windows 10. Первый способ будет актуален для Windows 10 версии 1809 и выше, а второй можно использовать как на Windows 10, так и на Windows 7.
Подключение по SSH с помощью OpenSSH
Раньше для подключения к Linux серверу по SSH из Windows компьютера требовалась установка программы PuTTy или какого-то другого SSH-клиента. Но, в операционной системе Windows 10 (начиная с версии 1809) доступен клиент OpenSSH, с помощью которого можно подключаться к Linux серверам по SSH. Это позволяет работать с терминалом Linux прямо из командной строки Windows 10, при этом не требуется установка никаких сторонних программ.
Перед тем как использовать данный способ подключения необходимо проверить версию Windows 10. Для этого нажмите комбинацию клавиш Win-R и выполните команду «winver». Если на вашем компьютере установлена Windows 10 с версией 1809 или выше, то все нормально, в противном случае сначала нужно выполнить обновление.

Также нужно открыть меню «Параметры» и зайти в раздел «Приложения – Дополнительные возможности».

Здесь нужно пролистать список установленных дополнительных компонентов и найти в нем «Клиент OpenSSH». Если такой компонент присутствует, значит все нормально и можно переходить к следующему шагу. Если нет, то его нужно сначала установить с помощью меню «Добавить компонент».
Обратите внимание, не нужно путать «Клиент OpenSSH» и «Сервер OpenSSH». Для подключения по SSH вам нужен именно клиент.

Также клиент OpenSSH можно установить с помощью PowerShell. Для этого запустите консоль PowerShell с правами администратора и выполните следующую команду:
Add-WindowsCapability -Online -Name OpenSSH.Client~~~~0.0.1.0
Более подробно об установке и удалении клиента OpenSSH можно почитать в официальной документации Майкрософт.

Если версия Windows 10 подходящая и клиент OpenSSH установлен, то можно начинать подключение по SSH. Для этого запустите обычную командную строку Windows и введите команду «ssh». В ответ вы должны получить информацию о работе с данной командой.

В общем случае синтаксис команды «ssh» выглядит следующем образом:
ssh user@server
Где «user» — это имя пользователя на удаленном сервере, а «server» — это имя компьютера или его ip адрес.
Например, если наш сервер доступен по ip адресу «192.168.1.214», а имя пользователя это «aleks», то команда для подключения будет выглядеть так:
ssh [email protected]
После ввода данной команды появится запрос пароля и после этого мы получим доступ к удаленному серверу. Также при первом подключении с помощью ssh будет появляться запрос на добавление сервера в список известных.

По умолчанию для SSH используется порт 22. Для того чтобы это изменить нужно использовать параметр «-p». Например, для подключения по порту 2222 нужно выполнить вот такую команду.
ssh [email protected] -p 2222
Если подключение предполагает использование ключей, то они должны находиться в папке «C:\Users\user\.ssh». А при подключении путь к приватному ключу нужно указать с помощью параметра «-i». Например, чтобы использовать ключ «C:\Users\stepu\.ssh\id_rsa» нужно выполнить:
ssh [email protected] -i C:\Users\stepu\.ssh\id_rsa
Более подробную информацию о команде «ssh» и ее параметрам можно получить на сайте man.openbsd.org/ssh или на opennet.ru (перевод).
Подключение по SSH через PuTTY
В тех случаях, когда версия Windows 10 не поддерживает OpenSSH (или используется Windows 7) к SSH можно подключаться с помощью программы PyTTY. Скачать установщик данной программы можно на официальном сайте www.putty.org.
После установки программы PyTTY ее можно будет запустить с помощью поиска в меню «Пуск»

Сразу после запуска программы PuTTY появляется окно с настройками подключения. Основными параметры здесь находятся на вкладке «Session», здесь нужно ввести:
- Имя компьютера или IP адрес;
- Порт для подключения (по умолчанию, 22);
- Способ подключения (SSH);
После ввода этих данных можно запускать подключение с помощью кнопки «Open».

Если для подключения к SSH используются ключи, то путь к приватному ключу нужно указать в разделе «Connection – SSH – Auth».
Обратите внимание, ключ должен быть сгенерирован программой PuTTYgen, которая устанавливается вместе с PuTTY. Если вы сгенерировали ключи с помощью OpenSSH, то их можно загрузить в PuTTYgen и сохранить в формате подходящем для PuTTy.

Если информация для подключения правильная, то вы увидите консоль с запросом на ввод имени пользователя пароля. Также при первом запуске появится запрос на добавление компьютера в список известных.

После ввода этих данных вы будете подключены к удаленному серверу по SSH.
Посмотрите также:
- Как удалить папку в Linux через терминал (консоль)
- Как открыть файл в терминале Linux
- Как создать файл в Linux через терминал
- Как скопировать файл в Linux через терминал
- Как удалить файл в Linux через терминал
Автор
Александр Степушин
Создатель сайта comp-security.net, автор более 2000 статей о ремонте компьютеров, работе с программами, настройке операционных систем.
Остались вопросы?
Задайте вопрос в комментариях под статьей или на странице
«Задать вопрос»
и вы обязательно получите ответ.
Безлимитные тарифы интернета с высокой скоростью соединения упростили администрирование компьютеров. Сегодня все чаще помощь пользователям оказывается удаленно. Это удобно, ведь не надо тратить время на поездки и возможность подключиться есть практически круглосуточно.
Сегодня поговорим об удаленном подключении к Ubuntu из ОС Windows.
Зачем удаленно подключаться из Windows к Ubuntu
Не так важно, где находится удаленный компьютер – в соседней комнате или в другом регионе. Интернет убирает подобные ограничения, главное – чтобы связь оставалась стабильной на все время настройки. Это одинаково относится к машинам, работающим хоть на операционной системе Windows, хоть на Ubuntu. Последние используются, например, для развертывания сервера CS или Minecraft.
Причины, по которым требуется удаленное подключение:
- ручной запуск обновлений на компьютере с Ubuntu;
- настройка системы без подключения локального монитора, клавиатуры;
- работа с машиной, расположенной по другому адресу.
Пользователю доступно три варианта коннекта с компьютеров, работающих на ОС Windows. Выбор зависит от удобства и предпочтений: SSH через приложение PuTTY, встроенная поддержка RDP и виртуальная сеть VNC (понадобится предварительная настройка клиента). В любом случае перед работами понадобится выяснить IP-адрес компьютера, к которому предстоит подключаться.
Комьюнити теперь в Телеграм
Подпишитесь и будьте в курсе последних IT-новостей
Подписаться
Как выяснить IP-адрес компьютера с установленной ОС Ubuntu
Если есть физический доступ к компьютеру с установленной Ubuntu, на нем открывается терминал (комбинация клавиш Ctrl+Alt+T) и вводится команда ifconfig. В отображенном перечне данных имеет значение строка, начинающаяся с inet addr. Если используется подключение через Wi-Fi, то рядом будет его маркер в виде «wlan0». При проводном соединении фраза будет заменена на «eth0». Рядом отображается актуальный IP-адрес машины.
Второй способ заключается в применении функций графического интерфейса. Последовательность действий: найти значок подключения на панели, кликнуть правой кнопкой мышки, выбрать пункт «Сведения о подключении». Там и указан постоянный IP-адрес компьютера. Если доступа к нему нет, то можно выяснить данные через маршрутизатор. В панели управления отображаются активные пользователи вместе с их «контактами».
Подключение к Linux через SSH
Перед подключением на компьютер с Windows устанавливается приложение PuTTY. Это популярный инструмент для организации SSH-соединения, которое предоставит удаленный доступ к командной строке Ubuntu. Важно понимать, что этот режим требует определенного опыта в управлении, ведь здесь нет привычной мыши и «окошек», а все команды передаются в текстовом виде. Отчеты предоставляются в таком же виде.
По умолчанию возможность коннекта через SSH в Ubuntu отключена. Так что предварительно эту систему требуется настроить. Активация функции выполняется вводом команды sudo apt install openssh-server (в той же консоли, где ранее был взят IP-адрес). Логин и пароль подключения будут те же, что используются при входе в операционную систему.
Из-за неудобства управления в текстовой среде этот вариант востребован для удаленной активации более удобных инструментов. Например, тех же протоколов RDP или VNC. В них также пригодится IP-адрес, поэтому получить минимальные навыки работы в консоли все равно рекомендуется. Это упростит решаемые задачи, если по каким-то причинам не удается соединение в других режимах.
Подключение из Windows через RDP
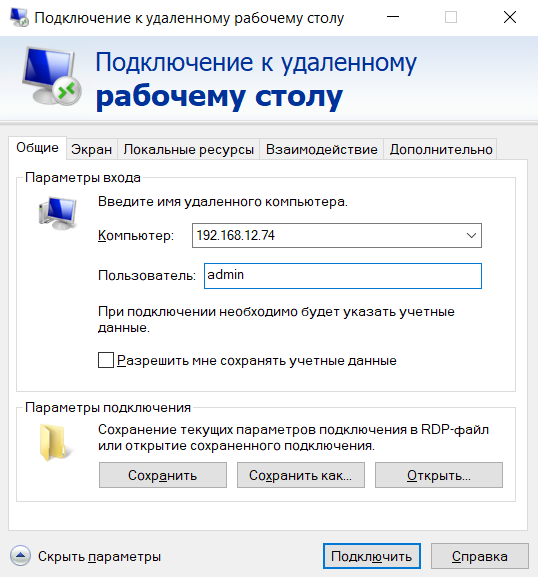
Способ подключения через службу Remote Desktop Protocol (RDP) распространен при работе с машинами на платформе Windows. Популярность инструмента объясняется просто – его поддержка встроена во все виды и версии операционных систем. Все, что понадобится для подключения, уже известно: это IP-адрес, логин и пароль от Ubuntu. Запускается утилита через поиск, называется она «Подключение к рабочему столу».
На компьютере-клиенте требуется установка приложения xrdp.
- Необходимо открыть окно термина нажатием комбинации клавиш Ctrl+Alt+T.
- Ввести текстовую команду sudo apt install xrdp и нажать «Ввод».
- Провести активацию программы командой sudo systemctl enable xrdp.
После установки надо ввести на компьютере-сервере данные доступа и нажать кнопку «Подключить». Если поставить галочку «Разрешить мне сохранять учетные данные», последующие входы будут выполняться без дополнительных вопросов. Но в первый раз пароль всегда вводится вручную. При желании создается отдельный конфигурационный файл (востребовано, когда много компьютеров с удаленным управлением).
После подключения пользователь видит рабочий стол компьютера на Ubuntu. Работа с его окнами не отличается от локального управления – функционируют все настроенные горячие клавиши, перетаскивание мышью. В некоторых версиях Ubuntu, например, 18.04 LTS, RDP не работает, пока не выйдешь из текущего пользователя. Подобные фишки обычно известны системным администраторам.
Подключение через VNC
Есть другой вариант удаленного рабочего стола – сеть Virtual Network Computing (VNC). Она тоже требует предварительной настройки обеих машин. Так, на компьютер с Ubuntu инсталлируется ПО, открывающее доступ к управлению.
Последовательность действий:
- Открыть окно терминала.
- Ввести команду sudo apt update.
- Установить сервер: sudo apt install tightvncserver.
- Активировать его: sudo tightvncserver.
Система предложит ввести пароль для подключения. Он понадобится при активации удаленного соединения, поэтому стоит записать (запомнить) внесенные данные.
На этом все! TightVNC Server готов к работе, остается следом настроить компьютер на Windows. Программа доступна на официальном сайте разработчика в двух версиях: 32 и 64-бит.
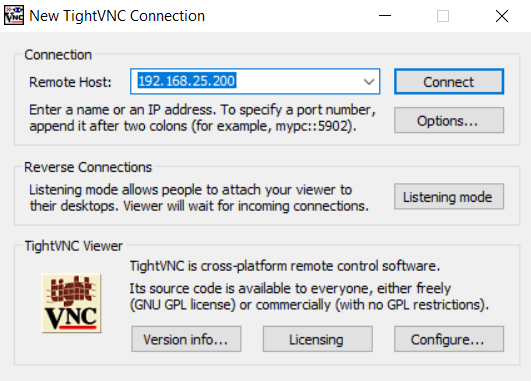
После инсталляции и запуска достаточно ввести IP-адрес хоста и пароль доступа, введенный после активации сервера на Ubuntu. Схема работы VNC аналогична предыдущему примеру: пользователь видит перед собой удаленный рабочий стол и управляет функциями операционной системы, как будто сидит за компьютером локально.
NOTE: I do a LOT of handholding in this article. I wanted to be sure someone who is less-than-familiar with the Linux Command Line Interface and/or SSH would have no trouble understanding what is going on. Here are some navigation links to more readily find what you need:
- Install OpenSSH on your Linux Machine
- Install PuTTY on Your Windows Machine
- Create Public/Private Key pairs with PuTTYGen
- Configure PuTTY for Initial Login to Your Linux Machine
- Your First Login Using Password-based Authentication
- Add Your Public Key to the Linux Authorized Keys List
- Configure PuTTY for Key-Based Authentication
- Connect to Your Linux Machine using Key-Based Authentication
- Set Key File Permissions
- Increase Security by Editing the SSH Configuration File to allow Key-Based Authorization ONLY
Getting to Know Linux
I have recently undertaken to learn how to develop on the Linux platform. I grew up in the Windows world, and decided it was time to expand my horizons. After all, the vast bulk of the web runs on some variant of Linux, and some of today’s most in-demand web application development occurs in Ruby on Rails, which is most at home on a Linux machine.
What I have found so far is that there is a whole lot to like about this strange new OS, and the underlying philosophies and tools which form the core of the Linux experience.
One of the very first things I wanted to do was learn how to access a Linux box remotely from my Windows desktop. The first step in this process was understanding how to set up a Secure Shell (SSH) connection. At first, it might seem this is a little redundant, since my Linux machine sits about 9 feet away from my Windows development box. However, this is a necessary first step in order to eventually be able to:
- Spin up a Linux VM instance on a IAAS/cloud service such as Amazon EC2 and/or Windows Azure, and control/access/utilize it from my windows desktop.
- Set up and manage a hosted Linux server for deployment of web applications/sites
- Understand remote access in a Linux environment
Of course, on top of those items in the list above, this was also a good exercise to get me started doing useful things with my new Linux machine!
Minor Linux Familiarity Required
We will need to perform some Linux commands via the Bash Command Line Interface (CLI), both on our Linux machine, and through our remote connection once we get it set up. If, like myself, you are new to Linux, you may want to review some Bash basics. While the posts linked to below are parts of a series on using Git version control, each of the following focus on basic Bash commands used to navigate and manipulate files in a Linux system.
Review Basic Bash Navigation:
- Getting Started with Git for the Windows Developer (Part II) — Get Acquainted with Bash
- Getting Started with Git for the Windows Developer (Part III) — Working with Files Using Bash
Setting Up the Linux Machine
I am using Linux Mint for my first forays into the Linux world. Mint is built atop Ubuntu, and features a friendly GUI for those of us just getting started. However, for me, the GUI is mainly for those “oh sh*t, I don’t know what to do” moments. One of my main purposes in setting up this machine was to utilize the Bash terminal as much as possible, and master this aspect of this new platform. In fact, we are going to perform this entire exercise using the Bash terminal when interacting with the Linux box.
For this post, I am dealing with a local Linux machine, on my home network behind a router. In another post, I will discuss exposing the machine to the outside world via the internet.
Installing OpenSSH on your Linux Machine
Having recently installed a fresh Mint OS, the first thing we have to do is install an SSH server. Your Linux Distro may or may not come pre-configured with OpenSSH, which I understand is the SSH server of choice in Linux-land.
Linux distro’s based on Debian-flavored Linux use the apt-get install newSotwareTitle to find and download software packages, and/or confirm and update existing installations if they are already present on your machine. So, let’s use apt-get to download OpenSSH on our Linux machine (note — this post assumes you have super-user/administrative permissions on your Linux machine):
Install OpenSSH
Open the Bash terminal on your Linux machine, and type the following command and hit enter. Since you are using sudo to perform this action, be ready to enter your password prior to execution:
Install OpenSSH Server
$ sudo apt-get install openssh-server
In my case, OpenSSH was already present on the system, so my terminal output looks like this:

If your machine did not have OpenSSH Server installed, the terminal will ask that you confirm installation/update of any number of packages. Type “Y” and hit enter. You will then see the terminal window populate with the actions taken and packages added.
Now, we could do some of the SSH server configuration right now at our Bash terminal. However, instead, I am going to move over to the Windows side, and do the rest of the configuring from there, by way of an SSH connection.
The Most Common SSH Client for Windows — PuTTY (no, that is not a typo)
Use of the SSH protocol is less common in the Windows universe then in Linux. However, the most popular SSH client for use on a windows machine is PuTTY, an open source terminal emulator which can act as a client for SSH, Telnet, and other protocols. To get started setting up your SSH client on Windows, visit the PuTTY download page, download and install putty on your machine. The easiest way to go is to download the putty-0.62-installer.exe package, which includes everything required for our purposes:
- Link to the PuTTY download site
- Directly download the PuTTY installer
Once the download completes, run the installer.
Use PuTTYGen to Create a Public/Private Key Pair for Your Windows Client Machine
SSH utilizes Key-based authorization to ensure the security of a connection. A simple description of how this works (From Wikipedia):
SSH uses public-key cryptography to authenticate the remote computer and allow it to authenticate the user, if necessary.[1] Anyone can produce a matching pair of different keys (public and private). The public key is placed on all computers that must allow access to the owner of the matching private key (the owner keeps the private key secret). While authentication is based on the private key, the key itself is never transferred through the network during authentication.
[Read More]
For our purposes, we will use the Handy PuTTYGen utility installed with our PuTTY package to create our keys. Open PuTTYGen (Start Menu —> PuTTY (Folder) —> PuTTYGen (application)) and you should see the following:
PuTTYGen, Ready to Create a Public/Private Key Pair:

Leave the settings at their defaults, and click the “Generate” button. PuTTYGen will request that you move your cursor about in the large empty area in order to ad some “randomness” to the process (and in fact will pause generation until you DO):

When key generation is complete, you will be presented with some additional settings to complete before saving your keys:
![PuTTY-Key-Generator-Comment--Passwor[2]](https://typecastexception.com/image.axd?picture=PuTTY-Key-Generator-Comment--Passwor%5B2%5D_thumb.png "PuTTY-Key-Generator-Comment--Passwor[2]")
Complete the following Items in the Generator Form as follows:
- Key Comment can technically be anything you like, but convention is to use your email address
- The Key Passphrase is not required, but is strongly recommended as an additional level of security, just in case anyone were to get hold of your private key. Use a reasonably strong (but easy to remember) pass word here.
Once you have completed these items, it is time to save your keys. First, I would create a directory (folder) in your Windows User Folder named “SSH Keys” in which to store your private keys. Then, click the “save private key” button and save the key there.
NOTE: Don’t use the “Save Public Key” feature. OpenSSH expects the public key in a slightly different format than PuTTYGen provides, so instead, we are going to copy the key as presented in the PuTTYGen window straight into our authorized_keys file once we log into our Linux machine.
ALSO NOTE: It is not necessary to save the public key which corresponds to the private key we just made, because we can use the PuTTYGen “Load” button to load our private key, which will then also load the proper public key data back into the Public Key Window for copying once again.
Leave the PuTTYGen Window open, and let’s configure PuTTY for our first login.
Configure PuTTY for the Initial Login
The first time we log in to our Linux machine, we will use plain old password authentication, so that we can pass our public SSH key directly over the (relatively) secure connection, and avoid exposing it in a way which might result in someone else getting ahold of it. This is also good practice in a number of different ways.
Open the PuTTY application (Start Menu —> PuTTY (folder) —> PuTTY (application))
Enter the IP Address of your Linux Machine:

As you can see in the picture above, enter the IP Address of the Server machine (your Linux box). If you don’t know what the IP address of your Linux machine is, follow this link:
- Find The IP Address of Your Computer on the Home or Local Area Network (LAN) -Linux (Debian-Based Systems)
Leave the port specification as the default value of 22 (this is the standard port used for SSH logins). While there are potential security reasons to change this later, for now it will do.
Next, in the tree menu to the left, select the Connection/Data node and enter your user name you use to log in to the Linux machine (REMINDER — we are assuming your user profile includes super-user permissions):
Enter your User Name in the Connection/Data node form:

Leave the rest of the settings at their default values (as shown above). Now, go back to the Session node, and enter a name for this configuration in the “Saved Sessions” space, then click “Save. In my case, I saved this session configuration using the IP address, and a brief description of the configuration:

First Remote Login to your Linux computer with Password Authentication
Ok, with those details tended to, click on the “open” button. This first time we log in, you will likely be presented with a warning dialog telling you that there are no keys cached for the server you are attempting to connect to, and do you wish to cache them now:

Since we know this machine is on your LAN, go ahead and click “Yes.” You should be presented with a terminal window that looks like this:

Next, enter the password you use to log in to your Linux machine and hit enter (note that in the terminal here, the cursor does not move, nor are standard obfuscated password placeholders used — in other words, as you type your password, it will appear as if nothing is happening). Your terminal should now resemble this:
![PuTTY-First-Login-Terminal-Logged-In[2]](https://typecastexception.com/image.axd?picture=PuTTY-First-Login-Terminal-Logged-In%5B2%5D_thumb.png "PuTTY-First-Login-Terminal-Logged-In[2]")
Congratulations — you have now logged into your Linux terminal from your Windows computer. However, we are not yet using SSH, and in fact, this method is not a very secure way to remotely access another machine. Next, we need to set up our key-based authentication. Once we have confirmed all is well with that, we will disable the Username/Password-based authentication we are using now in favor of the much stronger key-based security.
Add Your Public Key to the Linux Machine
Your Linux system stores public SSH keys for client machines in a directory within your Linux home user folder (the .ssh directory), in the authorized_keys file. Your next step depends upon whether there is already an .ssh directory on your machine, and whether or not there is already an authorized_keys file present. We can find this out quickly enough by attempting to navigate into a directory named .ssh from within our home folder (our terminal should have opened within our home folder.
If you are not familiar with navigation and basic file manipulation in Bash (the Linux terminal), have a quick look at these two articles I wrote. The articles are part of a series on using Git, but these two focus on basic Bash shell commands useful for file and directory navigation:
- Getting Started with Git for the Windows Developer (Part II) — Get Acquainted with Bash
- Getting Started with Git for the Windows Developer (Part III) — Working with Files Using Bash
First, let’s attempt to navigate into the .ssh directory on our remote Linux box. Type the following into the terminal window (note — the “$‘” symbol is not typed — this is the command “prompt” and indicates that the terminal is ready for command input):
$ cd .ssh
If there is not already a directory named .ssh in your user folder, your terminal window should look like this:
![Navigate-to-ssh-directory-not-exists[2]](https://typecastexception.com/image.axd?picture=Navigate-to-ssh-directory-not-exists%5B2%5D_thumb.png "Navigate-to-ssh-directory-not-exists[2]")
If this is the case, we need to create a new .ssh directory. Type the following:
$ mkdir .ssh
Now your terminal should look like this:

Now let’s try navigating into the new directory:

That’s more like it! Next, since there was no .ssh directory to begin with, we also need to create our authorized keys file. We are going to create a new file, and add our new public key all in one fell swoop. Go to the PuTTYGen window (still open on your Windows desktop), and select and copy the entire public key visible in the space labeled “Public key for pasting into OpenSSH authorized_keys file”:

Now we will use the echo command to create the new authorized_keys file, and insert the Public key for our Windows machine. The syntax of our echo command is as follows:
echo YourPublicKey >> authorized_keys
This command will append YourPublicKey to the file authorized_keys. If the file does not exist, it will be created (ours doesn’t exist yet. If yours DOES, don’t do this this way).
First, type the echo command into the Linux remote terminal like this:

Then, if you right click your mouse pointer at the terminal cursor, the contents of your clipboard (containing your newly created public key for your Windows machine) will automatically paste into the current line.
Then add the >> authorized_keys to the end, and hit the Enter key:

Now that we have added our public key to the Linux machine, let’s end our PuTTY session, and see if we can log back in using Public/Private key authentication. If this works, we will then modify our OpenSSH server configuration on the Linux box to ONLY allow this type of authorization. Go back to the Putty window, and close it. This will end the session.
Configure PuTTY for Public/Private Key Authorization
Now, open PuTTY again, and in the tree control to the left, load your previously saved session configuration, select the Connection/SSH/Auth node. Browse to find your private key you created using PuTTYGen, and select it for use. Leave the rest of the settings at their default values for now:
![PuTTY-Configuration-Load-Private-Key[2]](https://typecastexception.com/image.axd?picture=PuTTY-Configuration-Load-Private-Key%5B2%5D_thumb.png "PuTTY-Configuration-Load-Private-Key[2]")
Next, return to the Session configuration node, and type a new name for this modified configuration. As previously, I used the IP address, in conjunction with brief configuration details. Then click “Save”:

Connect to Linux/OpenSSH Server using Public/Private Key Authorization
Ok, let’s try connecting now, using our new configuration. Click on the Open button on the PuTTY interface. You should see something like this:

Notice that this time, PuTTY tells us it is attempting to log in using public key authentication, and prompts us for the password we associated with our key when we created it. Enter the password you used when creating the key (again, the cursor will remain still while you do this), and hit Enter:

Congratulations! You have now logged in to your Linux machine using Public/Private key authentication. While we are connected remotely, let’s tidy up a few loose ends.
Set Permissions on Keys File to Owner/Read-Only
Now that we know our keys are working properly, let’s protect the authorized_keys file on our Linux machine so that we don’t accidentally modify or delete it. Navigate into the .ssh directory, and type the following command into the Bash terminal:
chmod 400 authorized_keys
This sets the permissions on our authorized_keys file so that the current user, and only the current user has read-only permissions, and no one else can even access the file (that specific user can make the file writeable for themselves again by using chmod 700).

Edit the OpenSSH Configuration File to Disable Password Authentication
Now that we have a working key-based authentication scheme, we have no more need for the less-then-secure password-only security we used previously. In fact, our next step will be to edit the OpenSSH configuration file on our Linux machine to NOT allow that, and to ONLY accept key-based authentication.
First, let’s make a backup copy of the configuration file. Type cd to navigate back to your home directory (entering cd with no options or destination path returns you to the home directory by default), then create a folder in your home directory to store backups like this:
$ mkdir ssh_config_backup
Then, use the following command to make a copy of the configuration file in the new directory we just created (note: Since we are using sudo, we will be prompted for the user password we use on the Linux machine):
$ sudo cp /etc/ssh/sshd_config ~/ssh_config_backup
Next, we will open the sshd_config file using vi in terminal mode. Type the following:
$ sudo vi /etc/ssh/sshd_config
Again, you will be promoted for your password on the Linux machine. You should see something like this after hitting the Enter key:

A few things to note:
- I recognize it is difficult to see the dark blue text here. It will be easier to read on your actual screen
- Notice that we are no longer in the Bash terminal per se, but instead looking at the text of the sshd_config file within the terminal.
- At the moment, you cannot edit anything —
viis in command mode.
We will use a few (very few) basic vi commands to get this done. The Commands we need to edit this document are:
- Use the up/down/left/right arrow keys to navigate within the document, and to position your cursor within a line of text.
- If
viis in Command Mode, typei(lowercasei) to enter Insert mode. - If
viis in Insert mode, press the Esc key to return to Command Mode. - When you are finished editing, type :wq (colon then lowercase w the lowercase q) to save and exit the document, returning to the Bash Terminal proper.
Now, using your down arrow key, move down the document a ways until you find this line:
#PasswordAuthentication yes
We want to change it to:
PasswordAuthentication no
The hash symbol at the beginning of this line means that it has been “commented out” (meaning it is ignored when the OpenSSH server refers to this file during configuration). In addition, note its value is set to yes:

First, type lowercase i to enter Insert mode, and delete the hash symbol. Then, use your right arrow key to move to the end of the line, and change the yes to no. Now press the Esc key to return to Command mode.
You would think this would be the end of it. However, at least in my current Linux Mint system, we also have to disable the Password Authentication Modules (PAM) portion of the config file (this is usually the last line in the file). To do this, use your down arrow key to navigate through the document until you find the following line:
UsePAM yes
We want to change it to:
UsePAM no
Your screen should look like this:
Use your Right-Arrow key to move to the end of that line, and type I to enter Insert Mode. Change the yes to no, then press the Esc key to return to Command Mode:

Now, once safely back in Command mode, type the following:
:wq
As you type, this command will appear at the bottom of the vi screen.

Once you hit enter, the modified file will be saved, and you will be returned to the Bash terminal:

Restart the SSH Server
As a final step, we need to re-start the SSH Server on the Linux machine in order that the configuration changes we just made a reflected in the service. Type the following command into the terminal and hit enter:
$ sudo service ssh restart
Ok, now exit the current PuTTY session by closing the PuTTY window. Let’s see if we have succeeded in denying access for those seeking to login using simple password authentication. Re-open PuTTY, and load your original session configuration, which we set up without the key-based authentication using only our user name, and attempt to log in. If we have done everything correctly, you should be greeted with THIS unpleasant artifact:

Hopefully, this has helped some of you get started using OpenSSH and PuTTY to connect to your Linux machine from a Windows box remotely. Of course, this is of limited usefulness when like me, your two machines are in the same room. In a future post, I will discuss using SSH to connect to your Linux machine from the internet at large, and in conjunction with VNC to create a very secure Remote Desktop Connection.
Additionally, I began exploring this because my next goal is to utilize cloud services such as Amazon EC2 and Windows Azure. In that context, I want to be able to spin up a cloud-hosted Virtual Machine (VM) and perform this type of administrative stuff.
Please feel free to leave constructive feedback, and especially, to bust me where I have made a mistake or am propagating bad information. Comments are greatly appreciated!
CodeProject
My name is John Atten, and my username on many of my online accounts is xivSolutions. I am Fascinated by all things technology and software development. I work mostly with C#, Javascript/Node.js, Various flavors of databases, and anything else I find interesting. I am always looking for new information, and value your feedback (especially where I got something wrong!)