
Компьютеры на базе Виндовс 10 представляют собой многофункциональные устройства, позволяющие пользователям осуществить практически любую задумку. Кто-то работает в фоторедакторах, кто-то монтирует видео, а кто-то подключает FTP-сервер на операционной системе Windows 10. Далее разберемся, что это за сервер, для чего он нужен и как его можно настроить, используя встроенные средства ОС и специальные программы.
Для чего он нужен
Перед началом настройки сервера нужно понять, что за аббревиатура «FTP» прячется в его названии. FTP (File Transfer Protocol) – это протокол передачи данных через интернет. В первоначальном виде он появился в далеком 1971 году, но до сих пор пользуется популярностью. Следовательно, FTP-сервером допустимо назвать хранилище данных в интернете, к которому может обратиться человек, чтобы скачать музыку, фильмы, фото и другие файлы.

Раз уж в этом материале мы говорим о настройке FTP-сервера на ПК с операционной системой Windows 10 на борту, то стоит пояснить, что в нашем случае в качестве хранилища (сервера) будет выступать сам компьютер. А FTP будет использоваться в качестве протокола для передачи данных. Таким образом, вы сможете делиться информацией, сохраненной на вашем устройстве, с другими пользователями, не тратя время на загрузку данных в облако и, уж тем более, копирование данных на флеш-накопители.
Как создать и настроить FTP-сервер на компьютере Windows 10
Настройка FTP-сервера – это сложный процесс, который вызывает у новичков массу сложностей. Однако встроенные средства Windows 10 дают возможность подготовить сервер для подключения устройств любому желающему. Главное – четко следовать требованиям инструкции, а они не такие мудреные, как может показаться на первый взгляд.

Алгоритм действий для создания и настройки FTP-сервера выглядит следующим образом:
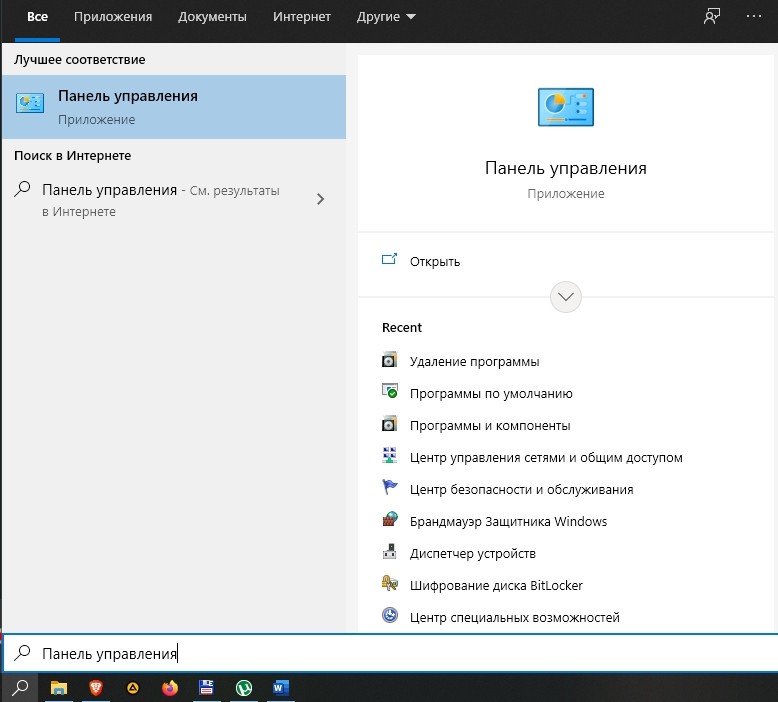
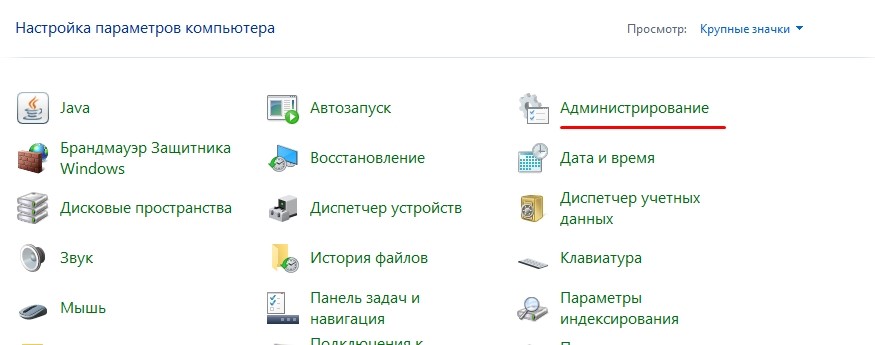
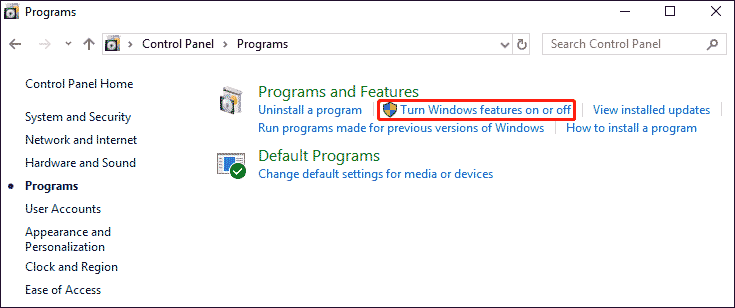
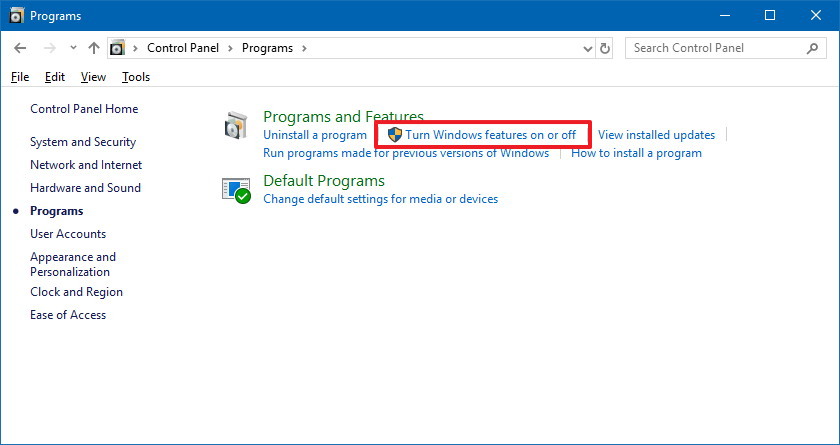
- Сначала нам нужно активировать встроенный FTP-протокол на компьютере, так как по умолчанию он отключен. Для этого нужно открыть «Панель управления» через поисковую строку Windows или любым другим способом.
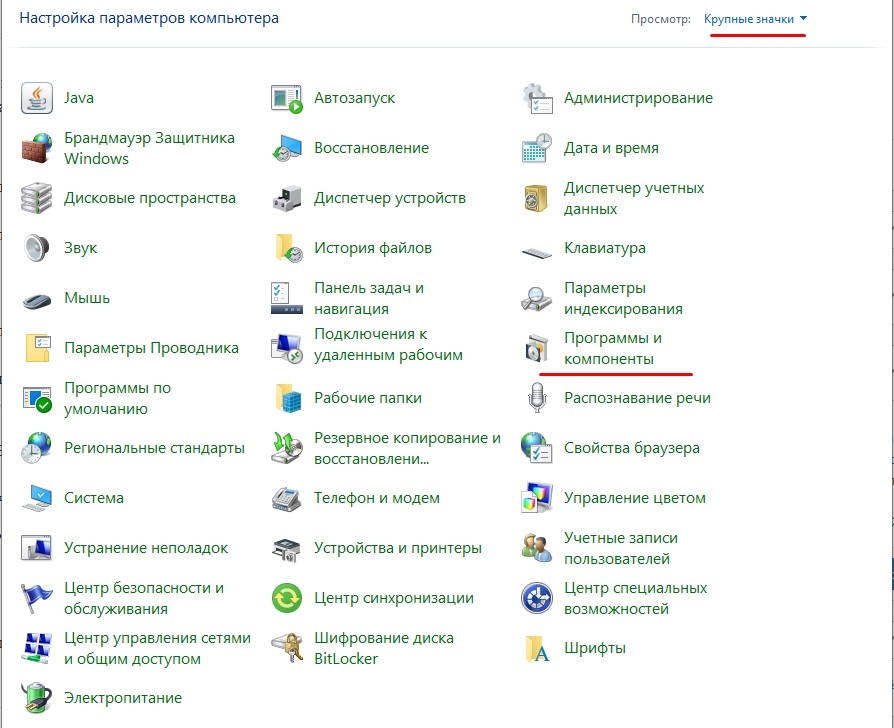
- Во вкладке «Просмотр» установите значение «Крупные значки». Это поможет вам как можно быстрее найти нужный раздел «Программы и компоненты», в который необходимо перейти для дальнейшей настройки.
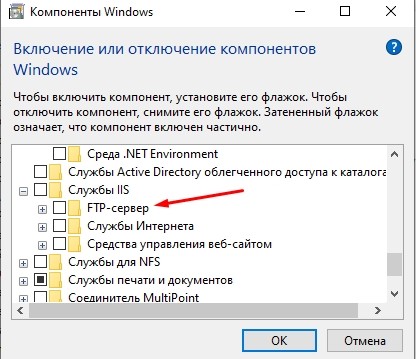
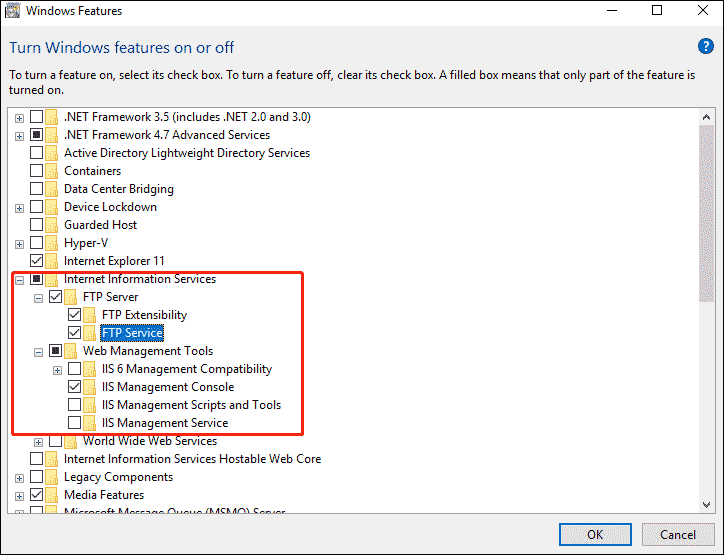
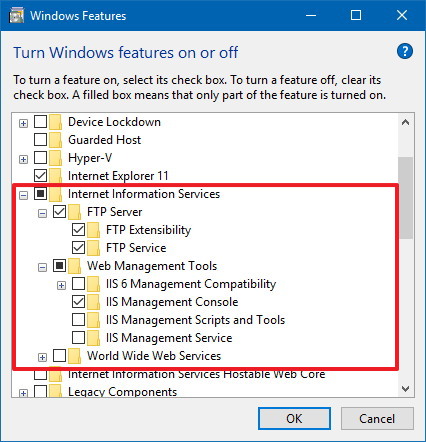
- В открывшемся окне вы увидите несколько вкладок. Поочередно раскройте «Службы IIS» и «FTP-сервер».
- Отметьте галочками вкладки «FTP-сервер», «Расширяемость FTP» и «Служба FTP».
- Теперь можно сказать, что мы активировали протокол. Далее останется создать собственный сервер и задать координаты для подключения к нему. Поэтому вернитесь на главную страницу «Панели управления» и перейдите в раздел «Администрирования».
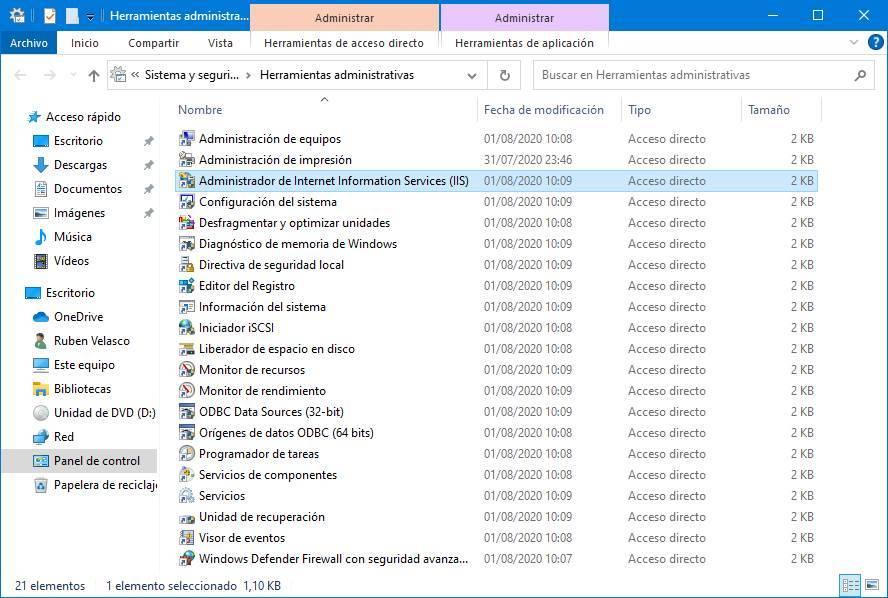
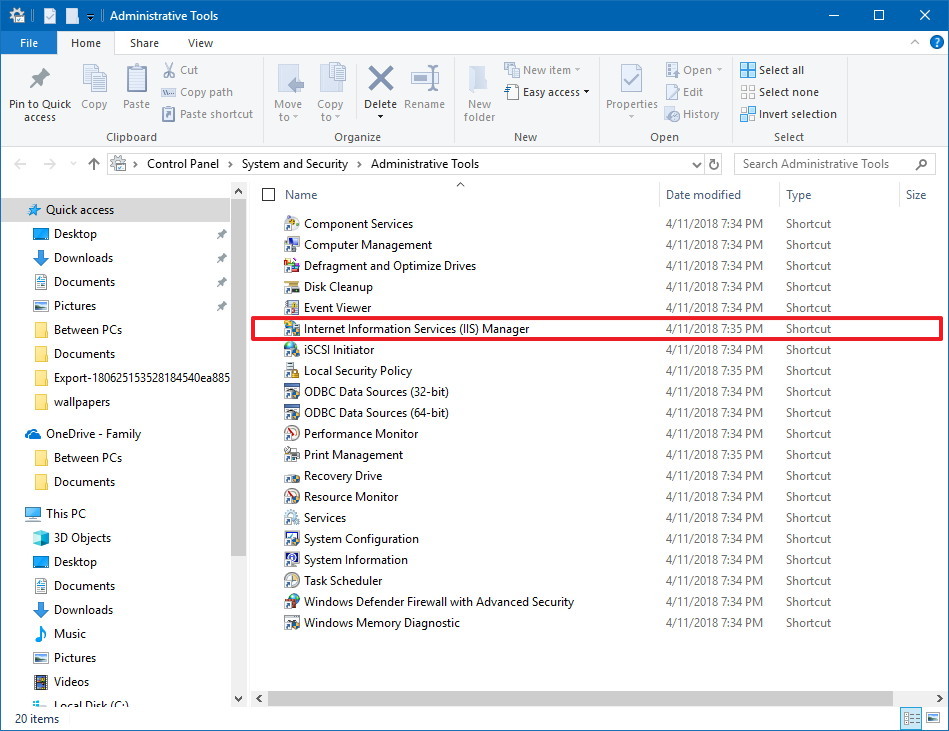
- Здесь находится множество файлов, среди которых нас будет интересовать «Диспетчер служб IIS». Запустите его двойным щелчком ЛКМ или откройте любым другим способом.
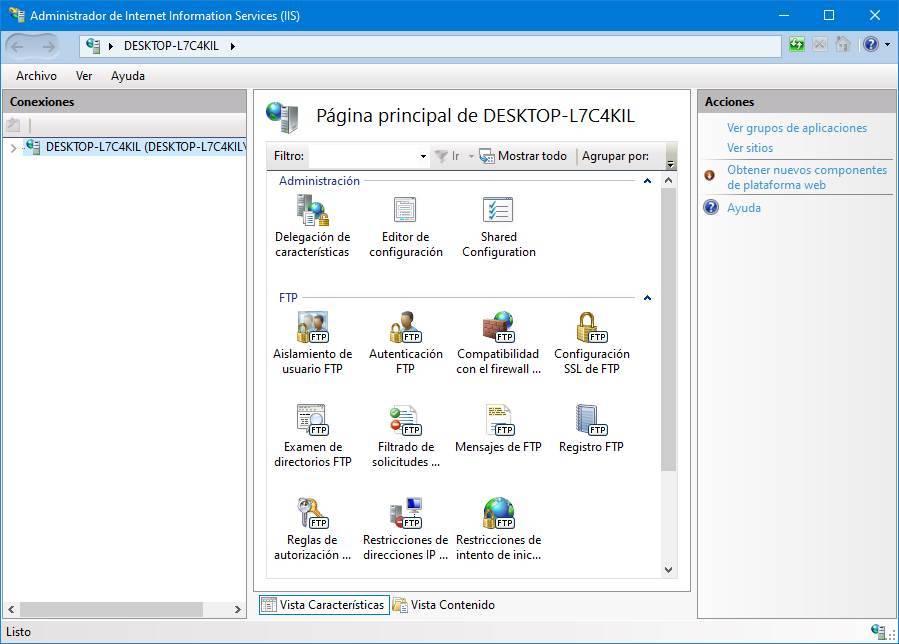
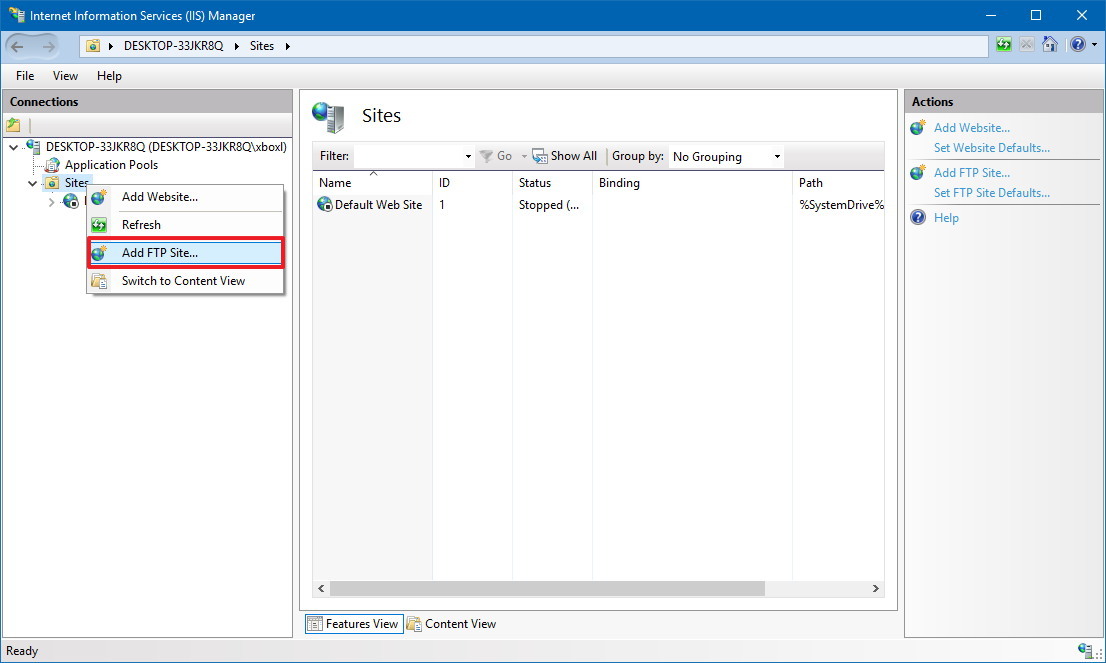
- В левой части открывшегося интерфейса будет располагаться вкладка «Сайты». Щелкните по ней ПКМ и выберите опцию «Добавить FTP-сайт».
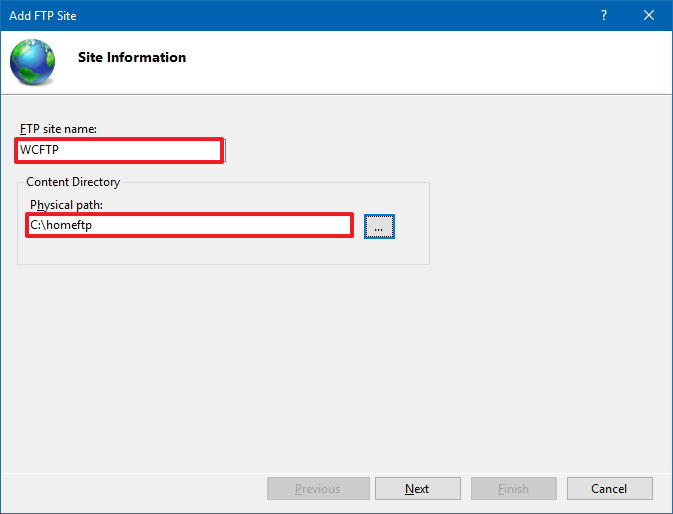
- Придумайте название и укажите расположение данных (например, диск «D» или конкретная папка).
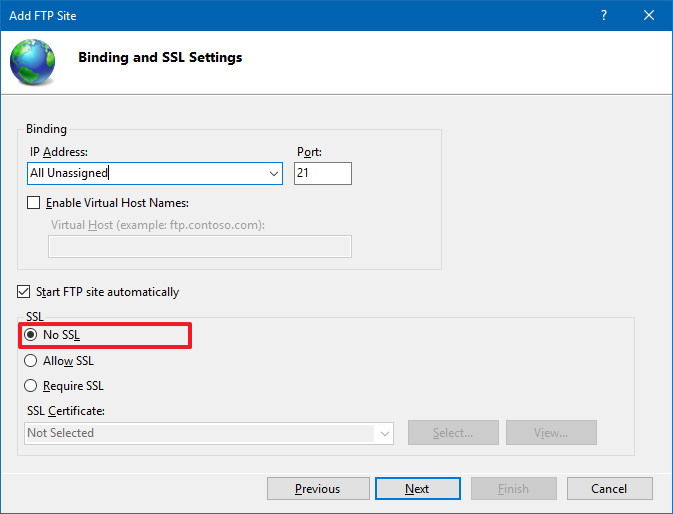
- Следующим шагом требуется настроить параметры привязки. Здесь рекомендуется установить значение «Все свободные» в качестве IP-адреса, выбрать порт «21», отметить галочкой пункт «Запускать сайт FTP автоматически» и запретить использование SSL («Без SSL»).

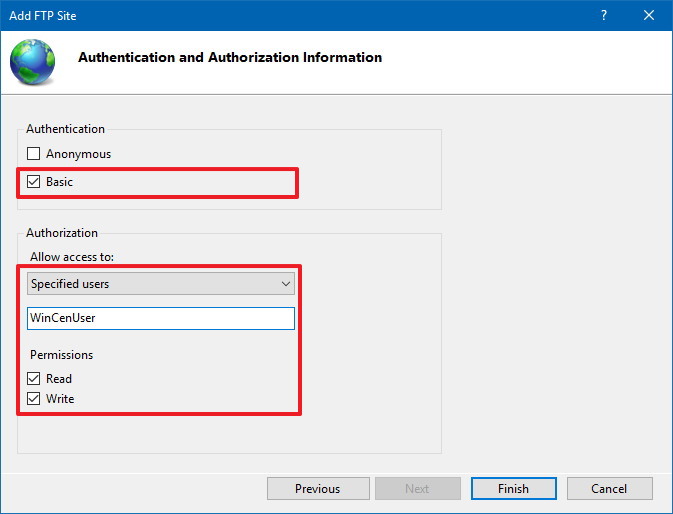
- На следующем этапе настраиваем параметры доступа. «Анонимный» – доступ к серверу можно будет получить без логина и пароля, «Обычный» – наоборот.

Важно. После создания FTP-сервера необходимо перейти в настройки брандмауэра и активировать доступ к FTP. Для этого откройте «Дополнительные параметры» и поставьте соответствующие галочки.
Создание сервера закончилось, и теперь нам осталось определить, кто из пользователей получит к нему доступ:
- Через «Панель управления» запустите инструмент «Управление компьютером» (находится в разделе «Администрирование»).
- Щелкните ПКМ и выберите «Создать группу».
- Добавьте пользователей, открыв получившуюся группу и нажав ПКМ.
- Как только все учетные записи будут добавлены, перейдите в «Свойства» группы и откройте вкладку «Безопасность».
- Нажмите на кнопку «Изменить» и добавьте созданную группу в список.

Теперь пользователи, добавленные в группу, смогут получить доступ к вашему FTP-серверу.
Лучшие FTP-серверы
Как вы уже могли догадаться, создание сервера FTP встроенными средствами компьютера – рутинное и очень сложное занятие. Намного легче установить приложение с собственным сервером и разрешить ему доступ к файлам, сохраненным на компьютере.
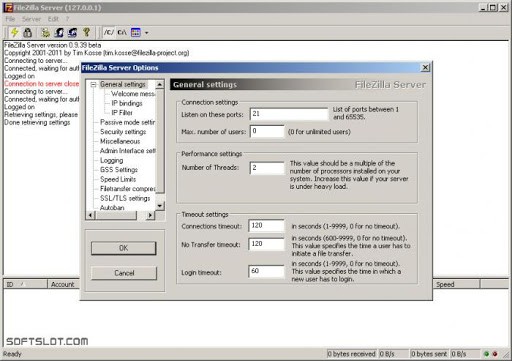
FileZilla Server 0.9.23
Самое известное приложение, которому удалось поднять вопрос удобства при подключении средствами FTP. Вам достаточно разрешить доступ к определенной папке, настроить параметры входа (имя сервера и пароль), а затем отправить эти данные человеку, решившему подключиться к вам через ту же программу FileZilla.
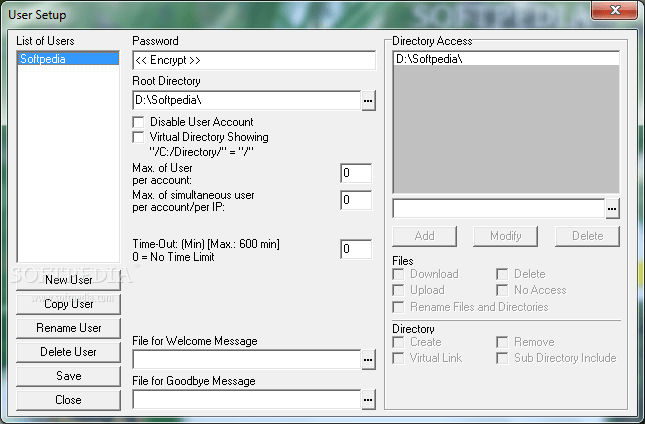
Xlight FTP Server
Еще одна программа, способная сделать пользовательский сервер. Приложение отличается устаревшим, но в то же время удобным интерфейсом. Русского языка нет, зато есть масса настроек вроде активации доступа через IPv6.

FAR
FAR-manager – еще один популярный клиент с массой настроек. Его можно посоветовать лишь тем, кто уверен в собственных знаниях, так как меню приложения напоминает старые версии BIOS, а весь интерфейс представлен на английском языке.

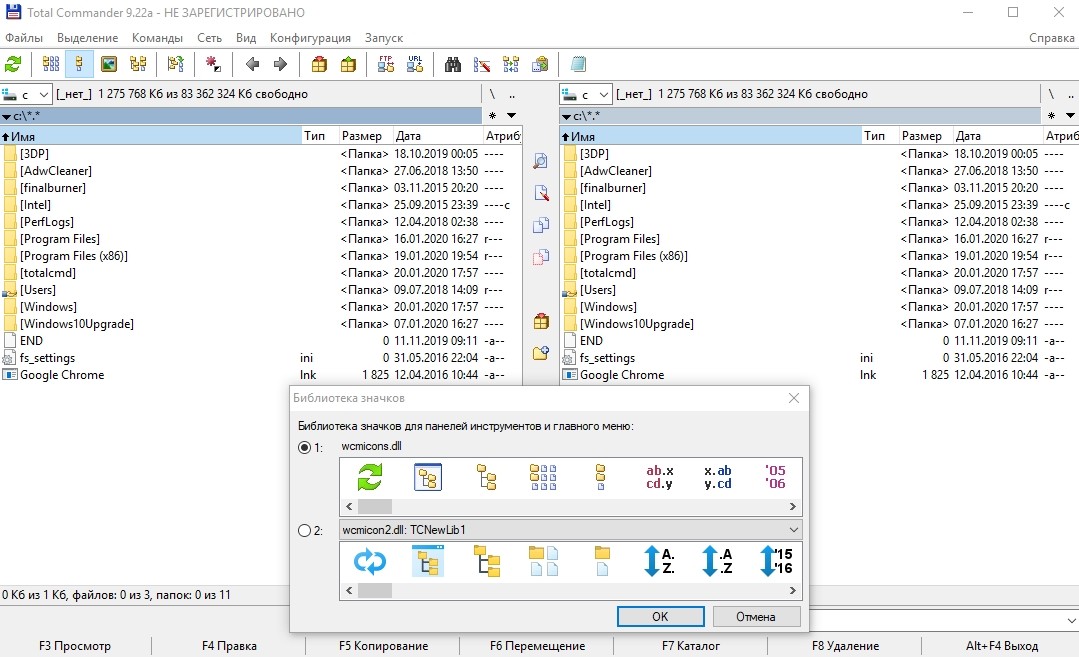
Total Commander
Файловый менеджер с функцией создания удаленного сервера, на который сможет попасть любая папка вашего ПК. Точнее, менеджер не создает сервер, а только управляет им. Отличается высоким уровнем удобства за счет поддержки русского языка и наличия раздела «Справка». Работает как на компьютере, так и на смартфоне.
FTP-сервер Complete FTP
Инструмент без файлового менеджера, но с интуитивно понятным меню. Интерфейс выглядит приветливым даже для новичка, а настройка сервера осуществляется за 5-7 нажатий и требует от пользователя не более пяти минут свободного времени.

Direct FTP
Платный клиент, чей недостаток с лихвой компенсируется удобством взаимодействия. Наличие раздела «Справка» позволяет без труда разобраться в азах даже новичку, но на изучение инструкции придется выделить от получаса до часа.
TYPSoft FTP Server 1.10
Простой клиент, который пользуется популярностью, как среди профессионалов, так и среди новых пользователей. Отличается удобным интерфейсом, наличием русского языка и настройкой массы удаленных функций – от скачивания до удаления файлов.
FTP-сервер Core FTP Server
Приложение распространяется в двух версиях. Одна является платной, вторая – бесплатной. У второй модификации есть ряд функциональных ограничений, но базовые потребности пользователя способна удовлетворить даже она.
FTPRush
Бесплатная программа, выполненная в стилистике продуктов Microsoft. Это позволяет рассчитывать на быстрое освоение утилиты. Также приложение готово похвастать наличием менеджера закачек.

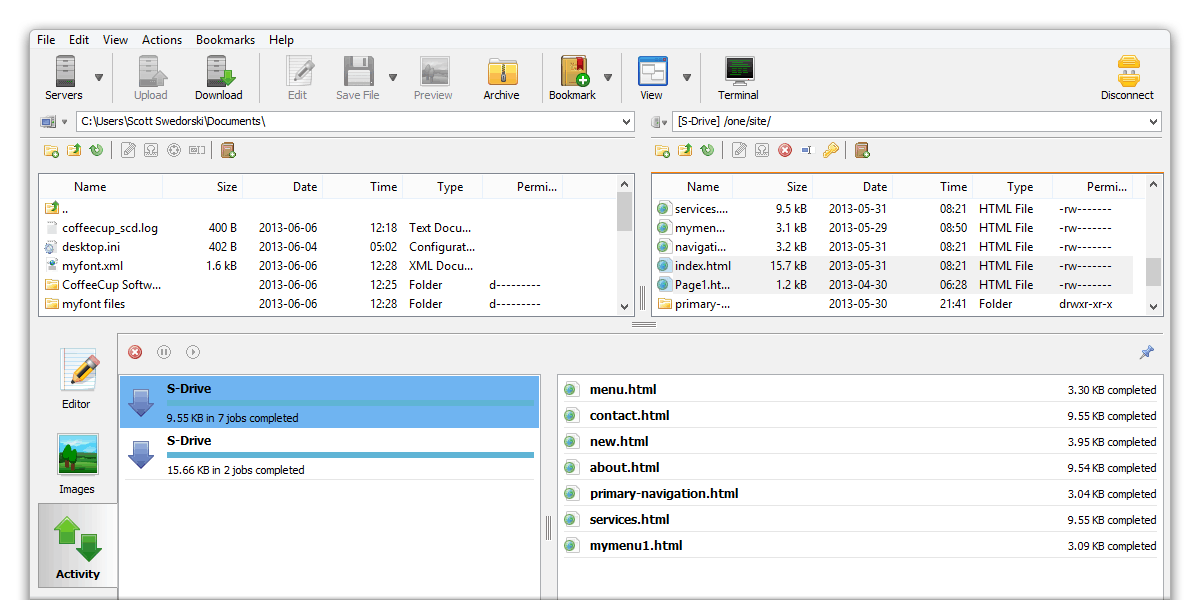
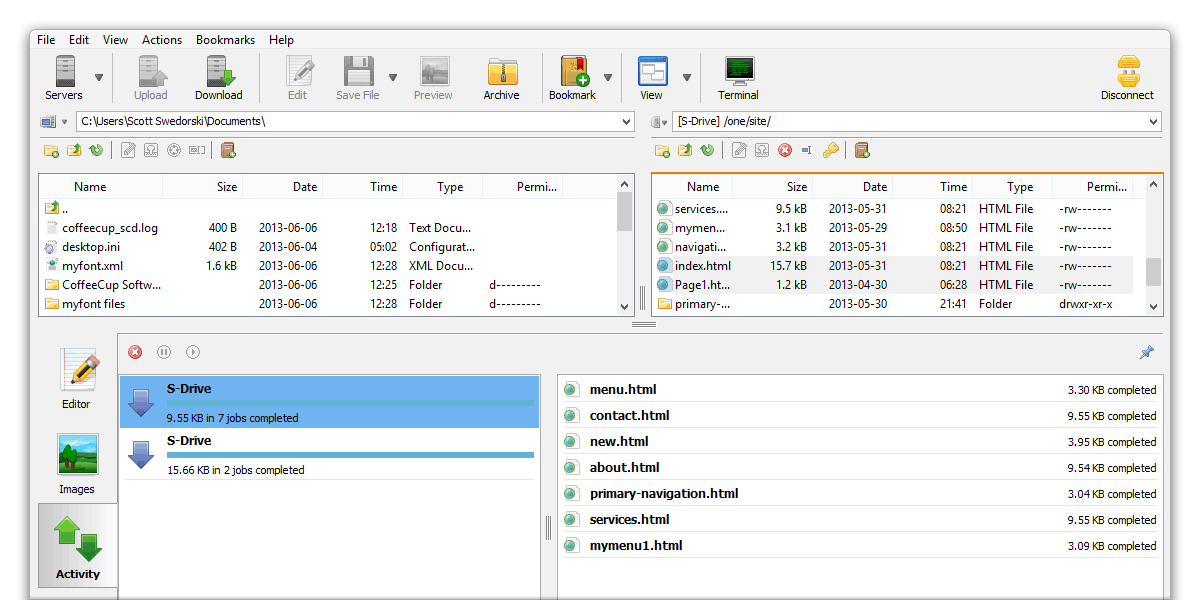
CoffeeCup Free FTP
Незамысловатая программа, которая подойдет новичкам. Интерфейс переведен на русский язык, а меню не выглядит перегруженным. Есть поддержка двухпанельного режима работы и передачи файлов с одного сервера на другой без прямого взаимодействия с хранилищем ПК.
Причины, по которым могут не работать
Чаще всего FTP-сервер не работает по причине того, что пользователь забыл активировать соответствующую опцию в Панели управления через инструмент «Программы и компоненты». Также сложности связывают с неправильным вводом логина и пароля, закрепленных за определенным сервером.
Содержание
- 1 Как создать FTP-сервер в Windows 10
- 1.1 Включить FTP в Windows 10
- 1.2 Настроить FTP-сервер Windows 10
- 1.3 Разрешить FTP-сервер через брандмауэр Windows
- 1.4 Настройте маршрутизатор для разрешения внешних подключений
- 1.5 Как получить доступ к FTP-серверу с любого компьютера
- 1.6 Скачать и загрузить файлы, папки на FTP-сервер
Ищете настройку Windows 10 FTP-сервер поделиться и получить доступ к файлам по сети? Вот этот пост мы обсуждаем Как создать FTP-сервер в Windows 10 и 8.1. Также вы узнаете, как обмениваться файлами с сервером Access через FTP и как вы можете получить к нему доступ через LAN и WAN из любой точки мира. И Вы можете предоставить доступ к своему FTP-сайту, ограничив пользователей именем пользователя / паролем или анонимным доступом. Это зависит от цели FTP сервер в вашей внутренней или внешней сети.
FTP обозначает протокол передачи файлов Полезная функция для передачи файлов между клиентским компьютером и FTP-сервером. Это как вы разделяете некоторые папки файлов на настроенном FTP сервер на номер порта, и пользователь может читать и записывать файлы по протоколу FTP из любого места. И большинство браузеров поддерживают протокол FTP, поэтому мы можем получить доступ к FTP-серверам через браузер.
Например, ftp: // YOURHOSTNAME или IP-адрес.
Как создать FTP-сервер в Windows 10
В отдельных словах, имеющих FTP сервер Во внутренней или внешней сети всегда легко и быстро обмениваться и получать доступ к файлам по сети. Windows 10 и 8.1 поставляются со встроенной функцией FTP-сервера в функциях Internet Information Service, которую необходимо установить перед использованием. В этом разделе мы рассмотрим, как настроить FTP-сервер на Windows 10. И Использование WinSCP в качестве клиента Windows для подключения к FTP-серверу. Также есть некоторые бесплатные FTP клиенты доступно, с помощью которого вы можете передавать файлы между вашим ПК и удаленными серверами.
Включить FTP в Windows 10
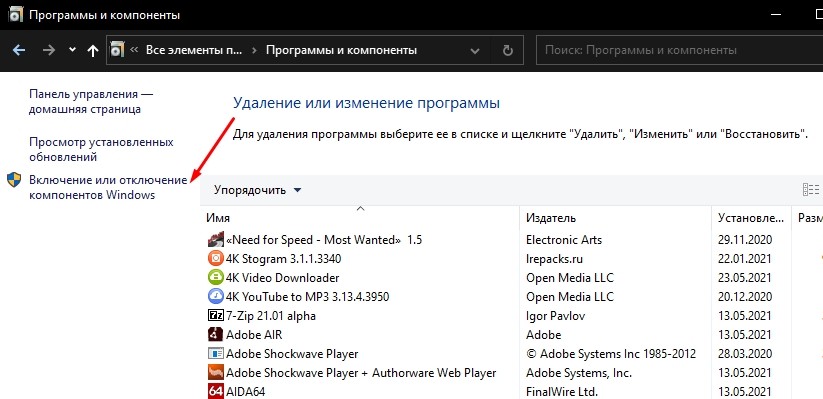
Для того, чтобы настроить FTP сервер на windows Сначала компьютер, нам нужно включить функцию FTP и IIS. Для этого нажмите Windows + R, введите appwiz.cpl и нажмите клавишу ввода. Это откроет Программы и компоненты, здесь нажмите «Включить или отключить функции Windows», как показано на рисунке ниже.
Если IIS не был установлен ранее на конкретном компьютере с Windows 10 или 8.1, вам необходимо установить и другие функции IIS (как показано стрелками). На скриншоте ниже приведены действительные требования для работы FTP-сервера в Windows 8 / 8.1 (необходимо установить все отмеченные функции). Нажмите OK, чтобы установить выбранные функции. Это займет некоторое время для установки функций, дождитесь завершения.
 Настроить FTP-сервер Windows 10
Теперь, когда установка завершена, откройте «Диспетчер служб IIS» из Панели управления \ Все элементы панели управления \ Администрирование. Затем разверните сайты, щелкните правой кнопкой мыши на них и ‘Добавить FTP сайт».
 Добавить FTP сайт
Замечания: Я создал папку под названием «Windows101tricks FTP Share» (которой мы собираемся поделиться через FTP-сервер) на диске C, прежде чем перейти к этому шагу.
Дайте имя для FTP-сайта и просмотрите локальную папку, которой вы хотите поделиться с другими через FTP-сервер.
 Назовите FTP-сервер и выберите физический путь
На следующем экране вам нужно выбрать IP-адрес локального компьютера из выпадающего списка. Я надеюсь, что вы уже настроили статический IP для компьютера. И оставил номер порта 21 в качестве номера порта по умолчанию для FTP-сервера.
Под опцией SSL выберите No SSL, чтобы установить соединение без SSL-сертификата. В производственной среде для настройки профессионального FTP-сервера вам может потребоваться включить SSL, для которого требуется сертификат.
 На следующем экране вы можете установить права доступа пользователей к FTP-сайту. Здесь вам необходимо решить, каким образом другие будут получать доступ к общему ресурсу FTP, а кому будут доступны только чтение или чтение. Доступ для записи.
Давайте предположим, что этот сценарий
Если вы хотите, чтобы определенные пользователи имели права на чтение и запись, очевидно, что они должны ввести для него имя пользователя и пароль. Другие пользователи могут получить доступ к FTP-сайту без какого-либо имени пользователя или пароля для просмотра только контента, это называется доступом анонимных пользователей. Теперь нажмите Готово.
 Разрешить FTP-сервер через брандмауэр Windows
Если на вашем компьютере запущен брандмауэр Windows, функция безопасности заблокирует все подключения, пытающиеся получить доступ к FTP-серверу. Используйте шаги ниже, чтобы пропустить FTP-сервер через брандмауэр. Для этого откройте Панель управления \ Все элементы панели управления \ Брандмауэр Windows. И нажмите ссылку Разрешить приложение или функцию через брандмауэр Windows.
(Замечания: В настоящее время брандмауэры управляются антивирусным приложением, поэтому вам нужно либо настроить / разрешить FTP оттуда, либо отключить защиту брандмауэра на своем антивирусе)
 Разрешить приложение или функцию через брандмауэр Windows
Теперь нажмите кнопку «Настройки изменений». Выберите FTP-сервер и убедитесь, что он включен в частной и публичной сети. Нажмите ОК. На этом этапе вы сможете использовать свой любимый FTP-клиент для подключения вновь созданного FTP-сервера из локальной сети.
 Разрешить FTP-сервер через брандмауэр Windows
Настройте маршрутизатор для разрешения внешних подключений
Теперь нам нужно настроить маршрутизатор и открыть порт TCP / IP номер 21, чтобы разрешить подключения к вашему ПК. Так что ваш FTP-сервер может быть доступен из Интернета, и вы можете получить к нему доступ из любого места. Здесь найдите шаги для настройки большинства маршрутизаторов. (Для получения более подробных инструкций по переадресации портов TCP / IP, посетите веб-сайт поддержки производителя вашего маршрутизатора.)
Сначала откройте командную строку, введите команду IPCONFIG и нажмите клавишу ввода, чтобы узнать адрес шлюза по умолчанию (IP-адрес маршрутизатора)
 проверьте IP-адрес и шлюз по умолчанию
Запишите IP-адрес шлюза по умолчанию, который является IP-адресом вашего маршрутизатора. Как правило, это частный адрес в диапазоне 192.168.x.x. Например, 192.168.1.1 или 192.168.2.1.
Теперь откройте веб-браузер по умолчанию. В адресной строке введите IP-адрес маршрутизатора и нажмите Enter. Войдите с учетными данными маршрутизатора.
 Найдите раздел Переадресация портов — обычно вы найдете эту функцию в настройках WAN или NAT.
Создайте новую переадресацию портов, которая включает следующую информацию:
- Наименование услуги: Вы можете использовать любое имя. Например, FTP-сервер.
- Порт ярости: Вы должны использовать порт 21.
- TCP / IP-адрес ПК: Откройте командную строку, введите IPCONFIG, а IPv4-адрес — это TCP / IP-адрес вашего ПК.
Теперь примените новые изменения и сохраните новые конфигурации маршрутизатора.
Как получить доступ к FTP-серверу с любого компьютера
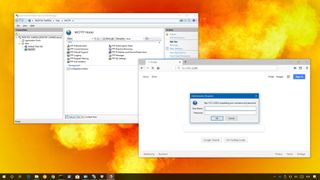
Вот самый быстрый способ протестировать ваш FTP-сервер после настройки брандмауэра и переадресации порта 21 на маршрутизаторе. Откройте веб-браузер по умолчанию и в адресной строке введите IP-адрес своего ПК с Windows 10 в формате FTP-ссылки и нажмите Enter. Адрес должен выглядеть так: FTP://192.168.1.199. или ваш публичный адрес. Будет запрошена аутентификация. Введите системное имя пользователя и пароль для доступа к файлам, которыми вы поделились в общей папке FTP.
 Чтобы получить доступ к FTP-серверу из другого места / сети, вам необходимо ввести статический IP-адрес (предоставленный вашим интернет-провайдером). Например, ваш статический IP-адрес 11.03.68.445, затем вам нужно использовать ftp://11.03.68.445 или ваш ftp: // ваше локальное имя хоста.
Скачать и загрузить файлы, папки на FTP-сервер
Кроме того, вы можете использовать стороннее приложение, например (FileZilla), для загрузки и выгрузки файлов управления, папок между клиентским компьютером и FTP-сервером. Доступно несколько бесплатных FTP-клиентов, вы можете использовать любой из них для управления вашим FTP-сервером:
FireFTP: расширение FTP-клиента браузера Firefox
FileZilla: FTP-клиент для Windows
Cyberduck: FTP-клиент доступен для Windows
WinSCP: бесплатный SFTP, FTP, WebDAV, Amazon S3 и SCP-клиент с открытым исходным кодом для Microsoft Windows
Например, я использую WinSCP, просто скачав и установив приложение. потом
 Откройте WinSCP, введите данные FTP-сервера. Имя пользователя — это имя пользователя FTP-сервера Windows, а пароль — пароль Windows-сервера FTP. щелчок Сохранить WinSCP устанавливает соединение и выводит список всех файловых папок, доступных для скачивания. Левое боковое окно на вашем компьютере, а правое — это FTP-сервер.
- Перетаскивание файлов слева направо скопирует перемещение файла на FTP-сервер
- Перетаскивание файлов справа налево скопирует перемещение файла на клиентский компьютер
Это все, что вы успешно настроили FTP-сервер на Windows 10 компьютер. Кроме того, эти шаги (настройка FTP-сервера) применимы к компьютерам под управлением Windows 8.1, 8 и Windows 7. И после настройки вы можете получить доступ к общей папке из любого места. Есть какие-либо вопросы, предложения не стесняйтесь обсуждать в комментариях ниже. Также читайте в нашем блоге: 5 твиков для исправления проблем с медленной загрузкой или запуском windows 10.
-
Home
-
Partition Manager
- How to Set FTP Server Windows 10?
By Vega | Follow |
Last Updated
Do you want to transmit your files between computers? The FTP server in Windows 10 can help you transfer files. Well, this article from MiniTool Partition Wizard will show you how to set FTP server Windows 10.
There are many advantages to having your own FTP server. First of all, it is private, and you have complete control over who accesses it and what is transmitted.
It is also fast, but the exact speed depends on your Internet connection. In addition, there are no restrictions on the amount and type of data you can store or transfer. Because of these benefits, many people prefer to set up their own FTP servers.
If you want to create your own private cloud so that you can share and transfer large files without restrictions, then please set your own FTP server Windows 10.
How to Install the FTP Server Components on Windows 10?
Although Windows 10 supports setting up an FTP server, you need to manually add the required components. Here is the guide to Windows 10 FTP server setup.
Step 1: Open the Control Panel, and click the Programs. Under Programs and Features, click the Turn Windows features on or off link.
Step 2: Expand the Internet Information Services feature, and then expand the FTP Server option. Check the FTP Extensibility and FTP Service options.
Step 3: Use the default options to check the Web Management Tools option, but make sure that the IIS Management Console option is selected.
Step 4: Click the OK button and then click the Close button.
After completing these steps, the components used to set up the FTP server will be installed on your device. Then you need to set up an FTP server site for Windows 10.
How to Set up an FTP Server Site on Windows 10?
After installing the required components, you can continue to configure the FTP server on your computer.
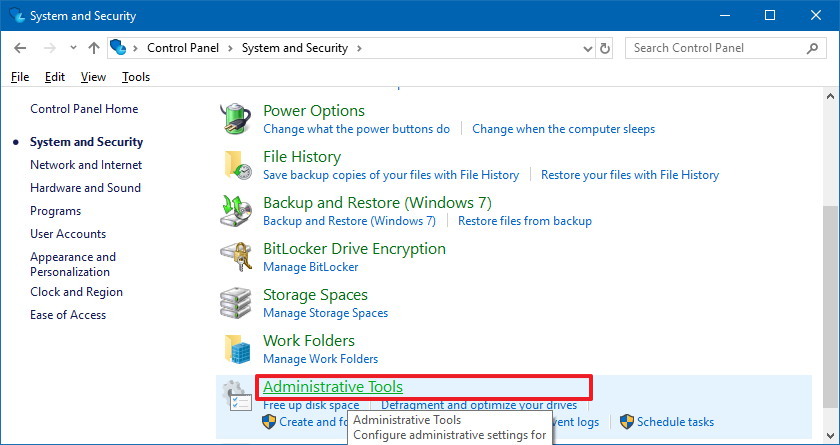
- Open the Control Panel, navigate to the System and Security > Administrative Tools > Internet Information Services (IIS) Manager.
- On the Connections pane, right click Sites, and select the Add FTP Site
- Type a short name for your server. In the Content Directory section, under the Physical path, click the button on the right to locate the folder you want to use to store your FTP files. And then click the Next
- In this screen, change the SSL setting to No SSL. Leave the other default settings and click the Next
- On the Authentication, check the Basic option and select Specified users from the drop-down menu.
- Type the email address of your Windows 10 account or local account name to allow you to access the FTP server.
- Check the options Read and Write. Finally, click the Finish
Tip: In a business environment or on an FTP server that will host sensitive data, the best practice is to configure the site to require SSL to prevent the transmission of data in clear text.
With this, you’re done setup the FTP server Windows 10.
Bottom Line
The above content is all about how to set FTP server Windows 10. Do you have any questions about this content? If you have any questions, please leave them in the comment zone and we will try to answer them as soon as possible.
About The Author

Position: Columnist
Vega joined MiniTool as an editor after graduation. She enjoys helping people with computer problems, including disk management, data recovery, and more. She is constantly expanding her knowledge in related fields. And she will continue to bring more easy-to-understand professional articles to help people solve various problems on the PC. In her daily life, Vega enjoys hanging out with friends, shopping online and listening to music. She is someone who knows how to enjoy life.
Setting up a File Transfer Protocol (FTP) server on Windows 10 is perhaps one of the most convenient solutions to upload and download files from virtually anywhere to your computer without the limitations typically found with cloud storage services.
Using an FTP server, you’re basically creating a private cloud that you have absolute control. You don’t have monthly transfers caps and speeds can be fast (depending on your internet subscription).
Also, there not file type or size restrictions, which means that you can transfer a 1KB text file as well as 1TB backup file, and you can create as many accounts as you want to let family and friends store and share files with each other.
There are plenty third-party solutions to set up a file server of this kind, but even though it may sound complicated, the FTP feature bundled on Windows 10 isn’t difficult to set up.
In this Windows 10 guide, we’ll walk you through the steps to set up and manage an FTP server on your computer to transfer files within your home network or remotely over the internet.
- How to install the FTP server components on Windows 10
- How to configure an FTP server site on Windows 10
- How to set up multiple FTP accounts on Windows 10
- How to connect to an FTP server remotely on Windows 10
How to install the FTP server components on Windows 10
Although Windows 10 includes support to set up an FTP server, you need to add the required components manually.
To install the FTP server components, do the following:
- Open Control Panel.
- Click on Programs.
- Under «Programs and Features,» click the Turn Windows features on or off link.
- Expand the «Internet Information Services» feature, and expand the FTP server option.
- Check the FTP Extensibility and FTP Service options.
- Check the Web Management Tools option with the default selections, but making sure that the IIS Management Console option is checked.
- Click the OK button.
- Click the Close button.
Once you’ve completed the steps, the components to set up an FTP server will be installed on your device.
How to configure an FTP server site on Windows 10
After installing the required components, you can proceed to configure an FTP server on the computer, which involves creating a new FTP site, setting up firewall rules, and allowing external connections.
Setting up an FTP site
To set up an FTP site, do the following:
- Open Control Panel.
- Click on System and Security.
- Click on Administrative Tools.
- Double-click the Internet Information Services (IIS) Manager shortcut.
- On the «Connections» pane, right-click Sites, and select the Add FTP Site option.
- In the FTP site name, type a short descriptive name for the server.
- In the «Content Directory» section, under «Physical path,» click the button on the right to locate the folder you want to use to store your FTP files.Quick Tip: It’s recommended to create a folder in the root of the main system drive, or on an entirely different hard drive. Otherwise, if you set the home folder in one of your default folders when adding multiple accounts, users won’t have permission to access the folder. (You can adjust folder permissions, but it’s not recommended.)
- Click the Next button.
- Use the default Binding settings selections.
- Check the Start FTP site automatically option.
- In the «SSL» section, check the No SSL option.Important: In a business environment or on an FTP server that will host sensitive data, it’s best practice to configure the site to require SSL to prevent transmitting data in clear text.
- Click the Next button.
- In the «Authentication» section, check the Basic option.
- In the «Authorization» section, use the drop-down menu, and select Specified users option.
- Type the email address of your Windows 10 account or local account name to allow yourself access to the FTP server.
- Check the Read and Write options.
- Click the Finish button.
After completing the steps, the FTP site should now be operational on your computer.
Configuring firewall rules
If you’re running the built-in firewall on Windows 10, connections to the FTP server will be blocked by default until you manually allow the service through, using these steps:
- Open Windows Defender Security Center.
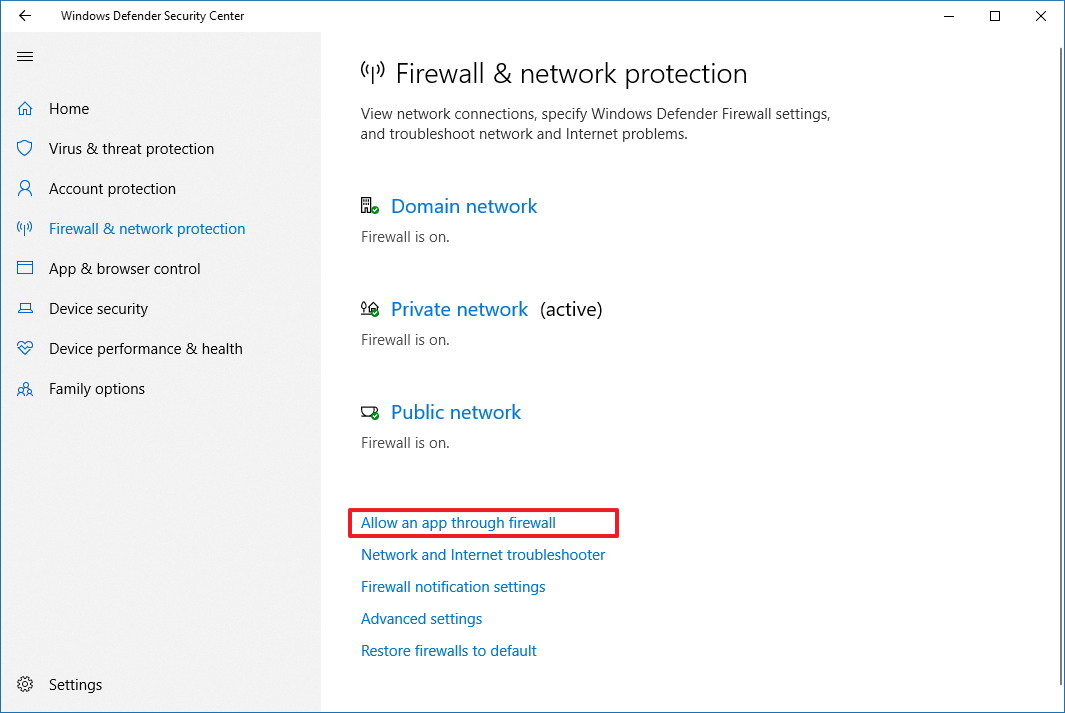
- Click on Firewall & network protection.
- Click the Allow an app through firewall option.
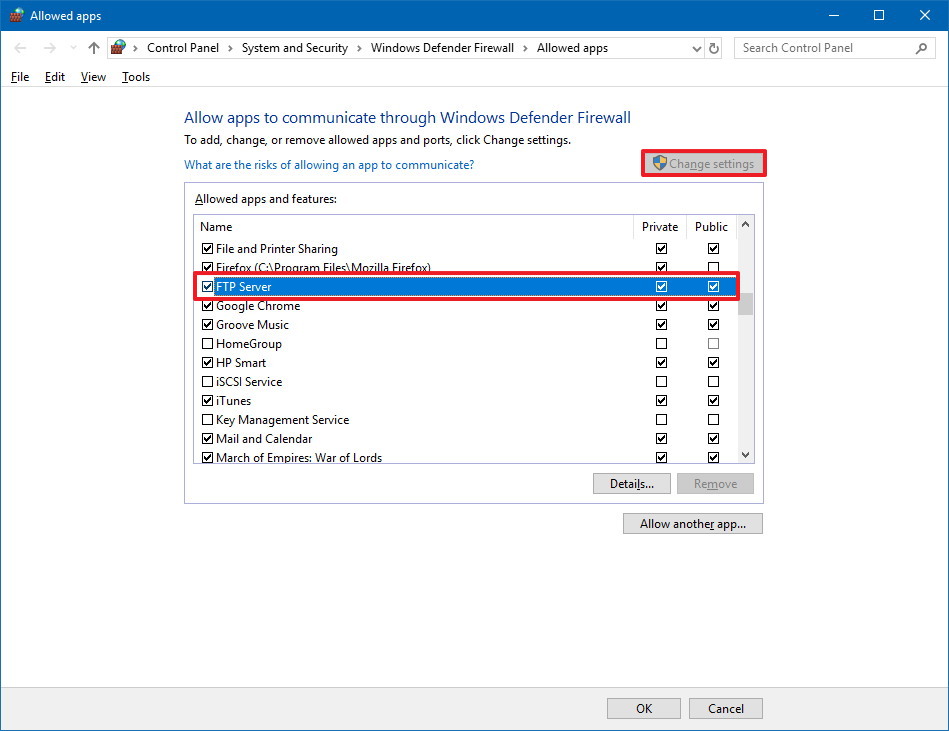
- Click the Change settings button.
- Check the FTP Server option, as well as the options to allow Private and Public access.
Once you’ve completed the steps, the FTP server should now be accessible from the local network.
In the case that you’re running third-party security software, make sure to check your vendor support website for more specific details on adding firewall rules.
Allowing external connections
To make your FTP server reachable from the internet, you also need to open the Transmission Control Protocol/Internet Protocol (TCP/IP) port number 21 on your router.
The instructions to forward a port will be different depending on the router, and even depending on the firmware version. In the steps below, we’ll outline the general steps, but you may need to consult your manufacturer support website for specific details.
To forward port 21 to allow FTP connections outside of the local network, do the following:
- Open Settings.
- Click on Network & Internet.
- Click on Status.
- Click the Change connections properties option.
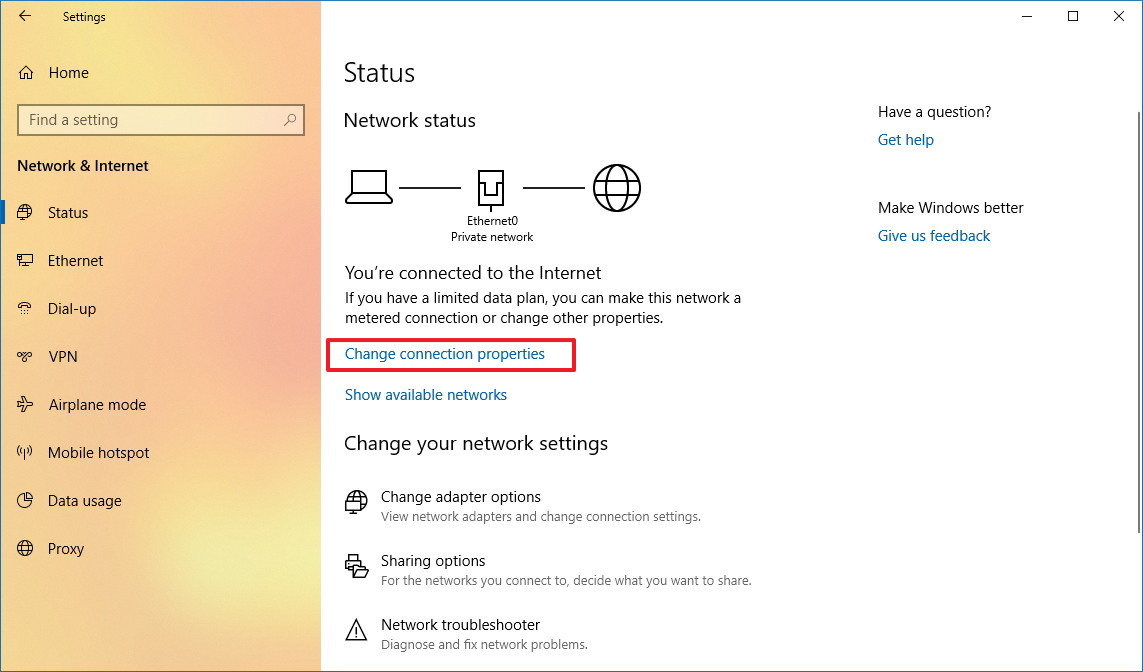
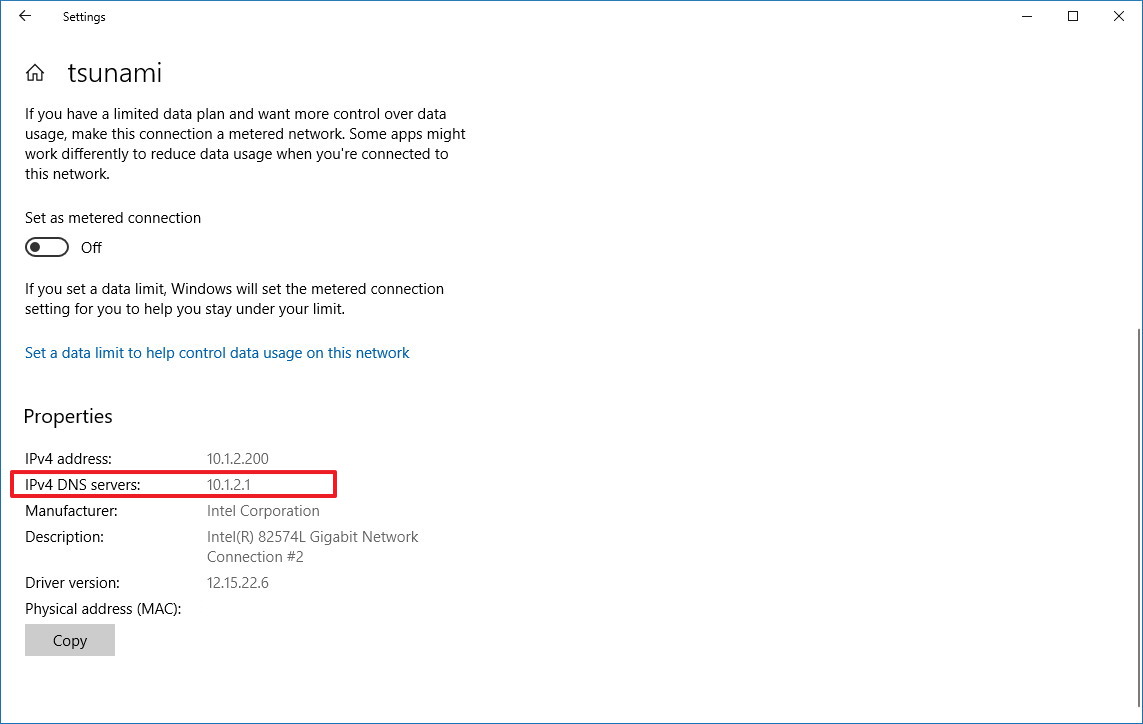
- Make a note of the IPv4 DNS server address, which is the address of your router. Usually, it’s private address in the 192.168.x.x range. For instance, 192.168.1.1 or 192.168.2.1.
- Open your default web browser.
- On the address bar enter the router’s IP address (for example, 192.168.1.1) and press Enter.
- Sign-in with your router credentials.
- Open the Port Forwarding page. (Usually, these settings can be found under the WAN, NAT, or Advanced settings pages.)
- Add a new rule to forward incoming connections to the FTP server from the internet by including this information:
- Service name: Type a descriptive name for the port forwarding rule.
- Port range: 21.
- Local IP: This is the FTP server IP address that the router will forward incoming connections. (This is your IPv4 address. See step No. 5.)
- Local port: 21.
- Protocol: TCP.
- Click the add button.
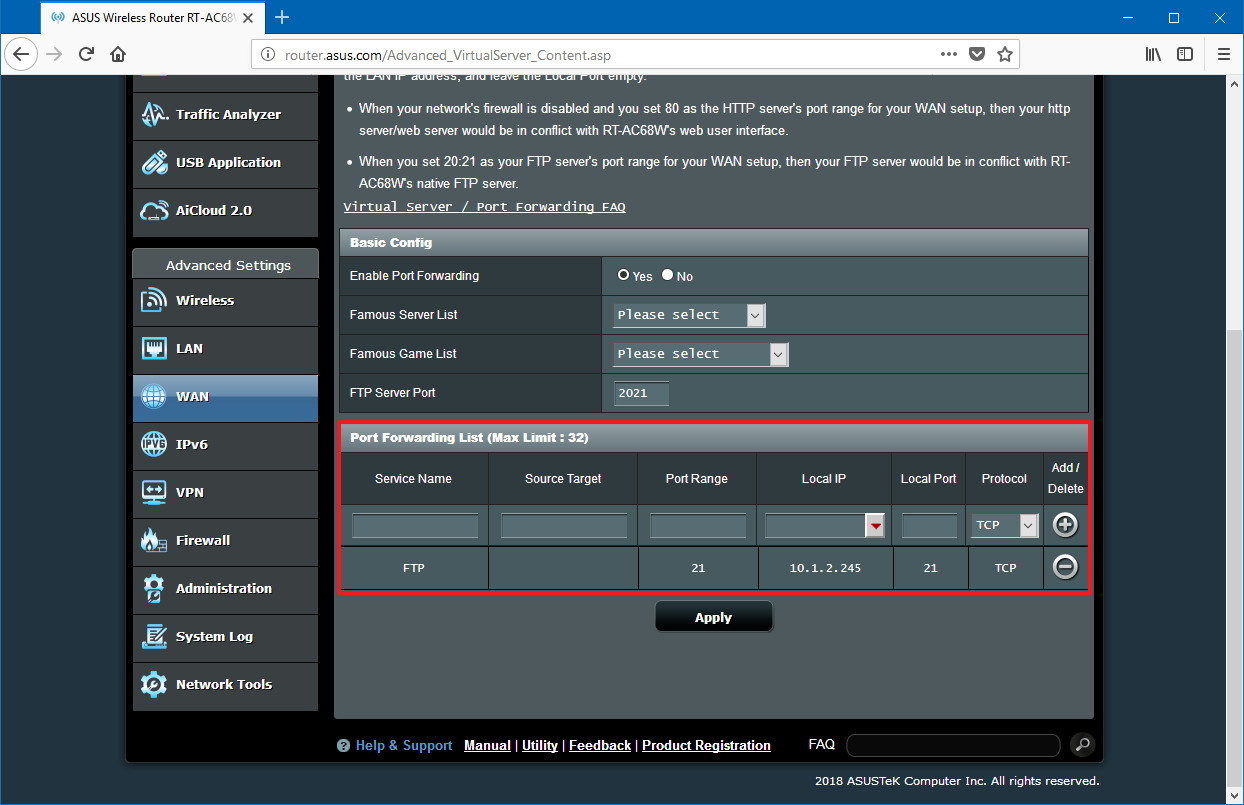
- Click the Apply button to save the changes.
After completing the steps, any incoming connection on port 21 will be forwarded to the FTP server to establish a networking session.
Setting up a static IP address
If you’re planning to transfer files over the internet in the regular basis, then it’s recommended to configure a static IP address to prevent having to reconfigure your router in the future if your device’s IP changes.
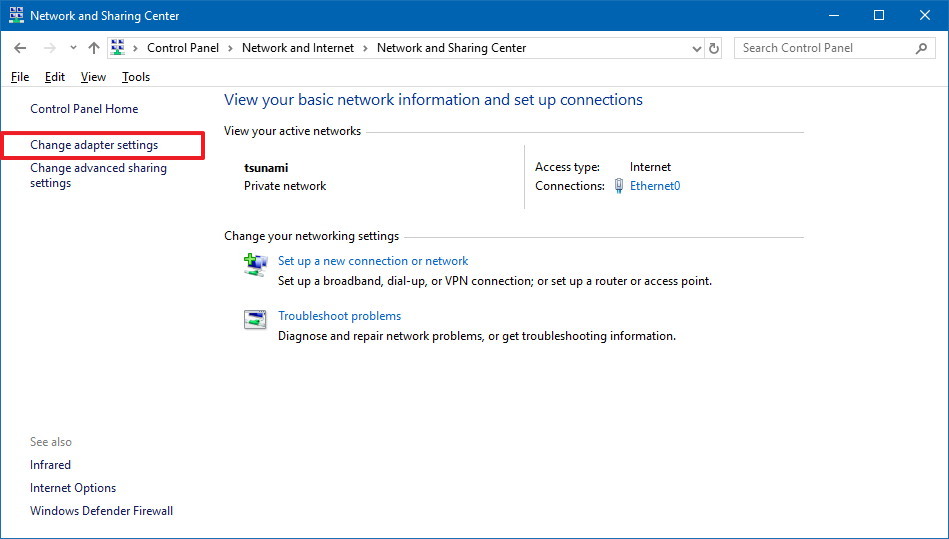
- Open Control Panel.
- Click on Network and Internet.
- Click on Network and Sharing Center.
- In the left pane, click the Change adapter settings option.
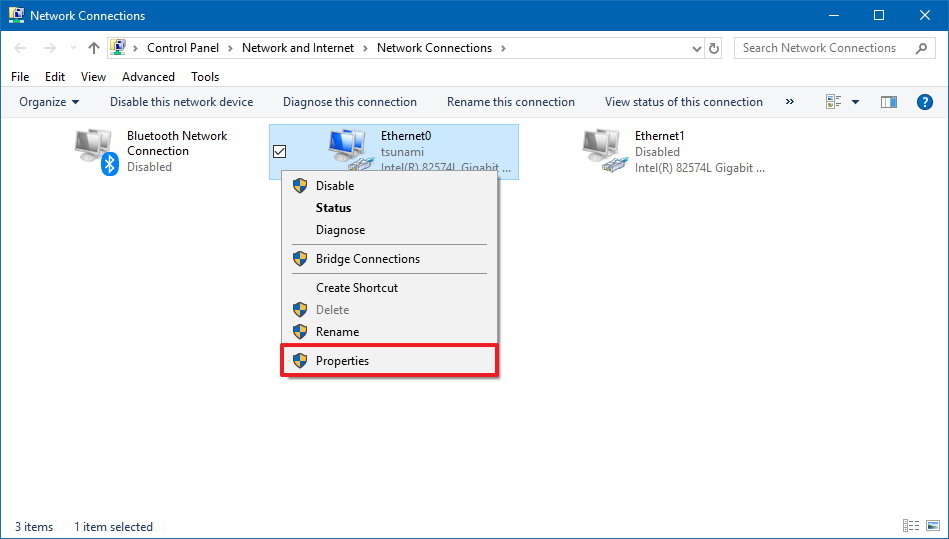
- Right-click the network adapter, and select the Properties option.
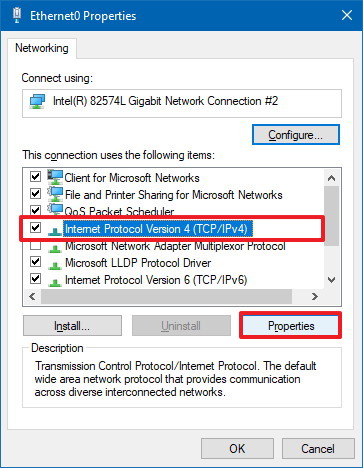
- Select the Internet Protocol Version 4 (TCP/IPv4) option.
- Click the Properties button.
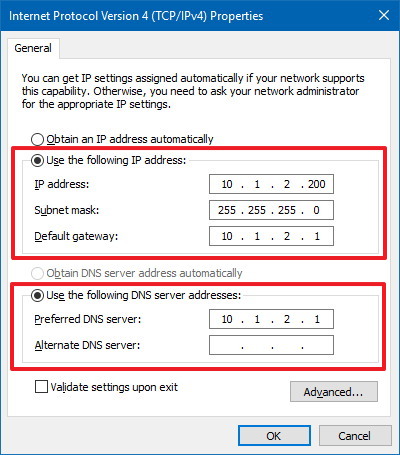
- Select the Use the following IP address option.
- Specify the IP settings:
- IP address: Specify a static network address for the computer. You should use an address outside of the DHCP server scope configured in your router to prevent conflicts. For instance, 192.168.1.200.
- Subnet mask: In a home network, the address usually is 255.255.255.0.
- Default gateway: This is usually the IP address of the router. For example, 192.168.1.1.
- Preferred DNS server: Typically, this is also the IP address of your router.
- Click the OK button.
- Click the Close button.
Once you’ve completed the steps, the IP configuration will no longer change, and it’ll prevent potential connection problems in the future.
How to set up multiple FTP accounts on Windows 10
If you want to allow multiple people to download and upload files to the FTP server simultaneously, you need to set up multiple accounts with specific permissions.
This process is done by creating new standard Windows 10 accounts and configuring the correct settings.
Creating new user accounts
To add multiple accounts to an FTP server, do the following:
- Open Settings.
- Click on Accounts.
- Click on Family & other people.
- Click the Add someone else to this PC button.
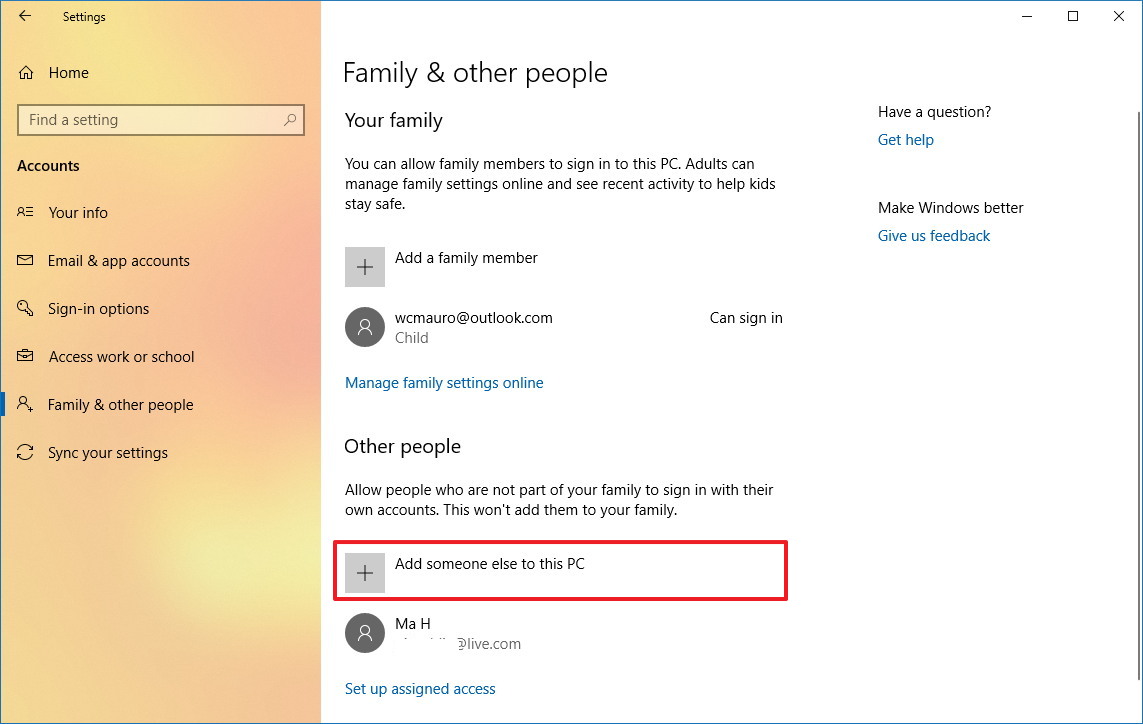
- Type the Microsoft account address for the user you want to allow access to the FTP server.Quick Tip: If you want users to access the server using local accounts, then click the I don’t have this person sign-in information option, click the Add a user without a Microsoft account option, and follow the on-screen direction to create the account.
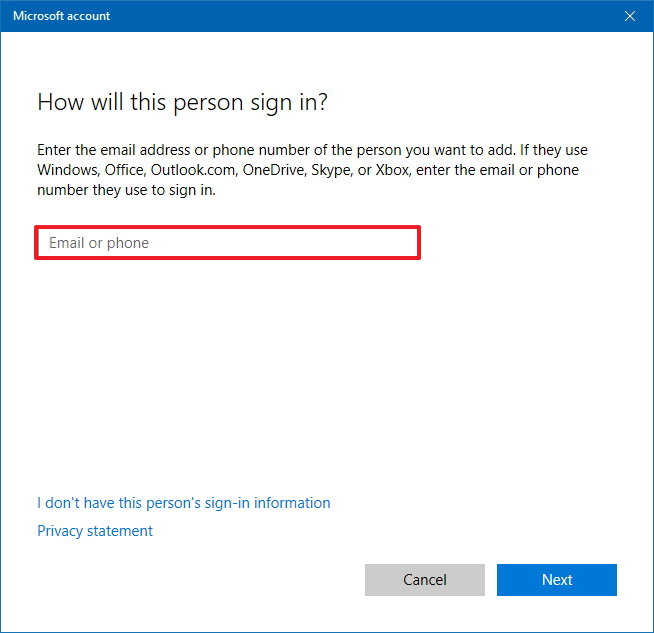
- Click the Next button.
Once you’ve completed the steps, you may need to repeat the steps to create additional accounts.
Configuring user accounts to FTP server
If you want multiple users to access the FTP server at the same time, you need to modify the server settings using these steps:
- Open Control Panel.
- Click on System and Security.
- Click on Administrative Tools.
- Double-click the Internet Information Services (IIS) Manager shortcut.
- On the left pane, expand «Sites,» and select the site you created earlier.
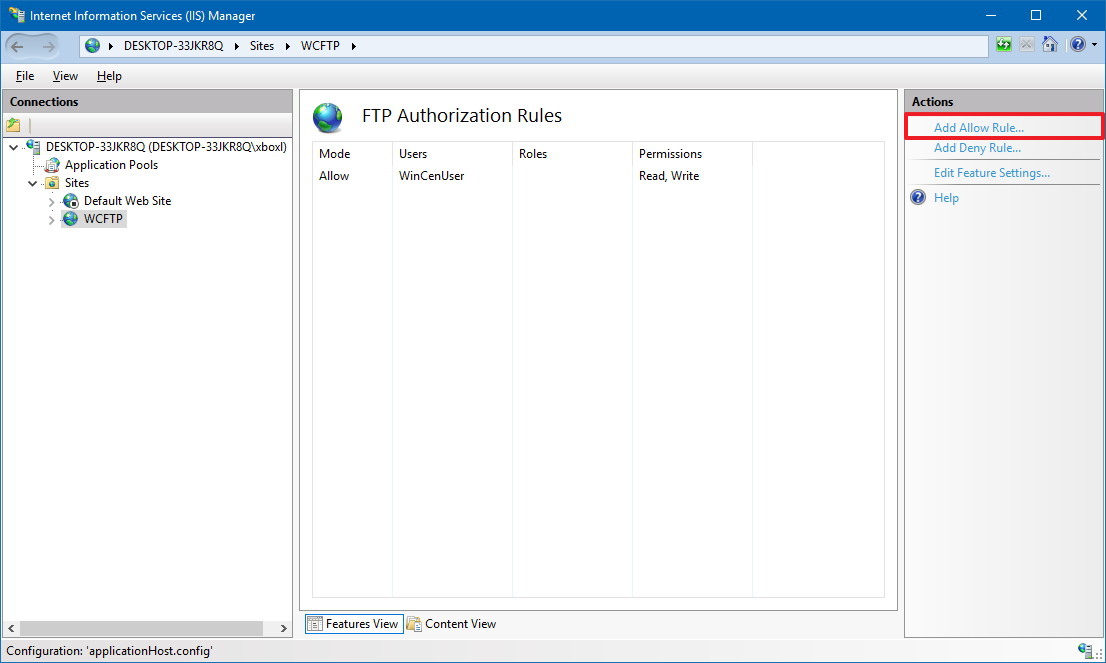
- Double-click the FTP Authorization Rules option.
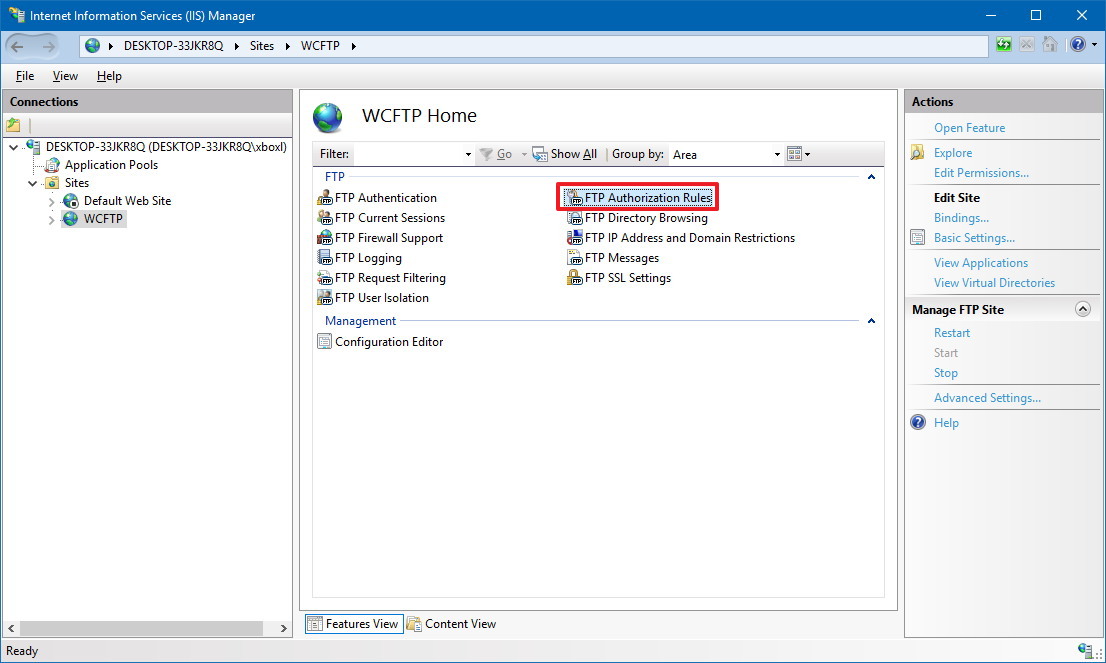
- On the right pane, click the Add Allow Rule option.
- Select one of these two options:
- All Users: Allows every user configured on your Windows 10 device to access the FTP server.
- Specified users: You can use this option to specify all the users you want to access the FTP server. (You must separate each user using a comma.)
- Check the Read and Write options.
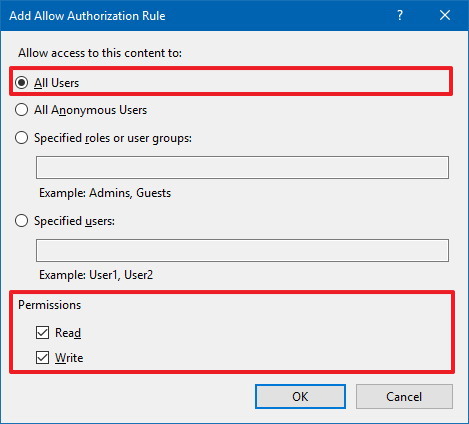
- Click the OK button.
After completing the steps, all the users you specified should now be able to access the FTP server to download and upload files remotely.
How to connect to an FTP server remotely on Windows 10
Once you’ve created and configured your FTP server, there are many ways to view, download, and upload files.
Viewing and downloading files
If you want to browse and download files, you can do this using Internet Explorer, Firefox, or Chrome:
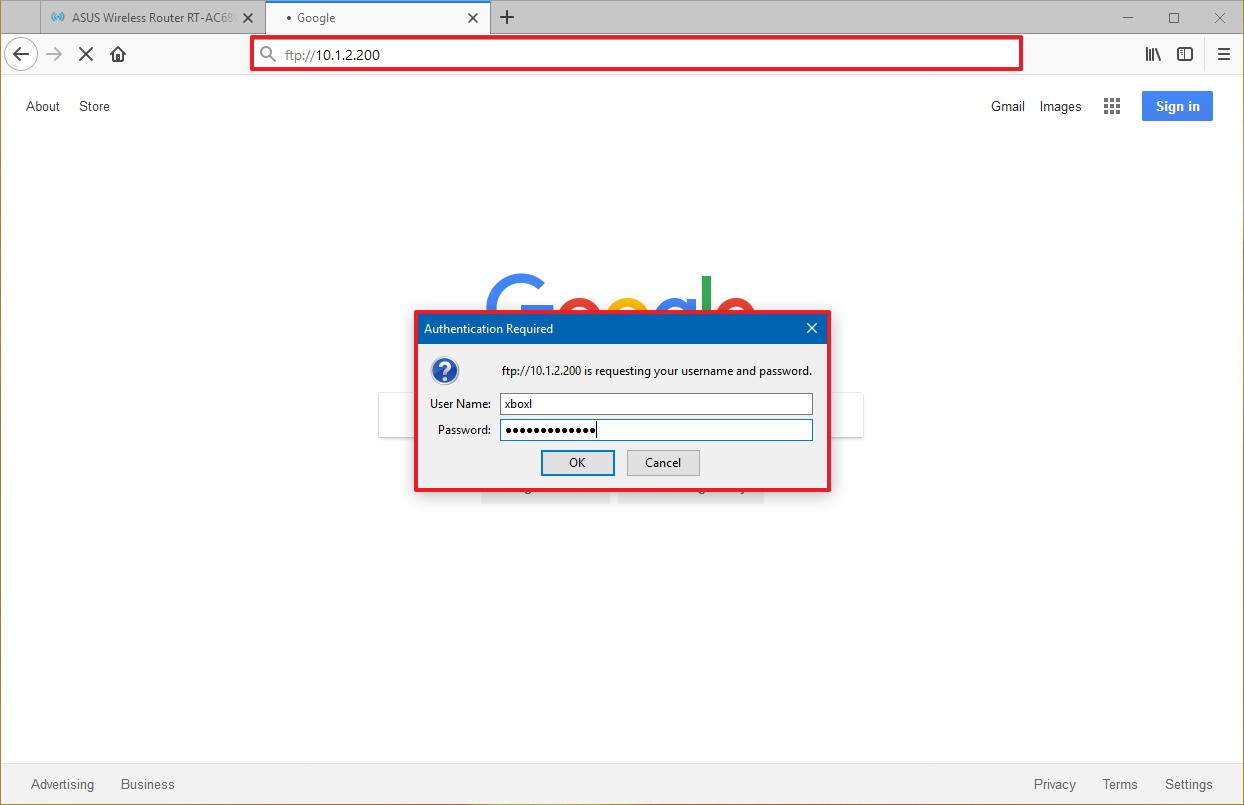
- Open a web browser.
- In the address bar, type the server IP address using ftp://, and press Enter. For example, ftp://192.168.1.100.
- Type your account credentials.
- Click the Log on button.
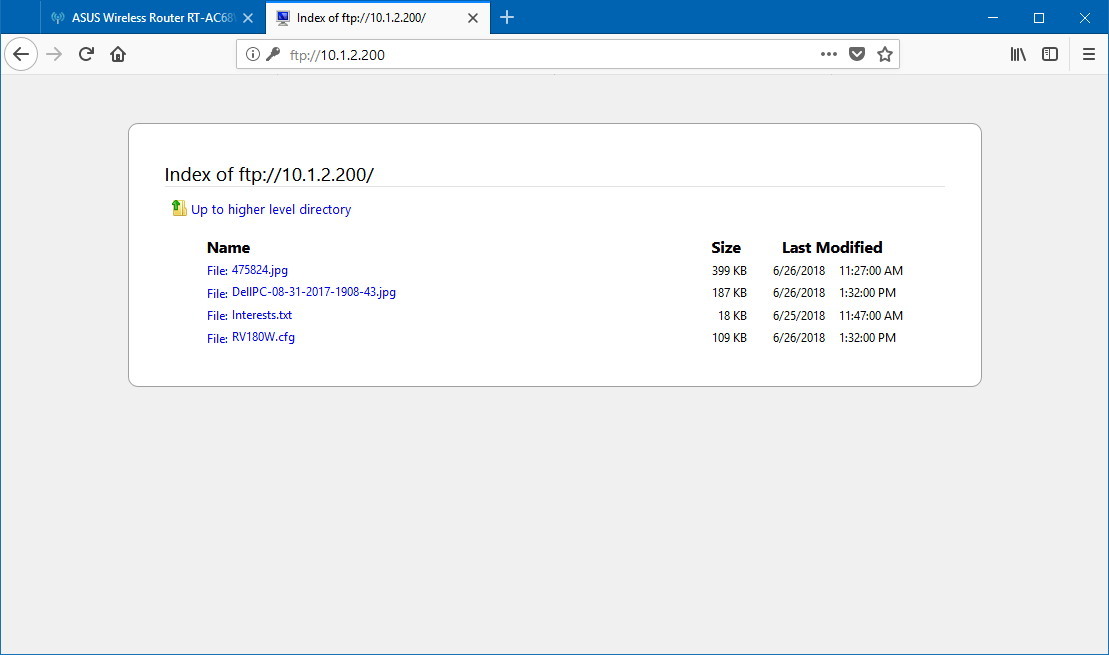
After completing the steps, you should be able to navigate and download files and folders from the server.
In the case that you’re trying to connect from the internet, you have to specify the public (internet) IP address of the network hosting the FTP server.
The easiest way to find out is to search for «What’s my IP» in Google or Bing within the network before trying to connect from a remote connection. Also, unless you have an static IP address from your internet provider, or you’re not using DDNS service, you may need to check your public IP regularly in order to connect, in case it changes.
Viewing, downloading, and uploading files
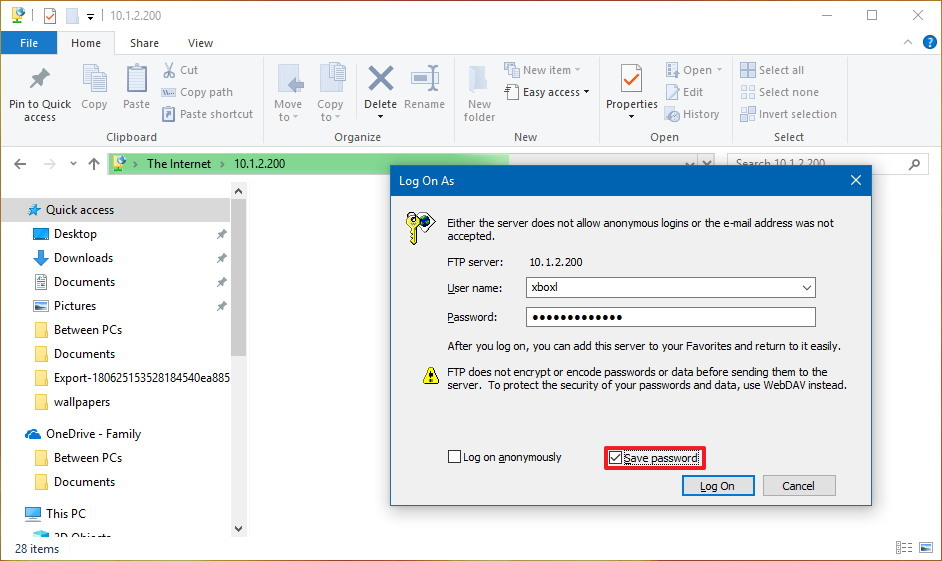
The easiest way to browse, download and upload files is to use File Explorer with these steps.
- Open File Explorer.
- In the address bar, type the server address using ftp://, and press Enter. For example, ftp://192.168.1.100.
- Type your account credentials.
- Check the Save password option.
- Click the Log on button.
After completing the steps, you’ll be able to browse folders and files, as well as download and upload files as if they’re locally stored on your device.
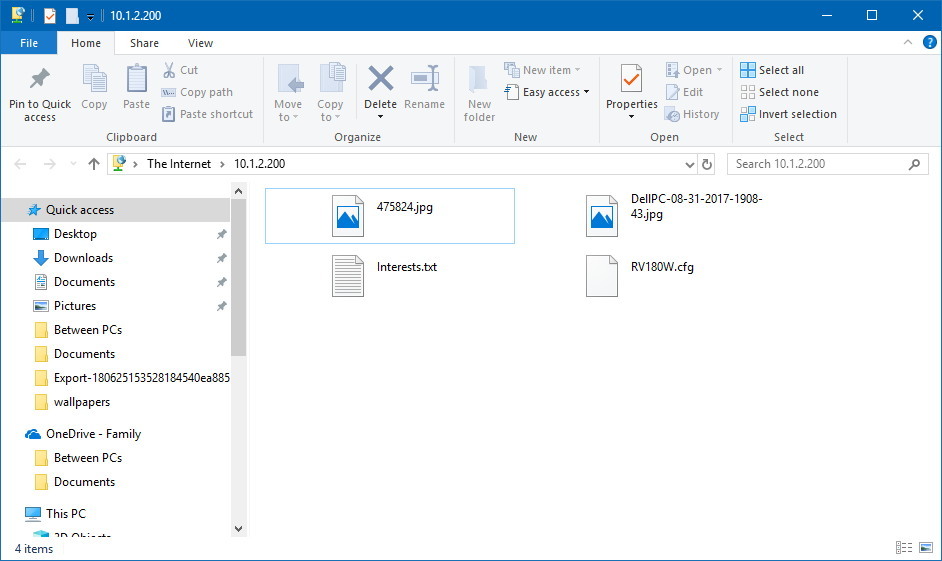
You can avoid going through the steps to reconnect to the FTP server by right-clicking Quick Access in the left pane, and selecting the Pin current folder to Quick Access option.
Of course, you’re not limited to use File Explorer as there are plenty of FTP clients, such as FileZilla that you can use to transfer files.
Wrapping things up
In this guide, we outlined the steps to get started with the FTP server feature available on Windows 10, and the steps to view, download, and upload files. However, bear in mind that you can only establish a connection as long as the device hosting the service is turned on. You won’t be able to access your files when the computer is asleep or hibernating.
The FTP Server component is available on Windows 10 Pro as well as on Windows 10 Home, and older versions of the OS, including Windows 8.1 and Windows 7.
More Windows 10 resources
For more helpful articles, coverage, and answers to common questions about Windows 10, visit the following resources:
- Windows 10 on Windows Central – All you need to know
- Windows 10 help, tips, and tricks
- Windows 10 forums on Windows Central
All the latest news, reviews, and guides for Windows and Xbox diehards.
Mauro Huculak is technical writer for WindowsCentral.com. His primary focus is to write comprehensive how-tos to help users get the most out of Windows 10 and its many related technologies. He has an IT background with professional certifications from Microsoft, Cisco, and CompTIA, and he’s a recognized member of the Microsoft MVP community.
Looking for Setup an FTP server on Windows PC? Here this post we go through step by step How to Setup an FTP Server in Windows, Setup a folder on your Windows computer as an FTP repository, Allow an FTP server through Windows Firewall, Share the folder and files to Access Via FTP server and Access them from a different machine Via Lan or Wan. Also, Give access to your FTP site by restricting users with username/password or anonymous access. Let’s start.
Contents
- 1 What is FTP?
- 2 How To Setup FTP Server in Windows
- 2.1 Enable FTP feature
- 3 How To Configure FTP server on Windows 10
- 4 Allow FTP to pass through Windows Firewall
- 5 FTP port (21) Forwarding on Router
- 6 Access an FTP server from a Different network
- 7 Download and Upload files, Folders On FTP server
- 8 Manage FTP using Filezilla
What is FTP?
FTP stands for file transfer protocol A useful Feature to transfer files between the client machine and the FTP Server. For Example, you share some File folders on a configured FTP server on a port number, And a user can read and write files through the FTP protocol from anywhere. And most browsers support FTP protocol so we can access the FTP servers through the browser using FTP:// YOURHOSTNAME or IP address.
— Advertisement —

How To Setup FTP Server in Windows
In order to host an FTP server, your computer must be connected to a wireless network. And need a public IP address to access Upload/Download files folders on the FTP server from a different location. Let’s prepare your Local PC to Act as an FTP server. To do this first we need to enable FTP Feature and IIS (IIS is a web server software package you can read more from here).
Note: Below steps also applicable to setup and configure the FTP server on windows 8.1 and 7!
— Advertisement —
Enable FTP feature
To Enable FTP and IIS features,
- Press Windows + R, type appwiz.cpl and ok.
- This will open Windows programs and features
- Click on ‘Turn Windows features on or off’
- Toggle on Internet Information Services, and select FTP SERVER
- All features which are ticked need to be installed.
- Press OK to install the selected features.
- This will take some time to install the features, wait until complete.
- After that restart Windows To take effect the changes.

How To Configure FTP server on Windows 10
After successfully enable The FTP feature now follow the steps below to configure your FTP server.
Before you go ahead first to Create a new folder Anywhere And Name it (for example Howtofix FTP server)
— Advertisement —

Note down your PC IP address (To check this open command prompt, type ipconfig) this will display your local IP address and default gateway. Note: You must use static IP on your System.

Also if you are planning to access your FTP files over a different network, you must need a public IP address. You can ask your ISP for the public IP address. To check your Public IP open chrome browser type whats my IP this will display your public IP address.

- Type Administrative Tools in the start menu search and Select it from Search results.
- Also, you can access the same from the Control panel -> all control panel items -> administrative tools.
- Then look for Internet information service(IIS) manager, And Double click on it.

- In the next window, expand the localhost (basically it’s your PC name) on your left side panel and navigate to “sites.”
- Right-click “sites” and choose “add FTP site” option. This will create an FTP connection for you.

- Give a name to your site and enter the path of the FTP folder that you want to use to send and receive files. Here we are set the folder path we previously created for the FTP server. Alternatively, you can also choose to create a new folder to store your FTP files. Just depends on your personal preferences.

- Click “next.” Here you need to select the local computer’s IP address from the drop-down box. I hope you have already set up static IP for the computer.
- left the port number 21 as the default port number of the FTP server.
- And change the SSL setting to “no SSL.” Leave the other default settings.
Note: If you’re configuring a business site, make sure to choose the “Require SSL” option, as it will add an extra layer of security to the transfer.

- Click “next” and you’ll get the authentication screen.
- Navigate to the authentication section of this screen, and select the “basic” option.
- In the authorization section, type “specified users” from the drop-down menu.
- In the text box below, type the username of your Windows 10 account to give you access to the FTP server. You can add more users too if you like.
- In the permission section, you need to decide how others will be accessing the FTP share and who will be having Read-only or Read & Write access.
Let’s assume this scenario: If you want specific users to have read and write access, so obviously they must type a username and password for it. Other users can access the FTP site without any username or password to view the content only, it’s called anonymous users access. Now Click Finish.
- Finally, click “finish.”

With this, you’re done setting up an FTP server on your Windows 10 machine, but, you have to perform some additional things to start using the FTP server to send and receive files.
Allow FTP to pass through Windows Firewall
Windows Firewall security feature will block any connections trying to access the FTP server. And that’s why we need to manually allow the connections, and tell the firewall to give access to this server. To do this
Note: Nowadays firewalls manage by Antivirus application, So either you need to configure/Allow FTP from there or Disable Firewall protection on your Antivirus
Search for Windows firewall in the Windows start menu and press “enter.”

On the left-side panel, you’ll see “allow an app or feature through Windows Firewall” option. Click on it.

When the next window opens, click on the “change settings” button.
From the list, check the “FTP server” and allow it on both private and public networks.

Once done, click OK
That’s it. Now, you should be able to connect to your FTP server from your local network. To check this open Web browser On a different PC connected to the same network type ftp://yourIPaddress (Note: here use FTP server PC IP address). use the username and password whom you previously Allowed to access the FTP server.
FTP port (21) Forwarding on Router
Now the Windows 10 FTP Server is enabled to be accessed from the LAN. But if you looking for accessing the FTP server from a Different network (our side LAN) then you need to allow FTP connection, and you must enable Port 21 in your router’s firewall to allow incoming connection via FTP port 21.
Open the Router configuration page, using the Default Gateway Address. You can check your default gateway (router IP address) using the Ipconfig command.
For me it’s 192.168.1.199 this will ask for Authentication, Type router admin username, and password. Here from Advanced options look for Port forwarding.

Create a new port forwarding that includes the following information:
- Service name: You can use any name. For example, FTP-Server.
- Port rage: You must use port 21.
- PC’s TCP/IP address: Open Command Prompt, type ipconfig, and the IPv4 address is your PC’s TCP/IP address.
Now Apply the new changes, and save the new router configurations.
Access an FTP server from a Different network
All is set now, Your FTP server is ready to access from anywhere the PC is connected to the internet. Here is how to quickly test your FTP server, I hope you have noted down your Public IP address (Where you configured the FTP server, Otherwise open the browser and type whats my IP)
Go to any computer outside of the network and type FTP:// IP address in the search bar. You should enter the username and password again and click OK.

Download and Upload files, Folders On FTP server
Also, you can use third-party applications like (FileZilla) to Download Upload manage files, Folders between the client machine and FTP Server. There are multiple free FTP Clients available you can use any of them to manage your FTP server:
FileZilla: an FTP Client available for Windows
Cyberduck: FTP Client available for Windows
WinSCP: A free and open-source SFTP, FTP, WebDAV, Amazon S3, and SCP client for Microsoft Windows
Manage FTP using Filezilla
Let’s use FileZilla client software to manage (Download/Upload) files folders on the FTP server. It’s very simple, Visit Filezilla’s official site and download the Filezilla client for windows.
- Right-click on it and Run as administrator to install the application.
- To open the same type Filezilla on the start menu search and select.

Then Input the FTP Server details, for example, ftp://10.253.67.24 (Public IP). Type the username to whom you are allowed to access your FTP server from anywhere type the password for authentication and use port 21. When you click Quickconnect this will list out all file folders available for download. The left side windows in your machine and right side are the FTP Server
Also here Drag files from left to right will copy the file move to the FTP server and Drag files from Right to left will copy the file move to the Client machine
That’s all you have successfully created and configured the FTP server on Windows 10. Did you encounter any problems while following these steps, let us know in the comments below, we do our best to guide you?
Also, Read
- Ethernet doesn’t have a valid IP configuration (Unidentified Network) Windows 10
- How to fix USB ports not working in Windows 10 Laptop/PC
- WiFi connected but no internet Access Windows 10 (5 Working fixes)
- How To Setup and configure VPN Connection In Windows 10/8/7?
- DNS server is not responding on Windows 10? Apply these solutions