One of the things I do the most when troubleshooting deployments of services exposing data to the internet is pinging the IP and port where the service is supposed to be alive. In this tutorial, I will show you how to ping IP and port on Linux and Windows.
I think most system administrators know the commands for this, but if you like me normally don’t work like an IT admin (at least not anymore) I tend to forget the commands. Due to that, I have written this article as a reference for myself but also for everyone else, who is in need of pinging services they expect at a location.
Often it’s enough to just ping an IP to validate that you got “life” on the server. However if you like me often got many services running on one server (often when using Docker), I need to ping the specific port number on the server. One of the Kubernetes clusters I manage is running more than 100 services and here I use it a lot.
In this article/reference post, I will show you how to ping IP and port on your Windows or Linux machine using different commands in the terminal (CLI).
Ping IP and port using Telnet
This is my favorite when working on both Windows and Linux. I also think that it’s the easiest one to use and it’s called Telnet. You can with a simple command using Telnet ping IP and port on the remote server you would like to check.
Telnet — Wikipedia

If you want to, you can also use a domain instead of the IP. A domain is often easier for humans to remember instead of numbers to multiple different servers locally or externally.
Below are the commands to ping IP and port on a server using Telnet:
$ telnet <server_ip_address> <server_port_number>

$ telnet <server_domain_name> <server_port_number>
As I mentioned above, you can use Telnet on both Windows and Linux computers/servers which makes it a great choice for most sys-ops.
On most computers, telnet is not installed by default. If you get the annoying error “telnet: command not found”, you have to install Telnet on the machine using the commands below:
Install Telnet on Linux
If you are working on a Linux Server or Desktop, you can use the below command to install Telnet on that machine:
$ sudo apt install telnetInstall Telnet on Windows
By default, Telnet is not an enabled Windows Feature. If you run Telnet on your computer in a Command Prompt, you will get the following error: “Telnet is not recognized as an operable program or batch file.”. So – to install Telnet on Windows, you have to do the following:
- Click on Start.
- Select Control Panel.
- Choose Programs and Features.
- Click Turn Windows features on or off.
- Select the Telnet Client option.
- Click OK.
A dialog box appears to confirm installation when it’s done. The telnet command should now be available in your Command Prompt. Remember to restart your CMD window.
Ping IP and port with Telnet example
Let’s check out how Telnet works. This website is running at IP: 172.67.161.26 – this is the public IP address of the website to which the domain is mapped to.
By default, all requests are redirected to HTTPS (port 443) if a request is made at port 80. This means that the server accepts connections on port 80 too – let’s try and ping both ports:
$ telnet 172.67.161.26 80

Trying 172.67.161.26...
Connected to 172.67.161.26.
Escape character is '^]'.

$ telnet 172.67.161.26 443

Trying 172.67.161.26...
Connected to 172.67.161.26.
Escape character is '^]'.
That went well. We got connected and could see that the server is responding on both ports. This simply means that the service on the port is up and running.
If you would like to escape out of the Telnet utility when connected, you can use “CTRL + ]” or the “q” command.
Ping IP and port using Nmap
Another well-used tool is Nmap. In Nmap, you can ping a port by using the “-p” option including the IP or domain you would like to scan.
Nmap: the Network Mapper — Free Security Scanner
Nmap Free Security Scanner, Port Scanner, & Network Exploration Tool. Download open source software for Linux, Windows, UNIX, FreeBSD, etc.
Free Security Scanner
$ nmap -p <server_port_number> <server_ip_address>

$ nmap -p <server_port_number> <internet_domain_name>
A heads up – be aware of legal issues!
“When used properly, Nmap helps protect your network from invaders. But when used improperly, Nmap can (in rare cases) get you sued, fired, expelled, jailed, or banned by your ISP.” – Nmap website.
If you get an error telling you that Nmap is not available on your computer/server, you would have to install it.
Install Nmap on Linux
To install Nmap on your Linux machine, you can use the below command:
$ sudo apt install nmapInstall Nmap on Windows
Not as simple as Linux, but it’s still easy to use the official installer from Nmap’s website. Go to this page: Download Nmap and look under the Windows Binaries for the latest available installer file.
Once the installer has completed installing, you are now ready to use Nmap on your Windows computer.
Ping IP and port using Nmap
Let’s try to ping a website at IP “172.67.161.26” on the global internet at the default HTTPS port – 443. If you test this yourself, then don’t use that IP. Cloudflare is protecting the website and will block your access and in the worst-case ban your IP from their global network. Only do this at IPs you own or services that won’t do any damage to others.
C:\Users\christian>nmap -p 443 172.67.161.26
Starting Nmap 7.92 ( https://nmap.org ) at 2022-02-10 06:50 Romance Standard Time
Nmap scan report for 172.67.161.26
Host is up (0.028s latency).
Well, once again the port is returned as open on the server. This means that there is a service accepting data at port 443, which was just verified by Nmap.
Ping IP and port using PowerShell
Normally when I’m not on my own machines, which means I’m working on production servers not related to my own business/platform and it’s a Windows Server Environment, I always use PowerShell to ping IP and port.
A great thing about PowerShell is that you can use the methods in scripts running automated stuff in the background or during the setup of service or multiple services. A great thing if deploying with PowerShell would be to check if the ports were active after deployment and return a status to the terminal.
In PowerShell, we got something called Test-NetConnection which is a command where you specify either an IP or a domain followed by the port you would like to ping.
PS C:\Users\christian> Test-NetConnection <server_ip_address> -p <server_port_number>Below is an example of what this would look like on a local network:
Windows PowerShell
Copyright (C) Microsoft Corporation. All rights reserved.
                                                                                                                                                                                                                                                                             PS C:\Users\christian> Test-NetConnection 192.168.1.1 -p 80                                                                                                                                                                                                                                                                                                                   ComputerName     : 192.168.1.1
RemoteAddress    : 192.168.1.1
RemotePort       : 80
InterfaceAlias   : Wi-Fi
SourceAddress    : 192.168.1.68
TcpTestSucceeded : True
In the test above you can see that the TCP call to my gateway at home succeeded at port 80. If you can’t get through to the service you will status False in TcpTestSucceeded.
Summary
In this quick article on how to ping IP and port using different tools on Windows or Linux machines, we learned how we can use the terminal to check if a given port is open and accepting requests.
If you got any issues, questions, or suggestions, please let me know in the comments below. Happy pinging!

My name is Christian. I am a 27-year-old pragmatic DevOps engineer with a passion for .NET, Cloud, and Containers. In my spare time, I share my knowledge and love teaching other people about tech.
To ping a specific port on Windows 10, you typically use a utility like Telnet or PowerShell, as the traditional ping command is used to test network connectivity by sending ICMP Echo Requests to an IP address. It does not allow you to specify a port number.
To ping a port on Windows 10, you will need to use the Command Prompt.
- To do this, type «cmd» into the search bar and click on the Command Prompt app.
- Once the Command Prompt is open, type «ping» followed by the IP address and the port number that you want to ping.
For example, if you wanted to ping port 80 on the IP address 192.168.1.1, you would type «ping 192.168.1.1 80» into the Command Prompt.
In order to ping an Ethernet port, you will need to have access to a computer with an Ethernet port and an Internet connection. Once you have these two things, you can ping an Ethernet port by following these steps:
- 1. Connect the computer to the Ethernet port.
- 2. Open a command prompt and type «ping [Ethernet port’s IP address].«
- 3. Press Enter.
- 4. Wait for the results of the ping test.
To ping a port on Windows 10 Using Telnet:
First, ensure Telnet is installed on your Windows 10 machine:
- Go to Control Panel.
- Choose
Programs and Features. - Select
Turn Windows features on or off. - Scroll down and check
Telnet Client. - Click OK and wait for it to install.
Once installed, open the Command Prompt and use the following command:
telnet <Hostname_or_IP> <PortNumber>
If the port is open, the window will go blank or display a connected message. If it’s closed or if there’s an issue, you’ll see a «Could not open connection» error.
Remember that even if a port is not responding to a telnet or PowerShell check, it doesn’t mean the port isn’t being used or active; it might be set to not respond, or there could be a firewall or other security measures in place. Always approach port checks and scans with caution and ensure you have permission to probe the target system.
How do I ping a specific port?
How do I test a port?
Nmap (Network Mapper) is a versatile and powerful tool for network discovery and security scanning. One of its primary uses is to check if specific ports on a system are open. Here’s how you can use Nmap to test a port:
- Install Nmap:
- If you haven’t installed Nmap on your system, you can download and install it from the official website: https://nmap.org/download.html
- Basic Port Scan:
- Open a command-line interface or terminal.
- To test a specific port, use the following command:
nmap -p <PortNumber> <Hostname_or_IP>
- Scan Multiple Ports:
- You can also test multiple ports by separating them with commas or using a range with a hyphen.
nmap -p 80,443 example.com # Tests port 80 and 443
nmap -p 20-30 example.com # Tests ports from 20 to 30 inclusive
4. Scan Most Common Ports:
- Nmap has a list of the 1,000 most common ports. To scan these, you don’t need to specify any port:
- Use the
-T4option for faster execution (be cautious as this might be flagged by intrusion prevention systems). - Use the
-voption for verbose mode to get more details. - Use the
-sVoption to determine the version of the service running on the port.
Example combining the options:
nmap -p 80,443 -T4 -v -sV example.com
Note: Always ensure you have permission to scan the target. Unauthorized scanning can be illegal and unethical. If you’re scanning a system or network that you do not own or have explicit permission to test, you could face legal consequences.
How do I check if port 22 is open?
If you are using a Windows operating system, you can use the telnet command to check if port 22 is open. Simply open the Command Prompt and type «telnet {hostname} 22«. If the port is open, you will see a blank screen. If the port is closed, you will see an error message.
If you are using a Linux operating system, you can use the nmap command to check if port 22 is open. Simply open the terminal and type «nmap -p 22 {hostname}«. If the port is open, you will see the message «22/tcp open«. If the port is closed, you will see the message «22/tcp closed«.
To ping a port in Windows, you can use the Command Prompt. To do this, open the Command Prompt and type «ping» followed by the IP address and the port number. For example, to ping port 80 on the IP address 192.168.1.1, you would type «ping 192.168.1.1 80«.
How do I test port 8080?
To test port 8080, you can use a tool like nmap or telnet.
How do I check if a port is running?
If you want to check if a port is running, you can use the netstat command. This command will show you a list of all the currently active ports on your system. You can use the -a flag to see all the ports, and the -n flag to see the port numbers.
How do I check if port 443 is open?
If you want to check if port 443 is open on a remote server, you can use the telnet command. For example:
telnet example.com 443
If the port is open, you will see a blank screen. If the port is closed, you will see a message like «Connection refused.«
How can I tell if port 443 is open?
If you want to check if port 443 is open on a remote server, you can use the telnet command to attempt to connect to the server on that port. For example, if you’re trying to check if port 443 is open on http://www.example.com, you would run the following command:
telnet http://www.example.com 443
If the port is open, you will see a blank screen. If the port is closed, you will see a message saying «Could not open connection to the host, on port 443: Connect failed.«
How check port is open in CMD?
To check if a port is open in CMD, you can use the netstat command. This command will show you a list of all the open ports on your computer. To use the netstat command, open the Command Prompt and type «netstat -a«.
Introduction
The ping command is a network tool for checking whether a remote system is up and running. In other words, the command determines if a certain IP address or a host are accessible. Ping uses a network layer protocol called Internet Control Message Protocol (ICMP) and is available on all operating systems.
On the other hand, port numbers belong to transport layer protocols, such as TCP and UDP. Port numbers help identify where an Internet or other network message is forwarded when it arrives.
In this tutorial, you will learn how to ping a port in Windows and Linux using different tools.

Prerequisites
- A Linux or Windows system
- Access to the command line
- An account with sudo/admin privileges
Can You Ping a Specific Port?
Network devices use ICMP to send error messages and information on whether communication with an IP address is successful or not. ICMP differs from transport protocols as ICMP is not used to exchange data between systems.
Ping uses ICMP packets, and ICMP does not use port numbers which means a port can’t be pinged. However, we can use ping with a similar intention – to check if a port is open or not.
Some network tools and utilities can simulate an attempt to establish a connection to a specific port and wait to see if the target host responds. If there is a response, the target port is open. If not, the target port is closed, or the host is unable to accept a connection because there is no service configured to listen for connections on that port.
You can use three tools to ping a port in Linux:
- Telnet
- Netcat (nc)
- Network Mapper (nmap)
See our tutorial on how to use the ping command in Linux to learn about additional ping options and variations in Linux.
Ping a Specific Port Using Telnet
Telnet is a protocol used for interactive communication with the target host via a virtual terminal connection.
1. To check whether telnet is already installed, open a terminal window and enter telnet.

2. If telnet is not installed, install it using the following command
- For CentOS/Fedora:
yum -y install telnet - For Ubuntu:
sudo apt install telnet
3. To ping a port using telnet, enter the following command in the terminal:
telnet <address> <port_number>The <address> syntax is the domain or the IP address of the host, while <port_number> is the port you want to ping.
telnet google.com 443
If the port is open, telnet establishes a connection. Otherwise, it states a failure.
4. To quit telnet, press Ctrl + ] and run the q command.
Ping a Specific Port Using Netcat
Netcat (nc) reads and writes from connections using TCP and UDP protocols. This command-line tool can perform many network operations.
1. To check if netcat is installed:
- For Debian, Ubuntu, and Mint: enter
netcat -h - For Fedora, Red Hat Enterprise Linux, and CentOS:
ncat -h
2. If netcat is not installed, run the following command in the terminal:
sudo apt install netcat3. To ping a port using netcat enter the following:
nc -vz <address> <port_number>The output informs the user if the connection to the specified port is successful or not. If it is successful, the port is open.
Ping a Specific Port Using Nmap
Nmap is a network tool used for vulnerability scanning and network discovery. The utility is also useful for finding open ports and detecting security risks.
Important: Be aware of legal ramifications regarding improper Nmap use, for example, flooding a network or crashing a system.
1. Check if you have Nmap installed by entering nmap -version in the terminal.

If Nmap is installed, the output informs the user about the app version and platform it runs on.
2. If there is no Nmap on your system, enter the following command:
- For CentOS or RHEL Linux:
sudo yum install nmap - For Ubuntu or Debian Linux:
sudo apt install nmap
3. Once Nmap is installed on the system, use the following command to ping a specific port:
nmap -p <port_number> <address>
The output informs the user about the port’s state and service type, latency, and the time elapsed until the completion of the task.
4. To ping more than one port, enter nmap -p <number-range> <address>.
The <number-range> syntax is the range of port numbers you want to ping, separated by a hyphen.
For example:
nmap -p 88-93 google.com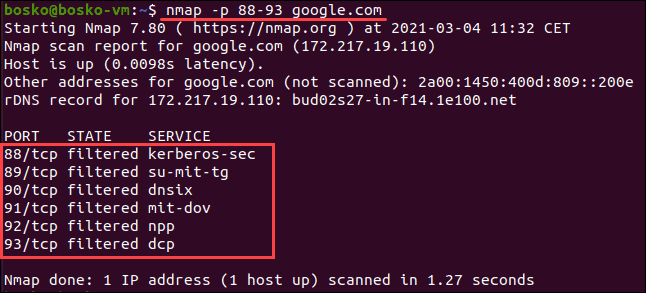
Learn in-depth how to use nmap to scan ports with our guide How To Scan & Find All Open Ports With Nmap.
How to Ping a Specific Port in Windows?
There are two ways to ping a port in Windows:
- Telnet
- PowerShell
Ping a Port Using Telnet
Before using telnet, make sure it is activated:
1. Open the Control Panel.
2. Click Programs, and then Programs and Features.
3. Select Turn Windows features on or off.
4. Find Telnet Client and check the box. Click OK.
You activated the Telnet Client on the system.
After completing the activation, you are ready to ping a port using telnet.
Follow these steps:
1. Search for “cmd” in the start menu. Click the Command Prompt.
2. In the command prompt window, enter
telnet <address> <port_number>The <address> syntax is the domain or the IP address of the host, while <port_number> is the port number you want to ping.

The output lets you know if the port is open and reachable. Alternatively, a connection failure message is shown.
Ping a Port Using PowerShell
PowerShell is a text-based shell that comes with Windows by default.
To ping a port using PowerShell, follow these steps:
1. Search for “PowerShell” in the start menu. Click the Windows PowerShell app.
2. In the PowerShell prompt window enter
Test-NetConnection <address> -p <port_number>
If the port is open and the connection passes, the TCP test is successful. Otherwise, a warning message appears saying the TCP connection failed.
Conclusion
Now you know how to ping and check if a port is open by using several network tools and utilities on Linux and Windows.
Bear in mind that you should not do TCP probing or scan a system unless you have the owner’s permission. Otherwise your actions may be interpreted as an attempt to compromise security.
This is the only solution that works for VPNs with the client machine being Windows Vista or Windows 7, as other listed answers simply do not function. This answer was previously deleted and should not have been, as this is the only solution for a real-world common case. Since there is no appeal available for the delete, I am reposting it to save others the frustration I had with trying to use the other answers.
The example below finds which IPs on the VPN that have VNC/port 5900 open with the client running on Windows 7.
A short Python (v2.6.6) script to scan a given list of IPs and Ports:
from socket import *

fTimeOutSec = 5.0
sNetworkAddress = '192.168.1'
aiHostAddresses = range(1,255)
aiPorts = [5900]

setdefaulttimeout(fTimeOutSec)
print "Starting Scan..."
for h in aiHostAddresses:
    for p in aiPorts:
        s = socket(AF_INET, SOCK_STREAM)
        address = ('%s.%d' % (sNetworkAddress, h))
        result = s.connect_ex((address,p))
        if ( 0 == result ):
            print "%s:%d - OPEN" % (address,p)
        elif ( 10035 == result ):
            #do nothing, was a timeout, probably host doesn't exist
            pass
        else:
            print "%s:%d - closed (%d)" % (address,p,result)

        s.close()
print "Scan Completed."
Results looked like:
Starting Scan...
192.168.1.1:5900 - closed (10061)
192.168.1.7:5900 - closed (10061)
192.168.1.170:5900 - OPEN
192.168.1.170:5900 - closed (10061)
Scan Completed.
The four variables at the top would need to be changed to be appropriate to whatever timeout, network, hosts, and ports that are needed. 5.0 seconds on my VPN seemed to be enough to work properly consistently, less didn’t (always) give accurate results. On my local network, 0.5 was more than enough.
Диагностика и логи
В этой статье мы расскажем:
- что такое порт,
- как проверить доступность порта через telnet,
- для чего нужны команды ping и traceroute,
- как диагностировать сеть с помощью MTR,
- как посмотреть журнал сайта.
Что такое порт
Когда решено обменяться данными по локальной сети, устройства связываются друг с другом. Для этого каждому устройству нужно иметь свой IP-адрес и открыть порты для взаимодействия.
Порт — это числовой идентификатор приложения или процесса в диапазоне от 0 до 65 535. На устройстве может находиться сразу несколько сетевых приложений, которые привязаны к разным портам, при этом за сеанс нужно подключиться только к одному приложению. Поэтому порт открывает соединение с конкретным приложением и обслуживает его, пока сеанс не завершится.
Проверить порт сервера на доступность можно следующими способами:
- с помощью сервиса Проверка доступных портов,
- с помощью консольных команд: telnet, ping, traceroute,
- с помощью программы MTR.
Как проверить, открыт ли порт, командой Telnet
Telnet — это утилита, с помощью которой можно соединиться с удалённым портом любого компьютера и установить канал связи. Это реализация клиентской части протокола с тем же названием (стандартный порт telnet — 23). Для использования telnet нужно знать, какой порт использует искомое приложение, а также имя или IP-адрес сервера. Если при работе с telnet не указать порт, утилита проверит доступность сервера аналогично команде ping.
Рассмотрим, как узнать, открыт ли порт на компьютере или сервере в Windows и Linux.
Важно: в Windows Vista и Windows 7/8/10 утилита telnet по умолчанию отключена. Вы можете установить утилиту по инструкции от Microsoft.
-
1.
Нажмите Пуск или сочетание клавиш Win + R.
-
2.
В поле поиска введите «cmd» и нажмите кнопку ОК.
-
3.
В командной строке введите команду:
telnet имя_сервера номер_портаили:
telnet IP_сервера номер_портаЕсли командная строка или терминал возвращает ошибку, то порт закрыт:
Как с помощью telnet в Windows 10 проверить портЕсли окно становится полностью пустым или на экране появляется приглашение сервера, порт открыт:
Как выглядят в Windows и Linux (Ubuntu, Centos) открытые порты
-
1.
Запустите терминал. Для этого в поисковой строке введите слово «Терминал» или нажмите комбинацию клавиш Ctrl+Alt+T.
-
2.
Установите утилиту telnet:
sudo apt install telnet -
3.
В терминале введите команду:
telnet имя_сервера номер_портаили:
telnet IP_сервера номер_портаЕсли командная строка возвращает ошибку, то порт закрыт:
Если порт открыт, появится следующее сообщение:
Telnet: подключение к порту
Как пользоваться ping и traceroute
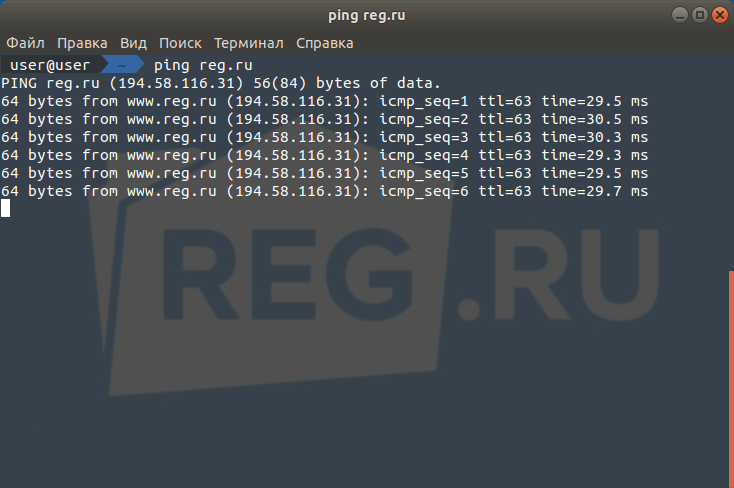
Ping — это утилита, с помощью которой возможна проверка доступности сервера по IP с компьютера. Опрашиваемому узлу отправляются эхо-запросы (ICMP-пакеты Echo Request). Если до узла дошёл запрос, в ответ он должен отправить ICMP-пакет с принятыми данными и эхо-ответ (Echo Reply). Подробнее в статье Команда Ping.
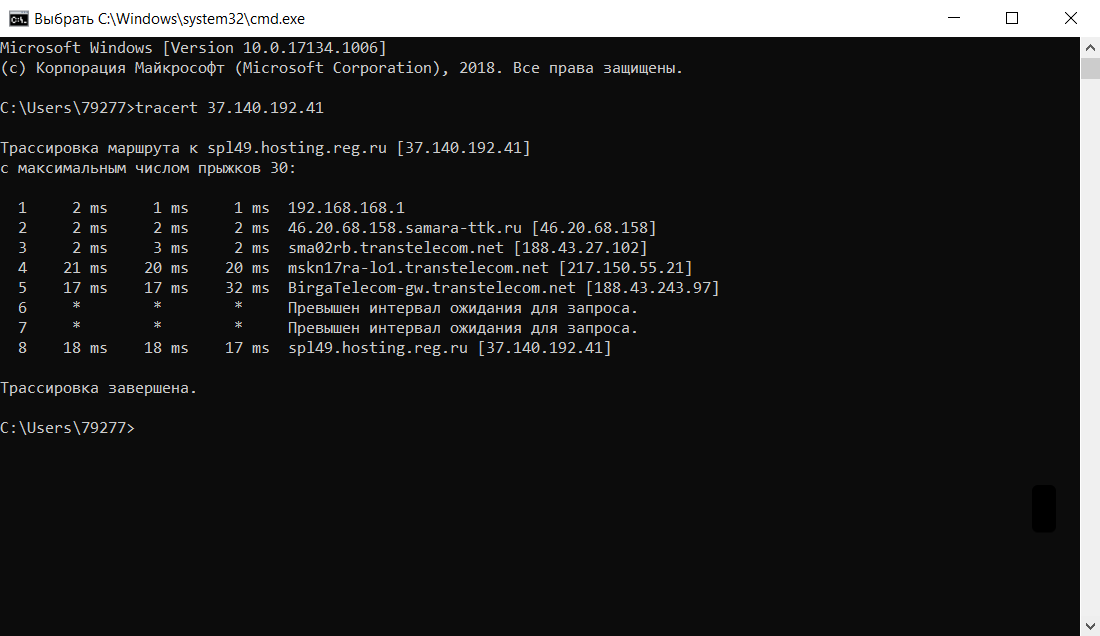
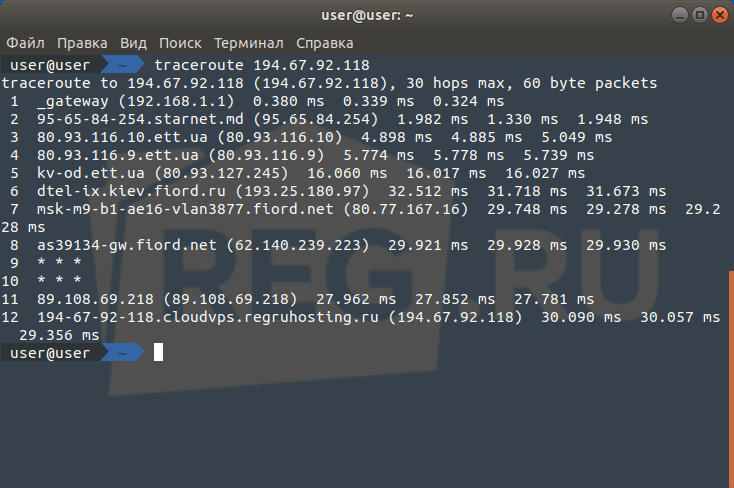
Traceroute — это утилита, с помощью которой можно отследить путь запроса к серверу, а также проблемы, связанные с доступностью удалённого сервера. Утилита отправляет запрос узлу и последовательно опрашивает все маршрутизаторы на пути. Подробнее о работе утилиты и её установке читайте в статье Утилиты Traceroute и Tracert.
Если у вас кириллический домен
Кириллические домены необходимо вводить в формате Punycode. Для перевода домена в Punycode воспользуйтесь сервисом. Введите имя вашего домена и нажмите Конвертировать.
Чтобы проверить доступность сайта или IP адреса, выберите инструкцию для вашей ОС.
-
1.
Нажмите Пуск или сочетание клавиш Win + R.
-
2.
В поле поиска введите «cmd» и нажмите кнопку ОК.
-
3.
В окне терминала введите нужную команду:
-
ping —
ping имя_сайтаилиping IP_сервера,
Команда ping: как проверить доступность сервера или компьютера -
traceroute —
tracert имя_сайтаилиtracert IP_сервера.
Telnet: порт Windows 7
-
-
1.
Запустите терминал. Для этого в поисковой строке введите слово «Терминал» или нажмите комбинацию клавиш Ctrl+Alt+T.
-
2.
В открывшемся окне терминала введите нужную команду:
-
ping —
ping имя_сайтаилиping IP_сервера,
-
traceroute —
traceroute имя_сайтаилиtraceroute IP_сервера.
-
-
1.
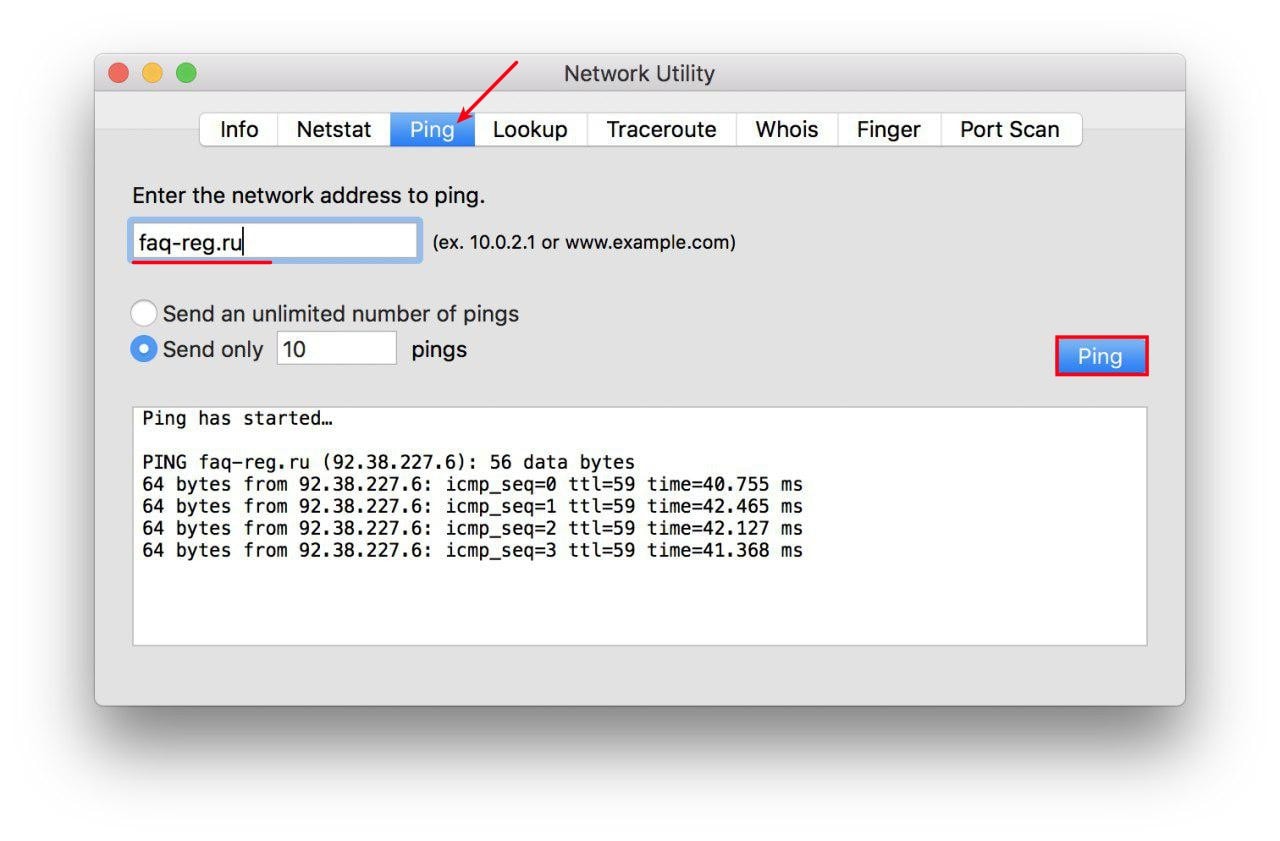
Найдите в Spotlight утилиту Network Utility (Сетевая утилита) и запустите её.
-
2.
В открывшейся программе выберите нужную вкладку:
-
ping — на вкладке «Ping» введите имя домена или IP-адрес и нажмите кнопку Ping:
-
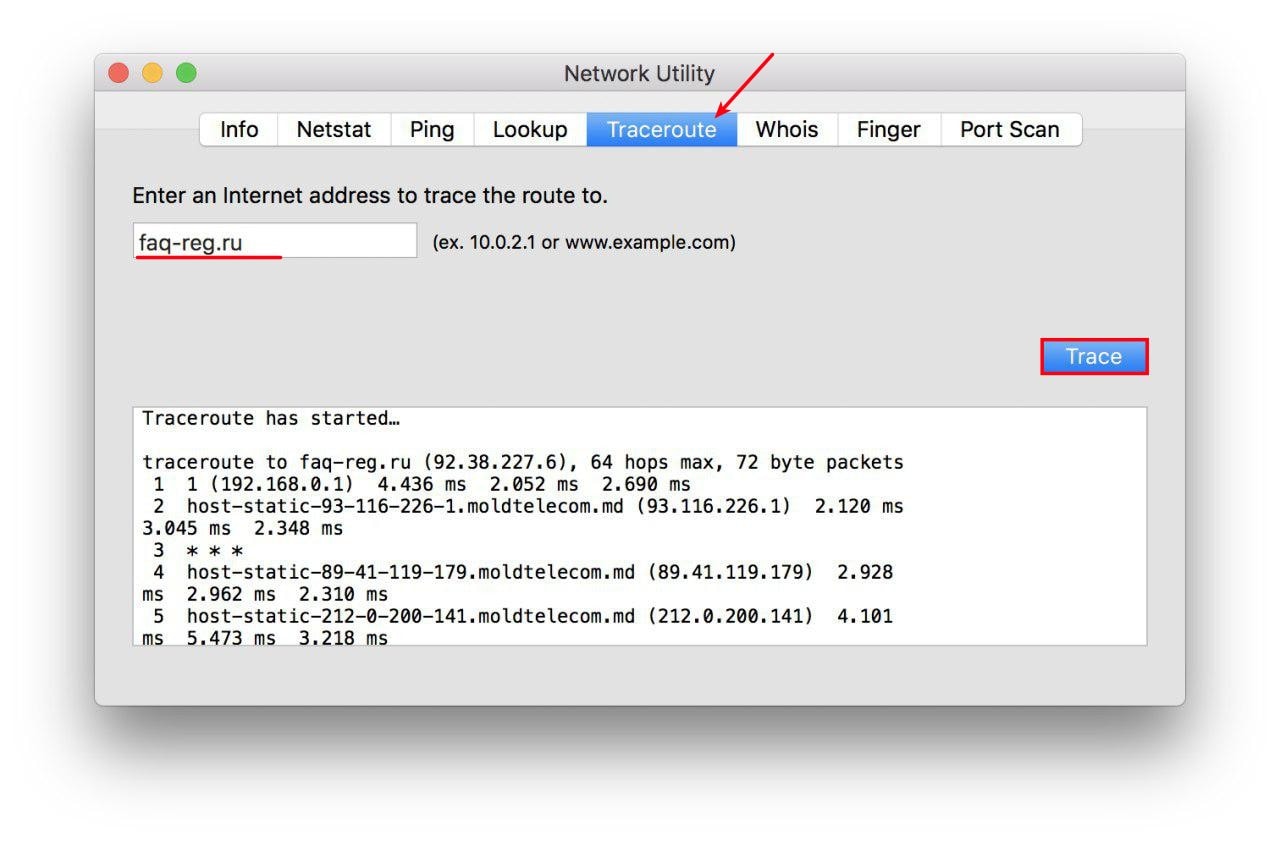
traceroute — на вкладке «Traceroute» введите имя домена или IP-адрес и нажмите кнопку Trace:
-
Готово, мы рассмотрели, как пользоваться командой ping и как запустить tracert.
Результатом работы каждой из этих команд будет несколько строк в окне терминала. Результат команды ping покажет количество переданных и потерянных пакетов при обмене с узлом, а также время приёма и передачи. Результатом traceroute будет трассировка маршрута к узлу.
Вы можете скопировать полученный результат или прислать скриншот с результатом исполнения в службу поддержки.
Диагностика сети при помощи MTR
MTR — программа, которая сочетает функционал команд traceroute и ping в одном инструменте. MTR проверяет соединение между локальной системой и указанным узлом (IP или доменом). Программа отправляет запрос к узлу, как команда ping, и показывает маршрут пакета, как traceroute.
Диагностика сети WinMTR:
- 1.
-
2.
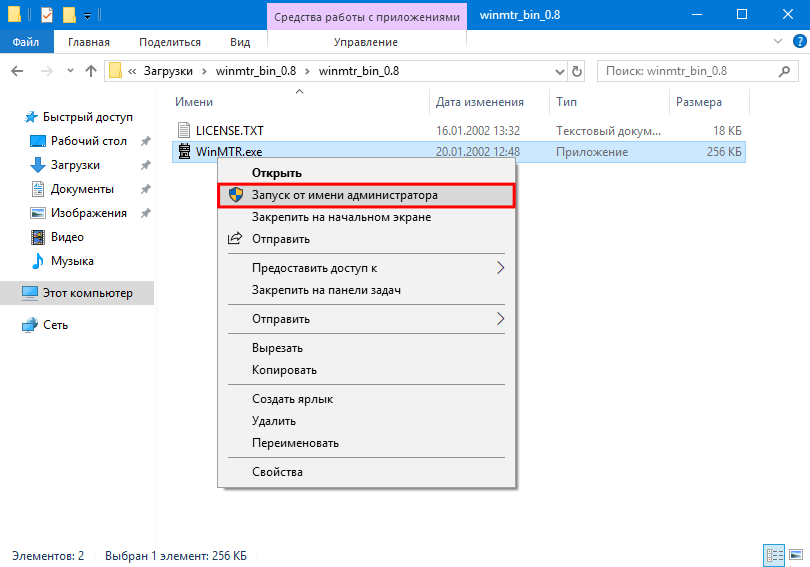
Распакуйте архив и запустите программу от имени администратора:
Centos: открытые порты -
3.
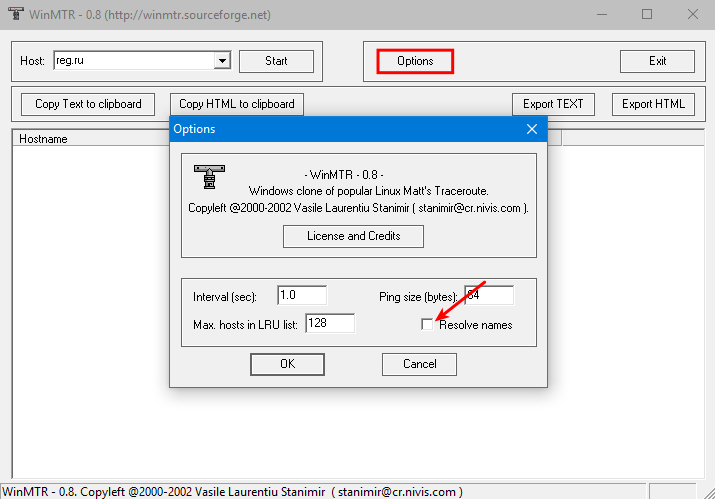
Нажмите Options, в настройках отключите галочку Resolve names. Нажмите OK:
-
4.
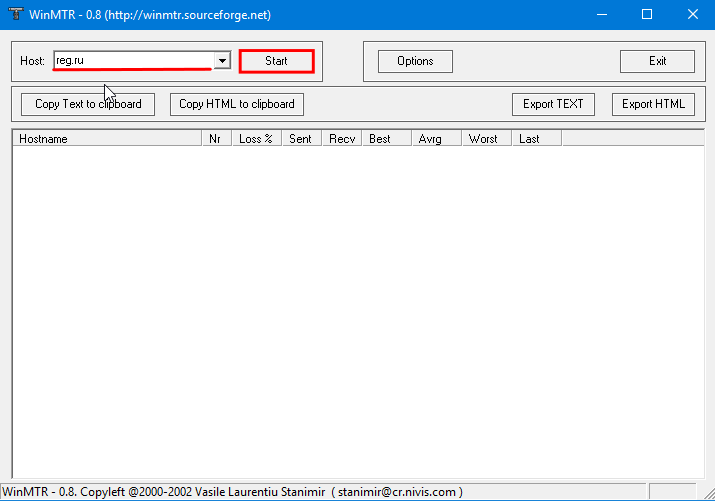
В поле «Host» введите ваше доменное имя или IP-адрес. Нажмите Start:
-
5.
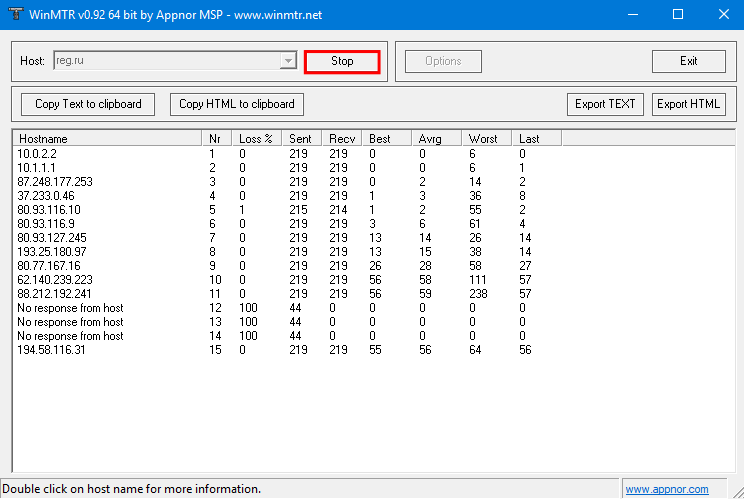
Когда число отправленных пакетов (колонка «Sent») будет более 200, нажмите Stop:
Диагностика сети Winmtr -
6.
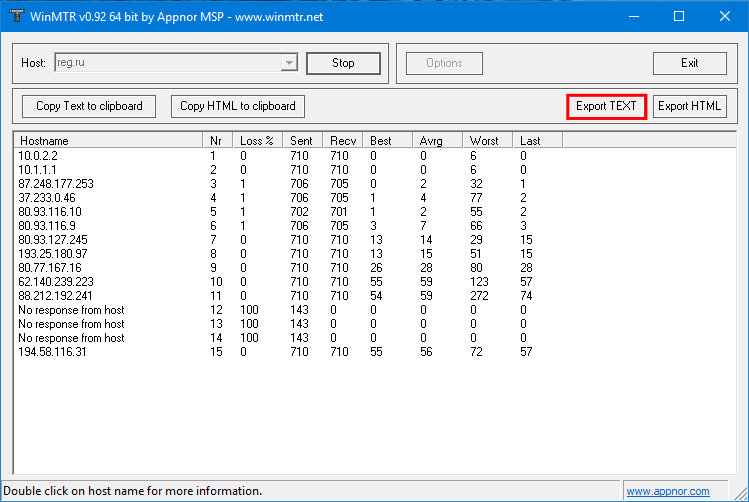
Нажмите Export TEXT и сохраните результат работы программы:
Centos: проверить открытые портыРезультат работы содержит:
- Hostname — IP-адрес или домен узла. Значение «No response from host» говорит о блокировке ICMP-пакетов в узле;
- Loss % — процент потерянных ответов от данного узла. Например, при «No response from host» процент потерь равен 100 — значит, маршрутизатор не ответил на ICMP-запрос;
- Sent — количество отправленных запросов узлу;
- Recv — количество полученных ответов от узла;
- Best — наименьшее время задержки, мс;
- Avrg — среднее время задержки, мс;
- Worst — наибольшее время задержки, мс;
- Last — время задержки последнего полученного пакета, мс.
На Linux утилита MTR установлена по умолчанию.
-
1.
Запустите терминал. Для этого в поисковой строке введите слово «Терминал» или нажмите комбинацию клавиш Ctrl+Alt+T.
-
2.
Если утилита MTR не установлена, введите команды:
- для Ubuntu/Debian:
sudo apt install mtr - для CentOS:
sudo yum install mtr - для Fedora:
sudo dnf install mtr
- для Ubuntu/Debian:
-
3.
Введите команду:
mtr -n -c 300 -r 123.123.123.123Где 123.123.123.123 — IP-адрес вашего сайта.
-
4.
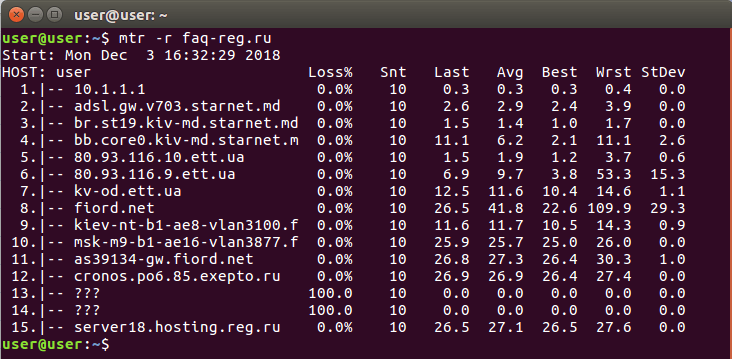
Дождитесь окончания выполнения запроса. В окне терминала вы увидите результат работы утилиты MTR:
Результат работы содержит:
- HOST — IP-адрес или домен узла. Значение «???» говорит о блокировке ICMP-пакетов в узле;
- Loss% — процент потерянных ответов от данного узла. Например, при «???» процент потерь равен 100 — значит, маршрутизатор не ответил на ICMP-запрос;
- Snt — количество отправленных запросов узлу;
- Last — время задержки последнего полученного пакета, мс;
- Avg — среднее время задержки, мс;
- Best — наименьшее время задержки, мс;
- Wrst — наибольшее время задержки, мс;
- StDev — среднеквадратичное отклонение времени задержки, мс.
В MacOS MTR не установлена по умолчанию. Чтобы установить MTR вручную:
-
1.
Запустите терминал. Для этого нажмите Cmd + Пробел, в поисковой строке введите слово «Терминал» и нажмите Enter.
-
2.
Если у вас не установлен пакетный менеджер Brew, установите его командой:
ruby -e "$(curl -fsSL https://raw.githubusercontent.com/Homebrew/install/master/install)" < /dev/null 2> /dev/nullДля выполнения команды укажите пароль пользователя. При успешном результате появится уведомление с текстом «Installation successful!»
-
3.
Затем установите MTR командой:
brew install mtr -
4.
После установки запустите MTR:
sudo /usr/local/sbin/mtr yourdomain.comГде yourdomain.com — ваш домен. Для выполнения команды также потребуется ввести пароль пользователя.
-
5.
Подождите примерно 10 минут, пока MTR отправит около 300 пакетов и соберёт информацию о задержках и потерях. В окне терминала вы увидите результат работы утилиты MTR:
Результат должен содержать:
- Host — IP-адрес или домен узла. Значение «???» говорит о блокировке ICMP-пакетов в узле;
- Loss % — процент потерянных ответов от данного узла. Например, при «???» процент потерь равен 100 — значит, маршрутизатор не ответил на ICMP-запрос;
- Snt — количество отправленных запросов узлу;
- Last — время задержки последнего полученного пакета, мс;
- Avg — среднее время задержки, мс;
- Best — наименьшее время задержки, мс;
- Wrst — наибольшее время задержки, мс;
- StDev — среднеквадратичное отклонение времени задержки, мс.
Если вы обнаружили потери на промежуточных узлах, проблемы нет. Промежуточные маршрутизаторы могут не отвечать на ICMP-запросы, а просто пропускать дальше трафик. Если же потери обнаружены на конечном узле, отправьте результат работы программы в службу поддержки. В сообщении укажите ваш внешний IP-адрес. Узнать IP-адрес можно на сайте Рег.ру.
Как просмотреть журналы сайтов
Журналы сайтов расположены в корневой директории хостинга в папке logs. Логи хостинга можно просмотреть как через хостинг-панели управления, так и по FTP и SSH. Подробнее о том, что такое логи, зачем они нужны и как их читать мы описали в статье Логи сервера.
В панели управления хостингом
- 1.
-
2.
Перейдите в Менеджер файлов, а затем в директорию logs:
-
3.
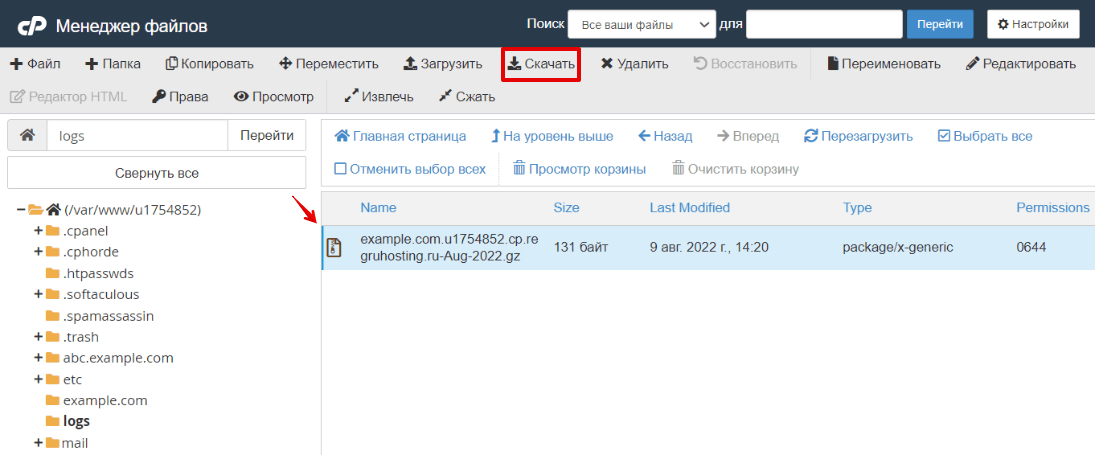
Для просмотра журнала скачайте необходимый файл на локальный ПК. Для этого выделите строку с названием журнала и нажмите кнопку Скачать:
Обратите внимание: если вид вашей панели управления отличается от представленного в статье, в разделе «Основная информация» переключите тему с paper_lantern на jupiter.
- 1.
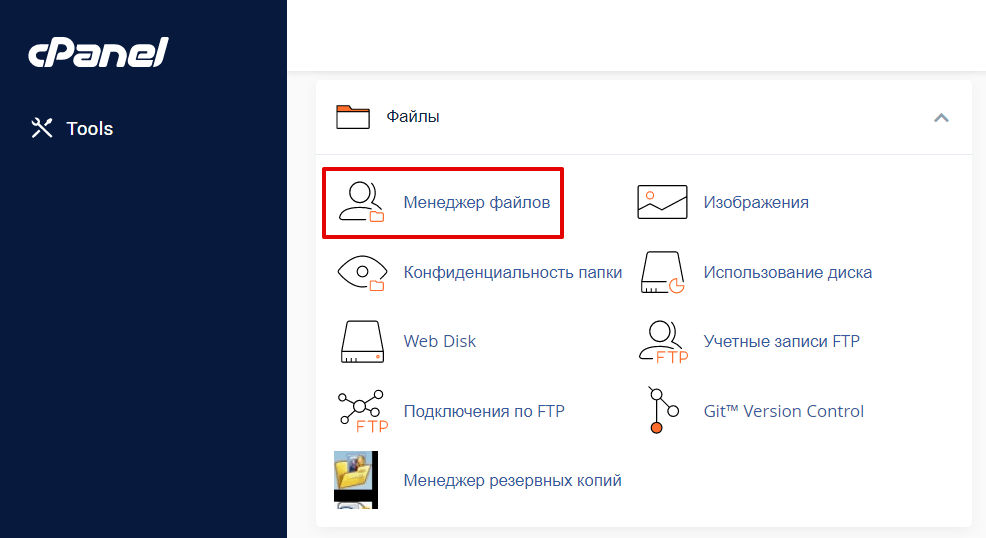
-
2.
В разделе «Файлы» нажмите Менеджер файлов:
-
3.
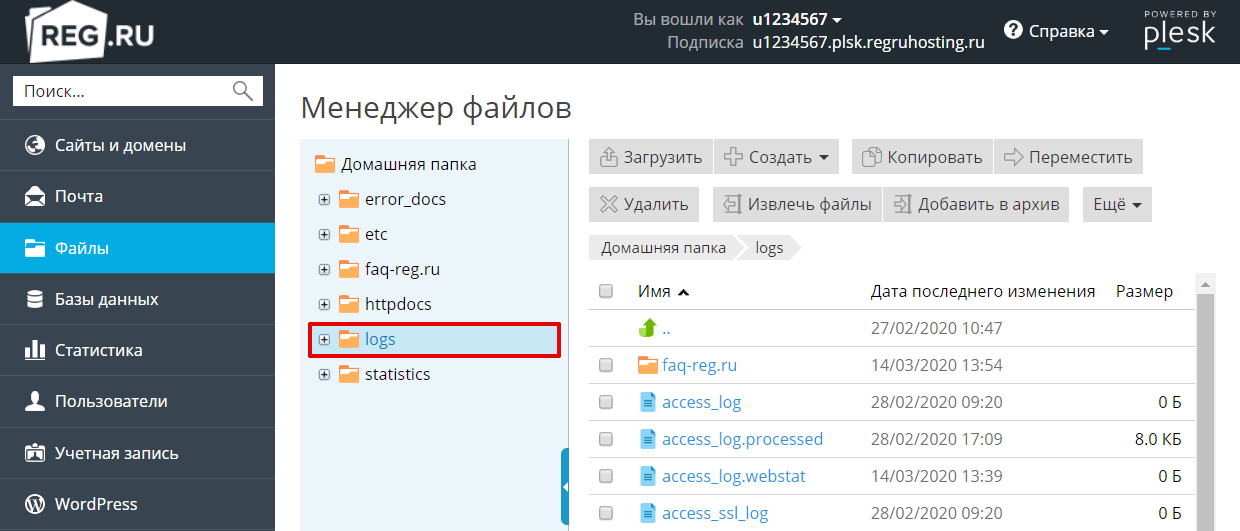
Кликните на папку logs:
-
4.
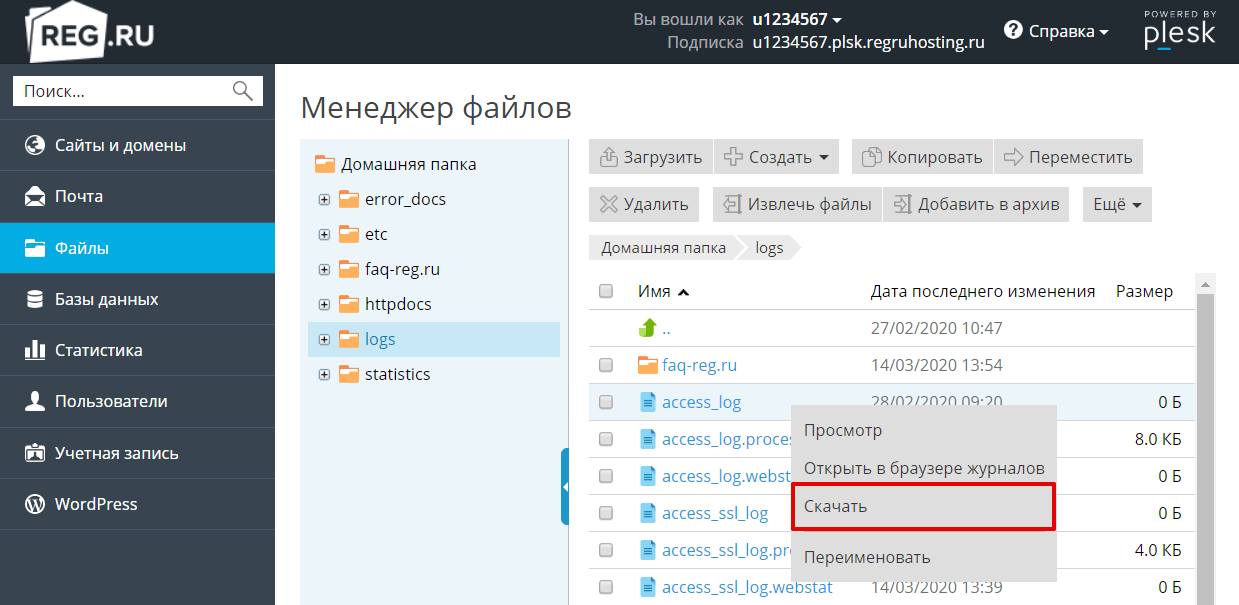
Выделите строку с названием нужного типа файла и нажмите Скачать:
- 1.
-
2.
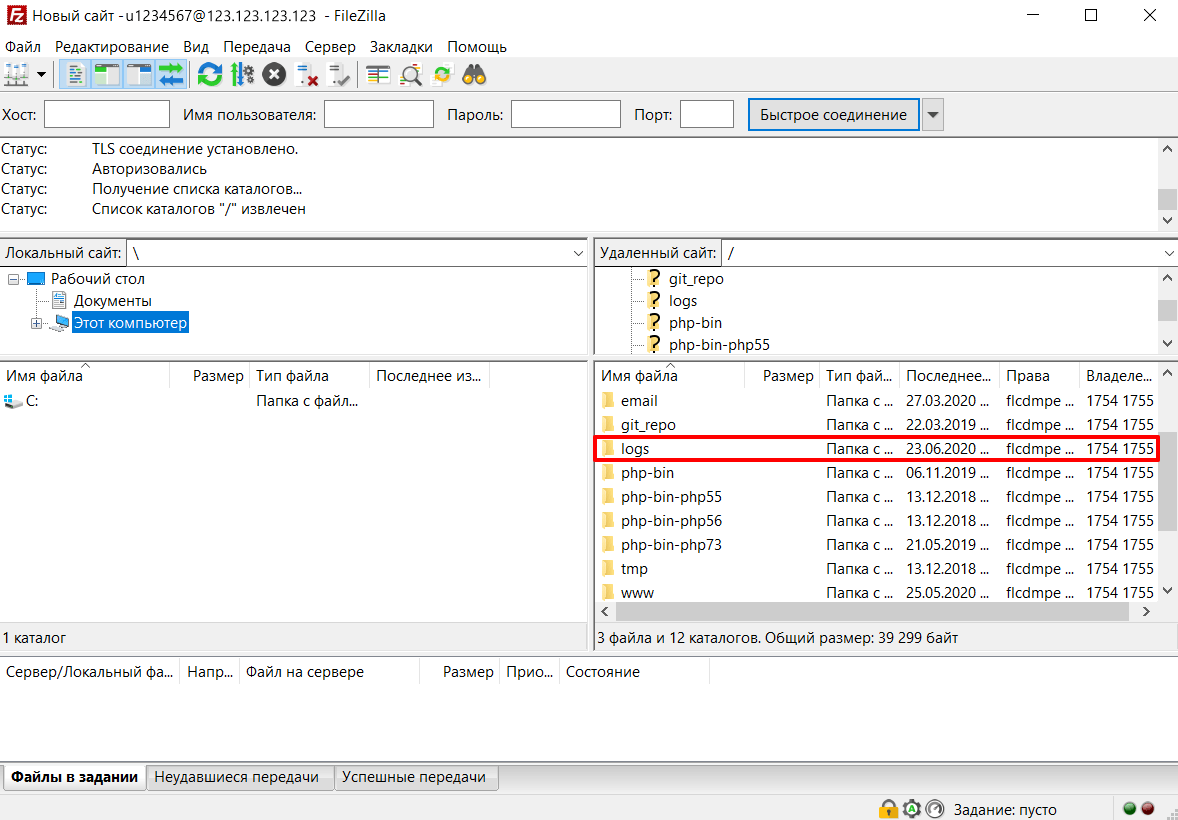
Перейдите во вкладку «Файлы», а затем в директорию logs:
-
3.
Для просмотра журнала скачайте необходимый файл на локальный ПК. Для этого выделите строку с названием журнала и нажмите кнопку Скачать:
По FTP или SSH
- 1.
-
2.
Перейдите в директорию logs:
-
3.
Откройте необходимый файл журнала:
- 1.
-
2.
Введите команды
cd logsиls -all, чтобы посмотреть содержимое папки logs:
-
3.
Откройте необходимый файл журнала.
Теперь вы знаете, как проверить, открыт ли порт на сервере, как использовать ping и traceroute, и как посмотреть логи сайта.
Помогла ли вам статья?
Спасибо за оценку. Рады помочь 😊
👍


