This PowerShell command reinstalls Windows Defender in seconds
Updated on September 22, 2022
What to Know
- You don’t need to download Windows Defender, because it’s integrated into Windows 11.
- Enter this in a PowerShell window: Get-AppxPackage Microsoft.SecHealthUI -AllUsers | Reset-AppxPackage.
- Or, go to Settings > Apps > Installed apps > Windows Security > three dots > Advanced options > Reset.
This article explains when and how to reinstall Windows Defender through the command line or Settings app in Windows 11.
How to Reinstall Windows Defender in Windows 11
Windows Defender (aka, Microsoft Defender) isn’t installed on your computer like a typical program, so you can’t reinstall it like you can regular software. Instead, follow these directions to use a PowerShell command to get the job done. It might take anywhere from 5 seconds to a few minutes to complete. If you can open Settings normally, there’s an easier method after these steps.
-
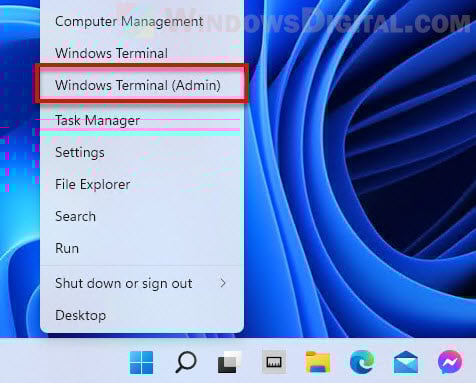
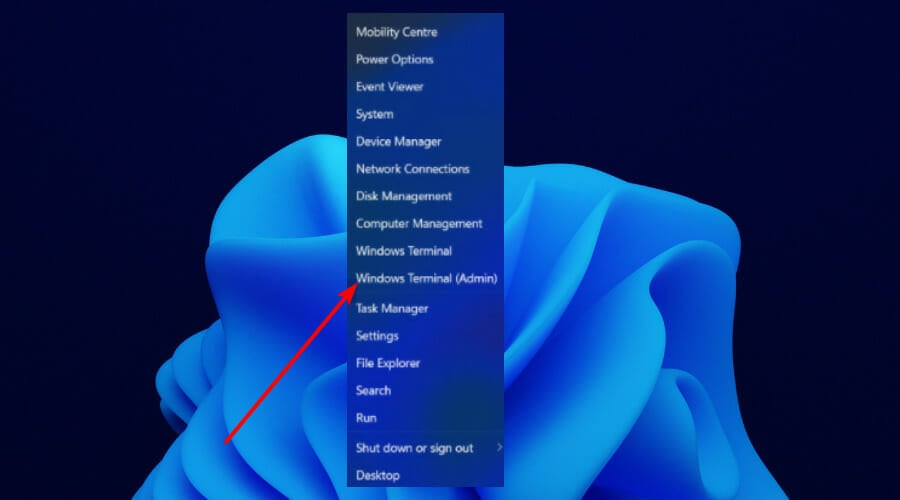
Right-click the Start button and select Terminal (Admin).
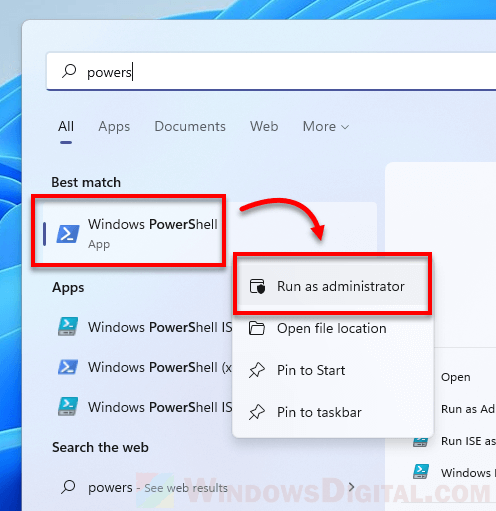
If that doesn’t work for whatever reason, use the search bar on the taskbar to search for PowerShell, and then right-click it to find the Run as administrator option.
-
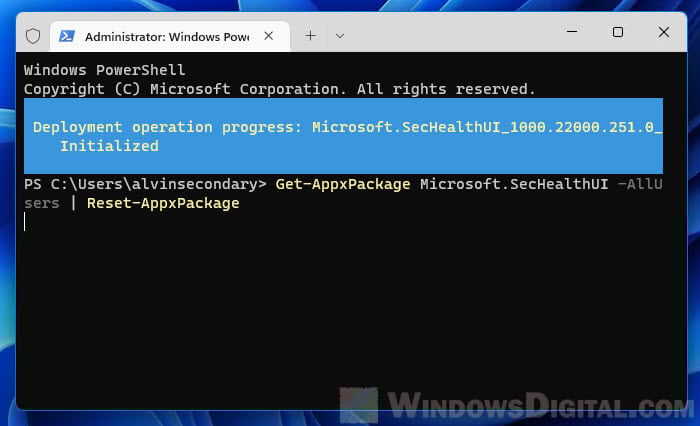
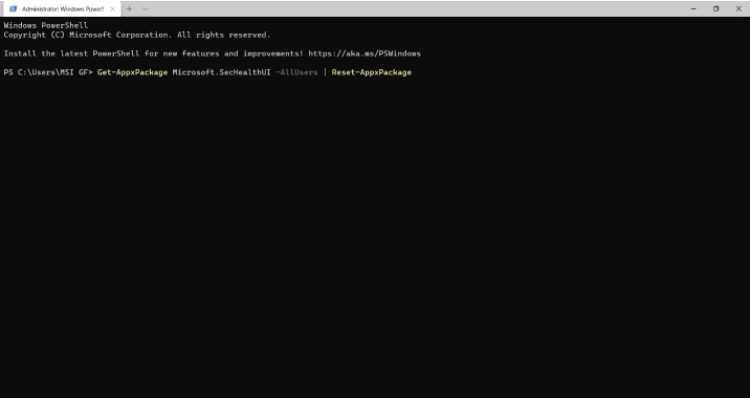
Copy the command exactly as it’s shown here, and then right-click in the PowerShell window to paste it (Ctrl+V works, too):
Get-AppxPackage Microsoft.SecHealthUI -AllUsers | Reset-AppxPackage -
Press Enter to immediately start the process to reset Windows Defender to its original settings so that it performs as a freshly installed app.
-
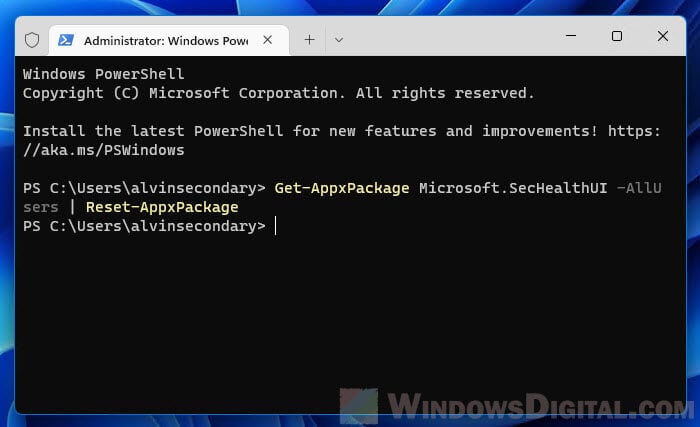
You’ll know when it’s finished because you’ll see the blinking cursor again on a new line below the command you entered. In the meantime, you might briefly see a Deployment operation progress message.
If you see lots of red text, and an «Access is denied» message, return to step 1 and make sure you’re opening PowerShell as an administrator.
Another way to reset Windows Defender is through Settings. If Settings opens fine for you, you don’t need to bother with a PowerShell command. Instead, go to Settings > Apps > Installed apps > Windows Security > three dots > Advanced options > Reset.
When to Reinstall Windows Defender
Technically, you’re not really reinstalling the program because Windows doesn’t actually let you uninstall it. That said, you might run the above command to reset Windows Defender if it’s just not working correctly.
The most obvious sign you need to do this is if you see an error when you try to open it. If it’s not opening as it should, and you see this message, the above command should fix it right away:
You'll need a new app to open this windowsdefender linkLook for an app in the Microsoft Store
Or, maybe it does open, but some of its toggles won’t turn on or off, or you can’t even find a link to it on your computer. In these cases, the PowerShell command should refresh the tool back to working order.
Windows Defender Might Just Be Off
It’s possible that you’ve considered reinstalling Windows Defender because it isn’t catching malware, when in reality, it’s just not turned on. You might think it’s been uninstalled or is broken, but really it’s just disabled.
This is completely possible since Windows 11 lets you turn off its built-in antivirus program if you’d rather not use it.
Learn how to turn Windows Defender on and off for specific directions.
FAQ
-
Is Windows Defender a good antivirus?
Not really. While Windows Defender provides basic protection from threats, it’s no substitute for third-party antivirus software.
-
How do I add exceptions to Windows Defender?
Go to Start > Settings > Privacy & Security > Windows Security > Virus & threat protection. Under Virus & Threat Protection Settings, select Manage settings, then under Exclusions, select Add or remove exclusions.
Thanks for letting us know!
Get the Latest Tech News Delivered Every Day
Subscribe
If you can’t open Windows Defender or access any of its settings, or if you have accidentally uninstalled Windows Defender, this guide will show you how to reinstall Windows Defender in Windows 11 via PowerShell command lines.
Although Windows Defender has always been the default antivirus software that comes preinstalled with Windows, some users may find the app missing after certain events such as after updating Windows or after installing or uninstalling certain third party antivirus software.
When the problem occurs and you try to open Windows Defender, Windows may prompt you the “You’ll need a new app to open this Windows Defender link” pop up that ask you to find a compatible app from Microsoft Store to open Windows Defender related link or setting. This indicates that Windows Defender is either missing or corrupted in Windows 11.
Reinstall Windows Defender in Windows 11
You can reinstall Microsoft Windows Defender in Windows 11 by executing a single line of command through PowerShell or Windows Terminal. However, you will need administrator rights to be able to execute the command.
Thus, you will need to first open Windows Terminal or PowerShell with admin rights. To do so, right-click the Start button on the taskbar and select “Windows Terminal (Admin)“.
Alternatively, you can search for PowerShell through Start menu. Then, right-click Windows PowerShell from the search result and select Run as administrator.
Once you have an elevated (admin) Windows Terminal or PowerShell window opened, enter the following command to reset and reinstall Windows Defender in Windows 11.
Get-AppxPackage Microsoft.SecHealthUI -AllUsers | Reset-AppxPackage
After executing the command, Windows Terminal will begin to reset Windows Defender and show a progress message that says “Deployment operation progress”. It may take a while for the process to complete.
Once completed, the progress message will disappear and Windows Terminal will start at a new line, which indicates the previous command has been executed.
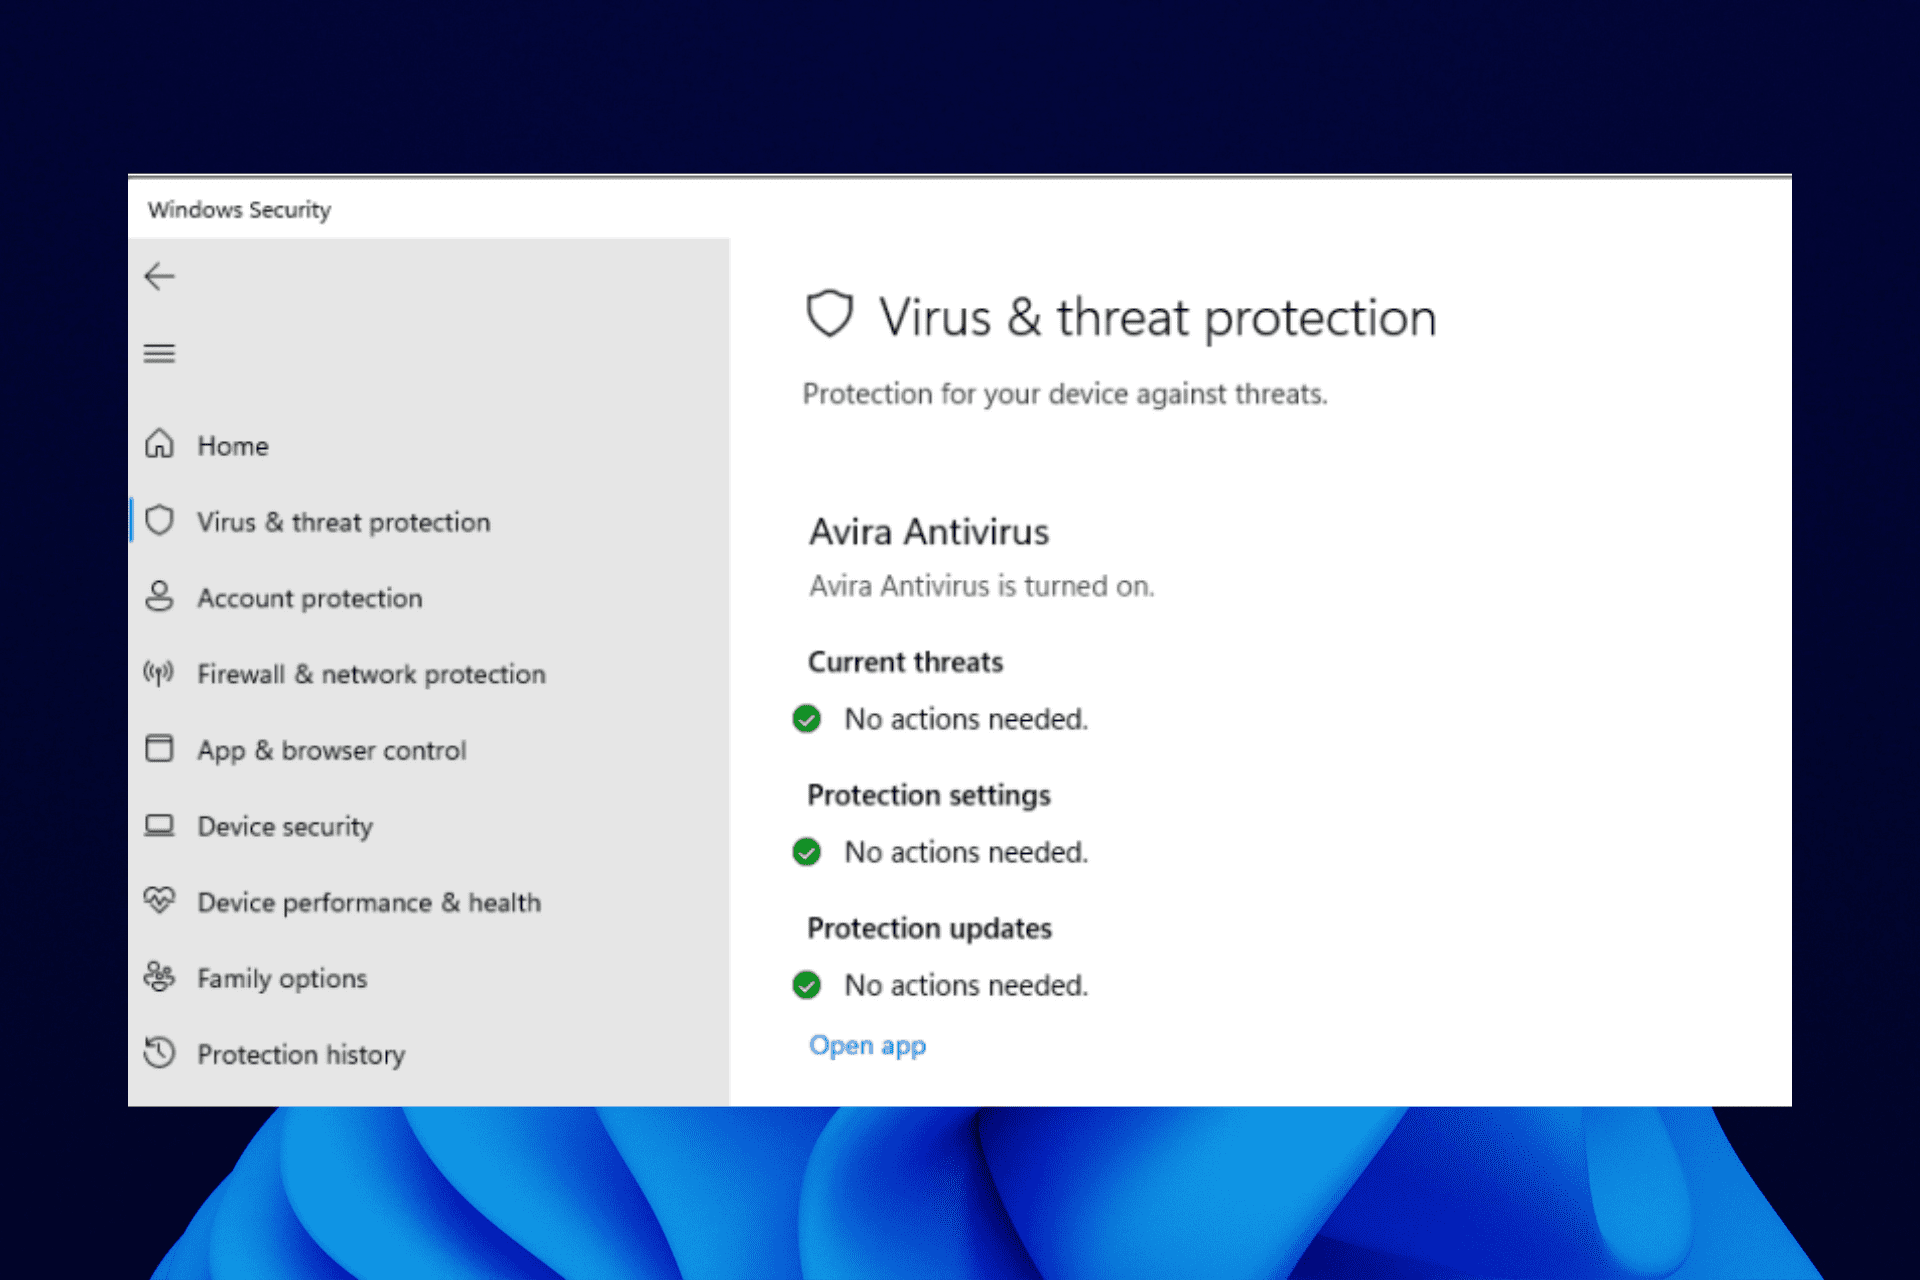
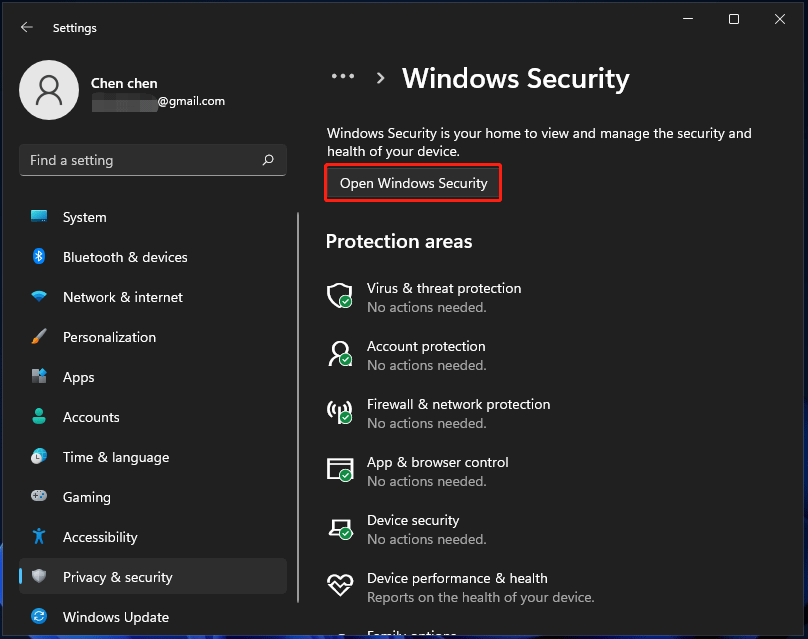
Now, you can press Win + i keys to open Settings and go to Privacy & security > Windows Security. This should open up the Windows Security (Windows Defender) settings like it used to.
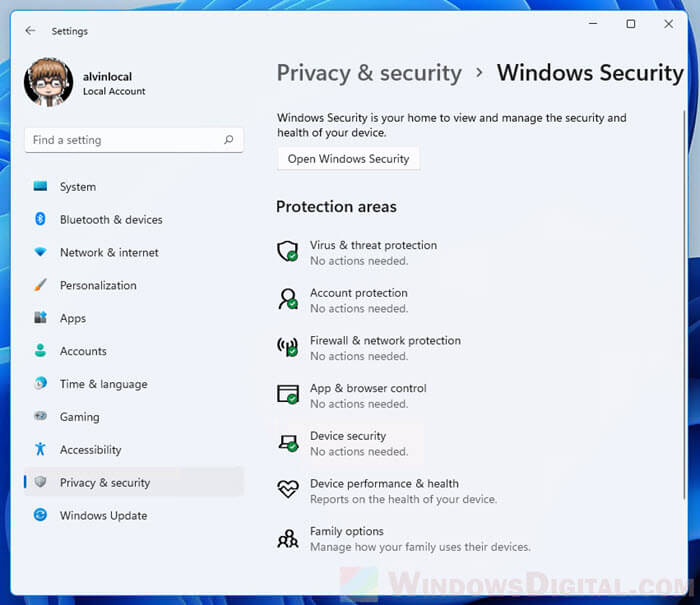
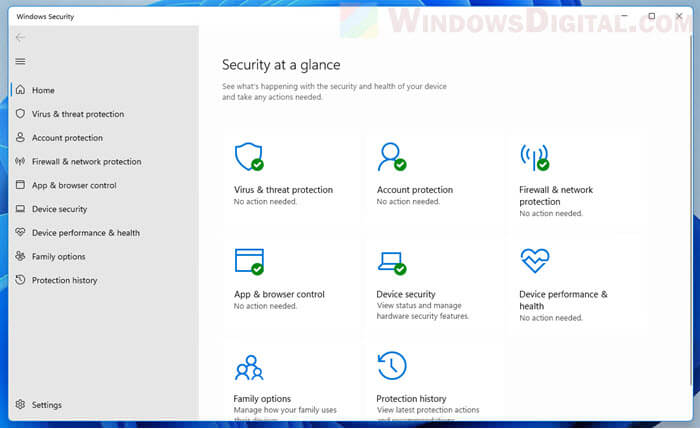
To further verify if Windows Defender is successfully installed, click on the “Open Windows Security” button to open the Windows Security window. From there, you can manage your computer’s security such as virus protection, firewall, network protection, browser control, etc.
PowerShell shows errors when executing the command
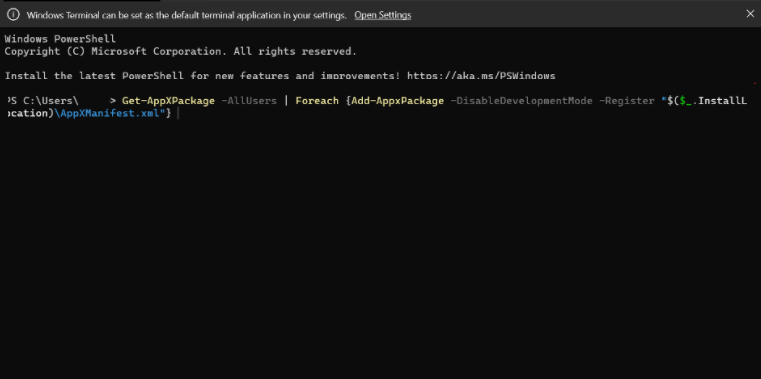
If the command above doesn’t work or if you receive errors when you execute the command, try the following commands instead to reinstall Windows Defender in Windows 11.
In an elevated (admin) Windows Terminal or PowerShell window, enter the following commands in the following order.
Set-ExecutionPolicy Unrestricted
Get-AppXPackage -AllUsers | Foreach {Add-AppxPackage -DisableDevelopmentMode -Register "$($_.InstallLocation)\AppXManifest.xml"}
Set-ExecutionPolicy Default
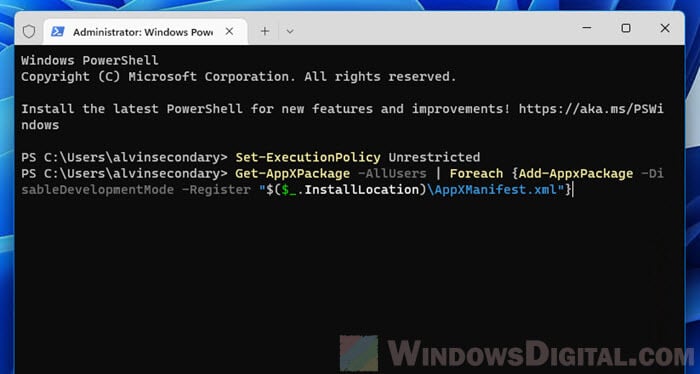
Since the command requires execution policy to be set to unrestricted in order to be executed successfully, you should set the execution policy back to its default (by running the third line of command as shown above) after the Get-AppXPackage process is completed.
If you receive an error that says “Access is denied”, it indicates that you do not have the rights to run the command. As mentioned above, you need to open Windows Terminal or PowerShell as administrator in order to execute the command successfully.
How to enable Windows Defender if you already have an existing antivirus software
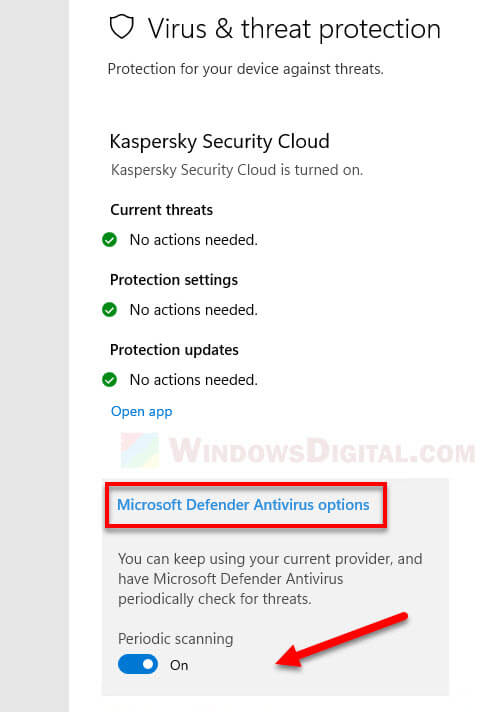
If you already have an existing third party antivirus program actively running and protecting your PC, Microsoft Defender Antivirus will be disabled. However, you can re-enable Microsoft Defender periodic scanning to have it periodically check for threats in conjunction with your other antivirus software.
To enable Windows Defender with periodic scanning when you are already using an existing third party antivirus software, open Settings and navigate to Privacy & Security > Windows Security, then click the Open Windows Security button.
Next, select Virus & threat protection and click Microsoft Defender Antivirus options. This will expand the setting and you should then be able to see a toggle option. Toggle on the Periodic scanning option to enable Windows Defender periodic scan while also using your other antivirus software.
The best solution is to simply reinstall Windows Defender
by Ola-Hassan Bolaji
A Computer Engineering graduate, he has spent most of his life reading and writing about computers. He finds joy in simplifying complex topics into simple solutions for PC… read more
Updated on
- Windows Defender has seen some significant security improvements in Windows 11.
- However, some users reported that their Windows 11 Windows Defender is missing after updating their new OS.
- To resolve this issue, reinstalling the app with PowerShell will most likely do the trick.
Windows Defender missing on Windows 11 is one of the numerous problems users face when using Microsoft’s default antivirus on their PC.
In the past, users have complained that Windows 11 Defender is turned off. But some could not even find the app on their PC at all.
Thankfully, the fixes for this problem are not far-fetched, with a little tweak needed in most cases. Read on to find out what to do if Windows Defender is not installed on your Windows 11 device.
Why can’t I find Windows Defender?
There are various reasons why Windows Defender is not found in Windows 11, but we will highlight the most important ones:
- Malware infection – Usually, the first thing a virus or malware does is disable or eliminate the antivirus. Good third-party antiviruses are harder to counter.
- The service is not running – Though Windows Defender should show up even when the service is not running, this, coupled with other issues, can make the app inaccessible.
- Registry problems – Changes to the registry, wherein Windows Defender is disabled, could be an underlying cause. The administrator could take action in case you are using an office computer.
So, let’s find out how to fix things if Windows Defender is not working in Windows 11.
Quick Tip:
If you want to protect your PC on all fronts, use a security utility with multi-layered protection. ESET Internet Security’s feature set aims to protect you from today’s cyber threats.
It includes advanced banking and payment protection, webcam and microphone security, parental controls, anti-malware, anti-ransomware, and more.
How we test, review and rate?
We have worked for the past 6 months on building a new review system on how we produce content. Using it, we have subsequently redone most of our articles to provide actual hands-on expertise on the guides we made.
For more details you can read how we test, review, and rate at WindowsReport.

Eset Internet Security
ESET technology protects every click, screen tap, and step in your digital life.
How can I fix the Windows 11 Windows Defender missing issue?
- Why can’t I find Windows Defender?
- How can I fix the Windows 11 Windows Defender missing issue?
- 1. Install Windows Defender Using PowerShell
- 2. Repair and reinstall Windows Defender
- 3. Perform a Windows update
- 4. Perform a System Restore
- Does Windows 11 have a built-in antivirus?
1. Install Windows Defender Using PowerShell
Using the commands below via Powershell should reinstall Windows Defender on your Windows 11 PC and solve the missing issue in no time.
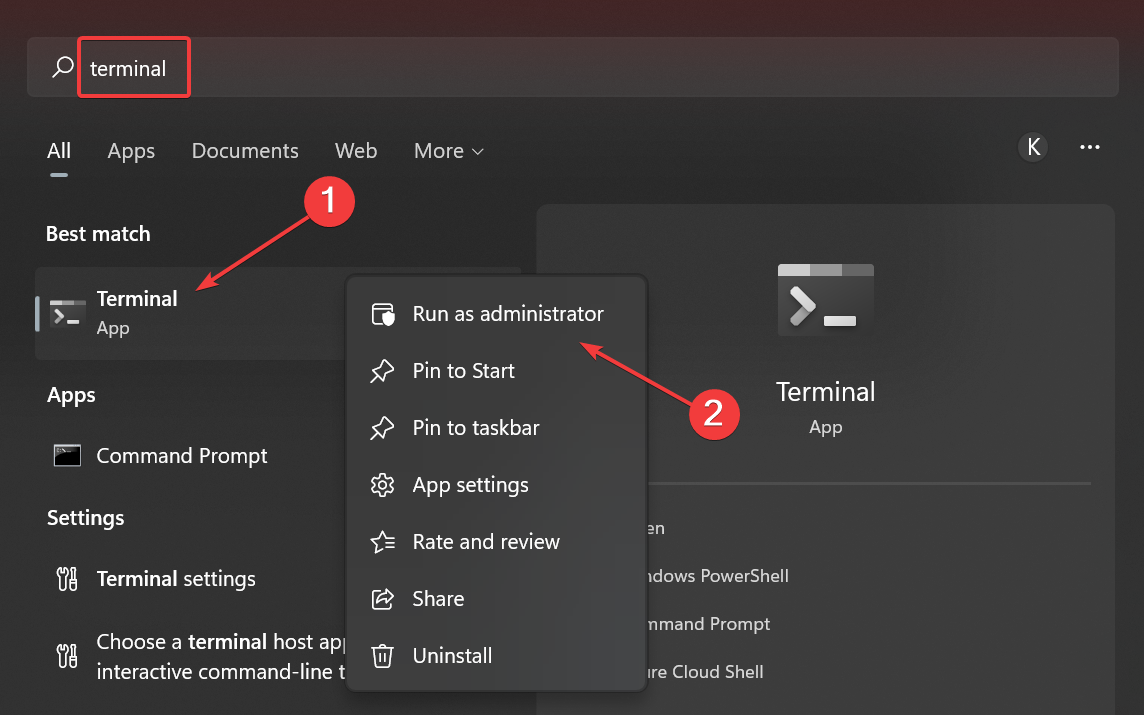
1.Right-click on the Start icon in the Taskbar, and then select the Windows Terminal (Admin) option.
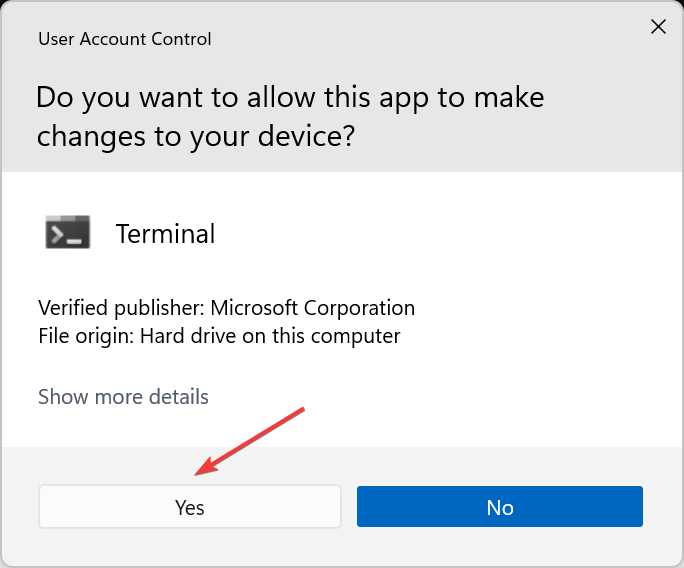
2.Click the Yes button to allow Windows Terminal to make changes to your PC.
3. Paste the following commands individually and hit Enter after each:Set-ExecutionPolicy UnrestrictedGet-AppXPackage -AllUsers | Foreach {Add-AppxPackage -DisableDevelopmentMode -Register "$($_.InstallLocation)\AppXManifest.xml"}
The command above helps to reinstall all default Windows apps. This is especially useful if Windows Defender is not installed in Windows 11 due to file corruption during an upgrade.
2. Repair and reinstall Windows Defender
- Press Windows + S to open the Search menu, enter Terminal in the text field, right-click on the relevant search result, and select Run as administrator.

- Click Yes in the UAC prompt.

- Type/paste the following command and hit Enter:
Get-AppxPackage Microsoft.SecHealthUI-AllUsers | Reset-AppxPackage
Sometimes, Windows Defender might be installed, but the installation is either incorrect or incomplete. The command above will remove all components from the PC and reinstall Windows Defender in Windows 11.
- Fix: Monitor is Stuck at 60Hz on Windows 11
- How to Type Accents on Windows 11
- Fix: EXCEPTION_ILLEGAL_INSTRUCTION Error on Windows 11
- Delayed Write Failed Error on Windows 11: How to Fix it
- How to Remove Windows Copilot on Windows 11
3. Perform a Windows update
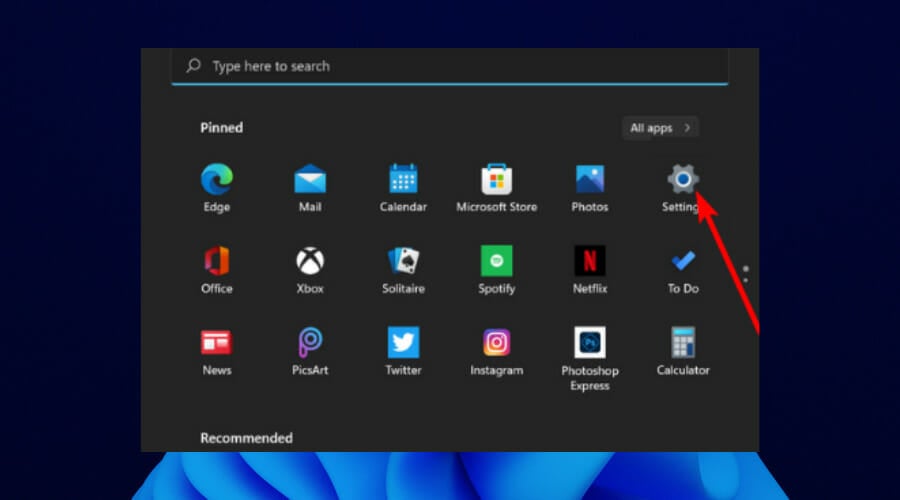
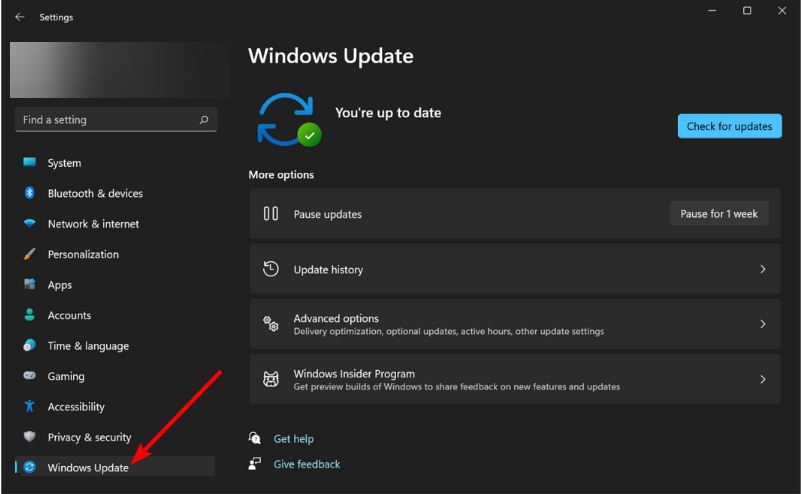
- Press the Windows key, and select the Settings app.

- Select the Windows Update option on the left pane.

- Click the Check for updates button in the right pane.

- If an update is listed after the scan, download and installs it on the computer.
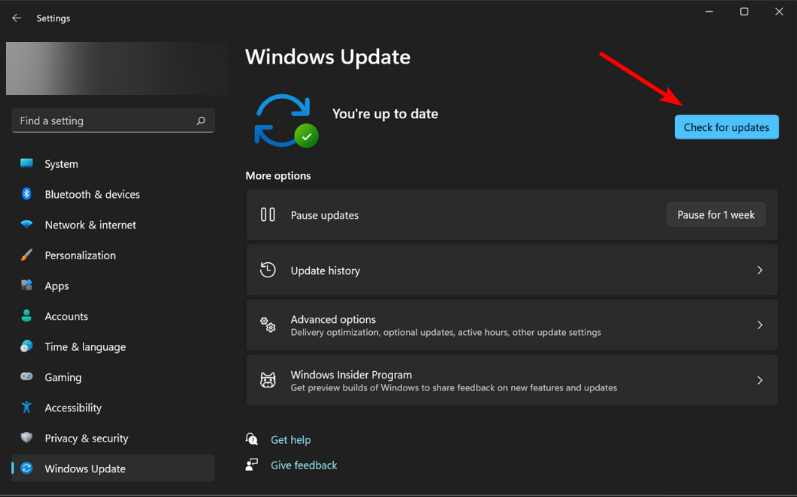
Windows update comes with fixes for bugs and other errors in the previous versions.
If Windows Security is missing in Windows 11, an update should have fixes for the bugs responsible for the error. Also, if it is due to an incomplete or incorrect update, this should solve the problem if done correctly.
4. Perform a System Restore
- Press Windows + R to launch the Run command, enter rstrui.exe in the text field, and click OK.

- Select Next in the System Restores window to proceed.

- Choose a restore point from the options provided, and click Next.
- Verify the restore details, and click on Finish to initiate the restore process.
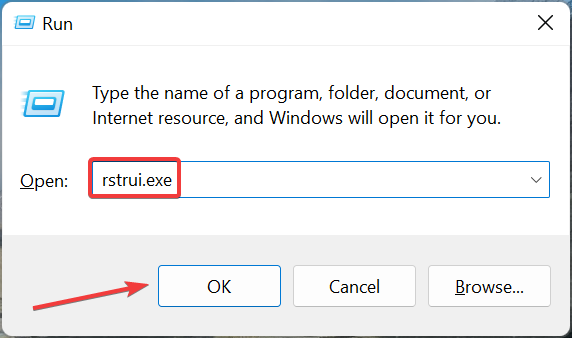
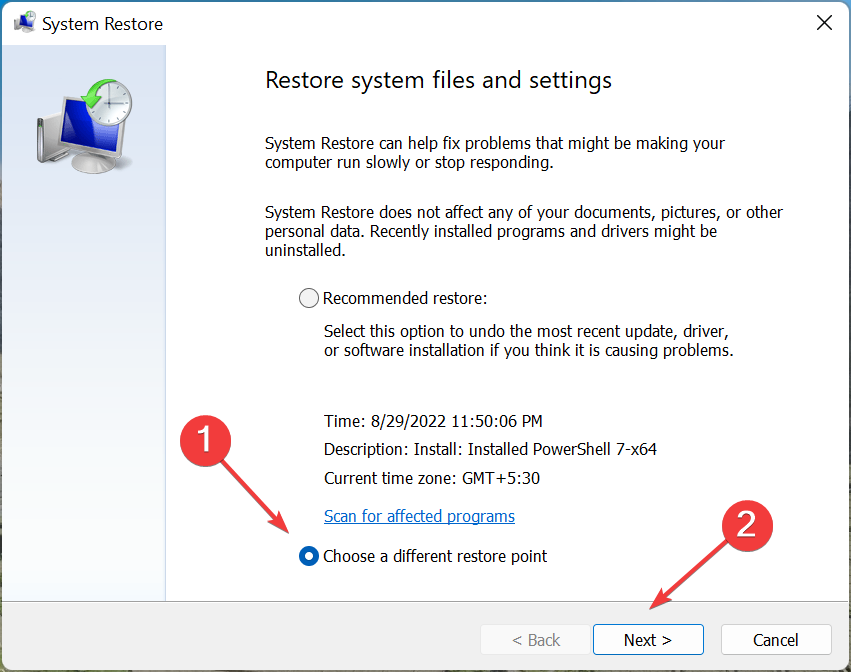
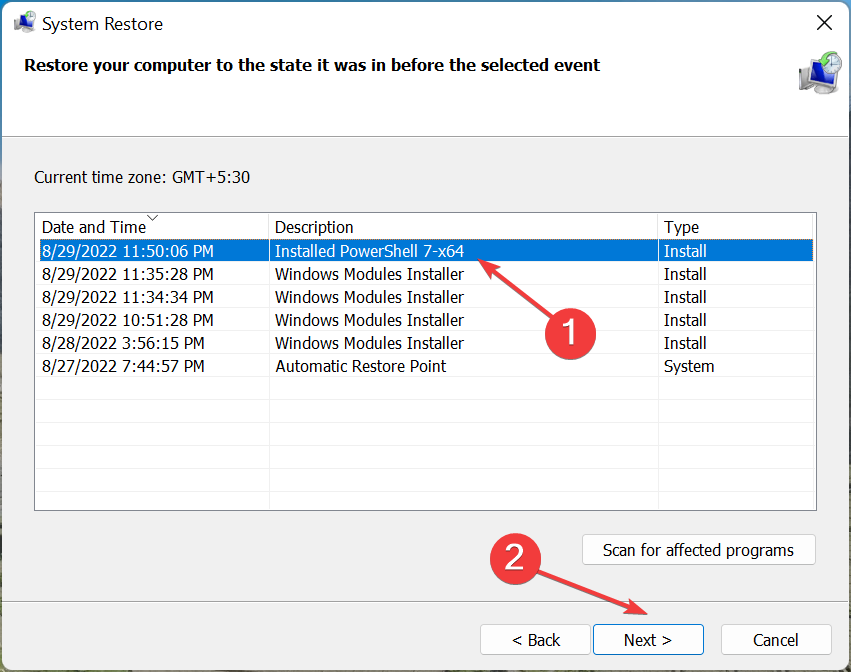
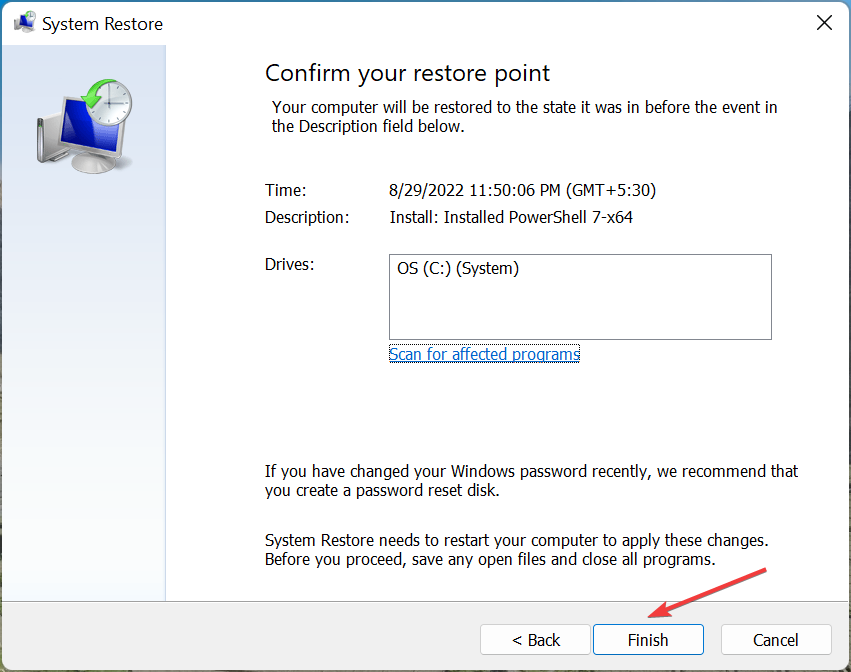
If you noticed the Windows Defender link missing after installing an update in Windows 11 or making changes to the system, this fix could help you return to the previous state.
Select a restore point created before installing the new update, and things should return to normal.
Does Windows 11 have a built-in antivirus?
Yes, Windows 11 comes with Windows Security as the built-in antivirus. In case you are confused between the two, Windows Defender and Windows Security are the same thing.
The program efficiently identifies and eliminates malware and performs other essential functions to ensure security. But, in case you were looking for advanced security, we recommend using an effective third-party antivirus.
The Windows 11 Defender not installed problem is not the first faced by users. There have been complaints that Windows Defender is not opening or not enabled, among other issues.
Unlike some of these issues, this problem is not hard to fix, as shown above. We hope you find the helpful guide and get Windows Defender back to protect your PC.
Also, if you are wondering, Windows Defender can be downloaded from the Microsoft Store. This will download the Windows Defender 64-bit version in Windows 11.
Besides, find out what to do if you get the You’ll need a new app to open this windowsdefender link error in Windows 11
Feel free to discuss the solution that worked for you in the comments section. You can also state any solution you tried successfully that is not in this guide.
![]()
Windows 11 Windows Defender not working is a common problem. If you cannot use it to protect your PC against viruses and malware attacks, some troubles may come to you. What should you do to fix Windows 11 Security not working to get real-time protection? Refer to this post and MiniTool will show you some possible methods.
Windows Defender Not Working Windows 11
Windows Security, usually known as Windows Defender, is an excellent antivirus program that comes with Windows 11 by default. As one of the best antivirus apps, it can run properly in most situations to protect your PC from threats like viruses, spyware, malware attacks, and more.
To use it, you won’t need to download Windows Security in Windows 11 but you are required to enable it in Settings. Just press Win + I to open Windows 11 Settings, go to Privacy & security > Windows Security > Open Windows Security. (Related article: How to Enable or Disable Microsoft Defender in Windows 11)
However, due to some reason, you may find Windows Defender is not working or starting/turning on in Windows 11 or Windows Defender Windows 11 missing. Sometimes you get a message saying “unexpected error”; sometimes you get a pop-up saying “you’ll need a new app to open this windowsdefender link”. Or sometimes you get other errors. No matter which situation you have, you cannot use Windows Defender for PC protection as normal.
Fixing Windows Security not working in Windows 11 is an urgent thing since viruses and malware may affect your computer. Fortunately, it is not a difficult task to solve this issue if you follow the methods below.
Fixes for Windows 11 Windows Defender Not Working
Set Date and Time Correctly
A common reason why Windows Defender won’t start/work is an incorrect time and date since most system features depend on time and date. So, make sure your date and time are set correctly.
Step 1: Click the Start icon from the Taskbar in Windows 11 and choose Settings to open this app.
Step 2: Move to the Time & language tab on the left side and click Date & time in the right pane.
Step 3: Click the Change button to set the correct time and date.
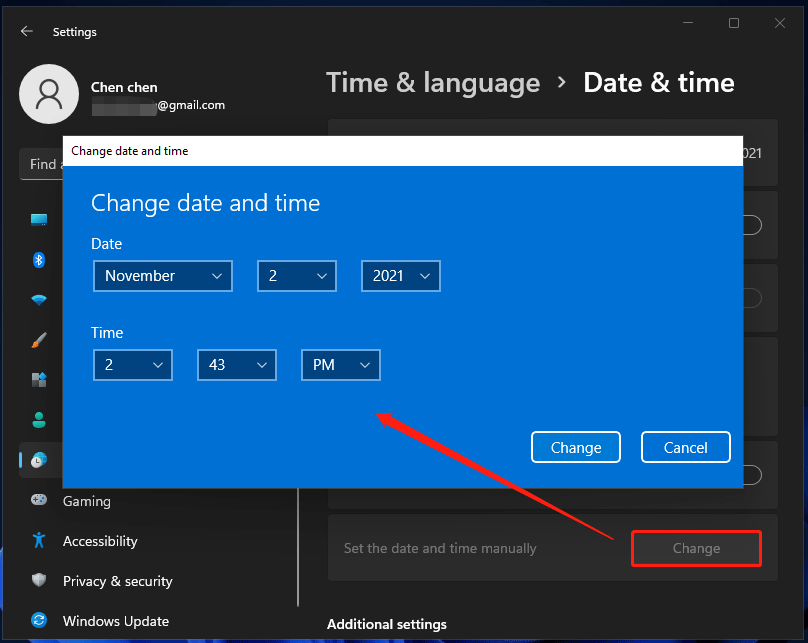
Tip: In addition, you can set date and time in other methods, and here is a related article – [3 Ways] How to Change Date and Time & Sleep Time on Windows 11.
Restart Security Center Service
Windows Defender service not running may be another reason why Windows Security is not working or operating in Windows 11. To fix Windows 11 Windows Defender not working, make sure the service is running properly.
Step 1: To get the Run dialog, press Win + R.
Step 2: Type services.msc into the textbox and click OK to open Services.
Step 3: Go to find the Security Center service from the right pane, right-click it and choose Restart.
Besides, you should also check these services – Windows Defender Advanced Threat Protection, Windows Defender Firewall, Windows Defender Antivirus Network Inspection Service, and Windows Defender Antivirus Service and make sure they are running.
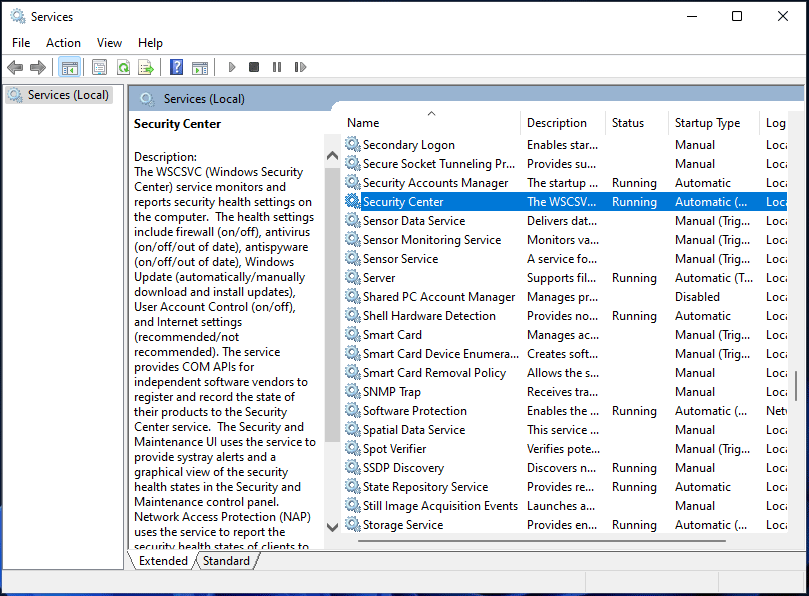
Step 4: Double-click each service to open the Properties window and set the Startup type to Automatic.
After that, go to check if Windows Defender can work. If it is still not working as normal, try other methods below.
Update Windows 11 to the Latest Version
Sometimes Windows Defender Windows 11 missing or Windows 11 Security not working appears due to the bugs in the certain Windows versions. To fix it, you can update it to the latest version to see if the issue is resolved.
Step 1: Click Start > Settings to get Windows 11 Settings interface.
Step 2: Go to Windows Update in the left sidebar and click Check for updates.
Step 3: If the system checks for some available updates, download and install them on your Windows 11 PC. Then, you may be able to run Windows Defender for PC protection against viruses and threats.

Disable or Uninstall Third-Party Security Software
If you also install a third-party antivirus program, it may interface with Windows Defender. If you want to run this app to keep your PC safe without having any conflicts, you had better disable or uninstall the third-party antivirus software from your Windows 11 PC.
After uninstalling the antivirus, reboot your PC and try to run Windows Defender to see if it can work properly.
Tip: A simple uninstallation sometimes cannot completely remove programs and some entries are saved in registry. You can follow this post – How to Remove Remnants of Uninstalled Software? Try These Ways to remove them.
Run an SFC Scan
Performing an SFC scan is a fast and straightforward solution to fix the issue of Windows Security not working Windows 11. System File Checker (SFC) can be used to check and fix system file corruption. This means if Windows Defender stops working due to faulty files, the scan can fix this issue.
Step 1: Type cmd to the search box and right-click on Command Prompt to choose Run as administrator.
Step 2: In the CMD window, type in sfc /scannow and press Enter to execute this scanning task.

After the verification is 100% complete, restart your PC and see if Windows Defender can work well.
Perform a Clean Boot
The running third-party services and programs may interrupt Windows, leading to Windows 11 Windows Defender not working. To get rid of the trouble, you can try to perform a clean boot.
Step 1: Open the Run window by pressing Win + R, type msconfig, and click OK.
Step 2: Under the Services tab, tick the checkbox of Hide all Microsoft Services.

Step 3: After that, click Disable all to disable all the services except Microsoft services.
Step 4: Go to the Startup tab and click Open Task Manager.
Step 5: Choose programs individually and click Disable to disable them to fix Windows Security not working in Windows 11.
Make Changes in Your Registry
If Windows Defender won’t start or work after trying many solutions, you can try to change Registry settings. Before you do, you had better back up your registry keys in Windows 11 to avoid system corruption due to mistaken operations.
Step 1: Type regedit to the search box and click Registry Editor.
Step 2: Go to this path: Computer\HKEY_LOCAL_MACHINE\SOFTWARE\Policies\Microsoft\Windows Defender.
Step 3: Locate DisableAntiSpyware in the right pane. If it is not here, right-click Windows Defender and choose New > DWORD (32-bit) Value to create it.
Step 4: Double-click this key and set its value data to 0.

Repair or Reset Windows Security Windows 11
If Windows Security is not working in Windows 11, another solution you can try is to repair or reset this app by following the steps below.
Step 1: Launch the Windows Settings app by pressing Win + I.
Step 2: Click App > App & features.
Step 3: Scroll down to find Windows Security, click the three-dot menu and choose Advanced options.
Step 4: In the new window, go to the Reset section, click Repair to repair it. If this cannot work, click Reset to reset this app.

Reset This PC
If all of these methods cannot fix Windows 11 Windows Defender not working, the last solution you can try is to reset your PC to its factory settings. To do this task, go to Settings > System > Recovery > Recovery options > Reset this PC. Then, choose an option based on your need and finish the resetting operation by following the instructions on the screen.
To know more information about PC resetting or reinstallation, refer to this post – How to Reinstall Windows 11? Try 3 Simple Ways Here Now!
“Is Windows Defender not working in Windows 11 or Windows 11 Security not working? Try these solutions to fix it. Or, you can share them with your friends on Twitter.”Click to Tweet
Suggestion: Back up Your PC
After trying the methods above, you should run Windows Security properly to protect your PC from malicious programs, viruses, and some other threats. In practice, only running antivirus is not enough to keep your PC safe. From this post – Is Windows Defender Enough? More Solutions to Protect PC, you know the reasons.
To prevent your PC’s data loss due to malware and virus attacks, you can choose to make a full backup for them. Besides, you had better create a system image to avoid system breakdown due to virus infection.
Well then, how can you back up your computer in Windows 11? A professional PC backup software should be your good assistant. Here, we strongly recommend using MiniTool ShadowMaker.
This backup software is compatible with Windows 11/10/8/7 and can be used to back up your files, folders, disks, partitions, and Windows systems. In addition, you can use it to clone a hard drive to another disk for disk upgrade or the entire disk backup. Besides, data sync is also supported. Importantly, you can use it to only create backups for the changed or newly added data without taking much disk space.
Now, get MiniTool ShadowMaker by clicking the following download button and install it on your Windows 11 PC for backup.
MiniTool ShadowMaker TrialClick to Download100%Clean & Safe
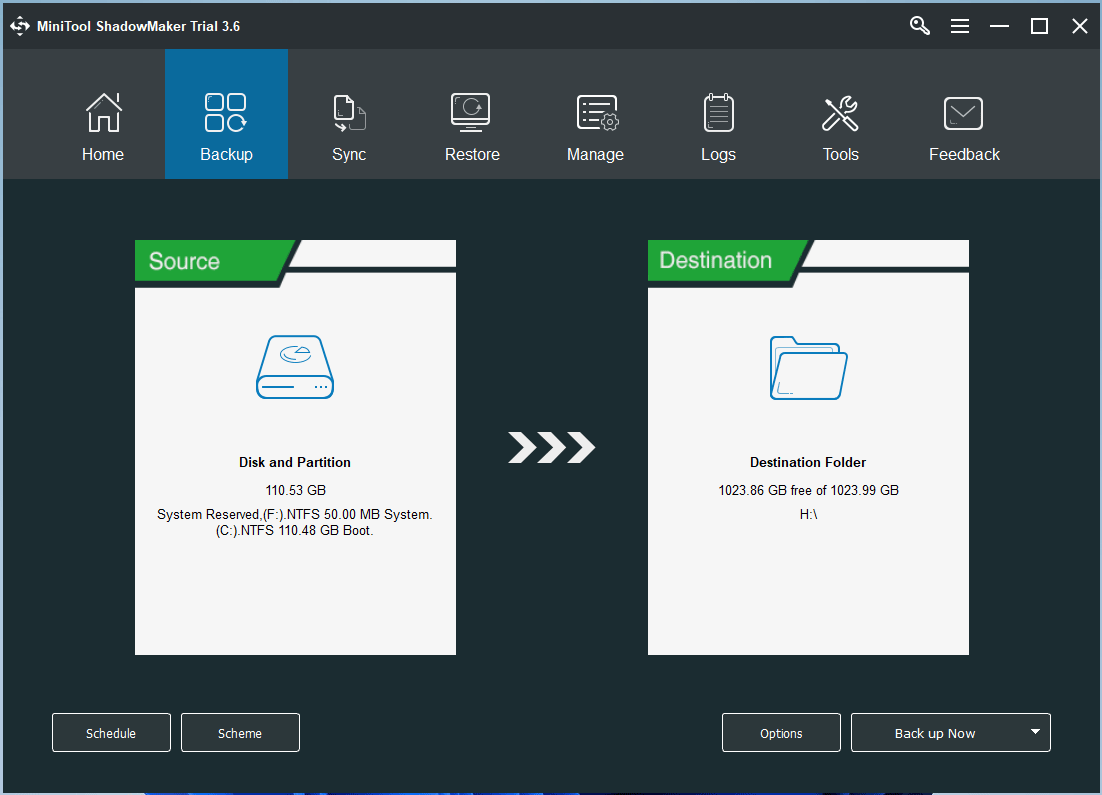
Step 1: Double-click the icon of this software to launch it.
Step 2: Click Backup and you can see this software backs up the system by default. To create a system image, you can directly go to choose a destination path to continue. If you need to back up files, click Source to go to choose files you need.
Step 3: After selecting backup source and destination, click Back up Now to execute the backup task immediately.
Tip: In addition to using MiniTool ShadowMaker to back up your PC in Windows 11, you can try other ways. Just refer to this post – How to Back up Windows 11 (Focuses on Files & System) to know more.
Other Tips to Keep PC Safe
In addition to backing up your files or system, there are some other measures you can take to keep your PC safe:
- Don’t Visit Suspect Websites
- Turn on SmartScreen Filter
- Keep Your Windows Up-to-Date
- Use a Firewall App
- Pay Attention to Your Downloaded Files
- To know more, refer to this post – How to Protect Your Computer from Viruses? (12 Methods).
Wrapping Things up
Is Windows 11 Windows Defender not working or Windows 11 Security not working? After reading this post, you should know how to get rid of this issue. Just try these solutions above to fix your issue. Besides, you had better take some measures to make sure the security of your PC.
If you have any issues or suggestions, you can leave a comment in the following section or send an email to [email protected].