![]()
Загрузить PDF
![]()
Загрузить PDF
Из этой статьи вы узнаете, как в Windows копировать отдельные файлы и файлы из папки с помощью командной строки.
-

1
Определите, где находится файл. Необходимо выяснить, в каком каталоге хранится файл, чтобы указать его в командной строке.
- Чтобы найти каталог, в Проводнике перейдите в папку с файлом, а затем щелкните по адресной строке в верхней части окна Проводника.
- Большинство файлов находится в следующем каталоге: [буква диска]:\Пользователи\[имя пользователя] (например, «C:\Пользователи\Иван»). В этом каталоге хранятся практически все файлы, созданные пользователем.
- Например, файл на рабочем столе находится в следующем каталоге: «C:\Пользователи\Иван\Рабочий стол», а файл в папке «Документы» в каталоге «C:\Пользователи\Иван\Документы».
-
2
Запишите имя файла. Это необходимо, чтобы скопировать файл. Имейте в виду, что командная строка учитывает регистр букв, поэтому правильно запишите имя файла.
-
3
Откройте меню «Пуск»
. Нажмите на логотип Windows в нижнем левом углу экрана.
-
4
Введите командная строка. Начнется поиск утилиты «Командная строка».
-
5
Нажмите «Командная строка»
. Вы найдете этот значок в верхней части меню «Пуск». Откроется окно командной строки.
- Имейте в виду, что на общедоступном компьютере (например, в школе) вы не сможете открыть командную строку.
Реклама


-
1
Введите команду для перехода в другой каталог. Введите cd, а затем нажмите Пробел; клавишу ↵ Enter не нажимайте.
-
2
Введите каталог, в котором находится нужный файл.
-
3
Нажмите ↵ Enter. В командной строке вы перейдете в указанный каталог.
-
4
Введите команду для копирования файла. Введите copy, а затем нажмите Пробел; клавишу ↵ Enter не нажимайте.
-
5
Введите имя файла. Введите имя файла, а затем нажмите Пробел. Имя файла введите с расширением файла (например, .txt в случае текстового файла). Клавишу ↵ Enter не нажимайте.
- Если в имени файла есть пробелы, заключите их в кавычки. Например, имя файла «Pickles are Good.txt» в командной строке нужно ввести так: Pickles" "are" "Good.txt.
-
6
Введите конечный каталог. Введите каталог (например, C:\Пользователи\[ваше имя пользователя]\Рабочий стол, в который будет скопирован файл.
- Если не ввести конечный каталог, файл будет скопирован в ваш персональный каталог (например, «C:\Пользователи\[ваше имя пользователя]»).
-
7
Нажмите ↵ Enter. Файл будет скопирован в указанный каталог. Чтобы открыть скопированный файл, перейдите в соответствующий каталог в окне Проводника.
Реклама


-
1
Перейдите в каталог с папкой. Введите cd, нажмите Пробел, введите каталог с папкой и нажмите ↵ Enter.
- Например, чтобы скопировать файлы из папки «Example», которая находится на рабочем столе, введите каталог C:\Пользователи\Иван\Рабочий стол.
-
2
Введите команду robocopy. Введите robocopy, а затем нажмите Пробел; клавишу ↵ Enter не нажимайте.
-
3
Введите имя папки. Введите имя папки, файлы из которой вы хотите скопировать, а затем нажмите Пробел. Клавишу ↵ Enter не нажимайте.
- Если в имени папки есть пробелы, заключите их в кавычки.
-
4
Введите конечный каталог. Введите каталог, в который вы хотите скопировать файлы из папки.
- Если в исходной и конечной папках много файлов, они перемешаются, потому что сама исходная папка скопирована не будет.
-
5
Нажмите ↵ Enter. Файл из исходной папки будут скопированы в конечную папку.
Реклама


Советы
- Чтобы скопировать все файлы, которые находятся в каталоге, введите команду copy *[тип файла] (например, copy *.txt).
- Чтобы создать конечную папку и скопировать в нее сразу несколько файлов, введите каталог конечной папки (включая саму конечную папку) в сочетании с командой «robocopy».[1]
- Если скопировать файлы, которые находятся на рабочем столе, в новую папку, она будет переименована в «Рабочий стол».
Реклама
Предупреждения
- Копировать файлы и папки через командную строку довольно рискованно, если вы не знаете, что делаете. Не трогайте папки и файлы, назначение которых вам неизвестно.
Реклама
Об этой статье
Эту страницу просматривали 212 054 раза.
Была ли эта статья полезной?
При работе в командной строке (cmd) часто возникает необходимость скопировать файл или целую папку. Также консольные команды для копирования могут использоваться в BAT-файлах для резервного копирования и других задачах.
В этой статье мы расскажем о том, как скопировать файл или папку в командной строке Windows. Статья будет актуальной для всех версий Windows, включая самые новые Windows 11 и Windows 10.
Как скопировать файл через командную строку Windows
Для копирования файлов в командной строке Windows нужно использовать команду «copy». Данная команда позволяет скопировать один или несколько файлов из одной папку в другую. Обратите внимание, команда «copy» копирует только файлы. Для копирования вложенных папок нужно использовать команду «xcopy», которую мы рассмотрим ниже.
В самом простом случае команда для копирования файлов выглядит так:
copy [исходный файл] [новый файл или папка назначения]
Например, чтобы скопировать файл «file1.txt» из текущего каталога в папку «e:\tmp» нужно выполнить:
copy file1.txt e:\tmp

При необходимости для копируемого файла можно указать новое название в папке назначения. Например, чтобы скопировать «file1.txt» из текущего каталога в папку «e:\tmp» и при этом назвать его «newfile.txt» нужно выполнить:
copy file1.txt e:\tmp\newfile.txt

С указанием полных путей команда копирования будет выглядеть так:
copy d:\tmp\file1.txt e:\tmp\file.txt

Для копирования большого количества файлов в названиях можно использовать маски. Символ звездочка (*) обозначает любое количество любых символов, а знак вопроса (?) – один любой символ. Например, чтобы скопировать все документы с расширением TXT из текущего каталога в папку «e:\tmp\» нужно выполнить следующее:
copy *.txt e:\tmp\

Также с помощью команды «copy» можно скопировать все содержимое одной папки в другую. Например, в случае копирования всех файлов из папки «d:\tmp\» в папку «e:\tmp» команда будет выглядеть так:
copy d:\tmp\ e:\tmp

В данном случае из папки «d:\tmp\» будут скопированы только файлы. Для копирования вложенных папок нужно использовать «xcopy».
Полный синтаксис команды «copy» выглядит так:
copy [/d] [/v] [/n] [/y | /-y] [/z] [/a | /b] <source> [/a | /b] [+<source> [/a | /b] [+ ...]] [<destination> [/a | /b]]
Полный список параметров для команды «copy»:
| Параметр | Описание |
| /d | Сохранение копируемых зашифрованные файлов в расшифрованном виде в месте назначения. |
| /v | Проверка правильности записи скопированных файлов. |
| /n | Использование короткого имени файла (если доступно) при копировании файла с именем длиннее восьми символов или с расширением длиннее трех символов. |
| /y | Подавление запроса на подтверждение перезаписи. |
| /-y | Вывод запроса на подтверждение перезаписи. |
| /z | Копирует сетевые файлы в перезапускаемом режиме. |
| /a | Копирование текстового файла ASCII. |
| /b | Копирование двоичного файла. |
| <source> | Указывает расположение, из которого необходимо скопировать один или несколько файлов. Обязательный параметр. |
| <destination> | Указывает расположение, в которое необходимо скопировать файл или несколько файлов. Обязательный параметр. |
| /? | Отображение справки в командной строке. |
Большинство параметров указываются в начале, сразу после команды «copy». Например, для того чтобы подавить вывод запросов на перезапись существующих файлов можно добавить параметр «/y».
copy /y file1.txt file2.txt
Как скопировать папку через командную строку Windows
Для копирования папок с вложенными папками и файлами в командной строке Windows нужно использовать команду «xcopy». Данная команда позволяет скопировать папку из одного расположение в другое с сохранением структуры каталогов. Фактически «xcopy» — это более продвинутая версия команды «copy».
В упрощенном виде синтаксис команды «xcopy» будет выглядеть так:
xcopy [исходная папка или файл] [папка назначения или файл] [параметры]
Для копирования папок с вложенными папками и файлами нужно использовать параметр «/s» или «/e». Без этих параметров команда будет работать только с одним каталогом.
| Параметр | Описание |
| /s | Копирование каталогов с подкаталогами (исключая пустые) |
| /e | Копирование каталогов с подкаталогами (включая пустые). |
Например, для того чтобы скопировать все файлы и вложенные папки (включая пустые) из папки «d:\tmp» в папку «e:\tmp» нужно выполнить:
xcopy d:\tmp e:\tmp /e

Полный синтаксис команды «xcopy» выглядит так:
xcopy <Source> [<Destination>] [/w] [/p] [/c] [/v] [/q] [/f] [/l] [/g] [/d [:MM-DD-YYYY]] [/u] [/i] [/s [/e]] [/t] [/k] [/r] [/h] [{/a | /m}] [/n] [/o] [/x] [/exclude:FileName1[+[FileName2]][+[FileName3]]] [{/y | /-y}] [/z] [/b] [/j]
Полный список параметров для команды «xcopy» можно посмотреть на сайте Майкрософт. Здесь же приведены только некоторые самые базовые:
| Параметр | Описание |
| /s | Копирование каталогов с подкаталогами (исключая пустые) |
| /e | Копирование каталогов с подкаталогами (включая пустые). |
| /w | Вывод запроса на подтверждения начала копирования. |
| /p | Запрос подтверждение при создании каждого нового файла. |
| /c | Пропуск ошибок. |
| /v | Проверка всех скопированных файлов на соответствие его исходнику. |
| /q | Скрывает вывод информации от команды xcopy. |
| /f | Вывод имен в процессе копирования. |
| /l | Вывод списка копируемых файлов. |
| /g | Сохранение новых файлов в незашифрованном виде. |
| /d[:мм-дд-гггг] | Копирование файлов, которые были измененные не ранее указанной даты. Если не указать дату (мм-дд-гггг), то команда xcopy будет копировать все файлы, которые новее существующих. |
| /u | Обновление только существующих файлов в папке назначения. |
| /y | Подавление запроса на подтверждение перезаписи. |
| /-y | Вывод запроса на подтверждение перезаписи. |
| /z | Копирует сетевые файлы в перезапускаемом режиме. |
| /h | Копирование скрытых и системных файлов. |
| /r | Перезапись файлов с атрибутом «только для чтения». |
| /t | Создание структуры каталогов без копирования файлов. Пустые каталоги не включаются в структуру. Для включения пустых каталогов нужно добавить параметр /E. |
| <source> | Указывает расположение, из которого необходимо скопировать один или несколько файлов. Обязательный параметр. |
| <destination> | Указывает расположение, в которое необходимо скопировать файл или несколько файлов. Обязательный параметр. |
| /? | Отображение справки в командной строке. |
Параметры указываются в конце команды. Например, для того чтобы скопировать все файлы (включая скрытые, системные и только для чтения) и вложенные папки (включая пустые) из папки «d:\tmp» в папку «e:\tmp» нужно выполнить:
xcopy d:\tmp e:\tmp /e /h /r
Посмотрите также:
- Выключение компьютера через командную строку
- Как перезагрузить компьютер через командную строку
- Как вызвать командную строку в Windows 7
- Как поменять дату в Windows 7
- Как выключить компьютер через определенное время
Автор
Александр Степушин
Создатель сайта comp-security.net, автор более 2000 статей о ремонте компьютеров, работе с программами, настройке операционных систем.
Остались вопросы?
Задайте вопрос в комментариях под статьей или на странице
«Задать вопрос»
и вы обязательно получите ответ.
You can use move for this. The documentation from help move states:
Moves files and renames files and directories.

To move one or more files:
MOVE [/Y | /-Y] [drive:][path]filename1[,...] destination

To rename a directory:
MOVE [/Y | /-Y] [drive:][path]dirname1 dirname2

  [drive:][path]filename1 Specifies the location and name of the file
                          or files you want to move.
  destination             Specifies the new location of the file. Destination
                          can consist of a drive letter and colon, a
                          directory name, or a combination. If you are moving
                          only one file, you can also include a filename if
                          you want to rename the file when you move it.
  [drive:][path]dirname1  Specifies the directory you want to rename.
  dirname2                Specifies the new name of the directory.

  /Y                      Suppresses prompting to confirm you want to
                          overwrite an existing destination file.
  /-Y                     Causes prompting to confirm you want to overwrite
                          an existing destination file.

The switch /Y may be present in the COPYCMD environment variable.
This may be overridden with /-Y on the command line.  Default is
to prompt on overwrites unless MOVE command is being executed from
within a batch script.
See the following transcript for an example where it initially shows the qq1 and qq2 directories as having three and no files respectively. Then, we do the move and we find that the three files have been moved from qq1 to qq2 as expected.
C:\Documents and Settings\Pax\My Documents>dir qq1
 Volume in drive C is Primary
 Volume Serial Number is 04F7-0E7B

 Directory of C:\Documents and Settings\Pax\My Documents\qq1

20/01/2011  11:36 AM    <DIR>          .
20/01/2011  11:36 AM    <DIR>          ..
20/01/2011  11:36 AM                13 xx1
20/01/2011  11:36 AM                13 xx2
20/01/2011  11:36 AM                13 xx3
               3 File(s)             39 bytes
               2 Dir(s)  20,092,547,072 bytes free

C:\Documents and Settings\Pax\My Documents>dir qq2
 Volume in drive C is Primary
 Volume Serial Number is 04F7-0E7B

 Directory of C:\Documents and Settings\Pax\My Documents\qq2

20/01/2011  11:36 AM    <DIR>          .
20/01/2011  11:36 AM    <DIR>          ..
               0 File(s)              0 bytes
               2 Dir(s)  20,092,547,072 bytes free
C:\Documents and Settings\Pax\My Documents>move qq1\* qq2
C:\Documents and Settings\Pax\My Documents\qq1\xx1
C:\Documents and Settings\Pax\My Documents\qq1\xx2
C:\Documents and Settings\Pax\My Documents\qq1\xx3
C:\Documents and Settings\Pax\My Documents>dir qq1
 Volume in drive C is Primary
 Volume Serial Number is 04F7-0E7B

 Directory of C:\Documents and Settings\Pax\My Documents\qq1

20/01/2011  11:37 AM    <DIR>          .
20/01/2011  11:37 AM    <DIR>          ..
               0 File(s)              0 bytes
               2 Dir(s)  20,092,547,072 bytes free

C:\Documents and Settings\Pax\My Documents>dir qq2
 Volume in drive C is Primary
 Volume Serial Number is 04F7-0E7B

 Directory of C:\Documents and Settings\Pax\My Documents\qq2

20/01/2011  11:37 AM    <DIR>          .
20/01/2011  11:37 AM    <DIR>          ..
20/01/2011  11:36 AM                13 xx1
20/01/2011  11:36 AM                13 xx2
20/01/2011  11:36 AM                13 xx3
               3 File(s)             39 bytes
               2 Dir(s)  20,092,547,072 bytes free
The move is an internal command found in the Windows Command Interpreter (cmd) that is used to move files and folders/directories. The command is robust than a regular move operation, as it allows for pattern matching via the inclusion of Wildcards in the source path.
The command is a very generic one and is available (in one form or the other) in almost every single operating system out there (under different aliases). In this article, we will learn about the move command and would learn various uses/applications of it.
Description of the Command :
MOVE [/Y | /-Y] [drive:][path]dirname1 dirname2
- [drive:][path]filename1 –
Specifies the location and name of the file or files you want to move. - destination –
Specifies the new location of the file. The destination can consist of a drive letter and colon, a directory name, or a combination. If you are moving only one file, you can also include a filename if you want to rename the file when you move it. - [drive:][path]dirname1 –
Specifies the directory you want to rename. - dirname2 –
Specifies the new name of the directory. - /Y –
Suppresses prompting to confirm you want to overwrite an existing destination file. - /Y –
Causes prompting to confirm you want to overwrite an existing destination file.
The switch /Y may be present in the COPYCMD environment variable. This may be overridden with /-Y on the command line. The default is to prompt on overwrites unless the MOVE command is being executed from within a batch script. The above output can be obtained by executing the command move /? in cmd.
The above text is a little cryptic at first, but the command is really basic and follows the minimal blueprint.
Syntax :
MOVE [options] (Source) (Target)
Key :
- [option] –
An optional flag denoted by /Y or /-Y, that is used to suppress the confirmation prompt on overwritten files. The default is to prompt on overwrites unless the MOVE command is being executed from within a batch script. - (Source) –
A path of the file/files that would be used to move them. This path can contain wildcards ( * ? ) in the path. If more then files are made to move, then wildcards are used. - (Target) –
A path for the new location of the file.
Using the Command :
Throughout this section, we would take the following directory as example for demonstrating the usage of move command.

Moving a File from One Folder to Another :
move source_path destination_path
- source_path –
It is the path of the file which we are willing to move, and the destination_path is the location to which we want the file to be moved.
Example :
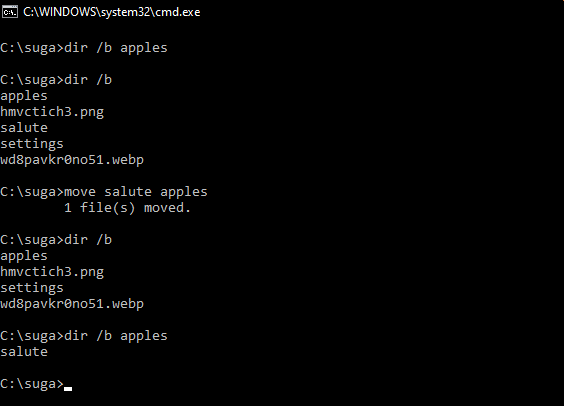
- The Dir /b command is used to list all the files and folders inside a directory.
- In the above example, we have moved an extension-less file named salute from C:\suga to C:\suga\apples directory.
Moving Multiple Files from One Path to Another :
move source_path destination_path
- source_path –
It is a path containing wildcards that will allow more than one file to be taken as a source. The destination_path is now a path to a directory where the moved files would reside (should not contain wildcards).
Example :

- In the above example we have moved all the files inside C:\suga folder which matches the pattern *.* to C:\suga\Apples directory.
- It should be noted that wildcard in source_path should match with the file(s) otherwise it would result in source_path being null, and a subsequent error.
Moving Directory from One Path to Another :
move source_dir_path Destination_dir_path
- source_dir_path –
It is the path to the directory to which we are moving, and destination_dir_path is the new location where it would be moved to.
Example :

- In the above example, we have moved the C:\suga\apples directory to C:\Users\Public directory.
- Multiple Directories can be moved using the method described in Moving multiple files from one path to another (with little modification to make is eligible for directories).
Moving a File to Another Folder with a Same Name File already existing :
There are two ways to tackle this situation –
- Abort the move process.
- Continue the move process, by overwriting the existing file with the newer one.
By default, the move command upon encountering any name collisions would prompt the user, asking whether he wants to rewrite the existing file with the new one, or stop the move process (via a Y/N prompt). To abort the move process, the user can simply enter N in the prompt input, stating that the file should not be overwritten. The prompt seeking for user input (for overwrite of files) appears as follows –
Overwrite {full_file_path}? (Yes/No/All):
When the users enter N in the prompt the output appears as follows –
Overwrite {full_file_path}? (Yes/No/All): N

0 file(s) moved.
When the user enters Y in the prompt the output appears as follows –
Overwrite {full_file_path}? (Yes/No/All): Y

1 file(s) moved.
To continue the move process by overwriting existing files (on all name collisions), a /Y switch needs to be added to the command as follows –
move /Y source_path destination_path
Last Updated :
20 Oct, 2020
Like Article
Save Article
-
Home
-
News
- How to Use Commands to Move Files in Windows 10/11? [2 Ways]
By Vega | Follow |
Last Updated
Why need to use commands to move files? How to move files using CMD in Windows 10/11? A lot of users are confused about these questions. Now, this post of MiniTool Partition Wizard explains the move file CMD operation in detail.
Why Need to Use Commands to Move Files?
When the computer is running low on space, especially when the system drive (C drive) is full, many Windows users wonder how to free it. Since some files are stored on the C drive by default, it’s obviously a good idea to migrate your files to another drive.
However, sometimes various issues and errors may appear while moving files, such as 0x8007112A, “Can’t Move the Folder on Windows PC” etc. In these cases, you might consider using CMD move files to another folder. You can use different move commands in Command Prompt. To learn more about move file CMD lines, you can refer to this article.
External Hard Drive Freezes When Copying Files| Fix It Now
How to Use Commands to Move Files?
How to efficiently CMD move file to another folder in Windows 10/11? In the following, we will share 2 commands to move files.
Way 1. Move Command
The move command is the command used in CMD to move files or folders. It is more powerful than normal copy-paste because it can migrate files out of the original path.
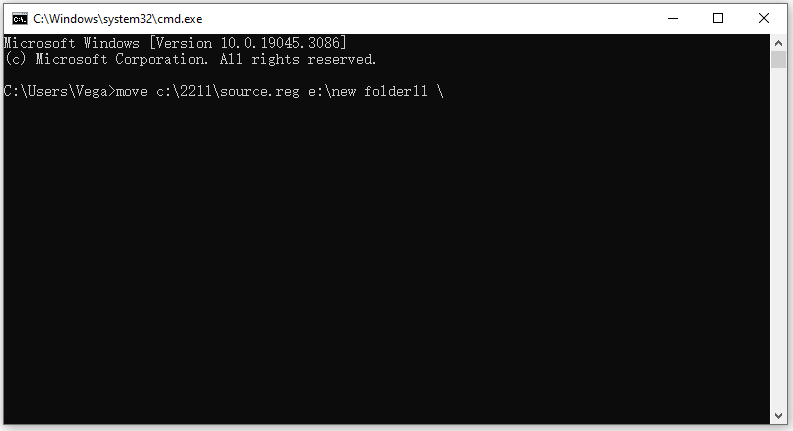
Step 1: Press the Win + R key to open the Run dialog box. Then press CMD in it and press Enter.
Step 2: In the Command Prompt window, type the Move command as follows to move the file. For example, if you want to move all files with the Source.reg from the \2211 folder on the C drive to the \New folder11 folder of the E drive, enter the Move command as follows:
move c:\2211\source.reg e:\new folder11\
Way 2. XCOPY Command
XCOPY command is a more advanced command on Windows operating systems that can copy directories, copy source directory structures from one drive to another, etc.
NOTE: If you are copying content between two different filesystems, it will fail.
Step 1: Open the elevated Command Prompt window as we explained above.
Step 2: Now, type the XCOPY command as follows to copy the file. For example, if you want to copy the Source.reg file from the 2211 folder of the C drive to the New folder11 folder of the E drive, enter the XCOPY command as follows:
XCOPY C:\2211\Source.reg “E:\New folder11” /I

Move Files with a More Handy Tool – MiniTool Partition Wizard
As shown above, both Move and Xcopy require running long and complex commands in the Command Prompt. The commands may refuse to work if the corresponding parameters are used incorrectly. Even worse, you may be at risk of losing your files.
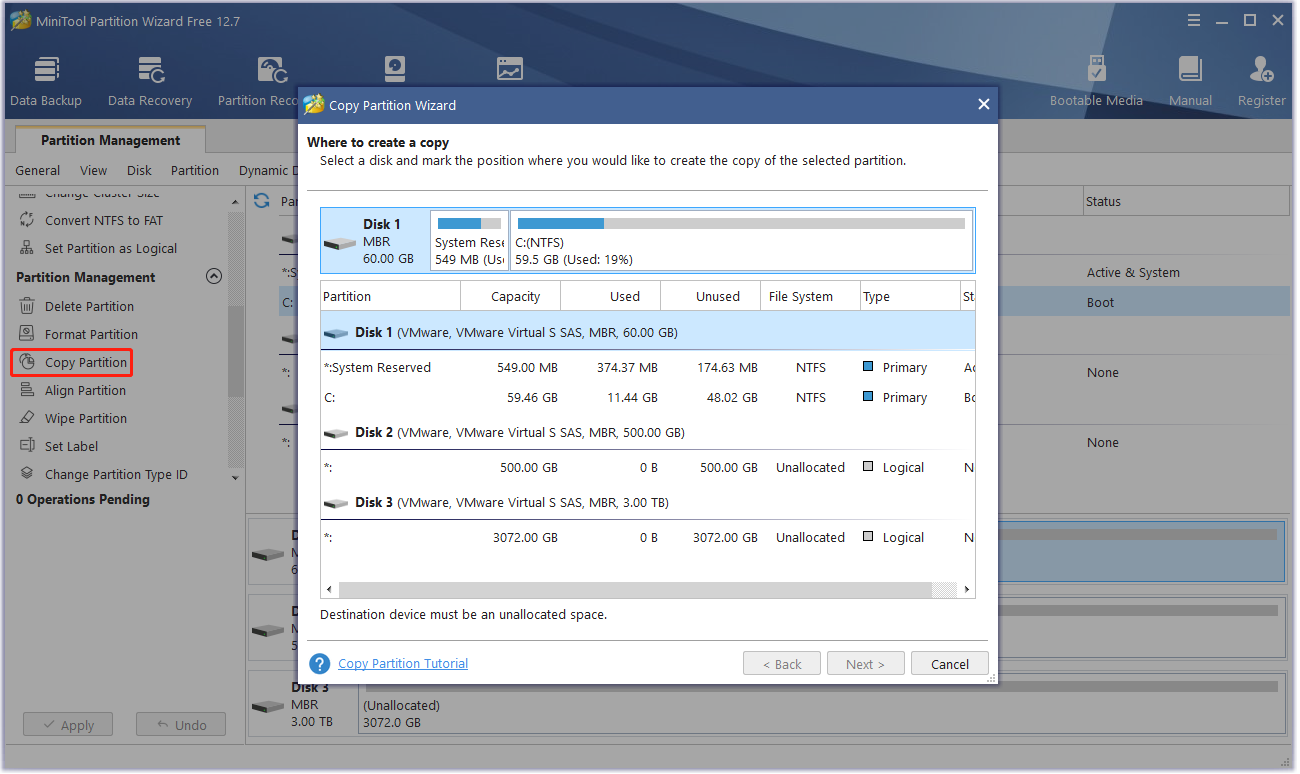
Also, these parameters might not be friendly for those who are not good at computers. Therefore, when you need to transfer files or folders, it is recommended that you rely on third-party software – MiniTool Partition Wizard.
MiniTool Partition Wizard is a professional software that allows you to transfer files easily and safely. This tool is so handy that even a computer novice can learn how to move files in minutes. Besides, it can be used to copy disk, migrate OS to SSD/HD without reinstalling, convert MBR to GPT, etc.
MiniTool Partition Wizard FreeClick to Download100%Clean & Safe
About The Author

Position: Columnist
Vega joined MiniTool as an editor after graduation. She enjoys helping people with computer problems, including disk management, data recovery, and more. She is constantly expanding her knowledge in related fields. And she will continue to bring more easy-to-understand professional articles to help people solve various problems on the PC. In her daily life, Vega enjoys hanging out with friends, shopping online and listening to music. She is someone who knows how to enjoy life.