Время на прочтение
9 мин
Количество просмотров 75K
Curl (client URL) — это инструмент командной строки на основе библиотеки libcurl для передачи данных с сервера и на сервер при помощи различных протоколов, в том числе HTTP, HTTPS, FTP, FTPS, IMAP, IMAPS, POP3, POP3S, SMTP и SMTPS. Он очень популярен в сфере автоматизации и скриптов благодаря широкому диапазону функций и поддерживаемых протоколов. В этой статье мы расскажем, как использовать curl в Windows на различных примерах.
▍ Установка в Windows
Во всех современных версиях Windows, начиная с Windows 10 (версия 1803) и Server 2019, исполняемый файл curl поставляется в комплекте, поэтому ручная установка не требуется. Чтобы определить местоположение curl и его версию в системе, можно использовать следующие команды:
where curl
curl --version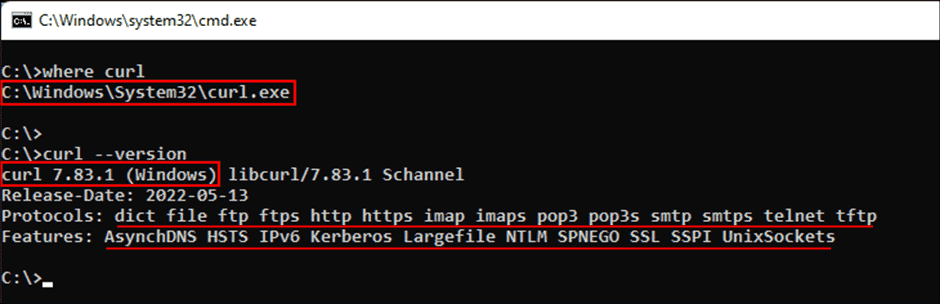
Определение местоположения и версии curl в Windows
Команда curl —version также выводит список протоколов и функций, поддерживаемых текущей версией curl. Как видно из показанного выше скриншота, к использованию встроенной утилиты curl всё готово. Если вместо этого отображается сообщение об ошибке, curl может быть недоступен потому, что вы используете более раннюю версию Windows (например, Windows 8.1 или Server 2016). В таком случае вам потребуется установить curl в Windows вручную.
▍ Синтаксис curl
Команда curl использует следующий синтаксис:
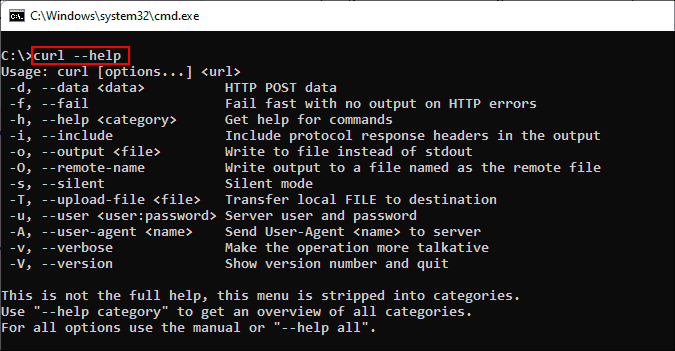
curl [options...] [url]Инструмент поддерживает различные опции, которые мы рассмотрим ниже. Как и в любом инструменте командной строки, вы можете использовать для получения справки команду curl —help.
Получение справки при помощи команды curl
Для получения подробной справки можно использовать команду curl —help all. Справка разделена на категории, поэтому при помощи curl —help category можно просмотреть все темы.
Ознакомившись с синтаксисом curl, давайте рассмотрим различные способы применения этого инструмента на примерах.
▍ HTTP-запрос GET
При использовании curl с URL и без указания опций запрос по умолчанию использует метод GET протокола HTTP. Попробуйте выполнить такую команду:
curl https://4sysops.comПриведённая выше команда по сути эквивалентна curl —request GET 4sysops.com, отправляющей запрос GET к 4sysops.com по протоколу HTTPS. Чтобы указать версию протокола HTTP (например, http/2), используйте опцию —http2:
curl --http2 https://4sysops.comВ случае URL, начинающихся с HTTPS, curl сначала пытается установить соединение http/2 и автоматически откатывается к http/1.1, если это не удаётся. Также он поддерживает другие методы, например, HEAD, POST, PUT и DELETE. Для использования этих методов вместе с командой curl нужно указать опцию —request (или -X), за которой следует указание метода. Стоит заметить, что список доступных методов зависит от используемого протокола.
▍ Получение информации об удалённом файле
Если вы администратор, то иногда вам могут быть интересны только заголовки HTTP. Их можно получить при помощи опции —head (или -I). Иногда URL может перенаправлять пользователя в другую точку. В таком случае опция —location (или -L) позволяет curl выполнять перенаправления. Также можно использовать —insecure (или -k), чтобы разрешить незащищённые подключения и избежать ошибок с сертификатом TLS в случае, если целевой URL использует самоподписанный сертификат. Пользуйтесь этой опцией только при абсолютной необходимости. Все эти три опции можно скомбинировать в одну краткую запись, как показано в следующей команде:
curl -kIL 4sysops.com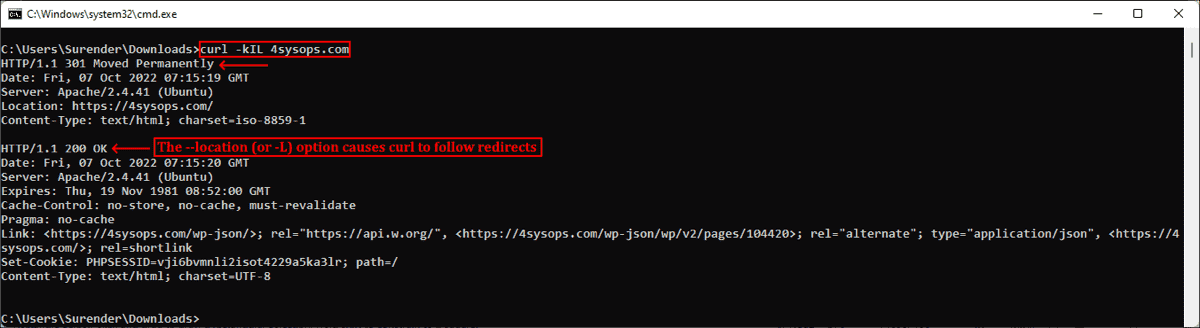
Опции просмотра заголовков запросов, включения незащищённого соединения и использования перенаправлений
Как можно заметить, такая краткая запись особенно полезна для комбинирования нескольких опций. Приведённая выше команда по сути эквивалентна команде curl —insecure —head —location 4sysops.com.
Опция —head (или -I) также даёт основную информацию об удалённом файле без его скачивания. Как показано на скриншоте ниже, при использовании curl с URL удалённого файла он отображает различные заголовки, дающие информацию об удалённом файле.
curl -IL https://curl.se/windows/dl-7.85.0_5/curl-7.85.0_5-win64-mingw.zip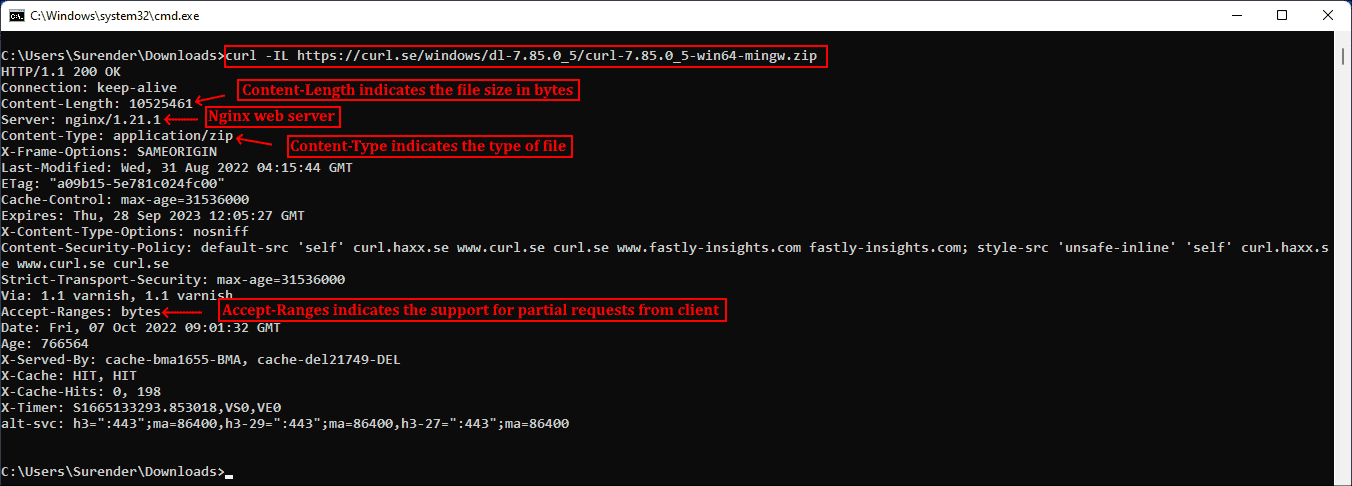
Использование curl для просмотра основной информации удалённых файлов
Заголовок Content-Length обозначает размер файла (в байтах), Content-Type сообщает о типе медиафайла (например, image/png, text/html), Server обозначает тип серверного приложения (Apache, Gunicorn и так далее), Last-Modified показывает дату последнего изменения файла на сервере, а заголовок Accept-Ranges обозначает поддержку частичных запросов для скачивания от клиента, что по сути определяет возможность продолжения прерванной загрузки.
▍ Скачивание файла
Для скачивания файла и сохранения с тем же именем, что и на сервере, можно использовать curl с опцией —remote-name (или -O). Показанная ниже команда скачивает последнюю версию curl для Windows с официального сайта:
curl -OL https://curl.se/windows/latest.cgi?p=win64-mingw.zip
Скачивание файла с именем по умолчанию и индикатором прогресса
При необходимости для нахождения ресурса добавляется опция -L, разрешающая перенаправления. Если нужно сохранить файл с новым именем, используйте опцию —output (или -o). Кроме того, при использовании команды curl в скрипте может понадобиться отключить индикатор прогресса, что можно сделать при помощи опции —silent (или -s). Эти две опции можно скомбинировать:
curl -sLo curl.zip https://curl.se/windows/latest.cgi?p=win64-mingw.zip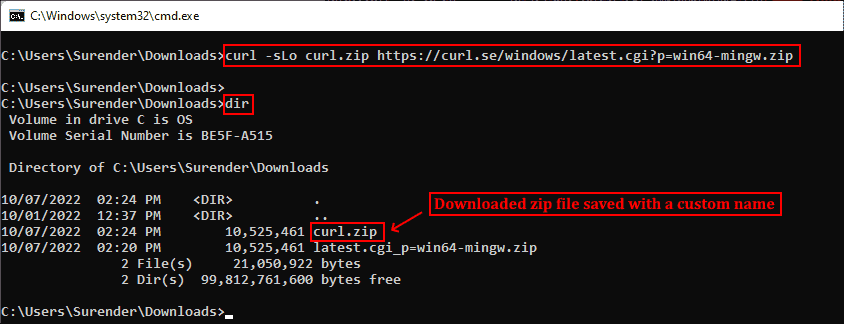
Скачивание файла без индикатора и сохранение под произвольным именем
▍ Продолжение прерванного скачивания
Наличие Accept-Ranges: bytes в заголовке ответа в буквальном смысле обозначает, что сервер поддерживает скачивания с возможностью продолжения. Чтобы продолжить прерванное скачивание, можно использовать опцию —continue-at (или -C), получающую смещение (в байтах). Обычно указывать смещение непросто, поэтому curl предоставляет простой способ продолжения прерванной загрузки:
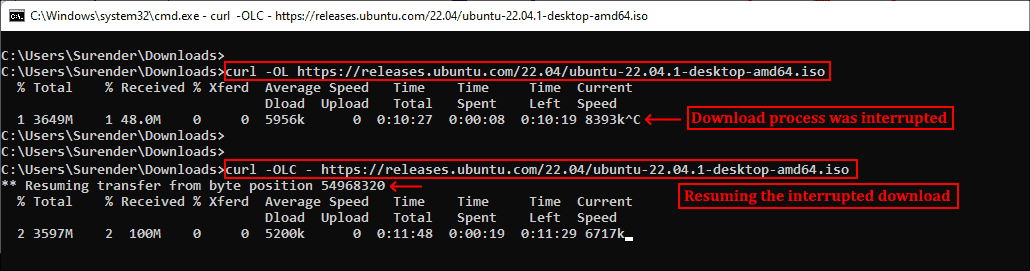
curl -OLC - https://releases.ubuntu.com/22.04/ubuntu-22.04.1-desktop-amd64.iso
Продолжение прерванного скачивания
Как видно из скриншота, я скачивал iso-файл Ubuntu, но скачивание было прервано. Затем я снова запустил команду curl с опцией -C, и передача продолжилась с того диапазона байтов, на котором была прервана. Знак минус (—) рядом с -C позволяет curl автоматически определить, как и где продолжить прерванное скачивание.
▍ Аутентификация с Curl
Также Curl поддерживает аутентификацию, что позволяет скачать защищённый файл, предоставив учётные данные при помощи опции —user (or -u), принимающей имя пользователя и пароль в формате username:password. Если не вводить пароль, curl попросит ввести его в режиме no-echo.
curl -u surender -OL https://techtutsonline.com/secretFiles/sample.zip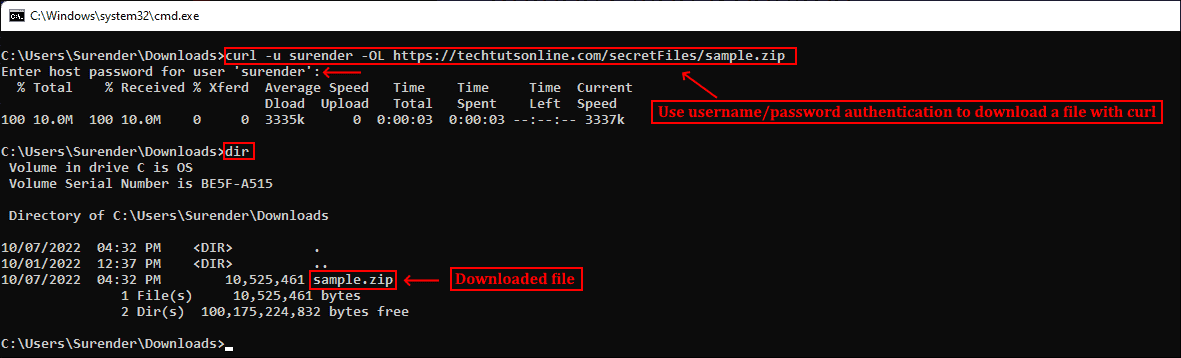
Скачивание файла с аутентификацией по имени пользователя и паролю
Если вы используете Basic authentication, то необходимо передать имя пользователя и пароль, а значит, воспользоваться защищённым протоколом наподобие HTTPS (вместо HTTP) или FTPS (вместо FTP). Если по каким-то причинам приходится использовать протокол без шифрования, то убедитесь, что вы используете способ аутентификации, не передающий учётные данные в виде простого текста (например, аутентификацию Digest, NTLM или Negotiate).
Также curl поддерживает использование файлов конфигурации .curlrc, _curlrc и .netrc, позволяющих задавать различные опции curl в файле, а затем добавлять файл в команду при помощи опции curl —config (или curl -K), что особенно полезно при написании скриптов.
▍ Выгрузка файла
Опция —upload-file (или -T) позволяет выгружать локальный файл на удалённый сервер. Показанная ниже команда выгружает файл из локальной системы на удалённый веб-сервер по протоколу FTPS:
curl -kT C:\Users\Surender\Downloads\sample1.zip -u testlab\surender ftps://192.168.0.80/awesomewebsite.com/files/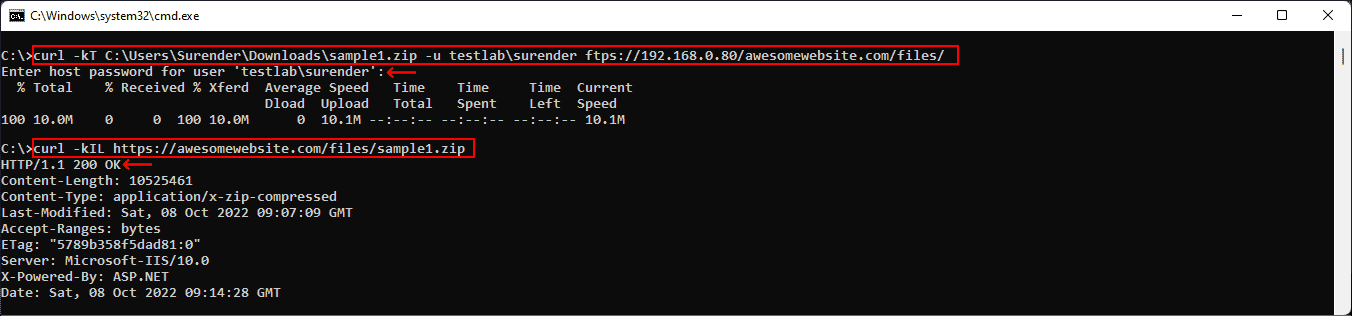
Выгрузка файла на удалённый сервер
Опция -k добавляется для устранения проблем с сертификатами на случай, если веб-сервер использует самоподписанный сертификат. Наклонная черта в конце URL сообщает curl, что конечная точка является папкой. Можно указать несколько имён файлов, например «{sample1.zip,sample2.zip}». Ниже показано, как с помощью одной команды curl можно выгрузить на сервер несколько файлов:
curl -kT sample[1-5].zip -u testlab\surender ftps://192.168.0.80/awesomewebsite.com/files/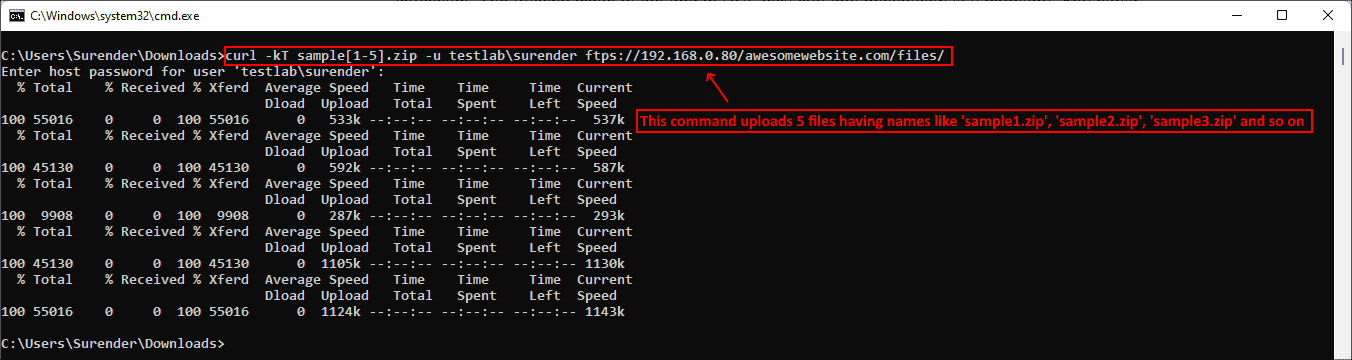
Выгрузка нескольких файлов на сервер
▍ Последовательность команд
Как говорилось ранее, curl поддерживает различные методы в зависимости от используемого протокола. Дополнительные команды можно отправлять при помощи —quote (или -Q) для выполнения операции до или после обычной операции curl. Например, можно скачать файл с удалённого сервера по протоколу FTPS и удалить файл с сервера после успешного скачивания. Для этого нужно выполнить следующую команду:
curl -u testlab\surender -kO "ftps://192.168.0.80/awesomewebsite.com/files/sample1.zip" -Q "-DELE sample1.zip"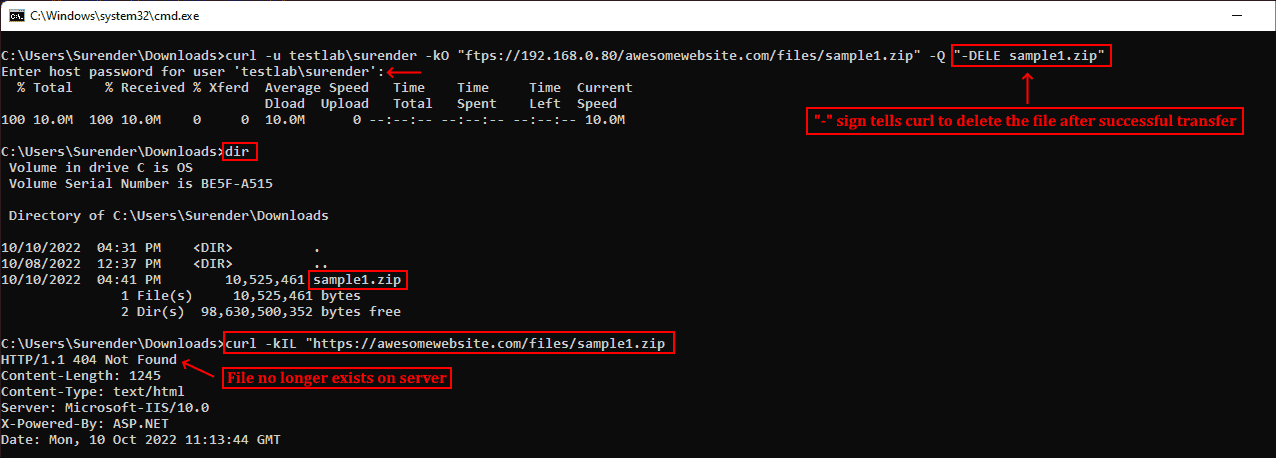
Удаление файла после успешного скачивания
В показанном выше примере я скачал файл sample1.zip с FTPS-сервера при помощи опции -O. После опции -Q я добавил минус (-) перед командой DELE, что заставляет curl отправить команду DELE sample1.zip сразу после успешного скачивания файла. Аналогично, если вы хотите отправить команду на сервер до выполнения операции curl, используйте плюс (+) вместо минуса.
▍ Изменение user-agent
Информация user-agent сообщает серверу тип клиента, отправляющего запрос. При отправке запроса curl на сервер по умолчанию используется user-agent curl/<version>. Если сервер настроен так, чтобы блокировать запросы curl, можно задать собственный user-agent при помощи опции —user-agent (или -A). Показанная ниже команда отправляет стандартный user-agent Google Chrome:
curl -kIA "Mozilla/5.0 (Windows NT 10.0; Win64; x64) AppleWebKit/537.36 (KHTML, like Gecko) Chrome/106.0.0.0" https://awesomewebsite.com/files/secretFile.zip
Использование собственного user-agent с командой curl, чтобы избежать блокировки сервером
На показанном выше скриншоте видно, что обычный запрос curl был отклонён веб-сервером (с ответом 403 Forbidden), но при передаче другого user-agent запрос выполняется успешно, возвращая ответ 200 OK.
▍ Отправка куки
По умолчанию запрос curl не отправляет и не сохраняет куки. Для записи куки можно использовать опцию —cookie-jar (или -c), а отправить куки можно опцией —cookie (or -b):
curl -c /path/cookie_file https://awesomewebsite.com/
curl -b /path/cookie_file https://awesomewebsite.com/
Первая команда записывает файл куки, а вторая отправляет куки с запросом curl. Также можно отправить куки в формате ‘name = value’:
curl -b 'session=abcxyz' -b 'loggedin=true' http://echo.hoppscotch.io
Отправка нескольких куки командой curl
Я воспользовался веб-сайтом echo.hoppscotch.io для демонстрации заголовков HTTP-запросов, которые обычно невидимы клиентам, отправляющим запрос. Если вы не хотите пользоваться этим веб-сайтом, то можете применить опцию –verbose (или -v) для отображения запроса в сыром виде (который отображает и заголовки запросов).
▍ Использование прокси-сервера
Если вы пользуетесь прокси-сервером для подключения к интернету, в curl можно указать прокси опцией —proxy (или -x). Если прокси-сервер требует аутентификации, то добавьте —proxy-user (или -U):
curl -x 192.168.0.250:8088 -U username:password https://awesomewebsite.com/Прокси-сервер указывается в формате server:port, а пользователь прокси — в формате username:password. Можно не вводить пароль пользователя прокси, тогда curl попросит ввести его в режиме no-echo.

Использование прокси-сервера и аутентификации
▍ Дополнительные заголовки запросов
Иногда вместе с запросом к серверу необходимо отправить дополнительную информацию. В curl это можно сделать при помощи —header (или -H), как показано в следующей команде:
curl -vkIH "x-client-os: Windows 11 Enterprise (x64)" https://awesomewebsite.com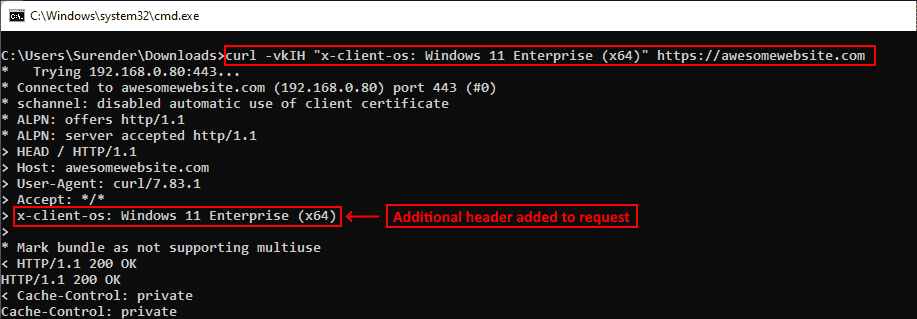
Указание дополнительных заголовков для запроса curl
Можно отправлять любую информацию, недоступную через стандартные заголовки HTTP-запросов. В этом примере я отправил название своей операционной системы. Также я добавил опцию -v для включения verbose-вывода, отображающего дополнительный заголовок, отправляемый вместе с каждым моим запросом curl.
▍ Отправка электронного письма
Так как curl поддерживает протокол SMTP, его можно использовать для отправки электронного письма. Показанная ниже команда позволяет отправить электронное письмо при помощи curl:
curl --insecure --ssl-reqd smtps://mail.yourdomain.com –-mail-from sender@yourdomain.com –-mail-rcpt receiver@company.com --user sender@yourdomain.com --upload-file email_msg.txt
Отправка электронного письма командой curl
Давайте вкратце перечислим использованные здесь опции:
- Опция —insecure (или -k) используется, чтобы избежать ошибки сертификата SSL. Мы уже применяли её ранее.
- Опция —ssl-reql используется для апгрейда соединения передачи простого текста до зашифрованного соединения, если оно поддерживается SMTP-сервером. Если вы уверены, что ваш SMTP-сервер поддерживает SSL, то можно использовать непосредственно имя сервера smtps (например, smtps://smtp.yourdomain.com), как показано на скриншоте.
- Опция —mail-from используется для указания адреса электронной почты отправителя.
- Опция mail-rcpt указывает адрес электронной почты получателя.
- Опция —user (или -u) отправляет имя пользователя для аутентификации, оно должно совпадать с адресом mail-from, потому что в противном случае письмо может быть отклонено или помечено как спам.
- Опция —upload-file (или -T) используется для указания файла, в котором находится отправляемое письмо.
На скриншоте ниже показано письмо, полученное мной во входящие:
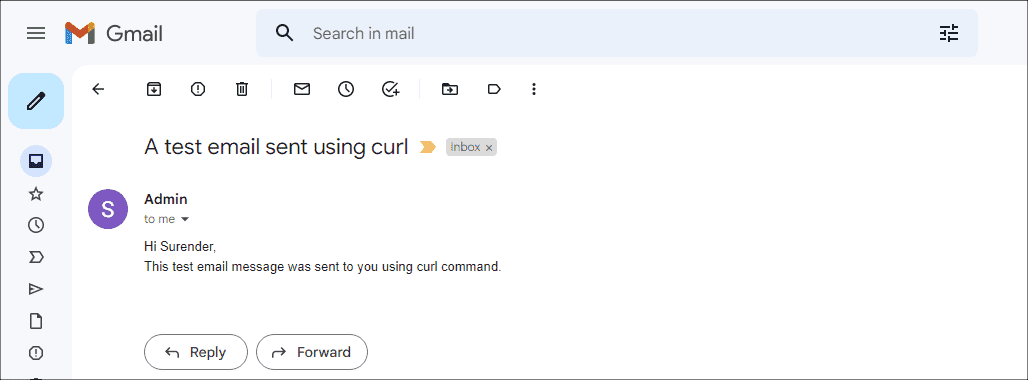
Просмотр письма, отправленного с помощью curl
Это всего лишь несколько примеров использования curl — на самом деле их гораздо больше. Я настоятельно рекомендую проверить справку по curl и поэкспериментировать с ней.
А вы используете curl? И если да, то для чего?
Telegram-канал с полезностями и уютный чат

CURL — утилита командной строки для Linux или Windows, поддерживает работу с протоколами: FTP, FTPS, HTTP, HTTPS, TFTP, SCP, SFTP, Telnet, DICT, LDAP, POP3, IMAP и SMTP. Она отлично подходит для имитации действий пользователя на страницах сайтов и других операций с URL адресами. Поддержка CURL добавлена в множество различных языков программирования и платформ.
Для начала скачаем саму утилиту, для этого переходим на официальный сайт утилиты, в раздел Download. После скачивания архива для своей платформы (у меня это Windows 64 bit), распаковываем архив. Чтобы иметь возможность работать с HTTPS и FTPS, устанавливаем сертификат безопасности url-ca-bundle.crt, который находится в папке curl/bin.

Запускаем командную строку, переходим в директорию curl/bin и пытаемся скачать главную страницу Google:
> cd C:/curl/bin
> curl google.com
<HTML><HEAD><meta http-equiv="content-type" content="text/html;charset=utf-8">
<TITLE>301 Moved</TITLE></HEAD><BODY>
<H1>301 Moved</H1>
The document has moved
<A HREF="http://www.google.com/">here</A>.
</BODY></HTML>
Опция -X позволяет задать тип HTTP-запроса вместо используемого по умолчанию GET. Дополнительные запросы могут быть POST, PUT и DELETE или связанные с WebDAV — PROPFIND, COPY, MOVE и т.п.
Следовать за редиректами
Сервер Google сообщил нам, что страница google.com перемещена (301 Moved Permanently), и теперь надо запрашивать страницу www.google.com. С помощью опции -L укажем CURL следовать редиректам:
> curl -L google.com
<!doctype html>
<html itemscope="" itemtype="http://schema.org/WebPage" lang="ru">
<head>
<meta content="Поиск информации в интернете: веб страницы, картинки, видео и многое другое." name="description">
<meta content="noodp" name="robots">
<meta content="/images/branding/googleg/1x/googleg_standard_color_128dp.png" itemprop="image">
<meta content="origin" name="referrer">
<title>Google</title>
..........
Сохранить вывод в файл
Чтобы сохранить вывод в файл, надо использовать опции -o или -O:
-o(oнижнего регистра) — результат будет сохранён в файле, заданном в командной строке;-O(Oверхнего регистра) — имя файла будет взято из URL и будет использовано для сохранения полученных данных.
Сохраняем страницу Google в файл google.html:
> curl -L -o google.html google.com
  % Total    % Received % Xferd  Average Speed   Time    Time     Time  Current
                                 Dload  Upload   Total   Spent    Left  Speed
100   219  100   219    0     0   2329      0 --:--:-- --:--:-- --:--:--  2329
100 14206    0 14206    0     0  69980      0 --:--:-- --:--:-- --:--:-- 69980
Сохраняем документ gettext.html в файл gettext.html:
> curl -O http://www.gnu.org/software/gettext/manual/gettext.html
  % Total    % Received % Xferd  Average Speed   Time    Time     Time  Current
                                 Dload  Upload   Total   Spent    Left  Speed
100 1375k  100 1375k    0     0   800k      0  0:00:01  0:00:01 --:--:--  800k
Загрузить файл, только если он изменён
Опция -z позволяет получить файлы, только если они были изменены после определённого времени. Это будет работать и для FTP и для HTTP. Например, файл archive.zip будет получен, если он изменялся после 20 августа 2018 года:
> curl -z 20-Aug-18 http://www.example.com/archive.zip
Команда ниже загрузит файл archive.zip, если он изменялся до 20 августа 2018 года:
> curl -z -20-Aug-18 http://www.example.com/archive.zip
Прохождение аутентификации HTTP
Опция -u позволяет указать данные пользователя (имя и пароль) для прохождения базовой аутентификаци (Basic HTTP Authentication):
> curl -u evgeniy:qwerty -O http://www.example.com/archive.zip
Получение и отправка cookie
Cookie используются сайтами для хранения некой информации на стороне пользователя. Сервер сохраняет cookie на стороне клиента (т.е. в браузере), отправляя заголовки:
Set-Cookie: PHPSESSID=svn7eb593i8d2gv471rs94og58; path=/
Set-Cookie: visitor=fa867bd917ad0d715830a6a88c816033; expires=Mon, 16-Sep-2019 08:20:53 GMT; Max-Age=31536000; path=/
Set-Cookie: lastvisit=1537086053; path=/
А браузер, в свою очередь, отправляет полученные cookie обратно на сервер при каждом запросе. Разумеется, тоже в заголовках:
Cookie: PHPSESSID=svn7eb593i8d2gv471rs94og58; visitor=fa867bd917ad0d715830a6a88c816033; lastvisit=1537086053
Передать cookie на сервер, как будто они были ранее получены от сервера:
> curl -b lastvisit=1537086053 http://www.example.com/
Чтобы сохранить полученные сookie в файл:
> curl -c cookie.txt http://www.example.com/
Затем можно отправить сохраненные в файле cookie обратно:
> curl -b cookie.txt http://www.example.com/catalog/
Файл cookie.txt имеет вид:
# Netscape HTTP Cookie File
# https://curl.haxx.se/docs/http-cookies.html
# This file was generated by libcurl! Edit at your own risk.

www.example.com    FALSE    /    FALSE    0             lastvisit        1537085301
www.example.com    FALSE    /    FALSE    1568621304    visitor          60f7c17ba4b5d77975dfd020f06ac8ca
www.example.com    FALSE    /    FALSE    0             PHPSESSID        p23cr2d14rlgj5kls58kd7l6a6
Получение и отправка заголовков
По умолчанию, заголовки ответа сервера не показываются. Но это можно исправить:
> curl -i google.com
HTTP/1.1 301 Moved Permanently
Location: http://www.google.com/
Content-Type: text/html; charset=UTF-8
Date: Sun, 16 Sep 2018 08:28:18 GMT
Expires: Tue, 16 Oct 2018 08:28:18 GMT
Cache-Control: public, max-age=2592000
Server: gws
Content-Length: 219
X-XSS-Protection: 1; mode=block
X-Frame-Options: SAMEORIGIN

<HTML><HEAD><meta http-equiv="content-type" content="text/html;charset=utf-8">
<TITLE>301 Moved</TITLE></HEAD><BODY>
<H1>301 Moved</H1>
The document has moved
<A HREF="http://www.google.com/">here</A>.
</BODY></HTML>
Если содержимое страницы не нужно, а интересны только заголовки (будет отправлен HEAD запрос):
> curl -I http://www.example.com/
HTTP/1.1 200 OK
Date: Sun, 16 Sep 2018 08:20:52 GMT
Server: Apache/2.4.34 (Win64) mod_fcgid/2.3.9
X-Powered-By: PHP/7.1.10
Expires: Thu, 19 Nov 1981 08:52:00 GMT
Cache-Control: no-store, no-cache, must-revalidate
Pragma: no-cache
Set-Cookie: PHPSESSID=svn7eb593i8d2gv471rs94og58; path=/
Set-Cookie: visitor=fa867bd917ad0d715830a6a88c816033; expires=Mon, 16-Sep-2019 08:20:53 GMT; Max-Age=31536000; path=/
Set-Cookie: lastvisit=1537086053; path=/
Content-Length: 132217
Content-Type: text/html; charset=utf-8
Посмотреть, какие заголовки отправляет CURL при запросе, можно с помощью опции -v, которая выводит более подробную информацию:
> curl -v google.com
- Строка, начинающаяся с
>означает заголовок, отправленный серверу - Строка, начинающаяся с
<означает заголовок, полученный от сервера - Строка, начинающаяся с
*означает дополнительные данные от CURL
* Rebuilt URL to: http://google.com/
*   Trying 173.194.32.206...
* TCP_NODELAY set
* Connected to google.com (173.194.32.206) port 80 (#0)
> GET / HTTP/1.1
> Host: google.com
> User-Agent: curl/7.61.1
> Accept: */*
>
< HTTP/1.1 301 Moved Permanently
< Location: http://www.google.com/
< Content-Type: text/html; charset=UTF-8
< Date: Mon, 17 Sep 2018 15:11:49 GMT
< Expires: Wed, 17 Oct 2018 15:11:49 GMT
< Cache-Control: public, max-age=2592000
< Server: gws
< Content-Length: 219
< X-XSS-Protection: 1; mode=block
< X-Frame-Options: SAMEORIGIN
<
<HTML><HEAD><meta http-equiv="content-type" content="text/html;charset=utf-8">
<TITLE>301 Moved</TITLE></HEAD><BODY>
<H1>301 Moved</H1>
The document has moved
<A HREF="http://www.google.com/">here</A>.
</BODY></HTML>
* Connection #0 to host google.com left intact
Если этой информации недостаточно, можно использовать опции --trace или --trace-ascii.
А вот так можно отправить свой заголовок:
> curl -H "User-Agent: Mozilla/5.0" http://www.example.com/
Отправка данных методом POST
Команда ниже отправляет POST запрос на сервер аналогично тому, как пользователь, заполнив HTML форму, нажал бы кнопку «Отправить». Данные будут отправлены в формате application/x-www-form-urlencoded.
> curl -d "key1=value1&key2=value2" http://www.example.com
> curl --data "key1=value1&key2=value2" http://www.example.com
Параметр --data аналогичен --data-ascii, для отправки двоичных данных необходимо использовать параметр --data-binary. Для URL-кодирования полей формы нужно использовать --data-urlencode.
> curl --data-urlencode "name=Василий" --data-urlencode "surname=Пупкин" http://www.example.com
Если значение опции --data начинается с @, то после него должно быть имя файла с данными (или дефис — тогда будут использованы данные из стандартного ввода). Пример получения данных из файла для отправки POST-запроса:
> curl --data @data.txt http://www.example.com
Содержимое файла data.txt:
key1=value1&key2=value2
Массив $_POST, который будет содержать данные этого запроса:
Array
(
    [key1] => value1
    [key2] => value2
)
Пример URL-кодирования данных из файла перед отправкой POST-запроса:
> curl --data-urlencode name@username.txt http://www.example.com
Содержимое файла username.txt:
Иванов Иван Иванович
Массив $_POST, который будет содержать данные этого запроса:
Array
(
    [name] = Иванов Иван Иванович
)
Загрузка файлов методом POST
Для HTTP запроса типа POST существует два варианта передачи полей из HTML форм, а именно, используя алгоритм application/x-www-form-urlencoded и multipart/form-data. Алгоритм первого типа создавался давным-давно, когда в языке HTML еще не предусматривали возможность передачи файлов через HTML формы.
Со временем возникла необходимость через формы отсылать еще и файлы. Тогда консорциум W3C взялся за доработку формата POST запроса, в результате чего появился документ RFC 1867. Форма, которая позволяет пользователю загрузить файл, используя алгоритм multipart/form-data, выглядит примерно так:
<form action="/upload.php" method="POST" enctype="multipart/form-data">
    <input type="file" name="upload">
    <input type="submit" name="submit" value="OK">
</form>
Чтобы отправить на сервер данные такой формы:
> curl -F upload=@image.jpg -F submit=OK http://www.example.com/upload.php
Скрипт upload.php, который принимает данные формы:
<?php
print_r($_POST);
print_r($_FILES);
move_uploaded_file($_FILES['upload']['tmp_name'], 'image.jpg');
Ответ сервера:
Array
(
    [submit] => OK
)
Array
(
    [upload] => Array
        (
            [name] => image.jpg
            [type] => image/jpeg
            [tmp_name] => D:\work\temp\phpB02F.tmp
            [error] => 0
            [size] => 2897
        )
)
Работа по протоколу FTP
Скачать файл с FTP-сервера:
> curl -u username:password -O ftp://example.com/file.zip
Если заданный FTP путь является директорией, то по умолчанию будет выведен список файлов в ней:
> curl -u username:password -O ftp://example.com/public_html/
Выгрузить файл на FTP-сервер
> curl -u username:password -T file.zip ftp://example.com/
Получить вывод из стандартного ввода и сохранить содержимое на сервере под именем data.txt:
> curl -u username:password -T - ftp://example.com/data.txt
Дополнительно:
- Утилита curl. Обмен данными с сервером
- Пользуемся curl для отладки HTTP
Поиск:
CLI • CURL • Cookie • FTP • GET • HTTP • Linux • POST • URL • Web-разработка • Windows • Форма
Каталог оборудования
Lorem ipsum dolor sit amet, consectetur adipiscing elit, sed do eiusmod tempor incididunt ut labore et dolore magna aliqua.
Производители
Lorem ipsum dolor sit amet, consectetur adipiscing elit, sed do eiusmod tempor incididunt ut labore et dolore magna aliqua.
Функциональные группы
Lorem ipsum dolor sit amet, consectetur adipiscing elit, sed do eiusmod tempor incididunt ut labore et dolore magna aliqua.
It looks like you’re using cmd.exe. Command Prompt’s character escaping rules are both archaic and awful. I recommend using Powershell instead; it uses rules much more similar to those of bash on other *nix shells (though not identical, notably because it uses ` (backtick) as the escape character instead of backslash).
Here’s the command in Powershell on my system:
& 'C:\Program Files\Git\mingw64\bin\curl' -i -X POST -H "Content-Type:application/json" -d '{ "firstName" : "Frodo", "lastName" : "Baggins" }' http://localhost:8080/people
The leading & is required because the path to the program is a quoted string. I had to specify the path because I don’t have a curl.exe in my Windows PATH. However, I could just escape the space in «Program Files»:
C:\Program` Files\Git\mingw64\bin\curl -i -X POST -H "Content-Type:application/json" -d '{ "firstName" : "Frodo", "lastName" : "Baggins" }' http://localhost:8080/people
Single and double quotes otherwise work as you’re using them, with the ' delimiting the start of a string and the " appearing just as literal characters inside it.
Note that you do have to provide the path to a curl executable, or at least specify curl.exe; curl by itself is a Powershell alias for the Invoke-WebRequest cmdlet, which can do most of what the cURL program can do but has very different argument syntax.
Also, while you can invoke Powershell from cmd using powershell -c <command>, that wouldn’t really help here because you’d have to escape the string using cmd‘s silly syntax anyhow.
Another option is just to use the Windows Subsystem for Linux (WSL), which lets you run Linux programs (including the default Ubuntu versions of bash and curl) directly on Windows, no VM or rebooting needed. Full details about this can be found at https://msdn.microsoft.com/en-us/commandline/wsl/about, but the short version is try running bash (or bash.exe) from any Command Prompt or Powershell window, and it will install the Linux subsystem or at least tell you how.
As a web developer or tech enthusiast, understanding HTTP requests and how to interact with APIs is crucial, particularly when it comes to automating requests and debugging. In such scenarios, you might want to execute a quick HTML request from your terminal and this is where cURL, a free command-line tool for data transfer, comes in handy.

Client URL (cURL) lets you exchange data between your device and a server through a command-line interface (CLI). By simply specifying a server URL and the data to be sent, cURL enables diverse request forms, much like API tools like Postman and Insomnia, but directly from your terminal.
In this article, we’ll introduce the cURL command, explore how and why it’s used, and showcase some common cURL command examples and use cases.
![Download Now: How to Use an API [Free Ebook]](https://no-cache.hubspot.com/cta/default/53/1cbd6f4c-4566-446c-852a-0a9dae73e987.png)
Client URL (cURL, pronounced “curl”) is a command line tool that enables data exchange between a device and a server through a terminal. Using this command line interface (CLI), a user specifies a server URL (the location where they want to send a request) and the data they want to send to that server URL.
API tools like Postman and Insomnia provide an interactive user interface (UI) that allows you to make different forms of requests to URLs, for receiving and processing requests. The cURL command does the same thing, except in your terminal. cURL works on Linux, Mac, and Windows.
The cURL command uses the libcURL client-side URL transfer library. This library supports many different transfer protocols including HTTPS, SMTP, and FTP. It also enables you to include cookies, set proxies, and add authentication credentials when making requests.
Use cases of cURL include testing APIs, downloading data from sources, testing websites, and following redirects from the terminal.
How to Use cURL
You know what the cURL command is, but how does it work?
cURL comes pre-installed on Windows and macOS — otherwise, you can download the package from the cURL website.
The cURL command receives the URL to transfer data to — or receive data from — along with other options for different purposes.
The syntax of a cURL command is:
cURL [options] [URL]
This article uses the JSONPlaceholder Fake API to explain the different ways to use cURL. This mock API contains different example paths for making requests.
Request Data From a Source
Using the GET method with cURL, you can quickly request data from a source or API. Here’s a simple cURL command that makes a GET request:
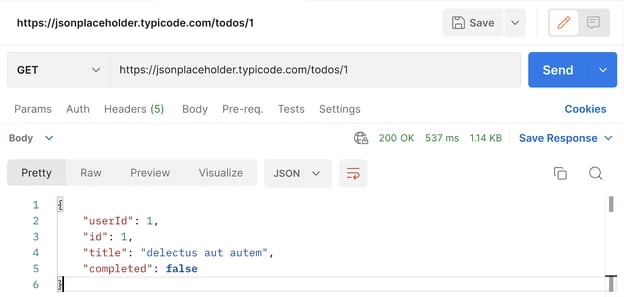
cURL https://jsonplaceholder.typicode.com/todos/1
Without passing any flags or options, the cURL command defaults to making a GET request to the specified URL. The command returns the response body sent from the API, which would look like this in your terminal:
{
«userId»: 1,
«id»: 1,
«title»: «delectus aut autem»,
«completed»: false
}
This is similar to the results from platforms like Postman, shown below:
Additionally, you can include options and values to use a different request method with the cURL command. For example, you can use the -X (hyphen and uppercase X) option with the request method. The -X option is an alias for —request.
Write the command as follows:
cURL -X [METHOD] [URL]
The default GET method in the first cURL command above is the same as the following:
cURL -X GET https://jsonplaceholder.typicode.com/todos/1
Send Data to a Source
Using the POST method and the cURL command, you can transfer data to a server through an API. The API processes the data, then takes steps such as saving it to a database, and returns return a response indicating the status of your request.
To make a POST request to a URL, use the -X option and pass the POST method as the value. But how about adding data with the request? You use another option, -d (hyphen and lowercase d), which is an alias for —data.
You can use the two popular data formats when sending data with a request: application/x-www-form-urlencoded or application/json. We’ll cover both of these methods next.
application/x-www-form-URLencoded
If you do not specify the format you want, cURL uses application/x-www-form-urlencoded by default. Here’s an example using this format and the JSON fake API:
cURL -X POST -d «name=cURL&type=article» https://jsonplaceholder.typicode.com/posts
This command makes a POST request to https://jsonplaceholder.typicode.com/posts and passes the URL encoded data «name=cURL&type=article» which is a name key with a cURL value and a type key with an article value.
For POST requests made to the JSON Fake API, the response body is the data object sent to it along with an ID property.
Here’s the response body from the API after entering the command:
{
«name»: «cURL»,
«type»: «article»,
«id»: 101
}
application/JSON
With cURL, you can also send a stringified JSON object like this:
cURL -X POST -d ‘{«name»: «cURL», «type»: «article»}’ https://jsonplaceholder.typicode.com/posts
As described above, the data in this request is sent in the application/x-www-form-urlencoded format. Here’s the result from the API:
{
«{\»name\»: \»cURL\», \»type\»: \»article\»}»: «»,
«id»: 101
}
The API understands the request data to be in URL encoded data format, so it doesn’t interpret it as you would expect. You must specify that this is the JSON data format by using the -H (hyphen with an uppercase H) option, an alias for —header, and passing the Content-Type header as follows:
cURL -X POST -d ‘{«name»: «cURL», «type»: «article»}’ -H «Content-Type: application/json» https://jsonplaceholder.typicode.com/posts
Now, you get the right response body from the API:
{
«name»: «cURL»,
«type»: «article»,
«id»: 101
}
Instead of typing the JSON string in the terminal, you can specify a JSON file that the cURL command will use for the data option. For example, suppose you have a file called data.json with the following contents:
{
«name»: «cURL»,
«type»: «article»
}
You can run the cURL command assuming it’s in the same project as the file. This command will get the JSON file, stringify it and send it with the request. You get the same result as above:
{
«name»: «cURL»,
«type»: «article»
}
Delete Resources on a Server
You can send deletion requests to an API using the DELETE method and the cURL command. The URL and data you provide to this request depend on the API configuration.
For the JSON Fake API, you specify the resource path and the DELETE method like this:
cURL -X DELETE https://jsonplaceholder.typicode.com/posts/1
The response body is an empty object:
Best for Updating Existing Resources Using an API
Using the PUT method and the cURL command, you can make “update” requests to an API that modify an existing resource. For the JSON Fake API, you specify the resource path and the PUT method, and pass some data to update the resource.
You can use any data format you want here. This example uses application/json:
cURL -X PUT -d ‘{«name»: «json», «type»: «post»}’ -H «Content-Type: application/json» https://jsonplaceholder.typicode.com/posts/1
You must directly specify the data format in the header so that the API can interpret the request correctly.
The above code returns this response body:
{
«name»: «json»,
«type»: «post»,
«id»: 1
}
cURL Protocols and Formats
By default, cURL uses the HTTP protocol. Here are some other protocols and formats that cURL can use:
File Transfer Protocol
The File Transfer Protocol (FTP) transfers files from a server to a client. Use this protocol with cURL to upload files like this:
cURL -T [selected-file] «ftp://[target-destination]»
cURL makes for a good replacement for a standard FTP client.
Simple Mail Transfer Protocol
The Simple Mail Transfer Protocol (SMTP) is for sending data to an SMTP server. This data consists of the text you’re sending, the sender, and the receiver. It looks like this:
cURL smtp://[smtp-sever] —mail-from [sender] —mail-rcpt \ [receiver] —upload-file [mail-content-file]
Dictionary Network Protocol
The Dictionary Network Protocol (DICT) provides access to dictionaries. Using it with cURL, you run the following command:
cURL «dict://dict.org/d:hello»
With this command, you get a result showing the dictionary selected and the meaning of “hello” from the dictionary.
You can find more protocols on the cURL man page.
Common Use Cases for cURL
While API platforms usually provide intuitive interfaces for requesting and transferring data to a URL, cURL can be a great tool to use with the terminal. Here are some common use cases for the cURL command.
Quickly Testing APIs From the Terminal
As we’ve seen, cURL allows you to test APIs quickly form your terminal without having to download any API-based application.
Downloading Images and Files to a Device
Since the terminal has access to the file system, you can also download images from URLs easily.
For example, here’s the Google logo URL. Using cURL, you can download the image like this:
cURL https://www.google.com/images/branding/googlelogo/2x/googlelogo_light_color_272x92dp.png > google-logo.png
Using cURL and the URL of the image returns the binary data of the image. By storing the raw image data in an image file (with a .png extension matching the extension of the original image), you can save the image on your device.
Saving URL Content
Like downloading images, you can also save the content of a URL (for example, a web page) to a file. Here’s an example for the Google homepage:
cURL -o google.html https://www.google.com
This saves the source code of the Google homepage to a file called google.html.
Make cURL work for you.
cURL is a CLI tool that allows you to request and transfer data over a URL under different protocols. It gives you flexibility and control of URLs on the terminal.
Using cURL on the terminal is simple, but may not be intuitive to use by every user. By providing the URL and the options needed, you can request and download data from URLs, transfer data to URLs, and more.
Curl (client URL) is a command-line tool powered by the libcurl library to transfer data to and from the server using various protocols, such as HTTP, HTTPS, FTP, FTPS, IMAP, IMAPS, POP3, POP3S, SMTP, and SMTPS. It is highly popular for automation and scripts due to its wide range of features and protocol support. In this article, you will learn how to use curl in Windows with various examples. Let’s get started.
Contents
- Install curl on Windows
- Curl syntax
- HTTP GET request
- Get remote file information.
- Download a file
- Resume interrupted download
- Authentication with Curl
- Upload a file
- Quote a command
- Change the user-agent
- Send a cookie
- Use a proxy server
- Additional request headers
- Send an email
- Author
- Recent Posts

Surender Kumar has more than twelve years of experience in server and network administration. His fields of interest are Windows servers, Active directory, PowerShell, web servers, networking, Linux, virtualization, and Kubernetes. He loves writing for his blog.
Install curl on Windows
All the modern Windows versions, starting with Windows 10 (version 1803) and Server 2019, have the curl executable pre-installed, so there is no need for a manual installation. To determine the curl location and version in your system, you can use the following commands:
where curl
curl --version

Determine the location and version of curl in Windows
The curl —version command also lists the protocols and features supported by the current curl version. If you see an output, as shown in the screenshot above, you’re all set to use the built-in curl utility. If you get an error message instead, curl might not be available, probably because you’re on an earlier version of Windows (e.g., Windows 8.1 or Server 2016). In that case, you might need to manually setup curl in Windows.
Curl syntax
The curl command uses the following syntax:
curl [options...] [url]
It supports various options, which we will discuss later in this post. As with any other command-line tool, you can use the curl —help command to get help.

Getting help with the curl command
To get detailed help, you can use curl —help all. The help section is divided into categories, so the curl —help category gets you an overview of all the categories.
Now that you’ve become familiar with curl syntax, let’s discuss various use cases with the help of examples.
HTTP GET request
When you use curl against a URL without specifying any option, the request defaults to the GET method of the HTTP protocol. Try this:
curl https://4sysops.com
The above command is essentially equivalent to curl —request GET https://4sysops.com, which sends a GET request to 4sysops.com using the HTTPS protocol. To specify the HTTP protocol version (e.g., http/2), use the —http2 option, as shown below:
curl --http2 https://4sysops.com
For URLs starting with HTTPS, curl first tries to negotiate to establish a http/2 connection and automatically falls back to http/1.1 if the negotiation fails. It also supports other methods, such as HEAD, POST, PUT, and DELETE. To use these methods, along with the curl command, use the —request (or -X) option, followed by the method. Notice that the methods that are available depend on the protocol being used.
Get remote file information.
As an admin, you might want to be interested in HTTP headers only. This can be done using the —head (or -I) option. Sometimes, a URL might redirect you to another location. In that case, —location (or -L) allows the curl to follow the redirects. You can also use —insecure (or -k) to allow insecure connections to avoid any TLS certificate errors if the target URL is using a self-signed certificate. Use this only when absolutely necessary. All three of these options can be combined in short-notation, as shown in the following command:
curl -kIL 4sysops.com

View request headers allow insecure connection and follow redirect options with curl
You can see that short-notation is particularly useful for combining multiple options. The above command is essentially equivalent to the curl —insecure —head —location 4sysops.com command.
The —head (or -I) option also gives you basic information about a remote file without actually downloading it. As shown in the screenshot below, when you use curl with a remote file URL, it displays various headers to give you information about the remote file.
curl -IL https://curl.se/windows/dl-7.85.0_5/curl-7.85.0_5-win64-mingw.zip

Use curl to view the basic information about remote files
The Content-Length header indicates the size of the file (in bytes), Content-Type reveals the media type of the file (for instance image/png, text/htm), Server indicates the type of server application (Apache, Gunicron, etc.), Last-Modified shows the date when file was last changed on the server, and the Accept-Ranges header indicates the support of partial requests from the client for downloads, which essentially means you can resume an interrupted download.
Download a file
You can use curl with the —remote-name option (or -O, in short) to download a file and save it with the same name as on the server. The following command downloads the latest version of curl for Windows from the official website:
curl -OL https://curl.se/windows/latest.cgi?p=win64-mingw.zip

Downloading a file with a default name and progress indicator using curl
The -L option is added to follow redirects, if needed, for locating the resource. If you want to save the file with a new name, use the —output (or -o) option instead. Furthermore, while using the curl command in a script, you might want to suppress the progress indicator using —silent (or -s). Both options can be combined, as shown in the following command:
curl -sLo curl.zip https://curl.se/windows/latest.cgi?p=win64-mingw.zip

Silently download a file and save with a custom name using curl
Resume interrupted download
The presence of Accept-Ranges: bytes in the response header literally means that the server supports resumable downloads. To resume an interrupted download, you can use —continue-at (or -C), which accepts an offset (in bytes). Generally, specifying an offset is tricky, so curl offers an easy way of resuming an interrupted download:
curl -OLC - https://releases.ubuntu.com/22.04/ubuntu-22.04.1-desktop-amd64.iso

Resuming an interrupted download with curl
As you can see in the screenshot, I was downloading an Ubuntu iso file, which was interrupted. When I ran the curl command again with the -C option, the transfer was resumed from the byte range where it was interrupted. The minus sign (—) next to -C allows the curl to automatically figure out how and where to resume the interrupted download.
Authentication with Curl
Curl also supports authentication, allowing you to download a protected file by supplying credentials with the —user (or -u) option, which accepts a username and password in the username:password format. If you skip typing the password, curl will prompt you to type it in no-echo mode.
curl -u surender -OL https://techtutsonline.com/secretFiles/sample.zip

Downloading a file using username and password authentication with curl
If you use a basic authentication method, you have to transfer a username and password, which means that you should use a secure protocol such as HTTPS (instead of HTTP) or FTPS (instead of FTP). If, for some reason, you have to use an unencrypted protocol, make sure you use an authentication method that doesn’t transmit credentials in clear text (for instance, Digest, NTLM, or Negotiate authentication).
Curl also supports the use of .curlrc, _curlrc, and .netrc config files, allowing you to define various curl options in a file and then to include the file in your command with curl —config (or curl -K), which is particularly useful for scripting.
Upload a file
The —upload-file (or -T) option allows you to upload a local file to a remote server. The following command shows how to upload a file from a local system to a remote web server using the FTPS protocol:
curl -kT C:\Users\Surender\Downloads\sample1.zip -u testlab\surender ftps://192.168.0.80/awesomewebsite.com/files/

Uploading a file to a remote server using curl
The -k option is included to avoid certificate errors if the web server uses a self-signed certificate. The trailing slash at the end of the URL tells curl that the destination is a directory. You could specify multiple file names, such as “{sample1.zip,sample2.zip}.” The following command shows how to upload multiple files with a single curl command:
curl -kT sample[1-5].zip -u testlab\surender ftps://192.168.0.80/awesomewebsite.com/files/

Upload multiple files to a remote server using curl
Quote a command
As already discussed, curl supports various methods based on the underlying protocol being used. You can send additional commands using —quote (or -Q) to perform a particular operation either before or after the regular curl operation; for instance, if you want to download a file from a remote server using the FTPS protocol and want the file to be removed from the server once it has been downloaded successfully. To do this, you can run the command shown below:
curl -u testlab\surender -kO "ftps://192.168.0.80/awesomewebsite.com/files/sample1.zip" -Q "-DELE sample1.zip"

Delete a file after successful download using curl command
Here, I downloaded the sample1.zip file from an FTPS server with the help of the -O option. After the -Q option, I added a minus sign (-) just before the DELE command, which tells the curl to send the DELE sample1.zip command immediately after the file is downloaded successfully. Likewise, if you want to send a command to the server before performing the actual curl operation, use a plus (+) sign instead of a minus sign.
Change the user-agent
The user-agent tells a server what type of client is sending the request. When you send a curl request to the server, the curl/<version> user-agent is used by default. If the server is configured to block the curl requests, you can specify a custom user-agent using —user-agent (or -A). The following command sends a common Google Chrome user-agent:
curl -kIA "Mozilla/5.0 (Windows NT 10.0; Win64; x64) AppleWebKit/537.36 (KHTML, like Gecko) Chrome/106.0.0.0" https://awesomewebsite.com/files/secretFile.zip

Use a custom user agent with a curl command to avoid server blocks
The above screenshot shows that a normal curl request was forbidden by the web server (with a 403 Forbidden response), but when I passed a custom user-agent, the request was successful, returning a 200 OK response.
Send a cookie
By default, the curl request does not send or store cookies. To write a cookie, use the —cookie-jar (or -c) option, and with —cookie (or -b), you can send a cookie:
curl -c /path/cookie_file https://awesomewebsite.com/
curl -b /path/cookie_file https://awesomewebsite.com/
The first command writes a cookie file, and the second command sends the cookie with a curl request. You can also send a cookie in ‘name = value’‘ format, as shown below:
curl -b 'session=abcxyz' -b 'loggedin=true' http://echo.hoppscotch.io

Send multiple cookies using a curl command
I used the echo.hoppscotch.io website to view HTTP request headers that aren’t normally visible to clients sending a request. If you don’t want to use this website, you could use the –verbose (or -v) option to see your request in raw form (which will show request headers, too).
Use a proxy server
Do you use a proxy server to connect to the internet? No problem! Curl lets you specify a proxy server using the —proxy (or -x) option. If your proxy server requires authentication, add —proxy-user (or -U):
curl -x 192.168.0.250:8088 -U username:password https://awesomewebsite.com/
The proxy server is specified in the server:port format, and the proxy user is specified in the username:password format. Again, you could skip typing the password for the proxy user, and curl will prompt you to enter it in no-echo mode.

Use a proxy server and authentication with a curl command
Additional request headers
Sometimes, you might want to send additional information along with your request to the server. With curl, you can do so easily by using —header (or -H), as shown in the following command:
curl -vkIH "x-client-os: Windows 11 Enterprise (x64)" https://awesomewebsite.com

Specify additional headers with a curl request
You could send any information that isn’t available with standard HTTP request headers. In this example, I sent my operating system name. I also added the -v option this time to enable verbose output, which displayed the additional header being sent along with my curl request.
Send an email
Since curl supports the SMTP protocol, you could use it to send an email message. The following command shows how to send an email using curl:
curl --insecure --ssl-reqd smtps://mail.yourdomain.com –-mail-from sender@yourdomain.com –-mail-rcpt receiver@company.com --user sender@yourdomain.com --upload-file email_msg.txt

Send an email message using a curl command
Let’s quickly discuss the options used:
- The —insecure (or -k) command is used to avoid an SSL certificate error. We have used this before.
- The —ssl-reql option is used to upgrade a plain-text connection to encrypted connection if supported by the SMTP server. Alternatively, if you’re sure your SMTP server supports SSL, you could directly use the smtps server name (e.g., smtps://smtp.yourdomain.com), as you can see in the screenshot.
- The —mail-from option is used to define the sender’s (from) email address.
- The mail-rcpt option specifies the recipient’s email address.
- The —user (or -u) option sends the username for authentication, which should match the mail-from address, because otherwise your message might be rejected or flagged as spam.
- The —upload-file (or -T) option is used to specify a file that contains the email message to send.
The following screenshot shows the email message I received in my inbox:

Viewing the email message sent with curl
Viewing the email message sent with curl
Subscribe to 4sysops newsletter!
These are just a few examples, but there is a lot more you can do with curl. I highly recommend checking out curl help and experimenting with it. You’ll notice what a powerful command curl is.