Всем привет! Сегодня мы поговорим про включение и отключение компонентов в системе. Мы посмотрим, как их открыть в любой из существующих версий Windows (10, 11, 7 или 8). Я расскажу вам, как установить или наоборот выключить дополнительные пакеты, которые система использует для работы с определенными программами или протоколами.
Содержание
- Способ 1: Панель управления
- Способ 2: Параметры Windows 10
- Способ 3: Параметры Windows 11
- Способ 4: Командная строка
- Задать вопрос автору статьи
Способ 1: Панель управления

Давайте посмотрим, как же нам открыть раздел Windows Features на любой версии Windows (10, 11, 8, 8.1, 7, XP и т.д.). Для этого мы можем воспользоваться «Панелью управления». Хорошо, что её пока не выпилили на свежих версиях «Окон».
ВНИМАНИЕ! Еще один важный момент – через «Панель управления» можно включить и отключить компоненты, которые уже установлены в системе. Если же вам нужно установить какие-то компоненты, которых еще нет в ОС, то используем вариант с использованием параметров системы (две следующие главы).
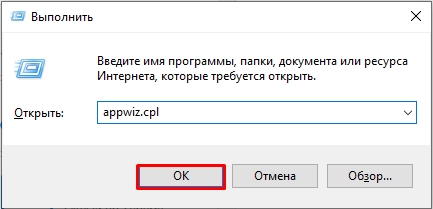
- Одновременно зажимаем клавиши:
+ R
- Теперь открываем пункт:
appwiz.cpl
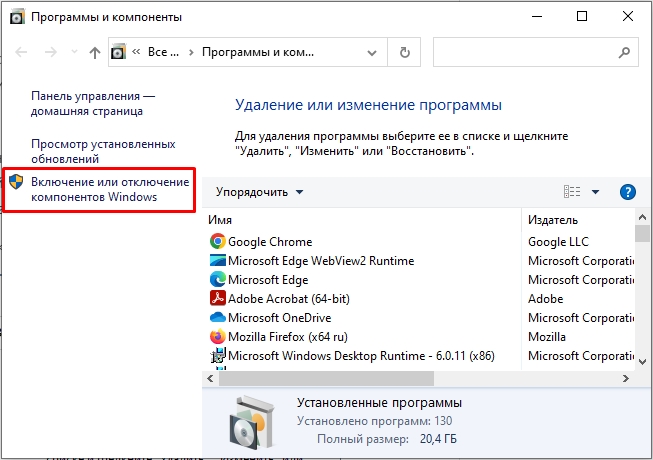
- Слева выберите ту же ссылку, как на картинке ниже.
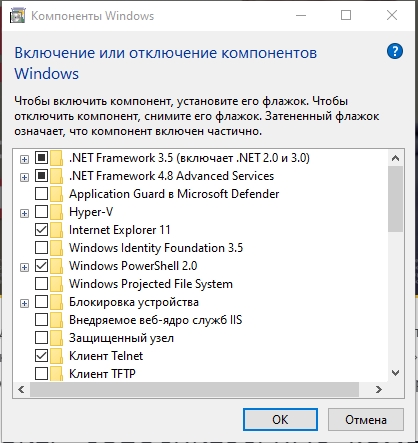
- Теперь включаем или отключаем нужные компоненты и жмем «ОК». Если вас попросят перезапустить систему – сделайте это, чтобы изменения вступили в силу.
Открыть и установить компоненты в Windows 10 можно через стандартное меню системы.
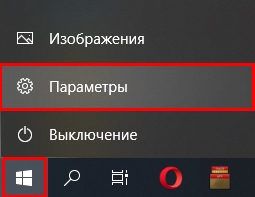
- Откройте «Пуск» и зайдите в «Параметры».
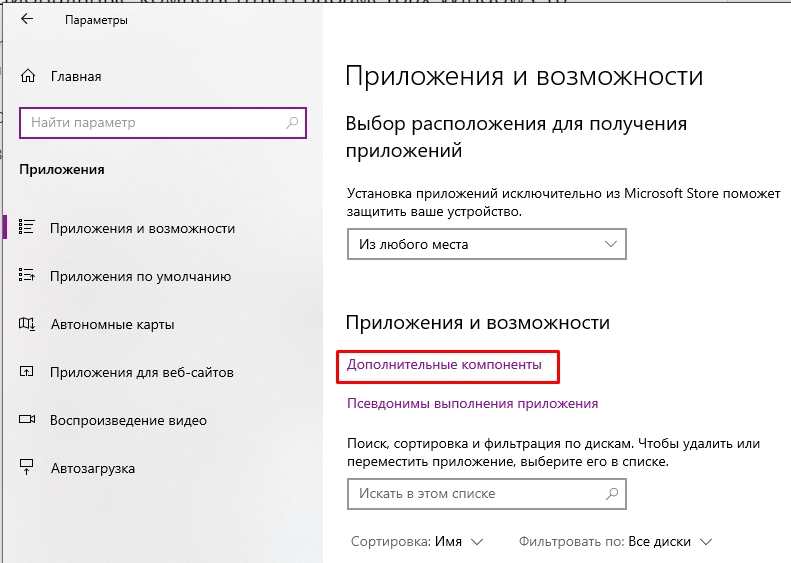
- Среди всего многообразия найдите раздел «Приложения».

- В правой области окошка найдите ссылку «Дополнительные параметры».
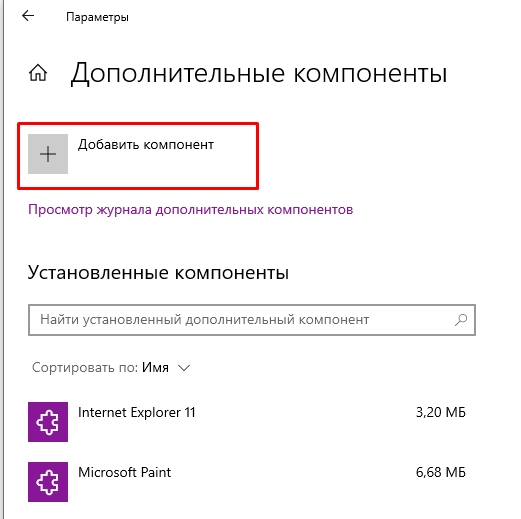
- Если вам нужно добавить пакет, в самом верху нажмите по значку плюсика.
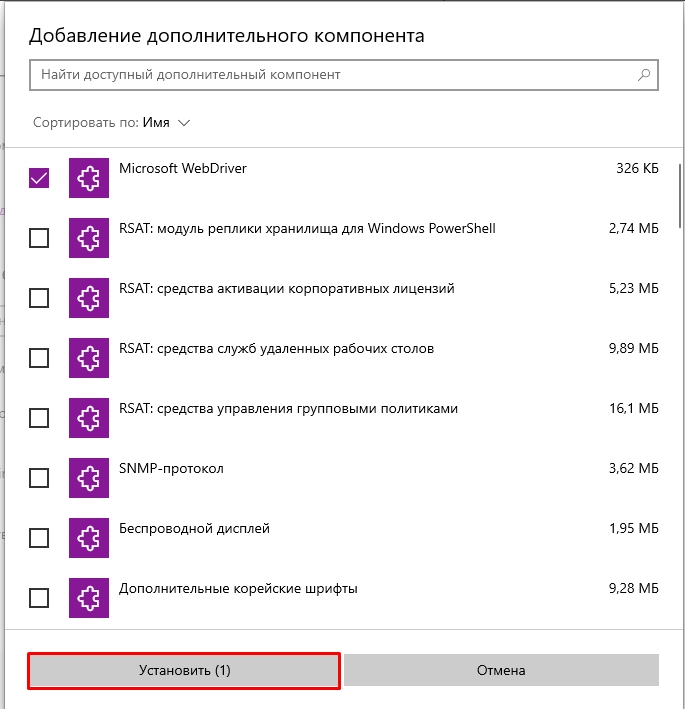
- Выделяем нужный и жмем по кнопке установки. Вы также можете воспользоваться строкой поиска. Компонент будет загружен с сервера и установлен к вам на компьютер.
- Если же вам нужно наоборот удалить пакет – просто выберите его из списка ниже, кликните по нему левой кнопкой мыши и выберите команду «Удалить».
Способ 3: Параметры Windows 11
- Чтобы быстро открыть параметры системы одновременно зажмите две клавиши:
+ I
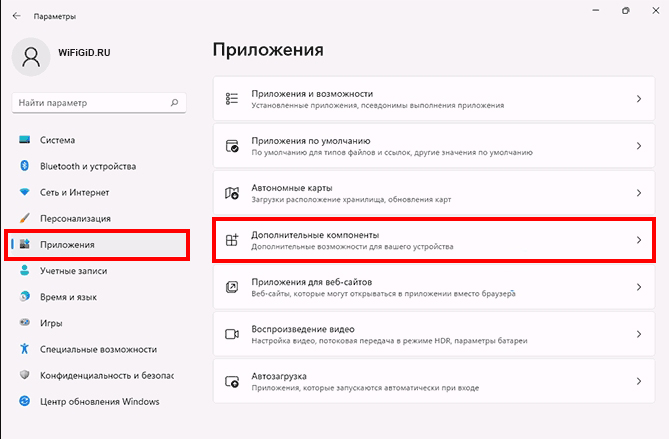
- В левом блоке выберите раздел «Приложения».
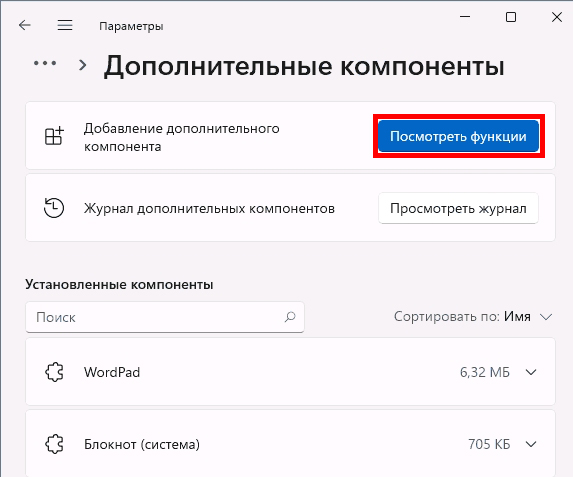
- Далее справа находим пункт «Дополнительные компоненты».
- Внизу вы увидите список уже установленных пакетов, если вам нужно что-то выключить, находим нужный, выделяем и деактивируем. Если же вам нужно что-то установить – в самом верху нажмите по кнопке «Посмотреть функции».
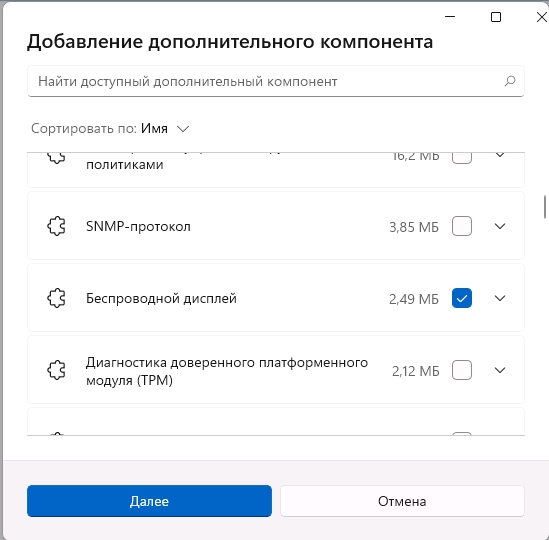
- Все аналогично как и в десятой версии «Окон», находим нужный компонент, выделяем и жмем «Далее». После этого устанавливаем к себе в операционную систему.
Способ 4: Командная строка
Инсталлировать дополнительный пакет можно с помощью консоли. Для этого запускаем командную строку с правами администратора. Сначала нам нужно узнать список всех доступных компонентов. Также вы увидите, что уже установлено. Вводим:
Dism /online /Get-Features
Как только вы нашли нужный пакет, используем команду установки:
Dism /online /Enable-Feature /FeatureName:ИМЯ_КОМПОНЕНТА /All
После этого он будет установлен. Напомню, что таким же образом можно использовать команды для скриптов, которые запускаются из-под Windows. На этом все, дорогие друзья портала WiFiGiD.RU. Если что-то осталось неясным – пишите в комментариях.
Windows features – компоненты и служб операционной системы Windows. Они присутствуют во всех версиях ОС, и каждая новая версия системы содержит как старые, так и новые компоненты. Поэтому в большинстве случаев новая Windows поддерживает функционал ранних версий. Службы и компоненты можно включить и выключить чтобы освободить ресурсы компьютера. Это полезно для быстродействия системы, когда нужно нагрузить компьютер сложными задачами.
Процедуры управления службами и компонентами в Windows 10 остались классическими. Их алгоритмы не отличаются от тех, которые были в ранних версиях операционной системы. Раздел с удалением программ разработчики перенесли в пункт Параметры, однако ссылка на этот функционал осталась в Панели управления. Чтобы попасть в разделы с features нужно выполнить следующие шаги:
- зайти в Панель управления через меню Пуск или другим доступным способом;
- в Панели управления рекомендуется установить режим просмотра Мелкие или Крупные значки (это раскрывает весь функционал панели на экране);
- зайти в пункт Программы и компоненты-Включение и отключение компонентов Windows;
- в открывшемся меню с доступными компонентами галочками можно включать или отключать службы и компоненты операционной системы.
Выполнять это нужно с большой долей ответственности, особенно, когда компьютер используется в качестве рабочей станции на предприятии. Отключением служб можно деактивировать работу многих систем и оргтехники. Например, если выключать службу управления факсом, представленное оборудование перестанет работать, что приведет к утрате компанией части коммуникативных возможностей.
Какие службы и компоненты можно отключить и при каких условиях
Операционная система Windows 10 разрабатывалась под широкий круг задач. Для домашнего использования многие программы и компоненты можно выключить, чтобы освободить ресурсы компьютера для увеличения быстродействия. Основными службами и компонентами, которые можно выключить домашнему пользователю, являются следующие:
- Internet Explorer или Edge при использовании других браузеров, однако нужно учитывать, что веб-интерфейс некоторых программ или некоторые сайты корректно открываются только в браузере от Microsoft;
- Hyper-V, если на компьютере не используются виртуальные машины;
- SNMP-протокол – помощник в настройке старых роутеров;
- Внедряемое веб-ядро служб IIS и Клиент TFTP, Служба активации Windows используются исключительно для разработчиков;
- Клиент Telnet, если не нужно подключаться удаленно к командной строке;
- набор инструментов для корпоративного использования (Клиент рабочих папок, Прослушиватель RIP, Простые службы TCPIP, Службы Active Directory для облегчённого доступа к каталогам, «Службы IIS и Соединитель MultiPoint).
Некоторые службы и компоненты операционной системы Windows 10 могут быть отключены по умолчанию. Об этом свидетельствует соответствующая пометка напротив их наименования в таблице. В таком случае вносить корректировки в настройку этих features не имеет смысла.
Возможные проблемы и их решения
При работе со службами и компонентами «десятки» возможно появление неисправностей. Основные из них – пустое окно Windows features, а также один или несколько компонентов не включаются. Ошибку белого экрана решают следующим образом:
- нажать Win+R и в открывшемся окне прописать команду regedit;
- откроется редактор реестра, где нужно пройти по ветке HKEY_LOCAL_MACHINE\SYSTEM\CurrentControlSet\Control\Windows;
- открыть параметр CSDVersion двойным нажатием левой клавиши мыши;
- задать значение 0.
Причиной блокирования работы объектов в Windows features является их деактивированное состояние. Исправить проблему можно путем выполнение таких шагов:
- вывести все работающие компоненты в отдельный список и отключить их;
- перезагрузить компьютер и попытаться включить неработающие изначально компоненты;
- включить остальные features и перезагрузить компьютер.
В большинстве случаев описанные шаги приводят к активированию нужных служб и компонентов операционной системы Windows 10.
Over 30 optional features available in Windows 10
by Milan Stanojevic
Milan has been enthusiastic about technology ever since his childhood days, and this led him to take interest in all PC-related technologies. He’s a PC enthusiast and he… read more
Updated on
- Windows 10 comes with a set of hidden optional features.
- They can be manually toggled on and off.
- We will show you how to do this in our article.

XINSTALL BY CLICKING THE DOWNLOAD
FILE
Windows 10 is a great operating system, but it also comes with several hidden features that you might not know about.
All these features are listed in the Turn Windows features on or off section, and in today’s article, we’ll show you how you can enable or disable them.
How do I turn on or off optional Windows features?
You can easily configure optional Windows features from the Control Panel. From there, you can manually select which features you want to turn on or off.
1. Press the Windows key and type control panel in the search box.
2. Click on the first result to open Control Panel.
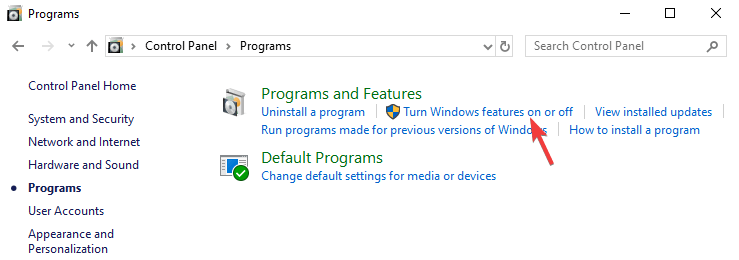
3. Navigate to Programs.
4. Now select Turn Windows features on or off.
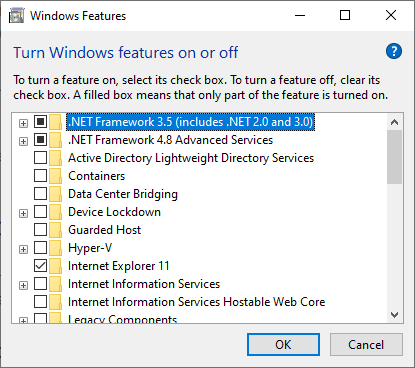
5. A list of features will now appear.
6. Check the feature you want to install or uncheck the one you want to remove and click OK.
7. Restart your PC in order to apply the changes.
If you want to access this feature quickly, you can use the following method:
- Press Windows Key + R to open the Run window.
- Now enter optionalfeatures and press Enter or click OK.


Want to unlock secret Windows 10 features? Here’s how to do it like a pro!
What features are available to be installed?

There are about 30+ optional features available to be installed, but we’re going to focus on several most important ones.
- .NET Framework 3.5 (includes .NET 2.0 and 3.0) and .NET Framework 4.6 Advanced Services – These two features are required in order to run applications created using the .NET Framework 3.5 or 4.6.
- Hyper-V – Microsoft’s virtualization technology that lets you run virtual machines on your PC without third-party software.
- Internet Explorer 11 – If you still need to use Internet Explorer on your PC, you should know it’s still available on Windows 10.
- Media Features – This includes Windows Media Player and other multimedia components.
- Microsoft Print to PDF – A feature that lets you “print” your documents straight to PDF files instead of an actual printer.
- Windows PowerShell 2.0 – Command Line interface similar to the Command Prompt, but more advanced.
- Windows Subsystem for Linux (Beta) – This feature gives you access to the Ubuntu command line and it allows you to use the same commands you’d use on a Linux system.
These are some of the most notable features that you can enable/disable, but there are a lot more available.
There you go, a quick and easy guide on how to use Turn Windows Features on or off on your PC.
As you can see, most of the features available here are made for advanced users, and you most likely won’t have to enable or disable them on your own anytime soon.
We hope you found this article informative and that you now have a better understanding of optional Windows Features.
- How to sign in to Windows 10 without a password
- How to use the new Windows 10 clipboard history and sync
- How to update drivers in Windows 10: Use these 4 methods
![]()

(Image credit: Windows Central)
On Windows 11, you can add or remove many «optional features» to extend your computer’s functionalities. For example, you can configure features such as Windows Subsystem for Linux, Windows Sandbox, Microsoft Defender Application Guard, Hyper-V, Windows Hello Face, Windows Developer Mode, Print Management, and many more.
Some of these features can be enabled directly from the «Windows Features» page since the components are available on every installation, and others, you can only download through the Settings app since they are not part of the default setup.
Also, a lot of these features are advanced and won’t apply to most users, as turning them on can potentially make the system vulnerable or cause performance issues if not configured correctly. However, they can make Windows 11 even more capable in the right situation.
In this Windows 11 guide, you will learn the different ways you add and remove optional features on your computer.
- How to manage optional features via Settings
- How to manage optional features via Control Panel
How to manage optional features via Settings
On Windows 11, the Settings app lets you install additional features to extend the system’s functionalities. You will need an internet connection to download these features since the components are not stored in the default installation.
Add optional features
To download and install optional features through the Settings app, use these steps:
- Open Settings.
- Click on Apps.
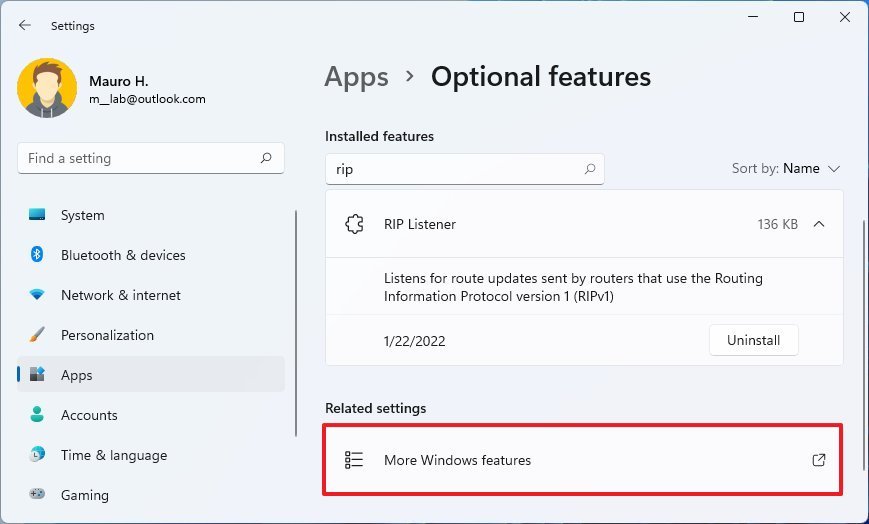
- Click the Optional features page on the right side.
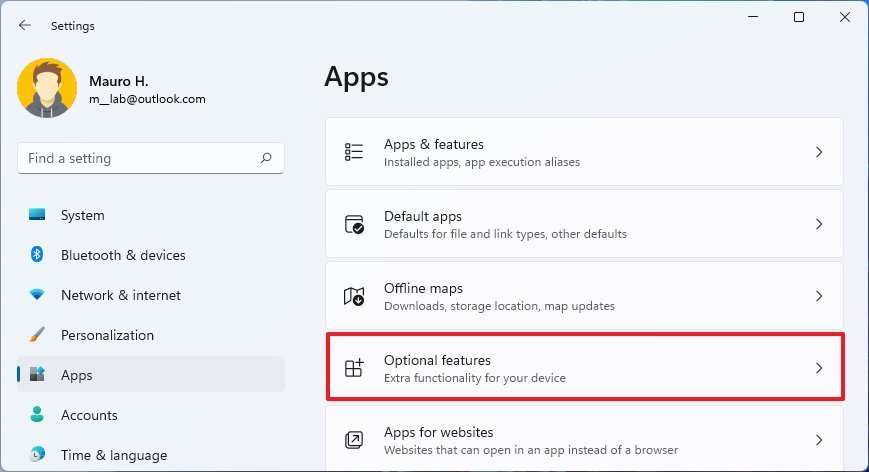
- Click the View features button for the «Add an optional feature» setting.
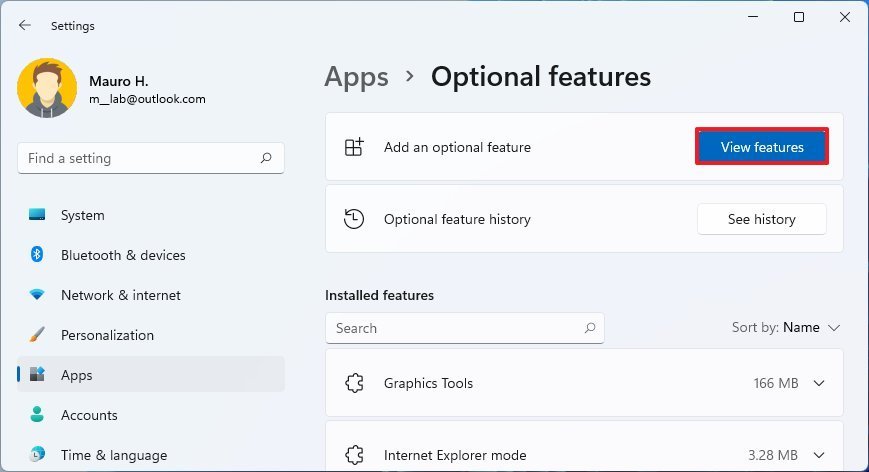
- Select the feature to install on Windows 11.Quick tip: Click the down-arrow button to see more details about the feature. You can select multiple features at one time.
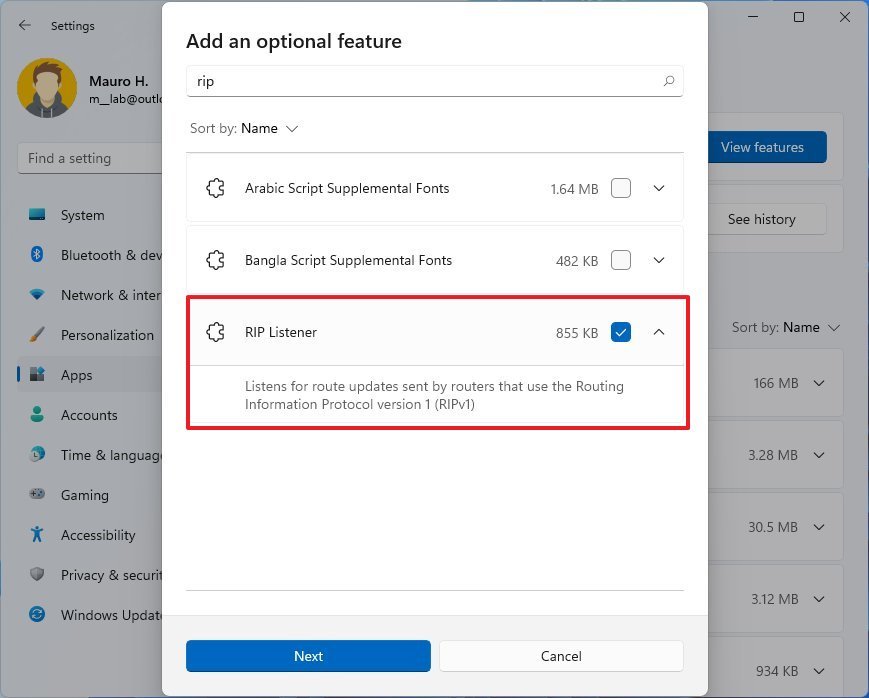
- Click the Next button.
- Click the Install button.
Once you complete the steps, the feature will install without restarting the computer (in most cases).
Remove optional features
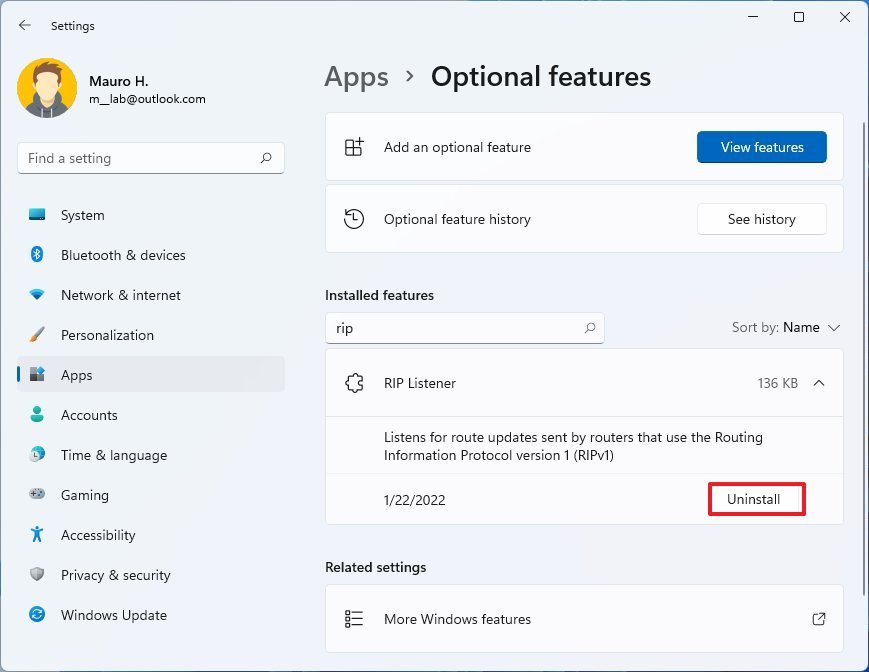
To remove features from the «Optional features» settings, use these steps:
- Open Settings.
- Click on Apps.
- Click the Optional features page on the right side.
- Under the «Installed features» section, select the feature to remove and click the Uninstall button.
After you complete the steps, the feature will be removed from the installation.
How to manage optional features via Control Panel
The features available through the «Windows features» interface can also help you to extend the functionality of Windows 11. However, since these components come on every setup, you don’t need an internet connection to enable them.
Add optional features
To turn on Windows features, use these steps:
- Open Settings.
- Click on Apps.
- Click the Optional features page on the right side.
- Under the «Related settings» section, click the More Windows features setting.
- Check the Windows 11 feature to install.
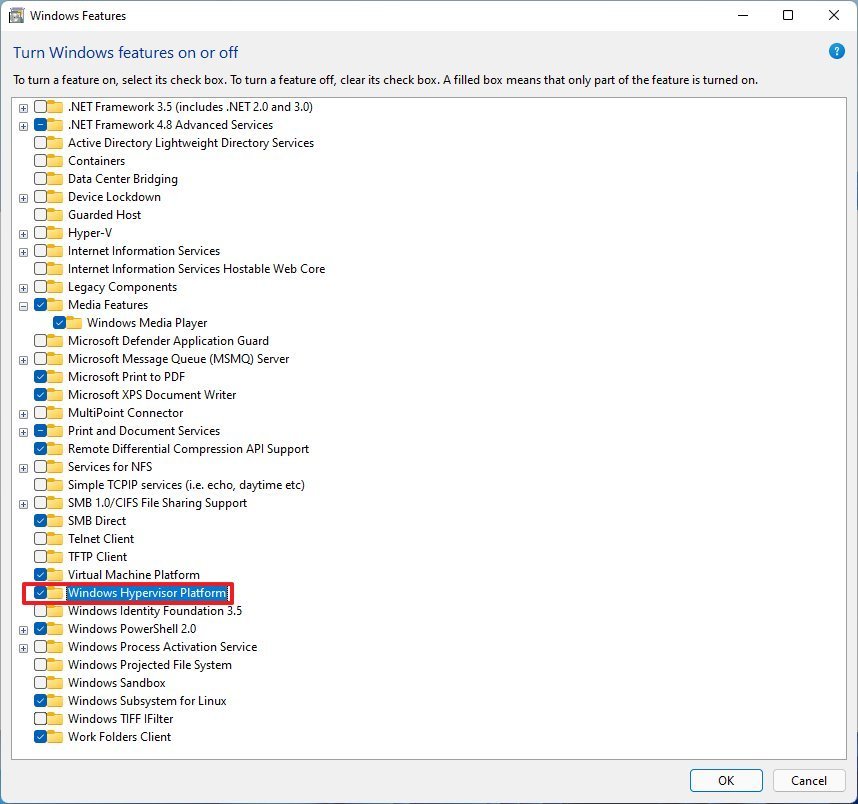
- Click the OK button.
- Click the Restart button.
Once you complete the steps, the computer will restart to finish applying the feature.
On Windows 11, you can add a number of optional features, depending on your edition, since the Pro edition has more advanced components than the Home edition.
Here are the Windows features you can turn on or off on Windows 11 Pro:
- .NET Framework 3.5 (includes .NET 2.0 and 3.0): Runs app built using Microsoft .NET software framework version 3.5 or older. You can safely enable this older support, but usually, it’ll enable on demand when needed.
- .NET Framework 4.8 Advanced Services: Required for apps built with version 4.8 of the framework.
- Active Directory Lightweight Directory Services: Adds Lightweight Directory Access Protocol (LDAP) support for directory-enabled apps. This is an alternative to Windows Active Directory. Typically, you’ll have to turn on this feature in specific corporate network scenarios.
- Containers: Provides services and tools to create and manage Windows Server Containers and Hyper-V containers.
- Data Center Bridging: This is an IEEE standard that enables converged fabrics in a data center, where network, storage, clustering, and traffic managements share the same Ethernet network infrastructure. Data center bridging is only useful in corporate networks.
- Device Lockdown: Adds services and tools for a more controlled experience, such as when setting up a kiosk or temporary workstation.
- Guarded Host: Creates an environment to provide stronger protection for virtual machines to prevent tampering and theft by malicious individuals and malware.
- Hyper-V: Virtualization component to create and manage virtual machines on Windows 11.
- Internet Information Services: It’s known as «IIS,» and it’s a service that allows to set up an FTP server or a server to host websites with management services.
- Internet Information Services Hostable Web Core: Creates an environment to host apps on the web.
- Legacy Components: Adds support for old components, including DirectPlay, a feature formerly part of DirectX.
- Media Features: Allows you to add or remove the classic Windows Media Player app. This option is also part of the «Optional features» settings page.
- Microsoft Defender Application Guard: Creates up an isolated virtualized environment to test apps and browse untrusted sites to prevent old and newly emerging attacks on the physical machine.
- Microsoft Message Queue (MSMO) Server: Enables apps to run correctly on unreliable networks by queuing messages instead of sending them as they’re generated.
- Microsoft Print to PDF: Allows printing to a PDF file instead of a physical printer.
- Microsoft XPS Document Writer: This is an old Microsoft feature similar to PDF. You can still print documents to XPS, but PDF is a format that’s more widely supported.
- MultiPoint Connector: Allows you to monitor and manage a computer using MultiPoint Manager and MultiPoint Manager Dashboard applications.
- Print and Document Services: Adds printing services to Windows 11, including scan, fax, and network printing.
- Remote Differential Compression API Support: Provides synchronization algorithm that intelligently compares two files that are about to be synchronized and only updates the differences between them. Only specific apps can use this feature.
- Services for NFS: Provides file access using the Network File System (NFS) protocol. For example, when you need access files on Network Attached Storage (NAS).
- Simple TCPIP Services (i.e., echo, daytime, etc.): Adds support for additional TCP/IP protocol services, including «Echo,» «Character Generator (CHARGEN),» «Daytime,» «Discard,» and «Quote of the Day (QUOTE).»
- SMB 1.0/CIFS File Sharing Support: Adds support to configure file and printer sharing for previous versions of Windows, including Windows XP and Windows Server 2003 R2.
- SMB Direct: Allows the use of network adapters with Remote Direct Memory Access (RDMA) capability to improve file-sharing support using SMB 3.x.
- Telnet Client: Enables command-line utility to connect to other devices, such as routers and switches, running a Telnet server. This network protocol isn’t secure, and you shouldn’t use it outside of your network.
- TFTP Client: Enables command-line utility to upload and download files using Trivial File Transfer Protocol. This protocol isn’t secure, and you shouldn’t use it unless required.
- Virtual Machine Platform: Add platform support for virtual machines, and you can leverage this feature to create MSIX app packages for App-V or MSI. You must enable this option to set up the Windows Subsystem for Linux 2 (WSL2).
- Windows Hypervisor Platform: Enables the virtualization components to run the Microsoft Hyper-V hypervisor.
- Windows Identity Foundation 3.5: This may be needed for apps created with older .NET technologies.
- Windows PowerShell 2.0: Enables or disables PowerShell scripting command-line application on Windows 11.
- Windows Process Activation Service: Installs services that may be required when using IIS web services.
- Windows Projected File System: Also known as (ProjFS), this feature allows an app (provider) to present hierarchical data from a backing data store into the file system, making it seem like files are in the file system.
- Windows Sandbox: Creates a lightweight virtual machine to test applications and navigate untrusted web pages in an isolated environment. When you close the sandbox, everything will be deleted. The next time you open the app, a new sandboxed instance will be created.
- Windows Subsystem for Linux: Installs the platform to install and run Linux distros alongside Windows 11.
- Windows TIFF iFilter: Allows the system to index and search Tagged Image File Format (TIFF) using optical character recognition (OCR), but it typically uses more system resources than traditional file indexing and searching.
- Work Folders Client: Allows file synchronization with network file servers.
Other features like RIP Listener, RAS Connection Manager Administration Kit (CMAK), and Simple Network Management Protocol (SNMP) are now part of optional features through the Settings app.
Remove optional features
To turn off Windows features, use these steps:
- Open Settings.
- Click on Apps.
- Click the Optional features page on the right side.
- Under the «Related settings» section, click the More Windows features setting.
- Clear the Windows 11 feature to install.
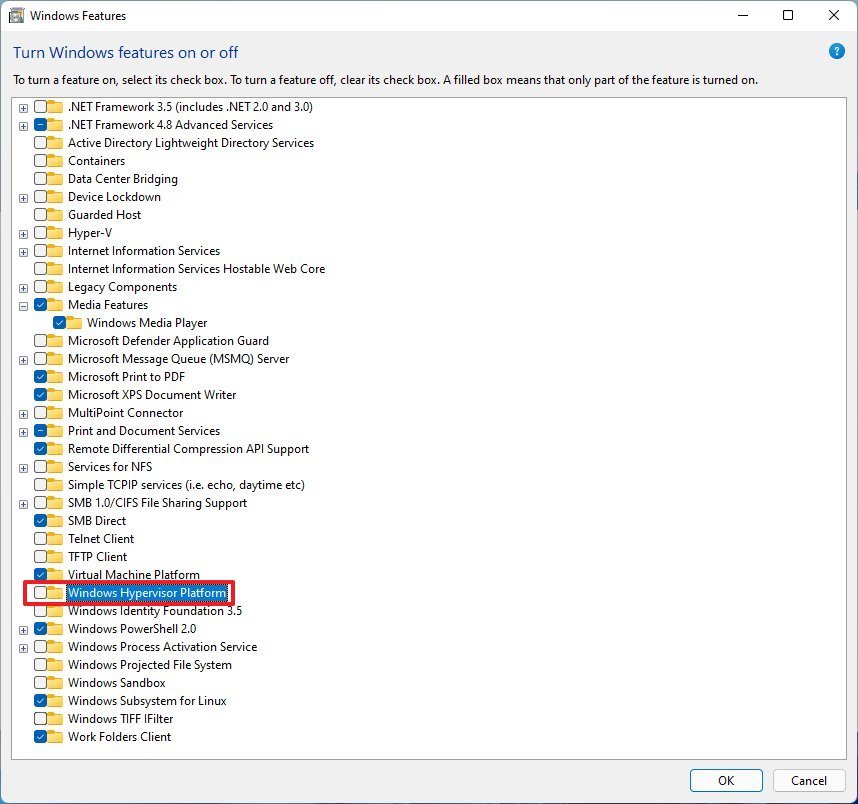
- Click the OK button.
- Click the Restart button.
After you complete the steps, the feature will no longer be available on Windows 11.
More Windows resources
For more helpful articles, coverage, and answers to common questions about Windows 10 and Windows 11, visit the following resources:
- Windows 11 on Windows Central — All you need to know
- Windows 11 help, tips, and tricks
- Windows 10 on Windows Central — All you need to know
All the latest news, reviews, and guides for Windows and Xbox diehards.
Mauro Huculak is technical writer for WindowsCentral.com. His primary focus is to write comprehensive how-tos to help users get the most out of Windows 10 and its many related technologies. He has an IT background with professional certifications from Microsoft, Cisco, and CompTIA, and he’s a recognized member of the Microsoft MVP community.
In this tutorial I will show you, how to reach the Windows Features options in Windows 10 and how to use it to enable and disable Windows Features in Windows 10.
You can use the Windows Features to turn on or off the following features:
- .NET Framework 3.5
- .NET Framework 4.6
- Active Directory Lightweight Directory Services
- Embedded Shell Launcher
- Hyper-V
- Internet Information Services
- Internet Information Services Hostable Web Core
- Legacy Components
- Media Features
- Microsoft Message Queue
- MultiPoint Connector
- Print and Document Services
- Print as a PDF
- RAS Connection Manager Administration Kit
- Remote Differential Compression API Support
- RIP Listener
- Simple Network Management Protocol (SNMP)
- Simple TCPIP Services
- SMB 1.0 / CIFS File Sharing Support
- Telnet Client
- TFTP Client
- Unified Write Filter
- Windows Indentity Foundation
- Windows PowerShell 2.0
- Windows Process Activation Service
- Windows TIFF Ifilter
- Work Folders Client
- XPS Services
- XPS Viewer
Depending on your installation and device, some features might not be available or you might have more features. The above list was given as a way of showing you some features, features can change in upcoming updates.
How-to Enable or Disable Windows Features in Windows 10
1. Begin by opening the Control Panel, you can do this by typing “Control Panel” in the Cortana search bar or by right-clicking the Start logo and then choose Control Panel

2. In Control Panel click on Programs
3. Within programs click on Programs and Features
4. In the left pane you will now see the button Turn Windows Features on or off, click on that.
5. A UAC (User Account Control) message might appear, click on Yes or fill in an Administrator password.
You can now turn on and off certain features. I suggest you be careful with disabling features as Windows or your software might need them to function properly. In some cases Windows will warn you before you can disable features.
I hope this tutorial helped you to turn on or off Windows Features in Windows 10.
As a business owner, you might be wondering how to maintain strong relationships with your…
If you’ve been searching for the best way to get your online business up and…
Are you eager to make your reaction GIFs and memes? Reaction GIFs have become a…
If there’s one streaming platform that has taken over the world in a flash, that’s…