В современных версиях Windows уже есть встроенный SSH сервер на базе пакета OpenSSH. В этой статье мы покажем, как установить и настроить OpenSSH сервер в Windows 10/11 и Windows Server 2022/2019 и подключиться к нему удаленно по защищенному SSH протоколу (как к Linux).
Содержание:
- Установка сервера OpenSSH в Windows
- Настройка SSH сервера в Windows
- Sshd_config: Конфигурационный файл сервера OpenSSH
- Подключение по SSH к Windows компьютеру
- Логи SSH подключений в Windows
Установка сервера OpenSSH в Windows
Пакет OpenSSH Server включен в современные версии Windows 10 (начиная с 1803), Windows 11 и Windows Server 2022/2019 в виде Feature on Demand (FoD). Для установки сервера OpenSSH достаточно выполнить PowerShell команду:
Get-WindowsCapability -Online | Where-Object Name -like ‘OpenSSH.Server*’ | Add-WindowsCapability –Online
Или при помощи команды DISM:
dism /Online /Add-Capability /CapabilityName:OpenSSH.Server~~~~0.0.1.0
Если ваш компьютер подключен к интернету, пакет OpenSSH.Server будет скачан и установлен в Windows.
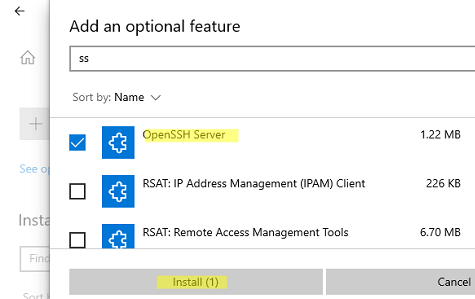
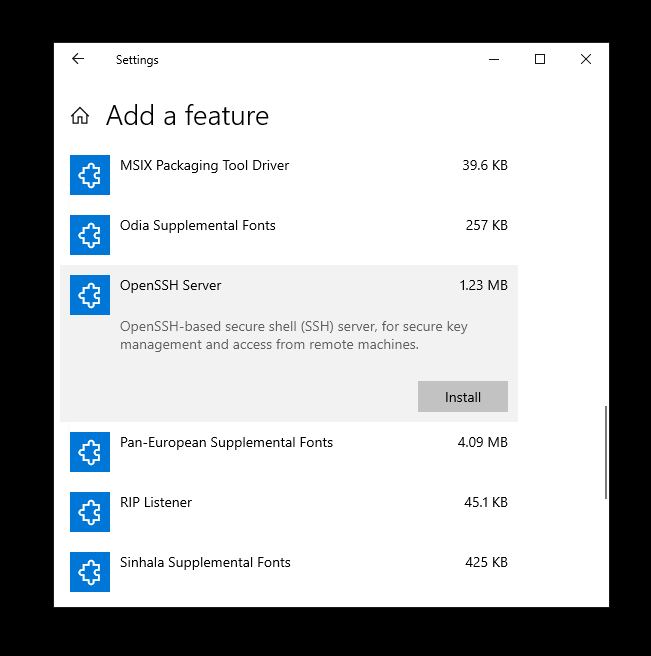
Также вы можете установить сервер OpenSSH в Windows через современную панель Параметры (Settings -> Apps and features -> Optional features -> Add a feature, Приложения -> Управление дополнительными компонентами -> Добавить компонент. Найдите в списке OpenSSH Server и нажмите кнопку Install).
На изолированных от интернета компьютерах вы можете установить компонент с ISO образа Features On Demand (доступен в личном кабинете на сайте Microsoft: MSDN или my.visualstudio.com). Скачайте диск, извлеките его содержимое в папку c:\FOD (достаточно распаковать извлечь файл
OpenSSH-Server-Package~31bf3856ad364e35~amd64~~.cab
), выполните установку из локального репозитория:
Add-WindowsCapability -Name OpenSSH.Server~~~~0.0.1.0 -Online -Source c:\FOD
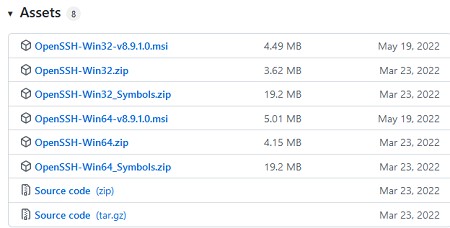
Также доступен MSI установщик OpenSSH для Windows в официальном репозитории Microsoft на GitHub (https://github.com/PowerShell/Win32-OpenSSH/releases/). Например, для Windows 10 x64 нужно скачать и установить пакет OpenSSH-Win64-v8.9.1.0.msi. Следующая PowerShell команда скачает MSI файл и установит клиент и сервер OpenSSH:
Invoke-WebRequest https://github.com/PowerShell/Win32-OpenSSH/releases/download/v8.9.1.0p1-Beta/OpenSSH-Win64-v8.9.1.0.msi -OutFile $HOME\Downloads\OpenSSH-Win64-v8.9.1.0.msi -UseBasicParsing
msiexec /i c:\users\root\downloads\OpenSSH-Win64-v8.9.1.0.msi
Также вы можете вручную установить OpenSSH сервер в предыдущих версиях Windows (Windows 8.1, Windows Server 2016/2012R2). Пример установки Win32-OpenSSH есть в статье “Настройка SFTP сервера (SSH FTP) в Windows”.
Чтобы проверить, что OpenSSH сервер установлен, выполните:
Get-WindowsCapability -Online | ? Name -like 'OpenSSH.Ser*'
State : Installed

Настройка SSH сервера в Windows
После установки сервера OpenSSH в Windows добавляются две службы:
- ssh-agent (OpenSSH Authentication Agent) – можно использовать для управления закрытыми ключами если вы настроили SSH аутентификацию по ключам;
- sshd (OpenSSH SSH Server) – собственно сам SSH сервер.
Вам нужно изменить тип запуска службы sshd на автоматический и запустить службу с помощью PowerShell:
Set-Service -Name sshd -StartupType 'Automatic'
Start-Service sshd

С помощью nestat убедитесь, что теперь в системе запущен SSH сервер и ждет подключений на порту TCP:22 :
netstat -na| find ":22"

Проверьте, что включено правило брандмауэра (Windows Defender Firewall), разрешающее входящие подключения к Windows по порту TCP/22.
Get-NetFirewallRule -Name *OpenSSH-Server* |select Name, DisplayName, Description, Enabled
Name DisplayName Description Enabled
---- ----------- ----------- -------
OpenSSH-Server-In-TCP OpenSSH SSH Server (sshd) Inbound rule for OpenSSH SSH Server (sshd) True

Если правило отключено (состоянии Enabled=False) или отсутствует, вы можете создать новое входящее правило командой New-NetFirewallRule:
New-NetFirewallRule -Name sshd -DisplayName 'OpenSSH Server (sshd)' -Enabled True -Direction Inbound -Protocol TCP -Action Allow -LocalPort 22
Рассмотрим, где храниться основные компоненты OpenSSH:
- Исполняемые файлы OpenSSH Server находятся в каталоге
C:\Windows\System32\OpenSSH\
(sshd.exe, ssh.exe, ssh-keygen.exe, sftp.exe и т.д.) - Конфигурационный файл sshd_config (создается после первого запуска службы):
C:\ProgramData\ssh - Файлы authorized_keys и ssh ключи можно хранить в профиле пользователей:
%USERPROFILE%\.ssh\
Sshd_config: Конфигурационный файл сервера OpenSSH
Настройки сервере OpenSSH хранятся в конфигурационном файле %programdata%\ssh\sshd_config. Это обычный текстовый файл с набором директив. Для редактирования можно использовать любой текстовый редактор (я предпочитаю notepad++). Можно открыть с помощью обычного блокнота:
start-process notepad C:\Programdata\ssh\sshd_config
Например, чтобы запретить SSH подключение для определенного доменного пользователя (и всех пользователей указанного домена), добавьте в конце файле директивы:
DenyUsers winitpro\[email protected]
DenyUsers corp\*
Чтобы разрешить подключение только для определенной доменной группы:
AllowGroups winitpro\sshadmins
Либо можете разрешить доступ для локальной группы:
AllowGroups sshadmins
По умолчанию могут к openssh могут подключаться все пользователи Windows. Директивы обрабатываются в следующем порядке: DenyUsers, AllowUsers, DenyGroups,AllowGroups.
Можно запретить вход под учетными записями с правами администратора, в этом случае для выполнения привилегированных действий в SSH сессии нужно делать runas.
DenyGroups Administrators
Следующие директивы разрешают SSH доступ по ключам (SSH аутентификации в Windows с помощью ключей описана в отдельной статье) и по паролю:
PubkeyAuthentication yes
PasswordAuthentication yes
Вы можете изменить стандартный SSH порт TCP/22, на котором принимает подключения OpenSSH в конфигурационном файле sshd_config в директиве Port.
После любых изменений в конфигурационном файле sshd_config нужно перезапускать службу sshd:
restart-service sshd
Подключение по SSH к Windows компьютеру
Теперь вы можете попробовать подключиться к своей Windows 10 через SSH клиент (в этом примере я использую putty).
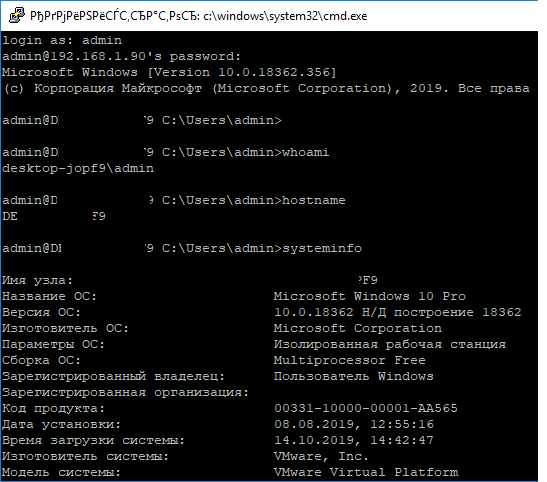
Вы можете использовать встроенный SSH клиентом Windows для подключения к удаленному хосту. Для этого нужно в командной строке выполнить команду:
ssh [email protected]
В этом примере
alexbel
– имя пользователя на удаленном Windows компьютере, и 192.168.31.102 – IP адрес или DNS имя компьютера.
Обратите внимание что можно использовать следующие форматы имен пользователей Windows при подключении через SSH:
-
alex@server1
– локальный пользователь Windows -
[email protected]@server1
–пользователь Active Directory (в виде UPN) или аккаунт Microsoft/ Azure(Microsoft 365) -
winitpro\alex@server1
– NetBIOS формат имени
В домене Active Directory можно использовать Kerberos аутентификацию в SSH. Для этого в sshd_config нужно включить параметр:
GSSAPIAuthentication yes
После этого можно прозрачно подключать к SSH сервер с Windows компьютера в домене из сессии доменного подключается. В этом случае пароль пользователя не указывается и выполняется SSO аутентификация через Kerberos:
ssh -K server1
При первом подключении появится стандартный запрос на добавление узла в список известных SSH хостов.
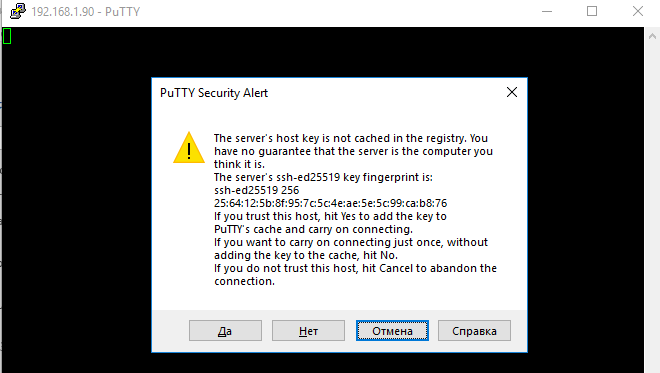
Нажимаем Да, и в открывшееся окне авторизуемся под пользователем Windows.
При успешном подключении запускается командная оболочка cmd.exe со строкой-приглашением.
admin@win10tst C:\Users\admin>
В командной строке вы можете выполнять различные команды, запускать скрипты и программы.
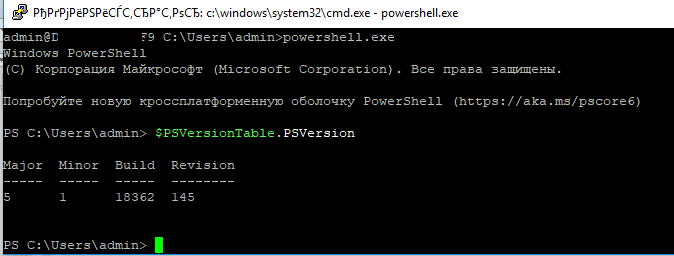
Я предпочитаю работать в командной строке PowerShell. Чтобы запустить интерпретатор PowerShell, выполните:
powershell.exe
Чтобы изменить командную оболочку (Shell) по умолчанию в OpenSSH с cmd.exe на PowerShell, внесите изменение в реестр такой командой:
New-ItemProperty -Path "HKLM:\SOFTWARE\OpenSSH" -Name DefaultShell -Value "C:\Windows\System32\WindowsPowerShell\v1.0\powershell.exe" -PropertyType String –Force
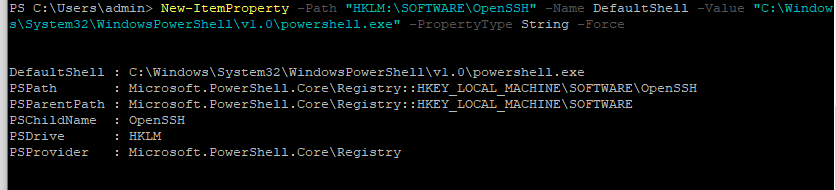
Осталось перезапустить SSH подключение и убедиться, что при подключении используется командный интерпретатор PowerShell (об этом свидетельствует приглашение
PS C:\Users\admin>
).
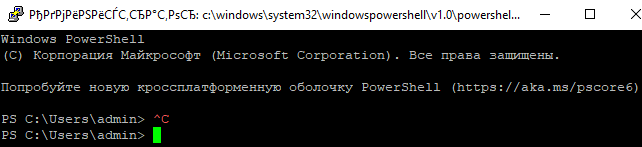
В SSH сессии запустилась командная строка PowerShell, в которой работают привычные функции: авто дополнение, раскраска модулем PSReadLine, история команд и т.д. Если текущий пользователь входит в группу локальных администраторов, то все команды в его сессии выполняются с повышенными правами даже при включенном UAC.
Логи SSH подключений в Windows
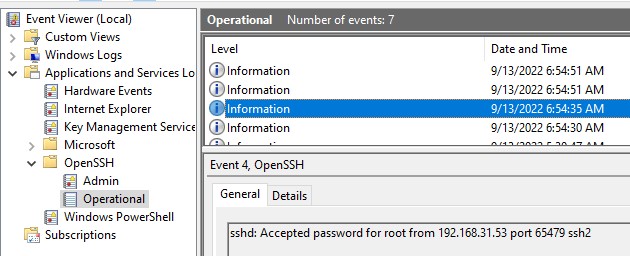
В Windows логи подключений к SSH серверу по-умолчанию пишутся не в текстовые файлы, а в отдельный журнал событий через Event Tracing for Windows (ETW). Откройте консоль Event Viewer (
eventvwr.msc
>) и перейдите в раздел Application and services logs -> OpenSSH -> Operational.
При успешном подключении с помощью к SSH серверу с помощью пароля в журнале появится событие:
EventID: 4
sshd: Accepted password for root from 192.168.31.53 port 65479 ssh2
Если была выполнена аутентификация с помощью SSH ключа, событие будет выглядеть так:
sshd: Accepted publickey for locadm from 192.168.31.53 port 55772 ssh2: ED25519 SHA256:FEHDEC/J72Fb2zC2oJNb45678967kghH43h3bBl31ldPs
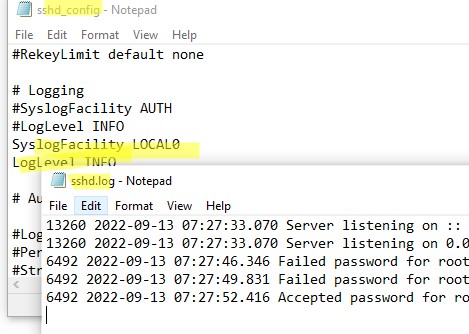
Если вы хотите, чтобы логи писались в локальный текстовый файл, нужно в файле sshd_config включить параметры:
SyslogFacility LOCAL0
LogLevel INFO
Перезапустите службу sshd и провеьте, что теперь логи SSH сервера пишутся в файл C:\ProgramData\ssh\logs\sshd.log
Для того чтобы установить OpenSSH на Windows Server 2019 или 2022 найдите и откройте Windows Settings. В новом окне перейдите в раздел «Apps» и выберите «Select Optional Features» в разделе «Apps & Features».
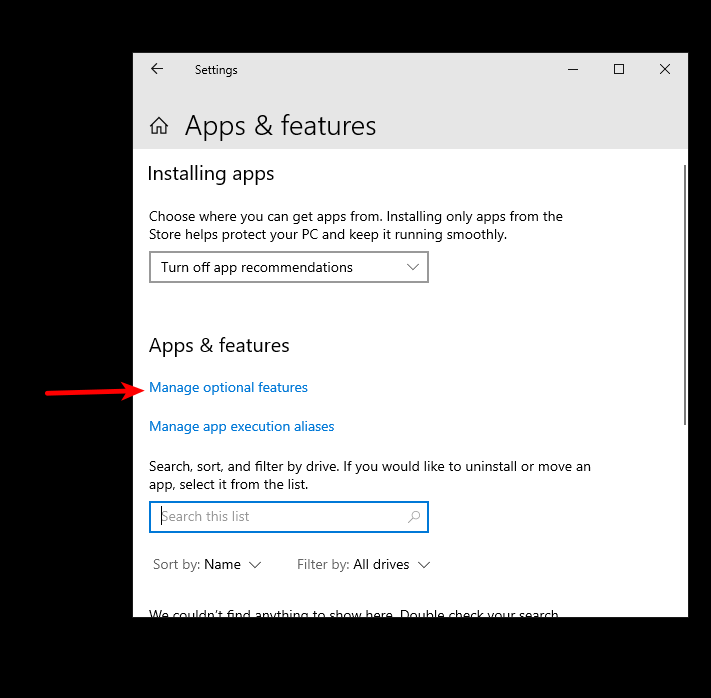
Нажмите «Manage optional features», и выберите OpenSSH Server из полученного списка, затем нажмите «Install».
После установки запустите PowerShell от Администратора. Вставьте следующую команду для установки OpenSSH Server.
Add-WindowsCapability -Online -Name OpenSSH.Server
Установите OpenSSH Client:
Add-WindowsCapability -Online -Name OpenSSH.Client
Для настройки сервера можно использовать следующую команду, которая откроет блокнот и можно будет добавить свои изменения:
start-process notepad C:\Programdata\ssh\sshd_config
После всех настроек нужно запустить сервис командой:
Start-Service sshd
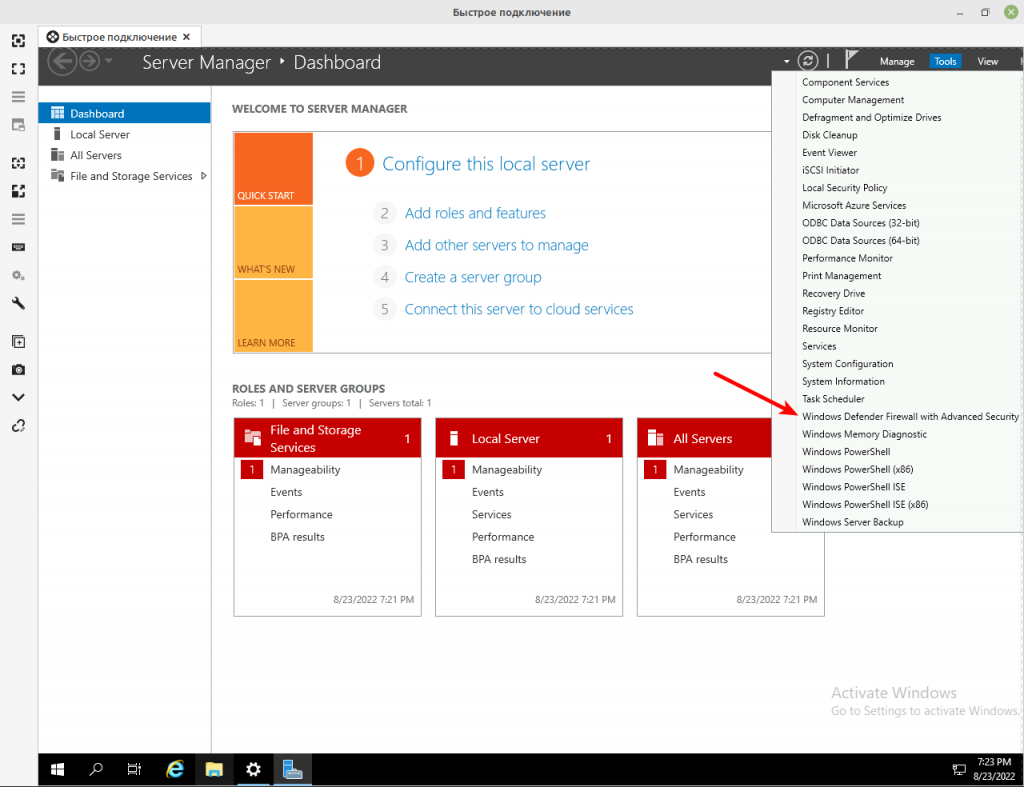
Далее необходимо будет настроить Firewall.
Для этого в меню “Пуск” находим “Server Manager”. Там выбираем “Tools” и клацаем на “Windows Defender Firewall with Advanced Security” в выпавшем списке.
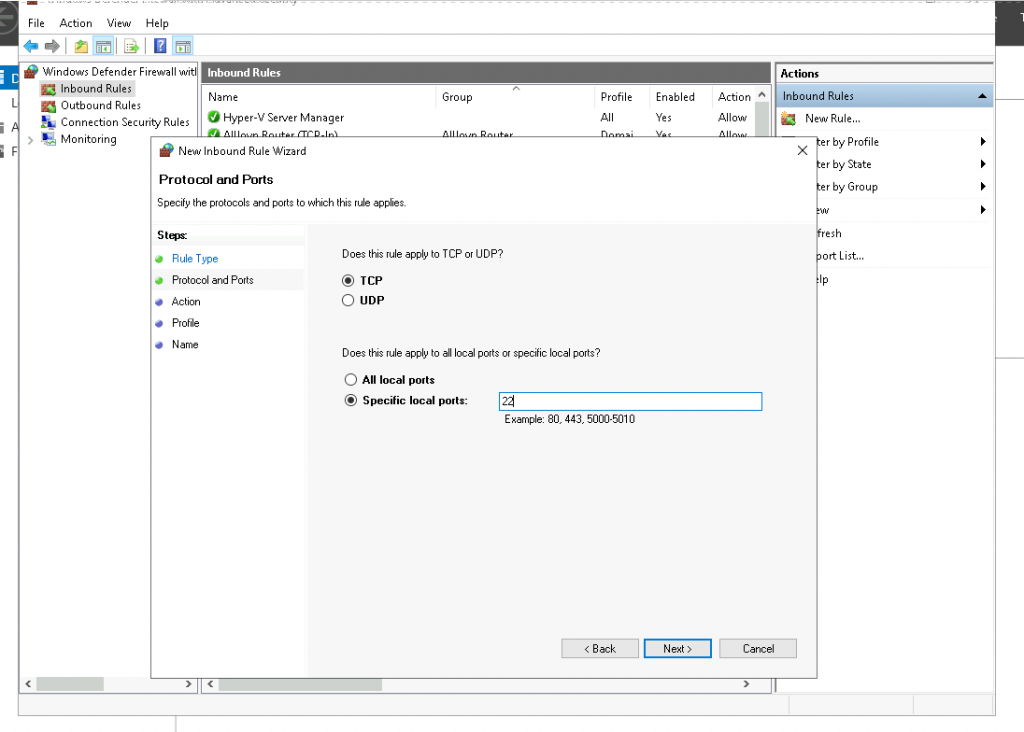
Теперь кликаем на “Inbound Rules” в открывшемся окне и создаём новое правило “New Rule”. В окне “New Inbound Rule Wizard” выбираем “Protocol and Ports”, клацаем “TCP” и указываем порт 22 в “Specific local ports:”. После жмём Next, Next даём название правилу и нажимаем Finish.
Теперь всё готово к подключению по ssh.
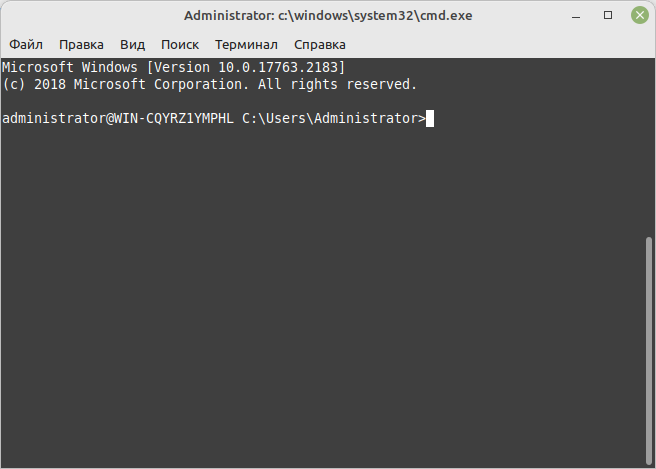
Подключиться можно с любой машины – как с linux, так и с Windows. Достаточно ввести:
ssh -l Administrator SERVER-IP
Согласиться с парой ключей:
ECDSA key fingerprint is SHA256:Vv2A8NOfzCLR/e35Fm5UyqGeJptrn6ZlY6Vabx0wHXQ.
Are you sure you want to continue connecting (yes/no/[fingerprint])?
И вы можете работать на удалённом сервере по ssh, пример подключения с linux-машины.
Спасибо за чтение! Надеемся статья была для вас полезна.
В данном руководстве посмотрим, как настроить подключение по SSH к виртуальному Windows-серверу. Для работы мы будем использовать VPS, работающий на операционной системе Windows Server 2016. Заказ подобного сервера производится в личном кабинете на сайте UltraVDS.
Загрузка и установка OpenSSH
На первом шаге настройки подключения к Windows-серверу по протоколу SSH необходимо установить на него оболочку OpenSSH. В Windows Server 2016 это удобнее осуществить путём загрузки и инсталляции OpenSSH из репозитория на GitHub.
Для этого подключитесь к вашему VDS через RDP и уже с удалённого рабочего стола вашего виртуального сервера перейдите по ссылке. На момент написания данного мануала последней версией OpenSSH на GitHub была версия v9.1.0.0p1-Beta. Поэтому на ресурсе последней версии необходимо найти и загрузить оттуда архив дистрибутива — файл OpenSSH-Win64.zip.
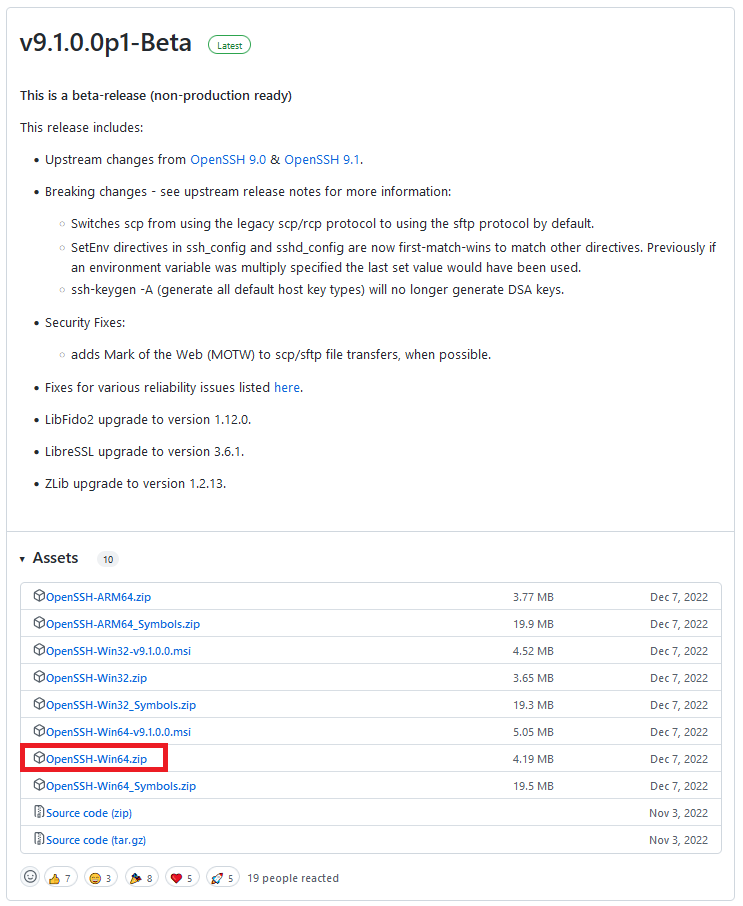
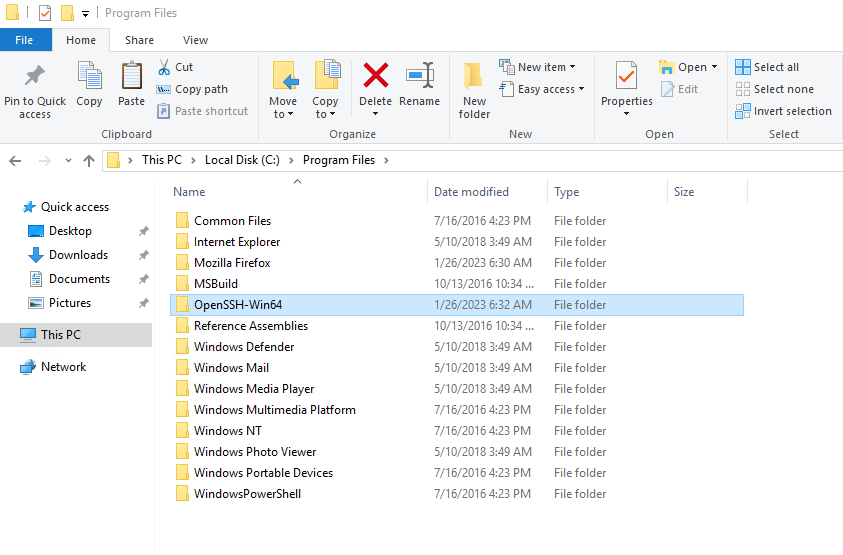
После того, как загрузка файла будет завершена, папку OpenSSH-Win64 скопируйте из архива OpenSSH-Win64.zip в каталог Program Files.
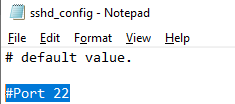
Далее перейдите в папку OpenSSH-Win64 и при помощи текстового редактора Notepad отредактируйте файл sshd_config_default. А именно, в нём необходимо снять комментарии (удалить символ #) в строке:
#Port 22И в строке:
#PasswordAuthentication yesПосле чего закройте файл sshd_config_default с сохранением внесённых изменений.
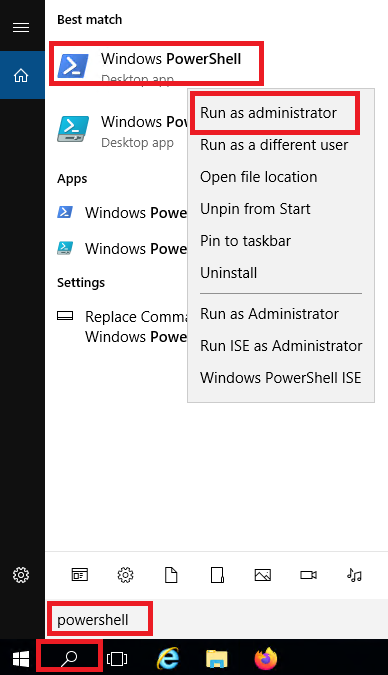
Теперь можно перейти непосредственно к установке OpenSSH. Для этого от имени администратора запустите оболочку PowerShell.
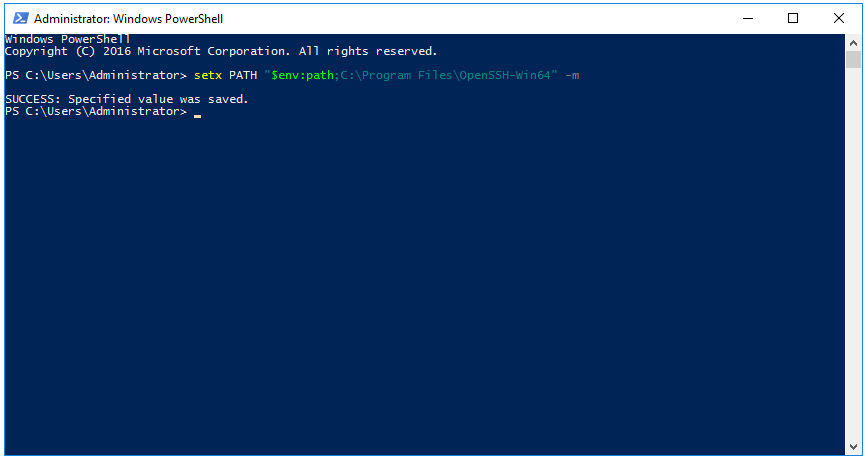
Далее в командной строке PowerShell наберите следующую команду:
setx PATH "$env:path;C:\Program Files\OpenSSH-Win64" -mПри её успешном выполнении вывод команды должен выглядеть как на скриншоте ниже:
Следующая команда осуществляет переход в папку C:\Program Files\OpenSSH-Win64 и запускает скрипт install-sshd.ps1.
cd "C:\Program Files\OpenSSH-Win64"; .\install-sshd.ps1В процессе выполнения своих инструкций скрипт дважды запросит разрешение на их запуск. Для проведения успешной установки OpenSSH нажмите R при каждом запросе.
Первоначальная настройка OpenSSH
Для того, чтобы оболочка OpenSSH была доступна всегда и самостоятельно запускалась при перезагрузке сервера, необходимо запустить службы sshd и ssh-agent, а также включить их автоматический старт. Производится это при помощи следующей команды:
Set-Service sshd -StartupType Automatic; Set-Service ssh-agent -StartupType Automatic; Start-Service sshd; Start-Service ssh-agent
На заключительном этапе установки OpenSSH необходимо разрешить в брандмауэре Windows доступ к серверу по протоколу SSH. По умолчанию SSH использует TCP-порт 22. Таким образом, следующей командой нужно будет открыть доступ к данному порту в Windows Firewall.
New-NetFirewallRule -DisplayName "OpenSSH-Server-In-TCP" -Direction Inbound -LocalPort 22 -Protocol TCP -Action Allow
Подключение к VPS по SSH
Теперь можно попробовать подключиться к вашему VPS с использованием протокола SSH. С компьютера, работающего под управлением как Windows, так и одной из операционных систем Linux, подключение производится из командной строки или терминала при помощи команды:
$ ssh your_user_name@your_server_IPЗдесь:
your_user_name— имя учётной записи, под которой производится подключение к VDS;your_server_IP— IP-адрес вашего виртуального Windows-сервера.
При первом подключении система предупредит вас о невозможности установления подлинности удалённого хоста. Для того, чтобы рабочая станция, с которой производится подключение получила отпечаток ключа для проверки, необходимо ответить на предупреждение набрав yes.

При каждом повторном подключении к тому же удалённому серверу SSH будет проверять принятый вами фингерпринт для подтверждения его легитимности.
В современных версиях Windows уже есть встроенный SSH сервер на базе пакета OpenSSH. В этой статье мы покажем, как установить и настроить OpenSSH сервер в Windows 10/11 и Windows Server 2022/2019 и подключиться к нему удаленно по защищенному SSH протоколу (как к Linux).
Содержание:
- Установка сервера OpenSSH в Windows
- Настройка SSH сервера в Windows
- Sshd_config: Конфигурационный файл сервера OpenSSH
- Подключение по SSH к Windows компьютеру
- Логи SSH подключений в Windows
Установка сервера OpenSSH в Windows
Пакет OpenSSH Server включен в современные версии Windows 10 (начиная с 1803), Windows 11 и Windows Server 2022/2019 в виде Feature on Demand (FoD). Для установки сервера OpenSSH достаточно выполнить PowerShell команду:
Get-WindowsCapability -Online | Where-Object Name -like ‘OpenSSH.Server*’ | Add-WindowsCapability –Online
Или при помощи команды DISM:
dism /Online /Add-Capability /CapabilityName:OpenSSH.Server~~~~0.0.1.0
Если ваш компьютер подключен к интернету, пакет OpenSSH.Server будет скачан и установлен в Windows.
Также вы можете установить сервер OpenSSH в Windows через современную панель Параметры (Settings -> Apps and features -> Optional features -> Add a feature, Приложения -> Управление дополнительными компонентами -> Добавить компонент. Найдите в списке OpenSSH Server и нажмите кнопку Install).
На изолированных от интернета компьютерах вы можете установить компонент с ISO образа Features On Demand (доступен в личном кабинете на сайте Microsoft: MSDN или my.visualstudio.com). Скачайте диск, извлеките его содержимое в папку c:FOD (достаточно распаковать извлечь файл
OpenSSH-Server-Package~31bf3856ad364e35~amd64~~.cab
), выполните установку из локального репозитория:
Add-WindowsCapability -Name OpenSSH.Server~~~~0.0.1.0 -Online -Source c:FOD
Также доступен MSI установщик OpenSSH для Windows в официальном репозитории Microsoft на GitHub (https://github.com/PowerShell/Win32-OpenSSH/releases/). Например, для Windows 10 x64 нужно скачать и установить пакет OpenSSH-Win64-v8.9.1.0.msi. Следующая PowerShell команда скачает MSI файл и установит клиент и сервер OpenSSH:
Invoke-WebRequest https://github.com/PowerShell/Win32-OpenSSH/releases/download/v8.9.1.0p1-Beta/OpenSSH-Win64-v8.9.1.0.msi -OutFile $HOMEDownloadsOpenSSH-Win64-v8.9.1.0.msi -UseBasicParsing
msiexec /i c:usersrootdownloadsOpenSSH-Win64-v8.9.1.0.msi
Также вы можете вручную установить OpenSSH сервер в предыдущих версиях Windows (Windows 8.1, Windows Server 2016/2012R2). Пример установки Win32-OpenSSH есть в статье “Настройка SFTP сервера (SSH FTP) в Windows”.
Чтобы проверить, что OpenSSH сервер установлен, выполните:
Get-WindowsCapability -Online | ? Name -like 'OpenSSH.Ser*'
State : Installed
После установки сервера OpenSSH в Windows добавляются две службы:
- ssh-agent (OpenSSH Authentication Agent) – можно использовать для управления закрытыми ключами если вы настроили SSH аутентификацию по ключам;
- sshd (OpenSSH SSH Server) – собственно сам SSH сервер.
Вам нужно изменить тип запуска службы sshd на автоматический и запустить службу с помощью PowerShell:
Set-Service -Name sshd -StartupType 'Automatic'
Start-Service sshd
С помощью nestat убедитесь, что теперь в системе запущен SSH сервер и ждет подключений на порту TCP:22 :
netstat -na| find ":22"
Проверьте, что включено правило брандмауэра (Windows Defender Firewall), разрешающее входящие подключения к Windows по порту TCP/22.
Get-NetFirewallRule -Name *OpenSSH-Server* |select Name, DisplayName, Description, Enabled
Name DisplayName Description Enabled
---- ----------- ----------- -------
OpenSSH-Server-In-TCP OpenSSH SSH Server (sshd) Inbound rule for OpenSSH SSH Server (sshd) True
Если правило отключено (состоянии Enabled=False) или отсутствует, вы можете создать новое входящее правило командой New-NetFirewallRule:
New-NetFirewallRule -Name sshd -DisplayName 'OpenSSH Server (sshd)' -Enabled True -Direction Inbound -Protocol TCP -Action Allow -LocalPort 22
Рассмотрим, где храниться основные компоненты OpenSSH:
- Исполняемые файлы OpenSSH Server находятся в каталоге
C:WindowsSystem32OpenSSH
(sshd.exe, ssh.exe, ssh-keygen.exe, sftp.exe и т.д.) - Конфигурационный файл sshd_config (создается после первого запуска службы):
C:ProgramDatassh - Файлы authorized_keys и ssh ключи можно хранить в профиле пользователей:
%USERPROFILE%.ssh
Sshd_config: Конфигурационный файл сервера OpenSSH
Настройки сервере OpenSSH хранятся в конфигурационном файле %programdata%sshsshd_config. Это обычный текстовый файл с набором директив. Для редактирования можно использовать любой текстовый редактор (я предпочитаю notepad++). Можно открыть с помощью обычного блокнота:
start-process notepad C:Programdatasshsshd_config
Например, чтобы запретить SSH подключение для определенного доменного пользователя (и всех пользователей указанного домена), добавьте в конце файле директивы:
DenyUsers winitpro[email protected]
DenyUsers corp*
Чтобы разрешить подключение только для определенной доменной группы:
AllowGroups winitprosshadmins
Либо можете разрешить доступ для локальной группы:
AllowGroups sshadmins
По умолчанию могут к openssh могут подключаться все пользователи Windows. Директивы обрабатываются в следующем порядке: DenyUsers, AllowUsers, DenyGroups,AllowGroups.
Можно запретить вход под учетными записями с правами администратора, в этом случае для выполнения привилегированных действий в SSH сессии нужно делать runas.
DenyGroups Administrators
Следующие директивы разрешают SSH доступ по ключам (SSH аутентификации в Windows с помощью ключей описана в отдельной статье) и по паролю:
PubkeyAuthentication yes
PasswordAuthentication yes
Вы можете изменить стандартный SSH порт TCP/22, на котором принимает подключения OpenSSH в конфигурационном файле sshd_config в директиве Port.
После любых изменений в конфигурационном файле sshd_config нужно перезапускать службу sshd:
restart-service sshd
Подключение по SSH к Windows компьютеру
Теперь вы можете попробовать подключиться к своей Windows 10 через SSH клиент (в этом примере я использую putty).
Вы можете использовать встроенный SSH клиентом Windows для подключения к удаленному хосту. Для этого нужно в командной строке выполнить команду:
ssh [email protected]
В этом примере
alexbel
– имя пользователя на удаленном Windows компьютере, и 192.168.31.102 – IP адрес или DNS имя компьютера.
Обратите внимание что можно использовать следующие форматы имен пользователей Windows при подключении через SSH:
-
[email protected]
– локальный пользователь Windows -
[email protected]@server1
–пользователь Active Directory (в виде UPN) или аккаунт Microsoft/ Azure(Microsoft 365) -
winitpro[email protected]
– NetBIOS формат имени
В домене Active Directory можно использовать Kerberos аутентификацию в SSH. Для этого в sshd_config нужно включить параметр:
GSSAPIAuthentication yes
После этого можно прозрачно подключать к SSH сервер с Windows компьютера в домене из сессии доменного подключается. В этом случае пароль пользователя не указывается и выполняется SSO аутентификация через Kerberos:
ssh -K server1
При первом подключении появится стандартный запрос на добавление узла в список известных SSH хостов.
Нажимаем Да, и в открывшееся окне авторизуемся под пользователем Windows.
При успешном подключении запускается командная оболочка cmd.exe со строкой-приглашением.
[email protected] C:Usersadmin>
В командной строке вы можете выполнять различные команды, запускать скрипты и программы.
Я предпочитаю работать в командной строке PowerShell. Чтобы запустить интерпретатор PowerShell, выполните:
powershell.exe
Чтобы изменить командную оболочку (Shell) по умолчанию в OpenSSH с cmd.exe на PowerShell, внесите изменение в реестр такой командой:
New-ItemProperty -Path "HKLM:SOFTWAREOpenSSH" -Name DefaultShell -Value "C:WindowsSystem32WindowsPowerShellv1.0powershell.exe" -PropertyType String –Force
Осталось перезапустить SSH подключение и убедиться, что при подключении используется командный интерпретатор PowerShell (об этом свидетельствует приглашение
PS C:Usersadmin>
).
В SSH сессии запустилась командная строка PowerShell, в которой работают привычные функции: авто дополнение, раскраска модулем PSReadLine, история команд и т.д. Если текущий пользователь входит в группу локальных администраторов, то все команды в его сессии выполняются с повышенными правами даже при включенном UAC.
Логи SSH подключений в Windows
В Windows логи подключений к SSH серверу по-умолчанию пишутся не в текстовые файлы, а в отдельный журнал событий через Event Tracing for Windows (ETW). Откройте консоль Event Viewer (
eventvwr.msc
>) и перейдите в раздел Application and services logs -> OpenSSH -> Operational.
При успешном подключении с помощью к SSH серверу с помощью пароля в журнале появится событие:
EventID: 4
sshd: Accepted password for root from 192.168.31.53 port 65479 ssh2
Если была выполнена аутентификация с помощью SSH ключа, событие будет выглядеть так:
sshd: Accepted publickey for locadm from 192.168.31.53 port 55772 ssh2: ED25519 SHA256:FEHDEC/J72Fb2zC2oJNb45678967kghH43h3bBl31ldPs
Если вы хотите, чтобы логи писались в локальный текстовый файл, нужно в файле sshd_config включить параметры:
SyslogFacility LOCAL0
LogLevel INFO
Перезапустите службу sshd и провеьте, что теперь логи SSH сервера пишутся в файл C:ProgramDatasshlogssshd.log
Прежде всего, вы можете спросить, зачем нам вообще нужен SSH-сервер на Windows-сервере? В среде Windows SSH может показаться не очень полезным. В конце концов, у нас есть RDP и PowerShell Remoting с WinRM, которые уже обеспечивают мощные возможности удаленного управления. Тем не менее, SSH в Windows определенно имеет свои преимущества. Среди них можно выделить такие вещи, как:
- Простое подключение и управление Windows-серверами из Linux или MacOS с помощью встроенных инструментов.
- Подключение из систем Windows к серверам Linux — это простое решение с интегрированным SSH-клиентом. Есть много администраторов Linux, которые должны управлять серверами на работе с помощью ОС Windows, и всегда должны устанавливать некоторые дополнительные инструменты, такие как PuTTY или WinSCP. Теперь они могут использовать знакомые команды SSH прямо из командной строки Windows.
- Используются те же инструменты удаленного управления для серверов Linux и Windows (SSH, SCP, аутентификация с открытым ключом и т. д.).
- Кроссплатформенный PowerShell Remoting. PowerShell Core использует SSH для включения удаленного сеанса PowerShell в Windows, MacOS и Linux. В отличие от WinRM PowerShell Remoting — Windows PowerShell работает только на Windows.
- Вместе с подсистемой Windows для Linux вы можете получить Linux-подобные сеансы SSH с Bash и обычные инструменты Linux также на сервере Windows, который позволяет администраторам Linux использовать свои знания для управления системами Windows.
- И наоборот: администраторы Windows могут использовать PowerShell для управления сервером Linux, если на нем будет присутствовать соответствующий shell от Microsoft.
- Просто другой вариант для удаленного управления, который дает еще большую гибкость.
Установка OpenSSH в Windows Server 2019
- Используя GUI
Открываем Settings — Apps & features — Manage optional features:

Нажимаем Add a feature, ищем OpenSSH Server — Install:

На предыдущем экране дожидаемся окончания процесса инсталляции. OpenSSH сервер можем считать установленным.
Обращаем внимание, что установка этим методом автоматически создаст правило Windows Firewall, с названием «OpenSSH-Server-In-TCP», открывающее 22 порт для входящих подключений.
Используя PowerShell:
Проверим, присутствует ли на нашей системе встроенный OpenSSH:
Get-WindowsCapability -Online | ? Name -like 'OpenSSH*'
В ответ должны получить:
Name : OpenSSH.Client~~~~0.0.1.0

State : NotPresent #или Install, если клиент уже установлен

Name : OpenSSH.Server~~~~0.0.1.0

State : NotPresent
Устанавливаем клиент, если он не установлен:
Add-WindowsCapability -Online -Name OpenSSH.Client~~~~0.0.1.0
Для установки сервера вводим:
Add-WindowsCapability -Online -Name OpenSSH.Server~~~~0.0.1.0
В обоих случаях вывод должен быть следующим:
Path :

Online : True

RestartNeeded : False
Первичная конфигурация SSH-сервера
По умолчанию при подключении к OpenSSH-серверу используется командная строка Windows. Вы можете использовать практически любую оболочку на вашем компьютере с Windows через SSH-соединение. Даже возможно использовать Bash, когда подсистема Windows для Linux (WSL) также установлена на целевой машине. Также возможно изменение оболочки по умолчанию на SSH-сервере на нечто иное, чем командная оболочка. Для этого ключ реестра «DefaultShell» необходимо изменить.
Сделать это можно как через редактор реестра regedit.exe, открыв в нем следующий путь: HKEY_LOCAL_MACHINESOFTWAREOpenSSH и изменив в нем параметр DefaultShell, указав в нем полный путь до исполняемого файла необходимой командной строки, например:
C:WindowsSystem32WindowsPowerShellv1.0powershell.exe
Тоже самое можно сделать используя PowerShell:
New-ItemProperty -Path "HKLM:SOFTWAREOpenSSH" -Name DefaultShell -Value "C:WindowsSystem32WindowsPowerShellv1.0powershell.exe" -PropertyType String -Force
Проверим настройки Windows Firewall, используя для этого PowerShell:
Get-NetFirewallRule -Name *ssh*
Введя данную команду мы получим параметры правила, разрешающего SSH-подключение к серверу. Если правила не оказалось, введем следующую команду, создав его:
New-NetFirewallRule -Name sshd -DisplayName 'OpenSSH Server (sshd)' -Enabled True -Direction Inbound -Protocol TCP -Action Allow -LocalPort 22
Запуск службы OpenSSH
После установки функции SSH-сервера нам остается только его запустить:
Start-Service sshd
Опционально можно установить для службы sshd автоматический запуск:
Set-Service -Name sshd -StartupType 'Automatic'
Подключение к серверу
Теперь мы готовы к работе и можем подключиться через установленное приложение к нашему хосту. Это можно осуществить либо с Windows 10, компьютера с Linux, с putty.exe на более старой машине с Windows, либо с Bash в настольной операционной системе от Microsoft. Все, что вам нужно, это найти какой-либо SSH-клиент, ввести в него имя пользователя, имя вашего сервера или IP-адрес и подключиться.
Для SSH-клиента в PowerShell синтаксис будет таким:
Ssh username@servername
При первом подключении с неизвестного хоста будет показано следующее сообщение:

Ответив на него yes, хост подключения будет добавлен в список известных хостов сервера. После чего необходимо ввести пароль пользователя (по соображениям безопасности вводимые символы отображаться не будут). После успешного подключения отобразится интерфейс используемой командной строки:

Копирование файлов
Также, как с сервером OpenSSH в любой системе * nix, вы можете использовать SCP для копирования файлов на сервер или с сервера.
Например, администратор Linux может быстро получить файл журнала с сервера Windows с помощью той же команды, что и для сервера Linux.
scp username@servername:C:/inetpub/logs/LogFiles/W3SVC1/u_ex191017.log u_ex191017.log
Когда вы подключаетесь из Bash/*nix к машине с Windows, нужно помнить, что пути Windows также должны указываться с обычными косыми чертами Unix вместо обратных косых черт. Например, C:/Windows вместо C:Windows.
sshd_config
Аналогично операционным системам семейства Linux, OpenSSH Server в Windows имеет в своем составе особый файл, где хранятся все параметры для выполнения более подробных настроек. Например, для ограничения входа.
По умолчанию файл конфигурации находится в «%programdata%sshsshd_config».
Самые различные настройки, применимые к этому файлу можно найти на сайте https://man.openbsd.org/sshd_config.
Кроме того, у Microsoft есть документация для специфичных настроек Windows.
Больше информации
Дополнительную информацию об OpenSSH в Windows можно найти на сайте docs.microsoft.com или в проекте GitHub разветвления OpenSSH от Microsoft.
191028
Санкт-Петербург
Литейный пр., д. 26, Лит. А
+7 (812) 403-06-99
![]()
700
300
ООО «ИТГЛОБАЛКОМ ЛАБС»
191028
Санкт-Петербург
Литейный пр., д. 26, Лит. А
+7 (812) 403-06-99
![]()
700
300
ООО «ИТГЛОБАЛКОМ ЛАБС»
Для того чтобы установить OpenSSH на Windows Server 2019 или 2022 найдите и откройте Windows Settings. В новом окне перейдите в раздел «Apps» и выберите «Select Optional Features» в разделе «Apps & Features».
Нажмите «Manage optional features», и выберите OpenSSH Server из полученного списка, затем нажмите «Install».
После установки запустите PowerShell от Администратора. Вставьте следующую команду для установки OpenSSH Server.
Add-WindowsCapability -Online -Name OpenSSH.Server
Установите OpenSSH Client:
Add-WindowsCapability -Online -Name OpenSSH.Client
Для настройки сервера можно использовать следующую команду, которая откроет блокнот и можно будет добавить свои изменения:
start-process notepad C:Programdatasshsshd_config
После всех настроек нужно запустить сервис командой:
Start-Service sshd
Далее необходимо будет настроить Firewall.
Для этого в меню “Пуск” находим “Server Manager”. Там выбираем “Tools” и клацаем на “Windows Defender Firewall with Advanced Security” в выпавшем списке.
Теперь кликаем на “Inbound Rules” в открывшемся окне и создаём новое правило “New Rule”. В окне “New Inbound Rule Wizard” выбираем “Protocol and Ports”, клацаем “TCP” и указываем порт 22 в “Specific local ports:”. После жмём Next, Next даём название правилу и нажимаем Finish.
Теперь всё готово к подключению по ssh.
Подключиться можно с любой машины – как с linux, так и с Windows. Достаточно ввести:
ssh -l Administrator SERVER-IP
Согласиться с парой ключей:
ECDSA key fingerprint is SHA256:Vv2A8NOfzCLR/e35Fm5UyqGeJptrn6ZlY6Vabx0wHXQ.
Are you sure you want to continue connecting (yes/no/[fingerprint])?
И вы можете работать на удалённом сервере по ssh, пример подключения с linux-машины.
Спасибо за чтение! Надеемся статья была для вас полезна.
Previous Story
Ansible: ввод sudo-пароля при выполнении playbook
Next Story
MikroTik Mesh – единая WiFi сеть
Latest from Blog
Как настроить FreePBX с помощью Docker (сборка Docker-контейнера FreePBX). В этом посте мы расскажем о FreePBX , его функциях
Продолжаем изучать работу с единым дистрибутивом платформы 1С:Предприятие для Linux, который появился в версии 8.3.20. В
Установка и обновление сервера 1С:Предприятие после перехода на единый дистрибутив стала еще проще. Но хорошо, если у вас
Asterisk — это бесплатный инструмент с открытым исходным кодом для создания/разработки коммуникационных приложений. Он был разработан Марком Спенсером из Digium
Связка из Postfix и Dovecot плюс стандартный обвес из антивируса, антиспама и прочих утилит. Доменные имена
| title | description | ms.date | ms.topic | ms.author | author | ms.custom |
|---|---|---|---|---|---|---|
|
Get started with OpenSSH for Windows |
Learn how to install and connect to remote machines using the OpenSSH Client and Server for Windows. |
01/11/2023 |
quickstart |
roharwoo |
robinharwood |
contperf-fy21q4 |
Get started with OpenSSH for Windows
Applies to: Windows Server 2022, Windows Server 2019, Windows 10 (build 1809 and later)
OpenSSH is a connectivity tool for remote sign-in that uses the SSH protocol. It encrypts all traffic between client and server to eliminate eavesdropping, connection hijacking, and other attacks.
An OpenSSH-compatible client can be used to connect to Windows Server and Windows client devices.
[!IMPORTANT]
If you downloaded the OpenSSH beta from the GitHub repo at PowerShell/Win32-OpenSSH, follow the instructions listed there, not the ones in this article. Some information in the Win32-OpenSSH repository relates to prerelease product that may be substantially modified before it’s released. Microsoft makes no warranties, express or implied, with respect to the information provided there.
Prerequisites
Before you start, your computer must meet the following requirements:
- A device running at least Windows Server 2019 or Windows 10 (build 1809).
- PowerShell 5.1 or later.
- An account that is a member of the built-in Administrators group.
Prerequisites check
To validate your environment, open an elevated PowerShell session and do the following:
-
Type winver.exe and press enter to see the version details for your Windows device.
-
Run
$PSVersionTable.PSVersion. Verify your major version is at least 5, and your minor version at least 1. Learn more about installing PowerShell on Windows. -
Run the command below. The output will show
Truewhen you’re a member of the built-in Administrators group.(New-Object Security.Principal.WindowsPrincipal([Security.Principal.WindowsIdentity]::GetCurrent())).IsInRole([Security.Principal.WindowsBuiltInRole]::Administrator)
Install OpenSSH for Windows
GUI
Both OpenSSH components can be installed using Windows Settings on Windows Server 2019 and Windows 10 devices.
To install the OpenSSH components:
-
Open Settings, select Apps, then select Optional Features.
-
Scan the list to see if the OpenSSH is already installed. If not, at the top of the page, select Add a feature, then:
- Find OpenSSH Client, then select Install
- Find OpenSSH Server, then select Install
-
Once setup completes, return to Apps and Optional Features and confirm OpenSSH is listed.
-
Open the Services desktop app. (Select Start, type services.msc in the search box, and then select the Service app or press ENTER.)
-
In the details pane, double-click OpenSSH SSH Server.
-
On the General tab, from the Startup type drop-down menu, select Automatic.
-
To start the service, select Start.
[!NOTE]
Installing OpenSSH Server will create and enable a firewall rule namedOpenSSH-Server-In-TCP. This allows inbound SSH traffic on port 22. If this rule is not enabled and this port is not open, connections will be refused or reset.
PowerShell
To install OpenSSH using PowerShell, run PowerShell as an Administrator.
To make sure that OpenSSH is available, run the following cmdlet:
Get-WindowsCapability -Online | Where-Object Name -like 'OpenSSH*'
The command should return the following output if neither are already installed:
Name  : OpenSSH.Client~~~~0.0.1.0
State : NotPresent

Name  : OpenSSH.Server~~~~0.0.1.0
State : NotPresent
Then, install the server or client components as needed:
# Install the OpenSSH Client
Add-WindowsCapability -Online -Name OpenSSH.Client~~~~0.0.1.0

# Install the OpenSSH Server
Add-WindowsCapability -Online -Name OpenSSH.Server~~~~0.0.1.0
Both commands should return the following output:
Path          :

Online        : True

RestartNeeded : False
To start and configure OpenSSH Server for initial use, open an elevated PowerShell prompt (right click, Run as an administrator), then run the following commands to start the sshd service:
# Start the sshd service
Start-Service sshd

# OPTIONAL but recommended:
Set-Service -Name sshd -StartupType 'Automatic'

# Confirm the Firewall rule is configured. It should be created automatically by setup. Run the following to verify
if (!(Get-NetFirewallRule -Name "OpenSSH-Server-In-TCP" -ErrorAction SilentlyContinue | Select-Object Name, Enabled)) {
    Write-Output "Firewall Rule 'OpenSSH-Server-In-TCP' does not exist, creating it..."
    New-NetFirewallRule -Name 'OpenSSH-Server-In-TCP' -DisplayName 'OpenSSH Server (sshd)' -Enabled True -Direction Inbound -Protocol TCP -Action Allow -LocalPort 22
} else {
    Write-Output "Firewall rule 'OpenSSH-Server-In-TCP' has been created and exists."
}
Connect to OpenSSH Server
Once installed, you can connect to OpenSSH Server from a Windows or Windows Server device with the OpenSSH client installed. From a PowerShell prompt, run the following command.
ssh domainusername@servername
Once connected, you get a message similar to the following output.
The authenticity of host 'servername (10.00.00.001)' can't be established.
ECDSA key fingerprint is SHA256:(<a large string>).
Are you sure you want to continue connecting (yes/no)?
Entering yes adds that server to the list of known SSH hosts on your Windows client.
At this point, you’ll be prompted for your password. As a security precaution, your password won’t be displayed as you type.
Once connected, you’ll see the Windows command shell prompt:
domainusername@SERVERNAME C:Usersusername>
Uninstall OpenSSH for Windows
GUI
To uninstall OpenSSH using Windows Settings:
- Open Settings, then go to Apps > Apps & Features.
- Go to Optional Features.
- In the list, select OpenSSH Client or OpenSSH Server.
- Select Uninstall.
PowerShell
To uninstall the OpenSSH components using PowerShell, use the following commands:
# Uninstall the OpenSSH Client
Remove-WindowsCapability -Online -Name OpenSSH.Client~~~~0.0.1.0

# Uninstall the OpenSSH Server
Remove-WindowsCapability -Online -Name OpenSSH.Server~~~~0.0.1.0
You may need to restart Windows afterwards if the service was in use at the time it was uninstalled.
Next steps
Now that you’ve installed OpenSSH Server for Windows, here are some articles that might help you as you use it:
- Learn more about using key pairs for authentication in OpenSSH key management
- Learn more about the OpenSSH Server configuration for Windows
OpenSSH is a secure remote access tool that encrypts traffic between the connecting client and a remote server. As a result, it eliminates connection hijacking, sniffing, eavesdropping, among other common network attacks. In this guide, you’ll install OpenSSH on a Windows Server.
Prerequisites
-
Deploy a Windows Server 2019 or 2022 Server at Vultr.
-
Connect to the server with RDP
Through Windows Settings
Open the Windows Start Menu.

Locate and open Windows Settings. In the new Window, navigate to Apps, and Select Optional Features under Apps & Features.
Click Add Feature, then enter the keyword OpenSSH in the search box. Next, select OpenSSH Server from the list of results, then click Install.

Once installed, both OpenSSH Client and Server will be available on the list of Installed Features.
Using Windows PowerShell
Open PowerShell as an Administrator.

Paste the following commands to Install OpenSSH Server:
Add-WindowsCapability -Online -Name OpenSSH.Server
Install OpenSSH Client:
Add-WindowsCapability -Online -Name OpenSSH.Client
Output:
Path          :

Online        : True

RestartNeeded : False
To configure OpenSSH, use the following command to open the main configuration file in Notepad and make your preferred changes.
start-process notepad C:Programdatasshsshd_config
Configure Firewall
Open the Windows start menu, locate and click Server Manager. In the Server Manager window, navigate to Tools, and select Windows Defender Firewall with Advanced Security from the drop-down list.

Now, click Inbound Rules in the open Firewall window. Then, select New Rule from the right pane.
In the New Inbound Rule Wizard, select Port from the list of options, then click Next. Select ‘TCP’, then enter port 22 in the Specific local ports: section.

Next, allow the connection, assign the rule to server profiles, and set a custom name for easy identification from the list of Firewall rules.
Click Finish to save the new firewall rule.
Login to Windows Server using SSH
First, start the OpenSSH server by entering the following command in your PowerShell terminal.
Start-Service sshd
Log out of the RDP session.
Then, initiate an SSH connection from your local computer to the server using the following command:
$ ssh -l Administrator SERVER-IP
Replace Administrator with your target username and SERVER-IP with your actual Vultr Windows server address.
ECDSA key fingerprint is SHA256:Vv2A8NOfzCLR/e35Fm5UyqGeJptrn6ZlY6Vabx0wHXQ.

Are you sure you want to continue connecting (yes/no/[fingerprint])?
Verify the server key by accepting with yes. Then, enter the user account password to connect to the remote Windows server over SSH.
Once logged in, your SSH terminal should be similar to the one below:
Microsoft Windows [Version 10.0.20348.405]

(c) Microsoft Corporation. All rights reserved.


Administrator@EXAMPLE C:UsersAdministrator>
Conclusion
Congratulations, you have successfully installed OpenSSH on a Windows Server. To fine-tune your SSH configuration file, consider visiting the Windows SSH configuration documentation here.
Меня всегда удручало подключение к Windows машинам. Нет, я не противник и не сторонник Microsoft и их продуктов. Каждый продукт существует для своей цели, но речь не об этом.
Для меня всегда было мучительно больно подключаться к серверам с Windows, потому что эти подключения либо настраиваются через одно место (привет WinRM с HTTPS) либо работают не очень стабильно (здравствуй RDP к виртуалкам за океаном).
Поэтому, случайно натолкнувшись на проект Win32-OpenSSH, я решил поделиться опытом настройки. Возможно кому-нибудь эта тулза сэкономить кучу нервов.

Варианты установки:
- Вручную
- Через пакет Chocolatey
- Через Ansible, например роль jborean93.win_openssh
Далее я буду рассказывать про первый пункт, так как с остальными и так все более менее понятно.
Отмечу, что данный проект пока что находится на стадии beta, поэтому его не рекомендуют использовать в production.
Итак, скачиваем последний релиз, на текущий момент это 7.9.0.0p1-beta. Есть версии как для 32 так и для 64 битных систем.
Распаковываем в C:Program FilesOpenSSH
Обязательный момент для корректной работы: права на запись в этой директории должны быть только у SYSTEM и у админской группы.
Устанавливаем сервисы скриптом install-sshd.ps1 находящимся в этой директории
powershell.exe -ExecutionPolicy Bypass -File install-sshd.ps1Разрешаем входящие подключения на 22 порт:
New-NetFirewallRule -Name sshd -DisplayName 'OpenSSH Server (sshd)' -Enabled True -Direction Inbound -Protocol TCP -Action Allow -LocalPort 22Уточнение: апплет New-NetFirewallRule используется на Windows Server 2012 и новее. В наиболее старых системах (либо десктопных) можно воспользоваться командой:
netsh advfirewall firewall add rule name=sshd dir=in action=allow protocol=TCP localport=22
Запускаем сервис:
net start sshdПри запуске будут автоматически сгенерированы хост-ключи (если отсутствуют) в %programdata%ssh
Автозапуск сервиса при запуске системы мы можем включить командой:
Set-Service sshd -StartupType AutomaticТак же, можно сменить командную оболочку по умолчанию (после установки, по умолчанию — cmd):
New-ItemProperty -Path "HKLM:SOFTWAREOpenSSH" -Name DefaultShell -Value "C:WindowsSystem32WindowsPowerShellv1.0powershell.exe" -PropertyType String -ForceУточнение: Необходимо указывать абсолютный путь.
Что дальше?
А дальше настраиваем sshd_config, который расположем в C:ProgramDatassh. Например:
PasswordAuthentication no
PubkeyAuthentication yes
И создаем в пользовательской папке директорию .ssh, а в ней файл authorized_keys. Туда записываем публичные ключи.
Важное уточнение: права на запись в этот файл, должен иметь только пользователь, в чьей директории лежит файл.
Но если у вас проблемы с этим, всегда можно выключить проверку прав в конфиге:
StrictModes noК слову, в C:Program FilesOpenSSH лежат 2 скрипта (FixHostFilePermissions.ps1, FixUserFilePermissions.ps1), которые должны
но не обязаны
фиксить права, в том числе и с authorized_keys, но почему-то не фиксят.
Не забывайте перезапускать сервис sshd после для применения изменений.
ru-mbp-666:infrastructure$ ssh Administrator@192.168.1.10 -i ~/.ssh/id_rsa
Windows PowerShell
Copyright (C) 2016 Microsoft Corporation. All rights reserved.

PS C:UsersAdministrator> Get-Host


Name             : ConsoleHost
Version          : 5.1.14393.2791
InstanceId       : 653210bd-6f58-445e-80a0-66f66666f6f6
UI               : System.Management.Automation.Internal.Host.InternalHostUserInterface
CurrentCulture   : en-US
CurrentUICulture : en-US
PrivateData      : Microsoft.PowerShell.ConsoleHost+ConsoleColorProxy
DebuggerEnabled  : True
IsRunspacePushed : False
Runspace         : System.Management.Automation.Runspaces.LocalRunspace

PS C:UsersAdministrator>
Субъективные плюсы/минусы.
Плюсы:
- Стандартный подход к подключению к серверам.
Когда есть немного Windows машин, очень неудобно когда:
Так, сюда мы ходим по ssh, а тут рдп,
и вообще best-practice с бастионами, сначала ssh-туннель, а через него RDP. - Простота настройки
Считаю что это очевидно. - Скорость подключения и работы с удаленной машиной
Нет графической оболочки, экономятся как ресурсы сервера, так и количество передаваемых данных.
Минусы:
- Не заменяет RDP полностью.
Не все можно сделать из консоли, увы. Я имею ввиду ситуации, когда требуется GUI.
Материалы использованные в статье:
Ссылка на сам проект
Варианты установки бессовестно скопированы с Ansible docs.
The Secure Shell (SSH) protocol and the OpenSSH project have been around for decades on Linux. But OpenSSH on Windows hasn’t been embraced in the Windows world until recently. As such, a Windows Server doesn’t typically come pre-built and ready to go and requires some setup.
Not a reader? Watch this related video tutorial!
Not seeing the video? Make sure your ad blocker is disabled.
In this tutorial, you’re going to learn how to SSH into your Windows Server just as easily as Linux. You’ll learn how to get OpenSSH installed (or updated) on Windows, add appropriate firewall rules, and configure public key, password, and certificate-based authentication.
Prerequisites
To effectively follow the examples and demos in this article, you’ll need to meet these requirements below.
- A Windows Server machine – This article will use Windows Server 2019 Datacenter. The server this tutorial will use will have a user account called june and will connect to the server at the IP address of 40.117.77.227 with a hostname of ataWindows.
- A local computer with PowerShell 7.1 installed. PowerShell 7.1 is available in Windows, Linux, and macOS. The examples in this article use PowerShell 7.1 in Windows 10.
Downloading OpenSSH
Unlike Linux servers, Windows servers do not have an out-of-the-box SSH server running. But Microsoft has released an open-source port of OpenSSH for Windows. With this release, you can now set up an SSH server on a Windows machine.
To get started, you’ll first need to download OpenSSH. To do so, follow the steps below:
- Connect to the desktop on a Windows Server using Remote Desktop (RDP) or your preferred desktop manager client.
2. On your Windows Server desktop, open an elevated Windows PowerShell console.
3. Next, copy the code below, paste it in the PowerShell window, and press Enter. This script will download the latest OpenSSH release, which as of this writing, is v8.1.0.0p1-Beta to the current working directory.
If you like to save the PowerShell code to download OpenSSH, you can also open a code editor like Windows PowerShell ISE or Visual Studio Code and save it in there.
## Set network connection protocol to TLS 1.2
## Define the OpenSSH latest release url
$url = 'https://github.com/PowerShell/Win32-OpenSSH/releases/latest/'
## Create a web request to retrieve the latest release download link
$request = [System.Net.WebRequest]::Create($url)
$request.AllowAutoRedirect=$false
$response=$request.GetResponse()
$source = $([String]$response.GetResponseHeader("Location")).Replace('tag','download') + '/OpenSSH-Win64.zip'
## Download the latest OpenSSH for Windows package to the current working directory
$webClient = [System.Net.WebClient]::new()
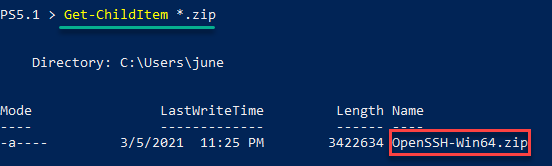
$webClient.DownloadFile($source, (Get-Location).Path + '\OpenSSH-Win64.zip')4. The OpenSSH-Win64.zip file should now be in your current working directory. Verify this by running the command below.
As you can see below, the OpenSSH-Win64.zip file exists in the directory.
Installing OpenSSH
After you’ve downloaded OpenSSH-Win64.zip, the next step is to install OpenSSH on the server. There’s no installation wizard in case you’re expecting it.
- While still in the same PowerShell session, copy the code below and run it in PowerShell. This code extracts the OpenSSH-Win64.zip file contents to C:\Program Files\OpenSSH.
# Extract the ZIP to a temporary location
Expand-Archive -Path .\OpenSSH-Win64.zip -DestinationPath ($env:temp) -Force
# Move the extracted ZIP contents from the temporary location to C:\Program Files\OpenSSH\
Move-Item "$($env:temp)\OpenSSH-Win64" -Destination "C:\Program Files\OpenSSH\" -Force
# Unblock the files in C:\Program Files\OpenSSH\
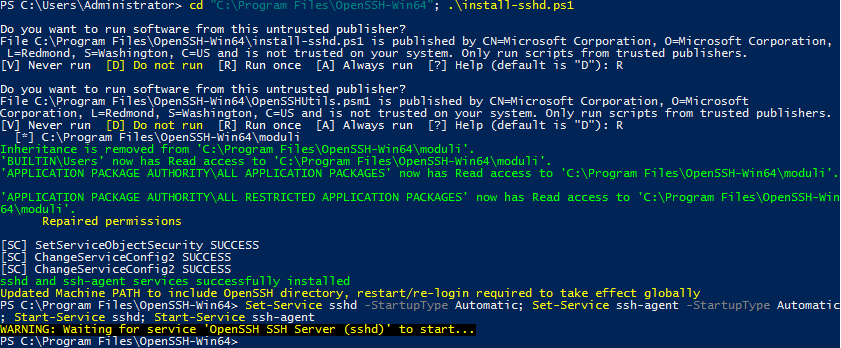
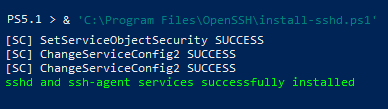
Get-ChildItem -Path "C:\Program Files\OpenSSH\" | Unblock-File2. After extracting the ZIP file, run the command below in PowerShell to execute the script C:\Program Files\OpenSSH\install-sshd.ps1. This script installs the OpenSSH SSH Server service (sshd) and OpenSSH Authentication Agent service (sshd-agent).
& 'C:\Program Files\OpenSSH\install-sshd.ps1'You can see the expected result below.
To ensure that the SSH server starts automatically, run the command below in PowerShell.
## changes the sshd service's startup type from manual to automatic.
 Set-Service sshd -StartupType Automatic
## starts the sshd service.
 Start-Service sshd
Adding a Windows Firewall Rule to Allow SSH Traffic
This procedure is applicable only if your Windows Server is using the Windows Firewall. For servers using third-party firewalls, refer to your firewall documentation on how to allow port 22.
Installing OpenSSH does not automatically create a firewall exception rule to allow SSH traffic. Therefore, your next task is to create the firewall rule manually.
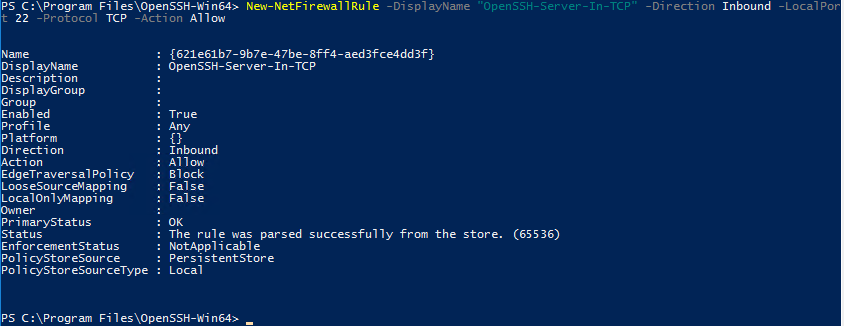
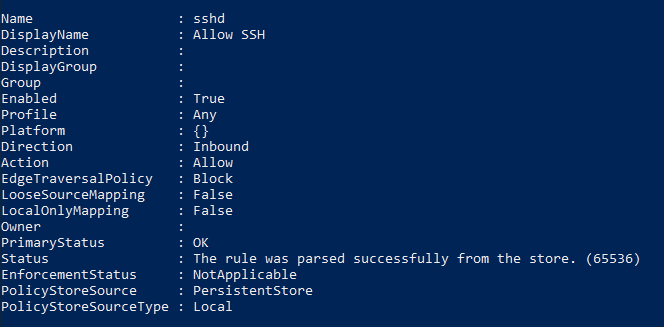
One of the easiest ways to create a new Windows Firewall rule is with PowerShell and the New-NetFirewallRule cmdlet. The command below creates a firewall rule called Allow SSH that allows all inbound TCP traffic destined to port 22.
Copy the command below and run it in PowerShell.
New-NetFirewallRule -Name sshd -DisplayName 'Allow SSH' -Enabled True -Direction Inbound -Protocol TCP -Action Allow -LocalPort 22The below screenshot shows the expected output in PowerShell after creating the firewall rule.
Connecting with SSH using Password Authentication
At this point, you’ve installed OpenSSH on Windows and performed the initial server configuration. The next step is to test whether connecting via SSH actually works.
To test your newly configured SSH server, let’s now run the ssh command on your local computer.
The same steps in this section also apply when connecting to a Linux SSH server.
1. From your local computer this time, open PowerShell.
2. Next, run the command below to start the SSH login process. Make sure to change the username and the remote host of your Windows Server.
3. Since you’re connecting for the first time to the server, you will see a prompt saying that the authenticity of the host can’t be established. The message means that your computer does not recognize the remote host yet. Type yes and press Enter to continue.
4. When prompted for the password, type in your account password and press enter.

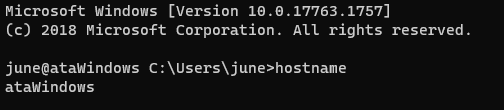
5. After logging in, as you can see in the screenshot below, you’ll arrive at the remote host’s command prompt. Suppose you want to confirm that you’ve entered the session on the remote host. To do so, type hostname, and press Enter. The command should return the remote computer name.
Changing the Default Shell for OpenSSH to PowerShell
When you first logged in to your Windows SSH server, you’ll notice that the default shell or command interpreter is CMD. Having CMD as the default SSH shell is fine, but if you prefer to use PowerShell as the default shell instead, follow these steps.
To change the default OpenSSH shell from CMD to PowerShell:
First, open an elevated PowerShell window on your Windows Server, if you don’t have one open already.
Next, create a new registry string value called DefaultShell in the registry key HKLM:\SOFTWARE\OpenSSH. Set the DefaultShell string data to the Windows PowerShell path C:\Windows\System32\WindowsPowerShell\v1.0\powershell.exe.
New-ItemProperty -Path "HKLM:\SOFTWARE\OpenSSH" -Name DefaultShell -Value "C:\Windows\System32\WindowsPowerShell\v1.0\powershell.exe" -PropertyType String -ForceThe screenshot below shows the expected result of the command.

Configuring Public Key Authentication
In the previous sections, you connected with a username and password. this works but a more secure way to authenticate with an SSH server is by using a key pair.
In a nutshell, a key pair consists of two keys called the public key and private key, which constitute a set of security credentials to prove your identity.
The public key is stored on the server, while the private key stays on the local computer. You must treat a private key like your password. If the private key is compromised, anyone can use it to gain access to your SSH server.
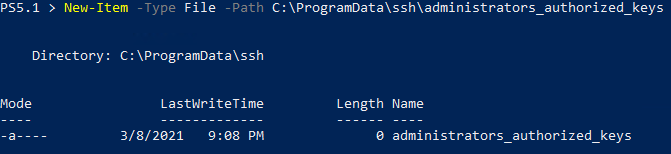
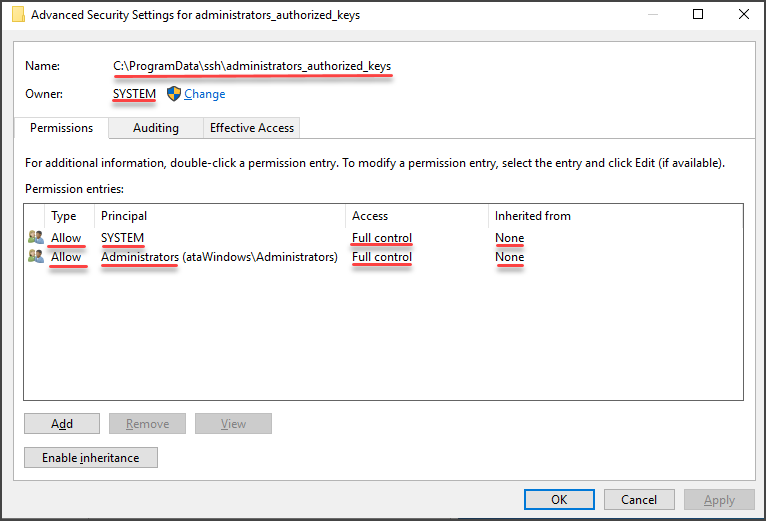
Public keys have to be on the server. But where? For OpenSSH on Windows, the SSH server reads the public keys from the C:\ProgramData\ssh\administrators_authorized_keys file. But this file does not exist by default. You must create one first.
Follow these steps below to create the administrators_authorized_keys file and set its proper access control list (ACL).
On the Windows Server:
1. Open an elevated Windows PowerShell console if not already.
2. Copy the command below and run it in PowerShell. This command creates the administrators_authorized_keys file using the New-Item cmdlet.
New-Item -Type File -Path C:\ProgramData\ssh\administrators_authorized_keysYou should see a result similar to the screenshot below.
3. Next, get the ACL currently assigned to the ssh_host_dsa_key file and copy that ACL to the administrators_authorized_keys file. To do so, run the command below.
get-acl C:\ProgramData\ssh\ssh_host_dsa_key | set-acl C:\ProgramData\ssh\administrators_authorized_keysThe OpenSSH service requires that only the Administrators group and the SYSTEM account have access to the administrators_authorized_keys file. And copying the ACL of ssh_host_dsa_key to administrators_authorized_keys makes sense because the ACL is already set.
4. Now open up Windows Explorer.
5. Navigate to the C:\ProgramData\ssh\ folder.
6. Right-click on the administrators_authorized_keys file and click Properties.
7. On the properties page, click on the Security Tab and click Advanced.
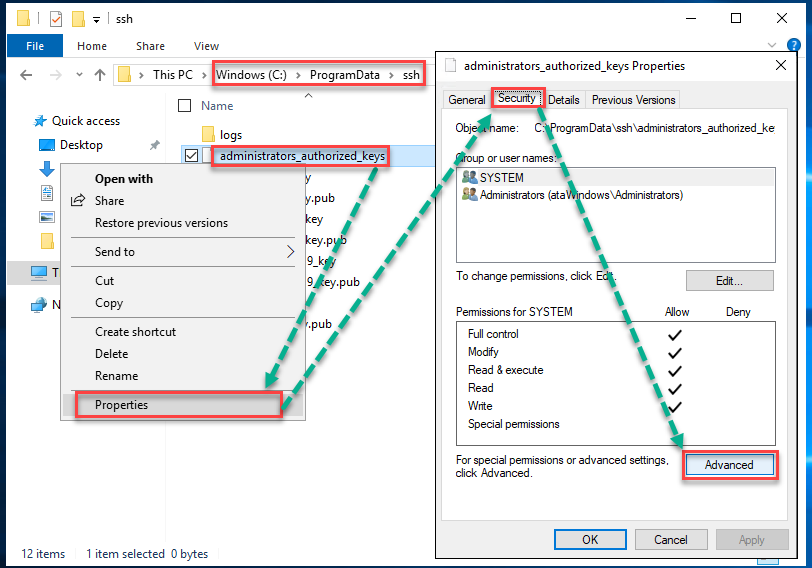
8. Then, confirm if the permissions are as shown like in the image below.
Generating a New SSH Key Pair
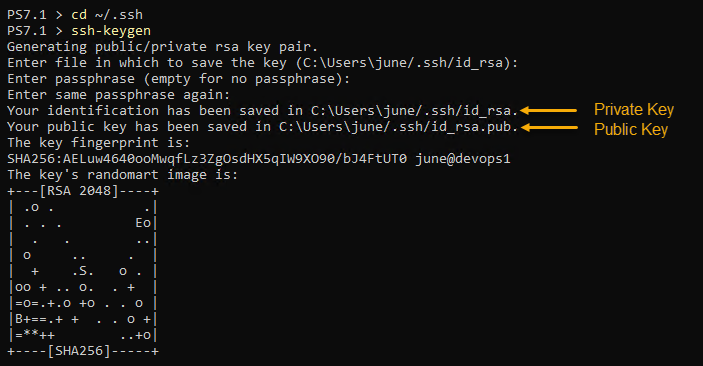
To generate a new SSH key pair, use the ssh-keygen command, which is part of the OpenSSH client tools built-in to Windows 10 (and above) and most Linux operating systems.
The example shown in this section works on both Windows and Linux computers.
On your local computer, in a PowerShell console:
1. Navigate to your home folder’s .ssh directory by running the command below.
2. Next, type in the command ssh-keygen and press Enter. When asked to enter a file location to save the key you’re generating, keep the default location and press Enter. Doing so allows your SSH client to find your SSH keys when authenticating automatically.
In Windows, the default key file is C:\Users\<username>\.ssh\id_rsa.
3. At the next prompt, leave the passphrase blank. At this point, you do not have to use a passphrase for testing.
Adding a passphrase to your private key significantly increases its security. A passphrase acts as a second-factor authentication (2FA) to your private key.
You’ll notice that the command created two files; id_rsa (private key) and id_rsa.pub (public key).
Deploying the Public Key to the Windows SSH Server
Now that you’ve generated your private-public key pair, your next step is to copy the public key to the C:\ProgramData\ssh\administrators_authorized_keys file on the SSH server.
On your local computer, in a PowerShell console:
1. Copy the code below and run it in PowerShell. Make sure to change the username and IP address first. You can refer to the comment above each command to know what each command does.
# Read the public key
 $public_key = Get-Content ~/.ssh/id_rsa.pub
# Append the public key to the administrators_authorized_keys on the server using ssh.
 ssh [email protected] "'$($public_key)' | Out-File C:\ProgramData\ssh\administrators_authorized_keys -Encoding UTF8 -Append"
2. Enter your password when prompted, and ssh will proceed to copy the public key. You will see a similar result, as shown below.

Connecting with SSH using Public Key Authentication
Now that you’ve copied your public key to your SSH server, you no longer need to use a password to authenticate. As you can see below, ssh did not prompt for a password.

Configuring Certificate Authentication
Like public key authentication, certificate authentication is passwordless or passphrase-protected. To enable certificate login, follow the same procedure of generating a key pair sans deploying the public key to the SSH server.
You do not need to map the public key to the authorized_keys or administrators_authorized_keys files on the SSH server. Instead, the public key is signed using a certificate authority (CA) key.
Creating the Certificate Authority (CA) Key
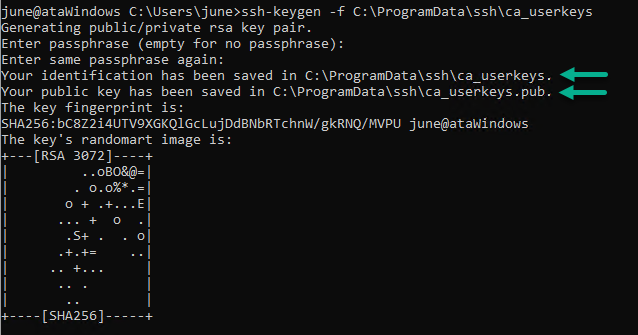
Generating the CA keys for signing is similar to generating a user key pair that you did earlier in this article. Only this time, you’ll need to specify a filename for the new CA keys. To do so, on your Windows Server in a PowerShell console:
Execute the ssh-keygen command as shown below. This command creates the CA key in C:\ProgramData\ssh\ca_userkeys, but feel free to use a different file name. Using a different filename will not affect the CA key functionality.
When asked for a passphrase, leave the passphrase empty and press Enter.
ssh-keygen -f C:\ProgramData\ssh\ca_userkeysYou can see below that the command created two files. ca_userkeys, which is the private key, and ca_userkeys.pub, which is the public key.
Now that you’ve generated the CA keys, tell the SSH server to trust the CA and where to find the CA key. To do this, add a new line TrustedUserCAKeys path/to/ca_userkeys.pub to the C:\ProgramData\ssh\sshd_config file on the server.
Run the commands below to append the configuration item in the file sshd_config.
# If the SSH server is Windows
 echo TrustedUserCAKeys C:\ProgramData\ssh\ca_userkeys.pub>> C:\ProgramData\ssh\sshd_config
Signing the User’s Public Key
At this point, you’ve generated the CA keys and configured the SSH server to trust the CA public key file. What’s left now is to sign your user public key.
On your local computer, in a PowerShell console:
1. Copy the id_rsa.pub file to your home drive on the SSH server using the SCP command. Make sure to change the username and IP address to the correct values.
2. Log in to your Windows Server using ssh. Once logged in, run ssh-keygen to sign the user’s public key. You’ll notice that the command below used several parameters. Let’s break them down.
-s C:\ProgramData\ssh\ca_userkeys– specify the CA key’s location for signing the public key. In this example, the CA key is the one you generated.-I id_username– specify the ID you want to assign to the signed user public key. Change theid_usernamevalue to any name you want.-V +4w– this parameter specifies the validity period for the signed key. In this example,+4wmeans that the signed user key will be valid for four weeks. You can change this value to your preferred validity period.-n username– this is the username of whom will own the signed public key.<path to id_rsa.pub>– this is the user public key’s location to sign (Windows).
ssh-keygen -s C:\ProgramData\ssh\ca_userkeys -I id_username -V +4w -n username ~/id_rsa.pubAfter you run the command in your SSH session, you should get a similar output, as shown below. As you can see, the command generated a new file called id_rsa-cert.pub, which is the signed user certificate.

3. Now, navigate back to your local computer PowerShell session and copy the id_rsa-cert.pub file from the server to your local computer. Change the username and IP address to the correct values first before running the command.
After the copy completes, you’ll find the signed user certificate in your home folder, as shown below.

Connecting with SSH using Certificate Authentication
You’ve configured certificate authentication, and now you have your user certificate. You should now test if you can connect the SSH server with certificate authentication.
The command to connect to SSH with a certificate is the same as using a password or public key. But, if you enabled public key authentication previously, disable it first. Otherwise, ssh will keep using your key pair instead of your certificate.
To disable your key-pair, remove your public key from the administrators_authorized_keys file. To do so, follow these steps.
Note that the succeeding commands will empty the whole administrators_authorized_keys file, effectively removing all mapped public keys. If you don’t want to clear all mapped public keys, use a text editor to remove selected public keys from each file manually.
While SSHed into the Windows Server:
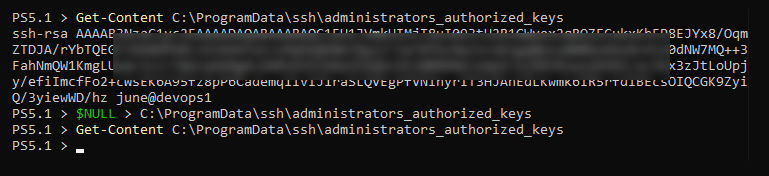
1. Run the below code in PowerShell to empty the administrators_authorized_keys file.
# Clear the administrators_authorized_keys file
 $NULL > C:\ProgramData\ssh\administrators_authorized_keys
# Confirm that the administrators_authorized_keys is empty
 Get-Content C:\ProgramData\ssh\administrators_authorized_keys
2. At this point, the authorized_keys and administrators_authorized_keys files are empty, as you can see in the screenshot below.
3. Type exit and press Enter to disconnect from your SSH session. You’ll be back to your PowerShell session.
4. After removing the public keys, your next ssh login attempt will use certificate authentication. The login experience will be the same as public key authentication.

Conclusion
You’ve now set up an OpenSSH Windows Server from scratch all the way to exploring and setting up various authentication means. You can now connect to your Windows Servers exactly how you would with Linux!