— Advertisement —
Hello! One of the protection mechanisms of the server is the implementation of the Firewall. Although there are third party options, Microsoft offers a Firewall integrated into the operating system. It is very efficient and highly configurable. Additionally, it can allow or block connections or redirect connection requests. Also, by customizing the rules it is possible to allow only authorized communications. On the other hand, port management is vital within the Firewall. Since they allow communication between the server and the external network. In fact, the vast majority of attacks are carried out through these ports. For this reason, the Firewall blocks most of the ports. However, it is occasionally necessary for an app to have access to one. In this case, the administrator must authorize the program’s access to the required port. So let’s see how to open a firewall port in Windows Server 2019/2016.
How to open the firewall port using the advanced settings.
In the first place it is necessary to enter the Control Panel and follow the next path:
- System and security
- Windows Defender Firewall
- Advanced Settings

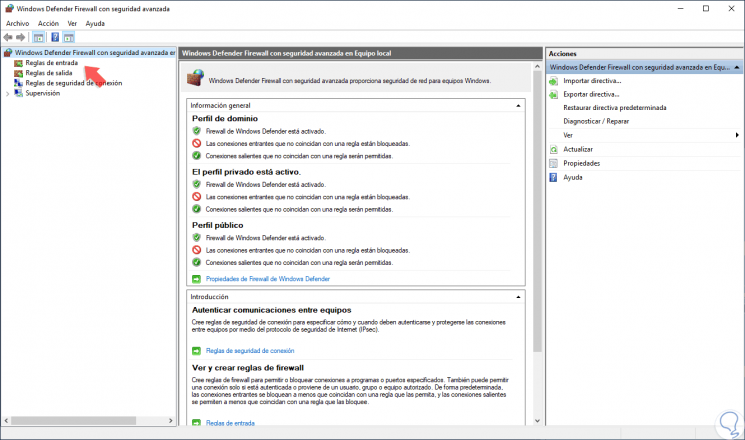
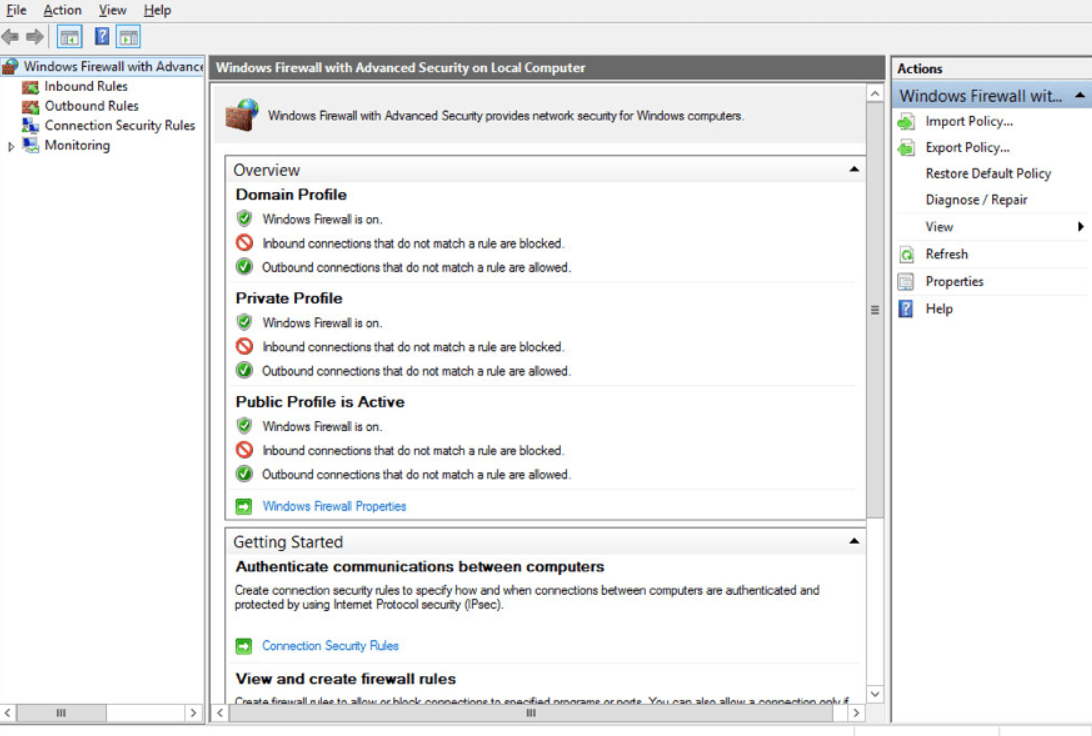
The advanced settings of the Windows Firewall are immediately displayed. There are the entry and exit rules plus the security rules for connections. Finally, there are the firewall supervision options.

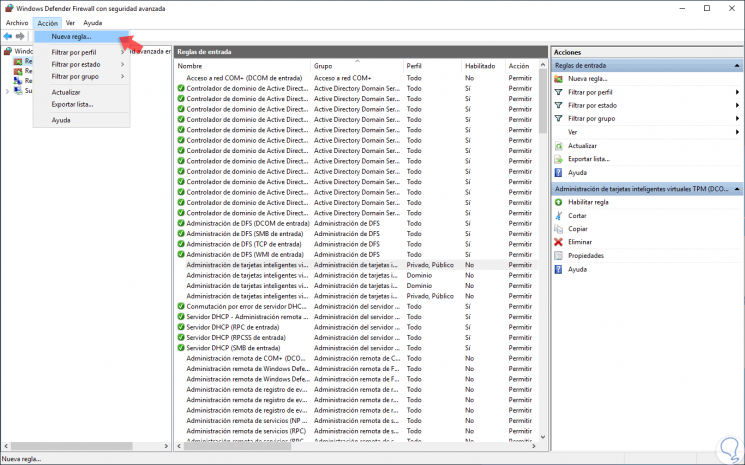
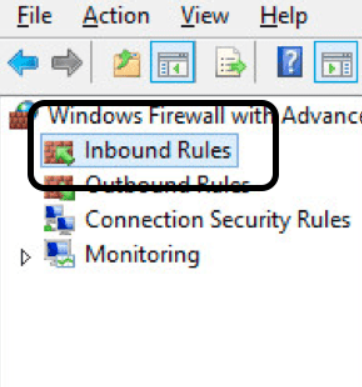
Clicking on the input rules will display the pre-configured Windows Server rules. As the name implies, they are related to incoming network connections and packets. Also, some rules are not activated by default. Therefore, you just need to double-click on them and then enable them.

Creating a new rule in the Windows Server Firewall.
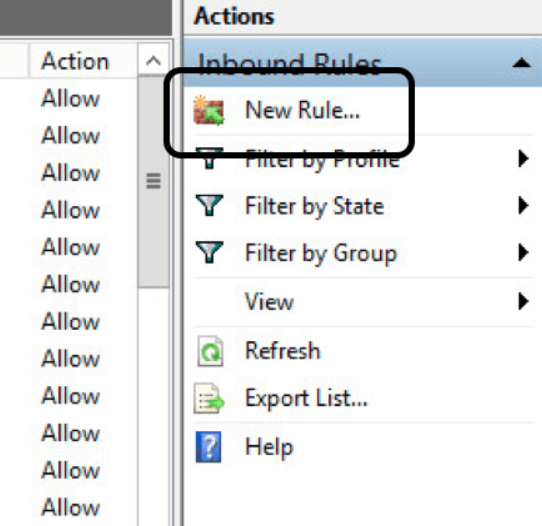
By right-clicking on inboud rules, you can create a new rule.

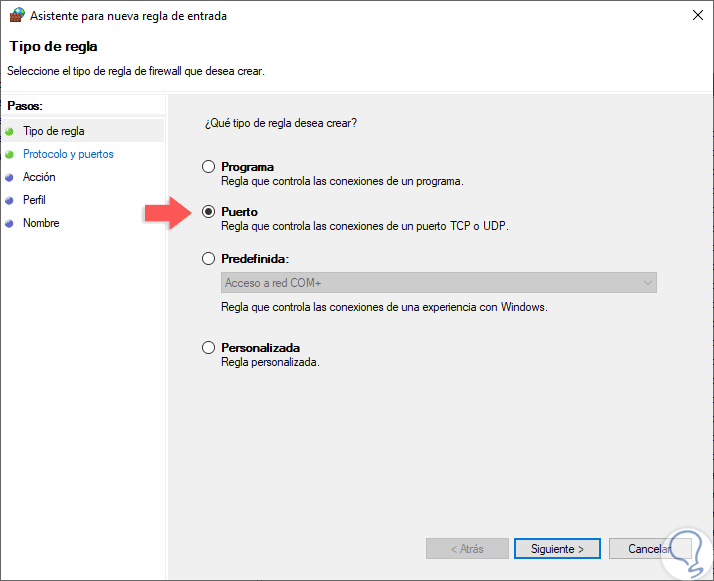
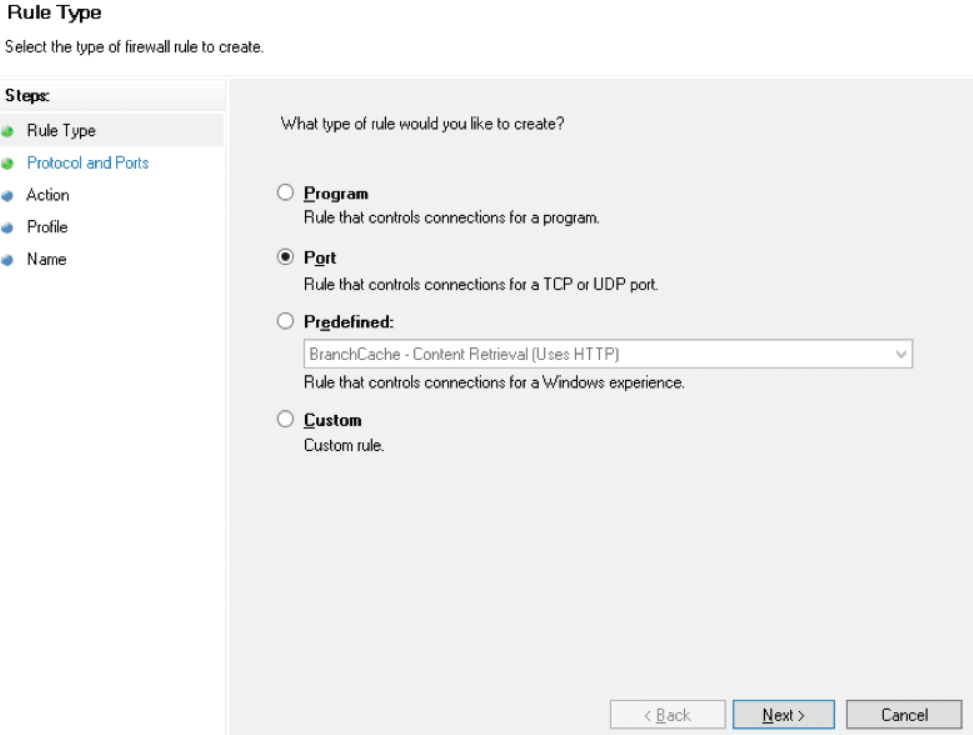
There are several options for the creation of the rule. However, you should only select Port. Press Next to continue

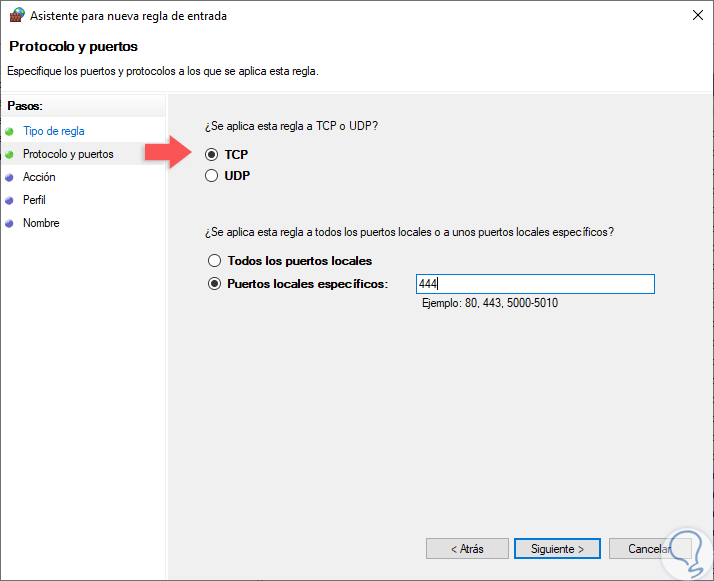
Now it’s time to set your connection preferences:
- TCP: It is a connection-oriented protocol. In other words, its function is to create connections with the aim of sending data flow.
- UDP: It is a non connection-oriented protocol. Consequently, its development is based on the exchange of data grams.
On the other hand, it is possible to enable all ports for connection. This is obviously an unsecured option. Or you can configure specific ports.

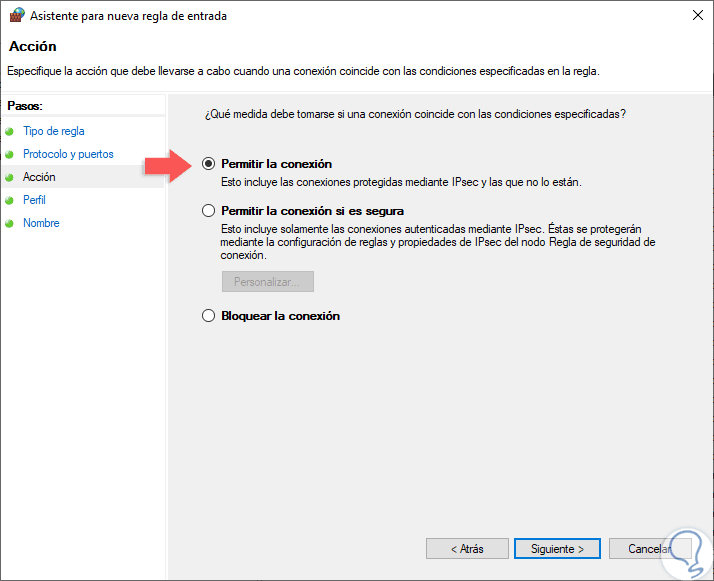
Now it is time to determine what action the new rule will take:
- Allow connection through the port.
- Allow connection if secure. That is, allow data to be transmitted only if the connection is authenticated through Ipsec.
- Block connection through the port.

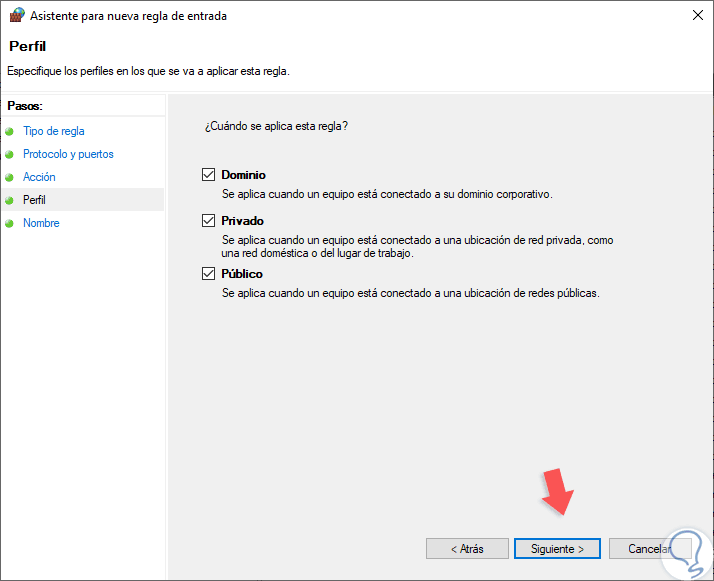
Please select the option corresponding to Allow connection and press Next. Now it is time to determine which profiles the new rule will be applied to.

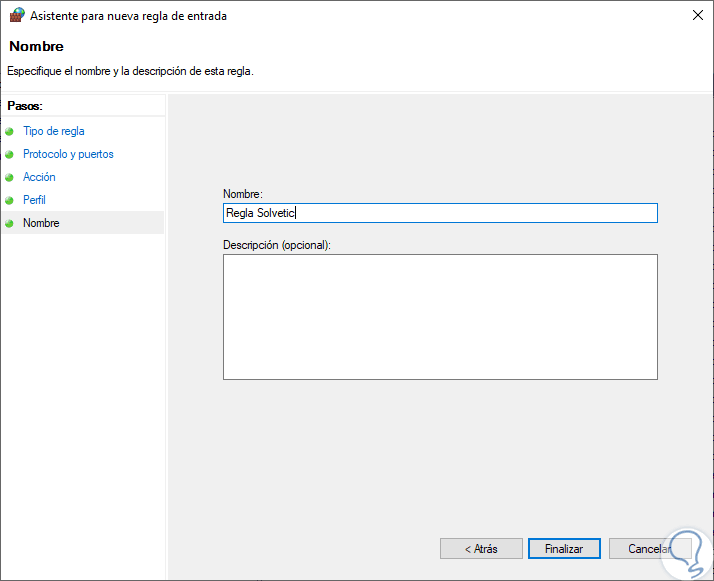
Finally, you can assign a name and description to the new rule. This way it is easier to locate it later.

Back to the previous screen, you can see the new rule created.

Ultimately we have seen how to open a firewall port in Windows Server 2019/2016. In addition, the tutorial also serves to block a specific port. This way, the administrator can increase the functionality of the Firewall. All right, that’s it for now. Greetings!
Windows Server 2019 contains a firewall program called Windows Defender Firewall with Advanced Security. The firewall filters incoming and outgoing traffic on your Windows Server 2019 instance to safeguard it from common network attacks. By default, the firewall is configured to allow access to all pre-installed system programs.
However, several programs may use multiple different ports for operation, and these will be automatically blocked because they don’t match with the rules in your firewall configuration. In this case, you need to open the specific port on Windows Server.
Prerequisites
-
Deploy a Windows Server 2019 Instance on Vultr
-
A Remote Desktop Connection App
Establish a connection to your server by logging in through any remote desktop app or click the console on your Vultr dashboard to access your server. After you connect you can start configuring your Windows server 2019 firewall rules.
By default, Windows Defender Firewall is turned on, but in any case, you should confirm the current status and turn on firewall. To do this, click the tools node under server manager and select Windows Defender Firewall with Advanced Security from the drop down list.

From the open group policy management window, check the current status of Windows Firewall profiles if it is set to ON; otherwise, click the Windows Defender Firewall properties option and turn the service on per profile.

Firewall Rules
Windows Firewall rules allow you to either permit or block specific incoming and outgoing network packets on your server. You can choose multiple parameters for each inbound or outbound rule. A rule can consist of a TCP or UDP port, program name, service, or a protocol to filter for every server profile.
Windows server profiles are grouped into, Domain, Private and Public. Domain represents your server’s connection to a corporate domain network, Private applies to your home or workplace network connection, and Public represents non-secure public network locations.
Open an Inbound Port (Incoming connections)
Launch windows defender firewall from the tools sub-menu under server manager. Then, select Inbound Rules on the left panel of the Firewall console.
A list of current rules will be displayed. Now, on the left Inbound Rules sub-menu under actions, click New Rule.

Select Port as the rule type in the rule wizard and click Next.

Now, choose whether the new rule applies to a TCP or UDP port on your server. Then, select specific ports and enter your target port number, you can enter a ports range, or multiple ports separated by - and , respectively, then click Next.

Define your TCP or UDP port rule.

-
Allow the connectionwill allow incoming connections to the specified server port -
Allow the connection if it is securewill authenticate with IP security and either deny or allow the connection. For example,httpsconnections will be allowed andhttpblocked. -
Block the connectionwill block all incoming connections to your server through the specified port
In this case, choose Allow the connection to open the port.
Click Next to assign the new rule to one or more profiles. You can select between Domain, Private, and Public, or choose all to apply the firewall rule on multiple profiles.
Next, give your new firewall rule a custom name and description for easy identification. Then, Click finish to enable the new rule. Your new Inbound (Incoming) port rule will be enabled, and all connections to the server that match the port will be accepted.
Open an Outbound Port (Outgoing connection)
From the Windows Defender Firewall console, click Outbound Rules on the left pane, and a list of available outgoing connection rules will be displayed.
Now, click New Rule on the right pane under the outbound rules node.
In the new outbound rule wizard, select Port as the rule type and click Next.

Now, let’s choose whether the new rule applies to a TCP or UDP port. Then, select specific remote ports and enter the target server port number; you can enter a range of ports, a single port, or multiple different ports you intend to open.

Next, on the Action page, select Allow the connection, then click next to select the server profile on which the rule should be enabled.
Give the new outbound rule a name and description that uniquely describes it. Then, click Finish to enable the outbound rule for the target port to be open on all selected server profiles.

Open a Port through Windows PowerShell
From the Windows start menu, open PowerShell. Then, edit the following command and replace it with your settings.
New-NetFirewallRule -Enabled:True -LocalPort 21 -Protocol TCP -Direction Inbound -Profile Domain -Action Allow -DisplayName example opening a port rule"
-
New-NetFirewallRuleCreates a new Firewall rule. -
EnabledThis enables the new rule, by default, it will be set to True. -
LocalPortYour target port number. -
ProtocolSpecifies the protocol associated with your port number. -
DirectionSets your target direction to either Inbound (Incoming) or Outbound (Outgoing). -
ProfileAssigns the new rule to a server profile; you can choose domain, private, or public. -
Actiondefines the state for the new firewall rule, enter allow. -
DisplayNamesets a custom name for the new firewall rule
Your Output should be similar to the one below.
PS C:\Users\Administrator> New-NetFirewallRule  -Enabled:True  -LocalPort 21  -Protocol TCP  -Direction Inbound  -Profile Domain  -Action Allow  -DisplayName "example opening a port rule"


Name                  : {427a1b12-ece6-4d54-847d-de482b227c6c}

DisplayName           : example opening a port rule

Description           :

DisplayGroup          :

Group                 :

Enabled               : True

Profile               : Domain

Platform              : {}

Direction             : Inbound

Action                : Allow

EdgeTraversalPolicy   : Block

LooseSourceMapping    : False

LocalOnlyMapping      : False

Owner                 :

PrimaryStatus         : OK

Status                : The rule was parsed successfully from the store. (65536)

EnforcementStatus     : NotApplicable

PolicyStoreSource     : PersistentStore

PolicyStoreSourceType : Local
Congratulations, you just opened a network port on your Windows Server 2019. The server will accept incoming and outgoing connections through the selected ports, but the firewall will block connections from a profile that doesn’t match the port rule.
In this article, we want to teach you How To Open a Firewall Port on Windows Server 2019.
A firewall is a network security device that monitors incoming and outgoing network traffic and permits or blocks data packets based on a set of security rules.
Its purpose is to establish a barrier between your internal network and incoming traffic from external sources (such as the internet) in order to block malicious traffic like viruses and hackers.
Firewalls carefully analyze incoming traffic based on pre-established rules and filter traffic coming from unsecured or suspicious sources to prevent attacks.
Most Internet applications and services have well-known ports on which machines ‘listen’ for communications.
- How To Open a Firewall Port on Windows Server 2019
How To Open a Firewall Port on Windows Server 2019
You can follow the steps below to open a Firewall port on your Windows server.
Note: This guide applies to Windows Server 2016 too.
First, you need to open your control panel. Then, follow the path below to open the Advanced settings:
System and security > Windows Defender Firewall > Advanced Settings
At the Windows Defender Advanced settings window, click on the inbound rules. And, on the top right of the window click on the New Rule to open a firewall port.
Here a New Inbound Rule Wizard will open. You need to check the box next to the port and click on the Next button.
At this point, you need to check the box next to the TCP. And in the specific local ports, enter the desired port that you want to open on your Windows server.
Next, you need to allow connections for the firewall port on the Windows server and click on the Next button.
Now depending on what you desire, you need to apply the new rule.
You can either choose “Domain, Private, or Public“. Press Next after that.
In the next window, enter the name of the rule and a description if you want. Then, press the Finish.
You can back to the Windows Defender Firewall Advanced settings window and you will see the new rule is created.
Conclusion
At this point, you learn to Open a Firewall Port on Windows Server 2019.
Hope you enjoy it.
One of the most fundamental security mechanisms that current operating systems offer us is the implementation and activation of the firewall, although we have heard this term many times, we are not always aware of the high impact it has on the system both at a corporate and personal level . While it is true that certain companies offer firewall solutions on a physical level, which is a bridge between the external network and the local network, the operating system itself, in this case we talk about Windows Server 2019 , has its own integrated firewall which with a correct configuration it will give us the possibility to increase the security levels and thus guarantee the availability and integrity of all the elements that are hosted on the server, such as roles, services, shared folders and more..
In Windows Server Firewall, it is normal that it is often necessary to configure certain exceptions to allow communication of applications with the server, in this case these exceptions must be configured based on the requirements of the application and enable your access to have Control of all your capabilities.
Usage options
When using the integrated Windows Server 2019 firewall we will have management options such as:
- Authorize a connection (Allow).
- Block a connection (Deny).
- Redirect a connection request without notifying the sender of said redirection (Drop).
The set of rules that are managed by the firewall, give the possibility of installing a filtration method based on the security policies of the organization, normally we have two types of security policies thanks to which it will be possible to carry out actions as:
- Allow only authorized communications.
- Prevent any type of communication that has been explicitly prohibited.
In the administration of the firewall , the ports play a vital role since they are the ones that allow communication between the server and the external network. That is why these ports are where more than 95% of the attacks are carried out since they act as a door that opens for attackers. That is why the firewall blocks or closes most of the ports, this is obviously for security reasons but it is possible that some management application requests the opening of a certain port in the firewall so that its access is authorized. In this case as administrators we must allow that particular port to have proper authorization in the firewall..
This is why TechnoWikis will explain how we can open and authorize a port in the Windows Server 2019 firewall and thus ensure that the applications or services that use that port will have the required permissions.
To keep up, remember to subscribe to our YouTube channel! SUBSCRIBE
Open Firewall port with advanced firewall settings in Windows Server 2019
Step 1
To start this process we must go to the next route. Alternatively we can go to the Windows Server 2019 search box and enter the term «firewall» and select the «Windows Defender Firewall» option.
- Control Panel
- Security system
- Windows Defender Firewall

Step 2
In the displayed window we will click on the “Advanced configuration†line and a new window will be displayed where we find parameters such as:
- Entry and exit rules
- Connection Security Rules
- Server firewall monitoring options
Step 3
When selecting the «Inbound rules» section, all the preconfigured Windows Server 2019 rules associated with incoming network connections and packages will be displayed, some of these rules are not enabled by default so if we want to activate them, just right click on the rule and select the option “Enable ruleâ€: 
Step 4
We can find specific details of the rules such as:
- Rule Name
- Group to which it belongs
- Profile (Public, Private or Domain)
- Actual state
Step 5
To create a new rule in Windows Server 2019, we have the following options:
- Right click on the «Inbound rules» section and select «New rule».
- Go to the «Action» menu and select «New rule»
- By clicking on the “New rule†option located in the right side panel.
Step 6
When selecting this option, the following wizard will be displayed where we define the type of rule to be created, in this case we select the “Port†box:
Step 7
In the next window we will define the type of port to enable:
TCP (Transmission Control Protocol)
It is a connection-oriented protocol, that is, with TCP it will be possible to create connections with each other in order to send data flow, this protocol guarantees that the data is delivered to the recipient without errors and in the same order in which they were transmitted.
UDP (User Datagram Protocol)
It is a non-connection-oriented protocol, its development is based on the exchange of datagrams and facilitates the sending of datagrams through the network that it is necessary to have previously established a connection with the destination.
Step 8
We can also select the «All local ports» box to enable all TCP or UDP ports on the server which is not secure, or check the «Specific local ports» box to determine which port is to be authorized based to the requirements. Defined this, click on the Next button and now we will define the action that this rule will have, the options are:
Allow connection
This option enables full communication through this port.
Allow connection if it is secure
This option allows data to be transmitted only if the connection is authenticated through Ipsec.
Block connection
This option prevents data from being directed through this port.
Step 9
Select the option «Allow connection» and click Next, now we must define which firewall profiles to apply, remember that we can use it in Public, Domain or Private profiles:
Step 10
We can activate them all if we wish. Finally, we must assign a name and, if we wish, a description of the new rule to facilitate its use:
Step 11
Click on the «Finish» button to complete the process and create the new rule in Windows Server 2019: 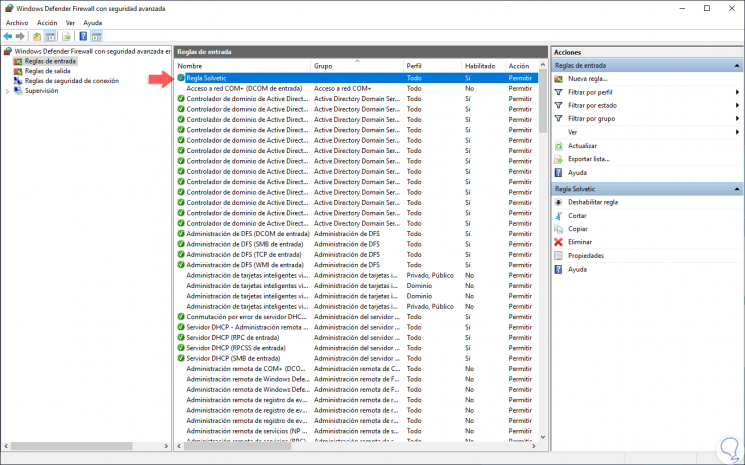
Step 12
There we can double-click on the rule and in the pop-up window go to the «Advanced options» tab and check aspects of that rule:

If we want there we can make changes at the security level of the new rule created. With this simple method, we can create and configure rules in the Windows Server 2019 firewall and improve the security of our network..
All recent versions of Windows include the Windows Firewall utility. A firewall includes options for opening and closing ports, as well as allowing and disabling specific programs and services.
Computer resources can be protected from unauthorized access by firewalls on networks and servers. Incoming or even outgoing traffic is checked for by the firewall systems and in accordance with the rules configured, decisions are made about them.
Windows Firewall cannot access the port if it isn’t explicitly allowed. TCP/IP ports are reserved for applications whenever they want to access the network, which means anyone else cannot use them.

Also Read: How to Change RDP Port in Windows Server?
In Windows Server 2008/2012 R2/2016 and Windows Server 2019, there are three ways to open ports.
- MMC
- The command line (netsh)
- PowerShell commands (For 2012R2 and 2016 only)
So, you can open ports on Windows Server by following the instructions in the following article.
Open Ports via MMC
- Here first of all you have to log in using an admin account.
- Then you have to click on:
Start > Administrative Tools > Windows Firewall with Advanced Security
- Now you have to click on the Inbound Rules on the left of the MMC.
- Then click on the New Rule on the Right of the MMC.
- Now here you will get five steps to open a port and accept incoming connections:-
- Rule Type
- Protocol and Ports
- Action
- Profile
- Name
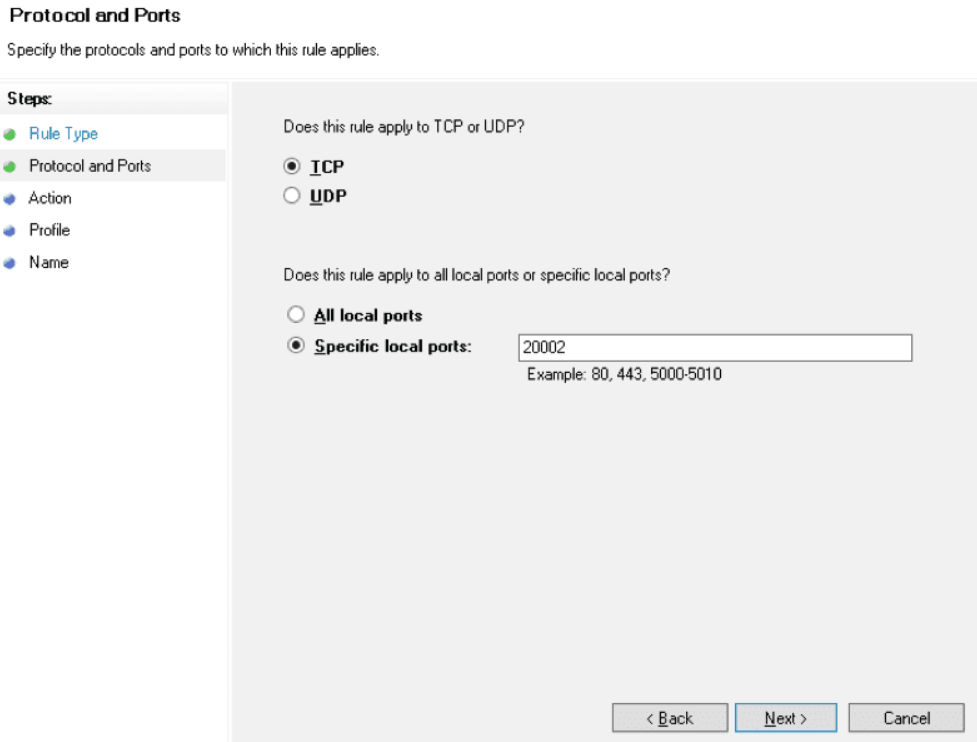
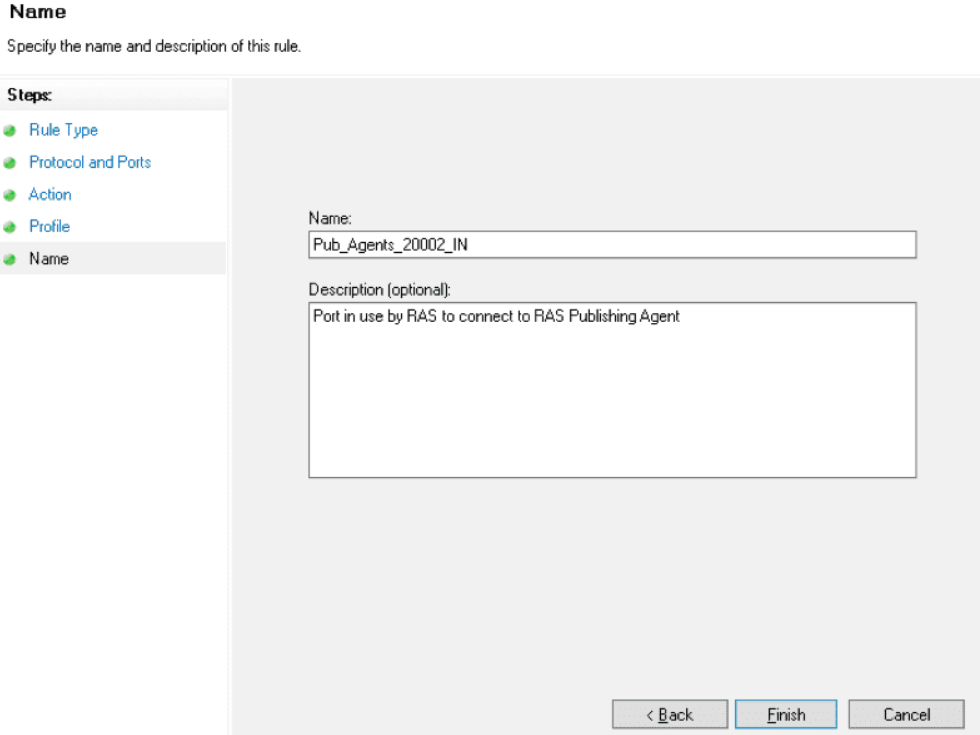
- Suppose for example the servers with Parallels RAS Publishing Agents will need to open TCP port 20002.
- Now under the Rule Type section, you have to select “Port” and then click on the “Next” button.
- Then under the Protocol and Ports section, you have to select the “TCP” as the type of protocol.
- After that, you have to type “20002” in the “Specific local ports” input field.
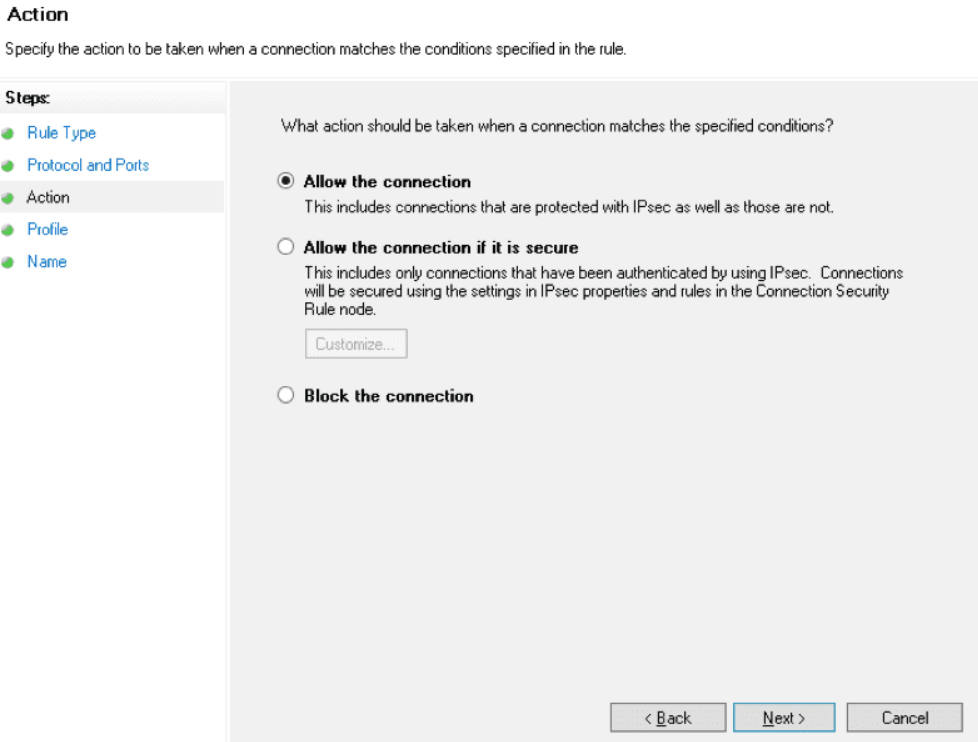
- Next, you have to head to the Action section in which you have to select “Allow the Connection“ and then you have to click on the “Next” button.
- Now under the Profile section, you have to select all three options and click on the “Next” button.

(NOTE: Here at this point if you wish to limit the connection to a particular profile then you can simply select the profiles that are appropriate to your setup.)
- After that, now you have to enter a “Name” for this rule under the Name section, and then click on the “Finish” button when you are done.
- That’s it, now you are done.
Open Ports through command line (netsh)
- First of all, using an administrator account you have to login to the server.
- Then you have to open and run the Command Prompt as Administrator.
- For the Publishing Agents role on the servers, open the TCP port 20002 with the following command.

- That’s it, now you are done.
Open Ports through PowerShell commands
- First of all, using an admin account you have to Log in.
- Then you have to run the Windows PowerShell as Administrator.
- You need to open the TCP port 20002 on the publishing agents server using the following command.

- That’s it, now you are done.
Once all is done, now immediately after creating this rule, the firewall rule will allow traffic to (or from) your server. While if you want to open a port for both sending and receiving, you need to repeat the process as an Outbound rule.
Ports play a very important role in any computer system. In computer networks, ports are used to connect computers and other devices to one another. When you open a port, you are allowing specific types of information to go in and out of your computer.
For example, if you want to host a website, you need to open port 80 to allow web traffic to go in and out. This blog is all about how to open ports on a Windows server and we hope that you liked it.
FAQs
What is a firewall and how does it work?
A firewall is a security system that is used to protect computer resources from unauthorized access. It checks incoming and outgoing traffic on a network or server, and according to the configured rules, decides whether to allow or block traffic.
How do I open ports on Windows Server?
There are three ways to open ports on Windows Server 2008/2012 R2/2016 and Windows Server 2019: using MMC, command line (netsh), or PowerShell commands. To open a port using MMC, you need to log in as an admin, click on Start > Administrative Tools > Windows Firewall with Advanced Security, click on Inbound Rules, then click on New Rule, and follow the five steps to open a port and accept incoming connections.
What is a TCP/IP port and why do applications need them?
TCP/IP ports are reserved for applications when they want to access the network, which means that no one else can use them. Ports are used to connect computers and other devices to one another. When you open a port, you are allowing specific types of information to go in and out of your computer.
What is the difference between Inbound and Outbound rules when opening a port?
Inbound rules control traffic coming into the server, while outbound rules control traffic going out of the server. If you want to open a port for both sending and receiving, you need to repeat the process as an outbound rule.
Why is it important to open ports on a Windows server?
Opening ports on a Windows server is important because it allows specific types of information to go in and out of your computer. For example, if you want to host a website, you need to open port 80 to allow web traffic to go in and out. By opening ports, you can ensure that the applications and services you want to use can communicate properly.