Windows Defender Interference may affect WIndows 10 ping
by Henderson Jayden Harper
Passionate about technology, Crypto, software, Windows, and everything computer-related, he spends most of his time developing new skills and learning more about the tech world. He also enjoys… read more
Updated on
Reviewed by
Alex Serban

After moving away from the corporate work-style, Alex has found rewards in a lifestyle of constant analysis, team coordination and pestering his colleagues. Holding an MCSA Windows Server… read more
- Ping can check whether a particular IP address is available in the network and measures the response time.
- Windows Firewall may block the ping request if it doesn’t allow the File and Printer Sharing app to run.
- You can enable ping via Windows Firewall, Windows Firewall with Advanced Security, PowerShell, and the Command Prompt.
Ping is the primary TCP/IP command for troubleshooting connectivity, reachability, and name resolution on Windows. It helps users verify IP-level connectivity to another TCP/IP computer by sending Internet Control Message Protocol (ICMP) echo Request messages.
However, users can encounter issues enabling ping on Windows 10 if the Windows Firewall blocks ping requests. Likewise, you may check our guide on what to do if you are getting a destination host unreachable error while trying to ping a host.
What causes ping not to work?
As said earlier, Ping verifies whether a particular IP address is available in the network. The ping request may not be able to send to the IP address or receive corresponding Echo Reply messages. Hence, it results in the request to return futile.
However, a couple of factors may be responsible for the problem. Some are:
How we test, review and rate?
We have worked for the past 6 months on building a new review system on how we produce content. Using it, we have subsequently redone most of our articles to provide actual hands-on expertise on the guides we made.
For more details you can read how we test, review, and rate at WindowsReport.
- Windows Defender Firewall interference – You may experience issues with pinging if the Windows Defender Firewall is impeding the process. Ping does not work when Windows Firewall does not allow the File and Printer Sharing app to run. Also, ping may not work when Firewall blocks all incoming connections on your network path.
- Host or destination IP does not exist – If the IP address you want to verify for availability is not identified or does not exist, the ping request won’t work. So, you may encounter problems with ping if the host or target IP does not exist.
Other factors not highlighted above may also be responsible for ping not working. Hence, we’ll help you with steps to fix the issue and enable ping on your device.
How can I enable ping in Windows 10?
1. Use Windows Firewall with Advanced Security
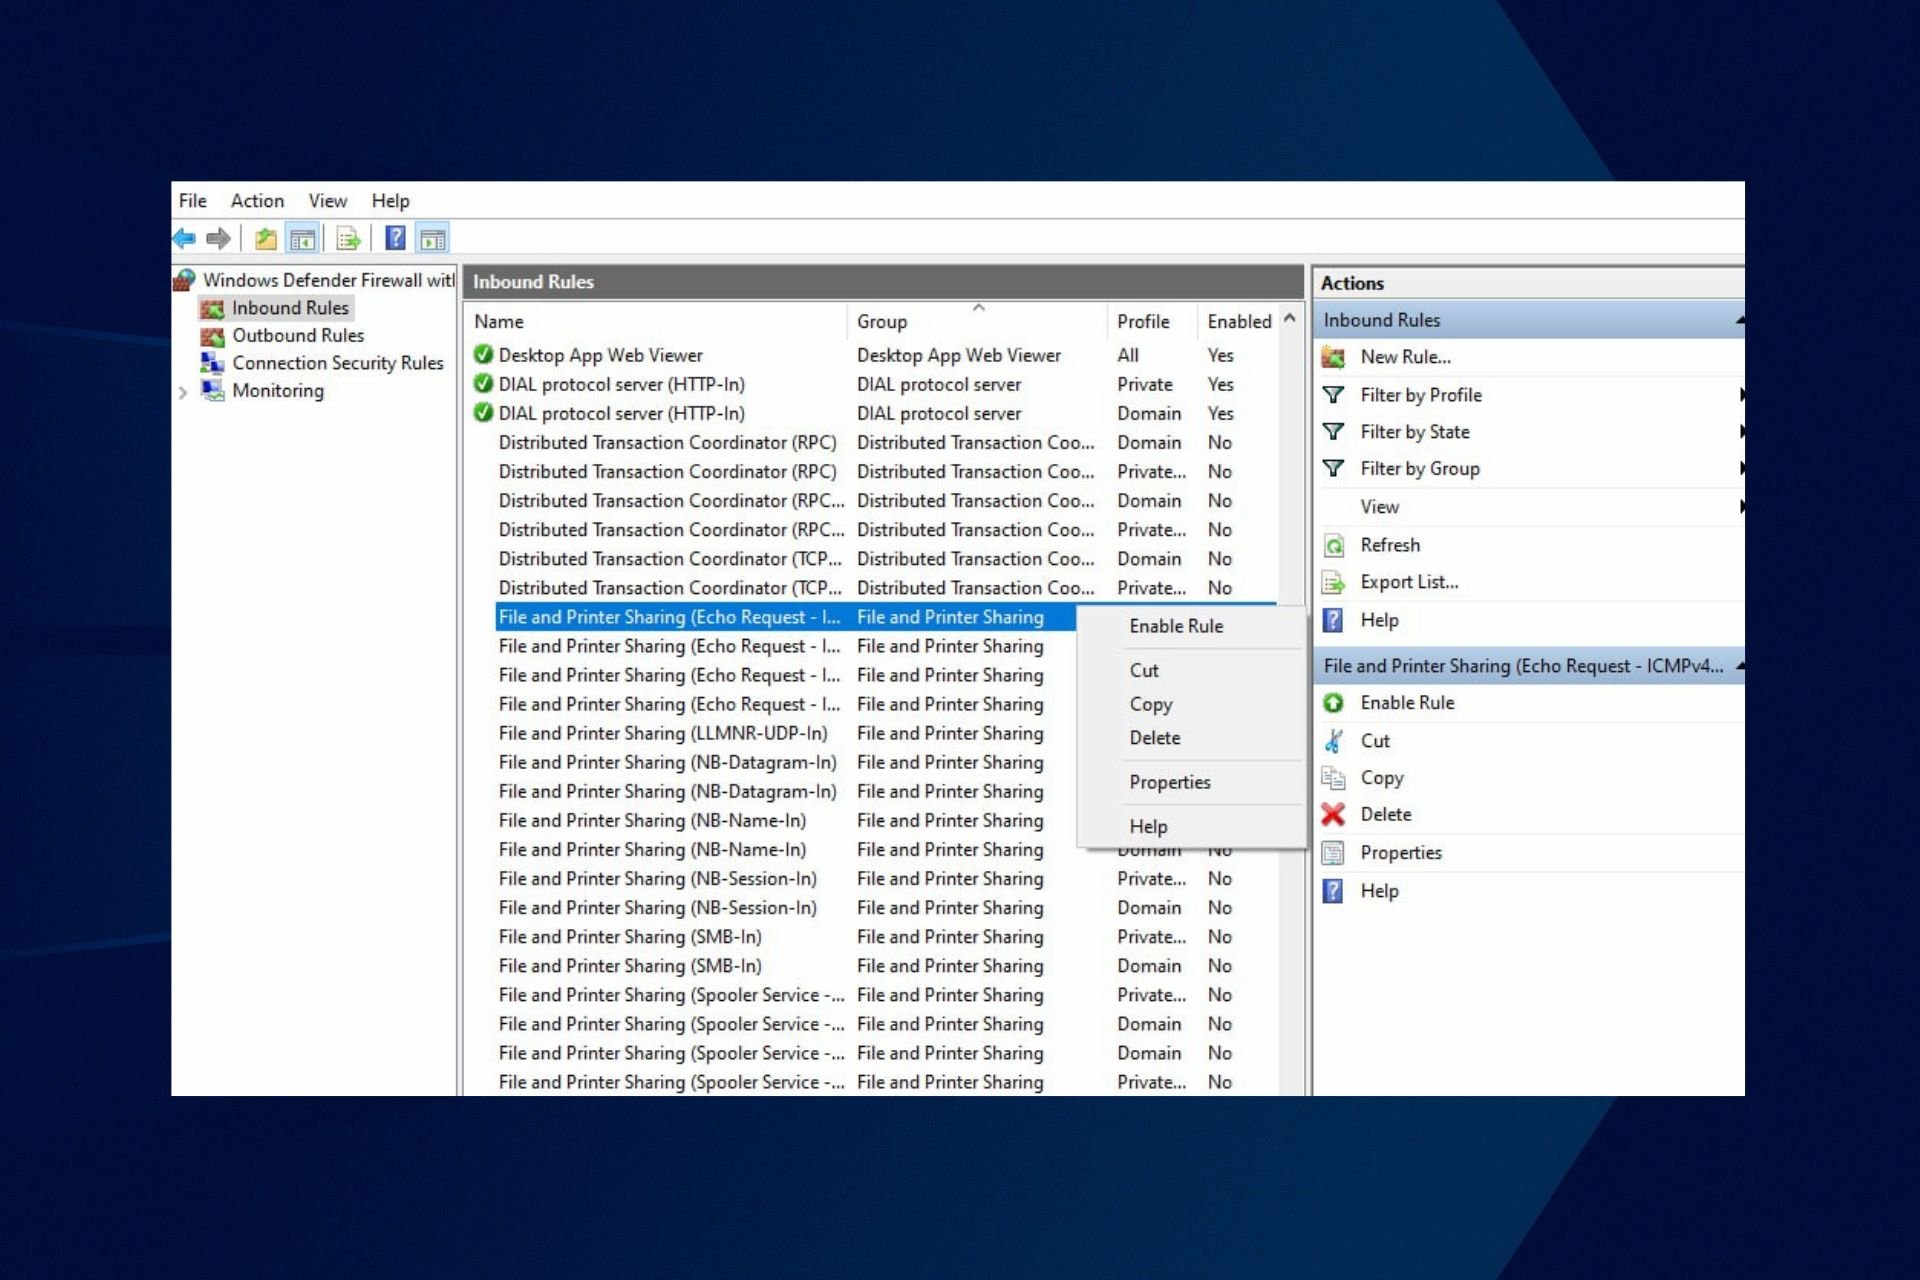
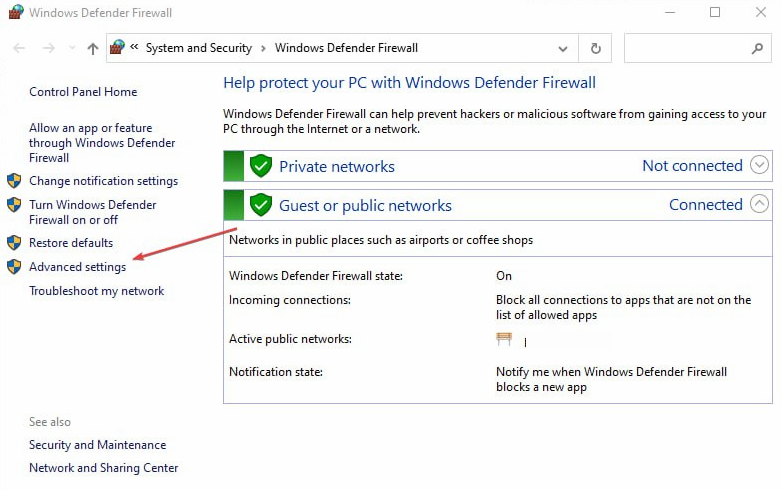
- Press Windows + R key to open the Run dialog box, type firewall.cpl in the text field, and click OK to open Windows Defender Firewall.
- Click on Advanced settings from the right pane.

- Click on Inbound Rules, find and right-click on File and Printer Sharing (Echo Request – ICMPv4 – In) that has a Public Profile, then click on Enable Rule from the drop-down.

- To know if you have successfully enabled File and Printer Sharing (Echo Request – ICMPv4 – In), check the Enabled tab and confirm if it says Yes.

Enabling the File and Printer Sharing (Echo Request – ICMPv4 – In) option will allow your computer to ping and whether a particular IP address is available in the network or not.
Check our guide on Firewall disabled but still blocking apps on Windows 10 for more information.
2. Allow File and Printer Sharing through Windows Firewall
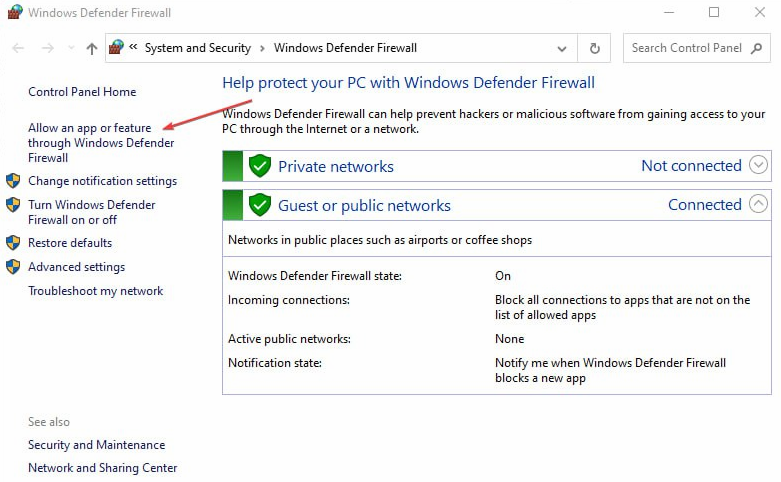
- Press Windows + R key to open the Run dialog box, type firewall.cpl in the text field, and click OK to open Windows Defender Firewall.
- Click on the Allow an app or feature through Windows Defender Firewall option.

- Click the Change settings button.
- Check the box for File and Printer Sharing, and click OK to save the changes.

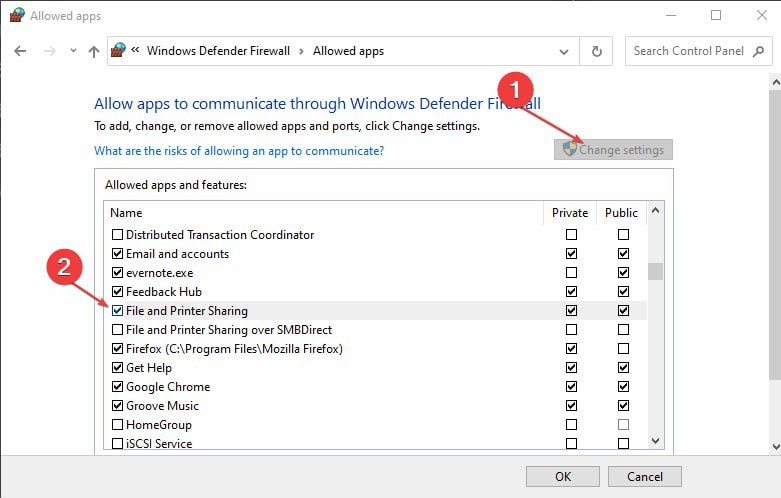
Checking the box for File and Printer Sharing enables the ping functionality on your computer.
- Is Windows 11 Faster Than Windows 10?
- How to Change the Icon Size on Windows 10
- Are Windows 11 Product Keys Backward Compatible?
- Microsoft Store Apps vs Desktop Apps: Which Ones to Use?
3. Use PowerShell
- Left-click the Start button, type PowerShell, and click Run as administrator.
- Click Yes on the User Account Control prompt.
- Copy and paste the following lines of commands and press Enter:
netsh advfirewall firewall add rule name="Allow ICMPv4" protocol=icmpv4:8,any dir=in action=allownetsh advfirewall firewall add rule name="Allow ICMPv6" protocol=icmpv6:8,any dir=in action=allow
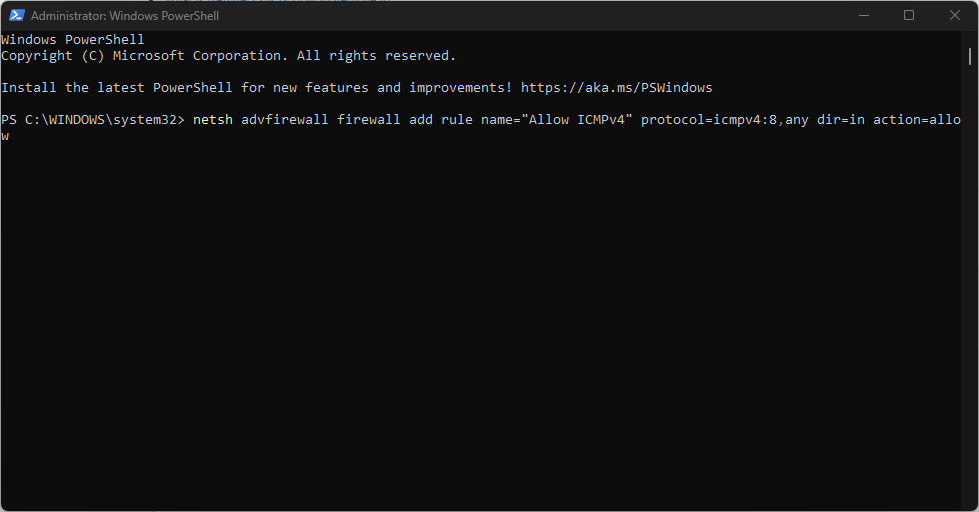
The above commands will enable the ping functionality, allowing your Windows PC to respond to ping requests.
You can check our guide about PowerShell not showing the full output and some fixes to get it working if you experience it.
4. Use the Command Prompt
- Left-click the Start button, type Command Prompt, and click the Run as administrator option.
- Click Yes on the User Account Control (UAC) prompt.
- Type the following lines of commands and press Enter to run them:
netsh advfirewall firewall add rule name="ICMP Allow incoming V4 echo request" protocol=icmpv4:8,any dir=in action=allow - Close the Command Prompt and restart your PC.

The above commands will create two exceptions to allow traffic through the firewall and allow ping requests.
Read our guide on what to do if Command Prompt keeps crashing on your PC.
In addition, our readers may be interested in ways to fix Cannot Ping computers on the same Network on Windows 10.
If you have further questions or suggestions concerning enabling ping on Windows 10, kindly drop them in the comments section.
![]()
Recent Windows Operating systems do not reply to ping requests by default. The firewall policy was set to refuse ICMP Echo Requests by default. That means you will be getting ‘Request Timed Out’ from a Windows 10 or Windows 11 PC even though it is connected and set up properly on the network. This same basic network security rule was applied on earlier Operating Systems such as Windows 8.1 and 7 too. This guide shows how to enable ping reply and make your Windows 11/10 desktop or laptop computer respond to ICMP (ping) requests from other network devices.
If the Windows 11/10 computer is in a domain network, then the global domain policy that is related to ICMP echo requests will be applied automatically by your system administrator. In this example, we consider workgroup setup where the domain setup is not available; for example, a small office or your simple home network.
Also, this guide shows how to enable incoming FTP traffic in the Windows 11/10 firewall if you are planning to make your Windows PC an FTP server by using Microsoft IIS or other FTP server programs like FileZilla FTP server.
There is a pre-built firewall rule in Windows 11/10 to enable or disable ICMP echo requests. By default it was disabled. We can enable the rule to allow ping requests in Windows OS which can reply back to other network devices in the local or external network.
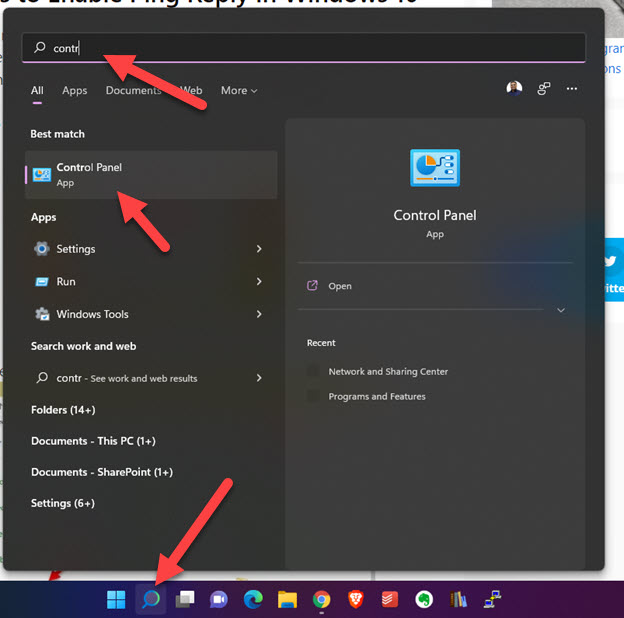
To open the rule, go to the control panel by right-clicking on the start button and selecting Control Panel.

In another way, you can search for ‘control’ in Windows 11 search bar.
Make sure to change the view to the ‘Large Icon’ in the control panel to access Windows Firewall (or Windows Defender Firewall in Windows 11) settings quickly and easily.

Click on Advanced Settings to get the ICMP rule (incoming and outbound connections) option.

Since we are going to allow incoming ping requests, we need to open the Inbound Rules area and look for the File and Printer Sharing Echo Request –ICMPv4 rule as shown below.

Once you enabled the Echo Request for ICMPv4 which is for IP v4, then your Windows 10 or Windows 11 computer will respond to ping requests.
You will see ‘Private’, ‘Public’ and ‘Domain’ network profiles in the advanced Firewall security settings while enabling or creating rules. Windows OS have each rule for every network profile. You have to enable the only profile which is related to your current connection.
For example, if you are at home or office local network, then the connection mostly will be in ‘Private’ or ‘Domain’ network profile. Therefore enable the Echo Request rule for these profiles only.
If you connect the same laptop to any public Internet network (like a coffee shop or airport Wi-Fi), Windows 11 will treat it as the public network profile. In this case, your computer will not respond to ping requests which come from the Internet to your computer, because the Echo Request rule is not enabled for the ‘Public’ network profile. Hence, it is essential to not enable unwanted firewall rules for public network profile.
Allow Ping Requests in Windows 11 by Command Prompt
You can also allow the Ping (ICMP Echo requests) by using the command prompt. It will modify the firewall rules. Using the command prompt will be handier to do the task quicker than the GUI. Also, it will be useful to execute these commands remotely when you are connected through a command prompt or on the Windows server core versions.
To enable ping requests for IPV4, execute the following command as administrator. Make sure to open the command prompt (CMD) as run as administrator.
netsh advfirewall firewall add rule name="ICMP Allow incoming V4 echo request" protocol=icmpv4:8,any dir=in action=allowDisable Ping Reply in Windows 10/11:
Visit the same control panel settings and disable the rule (for private or domain network profile). Now the Windows computer will not respond to ping requests from the connected network devices.
Here is the command to disable the ping in the command prompt.
netsh advfirewall firewall add rule name="ICMP Allow incoming V4 echo request" protocol=icmpv4:8,any dir=in action=blockEnable Incoming FTP Traffic in Windows 11/10/8.1 Firewall
Once you set up an FTP server on a Windows computer, then you must enable inbound FTP traffic in the firewall settings. You can follow the same methods below in Windows 11, even though screenshots are taken on Windows 10.
1) Open the control panel and Windows Firewall.

2) Click on ‘Allow an App or feature through Windows Firewall’. It may have a different option in Windows 8.1 or older versions, but you will find a similar option.

Assuming that you already installed IIS and enabled the FTP server, the firewall settings will automatically detect the FTP server application and list it out in the field.
Click on ‘Change Settings’ and choose ‘FTP Server’. Select the network profile currently the computer is connected, press OK to complete the steps.
3) Another Method: Manually Create The Policy and Allow
If you could not succeed with the above method or are not able to see the FTP server app in the programs list of firewall settings, you can manually create an inbound rule and allow particular FTP ports (20 and 21).
4) In the Control panel Firewall settings, click on Advanced settings.

5) We need to create a new inbound rule to allow FTP traffic. This can be done by allowing particular port numbers in incoming traffic. If you do not have any third party personal firewall programs, this step will ensure that incoming FTP traffic is enabled on the computer even though the Windows firewall is on.
To create a new inbound rule in Windows 10/11 computer, click on Inbound Rules and ‘New Rule’.

6) Select ‘Port’ as the rule type on the next screen.
7) You can leave ‘TCP’ selected and in ports number enter 20 and 21 (20,21). FTP (File Transfer Protocol) uses port numbers 20 and 21 for data transfer and command control, click here to view more information.

 Select ‘Allow the connection’ which will accept the incoming traffic/packets on these port numbers.

9) Depending on the network connection you are connected to, select the connection type where the particular rule should be applied. You can select all three (Domain, Private and Public) if you are not sure which one to select.

10) Provide a name for the rule, for example, ‘FTP’. This rule name will show under incoming rules in firewall advanced settings. We can easily modify or disable it later by this name.

If you want to block incoming FTP traffic later, you can simply right-click on it and disable the rule.
Also, you can enable the FTP inbound traffic in Windows 10/11 firewall by command prompt with simple commands which are explained at the Microsoft site here.
With the steps outlined in this guide, you will be able to enable ping reply and FTP packets on your Windows 11/10 computer without completely disabling the Firewall.
— Advertisement —
Hello! This time I’m going to talk to you about security in Windows 10. It is well known that the system offers multiple layers of security to keep the privacy of our information safe. Certainly, this entails control over network connections. These are really useful for exchanging information and sending data. However, sometimes these connections can fail and so it is imperative to get the error. One of the resources used for this task is PING. It is a basic Internet program that allows a user to verify that a particular IP address exists and can accept requests. This app verifies whether the IP address of a host is currently operational, and how long it takes to respond. Ping works by sending an Internet Control Message Protocol (ICMP) Echo Request to a specified interface on the network and waiting for a reply.
Additionally, it can be used for troubleshooting to test connectivity and determine response time. However, most administrator users consider the ICMP protocol to be potentially unsafe and prefer to block these calls. For this reason, the Windows 10 firewall by default has a security policy of blocking such requests. This is easy to check, trying to ping our computer from a remote machine, we’ll see the following message:

However, it is not advisable to completely block these calls. Therefore, here I show you how to enable and disable ping in Windows 10.
Enable ping in windows 10. Command line mode.
The first thing we need to do is to open a Command Prompt as administrators. Once there, we have to create a rule for IPv4 addressing and another for IPv6. All right, to create the first rule you just have to type the following command in the console:
netsh advFirewall Firewall add rule name="OSRadar Rule PING IPv4" protocol=icmpv4:8,any dir=in action=allow
If everything was done correctly, the CMD should look like this:

Next, we will create the rule for IPv6 addressing:
netsh advFirewall Firewall add rule name="OSRadar Rule PING IPv6" protocol=icmpv6:8,any dir=in action=allow

We have correctly applied the rules for the ping command. We can check that it works, pinging from a remote computer:

To disable the exception for IPv4 addresses, just type the following commanding in the CMD:
netsh advFirewall Firewall add rule name="OSRadar Rule PING IPv4" protocol=icmpv4:8,any dir=in action=block
In the case of IPv6 addressing, the command to write will be the following:
netsh advFirewall Firewall add rule name="OSRadar Rule IPv6" protocol=icmpv6:8,any dir=in action=block
Please note that you can choose the name you want for the rules. If you want to see every rule in the system in detail, just write the following in the terminal:
netsh advFirewall Firewall show rule name=all

Enable ping in windows 10. Graphic mode.
It is also possible to create specific rules to enable and disable ping by entering the Windows 10 Firewall Advanced Security Configuration. With this intention, just type Firewall on the search bar:

Immediately the Firewall options will be displayed. As we did before, we have to create a rule for IPv4 and another for IPv6.

So first, select the Inbound Rules option in the left column and right-click the mouse to create a New Rule:

A rule creation wizard will start. Please select Custom in the rule type and press Next to continue.

On the next screen select All programs and press Next to continue.

In the protocol type, select ICMPv4 and then click on customize.

In the pop-up screen activate the Specific ICMP types box and navigate until you activate the Echo Request option. Press accept to apply the changes.

Next, we can define which specific IP addresses this rule will apply, on the contrary, we will allow the requests of all the addresses. Once the selection is made, press next to continue.

Now select Allow the connection and press Next to continue

In the following screen, we have to select when the new rule will be applied. Please check the 3 available options and press next to continue.

Finally, we only have to assign a name to the rule and press Finish to close the wizard.

Finally, we can see the rule created correctly. To create the exception for IPv6 addressing, we have to repeat the same process but in the protocol and ports window, we have to select ICMPv6.

To disable any of the created rules, just right-click on it and choose Disable Rule.

Conclusion
Finally, we have seen how to enable and disable ping in Windows 10. This will allow us to manage and administer our connections using this command. Finally, we have seen how to enable and disable ping in Windows 10. This will allow us to manage and administer our connections using this command. Consequently, we will be able to monitor the levels of security and data protection on our computers. This is all for now, before saying goodbye I invite you to review our tutorial on bash in Windows 10