Последнее обновление: 31.10.2015
Окна открытия и сохранения файла представлены классами OpenFileDialog и SaveFileDialog.
Они имеют во многом схожую функциональность, поэтому рассмотрим их вместе.
OpenFileDialog и SaveFileDialog имеют ряд общих свойств, среди которых можно выделить следующие:
-
DefaultExt: устанавливает расширение файла, которое добавляется по умолчанию, если пользователь ввел имя файла без расширения -
AddExtension: при значенииtrueдобавляет к имени файла расширение при его отсуствии. Расширение берется из
свойстваDefaultExtилиFilter -
CheckFileExists: если имеет значениеtrue, то проверяет существование файла с указанным именем -
CheckPathExists: если имеет значениеtrue, то проверяет существование пути к файлу с указанным именем -
FileName: возвращает полное имя файла, выбранного в диалоговом окне -
Filter: задает фильтр файлов, благодаря чему в диалоговом окне можно отфильтровать файлы по расширению. Фильтр задается в следующем формате
Название_файлов|*.расширение. Например,Текстовые файлы(*.txt)|*.txt. Можно задать сразу несколько фильтров, для этого они разделяются
вертикальной линией |. Например,Bitmap files (*.bmp)|*.bmp|Image files (*.jpg)|*.jpg -
InitialDirectory: устанавливает каталог, который отображается при первом вызове окна -
Title: заголовок диалогового окна
Отдельно у класса SaveFileDialog можно еще выделить пару свойств:
-
CreatePrompt: при значенииtrueв случае, если указан не существующий файл, то будет отображаться сообщение о его создании -
OverwritePrompt: при значенииtrueв случае, если указан существующий файл, то будет отображаться сообщение о том, что файл будет перезаписан
Чтобы отобразить диалоговое окно, надо вызвать метод ShowDialog().
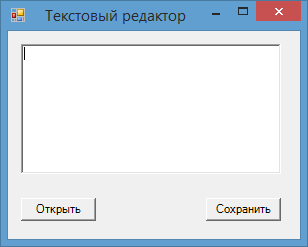
Рассмотрим оба диалоговых окна на примере. Добавим на форму текстовое поле textBox1 и две кнопки button1 и button2. Также перетащим с панели инструментов
компоненты OpenFileDialog и SaveFileDialog. После добавления они отобразятся внизу дизайнера формы. В итоге форма будет выглядеть примерно так:
Теперь изменим код формы:
public partial class Form1 : Form
{
    public Form1()
    {
        InitializeComponent();

        button1.Click += button1_Click;
        button2.Click += button2_Click;
        openFileDialog1.Filter = "Text files(*.txt)|*.txt|All files(*.*)|*.*";
        saveFileDialog1.Filter = "Text files(*.txt)|*.txt|All files(*.*)|*.*";
    }
    // сохранение файла
    void button2_Click(object sender, EventArgs e)
    {
        if (saveFileDialog1.ShowDialog() == DialogResult.Cancel)
            return;
        // получаем выбранный файл
        string filename = saveFileDialog1.FileName;
        // сохраняем текст в файл
        System.IO.File.WriteAllText(filename, textBox1.Text);
        MessageBox.Show("Файл сохранен");
    }
    // открытие файла
    void button1_Click(object sender, EventArgs e)
    {
        if (openFileDialog1.ShowDialog() == DialogResult.Cancel)
            return;
        // получаем выбранный файл
        string filename = openFileDialog1.FileName;
        // читаем файл в строку
        string fileText = System.IO.File.ReadAllText(filename);
        textBox1.Text = fileText;
        MessageBox.Show("Файл открыт");
    }
}
По нажатию на первую кнопку будет открываться окно открытия файла. После выбора файла он будет считываться, а его текст будет отображаться в
текстовом поле. Клик на вторую кнопку отобразит окно для сохранения файла, в котором надо установить его название. И после этого произойдет сохранение
текста из текстового поля в файл.
This C# tutorial demonstrates the OpenFileDialog control in Windows Forms.
OpenFileDialog allows users to browse folders and select files.
It is available in Windows Forms and can be used with C# code. It displays the standard Windows dialog box. The results of the selection can be read in your C# code.
Intro. To begin developing your OpenFileDialog, you need to open your Windows Forms program in the Visual Studio designer and open the Toolbox pane. Find the OpenFileDialog entry and double-click on it.
Note: This entry describes a control that «displays a dialog box that prompts the user to open a file.»
With OpenFileDialog, you can only change properties in the Properties pane. Please select the openFileDialog1 icon in the tray at the bottom of the Visual Studio window, and then look at the Properties pane.
ShowDialog. You can open the OpenFileDialog that is in your Windows Forms program. The dialog will not open automatically and it must be invoked in your custom code. You will want to use an event handler to open the dialog in your C# code.
Here: We will use a button in this tutorial, which when clicked will open the dialog.
You can add a Button control—this can be clicked on to call into the OpenFileDialog window. To add a Button, find the Button icon in the Toolbox and drag it to an area in your Windows Forms window.
Tip: You can add an event to the button click by double-clicking on the «button1» in the designer.
C# program that uses OpenFileDialog

using System;
using System.Windows.Forms;

namespace WindowsFormsApplication1
{
    public partial class Form1 : Form
    {
	public Form1()
	{
	    InitializeComponent();
	}

	private void button1_Click(object sender, EventArgs e)
	{
	    // Show the dialog and get result.
	    DialogResult result = openFileDialog1.ShowDialog();
	    if (result == DialogResult.OK) // Test result.
	    {
	    }
	    Console.WriteLine(result); // <-- For debugging use.
	}
    }
}
The example demonstrates the use of the openFileDialog1 component that was created in the designer in previous steps. The DialogResult enumerated type is assigned to the result of ShowDialog.
Then: This DialogResult variable is tested to see what action the user specified to take.
DialogResult
Tip: The actual strings from the dialog window can be accessed directly as properties on openFileDialog1.
Read files. You can access the file specified by the user in the OpenFileDialog—and then read it in using the System.IO namespace methods. We also handle exceptions, preventing some errors related to file system changes that are unavoidable.
Note: In this example, when you click on the button the dialog will ask you what file you want.
And: When you accept the dialog, the code will read in that file and print its size in bytes.
C# program that reads in file from OpenFileDialog

using System;
using System.IO;
using System.Windows.Forms;

namespace WindowsFormsApplication1
{
    public partial class Form1 : Form
    {
	public Form1()
	{
	    InitializeComponent();
	}

	private void button1_Click(object sender, EventArgs e)
	{
	    int size = -1;
	    DialogResult result = openFileDialog1.ShowDialog(); // Show the dialog.
	    if (result == DialogResult.OK) // Test result.
	    {
		string file = openFileDialog1.FileName;
		try
		{
		    string text = File.ReadAllText(file);
		    size = text.Length;
		}
		catch (IOException)
		{
		}
	    }
	    Console.WriteLine(size); // <-- Shows file size in debugging mode.
	    Console.WriteLine(result); // <-- For debugging use.
	}
    }
}
The event handler is executed when the user clicks on the button1 control. An OpenFileDialog is displayed. Second, the DialogResult is tested. Next the FileName property is accessed and the file is read in with File.ReadAllText.
Note: The above program for simplicity does not have a TextBox control to display the file it opens.
Tip: If you want to show the file contents in another control, add a TextBox and assign it to the text string.
Properties. The OpenFileDialog control in Windows Forms has many properties that you can set directly in the designer. You do not need to assign them in your own C# code. This section shows some notes on these properties.
AddExtension: You can change this to False from its default True if you want to automatically fix file extension problems.
AutoUpgradeEnabled: This allows you to automatically get Vista-style open file dialogs. Recommended. See blogs.msdn.com link.
AutoUpgradeEnabled for Open File Dialog
DefaultExt: Set this to a string extension for files to automatically add that extension. This is not often useful.
DereferenceLinks: This tells Windows to resolve shortcuts (aliases) on the system before returning the paths.
FileName: You can initialize this in the designer to a preset file name. This is changed to be the name the user specifies.
InitialDirectory: Specify a string to use that folder as the starting point. Try using Environment.SpecialFolder with this property.
Environment
Multiselect: Specifies if multiple files can be selected at once in the dialog. Users can select multiple files by holding SHIFT or CTRL.
Filters make it easier for the user to open a valid file. The OpenFileDialog supports filters for matching file names. The asterisk indicates a wildcard. With an extension, you can filter by a file type.
Filter: Use this to specify the file matching filter for the dialog box. With «C# files|*.cs», only files ending with «.cs» are shown.
FilterIndex: Use to specify the default filter, which will have index of 1. The second filter if one exists would have index of 2.
ValidateNames: The Windows file system does not allow files to contain characters such as «*». This option should usually be left as True.
ReadOnly. To continue, the OpenFileDialog has some properties that allow users to specify whether a file should be read in read-only mode. The read-only checkbox can be displayed. Usually these are not needed.
ReadOnlyChecked: This changes the default value of the «read only» checkbox, which is only shown when «ShowReadOnly» is set to True.
ShowReadOnly: Whether you want the read-only checkbox to be shown. If set to True, change «ReadOnlyChecked» to set the check state.
Summary. We looked at the useful OpenFileDialog in Windows Forms. Nearly every nontrivial program will need to have an open file dialog. This control implements this functionality without any problems.
And: We saw how to add an OpenFileDialog, set its properties, and use it in C# code.
Related Links
Adjectives
Ado
Ai
Android
Angular
Antonyms
Apache
Articles
Asp
Autocad
Automata
Aws
Azure
Basic
Binary
Bitcoin
Blockchain
C
Cassandra
Change
Coa
Computer
Control
Cpp
Create
Creating
C-Sharp
Cyber
Daa
Data
Dbms
Deletion
Devops
Difference
Discrete
Es6
Ethical
Examples
Features
Firebase
Flutter
Fs
Git
Go
Hbase
History
Hive
Hiveql
How
Html
Idioms
Insertion
Installing
Ios
Java
Joomla
Js
Kafka
Kali
Laravel
Logical
Machine
Matlab
Matrix
Mongodb
Mysql
One
Opencv
Oracle
Ordering
Os
Pandas
Php
Pig
Pl
Postgresql
Powershell
Prepositions
Program
Python
React
Ruby
Scala
Selecting
Selenium
Sentence
Seo
Sharepoint
Software
Spellings
Spotting
Spring
Sql
Sqlite
Sqoop
Svn
Swift
Synonyms
Talend
Testng
Types
Uml
Unity
Vbnet
Verbal
Webdriver
What
Wpf
I am new to the OpenFileDialog function, but have the basics figured out. What I need to do is open a text file, read the data from the file (text only) and correctly place the data into separate text boxes in my application. Here’s what I have in my «open file» event handler:
private void openToolStripMenuItem_Click(object sender, EventArgs e)
{
    OpenFileDialog theDialog = new OpenFileDialog();
    theDialog.Title = "Open Text File";
    theDialog.Filter = "TXT files|*.txt";
    theDialog.InitialDirectory = @"C:\";
    if (theDialog.ShowDialog() == DialogResult.OK)
    {
        MessageBox.Show(theDialog.FileName.ToString());
    }
}
The text file I need to read is this (for homework, I need to read this exact file), It has an employee number, name, address, wage, and hours worked:
1
John Merryweather
123 West Main Street
5.00 30
In the text file I was given, there are 4 more employees with info immediately after this in the same format. You can see that the employee wage and hours are on the same line, not a typo.
I have an employee class here:
public class Employee
{
    //get and set properties for each
    public int EmployeeNum { get; set; }
    public string Name { get; set; }
    public string Address { get; set; }
    public double Wage { get; set; }
    public double Hours { get; set; }

    public void employeeConst() //constructor method
    {
        EmployeeNum = 0;
        Name = "";
        Address = "";
        Wage = 0.0;
        Hours = 0.0;
    }

    //Method prologue
    //calculates employee earnings
    //parameters: 2 doubles, hours and wages
    //returns: a double, the calculated salary
    public static double calcSalary(double h, double w)
    {
        int OT = 40;
        double timeandahalf = 1.5;
        double FED = .20;
        double STATE = .075;
        double OThours = 0;
        double OTwage = 0;
        double OTpay = 0;
        double gross = 0; ;
        double net = 0;
        double net1 = 0;
        double net2 = 0;
        if (h > OT)
        {
            OThours = h - OT;
            OTwage = w * timeandahalf;
            OTpay = OThours * OTwage;
            gross = w * h;
            net = gross + OTpay;
        }
        else
        {
            net = w * h;
        }

        net1 = net * FED; //the net after federal taxes
        net2 = net * STATE; // the net after state taxes

        net = net - (net1 + net2);
        return net; //total net
    }
}
So I need to pull the text from that file into my Employee class, then output the data to the correct textbox in the windows forms application. I am having trouble understanding how to do this right. Do I need to use a streamreader? Or is there another, better way in this instance? Thank you.
In a WinForms project, you can prompt the user to select a file by using the OpenFileDialog control:
if (openFileDialog.ShowDialog() == DialogResult.OK)
{
	txtFilePath.Text = openFileDialog.FileName;
}
Code language: C# (cs)
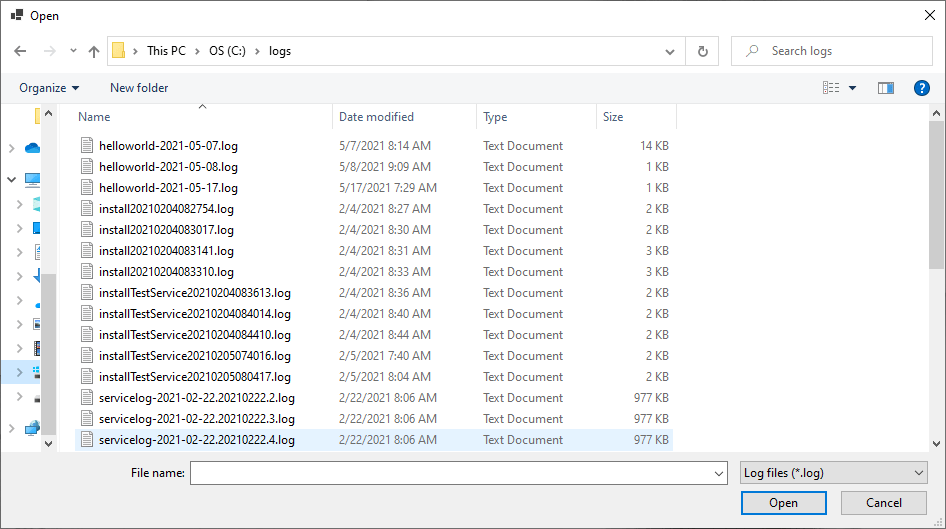
When you call ShowDialog(), it’ll prompt the user to select a file:
When the user clicks Open, you’ll be able to get the file path they selected from the OpenFileDialog.FileName property.
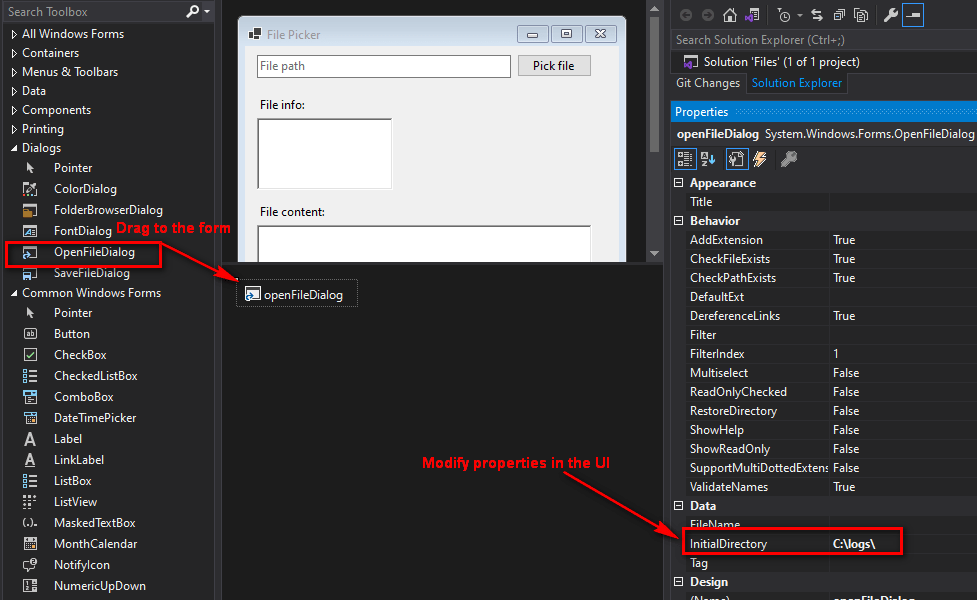
To use the OpenFileDialog control, drag it from the toolbox to the form. Then you can modify the properties through the UI or programmatically (as I’ll show in examples in this article).
The most important properties are InitialDirectory, Filter, and Multiselect. InitialDirectory is straightforward: when the prompt opens, it’ll open up to the specified initial directory. In this article, I’ll go into details about Filter and Multiselect properties, and then show an example of displaying the selected file’s metadata and content.
Filter which files can be selected
The Filter property controls which files appear in the prompt.
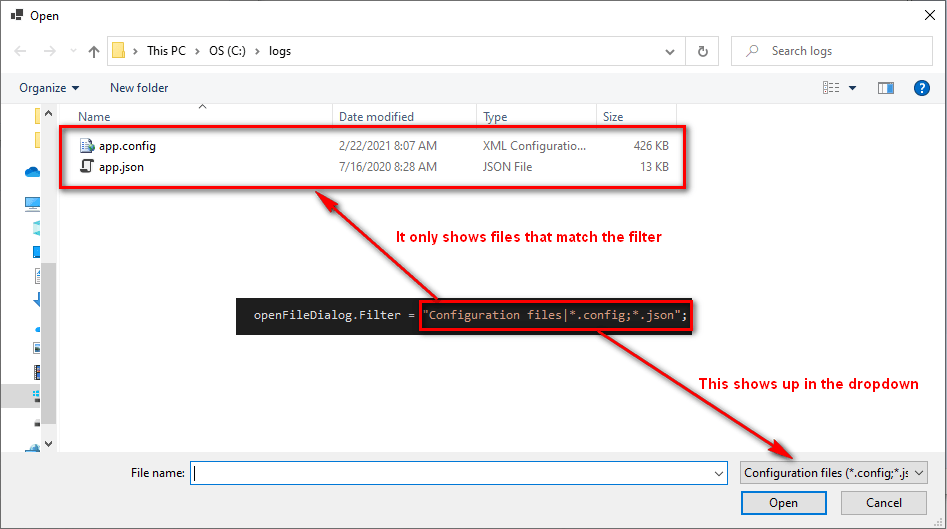
Here’s an example that only lets the user select .config and .json files:
openFileDialog.Filter = "Configuration files|*.config;*.json";
Code language: C# (cs)
Only .config and .json files will appear:
Filter string format
The filter string format is like this: <file group 1 name>|<file 1 name>;<file 2 name>|<file group 2 name>|<file 1 name><file 2 name>. This is a pretty confusing format, so it’s easier to just show examples.
Example – Only show a specific file
The following only allows the user to select a file with the name app.json:
openFileDialog.Filter = "app.json";
Code language: C# (cs)
Example – Show all files
This allows the user to select any file:
openFileDialog.Filter = "All files|*.*";
Code language: C# (cs)
Example – Show a single file group with multiple extensions
This allows the user select any file with the .config or .json extensions:
openFileDialog.Filter = "Configuration files|*.config;*.json";
Code language: C# (cs)
The two extensions are grouped together and referred to as “Configuration files.”
Example – Show two file groups with one extension each
This allows the user to select .xml or .json files:
openFileDialog.Filter = "XML|*.xml|JSON|*.json";
Code language: C# (cs)
The reason for having these two groups (XML and JSON) is because each group appears in the dropdown:
This is useful if you want to display names that are more specific to the extensions, instead of just using a generic group name like “Configuration files.”
Select multiple files
To allow the user to select multiple files, set Multiselect=true, and get all the files they selected from the OpenFileDialog.FileNames property:
openFileDialog.Multiselect = true;
openFileDialog.Filter = "Log files|*.log";

if (openFileDialog.ShowDialog() == DialogResult.OK)
{
	foreach(var filePath in openFileDialog.FileNames)
	{
		//use file path
	}
}
Code language: C# (cs)
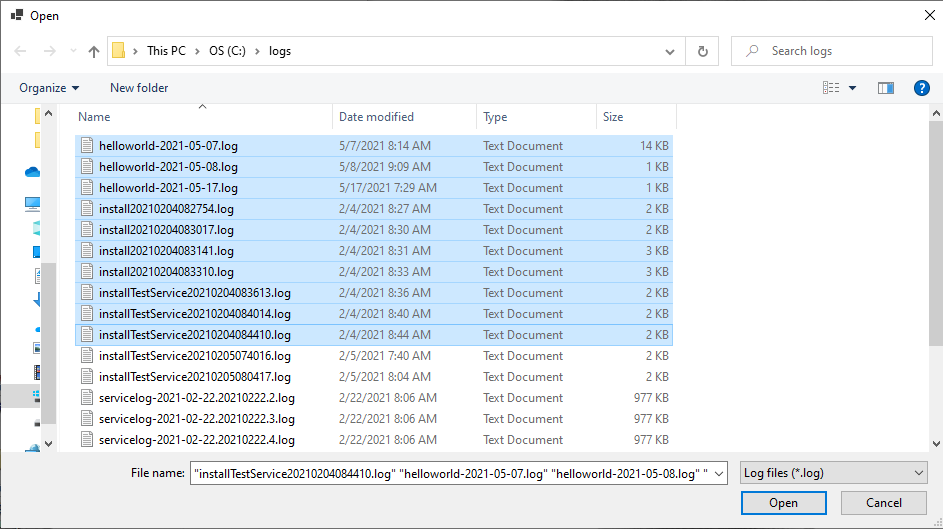
This prompts the user to select a file. Since Multiselect is true, they can select multiple files at once:
When the user clicks Open, this’ll populate the OpenFileDialog.FileNames string array with all the file paths that the user selected.
Display the selected file’s metadata and contents
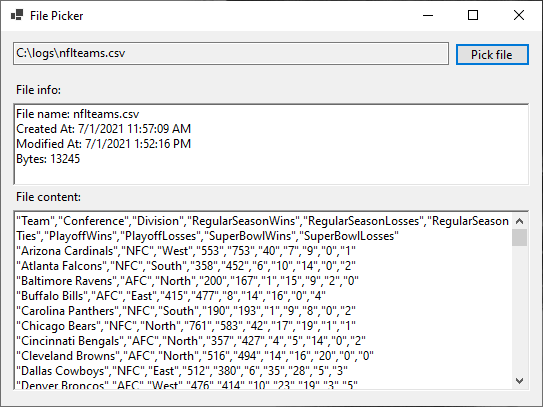
After the user selects a file, and you have the file path, what do you do with it? Most likely you’ll want to use the file’s metadata and content. Here’s an example of displaying the selected file’s information:
using System.IO;

private void btnFilePicker_Click(object sender, EventArgs e)
{
	openFileDialog.Filter = "Comma-separated values file|*.csv";

	if (openFileDialog.ShowDialog() == DialogResult.OK)
	{
		var filePath = openFileDialog.FileName;

		txtFilePath.Text = filePath;

		var fileInfo = new FileInfo(filePath);
		var sb = new StringBuilder();
		sb.AppendLine($"File name: {fileInfo.Name}");
		sb.AppendLine($"Created At: {fileInfo.CreationTime}");
		sb.AppendLine($"Modified At: {fileInfo.LastWriteTime}");
		sb.AppendLine($"Bytes: {fileInfo.Length}");
		txtFileInfo.Text = sb.ToString();

		txtFileContent.Text = File.ReadAllText(filePath);

	}
}
Code language: C# (cs)
Here’s what it looks like:
В программе продемонстрировано использование классов StreamWriter и StreamReader для чтения и записи текстовых файлов. Также в программе использованы элементы управления (компоненты) RichTextBox и OpenFileDialog.
Содержание
- Условие задачи
- Выполнение
- 1. Запустить MS Visual Studio. Создать проект по шаблону Windows Forms Application
- 2. Разработка формы приложения
- 3. Элемент управления OpenFileDialog
- 4. Добавление внутренних переменных в текст приложения
- 5. Программирование события Load класса формы Form1
- 6. Импорт пространства имен System.IO
- 7. Программирование события клика на кнопке button1 («Открыть файл…»)
- 8. Программирование события изменения текста в компоненте RichTextEdit
- 9. Программирование события клика на кнопке “Сохранить файл”
Поиск на других ресурсах:
Условие задачи
Разработать программу чтения/записи текстовых файлов. В программе должна быть возможность выбора файла для чтения, его корректировка и запись этого файла на диск.
⇑
Выполнение
1. Запустить MS Visual Studio. Создать проект по шаблону Windows Forms Application
Подробный пример создания приложения по шаблону Windows Forms Application подробно описывается здесь.
⇑
2. Разработка формы приложения
Создать форму как показано на рисунке 1.
На форме размещаются следующие элементы управления:
- два элемента управления типа Button. Автоматически будут созданы два объекта (экземпляры класса Button) с именами button1 и button2;
- один элемент управления типа RichTextBox. Автоматически создается объект с именем richTextBox1;
- элемент управления типа Label. Создается объект с именем label1.
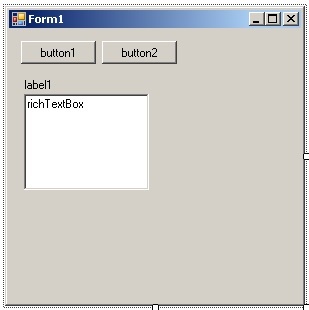
Осуществить настройку элементов управления типа Button следующим образом:
- в элементе управления button1 свойство Text = “Открыть файл …»;
- в элементе управления button2 свойство Text = “Сохранить файл».
Настройка формы приложения Form1:
- свойство Text = “Чтение/запись текстовых файлов”;
- свойство MaximizeBox = false (кнопка развертывания на весь экран становится неактивной);
- свойство FormBorderStyle = “Fixed3D”;
- свойство StartPosition = “CenterScreen”.
Также нужно откорректировать размеры формы и элементов управления на форме приблизительно так, как показано на рисунке 2.
В элементе управления RichTextBox (рис. 3):
- свойство WordWrap = «false» (перенос длинных строк в пределах границ окна редактора).
Элемент управления RichTextBox представляет собой многострочное редактированное текстовое поле, которое работает с текстом в формате RTF (Rich Text Format – расширенный текстовый формат). Текст формата RTF сохраняет дополнительную служебную информацию, которая управляет свойствами каждого абзаца и изменением шрифта по ходу текста.

Рис. 3. Элемент управления типа RichTextBox
⇑
3. Элемент управления OpenFileDialog
Для того, чтобы выбрать текстовый файл для чтения, нужно использовать элемент управления типа OpenFileDialog. Этот элемент управления представляет собой стандартное диалоговое окно Windows, предназначенное для открытия файлов.
Разместить на форме компонент OpenFileDialog (рис. 4).

⇑
4. Добавление внутренних переменных в текст приложения
Для работы программы нужно ввести следующие дополнительные внутренние переменные:
- f_open – определяет, выбрал ли пользователь файл командой «Открыть файл…»;
- f_save – определяет, был ли сохранен ранее открытый файл (f_open = true).
Поэтому, в текст модуля “Form1.cs” нужно ввести следующий код:
...

namespace WindowsFormsApplication1
{
    public partial class Form1 : Form
    {
        bool f_open, f_save; // определяют выбор файла и его сохранение

        public Form1()
        {
            InitializeComponent();
        }
    }
}

...
⇑
5. Программирование события Load класса формы Form1
Событие Load возникает в момент загрузки формы сразу после запуска приложения на выполнение. В обработчик события целесообразно включать начальную инициализацию переменных.
В данном случае, начальной инициализации подлежат такие переменные и объекты как f_open, f_save, label1, richTextBox1.
В компоненте label1 будет отображаться путь к выбранному файлу. В компоненте richTextBox1 будет отображаться содержимое (текст) выбранного файла.
Листинг обработчика Form1_Load() события Load загрузки формы следующий:
private void Form1_Load(object sender, EventArgs e)
{
  f_open = false; // файл не открыт
  f_save = false;
  label1.Text = "-";
  richTextBox1.Text = "";
}
⇑
6. Импорт пространства имен System.IO
В данной работе для чтения и записи файлов будут использованы возможности классов StreamWriter и StreamReader из библиотеки классов языка C#.
Поэтому, для использования методов этих классов, нужно в начале кода модуля “Form1.cs” добавить строку:
using System.IO;
Таким образом, верхняя часть файла “Form1.cs” имеет вид:
using System;
using System.Collections.Generic;
using System.ComponentModel;
using System.Data;
using System.Drawing;
using System.Linq;
using System.Text;
using System.Windows.Forms;
using System.IO;
⇑
7. Программирование события клика на кнопке button1 (“Открыть файл…»)
Для вызова стандартного окна Windows выбора файла, пользователь должен выбрать команду «Открыть файл…» (button1). Пример программирования события клика на кнопке button1 подробно описан здесь.
Листинг обработчика button1_Click() события Click кнопки button1, осуществляющей открытие окна выбора файла, следующий:
private void button1_Click(object sender, EventArgs e)
{
  // 1. Открытие окна и проверка, выбран ли файл
  if (openFileDialog1.ShowDialog() == DialogResult.OK)
  {
    // 2. Вывести имя файла на форме в компоненте label1
    label1.Text = openFileDialog1.FileName;

    // 3. Установить флажки f_open и f_save
    f_open = true;
    f_save = false;

    // 4. Прочитать файл в richTextBox1
    // очистить предыдущий текст в richTextBox1
    richTextBox1.Clear();

    // 5. Создать объект класса StreamReader и прочитать данные из файла
    StreamReader sr = File.OpenText(openFileDialog1.FileName);

    // дополнительная переменная для чтения строки из файла
    string line = null;
    line = sr.ReadLine(); // чтение первой строки

    // 6. Цикл чтения строк из файла, если строки уже нет, то line=null
    while (line != null)
    {
      // 6.1. Добавить строку в richTextBox1
      richTextBox1.AppendText(line);

      // 6.2. Добавить символ перевода строки
      richTextBox1.AppendText("\r\n");

      // 6.3. Считать следующую строку
      line = sr.ReadLine();
    }

    // 7. Закрыть соединение с файлом
    sr.Close();
  }
}
Для вызова стандартного окна Windows выбора файла используется метод ShowDialog() компонента openFileDialog1. Выбранный файл сохраняется в свойства FileName объекта openFileDialog.
Для чтения текстового файла используется класс StreamReader, который осуществляет чтение символьных данных из файла. Чтобы создать экземпляр класса StreamReader используется метод OpenText() класса File. Класс File содержит ряд методов, которые хорошо подходят для упрощенного чтения символьных данных.
Чтобы считать строку из файла в программе используется метод ReadLine(), считывающий строку символов из текущего потока и возвращающий данные в виде строки. Если достигнут конец файла, то метод возвращает null.
Чтение строк осуществляется в локальную переменную line.
Чтобы добавить строку к объекту richTextBox1, используется метод AppendText().
⇑
8. Программирование события изменения текста в компоненте RichTextEdit
В соответствии с логикой программы, если в тексте файла происходят изменения, то флажок f_save должен быть равен значению false.
В компоненте richTextBox1 есть событие TextChanged, которое вызывается в момент изменения текста в редакторе (рис. 5).

Обработчик события TextChanged имеет следующий вид:
private void richTextBox1_TextChanged(object sender, EventArgs e)
{
  f_save = false;
}
⇑
9. Программирование события клика на кнопке “Сохранить файл”
Для сохранения измененного текста в файле нужно выбрать команду «Сохранить файл» (кнопка button2). Для сохранения измененного в richTextBox1 файла используются методы класса StreamWriter.
Листинг обработчика события клика на кнопке button2 следующий:
private void button2_Click(object sender, EventArgs e)
{
  // 1. Проверка, открыт ли файл
  if (!f_open) return;

  // 2. Если файл открыт, то проверка – сохранен ли он
  if (f_save) return;

  // 3. Создание объекта типа StreamWriter и получение строчных данных
  StreamWriter sw = File.CreateText(openFileDialog1.FileName);

  // 4. Чтение строк с richTextBox1 и добавление их в файл
  string line;
  for (int i = 0; i < richTextBox1.Lines.Length; i++)
  {
    // 4.1. Чтение одной строки
    line = richTextBox1.Lines[i].ToString();

    // 4.2. Добавление этой строки в файл
    sw.WriteLine(line);
  }

  // 5. Закрыть объект sw
  sw.Close();
}
Объясним некоторые фрагменты кода.
В обработчике события button2_Click после проверки на наличие открытого файла создается объект (переменная) с именем sw типа StreamWriter.
При создании объекта используется метод CreateText() из типа File, возвращающего экземпляр типа StreamWriter. Имя файла сохраняется в свойстве openFileDialog1.FileName.
Для доступа к введенным строкам компонента richTextBox используется свойство Lines, которое есть массивом строк.
Чтобы добавить одну строку, нужно вызвать метод WriteLine() объекта sw типа StreamWriter.
⇑
Связанные темы
- C#. Пример создания приложения копирования файлов. Класс FileStream
- Пример разработки приложения демонстрации работы списков и ассоциативных массивов. Классы Dictionary, List, StreamReader
