Thanks to the graphical user interface of Windows 10, users can get just about anything done by simply clicking on the icon. Without the GUI, we’d have been forced to do everything from the command line in PowerShell or Command Prompt.
However, learning to work with the command line is a useful skill, as it gives you quick access to functions and operations. For instance, in some situations when working on Command Prompt or PowerShell, you need to open folders or files. You don’t have to exit the window just to find the folder or file.
Open folders & files using Command Prompt & PowerShell
In this guide, I’ll show you how to open folders right from Command Prompt and PowerShell on your Windows 11/10 PC.
What you will learn:
- How to navigate to a folder using Command Prompt and PowerShell.
- How to open a folder using Command Prompt and PowerShell.
- How to close a file using Command Prompt and PowerShell.
In the post remember to replace <username> with your username.
1] How to navigate to a folder using Command Prompt and PowerShell
Open the Command prompt by searching for cmd in the Start Menu and selecting Command Prompt. For PowerShell, you can also search for it and open from the Start Menu.
Type in the following command and hit ENTER to run it:
cd Path\To\Folder
NOTE: In the above command, replace Path\To\Folder with the actual path to the folder that you want to open. So, it can become:
cd C:\Users\<username>\Desktop\New Folder
To open a file saved in this folder, input the name of the file and press ENTER. Example,
Path\To\Folder new-file.txt
Alternatively, you can enter the full path to the file without using the cd command. For example,
C:\Users\<username>\Desktop\New Folder\new_file.txt
2] How to open a folder using Command Prompt and PowerShell
The first technique would open a file saved in a folder. However, if you wish to open the folder in File Explorer using Command Prompt or PowerShell, you make use of the start command.
Command Prompt
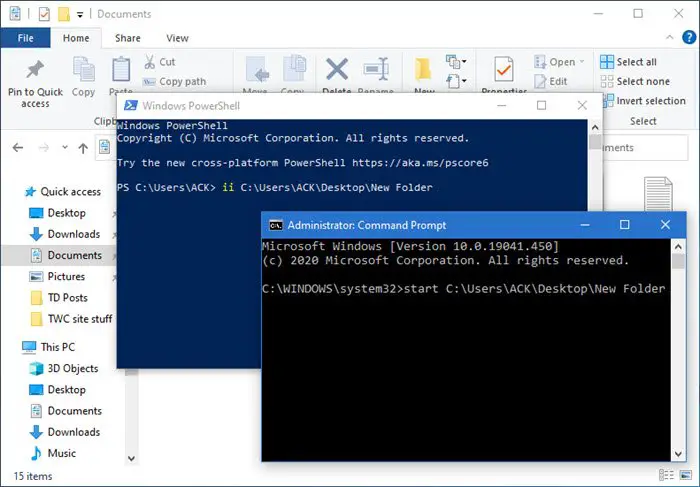
To open a folder, append the folder path after the start command. For example, I can navigate to the New Folder folder using the following command:
start C:\Users\<username>\Desktop\New Folder
If you want to open the current folder, run the start command with a fullstop (.):
start .
To open the parent folder to your current folder, use two fullstops (..):
start ..
On hitting ENTER, the specified folder will open in a File Explorer window.
PowerShell
To open a folder in File Explorer using PowerShell, input either of the following cmdlets –
Invoke-Item
or
ii
and add the path to the folder.
ii C:\Users\<username>\Desktop\New Folder
To open the current directory, use the following command:
ii
Read: How to open Folder with Keyboard Shortcut in Windows
3] How to close a file using Command Prompt and PowerShell
To close an already opened file using the command line, you make use of the taskkill command. First, navigate to the folder using the first method:
C:\Path\To\Folder
Enter the following command when you are in the correct directory:
taskkill /im filename.exe /t
In the above command, replace the filename part with the name of the file you want to close.
Note that this command closes every instant of the open file, and you risk losing unsaved data.
Now read: Ways to open a Command Prompt in a Folder.
I hope you find the post useful.
Задача запустить из PowerShell какой либо исполняемый файл (программу или утилиту командной строки) встречается достаточно часто. PowerShell предлагает для этого несколько различных способов, которые мы и рассмотрим далее в этой статье. Начнем с самого простого…
Прямой запуск
Самый простой способ запустить исполняемый файл в PowerShell — это перейти в директорию с файлом и стартовать его напрямую. Для примера возьмем простенькую программку, выводящую приветствие, и выполним ее командой:
Set-Location ″C:\Program Files″
.\Hello.exe

Обратите внимание, что даже находясь в нужном каталоге, требуется указывать относительный путь к исполняемому файлу. Исключение составляют файлы из директорий, перечисленных в переменной окружения (path). Например различные встроенные программы и утилиты (notepad, calc, ping и т.п.), находящиеся в директории Windows\System32, можно запускать без указания пути.

Оператор &
Если необходимо указать полный путь к исполняемому файлу, то можно воспользоваться оператором & (оператор вызова). Он позволяет выполнить строку текста, указанную в кавычках, как единую команду. Например:
& ′C:\Program Files\Hello.exe′
![]()
Поскольку оператор & не анализирует передаваемую команду, то он не может интерпретировать ее параметры. Поэтому дополнительные параметры\аргументы передаются также в виде текста, в кавычках. Для примера возьмем предыдущую программу и немного изменим ее, так что она принимает нужный текст в виде аргумента:
& ′C:\Program Files\Hello.exe′ ′Hello, world′
При желании можно указать нескольких аргументов через запятую:
& ′C:\Program Files\Hello.exe′ ′Hello,′, ′ world′
Для удобства команду и аргументы можно поместить в переменные:
$exe = ′C:\Program Files\Hello.exe′
$arg1 = ′Hello′
$arg2 = ′world′
& $exe $arg1 $arg2

Ну и если аргументов много, то их можно объединить, воспользовавшись такой конструкцией:
$exe = ′C:\Program Files\Hello.exe′
$allargs = @(′Hello,′,′world′)
& $exe $allargs

Invoke-Expression
Командлет Invoke-Expression работает примерно так-же, как и оператор & — берет текстовую строку и выполняет ее в виде команды. Например:
Invoke-Expression -Command ′C:\Windows\Hello.exe′
Однако у него есть один большой недостаток, а именно — неумение работать с пробелами. К примеру, следующая команда вызовет ошибку:
Invoke-Expression -Command ′C:\Program Files\Hello.exe′
Эта особенность делает применение командлета крайне неудобным. Хотя при необходимости подобных ошибок можно избежать с помощью дополнительных кавычек, например так:
Invoke-Expression -Command ″C:\′Program Files′\Hello.exe″

Start-Process
Командлет Start-Process запускает указанный файл в виде процесса, используя метод Start .NET класса Process. Например:
Start-Process -FilePath ′C:\Program Files\Hello.exe′
По умолчанию процесс выполняется в отдельном окне, которое закрывается по окончании процесса. Изменить такое поведение можно с помощью параметров, так следующая команда запустится в текущем окне:
Start-Process -FilePath ′C:\Program Files\Hello.exe′ -NoNewWindow -Wait
Также Start-Process позволяет передать в процесс дополнительные аргументы:
Start-Process -FilePath ′C:\Program Files\Hello.exe′ -ArgumentList ′Hello, world′ -NoNewWindow -Wait

По умолчанию командлет ничего не возвращает, но с помощью параметра -PassThru можно заставить его вернуть объект процесса. Этот объект очень удобно поместить в переменную:
$process = Start-Process -FilePath ′C:\Program Files\Hello.exe′ -Wait -PassThru
из которой можно затем можно узнать многие полезные вещи, такие как статус:
$process.HasExited
время:
$process.ExitTime
или код выполнения:
$process.ExitCode

.NET
В принципе .NET классом Process можно воспользоваться напрямую, без командлета Start-Process. К примеру, запустить процесс можно командой:
[System.Diagnostics.Process]::Start(′C:\Program Files\Hello.exe′)

Такой способ достаточно неудобен и громоздок (на мой взгляд), но чуть более гибок в использовании. Для примера запустим нашу программу в текущем окне, передадим в нее аргументы и заберем результат выполнения:
$process = New-Object -TypeName System.Diagnostics.Process
$process.StartInfo.FileName = ″C:\Program Files\Hello.exe″
$process.StartInfo.Arguments = ″Hello,world″
$process.StartInfo.RedirectStandardOutput = $true
$process.StartInfo.UseShellExecute = $false
$process.Start()
$process.WaitForExit()
$process.StandatdOutput.ReadToEnd()

WMI
С помощью WMI можно сделать практически все, в том числе и запустить программу. Для этого вполне подойдет метод Create WMI-класса Win32_Process. Этот метод запускает процесс на локальном или удаленном компьютере через RPC. Например, для выполнения программы на локальном компьютере можно воспользоваться такой командой:
([wmiclass])″Win32_Process″).Create(′C:\Program Files\Hello.exe′)
А для выполнения на удаленном компьютере команда будет выглядеть так:
([wmiclass])″\\remotecomputer\root\cimv2:Win32_Process″).Create(′C:\Program Files\Hello.exe′)

Как вариант, можно воспользоваться командлетом Invoke-WmiMethod:
Invoke-WmiMethod -Class Win32_Process -Name Create -ArgumentList ″C:\Program Files\Hello.exe″

Либо командлетом Invoke-CimMethod:
Invoke-CimMethod -ClassName Win32_Process -MethodName Create -Arguments @{CommandLine=″C:\Program Files\Hello.exe″}

WMI запускает процесс в отдельном окне и возвращает объект, содержащий идентификатор процесса (ProcessID) и результат выполнения (ReturnValue). ReturnValue может принимать следующие значения:
0 — Sucsessful Completiom
2 — Access Denied
3 — Insufficient Privilege
8 — Uncnown Failure
9 — Path Not Found
21 — Invalid Parameter
Invoke-Command
Командлет Invoke-Command умеет выполнять команды на локальном или удаленном компьютере, используя WinRM. Например, для запуска нашей программы на локальном компьютере используем команду:
Invoke-Command -ScriptBlock {″C:\′Program Files′\Hello.exe″}
При необходимости в программу можно передать аргументы:
Invoke-Command -ScriptBlock {C:\′Program Files′\Hello.exe ″Hello,world″}
Обратите внимание, что Invoke-Command не очень дружит с пробелами, поэтому во избежании ошибок приходится исхитряться с кавычками. Впрочем, подобных проблем можно избежать, например комбинируя использования командлета с оператором &:
Invoke-Command -ScriptBlock {& ′C:\Program Files\Hello.exe′}

В основном Invoke-Command применяется для удаленного управления, его главное достоинство — это возможность одновременного выполнения на нескольких компьютерах. Например:
Invoke-Command -ScriptBlock {″C:\′Program Files′\Hello.exe″} -ComputerName SRV1,SRV2,SRV3
Или так:
$scriptblock = {″C:\′Program Files′\Hello.exe″}
$Computers = @(′SRV1′,′SRV2′,′SRV3′)
Invoke-Command -ScriptBlock $scriptblock -ComputerName $Computers
По умолчанию командлет возвращает результат выполнения программы, а если запустить его в фоновом режиме (параметр -AsJob), то возвращает объект Job:
Invoke-Command -ScriptBlock {C:\′Program Files′\Hello.exe} -ComputerName localhost -AsJob -JobName Hello

Invoke-Item
Командлет Invoke-Item предназначен для применения к файлу действия по умолчанию. Так запустить исполняемый файл можно командой:
Invoke-Item -Path ″C:\Program Files\Hello.exe″
Однако наиболее удобно использовать Invoke-Item для открытия определенного типа файлов. Например так мы откроем текстовый файл:
Invoke-Item -Path ″C:\Files\test.txt″
А так все текстовые файлы в папке:
Invoke-Item -Path ″C:\Files\*.txt″

CMD
Ну и в завершение еще один способ запуска программы из PowerShell — с помощью оболочки cmd. Способ достаточно ″непрямой″, но тем не менее работающий. Следующая команда запускает новый экземпляр cmd, выполняет в нем указанную программу, завершает работу cmd и возвращает результат:
cmd /c ″C:\Program Files\Hello.exe″
![]()
Такое вот изобилие способов запустить программу предоставляет PoSh. И каждый из них хорош для определенных ситуаций.
Кстати, статья написана по мотивам PowerShell: Deep Dive and Best Practice. Рекомендую почитать, там еще много интересного.
Для открытия файлов и чтения его содержимого используется команда Powershell Get-Content. В этой статье рассмотрим работу команды с открытием файла, построчным чтением, поиском по содержимому строки на примерах.
Получение данных
Для открытия файла ‘C:\text.txt’ можно использовать следующую команду:
Get-Content -Path 'C:\Windows\System32\drivers\etc\hosts'
Если у вас множество файлов или вы не уверены в назывании, то вы можете использовать подстановку. Символы подстановок бывают следующих типов:
- ‘*’ — говорит об неизвестном количестве символов;
- [a,b] — говорит, что в этом месте может быть буква ‘a’ или ‘b’;
- ? — обозначает один неизвестный символ.
Каждый из символов выше можно применять вместе и неограниченное число раз, в любой части пути и имени.
В этом примере я открою сразу два файла: lmhosts и hosts:
Get-Content -Path 'C:\Windows\System32\drivers\etc\*st*'
Следующие примеры вернут аналогичный результат:
Get-Content -Path 'C:\Windows\System32\drivers\etc\[l,h]*ost*'
Get-Content -Path 'C:\Windows\System32\drivers\etc\*h?st*'
Для похожей фильтрации есть следующие параметры, которые так же позволяют использовать символы подстановок:
- Include — в этом параметре мы добавляем шаблон, по которому будем включать файл;
- Exclude — с помощью этого параметра исключает файлы;
- Filter — исключает результаты.
Для каждого из этих параметров есть обязательно условие — использовать знак ‘*’ в конце пути.
Так мы вернем все файлы с расширением ‘.txt’:
Get-Content -Path 'C:\*' -Filter '*.txt'
В отличие от Filter, в Include и Exclude мы можем использовать несколько значений. В этом примере мы откроем файлы формата ‘.txt’ и ‘.ini’:
Get-Content -Path 'C:\*' -Include '*.txt','*.ini'
Полное и построчное чтение с поиском
По умолчанию, если мы будем передавать результат команды через конвейер Powershell вывод будет построчный. Это может составить проблему, так как при дополнительных условиях у нас будет возвращаться одна строка, а не весь текст:
Get-Content -Path 'C:\file*.txt' | Select-String -Pattern 'Line 8'
Что бы текст передавался полностью, а не построчно — используйте параметр Raw:
Get-Content -Path 'C:\file*.txt' -Raw | Select-String -Pattern 'Line 8'
Если вам вдруг понадобится выводить по 2 или более строк за раз, можно указать их количество через ReadCount:
Get-Content -Path 'C:\file*.txt' -ReadCount 2 | Select-String -Pattern 'Line 8'
Разделение файла
Файл выводится построчно из-за делиметра (разделителя), который по умолчанию равен ‘\n’ (идентификатор новой строки). Мы можем разделить файл иначе, например, использовав точку с запятой:
Get-Content -Path 'C:\delimiter.txt' -Delimiter ';'
То есть результат выше — это массив. В массивах Powershell мы можем получать содержимое по индексам. В следующем примере я просто уберу точку с запятой:
$content = Get-Content -Path 'C:\delimiter.txt' -Delimiter ';'
# Выведем первый элемент
$content[0]
# Уберем разделитель во всех адресах
foreach ($c in $content){
    $c -replace ';',''
}
Подсчет количества строк
Построчный вывод с командой Powershell позволяет посчитать количество строк во всем файле. Для подсчета используется команда Measure-Object:
Get-Content -Path 'C:\file.txt' | measure
Если нужна только цифра, а не объект, можно сделать так:
(Get-Content -Path 'C:\file.txt' | measure).Count
Кодировки
В параметре -Encoding можно указать следующие кодировки:
- ASCII
- BigEndianUnicode
- BigEndianUTF32
- Byte
- Default
- OEM
- Unicode
- UTF7
- UTF8
- UTF32
Чтения файла под другим пользователем
В этом командлете не предусмотрена возможность открытия файла под другим пользователем. При любых попытках вы будете получать ошибки:
- Access to the path is denied
- The FileSystem provider supports credentials only on the New-PSDrive cmdlet. Perform the operation again withoutspecifying credentials.
Для обхода этих ошибок, если у вас нет другого выхода, нужно использовать Invoke-Command (команда удаленного подключения). Для ее настройки могут потребоваться дополнительные настройки описанные в другой статье.
Сам процесс открытия файла под другим пользователем будет выглядеть так:
# Вводим свои учетные данные
$creds = Get-Credential
# Выполняем запрос под другим пользователем
Invoke-Command -Computer localhost -Credential $creds -ScriptBlock {Get-Content -Path 'C:\Folder\File2.txt'}
Непрерывное чтение
С помощью параметра Wait вы можете читать файл, который в этот момент обновляется системой или другим пользователем:
Get-Content -Path 'C:\file1.txt' -Wait
Ограничение вывода строк
Можно ограничить вывод содержимого файла указав количество нужных строк в начале или конце:
- Head — выведет указанное количество строк с начала;
- Tail — выведет указанное количество строк с конца.
Так будут выведены только первые 5 строк:
Get-Content -Path 'C:\file1.txt' -Head 5
Поиск файлов по содержимому
Get-Content не позволяет искать и открывать фалы находящиеся внутри других каталогов. Такой поиск называется рекурсивным и он доступен в Get-ChildItem.
В следующем примере мы вернем файлы из всех каталогов и подкаталогов:
Get-ChildItem -Path 'C:\Windows\' -Recurse -File
File — возвращает только файлы. Каталоги нам не нужны.
С Get-ChildItem вы так же можете использовать Include,Exclude и Filter, которые были рассмотрены раннее. Использовать эти ключи лучше всего в первой команде т.к. это будет работать быстрее.
Через конвейер мы сможем открыть каждый файл, а с Select-Sting проверить есть ли в нем нужный текст. Так мы найдем файл с Powershell, который содержит строку ‘127.0.0.1’ в папке Windows:
Get-ChildItem -Path 'C:\Windows\System32\drivers\etc\' -Recurse -File |
Get-Content -Raw |
Select-String '127.0.0.1'
Если убрать параметр Raw, то у нас выведется только та строка, которую мы искали:

Изменение файла с последующей записью
Вы так же можете изменить содержимое файла и перезаписать этот файл. Представим, что вам нужно заменить адрес ‘127.0.0.1’ в строке — это можно сделать так:
'My address: 127.0.0.1/24' -replace '127.0.0.1','192.168.3.2'
Или с помощью регулярного выражения (не точный шаблон):
'My address: 127.0.0.1/24' -replace '\d{1,3}\.\d{1,3}\.\d{1,3}\.\d{1,3}','192.168.3.2'
Для записи в файл у нас есть два варианта. Первый — это использовать перенаправление в виде знака ‘>’, который перезапишет все содержимое файла или создаст новый файл:
$file_content = Get-Content -Path 'C:\file1.txt'
$file_content -replace '127.0.0.1','192.168.3.2' > file1.txt
Второй вариант — использовать команду Set-Content:
$file_content = Get-Content -Path 'C:\file1.txt'
$file_content -replace '127.0.0.1','192.168.3.2' | Set-Content -Path 'C:\file1.txt'
Подсчет четных чисел в файле
У меня есть файл ‘file.txt’ со следующим содержанием:
some text 123 some text 6 some
text 9 some text 312345
123.2
Шаблон регулярного выражения ‘\d*\.?\d*’ говорит, что мы ищем число, после которого может быть точка, после которого могут быть еще числа. Таким образом мы захватим целые и числа с плавающей точкой.
Для выделения таких чисел из строк нужно использовать Select-String:
$file = Get-Content -Path 'file.txt'
$result = Select-String -InputObject $file -Pattern '\d*\.?\d*' -AllMatches | Foreach {$_.matches}
Нам нужно отформатировать вывод убрав пустые строки и получить значения свойства Value:
$result | where Value -ne '' | select Value
Мы можем вернуть остаток от деления использовав %. Если число делится на 2 с остатком 0, то оно будет четным:
# Открываем файл
$opened_file = Get-Content -Path 'file.txt'
# Поиск чисел
$result = Select-String -InputObject $opened_file -Pattern '\d*\.?\d*' -AllMatches | Foreach {$_.matches}
# Исключение пустых строк в выводе
$result = ($result | where Value -ne '').Value
foreach ($num in $result){
   # Результат деления
   $n = $num%2
   if ($n -eq 0){Write-Output "Число четное: $num"}
   else {Write-Output "Число не четное: $num"}
}
…
Теги:
#powershell
#файлы
Want to open a file from the command line? Here how you can open a file using Command Prompt or PowerShell in simple steps.
To open a file in Windows, all you have to do is double-click on it with your mouse. Alternatively, you can also select it and press the Enter key on your keyboard. As long as there is a compatible program, the file will be opened almost immediately. In a vast majority of situations, opening a file like this is good enough. However, there will be times when you might what to open a file using command line tools like Command Prompt or PowerShell.
There might be any number of situations where you need to open files using Command Prompt. For example, if you want to run a program with special flags, you generally have to run it using Command Prompt or create a desktop shortcut with the special flags. In fact, you can even create batch files and run them to open files via other programs like the task scheduler.
No matter the reason, if you ever need to open a file with Command Prompt or PowerShell, follow the steps given below. The steps listed below will work in all versions of Windows.
Related: How to create file using Command Prompt or PowerShell
Jump to:
- Command Prompt
- PowerShell
To open a file using Command Prompt in Windows, follow the below steps.
1. Open the Command Prompt window. On Windows, you can do that by searching for “cmd” in the Start menu or by executing the “cmd” Run command.

2. In the Command Prompt window, execute the below command to go to the folder where the file you want to open is located.
cd "path\to\folder"
3. Next, type the file name along with its extension and press Enter. For example, if you want to open a JPEG file, you have to type “image.jpeg”.
Note: If the file name has spaces, type it in quotes (Ex: “my image.jpeg”).
4. To open the file in Command Prompt with a specific program, use the below command.
"path\to\program.exe" "path\to\file"
If the program is added to the Windows path, you don’t have to type the full program path. You can just type it as following:
program.exe "path\to\file"
Open File using PowerShell
To open a file using PowerShell, follow the steps given below.
1. Open the PowerShell window. You can do that on Windows by searching for it in the Start menu. Alternatively, right-click on the Start menu and select the “Windows PowerShell” option.

2. Use the below command to go to the folder where the file you want to open is located. This step is not necessary but if you don’t do this, you have to manually type the full file path instead of just the file name.
cd "C:\path\to\folder"
3. Once you are in the folder, execute the below command to open the file with PowerShell. Replace the dummy file name with the actual file name and its extension. As long as there is a compatible program, the file will be opened.
"./file name.jpg"
4. To open the file with a specific program, execute the below command. Don’t forget to replace the dummy paths with the actual program and file paths.
“C:\path\to\program.exe” “D:\path\to\file.png”
Important note: Some files might require admin rights to open. In that case, open the command line tool as an admin and then open the file from there.
That is all. It is that simple to open files using Command Prompt or PowerShell.
I hope that helps. If you are stuck or need some help, comment below and I will try to help as much as possible.
Updated March 6, 2023

Definition of PowerShell Open File
PowerShell open file commands are meant to open the file using the PowerShell cmdlet or using the .Net Namespace and once the file is opened it can be used for reading the contents from the file by reading a single line or the whole content, writing the content to the file and then close the file end the running process of the opened file and these files can be various types like TEXT, JSON, XML, etc.
Syntax:
Using Get-Content to open and read file.
Get-Content
[-ReadCount <Int64>]

[-TotalCount <Int64>]

[-Tail <Int32>]

[-Path] <String[]>

[-Filter <String>]

[-Include <String[]>]

[-Exclude <String[]>]

[-Force]

[-Credential <PSCredential>]

[-Delimiter <String>]

[-Wait]

[-Raw]

[-Encoding <Encoding>]

[-AsByteStream]

[-Stream <String>]

[<CommonParameters>]
Get-Content
[-ReadCount <Int64>]

[-TotalCount <Int64>]

[-Tail <Int32>]

-LiteralPath <String[]>

[-Filter <String>]

[-Include <String[]>]

[-Exclude <String[]>]

[-Force]

[-Credential <PSCredential>]

[-Delimiter <String>]

[-Wait]

[-Raw]

[-Encoding <Encoding>]

[-AsByteStream]

[-Stream <String>]

[<CommonParameters>]
Using File.Open method
a. Open(String, FileMode)
Opens the file from the specified path with the various FileModes, explained later.
b. Open(String, FileMode, FileAccess)
Opens the file from the specified path with the various file modes and file access method.
c. Open(String, FileMode, FileAccess, FileShare)
Opens the file from the path specified with the specified file mode, file access rights, and the specified sharing option.
Using File StreamReader class.
System.IO.StreamReader(“FilePath”)
How does the open file command work in PowerShell?
When we use the Get-Content method, we can read the file from the path we specify, and when we read the file by default PowerShell command opens up a file and read the content of the file.
Get-Content C:\Temp\Servers.txt
While using the System.IO namespace with PowerShell, we can use its class File and its methods Open() as shown in the syntax.
a. Open(String, FileMode)
String: It is the path of the file to open its content.
FileMode: Below is the file modes used by the File System.
- Append: Opens a file if exists or creates a new file. This requires to append permission FileMode.Append and can only be used with FileAccess.Write.
- Create: Specifies that the Operating system will create a new file and if exists it will overwrite the file and should be used with the FileMode.Create permission.
- CreateNew: Specifies that the Operating System will create a new file and if exists it will throw an exception.
- Open: Specifies that the Operating System will open a file if exist, otherwise it will throw an exception.
- OpenOrCreate: Specifies if the operating system should open a file. If the file exists, it will open a new file otherwise it will create a new file.
- Truncate: Specifies that the operating system should open an existing file. When the file is truncated so that its size should be zero bytes.
b. Open(String, FileMode, FileAccess)
String: Path of the file to open.
FileMode: As explained in the previous syntax.
FileAccess: Below are the FileAccess methods.
- Read: Read Access to the file. Data can be read from the file.
- ReadWrite: Read and write access to the file. Data can be written and read from the file.
- Write: Write access to the file. Data can be written to the file.
C . Open(String, FileMode, FileAccess, FileShare)
String, FileMode, and FileAccess is explained earlier. We will provide description about FileShare here.
Below are the supported fields.
- Delete: Allows deleting of a file.
- Inheritable: Makes the files are inheritable. This is not supported by Win32 system.
- None: Rejects the file sharing.
- Read: Allows the opening file for the reading until the file is closed.
- ReadWrite Allows the opening file for reading and writing until the file is closed.
- Write: Allows the opening file for the writing until the file is closed.
Examples
Example #1: Use the Get-Content to open and read the file.
Get-Content C:\Temp\Servers.txt
Output:
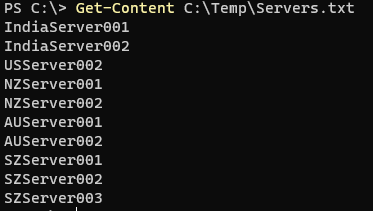
When you type this command, it opens the file for the reading and when file read is successful, it closes the file.
When you add the content to the file, the file is first opens and then data is written to the file. For example, if the Servers.txt file is in use the server name “AusServer001” can’t be added to the file.
"AUSServer001" | Add-Content -Path C:\Temp\Servers.txt -Force
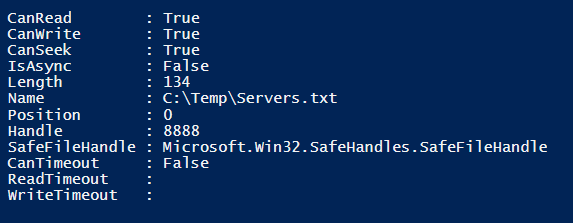
Example #2: Open the file with System.IO namespace.
To open the file for the operation, we can use the below command. We have the file to open is Servers.txt from the C:\temp location.
[System.IO.File]::Open("C:\Temp\Servers.txt", [System.IO.FileMode]::Open)
Output:
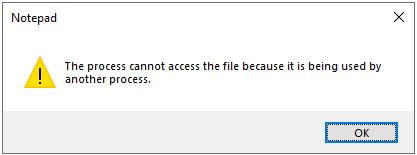
So when the file is open and when you try to open or edit the file it will show the below error message.
To close the open file once the operation completes, use the close() method.
$file = [System.IO.File]::Open("C:\Temp\Servers.txt", [System.IO.FileMode]::Open)

$file.Close()
As shown in the above syntax, instead of Open, you can use various methods like Create, CreateNew, Truncate, etc.
For example, below command, will open Servers.txt if it is exist otherwise it will Create a new file.
[System.IO.File]::Open("C:\Temp\Servers.txt", [System.IO.FileMode]::OpenOrCreate)
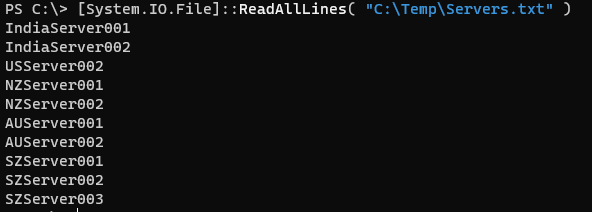
Another method to open and read file with the System.IO.File namespace is by using the ReadAllLines() command.
[System.IO.File]::ReadAllLines( "C:\Temp\Servers.txt" )
Output:
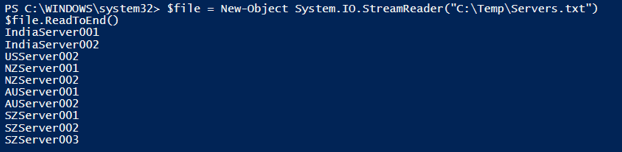
Example #3: Using File StreamRead to open and read the file.
Using the filestream method, we first need to create the FileStream .Net namespace as shown below.
$file = New-Object System.IO.StreamReader("C:\Temp\Servers.txt")
You can read the file with the method ReadToEnd() method.
$file.ReadToEnd()
Output:
We can also use the ReadLine() method to read the file but this command read one line at a time so we need to use the loop to read the entire file as shown below.
$file = New-Object System.IO.StreamReader( "C:\Temp\Servers.txt" )

while( ($line = $file.readline()) -ne $null){

$line

}
Output:

Conclusion
While writing a script sometimes we need to work with files. The above cmdlets and the .Net commands in PowerShell mentioned are useful in opening the file and reading and writing the content of the file using the script and this approach is helpful when we write a script to store logs or events.
Recommended Articles
This is a guide to PowerShell Open File. Here we discuss Introduction, syntax, parameters, How does the open file command work in PowerShell?. You may also have a look at the following articles to learn more –
- PowerShell Loop through Array
- PowerShell Multiline String
- PowerShell Batch File
- PowerShell do while