Server Manager is a management console (MMC) in Windows Server 2012 that allows you to add server roles / features, manage and deploy server remotely. In this tutorial we’ll show you 5 ways to launch Server Manager in Windows Server 2012.
Method 1: Launch Server Manager from Command Line
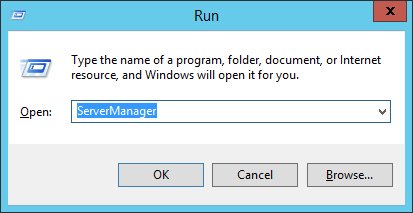
Press the Windows key + R to open the Run box, or open the Command Prompt. Type ServerManager and press Enter.
This should be the most common and quickest way to open Server Manager in Windows Server 2012 / 2008.
Method 2: Launch Server Manager from Taskbar
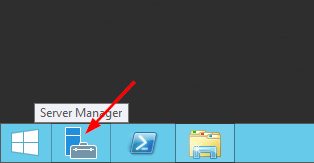
By default, the Server Manager shortcut is pinned to the taskbar. Just click the Server Manager icon and you can run Server Manager immediately.
Method 3: Launch Server Manager from Start Screen
Click the Start button to open the Start Screen.

As you can see in the picture above, the Metro interface gives you access to Server Manager.
Method 4: Launch Server Manager Using PowerShell
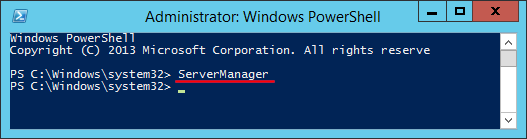
Open PowerShell in Windows Server 2012. Type ServerManager and press Enter.
Method 5: Create a Desktop Shortcut to Launch Server Manager
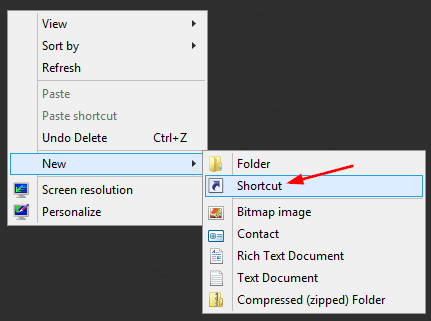
Right-click on any empty space on your desktop. Select New -> Shortcut from the context menu.
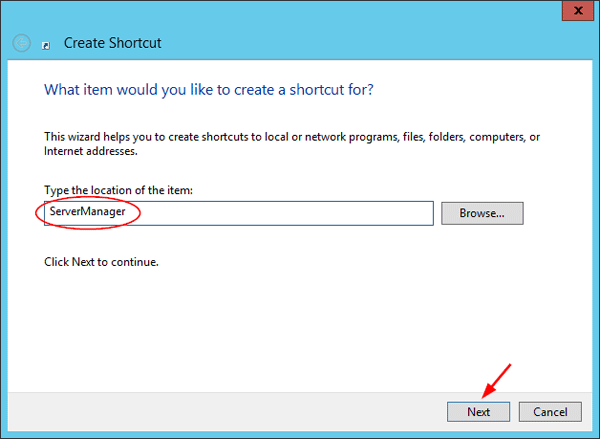
Type ServerManager in the shortcut location box and click Next.
Give a name for the shortcut and click Finish.

You should now see a new desktop shortcut on the desktop. Double-click it and you can launch Server Manager quickly.

That’s it!
- Previous Post: How to Enable USB Write Protection in Windows 10, 8 and 7
- Next Post: How to Add Missing Disk Cleanup in Windows Server 2012
Ввести единую консоль управления сервером Windows Microsoft хотела еще с момента выпуска Windows Server 2008. Данная консоль управления получила название Server Manager, однако работать с ней было крайне неудобно. В Windows Server 2008 R2 консоль эту немного доработали, и часть операций управления сервером уже было удобно выполнять именно из нее. В Windows Server 2012 консоль управления Server Manager была существенно улучшена и доработана, причем, стоит отметить, данный инструмент управления сервером Windows стал действительно удобным и полезным.
По сути, консоль Server Manager является графической оберткой для генерации скриптов PowerShell (эта функционал не понаслышке знаком администраторам Exchange 2010). Например, в консоли управления AD — Active Directory Administrative Center появилась специальная панель — PowerShell History,в которой генерируются и отображаются скрипты, дублирующие действия администратора в GUI, и данный код можно использовать в дальнейшем для автоматизации некоторых задач по управлению параметрами и объектами Active Directory.
В новой консоли Server Manager появились следующие возможности:
- Возможность одновременного управления несколькими серверами из одной консоли, и возможность группировки серверов
- Возможность установки ролей и функций на удаленных серверах и отключенных виртуальных дисках (Vhd, Vhdx)
- Действия в консоли можно переводить в команды PowerShell
- Возможность интеграции других инструментов управления в консоль
- Мониторинг статуса всех подключенных серверов в одной панели (dashboard)
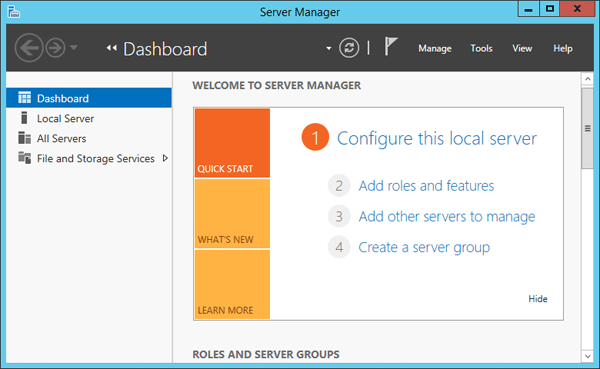
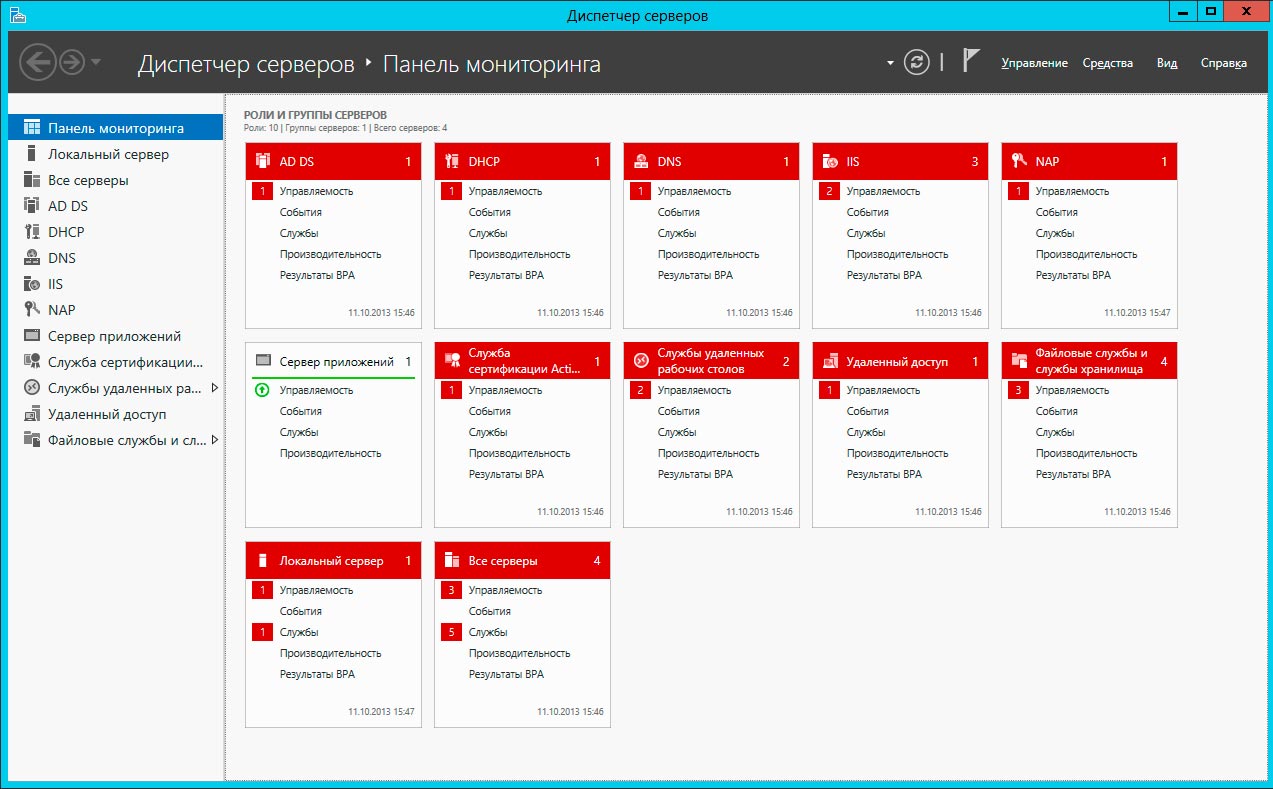
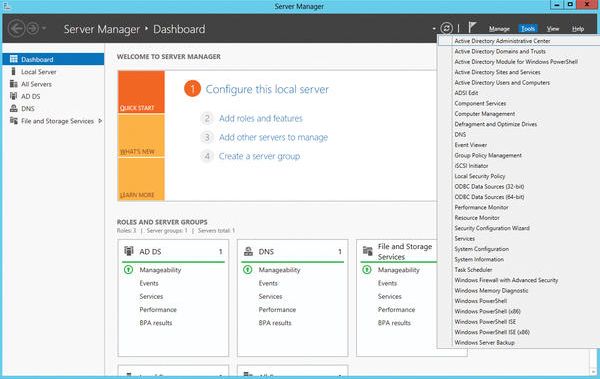
Консоль Server Manager запускается автоматически при входе на сервер и первое, что видит администратор – это панель Dashboard. На данной панели отображается текущее состояние серверов, подключенных к данной консоли Server Manager. В том случае, если наблюдались какие-либо проблемы с сервером или группой серверов, около элементов, требующих внимания администратора появляются красные значки (если присутствуют только зеленые элементы – все ОК).

В верхнем тулбаре окна располагаются несколько иконок и пункты меню: Manage, Tools, View и Help.
С помощью иконки Refresh можно вручную обновить информацию на панели Dashboard. Кроме того тут расположена иконка в виде флажка, если он красного цвета, то щелчок по нему покажет все обнаруженные на серверам проблемы.
В меню управления (Manage) присутствуют пункты Add Roles and Features, Remove Roles and Features (установка/удаление ролей и функций), Add servers (добавление серверов в группу управления), Create Group (создать группу серверов) и Server Manager Properties (настройки консоли Server Manager: периодичность обновления, автоматический запуск).

В меню Tools присутствуют ссылки на различные MMC консоли и другие утилиты администрирования. В данное меню можно добавить собственные инструменты (Как добавить собственные утилиты в Server Manager).

В правой панели содержаться следующие элементы: Dashboard, Local Server, All Servers и несколько групп серверов, созданных администратором. В центральной панели можно осуществить настройку локального сервера, управлять ролями и функциями и управлять группами серверов.
В разделе Local Server (локальный сервер) можно получить практически всю информацию о сервере, его ролях, событиях и службах. В свойствах локального сервера отображается такая информация, как имя компьютера, домен, настройки сети, версию ОС, параметры службы обновлений Windows, статус активации, параметры оборудования и временная зона.

В разделе All Servers содержится практически та же самая информация, что и у локального сервера, отличия в том, что из данного раздела можно просмотреть параметры сразу нескольких серверов.

В консоли можно создать несколько групп серверов по какому-либо признаку, например, “сервера филиала в Рязани”, все контроллеры домена, Exchange или Web сервера. Причем на данные сервера совсем не обязательно должна стоять Windows Server 2012, это могут быть и Windows 2008/R2/2003/R2, главное, чтобы на них был установлен и активирован пакет WinRM 3.0.
Добавить сервера в консоль можно с помощью соответствующего меню.

Щелкнув правой кнопкой по любому серверу в группе серверов, можно открыть меню, позволяющее запустить установку ролей, rdp клиент, открыть консоль управления сервером и т.д.

В отличие от системы Windows 8 управление сервером не ограничивается рамками локальной системы. Речь идет об удаленном управлении несколькими серверами и их ролями. Здесь на первый план выходит оснастка Windows Server 2012 Server Manager
В опубликованной в предыдущем номере статье «Осваиваем Windows Server 2012, часть 1» я рассказывал о том, как использовать интерфейс нового экрана Start и связанные с ним сочетания клавиши Winkey для выполнения локальных серверных задач. Однако в отличие от системы Windows 8 управление сервером не ограничивается рамками локальной системы. Речь идет об удаленном управлении несколькими серверами и их ролями. Здесь на первый план выходит оснастка Windows Server 2012 Server Manager.
Оснастка Server Manager устанавливается вместе с любой версией системы Windows Server 2012 с полным графическим пользовательским интерфейсом и по умолчанию автоматически запускается при регистрации в системе. Однако не обязательно регистрироваться на сервере с системой 2012, чтобы использовать оснастку Server Manager. Вы можете установить пакет Remote Server Administration Toolkit (RSAT) for Windows 8 (в данный момент находится на стадии подготовки), чтобы запускать оснастку Server Manager на клиентской системе Windows 8 (и только этой версии).
Оснастка Server Manager состоит из трех основных секций (экран 1): панель областей управления, панель подробностей и файловое меню. Не знаю, является ли данный набор самым актуальным (похоже, он меняется с каждым релизом), но предполагаю, что эти названия вам знакомы. Панель областей управления содержит общий набор областей применения оснастки Server Manager. При выборе одного из элементов на панели областей управления содержимое панели подробностей изменится, и вы получите подробную информацию по выбранной области. Файловое меню в правом верхнем углу – наиболее простой способ получить доступ ко множеству задач управления серверами в выбранной области управления.
 |
| Экран 1. Обзор сервера |
Чтобы облегчить понимание отображаемой в консоли Server Manager информации, давайте отберем пять серверов в данном окружении, определив их операционные системы и установленные роли:
-HANSHI (R2 — AD DS, DNS, DHCP, Hyper-V и File and Storage Services);
-SCVMM (R2 — System Center Virtual Machine Manager 2012, IIS и File and Storage Services);
-ROOTCA (R2 – AD CS, IIS);
-WS2012RTM-1 (WS2012 – AD DS, DNS, File and Storage Services);
-WS2012RTM-2 (WS2012 – AD DS, DNS, File and Storage Services).
Консоль Server Manager использует менее подробное отображение информации, чем предыдущие версии управляющих консолей, и демонстрирует состояние системы с помощью «плиток» и цветов. В результате консоль полностью использует всю предоставляемую площадь монитора. При работе с более низким разрешением панель областей управления будет автоматически сжиматься, когда вы «проваливаетесь» в определенные серверные роли и группы. Первым делом вы, скорее всего, захотите скрыть область Quick Start, позволив, таким образом, всем ролям/группам разместиться на экране.
Добавление серверов и групп серверов
Как я говорил, файловое меню содержит множество задач, которые вы можете выполнить как на серверах, так и в самой консоли Server Manager. Вкладка Manage позволяет вам добавлять серверы в консоль Server Manager (при этом учтите, что вы не сможете удалить их из консоли), добавлять и удалять роли и компоненты на отслеживаемые серверы, регулировать некоторые базовые настройки Server Manager и создавать группы серверов. Давайте создадим группу серверов прежних версий, в которую будут входить только серверы с установленной операционной системой Windows Server 2008 R2. Выбор пункта меню Manage, Create Server Group вызывает окно выбора серверов, которые являются членами группы (экран 2). Обратите внимание на вкладки в верхней части области выбора – вы можете выполнять поиск по службе DNS, серверному пулу, импортированному списку или каталогу Active Directory. Я поддерживаю подробное описание, но данная структура настолько проста и прозрачна, что подробности проще будет опустить. При поиске серверов для группы Legacy Servers я использовал каталог AD, чтобы выбрать системы только с 2008 R2 или Windows 7. Еще один недостаток: список отбора операционных систем содержит одновременно и серверную, и клиентскую операционные системы определенного поколения (например, 2008 R2 и Windows 7), а не просто серверную операционную систему. Консоль Server Manager – это не больше и не меньше чем средство управления серверами, и она имеет ограниченные возможности в управлении клиентскими системами. К тому же в корпоративном окружении такой параметр быстрого отбора заставит вас прокручивать тысячи клиентских машин, чтобы найти необходимые серверы.
|
|
| Экран 2. Создание группы серверов |
Мониторинг серверов старых версий
Единственными старыми операционными системами, состояние которых может отслеживать консоль Server Manager, являются системы Windows Server 2008 или 2008 R2. Чтобы обеспечить возможность мониторинга этих серверов в консоли Windows Server 2012 Server Manager, вы должны сделать следующее.
* Установить пакет. NET Framework 4.0. Я подозреваю, что на большинстве серверов, для которых проводится регулярное обновление, он уже установлен.
* Установите пакет Windows Management Foundation 3.0. Этот пакет содержит обновления для инструментов PowerShell 3.0, WMI и WinRM.
* Возможно, вам придется установить обновления, описанные в статье KB 2682011 (http://go.microsoft.com/fwlink/p/?LinkId=245487). И опять же, если вы своевременно обновляете системы, то я подозреваю, что этот пакет уже установлен. Подробную информацию об удаленном мониторинге серверов с помощью Windows Server 2012 Server Manager можно найти в статье «Configure Remote Management in Server Manager» (http://technet.microsoft.com/en-us/library/hh921475).
Как только серверы с системой 2008 R2 были выделены в отдельную группу и «плитку», сразу стало очевидно, что возникли проблемы с взаимодействием консоли Server Manager и серверов R2 (экран 3). При этом оставались проблемы с мониторингом этих старых операционных систем. Щелчок мыши на элементе Manageability с тремя ошибками в «плитке» Legacy Servers выявил проблемы с получением данных со всех трех систем R2 (экран 4). Чтобы скрыть эти ошибки или другие ошибки, какие вы сочтете нужным, раскройте список выбора Status и снимите выделение с соответствующей записи. Строка вернется в нормальное состояние.
|
|
| Экран 3. «Плитки» |
|
|
| Экран 4. Ошибки получения данных из систем R2 |
Инструменты и уведомления
В файловом меню есть еще два важных пункта: Tools и Notifications. Tools – это замена консоли Administrative Tools в системе Windows Server 2012. Именно сюда необходимо зайти, если вы хотите напрямую вызвать знакомые инструменты (например, Active Directory Administrative Center, Group Policy Management, DNS и так далее), а не использовать рабочую панель Roles.
Notifications – это флажок, меняющий цвет на красный, если какие-либо элементы требуют вашего внимания (экран 5). Хотя данная функциональность отчасти повторяет уведомления рабочей области, преимущество флага Notifications состоит в том, что он остается всегда видимым, даже если вы углубляетесь в определенные области консоли Server Manager и не видите рабочую область.
Local Server / All Servers
|
|
| Экран 5. Notifications |
Давайте вернемся в панель областей управления и рассмотрим оставшиеся способы просмотра информации по вашим серверам. Области Local Server и All Servers позволяют управлять множеством серверов, используя вертикальный (в моем понимании) подход, то есть предоставляя управление всеми установленными ролями, компонентами и службами на сервере.
Область роли
Помимо областей Dashboard, Local Server, All Servers и любых созданных групп серверов (например, Legacy Servers), панель областей автоматически дополняется значками, соответствующими всем серверным ролям, находящимся под вашим управлением (экран 6). Такой подход позволяет взглянуть на ваши серверы «в разрезе»: распространение определенной роли по множеству серверов.
|
|
| Экран 6. Обзор роли |
Давайте взглянем на роль AD DS (экран 7). Каждая область представляет собой набор окон (в данном случае окон Servers, Events, Services, Best Practices Analyzer (BPA), Performance и Roles and Features). Вы можете щелкнуть правой кнопкой мыши на каждой записи в окне и получить доступ к задачам контекстного меню. В каждой области также имеется «вон та штука» под названием Tasks в правом верхнем углу каждого окна, которая представляет собой дополнительную точку запуска задач. Такое многообразие способов запуска задачи в консоли Server Manager, позволяет просто выбрать один из способов выполнения задачи. Например, запомните, что пункта Remove Server нет в файловом меню Manage, содержащем пункт Add Server. Вы можете удалить сервер из окна мониторинга, щелкнув по нему правой кнопкой мыши, либо из области Servers или любой области роли, в которой представлен данный сервер.
|
|
| Экран 7. Роль AD DS |
Новый мощный интерфейс управления
Вы можете многое узнать о возможностях Server Manager, щелкнув правой кнопкой мыши в любой области и просмотрев разрешенные операции в контекстном меню. Например, можно перезагрузить один (или все, в зависимости от выбранного количества) сервер из области All Servers, щелкнув правой кнопкой и выбрав операцию Restart Server. Вы можете настроить объединение сетевых интерфейсов, запустить удаленную сессию PowerShell или воспользоваться другими известными механизмами администрирования. Такой подход приводит к интересным эффектам при использовании старых, не обновленных до последней версии инструментов. Например, приложение LDP.EXE, запускается три раза (каждый раз для определенного контроллера домена), когда я выбираю данную команду для выборки из трех контроллеров домена. Соблазнительная возможность, ведь большинство популярных инструментов командной строки представлены в контекстном меню – однако они просто запускаются и «вылетают» по ошибке, так как вы не указали (и не могли указать) необходимые параметры.
Чего мне не хватало, так это возможности использовать кнопку мыши «назад» для возврата к предыдущему экрану, например, если вы углубились в изучение определенной роли и захотели вернуться к общему виду. Я удивлен, что эта кнопка не работает, так как мы говорим о базовой функции, которой мне стало не хватать спустя три минуты с момента начала использования Server Manager.
После того как вы привыкнете к интерфейсу консоли Server Manager, он покажет себя во всей красе. Например, область роли помогла мне обнаружить, что я установил роль AD DS на виртуальную машину SCVMM, но не повысил сервер до контроллера домена. Средство BPA предложило мне применить политику Default Domain Controllers Policy на подразделение Servers. И что же? При дальнейшем исследовании я обнаружил не до конца настроенную роль AD DS на сервере SCVMM, который входит в подразделение Server OU. Лучше бы средство BPA сообщило мне, что у меня есть сервер, на котором установлена роль AD DS, но он не входит в подразделение Domain Controllers.
Server Manager или экран Start?
Одной из главных проблем при работе как с консолью Server Manager, так и с экраном Start в системе Windows Server 2012 является поиск расположения привычных задач и витиеватых маршрутов, по которым к ним можно добраться. В общем, мне действительно понравилась консоль Windows Server 2012 Server Manager. Она имеет удобный интерфейс, который позволяет управлять удаленными и локальными серверами, а также просматривать их состояние с разных сторон, например, увидеть установленные роли, уровень операционной системы или использовать любую другую группировку. Механизмы интерфейса немедленно уведомляют вас о появлении предупреждений или ошибок, а вы можете выполнять различные действия для нескольких серверов, что раньше было невозможно.
Но я до сих пор сомневаюсь в целесообразности использования нового экрана Start и связанных с ним сочетаний клавиши Windows Key для управления серверами – особенно для удаленного управления «через консоль» посредством сессий Remote Desktop. А если вы не установите параметр Apply Windows key combinations on the remote computer в настройках Local Resources подключения Remote Desktop Connection, парадигма использования нового экрана Start становится практически непригодной. Не все управляют крупными «облачными» центрами обработки данных, поэтому я верю, что настанет время, когда операторы сервера будут использовать сенсорные экраны на серверных консолях для просмотра красных «плиток» консоли Server Manager в поисках ошибки. Но в тоже время, я думаю, пройдет немало времени, прежде чем специалисты будут администрировать свои серверы через сенсорные экраны. Механизмы экрана Start в серверных системах выглядят уверткой, связанной со спущенным «сверху» решением о том, что все версии Windows должны иметь одинаковый интерфейс, независимо от соответствия этого интерфейса требованиям платформы, или, что еще хуже, последствий этого решения.
Ввести единую консоль управления сервером Windows Microsoft хотела еще с момента выпуска Windows Server 2008. Данная консоль управления получила название Server Manager, однако работать с ней было крайне неудобно. В Windows Server 2008 R2 консоль эту немного доработали, и часть операций управления сервером уже было удобно выполнять именно из нее. В Windows Server 2012 консоль управления Server Manager была существенно улучшена и доработана, причем, стоит отметить, данный инструмент управления сервером Windows стал действительно удобным и полезным.
По сути, консоль Server Manager является графической оберткой для генерации скриптов PowerShell (эта функционал не понаслышке знаком администраторам Exchange 2010). Например, в консоли управления AD — Active Directory Administrative Center появилась специальная панель — PowerShell History,в которой генерируются и отображаются скрипты, дублирующие действия администратора в GUI, и данный код можно использовать в дальнейшем для автоматизации некоторых задач по управлению параметрами и объектами Active Directory.
В новой консоли Server Manager появились следующие возможности:
- Возможность одновременного управления несколькими серверами из одной консоли, и возможность группировки серверов
- Возможность установки ролей и функций на удаленных серверах и отключенных виртуальных дисках (Vhd, Vhdx)
- Действия в консоли можно переводить в команды PowerShell
- Возможность интеграции других инструментов управления в консоль
- Мониторинг статуса всех подключенных серверов в одной панели (dashboard)
Консоль Server Manager запускается автоматически при входе на сервер и первое, что видит администратор – это панель Dashboard. На данной панели отображается текущее состояние серверов, подключенных к данной консоли Server Manager. В том случае, если наблюдались какие-либо проблемы с сервером или группой серверов, около элементов, требующих внимания администратора появляются красные значки (если присутствуют только зеленые элементы – все ОК).
В верхнем тулбаре окна располагаются несколько иконок и пункты меню: Manage, Tools, View и Help.
С помощью иконки Refresh можно вручную обновить информацию на панели Dashboard. Кроме того тут расположена иконка в виде флажка, если он красного цвета, то щелчок по нему покажет все обнаруженные на серверам проблемы.
В меню управления (Manage) присутствуют пункты Add Roles and Features, Remove Roles and Features (установка/удаление ролей и функций), Add servers (добавление серверов в группу управления), Create Group (создать группу серверов) и Server Manager Properties (настройки консоли Server Manager: периодичность обновления, автоматический запуск).
В меню Tools присутствуют ссылки на различные MMC консоли и другие утилиты администрирования. В данное меню можно добавить собственные инструменты (Как добавить собственные утилиты в Server Manager).
В правой панели содержаться следующие элементы: Dashboard, Local Server, All Servers и несколько групп серверов, созданных администратором. В центральной панели можно осуществить настройку локального сервера, управлять ролями и функциями и управлять группами серверов.
В разделе Local Server (локальный сервер) можно получить практически всю информацию о сервере, его ролях, событиях и службах. В свойствах локального сервера отображается такая информация, как имя компьютера, домен, настройки сети, версию ОС, параметры службы обновлений Windows, статус активации, параметры оборудования и временная зона.
В разделе All Servers содержится практически та же самая информация, что и у локального сервера, отличия в том, что из данного раздела можно просмотреть параметры сразу нескольких серверов.
В консоли можно создать несколько групп серверов по какому-либо признаку, например, “сервера филиала в Рязани”, все контроллеры домена, Exchange или Web сервера. Причем на данные сервера совсем не обязательно должна стоять Windows Server 2012, это могут быть и Windows 2008/R2/2003/R2, главное, чтобы на них был установлен и активирован пакет WinRM 3.0.
Добавить сервера в консоль можно с помощью соответствующего меню.
Щелкнув правой кнопкой по любому серверу в группе серверов, можно открыть меню, позволяющее запустить установку ролей, rdp клиент, открыть консоль управления сервером и т.д.
Windows Server 2012 R2 — решение для организации единой инфраструктуры в компании любого размера. WS также применяют для аутентификации и идентификации пользователей. Рассмотрим начало работы с Windows Server 2012 R2: установку, настройку и добавление новых пользователей для удаленного доступа.
На хороших хостингах установить Windows Server можно в автоматическом режиме при создании нового VDS. Посмотрим, как это работает, на примере Timeweb.
-
Открываем панель управления VDS.
-
Переходим в раздел «Список VDS».
-
Нажимаем на кнопку «Создать сервер».
-
Указываем любое имя и комментарий (опционально).
-
Выбираем в списке операционных систем Windows Server 2012 R2.
-
Настраиваем конфигурацию сервера: количество ядер процессора, объем оперативной памяти (минимум 512 МБ) и размер хранилища (минимум 32 ГБ).
-
Включаем защиту от DDoS, если она требуется.
-
Нажимаем на кнопку «Создать сервер».

Лицензия уже входит в итоговую стоимость сервера. При создании VDS система будет установлена и активирована. Хостер отправит на почту данные для авторизации на сервере, чтобы вы могли его настроить.
Если на хостинге нет автоматической установки Windows Server, то придется инсталлировать систему вручную. Для этого нужно купить лицензию и скачать ISO-образ WS 2012 R2.
Для установки системы из ISO-образа обычно используется панель VMmanager. Порядок ручной инсталляции такой:
-
Запускаем VMmanager.
-
Открываем раздел «Виртуальные машины» в меню слева.
-
Останавливаем VDS, на который будем устанавливать WS 2012 R2.
-
Кликаем на кнопку «Диски» на верхней панели.
-
Выбираем пункт «ISO» на верхней панели.
-
В строке «Имя образа» выбираем дистрибутив Windows Server, указываем шину «IDE» и порядок загрузки «В начало».
-
Возвращаемся в раздел «Диски виртуальной машины» и ставим шину IDE для виртуального диска.
-
Жмем на кнопку «Интерфейсы» на верхней панели.
-
Выбираем интерфейс и нажимаем на кнопку «Изменить».
-
Далее – интерфейс «rtl8139». Это нужно для автоматической установки сетевого адаптера.
-
Возвращаемся в раздел «Виртуальные машины» и запускаем VDS, которую мы остановили на втором шаге.
-
Переходим в консоль VNC — на верхней панели есть соответствующая кнопка.
В VNC-консоли запустится установка Windows Server 2012 R2. Если вы ставили любую другую версию ОС от Майкрософт, то без проблем здесь разберетесь.
-
Нажимаем на кнопку «Установить».
-
Вводим лицензионный ключ для активации системы.
-
Выбираем установку с графическим интерфейсом — так будет проще разобраться с настройками.
-
Принимаем лицензионное соглашение.
-
Запускаем выборочную установку.
-
Выбираем диск и при необходимости делим его на части.
-
Ждем, пока скопируются файлы.
-
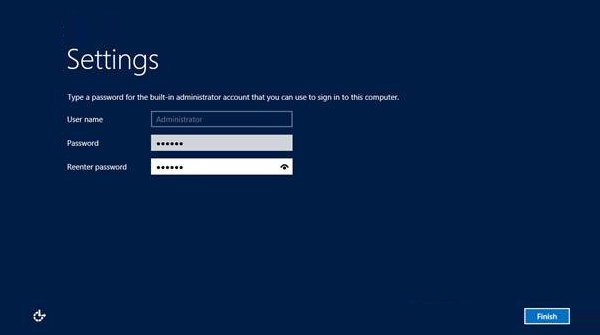
Придумываем пароль администратора.
-
Ожидаем завершения установки.
Ручная установка занимает заметно больше времени и требует опыта в администрировании. Автоматическая же инсталляция намного быстрее и проще.
Защита от DDoS + CDN в подарок при заказе VDS Timeweb
Обезопасьте свой проект и ускорьте его работу: при заказе любого тарифа вы получаете защиту от DDoS + CDN на 3 месяца бесплатно. Сообщите в поддержку промокод community3.
Заказать
Условия использования промокода
Настройка Windows Server 2012 R2
Сразу после установки рекомендуется установить обновления.
-
Открываем «Панель управления».
-
Переходим в раздел «Система и безопасность».
-
Открываем «Центр обновления».
-
Запускаем поиск и установку апдейтов.
Система установлена, обновления есть — теперь приступаем к настройке базовых параметров.
Первый шаг — изменение имени, чтобы было удобно настраивать подключения.
-
Открываем раздел «Панель управления» — «Система и безопасность» — «Система».
-
Нажимаем на ссылку «Изменить параметры».
-
В появившемся окне на вкладке «Имя компьютера» нажимаем на кнопку «Изменить».
-
В строке «Имя компьютера» указываем имя сервера, которое будет удобно использовать для настройки подключений. Например, WServer.
-
Перезагружаем машину для применения параметров.
Следующий шаг — проверка IP-адреса, по которому будет доступен сервер.
-
Открываем поисковую строку и вводим запрос «ncpa.cpl» и нажимаем на Enter.
-
Находим основной сетевой адаптер, кликаем по нему правой кнопкой и открываем «Свойства».
-
Выделяем «Протокол интернета версии 4» и нажимаем на кнопку «Свойства».
-
Прописываем IP-адрес, маску сети, шлюз по умолчанию, адреса DNS-серверов.
Теперь нужно добавить роли и компоненты.
-
Запускаем «Диспетчер серверов».
-
В «Панели мониторинга» нажимаем «Добавить роли и компоненты».
-
Выбираем тип установки «Установка ролей или компонентов».
-
На вкладке «Выбор сервера» выделяем свой VDS.

Выбираем из списка стандартные роли, которые подходят для решения большинства задач. Если вам нужны другие роли, отметьте их тоже.
-
DHCP-сервер
-
DNS-сервер
-
Веб-сервер (IIS)
-
Доменные службы Active Directory
-
Сервер приложений
-
Службы политики сети и доступа
-
Службы активации корпоративных лицензий
-
Службы удаленных рабочих столов
-
Удаленный доступ
-
Файловые службы и хранилища
На вкладке «Компоненты» оставляем стандартные отметки. Единственное возможное изменение — включение службы беспроводной локальной сети.
На вкладке «Службы ролей» отмечаем роли, необходимые для работы с удаленными рабочими столами.
-
Лицензирование удаленных рабочих столов
-
Узел виртуализации удаленных рабочих столов
-
Узел сеансов удаленных рабочих столов
-
Шлюз удаленных рабочих столов
В службах ролей удаленного доступа можно также отметить работу с VPN и прокси, если есть такая необходимость.
Доходим до вкладки «Подтверждение». Отмечаем опцию «Автоматический перезапуск конечного сервера, если требуется». Нажимаем на кнопку «Установить» и ждем завершения инсталляции.
После установки нужно все настроить. Начнем с DNS.
Настройка DNS
-
Открываем «Диспетчер серверов».
-
Жмемна флажок на верхней панели.
-
Кликаем на опцию «Повысить роль этого сервера до контроллера домена».

В конфигурации развертывания выбираем режим «Добавить новый лес» и придумываем корневой домен. Название может быть любым — например, domain.com.
На вкладке «Параметры контроллера» указываем новый пароль и нажимаем «Далее». Затем доходим до вкладки «Проверка предварительных требований». Если параметры установлены верно, то в окне будет сообщение о том, что все проверки готовности к установке выставлены успешно. Нажимаем на кнопку «Установить».
После завершения инсталляции перезагружаем сервер и авторизируемся под именем администратора.
После перезагрузки продолжаем настройку DNS.
-
Открываем «Диспетчер серверов».
-
Переходим в меню «Средства» на верхней панели и выбираем пункт «DNS».
-
В диспетчере DNS разворачиваем ветку DNS — Server — «Зоны обратного просмотра». Кликаем правой кнопкой мыши и выбираем пункт «Создать новую зону».
-
Выбираем тип зоны «Основная» и отмечаем пункт «Сохранять зону в Active Directory».
-
Выбираем режим «Для всех DNS-серверов, работающих на контроллерах домена в этом домене».
-
Отмечаем зону обратного просмотра IPv4.
-
В строке «Идентификатор сети» выбираем диапазон IP-адресов или имя зоны.
-
На следующем шаге разрешаем безопасные динамические обновления.
-
Жмем «Готово» для применения конфигурации.
Настройка DHCP
Следующий шаг — настройка DHCP. Это нужно для того, чтобы сервер мог раздавать диапазон IP.
-
Открываем «Диспетчер серверов».
-
Нажимаем на флажок и выбираем пункт «Завершение настройки DHCP».
-
В разделе «Авторизация» отмечаем пункт «Использовать учетные данные следующего пользователя» и нажимаем на кнопку «Фиксировать».
-
В разделе «Сводка» нажимаем «Закрыть».
-
Открываем меню «Средства» на верхней панели и выбираем пункт «DHCP».
-
Разворачиваем ветку DHCP — «Имя домена» — IPv4. Кликаем по IPv4 правой кнопкой и выбираем пункт «Создать область».
-
Задаем любое название области.
-
Прописываем диапазон IP-адресов, которые будет раздавать сервер. Он задается по желанию пользователя.
-
В следующем окне исключаем определенный диапазон адресов. Этот шаг можно пропустить.
-
Задаем срок действия IP-адреса для устройства. По истечении указанного периода адрес изменится.
-
Отмечаем пункт «Да, настроить эти параметры сейчас».
-
Добавляем IP-адрес маршрутизатора или пропускаем этот шаг.
-
Указываем имя домена в качестве родительского домена.
-
Подтверждаем, что хотим активировать область сейчас.
-
Нажимаем «Готово» для сохранения конфигурации.
Настройка сервера для подключения по RDP
Чтобы к VDS можно было подключаться по RDP, должны быть установлены следующие роли и компоненты:
-
Службы удаленных рабочих столов.
-
Лицензирование удаленных рабочих столов
-
Узел сеансов удаленных рабочих столов
-
Шлюз удаленных рабочих столов
Все эти роли и компоненты мы установили в предыдущем разделе. Теперь нужно настроить групповую политику.
-
Открываем «Поиск» на панели инструментов.
-
Находим и открываем редактор групповых политик — gpedit.msc.
-
Переходим на ветку «Конфигурация компьютера» — «Административные шаблоны» — «Компоненты Windows» — «Службы удаленных рабочих столов» — «Узел сеансов удаленных рабочих столов» — «Лицензирование».
-
Разворачиваем пункт «Использовать указанные серверы лицензирования удаленных рабочих столов».
-
В строке «Использовать серверы лицензий» указываем имя или адрес своего сервера.
-
Возвращаемся обратно в раздел «Лицензирование» и открываем пункт «Задать режим лицензирования».
-
Выбираем режим лицензирования — на пользователя или на устройство в зависимости от того, какой тип лицензии имеется.
После настройки групповых политик переходим к самому лицензированию.
-
Открываем «Панель управления».
-
Переходим в раздел «Администрирование» — Remote Desktop Services — «Диспетчер лицензирования».
-
Кликаем по серверу правой кнопкой и нажимаем «Активировать».
-
Выбираем метод подключения «Авто».
-
Вводим имя, фамилию, организацию, страну расположения сервера. Можно указать любые данные, они не проверяются.
-
Запускаем мастер установки лицензий.
-
Выбираем программу лицензирования, по которой была приобретена лицензия.
-
Вводим ключ активации, который получили после покупки лицензии.
-
Указываем количество пользователей/устройств, если оно не определилось автоматически.
-
Нажимаем «Готово», чтобы завершить работу мастера установки лицензий.
Затем нужно вернуться в раздел «Администрирование» — Remote Desktop Services — «Диспетчер лицензирования» и посмотреть, активирован ли сервер. Если да, значит, настройка успешно завершена.
На иконке сервера может быть желтый значок предупреждения. Чтобы устранить проблемы, нажимаем на ссылку «Рецензия». В меню будут пункты, которые необходимо отметить.
Добавление пользователей для подключения через RDP
После успешного лицензирования добавляем первого пользователя для подключения через RDP.
-
Открываем «Диспетчер серверов».
-
Раскрываем меню «Средства», выбираем пункт «Пользователи и компьютеры Active Directory».
-
Разворачиваем раздел «Пользователи и компьютеры».
-
Кликаем правой кнопкой по своему домену и выбираем пункт «Создать» — «Подразделение».
-
Задаем имя подразделения — например, «Пользователи».
-
Кликаем правой кнопкой по созданному подразделению и выбираем пункт «Создать» — «Пользователь».
-
В карточке пользователя задаем параметры: имя, фамилию, имя на латинице для авторизации.
-
Указываем пароль и настраиваем его параметры — например, можно запретить смену пароля пользователем и сделать срок действия неограниченным.
-
Нажимаем «Готово» для сохранения конфигурации.
Аналогичным образом добавляются другие пользователи, которые могут удаленно подключаться к серверу с Windows Server 2012.
Базовая настройка Windows Server 2012 R2 завершена.
В Windows Server 2012 появилось централизованное управление всеми ролями и службами на одном и более сервере из единой системы управления — Диспетчере Серверов (Server Manager) входящей в комплект Средства удаленного администрирования сервера. В серверной ОС диспетчер серверов предустановлен, но в клиентских Windows 8 и выше, не зависимо от редакции, это средство отсутствует.

Диспетчер серверов выглядит следующим образом. Ошибки запуска или в работе служб, ожидание перезагрузки и другие важные моменты выделены красным цветом.
Для установки Диспетчера Серверов требуется скачать Средства удаленного администрирования сервера для Windows 8 (Remote Server Administration Tools) с официального сайта Microsoft — http://www.microsoft.com/ru-ru/download/details.aspx?id=28972
Запуск производится из %windir%system32ServerManager.exe или по ярлыку из меню пуск.
Для добавления Windows Server 2012 к Диспетчеру Серверов нужно на сервере (или группе серверов) настроить разрешения подключения к WinRM (Windows Remote Management).
|
winrm quickconfig winrm e winrm/config/listener winrm get winrm/config winrm set winrm/config/service/auth @{Basic=«true»} winrm set winrm/config/service @{AllowUnencrypted=«true»} winrm set winrm/config/service @{TrustedHosts=«host1, host2, host3»} winrm set winrm/config/client/auth @{Basic=«true»} winrm set winrm/config/client @{AllowUnencrypted=«true»} winrm set winrm/config/client @{TrustedHosts=«host1, host2, host3»} |
Basic=»true» — разрешение подключения к сервису посредством базовой аутентификации строчными логином и паролем.
AllowUnencrypted=»true» — разрешить нешифрованные подключения.
TrustedHosts=»host1, host2, host3″ — доверенные хосты, допущенные к подключению. Сюда следует вписать ip и желательно DNS-имена.
В Брандмауэре должно присутствовать разрешение подключения к портам 5985 для http и 5986 для https.
Проверить подключение и решить проблемы в следствии которых не происходит подключение можно командой:
|
winrm identify -r:http://winrm_server:5985 -auth:basic -u:user_name -p:password -encoding:utf-8 |
Рассказать:
А вы пользуетесь Server Manager? Server Manager появился в операционной системе Windows Server 2008. Однако, в версии Windows Server 2012 внешний вид Server Manager был радикально изменён. Когда я иногда обращал на него внимания, то не понимал, как такая разноцветная программа может управлять чем-то на сервере, то есть с точки зрения моего мозга, привыкшего к серости серверных операционок Server Manager казался несерьезной побрякушкой. Я не понимал, что Server Manager под Windows Server 2012 – это потомок Server Manager под Windows Server 2008

В принципе не мудрено запутаться, ведь привычная древовидная структура, в виде которой были представлены все роли, фичи, логи и т.д. были заменены на простой список ролей в левой части окна. Лишь через полгода после первой встречи с Server Manager на Windows Server 2012, я начал понимать, что эта программа может служить не только для добавления ролей, консолей и фич. Оказывается, благодаря Server Manager можно держать под контролем всю серверную (и не только) инфраструктуру организации. Даже не представляю, как раньше я обходился без этого менеджера.
Прозрение по поводу полезности сервер менеджера пришло ко мне после настройки RDS. Там четко указывалось, что настройку нескольких серверов надо производить с одного сервера. Я сразу оценил удобство, не надо ходить с одного сервера на другой, а можно установить все роли тут же с одного сервера, просто запуская процессы на остальных, даже не видя их рабочие столы и это с использованием GUI, а не Powershell. Затем я заметил, что в разделе Dashboard отображаются проблемы, которые есть на сервере, при этом если в Server Manager добавить несколько серверов, то отображаются уведомления со всех серверов. 
Кроме всего прочего, после установки RSAT на Windows 8, Server Manager доступен и здесь. Я решил попытаться мониторить серверы прямо с рабочего места. Добавил все серверы организации в сервер менеджер, доустановил, где это было необходимо WinRM 4. Конечно, не без проблем, но со временем в дашборде Server Manager появились уведомления о проблемах. Особенно полезным мне показалось наличие уведомлений о превышении порога нагрузки на центральный процессор и оперативную память. Тут нет возможности настроить уведомления на почту или в линк, однако, достаточно несколько раз в день заглянуть в Server Manager, чтобы быть в курсе происходящего на серверах.
О чем уведомляет Server Manager:
- необходимость перезагрузки сервера (после установки обновлений или ролей);
- ошибки в журнале событий Windows;
- службы Windows находятся в неположенном состоянии;
- превышение порога загрузки процессора и памяти;
- не соответствие рекомендациям BPA.
И всё это в одном окне. Как я уже ранее упоминал, самым полезным мне показалось возможность получать уведомление о проблемах с производительностью на сервере. Для того, чтобы получать эти уведомления, необходимо на сервере запустить счётчики производительности. Они будут сохранять показатели загрузки процессора и памяти в папку C:PerfLogs на сервере, где запущены счетчики производительности. При этом размер папки при сборе недельной статистики не превышает 50Мб.

Если на каком-то сервере возникли проблемы с производительностью, через Server Manager даже можно посмотреть, какие процессы сколько процессорного времени использовали в критический момент.

После того как Server Manager настроен, туда добавлены серверы, необходимо как-то обновлять этот список серверов. Оказалось, для того, чтобы автоматизировать этот процесс необходимо изменять XML файл, в котором хранится список управляемых серверов. Логично для этого использовать Powershell. Ниже скрипт, который по расписанию запускается каждый день пока я хожу на обед и автоматически обновляет список серверов в Server Manager.
# Импорт модуля AD для перебора всех серверов в AD
import-module activedirectory

# Закрыть Server Manager
get-process ServerManager | stop-process –force

# Объявить переменные
$adsArray = @()
$xmlArray = @()

# Список серверов, которые я не хочу видеть в Server Manager
$srvException = @( 'server-test01', ‘server-test02’)

# Расположение файла со списком серверов
$file = get-item "$env:APPDATAMicrosoftWindowsServerManagerServerList.xml"

# Сделать бекап файла
copy-item –path $file –destination $file-backup –force

# Прочитать файл со списком серверов
$xml = [xml] ( get-content $file )

# Заполнить массив серверов из AD
ForEach( $objServer IN Get-ADComputer -Filter { OperatingSystem -like "*Server*" }`
 -Properties operatingSystem ) {
    if( $srvException -notcontains $objServer.Name ) {
        $adsArray += "$( $objServer.Name).ab.ru"
    }
}

# Заполнить массив серверов из списка
for( $i=0; $i -lt @( $xml.ServerList.ServerInfo ).Length; $i++ ) {
    $xmlArray += @( $xml.ServerList.ServerInfo )[$i].Name
}

# Сравнить массивы
Compare-Object $xmlArray $adsArray
$c = Compare-Object $xmlArray $adsArray
# Добавить в список новые серверы
for( $n=0; $n -lt $c.Length; $n++ ) {
    if( $c[$n].SideIndicator -eq "=>" ) {
        $newserver = @( $xml.ServerList.ServerInfo )[0].clone()
        $newserver.name = "$( $c[$n].InputObject )"
        $newserver.lastUpdateTime = “0001-01-01T00:00:00”
        $newserver.status = “2”
        $xml.ServerList.AppendChild( $newserver )
    }
}

# Поместить список в файл
$xml.Save( $file.FullName )
# Запустить Server Manager
ServerManager.exe –WindowStyle Maximized
Вот и всё, чем я хотел поделить с миром о Server Manager. Надеюсь, и читатель найдёт полезным этот инструмент администрирования, хотя он, конечно не заменит Saqwel Remote Administration Tool.
Пока пользователи всё ещё обсуждают практичность Windows 8, администраторы взволнованы пригодностью Windows Server 2012, которая доступна либо с «плиточным» GUI, либо вообще без какого-либо графического интерфейса. Под своей оболочкой новая версия Windows Server скрывает настоящие сокровища, что можно увидеть из «трюков», которые мы рассмотрим в этой статье.
Трюк №1: Эффективное использование Диспетчера сервера (Server Manager)
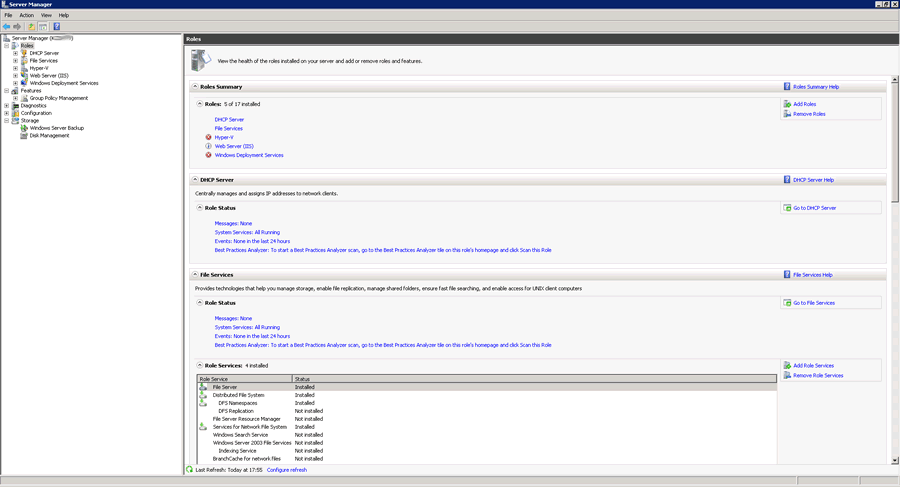
В Windows Server 2008 R2 администраторы уже частично могли управлять сетью с помощью Диспетчера сервера (Server Manager). Как бы то ни было, приложение было, честно говоря, недоразвитым. Например, в Windows Server 2008 R2 Диспетчер сервера не мог устанавливать роли по сети, и управление ролями сервера было не очень эффективным. В Windows Server 2010 этот компонент был намного улучшен. К примеру, в Windows Server 2012 Вы можете устанавливать роли сервера и их компоненты на других серверах через сеть.
Microsoft объединила мастера установки ролей сервера и мастера установки компонентов. Такой подход облегчает и ускоряет процесс, так как необходима лишь одна установка. Диспетчер сервера автоматически группирует установленные роли сервера вместе с соответствующими серверами. Он также составляет список средств управления прямо в меню Инструменты (Tools), и вы даже можете его настраивать. Для этого нужно открыть Панель Управления (Control Panel) и найти «Система и Безопасность / Администрирование» (System and Security / Administrative Tools). В Диспетчере сервера отобразятся все ссылки этой области в меню Инструменты (Tools). Здесь Вы можете добавить ещё ссылок, кое-какие удалить, а также создать структуру папок.
Чтобы использовать Диспетчер сервера в Windows Server 2012 для подключения к другим серверам, просто нажмите на «Управление» (Manage), а затем «Добавить серверы» (Add Servers). Далее в окне вы можете осуществить поиск серверов, чтобы затем управлять ими в своём Диспетчере Сервера. Таким образом, вы также можете создавать свои собственные группы серверов, которые можно объединять в Диспетчере сервера. Вы также можете просматривать сообщения о событиях для этих групп. Обратите внимание, что вы можете устанавливать роли серверов и их компоненты, только если вы уже установили соединение с соответствующим сервером.
Трюк №2: Сетевые группы
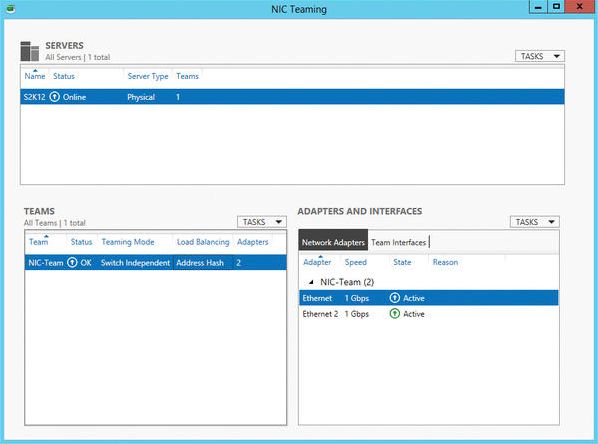
Windows Server 2012 может объединять в группы до 32 совместимых сетевых карт без как-либо дополнительных инструментов. Во время установки вы можете выбрать между использованием в группе отдельных адаптеров как запасных для улучшения доступности и объединением скоростей адаптеров для улучшения производительности. Объединять в группы возможно только соединения по локальной сети. Bluetooth и WLAN не поддерживаются. Более того, все сетевые карты должны иметь одинаковую скорость соединения.
Для создания сетевой группы запустите Диспетчер сервера и нажмите «Локальный Сервер» (Local Server). Создание сетевых групп по умолчанию отключено. Для включения данной функции нажмите на ссылку «Отключено» (Disabled). Откроется новое окно. В нём в нижнем правом углу вы можете увидеть, какие сетевые адаптеры сервера пригодны для создания сетевой группы. Для того чтобы создать группу, просто нажмите правой кнопкой мыши в окне «Адаптеры и интерфейсы» (Adapters and Interfaces) и выберите «Добавить в новую группу» (Add to New Team).
Ссылка «Свойства» (Properties) позволит вам установить дополнительные настройки для вашей сетевой группы. В Windows Server 2012 MAC-адрес первичной сети используется в качестве MAC-адреса всей группы. Центральные сервера также поддерживают сетевые группы. Вы можете создать их либо с помощью Диспетчера сервера на другом сервере, либо используя PowerShell. В PowerShell для отображения отдельных групповых адаптеров, подходящих для создания группы, вы можете использовать Get-NetAdapter, а также Enable-NetAdapter или Disable-NetAdapter для включения или отключения отдельных адаптеров.
Вы можете просмотреть полный список команд для управления сетевыми группами с помощью Get-Command -Module NetLbfo. Для создания новой группы используйте New-NetLbfoTeam <название группы> <сетевые карты>. Здесь следует ввести список сетевых карт, разделённых запятой. Windows Server 2012 удаляет привязку по IP с физических сетевых карт и привязывает их к новому виртуальному адаптеру, который создаётся мастером для всей группы. Вы можете просмотреть статус группы в Диспетчере Сервера в секции Локальный Сервер (Local Server), нажав на ссылку «Включено» (Enabled), расположенную рядом с именем сетевой группы.
Если статус группы и привязанных к ней адаптеров активен (active), то вы можете изменить настройки сети для всей группы. Для этого откройте настройки адаптера, набрав ncpa.cpl на главной странице. Вы увидите новую группу. На хосте Hyper-V Вы можете создавать многочисленные виртуальные коммутаторы в зависимости от различных физических адаптеров, а затем объединять виртуальные серверы в сетевые группы. В качестве основы они будут использовать отдельные виртуальные коммутаторы Hyper-V хоста.
Трюк №3: Контроллер виртуальных доменов — клонирование и снэпшоты
В Windows Server 2012 Microsoft оптимизировала использование контроллеров виртуальных доменов.
По сравнению с предыдущими версиями, снэпшоты и клонированные контроллеры доменов больше не представляют никакой опасности всей службе каталогов Active Directory. Для оптимальной виртуализации и клонирования ваших контроллеров доменов, должны быть выполнены как минимум следующие условия:
- PDC эмулятор должен находиться на контроллере доменов с Windows Server 2012. Вы не можете клонировать PDC эмулятор; он должен быть всегда доступен во время процесса клонирования.
- На домене должны уже находиться как минимум 2 контроллера доменов с Windows Server 2012, так как клонировать вы можете только второй домен. Первый выступает в качестве PDC-эмулятора.
- Приложение, с помощью которого осуществляется виртуализация, должно поддерживать новую технологию (VM поколения ID). На сегодняшний день это единственный Hyper-V на Windows Server 2012.
Для того чтобы узнать, поддерживает ли ваше приложение для виртуализации новую технологию VM поколения ID, обратитесь к Диспетчеру устройств на сервере с Windows Server 2012. Драйвер для системных устройств должен быть Microsoft Hyper-V Generation Counter с файлом драйвера vmgencounter.sys.
Перед осуществлением клонирования контроллера виртуальных доменов Вам следует выполнить на сервере команду
Get-ADDCCloningExcludedApplicationList
Она проверит, присутствуют ли на виртуальном сервере приложения, которые не могут быть клонированы.
Если будут обнаружены несовместимые сервисы, например, сервис DHCP или антивирусный сканер, то выскочит уведомление.
Конфигурация для клонирования создаётся в файле DCCloneConfig.xml. Файл-пример, SampleDCCloneConfig.xml, находится в C:WindowsSystem32.
После того, как файл DCCloneConfig.xml был создан, вы можете скопировать его в папку с базой данных Active Directory, которая обычно находится в C:WindowsNTDS. Вы можете клонировать только контроллеры исходных доменов, которые входят в группу Клонируемые котроллеры доменов (Clonable domain controllers) в Active Directory. Вы также можете клонировать только те контроллеры доменов, которые не включены. То есть, вам следует отключить нужный контроллер перед его клонированием.
Перед тем как добавить новый контроллер домена в Active Directory, вы должны скопировать файл DCCloneConfig.xml, заданный процессом клонирования, с исходного компьютера в папку с базой данных Active Directory — то есть, с исходного компьютера в папку C:WindowsNTDS на конечном компьютере. Windows изменяет имя файла, чтобы показать, что произошёл процесс клонирования. Поменяйте имя снова на DCCloneConfig.xml.
Далее вы можете либо создать новую виртуальную машину и использовать скопированный жёсткий диск, либо импортировать экспортированный сервер с помощью Диспетчера Hyper-V (Hyper-V Manager) или PowerShell. В процессе импортирования выберите «Копировать виртуальную машину» (Copy the virtual machine). После того, как будет запущен контроллер домена, он проанализирует файл DCCloneConfig.xml и подготовится к клонированию. Вы также получите соответствующее сообщение при запуске Windows.

Трюк №4: Изменение имени сервера, вида диспетчера сервера и IE
Многие задачи, являющиеся частью базовой конфигурации сервера, могут быть по-разному выполнены в Диспетчере сервера. Для этого нажмите на «Локальный сервер» (Local Server). На панели посередине вы увидите различные задачи, а также сможете вызвать соответствующих мастеров, нажимая на ссылки.
В меню «Вид» (View) Вы можете отключить «Плитку приветствия» (Welcome Tile); далее в «Настроить» / «Свойства Диспетчера сервера» (Manage / Server Manager Properties) включите опцию «Не запускать Диспетчер сервера автоматически при входе в систему» (Do not start Server Manager automatically at logon). Обычно для установки драйверов вам нужен Интернет. В Windows Server 2012 для Internet Explorer автоматически включена повышенная безопасность, что может помешать загрузке драйверов. Вы можете отключить этот компонент в Диспетчере сервера, выполнив следующее: откройте Диспетчер сервера и нажмите на «Локальный сервер» (Local Server), который находится с левой стороны. Нажмите на ссылку «Включено» (On), которая находится справа рядом с «Улучшенная конфигурация безопасности IE» (IE Enhanced Security Configuration) в секции «Свойства» (Properties). В появившемся диалоговом окне отключите опцию для пользователей или только администраторов.
После того, как повышенная безопасность отключена, вы можете без проблем загружать драйвера.
Трюк №5: управление Windows Server 2012 на Windows 8
Microsoft предлагает Инструменты управления удалённым сервером (Remote Server Administration Tools; RSAT) для того чтобы позволить администраторам управлять Windows Server 2012 на Windows 8. Установка данных инструментов на рабочей станции с Windows 8 предоставляет вам все инструменты администрирования, необходимые для управления Windows Server 2012.
Кроме различных инструментов для управления ролями сервера, мастер установки RSAT также добавляет в Windows 8 новый Диспетчера сервера от Windows Server 2012. С помощью этого диспетчера вы можете подсоединяться к различным серверам, на которых установлен Windows Server 2012. Также вы можете использовать Диспетчер Сервера на Windows 8 для установки ролей сервера.
В RSAT для Windows 8 входят Диспетчер сервера, инструменты управления ролями и компонентами сервера Windows Server 2012, командлеты PowerShell, а также консольные утилиты для управления ролями и компонентами. RSAT можно скачать в виде .msu-файла из Центра загрузки (Download Center). Для того, чтобы запустить Диспетчер сервера на Windows Server 2012 и Windows 8 и установить соединение с другими серверами, нажмите на «Настроить» (Manage), а затем «Добавить сервер» (Add Server). В появившемся окне вы можете осуществить поиск серверов и управлять ими в своём локальном Диспетчере сервера.
Трюк №6: центральные серверы, минимальный интерфейс сервера, GUI
Каждая установка Windows Server 2012 содержит в себе Ядро сервера (Server Core) как основу. Оно предоставляет все необходимые консольные инструменты управления, однако в нём отсутствуют какие-либо инструменты управления графикой. Для управления сервером вам необходим другой сервер, или же Инструменты управления удалённым сервером, установленные на Windows 8. Во время установки вы можете также выбрать установку режима Ядра сервера (Server Core). После завершения установки вы сможете легко установить на Windows Server 2012 инструменты управления, а также графический интерфейс.
Кроме возможности установить инструменты управления графикой на Ядра сервера, новым также является Минимальный интерфейс сервера (Minimal Server Interface). Он устанавливает все важные инструменты для управления графическим интерфейсом, но пропускает дополнительные приложения, такие как Media Player, Explorer и Internet Explorer. Также в этой опции отсутствует рабочий стол. Многие программы Панели управления и большинство инструментов администрирования ролями и компонентами сервера работают. Минимальный интерфейс сервера является средним между Ядром сервера и серверами с графическим интерфейсом.
Вы можете удалить графический интерфейс с помощью либо Диспетчера сервера, либо PowerShell. В Диспетчере сервера выберите «Настроить» / «Удалить роли и компоненты» (Manage / Remove Roles and Features). На странице «Удалить компоненты» (Remove features) есть поле «Интерфейсы пользователя и инфраструктура» (User Interfaces and Infrastructure) с тремя опциями:
- «Инструменты управления графикой и инфраструктура» (Graphic Management Tools and Infrastructure). Сюда относятся консоли управления наиболее важными графическими инструментами сервера. Если установлен лишь этот компонент, и не установлена графическая оболочка для сервера, а также компоненты рабочего стола, то у вас сервер с минимальным интерфейсом.
- Рабочий стол (Desktop Experience). Данный компонент разработан специально для серверов удалённых рабочих столов. Он заменяет интерфейс сервера на интерфейс Windows 8 и предоставляет такие инструменты, как Media Player, Photo Manager, темы и др.
- Графическая оболочка сервера (Server Graphical Shell). Вы можете отключить этот компонент совместно с рабочим столом, чтобы пользоваться Минимальным интерфейсом сервера. Обратите внимание, что это также удалит Explorer (ранее Windows Explorer) и Internet Explorer. Удалить данный компонент вы также можете в PowerShell с помощью команды:
Uninstall-WindowsFeature Server-Gui-Shell
Когда вы устанавливаете Центральный сервер (Core Server), на нём также отсутствуют двоичные файлы для установки графического интерфейса. Вам потребуется либо настроить интернет-соединение на сервере для установки, чтобы загрузить нужные данные с Windows Update, либо указать путь к папке, где находятся установочные файлы Windows Server 2012.
Установку ядра сервера можно произвести в PowerShell с помощью команды
Install-WindowsFeature Server-Gui-Mgmt-Infra
либо вы можете установить соединение с сервером, находящимся в сети, с помощью Диспетчера сервера. Для установки графического интерфейса используйте следующие команды PowerShell:
Import-Module Dism
Enable-WindowsOptionalFeature -online -Featurename ServerCore-FullServer,Server-Gui-Shell,Server-Gui-Mgmt
Альтернативный вариант:
Dism /online /enable-feature /featurename:ServerCore-FullServer /featurename:Server-Gui-Shell /featurename:Server-Gui-Mgmt
Трюк №7: создание резервных копий виртуальных серверов
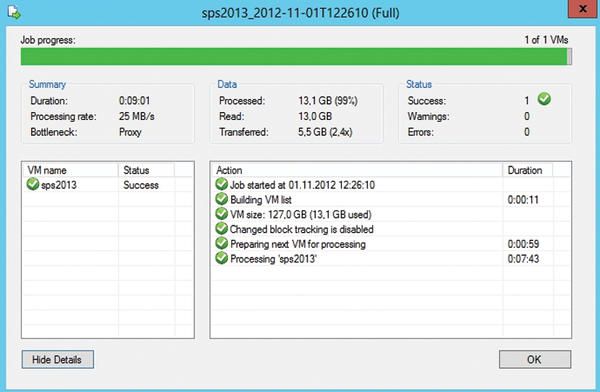
Veeam, известный поставщик инструментов для резервного копирования виртуальных серверов, предлагает бесплатную утилиту, с помощью которой вы можете анализировать процесс создания резервной копии виртуальных обменных серверов, а также восстановить отдельные объекты (восстановление элементов). Аналогичным образом вы можете создавать резервные копии и восстанавливать обычные серверы.
Основой для этой утилиты является программа Veeam Backup Free Edition. Она позволяет быстро создавать резервные копии виртуальных серверов, и не только виртуальных обменных серверов. Программа также поддерживает VMware и Microsoft Hyper-V. С помощью Veeam Backup Free Edition вы сможете даже подсоединиться к System Center Virtual Machine Manager 2008 R2/2012 и объединить Hyper-V кластеры. Если вы соедините SCVMM сервер с Veeam Backup, программа сможет автоматически просканировать все присоединенные серверы и создать резервные копии виртуальных серверов, которые на них находятся. Она создаёт резервные копии не только отдельных хостов виртуализации, но и виртуальных серверов.
Трюк №8: тестирование репликации в PowerShell
Узнать статус репликации Active Directory в PowerShell вы можете с помощью командлета:
Get-ADReplicationUpToDatenessVectorTable <имя сервера>
а просмотреть список всех серверов с помощью
Get-ADReplicationUpToDatenessVectorTable* | sort Partner,Server | ft Partner,Server,UsnFilter
Для просмотра отдельных сайтов и контроллеров доменов, размещённых на них, введите эти два командлета:
Get-ADReplicationSite XE "Get-ADReplicationSite" -Filter * | ft NameGet-ADDomainController -Filter * | ft Hostname,Site
Для того чтобы просмотреть репликационные соединения в PowerShell, используйте команду get-adreplicationconnetcion. Ещё пара интересных командлетов:
Get-ADReplicationPartnerMetadata XE "Get-ADReplicationPartnerMetadata"
Get-ADReplicationFailure XE "Get-ADReplicationFailure"Get-ADReplicationQueueOperation
Также в PowerShell вы можете получить более подробную информацию об отдельных сайтах с помощью
Get-ADReplicationSite -Filter *
Трюк №9: использование Hyper-V репликации
В Windows Server 2012 и Hyper-V Server 2012 репликации Hyper-V позволяют вам создавать копии и синхронизировать виртуальные жёсткие диски и целые виртуальные сервера асинхронно между различными Hyper-V хостами в сети без какого-либо кластера. Вы можете осуществить репликацию вручную, автоматически либо на основе расписания. Если на Hyper-V хосте произойдёт ошибка, то можно включить реплицированные серверы.
Для того чтобы сделать Hyper-V хост доступным для копирования, вам нужно сначала включить и настроить эту опцию на соответствующем сервере в меню Настройки Hyper-V / Конфигурация Репликации (Hyper-V Settings / Replication Configuration). Здесь вы указываете трафик данных и серверы, с которых данный сервер будет принимать репликации. Таким образом, вам нужно включить эту опцию на всех Hyper-V хостах.
Если вы используете Hyper-V Server 2012, вы также можете управлять этим сервером с другого сервера, используя Диспетчер Hyper-V (Hyper-V Manager), и таким же образом установить такие же настройки. Между коммерческими версиями Windows Server 2012 нет разницы. Убедитесь, что вы включили правило «Репликация Hyper-V» (Hyper-V Replica) в расширенной конфигурации файервола (wf.msc) под именем «Прослушиватель HTTP репликаций Hyper-V» (Hyper-V Replica HTTP Listener). Для HTTPS также существует прослушиватель.
Если вы хотите создать копию виртуального сервера на другом Hyper-V хосте, использующем Windows Server 2012 или Hyper-V Server 2012, то после настройки хоста нажмите правой кнопкой на нужном виртуальном сервере и выберите «Разрешить репликацию» (Enable Replication).
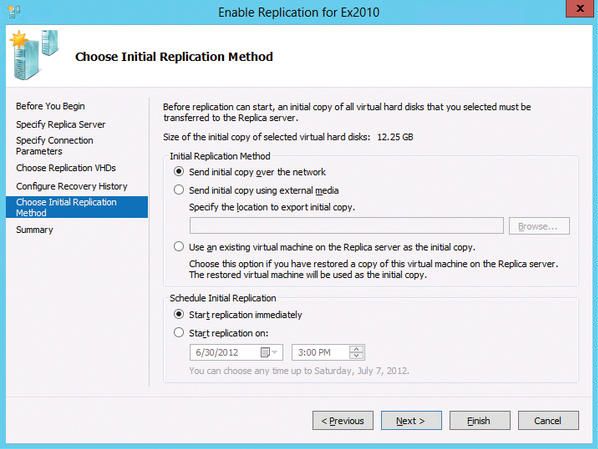
Этот шаг запускает мастера, в котором вы определяете, каким образом будет осуществляться копирование выбранного сервер с хоста-источника на целевой сервер. Виртуальный сервер на сервере-источнике останется тем же.
В мастере вам также необходимо указать целевой сервер и тип аутентификации. Какого рода аутентификацию принимает целевой сервер, определяется в настройках Hyper-V на конечном сервере (Replication Configuration). Вы также можете использовать мастера, чтобы указать виртуальные жёсткие диски для репликации. Чтобы начать процесс создания копии, вы должны разрешить правила для прослушивателя HTTP или HTTPS (в зависимости от типа трафика, который Вы хотите использовать) на конечном сервере в расширенных настройках Windows Firewall (wf.msc). Правила уже там есть, они просто не разрешены.
Трюк №10: переход на другой сервер при сбое с помощью копий Hyper-V
Преимуществом репликаций Hyper-V является то, что в случае сбоя на одном сервере, вы можете перейти на другой. Для этого нажмите на соответствующий виртуальный сервер, копию которого вы создали в Диспетчере Hyper-V, и в появившемся окне выберите Репликация / Переход в случае отказа (Replication / Failover). Вы можете также осуществить переход на другой сервер по расписанию. В этом случае переход будет осуществляться с сервера, на котором используется оригинальная виртуальная машина (VM).
Далее выберите точку восстановления, с которой вы хотите осуществить переход, а затем запустите сам переход. Это будет возможно лишь в том случае, если исходная VM выключена. Во время перехода мастер запустит скопированный сервер, который затем станет доступным по сети, как и исходная VM.
Преимуществом запланированного перехода исходного Hyper-V хоста является то, что Hyper-V может отправлять изменения, которые ещё не были скопированы на целевой сервер с целью обновления версии. После завершения планированного перехода, старая исходная VM становится новой целевой VM, а старая целевая VM — новой исходной VM для репликации. Это значит, что вы также можете повернуть процесс в обратную сторону.
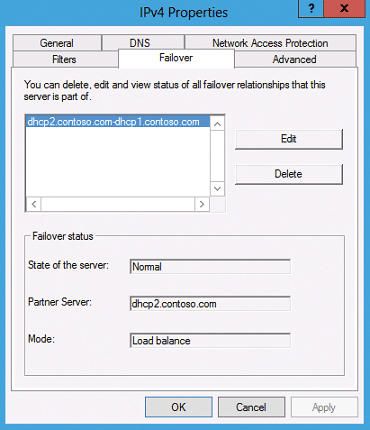
Трюк №11: настройка DHCP для перехода на другой сервер
Функция обеспечения отказоустойчивости DHCP в Windows Server 2012 позволяется размещать отказоустойчивые структуры DHCP-сервера без какого-либо кластера. Данная функция поддерживает два сервера с IPv4 конфигурациями. Эти серверы могут также входить в рабочую группу; быть частью домена не обязательно.
Функция обеспечения отказоустойчивости DHCP позволяет вам указать два IP-адреса DHCP-серверов и настроить конфигурации в одной подсети или в одном диапазоне. Эта информация дублируется на двух DHCP-серверах. Также возможна настройка перехода на другой сервер для балансировки нагрузки, при которой запросы клиента будут распределяться между двумя серверами.
Откройте DHCP консоль на DHCP-сервере, нажмите правой кнопкой мыши на область DHCP, куда вы хотите переходить в случае отказа, а затем выберите «Настроить переход в случае отказа» (Configure Failover). На второй странице введите адрес сервера-партнёра (Partner Server) и нажмите «Далее» (Next). Вы также можете назначить общий секретный ключ для данной связи для перехода. Вы можете выбрать режим, в котором будет осуществляться отказоустойчивость: либо «балансировка нагрузки» (load balancing), либо «горячее резервирование» (hot standby). По умолчанию, выбран режим «балансировка нагрузки». Это значит, что запросы будут распределяться по двум серверам. После того, как вы завершили установку, вы можете просмотреть переход в закладке «Переход в случае отказа» в окне «Свойства IP-диапазона».
Трюк № 12: предоставление iSCSI-целей с помощью виртуальных жёстких дисков
Windows Server 2012 может не просто достигать iSCSI-целей, но также предоставлять виртуальные диски для использования в качестве iSCSI-целей в сети. Для этого вы должны установить в Диспетчере сервера роль «Целевой сервер iSCSI» (iSCSI Target Server) с помощью следующих операций: «Настройка» / «Добавить роли и компоненты» / «Файловые службы и службы хранения» / «Файловые службы и службы iSCSI» (Manage / Add Roles and Features / File and Storage Services / File and iSCSI Services).
После установки роли сервера, вы можете создать виртуальные диски, которые могут быть использованы в сети как iSCSI цели, выбрав в Диспетчере сервера «Файловые службы и службы хранения» / iSCSI (File and Storage Services / iSCSI). С помощью мастера, как, впрочем, и Диспетчера сервера, вы также можете создать виртуальные iSCSI-цели на других серверах сети. Для корректной работы на соответствующем сервере должен быть установлен сервис роли целевого сервера iSCSI.
В процессе данной установки вы можете задавать размер и расположение VHD(s) файла. Кроме того, с помощью мастера вы можете контролировать доступ к iSCSI-цели. Также вы можете использовать iSCSI-цель для предоставления большого количества виртуальных iSCSI-дисков. После их создания, вы можете использовать контекстное меню, чтобы изменить их настройки.
Томас ДЖУС (Thomas Joos)
Windows Server 2012 — Overview
Windows Server 2012 codenamed Windows Server 8 is the most recent version of the operating system from Microsoft regarding server management. But it is not the last one, as the last one is Windows Server 2016. Officially it was released on August 1st, 2012 and is being sold as a commercial version only.

Improvements in Windows Server 2012
The major Improvements on this version are as follows −
-
It is ready to be integrated with cloud systems and it still can maintain the classic features of local datacenters as a result Hyper-V Virtualization has new features Hyper-v replicas, it allows you to create virtual machines replications between clusters and storage systems.
-
The Storage migration virtual disks can be moved to different physical storages, Virtual machine snapshots, virtual machines can be deleted from the Hyper-v and also from the virtual disks and it can be used directly without the need to shut down the virtual machine.
-
The Core server installation easily switches to GUI installation without the need of reinstallation.
-
The file server and storage service improvement is that it eliminates identical copies in the same volumes as such and saves space.
-
The Storage pools and storage spaces allows you to group the hard disks to one or more storage pools then it allows to create virtual disks. It can add other disks to the storage pools and make available to the users without impacting them.
-
The iSCSI Target Server can offer block storage to other servers and applications on the network using the iSCSI standard.
-
Active Directory cloning can deploy additional domain controllers by cloning an existing virtual domain controller.
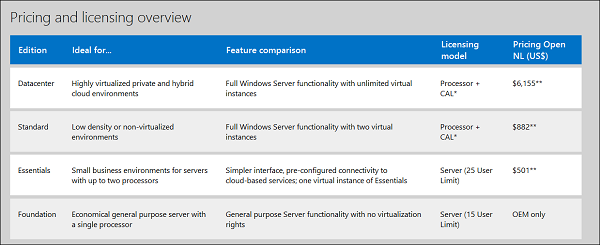
The Windows Server 2012 has four editions: Foundation, Essentials, Standard and Datacenter. Each one of them has their own limitation accept the Datacenter version which is also the most expensive one.
The following table will show what is the right one for your business needs −
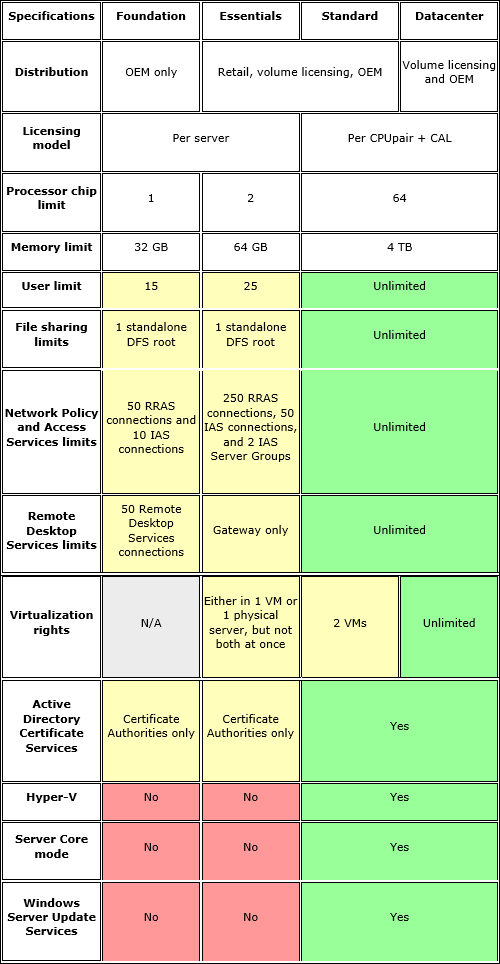
For finding out the cost of licensing you can click on the following link − https://www.microsoft.com/en-us/server-cloud/products/windows-server-2012-r2/purchasing.aspx
Windows Server 2012 — Installation
In this chapter, we will discuss regarding the requirements and prerequisites of the Windows Server 2012.
System Requirements
Although most of the servers nowadays probably have the necessary requirements for Windows Server 2012. It will certainly be useful to know them in case you want to upgrade from an older system.
The main requirements are −
-
CPU socket minimum 1.4 GHz (64-bit processor) or faster for single core and Microsoft recommends is 3.1 GHz (64-bit processor) or faster multi-core.
-
RAM memory minimum is 2GB, but Microsoft recommends 8GB.
-
160 GB hard disk with a 60 GB system partition space in your hard disk.
One important thing to note here is that the installation process itself will verify your computer hardware and let you know if it qualifies for a Windows Server 2012 installation. If not, then you will need to upgrade your hardware.
Installation
The following steps are to be adhered for the installation of Windows Server 2012.
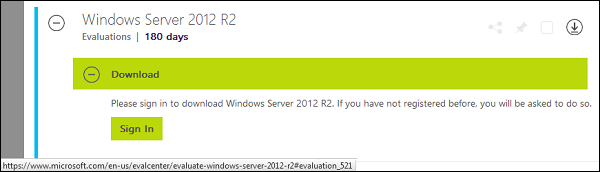
Step 1 − We can download the evaluation ISO of Windows Server 2012 R2 from the following link − https://www.microsoft.com/en-us/evalcenter/evaluate-windows-server-2012-r2
But you will need to sign in first with a Microsoft account like Hotmail for example in order to complete the download and the good thing is that the evaluation period will last for 180 days, so you will have enough time to know if it will be the right product for you or not.
At the end, if you decide to buy the license of your Windows server 2012 R2. You can purchase it online via a Microsoft online store found in − https://www.microsoftstore.com/store/msusa/en_US/list/Windows-Server/categoryID.70676900?icid=BusinessR_Software_80_Windows_Server_112315
For the Enterprise solution, I would recommend to purchase it via a Microsoft partner that is found in your country.
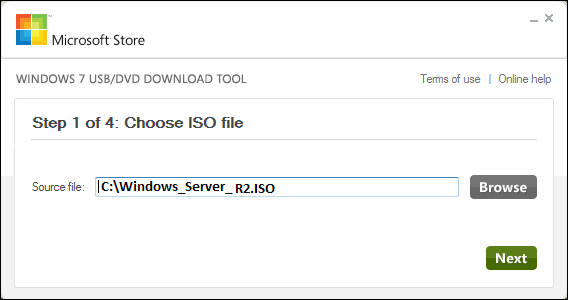
Step 2 − After downloading the ISO of Microsoft, create a boot USB driver which can be created with the Microsoft tool called Windows USB/DVD Download Tool and can be downloaded from the following link − https://www.microsoft.com/en-us/download/windows-usb-dvd-download-tool
After downloading the EXE file, open it and select the ISO file location and then click next like in the following screenshot, and wait up to the end when the Boot USB is created.
Step 3 − After completing the above given steps, plug-in the USB to the server and wait for a while till it loads the files. This will continue for about a couple of minutes as shown in the following screenshot.
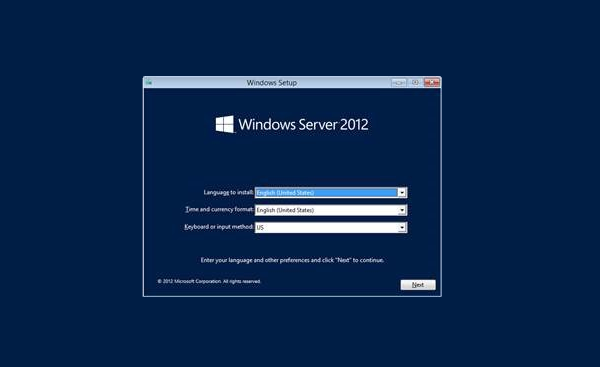
Step 4 − After the files are loaded, you will see the screen of language settings of installation, keyboard, time and currency format. Generally, all the default ones are also good enough to start with. Click Next.
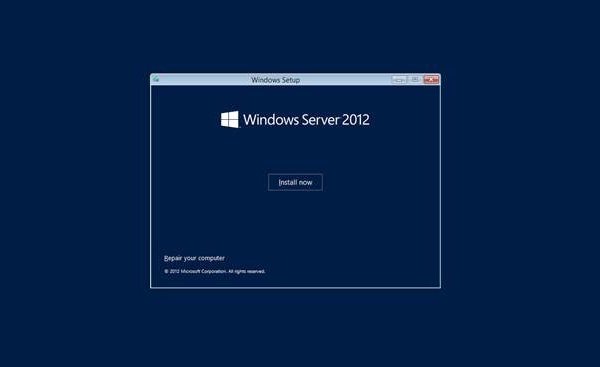
Step 5 − Click “Install now”.
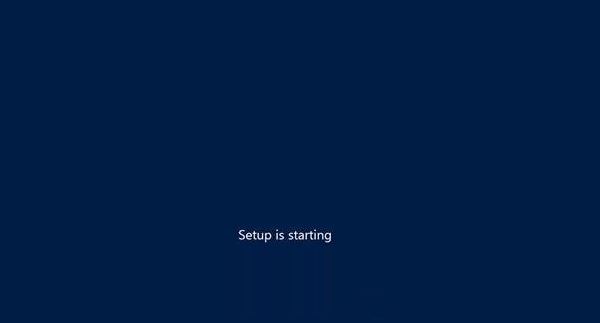
Step 6 − Once you have clicked on Install Now, the setup will start and it will load all the files and the screen will look as shown in the following screenshot.
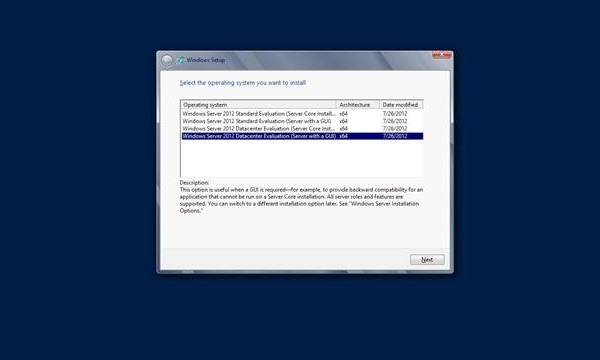
Step 7 − Wait until the files are loaded and then you will see the following screen. Let’s select Windows Server 2012 DataCenter Evaluation (Server with GUI) and click Next.
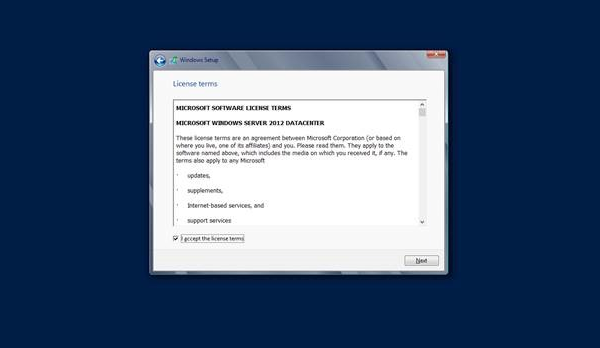
Step 8 − Click “I accept the license terms” and then click on the Next button as shown in the following screenshot.
Step 9 − The following screen will appear. In “Driver Options” you can create a new partition, delete or format the Hard disk. After you have done this process then you can select the partition where the Windows server 2012 R2 will be installed in our case we have one partition. Once all this is done, then click on Next.

Step 10 − Let’s wait until this process finishes during this time and then the server will reboot.
Step 11 − Once the reboot is done the following screen will appear. Set the password for the server and then click on “Finish”.
Step 12 − It will take some minutes until the setup finishes completely.
Step 13 − Once all this is done, you have completed the installation process and the following screen will appear.
Congratulations!!!
Windows Server 2012 — Server Roles
Like the previous version, Windows Server 2012 has the following roles which can be used and in the subsequent chapter, we will see how to install and configure the most important ones.
The following picture shows all the roles. A small reminder! — Roles and Features are the tools that you need to install or activate in order to complete your IT Administration duties, without their installation you cannot do anything.

To add a role in the server we should adhere to the following steps −
Step 1 − Click with the mouse on Server Manager which is found in the task bar as shown in the following screenshot.
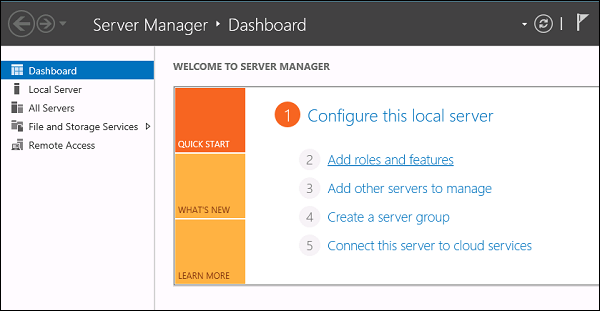
Step 2 − After opening the “Server Manager”, click on the second option “Add roles and features”.
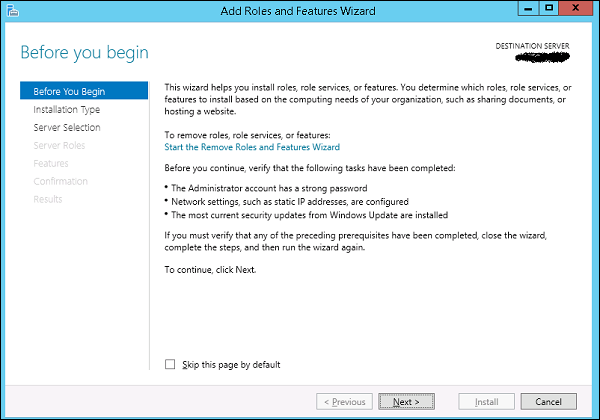
Step 3 − The following screen will appear, then you can Click on the Next button.
Step 4 − Select the Role-based or feature-based installation and then click on the Next button.

In the next screen that appears, you will have the following two options −
Option 1 − Select a server from the server pool. This option is – if you want to install the services in the physical server like being done in the following screenshot.
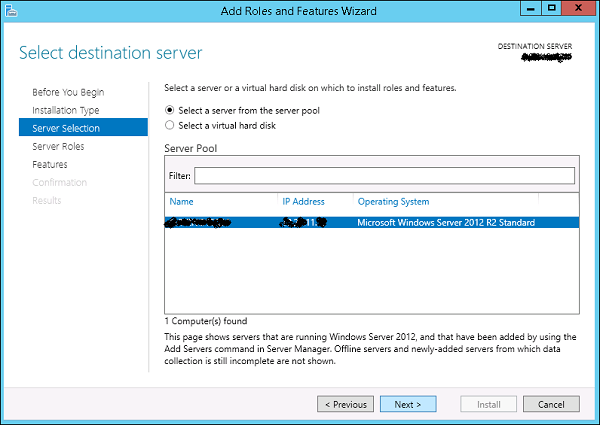
Option 2 − Select a virtual Hard disk if you want to install the services in a virtual disk that can be somewhere in the network storage. Take a look at the following screenshot for better understanding.
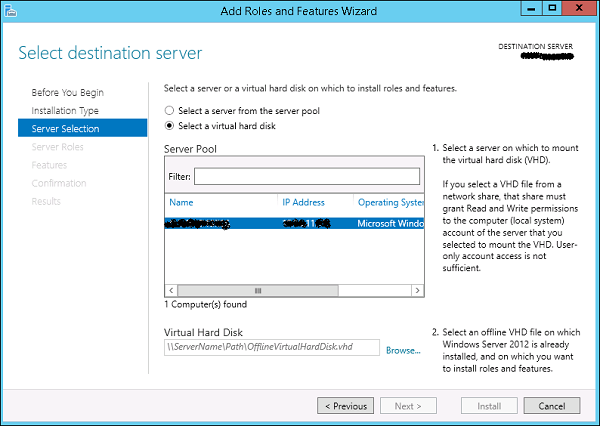
Step 5 − The last step will be to check the service that you want to install, but in the upcoming chapters we will continue this setup for each and every important services.
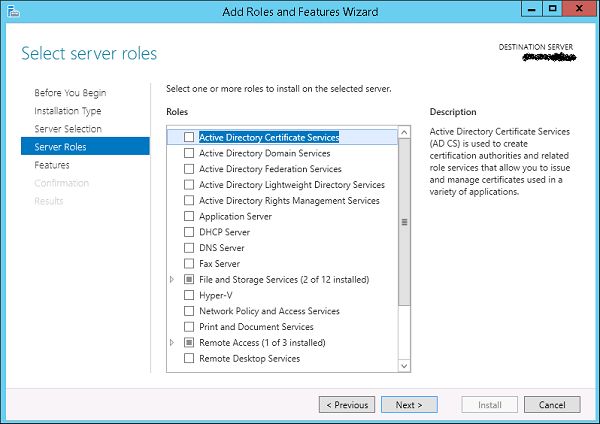
Windows Server 2012 — PowerShell
Windows PowerShell is a command-line shell and scripting language designed especially for system administration. It’s analogue in Linux is called as Bash Scripting. Built on the .NET Framework, Windows PowerShell helps IT professionals to control and automate the administration of the Windows operating system and applications that run on Windows Server environment.
Windows PowerShell commands, called cmdlets, let you manage the computers from the command line. Windows PowerShell providers let you access data stores, such as the Registry and Certificate Store, as easily as you access the file system.
In addition, Windows PowerShell has a rich expression parser and a fully developed scripting language. So in simple words you can complete all the tasks that you do with GUI and much more.
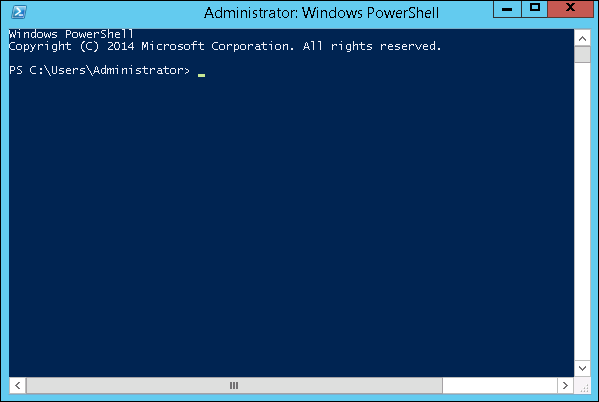
PowerShell Icon can be found in the task bar and in the start menu. Just by clicking on the icon, it will open.
![]()
To open it, just click on the icon and then the following screen will open and it means that PowerShell is ready for you to work on.
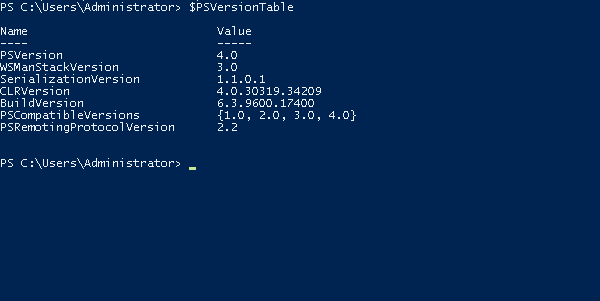
The latest version of PowerShell is 5.0 and to check what is installed in our server we type the following command – :$PSVersionTable as shown in the following screenshot and from the screen we also know that we have PSVersion 4.0
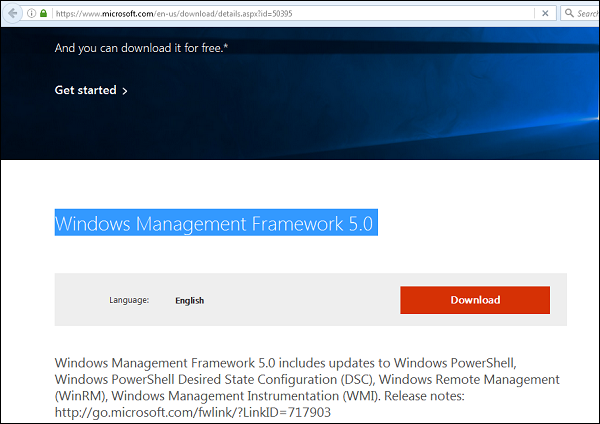
To update with the latest version where it has more Cmdlets we have to download Windows Management Framework 5.0 from the following link − https://www.microsoft.com/en-us/download/details.aspx?id=50395 and install it.
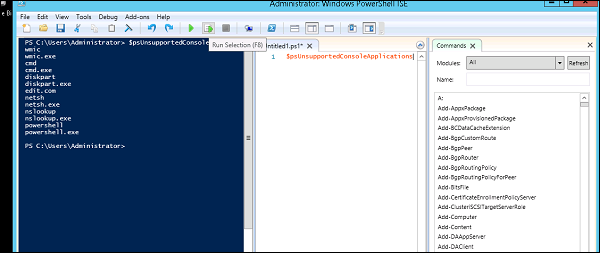
PowerShell ISE
The Windows PowerShell Integrated Scripting Environment (ISE) is a host application for Windows PowerShell. In Windows PowerShell ISE, you can run commands and write, test, and debug scripts in a single Windows-based graphic user interface with multiline editing, tab completion, syntax coloring, selective execution, context-sensitive help, and support for right-to-left languages.
You can use menu items and keyboard shortcuts to perform many of the same tasks that you would perform in the Windows PowerShell console. For example, when you debug a script in the Windows PowerShell ISE, to set a line breakpoint in a script, right-click the line of code, and then click Toggle Breakpoint.
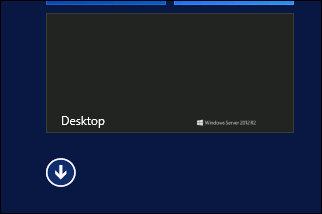
To open it you just go to Start – Search and then Type – PowerShell as shown in the following screenshot.

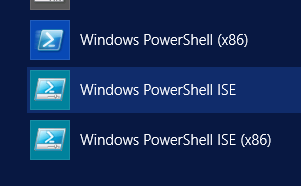
Then click on Windows PowerShell ISE. Or click on the downward Arrow as shown in the following screenshot.
It will list all the applications installed on the server and then click on Windows PowerShell ISE.
The following table will be open −
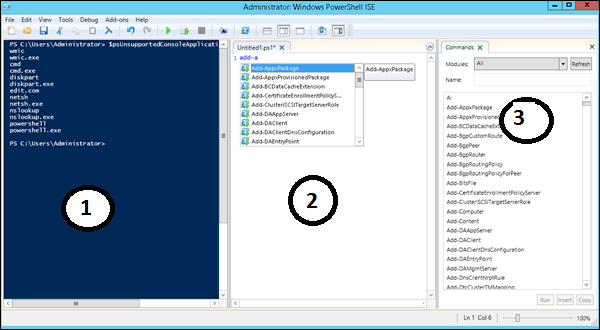
It has three sections, which include – The PowerShell Console with number 1, then Scripting File number 2 and the third is the Command Module where you can find the module.
While creating the script you can run directly and see the result like the following example −
PowerShell Basic Commands
There are a lot of PowerShell commands and it is very difficult to put in all these commands in this tutorial, we will focus on some of the most important as well as basic commands of PowerShell.
The first step is to go to the Get-Help command which gives you an explanation about how to give a command and its parameter.

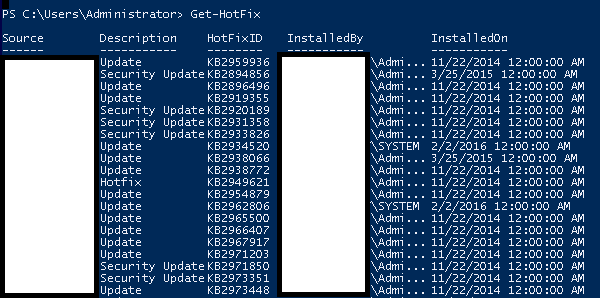
To get the list of Updates −
- Get-HotFix and to install a hot fix as follows
- Get-HotFix -id kb2741530
Remote Management
Remote Management Service is one of the most important part pertaining to administration of Windows Server 2012. Administration of servers is performed through Windows Management Instrumentation. WMI instructions can be sent over network WinRM “Remote Management”.
By default this utility is enabled, you can check it by going to Server Manager → then click on Local Server as shown in the following screenshot.
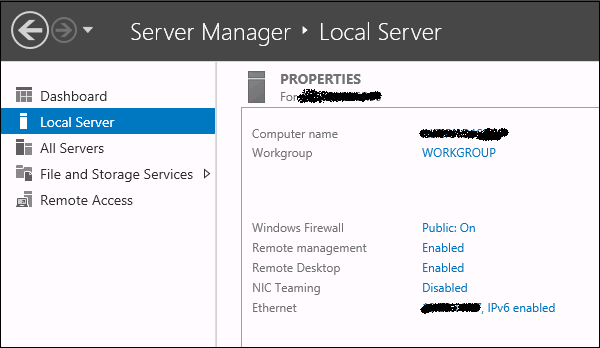
If in case it is disabled, you can enable it by Opening PowerShell and then typing EnablePSRemoting as shown in the screenshot given below.
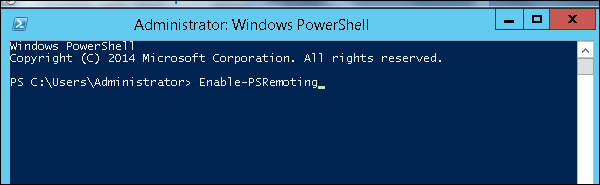
There is another way to enable it – Click on “Server Manager” → Local Server, then ENABLE Remote management.
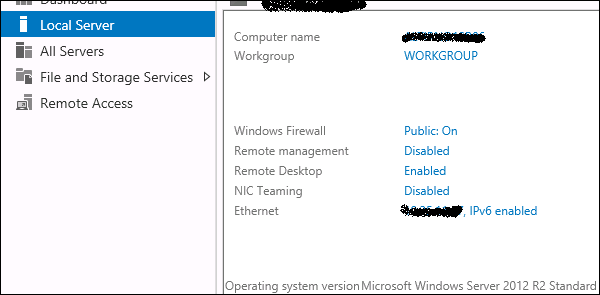
Adding a Server for Remote Management
To add other servers for remote management, follow the steps given below −
Step 1 − Server Manager → Dashboard → Add other servers to manage.
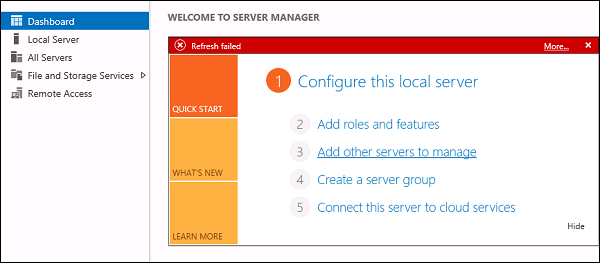
Step 2 − If the servers are joined to the domain, you add the select option “Active Directory“, in my case they are not joined, so I selected the second option “DNS” → In the search Box, I added the IP of the server that has to be managed → click on a small arrow → OK.
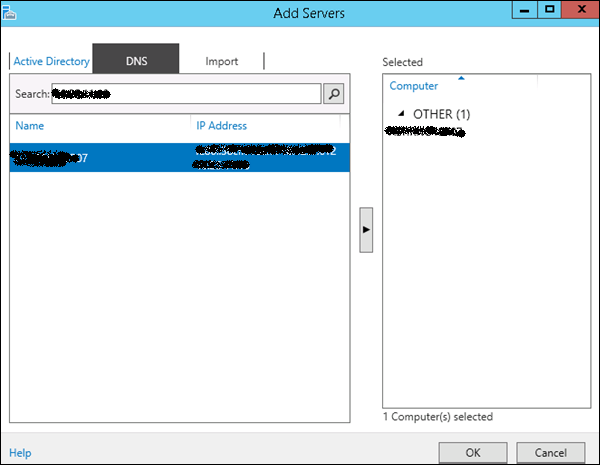
Step 3 − Go to Server Manager → All Servers, you will see the server that you have added. As my server is in the Work Group, I have to right click and click on – “Manage As” as shown in the following screenshot.
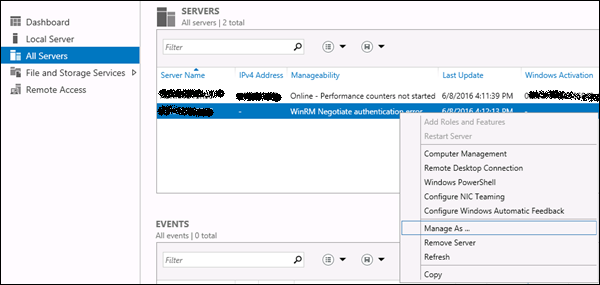
Step 4 − Enter the credentials of the remote server as follows and then → OK.
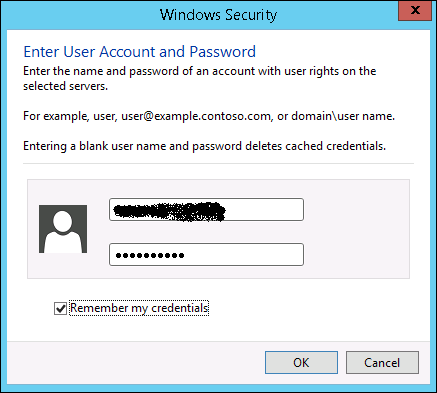
To remove a managed server, Right Click on server → Remove Server.
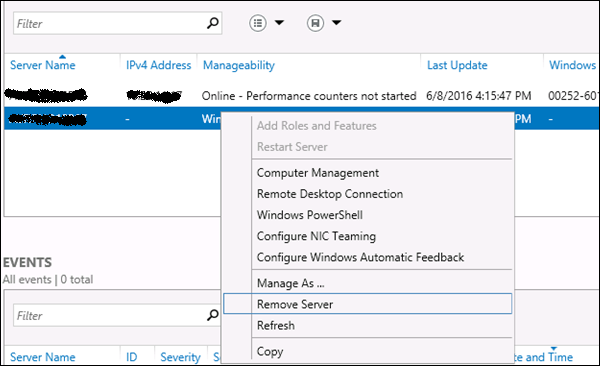
Windows Server 2012 — Windows Firewall
The Windows Firewall with Advanced Security is a firewall that runs on the Windows Server 2012 and is turned on by default. The Firewall settings within Windows Server 2012 are managed from within the Windows Firewall Microsoft Management Console. To set Firewall settings perform the following steps −
Step 1 − Click on the Server Manager from the task bar → Click the Tools menu and select Windows Firewall with Advanced Security.
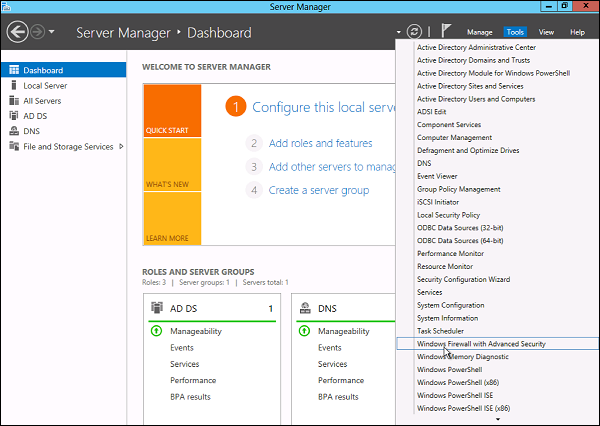
Step 2 − To see the current configuration settings by selecting Windows Firewall Properties from the MMC. This allows access to modify the settings for each of the three firewall profiles, which are – Domain, Private and Public and IPsec settings.
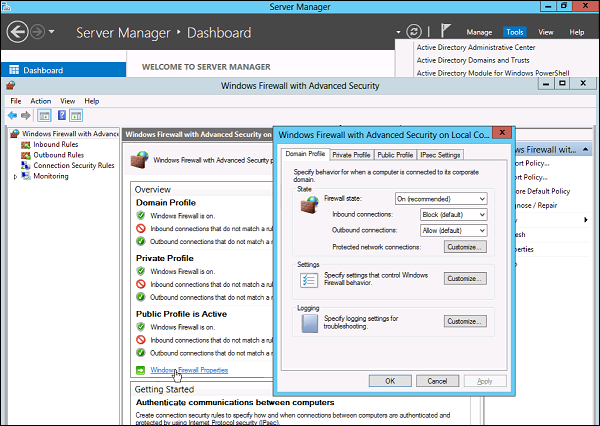
Step 3 − Applying custom rules, which will include the following two steps −
-
Select either Inbound Rules or Outbound Rules under Windows Firewall with Advanced Security on the left side of the management console. (As you Know outbound traffic is the traffic generated from server towards the internet and inbound traffic is vice versa). The rules that are currently enabled are denoted by green checkbox icon, while disabled rules display a grey checkbox icon.
-
Right-clicking a rule will allow you toggle enable/disable.
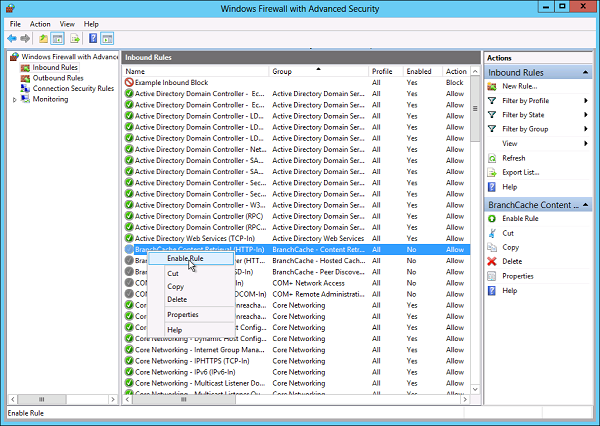
How to Create a New Firewall Rule?
To create a new Firewall Rule, you have to adhere to the following steps −
Step 1 − From the right side of either the Inbound Rules or Outbound Rules – click “New Rule”.
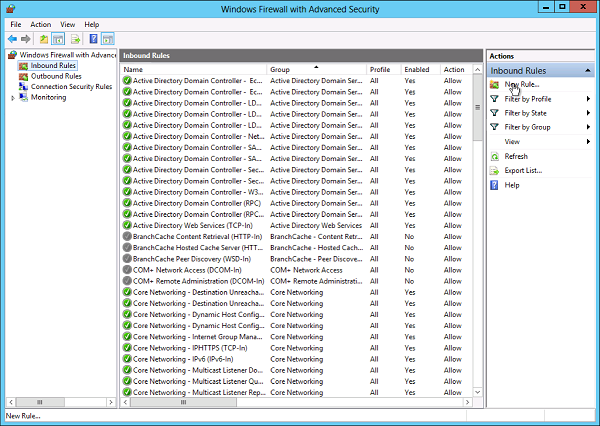
Step 2 − Custom from the Rule Type radial button → click Next.
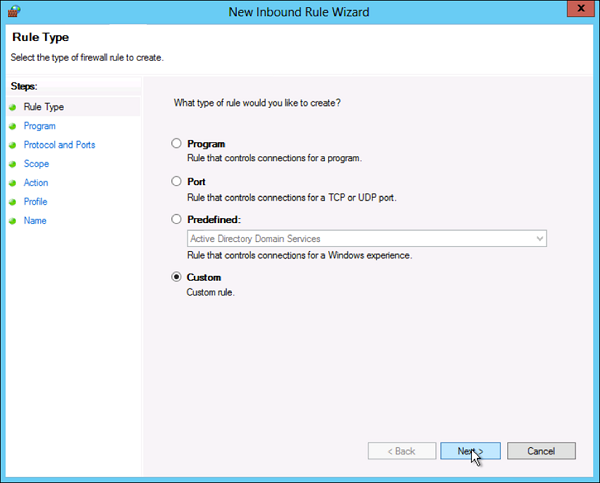
Step 3 − Select the Program association for the Custom Firewall Rule as either All programs or the path to a program → click Next.
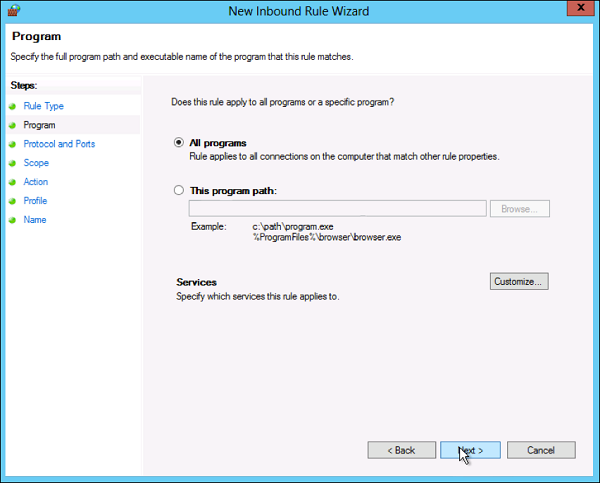
Step 4 − Protocol type field select the protocol type → click Next.
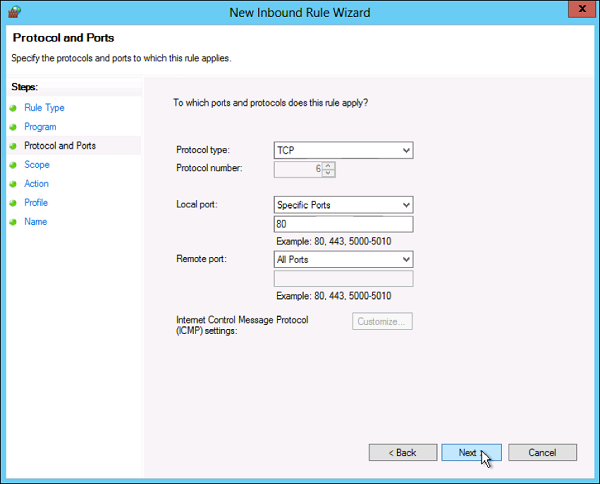
Step 5 − Select an IP address association for both local and remote addresses → click Next.

Step 6 − Select an action to take on matching traffic → click Next.
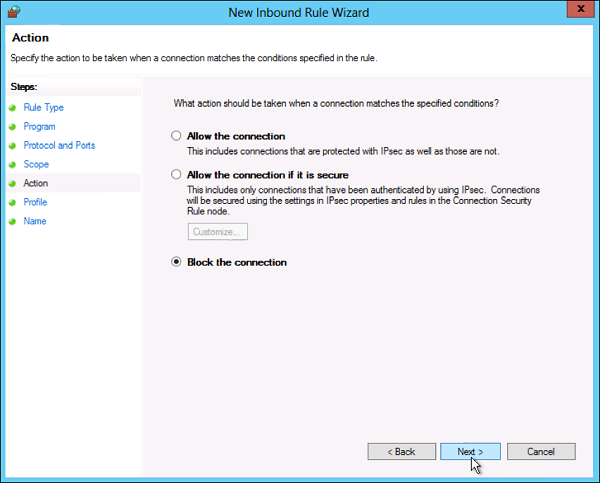
Step 7 − Select the profiles associated with the custom rule → click Next.
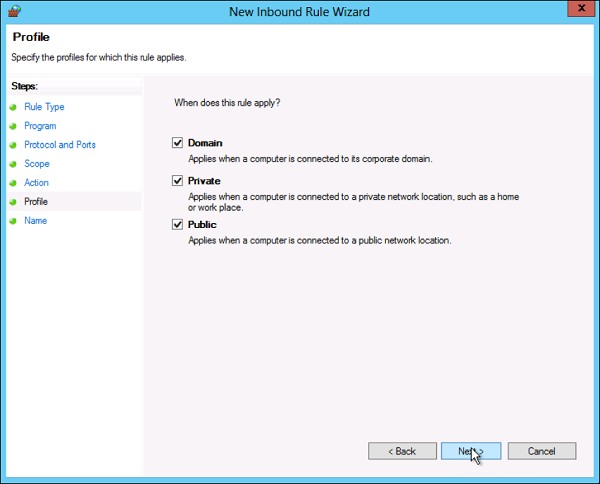
Step 8 − Put a name for your Firewall rule and an optional description → Finish.
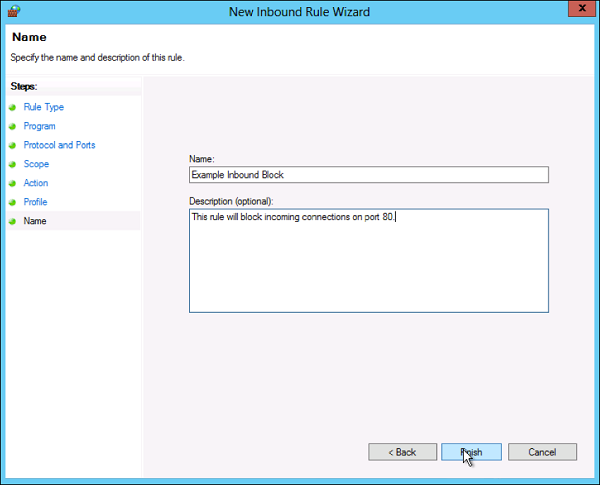
Step 9 − The firewall rule can be found on the corresponding Rule tab, either inbound or outbound depending on the type created. To disable or delete the rule find the rule in the MMC, right-click it and select either Disable Rule or Delete.
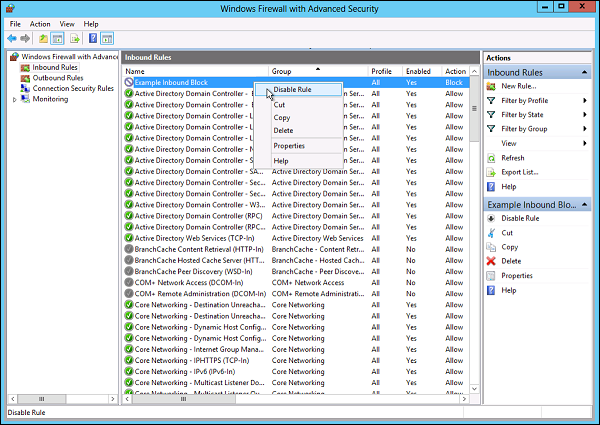
Remote Desktop Management
In this chapter, we will see how to enable remote desktop application. It is important because this enables us to work remotely on the server. To do this, we have the following two options. For the first option, we have to follow the steps given below.
Step 1 − Go to Start → right click “This PC” → Properties.
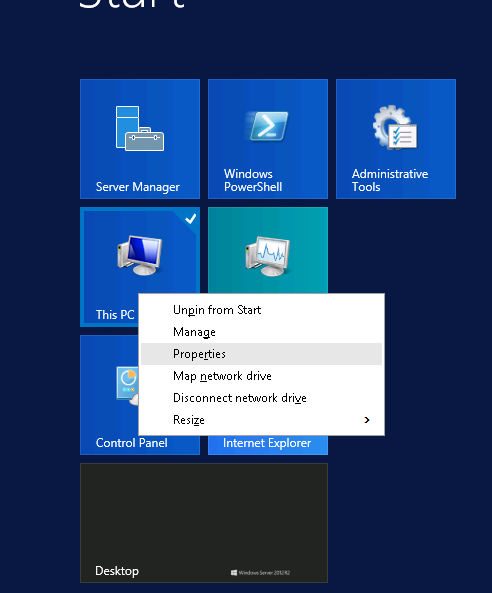
Step 2 − On Left side click “Remote Setting”.
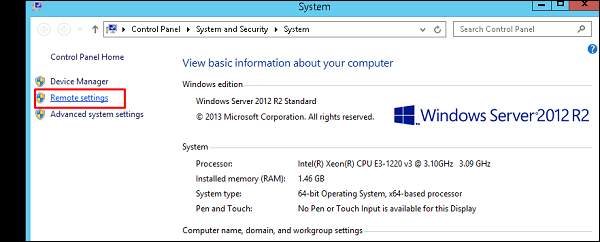
Step 3 − Check radio button “Allow Remote connection to this computer” and Check box “Allow connection only from computers running Remote Desktop with Network Level Authentication (recommended)” → click “Select Users”.
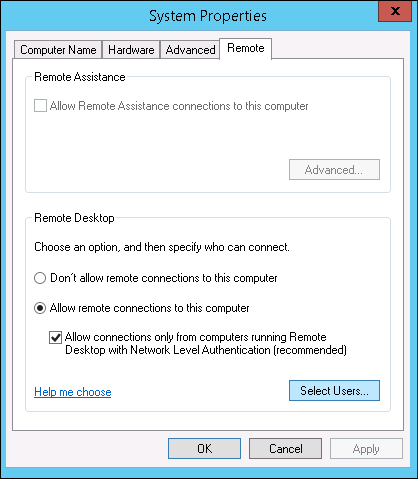
Step 4 − Click Add.
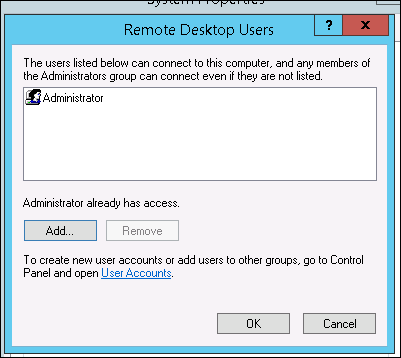
Step 5 − Type user that you want to allow access. In my case, it is administrator → click OK.
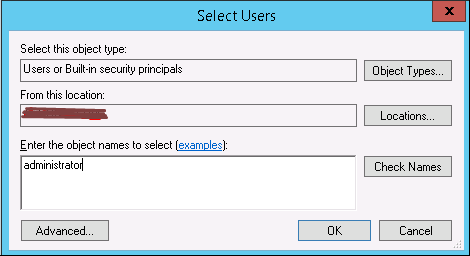
For the second option, we need to follow the steps given below.
Step 1 − Click on “Server Manage” → Local Server → click on “Enable” or Disable, if it is Disabled.
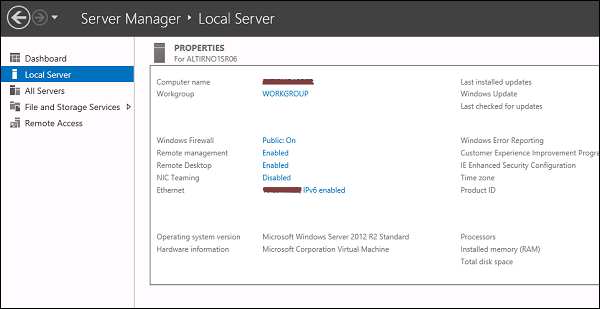
Windows Server 2012 — Resource Monitor
Resource Monitor is a great tool to identify which program/service is using resources like program, applications, network connection and memory usages.
To open Resource Monitor, go to Server Manage → Tools.
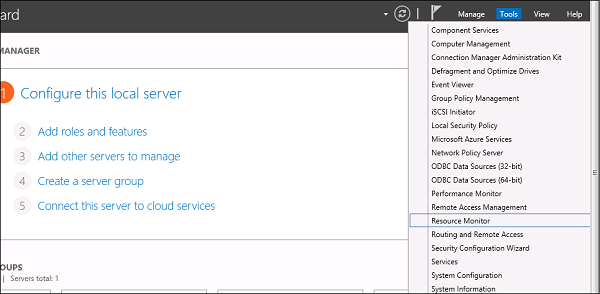
Click on “Resource Monitor”, the First Section is “Overview”. It tells how much CPU is consuming every application and on the right side of the table, it monitors in real time the chart of CPU usage. The Memory tells how much memory every application is consuming and in the right side of the table it is being monitored in real time in the chart of CPU usage.
The Disk tab splits it by the different hard drives. This will show the current Disk I/O and will show the disk usage per process. The network tab will show the processes and their network bytes sent and received. It will also show the current TCP connections and what ports are currently listening, IDs too.
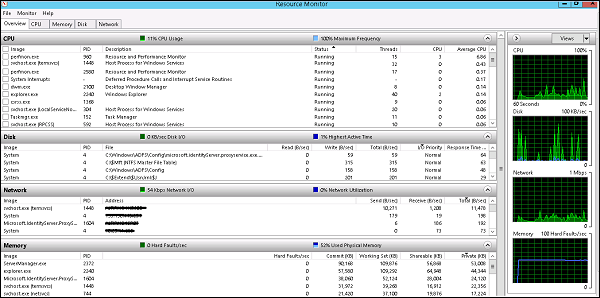
Windows Server 2012 — Active Directory
In this chapter, we will see how to Install Active Directory in Windows Server 2012 R2. Many of us who have worked with the previous version run DCPROMO.EXE to install it, but in the 2012 version, it is recommended by Microsoft not to use it anymore.
To continue with Installation follow the steps given below.
Step 1 − Go to “Server Manager” → Manage → Add Roles and Feature.
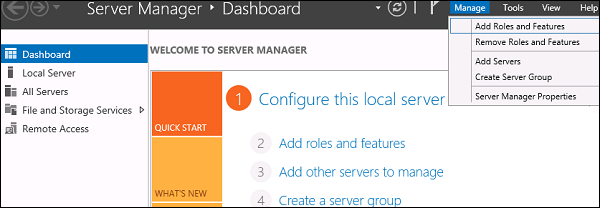
Step 2 − Click the Next button.
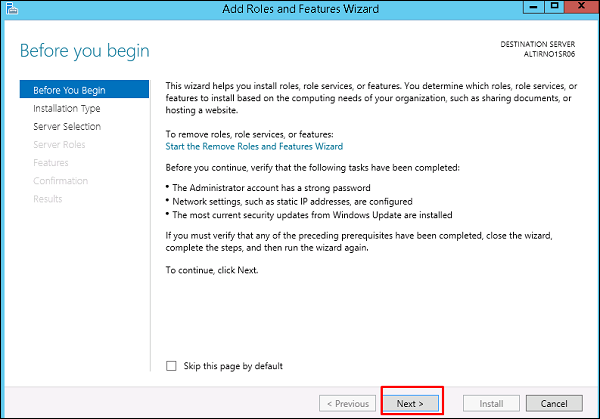
Step 3 − As we are installing AAD on this machine, we will select “Role-based or featurebased Installation” → Next.
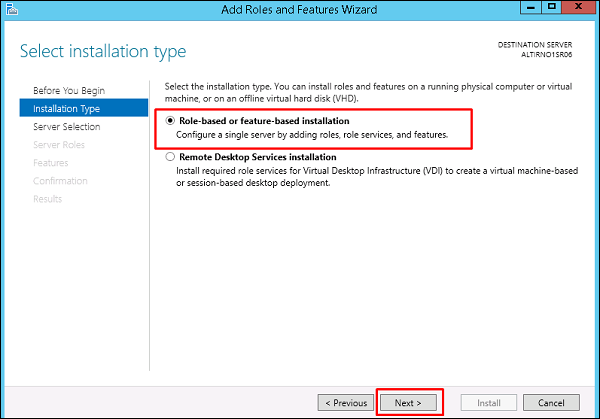
Step 4 − Click on “Select a server from the server pool”, this is the case when it will be installed locally.
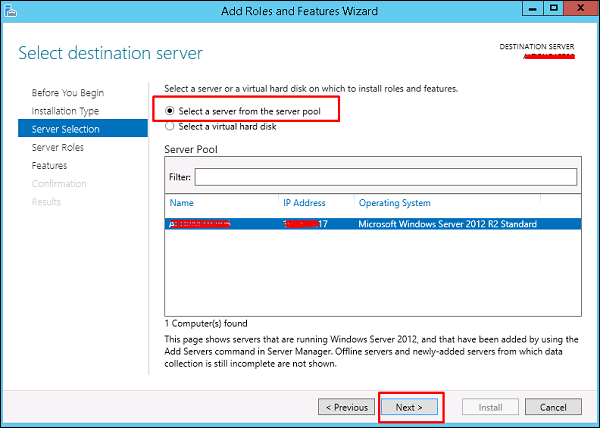
Step 5 − Check mark in the box next to Active Directory Domain Services. A box will be explaining additional roles services or features which are also required to install domain services.
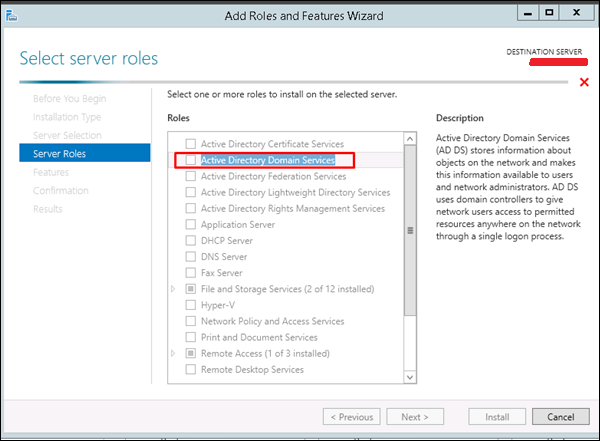
Step 6 − Click Add Features.
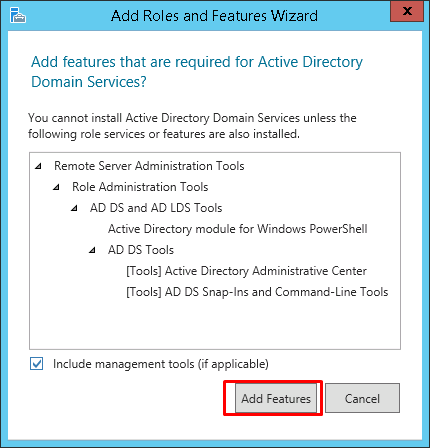
Step 7 − Check “Group Policy Management” → Next.
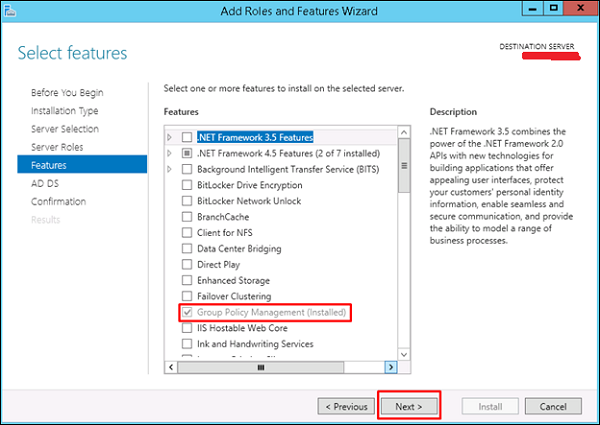
Step 8 − Click the “Next” button.
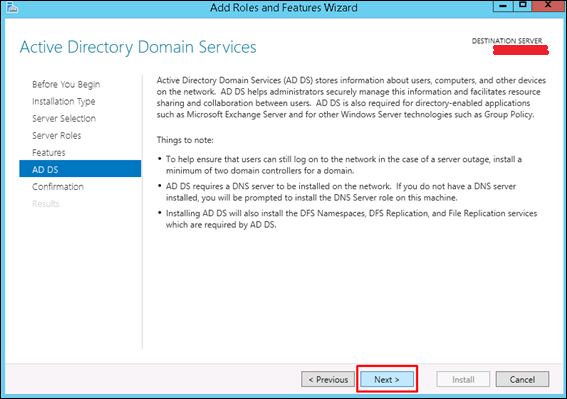
Step 9 − Click “Install”.
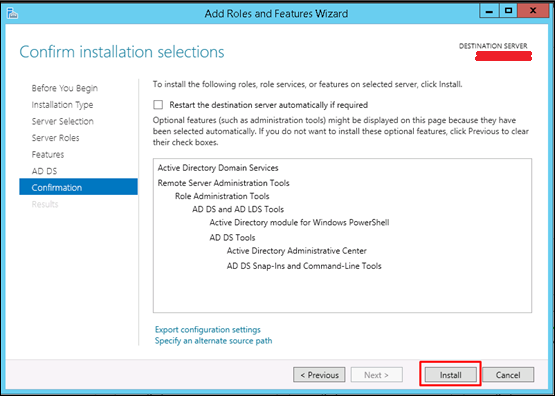
Installation Screen will come up now and you have to wait until installation bar completes.
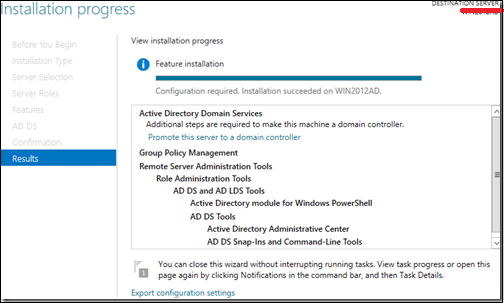
Now that the installation of DC role is finished, you have to configure it for you server.
Step 10 − Click “Server Manager” → Open the Notifications Pane by selecting the Notifications icon from the top of the Server Manager. From the notification regarding configuring AD DS (Active Directory Domain Services), click Promote this server to a domain controller.
![]()
Step 11 − Click “Add a new forest” → Insert your root domain name into the Root domain name field. In my case, I have put “example.com”.
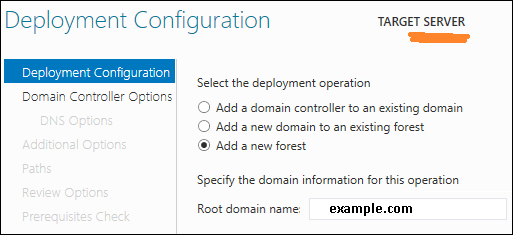
Step 12 − Select a Domain and Forest functional level. Once selected fill in a DSRM password in the provided password fields. The DSRM password is used when booting the Domain Controller into recovery mode.
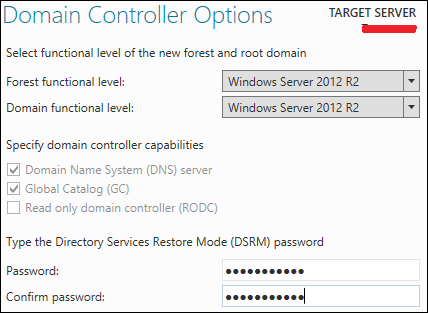
Step 13 − In the next screen which shows up, there is a warning on the DNS Options tab, click OK and then select Next.
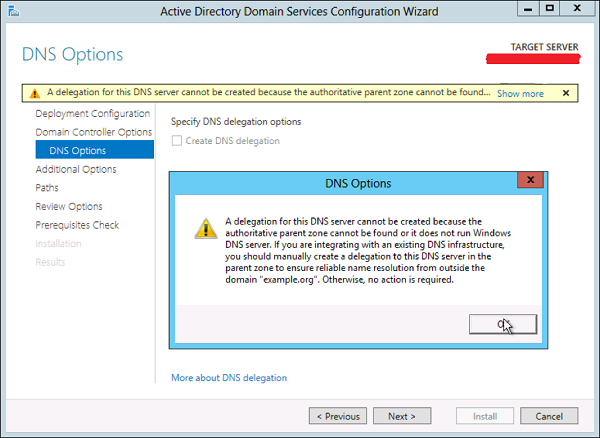
Step 14 − Enter NETBIOS name and click “Next”.
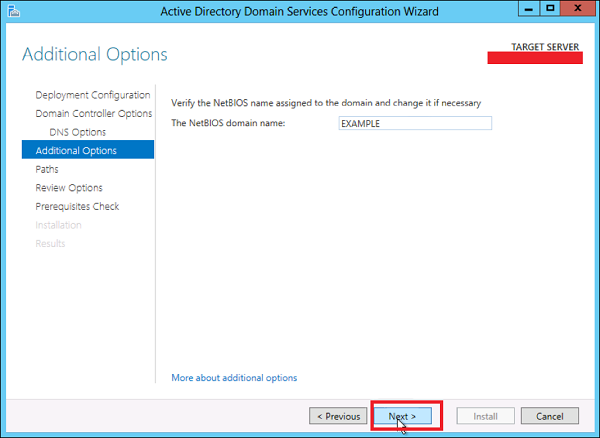
Step 15 − Select location of the SYSVOL, Log files and Database folders and then click Next.
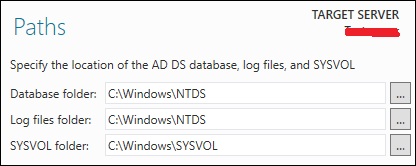
Step 16 − Click “Install” and wait until it is finished. The server will restart several times.

The installation is now complete.
Windows Server 2012 — DC Accounts
In Windows 2012, creating account OU and group is nearly the same as in the previous versions.
To Create an OU user, please follow the steps given below.
Step 1 − Go to: Server Manager → Tools → Active Directory Users and Computers.
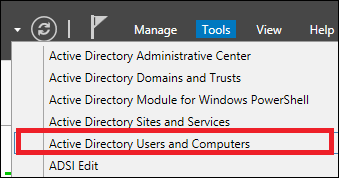
Step 2 − To create an OU named Management. Right-click domain in Active Directory Users and Computers, choose New and click Organizational Unit.
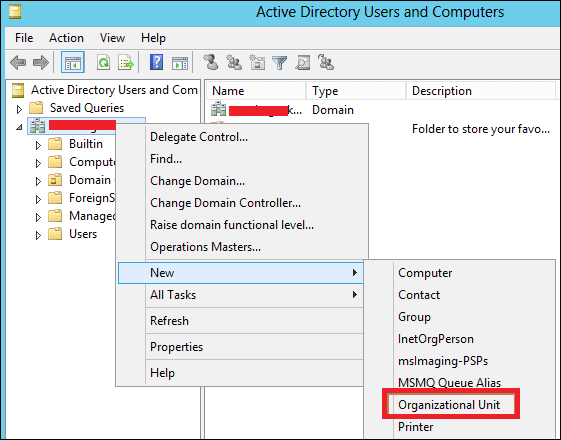
Step 3 − Type Management to name the OU. Check the Protect container from accidental deletion option. This option will protect this object from accidental deletion.
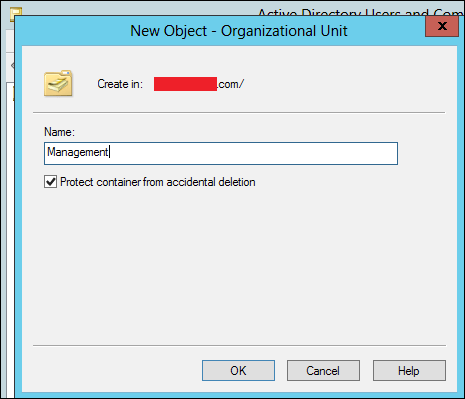
Step 4 − To create a user, Right-click on the Management OU → click New → and then click User.
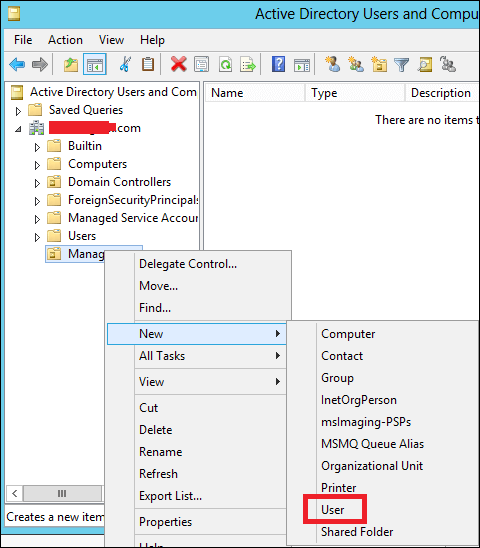
Step 5 − Complete the field with the data of the users → then click Next.
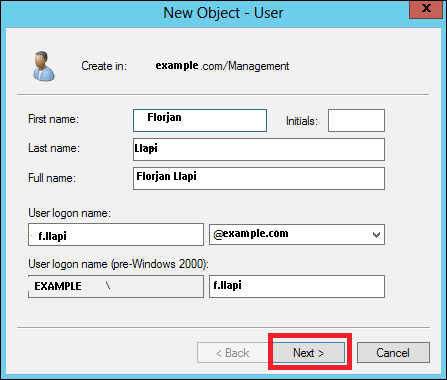
Step 6 − Now type-in the password. Check on the tick box → User must change password at next logon. The user will be forced to change the password when the user logs in → Click Next → and then click Finish.
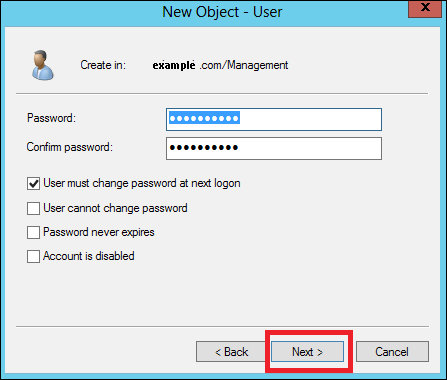
Windows Server 2012 — File System
In Windows Server 2012 a new file system it is presented with is caller Resilient File System (ReFS).
The key attributes of ReFS include −
-
Maintaining a high level of data availability and reliability, even when the individual underlying storage devices experience failures.
-
Providing a full, end-to-end resilient architecture when used in conjunction with Storage Spaces. When used together, ReFS and Storage Spaces provide enhanced resiliency to storage device failures.
The significant functionality included with ReFS is described below −
-
Integrity − ReFS stores data in a way that protects it from many of the common errors that can normally cause data loss. When ReFS is used in conjunction with a mirror space or a parity space, detected corruption — both metadata and user data, when integrity streams are enabled — can be automatically repaired using the alternate copy provided by Storage Spaces. In addition, there are Windows PowerShell cmdlets (Get-FileIntegrity and Set-FileIntegrity) that you can use to manage the integrity and disk scrubbing policies.
-
Availability − ReFS prioritizes the availability of data. Historically, file systems were often susceptible to data corruption that would require the system to be taken offline for repair. With ReFS, if corruption occurs, the repair process is both localized to the area of corruption and performed online, requiring no volume downtime. Although rare, if a volume does become corrupted or you choose not to use it with a mirror space or a parity space, ReFS implements salvage, a feature that removes the corrupt data from the namespace on a live volume and ensures that good data is not adversely affected by non-repairable corrupt data. Because ReFS performs all repair operations online, it does not have an offline chkdsk command.
-
Scalability − As the amount and size of data that is stored on computers continues to rapidly increase, ReFS is designed to work well with extremely large data sets — petabytes and larger — without performance impact. ReFS is not only designed to support volume sizes of 2^64 bytes (allowed by Windows stack addresses), but ReFS is also designed to support even larger volume sizes of up to 2^78 bytes using 16 KB cluster sizes. This format also supports 2^64 – 1-byte file sizes, 2^64 files in a directory and the same number of directories in a volume.
-
Proactive Error Correction − The integrity capabilities of ReFS are leveraged by a data integrity scanner, which is also known as a scrubber. The integrity scanner periodically scans the volume, identifying latent corruptions and proactively triggering a repair of that corrupt data.
When the metadata for a ReFS directory is corrupted, subfolders and their associated files are automatically recovered. ReFS identifies and recovers the files while ReFS remains online. Unrecoverable corruption of the ReFS directory metadata affects only those files that are in the directory in which the corruption has occurred.
ReFS includes a new registry entry, RefsDisableLastAccessUpdate, which is the equivalent of the previous NtfsDisableLastAccessUpdate registry entry. The new storage command lets in Windows PowerShell are available (Get-FileIntegrity and SetFileIntegrity) for you to manage the integrity and disk scrubbing policies.
Group Managed Service Accounts
The Managed Service Accounts (MSA) was introduced in Windows Server 2008 R2 to automatically manage (change) passwords of service accounts. Using MSA, you can considerably reduce the risk of system accounts running system services being compromised. MSA has one major problem which is the usage of such service account only on one computer. It means that MSA Service Accounts cannot work with cluster or NLB services, which operate simultaneously on multiple servers and use the same account and password. To fix this, Microsoft added the feature of Group Managed Service Accounts (gMSA) to Windows Server 2012.
To create a gMSA, we should follow the steps given below −
Step 1 − Create the KDS Root Key. This is used by the KDS service on DC to generate passwords.
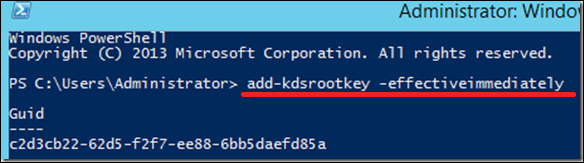
To use the key immediately in the test environment, you can run the PowerShell command −
Add-KdsRootKey –EffectiveTime ((get-date).addhours(-10))
To check whether it creates successfully or not, we run the PowerShell command −
Get-KdsRootKey
Step 2 − To create and configure gMSA → Open the Powershell terminal and type −
New – ADServiceAccount – name gmsa1 – DNSHostNamedc1.example.com – PrincipalsAllowedToRetrieveManagedPassword «gmsa1Group»
In which,
-
gmsa1 is the name of the gMSA account to be created.
-
dc1.example.com is the DNS server Name.
-
gmsa1Group is the active directory group which includes all systems that have to be used. This group should be created before in the Groups.
To check it, Go to → Server Manager → Tools → Active Directory Users and Computers → Managed Service Accounts.
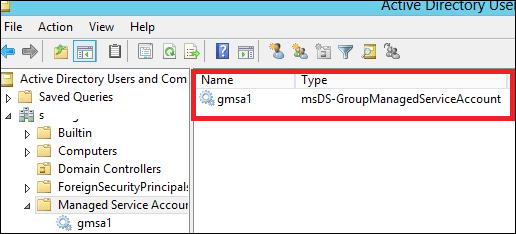
Step 3 − To install gMAs on a server → open PowerShell terminal and type in the following commands −
- Install − ADServiceAccount – Identity gmsa1
- Test − ADServiceAccount gmsa1
The result should come “True” after running the second command, as shown in the screenshot given below.
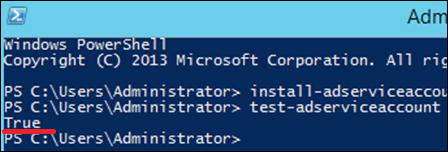
Step 4 − Go to service properties, specify that the service will be run with a gMSA account. In the This account box in the Log on tab type the name of the service account. At the end of the name use symbol $, the password need not to be specified. After the changes are saved, the service has to be restarted.
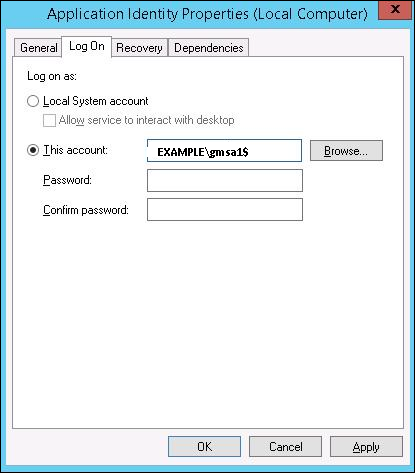
The account will get the “Log On as a Service” and the password will be retrieved automatically.
Group Policy Overview
The features of Group Policy Management were installed during the DC Role Installation. Many of the management features haven’t changed as compared to the previous versions of Windows Server. To create a GPO (Group Policy Overview), we need to follow the steps given below.
Step 1 − To create a GPO open the Group Policy Management Console (GPMC), go to Server Manager → Tools → Group Policy Management as shown in the screenshot below.
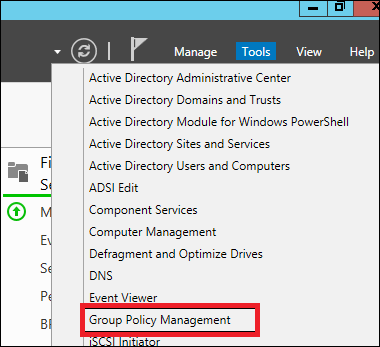
Step 2 − Right-click on an OU → select the first option Create a GPO in this domain and Link it here.
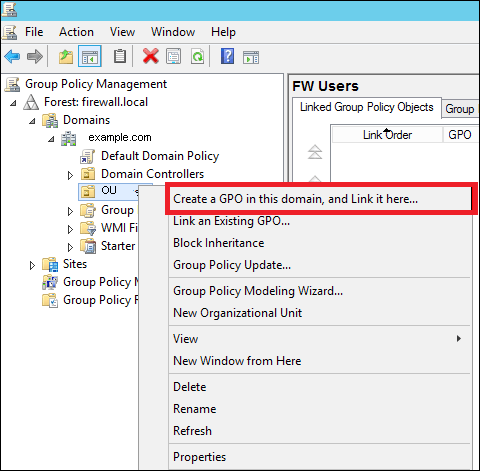
Step 3 − Type the Name for this GPO object → click OK button. We have selected the name as Test GPO.
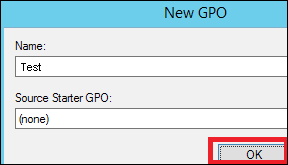
Step 4 − Right-click the GPO object and click Edit.
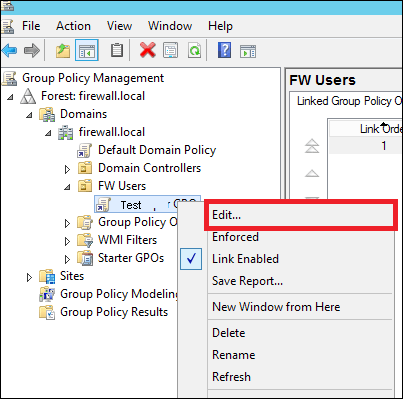
Windows Server 2012 — DHCP Role
As you know Dynamic Host Configuration Protocol (DHCP) is commonly implemented network services in today’s network environments. DHCP is primarily used to automatically distribute IP configuration settings to network clients, eliminating manually configuring hosts on TCP/IP-based networks.
To Install DHCP role, you will have to follow the steps given below.
Step 1 − Go to “Server Manager” → Manage → Add Roles and Features.

Step 2 − Click Next.
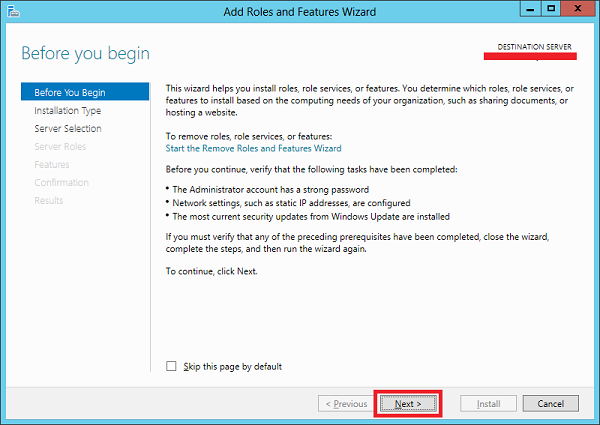
Step 3 − Select the Role-based or feature-based installation option → click Next.
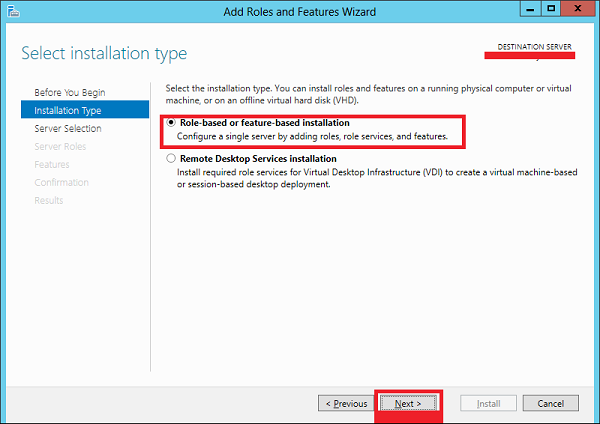
Step 4 − We will install a Local DHCP Role as it will Select a server from the Server Pool → then click Next.
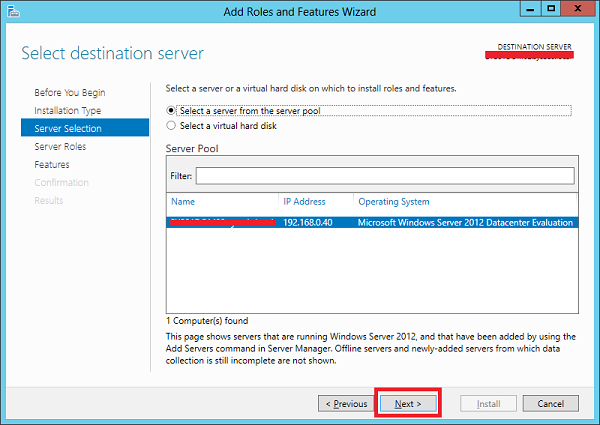
Step 5 − From the Roles lists, check the DHCP Server role → click Add Features on the popup windows as shown in the following screenshots.
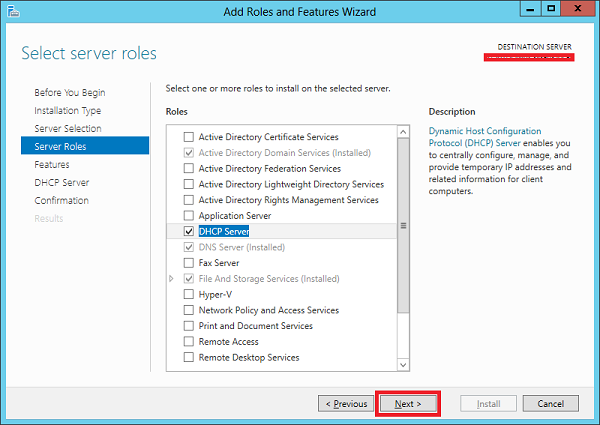
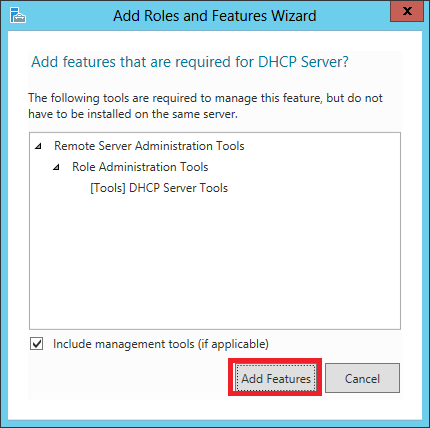
Step 6 − Click Next.
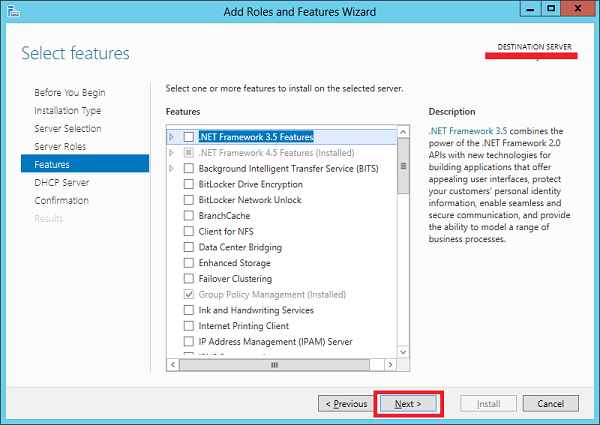
Step 7 − Click Next.
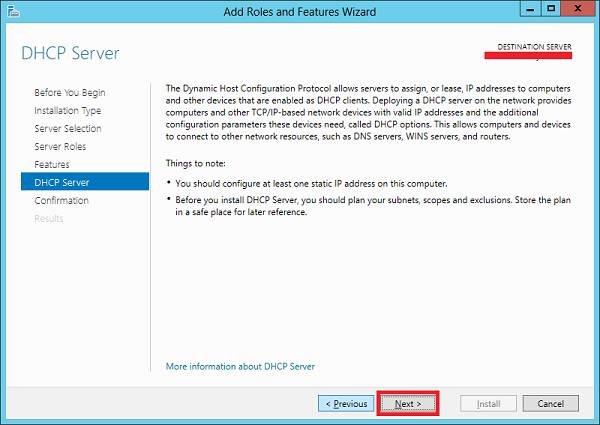
Step 8 − Click Install.
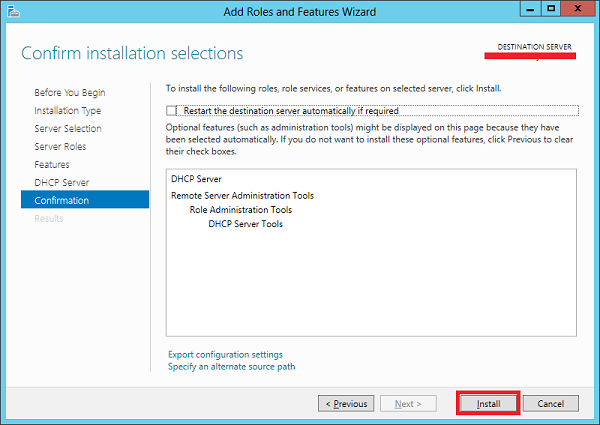
Step 9 − Click Close.
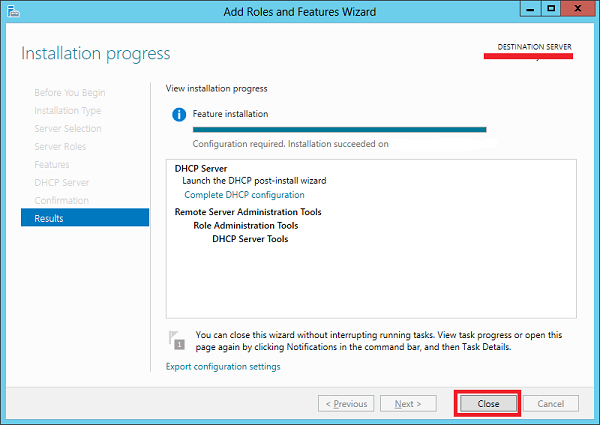
Post-deployment Configuration
In this section, we will see how to do the post-deployment configuration of the DHCP. Please follow the steps given below.
Step 1 − Click on the warning icon and then click on “Complete DHCP Configuration”.
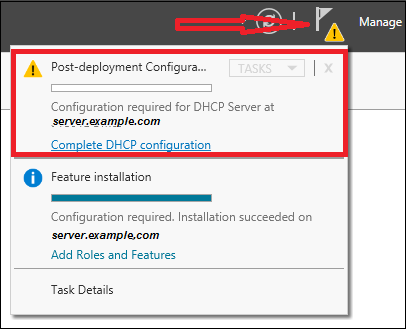
Step 2 − Click Next.
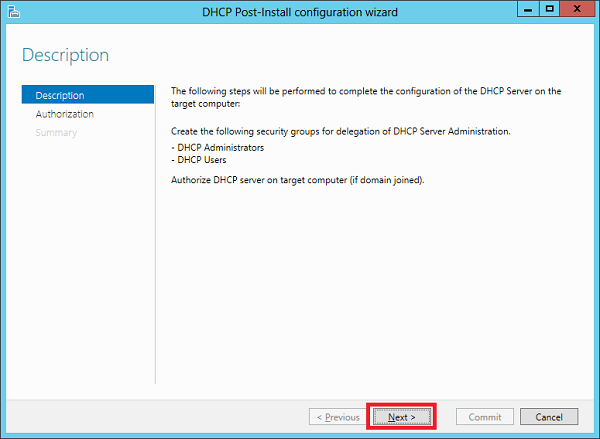
Step 3 − Select a domain user account that has permissions to create objects in the Net Services container in Active directory or a domain admin account → click Next.

Step 4 − Click Close.
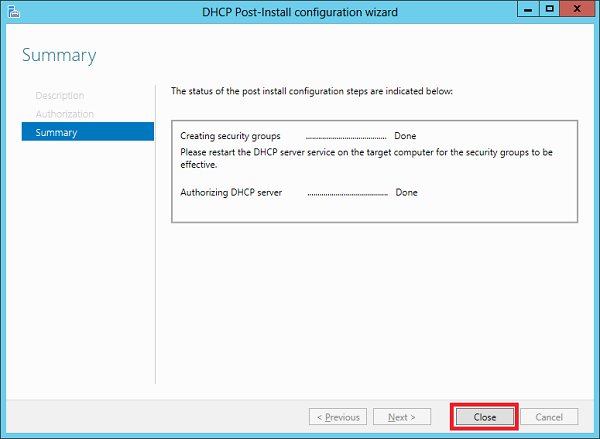
Scope Implementation of DHCP
Now we have to configure the service to make it useful for the computers. To do this, we need to follow the steps given below.
Step 1 − Server Manager screen → Tools → DHCP.
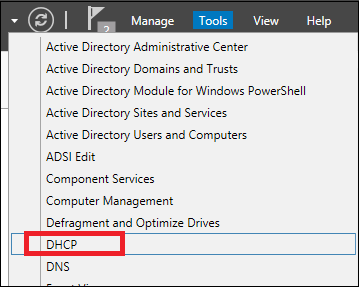
Step 2 − Right-click on the DHCP Server → then click on “Add/Remove Bindings… “
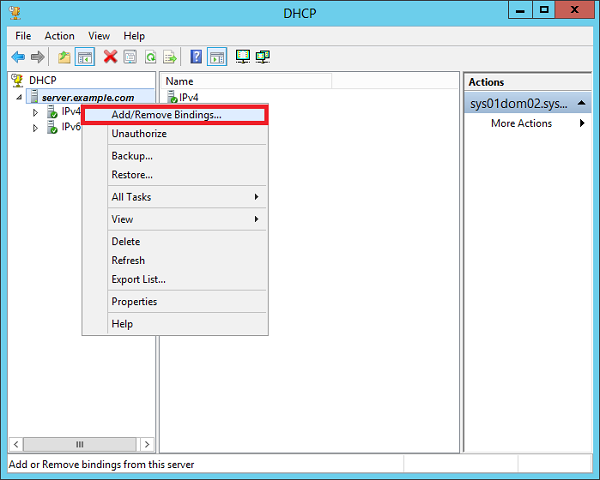
Step 3 − Ensure the static IP address of the server should appear as shown in the following screenshot.
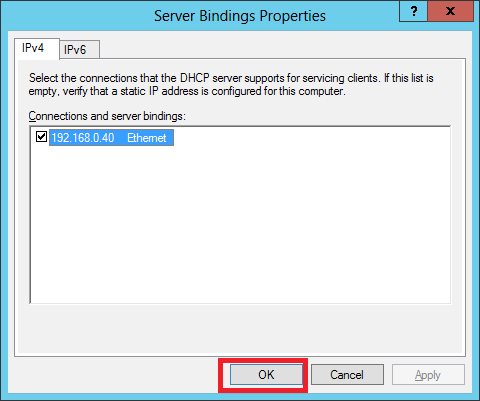
Step 4 − Right-click on IPv4 → Select “New Scope”.
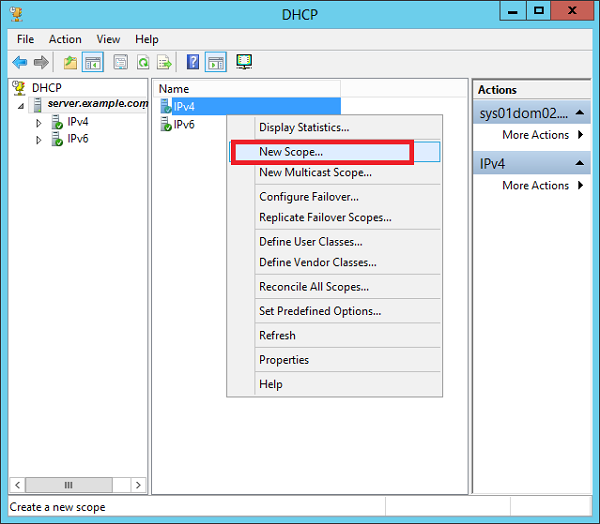
Step 5 − Click “Next”.
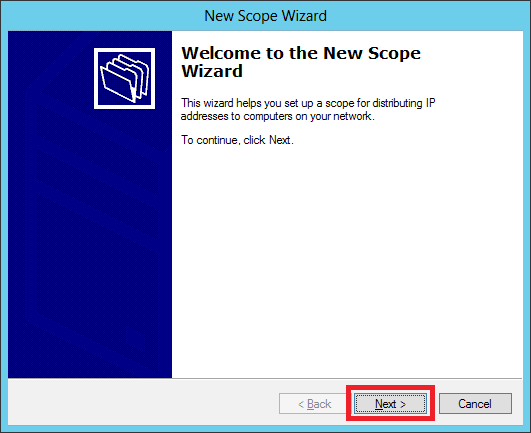
Step 6 − Enter Scope Name and description as shown in the following screenshot and then → Next.
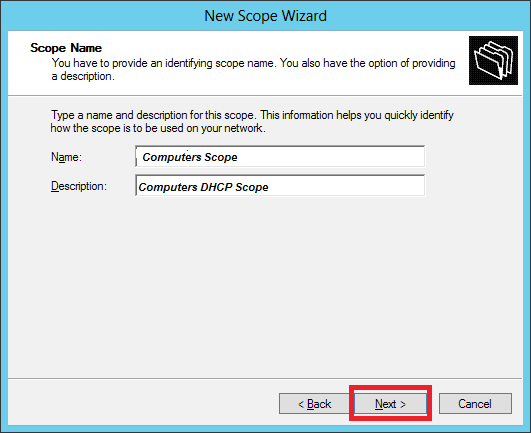
Step 7 − Enter the Start and End IP address, the Subnet mask, leave the Length as default “24” for class C subnet → click Next.
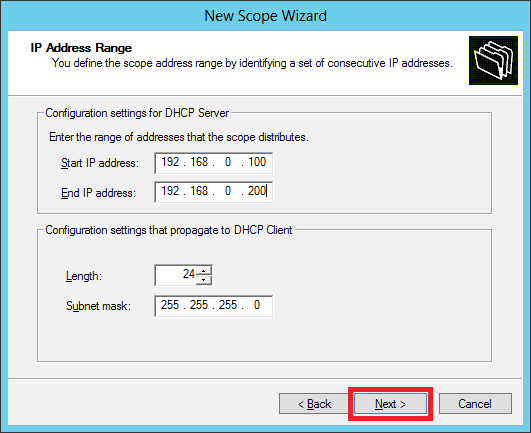
Step 8 − Enter your IP range in the exclusion list. If you have devices on the network that require static IP address and also ensure that the excluded range falls with the Start and End range earlier specified, then → click Next.
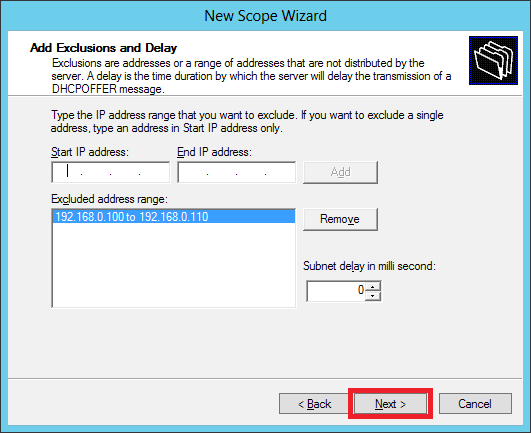
Step 9 − Enter the desired lease duration for the assigned IP’s or leave as default → then click Next.
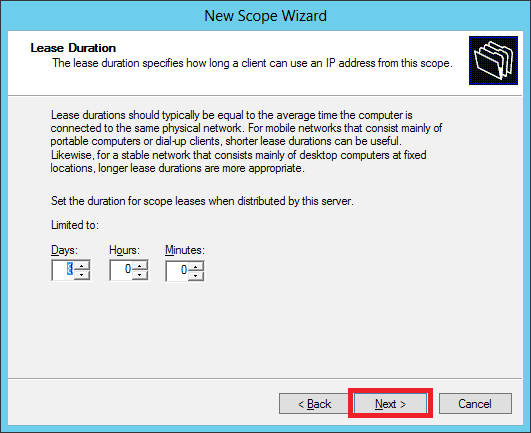
Step 10 − Select → Yes, I want to configure these options now to configure the DHCP options for the new scope → then click on Next.
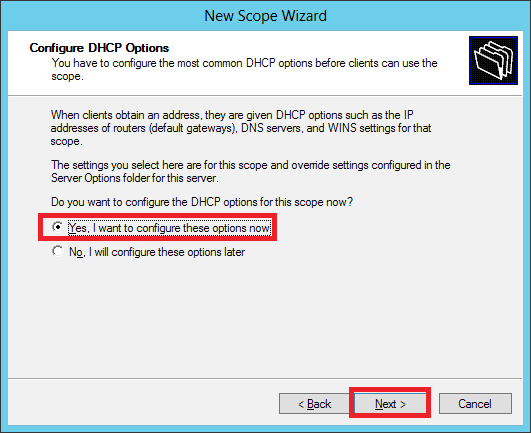
Step 11 − Enter the default gateway which is the IP of your Router → then click Next.
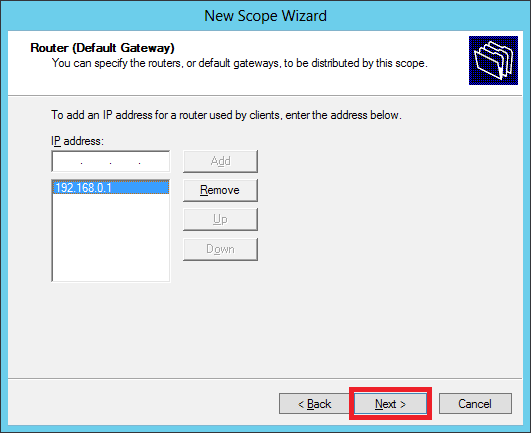
Step 12 − Add DNS IP → click Next (we can put Google DNS or if it is a Domain environment you can put the DC IP there) then click → Next.
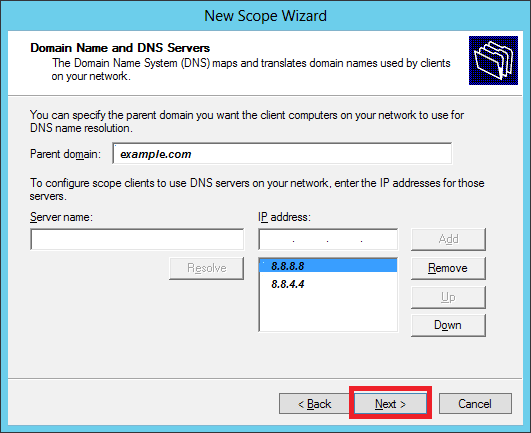
Step 13 − Specify your WINS Server if any and then click → Next.
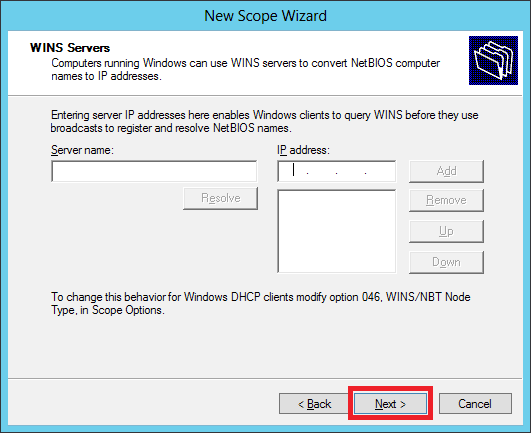
Step 14 − Select Yes, I want to activate this scope now option to activate the scope immediately and then click → Next.
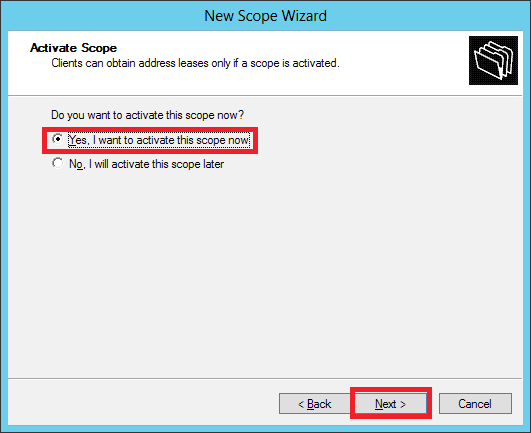
Step 15 − Click Finish.
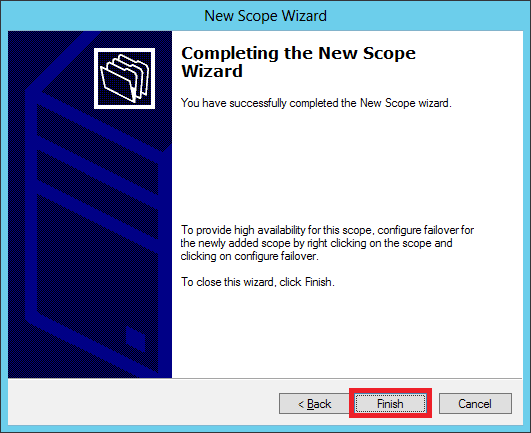
Windows Server 2012 — DNS Role
DNS Role is one of the most important services in a network with Domain Controllers Environment. It helps us to resolve domain names internally and externally to IP and to have access to the requested service for the respective domain.
Let us now see how to install the DNS Role. For this we need to follow the steps given below.
Step 1 − To Install DNS role, go to “Server Manager” → Manage → Add Roles and Features.

Step 2 − Click Next.

Step 3 − Select the Role-based or feature-based installation option and then click Next.

Step 4 − We will install a Local DNS role as it will select a server from the server pool → and then click Next.

Step 5 − From the Server Roles lists, check the DNS Server role → click Add Features on the popup windows and then click Next.
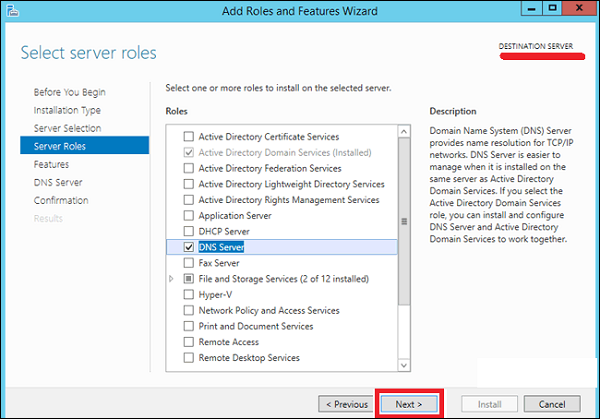
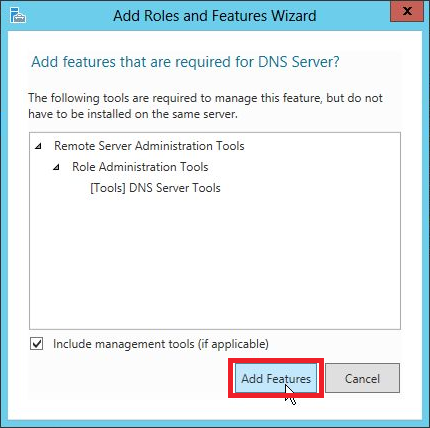
Step 6 − Click Next.
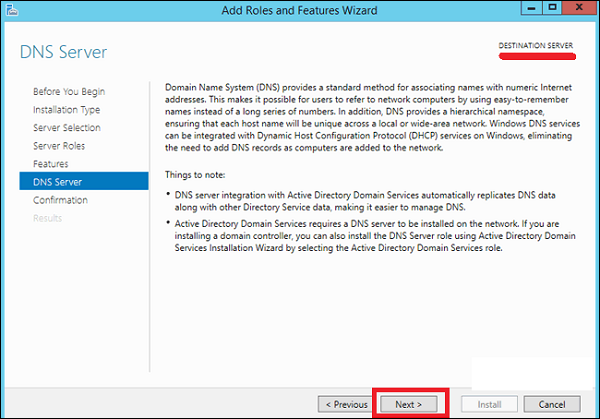
Step 7 − Click Install.
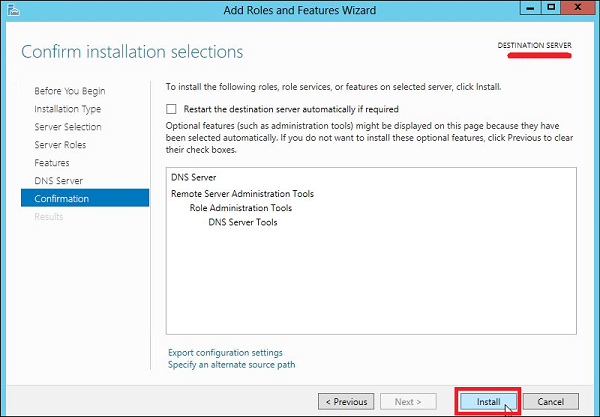
Step 8 − Wait until installation bar is complete.
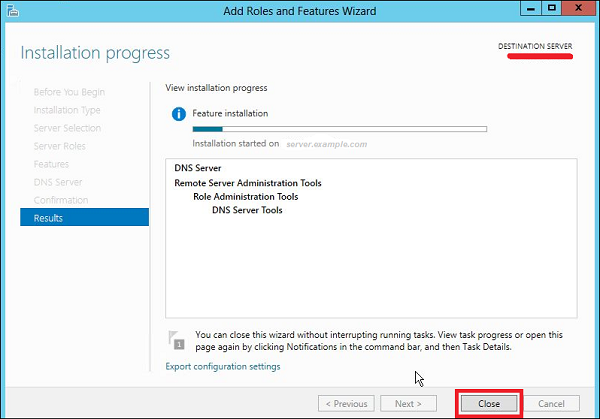
Once the installation is finished, click on Close.
Windows Server 2012 — Primary Zones
To manage DNS, we have to create a primary Zone because by default, there are no zones in order to manage the records.
Step 1 − To manage DNS, go to Server Manager → Tools → DNS → Right click on “Forward Lookup Zone” → New Zone.
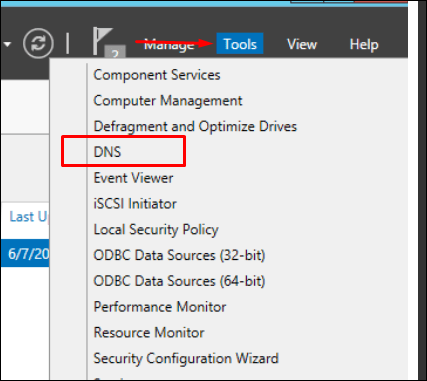
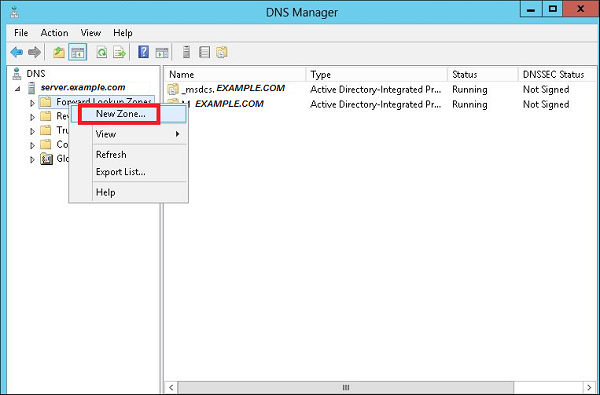
Step 2 − Select “Primary Zone” and then click Next.
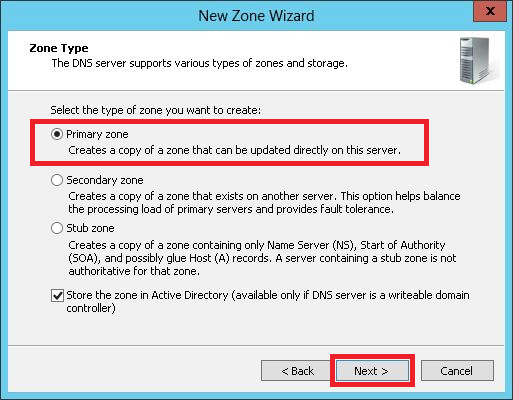
Step 3 − Enter the name of the primary Zone for which you want to manage the records.
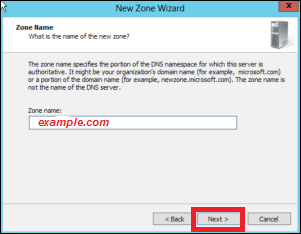
Step 4 − Select “Create a new file with this filename” option.
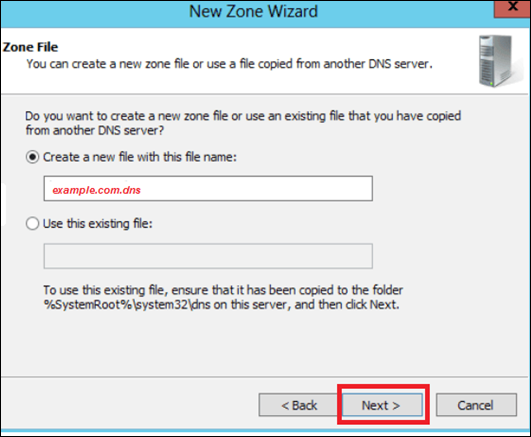
Step 5 − If you want to update the record of this zone manually, you have to select “Do not allow dynamic Updates”, as shown in the following screenshot.
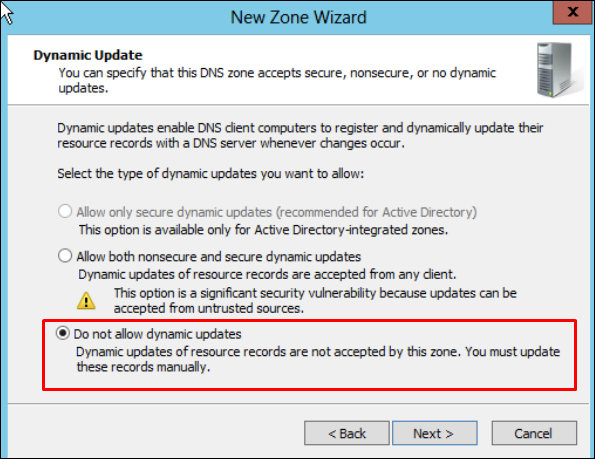
Step 6 − Click the Finish button.
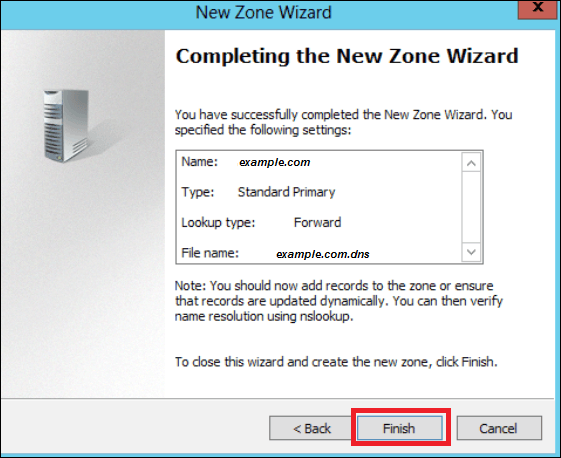
Windows Server 2012 — Manage Records
As you know, in DNS you can add records according to your need and in Windows server 2012 as well. This doesn’t change too much from its earlier version of Windows Server 2008.
To add or manage records, we have to follow the steps given below −
Step 1 − Server Manager → DNS → Right click on the server that has a DNS record, which in our case is local.
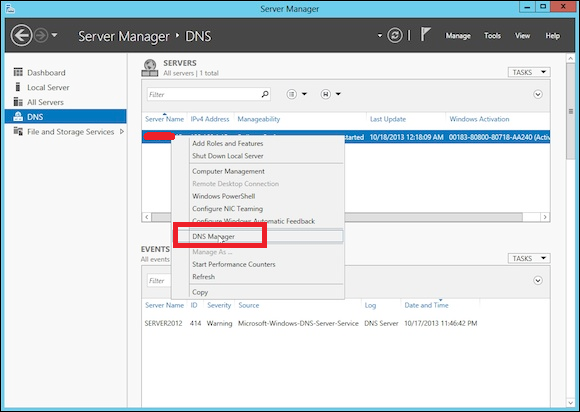
Step 2 − Go to “Forward Lookup Zone”.
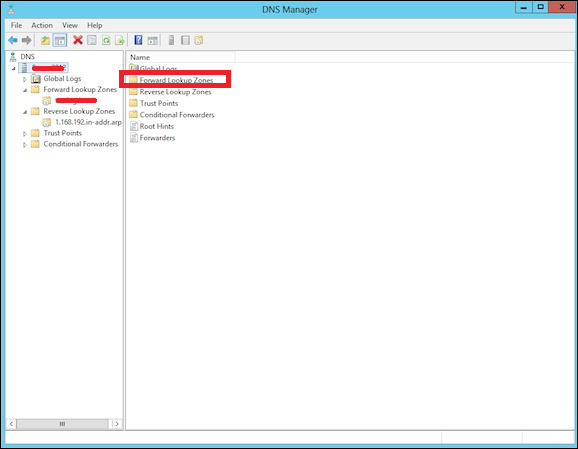
Step 3 − Right Click on the empty Field → New Host (A or AAAA) …

Step 4 − Name field and the subdomain name or case is WWW. → IP address we put is 192.168.1.200. So, when we will type-in our browser www.example.com, it will redirect us to 192.168.1.200.
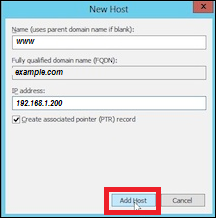
Step 5 − To add a Mail Server Record, we add an MX record and then Right click → New Mail Exchanger as shown in the screenshot given below.
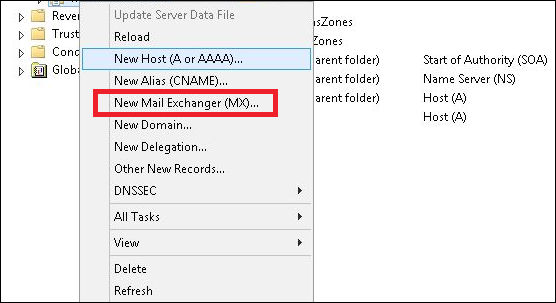
Step 6 − At “Fully qualifies domain name(FQDN) of mail server”, you enter the name of mail server → then in the “Mail server priority”, you enter a number. The smaller the number, the higher the priority.
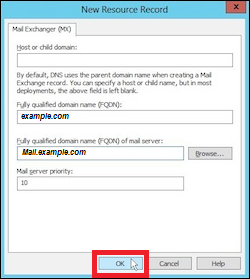
Windows Server 2012 — IIS Overview
The IIS or Internet Information Services role is one of the most important services in Windows Server 2012. It has improved features as compared to its previous versions and it helps us to publish web application or webpages.
Let us now see how to install the IIS Role for which you will have to follow the steps given below.
Step 1 − To Install IIS role, go to “Server Manager” → then Manage → and then to Add Roles and Features.
Step 2 − Click on Next in the window which pops up.
Step 3 − Select the Role-based or feature-based installation option and then click on Next.
Step 4 − I will install a Local IIS role as it will Select a server from the server pool → then click on Next.
Step 5 − From the Roles lists, check the “Web server” (IIS) Server role → Next.
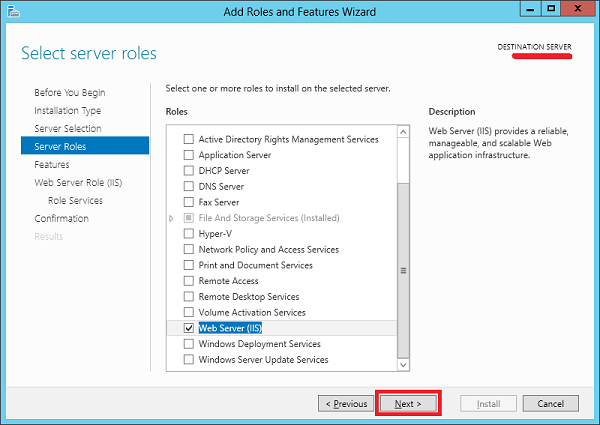
Step 6 − Click Next.
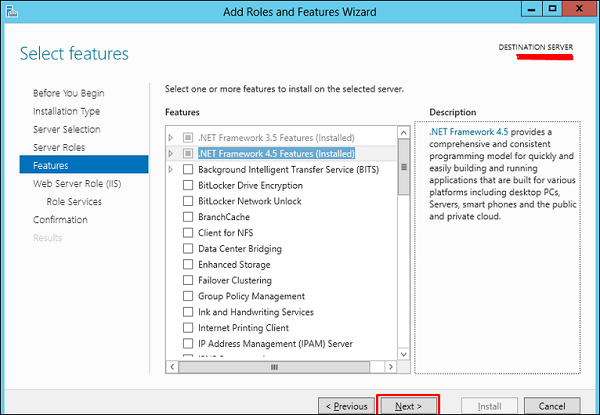
Step 7 − Click Next.
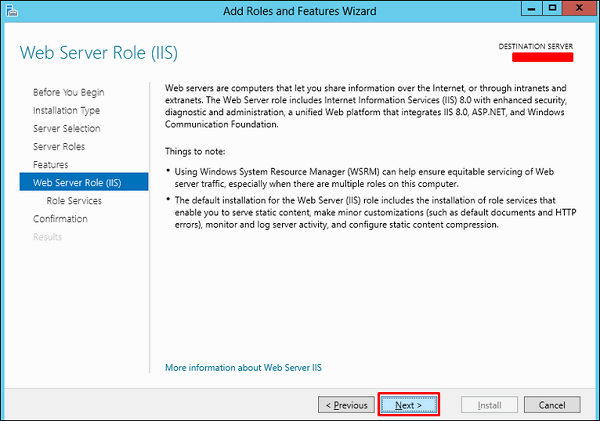
Step 8 − You can choose all the default setting or customize them according to you needs.
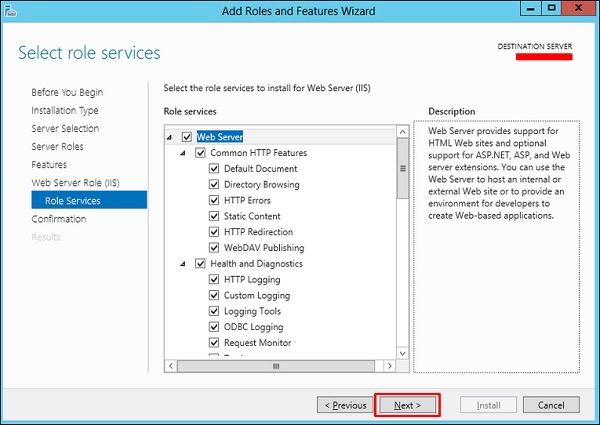
Step 9 − Click Install.
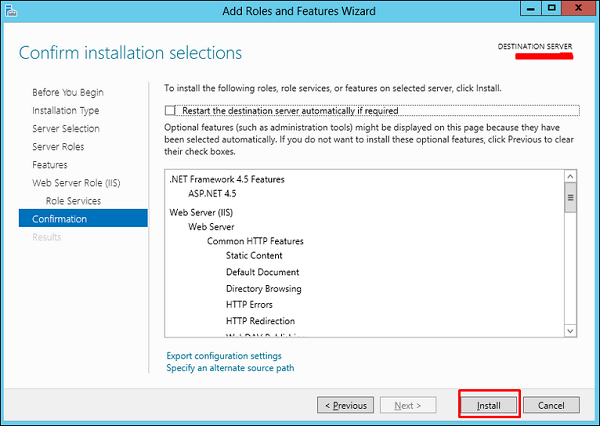
Step 10 − Wait until the Installation Wizard finishes. Once it is done click Close.
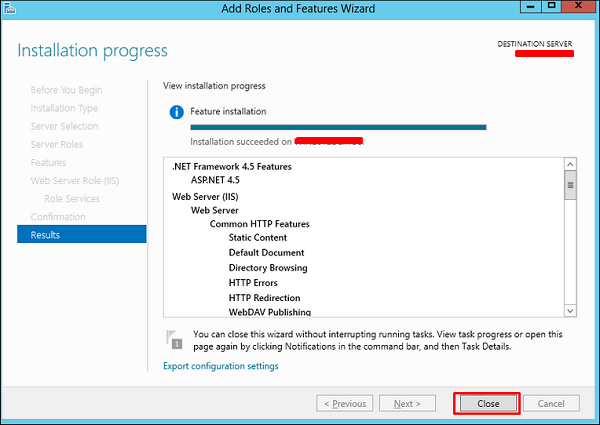
Step 11 − Check if your IIS is installed correctly. This can be done by opening your internet explorer and then typing http://localhost and you should be able to see the following screenshot.
Windows Server 2012 — IIS Security
The IIS (Internet Information Services) is facing internet all the time. So, it is important to follow some rules in order to minimize the risk of being hacked or having any other security issues. The first rule is to take all the updates of the system regularly. The second one is to create different application polls to this, which can be done by following the steps shown below.
Step 1 − You have to go to: Server Manager → Internet Information Services (IIS) Manager → Application Pulls.
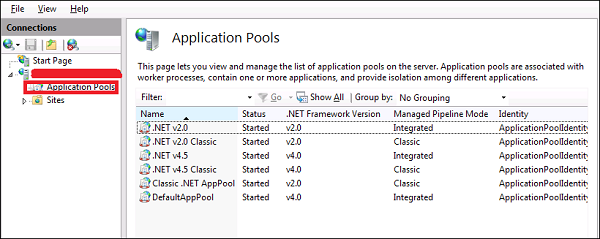
Step 2 − Click “Sites” → Right Click “Default Website” → Manage Website → Advance Settings.
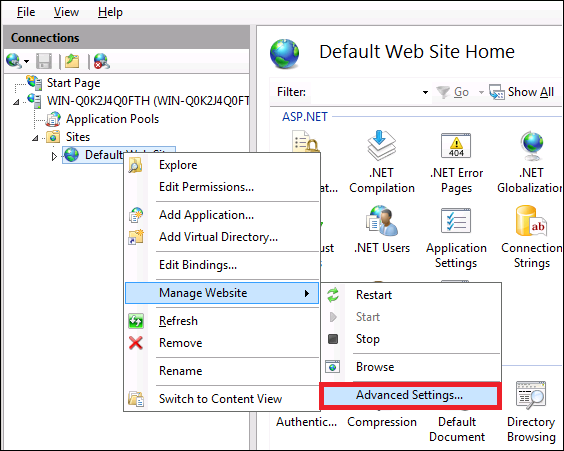
Step 3 − Select the Default Pools.
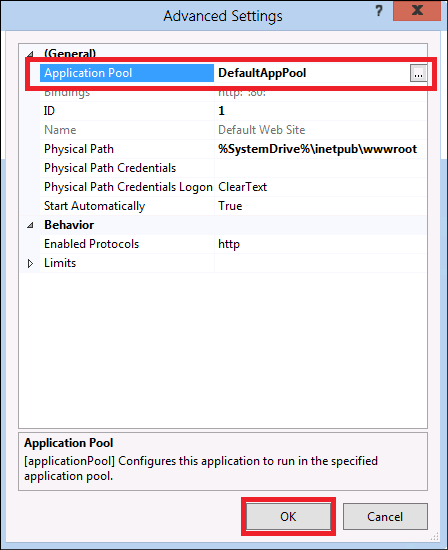
Step 4 − Disable the OPTIONS method, this can be done by following the path – Server Manager → Internet Information Services (IIS) Manager → Request Filtering.
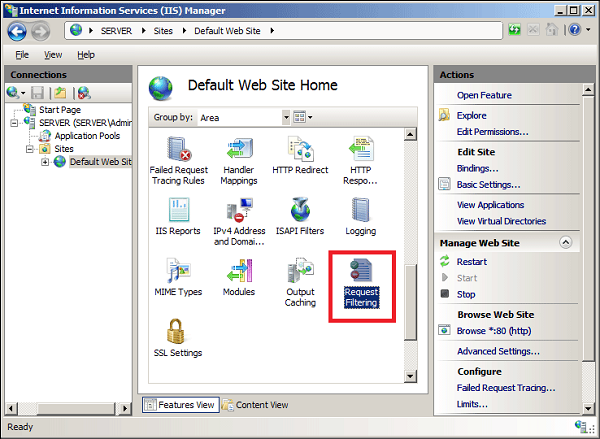
Step 5 − In the action pane, select «Deny Verb» → Insert ‘OPTIONS’ in the Verb → OK.
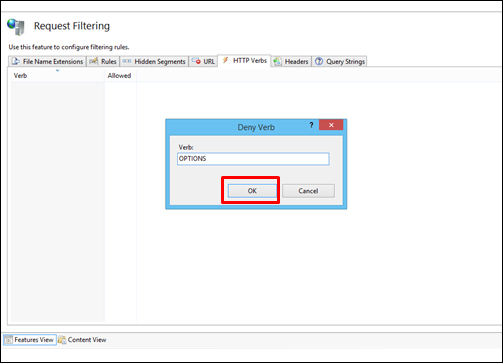
Step 6 − Enable Dynamic IP Restrictions blocks by going to – IIS Manager → Double click on «IP Address and Domain Restrictions» → Actions pane.
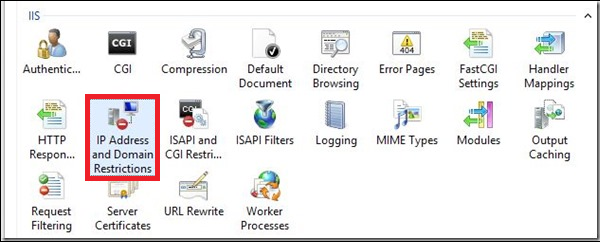
Step 7 − Then select «Edit Dynamic Restriction Settings» → Modify and set the dynamic IP restriction settings according to your needs → press OK.
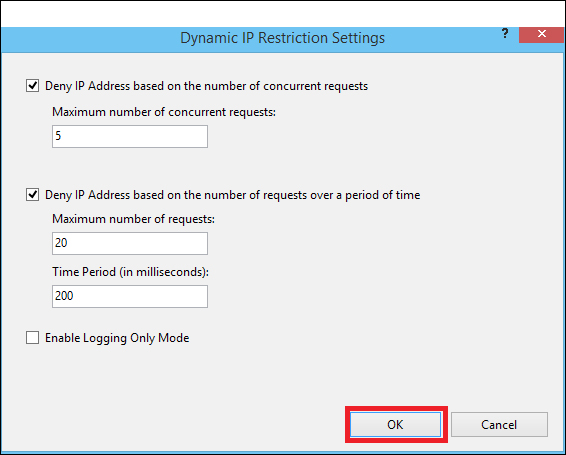
Step 8 − Enable and Configure Request Filtering Rules, to do this – IIS Manager → Double click on «Request Filtering» → Change to the Rules tab → Actions Pane.
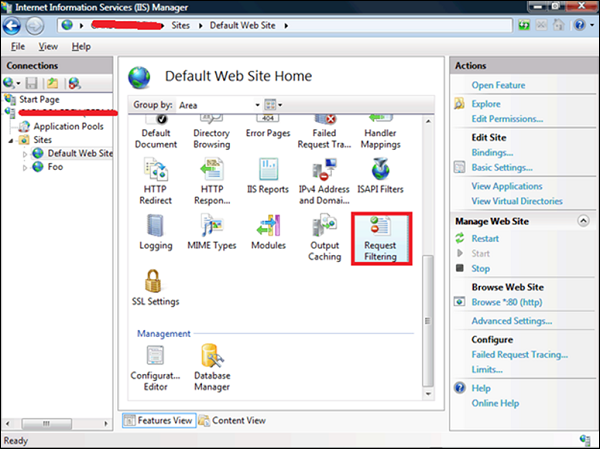
Step 9 − Then select «Add Filtering Rule» → Set the required rules → Click OK.
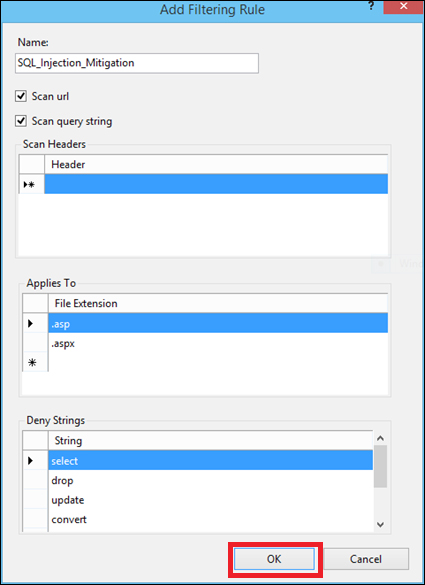
Step 10 − Enable logging, to do this we need to follow this path – IIS Manager → select the specific site you want to configure → Logging.

Windows Server 2012 — Hyper-V
Virtualization is one of the most important technology feature and Microsoft has invested on this and the responsible role is called as Hyper-V.
Let us now see how to install the Hyper-V Role, for doing this we should follow the steps given below.
Step 1 − To Install DNS role go to “Server Manager” → Manage → Add Roles and Features.
Step 2 − Click Next.
Step 3 − Select the Role-based or feature-based installation option → click Next.
Step 4 − I will install a Local Hyper-V role as it will Select a server from the server pool → Next.
Step 5 − From the Roles lists, check the Hyper-V Server role → click Add Features on the popup windows which show up and then → Next.
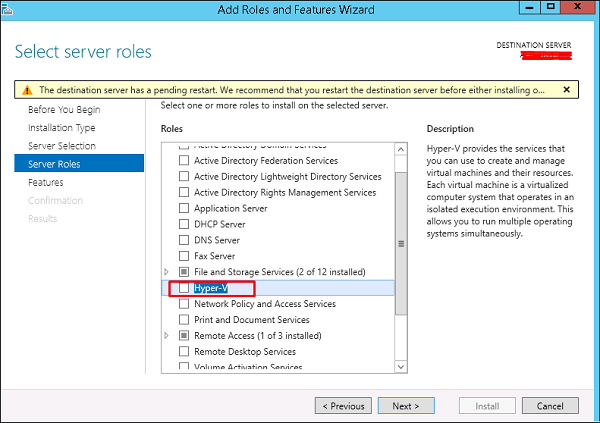
Step 6 − Click Next.
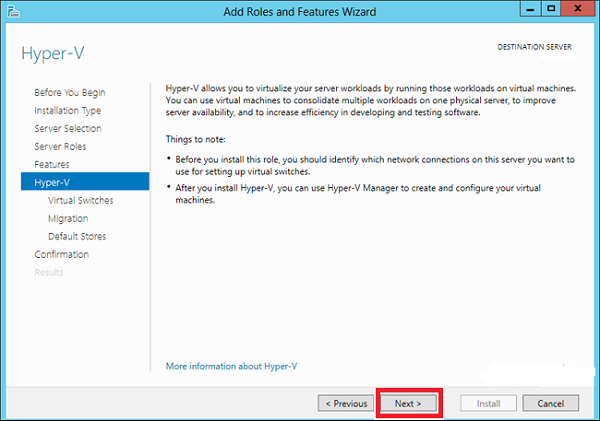
Step 7 − Choose your server’s physical network adapters that will take part in the virtualization → Next.
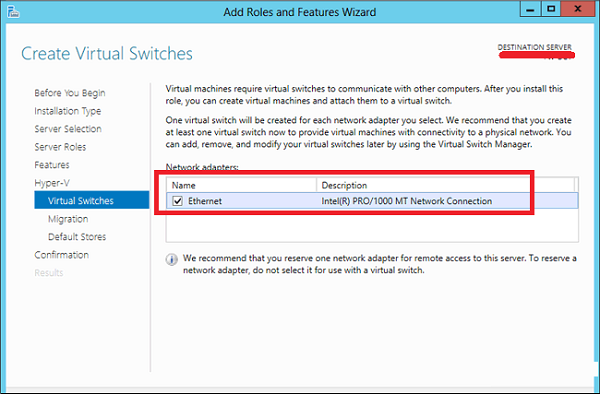
Step 8 − Under Migration, leave the default settings → Next.
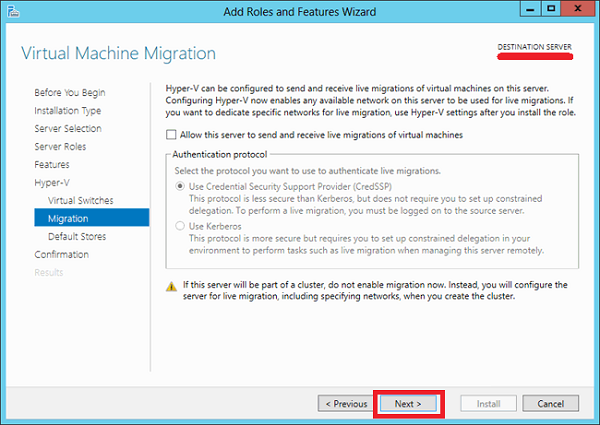
Step 9 − Choose the path where to save the file.
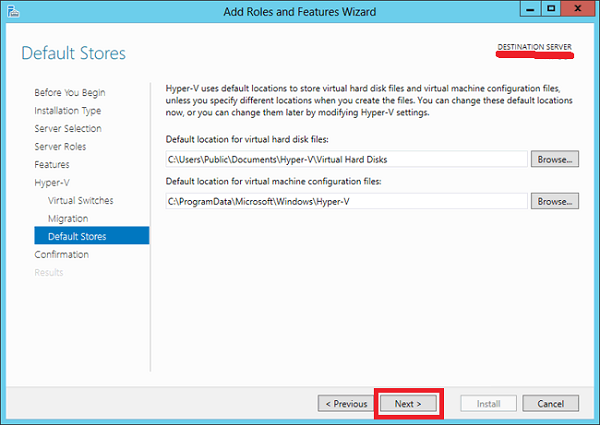
Step 10 − Click Install and wait for the installation bar to finish.
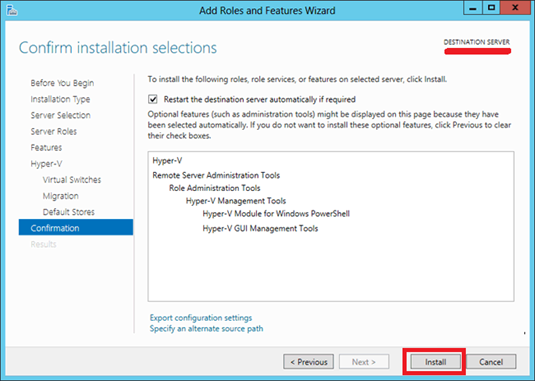
Advanced Configuration
In this chapter, we will see how to create a virtual machine. Firstly, we should open the Hyper-V manager and then follow the steps given below.
Step 1 − Open “Server Manager” → and then Click on “Hyper-V”.
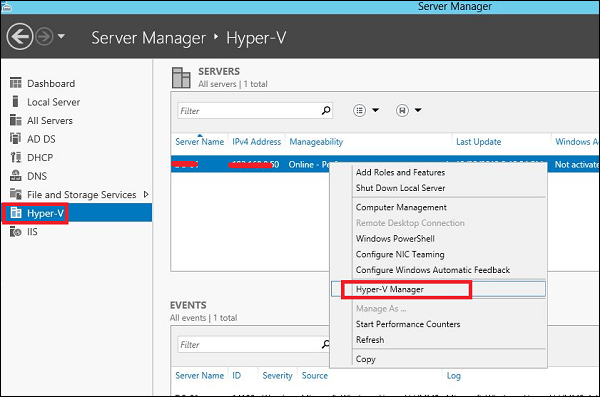
Step 2 − Click “New” on the Right side Panel or click on Action button in the options as shown in the screenshot below.
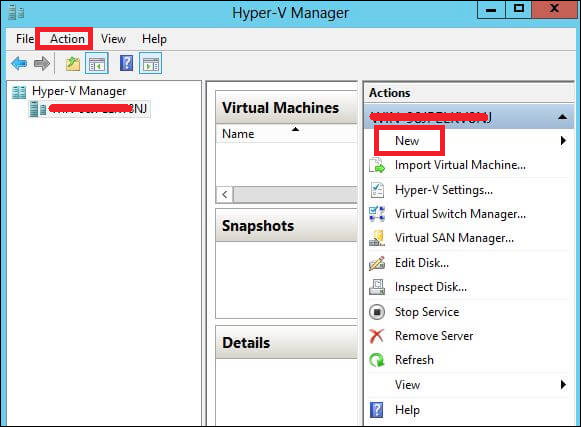
Step 3 − Double Click on the Virtual Machine option as shown in the following screenshot.
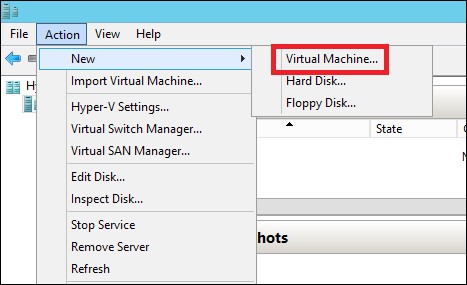
Step 4 − A new table will be open → Type the Name of your new machine and then click Next.
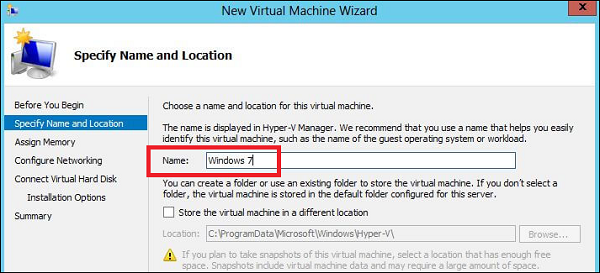
Step 5 − A new table will be open where you must allocate the memory. Keep in mind that you cannot choose more memory than what you have in your system.
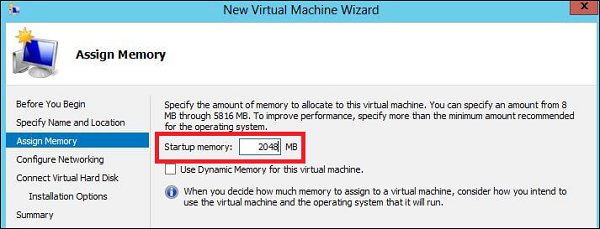
Step 6 − In the Connection dropdown box, choose you physical network adaptor and click Next.
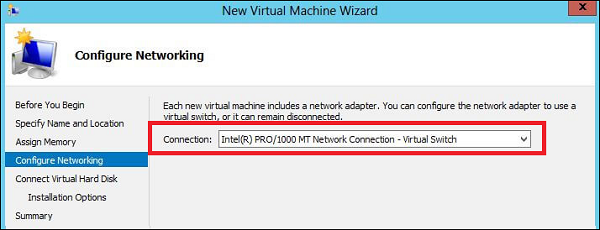
Step 7 − Now it is time to Create a Virtual Hard disk. If you already have one, choose the second option.
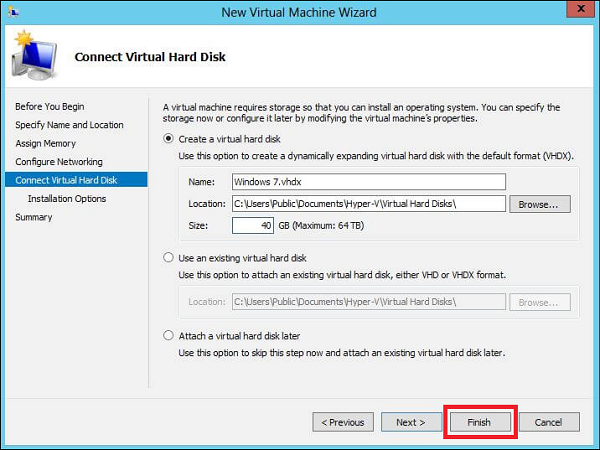
Step 8 − Select the Image of ISO that should be installed and then click Finish.
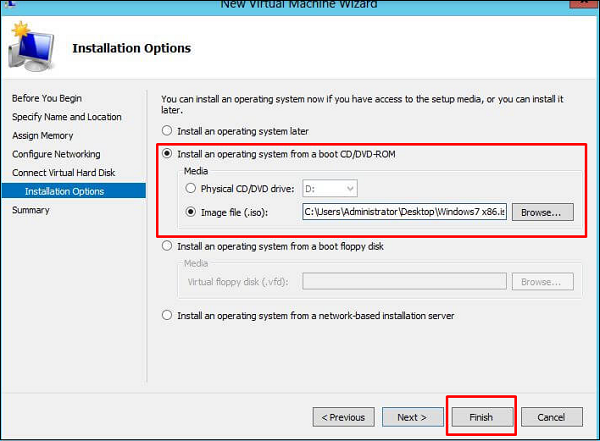
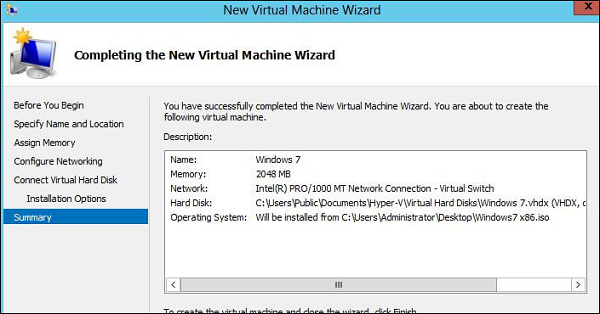
Step 9 − Connect to the Virtual machine. To do so, Right Click on the machine name and then → Connect.
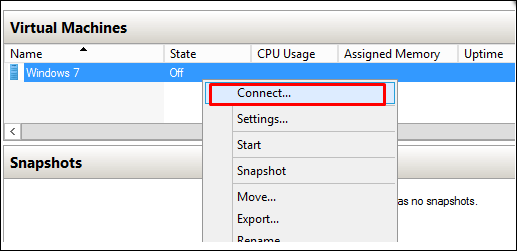
Step 10 − After that, the Installation of your ISO will continue.
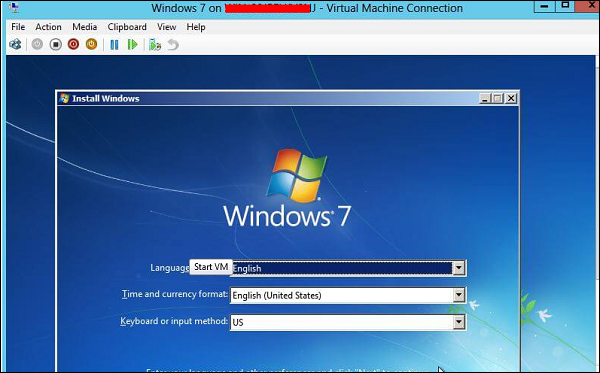
Configure WSUS Role
As you know the WSUS (Windows Server Update Services) is an update service of Microsoft which allows the companies to test updates before installing to live environment.
To install this role, we should follow the steps given below.
Step 1 − Go to “Server Manager” → Manage → Add Roles and Feature → Next → Select “Role-based or feature-Based-Installation → Select a server from the pool server and then → Next.
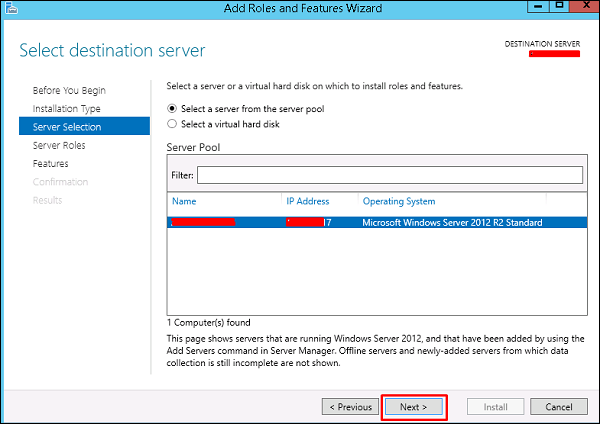
Step 2 − Check “Windows Server Update Service” a pop-up window table will come out → click “Add Features” then → Next and then again → Next.
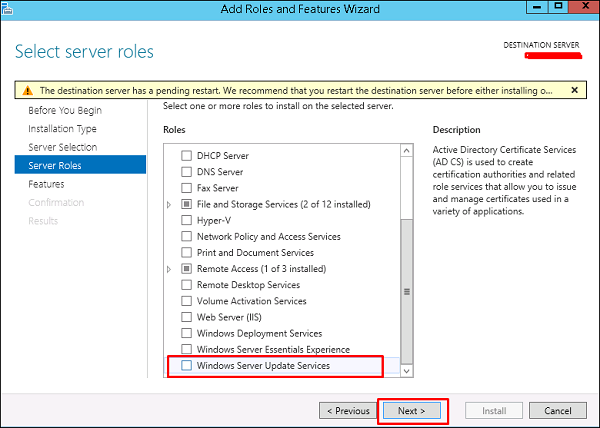
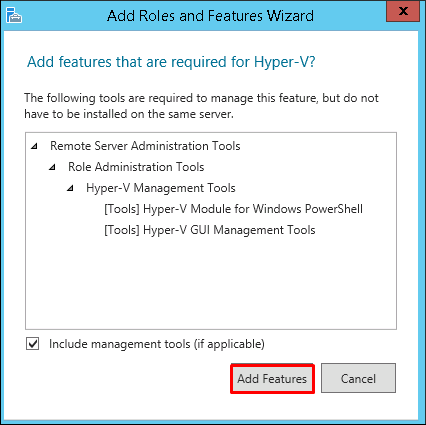
Step 3 − Check box of WID Database and WSUS Services
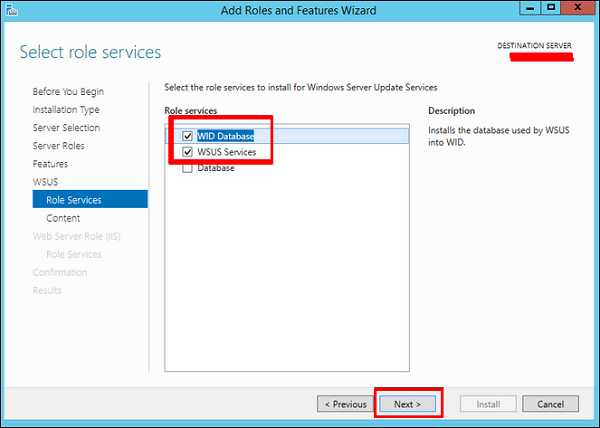
Step 4 − Choose the path for the content. If you have another partition other than C:, then install it there because C: can risk to become full → Next.
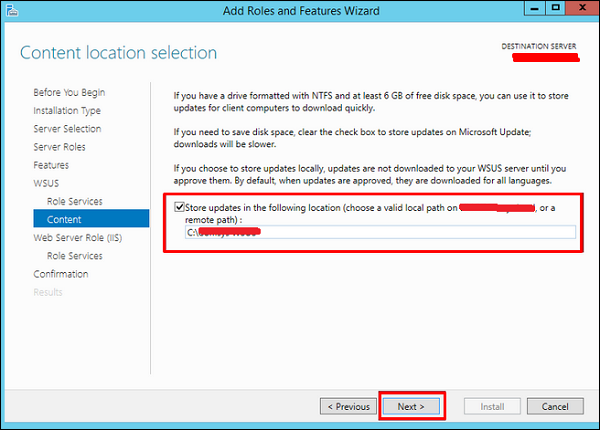
Once this is done, you should wait for the installation to finish.
WSUS Policies and Tuning
In this chapter, we will see how to configure WSUS and tune it. The following steps should be followed for configuring it.
Step 1 − When you open it for the first time, you should do it by going to “Server Manager” → Tools → Windows Server Update Services, then a Configuration wizard will be opened and then click → Next.

Step 2 − Click “Start Connecting” → Wait until the green bar is full and then → Next.
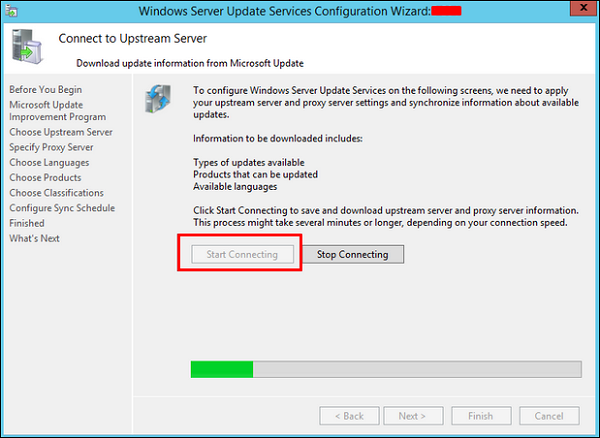
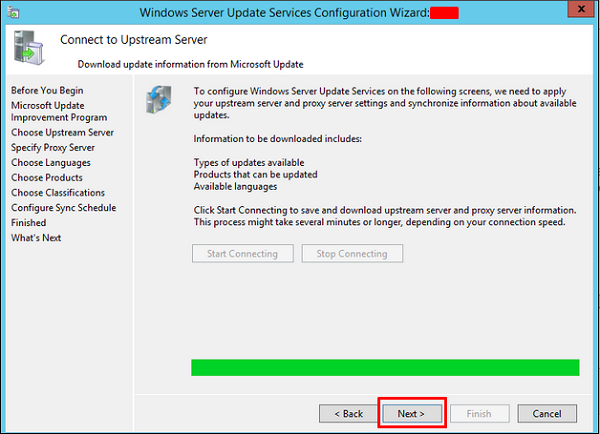
Step 3 − Check the box for which the updates want to be taken, I did for English and then → Next.
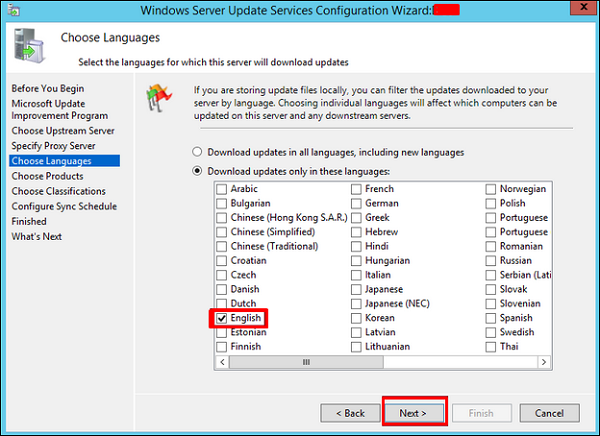
Step 4 − Check the box for all the products which you want to update. It is just for Microsoft products and it is recommended to include all the products related to Microsoft and then → Next.
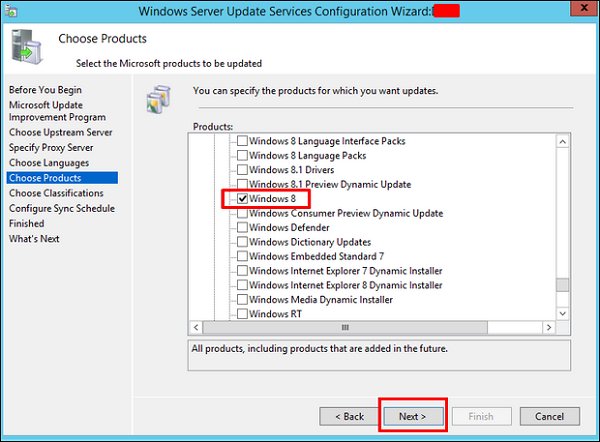
Step 5 − Choose the classification updated to be downloaded, if you have a very good internet speed, then check all the boxes, otherwise just check “Critical Updates”.
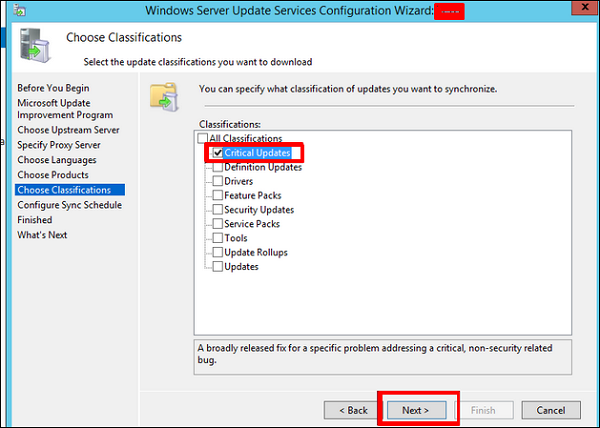
Step 6 − Now we should schedule the updates which I will recommend to do it automatically during night time → Next.

Step 7 − Check Box “Begin initial synchronization” → Finish.
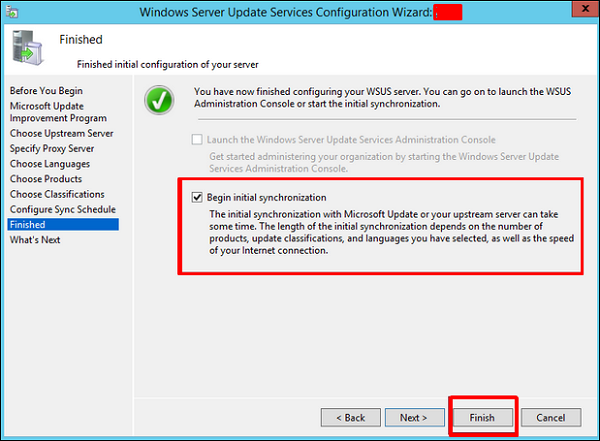
Step 8 − Now the WSUS console will be open and we must add the computer to WSUS. To do this, go to Options → Computers.
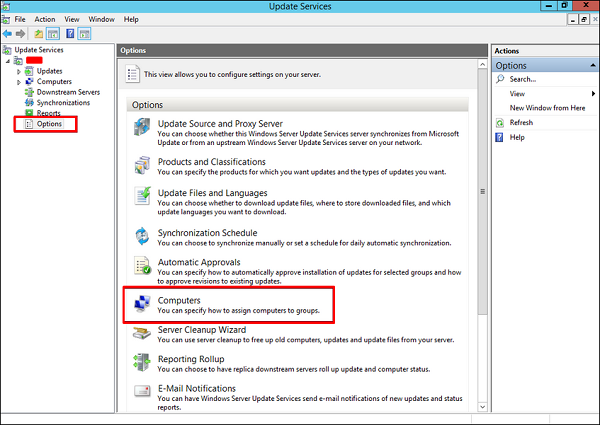
Step 9 − If you have a Domain Controler environment, choose the second option like in my case, otherwise choose the first option and then → OK.
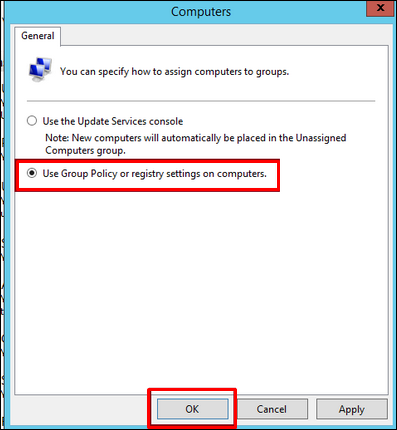
Step 10 − After you have done all this, you should approve updates, which is similar like how it is done in the previous version. To do this – Right click on the updates → Approve as shown in the screenshot given below.
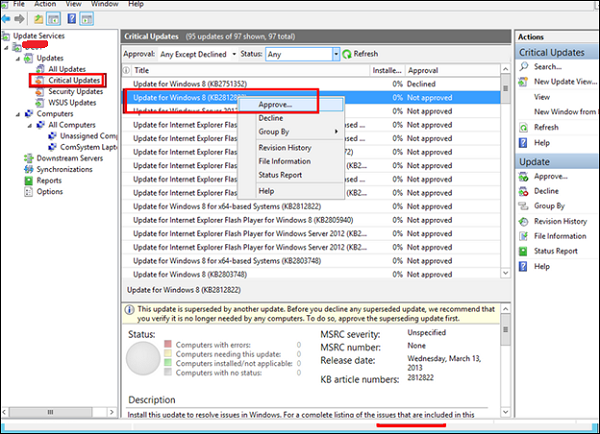
Step 11 − Then you should click Approve for install as shown in the screenshot given below.
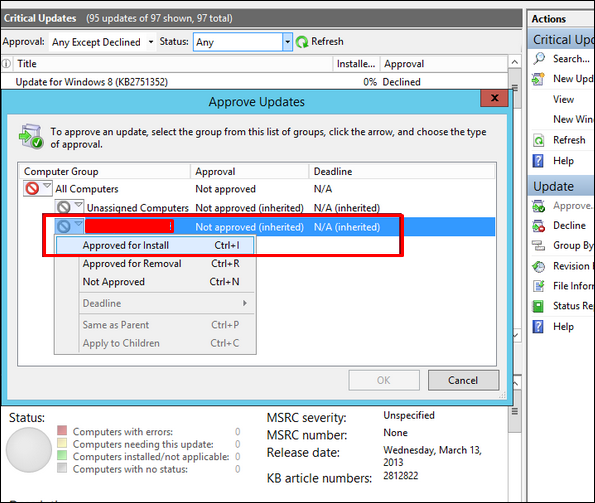
Windows Server 2012 — Sharing of Files
Another important service for Windows Server is Sharing Files and for this purpose the Windows Server 2012 has – File and Storage Services, which is found in Server Manager on the left pane as shown in the screenshot given below.
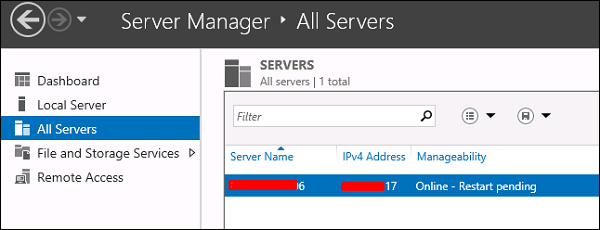
Now let us see how to create a Share in the system with its respective rights. To do this, we should follow the steps given below.
Step 1 − Click Server Manager → then click on File and Storage Services in the Server Manager sidebar → click on Shares → click on the Shares drop-down list → click on New Share.
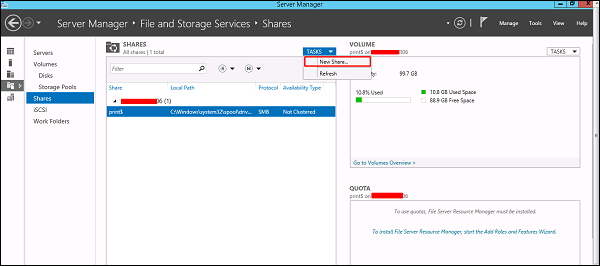
Step 2 − This will open the New Share Wizard → From here, select a type of share → I will create a very basic SMB share, so click on SMB Share – Quick. We can later configure the user rights of this share.

Step 3 − Click “Type a custom path” → click on Browse button.

Step 4 − Select the folder that you want to share → Click Select Folder.
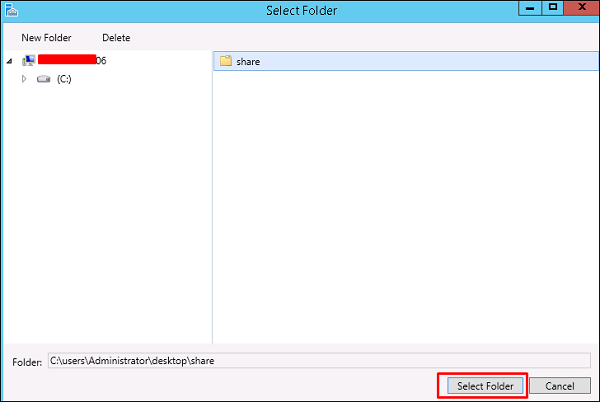
Step 5 − Click Next.
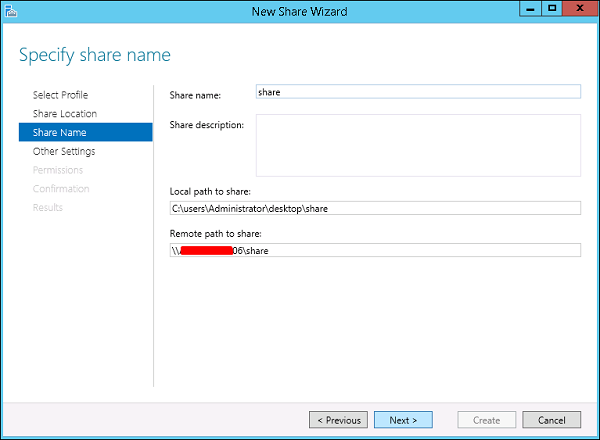
Step 6 − You can choose one of the three options as per your need. The explanations are also mentioned alongside the check boxes, once selected → Next.
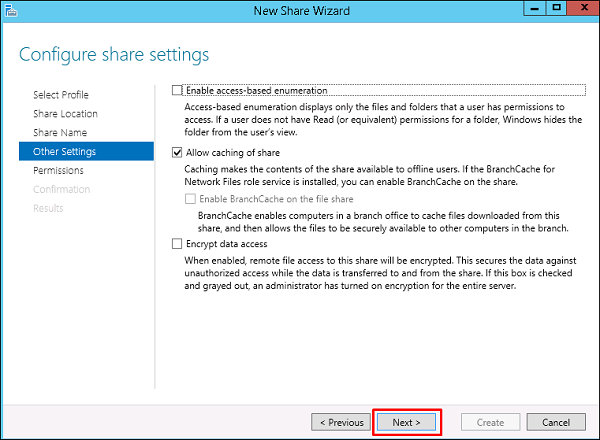
Step 7 − Click on Customize Permissions to authorize the rights that your users need to have.
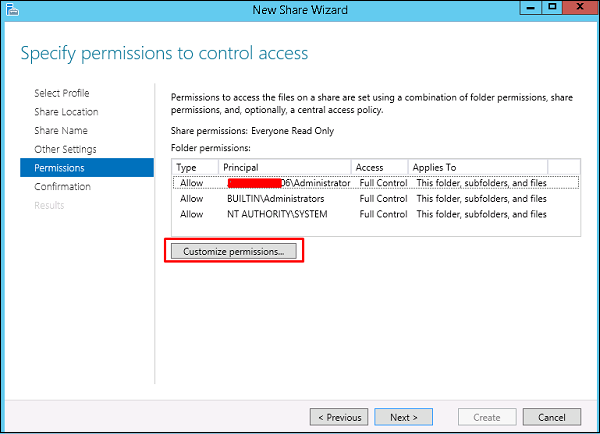
Step 8 − Click on Add if you would like to add other users.
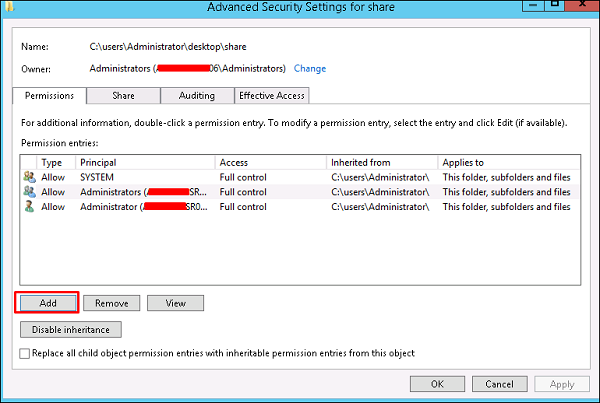
Step 9 − Click on Select a principal.
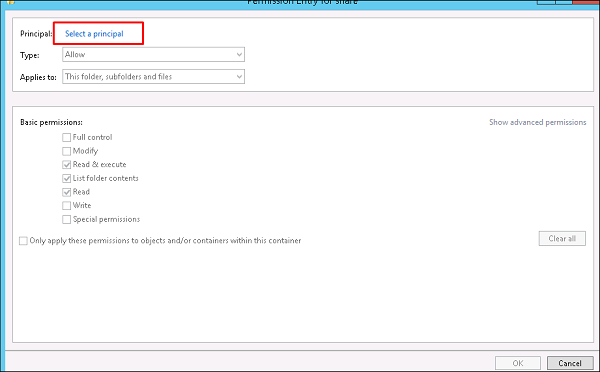
Step 10 − We should give rights that can be done by entering the object name, which is Backup Operator in this case and then → OK.
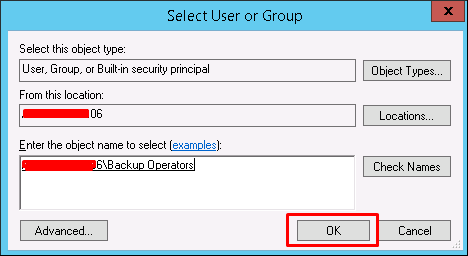
Step 11 − To this user we will give ReadWrite rights, for that we will check the respective boxes and then → OK → OK → Next.
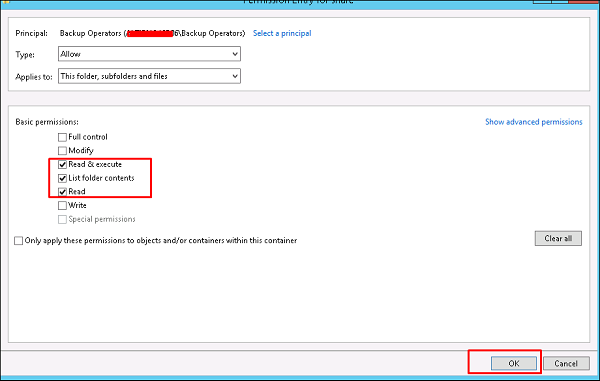
Step 12 − Click on Create.

Windows Server 2012 — File Manager
Like its previous versions, the present Windows Server 2012 version has a File Server Resource Manager Role. As you know, this is a role that helps system administrators to manage shared folders in the features link in setting up limits or file extension restrictions. To install it, we should follow the steps given below.
Step 1 − Go to Server Manager → Manage → Add Roles and Features → Next → Check on the Role-based or feature-based installation box → Check on the Select a server from the server pool box → Next.
Then, at the list of the roles find File and Storage Services and expand it. After this, expand the Files and iSCSI Services → Check on the File Server Resource Manager box and then a pop-up window will open.
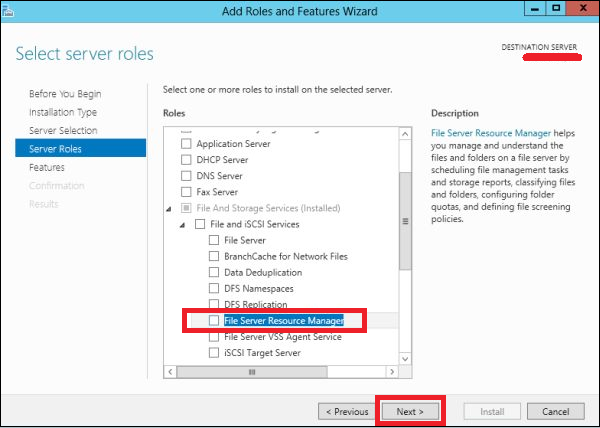
Step 2 − Click on Add features and then → Next.
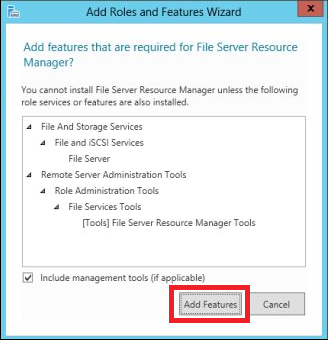
Step 3 − Click the Next button.
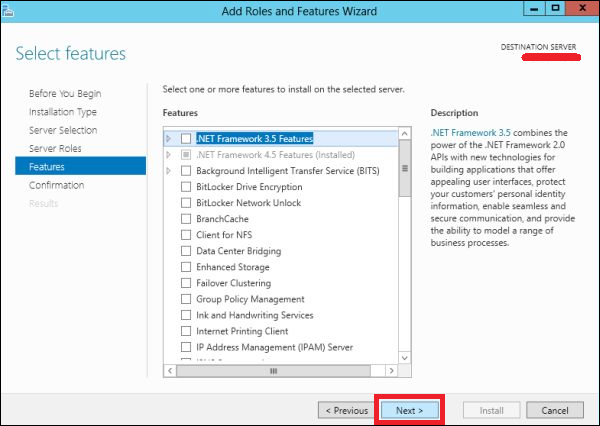
Step 4 − Click the Install button.
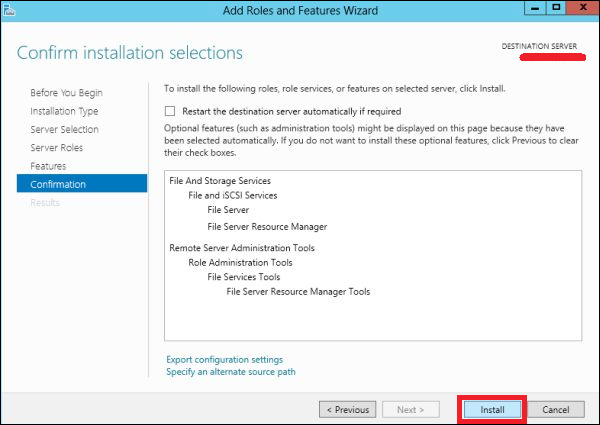
Now that we installed the File Server Resource Manager, let us open it by following the path given below.
Step 1 − Click on Server Manager → Tools → File Server Resource Manager.
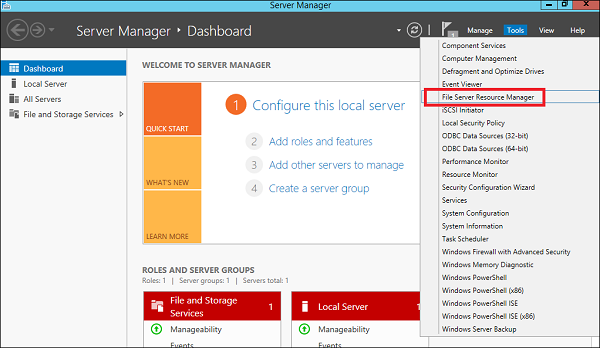
To set quota to a folder, we should follow the steps as below.
Step 2 − On the left panel click on Quota Management → expand Quota Templates → click on Create Quota Template… on the right-hand side panel as shown in the screenshot given below.
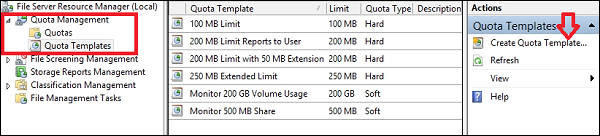
Step 3 − A new table will be opened, where the most important aspect to put is Space Limit depending on the need. Here, we will put 2GB and then → OK.
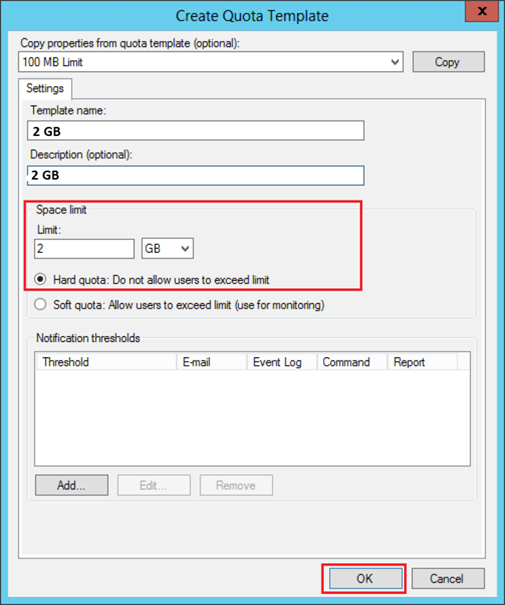
Step 4 − You must put the threshold for it and once the folder reaches the capacity, it will send you a notification where you will have an option to put the email.
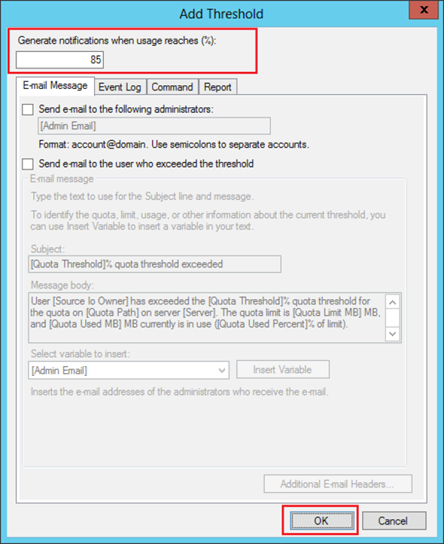
Step 5 − Click Ok.
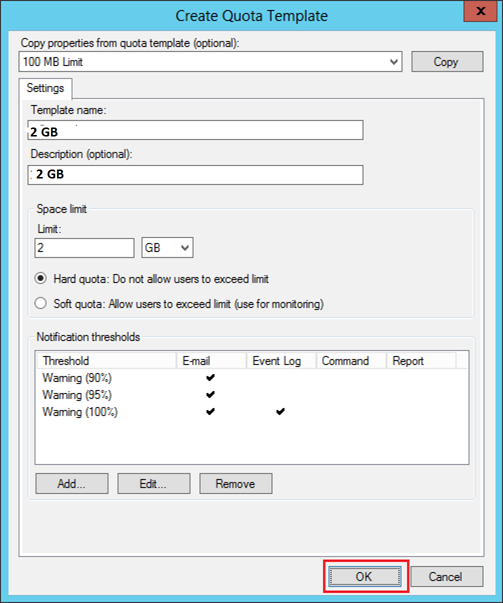
Step 6 − Then to attach this quota to a folder – Right Click on the template → click on Create Quota from Template…
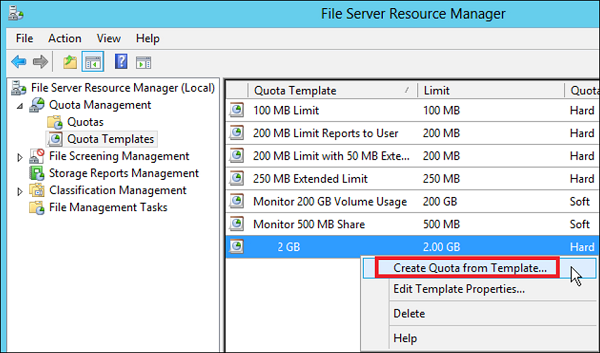
Step 7 − Click on Browse… and then select your folder → Create.
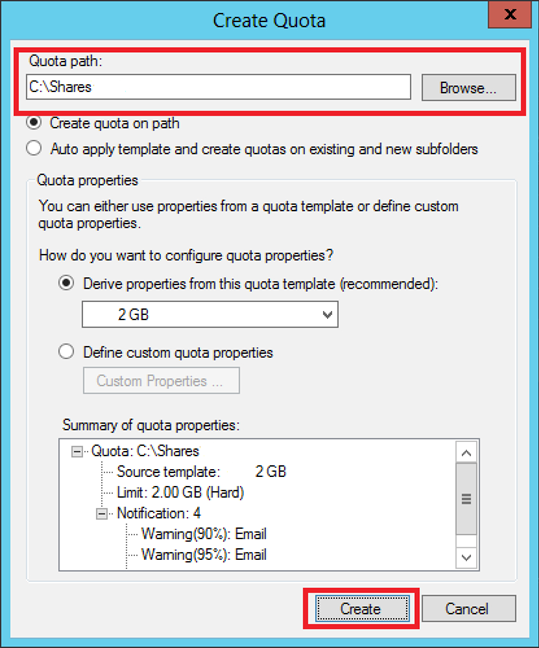
Step 8 − To put a file restriction to your folders, you can go to the left pane File Screening Management → File screening templates → Click on the left panel Create File Screen Template…
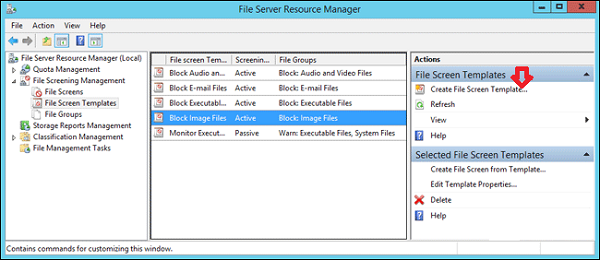
Step 9 − Click on Browse… and find the folder that you want → Create.
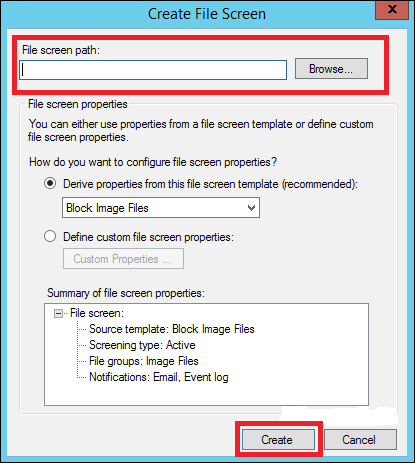
Windows Server 2012 — Print Server
In this chapter, we will see how to install a Print Server which plays some very important roles for the system administrator and the management. We should follow the steps given below.
Step 1 − Go to Server Manager → Manage → Add Roles and Features → Next → Check on the Role-based or feature-based installation box and → Check on Select a server from the server pool and then → Next.
Once it is done then, at the list of the roles find Print and Document Services → A popup window will open.
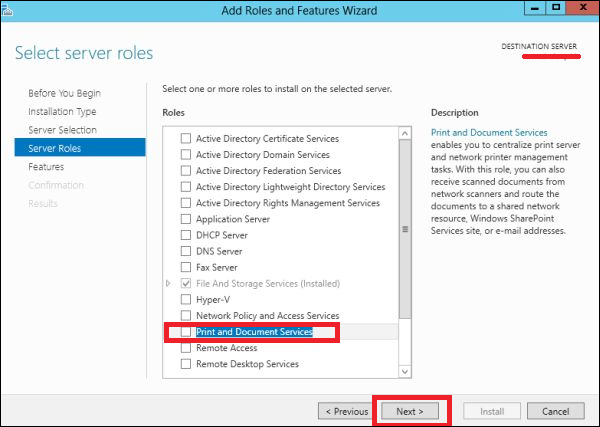
Step 2 − Click on Add features and then → Next → Next → Next.

Step 3 − Check on the Print Server box and → Next.
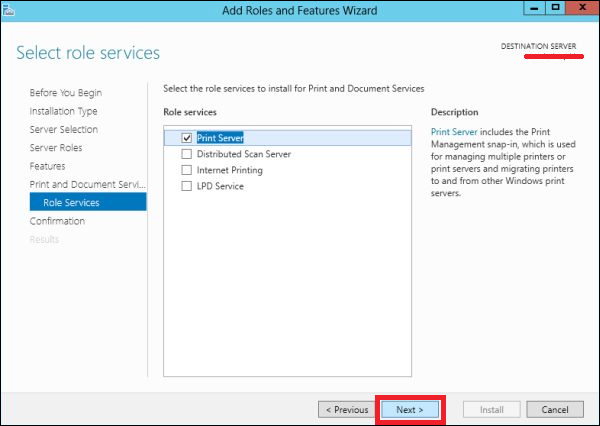
Step 4 − Click Install.
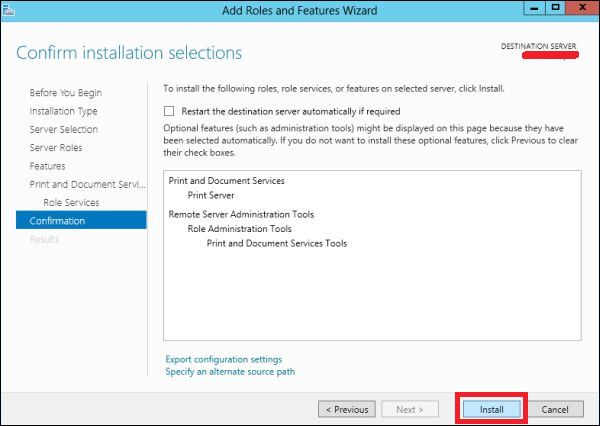
Windows Server 2012 — Easy Printing
Easy Printing is a feature which allows the client that connects via RDS to print over the network. It is installed in Windows server 2012 by default. Easy Printing is basically where the printer device is defined on the client system and a printer is connected directly via the network. All configuration is done via Group Policy Objects.
The configuration settings can be found at Computer Configuration – Administrative Templates – Remote Desktop Services – Printer Redirection.
For User Configuration, it will be have the same path – Administrative Templates – Remote Desktop Services – Printer Redirection.
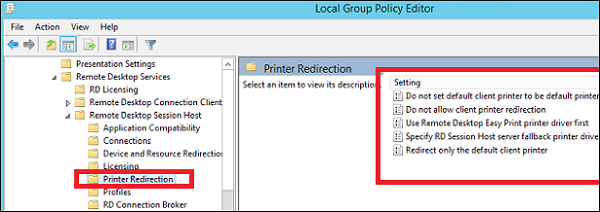
In administration, another important aspect is to set the priority for the printer, so the users have the same printer installer and can print as per their priorities. In this, the users printing with higher priorities overpass the printing will lower priorities.
To do so, you need to add different logical printers and then add then as per the users or departments that have different priorities.
To do this, firstly let us add a printer to the print server by following the steps given below.
Step 1 − Click on Server Manager → Tools → Print Management → then on the left panel click Print Servers → then right click on Printers and → Add Printer.
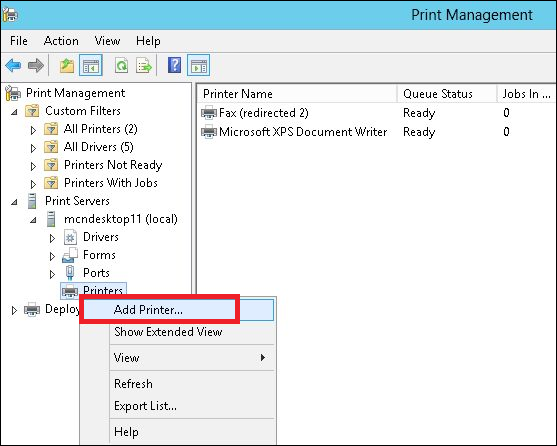
Step 2 − Next, follow the wizard to add the network printer like you do for a normal workstation and at the end this printer will be shown in the Printer Management.
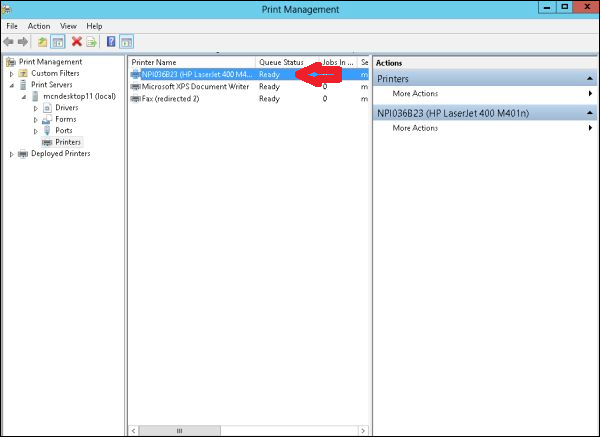
Step 3 − Now that we have installed the printer, we can set the priority on this printer – Right click on the printer → Advanced → put a number at Priority from 1-99 → OK.
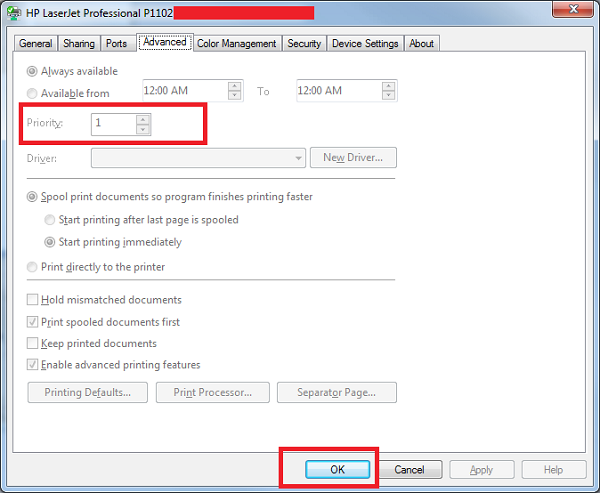
Configure Print Drivers
If we want to add other additional drivers, so that our clients find them easier to install a printer on their own. We must follow the steps given below −
Step 1 − Go to, Server Manager → Tools → Print Manager → Action → Add Driver…
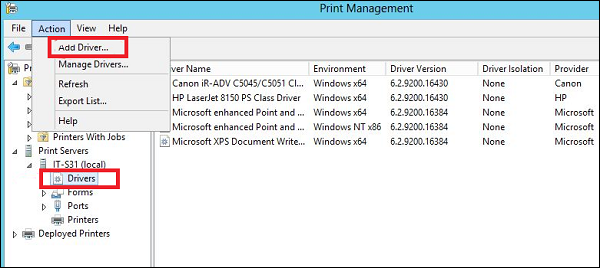
Step 2 − Check both boxes → Next.
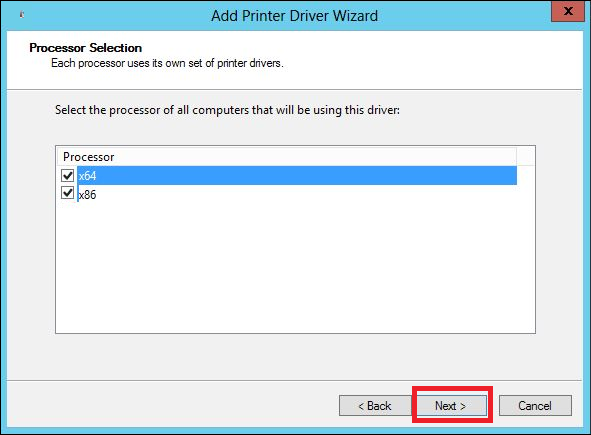
Step 3 − Choose the drivers Path to be installed and then → Next.
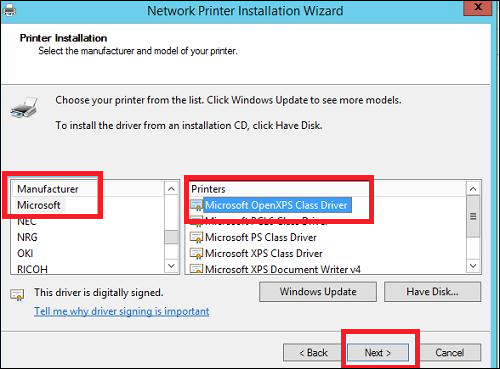
Step 4 − Click the Finish button.
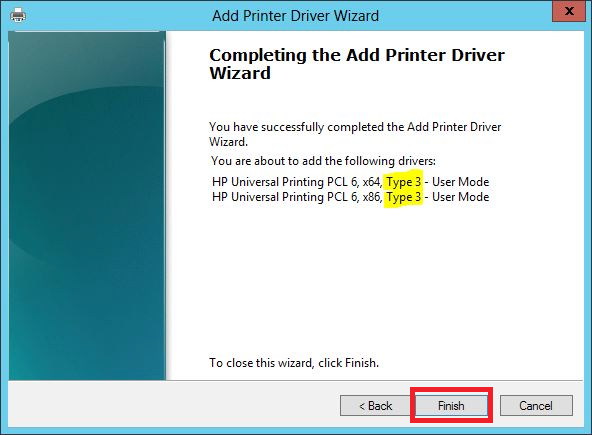
Windows Server 2012 — Network Services
Windows has many network services too and you might already be knowing that it can become a router or a VPN Server too. Let us see how to use the Windows server 2012 as a router by installing the Remote Access role to it.
PS − Server should have 2 network cards – One inside the LAN and the other facing the internet.
To add the Remote Access role, we should follow the steps given below.
Step 1 − Go to, Server Manager → Manage → Add Roles and Features → Next → Check Role-based or feature-based installation → Check Select a server from the server pool → Next.
Once all of it is done, then at the list of the roles find Remote Access and check it → A pop-up window will open.
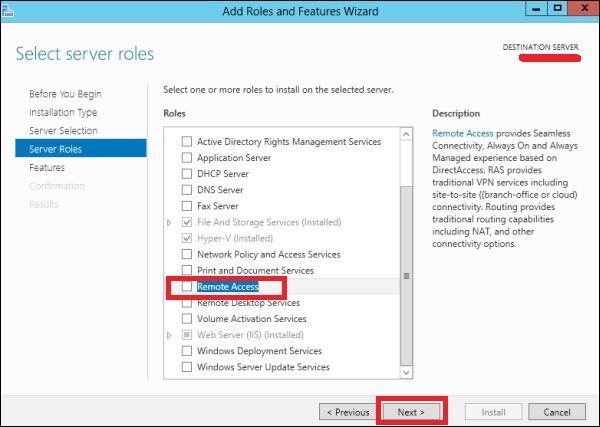
Step 2 − Click “Add Features” → Next.
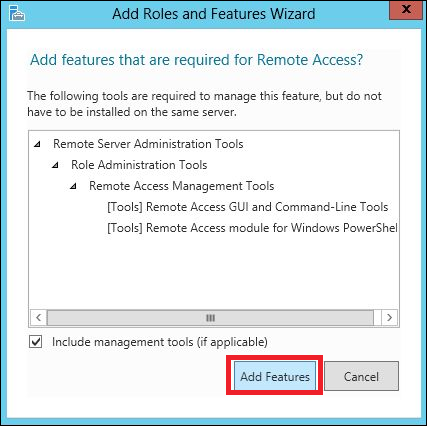
Step 3 − Click Next.
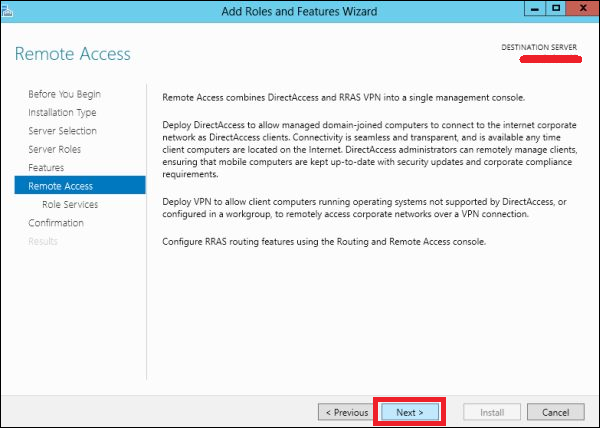
Step 4 − Check on the DirectAccess and VPN(RAS) and Routing check boxes.
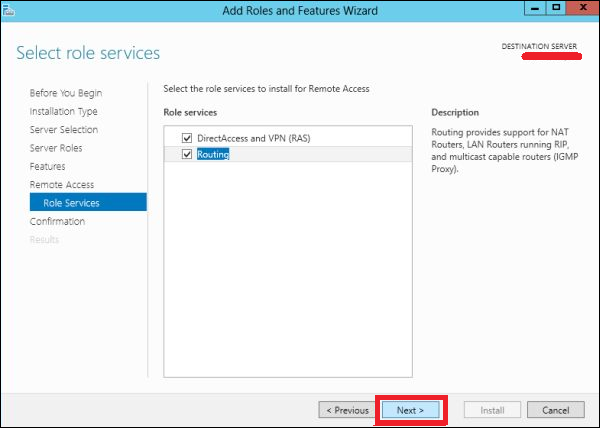
Step 5 − Click Install and wait for it to be installed completely.
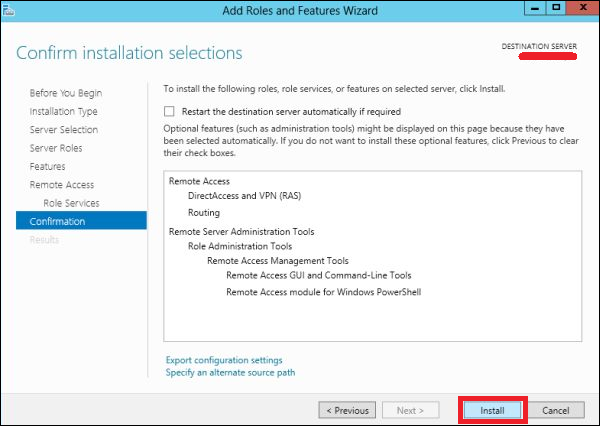
After the installation is done, let us now see the setup of the router. For this, we need to follow the steps given below.
Step 1 − Go to, Server Manager → Tools → Routing and Remote Access.
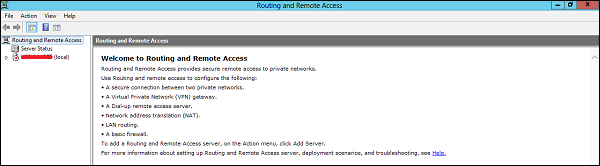
Step 2 − Right click → and then again click on Configure and Enable Routing and Remote Access as shown in the following screenshot.
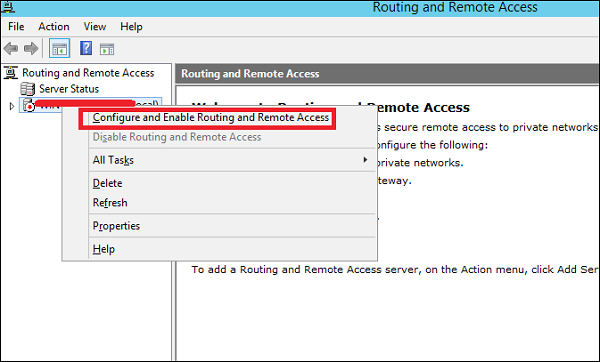
Step 3 − Select the Network address translation (NAT) option → Next.
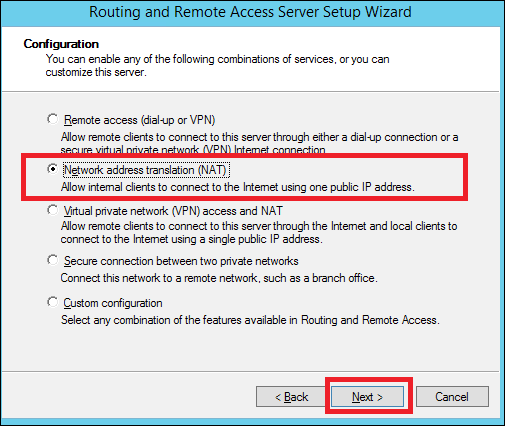
Step 4 − Now choose your Ethernet card that will be facing your internet site as shown in the following image and then → Next.
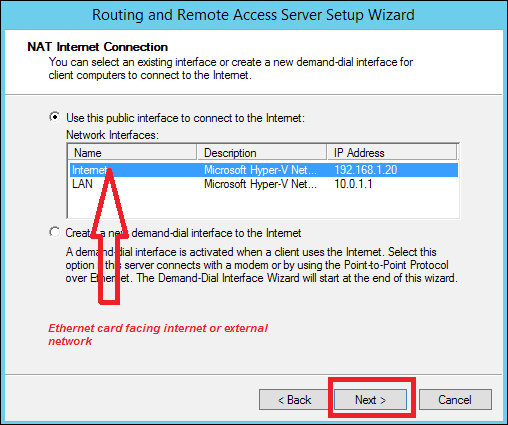
Step 5 − Choose I will set up name and address services later as we have already set up the DHCP and DNS and then → Next.
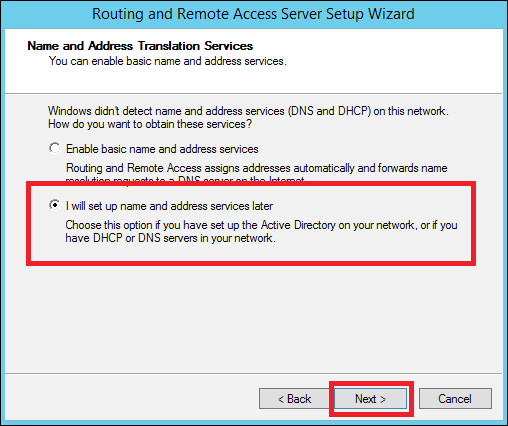
Step 6 − Click the Finish button.
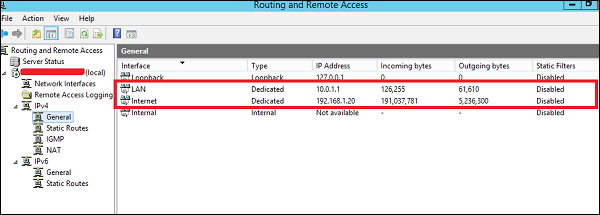
Now let us see how to make the VPN Setup to allow the employees to connect from home. To do this, we must follow the steps given below.
Step 1 − Go to, Server Manager → Tools → Routing and Remote Access → Right click → and then again click on Configure and Enable Routing and Remote Access → Custom Configuration and then → Next.
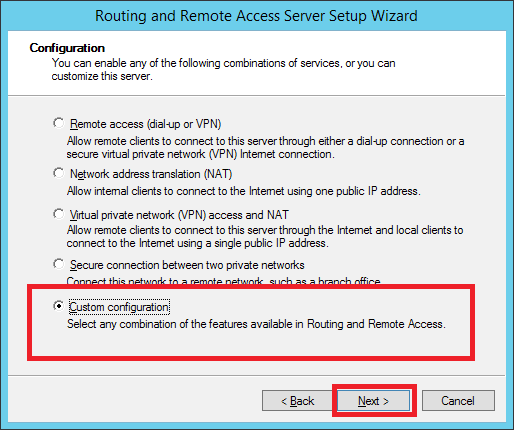
Step 2 − VPN Access and then → Next.
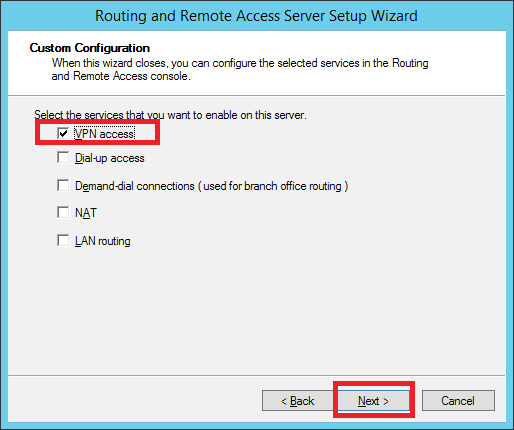
Step 3 − Click the Finish button.
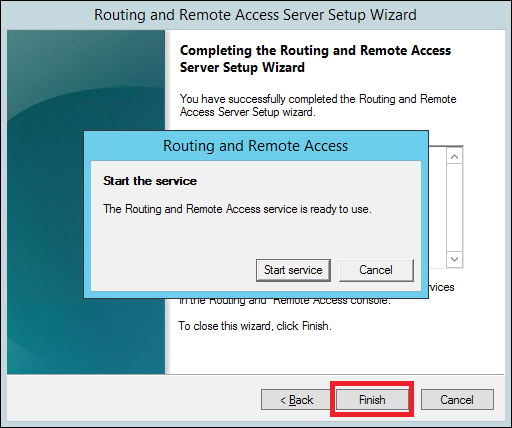
Windows Server 2012 — Backup Management
In this chapter, we will install and configure Backup which does not differ too much from the previous versions.
To Install the backup feature, we should follow the steps given below.
Step 1 − Go to Server Manager → Manage → Add Roles and Features → Next → Check the Role-based or feature-based installation box → then check on the Select a server from the server pool box and then click Next.
Once all this is done, check the Windows Backup Server box and then click on Next as shown in the following screenshot.
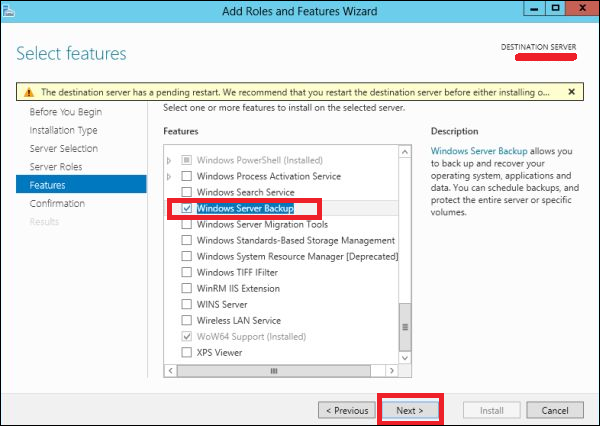
Step 2 − Click Install and then wait for the process to Finish.
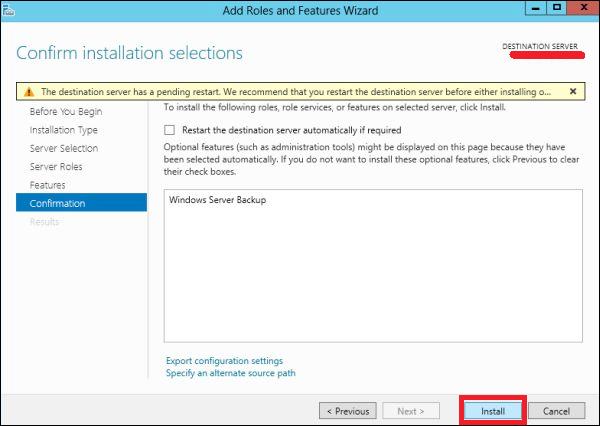
Now let us go and Configure the Backup Feature it, for which we should follow the steps given below.
Step 1 − Go to Server Manager → Tools → Windows Server Backup.
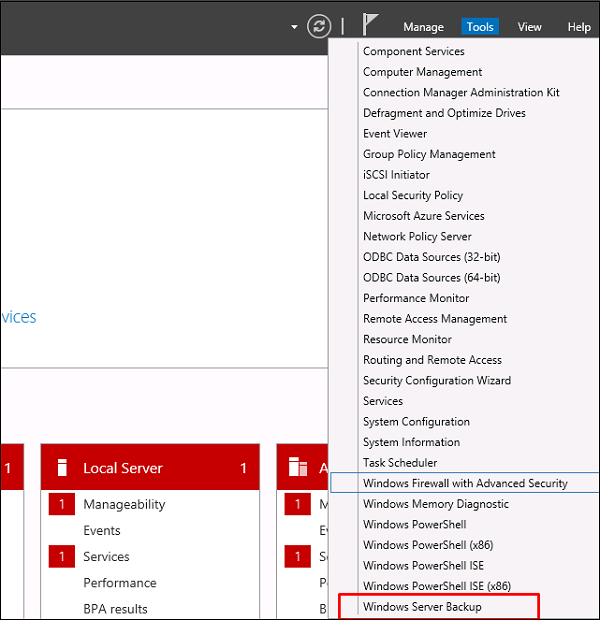
Step 2 − Click on Backup Schedule… in the left side panel or click on Action at the top of the screen as shown in the following screenshot.
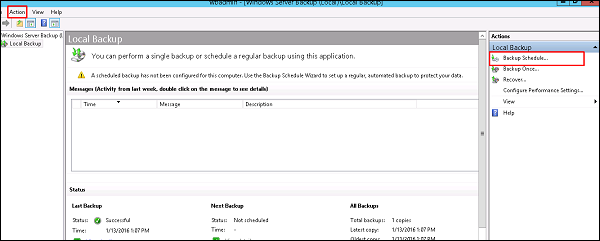
Step 3 − Click Next.
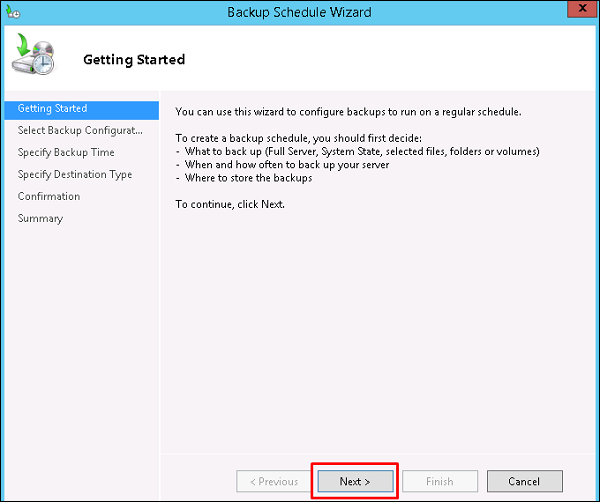
Step 4 − If you want to backup a file or a folder, you can click on custom file, but in this case I want to do a full backup of the server. So, we should click on the first option Full server (recommended) and then click Next.
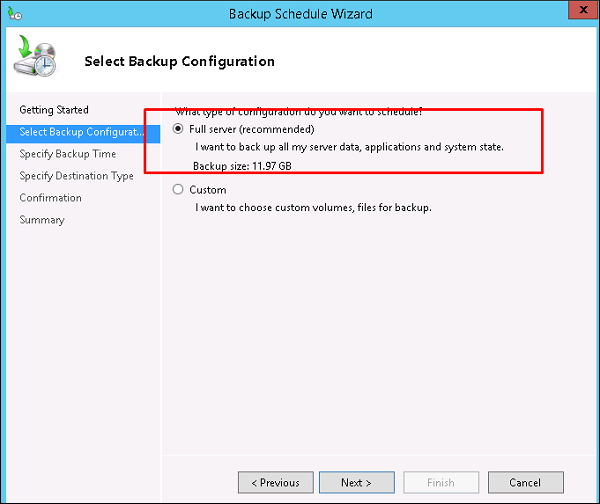
Step 5 − We should do backup once in a day, so we will choose the first option and the appropriate time, which generally is recommended at night → Next.
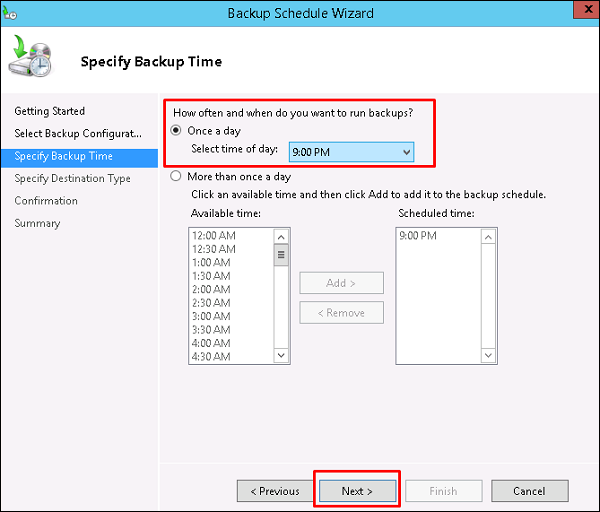
Step 6 − We should not click on the Back Up to a shared network folder option because the backup should be saved somewhere out of the server that is being backed up and then click on Next.
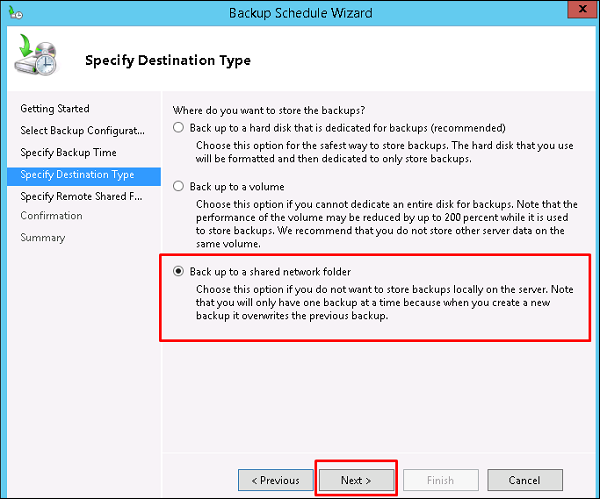
Step 7 − At the location, put the shared folder path and then → Next.

Step 8 − It will pop-up a credentials table asking you for the username and password of the shared folder which you should put here and then click → OK.
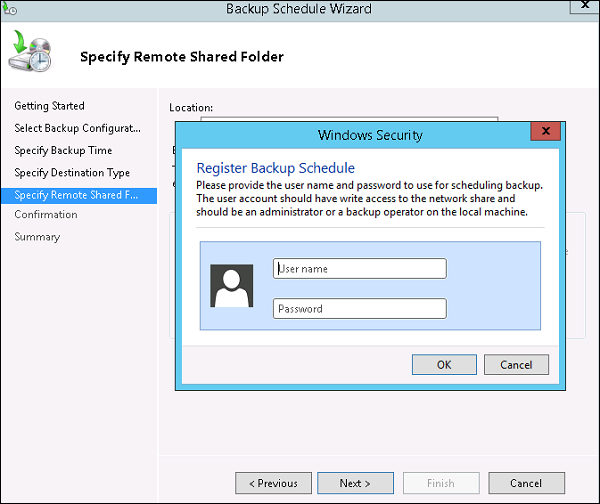
Step 9 − Click the Finish button.
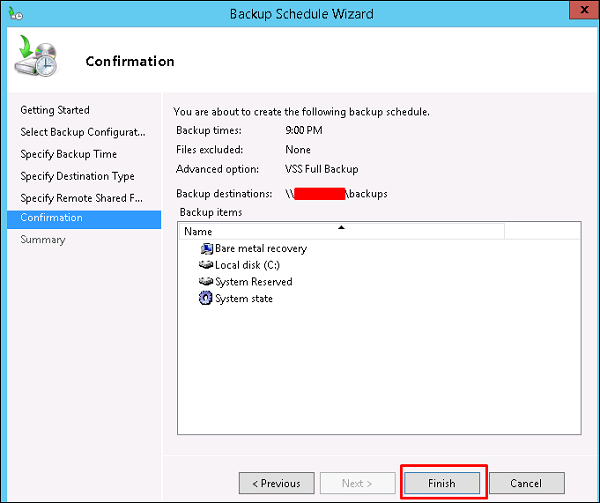
Step 10 − Now you will get a window showing the status if the backup was created successfully or not, which can be seen in the following screenshot.
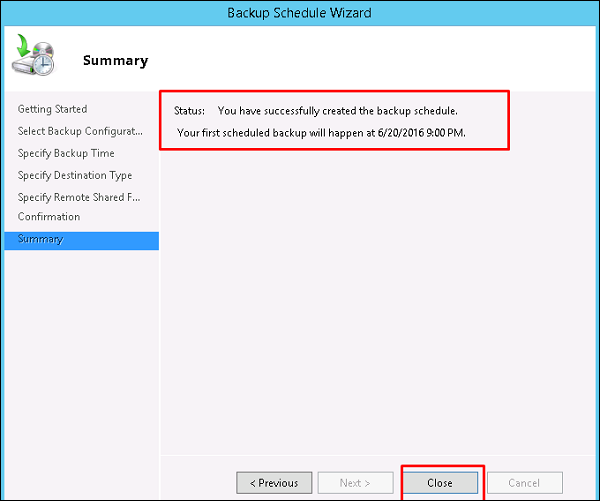
Print
Windows Server 2012 — Overview
Windows Server 2012 codenamed Windows Server 8 is the most recent version of the operating system from Microsoft regarding server management. But it is not the last one, as the last one is Windows Server 2016. Officially it was released on August 1st, 2012 and is being sold as a commercial version only.
Improvements in Windows Server 2012
The major Improvements on this version are as follows −
-
It is ready to be integrated with cloud systems and it still can maintain the classic features of local datacenters as a result Hyper-V Virtualization has new features Hyper-v replicas, it allows you to create virtual machines replications between clusters and storage systems.
-
The Storage migration virtual disks can be moved to different physical storages, Virtual machine snapshots, virtual machines can be deleted from the Hyper-v and also from the virtual disks and it can be used directly without the need to shut down the virtual machine.
-
The Core server installation easily switches to GUI installation without the need of reinstallation.
-
The file server and storage service improvement is that it eliminates identical copies in the same volumes as such and saves space.
-
The Storage pools and storage spaces allows you to group the hard disks to one or more storage pools then it allows to create virtual disks. It can add other disks to the storage pools and make available to the users without impacting them.
-
The iSCSI Target Server can offer block storage to other servers and applications on the network using the iSCSI standard.
-
Active Directory cloning can deploy additional domain controllers by cloning an existing virtual domain controller.
The Windows Server 2012 has four editions: Foundation, Essentials, Standard and Datacenter. Each one of them has their own limitation accept the Datacenter version which is also the most expensive one.
The following table will show what is the right one for your business needs −
For finding out the cost of licensing you can click on the following link − https://www.microsoft.com/en-us/server-cloud/products/windows-server-2012-r2/purchasing.aspx
Windows Server 2012 — Installation
In this chapter, we will discuss regarding the requirements and prerequisites of the Windows Server 2012.
System Requirements
Although most of the servers nowadays probably have the necessary requirements for Windows Server 2012. It will certainly be useful to know them in case you want to upgrade from an older system.
The main requirements are −
-
CPU socket minimum 1.4 GHz (64-bit processor) or faster for single core and Microsoft recommends is 3.1 GHz (64-bit processor) or faster multi-core.
-
RAM memory minimum is 2GB, but Microsoft recommends 8GB.
-
160 GB hard disk with a 60 GB system partition space in your hard disk.
One important thing to note here is that the installation process itself will verify your computer hardware and let you know if it qualifies for a Windows Server 2012 installation. If not, then you will need to upgrade your hardware.
Installation
The following steps are to be adhered for the installation of Windows Server 2012.
Step 1 − We can download the evaluation ISO of Windows Server 2012 R2 from the following link − https://www.microsoft.com/en-us/evalcenter/evaluate-windows-server-2012-r2
But you will need to sign in first with a Microsoft account like Hotmail for example in order to complete the download and the good thing is that the evaluation period will last for 180 days, so you will have enough time to know if it will be the right product for you or not.
At the end, if you decide to buy the license of your Windows server 2012 R2. You can purchase it online via a Microsoft online store found in − https://www.microsoftstore.com/store/msusa/en_US/list/Windows-Server/categoryID.70676900?icid=BusinessR_Software_80_Windows_Server_112315
For the Enterprise solution, I would recommend to purchase it via a Microsoft partner that is found in your country.
Step 2 − After downloading the ISO of Microsoft, create a boot USB driver which can be created with the Microsoft tool called Windows USB/DVD Download Tool and can be downloaded from the following link − https://www.microsoft.com/en-us/download/windows-usb-dvd-download-tool
After downloading the EXE file, open it and select the ISO file location and then click next like in the following screenshot, and wait up to the end when the Boot USB is created.
Step 3 − After completing the above given steps, plug-in the USB to the server and wait for a while till it loads the files. This will continue for about a couple of minutes as shown in the following screenshot.
Step 4 − After the files are loaded, you will see the screen of language settings of installation, keyboard, time and currency format. Generally, all the default ones are also good enough to start with. Click Next.
Step 5 − Click “Install now”.
Step 6 − Once you have clicked on Install Now, the setup will start and it will load all the files and the screen will look as shown in the following screenshot.
Step 7 − Wait until the files are loaded and then you will see the following screen. Let’s select Windows Server 2012 DataCenter Evaluation (Server with GUI) and click Next.
Step 8 − Click “I accept the license terms” and then click on the Next button as shown in the following screenshot.
Step 9 − The following screen will appear. In “Driver Options” you can create a new partition, delete or format the Hard disk. After you have done this process then you can select the partition where the Windows server 2012 R2 will be installed in our case we have one partition. Once all this is done, then click on Next.
Step 10 − Let’s wait until this process finishes during this time and then the server will reboot.
Step 11 − Once the reboot is done the following screen will appear. Set the password for the server and then click on “Finish”.
Step 12 − It will take some minutes until the setup finishes completely.
Step 13 − Once all this is done, you have completed the installation process and the following screen will appear.
Congratulations!!!
Windows Server 2012 — Server Roles
Like the previous version, Windows Server 2012 has the following roles which can be used and in the subsequent chapter, we will see how to install and configure the most important ones.
The following picture shows all the roles. A small reminder! — Roles and Features are the tools that you need to install or activate in order to complete your IT Administration duties, without their installation you cannot do anything.
To add a role in the server we should adhere to the following steps −
Step 1 − Click with the mouse on Server Manager which is found in the task bar as shown in the following screenshot.
Step 2 − After opening the “Server Manager”, click on the second option “Add roles and features”.
Step 3 − The following screen will appear, then you can Click on the Next button.
Step 4 − Select the Role-based or feature-based installation and then click on the Next button.
In the next screen that appears, you will have the following two options −
Option 1 − Select a server from the server pool. This option is – if you want to install the services in the physical server like being done in the following screenshot.
Option 2 − Select a virtual Hard disk if you want to install the services in a virtual disk that can be somewhere in the network storage. Take a look at the following screenshot for better understanding.
Step 5 − The last step will be to check the service that you want to install, but in the upcoming chapters we will continue this setup for each and every important services.
Windows Server 2012 — PowerShell
Windows PowerShell is a command-line shell and scripting language designed especially for system administration. It’s analogue in Linux is called as Bash Scripting. Built on the .NET Framework, Windows PowerShell helps IT professionals to control and automate the administration of the Windows operating system and applications that run on Windows Server environment.
Windows PowerShell commands, called cmdlets, let you manage the computers from the command line. Windows PowerShell providers let you access data stores, such as the Registry and Certificate Store, as easily as you access the file system.
In addition, Windows PowerShell has a rich expression parser and a fully developed scripting language. So in simple words you can complete all the tasks that you do with GUI and much more.
PowerShell Icon can be found in the task bar and in the start menu. Just by clicking on the icon, it will open.
![]()
To open it, just click on the icon and then the following screen will open and it means that PowerShell is ready for you to work on.
The latest version of PowerShell is 5.0 and to check what is installed in our server we type the following command – :$PSVersionTable as shown in the following screenshot and from the screen we also know that we have PSVersion 4.0
To update with the latest version where it has more Cmdlets we have to download Windows Management Framework 5.0 from the following link − https://www.microsoft.com/en-us/download/details.aspx?id=50395 and install it.
PowerShell ISE
The Windows PowerShell Integrated Scripting Environment (ISE) is a host application for Windows PowerShell. In Windows PowerShell ISE, you can run commands and write, test, and debug scripts in a single Windows-based graphic user interface with multiline editing, tab completion, syntax coloring, selective execution, context-sensitive help, and support for right-to-left languages.
You can use menu items and keyboard shortcuts to perform many of the same tasks that you would perform in the Windows PowerShell console. For example, when you debug a script in the Windows PowerShell ISE, to set a line breakpoint in a script, right-click the line of code, and then click Toggle Breakpoint.
To open it you just go to Start – Search and then Type – PowerShell as shown in the following screenshot.
Then click on Windows PowerShell ISE. Or click on the downward Arrow as shown in the following screenshot.
It will list all the applications installed on the server and then click on Windows PowerShell ISE.
The following table will be open −
It has three sections, which include – The PowerShell Console with number 1, then Scripting File number 2 and the third is the Command Module where you can find the module.
While creating the script you can run directly and see the result like the following example −
PowerShell Basic Commands
There are a lot of PowerShell commands and it is very difficult to put in all these commands in this tutorial, we will focus on some of the most important as well as basic commands of PowerShell.
The first step is to go to the Get-Help command which gives you an explanation about how to give a command and its parameter.
To get the list of Updates −
- Get-HotFix and to install a hot fix as follows
- Get-HotFix -id kb2741530
Remote Management
Remote Management Service is one of the most important part pertaining to administration of Windows Server 2012. Administration of servers is performed through Windows Management Instrumentation. WMI instructions can be sent over network WinRM “Remote Management”.
By default this utility is enabled, you can check it by going to Server Manager → then click on Local Server as shown in the following screenshot.
If in case it is disabled, you can enable it by Opening PowerShell and then typing EnablePSRemoting as shown in the screenshot given below.
There is another way to enable it – Click on “Server Manager” → Local Server, then ENABLE Remote management.
Adding a Server for Remote Management
To add other servers for remote management, follow the steps given below −
Step 1 − Server Manager → Dashboard → Add other servers to manage.
Step 2 − If the servers are joined to the domain, you add the select option “Active Directory“, in my case they are not joined, so I selected the second option “DNS” → In the search Box, I added the IP of the server that has to be managed → click on a small arrow → OK.
Step 3 − Go to Server Manager → All Servers, you will see the server that you have added. As my server is in the Work Group, I have to right click and click on – “Manage As” as shown in the following screenshot.
Step 4 − Enter the credentials of the remote server as follows and then → OK.
To remove a managed server, Right Click on server → Remove Server.
Windows Server 2012 — Windows Firewall
The Windows Firewall with Advanced Security is a firewall that runs on the Windows Server 2012 and is turned on by default. The Firewall settings within Windows Server 2012 are managed from within the Windows Firewall Microsoft Management Console. To set Firewall settings perform the following steps −
Step 1 − Click on the Server Manager from the task bar → Click the Tools menu and select Windows Firewall with Advanced Security.
Step 2 − To see the current configuration settings by selecting Windows Firewall Properties from the MMC. This allows access to modify the settings for each of the three firewall profiles, which are – Domain, Private and Public and IPsec settings.
Step 3 − Applying custom rules, which will include the following two steps −
-
Select either Inbound Rules or Outbound Rules under Windows Firewall with Advanced Security on the left side of the management console. (As you Know outbound traffic is the traffic generated from server towards the internet and inbound traffic is vice versa). The rules that are currently enabled are denoted by green checkbox icon, while disabled rules display a grey checkbox icon.
-
Right-clicking a rule will allow you toggle enable/disable.
How to Create a New Firewall Rule?
To create a new Firewall Rule, you have to adhere to the following steps −
Step 1 − From the right side of either the Inbound Rules or Outbound Rules – click “New Rule”.
Step 2 − Custom from the Rule Type radial button → click Next.
Step 3 − Select the Program association for the Custom Firewall Rule as either All programs or the path to a program → click Next.
Step 4 − Protocol type field select the protocol type → click Next.
Step 5 − Select an IP address association for both local and remote addresses → click Next.
Step 6 − Select an action to take on matching traffic → click Next.
Step 7 − Select the profiles associated with the custom rule → click Next.
Step 8 − Put a name for your Firewall rule and an optional description → Finish.
Step 9 − The firewall rule can be found on the corresponding Rule tab, either inbound or outbound depending on the type created. To disable or delete the rule find the rule in the MMC, right-click it and select either Disable Rule or Delete.
Remote Desktop Management
In this chapter, we will see how to enable remote desktop application. It is important because this enables us to work remotely on the server. To do this, we have the following two options. For the first option, we have to follow the steps given below.
Step 1 − Go to Start → right click “This PC” → Properties.
Step 2 − On Left side click “Remote Setting”.
Step 3 − Check radio button “Allow Remote connection to this computer” and Check box “Allow connection only from computers running Remote Desktop with Network Level Authentication (recommended)” → click “Select Users”.
Step 4 − Click Add.
Step 5 − Type user that you want to allow access. In my case, it is administrator → click OK.
For the second option, we need to follow the steps given below.
Step 1 − Click on “Server Manage” → Local Server → click on “Enable” or Disable, if it is Disabled.
Windows Server 2012 — Resource Monitor
Resource Monitor is a great tool to identify which program/service is using resources like program, applications, network connection and memory usages.
To open Resource Monitor, go to Server Manage → Tools.
Click on “Resource Monitor”, the First Section is “Overview”. It tells how much CPU is consuming every application and on the right side of the table, it monitors in real time the chart of CPU usage. The Memory tells how much memory every application is consuming and in the right side of the table it is being monitored in real time in the chart of CPU usage.
The Disk tab splits it by the different hard drives. This will show the current Disk I/O and will show the disk usage per process. The network tab will show the processes and their network bytes sent and received. It will also show the current TCP connections and what ports are currently listening, IDs too.
Windows Server 2012 — Active Directory
In this chapter, we will see how to Install Active Directory in Windows Server 2012 R2. Many of us who have worked with the previous version run DCPROMO.EXE to install it, but in the 2012 version, it is recommended by Microsoft not to use it anymore.
To continue with Installation follow the steps given below.
Step 1 − Go to “Server Manager” → Manage → Add Roles and Feature.
Step 2 − Click the Next button.
Step 3 − As we are installing AAD on this machine, we will select “Role-based or featurebased Installation” → Next.
Step 4 − Click on “Select a server from the server pool”, this is the case when it will be installed locally.
Step 5 − Check mark in the box next to Active Directory Domain Services. A box will be explaining additional roles services or features which are also required to install domain services.
Step 6 − Click Add Features.
Step 7 − Check “Group Policy Management” → Next.
Step 8 − Click the “Next” button.
Step 9 − Click “Install”.
Installation Screen will come up now and you have to wait until installation bar completes.
Now that the installation of DC role is finished, you have to configure it for you server.
Step 10 − Click “Server Manager” → Open the Notifications Pane by selecting the Notifications icon from the top of the Server Manager. From the notification regarding configuring AD DS (Active Directory Domain Services), click Promote this server to a domain controller.
![]()
Step 11 − Click “Add a new forest” → Insert your root domain name into the Root domain name field. In my case, I have put “example.com”.
Step 12 − Select a Domain and Forest functional level. Once selected fill in a DSRM password in the provided password fields. The DSRM password is used when booting the Domain Controller into recovery mode.
Step 13 − In the next screen which shows up, there is a warning on the DNS Options tab, click OK and then select Next.
Step 14 − Enter NETBIOS name and click “Next”.
Step 15 − Select location of the SYSVOL, Log files and Database folders and then click Next.
Step 16 − Click “Install” and wait until it is finished. The server will restart several times.
The installation is now complete.
Windows Server 2012 — DC Accounts
In Windows 2012, creating account OU and group is nearly the same as in the previous versions.
To Create an OU user, please follow the steps given below.
Step 1 − Go to: Server Manager → Tools → Active Directory Users and Computers.
Step 2 − To create an OU named Management. Right-click domain in Active Directory Users and Computers, choose New and click Organizational Unit.
Step 3 − Type Management to name the OU. Check the Protect container from accidental deletion option. This option will protect this object from accidental deletion.
Step 4 − To create a user, Right-click on the Management OU → click New → and then click User.
Step 5 − Complete the field with the data of the users → then click Next.
Step 6 − Now type-in the password. Check on the tick box → User must change password at next logon. The user will be forced to change the password when the user logs in → Click Next → and then click Finish.
Windows Server 2012 — File System
In Windows Server 2012 a new file system it is presented with is caller Resilient File System (ReFS).
The key attributes of ReFS include −
-
Maintaining a high level of data availability and reliability, even when the individual underlying storage devices experience failures.
-
Providing a full, end-to-end resilient architecture when used in conjunction with Storage Spaces. When used together, ReFS and Storage Spaces provide enhanced resiliency to storage device failures.
The significant functionality included with ReFS is described below −
-
Integrity − ReFS stores data in a way that protects it from many of the common errors that can normally cause data loss. When ReFS is used in conjunction with a mirror space or a parity space, detected corruption — both metadata and user data, when integrity streams are enabled — can be automatically repaired using the alternate copy provided by Storage Spaces. In addition, there are Windows PowerShell cmdlets (Get-FileIntegrity and Set-FileIntegrity) that you can use to manage the integrity and disk scrubbing policies.
-
Availability − ReFS prioritizes the availability of data. Historically, file systems were often susceptible to data corruption that would require the system to be taken offline for repair. With ReFS, if corruption occurs, the repair process is both localized to the area of corruption and performed online, requiring no volume downtime. Although rare, if a volume does become corrupted or you choose not to use it with a mirror space or a parity space, ReFS implements salvage, a feature that removes the corrupt data from the namespace on a live volume and ensures that good data is not adversely affected by non-repairable corrupt data. Because ReFS performs all repair operations online, it does not have an offline chkdsk command.
-
Scalability − As the amount and size of data that is stored on computers continues to rapidly increase, ReFS is designed to work well with extremely large data sets — petabytes and larger — without performance impact. ReFS is not only designed to support volume sizes of 2^64 bytes (allowed by Windows stack addresses), but ReFS is also designed to support even larger volume sizes of up to 2^78 bytes using 16 KB cluster sizes. This format also supports 2^64 – 1-byte file sizes, 2^64 files in a directory and the same number of directories in a volume.
-
Proactive Error Correction − The integrity capabilities of ReFS are leveraged by a data integrity scanner, which is also known as a scrubber. The integrity scanner periodically scans the volume, identifying latent corruptions and proactively triggering a repair of that corrupt data.
When the metadata for a ReFS directory is corrupted, subfolders and their associated files are automatically recovered. ReFS identifies and recovers the files while ReFS remains online. Unrecoverable corruption of the ReFS directory metadata affects only those files that are in the directory in which the corruption has occurred.
ReFS includes a new registry entry, RefsDisableLastAccessUpdate, which is the equivalent of the previous NtfsDisableLastAccessUpdate registry entry. The new storage command lets in Windows PowerShell are available (Get-FileIntegrity and SetFileIntegrity) for you to manage the integrity and disk scrubbing policies.
Group Managed Service Accounts
The Managed Service Accounts (MSA) was introduced in Windows Server 2008 R2 to automatically manage (change) passwords of service accounts. Using MSA, you can considerably reduce the risk of system accounts running system services being compromised. MSA has one major problem which is the usage of such service account only on one computer. It means that MSA Service Accounts cannot work with cluster or NLB services, which operate simultaneously on multiple servers and use the same account and password. To fix this, Microsoft added the feature of Group Managed Service Accounts (gMSA) to Windows Server 2012.
To create a gMSA, we should follow the steps given below −
Step 1 − Create the KDS Root Key. This is used by the KDS service on DC to generate passwords.
To use the key immediately in the test environment, you can run the PowerShell command −
Add-KdsRootKey –EffectiveTime ((get-date).addhours(-10))
To check whether it creates successfully or not, we run the PowerShell command −
Get-KdsRootKey
Step 2 − To create and configure gMSA → Open the Powershell terminal and type −
New – ADServiceAccount – name gmsa1 – DNSHostNamedc1.example.com – PrincipalsAllowedToRetrieveManagedPassword «gmsa1Group»
In which,
-
gmsa1 is the name of the gMSA account to be created.
-
dc1.example.com is the DNS server Name.
-
gmsa1Group is the active directory group which includes all systems that have to be used. This group should be created before in the Groups.
To check it, Go to → Server Manager → Tools → Active Directory Users and Computers → Managed Service Accounts.
Step 3 − To install gMAs on a server → open PowerShell terminal and type in the following commands −
- Install − ADServiceAccount – Identity gmsa1
- Test − ADServiceAccount gmsa1
The result should come “True” after running the second command, as shown in the screenshot given below.
Step 4 − Go to service properties, specify that the service will be run with a gMSA account. In the This account box in the Log on tab type the name of the service account. At the end of the name use symbol $, the password need not to be specified. After the changes are saved, the service has to be restarted.
The account will get the “Log On as a Service” and the password will be retrieved automatically.
Group Policy Overview
The features of Group Policy Management were installed during the DC Role Installation. Many of the management features haven’t changed as compared to the previous versions of Windows Server. To create a GPO (Group Policy Overview), we need to follow the steps given below.
Step 1 − To create a GPO open the Group Policy Management Console (GPMC), go to Server Manager → Tools → Group Policy Management as shown in the screenshot below.
Step 2 − Right-click on an OU → select the first option Create a GPO in this domain and Link it here.
Step 3 − Type the Name for this GPO object → click OK button. We have selected the name as Test GPO.
Step 4 − Right-click the GPO object and click Edit.
Windows Server 2012 — DHCP Role
As you know Dynamic Host Configuration Protocol (DHCP) is commonly implemented network services in today’s network environments. DHCP is primarily used to automatically distribute IP configuration settings to network clients, eliminating manually configuring hosts on TCP/IP-based networks.
To Install DHCP role, you will have to follow the steps given below.
Step 1 − Go to “Server Manager” → Manage → Add Roles and Features.
Step 2 − Click Next.
Step 3 − Select the Role-based or feature-based installation option → click Next.
Step 4 − We will install a Local DHCP Role as it will Select a server from the Server Pool → then click Next.
Step 5 − From the Roles lists, check the DHCP Server role → click Add Features on the popup windows as shown in the following screenshots.
Step 6 − Click Next.
Step 7 − Click Next.
Step 8 − Click Install.
Step 9 − Click Close.
Post-deployment Configuration
In this section, we will see how to do the post-deployment configuration of the DHCP. Please follow the steps given below.
Step 1 − Click on the warning icon and then click on “Complete DHCP Configuration”.
Step 2 − Click Next.
Step 3 − Select a domain user account that has permissions to create objects in the Net Services container in Active directory or a domain admin account → click Next.
Step 4 − Click Close.
Scope Implementation of DHCP
Now we have to configure the service to make it useful for the computers. To do this, we need to follow the steps given below.
Step 1 − Server Manager screen → Tools → DHCP.
Step 2 − Right-click on the DHCP Server → then click on “Add/Remove Bindings… “
Step 3 − Ensure the static IP address of the server should appear as shown in the following screenshot.
Step 4 − Right-click on IPv4 → Select “New Scope”.
Step 5 − Click “Next”.
Step 6 − Enter Scope Name and description as shown in the following screenshot and then → Next.
Step 7 − Enter the Start and End IP address, the Subnet mask, leave the Length as default “24” for class C subnet → click Next.
Step 8 − Enter your IP range in the exclusion list. If you have devices on the network that require static IP address and also ensure that the excluded range falls with the Start and End range earlier specified, then → click Next.
Step 9 − Enter the desired lease duration for the assigned IP’s or leave as default → then click Next.
Step 10 − Select → Yes, I want to configure these options now to configure the DHCP options for the new scope → then click on Next.
Step 11 − Enter the default gateway which is the IP of your Router → then click Next.
Step 12 − Add DNS IP → click Next (we can put Google DNS or if it is a Domain environment you can put the DC IP there) then click → Next.
Step 13 − Specify your WINS Server if any and then click → Next.
Step 14 − Select Yes, I want to activate this scope now option to activate the scope immediately and then click → Next.
Step 15 − Click Finish.
Windows Server 2012 — DNS Role
DNS Role is one of the most important services in a network with Domain Controllers Environment. It helps us to resolve domain names internally and externally to IP and to have access to the requested service for the respective domain.
Let us now see how to install the DNS Role. For this we need to follow the steps given below.
Step 1 − To Install DNS role, go to “Server Manager” → Manage → Add Roles and Features.
Step 2 − Click Next.
Step 3 − Select the Role-based or feature-based installation option and then click Next.
Step 4 − We will install a Local DNS role as it will select a server from the server pool → and then click Next.
Step 5 − From the Server Roles lists, check the DNS Server role → click Add Features on the popup windows and then click Next.
Step 6 − Click Next.
Step 7 − Click Install.
Step 8 − Wait until installation bar is complete.
Once the installation is finished, click on Close.
Windows Server 2012 — Primary Zones
To manage DNS, we have to create a primary Zone because by default, there are no zones in order to manage the records.
Step 1 − To manage DNS, go to Server Manager → Tools → DNS → Right click on “Forward Lookup Zone” → New Zone.
Step 2 − Select “Primary Zone” and then click Next.
Step 3 − Enter the name of the primary Zone for which you want to manage the records.
Step 4 − Select “Create a new file with this filename” option.
Step 5 − If you want to update the record of this zone manually, you have to select “Do not allow dynamic Updates”, as shown in the following screenshot.
Step 6 − Click the Finish button.
Windows Server 2012 — Manage Records
As you know, in DNS you can add records according to your need and in Windows server 2012 as well. This doesn’t change too much from its earlier version of Windows Server 2008.
To add or manage records, we have to follow the steps given below −
Step 1 − Server Manager → DNS → Right click on the server that has a DNS record, which in our case is local.
Step 2 − Go to “Forward Lookup Zone”.
Step 3 − Right Click on the empty Field → New Host (A or AAAA) …
Step 4 − Name field and the subdomain name or case is WWW. → IP address we put is 192.168.1.200. So, when we will type-in our browser www.example.com, it will redirect us to 192.168.1.200.
Step 5 − To add a Mail Server Record, we add an MX record and then Right click → New Mail Exchanger as shown in the screenshot given below.
Step 6 − At “Fully qualifies domain name(FQDN) of mail server”, you enter the name of mail server → then in the “Mail server priority”, you enter a number. The smaller the number, the higher the priority.
Windows Server 2012 — IIS Overview
The IIS or Internet Information Services role is one of the most important services in Windows Server 2012. It has improved features as compared to its previous versions and it helps us to publish web application or webpages.
Let us now see how to install the IIS Role for which you will have to follow the steps given below.
Step 1 − To Install IIS role, go to “Server Manager” → then Manage → and then to Add Roles and Features.
Step 2 − Click on Next in the window which pops up.
Step 3 − Select the Role-based or feature-based installation option and then click on Next.
Step 4 − I will install a Local IIS role as it will Select a server from the server pool → then click on Next.
Step 5 − From the Roles lists, check the “Web server” (IIS) Server role → Next.
Step 6 − Click Next.
Step 7 − Click Next.
Step 8 − You can choose all the default setting or customize them according to you needs.
Step 9 − Click Install.
Step 10 − Wait until the Installation Wizard finishes. Once it is done click Close.
Step 11 − Check if your IIS is installed correctly. This can be done by opening your internet explorer and then typing http://localhost and you should be able to see the following screenshot.
Windows Server 2012 — IIS Security
The IIS (Internet Information Services) is facing internet all the time. So, it is important to follow some rules in order to minimize the risk of being hacked or having any other security issues. The first rule is to take all the updates of the system regularly. The second one is to create different application polls to this, which can be done by following the steps shown below.
Step 1 − You have to go to: Server Manager → Internet Information Services (IIS) Manager → Application Pulls.
Step 2 − Click “Sites” → Right Click “Default Website” → Manage Website → Advance Settings.
Step 3 − Select the Default Pools.
Step 4 − Disable the OPTIONS method, this can be done by following the path – Server Manager → Internet Information Services (IIS) Manager → Request Filtering.
Step 5 − In the action pane, select «Deny Verb» → Insert ‘OPTIONS’ in the Verb → OK.
Step 6 − Enable Dynamic IP Restrictions blocks by going to – IIS Manager → Double click on «IP Address and Domain Restrictions» → Actions pane.
Step 7 − Then select «Edit Dynamic Restriction Settings» → Modify and set the dynamic IP restriction settings according to your needs → press OK.
Step 8 − Enable and Configure Request Filtering Rules, to do this – IIS Manager → Double click on «Request Filtering» → Change to the Rules tab → Actions Pane.
Step 9 − Then select «Add Filtering Rule» → Set the required rules → Click OK.
Step 10 − Enable logging, to do this we need to follow this path – IIS Manager → select the specific site you want to configure → Logging.
Windows Server 2012 — Hyper-V
Virtualization is one of the most important technology feature and Microsoft has invested on this and the responsible role is called as Hyper-V.
Let us now see how to install the Hyper-V Role, for doing this we should follow the steps given below.
Step 1 − To Install DNS role go to “Server Manager” → Manage → Add Roles and Features.
Step 2 − Click Next.
Step 3 − Select the Role-based or feature-based installation option → click Next.
Step 4 − I will install a Local Hyper-V role as it will Select a server from the server pool → Next.
Step 5 − From the Roles lists, check the Hyper-V Server role → click Add Features on the popup windows which show up and then → Next.
Step 6 − Click Next.
Step 7 − Choose your server’s physical network adapters that will take part in the virtualization → Next.
Step 8 − Under Migration, leave the default settings → Next.
Step 9 − Choose the path where to save the file.
Step 10 − Click Install and wait for the installation bar to finish.
Advanced Configuration
In this chapter, we will see how to create a virtual machine. Firstly, we should open the Hyper-V manager and then follow the steps given below.
Step 1 − Open “Server Manager” → and then Click on “Hyper-V”.
Step 2 − Click “New” on the Right side Panel or click on Action button in the options as shown in the screenshot below.
Step 3 − Double Click on the Virtual Machine option as shown in the following screenshot.
Step 4 − A new table will be open → Type the Name of your new machine and then click Next.
Step 5 − A new table will be open where you must allocate the memory. Keep in mind that you cannot choose more memory than what you have in your system.
Step 6 − In the Connection dropdown box, choose you physical network adaptor and click Next.
Step 7 − Now it is time to Create a Virtual Hard disk. If you already have one, choose the second option.
Step 8 − Select the Image of ISO that should be installed and then click Finish.
Step 9 − Connect to the Virtual machine. To do so, Right Click on the machine name and then → Connect.
Step 10 − After that, the Installation of your ISO will continue.
Configure WSUS Role
As you know the WSUS (Windows Server Update Services) is an update service of Microsoft which allows the companies to test updates before installing to live environment.
To install this role, we should follow the steps given below.
Step 1 − Go to “Server Manager” → Manage → Add Roles and Feature → Next → Select “Role-based or feature-Based-Installation → Select a server from the pool server and then → Next.
Step 2 − Check “Windows Server Update Service” a pop-up window table will come out → click “Add Features” then → Next and then again → Next.
Step 3 − Check box of WID Database and WSUS Services
Step 4 − Choose the path for the content. If you have another partition other than C:, then install it there because C: can risk to become full → Next.
Once this is done, you should wait for the installation to finish.
WSUS Policies and Tuning
In this chapter, we will see how to configure WSUS and tune it. The following steps should be followed for configuring it.
Step 1 − When you open it for the first time, you should do it by going to “Server Manager” → Tools → Windows Server Update Services, then a Configuration wizard will be opened and then click → Next.
Step 2 − Click “Start Connecting” → Wait until the green bar is full and then → Next.
Step 3 − Check the box for which the updates want to be taken, I did for English and then → Next.
Step 4 − Check the box for all the products which you want to update. It is just for Microsoft products and it is recommended to include all the products related to Microsoft and then → Next.
Step 5 − Choose the classification updated to be downloaded, if you have a very good internet speed, then check all the boxes, otherwise just check “Critical Updates”.
Step 6 − Now we should schedule the updates which I will recommend to do it automatically during night time → Next.
Step 7 − Check Box “Begin initial synchronization” → Finish.
Step 8 − Now the WSUS console will be open and we must add the computer to WSUS. To do this, go to Options → Computers.
Step 9 − If you have a Domain Controler environment, choose the second option like in my case, otherwise choose the first option and then → OK.
Step 10 − After you have done all this, you should approve updates, which is similar like how it is done in the previous version. To do this – Right click on the updates → Approve as shown in the screenshot given below.
Step 11 − Then you should click Approve for install as shown in the screenshot given below.
Windows Server 2012 — Sharing of Files
Another important service for Windows Server is Sharing Files and for this purpose the Windows Server 2012 has – File and Storage Services, which is found in Server Manager on the left pane as shown in the screenshot given below.
Now let us see how to create a Share in the system with its respective rights. To do this, we should follow the steps given below.
Step 1 − Click Server Manager → then click on File and Storage Services in the Server Manager sidebar → click on Shares → click on the Shares drop-down list → click on New Share.
Step 2 − This will open the New Share Wizard → From here, select a type of share → I will create a very basic SMB share, so click on SMB Share – Quick. We can later configure the user rights of this share.
Step 3 − Click “Type a custom path” → click on Browse button.
Step 4 − Select the folder that you want to share → Click Select Folder.
Step 5 − Click Next.
Step 6 − You can choose one of the three options as per your need. The explanations are also mentioned alongside the check boxes, once selected → Next.
Step 7 − Click on Customize Permissions to authorize the rights that your users need to have.
Step 8 − Click on Add if you would like to add other users.
Step 9 − Click on Select a principal.
Step 10 − We should give rights that can be done by entering the object name, which is Backup Operator in this case and then → OK.
Step 11 − To this user we will give ReadWrite rights, for that we will check the respective boxes and then → OK → OK → Next.
Step 12 − Click on Create.
Windows Server 2012 — File Manager
Like its previous versions, the present Windows Server 2012 version has a File Server Resource Manager Role. As you know, this is a role that helps system administrators to manage shared folders in the features link in setting up limits or file extension restrictions. To install it, we should follow the steps given below.
Step 1 − Go to Server Manager → Manage → Add Roles and Features → Next → Check on the Role-based or feature-based installation box → Check on the Select a server from the server pool box → Next.
Then, at the list of the roles find File and Storage Services and expand it. After this, expand the Files and iSCSI Services → Check on the File Server Resource Manager box and then a pop-up window will open.
Step 2 − Click on Add features and then → Next.
Step 3 − Click the Next button.
Step 4 − Click the Install button.
Now that we installed the File Server Resource Manager, let us open it by following the path given below.
Step 1 − Click on Server Manager → Tools → File Server Resource Manager.
To set quota to a folder, we should follow the steps as below.
Step 2 − On the left panel click on Quota Management → expand Quota Templates → click on Create Quota Template… on the right-hand side panel as shown in the screenshot given below.
Step 3 − A new table will be opened, where the most important aspect to put is Space Limit depending on the need. Here, we will put 2GB and then → OK.
Step 4 − You must put the threshold for it and once the folder reaches the capacity, it will send you a notification where you will have an option to put the email.
Step 5 − Click Ok.
Step 6 − Then to attach this quota to a folder – Right Click on the template → click on Create Quota from Template…
Step 7 − Click on Browse… and then select your folder → Create.
Step 8 − To put a file restriction to your folders, you can go to the left pane File Screening Management → File screening templates → Click on the left panel Create File Screen Template…
Step 9 − Click on Browse… and find the folder that you want → Create.
Windows Server 2012 — Print Server
In this chapter, we will see how to install a Print Server which plays some very important roles for the system administrator and the management. We should follow the steps given below.
Step 1 − Go to Server Manager → Manage → Add Roles and Features → Next → Check on the Role-based or feature-based installation box and → Check on Select a server from the server pool and then → Next.
Once it is done then, at the list of the roles find Print and Document Services → A popup window will open.
Step 2 − Click on Add features and then → Next → Next → Next.
Step 3 − Check on the Print Server box and → Next.
Step 4 − Click Install.
Windows Server 2012 — Easy Printing
Easy Printing is a feature which allows the client that connects via RDS to print over the network. It is installed in Windows server 2012 by default. Easy Printing is basically where the printer device is defined on the client system and a printer is connected directly via the network. All configuration is done via Group Policy Objects.
The configuration settings can be found at Computer Configuration – Administrative Templates – Remote Desktop Services – Printer Redirection.
For User Configuration, it will be have the same path – Administrative Templates – Remote Desktop Services – Printer Redirection.
In administration, another important aspect is to set the priority for the printer, so the users have the same printer installer and can print as per their priorities. In this, the users printing with higher priorities overpass the printing will lower priorities.
To do so, you need to add different logical printers and then add then as per the users or departments that have different priorities.
To do this, firstly let us add a printer to the print server by following the steps given below.
Step 1 − Click on Server Manager → Tools → Print Management → then on the left panel click Print Servers → then right click on Printers and → Add Printer.
Step 2 − Next, follow the wizard to add the network printer like you do for a normal workstation and at the end this printer will be shown in the Printer Management.
Step 3 − Now that we have installed the printer, we can set the priority on this printer – Right click on the printer → Advanced → put a number at Priority from 1-99 → OK.
Configure Print Drivers
If we want to add other additional drivers, so that our clients find them easier to install a printer on their own. We must follow the steps given below −
Step 1 − Go to, Server Manager → Tools → Print Manager → Action → Add Driver…
Step 2 − Check both boxes → Next.
Step 3 − Choose the drivers Path to be installed and then → Next.
Step 4 − Click the Finish button.
Windows Server 2012 — Network Services
Windows has many network services too and you might already be knowing that it can become a router or a VPN Server too. Let us see how to use the Windows server 2012 as a router by installing the Remote Access role to it.
PS − Server should have 2 network cards – One inside the LAN and the other facing the internet.
To add the Remote Access role, we should follow the steps given below.
Step 1 − Go to, Server Manager → Manage → Add Roles and Features → Next → Check Role-based or feature-based installation → Check Select a server from the server pool → Next.
Once all of it is done, then at the list of the roles find Remote Access and check it → A pop-up window will open.
Step 2 − Click “Add Features” → Next.
Step 3 − Click Next.
Step 4 − Check on the DirectAccess and VPN(RAS) and Routing check boxes.
Step 5 − Click Install and wait for it to be installed completely.
After the installation is done, let us now see the setup of the router. For this, we need to follow the steps given below.
Step 1 − Go to, Server Manager → Tools → Routing and Remote Access.
Step 2 − Right click → and then again click on Configure and Enable Routing and Remote Access as shown in the following screenshot.
Step 3 − Select the Network address translation (NAT) option → Next.
Step 4 − Now choose your Ethernet card that will be facing your internet site as shown in the following image and then → Next.
Step 5 − Choose I will set up name and address services later as we have already set up the DHCP and DNS and then → Next.
Step 6 − Click the Finish button.
Now let us see how to make the VPN Setup to allow the employees to connect from home. To do this, we must follow the steps given below.
Step 1 − Go to, Server Manager → Tools → Routing and Remote Access → Right click → and then again click on Configure and Enable Routing and Remote Access → Custom Configuration and then → Next.
Step 2 − VPN Access and then → Next.
Step 3 − Click the Finish button.
Windows Server 2012 — Backup Management
In this chapter, we will install and configure Backup which does not differ too much from the previous versions.
To Install the backup feature, we should follow the steps given below.
Step 1 − Go to Server Manager → Manage → Add Roles and Features → Next → Check the Role-based or feature-based installation box → then check on the Select a server from the server pool box and then click Next.
Once all this is done, check the Windows Backup Server box and then click on Next as shown in the following screenshot.
Step 2 − Click Install and then wait for the process to Finish.
Now let us go and Configure the Backup Feature it, for which we should follow the steps given below.
Step 1 − Go to Server Manager → Tools → Windows Server Backup.
Step 2 − Click on Backup Schedule… in the left side panel or click on Action at the top of the screen as shown in the following screenshot.
Step 3 − Click Next.
Step 4 − If you want to backup a file or a folder, you can click on custom file, but in this case I want to do a full backup of the server. So, we should click on the first option Full server (recommended) and then click Next.
Step 5 − We should do backup once in a day, so we will choose the first option and the appropriate time, which generally is recommended at night → Next.
Step 6 − We should not click on the Back Up to a shared network folder option because the backup should be saved somewhere out of the server that is being backed up and then click on Next.
Step 7 − At the location, put the shared folder path and then → Next.
Step 8 − It will pop-up a credentials table asking you for the username and password of the shared folder which you should put here and then click → OK.
Step 9 − Click the Finish button.
Step 10 − Now you will get a window showing the status if the backup was created successfully or not, which can be seen in the following screenshot.
Print
Microsoft хотела представить единую консоль управления для сервера Windows с момента выпуска Windows Server 2008. Эта консоль управления называлась Server Manager, но ее было крайне неудобно использовать. В Windows Server 2008 R2 эта консоль была немного изменена и с нее уже было удобно выполнять некоторые операции по управлению сервером. В Windows Server 2012 консоль управления Server Manager была значительно улучшена и доработана, и следует отметить, что этот инструмент Windows Server Management стал действительно удобным и полезным.
Фактически консоль Server Manager представляет собой графическую оболочку для генерации сценариев PowerShell (эта функция знакома администраторам Exchange 2010). Например, в консоли управления AD – Центр администрирования Active Directory появилась специальная панель PowerShell History, в которой генерируются и отображаются скрипты, дублирующие действия администратора в графическом интерфейсе, и этот код можно использовать в будущем для автоматизации некоторых задач для управления настройками и объектами Active Directory.
Новая консоль Server Manager имеет следующие функции:
- Возможность управлять несколькими серверами одновременно с единой консоли и возможность группировать серверы
- Возможность установки ролей и функций на удаленных серверах и отключенных виртуальных дисках (Vhd, Vhdx)
- Действия консоли можно преобразовать в команды PowerShell
- Возможность интеграции других инструментов управления в консоль
- Мониторинг состояния всех подключенных серверов в единой панели (дашборде)
Консоль Server Manager запускается автоматически при входе на сервер, и первое, что видит администратор, – это панель мониторинга. На этой панели отображается текущий статус серверов, подключенных к этой консоли Server Manager. В случае возникновения проблем с сервером или группой серверов, красные значки появляются рядом с элементами, требующими внимания администратора (если есть только зеленые элементы, все в порядке).

Верхняя панель инструментов окна содержит несколько значков и пунктов меню: «Управление», «Инструменты», «Просмотр» и «Справка.
Используя значок «Обновить», вы можете вручную обновить информацию на информационной панели. Также есть значок в виде флажка, если он красный, то при нажатии на него будут показаны все проблемы, обнаруженные на серверах.
Меню «Управление» содержит «Добавить роли и компоненты», «Удалить роли и компоненты», «Добавить сервер» (добавить серверы в группу управления), «Создать группу» (создать группу серверов) и «Свойства диспетчера серверов» (настройки консоли).

Меню «Инструменты» содержит ссылки на различные консоли MMC и другие утилиты администрирования. Вы можете добавить свои собственные инструменты в это меню (Как добавить свои собственные утилиты в Диспетчер серверов).
Правая панель содержит следующие элементы: Панель мониторинга, Локальный сервер, Все серверы и несколько групп серверов, созданных администратором. На центральной панели вы можете настроить локальный сервер, управлять ролями и функциями, а также управлять группами серверов.
В разделе «Локальный сервер» вы можете получить практически всю информацию о сервере, его ролях, событиях и сервисах. В свойствах локального сервера отображается такая информация, как имя компьютера, домен, параметры сети, версия операционной системы, параметры службы Windows Update, состояние активации, параметры оборудования и часовой пояс.
Раздел «Все серверы» содержит почти ту же информацию, что и локальный сервер, разница в том, что в этом разделе вы можете просматривать параметры нескольких серверов одновременно.
В консоли вы можете создавать разные группы серверов на основе любой характеристики, например «сервер филиала в Рязани», все контроллеры домена, Exchange или веб-серверы. Также данные сервера не обязательно должны быть Windows Server 2012, это может быть Windows 2008 / R2 / 2003 / R2, важно, чтобы на них был установлен и активирован пакет WinRM 3.0.
Вы можете добавить серверы в консоль через соответствующее меню.
Щелкнув правой кнопкой мыши на любом сервере в группе серверов, вы можете открыть меню, которое позволяет вам начать установку ролей, клиента rdp, открыть консоль управления сервером и т.д.
Источник изображения: winitpro.ru
SolVPS
|
Published: August 8, 2017
Can’t find Server Manager? It’s ok, it happens. It’s possible to launch Server Manager from command prompt or PowerShell.
How to Open Server Manager via Command Prompt
1. Open Command Prompt (Start > Run > cmd), or PowerShell
2. Type ServerManager and press Enter
Server Manager should open. That was easy!
This article applies to:
- Windows Server 2016
- Windows Server 2012
- Windows Server 2008
This entry was posted in Tech Support, VPS Hosting, Windows Server, Windows VPS. Bookmark the permalink. Trackbacks are closed, but you can post a comment.