by Loredana Harsana
Loredana is a passionate writer with a keen interest in PC software and technology. She started off writing about mobile phones back when Samsung Galaxy S II was… read more
Updated on
- The Windows 11 boot settings let you access the advanced option to reset and repair your Windows PC.
- It comes in handy if your PC runs into any issues or gets corrupted due to some internal software issues.
- You can quickly troubleshoot your problems and repair your PC using the Recovery mode.
The boot options are a safe zone in the Windows 11 system and can help you recover from the majority of the software issues.
You can back up your files, boot into Safe Mode, uninstall faulty updates and restore your Windows 11 system to a previous secure point.
In this article, if you’re a new user, we’ll show you where to find the boot options in Windows 11. It’ll help you easily navigate your settings and save your system in case of any mishaps.
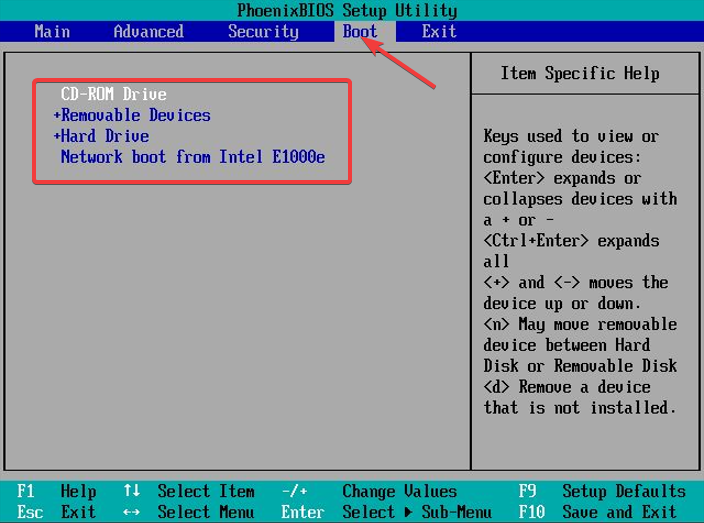
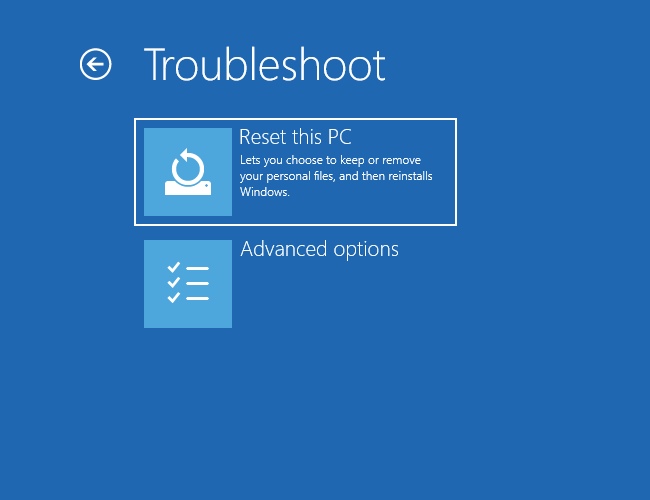
How can the boot options help you in Windows 11?
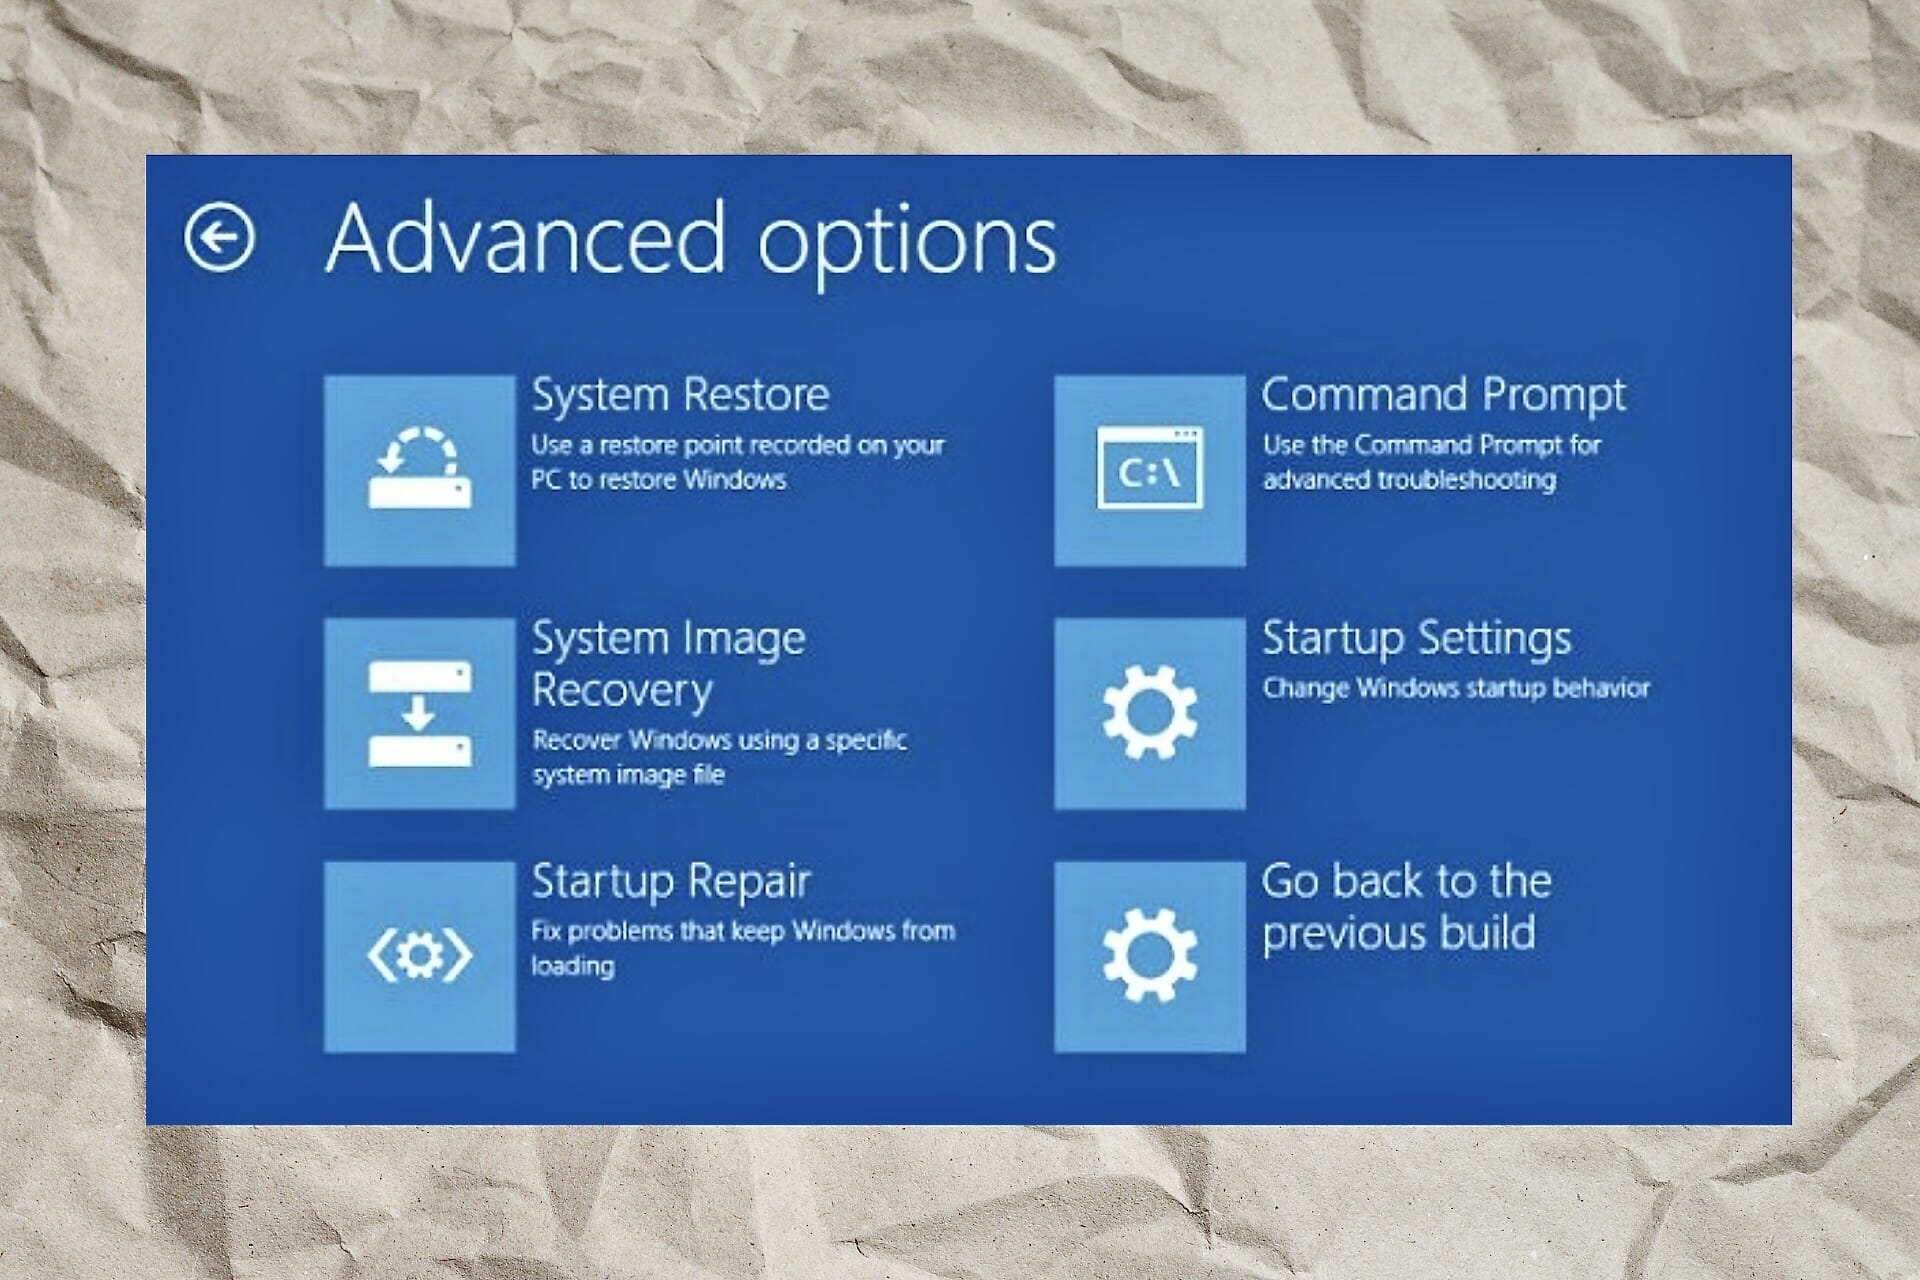
The Recovery mode or the Troubleshooting mode in Windows gives you access to all the options to restore or repair your windows, booting options, and a lot more.
As you can see from our screenshot, this mode helps you troubleshoot your system or reset your PC to factory settings.
How we test, review and rate?
We have worked for the past 6 months on building a new review system on how we produce content. Using it, we have subsequently redone most of our articles to provide actual hands-on expertise on the guides we made.
For more details you can read how we test, review, and rate at WindowsReport.
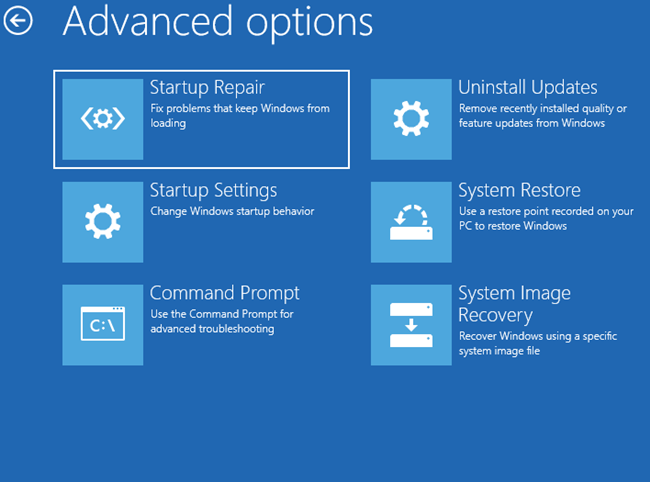
Actually, the Recovery mode in Windows 11 is the same as the one from Windows 10 and it comes with the following functions:
- Startup Repair – A way to check any Windows startup issues
- Safe Mode booting – It is very useful when you need to boot your system without loading all the Startup software and troubleshoot third-party software interference
- System Restore – This feature is useful for restoring your system to a previous restore point
- System Image Recovery – If you have a system backup file, you have the option of restoring your system using it
- Command Prompt – Advanced users can launch Command Prompt for command-line troubleshooting
For more information on what these Windows 11 recovery methods are intended to do, check the Microsoft page on the subject. If what you truly want to do is just enter it, all you have to do is follow one of the below methods.
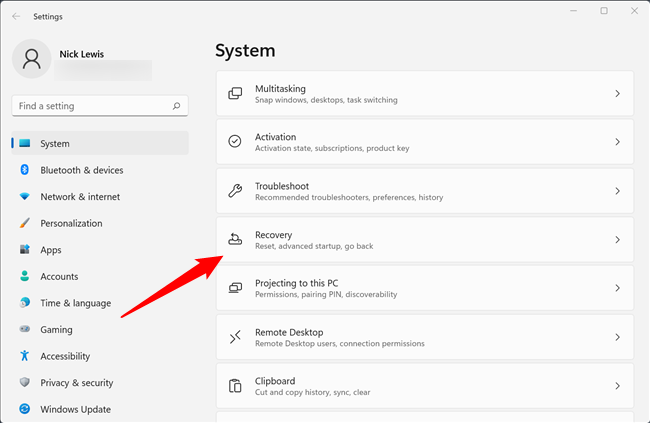
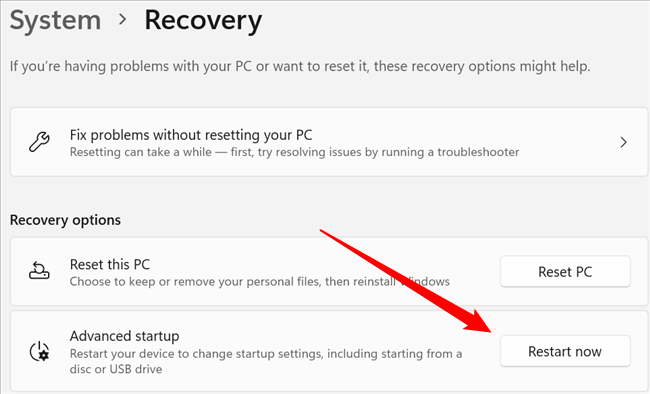
How can I access the boot settings in Windows 11?
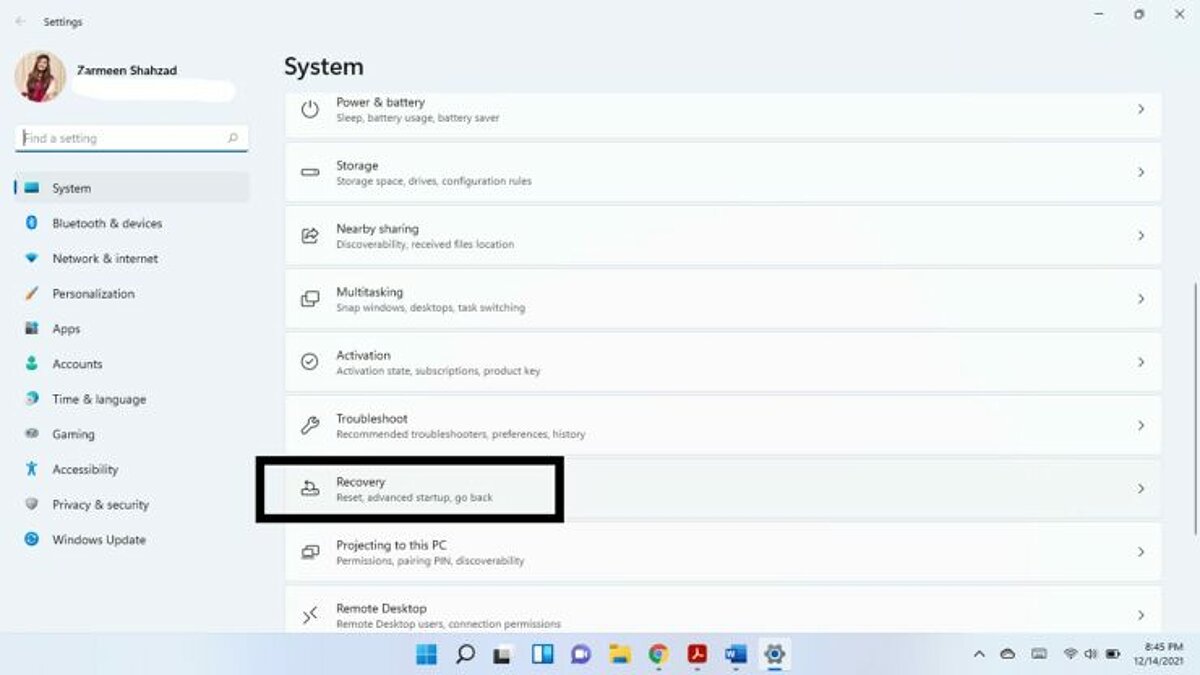
- Press the Windows key and open Windows Settings from the menu.

- Select System settings and click on Recovery settings.

- In the Advanced startup option click on Restart now.
- Your system will now restart into the boot settings.

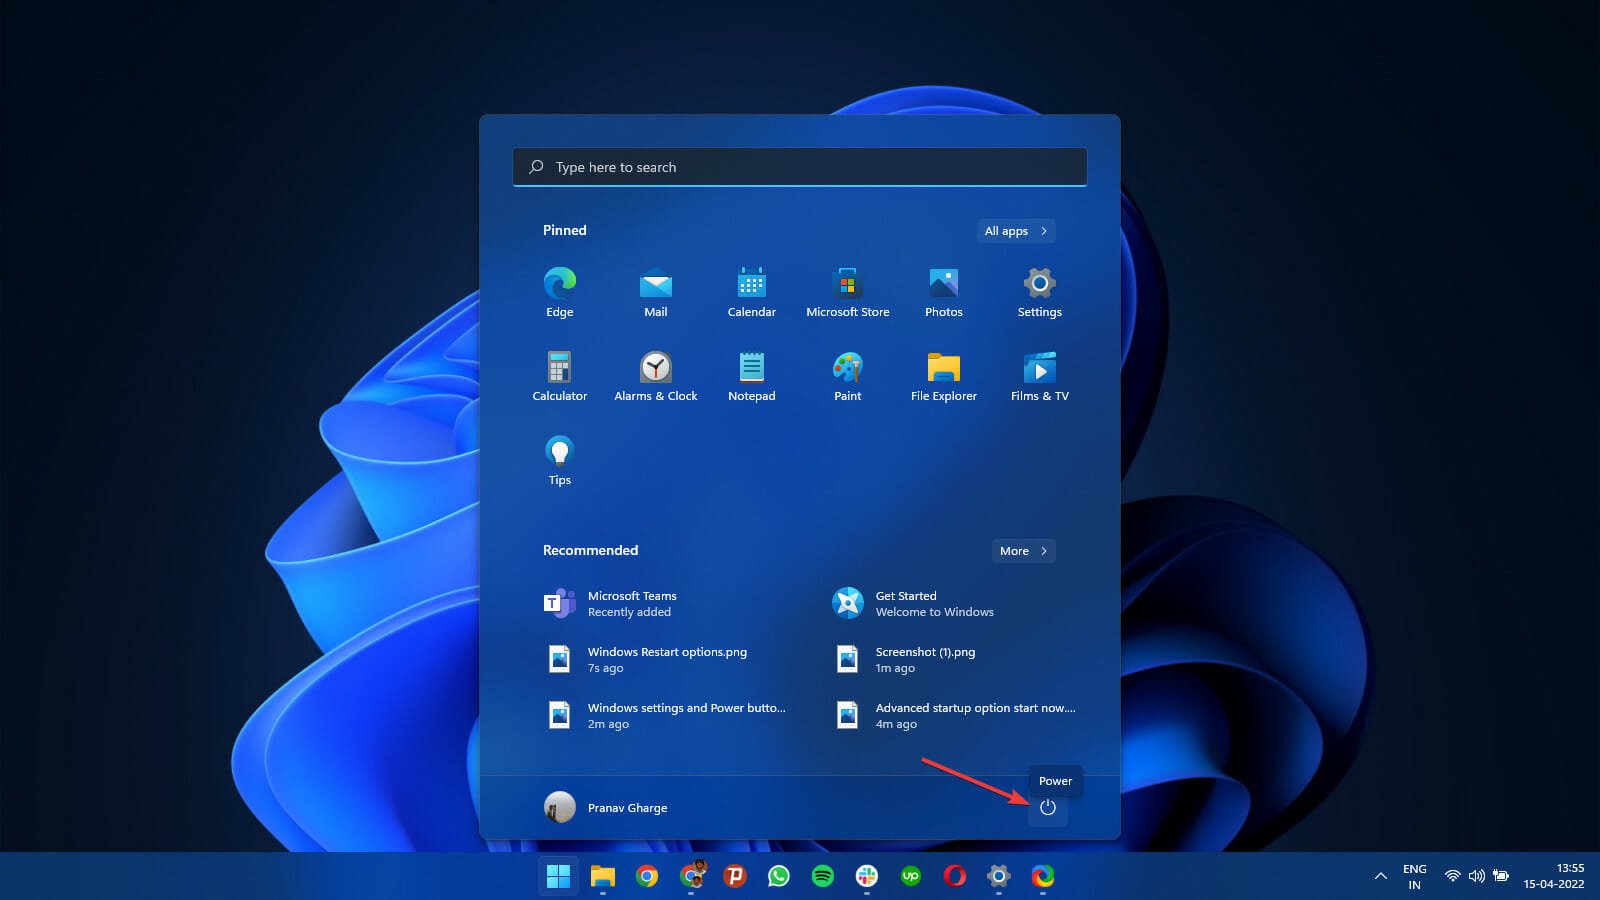
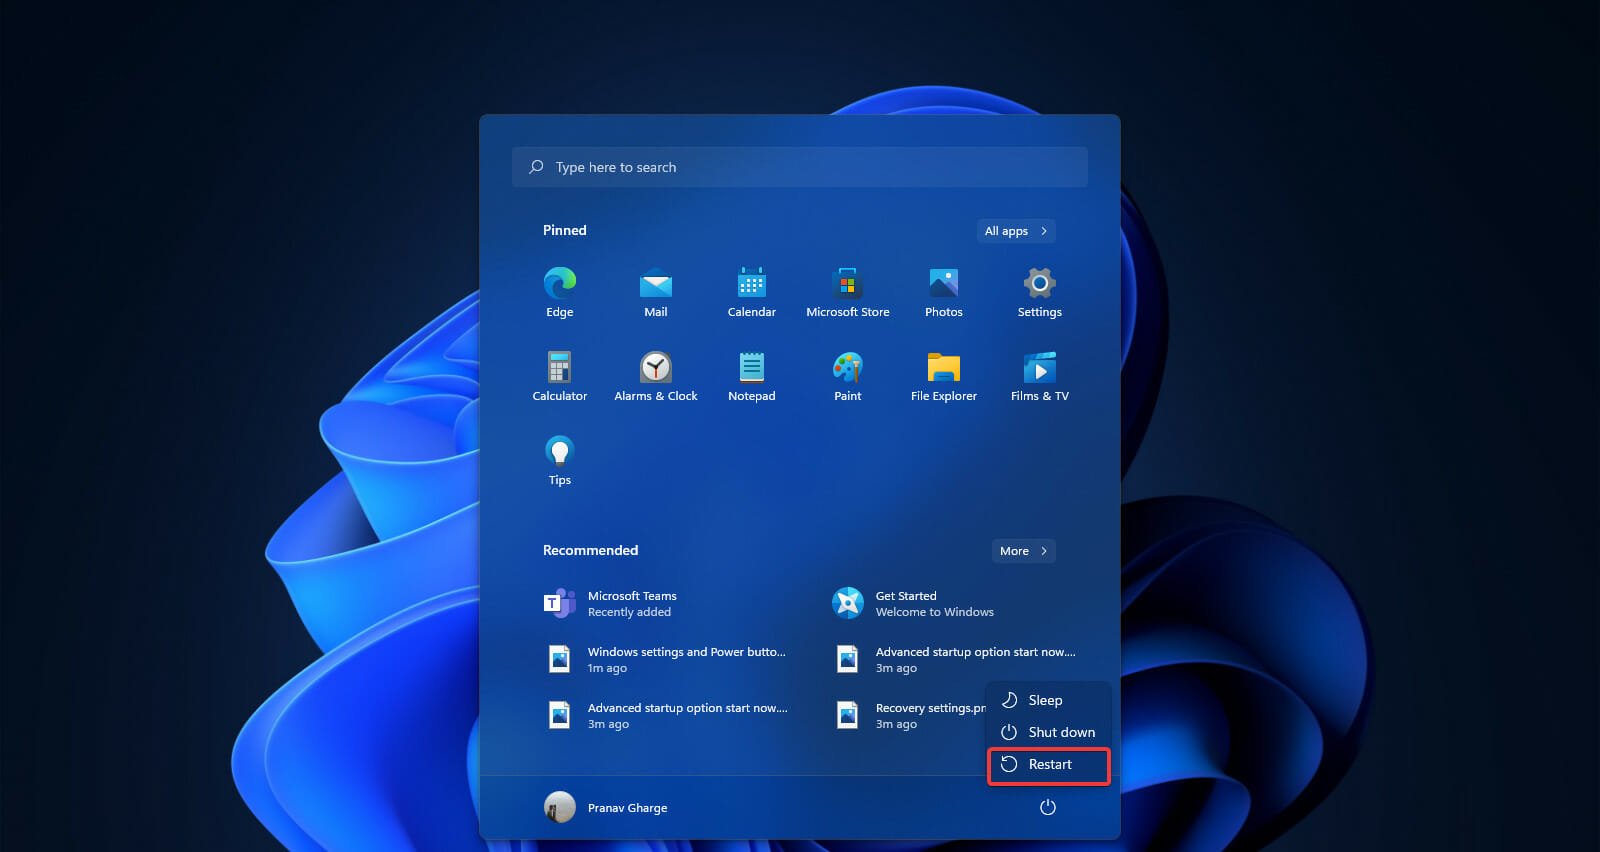
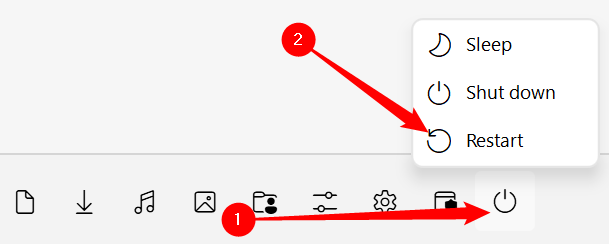
- Press the Windows key and click on the Power button in the bottom right corner.
- Hold the Shift key and select the Restart option.

- Your system will bypass the traditional restart and boot into advanced startup options.
- Are Windows 11 ADMX Templates Backward Compatible?
- How to Type Accents on Windows 11
- How to Disable the Insert Your Security Key Into the USB Port popup
- DTS Sound Unbound for Windows 11: Download & Install
- Fix: EXCEPTION_ILLEGAL_INSTRUCTION Error on Windows 11
3. Using Windows Quick links.
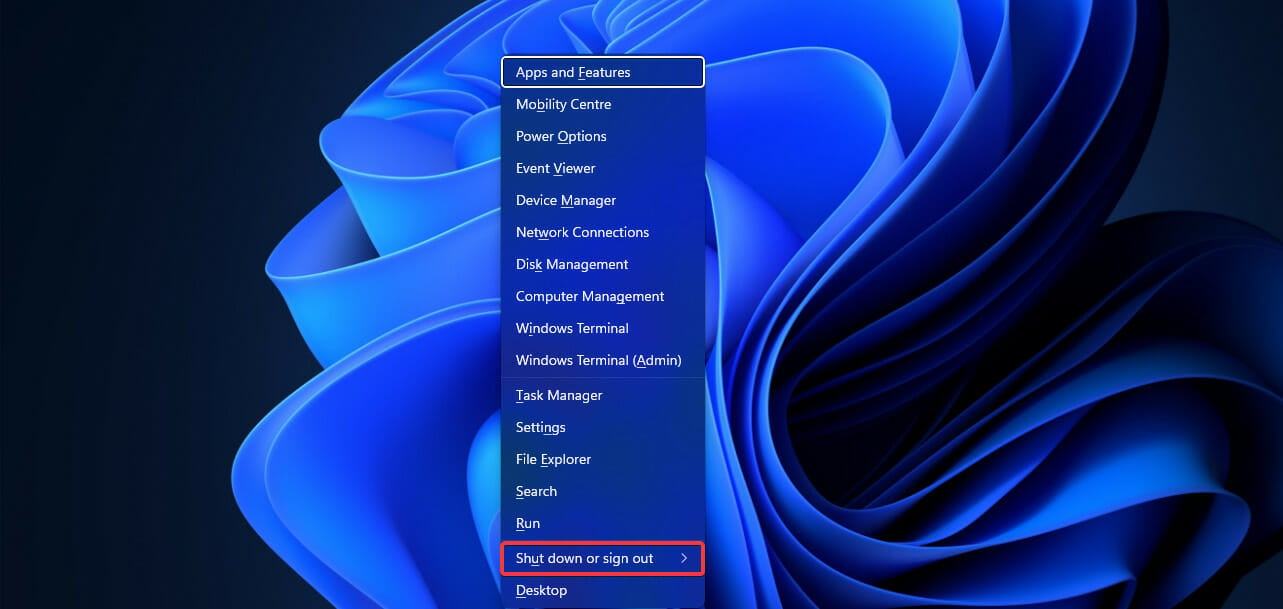
- Press Windows Key + X together. You’ll see a pop-up window with various options.

- Move your cursor on the Shut down or isgn out option.
- Press and hold the Shift key and click on the Restart option.


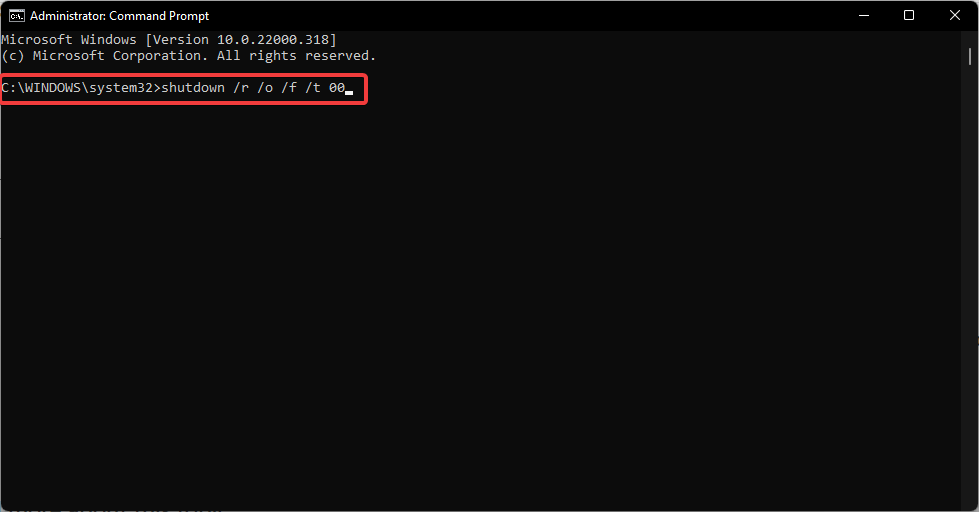
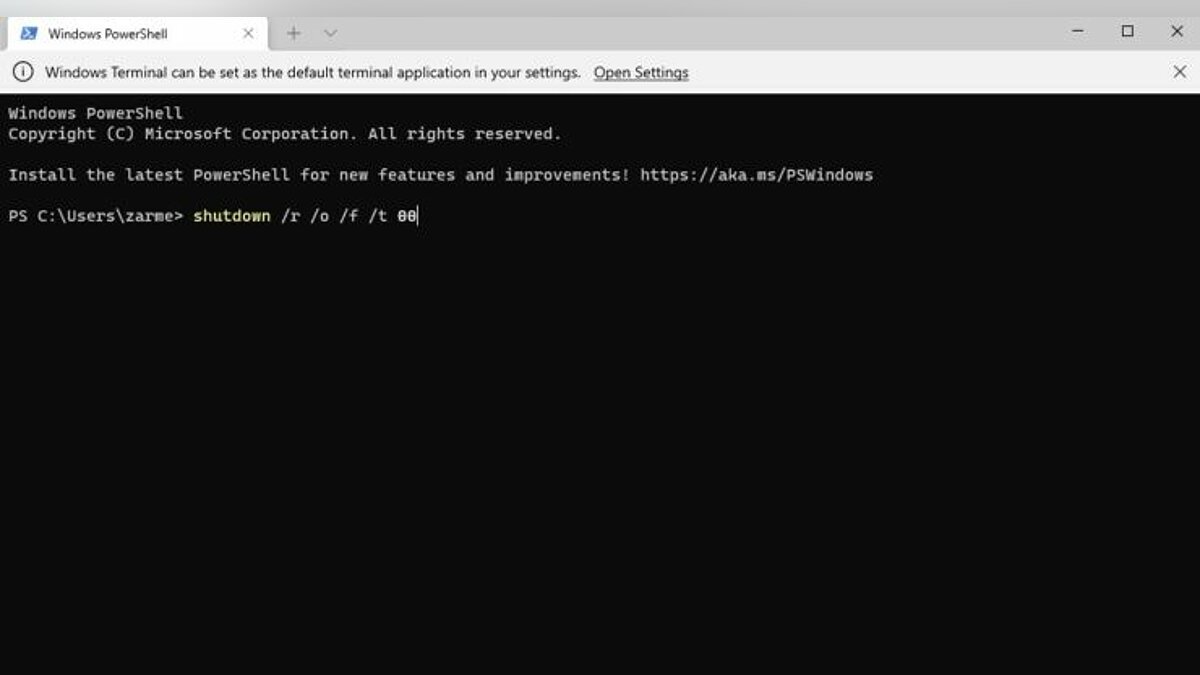
4. Use Command Prompt
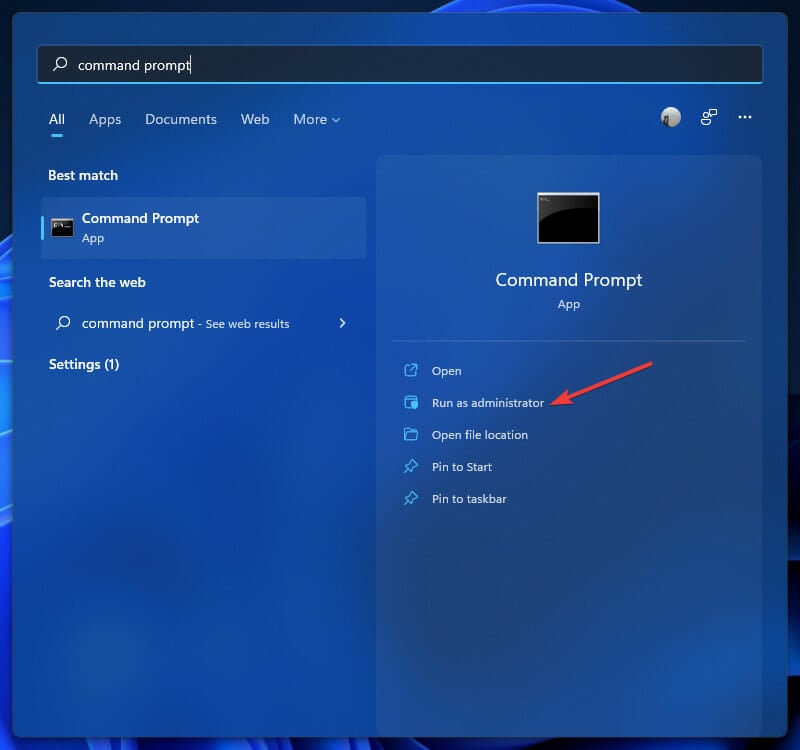
- Press the Windows key and type command prompt. Click on the Run as administrator option.

- Select Yes in the pop-up window that appears. It’ll now open the Command Prompt in administrator mode.
- Type the following command in the window and press Enter.
shutdown /r /o /f /t 00
- After executing the command, your system will restart the Windows 11 boot settings.
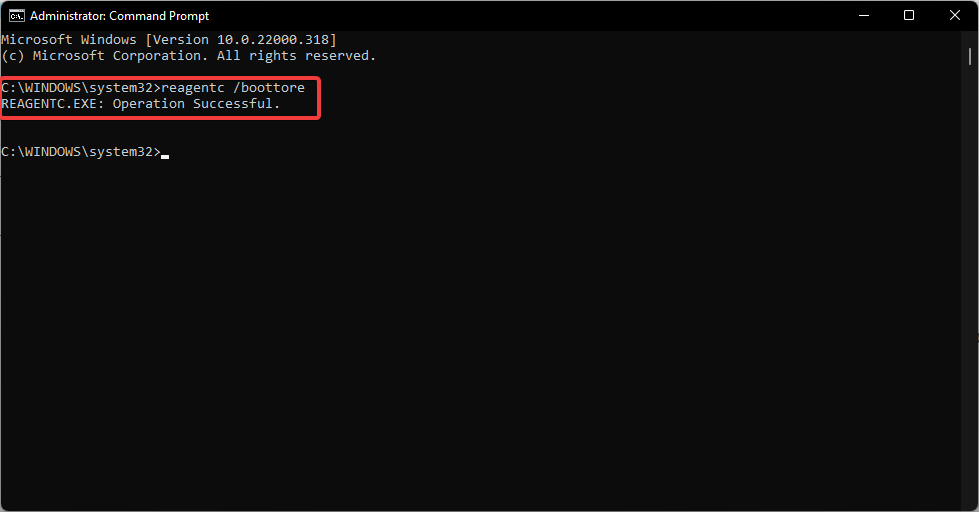
5. Use the reagentc command
- Press the Windows key and search for the command prompt. Click on the Run as administrator option.
- Select Yes in the pop-up window that appears to open the command prompt in administrator mode.
- Type the following command in the window and press Enter.
reagentc /boottore - You’ll get a confirmation informing you that the operation was successful.
- Restart your Windows 11 from the power menu, and you’ll enter the boot settings.
- How to enter recovery mode in Windows 10
- Windows 10/11 won’t enter Recovery mode
- Could not find the recovery environment [Windows 10/11]
6. Hard Reset your Windows system
- Press and hold the Power button of your PC till the system reboots.
- Once you see the Windows logo on the screen, press and hold the Power button again to restart Windows.

- Repeat the steps till your Windows 11 enters the boot settings.
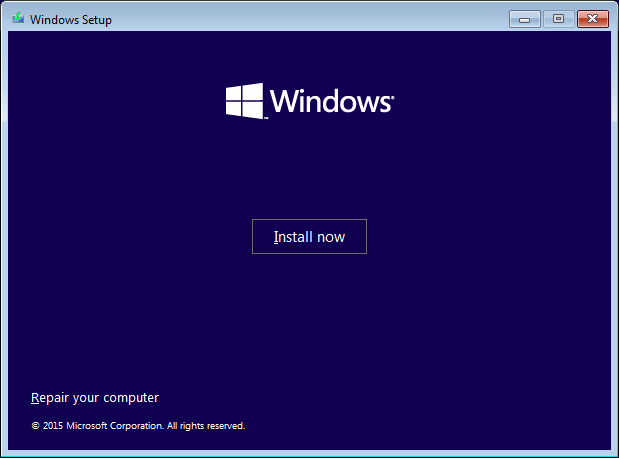
7. Use a bootable Windows 11 installation media
- Prepare a bootable USB drive for Windows 11.
- Switch off your PC and insert the USB drive into your PC.

- Power on your PC, and you’ll see a Windows setup pop-up window.

- Select the Repair your computer option in the bottom left corner. Your system will boot into its advanced settings option.
If your PC is not booting from the USB drive, check the following solution on how to change the boot order.
How to change the boot order on my PC?
If you want to boot from another source, like your USB, DVD, or another drive it’s not enough to get into the advanced booting options, you will have to access your BIOS.
There is an option for that in the Recovery mode and we will explain how to do that here:
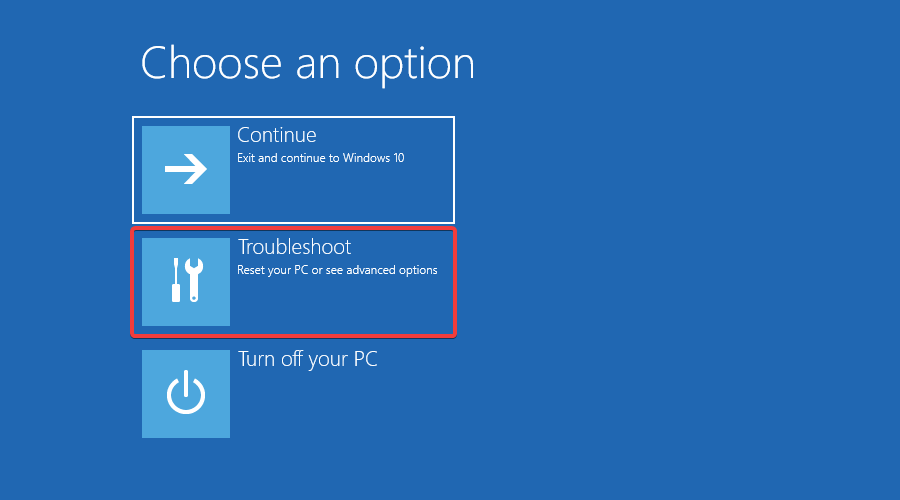
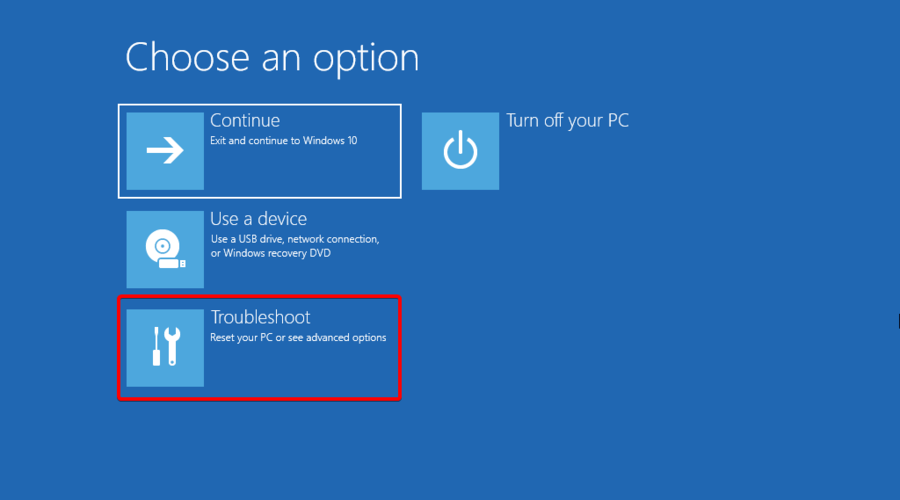
- After you get into Recovery mode using any of the methods described above, click on Troubleshoot.

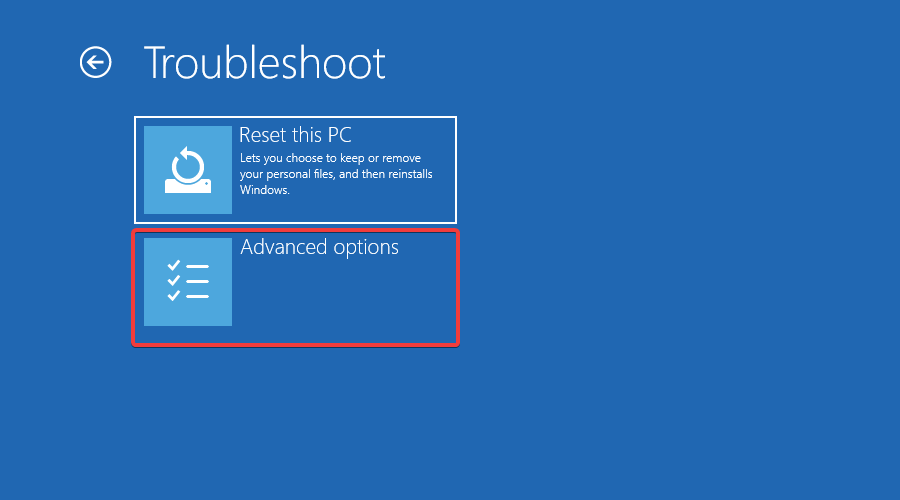
- Select Advanced options.
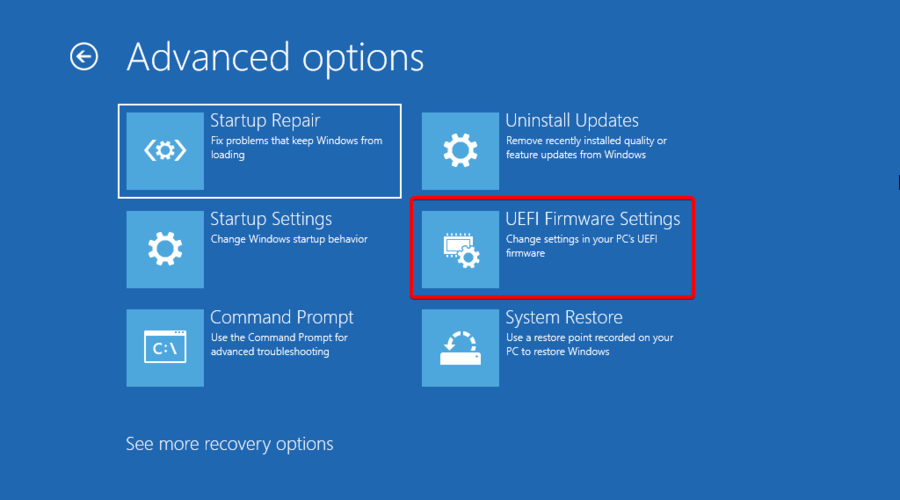
- Now, click on UEFI Firmware Settings.
- This will take you to your BIOS. Switch to the Boot tab and under Boot Option Priorities, and follow the instructions to change the boot priority to another source.

- Next, go to the Exit tab, then choose Save and Exit, and press Enter.
If you need more information on this procedure, read our guide on how to change the boot order in Windows 11.
However, sometimes, this is not enough, and when you exit the BIOS, you will find out that the PC is still not booting from the drive you specified.
In this case, we have another article on what to do if Windows 10/11 PC ignores boot order to sort this out for good.
That’s it. You can now easily find all the settings you need to get your system up and running again.
There are various options in the Windows 11 boot settings that you can use to fix any issue or recover your system to a working condition again.
For more questions or suggestions, access the comments section below and leave us a note. Your opinion counts!
![]()
Прошивка BIOS или UEFI, как её теперь называют, позволяет пользователям менять системные настройки, запускать загрузку с нужных дисков, выставлять время и так далее. Существуют разные способы получить доступ к этому режиму, так что можно использовать самый удобный и привычный. В этом гайде мы поговорим о том, как войти в UEFI в системах Windows 11.
С помощью «горячих клавиш»
Это необходимо сделать при старте компьютера. При нажатии специальной кнопки можно зайти в UEFI. При этом для ноутбуков и ПК разных производителей эти кнопки могут отличаться.
Примерный список выглядит так:
- Dell: F2 или F12;
- HP: ESC или F10;
- Acer: F2 или Del;
- MSI: Del;
- Lenovo: F1 или F2;
- ASUS: F2 или Del;
- Samsung: F2;
- Toshiba: F2;
- Microsoft Surface: нажмите и удерживайте кнопку увеличения громкости.
С помощью приложения «Настройки»
- Откройте «Параметры Windows» с помощью сочетания клавиш Win + I.
- В параметрах системы найдите пункт «Восстановление» и нажмите на него.

- Нажмите кнопку «Перезагрузить сейчас» и подтвердите перезагрузку.
С помощью терминала Windows
- Открываем меню WinX с помощью комбинации кнопок Win + X.
- Там выбираем Windows Terminal.
- После его запуска в чёрном окне вводим такую команду — shutdown / r / o / f / t 00.
- Нажимаем Enter.
- Появится синий экран, где надо выбрать «Устранение неполадок», затем «Дополнительные параметры» и «Настройки прошивки UEFI».

Надеемся, что этот гайд вам поможет.
- В Windows 11 обнаружилась ещё одна проблема — в «десятке» такого не было
- Как обновиться до Windows 11 и установить систему при помощи флешки, DVD-диска и без TPM 2.0
- Windows 11 не поддерживает Intel Core 7700K, но умеет работать с дискетами из 70-х
 Иногда пользователю необходимо зайти в БИОС (UEFI) для настроек тех или иных параметров, например, чтобы поставить загрузку с флешки в БИОС. На современных системах при включении сделать это не всегда получается — компьютер или ноутбук включается слишком быстро.
В этой пошаговой инструкции подробно о способах зайти в БИОC/UEFI на компьютере или ноутбуке, один из которых обязательно должен сработать на вашей системе.
Вход в БИОС с помощью клавиши при включении
Стандартный способ зайти в БИОС — нажать предназначенную для этого клавишу при включении компьютера или ноутбука. Лучше нажимать после включения многократно, так как иначе можно пропустить «нужный момент». Сама клавиша обычно указана на экране при загрузке в сообщении: «Press КЛАВИША to enter Setup».

Для большинства ПК и ноутбуков это следующие клавиши:
- Для ПК — обычно Del (Delete). Но возможны варианты, например F10 или F
- Для ноутбуков — обычно F2 (иногда нужно нажимать, удерживая клавишу Fn). Эта клавиша используется на ноутбуках ASUS, Acer, Gigabyte, Lenovo (кроме некоторых ThinkPad, где используется F1, Fn+F1 либо нажатие Enter и F1), Dell (также может быть F12), и многих других. На MSI это может быть клавиша F2 или Del. На HP вариантов больше: чаще всего Esc и F10, но возможны F2, F12, F1 или DEL в зависимости от модели ноутбука.
- На моноблоках и брендовых ПК может использоваться как Del, так и клавиша, аналогичная клавише входа в БИОС на ноутбуке этой же марки.
На некоторых системах с Windows 11 из-за включенной функции «Быстрый запуск» при включении не удается использовать клавишу для входа в БИОС/UEFI. В такой ситуации попробуйте использовать клавишу не после завершения работы и включения, а после перезагрузки системы через меню Пуск (при перезагрузке быстрый запуск не используется).
Учитывайте, что при включении ПК некоторые беспроводные клавиатуры могут не работать: реже это касается клавиатур, подключаемых по радиоканалу, почти всегда — Bluetooth клавиатур.
Как зайти в БИОС/UEFI Windows 11 через расширенные параметры запуска
В случае, если вход в БИОС с использованием клавиши выполнить не удается, можно попробовать использовать «Расширенные параметры запуска». Шаги будут следующими:
- В Windows 11 зайдите в Параметры — Система — Восстановление. Нажмите кнопку «Перезагрузить сейчас» в пункте «Расширенные параметры запуска». Вместо этого также можно открыть меню Пуск, нажать кнопку выключения, а затем, удерживая клавишу Shift нажать «Перезагрузка».

- После перезагрузки вы попадете в среду восстановления Windows 11. Выберите пункт «Поиск и устранение неисправностей», перейдите в «Дополнительные параметры» и нажмите «Параметры встроенного ПО UEFI».

- Подтвердите перезагрузку. После неё вы должны будете автоматически попасть в параметры UEFI вашего ПК или ноутбука, при условии, что система установлена в режиме UEFI.


Как правило, один из этих способов срабатывает, при условии, что клавиатура исправна и обнаруживается компьютером. Если же войти в БИОС не получается, подробно опишите ситуацию в комментариях: модель устройства (материнской платы или ноутбука), детали проблемы — решение должно найтись.
Everyone calls it the Boot Menu, but it isn’t actually named that.

Quick Links
- What Does the Advanced Options Menu Do?
- How to Access the Advanced Options Menu
The Advanced Options Menu, sometimes called the Boot Menu, contains tools and configuration options you can use to troubleshoot or repair your PC. Here’s how to use it on Windows 11.
The Advanced Startup Options Menu offers you a handful of utilities. Some of them are as simple as left-clicking the option and you’re done, while others require extensive user interaction. Here is a brief rundown on what the utilities are and what they do.
- Startup Repair: Startup Repair will attempt to automatically fix issues that prevent Windows 11 from booting correctly.
- Startup Settings: Startup Settings allows you to change how Windows 11 Boots. You can do things like enable Safe Mode, debugging, or boot logging, to name a few.
- Command Prompt: The Command Prompt option brings up a Command Prompt window that can be used to run diagnostic or repair commands.
- Uninstall Updates: The Uninstall Updates option will roll back the latest updates installed, including major Windows versions or updates.
- UEFI Firmware Settings: This option restarts your computer and opens the BIOS/UEFI.
- System Restore: System Restore allows you to use a previously created restore point to roll back Windows to a point where it was working correctly.
- System Image Recovery: System Image Recovery is similar to System Restore, but uses a complete system image instead of a restore point. System images are much larger and more complete than restore points and include all of your files, programs, and settings.
Windows 11, unlike Windows 10, does not support systems that are running a BIOS — they must be using UEFI. The UEFI requirement means that the advanced startup menu is always accessible from within Windows.
Within the Settings App
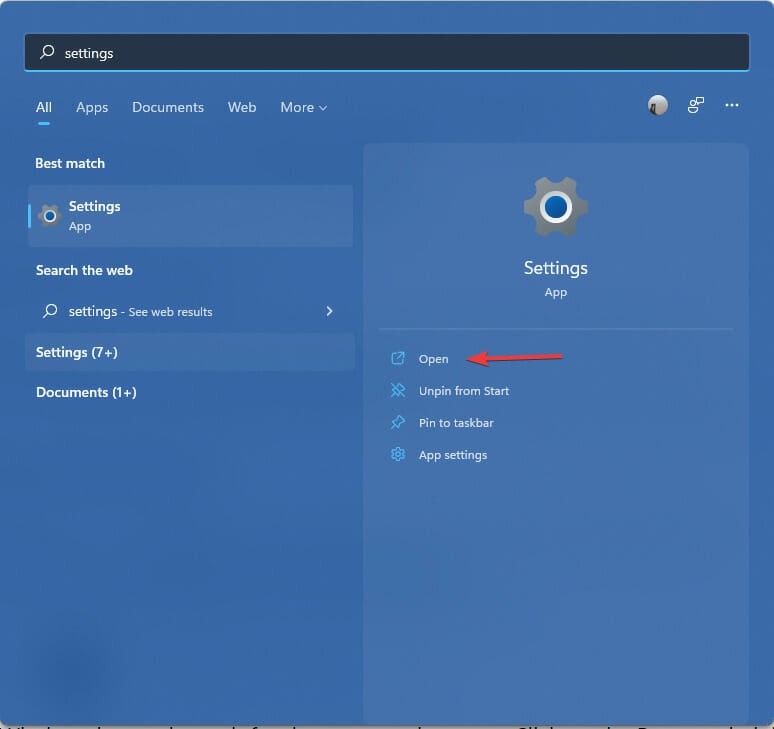
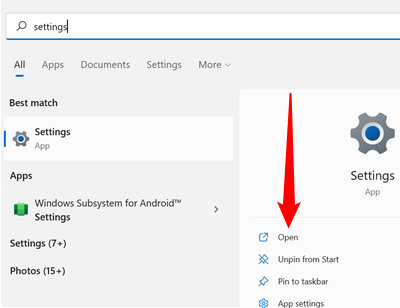
Open the Start Menu, type «Settings» into the search bar, and then click «Open» or hit Enter.
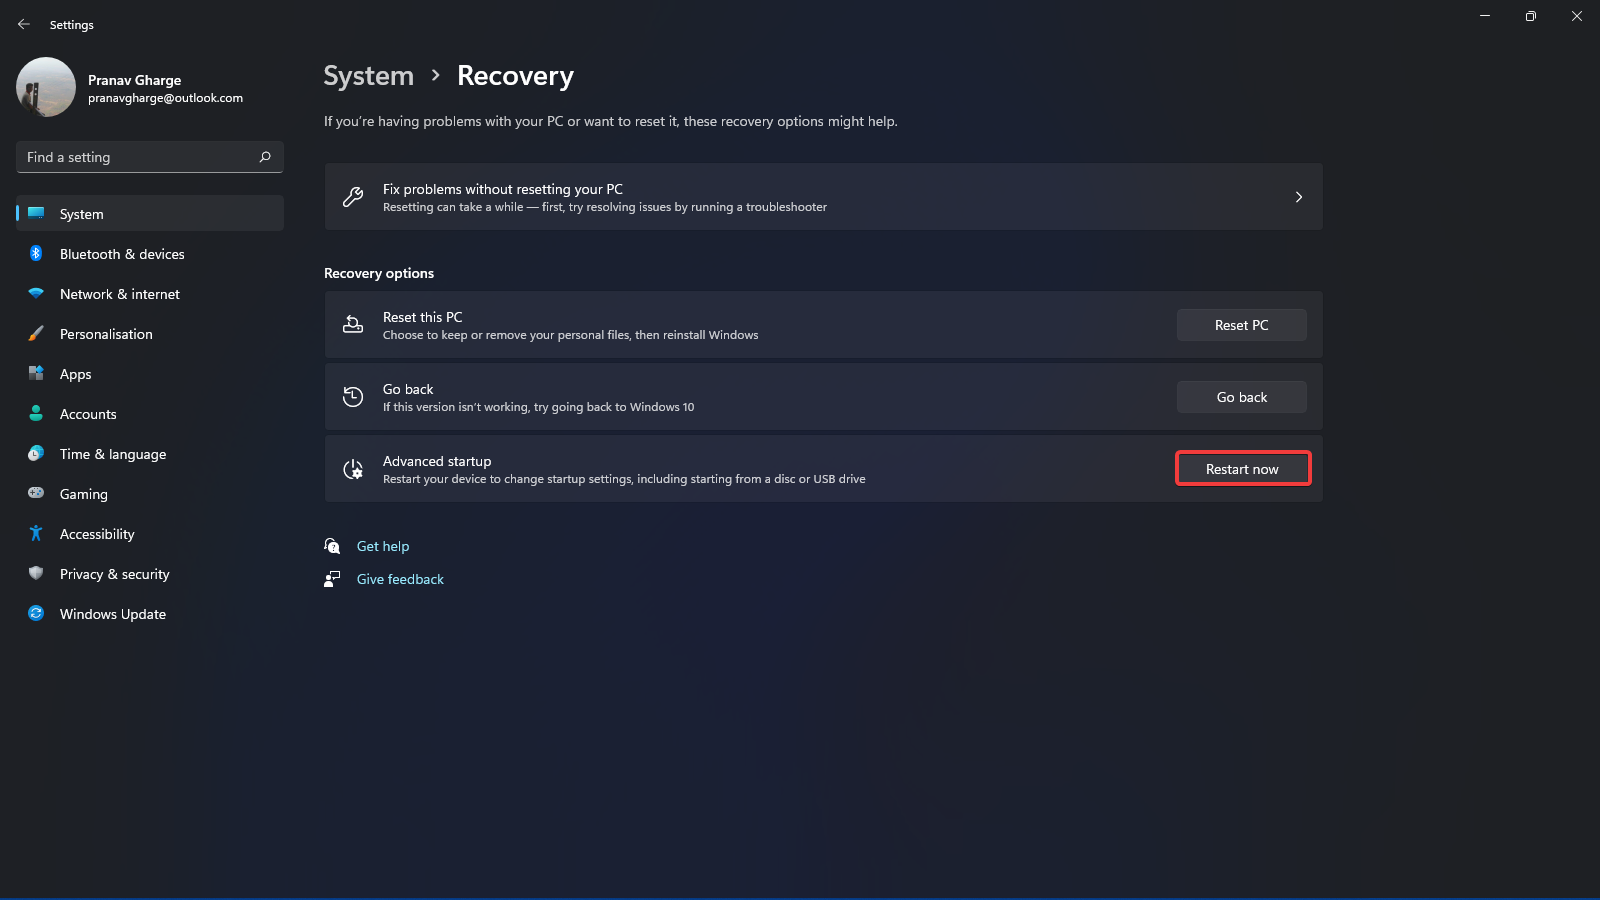
Ensure that you are on the System window. If you aren’t, click «System» in the top left-hand corner of the Settings window. Then scroll down and click «Recovery.»
There will be a section titled «Recovery Options.» Look for a section titled «Advanced Startup,» make sure to save anything you’re working on, and then click «Restart Now.» You may get a prompt warning you about unsaved work— if you have already saved everything, don’t worry about it.
Your computer will restart after a few seconds.
By Clicking Restart
If you don’t want to go into the Settings app and navigate through some sub-menus, there is a more efficient way: Shift-clicking the Restart option. Click the Start button or hit the Windows key, click the power icon, then hold Shift and click «Restart.»
The most obvious place to use this trick is with the Restart option in the Start menu, but it isn’t the only place. Just about anywhere that you see a «Restart» button will work, including the lock or login screen.
After Restarting Your Computer
Your computer will display a blue screen with a few options on it after you click «Restart Now» in the recovery menu, or Shift-click «Restart.» Choose «Troubleshoot» from the listed options.
It is possible there will be more options available to you than are displayed here. For example, the «Choose an option» screen might also feature a «Use a Device» option.
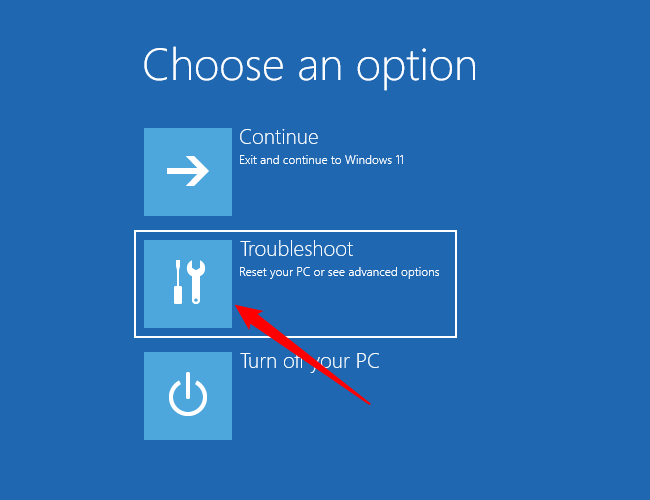
Click «Advanced Options» on the next screen, and you’ll be taken to the Advanced Options menu.
That’s it — you’re at the Advanced Options window.
The Advanced Options menu has a number of different utilities available. Some of them are fully automated, like Startup Repair, whereas others require extensive user interaction, like the Command Prompt. Which you use depends a lot on what is wrong with your PC.
![]()
Download Article
A quick guide to find the Boot menu on Windows to recover or repair
![]()
Download Article
- Using a Keyboard
- Using Windows 11, 10, and 8
- Using Windows 7 and Vista
- Using Windows XP
- Q&A
|
|
|
|
Are you trying to get to the Windows Boot menu through the menu or with a key? If you need to access the Boot menu, you can press the F8 key before the Windows starts. You can also open the Boot menu from the Start menu if you’re already logged into your device. Knowing how to access the Boot menu can help troubleshoot your computer if it’s experiencing issues. This wikiHow will show you how to get into the Boot menu on Windows 11, 10, 8, or 7.
Things You Should Know
- Turn on your computer and press the function key for your PC model.
- To reach the menu from Windows, click «Start» → Power button → hold «Shift» and click «Restart». Click «Troubleshoot» → «Advanced options».
- Use the Boot menu to find actions you can use to repair or troubleshoot issues with Windows.
-

1
Turn on your Windows computer. To access the Boot menu, you’ll need to press a key before the operating system fully loads.[1]
- If your computer is on, shut it down first. You can also restart it.
-
2
Press and hold the Boot menu key. This will vary depending on your device. Here’s a list of common BIOS keys by manufacturer:
- Acer: Del or F2
- Asus: F9
- Dell: F12
- HP: Esc or F10
- Lenovo: F1 or F2
- Samsung: F2
- You must press this key before the Windows logo appears. When done correctly, your computer will start in Safe mode.


Advertisement
-
1
Click the
button. It’s usually at the bottom-left corner of the screen.
- On Windows 11, this will be in the bottom center of the screen.
-
2
Click
. This will be underneath the cog icon.
- A pop-up menu will open.
-
3
Hold ⇧ Shift as you click Restart. You must hold Shift, otherwise your computer will perform a regular restart.
- The computer will power off and back on. Instead of booting to the desktop, you’ll see a blue menu titled “Choose an option.”
-
4
Click Troubleshoot. This will be underneath Continue.
-
5
Click Advanced Options. You can find this at the very bottom.
-
6
Click Startup Settings. You are now at the Windows boot (Startup Settings) menu.
- You can now use the Advanced Options menu to repair your device, or boot from another drive.


Advertisement
-
1
Press Alt+F4. This will open the Shut Down Windows menu.
-
2
Click the drop-down menu. The options will expand.
-
3
Select Restart. This will be next to Shut down.
-
4
Click OK. The computer will now shut down and restart. As soon as the computer restarts, you will need to act quickly—be ready.
-
5
Press and hold F8 as soon as the computer restarts. You’ll need to press it before the Windows logo appears. Continue holding this key until you see the Advanced Boot Options menu.
- If Windows boots to the desktop, repeat this process to try again.


Advertisement
-
1
Press Ctrl+Alt+Del. This will open the Windows Security menu.
-
2
Click Shut Down…. You can find this next to Log Off….
-
3
Click the drop-down menu. This will expand the options.
-
4
Click Restart. This will be next to Shut down.
-
5
Click OK. The computer will now restart. As soon as the computer restarts, you will need to act quickly—be ready.
-
6
Press F8 repeatedly as soon as the computer powers on. Continue tapping this key until you see the Advanced Boot Options menu—this is the Windows XP boot menu.
- If Windows boots to the desktop, repeat this process to try again.


Advertisement
Add New Question
-
Question
My Lenovo turbo boost laptop hangs by showing boot menu when switching on, what to do?

Amin Moghoomi
Community Answer
Try finding your hard drive in the list. And you can try a Windows installation disk to check your hard drive.
-
Question
I want to boot up using my old Windows XP Pro Disk and use it to format my hard drive, which doesn’t have windows XP on it. Can this be done?
Yes, it can. Insert Your disk. Press the bios key. This depends on your computer. Change the boot order. Save the changes. Reboot your computer. When you see «Press Any Key To Boot From CD», press a key. When you get to «Where Would You Like To Install Windows?», select the drive, press Enter, click «Format As Ntfs» Or «Format As Fat».
Ask a Question
200 characters left
Include your email address to get a message when this question is answered.
Submit
Advertisement
Thanks for submitting a tip for review!
About This Article
Thanks to all authors for creating a page that has been read 249,332 times.