Для обеспечения дополнительной защиты учетных данных пользователя в последних версиях Windows используется специальная функция Credential Guard, являющееся частью общей системы безопасности. Используя технологию виртуализации, она сохраняет данные авторизации в отдельных контейнерах, получить доступ к которым могут только привилегированные системные приложения. Механизм защиты Credential Guard впервые появился в Windows 10 Enterprise и Windows Server 2016.
Сегодня он также используется в Windows 11 Pro.
В отличие от Windows 10, в которой функция активируется при включении компонента Hyper-V, в Windows 11 она включена по умолчанию, если, конечно, система соответствует требованиям. К последним относятся поддержка VBS, безопасной загрузки, Unified Extensible Firmware Interface, наличие 64-битного процессора, доверенного платформенного модуля версии 1.2 или 2.0 и Hyper-V. К сожалению, будучи включенной, Credential Guard может вызывать проблемы в работе сторонних систем виртуализации, таких как VirtualBox или VMware, а также при подключении ПК к удаленному рабочему столу по RDP.
В таких случаях Credential Guard можно отключить, правда, тут есть одна небольшая проблема.
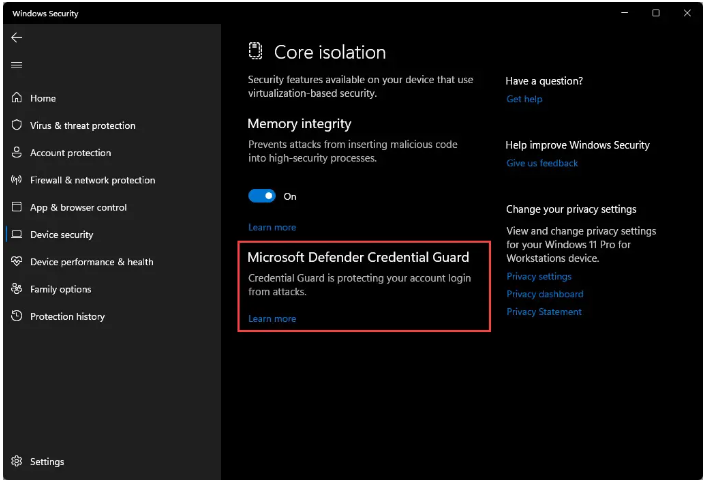
При поддержке Credential Guard функция будет доступна в подразделе «Безопасность устройства» → «Изоляция ядра», но ни отключить, ни включить ее вы не сможете по причине отсутствия переключателя.
Для деактивации Credential Guard в Windows 11 или 10 необходимо использовать редактор локальных групповых политик либо редактор реестра.
Примечание: перед отключением Credential Guard в Windows 10 Enterprise сначала потребуется отключить Hyper-V. Напоминаем, что сделать это можно в окне апплета «Включение или отключение компонентов Windows».
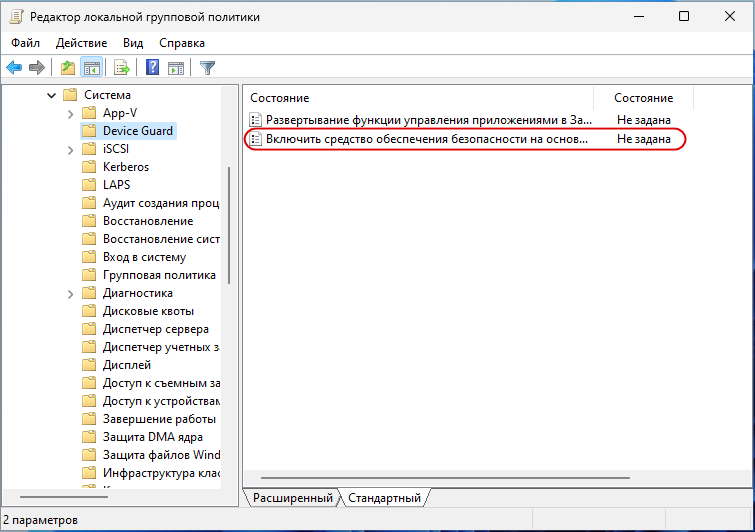
Локальные политики
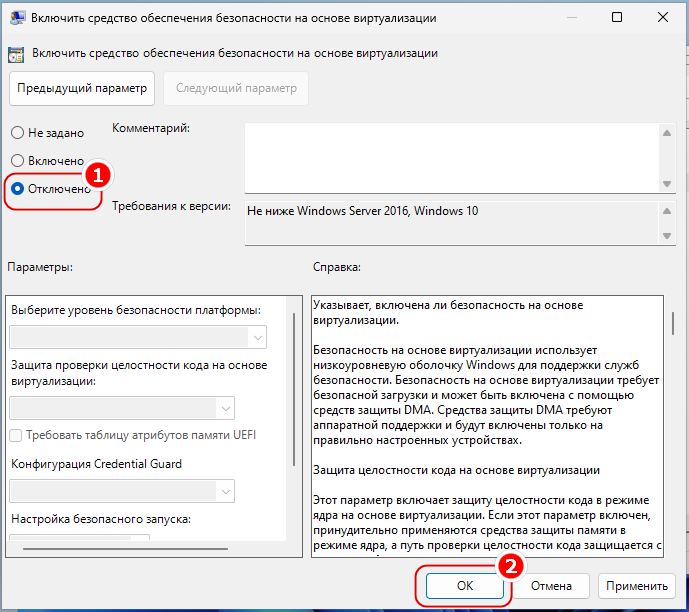
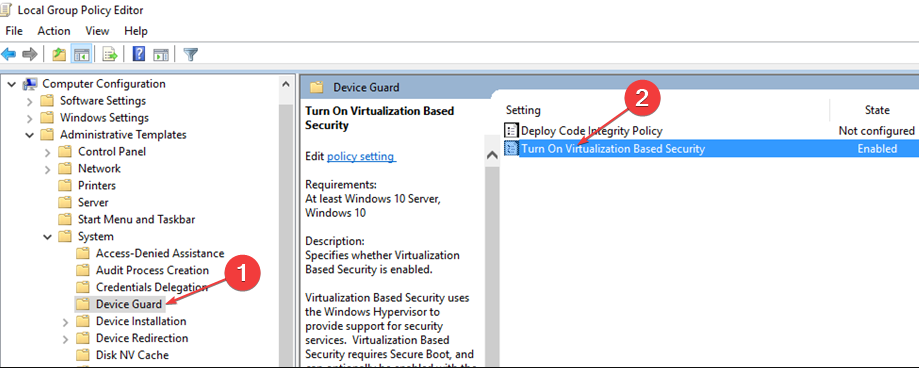
Откройте редактор локальных групповых политики командой gpedit.msc и перейдите в раздел «Конфигурация компьютера» → «Административные шаблоны» → «Система» → «Device Guard». Справа вы увидите политику «Включить средство обеспечения безопасности на основе виртуализации», откройте ее настройки двойным по ней кликом.
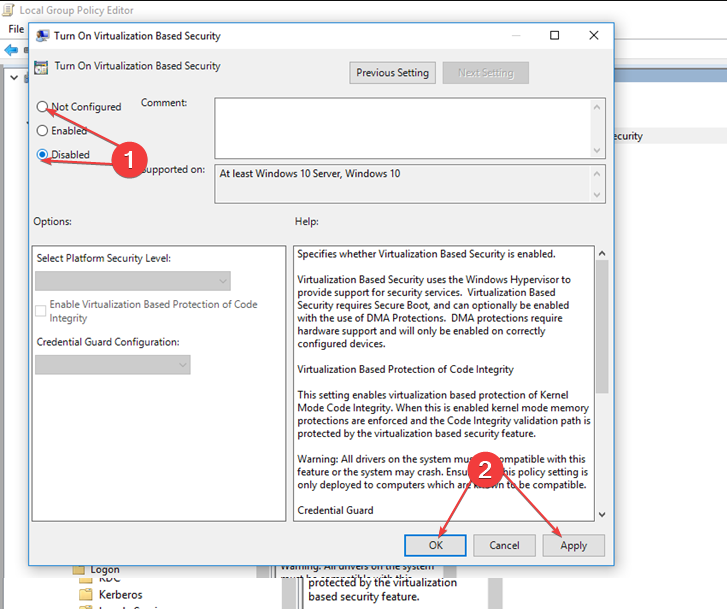
Активируйте радиокнопку «Отключено» и сохраните настройки.
Обновите политики, выполнив в запущенной с правами администратора командной строке или PowerShell команду gpupdate /force.

Редактор реестра
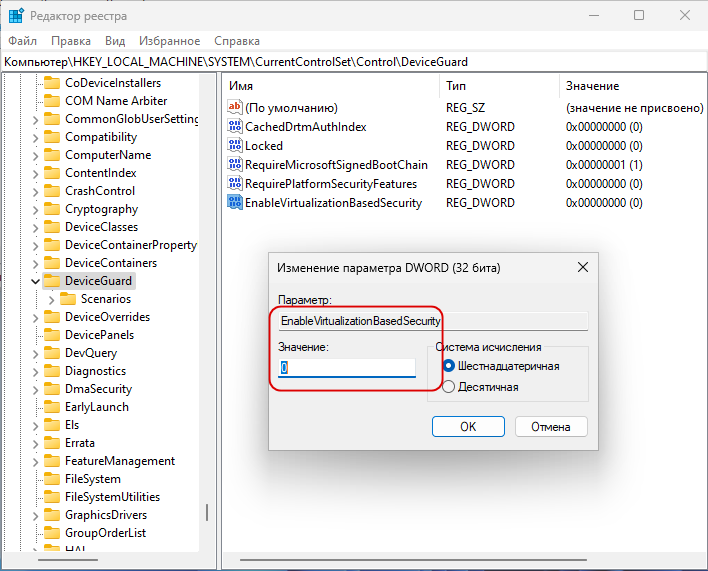
Откройте редактор Regedit одноименной командой, разверните:
HKLM\SYSTEM\CurrentControlSet\Control\DeviceGuard
И создайте в правой колонке новый DWORD-параметр,

с именем EnableVirtualizationBasedSecurity со значением 0. Если параметр уже существует, измените его значение на 0.
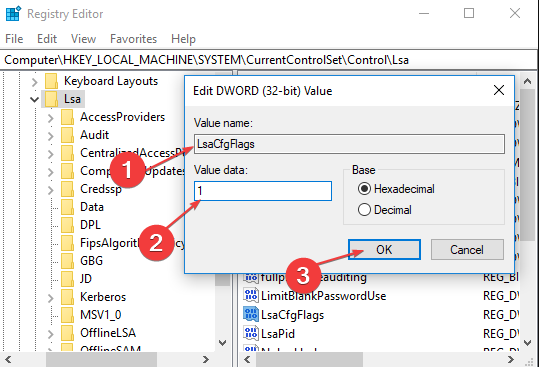
Затем перейдите к разделу HKLM\SYSTEM\CurrentControlSet\Control\Lsa, создайте в правой колонке новый DWORD-параметр,
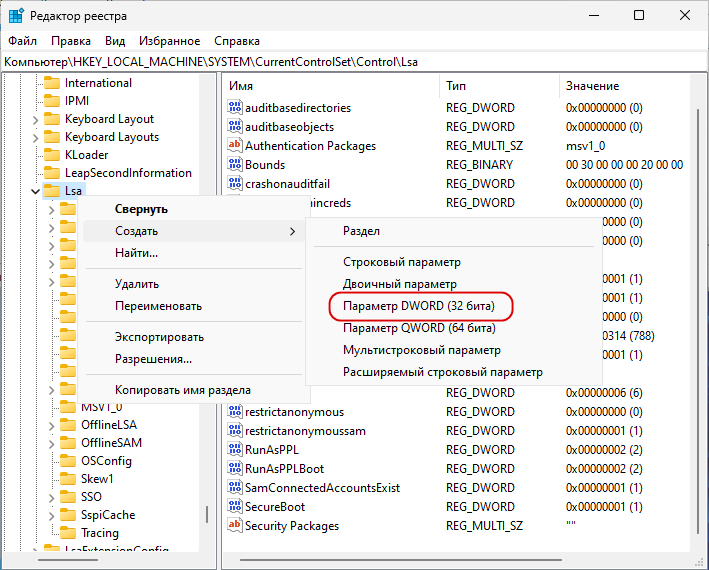
LsaCfgFlags и оставьте его значение неизмененным, то есть 0.
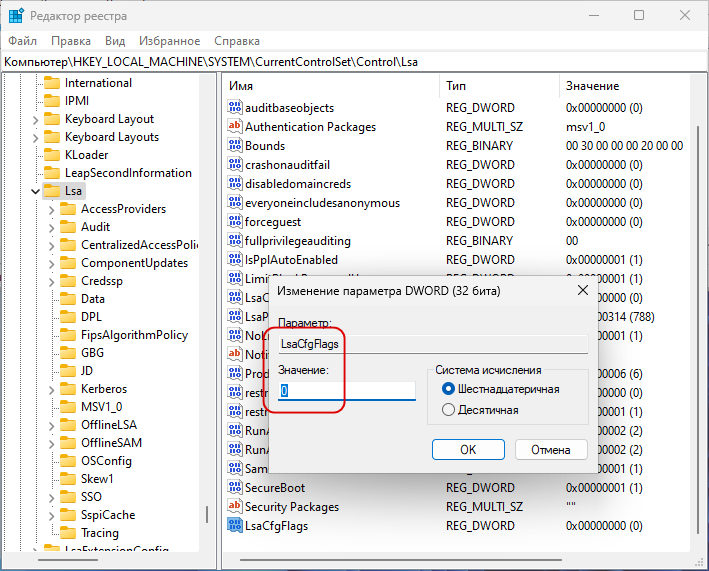
Чтобы настройки вступили в силу, перезагрузите компьютер.
В результате применения этого твика Credential Guard будет отключен
Проверить статус функции Credential Guard можно либо в оснастке «Сведения о системе», либо выполнив в PowerShell команду:
(Get-CimInstance -ClassName Win32_DeviceGuard -Namespace root\Microsoft\Windows\DeviceGuard).SecurityServicesRunning
Если защита на основе виртуализации отключена, команда вернет значение 0, если включена, ответом будет 1.

![]() Загрузка…
Загрузка…
Disable Windows Defender Credential Guard without hassles
by Henderson Jayden Harper
Passionate about technology, Crypto, software, Windows, and everything computer-related, he spends most of his time developing new skills and learning more about the tech world. He also enjoys… read more
Updated on
- Windows Defender Credential Guard isolates login information and personal items from your system.
- The Credential Guard can block some other programs from running on your PC.
- Disabling the VBS (Virtualization-Based Security) will disable other services dependent on it.
XINSTALL BY CLICKING THE DOWNLOAD
FILE
Some readers want to disable Windows Defender Credential Guard on Windows 11. Microsoft introduced this security feature to the Windows 10 Enterprise in 2016. Some report that the Credential Guard needs to be disabled to run VMware on their PCs.
What is Microsoft Defender Credential Guard?
Windows Defender Credential Guard is a security feature that protects and manages users’ login credentials by isolating users’ from the rest of the system. Its central concept is to keep users’ login information out of hackers’ reach, preventing them from taking control of your PC.
After its incorporation into Windows 10 Enterprise and Windows Server 2016, Microsoft decided to include it in Windows 11. Also, the Windows Defender Credential Guard secures any domain credentials generated from your apps.
However, running some programs alongside this feature can be difficult as it blocks their authentication access.
Likewise, it doesn’t support Domain Controllers, third-party security software, Active Directory database, or any other encryption support program. Also, VMware is not compatible with Credential Guard on Windows 10.
How we test, review and rate?
We have worked for the past 6 months on building a new review system on how we produce content. Using it, we have subsequently redone most of our articles to provide actual hands-on expertise on the guides we made.
For more details you can read how we test, review, and rate at WindowsReport.
Nevertheless, the Windows Defender Credential Guard isolates the secret credentials on your PC, keeping it protected from theft. Users can enable the Credential Guard on Windows 11 or disable it depending on their preferences and what type of programs they run on their PCs.
How do I disable the Windows Defender Credential Guard on Windows 11?
Before going through any steps for disabling Windows Defender Credential Guard, observe the following preliminary checks:
- Disconnect any remote connection on your PC.
- Disable third-party antivirus ruining on your computer.
- Close background apps.
The above steps will prepare your PC for the process.
1. Disable via Group Policy
- Press Windows + R key to open the Run dialog box, type gpedit.msc in the text space, and click OK to open the Group Policy Editor.

- Navigate to the following location:
Computer Configuration\Administrative Templates\System\Device Guard - Click on Device Guard and double-click the Turn on Virtualization Based Security policy option.

- Then, click the Disabled or the Not Configured option and the OK button to save the changes.

- Exit and restart your PC to effect the change you made.
Selecting the disabled option or Not configured will stop the activities of Windows Defender Credentials Guard on your Windows 11. Also, you can check the fixes for missing gpedit on Windows 11 if you cannot find it.
2. Disable via Registry Keys
- Left-click the Start button, type Regedit in the search box, and select Registry Editor.
- Navigate to the following keys and set their values to 0 to disable the virtualization-based security:
HKEY_LOCAL_MACHINE\SYSTEM\CurrentControlSet\Control\Lsa\LsaCfgFlagsHKEY_LOCAL_MACHINE\SOFTWARE\Policies\Microsoft\Windows\DeviceGuard\LsaCfgFlags
- Restart your computer.
Note that you must set the registry settings to 0 to disable virtualization-based security.
- How to Type Accents on Windows 11
- How to Disable the Insert Your Security Key Into the USB Port popup
3. Disable via UEFI Lock
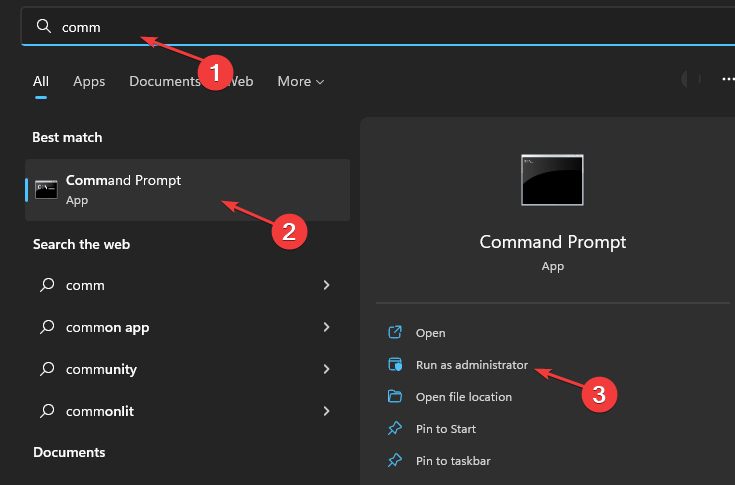
- Left-click the Start button, type comm in the search space, and select Run as Administrator.

- Click Yes when the User Account Control window appears.
- Run the following command and click ENTER:
bcdedit
- Then copy and paste the following commands in the Command Prompt:

mountvol X: /s
copy %WINDIR%\System32\SecConfig.efi X:\EFI\Microsoft\Boot\SecConfig.efi /Y
bcdedit /create {0cb3b571-2f2e-4343-a879-d86a476d7215} /d "DebugTool" /application osloader
bcdedit /set {0cb3b571-2f2e-4343-a879-d86a476d7215} path "\EFI\Microsoft\Boot\SecConfig.efi"
bcdedit /set {bootmgr} bootsequence {0cb3b571-2f2e-4343-a879-d86a476d7215}
bcdedit /set {0cb3b571-2f2e-4343-a879-d86a476d7215} loadoptions DISABLE-LSA-ISO
bcdedit /set {0cb3b571-2f2e-4343-a879-d86a476d7215} device partition=X:
mountvol X: /d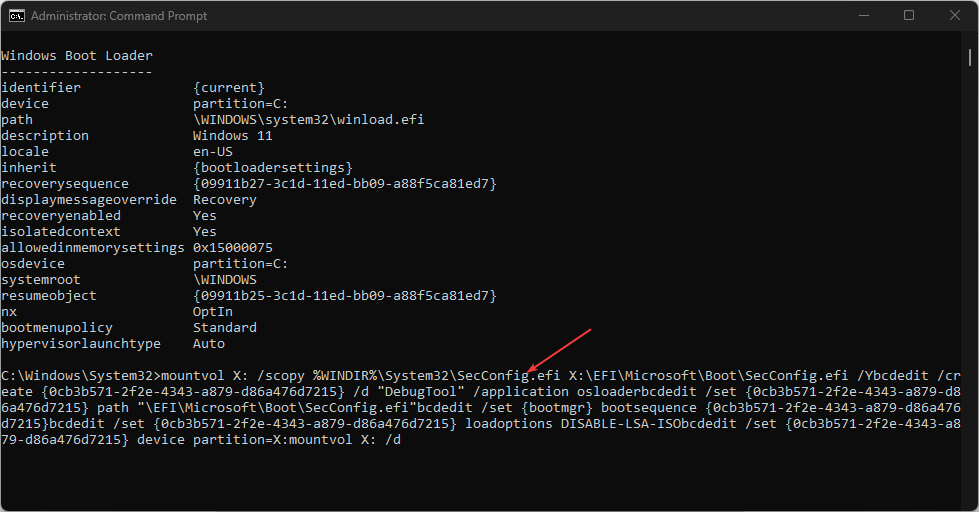
Before the booting process completes, confirm the prompt notifying you that UEFI was modified. Also, ensure the prompt will implement the changes you made.
4. Disable Virtualization-Based Security
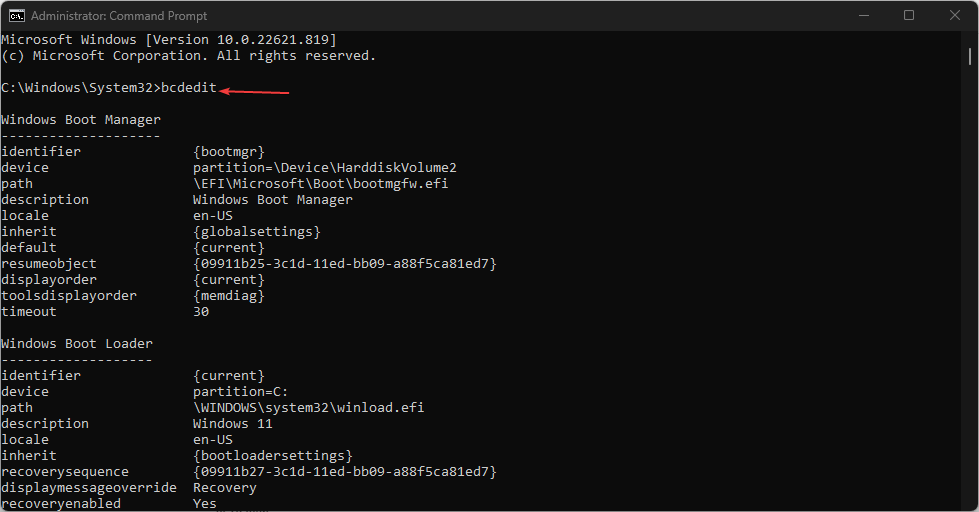
- Left-click the Start button, type comm in the search space, and select Run as Administrator.
- Click Yes when the User Account Control window appears.
- Run the following command and click ENTER:
bcdedit - Then copy and paste the following commands and press ENTER:
bcdedit /set {0cb3b571-2f2e-4343-a879-d86a476d7215} loadoptions DISABLE-LSA-ISO,DISABLE-VBS bcdedit /set vsmlaunchtype off - Finally, restart your PC to implement the changes.

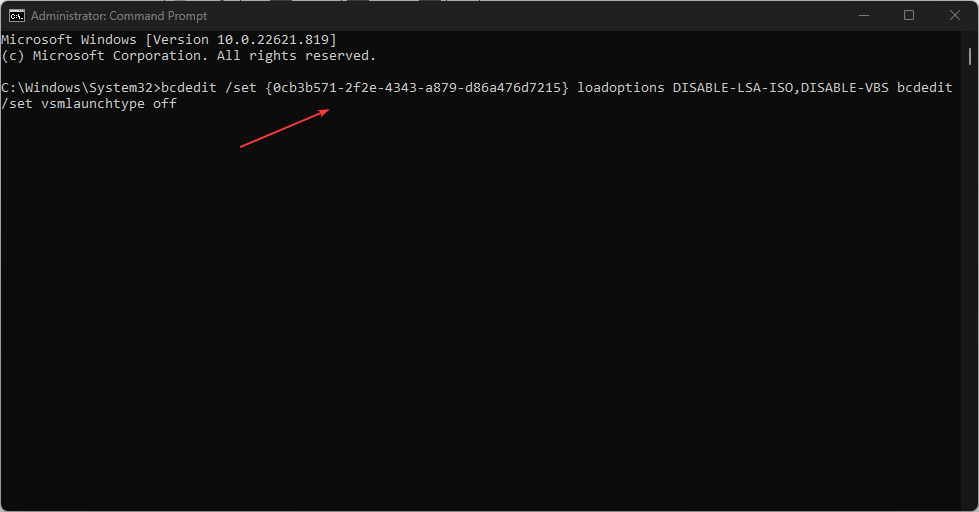
The Windows Defender Credential Guard is dependent on VBS (Virtualization-Based Security). Hence, disabling the Virtual-Based Security will automatically disable the Credential Guard on your Windows device.
Ensure to follow the steps strictly to avoid complicating your PC further.
Nonetheless, check our article about disabling Windows Defender Credential Guard on Windows 10 for more details.
Kindly tell us which solutions worked for you in the comments section. For further queries, leave them, and we will get back to you.
![]()
Перейти к содержанию
На чтение 2 мин Просмотров 823 Опубликовано

В последних обновлениях Windows 10 по умолчанию включен Windows Defender Credential Guard (Защитник Windows Защита учетной записи) и может получиться так, что ранее подготовленные виртуальные машины не запускаются в VMware Workstation или Hyper-V.
Не буду останавливаться на том, что это за технологии, т.к. цель данной заметки — просто и надежно отключить новый функуионал безопасности и тем самым исправить ошибку: «VMware Workstation and Device/Credential Guard are not compatible. VMware Workstation can be run after disabling Device/Credential Guard«.

При запуске несовместимой VM, появляется данное предупреждение и сразу же есть ссылка на официальный мануал по устранению этой проблемы. Там пошагово описан процесс включения и отключения Защиты учетной записи, но самый быстрый и безопасный вариант спрятан в самом конце заметки — что ж исправим ситуацию.
- Скачиваем официальны набор скриптов — Windows Defender Credential Guard hardware readiness tool — microsoft.com/en-us/download/details.aspx?id=53337 ;
- Распаковываем содержимое архива в удобную директорию;
- Запускаем Power Shell от имени администратора, переходим в папку с распакованным скриптом;
- Запускаем скрипт с нужными ключами (при необходимости подтверждаем выполнение операции — R).
В нашем примере используется ключ автоматической перезагрузки системы:
./DG_Readiness_Tool_v3.6.ps1 -Disable -AutoReboot

После перезагрузки можем как и прежде запускать виртуальные машины в VMware Workstation в нашей любимой Windows 10 😉

Занимаюсь IT с 2007 года. Всё началось с увлечения — разгона компьютерного оборудования. Много воды и азота утекло с тех пор… Сейчас уже более 3х лет со своей командой оказываю комплексную поддержку и продвижение бизнеса: SEO, Яндекс.Директ, рассылки и удалённое обслуживание серверов. Буду рад помочь, обращайтесь!
Мы используем cookies для улучшения работы сайта, анализа трафика и персонализации. Используя сайт или кликая на Я согласен, вы соглашаетесь с нашей политикой использования персональных данных и cookies в соответствии с Политикой о персональных данных. Вы можете прочитать нашу политику здесь
Windows Defender Credential Guard can be enabled either by using Group Policy (GPO), Windows registry, the Hypervisor-Protected Code Integrity (HVCI), or the Windows Defender Credential Guard hardware readiness tool. Credential Guard can also protect secrets in a Hyper-V virtual machine, just as it would on a physical machine. In this article, we shall discuss how to Enable or disable Windows Defender Credential Guard. Please see how to Integrate TestRail with Cypress, and how To Add Google Drive To File Explorer in Windows.
Virtualization-Based Security (VBS) must be enabled to run Windows Defender Credential Guard. Starting with Windows 11 Enterprise 22H2 and Windows 11 Education 22H2. Devices that meet the requirements to run Windows Defender Credential Guard as well as the minimum requirements to enable VBS will have both Windows Defender Credential Guard and VBS enabled by default.
By enabling Windows Defender Credential Guard, the following features and solutions are provided:
- Hardware security: NTLM, Kerberos, and Credential Manager take advantage of platform security features, including Secure Boot and virtualization, to protect credentials.
- Virtualization-based security: Windows NTLM and Kerberos-derived credentials and other secrets run in a protected environment that is isolated from the running operating system.
- Better protection against advanced persistent threats: When Credential Manager domain credentials,
NTLM, and Kerberos-derived credentialsare protected using virtualization-based security. The credential theft attack techniques and tools used in many targeted attacks will be blocked.Malware running in the operating system with administrative privileges will not be able to extract secrets that are protected by virtualization-based security.
While Windows Defender Credential Guard is a powerful mitigation, persistent threat attacks will likely shift to new attack techniques. You should also incorporate other security strategies and architectures.
Here are some related guides: How to turn on Windows 10 Tamper Protection for Microsoft Defender, how to find and remove Malware with Microsoft Defender Offline, and how to restore quarantined files in Microsoft Defender Antivirus. In this article, you will learn how to enable or disable Windows Defender Credential Guard
How does Windows Defender Credential Guard works?
Kerberos, NTLM, and Credential managers isolate secrets by using virtualization-based security. Previous versions of Windows stored secrets in the Local Security Authority (LSA). Prior to Windows 10, the LSA stored secrets used by the operating system in its process memory.
With Windows Defender Credential Guard enabled the LSA process in the operating system communicates to a new component called the isolated LSA process. This stores and protects those secrets. Data stored by the isolated LSA process is protected using Virtualization-based security.
And this isn’t accessible to the rest of the operating system. LSA uses remote procedure calls to communicate with the isolated LSA process.
For security reasons, the isolated LSA process doesn’t host any device drivers. Instead, it only hosts a small subset of operating system binaries that are needed for security and nothing else.
All of these binaries are signed with a certificate that is trusted by virtualization-based security. And these signatures are validated before launching the file in the protected environment.
When Windows Defender Credential Guard is enabled, NTLMv1, MS-CHAPv2, Digest, and CredSSP can’t use the signed-in credentials. Thus, single sign-on doesn’t work with these protocols. However, applications can prompt for credentials or use credentials stored in the Windows Vault, which aren’t protected by Windows Defender Credential Guard with any of these protocols.
It is recommended that valuable credentials, such as the sign-in credentials, aren’t to be used with any of these protocols. If these protocols must be used by domain or Azure AD users, secondary credentials should be provisioned for these use cases.
When Windows Defender Credential Guard is enabled, Kerberos doesn’t allow unconstrained Kerberos delegation or DES encryption. Not only for signed-in credentials but also prompted or saved credentials.
The image below shows a high-level overview of how the LSA is isolated by using Virtualization-based security.

Note: Windows Defender Credential Guard can also protect secrets in a Hyper-V virtual machine. Just as it would on a physical machine. The same set of procedures used to enable Windows Defender Credential Guard on physical machines applies also to virtual machines.
Please see How to configure additional LSA Protection, What is Pass the Hash Attack and how to mitigate the attack, and how to Protect Remote Desktop credentials with Windows Defender Remote Credential Guard or Restricted Admin Mode.
Enable Windows Defender Credential Guard by using Group Policy
You can use Group Policy to enable Windows Defender Credential Guard. When enabled, it will add and enable the virtualization-based security features for you if needed.
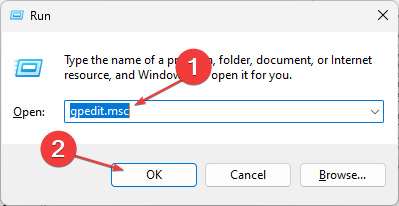
To launch the group policy editor, search for group policy from the search window, or open the run command, and run the following command ‘gpedit.msc’

From the Group Policy Management Console, go to the following location below.
Computer Configuration > Administrative Templates > System > Device Guard.
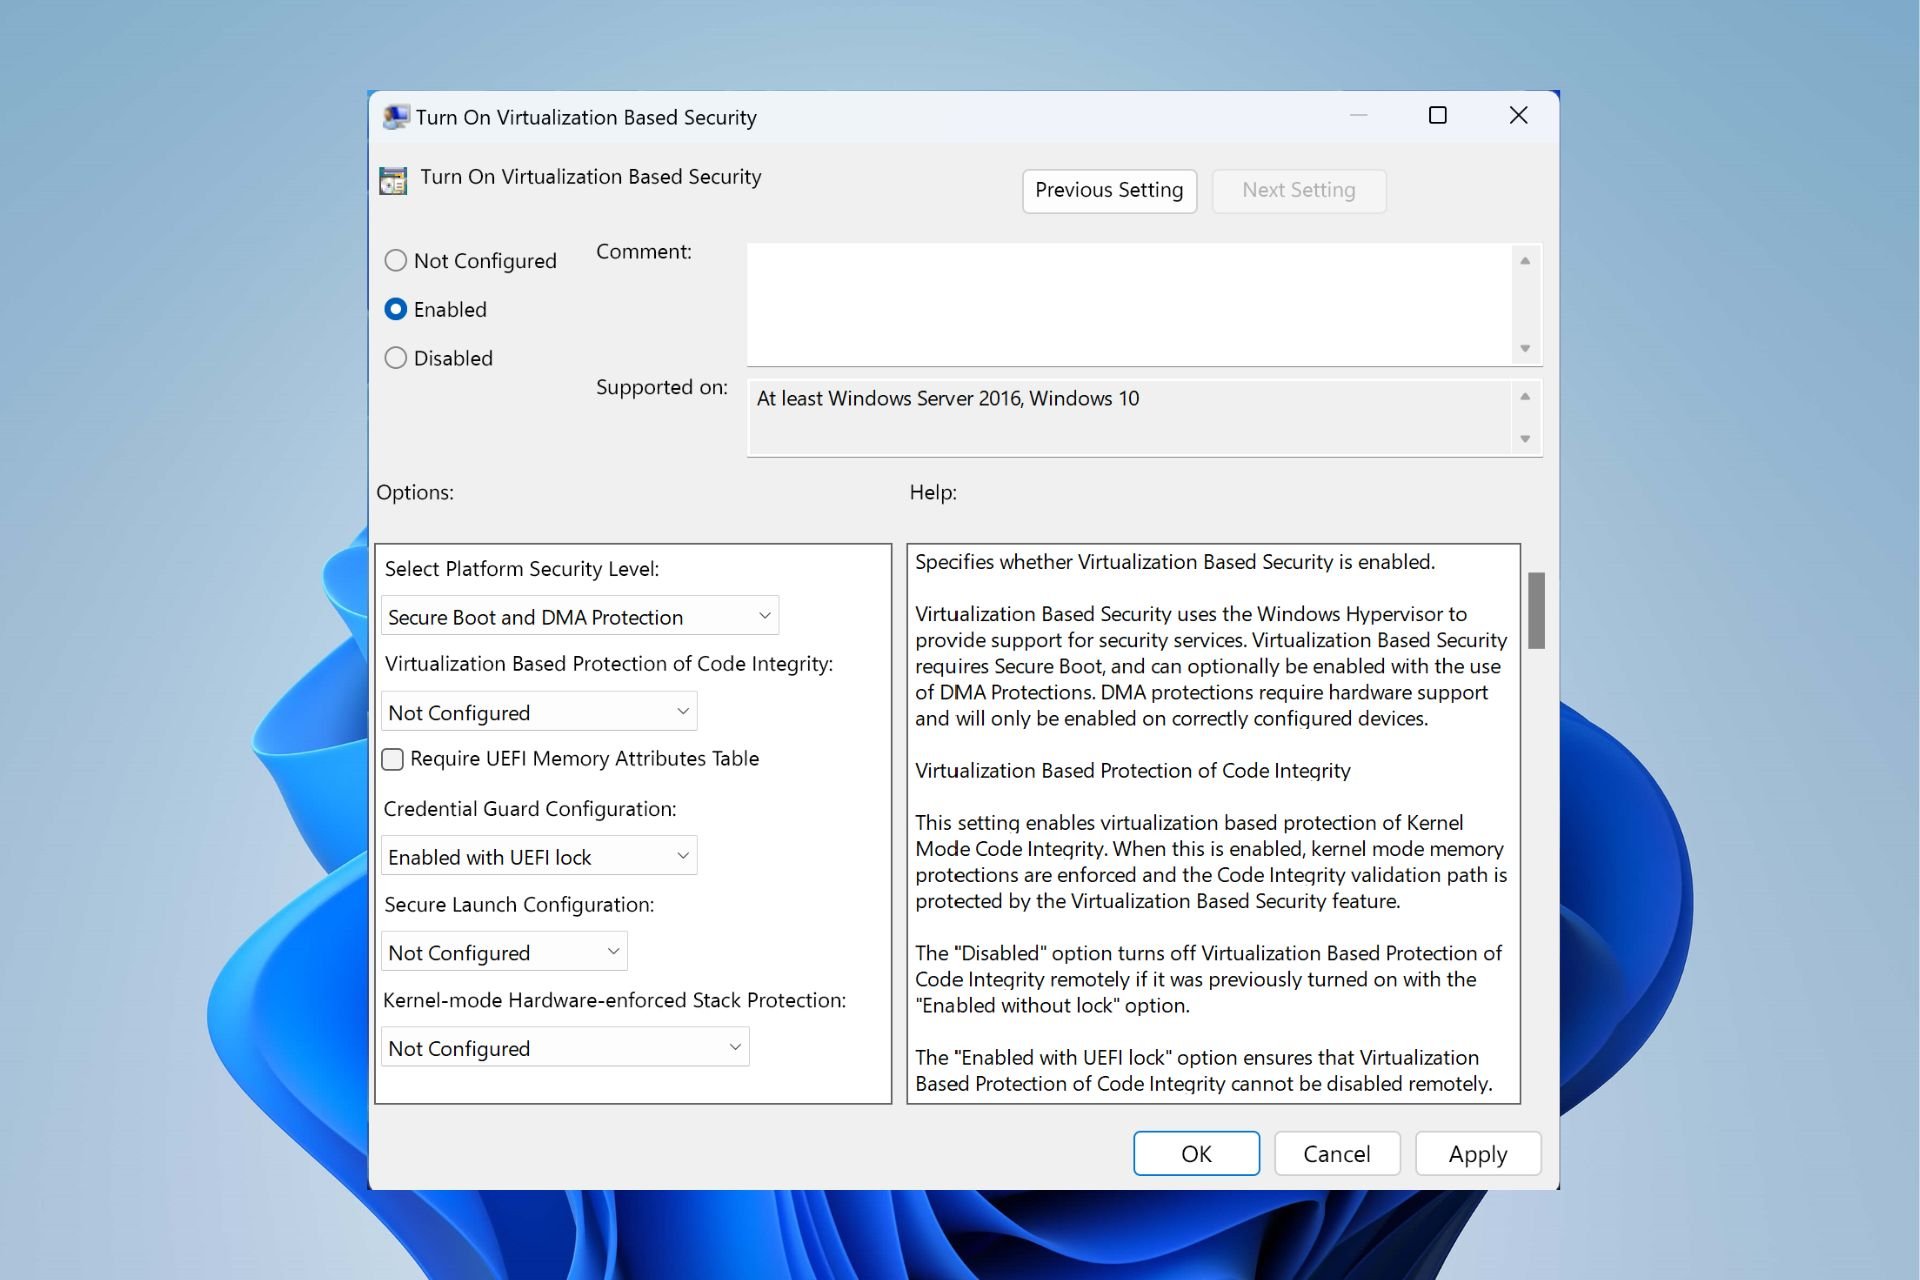
Select Turn On Virtualization Based Security, and then select the Enabled option.

In the Select Platform Security Level box, choose Secure Boot or Secure Boot and DMA Protection.
- In the Credential Guard Configuration box, select Enabled with UEFI lock. If you want to be able to turn off Windows Defender Credential Guard remotely, choose
Enabled without lock. - In the Secure Launch Configuration box, choose Not Configured, Enabled or Disabled.


Also, see how to allow saved credentials for RDP connection, and Disable credential Prompts for Remote Desktop Connections.
Enable Windows Defender Credential Guard by using the Windows Registry
If you don’t use Group Policy, you can enable Windows Defender Credential Guard by using the registry. Windows Defender Credential Guard uses virtualization-based security features that need to be enabled first on some operating systems.
Note: Starting with Windows 10, version 1607, and Windows Server 2016. Enabling Windows features to use virtualization-based security isn’t necessary. This step can be skipped. If you’re using Windows 10, version 1507 (RTM) or Windows 10, version 1511, Windows features have to be enabled to use virtualization-based security.
You may want to see how to update your device. See how to get the Windows 10 Version 22H2 Update. With this, you will not be required to add the virtualization-based security features by using Programs and Features.
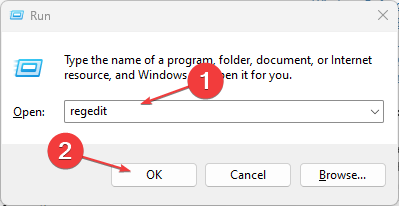
Open Registry Editor by searching or running the command regedit.exe from the run dialogue box

Navigate to the following location. As you can see, the DWORD value named LsaCfgFlags is missing. We have to create it.
HKEY_LOCAL_MACHINE\SYSTEM\CurrentControlSet\Control\Lsa.
Add a new DWORD value named LsaCfgFlags. Set the value of this registry setting to “1" to enable Windows Defender Credential Guard with UEFI lock, set it to “2” to enable Windows Defender Credential Guard without lock, and set it to 0 to disable it, and then close Registry Editor.
Disable Via the Group Policy
Windows Defender Credential Guard can be disabled via several methods explained below. Depending on how the feature was enabled.
For devices that had Windows Defender Credential Guard automatically enabled. In 22H2 update and didn’t have it enabled prior to the update, it’s sufficient to disable it via Group Policy.
Note: If windows Defender Credential Guard was enabled via Group Policy and without UEFI Lock, disabling the same Group Policy setting will disable Windows Defender Credential Guard.Disable the Group Policy setting that governs Windows Defender Credential Guard. Navigate to
Computer Configuration > Administrative Templates > System > Device Guard > Turn on Virtualization-Based SecurityIn the “Credential Guard Configuration” section, set the dropdown value to “Disabled”.

Disable via the Registry Keys
If Windows Defender Credential Guard was enabled with UEFI Lock. The procedure described in Disabling Windows Defender Credential Guard with UEFI Lock must be followed. The default enablement change in eligible 22H2 devices does not use a UEFI Lock.
If Windows Defender Credential Guard was enabled without UEFI Lock and without Group Policy. It’s sufficient to edit the registry keys as described below to disable Windows Defender Credential Guard.
Note: Deleting these registry settings may not disable Windows Defender Credential Guard. They must be set to a value of "0".
HKEY_LOCAL_MACHINE\SYSTEM\CurrentControlSet\Control\Lsa\LsaCfgFlagsHKEY_LOCAL_MACHINE\SOFTWARE\Policies\Microsoft\Windows\DeviceGuard\LsaCfgFlagsI hope you found this blog post helpful. Now, you have learned how to enable or disable Windows Defender Credential Guard. If you have any questions, please let me know in the comment session.
Today, in this post, we will see how to enable or turn on Credential Guard in Windows 11/10 using Group Policy. Credential Guard is one of the main security features available with Windows 11/10. It allows protection against the hacking of domain credentials, thereby preventing hackers from taking over the enterprise networks.
What does Credential Guard do?
Credential Guard is one of the main security features available with Windows 11/10. It allows protection against hacking of domain credentials thereby preventing hackers from taking over the enterprise networks. With features like Device Guard and Secure Boot, Windows 11/10 is more secure than any of the previous Windows operating systems.
Credential Guard is available only in Windows 11/10 Enterprise Edition. So if you are using Pro or Education, you won’t get to see this feature on your version of Windows. Moreover, Your machine should be supporting Secure Boot and 64-bit virtualization.
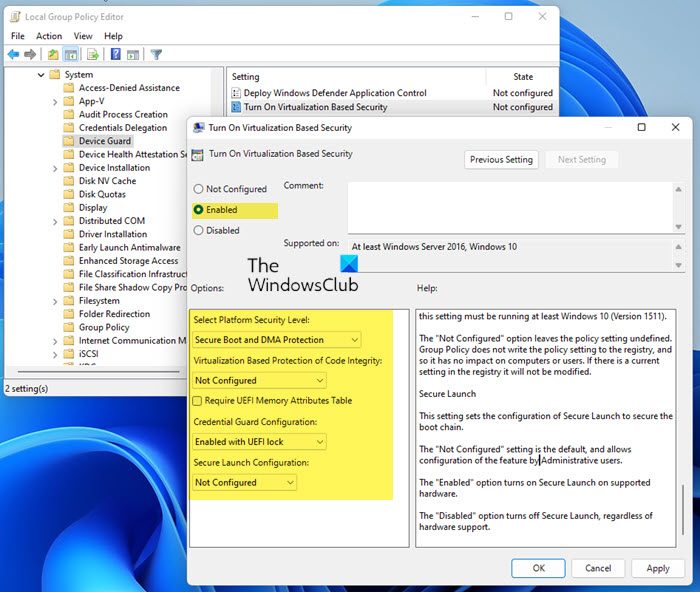
To enable or turn on Credential Guard, Open Run, type gpedit.msc and hit Enter to open the Group Policy Editor.
Now navigate to the following setting:
Computer Configuration > Administrative Templates > System > Device Guard
Now, double-click Turn On Virtualization Based Security, and then select Enabled.
Under Options, select Platform Security Level box, choose Secure Boot or Secure Boot and DMA Protection.
Under Virtual Based protection of Code Integrity, select Not configured
In the Credential Guard Configuration box, click Enabled with UEFI lock and then OK. If you want to turn off Credential Guard remotely, choose Enabled without lock.
Under Secure Launch Configuration, select Not configured
Under Kernal-mode Hardware-enforced Stack Protection, select Not configured
This policy specifies whether Virtualization Based Security is enabled.
Virtualization Based Security uses the Windows Hypervisor to provide support for security services. Virtualization Based Security requires Secure Boot, and can optionally be enabled with the use of DMA Protections. DMA protections require hardware support and will only be enabled on correctly configured devices.
Virtualization Based Protection of Code Integrity
This setting enables virtualization based protection of Kernel Mode Code Integrity. When this is enabled, kernel mode memory protections are enforced and the Code Integrity validation path is protected by the Virtualization Based Security feature.
The “Disabled” option turns off Virtualization Based Protection of Code Integrity remotely if it was previously turned on with the “Enabled without lock” option.
The “Enabled with UEFI lock” option ensures that Virtualization Based Protection of Code Integrity cannot be disabled remotely. In order to disable the feature, you must set the Group Policy to “Disabled” as well as remove the security functionality from each computer, with a physically present user, in order to clear configuration persisted in UEFI.
The “Enabled without lock” option allows Virtualization Based Protection of Code Integrity to be disabled remotely by using Group Policy.
The “Not Configured” option leaves the policy setting undefined. Group Policy does not write the policy setting to the registry, and so it has no impact on computers or users. If there is a current setting in the registry it will not be modified.
The “Require UEFI Memory Attributes Table” option will only enable Virtualization Based Protection of Code Integrity on devices with UEFI firmware support for the Memory Attributes Table. Devices without the UEFI Memory Attributes Table may have firmware that is incompatible with Virtualization Based Protection of Code Integrity which in some cases can lead to crashes or data loss or incompatibility with certain plug-in cards. If not setting this option the targeted devices should be tested to ensure compatibility.
Warning: All drivers on the system must be compatible with this feature or the system may crash. Ensure that this policy setting is only deployed to computers which are known to be compatible.
Credential Guard
This setting lets users turn on Credential Guard with virtualization-based security to help protect credentials.
The “Disabled” option turns off Credential Guard remotely if it was previously turned on with the “Enabled without lock” option.
The “Enabled with UEFI lock” option ensures that Credential Guard cannot be disabled remotely. In order to disable the feature, you must set the Group Policy to “Disabled” as well as remove the security functionality from each computer, with a physically present user, in order to clear configuration persisted in UEFI.
The “Enabled without lock” option allows Credential Guard to be disabled remotely by using Group Policy. The devices that use this setting must be running at least Windows 10 (Version 1511).
The “Not Configured” option leaves the policy setting undefined. Group Policy does not write the policy setting to the registry, and so it has no impact on computers or users. If there is a current setting in the registry it will not be modified.
Secure Launch
This setting sets the configuration of Secure Launch to secure the boot chain.
The “Not Configured” setting is the default, and allows configuration of the feature by Administrative users.
The “Enabled” option turns on Secure Launch on supported hardware.
The “Disabled” option turns off Secure Launch, regardless of hardware support.
Click Apply/OK and exit.
Restart your system.
Disable or Enable Credential Guard using Registry
You need to enable virtualization-based security first as follows:
Open Registry Editor and go to the following key:
HKEY_LOCAL_MACHINE\SYSTEM\CurrentControlSet\Control\DeviceGuard.
Add a new DWORD value. name it EnableVirtualizationBasedSecurity and set its value as follows:
- To enable virtualization-based security, set it to 1
- To disable virtualization-based security set it to 0
Next, add a new DWORD value named RequirePlatformSecurityFeatures.
Set the value of this registry setting to 1
- To use Secure Boot only set its value to 1
- To use Secure Boot and DMA protection, set its value to 3
Now, to enable Windows Defender Credential Guard, go to the following key:
HKEY_LOCAL_MACHINE\SYSTEM\CurrentControlSet\Control\Lsa
Add a new DWORD value and name it LsaCfgFlags.
- To disable Windows Defender Credential Guard, set its value to 0
- To enable Windows Defender Credential Guard with UEFI lock, set it to 1
- To enable Windows Defender Credential Guard without UEFI lock, set it to 2
Close Registry Editor and restart your computer.
You have to remember that Credential Guard will offer protection against direct hacking attempts and malware-seeking credential information. If the credential information is already stolen before you could implement Credential Guard, it won’t prevent the hackers from using the hash key on other computers in the same domain.
How do I know if Credential Guard running?
You can view System Information to check that Windows Defender Credential Guard is running on your computer. To do so, Run msinfo32.exe, and select System Information. Next, select System Summary. If you see Credential Guard mentioned next to Virtualization-based Security Services, it means it is running.
TIP: The Remote Credential Guard in Windows 11/10 protects Remote Desktop credentials.