7-day Free Trial w/Credit card, no charge upfront or if you cancel up to 2 days before expiration; Subscription price varies per region w/ auto renewal unless you timely cancel; notification before you are billed; 30-day money-back guarantee; Read full terms and more information about free remover.
*Source of claim SH can remove it.
The Reason Security Engine is an outdated component often linked with RAV Antivirus, an obsolete security software categorized as a potentially unwanted program (PUP). Users have reported the Reason Security Engine causing significant system slowdown, consuming an excessive amount of RAM, and monopolizing disk usage, often reaching 100%. Despite attempts to close it via the task manager, the engine remains operational, frequently denying access due to its background operation. Uninstallation poses a challenge as it may not be visible in the control panel. Furthermore, even after removing the associated RAV Antivirus, the Reason Security Engine persists, suggesting it embeds itself deeply within the system. Given these issues and its antiquated nature, it’s advisable to replace it with up-to-date security software.

How to uninstall ReasonLabs?
To uninstall ReasonLabs, you’ll first need to run its uninstaller, but since this may not be enough to get rid of everything, then you’ll need to either use a professional removal tool or follow our guide to manually find and eliminate any residual traces of the malware.
What is the ReasonLabs application virus?
The ReasonLabs application virus is actually a legitimate app that is mistakenly referred to as a virus due to it sometimes getting installed without the user’s informed permission. Though it’s technically a safe software, it’s still recommended to delete the ReasonLabs application if it got installed on your PC without you wanting it there.
How to delete ReasonLabs?
To fully delete ReasonLabs after running its uninstaller, we recommend checking system settings such as the Registry or the Services and Startup items and remove from there anything that may be related to the app. A detailed guide on how to do all that is provided for you on this page.
How to turn off Reason Cybersecurity?
To turn off Reason Cybersecurity, you will need to uninstall the application from your PC either by following the steps detailed in our removal guide, or by using a specialized removal tool that can automatically get rid of the undesired application and all of its residual files and settings.
Reason Security
Reason Security is a security software that may install itself without explicit user consent, often alongside outdated or unwanted software like RAV Antivirus. Once embedded in a system, it poses various challenges for users. It may not appear in Control Panel listings or settings apps, complicating its removal. Furthermore, it runs a component known as the Reason Security Engine in the background, which can consume significant system resources. Users report an inability to disable Reason Security through standard system settings, even after seemingly successful uninstallations, indicating it may leave residual traces. If the software is causing issues, it’s recommended to utilize specialized removal tools, like the one from this page, or to follow the detailed removal guide we’ve included below.

The Reason Security Engine service
The Reason Security Engine service is a process linked to the outdated RAV Antivirus program, which is often flagged as potentially unwanted. Although the service itself isn’t harmful, it’s associated with a program that offers inadequate security features and poses potential system vulnerabilities due to it being outdated. These vulnerabilities may be exploited by genuine malware, thereby jeopardizing your cybersecurity. Despite its non-malicious nature, the Reason Security Engine service may lead to intrusive behaviors like fake alerts, causing undue stress and confusion. Moreover, its high resource usage can affect system performance. Given these factors, it’s advisable to eliminate it along with the RAV Antivirus, ensuring a thorough system cleanup to minimize potential risks.
Reason Security Engine high CPU usage
The Reason Security Engine high CPU usage is a common problem faced by most users who have this engine on their machines. This service is linked with the outdated RAV Antivirus and can lead to system slowdowns and potential instability. This excessive utilization of system resources can disrupt other vital processes, hampering overall performance and potentially leading to system crashes. Additionally, the Reason Security Engine may trigger unwarranted alerts, creating a confusing user experience. Since RAV Antivirus itself is considered a potentially unwanted program with subpar security measures, it might leave your system vulnerable to actual malware threats. Therefore, despite the Reason Security Engine itself not being malicious, its Reason Security Engine high CPU usage and its other adverse impacts on system make its removal strongly recommended.
ReasonLabs application
The ReasonLabs Application is a safe security tool designed by the legitimate software company ReasonLabs. However, issues arise when the software gets bundled with other downloads, potentially installing without explicit user consent. The bundling practice often results in the automatic installation of the Reason Security Engine, an outdated component associated with various system issues. Despite being non-malicious, this engine can cause substantial CPU usage, leading to system slowdowns, unwarranted alerts, and possible instability. Thus, while the ReasonLabs Application is designed to enhance your system’s security, its unintended installation and the subsequent automatic inclusion of the Reason Security Engine can lead to performance degradation and potential exposure to security risks, necessitating its careful management or removal.
Reason Cybersecurity
In conclusion, Reason Cybersecurity, developed by the reputable company ReasonLabs, provides protective software solutions intended to bolster system security. However, some associated elements, such as the Reason Security Engine, can inadvertently disrupt system performance, particularly when bundled with other software and installed without user knowledge. Issues may include excessive CPU usage, misleading alerts, and even potential system instability. The fact that this component is sometimes installed without explicit user consent has led to a degree of skepticism and concerns regarding user privacy and system integrity. While the core software from ReasonLabs is undeniably safe, it’s essential for users to understand the full implications of bundled installations to ensure optimal computer performance and safety.
SUMMARY:
*Source of claim SH can remove it.
How to Uninstall Reason Security Engine
To get rid of Reason Security Engine:
- Uninstall RAV Antivirus and any other potentially unwanted programs from Apps & features settings section.
- Quit the Reason Security Engine process and delete its location folder.
- Clean the Startup items list, the Task Scheduler, the Services list, and the System Registry.
- Get rid of any remaining Reason Security Engine or RAV Antivirus files.
Completing those four steps should usually result in the full deletion of anything related to the Reason Security Engine process or the RAV Antivirus PUP. To make sure that you correctly complete each of the steps, make sure to check out the detailed instructions we’ve shown below.
Detailed Reason Security Engine removal guide
Step 1
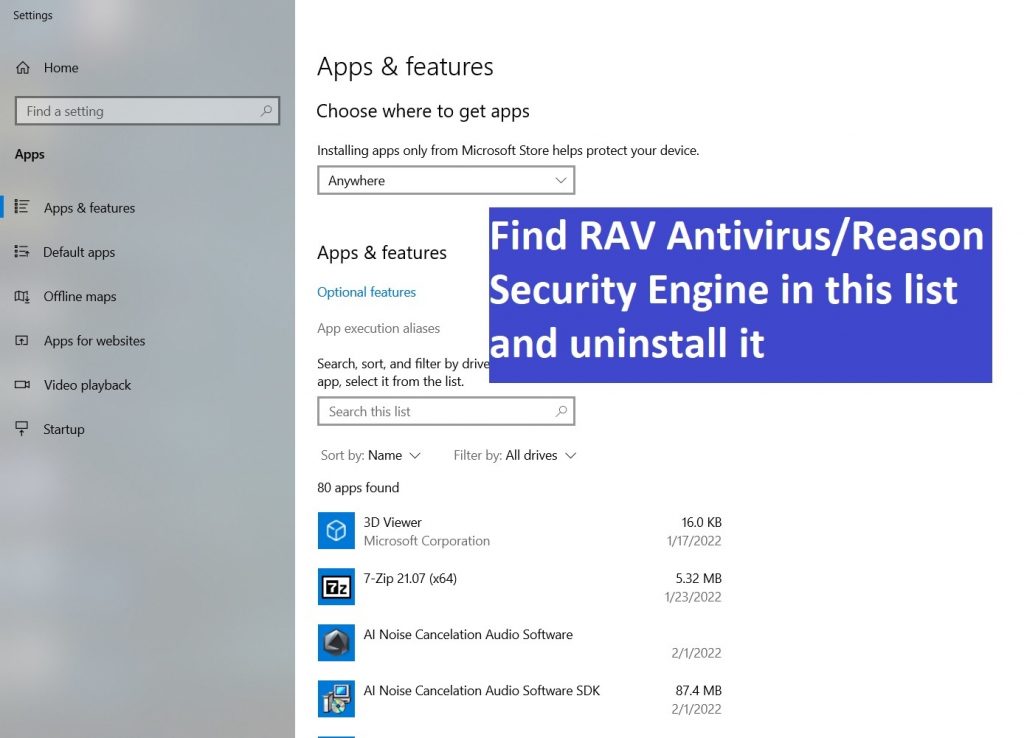
Open the Start Menu/click in the Start Menu search bar and type Apps & Features. Next, scroll down to see the list of apps and programs that are installed on your PC and look for anything named RAV Antivirus or Reason Security Engine. If you notice an app or apps with those names, select them, select Uninstall, and proceed to uninstall the potentially unwanted program/s by following the prompts. If the uninstaller asks you if you’d prefer to keep on your computer something related to the unwanted program, make sure to refuse that offer. Also, some unwanted apps try to trick you into installing other undesirable software when you are running their uninstallers – be sure to carefully read all the options in the uninstaller so that you don’t end up getting some other PUP on your PC.

Step 2
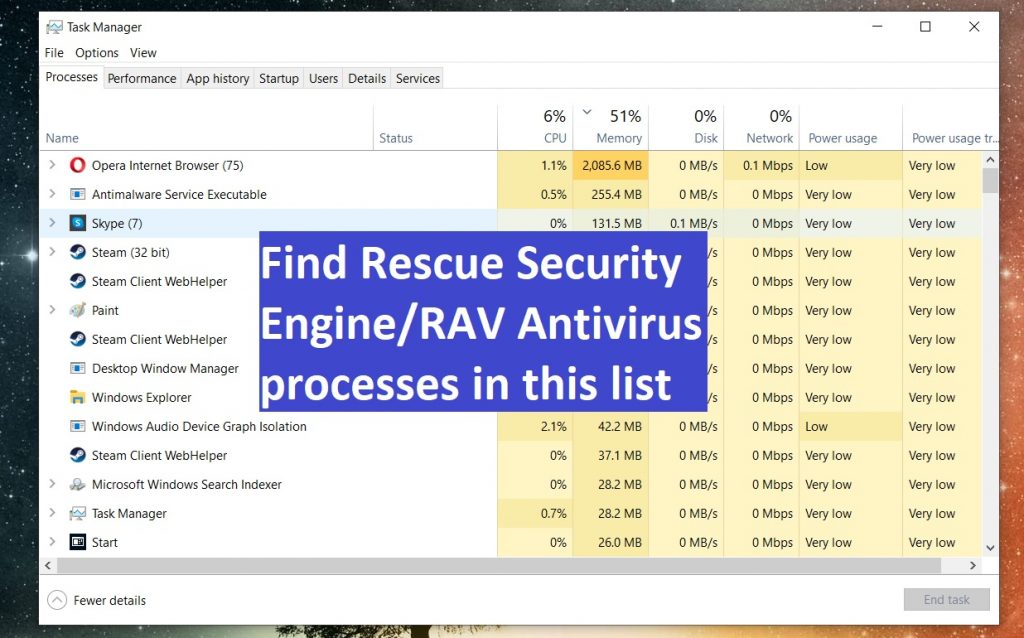
Open the Task Manager with the Ctrl + Shift + Esc keyboard combination, then visit the Processes tab and there look for the Reason Security Engine process. When you find it, right-click it, click Open File Location, then return to the Task Manager (without closing the file location folder), right-click the process again, click Quit Process, and click Quit again to confirm. Now go back to the file location folder, delete everything that’s in it, and then delete the folder itself. If there are any items that can’t be deleted right now, leave them as they are for now, and, once you finish the rest of the guide, try to delete them again.
You should also look for any processes named RAV Antivirus or anything similar and do the same thing with them and their file location folders. Additionally, if you notice any other sketchy and suspicious processes in the Task Manager, go to their file location folders, scan the contents of those folders with the next free online malware scanner, and if anything is flagged as potentially unsafe, quit the related process and delete the entire file location folder.
Each file will be scanned with up to 64 antivirus programs to ensure maximum accuracy
This scanner is free and will always remain free for our website’s users.
This file is not matched with any known malware in the database. You can either do a full real-time scan of the file or skip it to upload a new file. Doing a full scan with 64 antivirus programs can take up to 3-4 minutes per file.

Drag and Drop File Here To Scan

Analyzing 0 s
Each file will be scanned with up to 64 antivirus programs to ensure maximum accuracy
This scanner is based on VirusTotal’s API. By submitting data to it, you agree to their Terms of Service and Privacy Policy, and to the sharing of your sample submission with the security community. Please do not submit files with personal information if you do not want them to be shared.
Step 3
We recommend putting your PC in Safe Mode for the next steps, so this is what you should do now. Here are our instructions on How to enter Safe Mode on a Windows PC if you need help with this.
Step 4
Now, it is time to visit different sections and settings in your system where there may be remnants of the RAV Antivirus/Reason Security Engine. Go to each system section by typing the items/names shown below in the Start menu search and then hit Enter to open the first search results. After that, complete the instructions we’ve provided for each item:
Services – When the Services window opens, look through the services listed in it, searching for anything named RAV Antivirus or Reason Security Engine. If you find an item or items that have such names, right-click them, click Properties, and then set the Startup type to Disabled. Do this with every services item that you think is linked to the Reason Security Engine process and/or the RAV Antivirus PUP.
![]()
Task Scheduler – In the Task Scheduler, first click the Task Scheduler Library folder shown in the top-left, and then look at the tasks shown in the list. Again, search for items named Reason Security Engine or RAV Antivirus. If such items are found, right-click them, select Delete, and confirm the action.
Msconfig – Select the Startup tab in the System Configuration window, and then, if you see a button named Open Task Manager, click it. When you get a list of the system’s startup items, look carefully through them and if you see entries named Reason Security Engine or RAV Antivirus, disable them.
Regedit.exe – Allow the app to make changes to your system by clicking Yes when your permission is required and then, when the Registry Editor shows up, press Ctrl + F. In the search bar that pops up, type RAV Antivirus, perform the search, delete the first item that gets found, and search again. In this way, make sure that all items that come up for this search are deleted. Then do the same with search phrases “RAV”, “Reason Security”, and “Reason Security Engine”.
![]()
After you’ve made sure that everything related to those four search phrases is deleted, manually go to the following three Registry locations by expanding the folders to the left. In each of those locations, look for items with unusual names that seem to be randomly generated (for instance, items with names like this: “903urj09fd0923ut09ik3e90turr”). Tell us in the comments if you notice anything like this, and we will tell you what to do with it.
- HKEY_CURRENT_USER/Software/Random Directory.
- HKEY_CURRENT_USER/Software/Microsoft/Windows/CurrentVersion/Run
- HKEY_CURRENT_USER/Software/Microsoft/Internet Explorer/Main
Step 5
Lastly, there are a couple of folders where there may be file remnants from the RAV Antivirus PUP, so you should check for such remnants and delete what you may find. Before that, however, type Folder Options in the Start Menu, open the first result, click the View tab, and there check the Show hidden files, folders, and drives option. After that, click OK so that the changes are saved. Now, type each of the following (together with the “%” symbols) in the Start Menu search and open the respective folders. In all of those folders, except %Temp%, delete only the most recently created files (anything created since the time you think RAV Antivirus got installed on your PC). In the Temp folder, you must delete everything – since there will likely be thousands of items there, the easiest way to delete them all at once is to press Ctrl + A while in the folder, then press Del, and confirm the deletion.
- %LocalAppData%
- %ProgramData%
- %WinDir%
- %AppData%
- %Temp%
Reason cybersecurity is a potent software that is in use these days. Many of you are using this software. But not everything works best for everyone. Some of you might find Reason cybersecurity a little tricky and confusing. Hence turning off the reason cybersecurity is necessary. So here is the guide for you all about how to turn off reason cybersecurity. Now the reasons for turning this can be many.
However, the turning-off process is complex. It is one of the drawbacks of this software. Installing is extremely easy. But the more easy is installed the more complex is uninstalling. Make sure that you follow these steps to get done your work.
Table of Contents
Basics about reason cybersecurity
If you have some sensitive data in your system then reason cyber security protects this data at its best. Many cyber-attacks are happening on systems these days. These attract results in the leaking of all your private data. And you have to face some severe issues.
This software is created with the recent technologies. And one of the best features of this reason cybersecurity is to provide on-time protection. It means it will protect your data even when you are using your system.
Things To Do When You Ready To Turn Off the Reason CyberSecurity
Here are the things you can do when you turn off your cyber security. There are a variety of easy to do this. Some factors affect this process. What type of security you’re using in your system affects the process a lot.
Administrative Access
Most cybersecurity tools and software require administrative access to modify their settings. You can Log in with administrative privileges to your device to ensure that you can make the necessary changes.
Temporary Disablement
Instead of completely disabling entire cybersecurity suites opt for temporary disablement of specific features. For example, if you’re encountering compatibility issues with a program, you might need to disable a specific security module that’s causing the conflict.
Scheduled Downtime
Whenever possible, schedule the downtime during off-peak hours or times when you’re not actively using your device. This minimizes the impact on your daily activities and reduces the window of vulnerability.
Regular Updates
Before turning off cybersecurity measures, ensure that all your software, including the operating system and security tools, is up to date. Vulnerabilities in outdated software exploites during this period.
Disconnect From The Network
If your task doesn’t require internet access, disconnect from the network while cybersecurity measures are turned off. This reduces the exposure to potential threats of data sharing with the wrong people.
Stay Vigilant
While cybersecurity measures are disabled, remain cautious of any unusual activities or behaviors on your device. Be prepared to interrupt the task if you notice anything suspicious.
Enable After Task Completion
As soon as you’ve completed the task that required disabling cybersecurity measures, re-enable them immediately. Don’t leave your device unprotected any longer than necessary. These are the things you keep in mind when you are ready to turn off Reason Cybersecurity.
These are the steps that you have to follow to turn off your reason for cybersecurity. If you have installed this software in your system on your own then you will face no problem in turning this off too.
- The first step will be to launch the software. This is a simple process and you can do this by clicking on the software icon present on your home screen.
- Now for the next step, you have to reach the settings menu. To reach here you have to click on the “cogwheel” which is present next to the scan option in the software.
- After reaching the “setting menu” you have to find the option saying “real-time protection”
- As soon as you locate this option turn this off. When you turn this off a pop-up will appear on screen. In this pop-up, all the warnings for the system will appear. And you will see a list of disadvantages of turning this software off.
- Tap on the yes option to allow this setting.
Rember you can always turn this setting on and off accordingly. But if you uninstall this software then you have to download it again and then reinstall this. This will take a while. But turning this off gives you a chance to turn the reason cybersecurity on whenever you want.
Reasons to turn the cybersecurity off from the system
There are many reasons to turn off the reason cyber security. These are some of the reasons that you can not avoid. And if you want to disable the cybersecurity momentarily then you can do this very easily with reason cybersecurity.
Here are some of the common reasons to turn this software off.
- If you are into coding and creating new websites you will need this feature very frequently. Because to test a website you have to close the cybersecurity. Otherwise, your system will not run that website.
- Now if you’re installing new software. For example any gaming software or any coding software then you have to turn off the cyber security.
- If you are having connectivity issues with the internet or with some network then there are high chance that it might be because of cybersecurity. So try this after disabling the reason cybersecurity from your system.
Conclusion
In conclusion, here is how to turn off Reason cybersecurity. The process is easy but you have to take certain measures to do this and make sure that you won’t expose yourself to some unknown networks. Because it just took minutes to take all the data from your system.
Here are some preventive measures that you can take to keep your data safe in your system. And remember in case of any data leaking report to the cyber security team.
See Also…
Windows 10/8/7: how to install active directory users & computers tools(Opens in a new browser tab)
Reason Cybersecurity – это антивирусное программное обеспечение, которое разработано для обнаружения и удаления вредоносных программ. Однако, иногда пользователи могут столкнуться с ситуацией, когда нужно удалить Reason Cybersecurity с компьютера. Возможны различные причины для этого, например, если вы решили перейти на другой антивирусный продукт или если у вас возникли проблемы с работой программы. В этой статье мы расскажем вам о шагах, которые нужно выполнить, чтобы успешно удалить Reason Cybersecurity.
Первый шаг: перед тем, как приступить к удалению Reason Cybersecurity, важно убедиться, что у вас есть административные права на компьютере. В противном случае, удаление может быть заблокировано системой. Если вы не уверены, у вас ли есть административные права, свяжитесь с администратором компьютера или обратитесь к документации операционной системы для получения инструкций.
Второй шаг: чтобы удалить Reason Cybersecurity, вам потребуется открыть панель управления вашей операционной системы. Для этого найдите иконку «Пуск» в левом нижнем углу экрана и щелкните по ней. Затем выберите пункт «Панель управления». В некоторых версиях операционной системы может быть необходимо выполнить дополнительные шаги, например, выбрать пункт «Настройки» перед тем, как открыть панель управления.
Третий шаг: в панели управления найдите раздел «Программы» или «Программы и компоненты» и щелкните по нему. В этом разделе вы найдете список всех установленных программ на вашем компьютере. Прокрутите список программ вниз и найдите Reason Cybersecurity. Щелкните по нему правой кнопкой мыши и выберите пункт «Удалить» или «Изменить/Удалить». Следуйте инструкциям, чтобы завершить удаление Reason Cybersecurity с вашего компьютера.
Обратите внимание, что процесс удаления Reason Cybersecurity может незначительно отличаться в зависимости от операционной системы, которую вы используете. Если вы столкнулись с проблемами или у вас возникли вопросы по поводу удаления антивируса, рекомендуется обратиться к документации или службе поддержки Reason Cybersecurity для получения дополнительной помощи.
Содержание
- Как удалить Reason Cybersecurity?
- Шаги по удалению антивируса
- Остановите работу программы
Как удалить Reason Cybersecurity?
- Откройте панель управления системой в вашей операционной системе.
- Выберите «Программы и компоненты» (в Windows) или «Установленные программы» (в macOS).
- Найдите Reason Cybersecurity в списке установленных программ.
- Щелкните правой кнопкой мыши по Reason Cybersecurity и выберите «Удалить» или «Деинсталлировать».
- Следуйте инструкциям удаления на экране и подтвердите действие.
Если после выполнения этих шагов Reason Cybersecurity по-прежнему отображается в списке установленных программ, вам может потребоваться использовать специализированное программное обеспечение для удаления.
Не забудьте после удаления Reason Cybersecurity установить другую антивирусную программу или обновить наличествующую, чтобы обеспечить защиту вашего компьютера от вредоносных программ и онлайн-угроз.
Шаги по удалению антивируса
Удаление антивируса Reason Cybersecurity может оказаться несколько сложным процессом, но с помощью следующих шагов вы сможете успешно избавиться от этой программы:
- Перейдите в меню «Пуск» и выберите «Параметры».
- В открывшемся окне выберите «Система» и затем «Приложения и функции».
- В разделе «Приложения и функции» найдите антивирус Reason Cybersecurity в списке установленных программ.
- Щелкните на нем правой кнопкой мыши и выберите «Удалить».
- Следуйте инструкциям деинсталлятора Reason Cybersecurity, чтобы завершить удаление программы.
- После окончания удаления перезагрузите компьютер, чтобы изменения вступили в силу.
Важно отметить, что процесс удаления может зависеть от версии Windows, которую вы используете, и возможны небольшие отличия в конкретных шагах. Если вы столкнетесь с какими-либо проблемами или не сможете найти антивирус Reason Cybersecurity в списке установленных программ, рекомендуется обратиться в службу поддержки или проконсультироваться с онлайн-форумами, где пользователи могут помочь вам с конкретной ситуацией.
Остановите работу программы
Перед удалением Reason Cybersecurity необходимо остановить работу программы. В противном случае, удаление может быть затруднено или даже невозможно. Вот несколько простых шагов, которые помогут вам остановить Reason Cybersecurity:
- Нажмите на иконку Reason Cybersecurity в панели задач, правой кнопкой мыши.
- Выберите опцию «Закрыть» или «Выключить» из контекстного меню.
- Если программа не реагирует или не закрывается, нажмите клавишу Ctrl + Alt + Delete на клавиатуре.
- В появившемся меню выберите «Диспетчер задач».
- В разделе «Приложения» найдите Reason Cybersecurity и выделите его.
- Нажмите кнопку «Закрыть задачу» или «Завершить задачу».
- Подтвердите действие, нажав кнопку «Да» или «ОК».
После выполнения этих шагов Reason Cybersecurity должен быть полностью остановлен и вы можете приступить к удалению программы с вашего компьютера.
What is Reason Cybersecurity?
Reason Cybersecurity is the same program as RAV Antivirus and RAV Endpoint Protection as they are both programs developed by Reason Labs.
Many have reported that the two programs has been suddenly getting installed into their computers, that is because Reason Cybersecurity is often bundled along with other applications when they are installed.
Should I uninstall Reason Cybersecurity? The program itself provides effective security protection for its users. If you don’t have any antivirus software installed, feel free to to keep the program and allow it to do the task for you.
Although this application is an antivirus program and is safe to use, getting a software suddenly installed into the computer is something people may not want that is why it is often branded as a PUP (Potentially Unwanted Application).

One of the main ways of getting in to the computer is through software bundling wherein their program is tagged along in legitimate software like android emulators and utility programs. So when the user installs the program, the said program will be injected into the system as well.
Please head over to the next section below and follow the removal guide presented to uninstall Reason Cybersecurity from the computer system.
This procedure will assist you in removing Reason Cybersecurity as well as any other program bundled along with the potential unwanted application. You can rest assured that the information provided below has been tried and tested.
We have provided a simple step-by-step instructions for removing the unwanted program from the computer system.
Step 1: Find and Remove Unwanted Program
An automatic uninstallation guide may also be found below for a quick removal, but first here are the methods to remove the app manually.
Method 1: Remove Program via Control Panel 

- Search Control Panel in the Windows search bar then click it.
- The Control Panel should open, from there click Programs then Programs and Features.
- A list of installed software will show on the screen after a moment.
- Scroll down and find Reason Cybersecurity or any suspicious programs you did not download then right click the application and select Uninstall
Method 2: Utilizing Revo Uninstaller 
For computer users who are not sure of what to do. You may resort to using Revo Uninstaller since it is much more effective and easy to use. Revo Uninstaller is a very useful tool for Windows users.
This uninstaller not only removes programs from the computer but it also deletes their changes from the Windows Registry, Host File and etc.
- Using your browser, head over to their official website (click here) and download the latest software that is compatible with your system.

- Open the downloaded file and it should guide you through the setup.

- Follow the installation procedure and wait until the installation of the software is complete.

- After the installation is finished, tick the box that says Launch Revo Uninstaller then click finish.

- Once the software has launched, find the unwanted application that is needed to be removed, double click the program to uninstall.

- Click on the Continue button and follow the procedure to start uninstalling the program.

- Once it is uninstalled, a window will pop-up. Select the Advanced option for the scanning mode then click Scan to find remnants of Reason Cybersecurity.

- A window will pop-up and show all of the leftovers and changes made by the program uninstalled a while ago.

- Click the Select All button and hit Delete to remove the leftovers found on the Windows Registry.

- Some leftover files may be found, click Select All then Delete them as well.


Once the window closes, you have successfully removed Reason Cybersecurity from your system.
Simple tips to be safe online
- Never acquire software or programs from unknown sources, as this is one of the most common ways for adware and other types of malware to attack your computer. Only download from reputable and legitimate websites. To be safe, stay away from torrent downloads and cracked software download sites, as there will always be malware in the files.
- Using a firewall is one of the most foolproof ways to be safe online. It serves as a first line of defense against dangerous websites, shielding visitors from potential risks. It protects the user’s network and device from intruders. A firewall will safeguard a user from the threats hiding on the vast internet in today’s age.
- It is essential to keep anti-virus software up to date on a computer since hundreds of new malware threats are released every day that target the machine’s vulnerabilities in order to infect it. Anti-virus updates include the most recent files required to counter new threats and safeguard your machine.
- Only visit websites that has a secured connection. A site with HTTP connection does not encrypt the data it receives and therefore is not considered secure. Entering personal information such as email addresses, phone numbers, and passwords on a website with an HTTP connection is risky since it could be compromised and your information stolen. Websites with HTTPS connections, on the other hand, are secure since data is encrypted and attackers are unlikely to gain access to information exchanged within the site.
- Backups are critical for ensuring the safety of your data. Without a thorough backup of the data, several computer dangers and irreversible damage can arise. Backing up your data is a crucial step in ensuring the safety of your information. Having a backup copy of the system and data will be extremely useful in the event of a harmful malware attack.
Reason Security Engine
Reason Security Engine is an unwanted process in Windows systems that’s related to the RAV Antivirus program – a software commonly regarded as potentially unwanted. If you’ve noticed the Reason Security Engine process, you likely have RAV Antivirus on your PC and need to uninstall it.
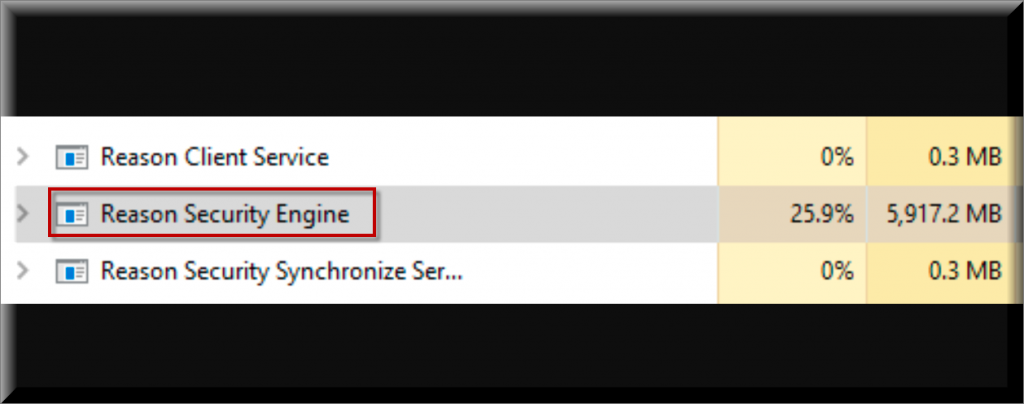
The Reason Security Engine process
Users who have noticed the Reason Security Engine in their computer’s Task Manager typically report that the unusual process is using up a lot of memory and CPU, thus leading to performance slowdowns and system sluggishness. While you can try to manually quit that process in the Task Manager, it will likely be automatically launched again soon after you quit it, or after you restart your PC. Either way, this won’t really resolve the issue, which is why you must find the root of the problem and eliminate it. Typically, the Reason Security Engine problem is associated with a potentially unwanted program known as RAV Antivirus. While this program is technically not malware, it’s also not something that should be kept on your computer for a variety of reasons, including the high resource consumption that’s usually associated with it.
Is Reason Security Engine a virus?
Reason Security Engine isn’t a virus process – it is, however, a process connected to the potentially unwanted RAV Antivirus program. If you want to keep your PC safe and protected against viruses, you should get rid of Reason Security Engine and RAV Antivirus.
In and of itself, neither the Reason Security Engine process nor the RAV Antivirus program is harmful or dangerous. However, RAV Antivirus is, at best, a janky and very outdated security tool with poor optimization and features that are in no way helpful to your system. At worst, an intrusive piece of software that is prone to spamming you with fake alerts and that has a lot of vulnerabilities that can be exploited by actual malware which could, in turn, expose your system and data to harm. For these reasons, if you’ve noticed either the Reason Security Engine process or the RAV Antivirus on your PC, make sure to clean your system from any sort of undesirable software that may put your cybersecurity at risk.
The good news is that, if you aren’t noticing any other strange processes in your system or any other unusual symptoms and instances of strange PC behavior, then your computer is probably safe and not infected by any actual malicious software. Even if you don’t remember how RAV antivirus has entered your computer, this doesn’t mean that your PC has been infected. Undesirable apps such as RAV Antivirus are usually distributed using installation bundles. The unwanted software is added to the installation file of a legitimate and, typically, free program that a lot of users are likely to willingly download. The installation of the added undesirable software is usually enabled by default, so if the user doesn’t notice and disable it, the unwanted app would get installed together with the main program. This is how a lot of users get all sorts of PUP (potentially unwanted programs) on their computers without realizing it. RAV Antivirus is typically distributed in the same way. The good news is that it’s usually easy to get rid of such software and in the guide posted below, we will show you exactly how to delete RAV Antivirus and, in turn, permanently get rid of the Reason Security Engine process.
SUMMARY:
| Name | Reason Security Engine |
| Type | PUP |
How to get rid of Reason Security Engine?
To get rid of Reason Security Engine:
- Uninstall RAV Antivirus and any other potentially unwanted programs from Apps & features settings section.
- Quit the Reason Security Engine process and delete its location folder.
- Clean the Startup items list, the Task Scheduler, the Services list, and the System Registry.
- Get rid of any remaining Reason Security Engine or RAV Antivirus files.
Completing those four steps should usually result in the full deletion of anything related to the Reason Security Engine process or the RAV Antivirus PUP. To make sure that you correctly complete each of the steps, make sure to check out the detailed instructions we’ve shown below.
Detailed Reason Security Engine removal guide
Step 1
Open the Start Menu/click in the Start Menu search bar and type Apps & Features. Next, scroll down to see the list of apps and programs that are installed on your PC and look for anything named RAV Antivirus or Reason Security Engine. If you notice an app or apps with those names, select them, select Uninstall, and proceed to uninstall the potentially unwanted program/s by following the prompts. If the uninstaller asks you if you’d prefer to keep on your computer something related to the unwanted program, make sure to refuse that offer. Also, some unwanted apps try to trick you into installing other undesirable software when you are running their uninstallers – be sure to carefully read all the options in the uninstaller so that you don’t end up getting some other PUP on your PC.
Step 2
Open the Task Manager with the Ctrl + Shift + Esc keyboard combination, then visit the Processes tab and there look for the Reason Security Engine process. When you find it, right-click it, click Open File Location, then return to the Task Manager (without closing the file location folder), right-click the process again, click Quit Process, and click Quit again to confirm. Now go back to the file location folder, delete everything that’s in it, and then delete the folder itself. If there are any items that can’t be deleted right now, leave them as they are for now, and, once you finish the rest of the guide, try to delete them again.
You should also look for any processes named RAV Antivirus or anything similar and do the same thing with them and their file location folders. Additionally, if you notice any other sketchy and suspicious processes in the Task Manager, go to their file location folders, scan the contents of those folders with the next free online malware scanner, and if anything is flagged as potentially unsafe, quit the related process and delete the entire file location folder.
Если вас не устраивает встроенный антивирус Windows 10, и вы хотите отключить его, тогда изучите данную статью. Я дам вам пошаговую инструкцию как отключить защитник Windows 10 временно или навсегда.
Даже если вы установите любую стороннюю антивирусную программу, то встроенный защитник все равно останется у вас на компьютере хоть и потеряет свой приоритет.
И в данном выпуске я покажу вам как можно отключить защитник виндовс 10 навсегда с помощью таких встроенных функций как: «Редактор локальной групповой политики» и «Редактор реестра».
Один из способов подойдет для версий «Windows 10 Enterprise» и «Windows 10 Professional» а второй для версии «Windows 10 Home».
А также покажу как временно отключить антивирус windows 10 в любой версии через параметры безопасности.
Давайте начнем с временного отключения виндовс.
Как на время отключить защитник Windows 10
Бываю такие ситуации, когда защитник виндовс 10 не позволяет сделать вам те или иные действия. Это может быть установка не проверенных программ и приложений или запуск и работа подобных программ.
В таком случае возникает необходимость отключить на время защитник виндовс 10, чтобы он не вмешивался в вашу деятельность. При этом вы должны понимать и правильно оценивать любые риски, которые при этом могут возникнуть. Вы должны быть уверены, что ваши действия не навредят вашей операционной системе.
В любом случае перед отключением защитника Windows 10 я советую вам сделать бэкап вашей системы, и желательно на внешний жесткий или SSD-диск.
Итак, чтобы временно отключить встроенный антивирус Windows 10 проделайте следующие пошаговые действия:
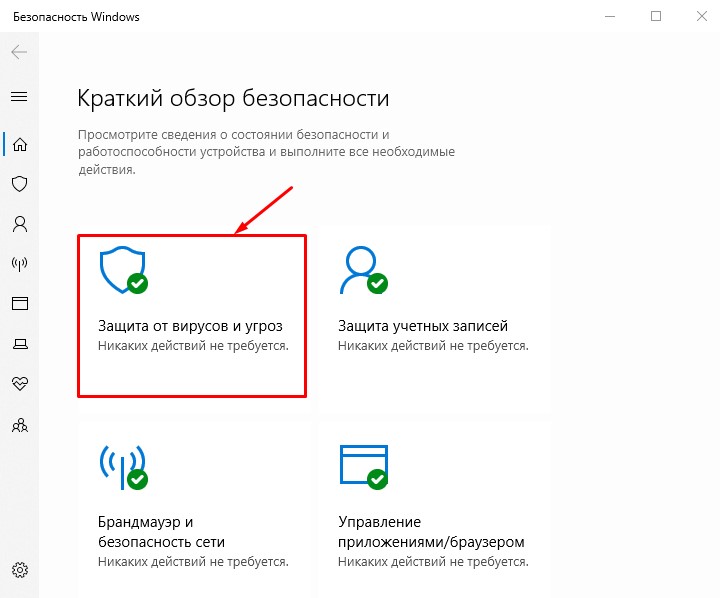
Шаг-1: Откройте меню «Пуск» и прокрутив роликом мышки вниз найдите приложение «Безопасность Windows».
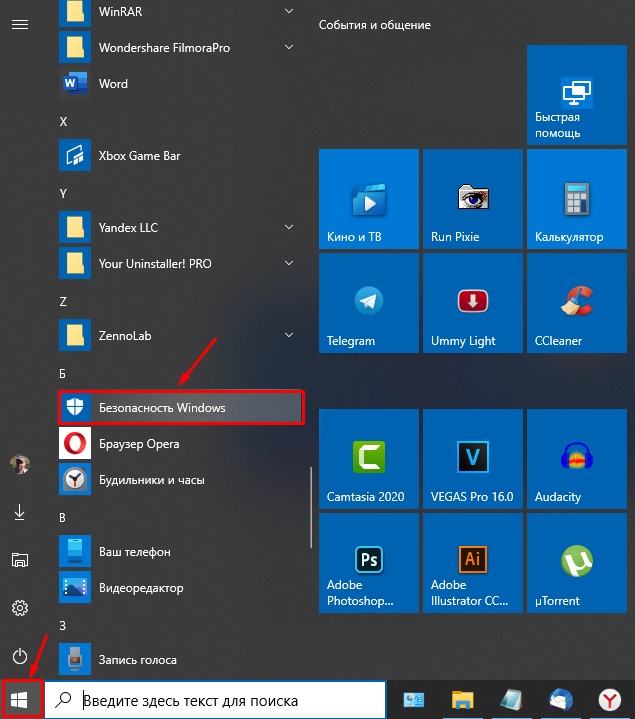
Кликните по нему и у вас откроется окно приложения с настройками защитника Windows 10, в котором вам необходимо перейти в раздел «Защита от вирусов и угроз». Просто кликните по нему.
Обратите внимание, что в данный раздел можно попасть и другими способами:
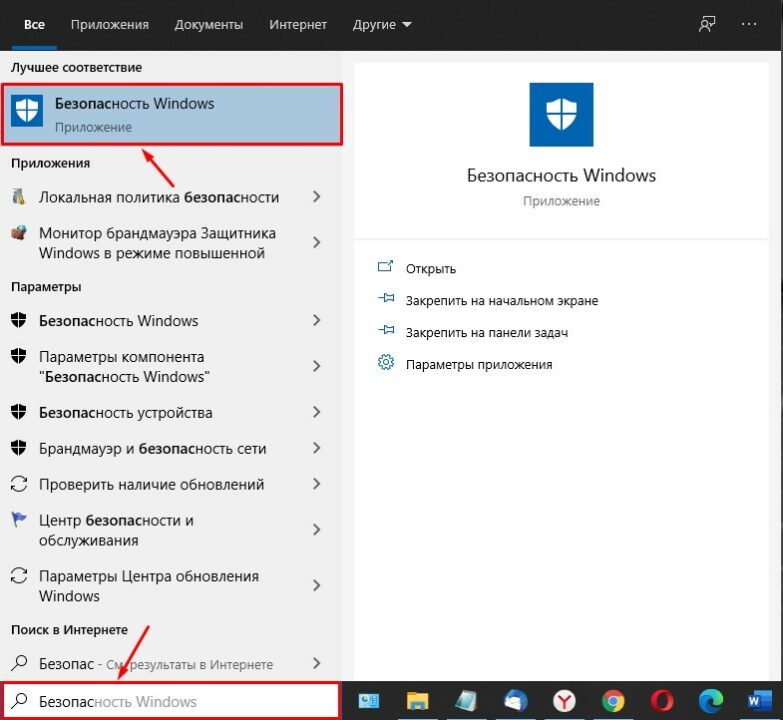
1. Через поиск Виндовс. Для этого в поисковом окошке начните набирать фразу «Безопасность Windows» и затем выберите соответствующий пункт.
2. Через раздел параметры. Для этого откройте меню «Пуск» — «Параметры»
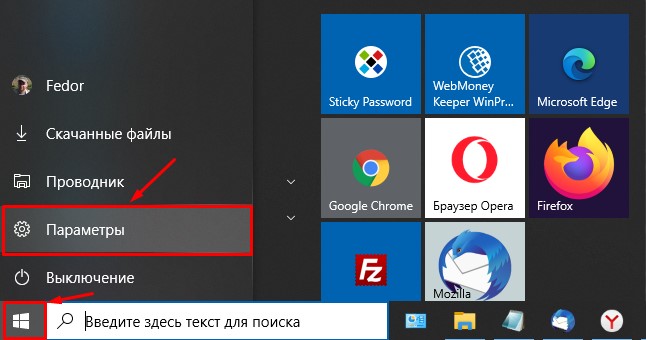
В открывшимся окне перейдите в раздел «Обновление и безопасность»
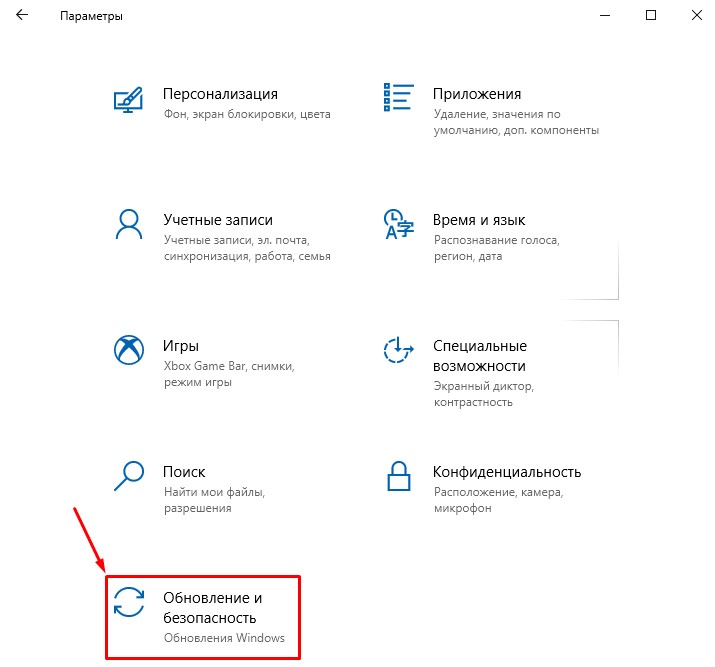
Затем кликните по пункту «Безопасность Windows» и нажмите на кнопку «Открыть службу Безопасноcть Windows».

Далее уже, как и в первом варианте, перейдите в раздел «Защита от вирусов и угроз». Используйте любой удобный для вас способ. Переходим ко второму шагу.
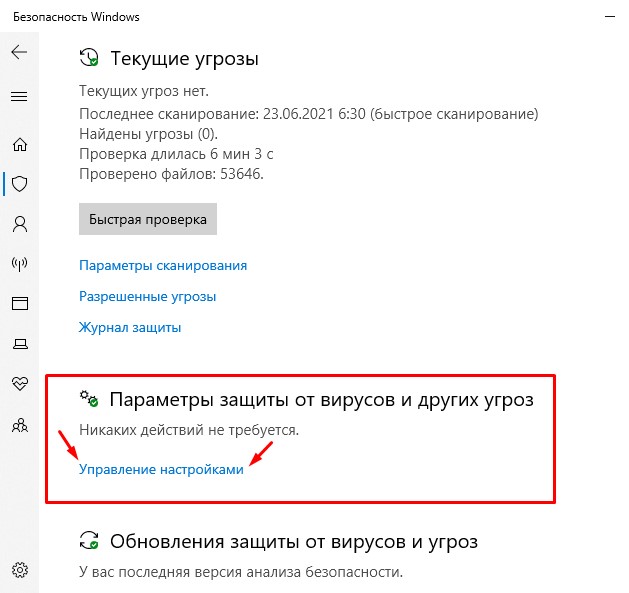
Шаг-2: В разделе «Параметры защиты от вирусов и других угроз» кликните по ссылке «Управление настройками».

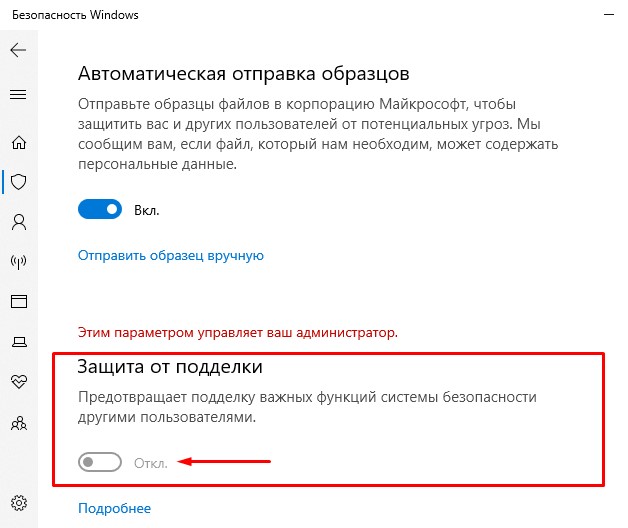
В открывшемся окне в разделе «Защита в режиме реального времени» и «Облачная защита» переключите ползунки в положение «Откл.», и они окрасятся в серый цвет.
Также вы можете отключить «Автоматическую отправку образцов», которая неизвестно какие данные отправляет с вашего компьютера в корпорацию Microsoft.
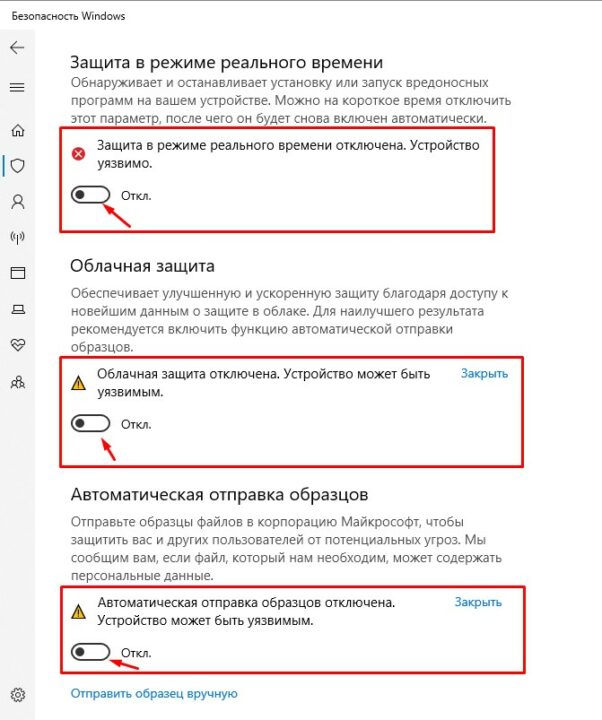
Вот такими не хитрыми действиями вы можете на время отключить защитник Windows 10. Теперь вы можете делать те действия, ради которых все это затевалось. Вы можете устанавливать сторонние приложения или совершать необходимые изменения в системе, которые до этого блокировал защитник.
Шаг-3: Когда вы сделаете все действия, ради которых отключали данную функцию не забудьте вернуть ползунки в положение «Вкл.».
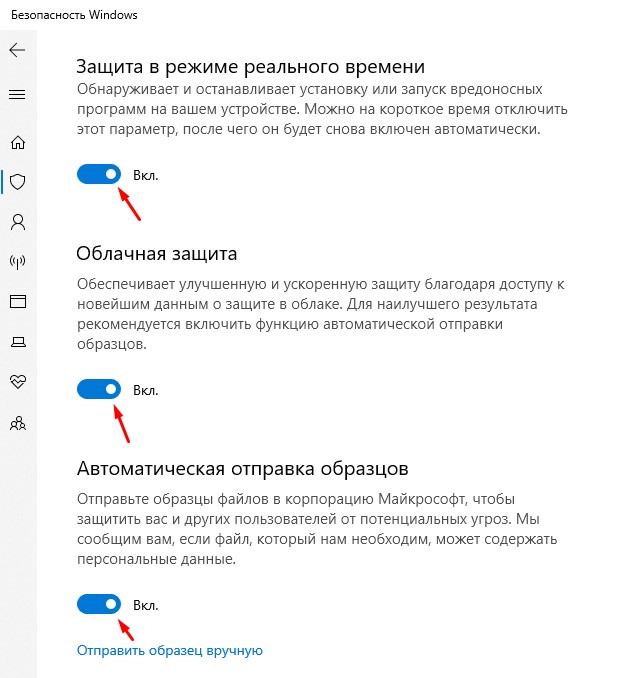
Но даже если вы забудете включить защиту в режиме реального времени и перевести остальные ползунки в положение «Вкл.», через определенный промежуток времени операционная система Windows сама их переключит. Также защитник Windows 10 автоматически включится после перезагрузки системы.
Конечно же данное решение подходит только для определенных задач, которые требуют лишь временного отключения антивируса Windows 10.
Если все же у вас есть острая необходимость отключить защитник Windows 10 навсегда, то воспользуйтесь дальнейшей инструкцией.
Как отключить защитник Windows 10 навсегда
Если у вас установлена версия Windows 10 Professional или Windows 10 Enterprise, тогда чтобы навсегда отключить защитник windows 10 необходимо воспользоваться встроенным приложением «Редактор локальной групповой политики», а если у вас версия Windows Home, то отключение надо производить через «Редактор реестра».
Но перед этим в обязательном порядке надо отключить функцию защиты от подделки, которая расположена в приложении «Безопасность Windows».
Для справки: функция «Защита от подделки» блокирует любой неправомерный доступ к системным файлам windows. И если мы ее не отключим, то при первой же перезагрузке системы, все наши изменения будут восстановлены, и защитник виндовс 10 снова будет функционировать.
Также перед тем, как мы приступим к отключению windows 10 навсегда я бы хотел показать, где посмотреть версию вашей Windows 10. Уверен, что многие опытные пользователи это и так знают. И если вы один из таких гуру, то просто пропустите следующий раздел.
Где посмотреть версию Windows 10
Есть несколько способов узнать версию вашей Windows 10. Я покажу вам два самых простых способа.
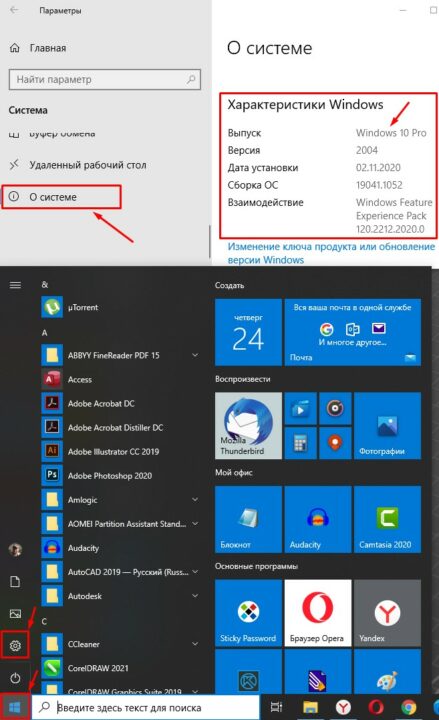
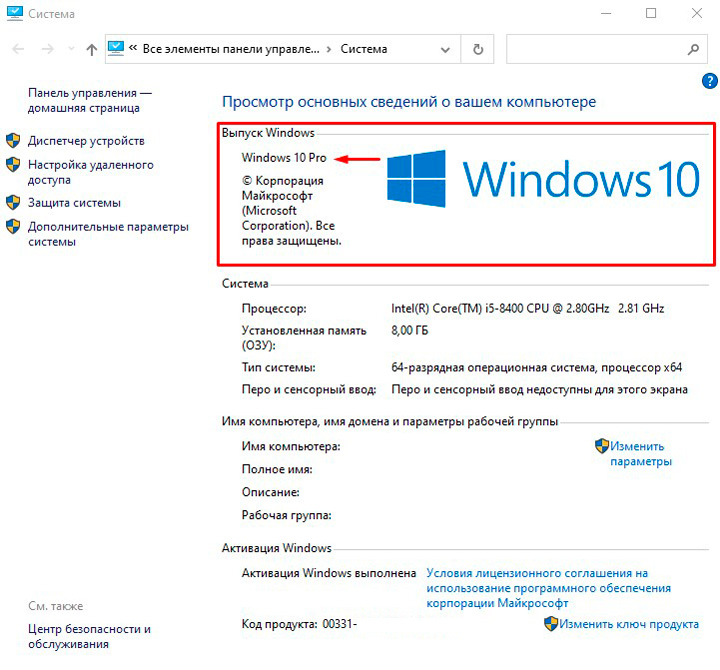
Способ-1: Откройте меню «Пуск» и перейдите в раздел «Параметры» -> «Система». Кликните по последнему пункту «О системе» и найдите раздел «Характеристики Windows». В графе «Выпуск» вы увидите какая виндовс у вас установлена.
Способ-2: Если у вас есть на рабочем столе ярлык «Этот Компьютер», то кликните по нему правой кнопкой мыши и выберите пункт «Свойства».
Если у вас нет этого ярлыка, тогда в поисковой строке виндовс наберите фразу «Этот компьютер» и в результатах поиска кликните также по значку компьютера правой кнопкой мыши и выберите пункт «Свойства».
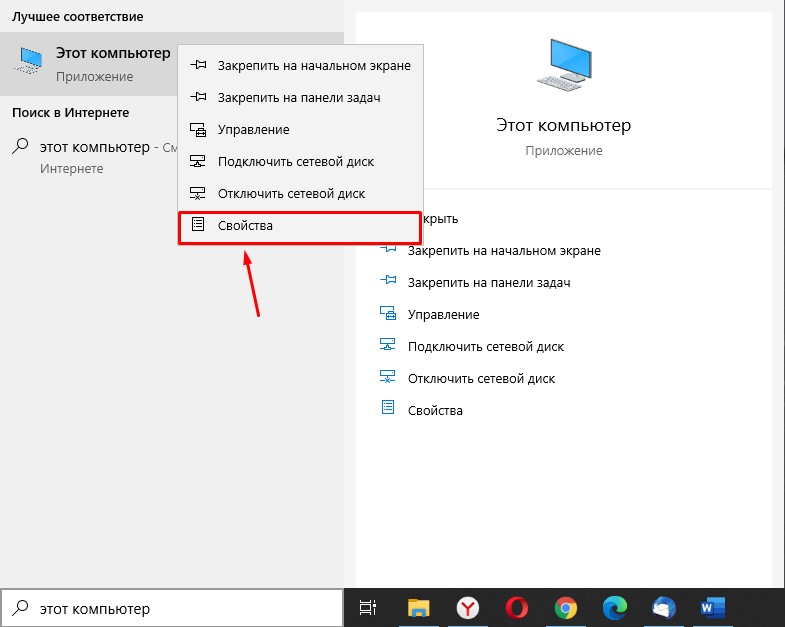
В открывшемся окне в разделе «Выпуск Windows» вы можете посмотреть свою версию системы.
С этим разобрались. Теперь как я уже писал выше нам необходимо отключить функцию «Защита от подделки». Это необходимо сделать независимо от того, какая версия Windows 10 у вас установлена: Professional, Enterprise или Home.
Шаг-1: Отключаем функцию «Защита от подделки» в Windows 10
Для того, чтобы отключить защиту от неправомерного доступа к файлам операционной системы и их изменению необходимо открыть приложение «Безопасноcть Windows». Как это сделать я описывал выше, когда показывал, как отключить защитник Windows на время. Я описал несколько способов.
Самый простой, как я считаю, это набрать название приложения в поле поиска виндовс. На всякий случай продублирую скриншот.
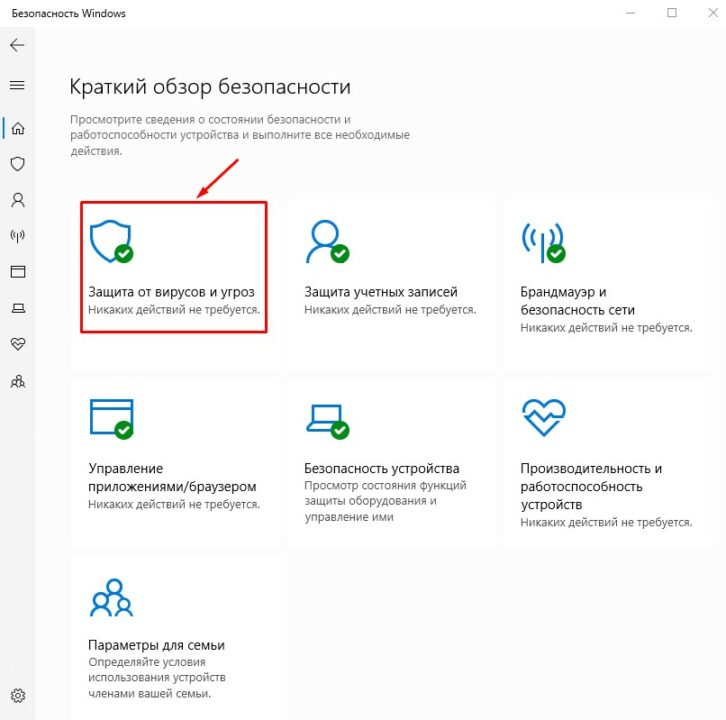
В разделе «Краткий обзор безопасности» выберите пункт «Защита от вирусов и угроз».
В открывшимся окне необходимо найти блок «Параметры защиты от вирусов и других угроз» и нажать на ссылку «Управление настройками».
Отыщите теперь блок «Защита от подделки» и, если у вас переключатель находится в положении «Вкл.», то переключите ползунок в положение «Откл.». Если же он выключен и написано «Этим параметром управляет ваш администратор», то ничего делать не надо.
После отключения параметра «Защита от подделки» можете переходить ко второму шагу отключения антивируса виндовс навсегда.
Шаг-2: Отключение защитника Windows 10 навсегда для версий «Professional» и «Enterprise»
Как я уже писал выше для отключения навсегда защитника виндовс в данных версиях необходимо воспользоваться функциями «Редактора локальной групповой политики».
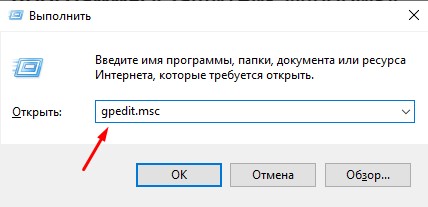
Для этого необходимо запустить приложение «Выполнить». Самый простой способ – это нажать сочетание клавиш Win + R.
Если у вас данный способ не работает, тогда просто в поисковом поле виндовс наберите «Выполнить» и откройте данное приложение.
В открывшемся окне в поле поиска наберите команду «gpedit.msc».
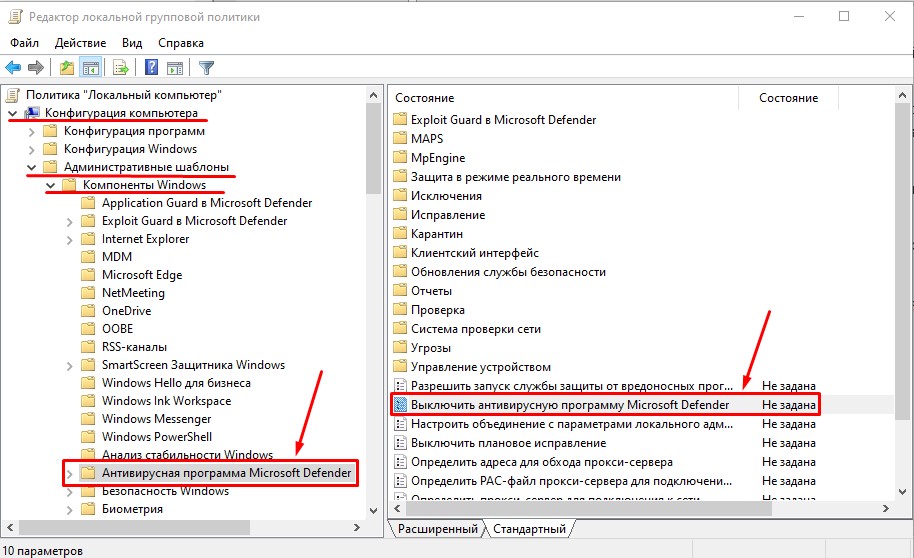
В левой части окна необходимо перейти по следующему пути:
«Конфигурация компьютера» -> «Административные шаблоны» -> «Компоненты Windows» и выделить папку «Антивирусная программа Microsoft Defender».
В правом окне найдите строку с надписью «Выключить антивирусную программу Microsoft Defender» и кликните по ней левой кнопкой мыши двойным щелчком.
Ознакомьтесь со справкой в правом нижнем углу. Там написано, что если включить этот параметр политики, то антивирусная программа Microsoft Defender перестанет работать и искать вредоносные программы и приложения.
Поэтому выберите параметр «Включено» и нажмите «Применить» и «ОК».
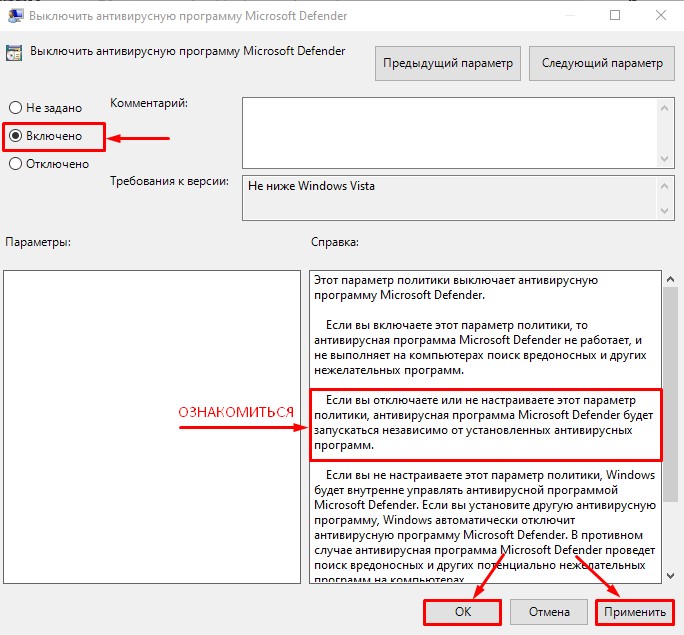
Перезагрузите компьютер. Теперь ваш защитник Windows-10 отключен навсегда. Хотя нет не навсегда, а до того момента пока вы не захотите включить его снова :).
Сделать это можно таким же образом, что я описал, только выбрать нужно будет параметр «Не задано». Затем также «Применить» -> «ОК» и перезагрузить компьютер. И тогда защитник виндовс снова включится и начнет защищать ваш компьютер.
Шаг-3: Как отключить защитник Windows 10 Home навсегда?
Если у вас установлена Windows 10 Home, то у вас нет доступа в «Редактор локальной групповой политики». А также если даже у вас установлены версии «Professional» и «Enterprise», но нет прав администратора, то вы также не сможете воспользоваться редактором политики.
Но вы все же можете отключить защитник Windows 10 Home навсегда с помощью «Редактора реестра».
Обратите внимание! Если вы не очень опытный пользователь, то выполнять все действия нужно очень внимательно и осторожно. Так как неправильные действия могут привести к появлению множества ошибок и сбою операционной системы. Поэтому я вам настоятельно рекомендую создать точку восстановления Windows 10 на другой диск или внешний накопитель. И только после этого приступать к отключению защитника Windows 10 с помощью редактора реестра.
Когда вы будете уверены, что готовы приступить к изменению параметров в редакторе реестра, то сделайте следующее:
1. Нажмите сочетание клавиш Win+R, чтобы открыть окно «Выполнить», или воспользуйтесь полем поиска виндовс. Наберите команду «regedit» и нажмите «ОК».
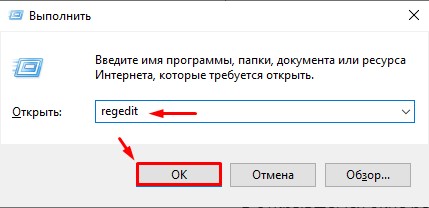
У вас откроется «Редактор реестра».
2. В левом боковом окне перейдите по следующему пути: HKEY_LOCAL_MACHINE\SOFTWARE\Policies\Microsoft\Windows Defender
Совет! Можете скопировать указанный путь и вставить в адресной строке редактора реестра, затем нажать «Enter». Таким образом вы сразу перейдете к нужной директории.
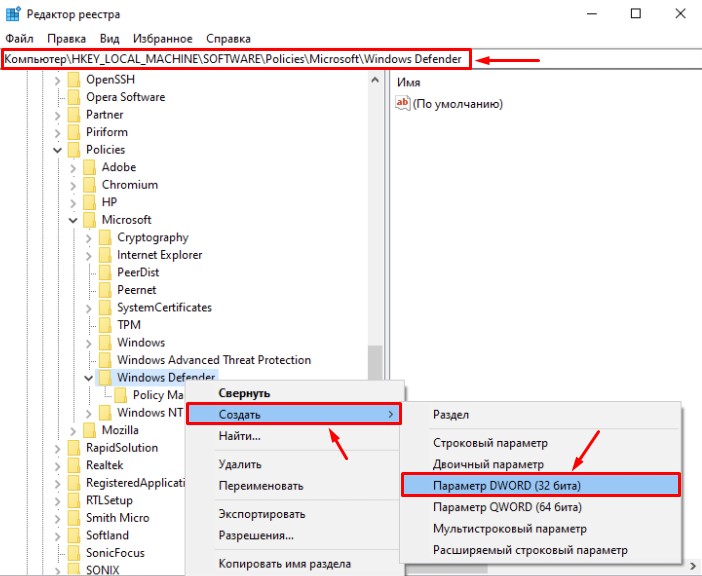
3. Там же в левой боковой колонке кликните правой кнопкой мыши по директории «Windows Defender» и выберите «Создать» -> «Параметр DWORD (32 бита)»
4. Кликните по созданному параметру правой кнопкой мыши и выберите «Переименовать». Переименуйте созданный параметр на «DisableAntiSpyware», затем еще раз кликните по нему правой кнопкой мыши и выберите «Изменить», в открывшемся окне в поле «Значение» поменяйте «0» на «1».
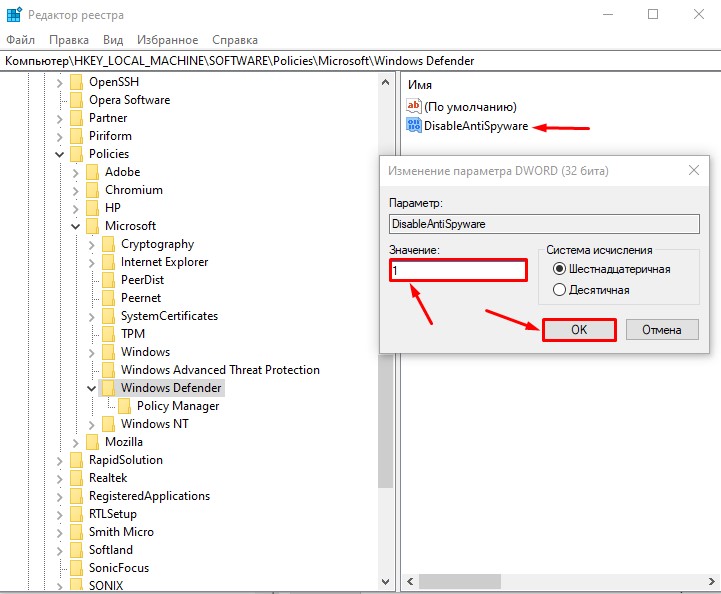
5. Нажмите «ОК» и у вас сохранится значение параметра. Перезагрузите компьютер.
Теперь ваш защитник Windows 10 Home отключен навсегда и не будет осуществлять функции защиты вашей системы от вирусов и других угроз.
Если через какое-то время вы захотите вернуть антивирус Windows 10 в рабочее состояние, то просто удалите этот параметр. Для этого кликните по нему правой кнопкой мыши и выберите «Удалить».
Если вам все же что-то не понятно из написанной мной статьи, то посмотрите видео на Ютуб. Пока это не мое видео, но в нем показан другой способ отключения защитника виндовс и как утверждает автор, способ 100% работающий. В ближайшее время я запишу свое и выложу на свой канал YouTube «Компьютерные Секреты».
Видео: Как отключить Защитник Windows (Windows Defender)? Новый 100% работающий способ!
На этом все! Выбирайте удобный и подходящий для вас способ и вопрос: «Как отключить защитник Windows 10 навсегда?» будет для вас решен. Но не забывайте, что ваш компьютер будет под угрозой заражения вирусами. Поэтому все же рекомендую вам установить хотя-бы бесплатное стороннее антивирусное программное обеспечение.
Если вы все-же словите вирусы, то ознакомьтесь с выпуском «Как удалить 100% вирусов со своего компьютера?».
Напишите в комментариях помогла ли данная статья решить вашу проблему и не возникло ли при этом каких-либо сложностей. Я обязательно вам отвечу, т.к. читаю абсолютно все комментарии.
Не удаляется антивирус Reason Cybersecurity
Через панель управления в программах и компонентах он удален и его нет. Но во вкладке «Защита от вирусов и угроз» этот антивирус работает. Когда нажимаю открыть приложение, ничего не происходит.
Вы его удалили из списка, а надо было деинсталлировать. Если был установлен недавно, попробуйте через восстановление системы. Ну или специализированными анинсталлерами или вообще вручную чистить.
А что за специализированный анинсталлер? Я пробовал Total uninstaller и другие, они не видят файл. Говорят что он связан с RAVantivirus и надо анинсталлерить его. Но большинство файлов Ravantivirus были удалены. Когда я пытался удалить остатки Ravantivirusa писалось, что папка или файл открыты в другой программе
Любой, подобный тому, что вы попробовали. Только все-равно сложно. Удалять процессы, которые блокируют, используя unlocker. Возможно использовать безопасный режим.
А можете дать ссылку на анлокеры? Я скачавиал анлокер 1.9.2 и он не запускался, писалось что в нем содержится вирус или нежелательная программа.
Удалите ваш антивирус, если он так пишет.
И вообще может вам проще переставить виндоуз? Если время чистки от всякой нечисти сравнимо со временем установки виндоуз, то лучше переставить виндоуз. Исключение всякие офисные, бухгалтерские, и т. д. компьютеры, где установлено много всего и разными людьми, так что переустановить все эти программы быстро не получится.
Приложение RAV antivirus
чтобы удалить, используй uninstall или HiBit. В одном из этого найди RAV antivirus и нажми деинсталляция и все готово
Задайте свой вопрос по компьютерам
профессионалам
Другие вопросы на эту тему:
Хочу удалить Reason CyberSecurity очень нужно, но не знаю как!
Добрый вечер, помогите пожалуйста
Нужно удалить этот антивирус бесит
Ошибка запуска
Пк не знает как открыть игру или программу и предлагает выбрать через что открывать и все значки поменялись
У меня удаляется игра
Здравствуйте. Я начинаю скачивать игру на компьютер, скачал, открыл папку с игрой, нажал на игру, пошла установка и вот тут возникает проблема. Как только начинается установка, сразу появляется окно с надписью «Удаление игры с компьютера». Установка удаляется автоматически. Даже не спрашивают, надо удалять или нет. Просто удаляют с ПК и всё. Что делать?

Помогите хочу удалить Reason Cybersecurity
помогите хочу удалить Reason Cybersecurity а данных на компьютере нету про это программу типо её нету на пк хотя она есть в безопасности виндовс
Клавиатурная скорость нажатия
хочу полность убратью задержку перед повтором ввода клавиатуры, а так же скорость самого повтора зажатой клавиши увеличить как минимум вдвое. Базовые ползунки в панеле управления Клавиатуры максимальны
Удаление вредоносных программ в Reason Core Security

Различного рода сканеры, выполняющие поиск и удаление вредоносного, рекламного и потенциально нежелательного ПО сегодня доступны в изобилии (см. Лучшие средства удаления вредоносных программ), учитывая актуальность такого рода угроз и тот факт, что многие антивирусы «относятся» к ним сравнительно благосклонно.
Reason Core Security — ещё один такой сканер, позволяющий как выполнить простое сканирование, так и отслеживать появление нежелательных программ в режиме реального времени. В этом кратком обзоре — об утилите для борьбы с вредоносным ПО Reason Core Security, его функциях и дополнительных возможностях.
Использование Reason Core Security
Reason Core Security доступна как в бесплатной версии без активации (часть функций будут недоступны по истечении пробного периода, но сканер и удаление нежелательных программ исправно работают), так и в платной версии. Апдейт: в комментариях сообщают, что угрозы находятся, но для удаления требует активации. Впрочем, платную версию именно этого продукта сейчас приобрести не получится, о чем подробнее в разделе про скачивание приложения.

В отличие от некоторых других средств поиска потенциально нежелательных программ (например, AdwCleaner), Reason Core Security требует обязательной установки на компьютер (с имеющимися антивирусами не конфликтует), при этом прописывает себя в автозапуск для сканирования в режиме реального времени (можно изменить в настройках), а при первом запуске автоматически выполняет сканирование компьютера на наличие угроз.
В дальнейшем утилита самостоятельно отслеживает наличие вредоносных и нежелательных программ на компьютере, позволяет запустить сканирование вручную как запустив программу, так и отдельно для файлов и папок с помощью соответствующего пункта контекстного меню.
Помимо непосредственно удаления вредоносных программ, Reason Core Security имеет следующие возможности (перечисляю только часть из них, самых интересных на мой взгляд):
- Проверка программ и заданий планировщика в автозапуске в разделе «Приложения» — «Автозапуск». Что интересно, в отличие от других утилит для работы с автозапуском, Reason Core Security сразу указывает, представляет ли конкретный пункт автозапуска угрозу. Также может быть полезным: Автозагрузка Windows 10.

- Аналогичным образом, на вкладке «Браузеры» можно просмотреть список поставщиков Интернет-поиска, расширений и домашних страниц с информацией о том, могут ли они быть опасными.
- То же самое вы увидите в разделе «Приложения» — «Деинсталлятор». Здесь можно удалить как просто установленные на компьютере или ноутбуке программы, так и оценить, являются ли они нежелательными с точки зрения Reason Core Security. См. также: Лучшие программы деинсталляторы.
- В разделе IoT вы можете выполнить сканирование конфигурации сети и получить список устройств в ней. В случае, если устройства в домашней сети недостаточно защищены от внешних угроз, вы получите уведомление об этом.


В остальном утилита не слишком отличается от многих других аналогичных продуктов: здесь также присутствует карантин и возможность добавлять исключения, настройки запуска и работы программы. Из полезного — достаточно подробная и понятная справка по каждому пункту (нажать по знаку вопроса в верхнем правом углу для вызова). Всё это на русском языке и, уверен, любой из вас легко сможет разобраться в работе.
Как скачать Reason Core Security и удалить программу при необходимости
Несмотря на то, что утилита Reason Core Security продолжает обновляться и поддерживаться производителем, с официального сайта reasoncoresecurity.com она исчезла. Более того, и сам сайт теперь перенаправляет на новый официальный адрес — reasonsecurity.com, где предлагается не простой сканер угроз, а полноценные антивирусы (а тут у нас есть выбор и получше, см. Лучший бесплатный антивирус).
В итоге, чтобы скачать Reason Core Security приходится прибегать к сторонним сайтам. И самый безопасный из них, это, пожалуй, страница, посвященная угрозам в Интернете на официальном сайте Яндекс — При изучении утилиты столкнулся с тем, что многие интересуются, как удалить Reason Core Security. В моем тесте удаление прошло абсолютно успешно с использованием штатных средств Windows:

- Откройте панель управления (в Windows 10 используйте для этого поиск в панели задач).
- Перейдите к пункту «Программы и компоненты» или «Удаление программ» (в зависимости от выбранного представления в поле «Просмотр»).
- Выберите Reason Core Security в списке установленных программ и нажмите «Удалить».
- Дождитесь завершения процесса удаления (на первых этапах может показаться, что процесс завис, но это не так, подождите), а после него обязательно перезагрузите компьютер. После этого можно проверить и удалить при наличии папку «Reason» в «Program Files».