— Advertisement —
Hello! This time I’m going to talk to you about security in Windows 10. It is well known that the system offers multiple layers of security to keep the privacy of our information safe. Certainly, this entails control over network connections. These are really useful for exchanging information and sending data. However, sometimes these connections can fail and so it is imperative to get the error. One of the resources used for this task is PING. It is a basic Internet program that allows a user to verify that a particular IP address exists and can accept requests. This app verifies whether the IP address of a host is currently operational, and how long it takes to respond. Ping works by sending an Internet Control Message Protocol (ICMP) Echo Request to a specified interface on the network and waiting for a reply.
Additionally, it can be used for troubleshooting to test connectivity and determine response time. However, most administrator users consider the ICMP protocol to be potentially unsafe and prefer to block these calls. For this reason, the Windows 10 firewall by default has a security policy of blocking such requests. This is easy to check, trying to ping our computer from a remote machine, we’ll see the following message:

However, it is not advisable to completely block these calls. Therefore, here I show you how to enable and disable ping in Windows 10.
Enable ping in windows 10. Command line mode.
The first thing we need to do is to open a Command Prompt as administrators. Once there, we have to create a rule for IPv4 addressing and another for IPv6. All right, to create the first rule you just have to type the following command in the console:
netsh advFirewall Firewall add rule name="OSRadar Rule PING IPv4" protocol=icmpv4:8,any dir=in action=allow
If everything was done correctly, the CMD should look like this:

Next, we will create the rule for IPv6 addressing:
netsh advFirewall Firewall add rule name="OSRadar Rule PING IPv6" protocol=icmpv6:8,any dir=in action=allow

We have correctly applied the rules for the ping command. We can check that it works, pinging from a remote computer:

To disable the exception for IPv4 addresses, just type the following commanding in the CMD:
netsh advFirewall Firewall add rule name="OSRadar Rule PING IPv4" protocol=icmpv4:8,any dir=in action=block
In the case of IPv6 addressing, the command to write will be the following:
netsh advFirewall Firewall add rule name="OSRadar Rule IPv6" protocol=icmpv6:8,any dir=in action=block
Please note that you can choose the name you want for the rules. If you want to see every rule in the system in detail, just write the following in the terminal:
netsh advFirewall Firewall show rule name=all

Enable ping in windows 10. Graphic mode.
It is also possible to create specific rules to enable and disable ping by entering the Windows 10 Firewall Advanced Security Configuration. With this intention, just type Firewall on the search bar:

Immediately the Firewall options will be displayed. As we did before, we have to create a rule for IPv4 and another for IPv6.

So first, select the Inbound Rules option in the left column and right-click the mouse to create a New Rule:

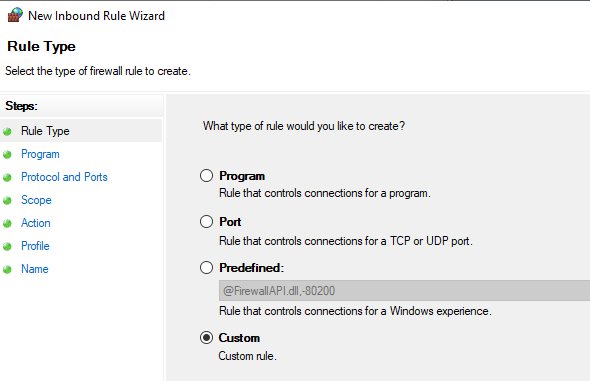
A rule creation wizard will start. Please select Custom in the rule type and press Next to continue.

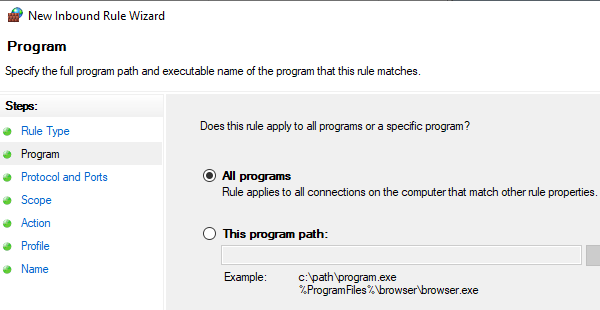
On the next screen select All programs and press Next to continue.

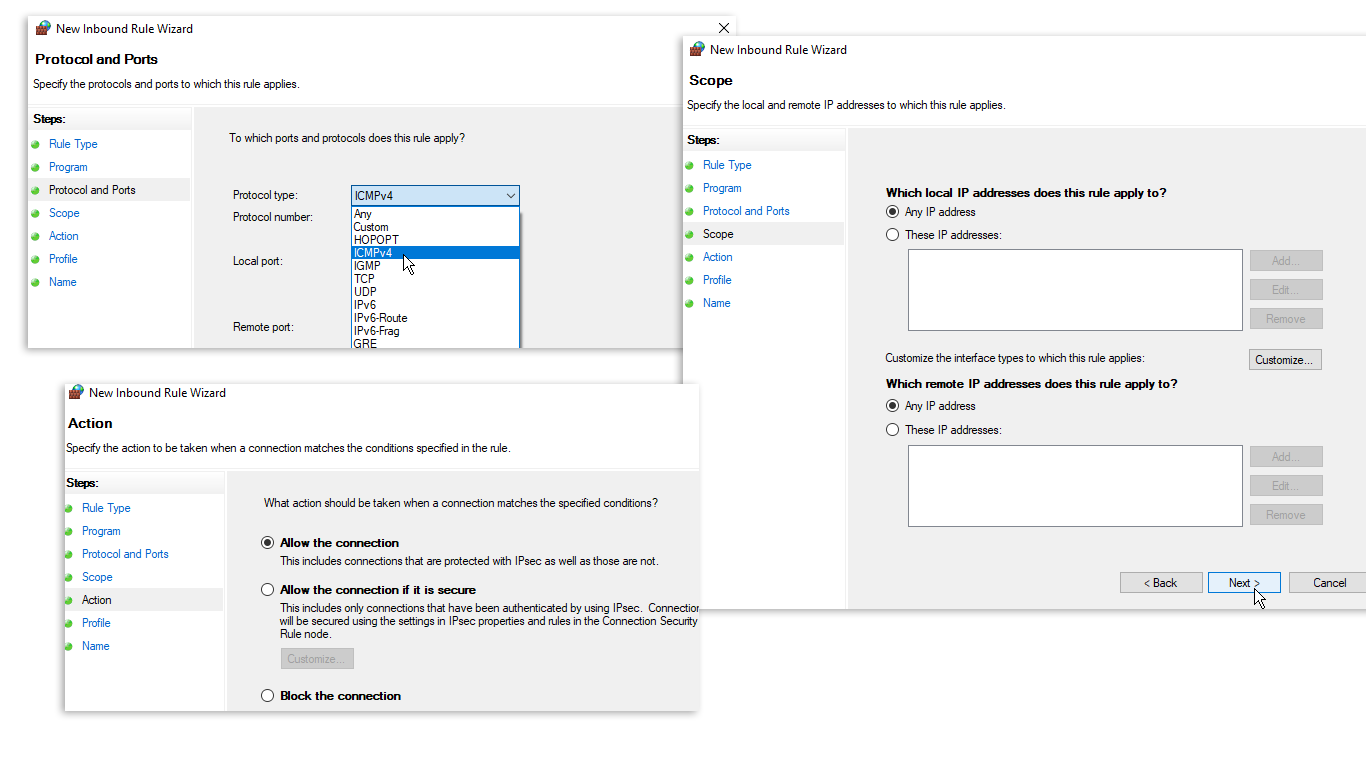
In the protocol type, select ICMPv4 and then click on customize.

In the pop-up screen activate the Specific ICMP types box and navigate until you activate the Echo Request option. Press accept to apply the changes.

Next, we can define which specific IP addresses this rule will apply, on the contrary, we will allow the requests of all the addresses. Once the selection is made, press next to continue.

Now select Allow the connection and press Next to continue

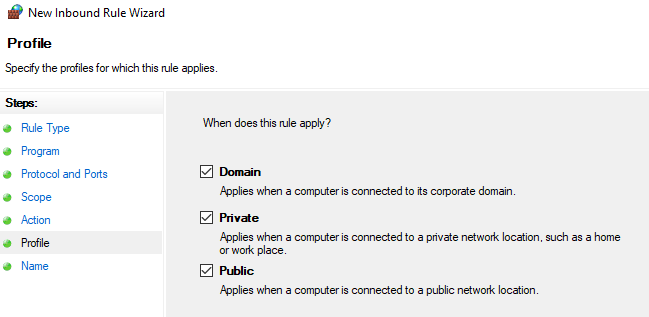
In the following screen, we have to select when the new rule will be applied. Please check the 3 available options and press next to continue.

Finally, we only have to assign a name to the rule and press Finish to close the wizard.

Finally, we can see the rule created correctly. To create the exception for IPv6 addressing, we have to repeat the same process but in the protocol and ports window, we have to select ICMPv6.

To disable any of the created rules, just right-click on it and choose Disable Rule.

Conclusion
Finally, we have seen how to enable and disable ping in Windows 10. This will allow us to manage and administer our connections using this command. Finally, we have seen how to enable and disable ping in Windows 10. This will allow us to manage and administer our connections using this command. Consequently, we will be able to monitor the levels of security and data protection on our computers. This is all for now, before saying goodbye I invite you to review our tutorial on bash in Windows 10
Содержание

Параметры Брандмауэра
Самый простой способ запретить или разрешить ping — воспользоваться оснасткой
«Брандмауэр Windows в режиме повышенной безопасности».
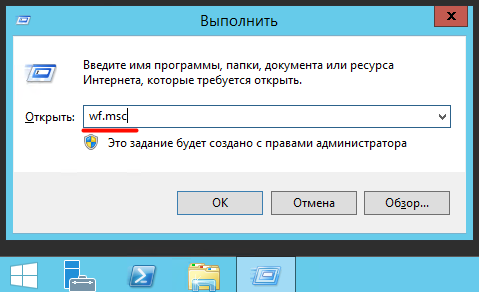
Для ее запуска нажимаем клавиши Win+R и вводим команду wf.msc.
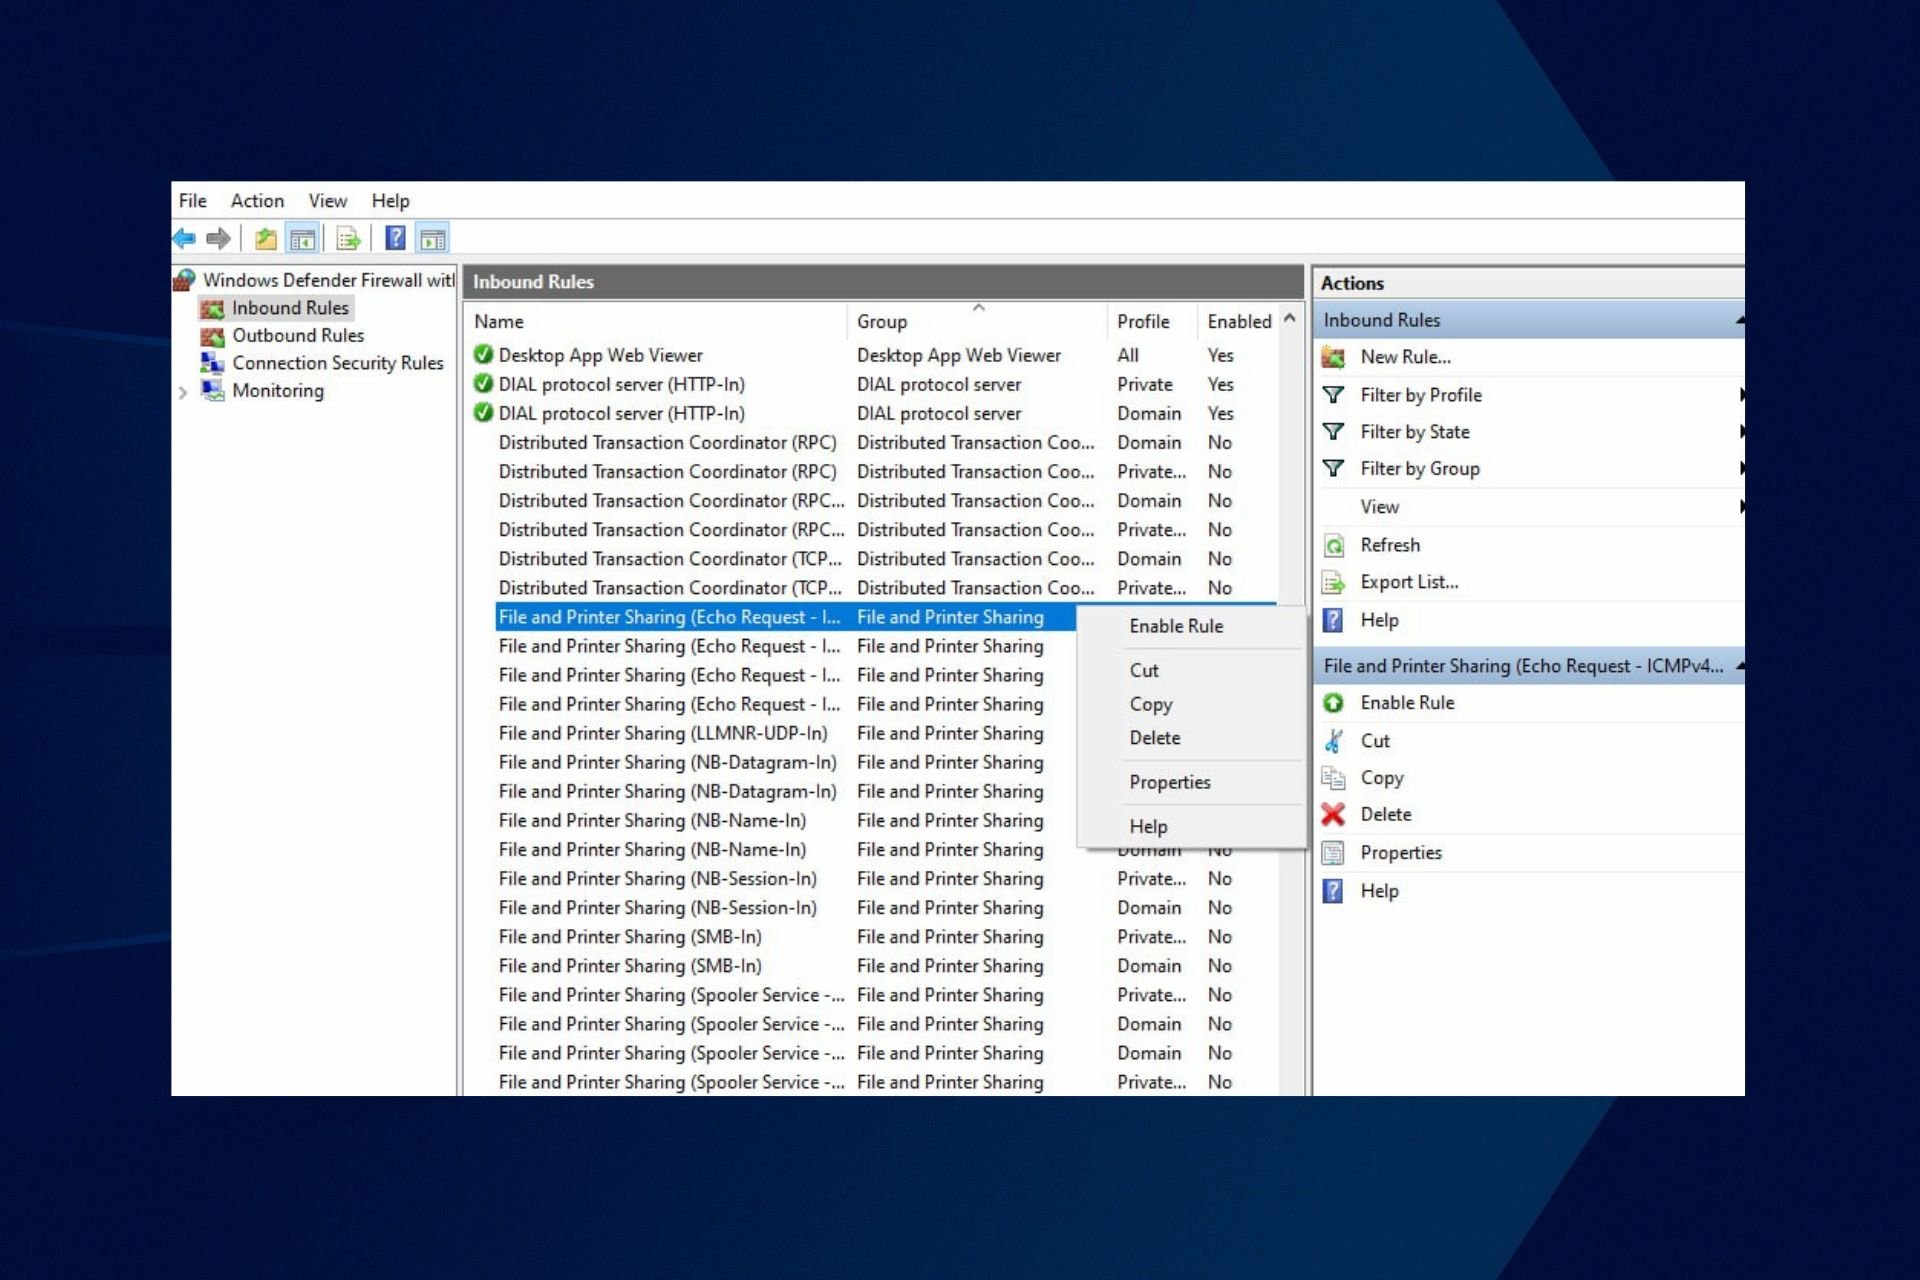
Заходим в раздел входящих правил («Правила для входящих подключений»).
Здесь нас интересует предопределенное правило для IPV4 — ″Общий доступ к файлам и принтерам (эхо-запрос — входящий трафик ICMPv4)″.
Обратите внимание, что в таблице присутствуют три правила с одинаковым названием.
На самом деле это одно и то же правило, просто настроенное для разных профилей — одно для доменного профиля, второе для общего и частного.

Отключить/Включить правило
Для того, чтобы выключить/включить правило — выберите его и нажмите на правой панели «Отключить правило»/«Включить правило».

С отключенным правилом Ваш сервер не отвечает на запросы утилиты ping и наоборот, с включенным — отвечает.
Windows Defender Interference may affect WIndows 10 ping
by Henderson Jayden Harper
Passionate about technology, Crypto, software, Windows, and everything computer-related, he spends most of his time developing new skills and learning more about the tech world. He also enjoys… read more
Updated on
Reviewed by
Alex Serban

After moving away from the corporate work-style, Alex has found rewards in a lifestyle of constant analysis, team coordination and pestering his colleagues. Holding an MCSA Windows Server… read more
- Ping can check whether a particular IP address is available in the network and measures the response time.
- Windows Firewall may block the ping request if it doesn’t allow the File and Printer Sharing app to run.
- You can enable ping via Windows Firewall, Windows Firewall with Advanced Security, PowerShell, and the Command Prompt.
Ping is the primary TCP/IP command for troubleshooting connectivity, reachability, and name resolution on Windows. It helps users verify IP-level connectivity to another TCP/IP computer by sending Internet Control Message Protocol (ICMP) echo Request messages.
However, users can encounter issues enabling ping on Windows 10 if the Windows Firewall blocks ping requests. Likewise, you may check our guide on what to do if you are getting a destination host unreachable error while trying to ping a host.
What causes ping not to work?
As said earlier, Ping verifies whether a particular IP address is available in the network. The ping request may not be able to send to the IP address or receive corresponding Echo Reply messages. Hence, it results in the request to return futile.
However, a couple of factors may be responsible for the problem. Some are:
How we test, review and rate?
We have worked for the past 6 months on building a new review system on how we produce content. Using it, we have subsequently redone most of our articles to provide actual hands-on expertise on the guides we made.
For more details you can read how we test, review, and rate at WindowsReport.
- Windows Defender Firewall interference – You may experience issues with pinging if the Windows Defender Firewall is impeding the process. Ping does not work when Windows Firewall does not allow the File and Printer Sharing app to run. Also, ping may not work when Firewall blocks all incoming connections on your network path.
- Host or destination IP does not exist – If the IP address you want to verify for availability is not identified or does not exist, the ping request won’t work. So, you may encounter problems with ping if the host or target IP does not exist.
Other factors not highlighted above may also be responsible for ping not working. Hence, we’ll help you with steps to fix the issue and enable ping on your device.
How can I enable ping in Windows 10?
1. Use Windows Firewall with Advanced Security
- Press Windows + R key to open the Run dialog box, type firewall.cpl in the text field, and click OK to open Windows Defender Firewall.
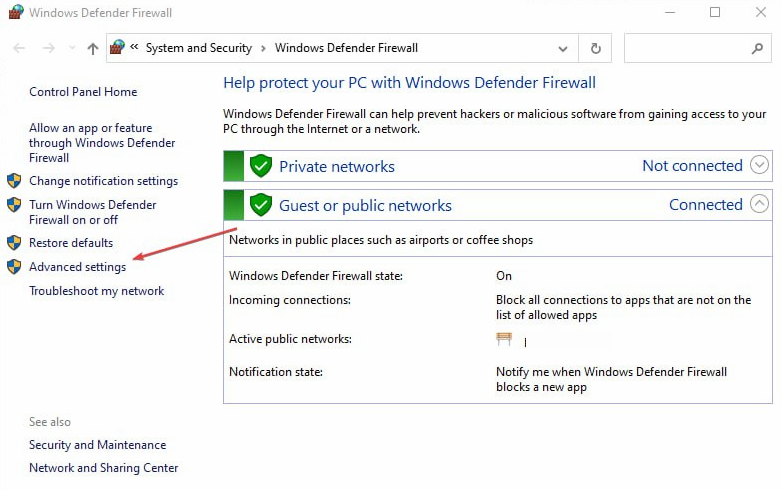
- Click on Advanced settings from the right pane.

- Click on Inbound Rules, find and right-click on File and Printer Sharing (Echo Request – ICMPv4 – In) that has a Public Profile, then click on Enable Rule from the drop-down.

- To know if you have successfully enabled File and Printer Sharing (Echo Request – ICMPv4 – In), check the Enabled tab and confirm if it says Yes.

Enabling the File and Printer Sharing (Echo Request – ICMPv4 – In) option will allow your computer to ping and whether a particular IP address is available in the network or not.
Check our guide on Firewall disabled but still blocking apps on Windows 10 for more information.
2. Allow File and Printer Sharing through Windows Firewall
- Press Windows + R key to open the Run dialog box, type firewall.cpl in the text field, and click OK to open Windows Defender Firewall.
- Click on the Allow an app or feature through Windows Defender Firewall option.

- Click the Change settings button.
- Check the box for File and Printer Sharing, and click OK to save the changes.

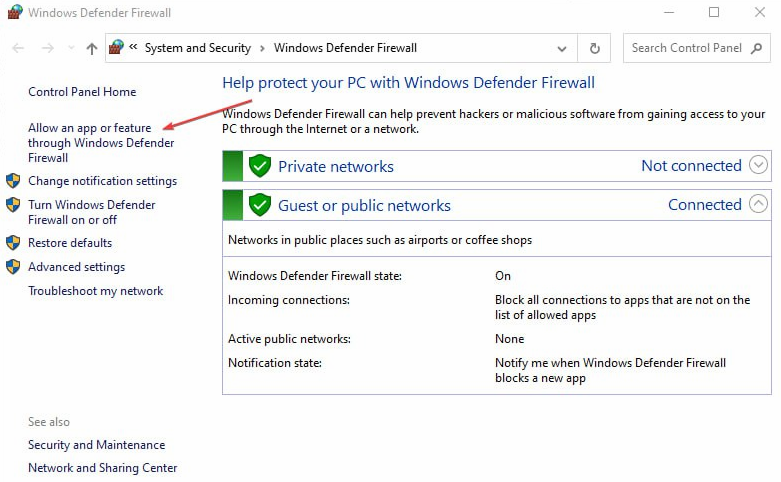
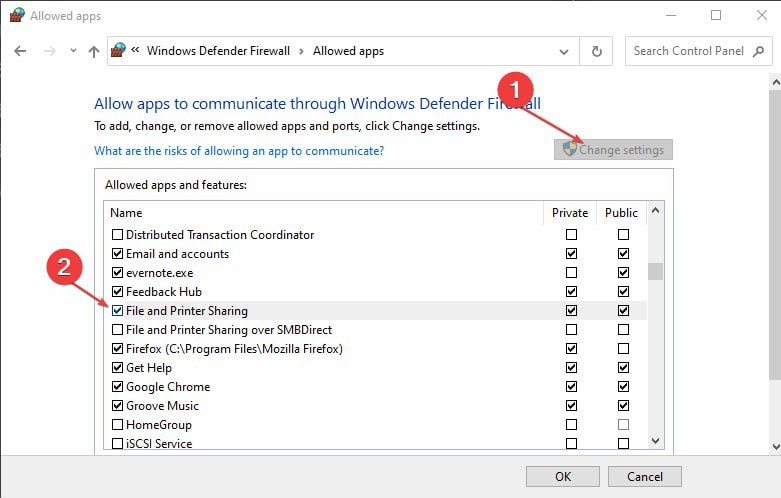
Checking the box for File and Printer Sharing enables the ping functionality on your computer.
- Is Windows 11 Faster Than Windows 10?
- How to Change the Icon Size on Windows 10
- Are Windows 11 Product Keys Backward Compatible?
- Microsoft Store Apps vs Desktop Apps: Which Ones to Use?
3. Use PowerShell
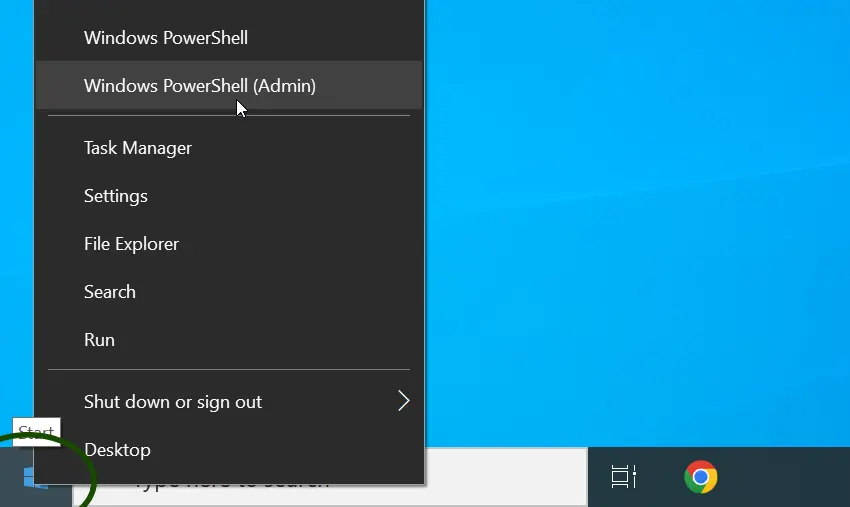
- Left-click the Start button, type PowerShell, and click Run as administrator.
- Click Yes on the User Account Control prompt.
- Copy and paste the following lines of commands and press Enter:
netsh advfirewall firewall add rule name="Allow ICMPv4" protocol=icmpv4:8,any dir=in action=allownetsh advfirewall firewall add rule name="Allow ICMPv6" protocol=icmpv6:8,any dir=in action=allow
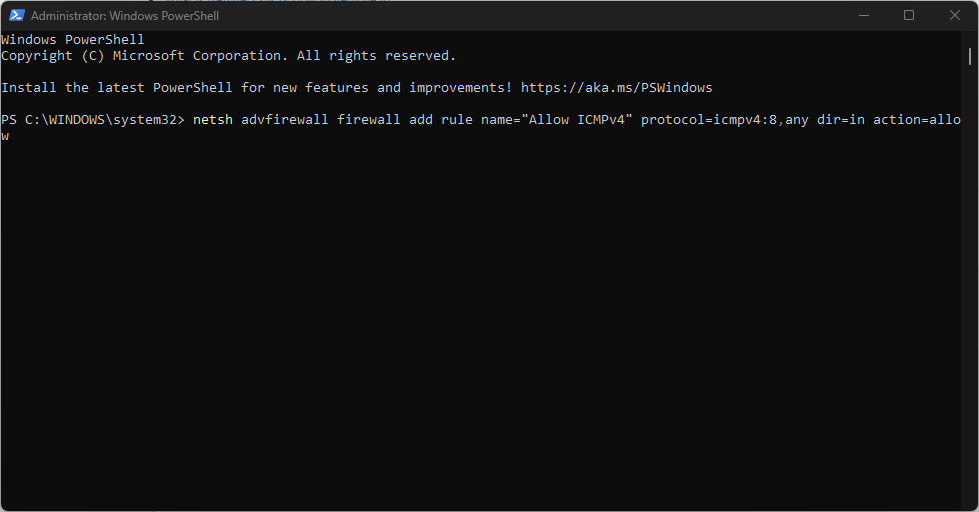
The above commands will enable the ping functionality, allowing your Windows PC to respond to ping requests.
You can check our guide about PowerShell not showing the full output and some fixes to get it working if you experience it.
4. Use the Command Prompt
- Left-click the Start button, type Command Prompt, and click the Run as administrator option.
- Click Yes on the User Account Control (UAC) prompt.
- Type the following lines of commands and press Enter to run them:
netsh advfirewall firewall add rule name="ICMP Allow incoming V4 echo request" protocol=icmpv4:8,any dir=in action=allow - Close the Command Prompt and restart your PC.

The above commands will create two exceptions to allow traffic through the firewall and allow ping requests.
Read our guide on what to do if Command Prompt keeps crashing on your PC.
In addition, our readers may be interested in ways to fix Cannot Ping computers on the same Network on Windows 10.
If you have further questions or suggestions concerning enabling ping on Windows 10, kindly drop them in the comments section.
![]()
Пинг — утилита, которая позволяет проверить доступность других узлов в сети с помощью отправки и получения ICMP-эхо-запросов. Она является важным инструментом для диагностики сетевых проблем и контроля сетевой активности. Однако, иногда пользователю может понадобиться отключить пинг на своем компьютере. В данной статье мы рассмотрим, как это сделать в операционной системе Windows 10 и какие последствия могут возникнуть.
Шаг 1: Войдите в «Панель управления» через меню «Пуск» или комбинацию клавиш Win + X. Выберите «Сеть и Интернет», затем «Центр управления сетями и общим доступом».
Шаг 2: В окне «Центр управления сетями и общим доступом» выберите активное подключение к интернету и откройте его свойства. Для этого, нажмите правой кнопкой мыши на активное подключение и выберите «Свойства».
Шаг 3: В списке доступных компонентов выберите «Интернет-протокол версии 4 (TCP/IPv4)» и снова нажмите «Свойства».
Шаг 4: В открывшемся окне «Свойства Интернет-протокол версии 4 (TCP/IPv4)» выберите раздел «Дополнительно».
Шаг 5: В нижней части окна «Дополнительно» найдите и снимите флажок напротив «Включить ICMP-запросы» или «Разрешить ввод ICMP-запросов». Нажмите «ОК», чтобы сохранить изменения.
Теперь пинг будет отключен на вашем компьютере с операционной системой Windows 10. Пожалуйста, имейте в виду, что это может привести к некоторым ограничениям в сетевой диагностике и работе некоторых программ и сервисов, которые требуют пинг для своей работы.
Обратите внимание, что отключение пинга может затруднить процесс обнаружения и устранения сетевых проблем. Если вы не уверены, что именно ищете, лучше не отключайте пинг полностью, а регулируйте его доступность через настройки брандмауэра или других программ.
Теперь вы знаете, как отключить пинг на Windows 10. Будьте осторожны при внесении любых изменений в сетевые настройки и имейте в виду возможные последствия.
Содержание
- Как отключить пинг на Windows 10
- Открыть командную строку
- Ввести команду для отключения пинга
- Проверить статус пинга
- Установить постоянное отключение пинга
Как отключить пинг на Windows 10
Однако, в ряде случаев, пользователю может потребоваться отключить пинг на своем компьютере с операционной системой Windows 10. Возможными причинами могут быть желание улучшить безопасность, снизить нагрузку на сеть или скрыть свое присутствие в сети.
Чтобы отключить пинг на Windows 10, следуйте этим шагам:
- Откройте командную строку: Нажмите сочетание клавиш Win + R, введите cmd в поле Выполнить и нажмите Enter.
- Перейдите в режим администратора: В открывшемся окне командной строки выполните правой кнопкой мыши на верхней панели и выберите «Свойства». В разделе «Свойства» установите флажок «Запускать от имени администратора» и нажмите OK.
- Отключите пинг: В командной строке введите команду netsh firewall set icmpsetting 8 disable и нажмите Enter.
После выполнения этих шагов пинг будет отключен на вашем компьютере с операционной системой Windows 10. При попытке пинговать ваш компьютер, он будет неактивен и не даст ответа на запрос.
Если вы хотите включить пинг снова, повторите первые два шага, а затем введите команду netsh firewall set icmpsetting 8 enable.
Обратите внимание, что отключение пинга может повлиять на некоторые сетевые функции, поэтому следует быть осторожным при его использовании.
Открыть командную строку
Чтобы отключить пинг на Windows 10, вам понадобится открыть командную строку. Есть несколько способов сделать это:
- Нажмите Win + R, чтобы открыть «Выполнить», введите «cmd» и нажмите «Enter».
- Нажмите правой кнопкой мыши на кнопке «Пуск» в левом нижнем углу экрана. В открывшемся контекстном меню выберите «Командная строка» или «Командная строка (администратор)».
- Нажмите правой кнопкой мыши на значке Windows в левом нижнем углу экрана. В открывшемся контекстном меню выберите «Windows PowerShell» или «Windows PowerShell (администратор)».
- Откройте меню «Пуск», найдите папку «Система Windows», а затем перейдите в папку «Командная строка» или «Системная программа». В этой папке вы найдете ярлык для командной строки.
После открытия командной строки вы будете готовы продолжить процесс отключения пинга на Windows 10.
Ввести команду для отключения пинга
Для отключения пинга на Windows 10 вам потребуется использовать командную строку. Вот как это сделать:
Шаг 1: Откройте командную строку. Вы можете сделать это, нажав клавиши «Windows + R» и введя «cmd» в поле «Выполнить», затем нажмите Enter.
Шаг 2: В командной строке введите следующую команду:
netsh advfirewall firewall add rule name="Отключение пинга" protocol=icmpv4:8,any dir=in action=block
Эта команда добавляет новое правило брандмауэра, которое блокирует входящие пакеты ICMP (пинг) для IPv4.
Примечание: Если вы хотите отключить пинг для IPv6, замените «icmpv4:8» на «icmpv6:8».
Шаг 3: Нажмите Enter, чтобы выполнить команду.
После выполнения этой команды пинг будет блокироваться брандмауэром Windows 10, и вы не будете получать ответ на пинги.
Если вы хотите включить пинг в будущем, вы можете удалить добавленное правило брандмауэра. Для этого введите следующую команду:
netsh firewall delete rule name="Отключение пинга"
Эта команда удалит правило, которое ранее было добавлено для блокировки пингов.
Проверить статус пинга
Если вы хотите узнать, включен ли пинг на вашем компьютере с операционной системой Windows 10, вы можете выполнить следующие шаги:
- Откройте командную строку. Нажмите на кнопку «Пуск» и введите «cmd». Затем выберите «Командная строка» из списка результатов.
- Введите команду. В командной строке введите «ping localhost» и нажмите клавишу Enter.
Если пинг включен, вы увидите результаты с временем и статистикой. В строке «Ответ от localhost […]» вы должны видеть сообщение с тайм-аутом и временем отклика.
Если пинг выключен, вы увидите сообщение «Host недоступен». Это означает, что ваш компьютер не может связаться с локальным хостом.
Примечание: Проверка статуса пинга с локальным хостом может быть полезна, но для определения статуса пинга с другими компьютерами или узлами сети вам понадобится их IP-адрес или имя хоста, которые вы можете использовать вместо «localhost» в команде «ping».
Установить постоянное отключение пинга
Чтобы постоянно отключить пинг на Windows 10, вам потребуется редактировать реестр операционной системы. Для этого следуйте инструкции:
| Шаг | Действие |
|---|---|
| 1 | Откройте редактор реестра, нажав комбинацию клавиш Win + R и введя в появившемся окне команду «regedit». |
| 2 | В редакторе реестра перейдите к следующему пути: HKEY_LOCAL_MACHINE\SYSTEM\CurrentControlSet\Services\Tcpip\Parameters. |
| 3 | Создайте новую запись реестра, щелкнув правой кнопкой мыши на правой панели и выбрав «New» -> «DWORD (32-bit) Value». |
| 4 | Назовите новую запись реестра «ICMPEnable» (без кавычек). |
| 5 | Откройте созданную запись реестра, дважды щелкнув по ней. |
| 6 | Установите значение записи равным «0» (без кавычек). |
| 7 | Нажмите «OK», чтобы сохранить изменения. |
| 8 | Перезагрузите компьютер, чтобы изменения вступили в силу. |
После перезагрузки компьютера пинг будет постоянно отключен, и вам не будет приходить ответ на пинги от вашего компьютера.
Содержание
- Создание правила ICMP для входящего трафика
- Разрешить входящий пинг (эхо-запрос) без отключения брандмауэра Windows 10
- Как разрешить или отключить и запретить ответ пинг на Windows
- Если вы хотите отключить или включить запросы ping, вы попали в нужное место.
- Как разрешить или отключить и запретить ответ пинг на Windows
- ZoneAlarm Free Firewall
- Emsisoft Online Armor Free
- Comodo Free Firewall
- Как отключить и запретить ответ пинг в Брандмауэр Windows 10
- Создание правила порта для входящего трафика
- ИТ База знаний
- Полезно
- Навигация
- Серверные решения
- Телефония
- Корпоративные сети
- Как разрешить ping в Windows Server 2019
- Разрешить проверку связи через брандмауэр Windows
- Резюме
Создание правила ICMP для входящего трафика
Относится к:
Чтобы разрешить входящий сетевой трафик протокола управления Интернетом (ICMP), используйте брандмауэр Защитник Windows с узлом advanced security в оснастке MMC управления групповой политикой для создания правил брандмауэра. Этот тип правила позволяет отослать и получить запросы и ответы ICMP с помощью компьютеров в сети.
Учетные данные администратора
Для выполнения этих процедур необходимо быть участником группы администраторов домена либо иметь делегированные разрешения на изменение объектов групповой политики.
В этом разделе описывается, как создать правило порта, которое позволяет входящий сетевой трафик ICMP. Другие типы правил входящие порты см. в этой ссылке.
Создание входящие правила ICMP
В области навигации щелкните Правила входящие.
Нажмите кнопку Действие, а затем нажмите новое правило.
На странице Тип правила мастера нового входящие правила щелкните Настраиваемый, а затем нажмите кнопку Далее.
На странице Программа нажмите кнопку Все программы, а затем нажмите кнопку Далее.
На странице Протокол и Порты выберите ICMPv4 или ICMPv6 из списка типов протокола. Если в сети используется как IPv4, так и IPv6, необходимо создать отдельное правило ICMP для каждого из них.
Нажмите кнопку Настройка.
В диалоговом окне Настройка Параметры ICMP сделайте одно из следующих:
Чтобы разрешить весь сетевой трафик ICMP, щелкните все типы ICMPи нажмите кнопку ОК.
Чтобы выбрать один из заранее определенных типов ICMP, нажмите кнопку Конкретные типы ICMP, а затем выберите каждый тип в списке, который вы хотите разрешить. Нажмите кнопку ОК.
Чтобы выбрать тип ICMP, который не фигурит в списке, **** щелкните Конкретные типы **** ICMP, выберите **** номер Типа из списка, выберите номер кода из списка, щелкните Добавить, а затем выберите вновь созданную запись из списка. Нажмите ОК
Нажмите кнопку Далее.
На странице Область можно указать, что правило применяется только к сетевому трафику или с IP-адресов, вступив на эту страницу. Настройка, как подходит для вашего дизайна, а затем нажмите кнопку Далее.
На странице Действие выберите Разрешить подключение, а затем нажмите кнопку Далее.
На странице Profile выберите типы расположения сети, к которым применяется это правило, и нажмите кнопку Далее.
На странице Имя введите имя и описание правила, а затем нажмите кнопку Готово.
Источник
Разрешить входящий пинг (эхо-запрос) без отключения брандмауэра Windows 10

Эхо-запрос (он же ICMP-пакеты или пинг) служит для обнаружения наличия сетевого устройства в сети (LAN или WAN). Его можно использовать для проверки связи с компьютерами, ноутбуками, серверами (в том числе хостингом веб-сайтов), сетевыми принтерами, маршрутизаторами и т. Д. Однако ответ на эхо-запрос должен быть включен заранее, чтобы сетевое устройство могло отвечать. В противном случае вы получите тайм-аут запроса вместо ответа.
К сожалению, большинство пользователей отключают брандмауэр Windows, когда хотят, чтобы в ответе ICMP работала команда Ping. Они забывают о том, что брандмауэр защищает их ПК от взлома и вредоносных программ, и это необходимо при работе в общественных сетях. Вот как правильно поступить.
Обратите внимание, что вы можете разрешить эхо-запросы для сети Приватный, Общедоступный и Домен независимо. Если для каждого типа предварительно установлены отдельные правила, включите те, которые вам нужны. В противном случае вы можете дважды щелкнуть правило, чтобы вызвать его свойства, перейти на вкладку «Дополнительно» и указать сетевые профили:
Теперь ваш компьютер будет реагировать на ICMP-пакеты при пинге с другого устройства. Именно так:

Надеюсь, это будет полезно для вас.
Источник
Как разрешить или отключить и запретить ответ пинг на Windows
Если вы хотите отключить или включить запросы ping, вы попали в нужное место.
Прежде всего, вам необходимо определить, хотите ли вы включить или отключить пинг-ответ во внутренней или внешней сети. Для запроса внешнего пинга вам необходимо настроить маршрутизатор, а не компьютер. Чтобы узнать, может ли внешний источник пропинговать ваш IP-адрес, посетите ping.eu. нажмите на свой IP-адрес, который отображается на веб-странице, и нажмите кнопку «Перейти». Если вы видите 100% потерю пакетов, это означает, что ваш маршрутизатор / сеть уже защищены от внешнего пинга. Однако, если ping.eu показывает результат, как на скриншоте ниже, это означает, что ваш маршрутизатор / сеть отвечает на запросы ping. 
Возможно, вы захотите обратиться к руководству вашего маршрутизатора, чтобы получить доступ к конфигурации вашего маршрутизатора и проверить настройки брандмауэра. Ниже приведен скриншот настроек маршрутизатора Belkin ADSL, которые можно настроить для блокировки пинга. Некоторые маршрутизаторы имеют очень простую настройку, как блокировать пинг WAN, в то время как некоторые могут быть довольно сложными в настройке для начинающего пользователя.
Чтобы включить или отключить пинг-ответы для вашего компьютера или ноутбука во внутренней сети (например, когда вы подключены к общедоступному Wi-Fi), вы должны выполнить некоторые настройки Windows, либо использовать стороннее программное обеспечение брандмауэра.
Как разрешить или отключить и запретить ответ пинг на Windows
ZoneAlarm Free Firewall
Для ZoneAlarm Free Firewall в программном обеспечении есть только две зоны: Public и Trusted. Зоны в ZoneAlarm выбираются автоматически в зависимости от профиля сетевого расположения в Windows. Например, если вы выбрали «Домашняя сеть» в качестве сетевого расположения для подключения к Wi-Fi, ZoneAlarm автоматически устанавливает зону как «Trusted» и наоборот.
Если ваш компьютер отвечает на запросы ping, отключить ответ ping так же просто, как изменить зону с Trusted на Public ZoneAlarm. Запустите ZoneAlarm, перейдите на вкладку FIREWALL и нажмите View Zones в Basic Firewall.


Если вы хотите снова включить пинг-ответ, установите для зоны сети значение «Trusted».
Emsisoft Online Armor Free
Emsisoft Online Armor Free автоматически отключит пинг-ответ, и у вас не будет способа настроить правила брандмауэра для повторного включения пинга. В отличие от платной версии, где вы можете переключиться в расширенный режим для настройки правил ICMP, бесплатная версия не позволяет переключаться в расширенный режим, а только в стандартный режим. Так что, если вы используете бесплатную версию Online Armor, то вы можете временно отключить защиту Брандмауэра, щелкнув правой кнопкой мыши значок Online Armor в трее и выбрать Брандмауэр, чтобы снять флажок.
Comodo Free Firewall
Comodo автоматически решает, следует ли разрешать или запрещать пинг в зависимости от зоны сети, которую вы выбрали для подключенной сети.

Если вы выбрали Home или Work, то пинг разрешен. Однако зона сети Public Place блокирует все пинг-запросы. Если вы выбрали Public Place и хотите включить запросы ping, вы можете вручную настроить глобальные правила, чтобы разрешить ping вместо блокировки.

Кроме того, вы также можете временно отключить брандмауэр на панели задач, чтобы разрешить ответы Ping. Не выходите и не завершайте программу, потому что брандмауэр все еще будет активен, даже если значок в области уведомлений не отображается в области уведомлений.
С другой стороны, если вы находитесь в зоне домашней или рабочей сети, где разрешены запросы ping, и вы хотите отключить ответы ping, вам просто нужно переместить правило брандмауэра, расположенное внизу, которое блокирует все эхо-запросы ICMP вплоть до верхний, так чтобы он переопределил первых два правила, которые разрешают все входящие и исходящие запросы.
Как отключить и запретить ответ пинг в Брандмауэр Windows 10
На самом деле нет необходимости полагаться на стороннее программное обеспечение брандмауэра для включения или отключения пинг-ответов, поскольку для этого можно настроить брандмауэр Windows.
Источник
Создание правила порта для входящего трафика
Относится к:
Чтобы разрешить входящий сетевой трафик только на указанном номере порта TCP или UDP, используйте брандмауэр Защитник Windows с узлом Advanced Security в оснастке MMC управления групповой политикой для создания правил брандмауэра. Этот тип правила позволяет любой программе, прослушиваемой в указанном TCP или порту UDP, получать сетевой трафик, отправленный в этот порт.
Учетные данные администратора
Для выполнения этих процедур необходимо быть участником группы администраторов домена либо иметь делегированные разрешения на изменение объектов групповой политики.
В этом разделе описывается создание стандартного правила порта для указанного протокола или номера порта TCP или UDP. Другие типы правил входящие порты см. в этой ссылке.
Создание правила входящий порт
В области навигации щелкните Правила входящие.
Нажмите кнопку Действие, а затем нажмите новое правило.
На странице Тип правила мастера нового входящие правила щелкните Настраиваемый, а затем нажмите кнопку Далее.
Примечание: Хотя вы можете создавать правила, выбрав программу или порт, эти варианты ограничивают количество страниц, представленных мастером. Если выбрать Настраиваемый, вы увидите все страницы и наиболее гибки в создании правил.
На странице Программа нажмите кнопку Все программы, а затем нажмите кнопку Далее.
Примечание: Этот тип правила часто сочетается с правилом программы или службы. Если вы объедините типы правил, вы получите правило брандмауэра, которое ограничивает трафик указанного порта и разрешает трафик только при запуске указанной программы. Указанная программа не может получать сетевой трафик в других портах, а другие программы не могут получать сетевой трафик в указанном порту. Если вы решите сделать это, выполните действия в процедуре Создать входящие программы или правила службы в дополнение к шагам в этой процедуре, чтобы создать единое правило, которое фильтрует сетевой трафик с использованием как программных, так и портовых критериев.
На странице Протокол и Порты выберите тип протокола, который необходимо разрешить. Чтобы ограничить правило указанным номером порта, необходимо выбрать TCP или UDP. Так как это входящие правила, обычно настраивается только локальный номер порта.
Если вы выбираете другой протокол, то через брандмауэр допускаются только пакеты, поле протокола которых в загорелом ip-адресе соответствует этому правилу.
Чтобы выбрать протокол по его номеру, выберите Custom из списка и введите номер в поле Номер протокола.
При настройке протоколов и портов нажмите кнопку Далее.
На странице Область можно указать, что правило применяется только к сетевому трафику или с IP-адресов, вступив на эту страницу. Настройка, как подходит для вашего дизайна, а затем нажмите кнопку Далее.
На странице Действие выберите Разрешить подключение, а затем нажмите кнопку Далее.
На странице Profile выберите типы расположения сети, к которым применяется это правило, и нажмите кнопку Далее.
Примечание: Если эта GPO ориентирована на серверные компьютеры с Windows Server 2008, которые никогда не перемещаются, рассмотрите возможность изменения правил для всех профилей типов расположения сети. Это предотвращает неожиданное изменение применяемых правил, если тип расположения сети изменяется из-за установки новой сетевой карты или отключения кабеля существующей сетевой карты. Отключенная сетовая карта автоматически назначена типу расположения общедоступных сетей.
На странице Имя введите имя и описание правила, а затем нажмите кнопку Готово.
Источник
ИТ База знаний
Полезно
— Онлайн генератор устойчивых паролей
— Онлайн калькулятор подсетей
— Руководство администратора FreePBX на русском языке
— Руководство администратора Cisco UCM/CME на русском языке
— Руководство администратора по Linux/Unix
Навигация
Серверные решения
Телефония
FreePBX и Asterisk
Настройка программных телефонов
Корпоративные сети
Протоколы и стандарты
Как разрешить ping в Windows Server 2019
По умолчанию, в Windows Server 2019 брандмауэр настроен на блокировку входящего трафика ICMP. Сюда входят эхо-запросы, которые используются командой ping, и это может затруднить устранение неполадок в сети. Некоторые системы мониторинга используют команду ping для отслеживания доступности серверов.

В этом руководстве рассмотрим, как включить правило, чтобы сервер стал отвечать на ping используя графический интерфейс Windows Server 2019, а также включим разрешающее правило через PowerShell и netsh.
Обычно просто отключают Windows Firewall полностью, однако это не рекомендуется делать в производственной среде, так как брандмауэр Windows хорошо справляется с обеспечением базового уровня защиты системы. Разрешим только конкретное правило, необходимое для успешного выполнения команды ping.
Разрешить проверку связи через брандмауэр Windows

Еще один быстрый способ: в PowerShell можно просто ввести «firewall» и нажать Enter. Откроется базовый интерфейс брандмауэра, а затем нажать кнопку «Advanced settings» в левой части. Откроется тот же интерфейс, что и через меню «Start«.
В Брандмауэре в расширенном режиме перейдите в Inboud Rules (Правила для входящих подключений).


Еще один вариант. Активируем разрешающее правило командлетом Powershell
Полную справку со всеми параметрами можно получить, набрав команду в PowerShell
Вариант создания правила через netsh
После разблокировки правила сервер должен начать отвечать на запросы ping. С хоста виртуализации или другого пк в локальной сети протестируем ping’ом Windows Server 2019 по адресу 192.168.1.11 перед включением правила, а затем снова после его включения. Ниже видно, что время ожидания первых запросов истекло, так как входящие запросы ICMP были отключены по умолчанию в Windows Server 2019. После включения правила ICMP запросы ping успешно выполняются, что подтверждает ожидаемую работу.
Пример проверки связи:
Резюме
Источник
ICMP — это протокол управляющих сообщений Интернета, отправляемый, когда пользователи используют утилиту ping. Утилита ping удобна для проверки, активны ли подключенные к сети устройства. Таким образом, пинг может пригодиться для проверки сетевых подключений.
Однако брандмауэры по умолчанию блокируют ICMP-проверки для пользователей. Следовательно, пользователи не могут пинговать, когда включен брандмауэр. Итак, совершенно очевидно, что нужно сделать пользователям, чтобы исправить ICMP-пинги!
1. Отключите брандмауэр Защитника Windows
Конечно, большинство пользователей отключают брандмауэр Защитника Windows, прежде чем вводить эхо-запрос в командной строке. Выключение WDF, пожалуй, самый простой способ исправить пинг. Пользователи могут отключить WDF следующим образом.
- Откройте Cortana, нажав клавишу Windows + горячую клавишу Q.
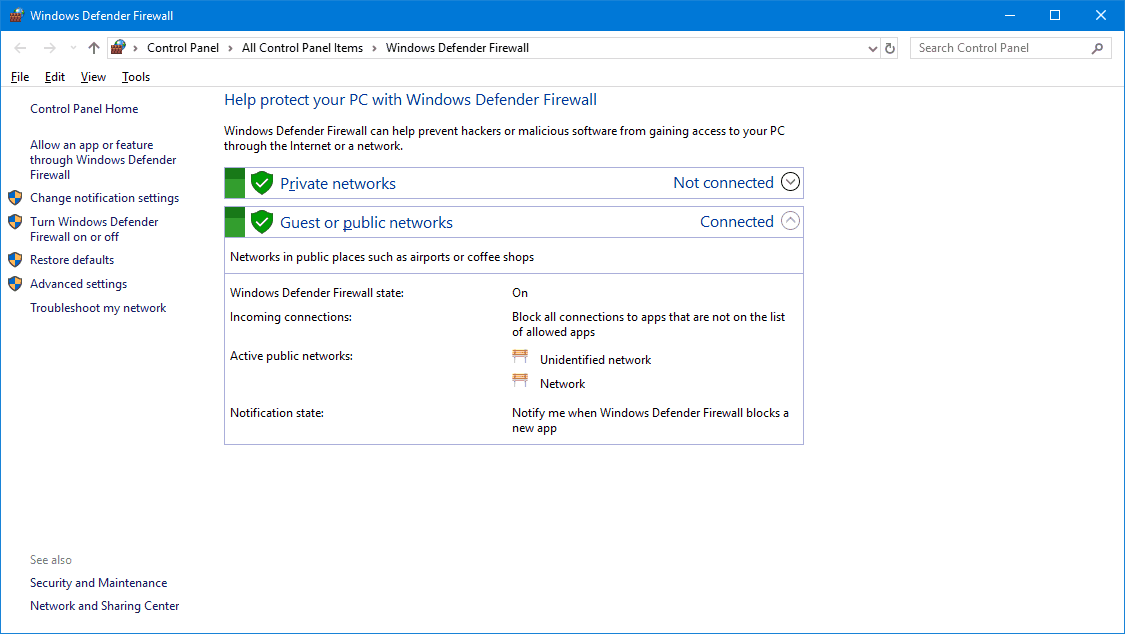
- Введите «брандмауэр» для поиска WDF, а затем выберите, чтобы открыть апплет панели управления брандмауэра Защитника Windows.

- Нажмите « Включить или выключить брандмауэр Защитника Windows» слева, чтобы открыть параметры в снимке экрана ниже.


- Затем нажмите кнопку-переключатель « Отключить брандмауэр Защитника Windows» .
- Выберите опцию ОК .
- Пользователи могут выбрать параметры включения брандмауэра Защитника Windows после проверки связи.
2. Включить Ping через брандмауэр
Тем не менее, пользователи также могут пропинговать, не выключая WDF. Пользователи могут сделать это, настроив исключение запроса пинга WDF. Следуйте приведенным ниже инструкциям, чтобы установить исключение для запроса пинга.
- Щелкните правой кнопкой мыши кнопку «Пуск», чтобы открыть меню Win + X.
- Выберите командную строку (Admin), чтобы открыть окно подсказки.
- Сначала введите «netsh advfirewall add rule name =« ICMP Allow входящий эхо-запрос V4 »protocol = icmpv4: 8, любой dir = в действии = allow» и нажмите клавишу Return, чтобы настроить исключение ICMPv4.

- Затем введите «netsh advfirewall добавить имя правила =« ICMP Allow входящий эхо-запрос V6 »протокол = icmpv6: 8, любой dir = в действии = разрешить» в окне командной строки, как показано ниже, и нажмите клавишу Enter.

- После этого пользователи могут вводить свои эхо-запросы в командной строке.
3. Отключите стороннее антивирусное программное обеспечение
Однако, если пинг ICMP все еще истекает, должен быть сторонний брандмауэр, блокирующий его. Некоторым пользователям также необходимо отключить стороннее антивирусное программное обеспечение, которое включает собственные брандмауэры. Для этого щелкните правой кнопкой мыши значок антивирусной утилиты на панели задач, чтобы открыть ее контекстное меню. Затем выберите параметр контекстного меню, который отключит антивирусное программное обеспечение, которое может быть отключено, отключено, остановлено или выключено. Кроме того, пользователи могут остановить антивирусную программу, начиная с Windows, следующим образом.
- Откройте меню Win + X , щелкнув правой кнопкой мыши кнопку «Пуск».
- Нажмите Диспетчер задач, чтобы открыть эту утилиту.
- Выберите вкладку «Запуск» в диспетчере задач .

- Выберите антивирусную утилиту на вкладке «Пуск» и нажмите кнопку « Отключить» .
- Затем перезапустите Windows.
Так вот, как пользователи могут исправить заблокированные пинги. Затем пользователи могут проверить свои соединения с помощью пингов.
СВЯЗАННЫЕ СТАТЬИ, ЧТОБЫ ПРОВЕРИТЬ:
- Полный Fix: Невозможно проверить и другие компьютеры на Windows 10
- Полное исправление: Nslookup работает, но ping не работает в Windows 10, 8.1, 7
— Advertisement —
Hello! This time I’m going to talk to you about security in Windows 10. It is well known that the system offers multiple layers of security to keep the privacy of our information safe. Certainly, this entails control over network connections. These are really useful for exchanging information and sending data. However, sometimes these connections can fail and so it is imperative to get the error. One of the resources used for this task is PING. It is a basic Internet program that allows a user to verify that a particular IP address exists and can accept requests. This app verifies whether the IP address of a host is currently operational, and how long it takes to respond. Ping works by sending an Internet Control Message Protocol (ICMP) Echo Request to a specified interface on the network and waiting for a reply.
Additionally, it can be used for troubleshooting to test connectivity and determine response time. However, most administrator users consider the ICMP protocol to be potentially unsafe and prefer to block these calls. For this reason, the Windows 10 firewall by default has a security policy of blocking such requests. This is easy to check, trying to ping our computer from a remote machine, we’ll see the following message:
However, it is not advisable to completely block these calls. Therefore, here I show you how to enable and disable ping in Windows 10.
Enable ping in windows 10. Command line mode.
The first thing we need to do is to open a Command Prompt as administrators. Once there, we have to create a rule for IPv4 addressing and another for IPv6. All right, to create the first rule you just have to type the following command in the console:
netsh advFirewall Firewall add rule name="OSRadar Rule PING IPv4" protocol=icmpv4:8,any dir=in action=allow
If everything was done correctly, the CMD should look like this:
Next, we will create the rule for IPv6 addressing:
netsh advFirewall Firewall add rule name="OSRadar Rule PING IPv6" protocol=icmpv6:8,any dir=in action=allow
We have correctly applied the rules for the ping command. We can check that it works, pinging from a remote computer:
To disable the exception for IPv4 addresses, just type the following commanding in the CMD:
netsh advFirewall Firewall add rule name="OSRadar Rule PING IPv4" protocol=icmpv4:8,any dir=in action=block
In the case of IPv6 addressing, the command to write will be the following:
netsh advFirewall Firewall add rule name="OSRadar Rule IPv6" protocol=icmpv6:8,any dir=in action=block
Please note that you can choose the name you want for the rules. If you want to see every rule in the system in detail, just write the following in the terminal:
netsh advFirewall Firewall show rule name=all
Enable ping in windows 10. Graphic mode.
It is also possible to create specific rules to enable and disable ping by entering the Windows 10 Firewall Advanced Security Configuration. With this intention, just type Firewall on the search bar:
Immediately the Firewall options will be displayed. As we did before, we have to create a rule for IPv4 and another for IPv6.
So first, select the Inbound Rules option in the left column and right-click the mouse to create a New Rule:
A rule creation wizard will start. Please select Custom in the rule type and press Next to continue.
On the next screen select All programs and press Next to continue.
In the protocol type, select ICMPv4 and then click on customize.
In the pop-up screen activate the Specific ICMP types box and navigate until you activate the Echo Request option. Press accept to apply the changes.
Next, we can define which specific IP addresses this rule will apply, on the contrary, we will allow the requests of all the addresses. Once the selection is made, press next to continue.
Now select Allow the connection and press Next to continue
In the following screen, we have to select when the new rule will be applied. Please check the 3 available options and press next to continue.
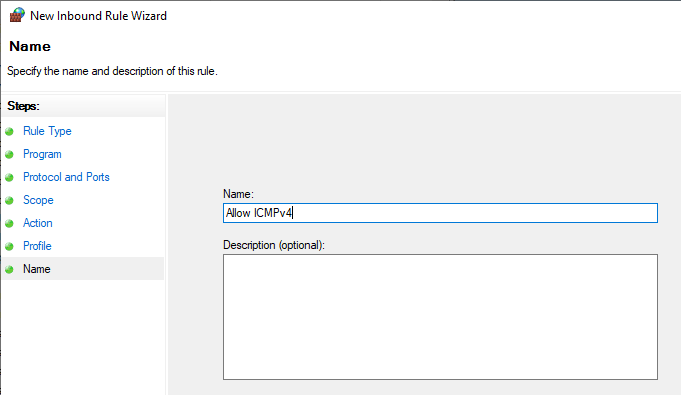
Finally, we only have to assign a name to the rule and press Finish to close the wizard.
Finally, we can see the rule created correctly. To create the exception for IPv6 addressing, we have to repeat the same process but in the protocol and ports window, we have to select ICMPv6.
To disable any of the created rules, just right-click on it and choose Disable Rule.
Conclusion
Finally, we have seen how to enable and disable ping in Windows 10. This will allow us to manage and administer our connections using this command. Finally, we have seen how to enable and disable ping in Windows 10. This will allow us to manage and administer our connections using this command. Consequently, we will be able to monitor the levels of security and data protection on our computers. This is all for now, before saying goodbye I invite you to review our tutorial on bash in Windows 10
ICMP, также известный как PING, обычно используется системными администраторами для проверки работоспособности компьютеров (и других сетевых устройств).
Брандмауэр в Windows 10 по умолчанию блокирует ответы ICMP. Чтобы разрешить ICMP в Windows, нам нужно создать два правила брандмауэра. Один для IPv4 и один для IPV6.
Мы можем добиться этого с помощью графического интерфейса или командной строки.
Использование PowerShell для разрешения проверки связи
Самый простой способ — запустить следующие две команды в окне PowerShell:
netsh advfirewall firewall add rule name="Allow ICMPv4" protocol=icmpv4:8,any dir=in action=allow
netsh advfirewall firewall add rule name="Allow ICMPv6" protocol=icmpv6:8,any dir=in action=allow
Чтобы открыть окно PowerShell, щелкните правой кнопкой мыши кнопку «Пуск» и выберите в меню Windows PowerShell (Admin).
Когда откроется командное окно, запустите две команды, которые мы указали выше.

Ваш ПК/сервер с Windows теперь будет отвечать на запросы ping. Если вы хотите снова заблокировать ping, удалите эти два правила брандмауэра, используя следующие две команды:
netsh advfirewall firewall delete rule name="Allow ICMPv4"
netsh advfirewall firewall delete rule name="Allow ICMPv6"
Использование брандмауэра Защитника Windows
Если вам не нравится командная строка, используйте графический интерфейс, чтобы разрешить эхо-запросы через брандмауэр Windows.
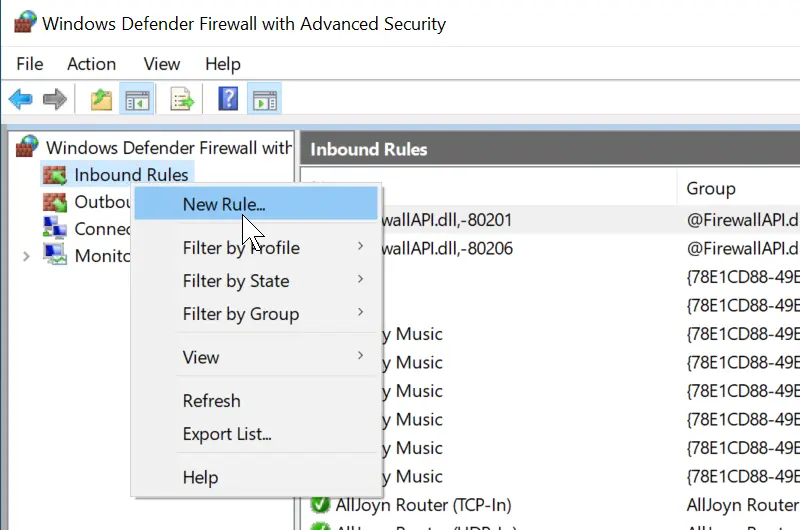
Нажмите кнопку «Пуск» и введите брандмауэр. В результатах поиска выберите Брандмауэр Защитника окон в режиме повышенной безопасности. В приложении брандмауэра щелкните правой кнопкой мыши «Правила для входящих подключений» и выберите «Новое правило» в контекстном меню.
На первом экране выберите Пользовательский тип правила, нажмите Далее, а затем выберите Все программы. Нажмите «Далее» еще раз.
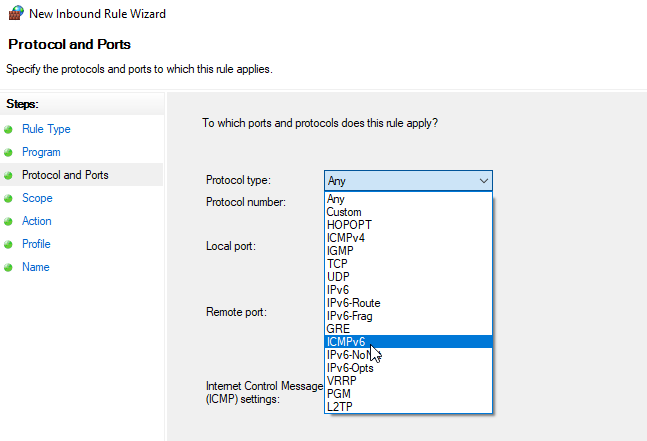
В раскрывающемся меню «Тип протокола» выберите ICMPv4 и нажмите «Далее».
На экране «Область» выберите «Любые IP-адреса», нажмите «Далее» и выберите «Разрешить подключение». На экране «Профиль» оставьте все три профиля брандмауэра отмеченными.
Наконец, дайте имя правилу брандмауэра и нажмите «Готово», чтобы завершить работу мастера.
Это правило разрешает трафик ICMPv4 через брандмауэр. Чтобы разрешить трафик ICMPv6, повторите ту же процедуру, но на экране «Протокол и порты» выберите ICMPv6.
И это все. Вы можете использовать описанные выше методы, чтобы разрешить проверку связи в любой операционной системе Windows, включая Windows 10, 11 и Server.
by Matthew Adams
Matthew is a freelancer who has produced a variety of articles on various topics related to technology. His main focus is the Windows OS and all the things… read more
Published on March 4, 2019
XINSTALL BY CLICKING THE DOWNLOAD FILE
This software will keep your drivers up and running, thus keeping you safe from common computer errors and hardware failure. Check all your drivers now in 3 easy steps:
- Download DriverFix (verified download file).
- Click Start Scan to find all problematic drivers.
- Click Update Drivers to get new versions and avoid system malfunctionings.
- DriverFix has been downloaded by 0 readers this month.
ICMP is the Internet Control Message Protocol sent when users utilize the ping utility. The ping utility is handy for checking if network-connected devices are active. Thus, pinging can come in handy for checking network connections.
However, firewalls block ICMP pings for users by default. Consequently, users can’t ping when there’s a firewall up. So, it’s pretty obvious what users need to do to fix the ICMP pings!
How to Fix Blocked Pings in Windows 10
1. Turn Off the Windows Defender Firewall
Most users will, of course, turn off the Windows Defender Firewall before they enter a ping in the Command Prompt. Turning WDF off is perhaps the most straightforward way to fix pinging. Users can turn off the WDF as follows.
- Open Cortana by pressing the Windows key + Q hotkey.
- Enter ‘firewall’ to search for the WDF, and then select to open the Windows Defender Firewall Control Panel applet.
- Click Turn Windows Defender Firewall on or off on the left to open the settings in the snapshot directly below.
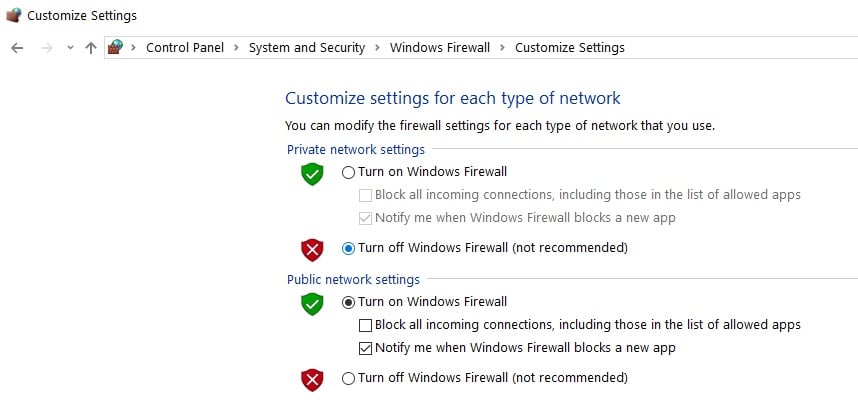
- Then click the Turn off Windows Defender Firewall radio buttons.
- Select the OK option.
- Users can select the Turn on Windows Defender Firewall settings after pinging.
2. Enable Ping Through the Firewall
However, users can also ping without turning WDF off. Users can do that by setting up a WDF ping request exception. Follow the guidelines below to establish a ping request exception.
- Right-click the Start button to open the Win + X menu.
- Select Command Prompt (Admin) to open the Prompt’s window.
- First, enter ‘netsh advfirewall firewall add rule name=”ICMP Allow incoming V4 echo request” protocol=icmpv4:8,any dir=in action=allow’ and press the Return key to set up an ICMPv4 exception.

- Then input ‘netsh advfirewall firewall add rule name=”ICMP Allow incoming V6 echo request” protocol=icmpv6:8,any dir=in action=allow’ in the Command Prompt’s window as shown directly below, and press the Enter key.
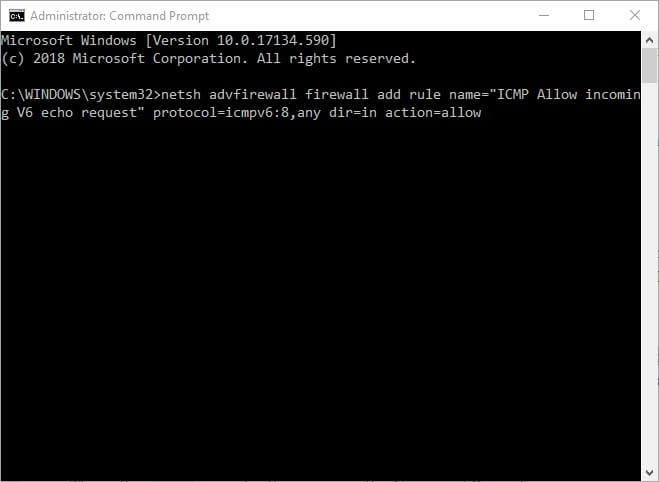
- Thereafter, users can enter their pings in the Command Prompt.
3. Disable Third-Party Antivirus Software
However, if the ICMP ping still times out, there must be a third-party firewall blocking it. Some users will also need to disable third-party antivirus software, which include their own firewalls. To do that, right-click the antivirus utility’s system tray icon to open its context menu. Then select a context menu option that will disable the antivirus software, which might be a turn off, disable, stop, or shut down option. Alternatively, users can stop antivirus software starting with Windows as follows.
- Open the Win + X menu by right-clicking the Start button.
- Click Task Manager to open that utility.
- Select the Start-up tab on the Task Manager.
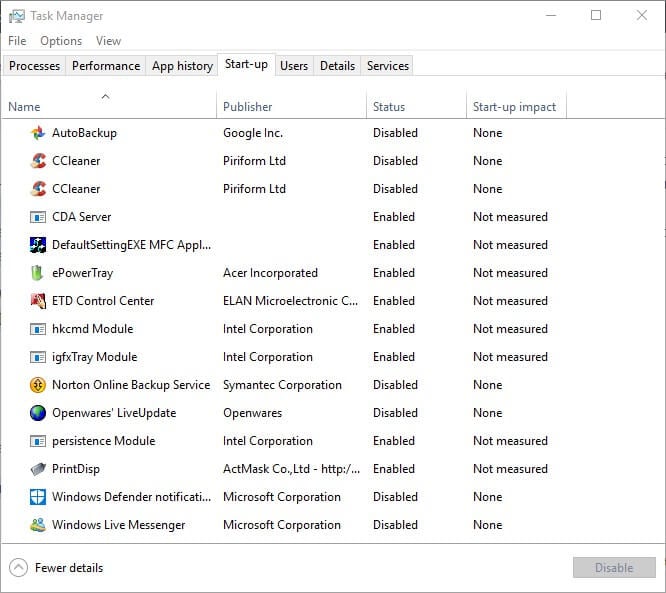
- Select the antivirus utility on the Start-up tab, and press the Disable button.
- Then restart Windows.
So, that’s how users can fix blocked pings. Then users can check their connections with pings.
RELATED ARTICLES TO CHECK OUT:
- Full Fix: Unable to ping other computers on Windows 10
- Full Fix: Nslookup works but ping fails on Windows 10, 8.1, 7
![]()
Newsletter
by Matthew Adams
Matthew is a freelancer who has produced a variety of articles on various topics related to technology. His main focus is the Windows OS and all the things… read more
Published on March 4, 2019
XINSTALL BY CLICKING THE DOWNLOAD FILE
This software will keep your drivers up and running, thus keeping you safe from common computer errors and hardware failure. Check all your drivers now in 3 easy steps:
- Download DriverFix (verified download file).
- Click Start Scan to find all problematic drivers.
- Click Update Drivers to get new versions and avoid system malfunctionings.
- DriverFix has been downloaded by 0 readers this month.
ICMP is the Internet Control Message Protocol sent when users utilize the ping utility. The ping utility is handy for checking if network-connected devices are active. Thus, pinging can come in handy for checking network connections.
However, firewalls block ICMP pings for users by default. Consequently, users can’t ping when there’s a firewall up. So, it’s pretty obvious what users need to do to fix the ICMP pings!
How to Fix Blocked Pings in Windows 10
1. Turn Off the Windows Defender Firewall
Most users will, of course, turn off the Windows Defender Firewall before they enter a ping in the Command Prompt. Turning WDF off is perhaps the most straightforward way to fix pinging. Users can turn off the WDF as follows.
- Open Cortana by pressing the Windows key + Q hotkey.
- Enter ‘firewall’ to search for the WDF, and then select to open the Windows Defender Firewall Control Panel applet.
- Click Turn Windows Defender Firewall on or off on the left to open the settings in the snapshot directly below.
- Then click the Turn off Windows Defender Firewall radio buttons.
- Select the OK option.
- Users can select the Turn on Windows Defender Firewall settings after pinging.
2. Enable Ping Through the Firewall
However, users can also ping without turning WDF off. Users can do that by setting up a WDF ping request exception. Follow the guidelines below to establish a ping request exception.
- Right-click the Start button to open the Win + X menu.
- Select Command Prompt (Admin) to open the Prompt’s window.
- First, enter ‘netsh advfirewall firewall add rule name=”ICMP Allow incoming V4 echo request” protocol=icmpv4:8,any dir=in action=allow’ and press the Return key to set up an ICMPv4 exception.
- Then input ‘netsh advfirewall firewall add rule name=”ICMP Allow incoming V6 echo request” protocol=icmpv6:8,any dir=in action=allow’ in the Command Prompt’s window as shown directly below, and press the Enter key.
- Thereafter, users can enter their pings in the Command Prompt.
3. Disable Third-Party Antivirus Software
However, if the ICMP ping still times out, there must be a third-party firewall blocking it. Some users will also need to disable third-party antivirus software, which include their own firewalls. To do that, right-click the antivirus utility’s system tray icon to open its context menu. Then select a context menu option that will disable the antivirus software, which might be a turn off, disable, stop, or shut down option. Alternatively, users can stop antivirus software starting with Windows as follows.
- Open the Win + X menu by right-clicking the Start button.
- Click Task Manager to open that utility.
- Select the Start-up tab on the Task Manager.
- Select the antivirus utility on the Start-up tab, and press the Disable button.
- Then restart Windows.
So, that’s how users can fix blocked pings. Then users can check their connections with pings.
RELATED ARTICLES TO CHECK OUT:
- Full Fix: Unable to ping other computers on Windows 10
- Full Fix: Nslookup works but ping fails on Windows 10, 8.1, 7
![]()
Newsletter
— Advertisement —
Hello! This time I’m going to talk to you about security in Windows 10. It is well known that the system offers multiple layers of security to keep the privacy of our information safe. Certainly, this entails control over network connections. These are really useful for exchanging information and sending data. However, sometimes these connections can fail and so it is imperative to get the error. One of the resources used for this task is PING. It is a basic Internet program that allows a user to verify that a particular IP address exists and can accept requests. This app verifies whether the IP address of a host is currently operational, and how long it takes to respond. Ping works by sending an Internet Control Message Protocol (ICMP) Echo Request to a specified interface on the network and waiting for a reply.
Additionally, it can be used for troubleshooting to test connectivity and determine response time. However, most administrator users consider the ICMP protocol to be potentially unsafe and prefer to block these calls. For this reason, the Windows 10 firewall by default has a security policy of blocking such requests. This is easy to check, trying to ping our computer from a remote machine, we’ll see the following message:
However, it is not advisable to completely block these calls. Therefore, here I show you how to enable and disable ping in Windows 10.
Enable ping in windows 10. Command line mode.
The first thing we need to do is to open a Command Prompt as administrators. Once there, we have to create a rule for IPv4 addressing and another for IPv6. All right, to create the first rule you just have to type the following command in the console:
netsh advFirewall Firewall add rule name="OSRadar Rule PING IPv4" protocol=icmpv4:8,any dir=in action=allow
If everything was done correctly, the CMD should look like this:
Next, we will create the rule for IPv6 addressing:
netsh advFirewall Firewall add rule name="OSRadar Rule PING IPv6" protocol=icmpv6:8,any dir=in action=allow
We have correctly applied the rules for the ping command. We can check that it works, pinging from a remote computer:
To disable the exception for IPv4 addresses, just type the following commanding in the CMD:
netsh advFirewall Firewall add rule name="OSRadar Rule PING IPv4" protocol=icmpv4:8,any dir=in action=block
In the case of IPv6 addressing, the command to write will be the following:
netsh advFirewall Firewall add rule name="OSRadar Rule IPv6" protocol=icmpv6:8,any dir=in action=block
Please note that you can choose the name you want for the rules. If you want to see every rule in the system in detail, just write the following in the terminal:
netsh advFirewall Firewall show rule name=all
Enable ping in windows 10. Graphic mode.
It is also possible to create specific rules to enable and disable ping by entering the Windows 10 Firewall Advanced Security Configuration. With this intention, just type Firewall on the search bar:
Immediately the Firewall options will be displayed. As we did before, we have to create a rule for IPv4 and another for IPv6.
So first, select the Inbound Rules option in the left column and right-click the mouse to create a New Rule:
A rule creation wizard will start. Please select Custom in the rule type and press Next to continue.
On the next screen select All programs and press Next to continue.
In the protocol type, select ICMPv4 and then click on customize.
In the pop-up screen activate the Specific ICMP types box and navigate until you activate the Echo Request option. Press accept to apply the changes.
Next, we can define which specific IP addresses this rule will apply, on the contrary, we will allow the requests of all the addresses. Once the selection is made, press next to continue.
Now select Allow the connection and press Next to continue
In the following screen, we have to select when the new rule will be applied. Please check the 3 available options and press next to continue.
Finally, we only have to assign a name to the rule and press Finish to close the wizard.
Finally, we can see the rule created correctly. To create the exception for IPv6 addressing, we have to repeat the same process but in the protocol and ports window, we have to select ICMPv6.
To disable any of the created rules, just right-click on it and choose Disable Rule.
Conclusion
Finally, we have seen how to enable and disable ping in Windows 10. This will allow us to manage and administer our connections using this command. Finally, we have seen how to enable and disable ping in Windows 10. This will allow us to manage and administer our connections using this command. Consequently, we will be able to monitor the levels of security and data protection on our computers. This is all for now, before saying goodbye I invite you to review our tutorial on bash in Windows 10
ICMP, также известный как PING, обычно используется системными администраторами для проверки работоспособности компьютеров (и других сетевых устройств).
Брандмауэр в Windows 10 по умолчанию блокирует ответы ICMP. Чтобы разрешить ICMP в Windows, нам нужно создать два правила брандмауэра. Один для IPv4 и один для IPV6.
Мы можем добиться этого с помощью графического интерфейса или командной строки.
Использование PowerShell для разрешения проверки связи
Самый простой способ — запустить следующие две команды в окне PowerShell:
netsh advfirewall firewall add rule name="Allow ICMPv4" protocol=icmpv4:8,any dir=in action=allow
netsh advfirewall firewall add rule name="Allow ICMPv6" protocol=icmpv6:8,any dir=in action=allow
Чтобы открыть окно PowerShell, щелкните правой кнопкой мыши кнопку «Пуск» и выберите в меню Windows PowerShell (Admin).
Когда откроется командное окно, запустите две команды, которые мы указали выше.
Ваш ПК/сервер с Windows теперь будет отвечать на запросы ping. Если вы хотите снова заблокировать ping, удалите эти два правила брандмауэра, используя следующие две команды:
netsh advfirewall firewall delete rule name="Allow ICMPv4"
netsh advfirewall firewall delete rule name="Allow ICMPv6"
Использование брандмауэра Защитника Windows
Если вам не нравится командная строка, используйте графический интерфейс, чтобы разрешить эхо-запросы через брандмауэр Windows.
Нажмите кнопку «Пуск» и введите брандмауэр. В результатах поиска выберите Брандмауэр Защитника окон в режиме повышенной безопасности. В приложении брандмауэра щелкните правой кнопкой мыши «Правила для входящих подключений» и выберите «Новое правило» в контекстном меню.
На первом экране выберите Пользовательский тип правила, нажмите Далее, а затем выберите Все программы. Нажмите «Далее» еще раз.
В раскрывающемся меню «Тип протокола» выберите ICMPv4 и нажмите «Далее».
На экране «Область» выберите «Любые IP-адреса», нажмите «Далее» и выберите «Разрешить подключение». На экране «Профиль» оставьте все три профиля брандмауэра отмеченными.
Наконец, дайте имя правилу брандмауэра и нажмите «Готово», чтобы завершить работу мастера.
Это правило разрешает трафик ICMPv4 через брандмауэр. Чтобы разрешить трафик ICMPv6, повторите ту же процедуру, но на экране «Протокол и порты» выберите ICMPv6.
И это все. Вы можете использовать описанные выше методы, чтобы разрешить проверку связи в любой операционной системе Windows, включая Windows 10, 11 и Server.