Learn to schedule a shutdown in a few minutes
by Matthew Adams
Matthew is a freelancer who has produced a variety of articles on various topics related to technology. His main focus is the Windows OS and all the things… read more
Updated on
- There are a few different ways you can schedule shutdown in Windows 11, which will automatically turn off your PC at a specified time.
- You can auto shutdown Windows 11 by entering a command in Run or the Windows Terminal.
- Alternatively, set up a desktop shortcut that starts a shutdown timer when you click it.
- You may also schedule shutdown in Windows 11 by setting up an automated task with the Task Scheduler tool.
Do you sometimes forget to shut down Windows 11? If so, maybe you should consider scheduling the shutdown to ensure your PC shuts down even when you forget to select for it to do so.
It’s also a good idea to schedule a shutdown when you need to wait for a big game download to finish. You can set up auto shutdown in Windows 11 with a relatively simple command.
That timer will shut down the PC after its specified countdown time has elapsed. So, you can schedule a PC to shut down after one, two, three, four, five, or more hours by entering that command.
Alternatively, you can schedule a shutdown with Task Scheduler. That’s the default utility in Windows for scheduling all manner of tasks. Some users might prefer to schedule shutdowns with that tool.
How we test, review and rate?
We have worked for the past 6 months on building a new review system on how we produce content. Using it, we have subsequently redone most of our articles to provide actual hands-on expertise on the guides we made.
For more details you can read how we test, review, and rate at WindowsReport.
How can I schedule the shutdown in Windows 11?
- How can I schedule the shutdown in Windows 11?
- 1. Auto shutdown Windows 11 with Run
- 2. Schedule shutdown via Windows Terminal
- 3. Schedule shutdown with Task Scheduler
- 4. Set up a shutdown timer desktop shortcut
- Does Windows 11 include any built-in options for scheduling the shutdown?
- Are there any third-party software packages to auto shutdown Windows 11?
1. Auto shutdown Windows 11 with Run
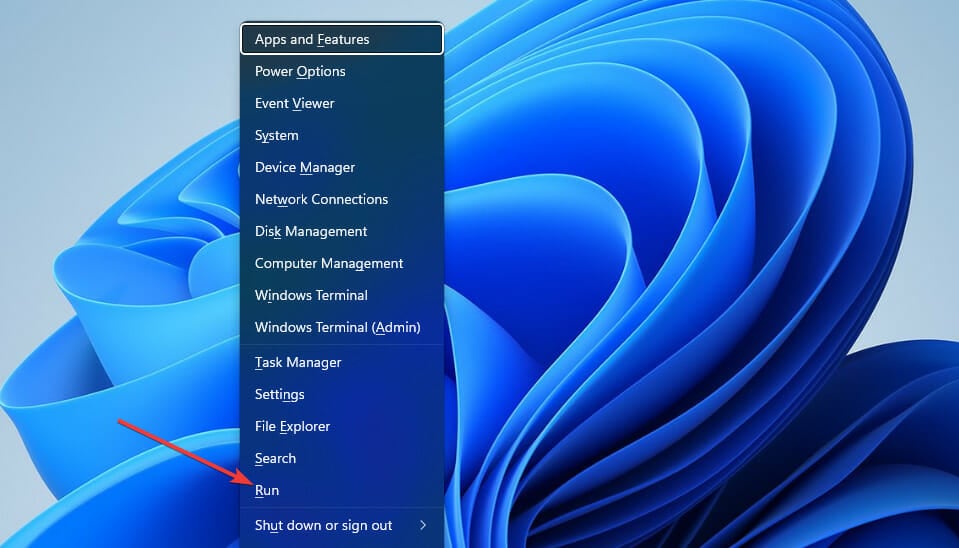
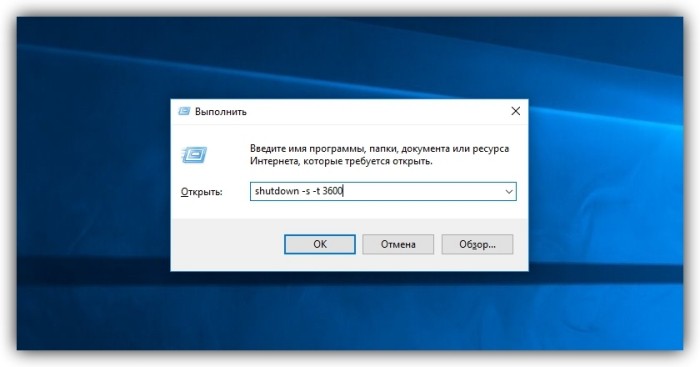
- First, press the Windows key + X hotkey, which will open a Win + X menu.
- Select Run on the menu to open the window for that accessory.
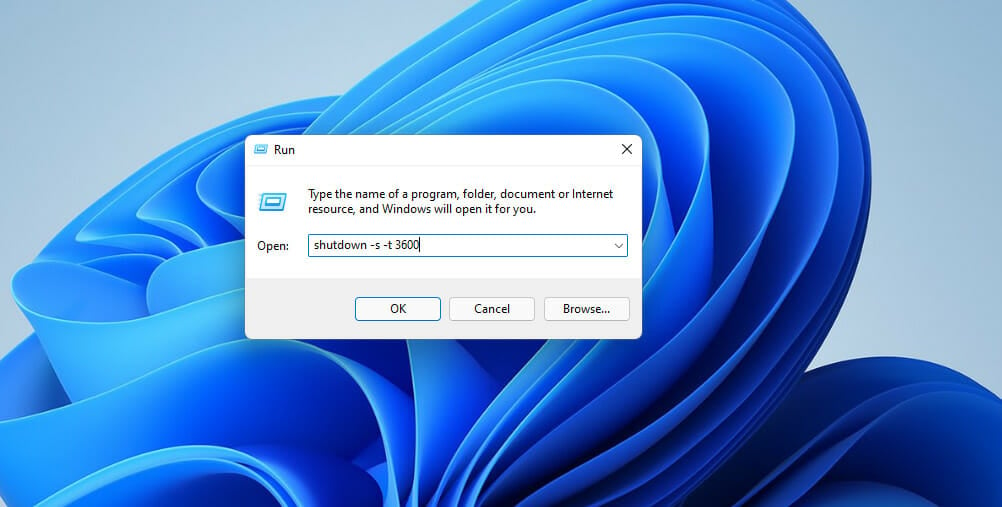
- Type the following shutdown timer command in the Open box:
shutdown -s -t XXXX - Then click OK to set the timer. Windows 11 will shut down after the number of seconds set by your timer command.
You will need to replace XXXX in that command with an actual numerical time value. Entering a value of 1 would set Windows to shut down in one second.
Entering 3600 (three thousand, six hundred seconds) will set Windows to shut down in an hour. There are some more time values:
- Two hours: shutdown -s -t 7200
- Three hours: shutdown -s -t 10800
- Four hours: shutdown -s -t 14400
- Five hours: shutdown -s -t 18000
- Six hours: shutdown -s -t 21600
2. Schedule shutdown via Windows Terminal
- First, launch the search tool (you can press the Windows key + S hotkey to do so).
- Input the keyword Windows Terminal within the text box to find that command-line app.
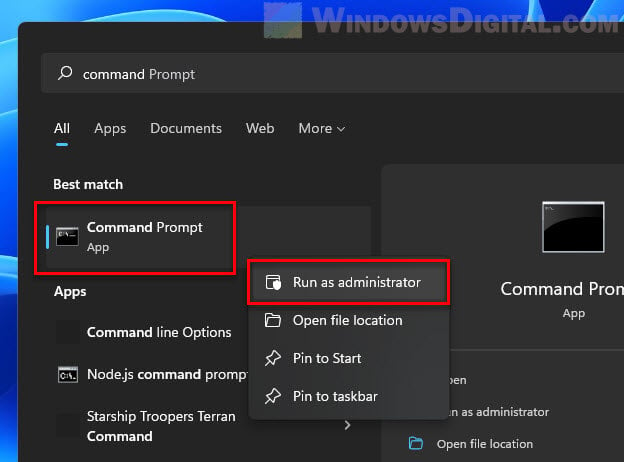
- Right-click Windows Terminal and select Run as administrator on the context menu.
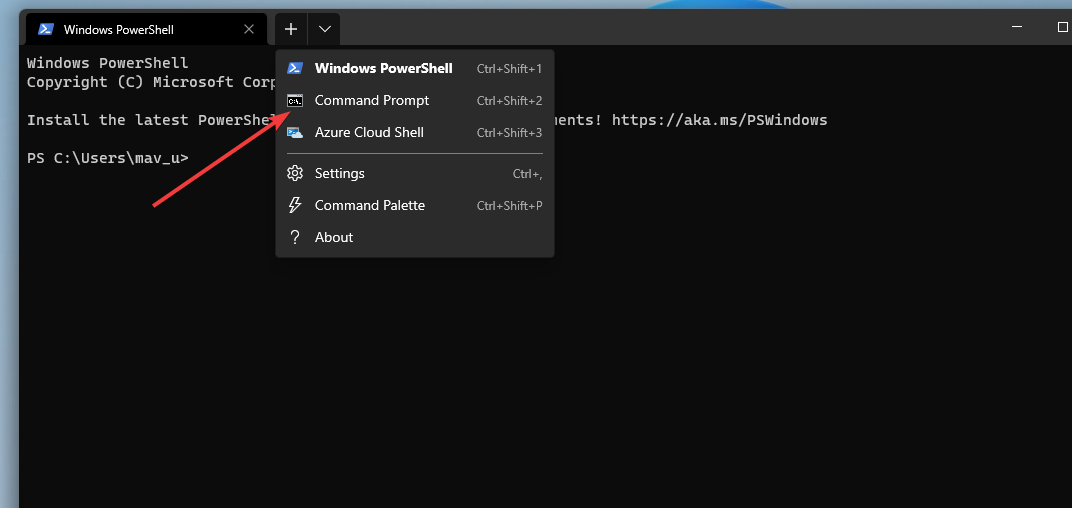
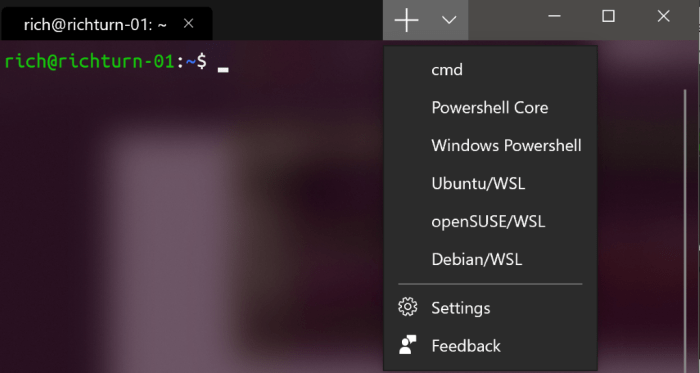
- Then click the Open a new tab button to bring up a menu.
- Select Command Prompt on the menu.
- Enter this command in the Prompt’s tab:
shutdown -s -t XXXX - Then hit the Return key to set the shutdown timer.
NOTE
This method is based on the same command as the Run one. So, you’ll need to specify a time in seconds for the timer much the same.
3. Schedule shutdown with Task Scheduler
- First, launch the search utility and type Task Scheduler within the search tool’s text box.
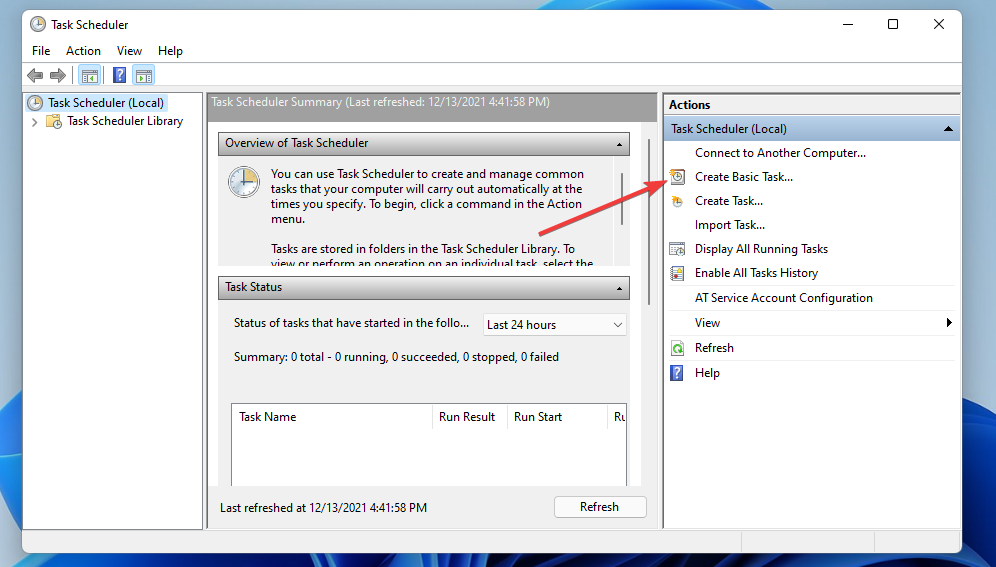
- Select Task Scheduler to open that utility’s window.
- Click Create Basic Task on the right side of Task Scheduler.
- Enter Scheduled Shutdown within the Name box, and click the Next button.
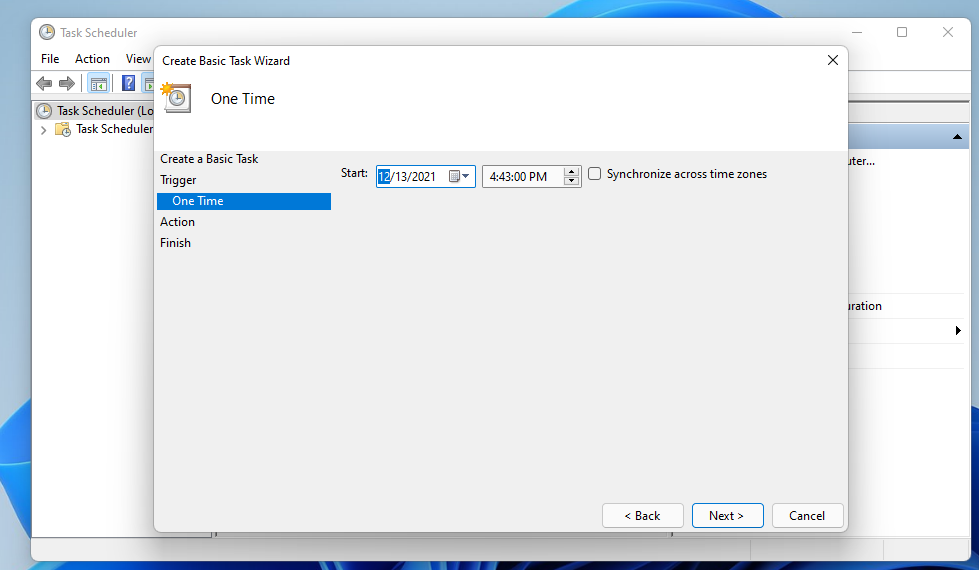
- Select the One time option, and click the Next option to continue.
- Then choose a date and time for the PC to shut down at, and select the Next option.
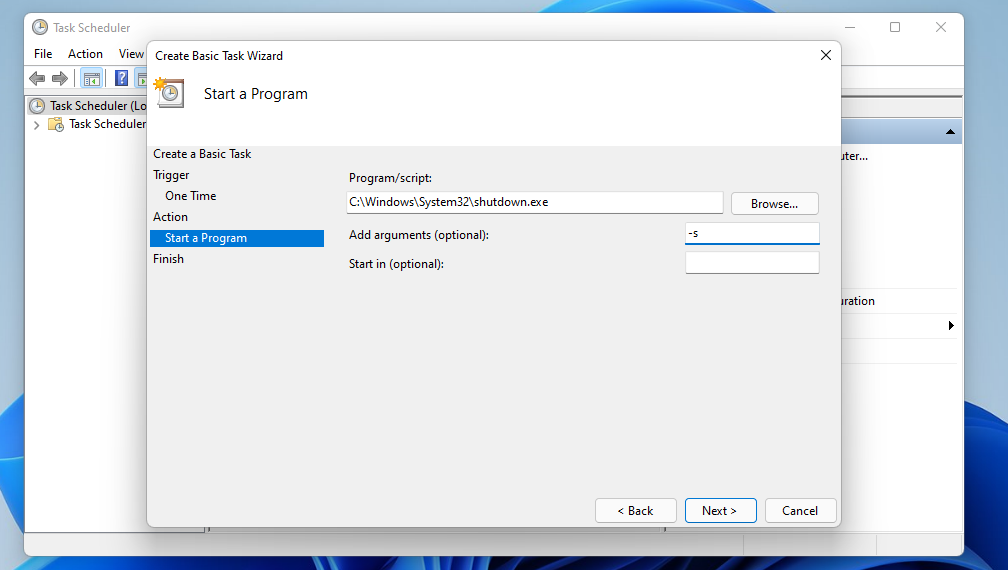
- Click the Start a program option and Next.
- Press the Browse button to select the shutdown.exe at:
C:\Windows\System32\shutdown.exe - Then select the Open option.
- Enter -s in the Add arguments box.
- Select the Next and Finish options to complete the scheduled task setup.
4. Set up a shutdown timer desktop shortcut
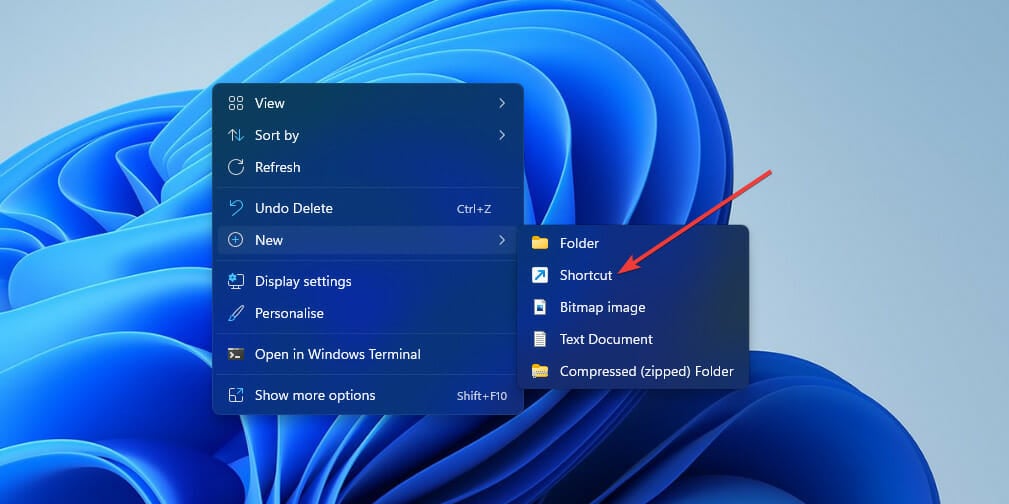
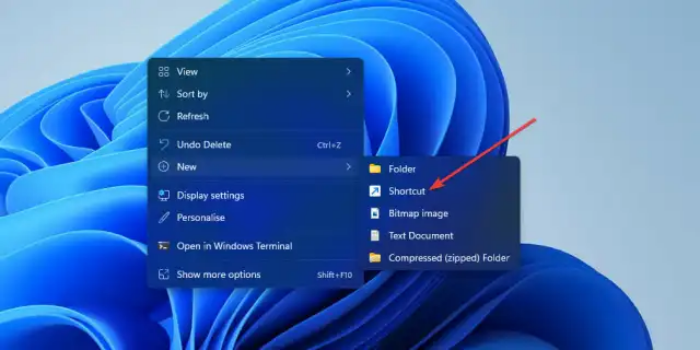
- Right-click a empty space on your desktop to select the New and Folder options.
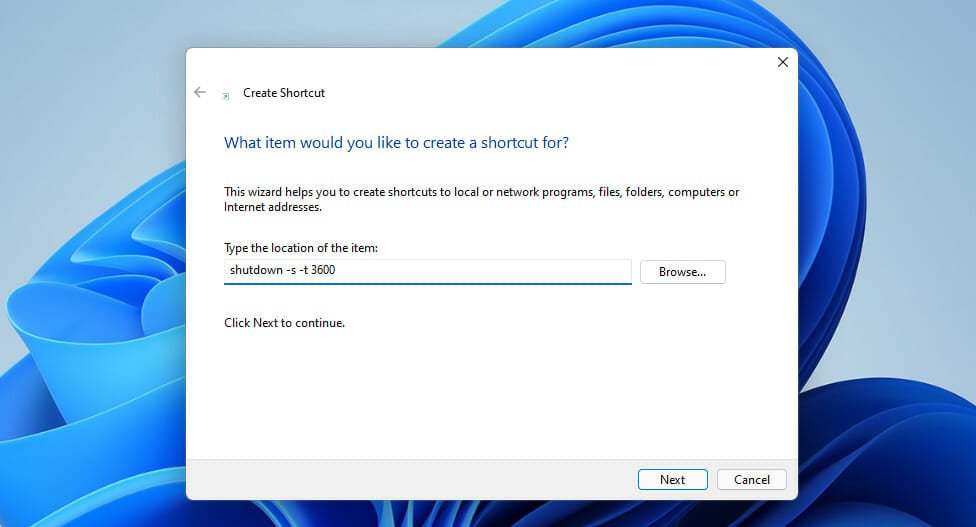
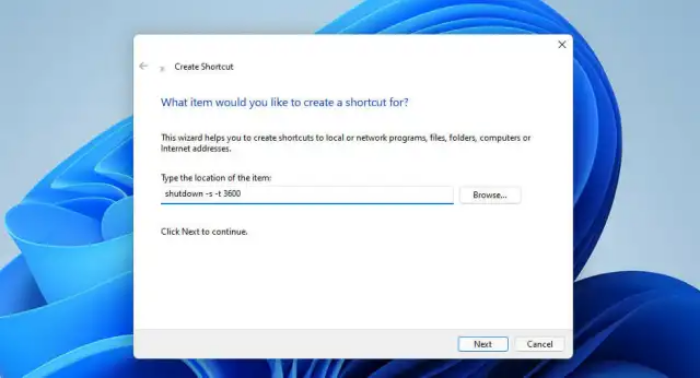
- Then enter the shutdown timer command in the item location box:
shutdown -s -t XXXX - Click Next to go to the final step.
- Enter a title for the shortcut in the text box, and select the Finish option.
- Thereafter, click the Scheduled Shutdown shortcut you just added to the desktop.
NOTE
Make sure you replace the XXXX in the command with an actual timer value as specified within the first resolution.
Does Windows 11 include any built-in options for scheduling the shutdown?
Windows 11 doesn’t include any kind of built-in options for scheduling shutdown in Settings, Control Panel, or anywhere else. Maybe it should, but Microsoft evidently never considered such a great idea.
So, you’ll need to schedule shutdown with the methods above instead.
Are there any third-party software packages to auto shutdown Windows 11?
There are numerous auto-shutdown third-party software tools that you may take into consideration. Those software packages enable you to configure Windows to shut down at specified times. Our list of best tools to schedule Windows restarts provides more details about some great choices.
However, you don’t need to install any third-party software to schedule the shutdown in Windows 11. All of the above methods are perfectly sufficient for scheduling Windows 11 to shut down at times you specify.
Three of those methods are based on the shutdown -s -t XXXX command. That command provides a quick and easy way to schedule shutdown with Run, Windows Terminal, and a desktop shortcut.
- Laptop won’t shutdown in Windows 10/11 [ULTIMATE GUIDE]
- How to Type Accents on Windows 11
- How to Disable the Insert Your Security Key Into the USB Port popup
If you want to specify Windows 11 to shut down at a specific time every day, the Task Scheduler method is worth noting. With that tool, you can set up a recurring daily shutdown task for a specific clock time. Then you won’t need to keep on entering a shutdown timer command every day.
Moreover, keep in mind that you can shut down Windows 11 with a keyboard shortcut. You may even create a custom shutdown shortcut to turn off your computer globally even if other apps are opened.
So, choose whatever method you prefer for scheduling shutdown in Windows 11. Note that those methods will also work in other Windows platforms.

Сценариев, когда может понадобиться автоматическое выключение компьютера, много. Например, загрузка обновлений, и неважно каких, ограничение времени и даже посмотреть фильм на ночь. Просто ставите таймер и позже компьютер отключается через заданное время.
Эта статья расскажет, как поставить таймер выключения компьютера Windows 11. Вы сможете выключить свой компьютер через 10, 30 или 60 минут. Собственно, это можно сделать буквально одной командой. Знаю несколько способов и стороннее программное обеспечение.
Как настроить автоматическое выключение компьютера
Команда для выключения компьютера через время
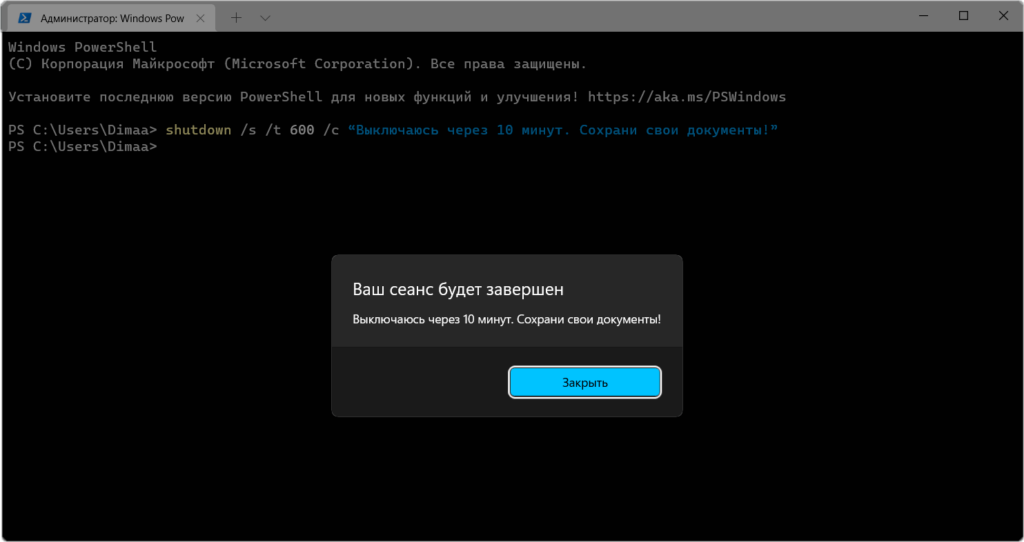
В контекстном меню «Пуск» выберите Терминал Windows (Администратор). Выполните команду: shutdown.exe /s /t 1800, чтобы установить таймер на 30 мин. Параметр /t XXX — указание секунд ожидания до завершения работы компьютера. Допустимый диапазон: 0 — 315360000 (10 лет).
| shutdown /s /t 600 /c “Выключаюсь через 10 минут. Сохрани свои документы!” | Установить таймер выключения через 10 минут с уведомлением. Не забудьте сохранить данные. |
| shutdown.exe /s /t 1800 | Завершить сеанс через 1800 секунд или 30 минут. |
| shutdown /s /t 3600 | Выключить компьютер через 60 минут или 1 час. |
| shutdown /a | Отменить запланированное завершение работы. |
| shutdown /? | Отображение справки. То же, что и без параметра. |
Можно вывести комментарий с причиной перезагрузки или завершения работы ПК. Воспользуйтесь параметром /c “комментарий”, длина не должна превышать 512 знаков. Важно, какие кавычки используются, подойдут: Alt+0147 и Alt+0148 (эти же: « » — не определяются)…
Создать задачу в планировщике заданий Windows 11
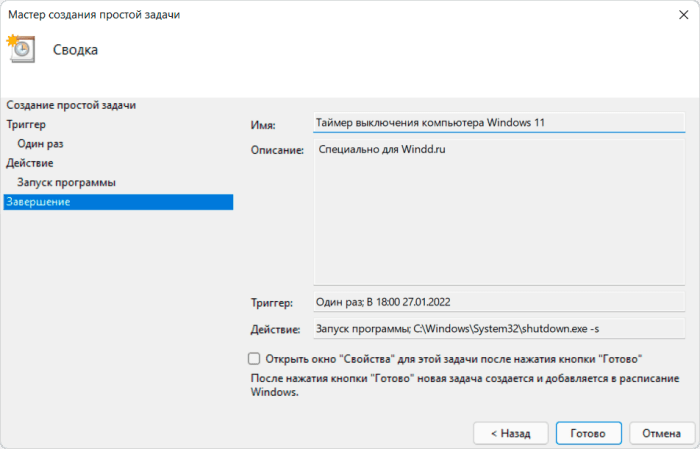
В меню «Пуск» введите Планировщик заданий, потом выберите Запуск от имени администратора. В библиотеке Действий планировщика выберите Создать простую задачу… Дальше просто следуйте мастеру создания. Плюс, можете воспользоваться подсказками ниже.
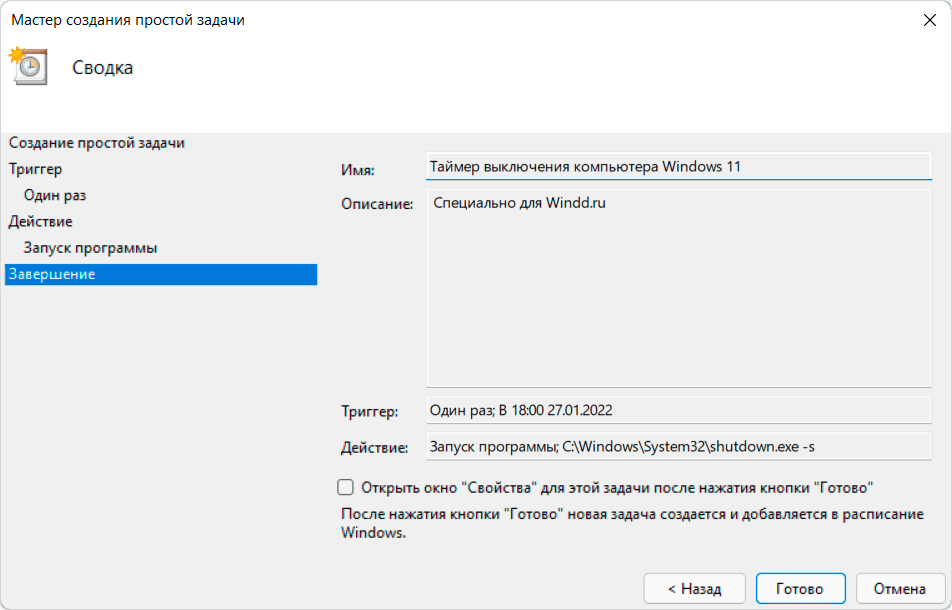
| 1. Название простой задачи |
Таймер выключения компьютера Windows 11 |
| 2. Триггер один раз |
Запустить задачу однократно начать сегодня 18:00 |
| 3. Действие запуск программы |
Запустить программу C:/Windows/System32/shutdown.exe (аргумент -s) |
| 4. Завершение проверка параметров |
После нажатия кнопки Готово, задача создаётся и добавляется в расписание Windows. |
В итоге Ваш компьютер будет выключен 27.01.2022 ровно в 18:00. Конечно же, Вы можете настроить таймер выключения на каждый день. Например, чтобы ограничить время использования компьютера ребёнку. Как назыв. созданное Вами задание совсем неважно…
Создание ярлыка для перезагрузки этого компьютера
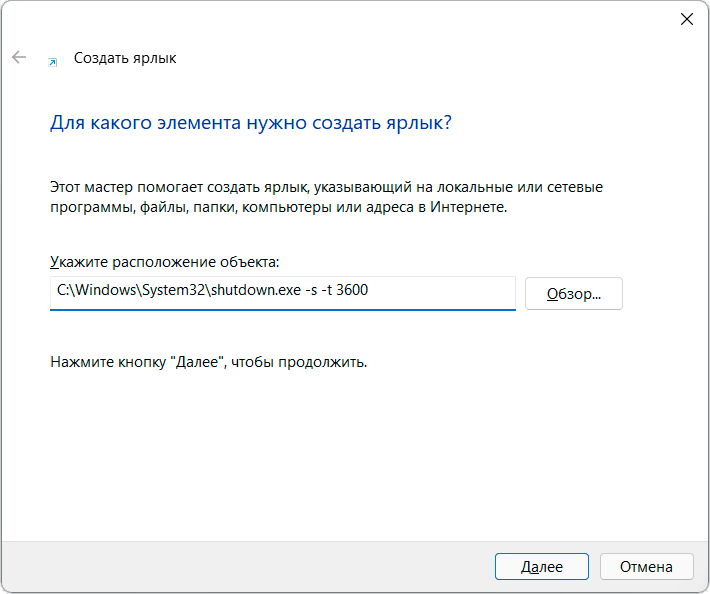
В контекстном меню выберите Создать > Ярлык. Просто укажите расположение, плюс, атрибут объекта: C:\Windows\System32\shutdown.exe -s -t 3600. Введите название ярлыка или оставьте значение по умолчанию. Чтобы включить таймер выключения — запустите созданный ярлык.
Или запустите Блокнот и вставьте ниже предложенный текст. Нажмите Файл > Сохранить как… и введите название Таймер.bat. Обратите внимание, что стандартное расширение .txt меняем на .bat. Потом, просто откройте файлик, это запустит таймер выключения через 3600 секунд…
@ECHO OFF
Title Shutdown Timer Windows 11
ECHO Windows Shutdown timer is being set
shutdown -s -t 3600
ECHO Windows Shutdown timer has been set
Pause
Заключение
Для удобства запомните несколько команд или создайте ярлык Windows 11. Важно знать не только команду для выключения компьютера, но и как отменить планированное завершение. В принципе, можно загрузить стороннее приложение Shutdown Timer Classic или Power Off Timer.
(2 оценок, среднее: 3,50 из 5)
Администратор и основатель проекта Windd.pro. Интересуюсь всеми новыми технологиями. Знаю толк в правильной сборке ПК. Участник программы предварительной оценки Windows Insider Preview. Могу с лёгкостью подобрать комплектующие с учётом соотношения цены — качества. Мой Компьютер: AMD Ryzen 5 3600 | MSI B450 Gaming Plus MAX | ASUS STRIX RX580 8GB GAMING | V-COLOR 16GB Skywalker PRISM RGB (2х8GB).
Довольно часто пользователи забывают выключать компьютер. В операционной системе Windows 11 предусмотрена опция автоматического отключения. Его можно запланировать в том случае, если требуется дождаться окончания загрузки объемного софта. Настройка таймера выключения компьютера Windows 11 считается несложной задачей. При этом она подразумевает выполнение определенной последовательности действий.
Использование планировщика событий
Чтобы автоматически выключить ПК с операционной системой Windows 11, допустимо воспользоваться таймером, командой CMD или запланированным заданием. При использовании команд это будет в большей степени одноразовой процедурой. Если захочется сделать ее регулярной, лучше пользоваться таймерами выключения.
Одним из наиболее удобных вариантов считается использование способа планировщика заданий. Для этого рекомендуется выполнить следующее:
- Запустить служебную программу поиска и ввести в текстовое поле средства поиска фразу «Планировщик заданий».
- Выбрать пункт «T ask Scheduler» для запуска окна этого ресурса.
- Нажать на пункт «Создать базовую задачу». Он располагается в правой части планировщика заданий.
- В поле «Имя» ввести фразу «Выключите по расписанию». После чего нужно нажать на пункт «Далее».
- Выбрать опцию «Один раз» и нажать на кнопку «Далее» для продолжения.
- Выбрать дату и время отключения ПК. После этого нужно нажать на кнопку «Далее».
- Кликнуть на параметр «Запустить программу» и нажать на пункт «Далее».
- Выбрать пункт «Обзор». После этого можно загрузить файл exe, расположенный по адресу C:\Windows\System32\shutdown.exe.
- Нажать на пункт «Открыть».
- Ввести «-s» в поле «Добавить аргументы».
- Выбрать параметры «Далее» и «Готово». Это поможет закончить процесс настройки запланированного задания.
Отключение планового выключения
Чтобы отменить выключение персонального компьютера, рекомендуется выполнить следующие действия:
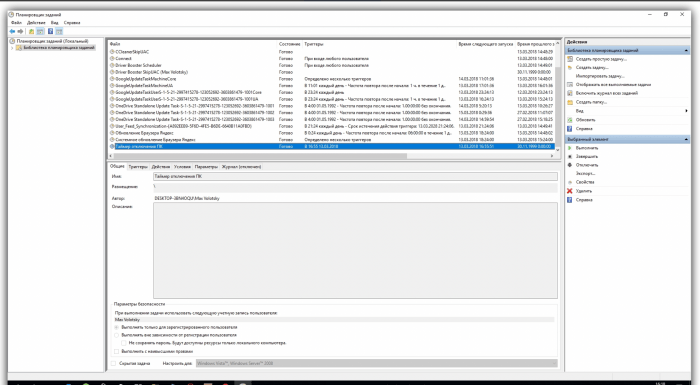
- Зайти в «Планировщик заданий».
- Кликнуть на пункт «Библиотека планировщика заданий». Он располагается на левой панели.
- Выделить в списке, который появился, созданную задачу.
- Выбрать пункт «Отключить». Он располагается на правой панели.
Выключение через терминал Windows
Чтобы добиться автоматического выключения ПК, рекомендуется сделать следующее:
- Запустить инструмент поиска. Для этого требуется нажать сочетание клавиш «Windows + S».
- Ввести в текстовое поле фразу «Windows Terminal». Благодаря этому удастся найти приложение командной строки.
- Кликнуть на «Терминал Windows» правой кнопкой мыши и выбрать в контекстном меню строку «Запуск от имени администратора».
- Кликнуть на строку «Открыть новую вкладку». Это даст возможность запустить меню.
- Выбрать пункт «Командная строка».
- Ввести команду «:shutdown -s -t XXXX».
- Нажать на кнопку «Return». Это даст возможность установить таймер.
Чтобы использование таймера было более удобным, можно создать ярлык. Для этого рекомендуется сделать следующее:
- Щелкнуть правой кнопкой мыши на любом месте рабочего стола или в специально созданном каталоге. После чего можно создать новый ярлык.
- В строке «Расположение объекта» указать путь «C:\Windows\System32\shutdown.exe -s -t T». При этом Т – это время, через которое потребуется отключить ПК после запуска ярлыка.
- Присвоить ярлыку имя. Желательно, чтобы оно соответствовало времени. Его допустимо указывать в часах или минутах.
- Кликнуть на строку «Готово».
Чтобы создать команды отключения ПК, можно сделать большое количество таких ярлыков. При этом они отличаются по времени отключения. Также дополнительно необходимо создать единый ярлык для отмены автоотключения. Для этого в пункте «Расположение объекта» требуется указать путь «C:\Windows\System32\shutdown.exe-a».
Если перечисленные способы кажутся не слишком удобными, допустимо воспользоваться сторонним софтом.
Проще всего установить бесплатные программы, которые присутствуют в магазине Microsoft Store.
Для этого требуется выполнить следующее:
- Запустить меню «Пуск».
- Набрать в поисковой строке «Microsoft Store» или использовать топ бесплатных программ, который представлен на сайте com.
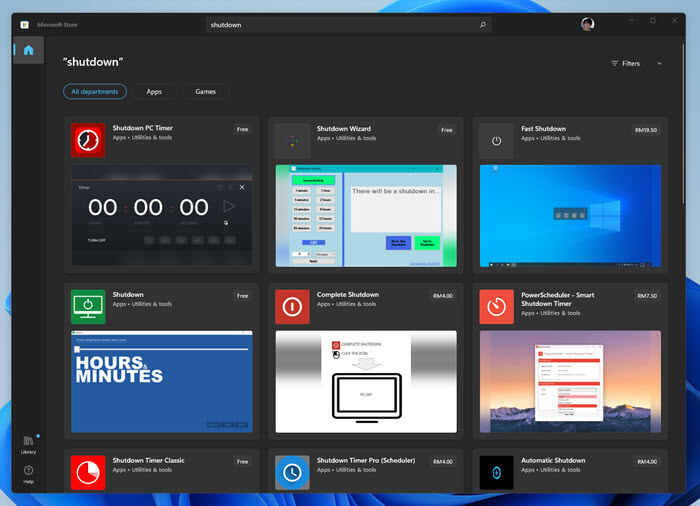
- Ввести в поле «Shutdown» и выбрать любое из предложений.
Как отменить плановое выключение
Для отмены планового выключения рекомендуется выполнить следующие действия:
- Запустить «Терминал».
- Ввести фразу «sudo killall shutdown».
- Нажать «Enter».
Автоматическое отключение ПК считается достаточно полезной функцией, которая помогает решать самые разные задачи. Это может потребоваться при загрузке сериалов по ночам или необходимости ограничения времени, которое ребенок проводит за компьютером. При этом отключить девайс можно при помощи планировщика, специального таймера или сторонних программ.
Вам помогло? Поделитесь с друзьями — помогите и нам!
Shutdown Timer is one useful way to shut down your computer without your direct action. Setting a shutdown timer is often helpful when you need to need to leave your computer while it’s downloading or copying something huge, or performing a very time-consuming task such as defragmenting or scanning your drives, and want it to shut down automatically after a set time period.
With a set shutdown timer, you can leave your computer alone while it does its things and when the timer expires, it will automatically shut down itself. There are several ways to set a shutdown timer in Windows 11 without the need to install any app. However, if you are not very tech-savvy and have trouble understanding and using commands in Windows, you can use a third party shutdown app instead.
Also see: How to Turn Off Auto Shutdown in Windows 11
How to set a timer for shutdown in Windows 11
This guide will show you 4 different methods to set a shutdown timer, as well as apps you can use to schedule automatic shutdown in Windows 11.
Method 1: Command Prompt
The easiest way to quickly set a shutdown timer in Windows 11 is to execute a simple command in Command Prompt. You can use the same command lines in PowerShell or Windows Terminal as well.
- Search for “Command Prompt” or simply “cmd” via Start and open it. In most cases, you don’t need to run CMD as administrator for the command line to work.
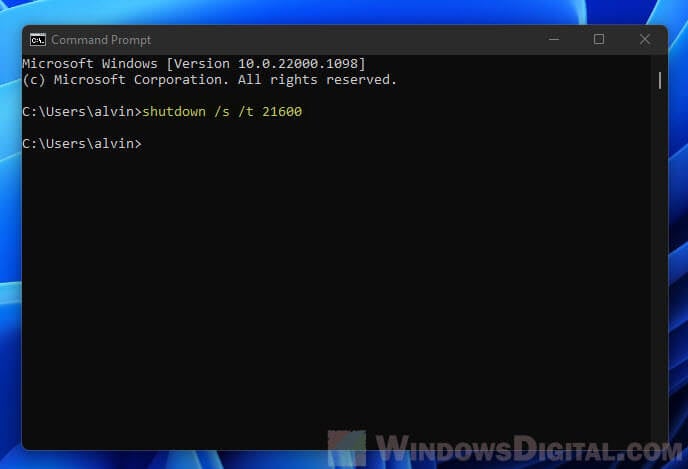
- In the Command Prompt window, execute the following command line.
shutdown /s /t xxx
- Replace xxx with the number of seconds you want to set as the time-out period before your computer shut down on its own. For example,
shutdown /s /t 1800will schedule an auto shutdown after 1800 seconds, which is 30 mins.
If you would like to cancel an already scheduled shutdown timer, execute this command line: shutdown /a.
In addition, if you execute the shutdown timer command when there is already a pending scheduled shutdown, you will receive and error that reads “A system shutdown has already been scheduled (1190)“.
If you would like to set a timer to restart instead of shutdown, use the parameter “/r” instead of “/s“. The command to set a restart timer in Windows 11 would look like shutdown /r /t 1800. To hibernate your computer, use “/h” as the parameter. To log off Windows instead, use “/l” as the parameter.
Learn more: Sleep vs. Hibernate vs. Hybrid Sleep vs. Shutdown
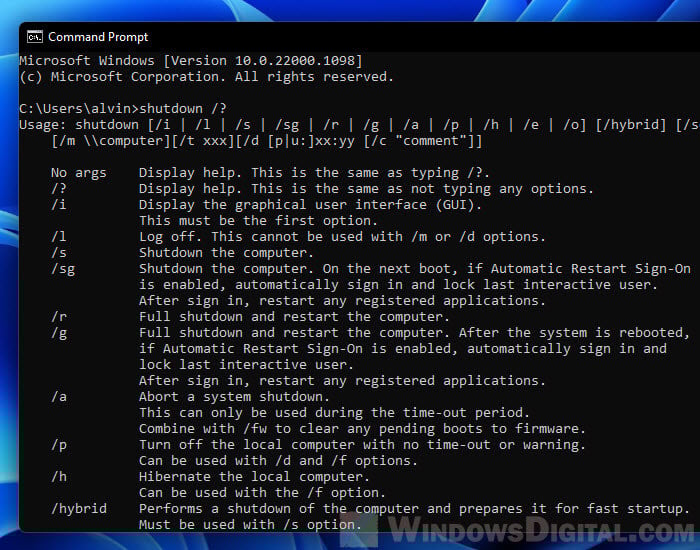
You can view a list of arguments you can use with the shutdown command by executing shutdown /? in the command prompt.
Unfortunately, there is no way to view the countdown timer (to know how much seconds left until next shutdown) after an automatic shutdown is scheduled this way. The best you can do is to determine if there is a pending scheduled shutdown. You can do so by executing the shutdown timer command line again and see if it will show the (1190) error.
Method 2: Run dialog box
Another simple way to set a timer to shut down Windows 11 is to enter a run command in the Run dialog box. The command line you will use in the Run dialog box will be the same as the one you use in Command Prompt.
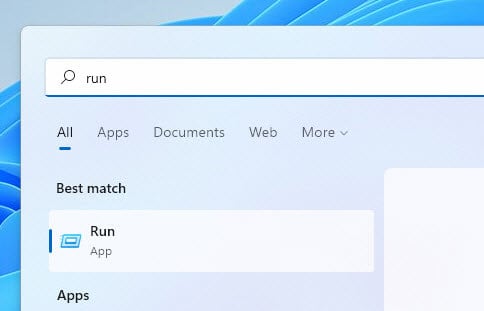
First, open the Run dialog box by either pressing Win + R keys or by search “Run” via the Start menu.
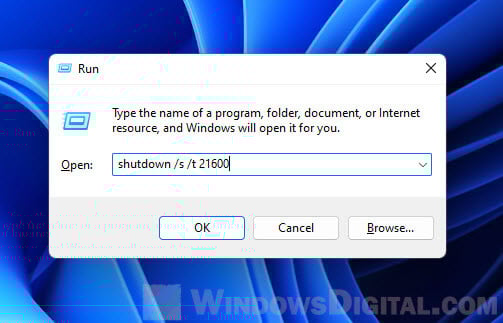
Next, type the following line into the “Open” text field and then click OK to run it.
shutdown /s /t 10800
Replace xxx with the countdown duration in number of seconds you want to set as the shutdown timer. When the timer expires, your computer will shutdown automatically. For example, setting a timer of 10800 would tell your computer to shut down after 3 hours.
To cancel a scheduled shutdown, reopen the Run dialog box and enter shutdown /a.
Related issue: Can’t Shut Down Windows 11 (Goes back to login screen)
Method 3: Create a shortcut
If you often need to set a shutdown timer for your computer, it would be a great idea to create a shortcut to do so. This way you can save time from needing to open the command prompt or run dialog box and manually enter the command line.
With this shortcut, you can double-click it to directly execute the shutdown timer command line without the need to open anything else. Without further ado, here’s how to create a shortcut to set a shutdown timer in Windows 11.
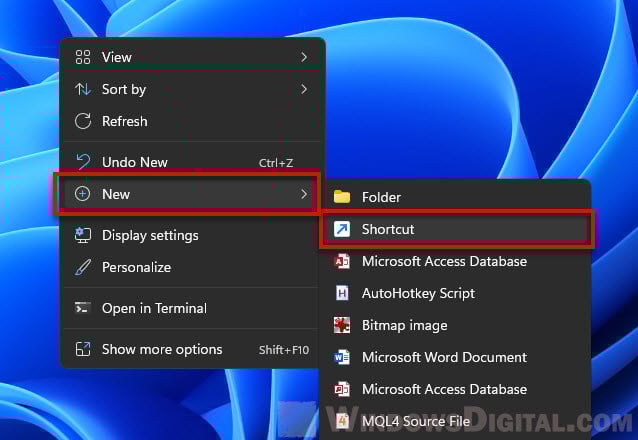
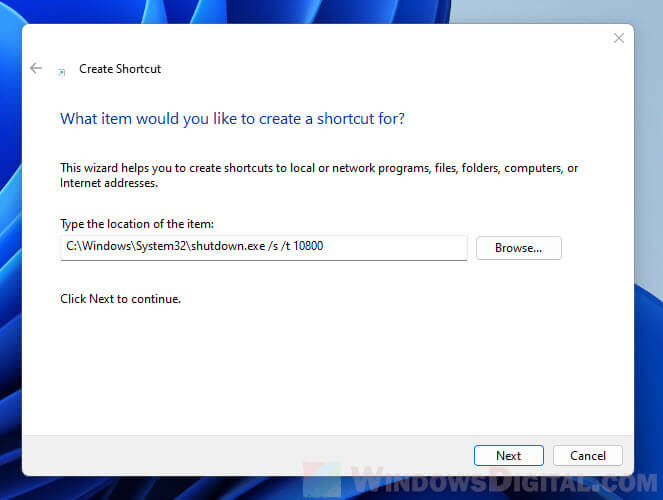
- Right-click anywhere on the desktop and select New > Shortcut.
- In the “location of the item” field, type the following.
C:\Windows\System32\shutdown.exe /s /t xxx
- Replace xxx with the number of seconds before Windows execute shutdown itself automatically. Replace C:\ if your Windows was installed on another drive. Click Next to continue.
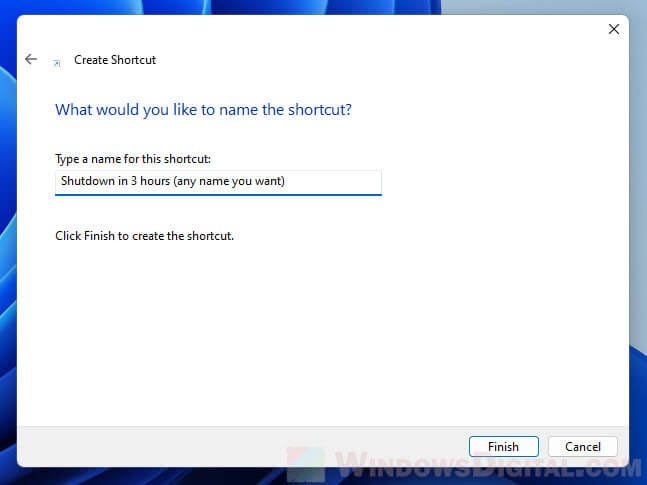
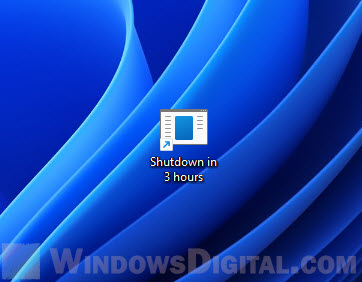
- Next, type a name for the shortcut. You can name it anything you want. Click Finish to complete the wizard.
- Every time you want to set a shutdown timer for your PC, just double-click the shortcut to instantly schedule the automatic shutdown.
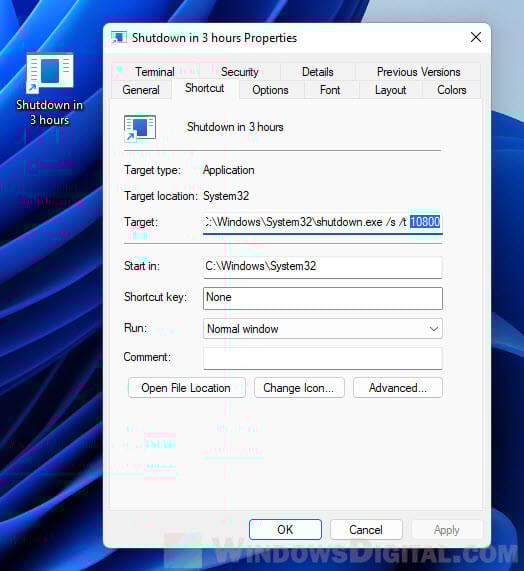
You can change the timer by right-clicking the created shortcut and select Properties. In the Target text field, replace the existing time-out period (number of seconds) with the new timer you want to set.
Method 4: Use a shutdown app
There are plenty of third-party apps that allow you to flexibly schedule an automatic shutdown for Windows 11. These apps also provide graphical-user interface so it’s much more easier to use. You will also be able to see more info about the shutdown timer such as how much time left until next scheduled shutdown, etc.
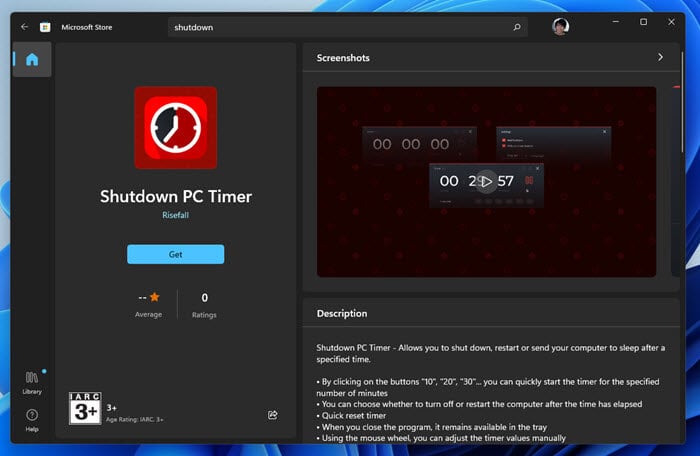
You can find these apps directly from the Microsoft Store. Go to Microsoft Store and search for “shutdown“. Most of these simple apps are free to use. You can try each one of them until you find one that satisfies your needs.
To install an app, select the app and then click the “Get” button to install it.
After you’ve installed the shutdown timer app, you can find the app from the Start menu “All apps” section or manually search for it. You can then pin the app to your taskbar for quick access.
В этой статье мы расскажем вам, почему мы должны планировать выключение в Windows 11 и как настроить таймер выключения Windows в Windows 11.
Windows предоставляет пользователям возможность атомарного выключения операционной системы, начиная с Windows 8. Функция автоматического выключения Windows предназначена для обеспечения безопасности вашего компьютера.
Windows предоставляет пользователям возможность атомарного выключения операционной системы, начиная с Windows 8. Хотя многие пользователи не знают, в чем преимущества этого. Сейчас мы скажем вам правду:
- Windows 11 часто внезапно выключается после завершения системных обновлений, что часто приводит к потере нашей сохраненной работы.
- Мы часто можем забыть выключить наш компьютер из-за загруженности работой, что нанесет вред нашей системе при длительной работе.
- Другие системные проблемы могут возникнуть, если система не выключается в течение длительного времени.
Автоматическое отключение решит все вышеперечисленные проблемы.
Как настроить таймер выключения Windows 11?
Всего 8 простых шагов через планировщик заданий Windows 11.
Шаг 1: Нажмите «Поиск на панели задач» и поиск планировщика заданий;
Шаг 2: Нажмите, чтобы запустить приложение Task Scheduler, и выберите Создать простую задачу;

Шаг 3: В окнах создания назовите задачу, которую хотите создать, добавьте к ней описание и нажмите Следующая;

Шаг 4. На вкладке «Триггер» выберите когда вы хотите, чтобы задача началась: Ежедневно, Еженедельно, Ежемесячно или один раз, а затем щелкните Следующая;

Шаг 4: Возьмем, к примеру, ежедневную настройку. Выберите время, когда вы хотите сделать ее эффективной, и укажите, сколько дней вам нужно, чтобы она повторялась, затем нажмите «Далее»;

Шаг 5: На вкладке «Действие» выберите Какое действие вы хотите, чтобы задача выполняла и нажмите Следующая;

Шаг 6: Скопируйте и вставьте следующий путь в поле «Программа/скрипт» и нажмите «Далее»;
C:\Windows\System32\Shutdown.exe

Шаг 7. Только что созданная основная задача вступит в силу после того, как вы нажмете Следующая на вкладке Готово.

Конечно, за исключением описанного выше метода настройки таймера выключения через приложение планировщика заданий Windows 11, существует также множество других сторонних программ, которые без проблем работают в Windows 11. После прохождения около 15 программ мы рекомендуем следующее. лучший таймер выключения Windows 11 Программное обеспечение:
- Классический таймер выключения
- Выключение по времени
- Таймер отключения питания
- ТаймКомX Базовый
- Планировщик выключения MZ
- DShutdown
